线程同步(互斥锁与条件变量)
文章目录
- 1、为什么要用互斥锁
- 2、互斥锁怎么用
- 3、为什么要用条件变量
- 4、互斥锁和条件变量如何配合使用
- 5、互斥锁和条件变量的常见用法
参考资料:https://blog.csdn.net/m0_53539646/article/details/115509348
1、为什么要用互斥锁
为了使各线程能够有序地访问公共资源。例如:有一个全局变量g_count,有三个线程thread_fun_1、thread_fun_2、thread_fun_3,三个线程都要对g_count写操作。在不加锁的情况下,当thread_fun_1正在写数据时thread_fun_2和thread_fun_3也可能会进行写操作,这就会导致程序不符合我们的预期结果。而加锁的目的就是保证各线程能够按顺序访问公共资源,就好比我们排队WC一样,一个人解决完下个人才能解决。不多说,直接看下面的例子:
#include <stdio.h>
#include <unistd.h>
#include <stdlib.h>
#include <string.h>
#include <pthread.h>static int g_count = 0; //共享数据static void *thread_fun_1(void *data)
{for(int i=0; i<10000; i++){g_count++;}printf("%s g_count: %d\n", __func__, g_count);
}static void *thread_fun_2(void *data)
{for(int i=0; i<10000; i++){g_count++;}printf("%s g_count: %d\n", __func__, g_count);
}static void *thread_fun_3(void *data)
{for(int i=0; i<10000; i++){g_count++;}printf("%s g_count: %d\n", __func__, g_count);
}int main(int argc, char const *argv[])
{pthread_t pid[3]; //创建3个线程pthread_create(&pid[0], NULL, thread_fun_1, NULL);pthread_create(&pid[1], NULL, thread_fun_2, NULL);pthread_create(&pid[2], NULL, thread_fun_3, NULL);//等待三个线程结束pthread_join(pid[0], NULL);pthread_join(pid[1], NULL);pthread_join(pid[2], NULL);return 0;
}
运行结果:
user@root:/mnt/hgfs/UbuntuRK3568/04_ThreadLockTest$ gcc threadtest1.c -pthread
user@root:/mnt/hgfs/UbuntuRK3568/04_ThreadLockTest$ ./a.out
thread_fun_1 g_count: 10000
thread_fun_2 g_count: 20000
thread_fun_3 g_count: 30000
user@root:/mnt/hgfs/UbuntuRK3568/04_ThreadLockTest$ ./a.out
thread_fun_1 g_count: 10000
thread_fun_2 g_count: 20437
thread_fun_3 g_count: 28812
user@root:/mnt/hgfs/UbuntuRK3568/04_ThreadLockTest$
例程解析:
上面的例程创建了3个线程,每个线程都对全局变量g_count加10000次,然后打印g_count的值。从运行结果很容易看出,同样的程序两次运行的结果不一致,这就是线程无序访问公共资源的原因。
2、互斥锁怎么用
说完为什么要用互斥锁,接下来就该说下怎么用了,步骤如下:
// 1、包含pthread.h头文件
#include <pthread.h>// 2、互斥锁的声明
static pthread_mutex_t g_mutex_lock//3、互斥锁的初始化
pthread_mutex_init(&g_mutex_lock, NULL);// 4、锁定互斥锁
pthread_mutex_lock(&g_mutex_lock);// 5、执行对共享资源的操作// 6、解锁互斥锁
pthread_mutex_unlock(&g_mutex_lock);// 7、销毁互斥锁
pthread_mutex_destroy(&g_mutex_lock);
接着上面的例子,写一个带互斥锁的程序:
#include <stdio.h>
#include <unistd.h>
#include <stdlib.h>
#include <string.h>
#include <pthread.h>static int g_count = 0; //共享数据
static pthread_mutex_t g_mutex_lock;static void *thread_fun_1(void *data)
{pthread_mutex_lock(&g_mutex_lock); //上锁for(int i=0; i<10000; i++){g_count++;}printf("%s g_count: %d\n", __func__, g_count);pthread_mutex_unlock(&g_mutex_lock); //解锁
}static void *thread_fun_2(void *data)
{pthread_mutex_lock(&g_mutex_lock); //上锁for(int i=0; i<10000; i++){g_count++;}printf("%s g_count: %d\n", __func__, g_count);pthread_mutex_unlock(&g_mutex_lock); //解锁
}static void *thread_fun_3(void *data)
{pthread_mutex_lock(&g_mutex_lock); //上锁for(int i=0; i<10000; i++){g_count++;}printf("%s g_count: %d\n", __func__, g_count);pthread_mutex_unlock(&g_mutex_lock); //解锁
}int main(int argc, char const *argv[])
{int ret;pthread_t pid[3];ret = pthread_mutex_init(&g_mutex_lock, NULL);if (ret != 0) {printf("mutex init failed\n");return -1;}pthread_create(&pid[0], NULL, thread_fun_1, NULL);pthread_create(&pid[1], NULL, thread_fun_2, NULL);pthread_create(&pid[2], NULL, thread_fun_3, NULL);pthread_join(pid[0], NULL);pthread_join(pid[1], NULL);pthread_join(pid[2], NULL);pthread_mutex_destroy(&g_mutex_lock);
}
运行结果:
user@root:/mnt/hgfs/UbuntuRK3568/04_ThreadLockTest$ gcc threadtest2.c -pthread
user@root:/mnt/hgfs/UbuntuRK3568/04_ThreadLockTest$ ./a.out
thread_fun_1 g_count: 10000
thread_fun_2 g_count: 20000
thread_fun_3 g_count: 30000
user@root:/mnt/hgfs/UbuntuRK3568/04_ThreadLockTest$ ./a.out
thread_fun_1 g_count: 10000
thread_fun_2 g_count: 20000
thread_fun_3 g_count: 30000
user@root:/mnt/hgfs/UbuntuRK3568/04_ThreadLockTest$ ./a.out
thread_fun_1 g_count: 10000
thread_fun_2 g_count: 20000
thread_fun_3 g_count: 30000
user@root:/mnt/hgfs/UbuntuRK3568/04_ThreadLockTest$
从上面的结果可以看到,程序多次运行,执行结果都是一样的
3、为什么要用条件变量
相信大家到这里会有一个疑问,既然互斥锁都能保证程序有序访问了,为什么还要使用条件变量呢?我们看下面的例子:下面代码创建了thread_fun_1和thread_fun_2两个线程,thread_fun_2中对g_count全局变量加100次,thread_fun_1中判断全局变量的值大于0才执行。按照我们的理解,两个线程都能正常运行退出才对,但实际运行结果并不是这样。
#include <stdio.h>
#include <unistd.h>
#include <stdlib.h>
#include <string.h>
#include <pthread.h>static int g_count = 0; //共享数据
static pthread_mutex_t g_mutex_lock;static void *thread_fun_1(void *data)
{pthread_mutex_lock(&g_mutex_lock); //上锁printf("%s g_count: %d\n", __func__, g_count);while(0 < g_count){//do somethingprintf("%s run ok,g_count: %d\n", __func__, g_count);pthread_mutex_unlock(&g_mutex_lock); //解锁break;}
}static void *thread_fun_2(void *data)
{pthread_mutex_lock(&g_mutex_lock); //上锁for(int i=0; i<100; i++){g_count++;}printf("%s g_count: %d\n", __func__, g_count);pthread_mutex_unlock(&g_mutex_lock); //解锁}int main(int argc, char const *argv[])
{int ret;pthread_t pid[3];ret = pthread_mutex_init(&g_mutex_lock, NULL);if (ret != 0) {printf("mutex init failed\n");return -1;}pthread_create(&pid[0], NULL, thread_fun_1, NULL);pthread_create(&pid[1], NULL, thread_fun_2, NULL);pthread_join(pid[0], NULL);pthread_join(pid[1], NULL);pthread_mutex_destroy(&g_mutex_lock);
}
运行结果:可以看到线程thread_fun_1打印了一串日之后就没有其他打印了,程序像是阻塞了一样。其实这里是进入了死锁,g_count一开始初始化为0:当 thread_fun_1进入临界区时,其他线程不能进入临界区,意味着 Bthread_fun_2没有机会去修改 g_count, g_count的值一直为 0,不满足Athread_fun_1继续执行的条件(g_count> 0),Athread_fun_1只能一直等待。 又因为使用了互斥锁:当 thread_fun_1进入临界区时,其他线程不能进入临界区,意味着 thread_fun_2没有机会去修改 g_count, g_count 的值一直为 0,不满足thread_fun_1继续执行的条件(g_count > 0)。最终结果:thread_fun_1只能一直等待,thread_fun_2不能执行,导致整个程序不能正常运行。这时候就需要使用条件变量了。
user@root:/mnt/hgfs/UbuntuRK3568/04_ThreadLockTest$ gcc threadtest3.c -pthread
user@root:/mnt/hgfs/UbuntuRK3568/04_ThreadLockTest$ ./a.out
thread_fun_1 g_count: 0
4、互斥锁和条件变量如何配合使用
使用步骤:
// 1、包含pthread.h头文件
#include <pthread.h>// 2、条件变量声明
pthread_cond_t g_cond ; //3、条件初始化
pthread_cond_init(&g_cond, NULL) ;// 4、/* 令一个线程A等待在条件变量上 */
pthread_cond_wait(&g_cond, &g_mutex_lock) ;// 5、线程B执行对共享资源的操作// 6、线程B通知等待在条件变量上的线程A,线程通知函数有2个,pthread_cond_broadcast是通知所有线程
//    pthread_cond_signal是至少通知一个线程,一般使用pthread_cond_broadcast函数
pthread_cond_broadcast(&g_cond) ;
pthread_cond_signal(&g_cond);// 7、销毁条件变量
pthread_cond_destroy( &g_cond ) ;
我们通过条件变量解决上面的问题:
#include <stdio.h>
#include <unistd.h>
#include <stdlib.h>
#include <string.h>
#include <pthread.h>static int g_count = 0; //共享数据
static pthread_mutex_t g_mutex_lock;//互斥锁
pthread_cond_t g_cond ; //条件变量static void *thread_fun_1(void *data)
{pthread_mutex_lock(&g_mutex_lock); //上锁printf("%s g_count: %d\n", __func__, g_count);pthread_cond_wait(&g_cond, &g_mutex_lock) ;while(0 < g_count){//do somethingprintf("%s run ok,g_count: %d\n", __func__, g_count);pthread_mutex_unlock(&g_mutex_lock); //解锁break;}
}static void *thread_fun_2(void *data)
{pthread_mutex_lock(&g_mutex_lock); //上锁for(int i=0; i<100; i++){g_count++;pthread_cond_broadcast(&g_cond) ;}printf("%s g_count: %d\n", __func__, g_count);pthread_mutex_unlock(&g_mutex_lock); //解锁}int main(int argc, char const *argv[])
{int ret;pthread_t pid[3];pthread_cond_init(&g_cond, NULL) ;ret = pthread_mutex_init(&g_mutex_lock, NULL);if (ret != 0) {printf("mutex init failed\n");return -1;}pthread_create(&pid[0], NULL, thread_fun_1, NULL);pthread_create(&pid[1], NULL, thread_fun_2, NULL);pthread_join(pid[0], NULL);pthread_join(pid[1], NULL);pthread_cond_destroy( &g_cond ) ;pthread_mutex_destroy(&g_mutex_lock);
}
运行结果:
user@root:/mnt/hgfs/UbuntuRK3568/04_ThreadLockTest$ gcc threadtest4.c -pthread
user@root:/mnt/hgfs/UbuntuRK3568/04_ThreadLockTest$ ./a.out
thread_fun_1 g_count: 0
thread_fun_2 g_count: 100
thread_fun_1 run ok,g_count: 100
user@root:/mnt/hgfs/UbuntuRK3568/04_ThreadLockTest$
5、互斥锁和条件变量的常见用法
一般做项目的时候如果我们希望多个线程使用同一资源,我们一般会将这部分资源打包成一个结构体,通过结构体定义一个全局变量供各线程使用。所以,互斥锁和条件变量一般也是和结构体一起用的,如下面的例子,加锁、解锁还有初始化跟上面的举的例子一样,放在结构体表示对该结构体的数据进行加锁。
typedef struct
{int a;char buf[32];/* ... */pthread_mutex_t mutex_test;pthread_cond_t cond_test;
} test;
就写这么多吧,如果哪里有问题欢迎大家指正。
相关文章:
)
线程同步(互斥锁与条件变量)
文章目录 1、为什么要用互斥锁2、互斥锁怎么用3、为什么要用条件变量4、互斥锁和条件变量如何配合使用5、互斥锁和条件变量的常见用法 参考资料:https://blog.csdn.net/m0_53539646/article/details/115509348 1、为什么要用互斥锁 为了使各线程能够有序地访问公共…...

EF Core中实现值对象
目录 值对象优点 值对象的需求 值类型的实现 值类型GEO的实现 值类型MultilingualString的实现 案例:构建表达式树,简化值对象的比较 值对象优点 把有紧密关系的属性打包为一个类型把领域知识放到类的定义中 class shangjia {long id;string nam…...

《从入门到精通:蓝桥杯编程大赛知识点全攻略》(十一)-回文日期、移动距离、日期问题
前言 在这篇博客中,我们将通过模拟的方法来解决三道经典的算法题:回文日期、移动距离和日期问题。这些题目不仅考察了我们的基础编程能力,还挑战了我们对日期处理和数学推理的理解。通过模拟算法,我们能够深入探索每个问题的核心…...

Kubernetes 最佳实践:Top 10 常见 DevOps/SRE 面试问题及答案
1. 如何在 Kubernetes 中设置资源请求和限制? 资源请求确保容器有最小资源量(CPU/内存),而限制则强制容器消耗的最大资源量。这有助于高效资源分配并防止资源争用。 示例: resources:requests:memory: "256Mi&…...

Docker Compose介绍及安装使用MongoDB数据库详解
在现代容器化应用部署中,Docker Compose是一种非常实用的工具,它允许我们通过一个docker-compose.yml文件来定义和运行多容器应用程序。然而,除了Docker之外,Podman也提供了类似的工具——Podman Compose,它允许我们在…...

科普:数据仓库中的“指标”和“维度”
在数据仓库中,指标和维度是两个核心概念,它们对于数据分析和业务决策至关重要。以下是对这两个概念的分析及举例说明: 一、指标 定义: 指标是用于衡量业务绩效的关键数据点,通常用于监控、分析和优化企业的运营状况。…...

11.swagger使用
菜单位置 未登录接口会返回401 登录的token存储的位置 配置文件swagger配置中将/dev-api修改/...

java高级知识之集合
前言 集合是java开发中的重点内容,需要掌握的东西很多,面试中可问的东西很多,无论是深度还是广度。集合框架中Collection对应的实现类如下所示,这些都是要完全掌握,一个可以分为三大类List集合、Set‘集合以及Map集合…...

deepseek + kimi 高效生成PPT
1.在deepseek中生成ppt大纲 2.将大纲复制到kimi中生成PPT kimi:https://kimi.moonshot.cn/...

hadoop之MapReduce:片和块
假如我现在500M这样的数据,如何存储? 500M 128M 128M 128M 116M 分为四个块进行存储。 计算的时候,是按照片儿计算的,而不是块儿。 块是物理概念,一个块就是128M ,妥妥的,毋庸置疑。 片是逻辑概念&…...

好好说话:深度学习扫盲
大创项目是和目标检测算法YOLO相关的,浅浅了解了一些有关深度学习的知识。在这里根据本人的理解做一些梳理。 深度学习是什么? 之前经常听到AI,机器学习,深度学习这三个概念,但是对于三者的区别一直很模糊。 AI&…...

ASP.NET Core的贫血模型与充血模型
目录 概念 需求 贫血模型 充血模型 总结 概念 贫血模型:一个类中只有属性或者成员变量,没有方法。充血模型:一个类中既有属性、成员变量,也有方法。 需求 定义一个类保存用户的用户名、密码、积分;用户必须具有…...

【愚公系列】《Python网络爬虫从入门到精通》001-初识网络爬虫
标题详情作者简介愚公搬代码头衔华为云特约编辑,华为云云享专家,华为开发者专家,华为产品云测专家,CSDN博客专家,CSDN商业化专家,阿里云专家博主,阿里云签约作者,腾讯云优秀博主&…...

Kubernetes控制平面组件:etcd(一)
云原生学习路线导航页(持续更新中) kubernetes学习系列快捷链接 Kubernetes架构原则和对象设计(一)Kubernetes架构原则和对象设计(二)Kubernetes架构原则和对象设计(三)kubectl 和 …...

2100年芜湖人的一天:张明的生活剪影
2100年芜湖人的一天:张明的生活剪影 破晓 6:30 "沙沙"的微风声轻轻掠过耳畔,杨柳的沙沙声混合着若有若无的鸟鸣,张明的意识从深邃的梦境中缓缓浮现。这并非真实的自然声响,而是他的脑机接口精心编织的唤醒交响曲。量子…...

外贸网站源码 助力企业抢占蛇年市场先机!
在竞争激烈的外贸市场中,蛇年无疑是企业寻求突破与增长的关键一年。外贸网站源码为企业提供了快速搭建专业外贸网站的解决方案,助力企业在新的一年抢占市场先机。 快速上线 时间就是商机,尤其是在蛇年这样充满变数和机遇的年份。外贸网站源码…...

verilog练习:i2c slave 模块设计
文章目录 前言1.结构2.代码2.1 iic_slave.v2.2 sync.v2.3 wr_fsm.v2.3.1 状态机状态解释 2.4 ram.v 3. 波形展示4. 建议5. 资料总结 前言 首先就不啰嗦iic协议了,网上有不少资料都是叙述此协议的。 下面将是我本次设计的一些局部设计汇总,如果对读者有…...

项目6:基于大数据校园一卡通数据分析和可视化
1、项目简介 本项目是基于大数据的清华校园卡数据分析系统,通过Hadoop,spark等技术处理校园卡交易、卡号和商户信息数据。系统实现消费类别、男女消费差异、学院消费排行和年级对比等分析,并通过Web后端和可视化前端展示结果。项目运行便捷&…...

Linux常见系统日志类型
目录 系统日志(/var/log/syslog 或 /var/log/messages) 认证日志(/var/log/auth.log 或 /var/log/secure) Web服务器日志(/var/log/apache2/ 或 /var/log/nginx/) MySQL日志(/var/log/mysql/…...

npm 常用命令大全
npm 常用命令大全 下载包 npm install清理缓存 npm cache clean --force查看当前配置 npm config get registry设置淘宝镜像 npm config set registry https://registry.npmmirror.com查看 npm 版本 npm -vnpm 设置超时时间 npm config set fetch-timeout 600更新依赖 …...

java.io.InvalidClassException
类实现序列问题 如果实现了序列,最好生成序列号,因为类结构发生改变时,会报错 java.io.InvalidClassException 所以实现序列,需要生成序列号 private static final long serialVersionUID 1L;...

Datawhale 组队学习 Ollama教程 task1
一、Ollama 简介 比喻:Ollama 就像是一个“魔法箱子”,里面装满了各种大型语言模型(LLM)。你不需要懂复杂的魔法咒语(配置),只需要轻轻一按(一条命令),就能让…...

大模型基本原理(二)——ChatGPT的工作原理
如何得到一个ChatGPT? 1、无监督预训练:通过大量的文本数据集进行无监督训练,得到一个基座模型(只会续写文本) 2、监督微调:通过一些人类撰写的高质量对话数据对基座模型进行监督微调,得到一个…...

成为高能量体质:从身体神庙到精神圣殿的修炼之路
清晨五点,当城市还在沉睡,瑜伽垫上的汗水已经折射出第一缕阳光。这不是苦行僧的自虐,而是高能量体质者的日常仪式。在这个能量稀缺的时代,如何把自己修炼成一座小型核电站?答案就藏在身体的每个细胞里。 一、能量管理…...

51c自动驾驶~合集50
我自己的原文哦~ https://blog.51cto.com/whaosoft/13280022 #VLA 主流方案全解析 旨在让智能体在物理世界中通过感知、决策和行动来实现目标,而视觉 - 语言 - 动作(VLA)模型作为其中的关键技术,近年来备受关注。VLA 模型能够…...

测试自动化落地方向
一、视觉回归自动化测试(低成本高回报) 痛点: UI 频繁迭代导致视觉问题难覆盖 方案: 引入Applitools或SikuliX做视觉比对(无需维护元素定位) 关键路径截图比对,自动检测 UI 错位/样式问题 亮点…...
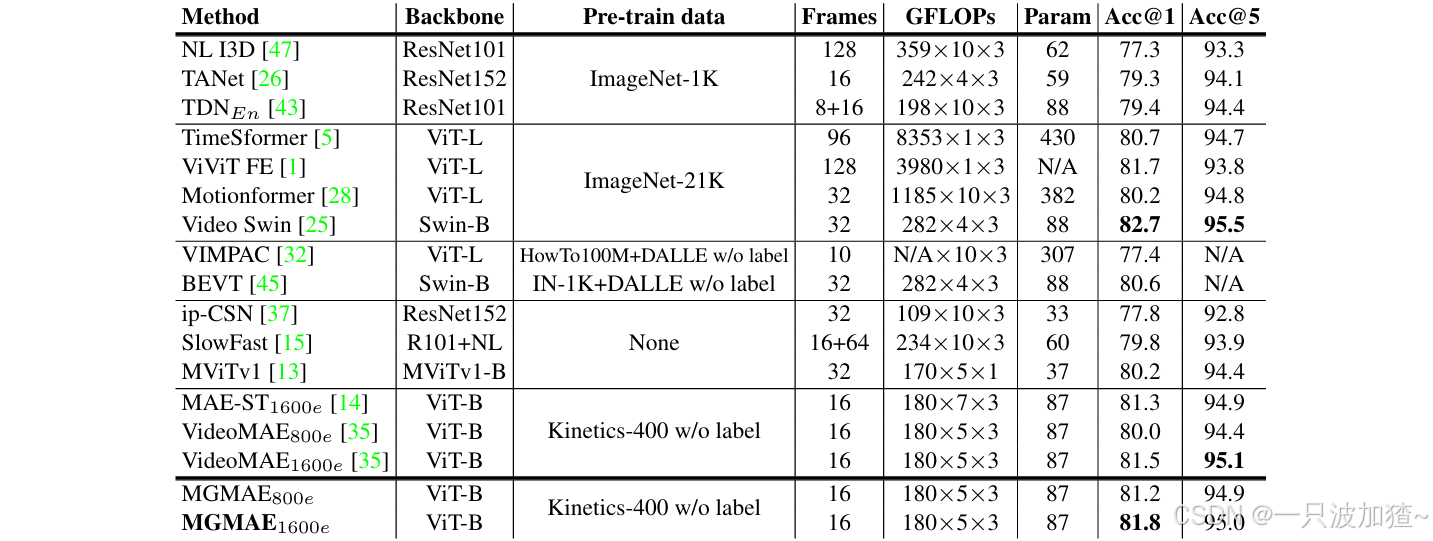
论文阅读:MGMAE : Motion Guided Masking for Video Masked Autoencoding
MGMAE:Motion Guided Masking for Video Masked Autoencoding Abstract 掩蔽自编码(Masked Autoencoding)在自监督视频表示学习中展现了出色的表现。时间冗余导致了VideoMAE中高掩蔽比率和定制的掩蔽策略。本文旨在通过引入运动引导掩蔽策略࿰…...

【嵌入式Linux应用开发基础】文件I/O基础编程
目录 一、文件I/O简介 二、文件描述符 2.1. 唯一性 2.2. 抽象性 2.3. 有限性 三、文件操作函数 四、标准文件I/O函数 五、文件执行权限 5.1. 权限类型 5.2. 权限分配对象 5.3. 权限表示方法 5.4. 权限设置命令 5.5. 权限设置的重要性 5.6. 实例说明 六、设备文件…...

Java 反射机制的安全隐患与防范措施:在框架开发与代码审计中的应用
前言 在 Java 编程的广阔领域中,反射机制堪称一把神奇且强大的钥匙,它为开发者打开了通往动态编程的全新大门。借助反射,Java 程序获得了在运行时自我审视和操作的独特能力,极大地增强了代码的灵活性与适应性。 简单来讲&#x…...

【JS】实现一个hexo插件并发布
hexo插件生成 在你的 hexo blog 目录,找到 node_modules. 新建一个文件夹。然后执行 npm init npm 会引导你生成 package.json 这是你的包的描述文件。需要注意的是,所有的 hexo 插件必须以 hexo - 开头,否则 hexo 不会加载。 如果hexo g中没…...