从零搭建微服务项目Pro(第3-1章——本地/OSS图片文件存取)
前言:
在小型demo项目中,一般将图片音频等字节流文件存放本地数据库,但企业级项目中,由于数据量容量有限,需要借助OSS来管理大规模文件。
OSS(对象存储服务,Object Storage Service)是一种用于存储和管理非结构化数据的云存储服务,适合存储图片、视频、文档等大规模数据。它具有高扩展性、高可靠性、低成本和易用性等特点,广泛应用于数据备份、多媒体存储、大数据分析和静态网站托管等场景。使用OSS的基本流程包括:首先在云服务提供商平台创建存储空间(Bucket),然后通过API、SDK或管理控制台上传和管理文件,设置访问权限以确保数据安全,最后可以通过生成的(临时)URL访问存储的文件。
本章在讲解如何使用mysql存储字节型数据后,示范如何使用阿里云OSS服务完成文件的存取,并提供对应前端代码而非postman调用接口。
本章项目源码如下:(注意将application中内容换成3.6部分内容)
wlf728050719/SpringCloudPro3-1![]() https://github.com/wlf728050719/SpringCloudPro3-1 以及本专栏会持续更新微服务项目,每一章的项目都会基于前一章项目进行功能的完善,欢迎小伙伴们关注!同时如果只是对单章感兴趣也不用从头看,只需下载前一章项目即可,每一章都会有前置项目准备部分,跟着操作就能实现上一章的最终效果,当然如果是一直跟着做可以直接跳过这一部分。专栏目录链接如下,其中Base篇为基础微服务搭建,Pro篇为复杂模块实现。
https://github.com/wlf728050719/SpringCloudPro3-1 以及本专栏会持续更新微服务项目,每一章的项目都会基于前一章项目进行功能的完善,欢迎小伙伴们关注!同时如果只是对单章感兴趣也不用从头看,只需下载前一章项目即可,每一章都会有前置项目准备部分,跟着操作就能实现上一章的最终效果,当然如果是一直跟着做可以直接跳过这一部分。专栏目录链接如下,其中Base篇为基础微服务搭建,Pro篇为复杂模块实现。
从零搭建微服务项目(全)-CSDN博客![]() https://blog.csdn.net/wlf2030/article/details/145799620
https://blog.csdn.net/wlf2030/article/details/145799620

一、基本项目创建
1.创建Spring Boot项目,选择不添加依赖和插件

2.删除不必要目录和文件,创建application.yml

3.替换pom内容如下:
<?xml version="1.0" encoding="UTF-8"?>
<project xmlns="http://maven.apache.org/POM/4.0.0" xmlns:xsi="http://www.w3.org/2001/XMLSchema-instance"xsi:schemaLocation="http://maven.apache.org/POM/4.0.0 https://maven.apache.org/xsd/maven-4.0.0.xsd"><modelVersion>4.0.0</modelVersion><parent><groupId>org.springframework.boot</groupId><artifactId>spring-boot-starter-parent</artifactId><version>2.3.9.RELEASE</version><relativePath/> <!-- lookup parent from repository --></parent><groupId>cn.bit</groupId><artifactId>Pro3_1</artifactId><version>0.0.1-SNAPSHOT</version><name>Pro3_1</name><description>Pro3_1</description><dependencies><!-- Web依赖 --><dependency><groupId>org.springframework.boot</groupId><artifactId>spring-boot-starter-web</artifactId><version>2.3.9.RELEASE</version></dependency><!-- Mysql驱动 --><dependency><groupId>mysql</groupId><artifactId>mysql-connector-java</artifactId><version>5.1.47</version></dependency><!--Mybatis--><dependency><groupId>com.baomidou</groupId><artifactId>mybatis-plus-boot-starter</artifactId><version>3.5.7</version></dependency><!-- Lombok --><dependency><groupId>org.projectlombok</groupId><artifactId>lombok</artifactId><scope>provided</scope><version>1.18.36</version><optional>true</optional></dependency><!-- test --><dependency><groupId>org.springframework.boot</groupId><artifactId>spring-boot-starter-test</artifactId><scope>test</scope></dependency></dependencies><build><plugins><plugin><groupId>org.springframework.boot</groupId><artifactId>spring-boot-maven-plugin</artifactId></plugin></plugins></build></project>
4.创建存放图片的数据库和表
表sql如下:
create table tb_img
(id    int auto_incrementprimary key,name  varchar(100) not null,image longblob     not null
);
yml内容如下:(替换为自己的数据库)
server:port: 1234
spring:datasource:url: jdbc:mysql://localhost:3306/db_image?useSSL=falseusername: rootpassword: 15947035212driver-class-name: com.mysql.jdbc.Driverapplication:name: image-servicemybatis-plus:mapper-locations: classpath:mapper/*Mapper.xmltype-aliases-package: cn.bit.pro3_1.mapper
5.配置数据源

二、本地数据库存取文件
1.连接成功后选择Mybatis X Generator自动生成实体类等对应代码。


2.最后生成目录如下:

3.生成mapper上加@Mapper

4.service接口加两个方法
package cn.bit.pro3_1.service;import cn.bit.pro3_1.entity.Image;
import com.baomidou.mybatisplus.extension.service.IService;/**
* @author wlf
* @description 针对表【tb_img】的数据库操作Service
* @createDate 2025-03-10 16:39:32
*/
public interface ImageService extends IService<Image> {int insertImage(Image image);Image selectImageById(int id);
}
5.对应实现
package cn.bit.pro3_1.service.impl;import com.baomidou.mybatisplus.extension.service.impl.ServiceImpl;
import cn.bit.pro3_1.entity.Image;
import cn.bit.pro3_1.service.ImageService;
import cn.bit.pro3_1.mapper.ImageMapper;
import org.springframework.stereotype.Service;/**
* @author wlf
* @description 针对表【tb_img】的数据库操作Service实现
* @createDate 2025-03-10 16:39:32
*/
@Service
public class ImageServiceImpl extends ServiceImpl<ImageMapper, Image>implements ImageService{@Overridepublic int insertImage(Image image) {return baseMapper.insert(image);}@Overridepublic Image selectImageById(int id) {return baseMapper.selectById(id);}
}
6.创建controller包以及ImageController @CrossOrigin必须,否则出现跨域问题导致尽管业务没问题,但响应被浏览器视为错误。
package cn.bit.pro3_1.controller;import cn.bit.pro3_1.entity.Image;
import cn.bit.pro3_1.service.ImageService;
import lombok.AllArgsConstructor;
import org.springframework.http.MediaType;
import org.springframework.http.ResponseEntity;
import org.springframework.web.bind.annotation.*;
import org.springframework.web.multipart.MultipartFile;import java.io.IOException;@RestController
@RequestMapping("/image")
@AllArgsConstructor
@CrossOrigin(origins = "*")
public class ImageController {private final ImageService imageService;/*** 上传图片并存储到数据库** @param file 前端上传的图片文件* @return 图片的 ID*/@PostMapping("/upload")public ResponseEntity<Integer> uploadImage(@RequestParam("file") MultipartFile file) throws IOException {// 将 MultipartFile 转换为 byte[]byte[] imageData = file.getBytes();// 获取文件名String fileName = file.getOriginalFilename();// 创建 Image 对象Image image = new Image();image.setName(fileName);image.setImage(imageData);// 调用 Service 层方法存储图片imageService.insertImage(image);// 返回图片的 IDreturn ResponseEntity.ok(image.getId());}/*** 根据图片 ID 获取图片并返回给前端** @param id 图片的 ID* @return 图片的字节数据*/@GetMapping(value = "/{id}", produces = MediaType.IMAGE_JPEG_VALUE)public ResponseEntity<byte[]> getImage(@PathVariable int id) {// 调用 Service 层方法获取图片Image image = imageService.selectImageById(id);if (image == null) {return ResponseEntity.notFound().build();}// 返回图片的字节数据return ResponseEntity.ok(image.getImage());}
}
7.前端html如下:
<!DOCTYPE html>
<html lang="en">
<head><meta charset="UTF-8"><meta name="viewport" content="width=device-width, initial-scale=1.0"><title>Image Upload and Display</title>
</head>
<body>
<h1>Upload Image to Local Server</h1>
<form id="uploadForm"><input type="file" id="fileInput" name="file" accept="image/*" required><button type="submit">Upload to Local</button>
</form><h1>Upload Image to AliYun OSS</h1>
<form id="aliyunUploadForm"><input type="file" id="aliyunFileInput" name="file" accept="image/*" required><button type="submit">Upload to AliYun OSS</button>
</form><h1>Download Image from AliYun OSS</h1>
<form id="aliyunDownloadForm"><input type="text" id="fileNameInput" placeholder="Enter file name" required><button type="submit">Download from AliYun OSS</button>
</form><h1>Display Image</h1>
<div id="imageContainer"><!-- 图片将显示在这里 -->
</div><script>// 处理本地服务器上传表单提交document.getElementById('uploadForm').addEventListener('submit', async (event) => {event.preventDefault();const fileInput = document.getElementById('fileInput');const file = fileInput.files[0];if (!file) {alert('Please select a file.');return;}const formData = new FormData();formData.append('file', file);try {// 发送上传请求到本地服务器const response = await fetch('http://localhost:1234/image/upload', {method: 'POST',body: formData});if (!response.ok) {throw new Error('Upload failed');}const imageId = await response.json();alert(`Image uploaded successfully! Image ID: ${imageId}`);// 上传成功后显示图片displayImage(imageId);} catch (error) {console.error('Error:', error);alert('Failed to upload image.');}});// 显示本地服务器图片async function displayImage(imageId) {try {const response = await fetch(`http://localhost:1234/image/${imageId}`);if (!response.ok) {throw new Error('Failed to fetch image');}const imageBlob = await response.blob();const imageUrl = URL.createObjectURL(imageBlob);const imageContainer = document.getElementById('imageContainer');imageContainer.innerHTML = `<img src="${imageUrl}" alt="Uploaded Image" style="max-width: 100%;">`;} catch (error) {console.error('Error:', error);alert('Failed to display image.');}}document.getElementById('aliyunUploadForm').addEventListener('submit', async (event) => {event.preventDefault();const fileInput = document.getElementById('aliyunFileInput');const file = fileInput.files[0];if (!file) {alert('Please select a file.');return;}const formData = new FormData();formData.append('file', file);try {// 发送上传请求到阿里云 OSSconst response = await fetch('http://localhost:1234/image/AliYunImgUpload', {method: 'POST',body: formData});if (!response.ok) {throw new Error('Upload to AliYun OSS failed');}const fileName = await response.text();alert(`Image uploaded to AliYun OSS successfully! File Name: ${fileName}`);} catch (error) {console.error('Error:', error);alert('Failed to upload image to AliYun OSS.');}});// 处理阿里云 OSS 下载表单提交document.getElementById('aliyunDownloadForm').addEventListener('submit', async (event) => {event.preventDefault();const fileNameInput = document.getElementById('fileNameInput');const fileName = fileNameInput.value;if (!fileName) {alert('Please enter a file name.');return;}try {// 发送下载请求到阿里云 OSSconst response = await fetch(`http://localhost:1234/image/AliYunImgDownload?fileName=${fileName}`);if (!response.ok) {throw new Error('Failed to fetch image');}const imageUrl = await response.text();alert(`Image downloaded from AliYun OSS successfully! Image URL: ${imageUrl}`);// 显示图片displayImageFromUrl(imageUrl);} catch (error) {console.error('Error:', error);alert('Failed to download image from AliYun OSS.');}});// 显示阿里云 OSS 图片function displayImageFromUrl(imageUrl) {const imageContainer = document.getElementById('imageContainer');imageContainer.innerHTML = `<img src="${imageUrl}" alt="Uploaded Image" style="max-width: 100%;">`;}
</script>
</body>
</html>
8.启动服务

9.前端选择本地图片并上传

10.弹窗提示上传成功,且会马上调用一次回显从数据库取出图片

11.数据库数据成功添加。

三、OSS存取文件
1.阿里云注册账号
2025主会场_智惠采购季 就上阿里云-阿里云采购季![]() https://www.aliyun.com/activity/purchase/purchasing?utm_content=se_10204504842.注册并登录后,搜索ram并创建用户
https://www.aliyun.com/activity/purchase/purchasing?utm_content=se_10204504842.注册并登录后,搜索ram并创建用户


记得存下id和key,关闭页面后就复制不了了

3.创建后授权

4.购买oss服务,并创建bucket,使用默认的选择即可

创建后点击查看概览

记住红框里面的endpoint值

5.pom添加阿里云oss依赖
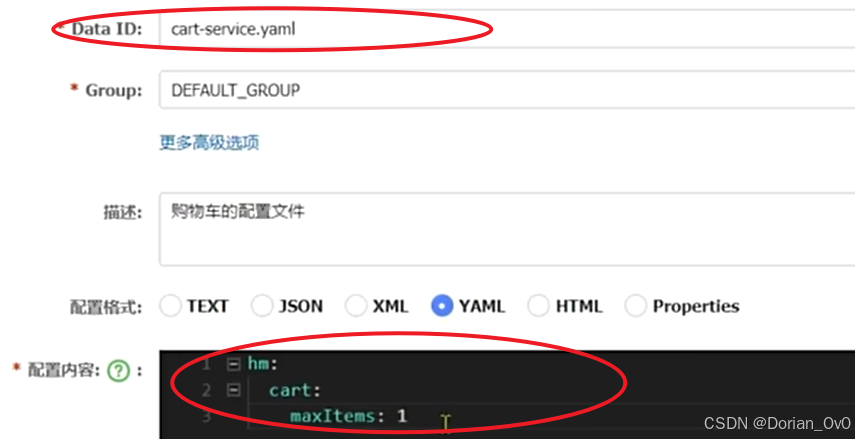
<!-- 阿里云对象存储 --><dependency><groupId>com.alibaba.cloud</groupId><artifactId>spring-cloud-starter-alicloud-oss</artifactId><version>2.2.0.RELEASE</version></dependency>6.修改application.yml内容:(记得替换为自己的数据)
server:port: 1234
spring:datasource:url: jdbc:mysql://localhost:3306/db_image?useSSL=falseusername: rootpassword: 15947035212driver-class-name: com.mysql.jdbc.Driverapplication:name: image-servicecloud:alicloud:access-key: 你的key idsecret-key: 你的key secretoss:endpoint: 你的end pointbucket:name: 你的bucket名
mybatis-plus:mapper-locations: classpath:mapper/*Mapper.xmltype-aliases-package: cn.bit.pro3_1.mapper
7.创建FileController
package cn.bit.pro3_1.controller;import com.aliyun.oss.OSS;
import com.aliyun.oss.model.GeneratePresignedUrlRequest;
import org.springframework.beans.factory.annotation.Autowired;
import org.springframework.beans.factory.annotation.Value;
import org.springframework.http.HttpStatus;
import org.springframework.http.ResponseEntity;
import org.springframework.web.bind.annotation.CrossOrigin;
import org.springframework.web.bind.annotation.GetMapping;
import org.springframework.web.bind.annotation.PostMapping;
import org.springframework.web.bind.annotation.RequestParam;
import org.springframework.web.bind.annotation.RestController;
import org.springframework.web.multipart.MultipartFile;import java.net.URL;
import java.util.Date;@RestController
@CrossOrigin(origins = "*")
public class FileController {@Autowiredprivate OSS ossClient;@Value("${spring.cloud.alicloud.oss.bucket.name}")private String bucketName;@Value("${spring.cloud.alicloud.oss.endpoint}")private String endPoint;/*** 上传文件到阿里云 OSS*/@PostMapping("/image/AliYunImgUpload")public ResponseEntity<String> fileUpload(@RequestParam("file") MultipartFile file) {try {String fileName = new Date().getTime() + "-" + file.getOriginalFilename(); // 使用时间戳避免文件名冲突// 文件上传ossClient.putObject(bucketName, fileName, file.getInputStream());return ResponseEntity.ok(fileName);} catch (Exception e) {return ResponseEntity.status(HttpStatus.BAD_REQUEST).body(e.getMessage());}}/*** 从阿里云 OSS 取回文件*/@GetMapping("/image/AliYunImgDownload")public ResponseEntity<String> fileDownload(@RequestParam("fileName") String fileName) {try {// 设置预签名 URL 的过期时间(例如 1 小时)Date expiration = new Date(System.currentTimeMillis() + 3600 * 1000);// 生成预签名 URLGeneratePresignedUrlRequest request = new GeneratePresignedUrlRequest(bucketName, fileName);request.setExpiration(expiration);URL url = ossClient.generatePresignedUrl(request);// 返回预签名 URLreturn ResponseEntity.ok(url.toString());} catch (Exception e) {return ResponseEntity.status(HttpStatus.BAD_REQUEST).body(e.getMessage());}}
}
8.启动服务后前端选择上传文件到oss
 9.oss刷新后能看到上传的文件

10.将oss中文件名复制

11.回显成功

最后:
目前仅仅只是通过文件名直接访问oss拿取文件,实际应当先根据用户身份从mysql数据库中拿取用户能够访问的文件名,之后再次访问oss,实际可将oss理解为一个以文件名+桶名为主键的数据库专门用于存储大规模数据以减少本地数据库压力。后续会继续完善以及合并。
相关文章:
从零搭建微服务项目Pro(第3-1章——本地/OSS图片文件存取)
前言: 在小型demo项目中,一般将图片音频等字节流文件存放本地数据库,但企业级项目中,由于数据量容量有限,需要借助OSS来管理大规模文件。 OSS(对象存储服务,Object Storage Service࿰…...

游戏引擎学习第147天
仓库:https://gitee.com/mrxiao_com/2d_game_3 上一集回顾 具体来说,我们通过隐式计算来解决问题,而不是像数字微分分析器那样逐步增加数据。我们已经涵盖了这个部分,并计划继续处理音量问题。不过,实际上我们现在不需要继续处理…...

Spring boot启动原理及相关组件
优质博文:IT-BLOG-CN 一、Spring Boot应用启动 一个Spring Boot应用的启动通常如下: SpringBootApplication Slf4j public class ApplicationMain {public static void main(String[] args) {ConfigurableApplicationContext ctx SpringApplication.…...

【Linux】信号处理以及补充知识
目录 一、信号被处理的时机: 1、理解: 2、内核态与用户态: 1、概念: 2、重谈地址空间: 3、处理时机: 补充知识: 1、sigaction: 2、函数重入: 3、volatile&…...
微服务——网关、网关登录校验、OpenFeign传递共享信息、Nacos共享配置以及热更新、动态路由
之前学习了Nacos,用于发现并注册、管理项目里所有的微服务,而OpenFeign简化微服务之间的通信,而为了使得前端可以使用微服务项目里的每一个微服务的接口,就应该将所有微服务的接口管理起来方便前端调用,所以有了网关。…...

【leetcode hot 100 19】删除链表的第N个节点
解法一:将ListNode放入ArrayList中,要删除的元素为num list.size()-n。如果num 0则将头节点删除;否则利用num-1个元素的next删除第num个元素。 /*** Definition for singly-linked list.* public class ListNode {* int val;* Lis…...

comctl32!ListView_OnSetItem函数分析LISTSUBITEM结构中的image表示图标位置
第一部分: BOOL ListView_SetSubItem(LV* plv, const LV_ITEM* plvi) { LISTSUBITEM lsi; BOOL fChanged FALSE; int i; int idpa; HDPA hdpa; if (plvi->mask & ~(LVIF_DI_SETITEM | LVIF_TEXT | LVIF_IMAGE | LVIF_STATE)) { …...

数据结构——多项式问题(顺序存储结构or链式存储结构)
补充:malloc函数: malloc 函数是 C 语言标准库中的一个重要函数,位于 <stdlib.h> 头文件中,主要用于在程序运行时动态分配内存。以下将详细介绍其用法。 前面的返回值指针可以自己定义,如 (int*&am…...

【学习方法】技术开发者的提问智慧:如何高效获得解答?
技术开发者的提问智慧:如何高效获得解答? 在技术开发过程中,每个人都会遇到无法解决的问题。此时,我们通常会向团队、社区或论坛求助。然而,为什么有些人的问题能迅速得到解答,而有些人的问题却石沉大海&a…...

记录小白使用 Cursor 开发第一个微信小程序(一):注册账号及下载工具(250308)
文章目录 记录小白使用 Cursor 开发第一个微信小程序(一):注册账号及下载工具(250308)一、微信小程序注册摘要1.1 注册流程要点 二、小程序发布流程三、下载工具 记录小白使用 Cursor 开发第一个微信小程序(…...

vue2项目修改浏览器显示的网页图标
1.准备一个新的图标文件,通常是. ico格式,也可以是. Png、. Svg等格式 2.将新的图标文件(例如:faviconAt.png)放入项目的public文件夹中。如下图 public文件夹中的所有文件都会在构建时原样复制到最终的输出目录(通常是dist) 3. 修改vue项目…...

spring boot3.4.3+MybatisPlus3.5.5+swagger-ui2.7.0
使用 MyBatis-Plus 操作 books 表。我们将实现以下功能: 创建实体类 Book。 创建 Mapper 接口 BookMapper。 创建 Service 层 BookService 和 BookServiceImpl。 创建 Controller 层 BookController。 配置 MyBatis-Plus 和数据库连接。 1. 项目结构 src ├─…...

【网络安全工程】任务10:三层交换机配置
CSDN 原创主页:不羁https://blog.csdn.net/2303_76492156?typeblog三层交换机是指在OSI(开放系统互连)模型中的第三层网络层提供路由功能的交换机。它不仅具备二层交换机的交换功能,还能实现路由功能,提供更为灵活的网…...

侯捷 C++ 课程学习笔记:C++内存管理机制
内存管理从平地到万丈高楼 内存管理入门(Memory Management 101) 需要具有动态分配并使用memory(存储(器),(计算机的)内存),使用过C标准库的容器࿰…...

JVM常用概念之本地内存跟踪
问题 Java应用启动或者运行过程中报“内存不足!”,我们该怎么办? 基础知识 对于一个在本地机器运行的JVM应用而言,需要足够的内存来存储机器代码、堆元数据、类元数据、内存分析等数据结构,来保证JVM应用的成功启动以及未来平…...

【鸿蒙开发】Hi3861学习笔记- 软件定时器示例
00. 目录 文章目录 00. 目录01. 定时器概述02. 定时器API03. 定时器常用API3.1 osTimerNew3.2 osTimerDelete3.3 osTimerStart3.4 osTimerStop 04. 程序示例05. 附录 01. 定时器概述 软件定时器,是基于系统Tick时钟中断且由软件来模拟的定时器,当经过设…...

在Html5中仿Matlab自定义色带生成实践
目录 前言 一、RGB的相关知识 1、RGB的基本原理 2、RGB的数值表示 3、应用场景 二、ColorMap生成实战 1、外部库介绍 2、相关API 3、实例生成 三、总结 前言 在现代网页开发与数据可视化领域,色彩的表现力对于信息传达和视觉体验起着至关重要的作用。色带&…...

贪心算法--
1.柠檬水找零 link:860. 柠檬水找零 - 力扣(LeetCode) code class Solution { public:bool lemonadeChange(vector<int>& bills) {// 贪心算法, 优先花出大面额bill, 尽可能保护小面额billint five 0, ten 0;// 不…...

【学习方法一】
学习方法一 一、通用高效学习法二、学科专项方法三、工具与技术辅助四、习惯与心理策略五、避免常见误区总结六、进阶学习策略七、解决学习痛点八、场景化学习法九、资源与工具推荐十、个性化学习调整十一、长期学习心态十二、常见问题QA十三、应对特殊挑战的学习法十四、健康与…...

k8s启动时calico-kube-controllers与coredns组件一直是pending状态
症状: k8s执行kubectl get po -n kube-system时,以下组件一直>是pending状态: calico-kube-controllerscoredns 当执行 kubectl get po -n kube-system 发现 calico-kube-controllers 和 coredns 一直处于 Pending 状态时,通常…...

ngx_openssl_create_conf
ngx_openssl_create_conf 声明在 src\event\ngx_event_openssl.c static void *ngx_openssl_create_conf(ngx_cycle_t *cycle); 定义在 src\event\ngx_event_openssl.c static void * ngx_openssl_create_conf(ngx_cycle_t *cycle) {ngx_openssl_conf_t *oscf;oscf ngx_…...

如何选择国产串口屏?
目录 1、迪文 2、淘晶驰 3、广州大彩 4、金玺智控 5、欣瑞达 6、富莱新 7、冠显 8、有彩 串口屏,顾名思义,就是通过串口通信接口(如RS232、RS485、TTL UART等)与主控设备进行通信的显示屏。其核心功能是显示信息和接收输入…...

matlab慕课学习3.1
3.1顺序结构程序 于20250306 3.1.1程序和程序设计 程序是用某种计算机能够理解并且能够执行的语言来描述的解决问题的方法和步骤。 3.1.2程序的三种基本结构 1.顺序结构 2.选择结构 3.循环结构 3.1.3脚本文件和函数文件 脚本文件是可在命令行窗口直接执行的文件࿰…...

EB-Cable许可管理系统的功能和特点
在数字化时代,软件许可管理已成为企业日常运营中不可或缺的一部分。EB-Cable许可管理系统作为一款专为电缆管理而设计的软件解决方案,为企业提供了全面、高效且灵活的许可管理功能。本文将详细介绍EB-Cable许可管理系统的功能和特点,帮助您快…...

cesium地图设置3d,2d,2.5d动态切换
通过修改cesium实例vw的scene的显示模式,来切换最终的显示模式。 Cesium.SceneMode总共有四个变量值,分别如下:NameTypeDescriptionMORPHINGnumber在3d与2d之间切换变体 between mode, e.g., 3D to 2D.COLUMBUS_VIEWnumber2.5d模式࿰…...

Mac如何查看 IDEA 的日志文件
在 macOS 上,IntelliJ IDEA 的日志文件通常存储在用户目录下的 .IntelliJIdea<版本号> 文件夹中。以下是查看日志文件的具体步骤: 1. 找到日志文件的位置 日志文件通常位于以下路径: ~/Library/Logs/IntelliJIdea<版本号> 其…...
)
linux 软件安装(下)
七、ElasticSearch安装 官网地址:Elasticsearch:官方分布式搜索和分析引擎 | Elastic 官网下载地址:Past Releases of Elastic Stack Software | Elastic 7.1、linux安装 1、上传安装包 altp # 打开sftp窗口 # 上传es安装包 put e:/sof…...

MongoDB 自动化部署
部署在容器中,并且自动创建所需用户和权限等 # 启动 mongoDBsudo docker run -dit --name china_fish_mongo \ -p 27017:27017 \ -v /data/project1/db/mongo/config/mongod.conf:/etc/mongod.conf \ -v /data/project1/db/mongo/data:/data/db \ -v /data/project1…...

程序化广告知识入门与Python基础数据处理实践
程序化广告知识入门与Python基础数据处理实践 大家好!我写这一系列博客的初衷是想和大家一起学习进步。在技术飞速发展的今天,数据处理能力愈发重要,Python作为强大的数据处理工具,掌握它能为我们的职业发展和技术提升带来极大帮…...
【数据结构】二叉搜索树、平衡搜索树、红黑树
二叉搜索树(Binary Search Tree) 二叉搜索树是一种特殊的二叉树,它用来快速搜索某个值,对于每个节点都应该满足以下条件: 若该节点有左子树,那么左子树中所有节点的值都应该小于该节点的值。若该节点有右…...