SnapdragonCamera骁龙相机源码解析
骁龙相机是高通开发的一个测试系统摄像头的demo,代码完善,功能强大。可以配合Camera驱动进行功能联调。
很多逻辑代码在CaptureModule.java里。
CaptureModule有8000多行,包罗万象。
涉及到界面显示要结合CaptureUI.java 一起来实现。
CaptureActivity持有了 CaptureModule 和 CaptureUI 。
以上是主要的引用关系。
CameraActivity 中调用了以下代码
case ModuleSwitcher.CAPTURE_MODULE_INDEX:if(mCaptureModule == null) {mCaptureModule = new CaptureModule();//核心代码!!!mCaptureModule.init(this, mCameraCaptureModuleRootView);} else {mCaptureModule.reinit();}mCurrentModule = mCaptureModule;mCameraCaptureModuleRootView.setVisibility(View.VISIBLE);Log.e("CameraActity"," setModuleFromIndex =================== CAPTURE_MODULE_INDEX");break;CaptureModule 里初始化代码:
@Overridepublic void init(CameraActivity activity, View parent) {mActivity = activity;mRootView = parent;mSettingsManager = SettingsManager.getInstance();mSettingsManager.createCaptureModule(this);mSettingsManager.registerListener(this);if (mSettingsManager.mIsHasOneCamera) {CURRENT_ID = 0;} else {if (isBackCameraId()) {CURRENT_ID = BACK_MODE;} else {CURRENT_ID = FRONT_MODE;}}mSettingsManager.init();mFirstPreviewLoaded = false;Log.d(TAG, "init");for (int i = 0; i < MAX_NUM_CAM; i++) {mCameraOpened[i] = false;mTakingPicture[i] = false;}for (int i = 0; i < MAX_NUM_CAM; i++) {mState[i] = STATE_PREVIEW;}SceneModule module;for (int i = 0; i < mSelectableModes.length + 2; i++) {module = new SceneModule();module.mode = CameraMode.values()[i];mSceneCameraIds.add(module);}mPostProcessor = new PostProcessor(mActivity, this);mFrameProcessor = new FrameProcessor(mActivity, this);mContentResolver = mActivity.getContentResolver();initModeByIntent();initCameraIds();mUI = new CaptureUI(activity, this, parent);mUI.initializeControlByIntent();mFocusStateListener = new FocusStateListener(mUI);mLocationManager = new LocationManager(mActivity, this);}通过以下代码初始化CaptureUI
mUI = new CaptureUI(activity, this, parent);mUI.initializeControlByIntent();介绍一个核心操作来,了解是如何切换拍照模式的。
首先,通过CaptureUI ,来对组件赋予监听回调。
mFlashButton = (FlashToggleButton) mRootView.findViewById(R.id.flash_button);mModeSelectLayout = (RecyclerView) mRootView.findViewById(R.id.mode_select_layout);mModeSelectLayout.setLayoutManager(new LinearLayoutManager(mActivity,LinearLayoutManager.HORIZONTAL, false));mCameraModeAdapter = new Camera2ModeAdapter(mModule.getCameraModeList());//设置单击回调 mCameraModeAdapter.setOnItemClickListener(mModule.getModeItemClickListener());mModeSelectLayout.setAdapter(mCameraModeAdapter);mSettingsIcon = (ImageView) mRootView.findViewById(R.id.settings);mSettingsIcon.setImageResource(R.drawable.settings);mSettingsIcon.setOnClickListener(new View.OnClickListener() {@Overridepublic void onClick(View v) {openSettingsMenu();}});对应CaptureModule的处理。
public OnItemClickListener getModeItemClickListener() {return new OnItemClickListener() {@Overridepublic int onItemClick(int mode) {if (showLog) Log.e(TAG, "mode >>> " + mode);if (!getCameraModeSwitcherAllowed()) {return -1;}if (mode == CameraMode.VIDEO.ordinal()) {videoCameraId = -1;videoType = VIDEO_DEFAULT;} else {if (mode == CameraMode.MACRO.ordinal() || mode == CameraMode.NIGHT.ordinal()) {videoCameraId = -1;videoType = -1;}}return selectCameraMode(mode);}};}CaptureModule 核心代码处理:
public int selectCameraMode(int mode) {if (showLog) Log.e("CaptureModule", "  mode:: ============== " + mode);if (showLog)Log.e("CaptureModule", "  mCurrentSceneMode.mode:: =================== " + mCurrentSceneMode.mode);for (SceneModule sceneModule : mSceneCameraIds) {if (showLog) Log.e(TAG, " secenmode:: >> " + sceneModule.mode);}if (showLog)Log.e("CaptureModule", "  mSceneCameraIds.get(mode).mode:: =================== " + mSceneCameraIds.get(mode).mode);if (showLog) Log.e("CaptureModule", "  videoType:: =================== " + videoType);if (showLog)Log.e("CaptureModule", "  videoCameraId:: =================== " + videoCameraId);showCameraDevice();String value = mSettingsManager.getValue(SettingsManager.KEY_FRONT_REAR_SWITCHER_VALUE);boolean post = false;if (mode == CameraMode.VIDEO.ordinal()) {videoType = VIDEO_DEFAULT;videoCameraId = 0;} else if (mode == CameraMode.MACRO.ordinal()) {if (value != null && value.equals("front")) {post = true;if (!isBackCamera()) {mUI.performCameraSwitchClick();}}} else if (mode == CameraMode.DEFAULT.ordinal()) {videoType = -1;videoCameraId = -1;} else if (mode == CameraMode.NIGHT.ordinal()) {if (value != null && value.equals("front")) {if (!isBackCamera()) {post = true;mUI.performCameraSwitchClick();}}if (showLog)Log.e("xxx", " mPreviewRequestBuilder.length ===========> " + mPreviewRequestBuilder.length);if (showLog)Log.e("xxx", " mPreviewRequestBuilder.length ===========> " + mPreviewRequestBuilder.length);} else if (mode == CameraMode.PRO_MODE.ordinal()) {
//            if (value != null && value.equals("front")) {
//                if (!isBackCamera()) {
//                    post = true;
//                    mUI.performCameraSwitchClick();
//                }
//            }} else if (mode == CameraMode.HFR.ordinal()) {if (value != null && value.equals("front")) {if (!isBackCamera()) {post = true;mUI.performCameraSwitchClick();}}}if (showLog)Log.e("CaptureModule", "  mode2:: ============== " + mode);if (showLog)Log.e("CaptureModule", "  mCurrentSceneMode.mode2 :: =================== " + mCurrentSceneMode.mode);if (showLog)Log.e("CaptureModule", "  mSceneCameraIds.get(mode).mode2 :: =================== " + mSceneCameraIds.get(mode).mode);showCameraDevice();nmode = mode;if (post) {mHandler.postDelayed(new Runnable() {@Overridepublic void run() {selectModle(nmode);}}, 1000);} else {selectModle(mode);}return 1;}
以上经过定制后的代码。代码逻辑更加复杂。因为要支持,夜视和微距摄像头效果。还要支持前摄。
再调用selectModle方法
selectModle(int mode)
private int selectModle(int mode) {
//        if (!isVideoModel) {
//            if (mCurrentSceneMode.mode == mSceneCameraIds.get(mode).mode) {
//                return -1;
//            }
//        }showCameraDevice();setCameraModeSwitcherAllowed(false);setNextSceneMode(mode);SceneModule nextSceneMode = mSceneCameraIds.get(mode);String value = mSettingsManager.getValue(SettingsManager.KEY_FRONT_REAR_SWITCHER_VALUE);if (showLog)Log.e(TAG, " =============== current Mode is :::  " + mCurrentSceneMode.mode.ordinal());if (value != null && value.equals("front") &&(nextSceneMode.mode == CameraMode.RTB|| nextSceneMode.mode == CameraMode.SAT|| nextSceneMode.mode == CameraMode.PRO_MODE)) {if (showLog)Log.e(TAG, " selectModle begin set value KEY_FRONT_REAR_SWITCHER_VALUE  rear ==========   mode:: " + mode);mSettingsManager.setValue(SettingsManager.KEY_FRONT_REAR_SWITCHER_VALUE, "rear");} else {if (showLog) Log.e(TAG, " restartAll ==========   mode:: " + mode);restartAll();}updateZoomSeekBarVisible();return 1;}
再调用 restartAll方法
public void restartAll() {showCameraDevice();int nextCameraId = getNextScreneModeId(mNextModeIndex);CURRENT_ID = getMainCameraId();Log.d(TAG, "restart all CURRENT_ID :" + CURRENT_ID + " nextCameraId :" + nextCameraId);if (CURRENT_ID == nextCameraId && mCameraDevice[nextCameraId] != null) {mIsCloseCamera = false;} else {mIsCloseCamera = true;}SceneModule nextSceneModule = mSceneCameraIds.get(mNextModeIndex);if (nextSceneModule.mode == CameraMode.DEFAULT|| nextSceneModule.mode == CameraMode.PRO_MODE|| nextSceneModule.mode == CameraMode.HFR) {mIsCloseCamera = true;}if (mCameraDevice[nextCameraId] == null) {if (showLog) Log.e(TAG, " mCameraDevice[nextCameraId] is null " + nextCameraId);} else {if (showLog) Log.e(TAG, " mCameraDevice[nextCameraId] is not null " + nextCameraId);}在restartAll中执行各种Camera的初始化操作。首先要关闭原来的摄像头资源,再打开新的摄像头资源。各种操作都封装在以下几个方法。
onPauseBeforeSuper();
if (showLog) Log.e(TAG, " do onPauseBeforeSuper");
onPauseAfterSuper(false);
if (showLog) Log.e(TAG, " do onPauseAfterSuper false");
reinitSceneMode();
if (showLog) Log.e(TAG, " do reinitSceneMode ");
onResumeBeforeSuper(true);
if (showLog) Log.e(TAG, " do onResumeBeforeSuper ");
onResumeAfterSuper(true);
if (showLog) Log.e(TAG, " do onResumeAfterSuper ");
setRefocusLastTaken(false);
if (showLog) Log.e(TAG, " do setRefocusLastTaken ");
打开摄像头的操作。
onResumeAfterSuper 方法里的
if (mIsCloseCamera) {Message msg = Message.obtain();msg.what = OPEN_CAMERA;msg.arg1 = mCurrentSceneMode.getCurrentId();Log.d(TAG, "open is " + msg.arg1);if (mCameraHandler != null) {mCameraHandler.sendMessage(msg);}}对应Handle的操作
private class MyCameraHandler extends Handler {public MyCameraHandler(Looper looper) {super(looper);}@Overridepublic void handleMessage(Message msg) {int id = msg.arg1;switch (msg.what) {case OPEN_CAMERA:openCamera(id);break;case CANCEL_TOUCH_FOCUS:cancelTouchFocus(id);break;}}}执行openCamra操作:
private void openCamera(int id) {if (mPaused) {return;}if (showLog) Log.e(TAG, "openCamera 1111 " + id);CameraManager manager;try {manager = (CameraManager) mActivity.getSystemService(Context.CAMERA_SERVICE);mCameraId[id] = manager.getCameraIdList()[id];if (!mCameraOpenCloseLock.tryAcquire(5000, TimeUnit.MILLISECONDS)) {Log.d(TAG, "Time out waiting to lock camera opening.");throw new RuntimeException("Time out waiting to lock camera opening");}manager.openCamera(mCameraId[id], mStateCallback, mCameraHandler);} catch (CameraAccessException e) {e.printStackTrace();if (showLog) Log.d(TAG, "openCamera CameraAccessException 2222" + id);} catch (InterruptedException e) {e.printStackTrace();if (showLog) Log.d(TAG, "openCamera InterruptedException 3333 " + id);} catch (Exception e) {e.printStackTrace();if (showLog) Log.d(TAG, "openCamera Exception 44444 " + id);}if (showLog) Log.d(TAG, "openCamera end 55555 " + id);}回调mStateCallback 操作。
private final CameraDevice.StateCallback mStateCallback = new CameraDevice.StateCallback() {@Overridepublic void onOpened(CameraDevice cameraDevice) {int id = Integer.parseInt(cameraDevice.getId());Log.d(TAG, "onOpened " + id);mCameraOpenCloseLock.release();if (mPaused) {return;}showCameraDevice();if (showLog)Log.e(TAG, "mStateCallback onOpened ========== id:: " + id);mCameraDevice[id] = cameraDevice;mCameraOpened[id] = true;if (isBackCamera() && getCameraMode() == DUAL_MODE && id == BAYER_ID) {Message msg = mCameraHandler.obtainMessage(OPEN_CAMERA, MONO_ID, 0);mCameraHandler.sendMessage(msg);} else {mCamerasOpened = true;if (showLog)Log.e(TAG, "mStateCallback onOpened ========== mCamerasOpened:: " + mCamerasOpened);mActivity.runOnUiThread(new Runnable() {@Overridepublic void run() {if (showLog)Log.e(TAG, "mStateCallback onOpened ========== mUI.onCameraOpened:: ");mUI.onCameraOpened(mCurrentSceneMode.getCurrentId());if (showLog)Log.e(TAG, "mStateCallback onOpened ========== mUI.onCameraOpened:: end ");}});showCameraDevice();createSessions();}}注意 mCameraDevice[id] = cameraDevice; 和 mCameraOpened[id] = true; 有几个摄像头就有几个mCameraDevice。id就是CameraId,一般就是其下标。
同样会有一个非常重要的函数 createSessions() ,有了 CameraDevice就要创建 CaptureSeesion。
private void createSessions() {if (PersistUtil.isTraceEnable())Trace.beginSection("createSessions");if (mPaused || !mCamerasOpened || mTempHoldVideoInVideoIntent) return;int cameraId = mCurrentSceneMode.getCurrentId();if (showLog)Log.e(TAG, "createSessions : Current SceneMode is ==== " + mCurrentSceneMode.mode);Log.e(TAG, "createSessions : Current cameraId is ===== " + cameraId);showCameraDevice();switch (mCurrentSceneMode.mode) {case VIDEO:case VIDEO_NIGHT:case VIDEO_MACRO:case NIGHT:createSessionForVideo(cameraId);break;case HFR:if (!HFR_RATE.equals("")) {mSettingsManager.setValue(SettingsManager.KEY_VIDEO_HIGH_FRAME_RATE, HFR_RATE);}createSessionForVideo(cameraId);break;default:createSession(cameraId);}if (PersistUtil.isTraceEnable())Trace.endSection();}对应的会执行2个方法,一个是创建Camera的Session createSession(cameraId) 一个是创建Video的Session createSessionForVideo(cameraId)
createSession()
if (mChosenImageFormat == ImageFormat.YUV_420_888 || mChosenImageFormat == ImageFormat.PRIVATE) {if (mPostProcessor.isZSLEnabled()) {mPreviewRequestBuilder[id].addTarget(mImageReader[id].getSurface());list.add(mPostProcessor.getZSLReprocessImageReader().getSurface());if (mSaveRaw) {mPreviewRequestBuilder[id].addTarget(mRawImageReader[id].getSurface());}mCameraDevice[id].createReprocessableCaptureSession(new InputConfiguration(mImageReader[id].getWidth(),mImageReader[id].getHeight(), mImageReader[id].getImageFormat()), list, captureSessionCallback, mCameraHandler);} else {if (mSettingsManager.isHeifWriterEncoding() && outputConfigurations != null) {mCameraDevice[id].createCaptureSessionByOutputConfigurations(outputConfigurations,captureSessionCallback, mCameraHandler);} else {mCameraDevice[id].createCaptureSession(list, captureSessionCallback, mCameraHandler);}}} else {outputConfigurations = null;if (ApiHelper.isAndroidPOrHigher() && outputConfigurations != null) {Log.i(TAG, "list size:" + list.size());Log.i(TAG, "create session 111 ");createCameraSessionWithSessionConfiguration(id, outputConfigurations,captureSessionCallback, mCameraHandler, mPreviewRequestBuilder[id]);// mCameraDevice[id].createCaptureSession(list, captureSessionCallback, mCameraHandler);} else {Log.i(TAG, "create session 222 ");mCameraDevice[id].createCaptureSession(list, captureSessionCallback, mCameraHandler);}captureSessionCallback 的操作
CameraCaptureSession.StateCallback captureSessionCallback =new CameraCaptureSession.StateCallback() {@Overridepublic void onConfigured(CameraCaptureSession cameraCaptureSession) {if (mPaused || null == mCameraDevice[id] ||cameraCaptureSession == null) {return;}Log.i(TAG, "cameracapturesession - onConfigured " + id);setCameraModeSwitcherAllowed(true);// When the session is ready, we start displaying the preview.mCaptureSession[id] = cameraCaptureSession;if (id == getMainCameraId()) {mCurrentSession = cameraCaptureSession;}initializePreviewConfiguration(id);setDisplayOrientation();updateFaceDetection();mFirstPreviewLoaded = false;try {if (isBackCamera() && getCameraMode() == DUAL_MODE) {linkBayerMono(id);mIsLinked = true;}// Finally, we start displaying the camera preview.// for cases where we are in dual mode with mono preview off,// don't set repeating request for monoif (mCaptureSession[id] == null) {return;}
//                                if (id == NIGHT_CAMRA_ID) { //Night模式
//                                    mPreviewRequestBuilder[id].set(CaptureRequest.FLASH_MODE, CaptureRequest.FLASH_MODE_TORCH);
//                                }if (id == MONO_ID && !canStartMonoPreview()&& getCameraMode() == DUAL_MODE) {mCaptureSession[id].capture(mPreviewRequestBuilder[id].build(), mCaptureCallback, mCameraHandler);} else {if (id == NIGHT_CAMRA_ID) { //Night模式mPreviewRequestBuilder[id].set(CaptureRequest.CONTROL_AE_MODE, CaptureRequest.CONTROL_AE_MODE_ON);
//                                        mPreviewRequestBuilder[id].set(CaptureRequest.FLASH_MODE, CaptureRequest.FLASH_MODE_TORCH);Log.d(TAG, "createSession : mPreviewRequestBuilder FLASH_MODE_TORCH ===== ");}mCaptureSession[id].setRepeatingRequest(mPreviewRequestBuilder[id].build(), mCaptureCallback, mCameraHandler);}if (mIntentMode == INTENT_MODE_STILL_IMAGE_CAMERA &&mIsVoiceTakePhote) {mHandler.sendEmptyMessageDelayed(VOICE_INTERACTION_CAPTURE, 500);}if (isClearSightOn()) {ClearSightImageProcessor.getInstance().onCaptureSessionConfigured(id == BAYER_ID, cameraCaptureSession);} else if (mChosenImageFormat == ImageFormat.PRIVATE && id == getMainCameraId()) {mPostProcessor.onSessionConfigured(mCameraDevice[id], mCaptureSession[id]);}} catch (CameraAccessException e) {e.printStackTrace();} catch (IllegalStateException e) {e.printStackTrace();} catch (IllegalArgumentException e) {e.printStackTrace();}mCurrentSessionClosed = false;}@Overridepublic void onConfigureFailed(CameraCaptureSession cameraCaptureSession) {if (showLog)Log.e(TAG, "cameracapturesession - onConfigureFailed " + id);setCameraModeSwitcherAllowed(true);if (mActivity.isFinishing()) {return;}
//                            Toast.makeText(mActivity, "Camera Initialization Failed",
//                                    Toast.LENGTH_SHORT).show();}@Overridepublic void onClosed(CameraCaptureSession session) {Log.d(TAG, "cameracapturesession - onClosed");setCameraModeSwitcherAllowed(true);}};
createSessionForVideo()
if (showLog)Log.e(TAG, "createSessionForVideo 66666666666666 ");if (isHighSpeedRateCapture()) {int optionMode = isSSMEnabled() ? STREAM_CONFIG_SSM : SESSION_HIGH_SPEED;if (showLog)Log.e("TAG", " buildConstrainedCameraSession in ");buildConstrainedCameraSession(mCameraDevice[cameraId], optionMode,surfaces, mSessionListener, mCameraHandler, mVideoRecordRequestBuilder);if (showLog)Log.e(TAG, "createSessionForVideo 77777777777777777");} else {if (showLog)Log.e("TAG", " configureCameraSessionWithParameters in cameraId :: " + cameraId);configureCameraSessionWithParameters(cameraId, surfaces,mSessionListener, mCameraHandler, mVideoRecordRequestBuilder);if (showLog)Log.e(TAG, "createSessionForVideo 888888888888");}创建CameraSession和VideoSession的主要区别。
CameraSession 使用了 mVideoRecordRequestBuilder 和  mPreviewRequestBuilder。
VideoSession 使用了 mVideoPreviewSurface 和 mMediaRecorderSurface。
CameraSession 通过拍照操作,来使用ImageReader获取图片数据。对应CameraSession有ImageReader实现的地方。
mCurrentSession.setRepeatingRequest(mVideoRecordRequestBuilder.build(),mCaptureCallback, mCameraHandler);执行以上操作后,就可以预览看到的内容了。
对应的,还有关闭Camera的操作。
closeCamera()
/*** Closes the current {@link CameraDevice}.*/private void closeCamera() {Log.d(TAG, "closeCamera ============== begin");closeProcessors();/* no need to set this in the callback and handle asynchronously. This is the samereason as why we release the semaphore here, not in camera close callback functionas we don't have to protect the case where camera open() gets called during cameraclose(). The low level framework/HAL handles the synchronization for open()happens after close() */try {// Close camera starting with AUX firstfor (int i = MAX_NUM_CAM - 1; i >= 0; i--) {if (null != mCameraDevice[i]) {try {if (!mCameraOpenCloseLock.tryAcquire(2000, TimeUnit.MILLISECONDS)) {Log.d(TAG, "Time out waiting to lock camera closing.");
//                            throw new RuntimeException("Time out waiting to lock camera closing");}} catch (Exception e) {mCameraOpenCloseLock.release();e.printStackTrace();}Log.d(TAG, "Closing camera: " + mCameraDevice[i].getId());// session was closed here if intentMode is INTENT_MODE_VIDEOif (mIntentMode != INTENT_MODE_VIDEO) {try {if (isAbortCapturesEnable() && mCaptureSession[i] != null) {mCaptureSession[i].abortCaptures();Log.d(TAG, "Closing camera call abortCaptures ");}if (isSendRequestAfterFlushEnable() && mCaptureSession[i] != null) {Log.v(TAG, "Closing camera call setRepeatingRequest");mCaptureSession[i].setRepeatingRequest(mPreviewRequestBuilder[i].build(),mCaptureCallback, mCameraHandler);}} catch (IllegalStateException | CameraAccessException e) {e.printStackTrace();}}mCameraDevice[i].close();mCameraDevice[i] = null;mCameraOpened[i] = false;mCaptureSession[i] = null;}}mIsLinked = false;if (null != mMediaRecorder) {mMediaRecorder.release();mMediaRecorder = null;}} catch (RuntimeException e) {mCameraOpenCloseLock.release();
//            throw new RuntimeException("Interrupted while trying to lock camera closing.", e);e.printStackTrace();} catch (Exception e) {e.printStackTrace();} finally {mCurrentSessionClosed = true;mCameraOpenCloseLock.release();}Log.d(TAG, "closeCamera ============== end");}
closeImageReader()的操作
private void closeImageReader() {for (int i = MAX_NUM_CAM - 1; i >= 0; i--) {if (null != mImageReader[i]) {mImageReader[i].close();mImageReader[i] = null;}if (null != mRawImageReader[i]) {mRawImageReader[i].close();mRawImageReader[i] = null;}}for (int i = mYUVCount - 1; i >= 0; i--) {if (null != mYUVImageReader[i]) {mYUVImageReader[i].close();mYUVImageReader[i] = null;}}if (null != mVideoSnapshotImageReader) {mVideoSnapshotImageReader.close();mVideoSnapshotImageReader = null;}}closeProcessors()
private void closeProcessors() {if (mPostProcessor != null) {mPostProcessor.onClose();}if (mFrameProcessor != null) {mFrameProcessor.onClose();}}closeSessions()
private void closeSessions() {for (int i = MAX_NUM_CAM - 1; i >= 0; i--) {if (null != mCaptureSession[i]) {if (mCamerasOpened) {try {if (mCurrentSession instanceof CameraConstrainedHighSpeedCaptureSession) {List requestList = ((CameraConstrainedHighSpeedCaptureSession)mCurrentSession).createHighSpeedRequestList(mVideoRecordRequestBuilder.build());mCurrentSession.captureBurst(requestList, null, mCameraHandler);} else {mCaptureSession[i].capture(mPreviewRequestBuilder[i].build(), null,mCameraHandler);}} catch (CameraAccessException e) {e.printStackTrace();} catch (IllegalStateException e) {e.printStackTrace();} catch (IllegalArgumentException e) {e.printStackTrace();}}mCaptureSession[i].close();mCaptureSession[i] = null;}}}以上是Camera的初始化流程,很复杂。这里单纯的是CaptureModule的逻辑。其中还要涉及到
CaptureUI的逻辑交互。
其中主要调用 showRelatedIcons(CaptureModule.CameraMode mode),根据显示模式显示不同的界面。
public void showRelatedIcons(CaptureModule.CameraMode mode) {//common settingsmShutterButton.setVisibility(View.VISIBLE);mFrontBackSwitcher.setVisibility(View.VISIBLE);photoVideoSwitcher.setVisibility(View.INVISIBLE);txt_macro_advice.setVisibility(View.INVISIBLE);mMakeupButton.setVisibility(View.INVISIBLE);mSceneModeSwitcher.setVisibility(View.INVISIBLE);//settings for each modeswitch (mode) {case DEFAULT:mFilterModeSwitcher.setVisibility(View.VISIBLE);mSceneModeSwitcher.setVisibility(View.VISIBLE);mVideoButton.setVisibility(View.INVISIBLE);mMuteButton.setVisibility(View.INVISIBLE);mPauseButton.setVisibility(View.INVISIBLE);break;case RTB:case SAT:mFilterModeSwitcher.setVisibility(View.VISIBLE);mSceneModeSwitcher.setVisibility(View.VISIBLE);mVideoButton.setVisibility(View.INVISIBLE);mFlashButton.setVisibility(View.INVISIBLE);mMuteButton.setVisibility(View.INVISIBLE);mPauseButton.setVisibility(View.INVISIBLE);if (!DEV_LEVEL_ALL) {mFrontBackSwitcher.setVisibility(View.INVISIBLE);}break;case VIDEO:case HFR:mFrontBackSwitcher.setVisibility(View.VISIBLE);photoVideoSwitcher.setVisibility(View.INVISIBLE);mVideoButton.setVisibility(View.VISIBLE);mFilterModeSwitcher.setVisibility(View.VISIBLE);if (mModule.isBackCamera()) {mFlashButton.setVisibility(View.INVISIBLE);} else {mFlashButton.setVisibility(View.VISIBLE);}mShutterButton.setVisibility(View.INVISIBLE);break;case PRO_MODE:mFilterModeSwitcher.setVisibility(View.INVISIBLE);mVideoButton.setVisibility(View.INVISIBLE);mFrontBackSwitcher.setVisibility(View.INVISIBLE);mMuteButton.setVisibility(View.INVISIBLE);mPauseButton.setVisibility(View.INVISIBLE);
//                if (mModule.isBackCamera()) {
//                    mFlashButton.setVisibility(View.VISIBLE);
//                } else {mFlashButton.setVisibility(View.INVISIBLE);
//                }break;case MACRO:mFrontBackSwitcher.setVisibility(View.INVISIBLE);photoVideoSwitcher.setVisibility(View.VISIBLE);((RotateImageView) photoVideoSwitcher).setImageResource(R.drawable.video_switch);mVideoButton.setVisibility(View.INVISIBLE);mFilterModeSwitcher.setVisibility(View.INVISIBLE);txt_macro_advice.setVisibility(View.VISIBLE);break;case VIDEO_MACRO:mFrontBackSwitcher.setVisibility(View.INVISIBLE);photoVideoSwitcher.setVisibility(View.VISIBLE);((RotateImageView) photoVideoSwitcher).setImageResource(R.drawable.photo_switch);mVideoButton.setVisibility(View.VISIBLE);mFilterModeSwitcher.setVisibility(View.INVISIBLE);mShutterButton.setVisibility(View.INVISIBLE);txt_macro_advice.setVisibility(View.VISIBLE);break;case VIDEO_NIGHT:mFlashButton.setVisibility(View.VISIBLE);mFrontBackSwitcher.setVisibility(View.INVISIBLE);photoVideoSwitcher.setVisibility(View.VISIBLE);((RotateImageView) photoVideoSwitcher).setImageResource(R.drawable.photo_switch);mFilterModeSwitcher.setVisibility(View.INVISIBLE);mShutterButton.setVisibility(View.INVISIBLE);mVideoButton.setVisibility(View.VISIBLE);break;case NIGHT:mFlashButton.setVisibility(View.INVISIBLE);mFrontBackSwitcher.setVisibility(View.INVISIBLE);photoVideoSwitcher.setVisibility(View.VISIBLE);((RotateImageView) photoVideoSwitcher).setImageResource(R.drawable.video_switch);mVideoButton.setVisibility(View.INVISIBLE);mFilterModeSwitcher.setVisibility(View.INVISIBLE);break;default:break;}String value = mSettingsManager.getValue(SettingsManager.KEY_FRONT_REAR_SWITCHER_VALUE);if (value == null) {mFrontBackSwitcher.setVisibility(View.INVISIBLE);}if (mModule.getVideoType() == CaptureModule.VIDEO_DEFAULT || mModule.getCurrenCameraMode() == CaptureModule.CameraMode.HFR) {photoVideoSwitcher.setVisibility(View.INVISIBLE);if (mModule.getCurrenCameraMode() == CaptureModule.CameraMode.HFR) {if (mModule.isBackCamera()) {mFlashButton.setVisibility(View.VISIBLE);} else {mFlashButton.setVisibility(View.INVISIBLE);}}}if (mModule.mMFNREnable && mModule.getMainCameraId() == android.hardware.Camera.CameraInfo.CAMERA_FACING_FRONT) {mFilterModeSwitcher.setVisibility(View.INVISIBLE);}}
源码多读,多多比较思考和跟踪代码的流程。
如何编译 在SnapdragonCamera工程呢?
执行
source ./build/envsetup.sh
执行
lunch
选择正确的配置
在SnapdragonCamera工程下,执行 ,
mm
编译即可。
执行
adb install -r ../../../../SnapdragonCamera.apk
安装即可。
相关文章:

SnapdragonCamera骁龙相机源码解析
骁龙相机是高通开发的一个测试系统摄像头的demo,代码完善,功能强大。可以配合Camera驱动进行功能联调。 很多逻辑代码在CaptureModule.java里。 CaptureModule有8000多行,包罗万象。 涉及到界面显示要结合CaptureUI.java 一起来实现。 Ca…...

Spring Boot 整合 RabbitMQ:注解声明队列与交换机详解
RabbitMQ 作为一款高性能的消息中间件,在分布式系统中广泛应用。Spring Boot 通过 spring-boot-starter-amqp 提供了对 RabbitMQ 的无缝集成,开发者可以借助注解快速声明队列、交换机及绑定规则,极大简化了配置流程。本文将通过代码示例和原理…...

SecureCRT常用命令
一、连接命令 1. telnet:使用Telnet协议连接到远程设备。 例如:telnet 192.168.1.1 会连接到IP地址为192.168.1.1的远程设备。 二、文件传输命令 2. put:上传文件到远程服务器。 例如:put C:\localfile.txt /remotefolder 将本地文…...

flink 分组窗口聚合 与 窗口表值函数聚合 的区别
警告:分组窗口聚合已经过时。推荐使用更加强大和有效的窗口表值函数聚合。 参考官方文档 在 Apache Flink 中,分组窗口聚合(Group Window Aggregation) 和 窗口表值函数聚合(Windowing TVF Aggregation)…...

阿里云Tair KVCache:打造以缓存为中心的大模型Token超级工厂
一、Tair KVCache 简介 Tair KVCache 是阿里云瑶池旗下云数据库 Tair 面向大语言模型推理场景推出的 KVCache 缓存加速服务。 随着互联网技术的演进与流量规模的激增,缓存技术逐渐成为系统架构的核心组件。该阶段催生了 Redis 等开源缓存数据库,阿里巴巴…...

通过TIM+DMA Burst 实现STM32输出变频且不同脉冲数量的PWM波形
Burst介绍: DMA控制器可以生成单次传输或增量突发传输,传输的节拍数为4、8或16。 为了确保数据一致性,构成突发传输的每组传输都是不可分割的:AHB传输被锁定,AHB总线矩阵的仲裁器在突发传输序列期间不会撤销DMA主设备…...
【JAVA】【疑难杂症解决!】org.springframework.transaction.UnexpectedRollbackException:
程序莫名其妙出现这个事务回滚错误,不显示具体错误信息!! 问题:前几天遇到一个问题,代码没有抛出我想要的带自定义提示消息的异常,却报了个这个,去搜了一下,大概原因如下: 因为我在方法上写了@Transactional注解,里边调用的service的方法上也写了@Transactional注解…...

[Effective C++]条款26:尽可能延后变量定义的出现时间
. 在C中,尽可能延后变量定义的出现时间,主要原因是为了提供代码的可读性,减少不必要的开销以及避免潜在的错误。 1、代码执行过程中抛出异常 如果在代码开头定义了变量,但在后续代码中抛出了异常,可能导致变量在未被使…...
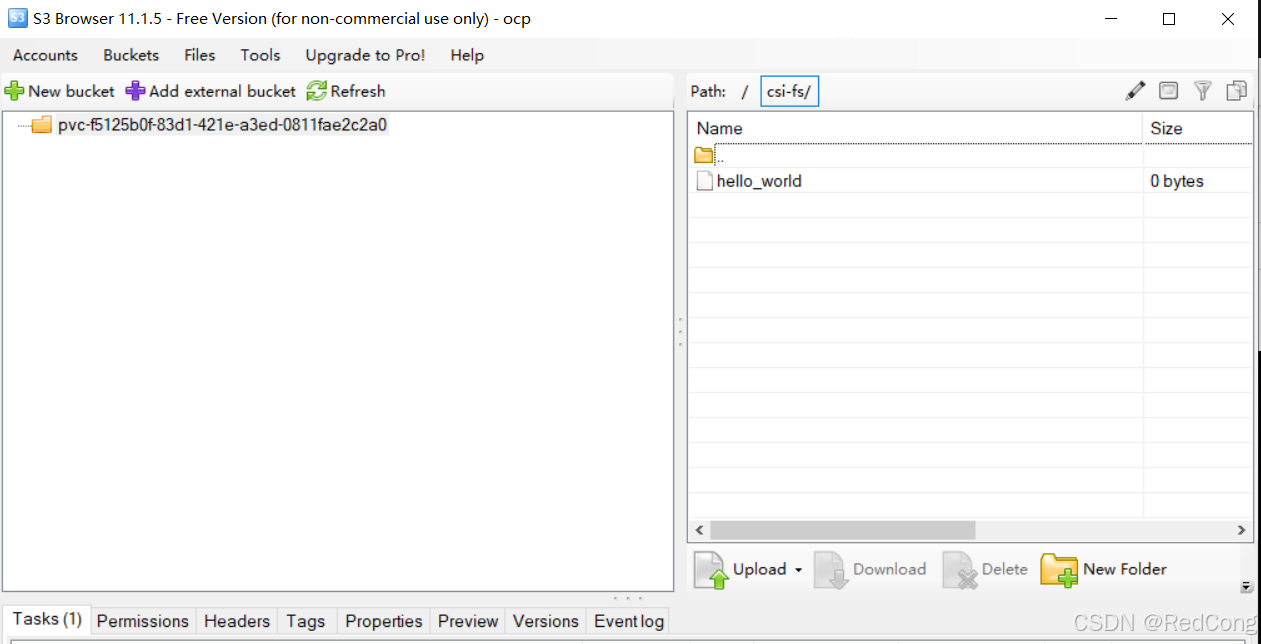
如何在k8s中对接s3存储
github地址: https://github.com/majst01/csi-driver-s3 1.CSI for S3 这是用于 S3(或兼容 S3)存储的容器存储接口 (CSI)。它可以动态分配存储桶并通过Fuse mount将它们安装到任何容器中 2.状态 这仍处于试验阶段,不应在任何…...

基于TradingView和CTPBee的自动化期货交易系统实现
引言 在量化交易领域,TradingView因其强大的技术分析工具和丰富的指标库而广受欢迎,但是其不支持国内期货自动化交易,CTPBee则是一个优秀的国产Python期货交易接口。本文将介绍如何将两者结合,实现一个完整的自动化交易系统。 本…...

FPGA实现LED流水灯
一、在VsCode中写代码 1、建立工程项目文件water_led.v文件 2、打开项目文件,创建三个目录 3、打开文件trl,创建water_led.v文件 4、打开文件tb,创建water_led_tb.v文件 5、用VsCode打开water_led.v文件,编写源代码 module water…...

电商场景下高稳定性数据接口的选型与实践
在电商系统开发中,API接口需要应对高并发请求、动态数据更新和复杂业务场景。我将重点解析电商场景对数据接口的特殊需求及选型方案。 一、电商API必备的四大核心能力 千万级商品数据实时同步 支持SKU基础信息/价格/库存多维度更新每日增量数据抓取与历史版本对比…...

4199. 公约数-公约数模版题
给定两个正整数 a 和 b。 你需要回答 q个询问。 每个询问给定两个整数 l,r,你需要找到最大的整数 x,满足: x 是 a 和 b 的公约数。l≤x≤r。 输入格式 第一行包含两个整数 a,b。 第二行包含一个整数 q。 接下来 q 行,每行包…...
百度文库免费下载器
01 引言 在国内的环境下,Greasy Fork网站是彻底打不开了,导致好多小伙伴想要用脚本都没办法。 特别是需要某Wen库下载的小伙伴,之前还说实在没办法,去Greasy Fork网站上安个脚本就可下载,但是现在网站被墙了…...

[NCTF2019]True XML cookbook[XXE] [内网探测] [网络ip相关知识]
一模一样的登录界面 我直接故伎重演但是并卵 (话说XXE注入之前好像其他博客都加上了<?xml version"1.0" encoding"utf-8"?>,但是不加好像也没有什么问题🤔) <?php /** * autor: c0ny1 * date: …...

Qt | 电脑音频采集曲线Charts
01 audio.pro # 项目使用了charts(图表)模块和multimedia(多媒体)模块。QT += charts multimedia# 调试打印QT += coreHEADERS += \ widget.h \ xyseriesiodevice.hSOURCES += \ main.cpp\ widget.cpp \ xyseriesiodevice.cpptarget.path = $$[QT_INSTAL…...

Linux驱动的基本概念
一 交叉开发编译 概念:交叉开发编译(Cross Compilation)是指在一个平台上生成能在另一个不同平台上执行的代码的编译过程。这是嵌入式系统开发和跨平台软件开发中的常见技术。 二 系统启动流程 在Linux源码下,通过网口利用tftp协议把u-bantu下的uImage…...
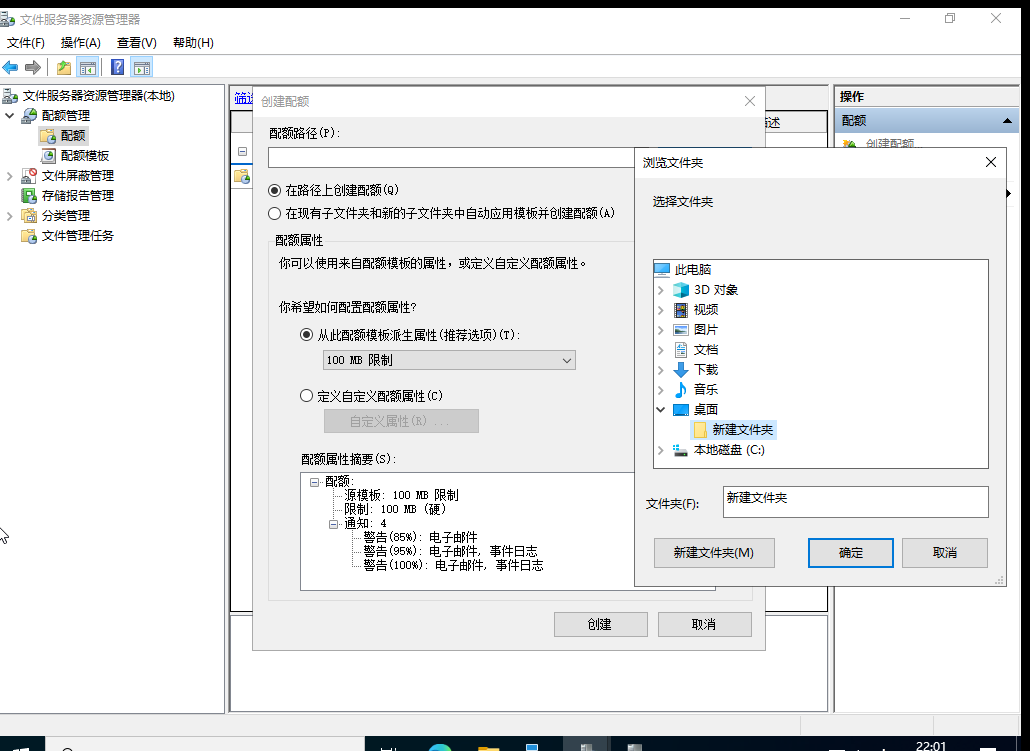
win server2022 限制共享文件夹d
点击配额管理中的配额 然后创建配额 导入要配额的文件即可 然后确定即可...

Ansible(3)——主机清单与配置文件
目录 一、创建 Ansible 清单: 1、清单定义: 2、使用静态清单指定受管主机: (1)主机名称指定: (2)IP 地址指定: 3、验证清单: (1࿰…...

C语言 【初始指针】【指针一】
引言 思绪很久,还是决定写一写指针,指针这块内容很多,也不是那么容易说清楚,这里尽可能写地详细,让大家理解指针。(未完序) 一、内存和地址 在讲指针前,需要有一个对内存和地址的认…...

装饰器模式详解
以下是一个结合装饰器模式解决实际开发问题的Java实现案例,涵盖动态扩展功能、多层装饰顺序控制、性能优化等场景需求,附带逐行中文注释: 场景描述 开发一个数据加密传输系统,需满足: 基础功能:原始数据传…...

IP 地址规划中的子网划分:/18 网络容纳 64 个 C 段(/24)的原理与应用解析
整体表格说明 这是某市教育城域网中某县教育相关机构的IP地址规划表,明确了某县一中和某县教育局的IP地址范围,包括终端使用地址段、业务互访地址段。 概念解析 64个C段终端及互联地址 C段地址:一个C段是IP地址中的一个/24网络(…...

linux下Tomcat配置提示权限不够解决办法
文章目录 前言解决方案 前言 往linux服务器上部署Java后端,但是在服务器上安装好的tomcat,却因为权限不够无法进入 这就导致后端war包项目及前端页面无法部署 解决方案 sudo chmod -R 777 /opt/tomcat/webapps修改tomcat目录下的权限即可,对…...
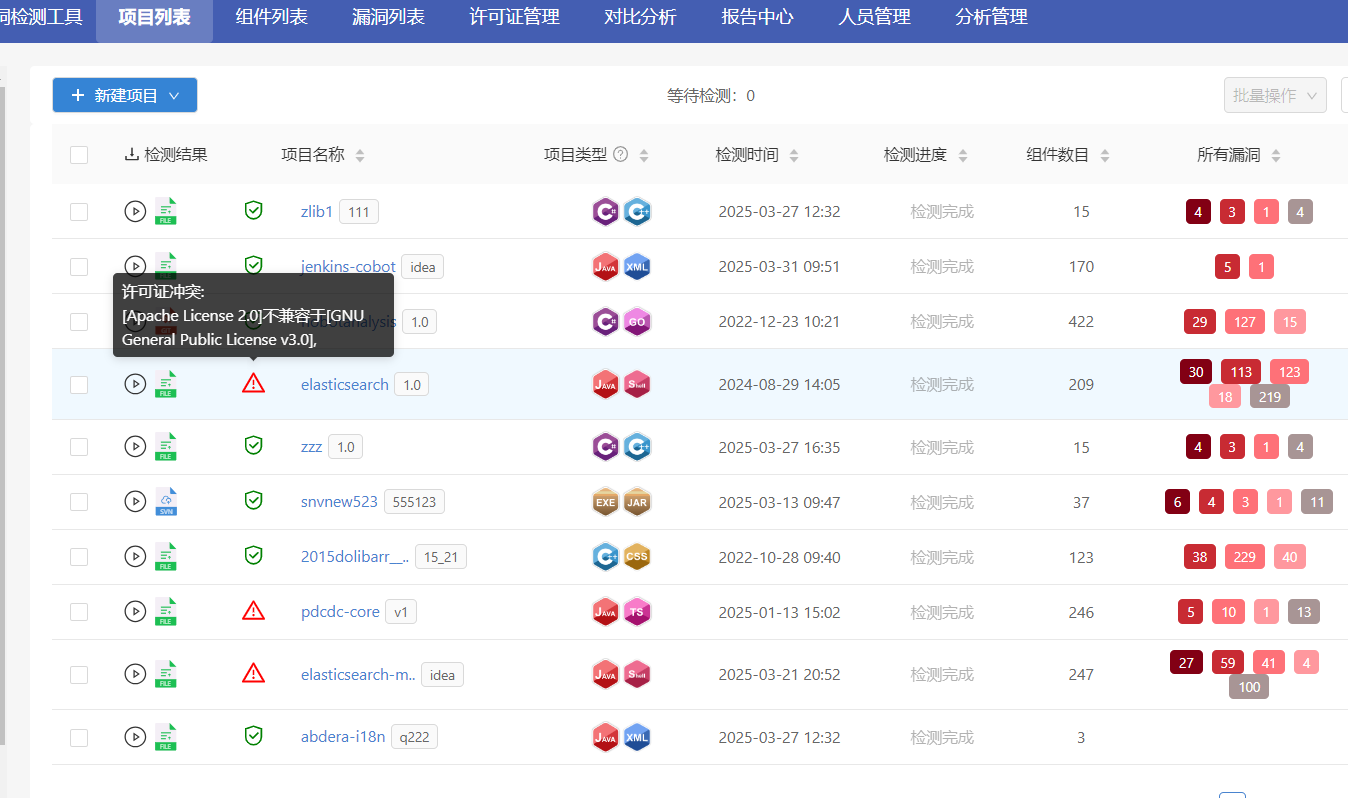
您使用的开源软件许可证是否存在冲突呢?
开源软件代码使用现状 根据最新发布的《第三次自由和开源软件普查报告》,96%的代码库中使用了开源组件,这表明开源技术在现代软件开发中占据了核心地位。在国内企业软件项目中,开源软件的使用率达到了100%,平均每个项目使用了166…...

leetcode刷题日记——接雨水
[ 题目描述 ]: [ 思路 ]: 题目要求求凹进去的部分能接多少雨水,即有多少个格子可以从第一个高度快出发去寻找下一个高于或者等于他的格子,然后计算其中的差值 有高于或等于他的格子,计算他俩中间能装的雨水当后续没有…...

阿里巴巴暑期实习Java面经,灵犀互娱一面
哈希表熟悉吗,可以如何实现? 开散列版本什么时候需要扩容 高并发服务器内的主从reactor模型是如何实现的? 进程 线程 协程 的区别? 如何保证线程安全 ? 了解读写锁吗? 单例模式有了解吗? 可以怎…...

AI知识补全(十四):零样本学习与少样本学习是什么?
名人说:一笑出门去,千里落花风。——辛弃疾《水调歌头我饮不须劝》 创作者:Code_流苏(CSDN)(一个喜欢古诗词和编程的Coder😊) 上一篇:AI知识补全(十三):注意力…...

如何用Postman实现自动化测试?
🍅 点击文末小卡片,免费获取软件测试全套资料,资料在手,涨薪更快 这里简单演示在postman中怎样实现自动化测试(不涉及到用户登录的token认证) 导入测试用例文件,测试web接口 postman使用流程…...
LeetCode Hot100 刷题笔记(9)—— 二分查找、技巧
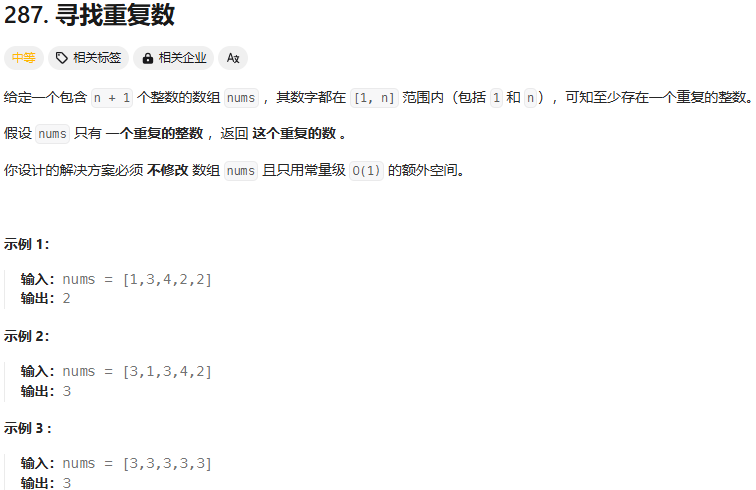
目录 前言 一、二分查找 1. 搜索插入位置 2. 搜索二维矩阵 3. 在排序数组中查找元素的第一个和最后一个位置 4. 搜索旋转排序数组 5. 寻找旋转排序数组中的最小值 6. 寻找两个正序数组的中位数 二、技巧 1. 只出现一次的数字 2. 多数元素 3. 颜色分类 4. 下一个排列 5. 寻找重复…...

Ubuntu 系统上完全卸载 Docker
以下是在 Ubuntu 系统上完全卸载 Docker 的分步指南 一.卸载验证 二.卸载步骤 1.停止 Docker 服务 sudo systemctl stop docker.socket sudo systemctl stop docker.service2.卸载 Docker 软件包 # 移除 Docker 核心组件 sudo apt-get purge -y \docker-ce \docker-ce-cli …...