记一次InternVL3- 2B 8B的部署测验日志
1、模型下载魔搭社区
2、运行环境:
1、硬件
RTX 3090*1 云主机[普通性能]
8核15G 200G
免费 32 Mbps+付费68Mbps
ubuntu22.04
cuda12.4
2、软件:
flash_attn(好像不用装 忘记了)
numpy
Pillow==10.3.0
Requests==2.31.0
transformers==4.43.0
accelerate==0.30.0
torch==2.5.0(自己去下载另一个库)modelscope==1.25.0
(base) root@ubuntu22:/opt# nvcc -V
nvcc: NVIDIA (R) Cuda compiler driver
Copyright (c) 2005-2024 NVIDIA Corporation
Built on Tue_Feb_27_16:19:38_PST_2024
Cuda compilation tools, release 12.4, V12.4.99
Build cuda_12.4.r12.4/compiler.33961263_0
3、运行代码如下
import math
import numpy as np
import torch
import torchvision.transforms as T
from decord import VideoReader, cpu
from PIL import Image
from torchvision.transforms.functional import InterpolationMode
from modelscope import AutoModel, AutoTokenizer
from transformers import AutoConfig
import os
import timeIMAGENET_MEAN = (0.485, 0.456, 0.406)
IMAGENET_STD = (0.229, 0.224, 0.225)def build_transform(input_size):MEAN, STD = IMAGENET_MEAN, IMAGENET_STDtransform = T.Compose([T.Lambda(lambda img: img.convert('RGB') if img.mode != 'RGB' else img),T.Resize((input_size, input_size), interpolation=InterpolationMode.BICUBIC),T.ToTensor(),T.Normalize(mean=MEAN, std=STD)])return transformdef find_closest_aspect_ratio(aspect_ratio, target_ratios, width, height, image_size):best_ratio_diff = float('inf')best_ratio = (1, 1)area = width * heightfor ratio in target_ratios:target_aspect_ratio = ratio[0] / ratio[1]ratio_diff = abs(aspect_ratio - target_aspect_ratio)if ratio_diff < best_ratio_diff:best_ratio_diff = ratio_diffbest_ratio = ratioelif ratio_diff == best_ratio_diff:if area > 0.5 * image_size * image_size * ratio[0] * ratio[1]:best_ratio = ratioreturn best_ratiodef dynamic_preprocess(image, min_num=1, max_num=12, image_size=448, use_thumbnail=False):orig_width, orig_height = image.sizeaspect_ratio = orig_width / orig_height# calculate the existing image aspect ratiotarget_ratios = set((i, j) for n in range(min_num, max_num + 1) for i in range(1, n + 1) for j in range(1, n + 1) ifi * j <= max_num and i * j >= min_num)target_ratios = sorted(target_ratios, key=lambda x: x[0] * x[1])# find the closest aspect ratio to the targettarget_aspect_ratio = find_closest_aspect_ratio(aspect_ratio, target_ratios, orig_width, orig_height, image_size)# calculate the target width and heighttarget_width = image_size * target_aspect_ratio[0]target_height = image_size * target_aspect_ratio[1]blocks = target_aspect_ratio[0] * target_aspect_ratio[1]# resize the imageresized_img = image.resize((target_width, target_height))processed_images = []for i in range(blocks):box = ((i % (target_width // image_size)) * image_size,(i // (target_width // image_size)) * image_size,((i % (target_width // image_size)) + 1) * image_size,((i // (target_width // image_size)) + 1) * image_size)# split the imagesplit_img = resized_img.crop(box)processed_images.append(split_img)assert len(processed_images) == blocksif use_thumbnail and len(processed_images) != 1:thumbnail_img = image.resize((image_size, image_size))processed_images.append(thumbnail_img)return processed_imagesdef load_image(image_file, input_size=448, max_num=12):image = Image.open(image_file).convert('RGB')transform = build_transform(input_size=input_size)images = dynamic_preprocess(image, image_size=input_size, use_thumbnail=True, max_num=max_num)pixel_values = [transform(image) for image in images]pixel_values = torch.stack(pixel_values)return pixel_valuesdef split_model(model_name):device_map = {}world_size = torch.cuda.device_count()config = AutoConfig.from_pretrained('OpenGVLab/InternVL3-8B', trust_remote_code=True)num_layers = config.llm_config.num_hidden_layers# Since the first GPU will be used for ViT, treat it as half a GPU.num_layers_per_gpu = math.ceil(num_layers / (world_size - 0.5))num_layers_per_gpu = [num_layers_per_gpu] * world_sizenum_layers_per_gpu[0] = math.ceil(num_layers_per_gpu[0] * 0.5)layer_cnt = 0for i, num_layer in enumerate(num_layers_per_gpu):for j in range(num_layer):device_map[f'language_model.model.layers.{layer_cnt}'] = ilayer_cnt += 1device_map['vision_model'] = 0device_map['mlp1'] = 0device_map['language_model.model.tok_embeddings'] = 0device_map['language_model.model.embed_tokens'] = 0device_map['language_model.output'] = 0device_map['language_model.model.norm'] = 0device_map['language_model.model.rotary_emb'] = 0device_map['language_model.lm_head'] = 0device_map[f'language_model.model.layers.{num_layers - 1}'] = 0return device_map# If you set `load_in_8bit=True`, you will need two 80GB GPUs.
# If you set `load_in_8bit=False`, you will need at least three 80GB GPUs.
path = 'OpenGVLab/InternVL3-8B'
device_map = split_model('InternVL3-8B')
model = AutoModel.from_pretrained(path,torch_dtype=torch.bfloat16,load_in_8bit=False,low_cpu_mem_usage=True,use_flash_attn=True,trust_remote_code=True,device_map=device_map).eval()
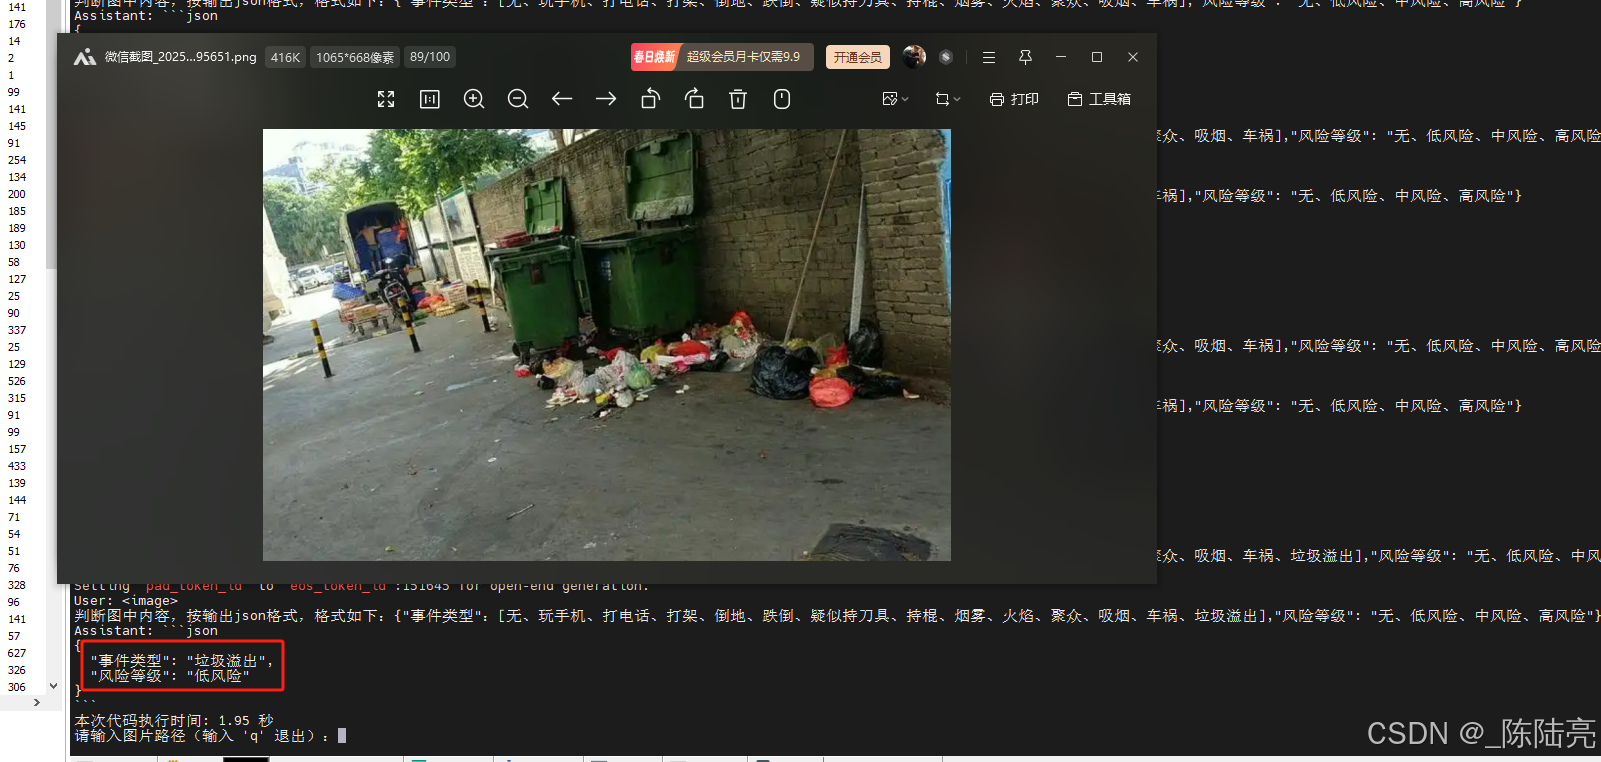
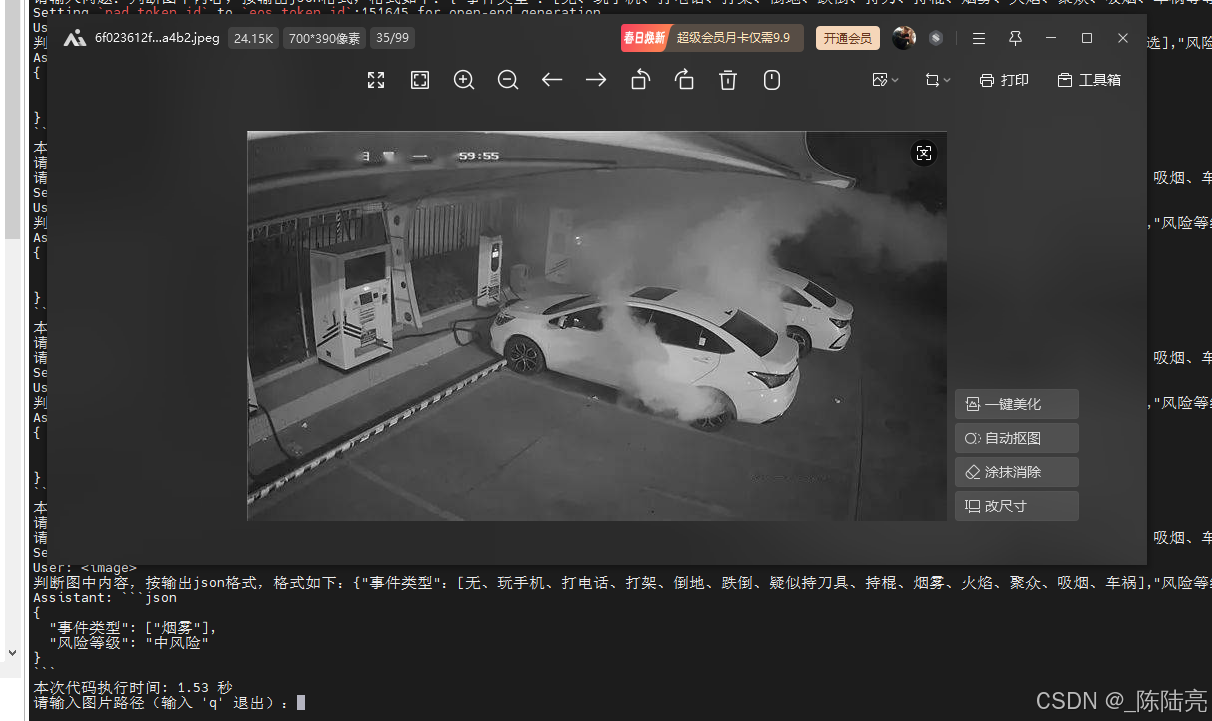
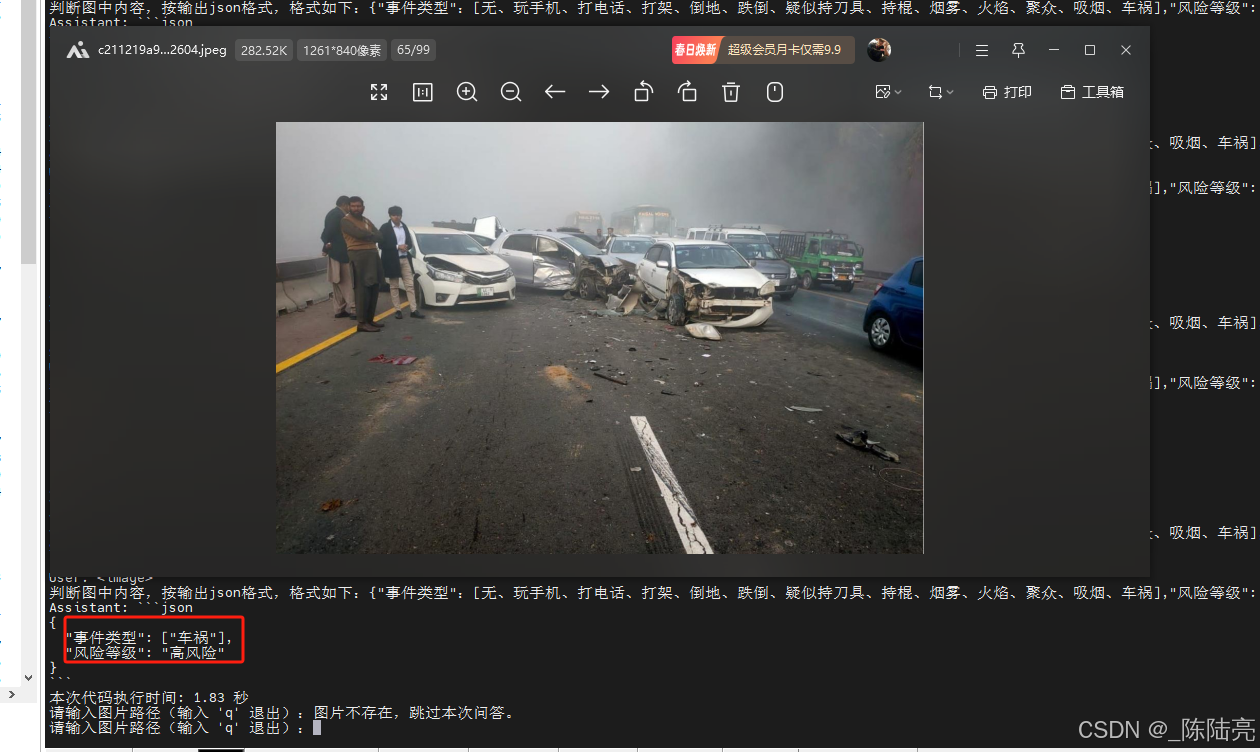
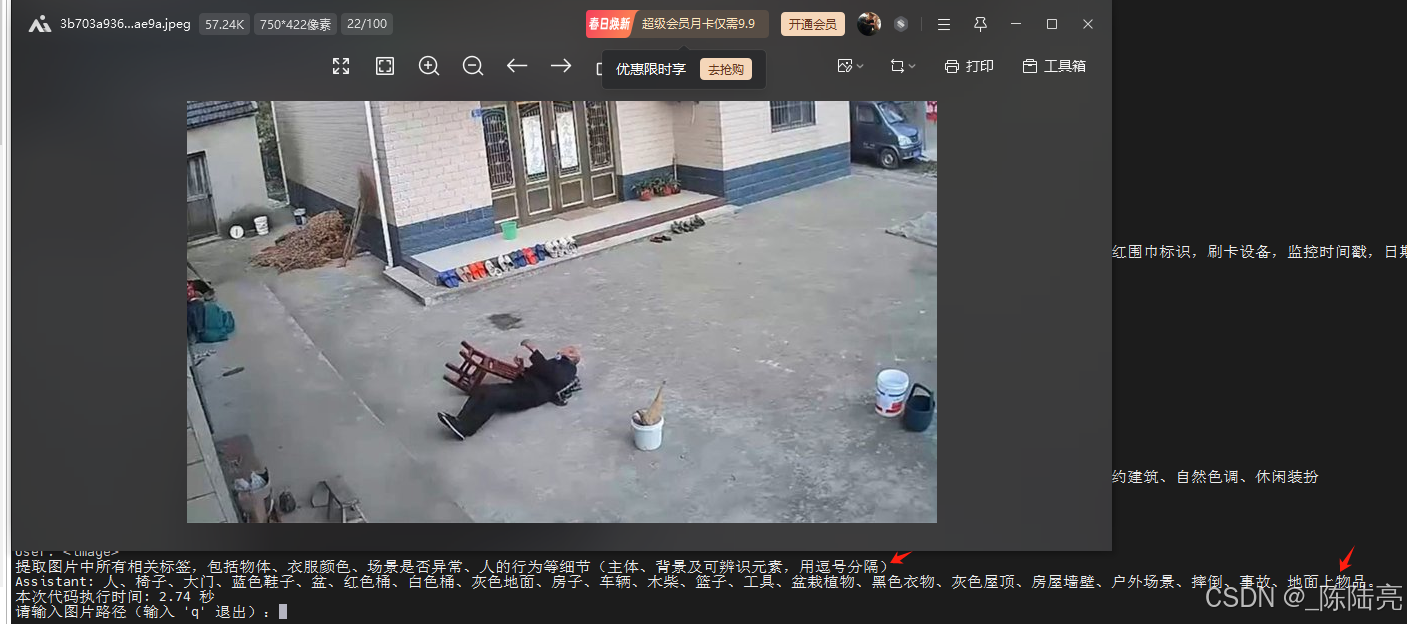
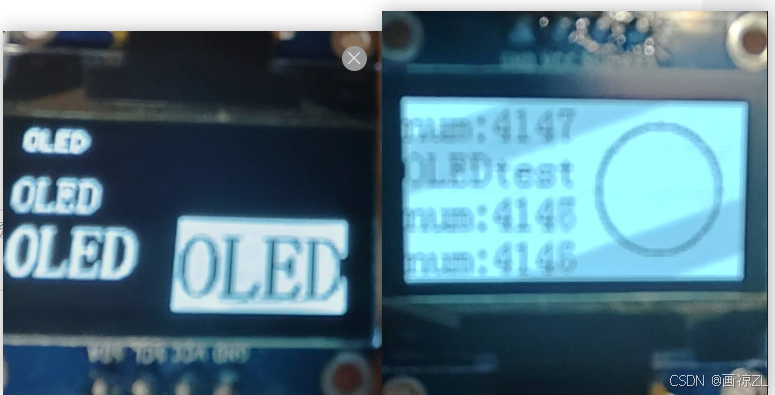
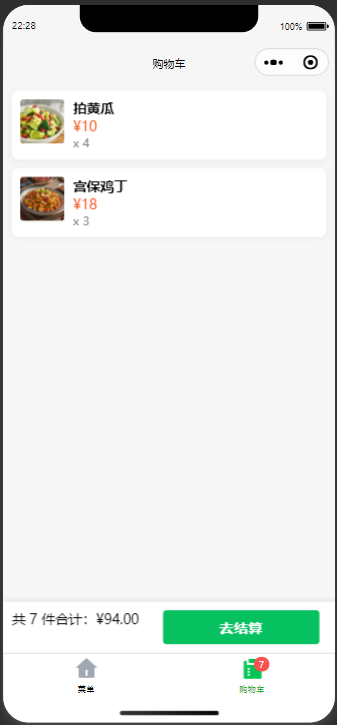
tokenizer = AutoTokenizer.from_pretrained(path, trust_remote_code=True, use_fast=False)while True:image_path = input("请输入图片路径(输入 'q' 退出):")if image_path.lower() == 'q':breakif not os.path.exists(image_path):print("图片不存在,跳过本次问答。")continuequestion = input("请输入问题:")start_time = time.time()# set the max number of tiles in `max_num`pixel_values = load_image(image_path, max_num=12).to(torch.bfloat16).cuda()generation_config = dict(max_new_tokens=1024, do_sample=True)# single-image single-round conversation (单图单轮对话)question = f'<image>\n{question}'response = model.chat(tokenizer, pixel_values, question, generation_config)end_time = time.time()execution_time = end_time - start_timeprint(f'User: {question}\nAssistant: {response}')print(f'本次代码执行时间: {execution_time:.2f} 秒')# 释放单次资源缓存del pixel_valuestorch.cuda.empty_cache() 4、测试效果:
问题和耗时如图
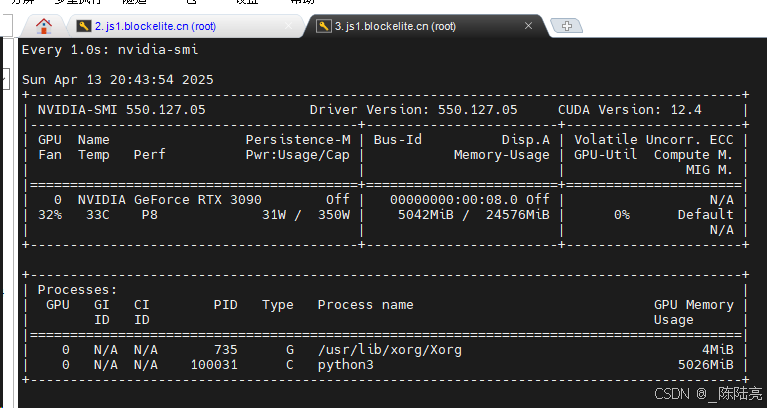
5、资源占用
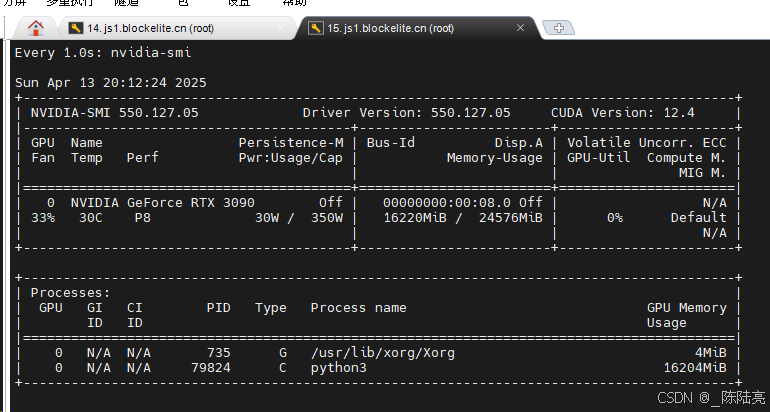
不释放资源会一直涨显存。总体还算满意,我试了好多个图理解大模型,就属它牛一点
附图一张

补充,测试InternVL3-2B的结果
相关文章:
记一次InternVL3- 2B 8B的部署测验日志
1、模型下载魔搭社区 2、运行环境: 1、硬件 RTX 3090*1 云主机[普通性能] 8核15G 200G 免费 32 Mbps付费68Mbps ubuntu22.04 cuda12.4 2、软件: flash_attn(好像不用装 忘记了) numpy Pillow10.3.0 Requests2.31.0 transfo…...

Android PowerManager功能接口详解
PowerManager 是 Android 系统中用于管理设备电源状态的核心服务,开发者可以通过它控制设备的唤醒、休眠、屏幕亮灭等行为。以下是对 PowerManager 核心功能接口的详细说明,包含使用场景、注意事项和代码示例。 1. 获取 PowerManager 实例 通过 Context…...

使用SSH解决在IDEA中Push出现403的问题
错误截图: 控制台日志: 12:15:34.649: [xxx] git -c core.quotepathfalse -c log.showSignaturefalse push --progress --porcelain master refs/heads/master:master fatal: unable to access https://github.com/xxx.git/: The requested URL return…...

Tauri 2.3.1+Leptos 0.7.8开发桌面应用--Sqlite数据库的写入、展示和选择删除
在前期工作的基础上(Tauri2Leptos开发桌面应用--Sqlite数据库操作_tauri sqlite-CSDN博客),尝试制作产品化学成分录入界面,并展示数据库内容,删除选中的数据。具体效果如下: 一、前端Leptos程序 前端程序主…...
技术的详细说明,涵盖 GraalVM 的配置、Spring Boot 3.x 的集成、使用示例及优缺点对比)
关于 Java 预先编译(AOT)技术的详细说明,涵盖 GraalVM 的配置、Spring Boot 3.x 的集成、使用示例及优缺点对比
以下是关于 Java 预先编译(AOT)技术的详细说明,涵盖 GraalVM 的配置、Spring Boot 3.x 的集成、使用示例及优缺点对比: 1. 预先编译(AOT)技术详解 1.1 核心概念 AOT(Ahead-of-Time)…...

《车辆人机工程-》实验报告
汽车驾驶操纵实验 汽车操纵装置有哪几种,各有什么特点 汽车操纵装置是驾驶员直接控制车辆行驶状态的关键部件,主要包括以下几种,其特点如下: 一、方向盘(转向操纵装置) 作用:控制车辆行驶方向…...

使用多进程和 Socket 接收解析数据并推送到 Kafka 的高性能架构
使用多进程和 Socket 接收解析数据并推送到 Kafka 的高性能架构 在现代应用程序中,实时数据处理和高并发性能是至关重要的。本文将介绍如何使用 Python 的多进程和 Socket 技术来接收和解析数据,并将处理后的数据推送到 Kafka,从而实现高效的…...
Redis 哨兵模式 搭建
1 . 哨兵模式拓扑 与 简介 本文介绍如何搭建 单主双从 多哨兵模式的搭建 哨兵有12个作用 。通过发送命令,让Redis服务器返回监控其运行状态,包括主服务器和从服务器。 当哨兵监测到master宕机,会自动将slave切换成master,然后通过…...

【网络安全 | 项目开发】Web 安全响应头扫描器(提升网站安全性)
原创项目,未经许可,不得转载。 文章目录 项目简介工作流程示例输出技术栈项目代码使用说明项目简介 安全响应头是防止常见 Web 攻击(如点击劫持、跨站脚本攻击等)的有效防线,因此合理的配置这些头部信息对任何网站的安全至关重要。 Web 安全响应头扫描器(Security Head…...

构建灵活的接口抽象层:支持多种后端数据存取的实战指南
构建灵活的接口抽象层:支持多种后端数据存取的实战指南 引言 在现代软件开发中,数据存取成为业务逻辑的核心组成部分。然而,由于后端数据存储方式的多样性(如关系型数据库、NoSQL数据库和文件存储),如何设计一套能够适配多种后端数据存取的接口抽象层,成为技术团队关注…...

计算机的发展及应用
一、计算机的发展历程 计算机的发展经历了从机械计算到电子计算的跨越,其核心驱动力是 硬件技术革新 和 体系结构演进,大致可分为以下阶段: 1. 前电子计算机时代(19世纪-20世纪40年代) 机械计算装置: 16…...

深入理解linux操作系统---第4讲 用户、组和密码管理
4.1 UNIX系统的用户和组 4.1.1 用户与UID UID定义:用户身份唯一标识符,16位或32位整数,范围0-65535。系统用户UID为0(root)、1-999(系统服务),普通用户从1000开始分配特殊UID&…...

【NLP】18. Encoder 和 Decoder
1. Encoder 和 Decoder 概述 在序列到序列(sequence-to-sequence,简称 seq2seq)的模型中,整个系统通常分为两大部分:Encoder(编码器)和 Decoder(解码器)。 Encoder&…...

Npfs!NpFsdCreate函数分析之从NpCreateClientEnd函数分析到Npfs!NpSetConnectedPipeState
第一部分: 1: kd> g Breakpoint 5 hit Npfs!NpFsdCreate: baaecba6 55 push ebp 1: kd> kc # 00 Npfs!NpFsdCreate 01 nt!IofCallDriver 02 nt!IopParseDevice 03 nt!ObpLookupObjectName 04 nt!ObOpenObjectByName 05 nt!IopCreateFile 06…...
基于PySide6与pycatia的CATIA绘图比例智能调节工具开发全解析
引言:工程图纸自动化处理的技术革新 在机械设计领域,CATIA图纸的比例调整是高频且重复性极强的操作。传统手动调整方式效率低下且易出错。本文基于PySide6+pycatia技术栈,提出一种支持智能比例匹配、实时视图控制、异常自处理的图纸批处理方案,其核心突破体现在: 操作效…...
STM32硬件IIC+DMA驱动OLED显示——释放CPU资源,提升实时性
目录 前言 一、软件IIC与硬件IIC 1、软件IIC 2、硬件IIC 二、STM32CubeMX配置KEIL配置 三、OLED驱动示例 1、0.96寸OLED 2、OLED驱动程序 3、运用示例 4、效果展示 总结 前言 0.96寸OLED屏是一个很常见的显示模块,其驱动方式在用采IIC通讯时,常用软件IIC…...

Spring Bean的创建过程与三级缓存的关系详解
以下以 Bean A 和 Bean B 互相依赖为例,结合源码和流程图,详细说明 Bean 的创建过程与三级缓存的交互。 1. Bean 的完整生命周期(简化版) #mermaid-svg-uwqaB5dgOFDQ97Yd {font-family:"trebuchet ms",verdana,arial,sa…...

IDEA 调用 Generate 生成 Getter/Setter 快捷键
快捷键不会用? 快捷键:AltInsert 全选键:CtrlA IDEA 调用 Generate 生成 Getter/Setter 快捷键 - 爱吃西瓜的番茄酱 - 博客园...

泛型的二三事
泛型(Generics)是Java语言的一个重要特性,它允许在定义类、接口和方法时使用类型参数(Type Parameters),从而实现类型安全的代码重用。泛型在Java 5中被引入,极大地增强了代码的灵活性和安全性。…...

编程思想——FP、OOP、FRP、AOP、IOC、DI、MVC、DTO、DAO
个人简介 👀个人主页: 前端杂货铺 🙋♂️学习方向: 主攻前端方向,正逐渐往全干发展 📃个人状态: 研发工程师,现效力于中国工业软件事业 🚀人生格言: 积跬步…...

实现一个动态验证码生成器:Canvas与JavaScript的完美结合
验证码(CAPTCHA)是现代网站中常见的安全机制,用于区分人类用户和自动化程序。本文将详细介绍如何使用HTML5 Canvas和JavaScript创建一个美观且功能完整的验证码生成器。 一、核心功能概述 这个验证码生成器具有以下特点: 随机生…...

python中 “with” 关键字的取舍问题
自动管理资源(自动关闭文件) 当你使用 with 打开文件时,文件会在 with 代码块结束后自动关闭,无论是否发生异常。这意味着你不需要显式地调用 f.close() 来关闭文件 示例: with open("words.txt", "r…...

【区块链安全 | 第三十九篇】合约审计之delegatecall(一)
文章目录 外部调用函数calldelegatecallcall 与 delegatecall 的区别示例部署后初始状态调用B.testCall()函数调用B.testDelegatecall()函数区别总结漏洞代码代码审计攻击代码攻击原理解析攻击流程修复建议审计思路外部调用函数 在 Solidity 中,常见的两种底层外部函数调用方…...

Nginx部署spa单页面的小bug
没部署过,都是给后端干的,自己尝试部署了一个下午终于成功了 我遇到的最大的bug是进入后只有首页正常显示 其他页面全是404,于是问问问才知道,需要这个 location / { try_files $uri $uri/ /index.html; } 让…...

linux多线(进)程编程——(6)共享内存
前言 话说进程君的儿子经过父亲点播后就开始闭关,它想要开发出一种全新的传音神通。他想,如果两个人的大脑生长到了一起,那不是就可以直接知道对方在想什么了吗,这样不是可以避免通过语言传递照成的浪费吗? 下面就是它…...

【愚公系列】《Python网络爬虫从入门到精通》050-搭建 Scrapy 爬虫框架
🌟【技术大咖愚公搬代码:全栈专家的成长之路,你关注的宝藏博主在这里!】🌟 📣开发者圈持续输出高质量干货的"愚公精神"践行者——全网百万开发者都在追更的顶级技术博主! 👉 江湖人称"愚公搬代码",用七年如一日的精神深耕技术领域,以"…...
信息安全管理与评估2021年国赛正式卷答案截图以及十套国赛卷
2021年全国职业院校技能大赛高职组 “信息安全管理与评估”赛项 任务书1 赛项时间 共计X小时。 赛项信息 赛项内容 竞赛阶段 任务阶段 竞赛任务 竞赛时间 分值 第一阶段 平台搭建与安全设备配置防护 任务1 网络平台搭建 任务2 网络安全设备配置与防护 第二…...

讲解贪心算法
贪心算法是一种常用的算法思想,其在解决问题时每一步都做出在当前状态下看起来最优的选择,从而希望最终能够获得全局最优解。C作为一种流行的编程语言,可以很好地应用于贪心算法的实现。下面我们来讲一篇关于C贪心算法的文章。 目录 贪心算法…...
高并发秒杀系统设计:关键技术解析与典型陷阱规避
电商、在线票务等众多互联网业务场景中,高并发秒杀活动屡见不鲜。这类活动往往在短时间内会涌入海量的用户请求,对系统架构的性能、稳定性和可用性提出了极高的挑战。曾经,高并发秒杀架构设计让许多开发者望而生畏,然而࿰…...
微信小程序实战案例 - 餐馆点餐系统 阶段 2 – 购物车
阶段 2 – 购物车(超详细版) 目标 把“加入购物车”做成 全局状态,任何页面都能读写在本地 持久化(关闭小程序后购物车仍在)新建 购物车页:数量增减、总价实时计算、去结算入口打 Git Tag v2.0‑cart 1. …...