从0开始搭建一套工具函数库,发布npm,支持commonjs模块es模块和script引入使用
文章目录
- 文章目标
- 技术选型
- 工程搭建
- 1. 初始化项目
- 2. 安装开发依赖
- 3. 项目结构
- 4. 配置文件
- tsconfig.json
- .eslintrc.js
- eslint.config
- .prettierrc.js
- rollup.config.cjs
- 创建 .gitignore文件
- 设置 Git 钩子
- 创建示例工具函数
- 8. 版本管理和发布
- 9 工具函数测试方案
- 1. 安装测试依赖
- 2. 配置 Jest
- 更新 tsconfig.json
- 4. 编写测试用例
- 最后的package.json
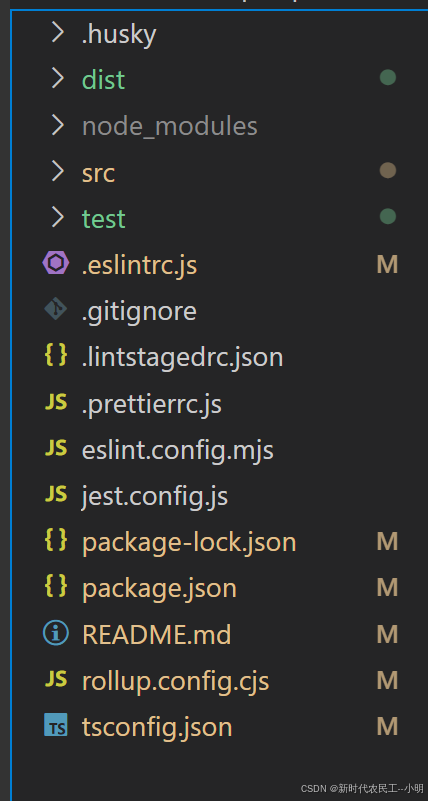
- 最后工程目录
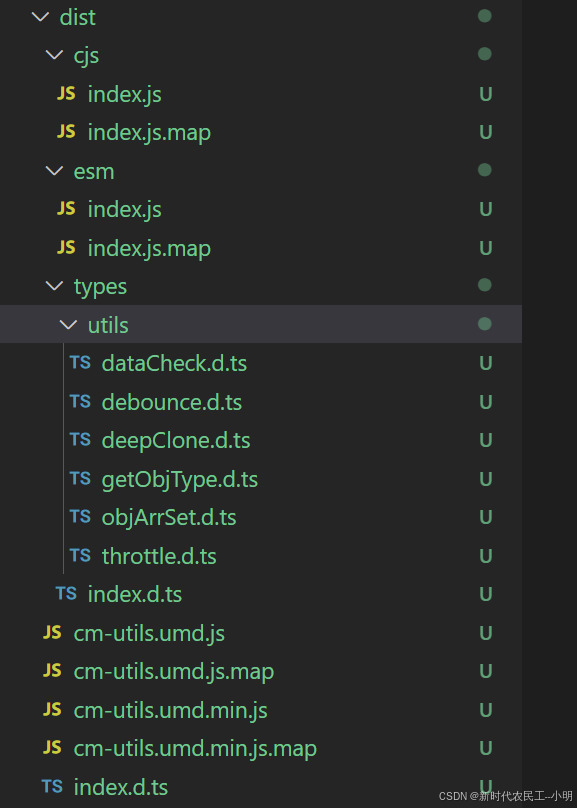
- 构建结果目录
- 发布npm
- 1.注册npm账号
- 2.登录npm
- 3.构建生产版本
- 4.模拟发布测试
- 6. 实际发布
- 7.发布403错误
- 8.发布成功验证
- npm包地址
- 总结
文章目标
- 从0开始。搭建一套自己的工具函数库,工程打包后支持commonjs模块的引入,es模块的引入。还支持script的形式引入。还支持工程化项目的unplugin-auto-import插件。并将打包结果发布到npm。这套模板也可以用于封装一些个性化的js库,不单单限于工具函数库的一套工程化模板。
技术选型
- 构建工具:rollup
- 语言:typescript
- 代码规范:eslint阿里规范
- 工程模块:es模块
工程搭建
1. 初始化项目
首先创建项目目录并初始化 npm:
mkdir cm-utils
cd my-utils
npm init -y
2. 安装开发依赖
安装所有必要的开发依赖:
npm install -D typescript rollup @rollup/plugin-node-resolve @rollup/plugin-commonjs @rollup/plugin-typescript @rollup/plugin-terser rollup-plugin-dts rimrafnpm install -D eslint @typescript-eslint/parser @typescript-eslint/eslint-plugin eslint-config-ali prettier eslint-config-prettier eslint-plugin-prettiernpm install -D husky lint-staged
3. 项目结构
创建以下目录结构:
my-utils/
├── src/
│   ├── index.ts        # 主入口文件
│   ├── utils/          # 工具函数目录
│   │   ├── debounce.ts
│   │   ├── throttle.ts
│   │   └── ...         # 其他工具函数
├── test/               # 测试目录
├── .eslintrc.js        # ESLint 配置
├── .prettierrc.js      # Prettier 配置
├── tsconfig.json       # TypeScript 配置
├── rollup.config.js    # Rollup 配置
└── package.json
4. 配置文件
tsconfig.json
{"compilerOptions": {"target": "es6","module": "esnext","strict": true,"moduleResolution": "node","esModuleInterop": true,"skipLibCheck": true,"forceConsistentCasingInFileNames": true,"baseUrl": ".","paths": {"@/*": ["src/*"]},"lib": ["es6", "dom"],"outDir": "dist/ts_temp"},"include": ["src/**/*"],"exclude": ["node_modules", "dist", "**/*.test.ts"],"types": ["jest", "node"]
}
.eslintrc.js
module.exports = {settings: {'import/resolver': {node: {extensions: ['.js', '.jsx', '.ts', '.tsx'],},},},fixOnSave: true,extends: ['ali','plugin:@typescript-eslint/recommended','prettier','plugin:prettier/recommended',],parser: '@typescript-eslint/parser',plugins: ['@typescript-eslint'],root: true,env: {node: true,jest: true,},ignorePatterns: ['.eslintrc.js'],rules: {'@typescript-eslint/interface-name-prefix': 'off','@typescript-eslint/explicit-function-return-type': 'off','@typescript-eslint/explicit-module-boundary-types': 'off','@typescript-eslint/no-explicit-any': 'off','no-explicit-any': 'off',},
};
eslint.config
- 在项目根目录下执行如下命令
npx eslint --init
# 根据命令行提示进行安装
.prettierrc.js
module.exports = {semi: true,trailingComma: 'all',singleQuote: true,printWidth: 100,tabWidth: 2,arrowParens: 'avoid',
};
rollup.config.cjs
const resolve = require('@rollup/plugin-node-resolve');
const commonjs = require('@rollup/plugin-commonjs');
const typescript = require('@rollup/plugin-typescript');
const terser = require('@rollup/plugin-terser');
const dts = require('rollup-plugin-dts').default;
const path = require('path');
const fs = require('fs');// 彻底清理目录
const cleanDist = () => {if (fs.existsSync('dist')) {fs.rmSync('dist', { recursive: true, force: true });}fs.mkdirSync('dist', { recursive: true });
};cleanDist();const packageJson = require('./package.json');// 每个构建目标独立配置
const builds = [// 1. 先单独生成类型声明{input: 'src/index.ts',output: {file: 'dist/types/index.d.ts',format: 'esm',},plugins: [typescript({tsconfig: './tsconfig.json',declaration: true,declarationDir: 'dist/types',emitDeclarationOnly: true, // 只生成声明outDir: 'dist/types', // 必须与declarationDir相同}),],},// 2. ESM构建{input: 'src/index.ts',output: {file: packageJson.module,format: 'esm',sourcemap: true,},plugins: [resolve(),commonjs(),typescript({tsconfig: './tsconfig.json',outDir: path.dirname(packageJson.module),declaration: false, // 禁用声明生成}),],},// 3. CJS构建{input: 'src/index.ts',output: {file: packageJson.main,format: 'cjs',sourcemap: true,},plugins: [resolve(),commonjs(),typescript({tsconfig: './tsconfig.json',outDir: path.dirname(packageJson.main),declaration: false,}),],},// 4. UMD构建{input: 'src/index.ts',output: {file: 'dist/cm-utils.umd.js',format: 'umd',name: 'MyUtils',sourcemap: true,},plugins: [resolve(),commonjs(),typescript({tsconfig: './tsconfig.json',outDir: 'dist',declaration: false,}),],},// 5. UMD压缩版{input: 'src/index.ts',output: {file: 'dist/cm-utils.umd.min.js',format: 'umd',name: 'MyUtils',sourcemap: true,},plugins: [resolve(),commonjs(),typescript({tsconfig: './tsconfig.json',outDir: 'dist',declaration: false,}),terser(),],},// 6. 最终类型声明处理{input: 'dist/types/index.d.ts',output: {file: 'dist/index.d.ts',format: 'esm',},plugins: [dts()],external: [/\.(css|less|scss)$/],},
];// 只导出非空配置
module.exports = builds.filter(Boolean);
创建 .gitignore文件
node_modules
设置 Git 钩子
初始化 husky 并设置 pre-commit 钩子:
npx husky install
npx husky add .husky/pre-commit "npx lint-staged"
创建 .lintstagedrc.json 文件:
{"src/**/*.ts": ["eslint --fix","prettier --write"]
}
创建示例工具函数
在 src/utils/debounce.ts 中
type DebounceFunction<T extends (...args: any[]) => any> = (...args: Parameters<T>
) => void;export function debounce<T extends (...args: any[]) => any>(func: T,wait: number,immediate?: boolean
): DebounceFunction<T> {let timeout: ReturnType<typeof setTimeout> | null;return function (this: any, ...args: Parameters<T>) {const context = this;const later = () => {timeout = null;if (!immediate) func.apply(context, args);};const callNow = immediate && !timeout;if (timeout) clearTimeout(timeout);timeout = setTimeout(later, wait);if (callNow) func.apply(context, args);};
}
在 src/index.ts 中:
export * from './utils/debounce';
// 导出其他工具函数...
8. 版本管理和发布
安装 standard-version 用于版本管理:
npm install -D standard-version
更新 package.json 的 scripts:
{"scripts": {"release": "standard-version && npm publish"}
}
9 工具函数测试方案
为了确保你的工具函数库质量,我会为你提供一套完整的测试方案。我们将使用 Jest 测试框架来测试 TypeScript 编写的工具函数。
1. 安装测试依赖
npm install -D jest @types/jest ts-jest @jest/globals
2. 配置 Jest
创建 jest.config.js
module.exports = {preset: 'ts-jest',testEnvironment: 'node',moduleFileExtensions: ['ts', 'js', 'json'],rootDir: '.',testRegex: '.*\\.test\\.ts$',transform: {'^.+\\.(t|j)s$': 'ts-jest',},collectCoverageFrom: ['src/**/*.(t|j)s'],coverageDirectory: './coverage',coverageReporters: ['text', 'html'],coverageThreshold: {global: {branches: 80,functions: 80,lines: 80,statements: 80,},},
};
更新 tsconfig.json
确保 TypeScript 配置支持测试类型:
{"compilerOptions": {// ...其他配置保持不变"types": ["jest", "node"]}
}
4. 编写测试用例
示例:测试 debounce 函数
在 test/utils/debounce.test.ts 中:
import { debounce } from '../../src/utils/debounce';
import { jest } from '@jest/globals';describe('debounce', () => {jest.useFakeTimers();it('should delay the function call', () => {const mockFn = jest.fn();const debounced = debounce(mockFn, 1000);debounced();expect(mockFn).not.toHaveBeenCalled();// 快进时间jest.advanceTimersByTime(500);expect(mockFn).not.toHaveBeenCalled();// 快进剩余时间jest.advanceTimersByTime(500);expect(mockFn).toHaveBeenCalledTimes(1);});it('should call function immediately if immediate is true', () => {const mockFn = jest.fn();const debounced = debounce(mockFn, 1000, true);debounced();expect(mockFn).toHaveBeenCalledTimes(1);// 快进时间不应再次调用jest.advanceTimersByTime(1000);expect(mockFn).toHaveBeenCalledTimes(1);});it('should cancel previous call when called multiple times', () => {const mockFn = jest.fn();const debounced = debounce(mockFn, 1000);debounced();jest.advanceTimersByTime(500);debounced(); // 取消前一个调用jest.advanceTimersByTime(500);expect(mockFn).not.toHaveBeenCalled();jest.advanceTimersByTime(500);expect(mockFn).toHaveBeenCalledTimes(1);});it('should pass arguments correctly', () => {const mockFn = jest.fn();const debounced = debounce(mockFn, 1000);debounced('arg1', 'arg2');jest.runAllTimers();expect(mockFn).toHaveBeenCalledWith('arg1', 'arg2');});
});
最后的package.json
{"name": "@renjinming/xm-utils","version": "1.0.0","description": "A collection of utility functions","main": "dist/cjs/index.js","module": "dist/esm/index.js","types": "dist/index.d.ts","files": ["dist"],"type": "commonjs","scripts": {"clean": "rimraf dist","build:pwd": "npm run clean && rollup -c --bundleConfigAsCjs","build": "rollup -c --bundleConfigAsCjs","prepublishOnly": "npm run build","lint": "eslint src --ext .ts","format": "prettier --write \"src/**/*.ts\"","prepare": "husky install","release": "standard-version && npm publish","test": "jest","test:watch": "jest --watch","test:coverage": "jest --coverage","test:ci": "jest --ci --coverage"},"keywords": ["utils","utilities","tools","functions"],"author": "Your Name","license": "MIT","devDependencies": {"@eslint/js": "^9.25.0","@eslint/json": "^0.12.0","@jest/globals": "^29.7.0","@rollup/plugin-commonjs": "^28.0.3","@rollup/plugin-node-resolve": "^16.0.1","@rollup/plugin-terser": "^0.4.4","@rollup/plugin-typescript": "^12.1.2","@types/jest": "^29.5.14","@typescript-eslint/eslint-plugin": "^8.30.1","@typescript-eslint/parser": "^8.30.1","eslint": "^9.25.0","eslint-config-ali": "^16.1.1","eslint-config-prettier": "^10.1.2","eslint-plugin-prettier": "^5.2.6","globals": "^16.0.0","husky": "^9.1.7","jest": "^29.7.0","lint-staged": "^15.5.1","prettier": "^3.5.3","rimraf": "^5.0.10","rollup": "^4.40.0","rollup-plugin-dts": "^6.2.1","standard-version": "^9.5.0","ts-jest": "^29.3.2","typescript": "^5.8.3","typescript-eslint": "^8.30.1"},"lint-staged": {"*.{js,ts,jsx,tsx}": ["eslint --fix","prettier --write"]},"publishConfig": {"access": "public"}
}
最后工程目录

构建结果目录

发布npm
1.注册npm账号
https://www.npmjs.com/signup
2.登录npm
- 需要注意一点的是,大家的npm镜像地址可能设置的都是淘宝镜像,需要先切换为npm官方镜像地址
npm config set registry https://registry.npmjs.org/
然后在登录
npm login
3.构建生产版本
npm run build
版本号管理(可选)
手动修改:直接编辑 package.json 中的 version 字段。
自动升级(推荐):
npx standard-version
会根据 Git 提交记录自动升级版本号(major/minor/patch)。
4.模拟发布测试
npm pack --dry-run
➔ 检查输出的文件列表是否仅包含 dist/ 和必要的配置文件。
6. 实际发布
npm publish
- 如果是修改提交必须要修改版本信息,不然提交会403 执行上面的升级命令在进行发布
➔ 若包名冲突或无权限,会报错。
7.发布403错误
如果发布403可能是包名已经存在。可以用下面的命令试试看有没有,如果存在可以修改package.json的name重新定义包名
npm view @renjinming/xm-utils # 检查包名占用
8.发布成功验证
- 查询包在npm上的所有版本
npm view @renjinming/xm-utils versions
- 安装使用,我这里为了方便就用node环境简单演示一下
npm i @renjinming/xm-utils
const { getObjType } = require("@renjinming/xm-utils");
const type = getObjType("123");
console.log(type); // "string"const type2 = getObjType(123);
console.log(type2); // "number"const type3 = getObjType({ name: "renjinming" });
console.log(type3); // "object"const type4 = getObjType([1, 2, 3]);
console.log(type4); // "array"const type5 = getObjType(null);
console.log(type5); // "null"const type6 = getObjType(undefined);
console.log(type6); // "undefined"
const type7 = getObjType(function () {});
console.log(type7); // "function"const type8 = getObjType(new Date());
console.log(type8); // "date"
const type9 = getObjType(/a/);
console.log(type9); // "regexp"
npm包地址
https://www.npmjs.com/package/@renjinming/xm-utils
总结
- 文档是后面整理的,可能会少了有些内容,项目已上传git,可以直接clone,https://gitee.com/public_12/xm-utlis-templet
- 遗留的问题。由于个人对jest测试框架不是很熟悉,测试用例也没写完整,还有就是在commit代码时,没有自动校验代码,不晓得问题在哪里,阁下要是有解决方案,或者是对项目有更好的改进。欢迎留言或者提交 PR,我个人也会持续的改进。
- 整理不易,如果对你有所帮助 记得点个赞喔,
相关文章:

从0开始搭建一套工具函数库,发布npm,支持commonjs模块es模块和script引入使用
文章目录 文章目标技术选型工程搭建1. 初始化项目2. 安装开发依赖3. 项目结构4. 配置文件tsconfig.json.eslintrc.jseslint.config.prettierrc.jsrollup.config.cjs创建 .gitignore文件 设置 Git 钩子创建示例工具函数8. 版本管理和发布9 工具函数测试方案1. 安装测试依赖2. 配…...

使用 Oracle 数据库进行基于 JSON 的应用程序开发
本文为“JSON-based Application Development with Oracle Database (and MongoDB compatibility)”翻译阅读笔记。 副标题为:版本 19c 和 21c,本地和云,自治JSON 数据库以及适用于 MongoDB 的 Oracle 数据库 API,版本为2022年2月…...
CSS核心机制:全面解析选择器分类、用法与实战应用)
Python爬虫(4)CSS核心机制:全面解析选择器分类、用法与实战应用
目录 一、背景与重要性二、CSS选择器基础与分类2.1 什么是选择器?2.2 选择器分类与语法 三、核心选择器详解与实战案例3.1 基础选择器:精准定位元素3.2 组合选择器:元素关系控制3.3 伪类与伪元素:动态与虚拟元素3…...

Cadence学习笔记之---原理图设计基本操作
目录 01 | 引 言 02 | 环境描述 03 | 原理图工具介绍 04 | 原理图设计基本操作 05 | 生成页间引用 06 | 元件自动编号 07 | 结 尾 01 | 引 言 书接上回,在前文中讲述了怎样制作常用的库元件,如电阻、二极管,IC器件,以及怎…...

从零开始学习人工智能Day5-Python3 模块
二、Python3基础语法学习 三、Python3 基本数据类型 四、Python3 数据类型转换 五、Python3 运算符 六、python基本数据类型(续) 七、Python3 控制语句 八、Python推导式 九、Python3 函数 十、Python3 数据结构 十一、Python3 模块 Python 中的模块(…...

进行性核上性麻痹饮食指南:科学膳食助力对抗疾病
进行性核上性麻痹是一种进展性神经退行性疾病,常导致患者出现吞咽困难、运动障碍等症状。科学合理的饮食不仅能为患者提供必要的营养支持,还能降低并发症风险,改善生活质量。 蛋白质是维持身体机能的关键,患者应注重优质蛋白的摄取…...

vue滑块组件设计与实现
vue滑块组件设计与实现 设计一个滑块组件的思想主要包括以下几个方面:用户交互、状态管理、样式设计和事件处理。以下是详细的设计思想: 1. 用户交互 滑块组件的核心是用户能够通过拖动滑块来选择一个值。因此,设计时需要考虑以下几点&…...

opencv函数展示4
一、形态学操作函数 1.基本形态学操作 (1)cv2.getStructuringElement() (2)cv2.erode() (3)cv2.dilate() 2.高级形态学操作 (1)cv2.morphologyEx() 二、直方图处理函数 1.直方图…...

附赠二张图,阐述我对大模型的生态发展、技术架构认识。
文章精炼,用两张图说明大模型发展业态方向,以及大模型主体技术架构。(目前还需要进一步验证我的Thought && ideas,等待机会吧.........) 图一:探究大模型三个层次应用方向,浅层次入门简…...

OpenCv高阶(九)——背景建模
目录 一、背景建模的核心目标与核心挑战 1. 核心目标 2. 核心挑战 二、背景建模模型 1、帧差法原理 2. 概率模型(Parametric Models) (1)高斯混合模型(Gaussian Mixture Model, GMM) (…...

leetcode - 字符串
字符串 466. 统计重复个数 题目 定义 str [s, n] 表示 str 由 n 个字符串 s 连接构成。 例如,str ["abc", 3] "abcabcabc" 。 如果可以从 s2( )中删除某些字符使其变为 s1,则称字符串 s1( )可以从字符串 s2 获得。 例如…...

【基础IO上】复习C语言文件接口 | 学习系统文件接口 | 认识文件描述符 | Linux系统下,一切皆文件 | 重定向原理
1.关于文件的预备知识 1.1 文件的宏观理解 广义上理解,键盘、显示器等都是文件,因为我们说过“Linux下,一切皆文件”,当然我们现在对于这句话的理解是片面的;狭义上理解,文件在磁盘上,磁盘是一…...

Freertos--统计所有任务栈信息以及CPU占比和钩子函数
一、概念 在 FreeRTOS 中统计任务栈信息和 CPU 占比是为了分析栈使用情况防止溢出、优化性能识别高负载任务、合理分配资源避免内存浪费、调试系统排查阻塞或优先级问题,有助于提升效率、确保稳定性、快速定位问题并防止崩溃,比如在你的蜂鸣器任务中可以…...

京东商品详情API接口调用技术指南
本文基于京东宙斯开放平台(JD Open API)的 jingdong.ware.product.detail.search.get 接口,提供商品详情数据获取的完整技术方案,包含参数说明、代码实现及实战避坑指南。 一、接口功能与权限 核心能力 获取商品SKU的完整信…...

基于Java(JSP)+MySQL实现深度学习的音乐推荐系统
基于深度学习的音乐推荐系统简述 本文简要介绍我做的基于深度学习的音乐推荐系统。主要从需求分析与设计实现的角度来进行介绍。 需求分析 基于深度学习的音乐推荐系统旨在以个性化音乐推荐模型为基础,使用B/S架构的形式实现。个性化推荐模型使用了 随机梯度下降…...

Linux:进程间通信---匿名管道
文章目录 1. 进程间通信1.1 什么是进程间通信?1.2 为什么进程要进行进程间通信?1.3 怎么实现进程间通信? 2. 匿名管道2.1 匿名管道的原理2.2 匿名管道的系统接口2.3 匿名管道的使用2.4 匿名管道的运用场景 序:在上一篇文章中我们知…...

C++ 类及函数原型详解
一、引言 在C 编程中,类(Class)是面向对象编程的核心概念之一,它是一种用户自定义的数据类型,封装了数据和操作数据的函数(成员函数)。函数原型则为函数的声明提供了必要的信息,让编…...

深度学习小记(包括pytorch 还有一些神经网络架构)
这个是用来增加深度学习的知识面或者就是记录一些常用的命令,会不断的更新 import torchvision.transforms as transforms toPIL transforms.ToPILImage()#可以把tensor转换为Image类型的 imgtoPIL(img) #利用save就可以保存下来 img.save("/opt/data/private/stable_si…...

声音分离人声和配乐base,vocals,drums -从头设计数字生命第6课, demucs——仙盟创梦IDE
demucs -n htdemucs --two-stemsvocals 未来之窗.mp3 demucs -n htdemucs --shifts5 之.mp3demucs -n htdemucs --shifts5 -o wlzcoutspl 未来之窗.mp3 伴奏提取人声分离技术具有多方面的重大意义,主要体现在以下几个领域: 音乐创作与制作 创作便利…...

深度探索多模态数据:从声音到图像的奇妙世界
深度探索多模态数据:从声音到图像的奇妙世界 在多模态深度学习的旅程中,我们不仅要了解不同数据形式的融合策略,还需要熟悉各种数据类型的特性。今天,我们将探索两种常见但极具价值的模态:音频数据和医学CT扫描。 音…...

【数据可视化-32】全球住房市场分析(2015-2024 年)数据集可视化分析
🧑 博主简介:曾任某智慧城市类企业算法总监,目前在美国市场的物流公司从事高级算法工程师一职,深耕人工智能领域,精通python数据挖掘、可视化、机器学习等,发表过AI相关的专利并多次在AI类比赛中获奖。CSDN…...
)
JAVA---面向对象(下)
重生之我开始补知识第三集 1.标准 JavaBean 要求: 1)类名需要见名知意 2)成员变量使用private修饰 3)至少提供两个构造方法 a.无参构造方法 b.带全部参数的构造方法 4)成员方法 a.提供每一个成员变量对应的 …...
笔记)
FPGA(现场可编程门阵列)笔记
*编程语言 - [Verilog]:硬件描述语言,语法风格类似于C语言,用于数字电路的设计。 - [SystemVerilog]:扩展自Verilog,增加了面向对象编程等特性,语法更接近于C,适用于复杂系统设计。 - [VHDL]:另一种硬件描述语言&…...

DAX Studio将PowerBI与EXCEL连接
DAX Studio将PowerBI与EXCEL连接 具体步骤如下: 第一步:先打开一个PowerBI的文件,在外部工具栏里打开DAXStudio,如图: 第二步:DAXStudio界面,点击Advanced选项卡-->Analyze in Excel&#…...

使用spring boot vue 上传mp4转码为dash并播放
1.前端实现 <template><div class"video-upload"><el-uploadclass"upload-demo"action"/api/upload":before-upload"beforeUpload":on-success"handleSuccess":on-error"handleError":show-file-…...

深入理解指针 (1)
1.内存和地址 1.1内存 1.1.1内存的使用和管理 (1)内存划分为一个个的内存单元,每个内存单元的大小是1个字节,一个内存单元可以存放8个bit。 (2)每个内存单元有一个编号,内存单元的编号在计…...

Leetcode98、230:二叉搜索树——递归学习
什么是二叉搜索树:右子树节点 > 根节点 > 左子树节点, 二叉搜索树中的搜索,返回给定值val所在的树节点 终止条件为传进来的节点为空、或者节点的值 val值,返回这个节点; 单程递归逻辑:定义一个resu…...

4/25 研0学习日志
Python学习 python 4个常用的数据容器 list dict tuple set list 列表中数据类型可以不一样 构造方式 mylist["xxx","xxxx"] 获取数据方式 mylist[1] mylist[:4] mylist[-1:] 添加数据 mylist.append() mylist.extern(["aaa","aaaa&…...

15. LangChain多模态应用开发:融合文本、图像与语音
引言:当AI学会"看听说想" 2025年某智慧医院的多模态问诊系统,通过同时分析患者CT影像、语音描述和电子病历,将误诊率降低42%。本文将基于LangChain多模态框架与Deepseek-R1,手把手构建能理解复合信息的智能系统。 一、…...

2022李宏毅老师机器学习课程笔记
机器学习笔记目录 1.绪论(内容概述)2.机器学习和深度学习的基本概念transformer 1.绪论(内容概述) 机器学习:让机器找一个函数,通过函数输出想要的结果。应用举例:语音识别,图像识别…...
