《操作系统真象还原》第十四章(2)——文件描述符、文件操作基础函数
文章目录
- 前言
- 文件描述符简介
- 文件描述符原理
- 文件描述符实现
- 修改thread.h
- 修改thread.c
- 文件操作相关的基础函数
- inode操作相关函数
- 文件相关函数
- 编写file.h
- 编写file.c
- 目录相关函数
- 完善fs/dir.h
- 编写fs/dir.c
- 路径解析相关函数
- 实现文件检索功能
- 修改fs.h
- 继续完善fs.c
- makefile
- 结语
前言
本章是14章第二篇博客,计划完成14.3、14.4两个小节内容。14.3是文件描述符简介,比较短,我们摘一些要点即可,14.4是一个大章,我们要完成文件操作的很多基础函数,代码量很大。
文件描述符简介
文件描述符原理
首先引入文件结构这个概念。文件结构用于描述文件被打开后,文件读写偏移量等信息。每次打开一个文件,就会创建一个文件结构,多次打开会创建多个文件结构。

Linux 把所有的“文件结构”组织到一起形成数组统一管理, 该数组称为文件表,我们要多次引用此概念。
然后引入文件描述符。在Linux中,我们读写函数文件时都是通过操作文件描述符来完成的。例如open,返回一个数字,而该数字就是我们所说的文件描述符,文件描述符是个整数,准确地说,它是PCB中文件描述符数组元素的下标,只不过此数字并不用来表示“数量”,而是用 来表示“位置”,它是位于进程PCB中的文件描述符数组的元素的下标,而文件描述符数组元素中的信息又指向文件表中的某个文件结构。
为什么文件描述符是数字,而不是像其他描述符那样,是个具有多个成员属性的复合数据结构?(1)所有进程可打开的文件数是一致的,每个进程都要有一套独立完整的文件描述符数组。(2)文件结构中包含进程执行文件操作的偏移量,它属于与各个任务单独绑定的资源,因此最好放在 PCB 中管理。
综合以上两点,我们不会把完整庞大的文件表塞进pcb,只要在 PCB中建立个文件描述符数组就可以了,该数组成员不需要是真正的文件结构,出于简单处理,咱们用int整型就足够了,用它存储文件表中文件结构的下标。
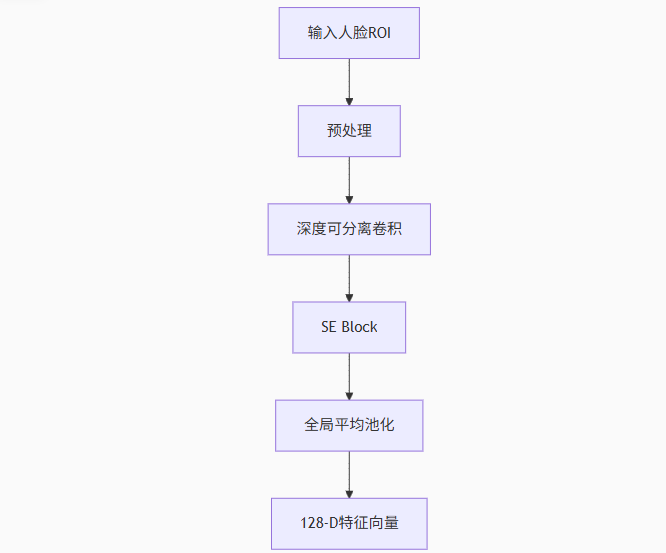
如何通过一个数字,也就是文件描述符,来找到文件数据块的?见示意图
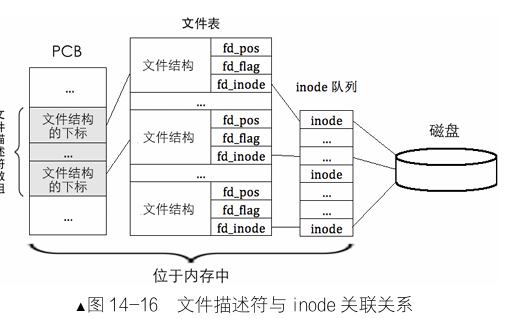
梳理寻址过程:某个进程调用类似于open这样的函数,把文件描述符(int类型)作为参数提交给文件系统,文件系统通过进程pcb中的文件描述符数组,索引到一个文件表的文件结构表项,从这个文件结构获取inode指针,通过inode指针找到数据块。
文件描述符数组在pcb中创建,inode队列在创建文件系统时就已经实现,所以创建文件描述符的过程就是在pcb数组、文件表和inode队列中寻找空位填充的过程。
文件描述符实现
这部分其实是在pcb中完善文件描述符数组属性。完整的通过文件描述符操作文件我们会在14.4中实现
修改thread.h
只给出修改部分吧,开头新增了一个宏,pcb结构体新增了一个文件描述符属性。
...
#define MAX_FILES_OPEN_PER_PROC 8 // 每个进程最大能同时打开的文件数
...
/* 线程或进程的pcb程序控制块 */
struct task_struct
{uint32_t *self_kstack;     // 线程自己的栈的栈顶指针pid_t pid;                 // 线程的pid,系统调用部分对它进行操作enum thread_status status; // 线程的状态uint8_t priority;          // 线程的优先级uint8_t ticks;             // 线程的时间片,在处理器上运行的时间滴答数uint32_t elapsed_ticks;    // 线程的运行时间,也就是这个线程已经执行了多久char name[16];             // 线程的名字int32_t fd_table[MAX_FILES_OPEN_PER_PROC]; // 文件描述符数组struct list_elem general_tag;  // 用于线程在一般队列中的节点struct list_elem all_list_tag; // 用于线程在thread_all_list队列中的节点uint32_t *pgdir;                              // 如果是进程,这是进程的页表结构中页目录表的虚拟地址,线程则置为NULLstruct virtual_addr userprog_vaddr;           // 用户进程的虚拟地址,后续转化为物理地址后存入cr3寄存器struct mem_block_desc u_block_desc[DESC_CNT]; // 进程内存块描述符数组,用于用户进程的堆内存管理uint32_t stack_magic;                         // 线程栈的魔数,边界标记,用来检测栈溢出
};
...
修改thread.c
初始化刚刚新增的文件描述符数组
...
/* 初始化线程基本信息 */
void init_thread(struct task_struct *pthread, char *name, int prio)
{memset(pthread, 0, sizeof(*pthread)); // 清空线程pcbpthread->pid = allocate_pid();        // 获取唯一的pidstrcpy(pthread->name, name);          // 线程名字if (pthread == main_thread)           // 线程状态pthread->status = TASK_RUNNING;elsepthread->status = TASK_READY;/* self_kstack 是线程自己在内核态下使用的栈顶地址 */pthread->self_kstack = (uint32_t *)((uint32_t)pthread + PG_SIZE); // 线程内核栈/*初始化文件描述符数组*/// 预留标准输入输出pthread->fd_table[0] = 0;pthread->fd_table[1] = 1;pthread->fd_table[2] = 2;// 剩下的设置为-1uint8_t fd_idx = 3;while (fd_idx < MAX_FILES_OPEN_PER_PROC){pthread->fd_table[fd_idx] = -1;fd_idx++;}pthread->priority = prio;          // 线程优先级pthread->ticks = prio;             // 线程时间片pthread->elapsed_ticks = 0;        // 线程运行时间pthread->pgdir = NULL;             // 线程页表pthread->stack_magic = 0x20250325; // 线程栈的魔数,边界标记,用来检测栈溢出
}
...
有关线程的部分就修改这些,剩下的就涉及到其他文件模块了,我们下一小节实现。
文件操作相关的基础函数
摘一下书上的原文:在本节我们要想实现文件及目录的创建、打开、读、写操作,必须建设好基础设施,现在咱们要一步 一个脚印,慢慢走向目的地。 为了帮助大伙儿理清楚函数间的依赖关系,本文按照它们的调用关系来介绍相关的文件,同时为了减 少学习的复杂性,根据实际情况有可能只会列出文件中的部分代码,并不是一股脑地把不相关的内容也搬 出来,待需要的时候依然会在相同的文件中添加新功能,因此有可能同一件文件会在不同功能的讲解中反 复更新,请您知晓。
inode操作相关函数
回顾:inode在inode数组里,inode数组实际位置在根目录前,inode位图后,inode数组的起始地址和大小也被记录在超级块里。这部分可以参考14.1文件系统布局。
在我们的文件系统里,引导扇区占据第0扇区、超级块占用第1扇区,位图类结构必须对齐到扇区,数据类结构(包括数组,根目录,空闲块)大小不定,可以跨扇区存在。
来看代码,在fs路径下创建inode.c文件,总共是写160行左右的代码,实现5个函数
#include "inode.h"
#include "../device/ide.h"
#include "../kernel/debug.h"
#include "../kernel/interrupt.h"
#include "../thread/thread.h"
#include "../lib/string.h"
#include "../lib/kernel/stdint.h"/*用来存储inode位置的结构体*/
struct inode_position
{bool two_sec;      // 此inode是否跨区uint32_t sec_lba;  // 此inode起始扇区号uint32_t off_size; // 此inode在扇区内的字节偏移量
};/*获取inode所在的扇区和扇区内的偏移量*/
static void inode_locate(struct partition *part, uint32_t inode_no, struct inode_position *inode_pos)
{ASSERT(inode_no < 4096);uint32_t inode_table_lba = part->sb->inode_table_lba;uint32_t inode_size = sizeof(struct inode);uint32_t off_size = inode_no * inode_size; // 第no号inode据inode数组起始位置的字节偏移量uint32_t off_sec = off_size / 512;         // 字节偏移量对应的扇区偏移量uint32_t off_size_in_sec = off_size % 512; // 待查找的inode在此扇区的起始地址// 判断此inode是否跨区uint32_t left_in_sec = 512 - off_size_in_sec; // 本扇区剩余存储空间// 剩余空间不够一个inodeif (left_in_sec < inode_size){inode_pos->two_sec = true;}else{inode_pos->two_sec = false;}inode_pos->sec_lba = inode_table_lba + off_sec;inode_pos->off_size = off_size_in_sec;
}/*将内存中的inode写入到硬盘分区part*/
void inode_sync(struct partition *part, struct inode *inode, void *io_buf)
{uint8_t inode_no = inode->i_no;struct inode_position inode_pos;// 调用上面的函数获取inode所在的扇区和偏移量,保存到inode_posinode_locate(part, inode_no, &inode_pos);ASSERT(inode_pos.sec_lba <= (part->start_lba + part->sec_cnt));struct inode pure_inode;memcpy(&pure_inode, inode, sizeof(struct inode));// 以下三个成员只在内存中有意义,写入硬盘时清理掉即可pure_inode.i_open_cnts = 0;pure_inode.write_deny = false; // 可读可写pure_inode.inode_tag.prev = pure_inode.inode_tag.next = NULL;// 以下,先把原有inode读取出来,更新后再写入char *inode_buf = (char *)io_buf;if (inode_pos.two_sec){// 如果跨扇区了,需要读两个扇区ide_read(part->my_disk, inode_pos.sec_lba, inode_buf, 2);/*inode_buf + inode_pos.off_sizes是在缓冲区内的偏移地址*用于在512/1024字节的缓冲区内定位到实际indoe位置*/memcpy((inode_buf + inode_pos.off_size), &pure_inode, sizeof(struct inode));ide_write(part->my_disk, inode_pos.sec_lba, inode_buf, 2);}else{ide_read(part->my_disk, inode_pos.sec_lba, inode_buf, 1);memcpy((inode_buf + inode_pos.off_size), &pure_inode, sizeof(struct inode));ide_write(part->my_disk, inode_pos.sec_lba, inode_buf, 1);}
}/*根据i节点号返回i节点指针*/
struct inode *inode_open(struct partition *part, uint32_t inode_no)
{// 先在每个分区中存在的,打开的i节点链表中寻找i节点,此链表是为了提速创建的缓冲区struct list_elem *elem = part->open_inodes.head.next;struct inode *inode_found;while (elem != &part->open_inodes.tail){inode_found = elem2entry(struct inode, inode_tag, elem);if (inode_found->i_no == inode_no) // 如果成功找到,inode打开次数+1,返回indoe地址{inode_found->i_open_cnts++;return inode_found;}elem = elem->next;}/*目前在链表中没有找到,于是从硬盘中读入inode并加入链表*/struct inode_position inode_pos;// 调用locate函数,获知no对应的inode的信息inode_locate(part, inode_no, &inode_pos);/*为了让进程新创建的inode被共享,需要将inode放在内核区*需要临时将pcb的pgdir设置为NULL*/struct task_struct *cur = running_thread();uint32_t *cur_pagedir_bak = cur->pgdir; // 临时记录cur->pgdir = NULL;inode_found = (struct inode *)sys_malloc(sizeof(struct inode));cur->pgdir = cur_pagedir_bak;char *inode_buf;if (inode_pos.two_sec == true){// 跨扇区读两个扇区inode_buf = (char *)sys_malloc(1024);ide_read(part->my_disk, inode_pos.sec_lba, inode_buf, 2);}else{inode_buf = (char *)sys_malloc(512);ide_read(part->my_disk, inode_pos.sec_lba, inode_buf, 1);}memcpy(inode_found, inode_buf + inode_pos.off_size, sizeof(struct inode));// 加入队列方便后续使用list_push(&part->open_inodes, &inode_found->inode_tag);// 队列里没有,说明这是第一次被打开,打开次数设置为1inode_found->i_open_cnts = 1;sys_free(inode_buf);return inode_found;
}/*关闭indoe或减少inode打开数*/
void inode_close(struct inode *inode)
{enum intr_status old_status = intr_disable(); // 关inode应为原子操作if (--inode->i_open_cnts == 0){list_remove(&inode->inode_tag);// 内存中新的inode开辟在内核空间,移除时也需要确保回收内核空间struct task_struct *cur = running_thread();uint32_t *cur_pagedir_bak = cur->pgdir; // 临时记录cur->pgdir = NULL;sys_free(inode);cur->pgdir = cur_pagedir_bak;}intr_set_status(old_status);
}/*初始化new_inode*/
void inode_init(uint32_t inode_no, struct inode *new_inode)
{new_inode->i_no = inode_no;new_inode->i_size = 0;new_inode->i_open_cnts = 0;new_inode->write_deny = false;// 初始化块索引数组i_sectoruint8_t sec_idx = 0;while (sec_idx < 13){new_inode->i_sectors[sec_idx] = 0;sec_idx++;}
}
这个文件已经编译过一次,排除了编译错误。
现在是2025年5月11日21点11分,今天就写到这里吧。
文件相关函数
这部分涉及两个新文件,file.c和file.h,都在fs目录下。
编写file.h
#ifndef __FS_FILE_H
#define __FS_FILE_H#include "../lib/kernel/stdint.h"
struct inode;     // 前向声明,代替inode
struct partition; // 代替ide.h/*文件结构,每次打开文件就会创建一个此结构*记录偏移量,打开情况,inode指针等信息*/
struct file
{uint32_t fd_pos;        // 记录文件操作的偏移地址,最小是0,最大是size-1uint32_t fd_flag;       // 记录是否打开struct inode *fd_inode; // 记录此文件的inode指针
};/*标准输入输出描述符*/
enum std_fd
{stdin_no,  // 0,标准输入stdout_no, // 1,标准输出stderr_no  // 2,标准错误
};/*位图类型*/
enum bitmap_type
{INODE_BITMAP, // inode位图BLOCK_BITMAP  // 块位图
};#define MAX_FILE_OPEN 32 // 系统可打开的最大文件数/*从文件表file_table中获取一个空闲位,成功返回下标,失败返回-1*/
int32_t get_free_slot_in_global(void);
/*将全局描述符下标安装到进程或线程自己的文件描述符数组fd_table中*成功返回下标,失败返回-1*/
int32_t pcb_fd_install(int32_t global_fd_idx);
/*分配一个i节点,返回i结点号*/
int32_t inode_bitmap_alloc(struct partition *part);
/*分配1个扇区,返回扇区地址*/
int32_t block_bitmap_alloc(struct partition *part);
/*将内存中bitmap第bit_idx位所在的512个字节同步到硬盘*/
void bitmap_sync(struct partition *part, uint32_t bit_idx, uint8_t btmp);
#endif
编写file.c
#include "file.h"
#include "inode.h"            //对应前向声明
#include "../device/ide.h"    //对应前向声明
#include "../lib/stdio.h"     //printk
#include "../thread/thread.h" //pcb/*文件表,前三个成员预留给标准输入、标准输出、标准错误*/
struct file file_table[MAX_FILE_OPEN];/*从文件表file_table中获取一个空闲位,成功返回下标,失败返回-1*/
int32_t get_free_slot_in_global(void)
{uint32_t fd_idx = 3; // 跳过0、1、2while (fd_idx < MAX_FILE_OPEN){if (file_table[fd_idx].fd_inode == NULL){break; // i结点==NULL说明这个文件结构没被使用,存在空闲}fd_idx++;}if (fd_idx == MAX_FILE_OPEN){// 超出最大打开文件数限制printk("exceed max open files\n");return -1;}return fd_idx;
}/*将全局描述符下标安装到进程或线程自己的文件描述符数组fd_table中*成功返回下标,失败返回-1*/
int32_t pcb_fd_install(int32_t global_fd_idx)
{struct task_struct *cur = running_thread();uint8_t local_fd_idx = 3;while (local_fd_idx < MAX_FILES_OPEN_PER_PROC){// 我们在线程初始化的时候,用-1表示线程文件表空位,所以-1对应可以使用if (cur->fd_table[local_fd_idx] == -1){cur->fd_table[local_fd_idx] = global_fd_idx;break;}local_fd_idx++;}if (local_fd_idx == MAX_FILES_OPEN_PER_PROC){// 超出单个进程最大打开文件数限制printk("exceed max open files_per_proc\n");return -1;}return local_fd_idx;
}/*分配一个i节点,返回i结点号*/
int32_t inode_bitmap_alloc(struct partition *part)
{int32_t bit_idx = bitmap_scan(&part->inode_bitmap, 1);if (bit_idx == -1){return -1; // 申请失败}// 申请成功,设置位图并返回编号bitmap_set(&part->inode_bitmap, bit_idx, 1);return bit_idx;
}/*分配1个扇区,返回扇区lba地址*/
int32_t block_bitmap_alloc(struct partition *part)
{int32_t bit_idx = bitmap_scan(&part->block_bitmap, 1);if (bit_idx == -1){return -1; // 申请失败}bitmap_set(&part->block_bitmap, bit_idx, 1);// 返回扇区lba号return (part->sb->block_bitmap_lba + bit_idx);
}/*内存中某个bitmap第bit_idx位修改后,将对应的修改同步到硬盘*/
void bitmap_sync(struct partition *part, uint32_t bit_idx, uint8_t btmp)
{// 一个位图的一个位进行了修改,说明512字节的一个扇区被分配或者回收,需要更新硬盘位图// 位图结构总是整扇区大小的,一次至少更新512字节uint32_t off_sec = bit_idx / 4096; // 找到位图对应的硬盘上的扇区偏移量uint32_t off_size = off_sec * 512; // 对应的字节偏移量uint32_t sec_lba;uint8_t *bitmap_off;if (btmp == INODE_BITMAP){sec_lba = part->sb->inode_bitmap_lba + off_sec;bitmap_off = part->inode_bitmap.btmp_bits + off_size;}else if (btmp == BLOCK_BITMAP){sec_lba = part->sb->block_bitmap_lba + off_sec;bitmap_off = part->block_bitmap.btmp_bits + off_size;}ide_write(part->my_disk, sec_lba, bitmap_off, 1);
}
目前file.c是100行左右代码,后续还会新增。
目录相关函数
先回顾目录和目录项:目录本身是一种特殊文件,内部的数据块保存的是目录项的列表。目录项是目录文件的一条记录,用于记录该目录下的一个文件或目录信息。这两种结构被抽象在dir.h中,大小都不需要是整扇区。
完善fs/dir.h
新增了函数声明
#ifndef __FS_DIR_H
#define __FS_DIR_H#include "../lib/kernel/stdint.h"
#include "fs.h" //提供enum file_types
struct inode;   // inode前向声明#define MAX_FILE_NAME_LEN 16 // 最大文件名长度/*目录结构体*/
struct dir
{struct inode *inode;uint32_t dir_pos;     // 记录在此目录下的偏移uint8_t dir_buf[512]; // 目录的数据缓冲区
};/*目录项结构体*/
struct dir_entry
{char filename[MAX_FILE_NAME_LEN]; // 普通文件或目录名称uint32_t i_no;                    // 对应的i结点编号enum file_types f_type;           // 文件类型
};/*打开根目录*/
void open_root_dir(struct partition *part);
/*在part分区打开i结点编号inode_no的目录,并返回目录指针*/
struct dir *dir_open(struct partition *part, uint32_t inode_no);
/*在part分区内的pdir目录内寻找名为name的文件或目录*找到后返回true,并把目录项存在dir_e,否则返回false*/
bool search_dir_entry(struct partition *part, struct dir *pdir, const char *name, struct dir_entry *dir_e);
/*关闭目录*/
void dir_close(struct dir *dir);
/*在内存中初始化目录项p_de*/
void create_dir_entry(char *filename, uint32_t inode_no, uint8_t file_type, struct dir_entry *p_de);
/*将目录项p_de写入父目录parent_dir中,io_buf由主调函数提供*/
bool sync_dir_entry(struct dir *parent_dir, struct dir_entry *p_de, void *io_buf);
#endif
编写fs/dir.c
回顾一下inode结构。一块一扇区512字节。对于我们的inode,只有13个指针,前12个是直接块指针,最后一个指针指向一级间接块索引表。索引表页也是一个块,512字节大小,内部包含128个4字节指针,再次指向128个块。一个inode结构可以控制140个块。
这是本节新增文件,写完是230+行。
#include "dir.h"
#include "inode.h"            // 前向声明
#include "file.h"             //block_bitmap_alloc函数
#include "../device/ide.h"    // partition结构体
#include "../kernel/memory.h" // sys_malloc函数
#include "../kernel/debug.h"  //ASSERT哨兵
#include "../lib/stdio.h"     //printk函数
#include "../lib/string.h"    //strcmp函数struct dir root_dir; // 根目录/*打开根目录,即初始化*/
void open_root_dir(struct partition *part)
{root_dir.inode = inode_open(part, part->sb->root_inode_no);root_dir.dir_pos = 0; // 偏移地址为0
}/*在part分区打开i结点编号inode_no的目录,并返回目录指针*/
struct dir *dir_open(struct partition *part, uint32_t inode_no)
{struct dir *pdir = (struct dir *)sys_malloc(sizeof(struct dir));pdir->inode = inode_open(part, inode_no);pdir->dir_pos = 0;return pdir;
}/*在part分区内的pdir目录内寻找名为name的文件或目录*找到后返回true,并把目录项存在dir_e,否则返回false*/
bool search_dir_entry(struct partition *part, struct dir *pdir, const char *name, struct dir_entry *dir_e)
{/*对于我们的inode,只有13个指针,前12个是直接块指针,最后一个指针指向一级间接块索引表*索引表页也是一个块,512字节大小,内部包含128个4字节指针,再次指向128个块*当硬盘被虚拟抽象到内存后,LBA号也就抽象成了指针*/uint32_t block_cnt = 12 + 128; // 12个直接块+128个一级间接块指针// all_block保存此inode所有块指针,32位系统中,一个指针大小为4字节uint32_t *all_block = (uint32_t *)sys_malloc((12 + 128) * 4);if (all_block == NULL){printk("search_dir_entry: sys_malloc for all_block failed");return false;}uint32_t block_idx = 0;// 先处理12个直接块while (block_idx < 12){all_block[block_idx] = pdir->inode->i_sectors[block_idx];block_idx++;}block_idx = 0;// 如果使用了一级间接块表,处理一级间接块if (pdir->inode->i_sectors[12] != 0){// 因为all_block的类型是uint32_t *,所以后面的+12其实是+12*4,目的是跳过12个直接块ide_read(part->my_disk, pdir->inode->i_sectors[12], all_block + 12, 1);}uint8_t *buf = (uint8_t *)sys_malloc(SECTOR_SIZE);struct dir_entry *p_de = (struct dir_entry *)buf; // 指向目录项的指针uint32_t dir_entry_size = part->sb->dir_entry_size;uint32_t dir_entry_cnt = SECTOR_SIZE / dir_entry_size; // 计算一个扇区包含多少目录项while (block_idx < block_cnt) // 遍历这个目录拥有的所有的块{// 地址为0说明块内无数据,寻找下一个块if (all_block[block_idx] == 0){block_idx++;continue;}ide_read(part->my_disk, all_block[block_idx], buf, 1);// 现在我们读取了一个块的数据到buf中(也就是pd_e中),接下来遍历这个扇区内所有的目录项uint32_t dir_entry_idx = 0;while (dir_entry_idx < dir_entry_cnt){// 取反的原因涉及到strcmp函数的返回值if (!strcmp(p_de->filename, name)){// 找到了相关文件或目录,复制到指定内存dir_ememcpy(dir_e, p_de, dir_entry_size);sys_free(buf);sys_free(all_block);return true;}dir_entry_idx++; // 进入下一个目录项p_de++;}block_idx++;                    // 此扇区已遍历完,进入下一个扇区p_de = (struct dir_entry *)buf; // 指向新扇区的bufmemset(buf, 0, SECTOR_SIZE);    // 将buf清零}sys_free(buf);sys_free(all_block);return false;
}/*关闭目录*/
void dir_close(struct dir *dir)
{/******************** 根目录不能被关闭 *********************1 根目录自打开后就不应该关闭,否则还需要再次open_root_dir();*2 root_dir 所在的内存是低端1MB之内,并非在堆中,free会出问题 */if (dir == &root_dir){return;}// 对于一般目录,关闭目录就是关闭目录文件inode,然后释放dir所占内存inode_close(dir->inode);sys_free(dir);
}/*在内存中初始化目录项p_de*/
void create_dir_entry(char *filename, uint32_t inode_no, uint8_t file_type, struct dir_entry *p_de)
{ASSERT(strlen(filename) <= MAX_FILE_NAME_LEN);memcpy(p_de->filename, filename, strlen(filename));p_de->i_no = inode_no;p_de->f_type = file_type;
}/*将目录项p_de写入父目录parent_dir中,io_buf由主调函数提供*/
bool sync_dir_entry(struct dir *parent_dir, struct dir_entry *p_de, void *io_buf)
{struct inode *dir_inode = parent_dir->inode;uint32_t dir_size = dir_inode->i_size;uint32_t dir_entry_size = cur_part->sb->dir_entry_size;ASSERT(dir_size % dir_entry_size == 0); // 目录大小是目录项大小的整数倍uint32_t dir_entry_per_sec = (512 / dir_size); // 每扇区目录项数int32_t block_lba = -1;                        // 数据块lbauint8_t block_idx = 0;uint32_t all_block[140] = {0};// 处理直接块while (block_idx < 12){all_block[block_idx] = dir_inode->i_sectors[block_idx];block_idx++;}struct dir_entry *dir_e = (struct dir_entry *)io_buf; // dir_e用来在io_buf中遍历目录项int32_t block_bitmap_idx = -1;                        // 数据块位图索引/*开始遍历扇区寻找空目录项,如果已有扇区没有空目录项,在文件大小范围内,申请新扇区*/while (block_idx < 140){block_bitmap_idx = -1;if (all_block[block_idx] == 0) // 此块未使用{// 申请此块,获得lbablock_lba = block_bitmap_alloc(cur_part);if (block_lba == -1) // 失败{printk("alloc block bitmap for sync_dir_entry failed\n");return false;}// 数据块位图索引=当前lba-数据块起始lbablock_bitmap_idx = block_lba - cur_part->sb->data_start_lba;ASSERT(block_bitmap_idx != -1);bitmap_sync(cur_part, block_bitmap_idx, BLOCK_BITMAP);block_bitmap_idx = -1;// 先定位到空目录项所在扇区if (block_idx < 12) // 直接块{dir_inode->i_sectors[block_idx] = all_block[block_idx] = block_lba;}else if (block_idx == 12) // 还未分配一级间接块表地址{dir_inode->i_sectors[12] = block_lba; // 将上面获取的lba作为一级间接块表地址block_lba = -1;block_lba = block_bitmap_alloc(cur_part); // 分配第0个间接块地址if (block_lba == -1)                      // 分配失败{block_bitmap_idx = dir_inode->i_sectors[12] - cur_part->sb->data_start_lba;bitmap_set(&cur_part->block_bitmap, block_bitmap_idx, 0); // 将相应块位图设置为未使用dir_inode->i_sectors[12] = 0;printk("alloc block bitmap for sync_dir_entry failed\n");return false;}// 同步block_bitmapblock_bitmap_idx = block_lba - cur_part->sb->data_start_lba;ASSERT(block_bitmap_idx != -1);bitmap_sync(cur_part, block_bitmap_idx, BLOCK_BITMAP);all_block[12] = block_lba;// 写入硬盘ide_write(cur_part->my_disk, dir_inode->i_sectors[12], all_block + 12, 1);}else // 还有未分配的间接块{all_block[block_idx] = block_lba;// 我们更新硬盘中的一级间接表,让间接表多一个指向新扇区的指针ide_write(cur_part->my_disk, dir_inode->i_sectors[12], all_block + 12, 1);}// 将新目录项p_de写入新分配的间接块memset(io_buf, 0, 512);memcpy(io_buf, p_de, dir_entry_size);// 区别dir_inode->i_sectors[12]和all_block// 前者是inode内一级块表,通过它索引到all_block后128项ide_write(cur_part->my_disk, all_block[block_idx], io_buf, 1);dir_inode->i_size += dir_entry_size;return true;}/*对应此块未使用的情况,如果此块已被使用,将块读入内存*然后寻找块内有没有空目录项*/ide_read(cur_part->my_disk, all_block[block_idx], io_buf, 1);uint8_t dir_entry_idx = 0; // 用于按目录项遍历块while (dir_entry_idx < dir_entry_per_sec){if ((dir_e + dir_entry_idx)->f_type == FT_UNKNOWN){// FT_UNKNOWN代表未使用或已删除,总之就是空白memcpy(dir_e + dir_entry_idx, p_de, dir_entry_size);ide_write(cur_part->my_disk, all_block[block_idx], io_buf, 1);dir_inode->i_size += dir_entry_size;return true;}dir_entry_idx++;}block_idx++;}printk("directory is full!\n");return false;
}
从今天下午4点开始写,到现在是2025年5月12日20点45分,进度推进到这里。
路径解析相关函数
路径解析,就是根据路径把文件名分层,逐层在磁盘查找,确认文件名是否存在。这部分继续编写fs.c,总共是实现两个函数。
/*将最上层路径名解析出来,在name_store保存当前路径名,然后返回解析后的子路径*/
static char *path_paser(char *pathname, char *name_store)
{if (pathname[0] == '/') // 跳过前面所有的/{while (*pathname == '/'){pathname++;}}// 开始一般的路径解析,提取最上层路径名,即从字符开始到第一个/停止while (*pathname != '/' && *pathname != 0) // 0是空字符ascii码{// 我不喜欢写自增,因为自增容易带来阅读障碍*name_store = *pathname;name_store++;pathname++;}if (pathname[0] == 0){return NULL;}return pathname;
}/*返回路径深度*/
int32_t path_depth_cnt(char *pathname)
{ASSERT(pathname != NULL);char *p = pathname;           // 用于保存每次path_paser返回的子路径char name[MAX_FILE_NAME_LEN]; // 用于保存每次path_paser返回的原文件名uint32_t depth = 0;p = path_paser(p, name);while (name[0] != 0) // 只要存在当前文件{depth++;memset(name, 0, MAX_FILE_NAME_LEN);if (p != 0) // 只要存在子路径{p = path_paser(p, name);}}return depth;
}
实现文件检索功能
文件检索就是确定文件是否存在于此路径
修改fs.h
新增了宏,枚举,结构体,还有上一节的函数的声明。
#ifndef __FS_FS_H
#define __FS_FS_Hstruct partition; // 前向声明,代替ide.h
struct dir;       // 代替dir.h#define MAX_FILES_PER_PART 4096 // 每个扇区最大支持文件数
#define BITS_PER_SECTOR 4096    // 每扇区的位数
#define SECTOR_SIZE 512         // 每扇区的字节数
#define BLOCK_SIZE SECTOR_SIZE  // 块字节大小 我们设置为1个块==1个扇区
#define MAX_PATH_LEN 512        // 路径最大长度/*文件类型枚举*/
enum file_types
{FT_UNKNOWN,  // 0,未知文件类型FT_REGULAR,  // 1,普通文件类型FT_DIRECTORY // 2,目录文件类型
};/*打开文件的选项枚举*/
enum oflags
{O_RDONLY,   // 只读O_WRONLY,   // 只写O_RDWR,     // 读写O_CREAT = 4 // 创建
};/*记录查找过程中的上级路径*/
struct path_search_record
{char searched_path[MAX_PATH_LEN]; // 父路径struct dir *parent_dir;           // 直接父目录enum file_types file_type;        // 找到的文件的类型
};void filesys_init(void);                /*在磁盘上搜索文件系统,若没有则格式化分区创建文件系统*/
int32_t path_depth_cnt(char *pathname); /*返回路径深度*/extern struct partition *cur_part;
#endif
继续完善fs.c
#include "fs.h"
#include "inode.h"
#include "dir.h"
#include "super_block.h"
#include "../lib/kernel/stdint.h"
#include "../lib/kernel/list.h"
#include "../lib/string.h"
#include "../lib/stdio.h"
#include "../device/ide.h" //partition
#include "../kernel/debug.h"struct partition *cur_part; // 记录默认情况下操作的分区/* 在分区链表中找到名为part_name的分区,并将其指针赋值给cur_part */
static bool mount_partition(struct list_elem *pelem, int arg)
{char *part_name = (char *)arg;struct partition *part = elem2entry(struct partition, part_tag, pelem);if (!strcmp(part->name, part_name)){cur_part = part;struct disk *hd = cur_part->my_disk;// 创建用来保存超级块的缓冲区struct super_block *sb_buf = (struct super_block *)sys_malloc(SECTOR_SIZE);// 在内存创建cur_part的超级块cur_part->sb = (struct super_block *)sys_malloc(sizeof(struct super_block));if (cur_part->sb == NULL){PANIC("alloc memory failed!");}/*读入超级块到缓冲区*/memset(sb_buf, 0, SECTOR_SIZE);ide_read(hd, cur_part->start_lba + 1, sb_buf, 1);/*把缓冲区超级块数据复制到cur_part的sb中*/memcpy(cur_part->sb, sb_buf, sizeof(struct super_block));/*为什么要先读入缓冲区,再把缓冲区数据复制到相应的变量中?*缓冲区大小就是1扇区512字节,和硬盘读取标准对齐,而实际超级块结构体小于512字节*如果直接读入实际结构体,会导致硬盘读写很慢。*//*将分区的块位图写入内存*/// 开辟内存空间给位图指针cur_part->block_bitmap.btmp_bits = (uint8_t *)sys_malloc(sb_buf->block_bitmap_sects * SECTOR_SIZE);if (cur_part->block_bitmap.btmp_bits == NULL){PANIC("alloc memory failed!");}// 设置位图长度cur_part->block_bitmap.btmp_bytes_len = sb_buf->block_bitmap_sects * SECTOR_SIZE;// sb_buf->block_bitmap_sects等价于cur_part->sb->block_bitmap_sects// 给位图指针赋值ide_read(hd, sb_buf->block_bitmap_lba, cur_part->block_bitmap.btmp_bits, sb_buf->block_bitmap_sects);/*将分区的inode位图写入内存*/cur_part->inode_bitmap.btmp_bits = (uint8_t *)sys_malloc(sb_buf->inode_bitmap_sects * SECTOR_SIZE);if (cur_part->inode_bitmap.btmp_bits == NULL){PANIC("alloc memory failed!");}cur_part->inode_bitmap.btmp_bytes_len = sb_buf->block_bitmap_sects * SECTOR_SIZE;ide_read(hd, sb_buf->inode_bitmap_lba, cur_part->inode_bitmap.btmp_bits, sb_buf->inode_bitmap_sects);list_init(&cur_part->open_inodes);printk("mount %s done!\n", part->name);/*返回true是为了配合定义在list.c的list_traversal函数,和本函数功能无关*返回true时list_traversal停止对链表的遍历*/return true;}return false;
}static void partition_format(struct disk *hd, struct partition *part)
{uint32_t boot_sector_sects = 1; // 根目录扇区uint32_t super_block_sects = 1; // 超级块扇区// inode位图所占扇区uint32_t inode_bitmap_sects = DIV_ROUND_UP(MAX_FILES_PER_PART, BITS_PER_SECTOR);// inode表所占扇区uint32_t inode_table_sects = DIV_ROUND_UP(((sizeof(struct inode) * MAX_FILES_PER_PART)), SECTOR_SIZE);uint32_t used_sects = boot_sector_sects + super_block_sects + inode_bitmap_sects + inode_table_sects;uint32_t free_sects = part->sec_cnt - used_sects;// 块位图所占扇区uint32_t block_bitmap_sects = DIV_ROUND_UP(free_sects, BITS_PER_SECTOR);uint32_t block_bitmap_bit_len = free_sects - block_bitmap_sects;block_bitmap_sects = DIV_ROUND_UP(block_bitmap_bit_len, BITS_PER_SECTOR);// 将超级块初始化struct super_block sb;sb.magic = 0x20250325;sb.sec_cnt = part->sec_cnt;sb.inode_cnt = MAX_FILES_PER_PART;sb.part_lba_base = part->start_lba;sb.block_bitmap_lba = sb.part_lba_base + 2;sb.block_bitmap_sects = block_bitmap_sects;sb.inode_bitmap_lba = sb.block_bitmap_lba + sb.block_bitmap_sects;sb.inode_bitmap_sects = inode_bitmap_sects;sb.inode_table_lba = sb.inode_bitmap_lba + sb.inode_bitmap_sects;sb.inode_table_sects = inode_table_sects;sb.data_start_lba = sb.inode_table_lba + sb.inode_table_sects;sb.root_inode_no = 0;sb.dir_entry_size = sizeof(struct dir_entry);printk("%s info:\n""  magic:              0x%x\n""  part_lba_base:      0x%x\n""  all_sectors:        0x%x\n""  inode_cnt:          0x%x\n""  block_bitmap_lba:   0x%x\n""  block_bitmap_sects: 0x%x\n""  inode_bitmap_lba:   0x%x\n""  inode_bitmap_sects: 0x%x\n""  inode_table_lba:    0x%x\n""  inode_table_sects:  0x%x\n""  data_start_lba:     0x%x\n",part->name,sb.magic, sb.part_lba_base, sb.sec_cnt, sb.inode_cnt,sb.block_bitmap_lba, sb.block_bitmap_sects, sb.inode_bitmap_lba,sb.inode_bitmap_sects, sb.inode_table_lba, sb.inode_table_sects,sb.data_start_lba);// 1.将超级块写入本分区1扇区ide_write(hd, part->start_lba + 1, &sb, 1);printk("  super_blcok_lba:    0x%x\n", part->start_lba + 1);// 开辟一块缓冲区,大小为三个属性中最大的uint32_t buf_size = (sb.block_bitmap_sects >= sb.inode_bitmap_sects) ? sb.block_bitmap_sects : sb.inode_bitmap_sects;buf_size = (buf_size >= sb.inode_table_sects) ? buf_size : sb.inode_table_sects;buf_size *= SECTOR_SIZE;uint8_t *buf = (uint8_t *)sys_malloc(buf_size);// 2.将块位图初始化并写入sb.block_bitmap_lbabuf[0] |= 0x01; // 0号块留给根目录uint32_t block_bitmap_last_byte = block_bitmap_bit_len / 8;uint8_t block_bitmap_last_bit = block_bitmap_bit_len % 8;// last_size是保存位图的最后一个扇区中,多余出的位uint32_t last_size = (SECTOR_SIZE - block_bitmap_last_byte % SECTOR_SIZE);// 先将超出实际块数的部分设置为已占用1memset(&buf[block_bitmap_last_byte], 0xff, last_size);// 在将有效位重新设置为未占用0uint8_t bit_idx = 0;while (bit_idx <= block_bitmap_last_bit){// 通过取反+左移,实现逐位清零buf[block_bitmap_last_byte] &= ~(1 << bit_idx++);}ide_write(hd, sb.block_bitmap_lba, buf, sb.block_bitmap_sects);// 3.将inode位图初始化并写入sb.inode_bitmap_lba// 清空缓冲区memset(buf, 0, buf_size);buf[0] |= 0x1;/*inode_table中有4096个inode,正好一个扇区,*inode_bitmap扇区没有多余无效位,不需要进一步处理*/ide_write(hd, sb.inode_bitmap_lba, buf, sb.inode_bitmap_sects);// 4 将inode数组初始化并写入sb.inode_table_lba// 初始化了第一个indoememset(buf, 0, buf_size);struct inode *i = (struct inode *)buf;i->i_size = sb.dir_entry_size * 2; // 留出..和.目录i->i_no = 0;i->i_sectors[0] = sb.data_start_lba;ide_write(hd, sb.inode_table_lba, buf, sb.inode_table_sects);// 5.将根目录写入sb.data_start_lbamemset(buf, 0, buf_size);struct dir_entry *p_de = (struct dir_entry *)buf;// 初始化当前目录.memcpy(p_de->filename, ".", 1);p_de->i_no = 0;p_de->f_type = FT_DIRECTORY;p_de++;// 初始化父目录..memcpy(p_de->filename, "..", 2);p_de->i_no = 0;p_de->f_type = FT_DIRECTORY;ide_write(hd, sb.data_start_lba, buf, 1);printk("  root_dir_lba:       0x%x\n", sb.data_start_lba);printk("%s format done\n", part->name);sys_free(buf);
}/*在磁盘上搜索文件系统,若没有则格式化分区创建文件系统*/
void filesys_init()
{uint8_t channel_no = 0, dev_no, part_idx = 0;// 开辟超级块缓冲区struct super_block *sb_buf = (struct super_block *)sys_malloc(SECTOR_SIZE);if (sb_buf == NULL){PANIC("alloc memory failed!");}printk("searching filesystem......\n");while (channel_no < channel_cnt) // channel_cnt声明在ide.h,实现在ide.c{dev_no = 0;while (dev_no < 2) // 一个通道可以挂载2个设备{if (dev_no == 0){dev_no++;continue;}struct disk *hd = &channels[channel_no].devices[dev_no];struct partition *part = hd->prim_parts; // 初始指向4个主分区while (part_idx < 12) // 4主分区+8逻辑分区{if (part_idx == 4){part = hd->logic_parts; // 开始处理逻辑分区}if (part->sec_cnt != 0){memset(sb_buf, 0, SECTOR_SIZE);// 读取超级块,根据魔数判断是否存在文件系统ide_read(hd, part->start_lba + 1, sb_buf, 1);// 魔数匹配,说明存在我的文件系统if (sb_buf->magic == 0x20250325){printk("    %s has file system\n", part->name);}// 不匹配,认为不存在文件系统,于是创建我的操作系统else{// 提示正在进行初始化printk("formatting %s's partition %s......\n", hd->name, part->name);// 调用函数创建每个分区的文件系统partition_format(hd, part);}}part_idx++;part++; // 进入下一分区}dev_no++; // 进入下一磁盘}channel_no++; // 进入下一通道}sys_free(sb_buf);/*确定默认操作分区*/char default_part[8] = "sdb1";/*挂载分区*/list_traversal(&partition_list, mount_partition, (int)default_part);
}/*将最上层路径名解析出来,在name_store保存当前路径名,然后返回解析后的子路径*/
static char *path_paser(char *pathname, char *name_store)
{if (pathname[0] == '/') // 跳过前面所有的/{while (*pathname == '/'){pathname++;}}// 开始一般的路径解析,提取最上层路径名,即从字符开始到第一个/停止while (*pathname != '/' && *pathname != 0) // 0是空字符ascii码{// 我不喜欢写自增,因为自增容易带来阅读障碍*name_store = *pathname;name_store++;pathname++;}if (pathname[0] == 0){return NULL;}return pathname;
}/*返回路径深度*/
int32_t path_depth_cnt(char *pathname)
{ASSERT(pathname != NULL);char *p = pathname;           // 用于保存每次path_paser返回的子路径char name[MAX_FILE_NAME_LEN]; // 用于保存每次path_paser返回的原文件名uint32_t depth = 0;p = path_paser(p, name);while (name[0] != 0) // 只要存在当前文件{depth++;memset(name, 0, MAX_FILE_NAME_LEN);if (p != 0) // 只要存在子路径{p = path_paser(p, name);}}return depth;
}/*搜索文件pathname,若找到返回inode号,否则返回-1*/
static int search_file(const char *pathname, struct path_search_record *search_record)
{/*如果查找的是根目录,直接返回根目录信息*/if (!strcmp(pathname, "/") || !strcmp(pathname, "/.") || !strcmp(pathname, "/..")){search_record->file_type = FT_DIRECTORY;search_record->parent_dir = &root_dir;search_record->searched_path[0] = 0;return 0;}uint32_t path_len = strlen(pathname);ASSERT(path_len < MAX_PATH_LEN);char *sub_path = (char *)pathname;struct dir *parent_dir = &root_dir;struct dir_entry dir_e; // 保存查到的目录项/*逐级解析路径*/char name[MAX_FILE_NAME_LEN] = {0};search_record->parent_dir = parent_dir;search_record->file_type = FT_UNKNOWN;uint32_t parent_inode_no = 0; // 父目录的inode号sub_path = path_paser(sub_path, name);while (name[0]){ASSERT(strlen(search_record->searched_path) < MAX_PATH_LEN);/*记录已经存在的路径*/strcat(search_record->searched_path, "/");strcat(search_record->searched_path, name);// 如果成功找到了当前本级文件名的目录项if (search_dir_entry(cur_part, parent_dir, name, &dir_e)){memset(name, 0, MAX_FILE_NAME_LEN);if (sub_path) // 如果还有子目录项{sub_path = path_paser(sub_path, name);}if (dir_e.f_type == FT_DIRECTORY) // 目录文件,需要进一步查找{parent_inode_no = parent_dir->inode->i_no;dir_close(parent_dir);parent_dir = dir_open(cur_part, dir_e.i_no);search_record->parent_dir = parent_dir;continue;}else if (dir_e.f_type == FT_REGULAR) // 普通文件,查找到了终点{search_record->file_type = FT_REGULAR;return dir_e.i_no;}}else // 没有找到当前文件名的目录项{return -1;}}/*至此,已经遍历完完整目录,并且最后一个文件是目录文件*/dir_close(search_record->parent_dir);// 更新查找记录search_record->parent_dir = dir_open(cur_part, parent_inode_no);search_record->file_type = FT_DIRECTORY;return dir_e.i_no;
}
这是目前能通过编译的fs.c,365行代码。
makefile
最后放一下这章结束时的makefile吧,这部分没有开bochs检验,因为还都是基础函数,所以没有什么运行截图。目前的makefile也是为了确保代码能编译,不保证代码逻辑的完全正确。
BUILD_DIR = ./build
ENTRY_POINT = 0xc0001500
AS = nasm
CC = gcc
LD = ld
LIB = -I lib/ -I lib/kernel/ -I lib/user/ -I kernel/ -I device/
ASFLAGS = -f elf
CFLAGS =  -Wall -m32 -fno-stack-protector $(LIB) -c -fno-builtin -W -Wstrict-prototypes -Wmissing-prototypes
LDFLAGS =  -m elf_i386 -Ttext $(ENTRY_POINT) -e main -Map $(BUILD_DIR)/kernel.map
OBJS = $(BUILD_DIR)/main.o $(BUILD_DIR)/init.o $(BUILD_DIR)/interrupt.o \$(BUILD_DIR)/timer.o $(BUILD_DIR)/kernel.o $(BUILD_DIR)/print.o \$(BUILD_DIR)/debug.o $(BUILD_DIR)/string.o $(BUILD_DIR)/memory.o \$(BUILD_DIR)/bitmap.o $(BUILD_DIR)/thread.o $(BUILD_DIR)/list.o \$(BUILD_DIR)/switch.o $(BUILD_DIR)/sync.o $(BUILD_DIR)/console.o \$(BUILD_DIR)/keyboard.o $(BUILD_DIR)/ioqueue.o $(BUILD_DIR)/tss.o \$(BUILD_DIR)/process.o $(BUILD_DIR)/syscall-init.o $(BUILD_DIR)/syscall.o \$(BUILD_DIR)/stdio.o $(BUILD_DIR)/ide.o $(BUILD_DIR)/fs.o \$(BUILD_DIR)/inode.o $(BUILD_DIR)/file.o $(BUILD_DIR)/dir.o ################	c代码编译   ##################
$(BUILD_DIR)/main.o: kernel/main.c lib/kernel/print.h \lib/kernel/stdint.h kernel/init.h kernel/debug.h \kernel/memory.h thread/thread.h kernel/interrupt.h \device/console.h userprog/process.h lib/user/syscall.h \userprog/syscall-init.h lib/stdio.h$(CC) $(CFLAGS) $< -o $@$(BUILD_DIR)/init.o: kernel/init.c kernel/init.h lib/kernel/print.h \lib/kernel/stdint.h kernel/interrupt.h device/timer.h \kernel/memory.h thread/thread.h device/console.h \device/keyboard.h userprog/tss.h userprog/syscall-init.h \device/ide.h fs/fs.h$(CC) $(CFLAGS) $< -o $@$(BUILD_DIR)/interrupt.o: kernel/interrupt.c kernel/interrupt.h \lib/kernel/stdint.h kernel/global.h kernel/io.h \lib/kernel/print.h$(CC) $(CFLAGS) $< -o $@$(BUILD_DIR)/timer.o: device/timer.c device/timer.h lib/kernel/stdint.h \kernel/io.h lib/kernel/print.h kernel/interrupt.h \thread/thread.h kernel/debug.h$(CC) $(CFLAGS) $< -o $@$(BUILD_DIR)/debug.o: kernel/debug.c kernel/debug.h \lib/kernel/print.h kernel/interrupt.h$(CC) $(CFLAGS) $< -o $@$(BUILD_DIR)/string.o: lib/string.c lib/string.h \kernel/debug.h$(CC) $(CFLAGS) $< -o $@$(BUILD_DIR)/memory.o: kernel/memory.c kernel/memory.h \lib/kernel/stdint.h lib/kernel/bitmap.h kernel/debug.h \lib/string.h thread/sync.h thread/thread.h$(CC) $(CFLAGS) $< -o $@$(BUILD_DIR)/bitmap.o: lib/kernel/bitmap.c lib/kernel/bitmap.h \lib/string.h kernel/interrupt.h lib/kernel/print.h \kernel/debug.h$(CC) $(CFLAGS) $< -o $@$(BUILD_DIR)/thread.o: thread/thread.c thread/thread.h \lib/kernel/stdint.h lib/kernel/list.h lib/string.h \kernel/memory.h kernel/interrupt.h kernel/debug.h \lib/kernel/print.h userprog/process.h$(CC) $(CFLAGS) $< -o $@$(BUILD_DIR)/list.o: lib/kernel/list.c lib/kernel/list.h \lib/kernel/stdint.h kernel/interrupt.h kernel/debug.h$(CC) $(CFLAGS) $< -o $@$(BUILD_DIR)/sync.o: thread/sync.c thread/sync.h \lib/kernel/stdint.h thread/thread.h kernel/debug.h \kernel/interrupt.h$(CC) $(CFLAGS) $< -o $@$(BUILD_DIR)/console.o: device/console.c device/console.h \lib/kernel/print.h thread/sync.h$(CC) $(CFLAGS) $< -o $@$(BUILD_DIR)/keyboard.o: device/keyboard.c device/keyboard.h \lib/kernel/print.h kernel/interrupt.h kernel/io.h \lib/kernel/stdint.h device/ioqueue.h$(CC) $(CFLAGS) $< -o $@$(BUILD_DIR)/ioqueue.o: device/ioqueue.c device/ioqueue.h \lib/kernel/stdint.h thread/thread.h thread/sync.h \kernel/interrupt.h kernel/debug.h$(CC) $(CFLAGS) $< -o $@$(BUILD_DIR)/tss.o: userprog/tss.c userprog/tss.h \lib/kernel/stdint.h thread/thread.h kernel/global.h \lib/kernel/print.h lib/string.h$(CC) $(CFLAGS) $< -o $@$(BUILD_DIR)/process.o: userprog/process.c userprog/process.h \kernel/global.h lib/kernel/stdint.h thread/thread.h \kernel/debug.h userprog/tss.h device/console.h \lib/string.h kernel/interrupt.h$(CC) $(CFLAGS) $< -o $@$(BUILD_DIR)/syscall.o: lib/user/syscall.c lib/user/syscall.h$(CC) $(CFLAGS) $< -o $@$(BUILD_DIR)/syscall-init.o: userprog/syscall-init.c userprog/syscall-init.h \lib/kernel/stdint.h lib/user/syscall.h thread/thread.h \lib/kernel/print.h$(CC) $(CFLAGS) $< -o $@$(BUILD_DIR)/stdio.o: lib/stdio.c lib/stdio.h \lib/kernel/stdint.h lib/string.h kernel/debug.h \lib/user/syscall.h$(CC) $(CFLAGS) $< -o $@$(BUILD_DIR)/ide.o: device/ide.c device/ide.h \lib/stdio.h kernel/debug.h kernel/global.h \thread/sync.h kernel/io.h device/timer.h \kernel/interrupt.h lib/string.h fs/super_block.h$(CC) $(CFLAGS) $< -o $@$(BUILD_DIR)/fs.o: fs/fs.c fs/fs.h \fs/inode.h fs/super_block.h fs/dir.h \lib/stdio.h lib/string.h kernel/debug.h \device/ide.h$(CC) $(CFLAGS) $< -o $@$(BUILD_DIR)/inode.o: fs/inode.c fs/inode.h \device/ide.h kernel/debug.h kernel/interrupt.h \thread/thread.h lib/string.h lib/kernel/stdint.h$(CC) $(CFLAGS) $< -o $@$(BUILD_DIR)/file.o: fs/file.c fs/file.h \fs/inode.h device/ide.h thread/thread.h \lib/stdio.h lib/kernel/stdint.h$(CC) $(CFLAGS) $< -o $@$(BUILD_DIR)/dir.o: fs/dir.c fs/dir.h \fs/inode.h fs/file.h device/ide.h \kernel/memory.h kernel/debug.h lib/stdio.h \lib/string.h$(CC) $(CFLAGS) $< -o $@##############    汇编代码编译    ###############
$(BUILD_DIR)/kernel.o: kernel/kernel.S$(AS) $(ASFLAGS) $< -o $@$(BUILD_DIR)/print.o: lib/kernel/print.S$(AS) $(ASFLAGS) $< -o $@$(BUILD_DIR)/switch.o: thread/switch.S$(AS) $(ASFLAGS) $< -o $@##############    连接所有目标文件    #############
$(BUILD_DIR)/kernel.bin: $(OBJS)$(LD) $(LDFLAGS) $^ -o $@.PHONY : mk_dir hd clean allmk_dir:if [ ! -d $(BUILD_DIR) ]; then mkdir $(BUILD_DIR); fihd:dd if=$(BUILD_DIR)/kernel.bin \of=/home/hongbai/bochs/bin/os_hd_60M.img \bs=512 count=200 seek=10 conv=notruncclean:cd $(BUILD_DIR) && rm -f ./*build: $(BUILD_DIR)/kernel.binall: mk_dir build hd
结语
现在是5月13日晚上8点,从前天晚上开始到现在,算是写完了14.3和14.4这部分。后面就是一个个功能的实现了,还是非常期待的。
这周能自由支配的时间比较短,所以一点点写吧,能写多少算多少。
感觉文件这部分想要学好,必须理解虚拟在内存的硬盘和内存之间的通信关系,只能说目前我只能是看懂代码copy一下,还需要进一步学习理解啊。
后续文件操作6章两篇博客,目录操作5章两篇博客,再有4篇博客我们就能完成文件系统这一部分了。
相关文章:
《操作系统真象还原》第十四章(2)——文件描述符、文件操作基础函数
文章目录 前言文件描述符简介文件描述符原理文件描述符实现修改thread.h修改thread.c 文件操作相关的基础函数inode操作相关函数文件相关函数编写file.h编写file.c 目录相关函数完善fs/dir.h编写fs/dir.c 路径解析相关函数实现文件检索功能修改fs.h继续完善fs.c makefile 结语 …...
EMQX v5.0通过连接器和规则同步数据
1 概述 EMQX数据集成功能,帮助用户将所有的业务数据无需额外编写代码即可快速完成处理与分发。 数据集成能力由连接器和规则两部分组成,用户可以使用数据桥接或 MQTT 主题来接入数据,使用规则处理数据后,再通过数据桥接将数据发…...

2. 盒模型/布局模块 - 响应式产品展示页_案例:电商产品网格布局
2. 盒模型/布局模块 - 响应式产品展示页 案例:电商产品网格布局 <!DOCTYPE html> <html><head><meta charset"utf-8"><title></title></head><style type"text/css">:root {--primary-color…...
LVGL的三层屏幕结构
文章目录 🌟 LVGL 的三层屏幕架构1. **Top Layer(顶层)**2. **System Layer(系统层)**3. **Active Screen(当前屏幕层)** 🧠 总结对比🔍 整体作用✅ 普通屏幕层对象&…...
【PDF】使用Adobe Acrobat dc添加水印和加密
【PDF】使用Adobe Acrobat dc添加水印和加密 文章目录 [TOC](文章目录) 前言一、添加保护加密口令二、添加水印三、实验四、参考文章总结 实验工具: 1.Adobe Acrobat dc 前言 提示:以下是本篇文章正文内容,下面案例可供参考 一、添加保护加…...

AI 搜索引擎 MindSearch
背景 RAG是一种利用文档减少大模型的幻觉,AI搜索也是 AI 搜索引擎 MindSearch 是一个开源的 AI 搜索引擎框架,具有与 Perplexity.ai Pro 相同的性能。您可以轻松部署它来构建您自己的搜索引擎,可以使用闭源 LLM(如 GPT、Claude…...
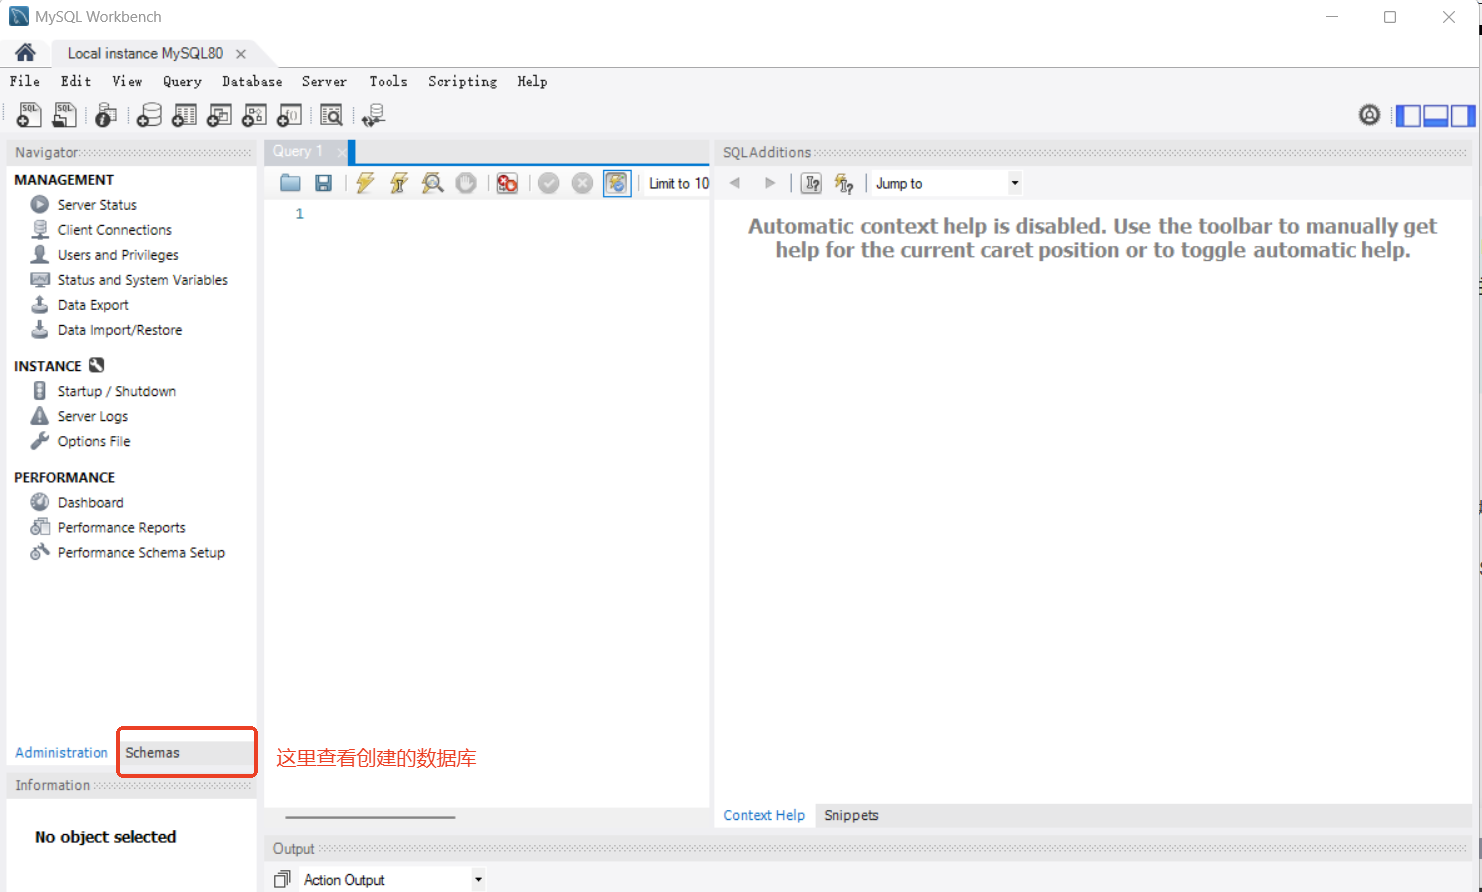
Windows下安装mysql8.0
一、下载安装离线安装包 (下载过了,可以跳过) 下载网站:MySQL :: Download MySQL Installerhttps://dev.mysql.com/downloads/installer/ 二、安装mysql 三、安装完成验证...

【android bluetooth 框架分析 02】【Module详解 7】【VendorSpecificEventManager 模块介绍】
1. 背景 我们在 gd_shim_module 介绍章节中,看到 我们将 VendorSpecificEventManager 模块加入到了 modules 中。 // system/main/shim/stack.cc modules.add<hci::VendorSpecificEventManager>();在 ModuleRegistry::Start 函数中我们对 加入的所有 module…...
水滴Android面经及参考答案
static 关键字有什么作用,它修饰的方法可以使用非静态的成员变量吗? static关键字在 Java 中有多种作用。首先,它可以用来修饰变量,被static修饰的变量称为静态变量。静态变量属于类,而不属于类的某个具体实例…...
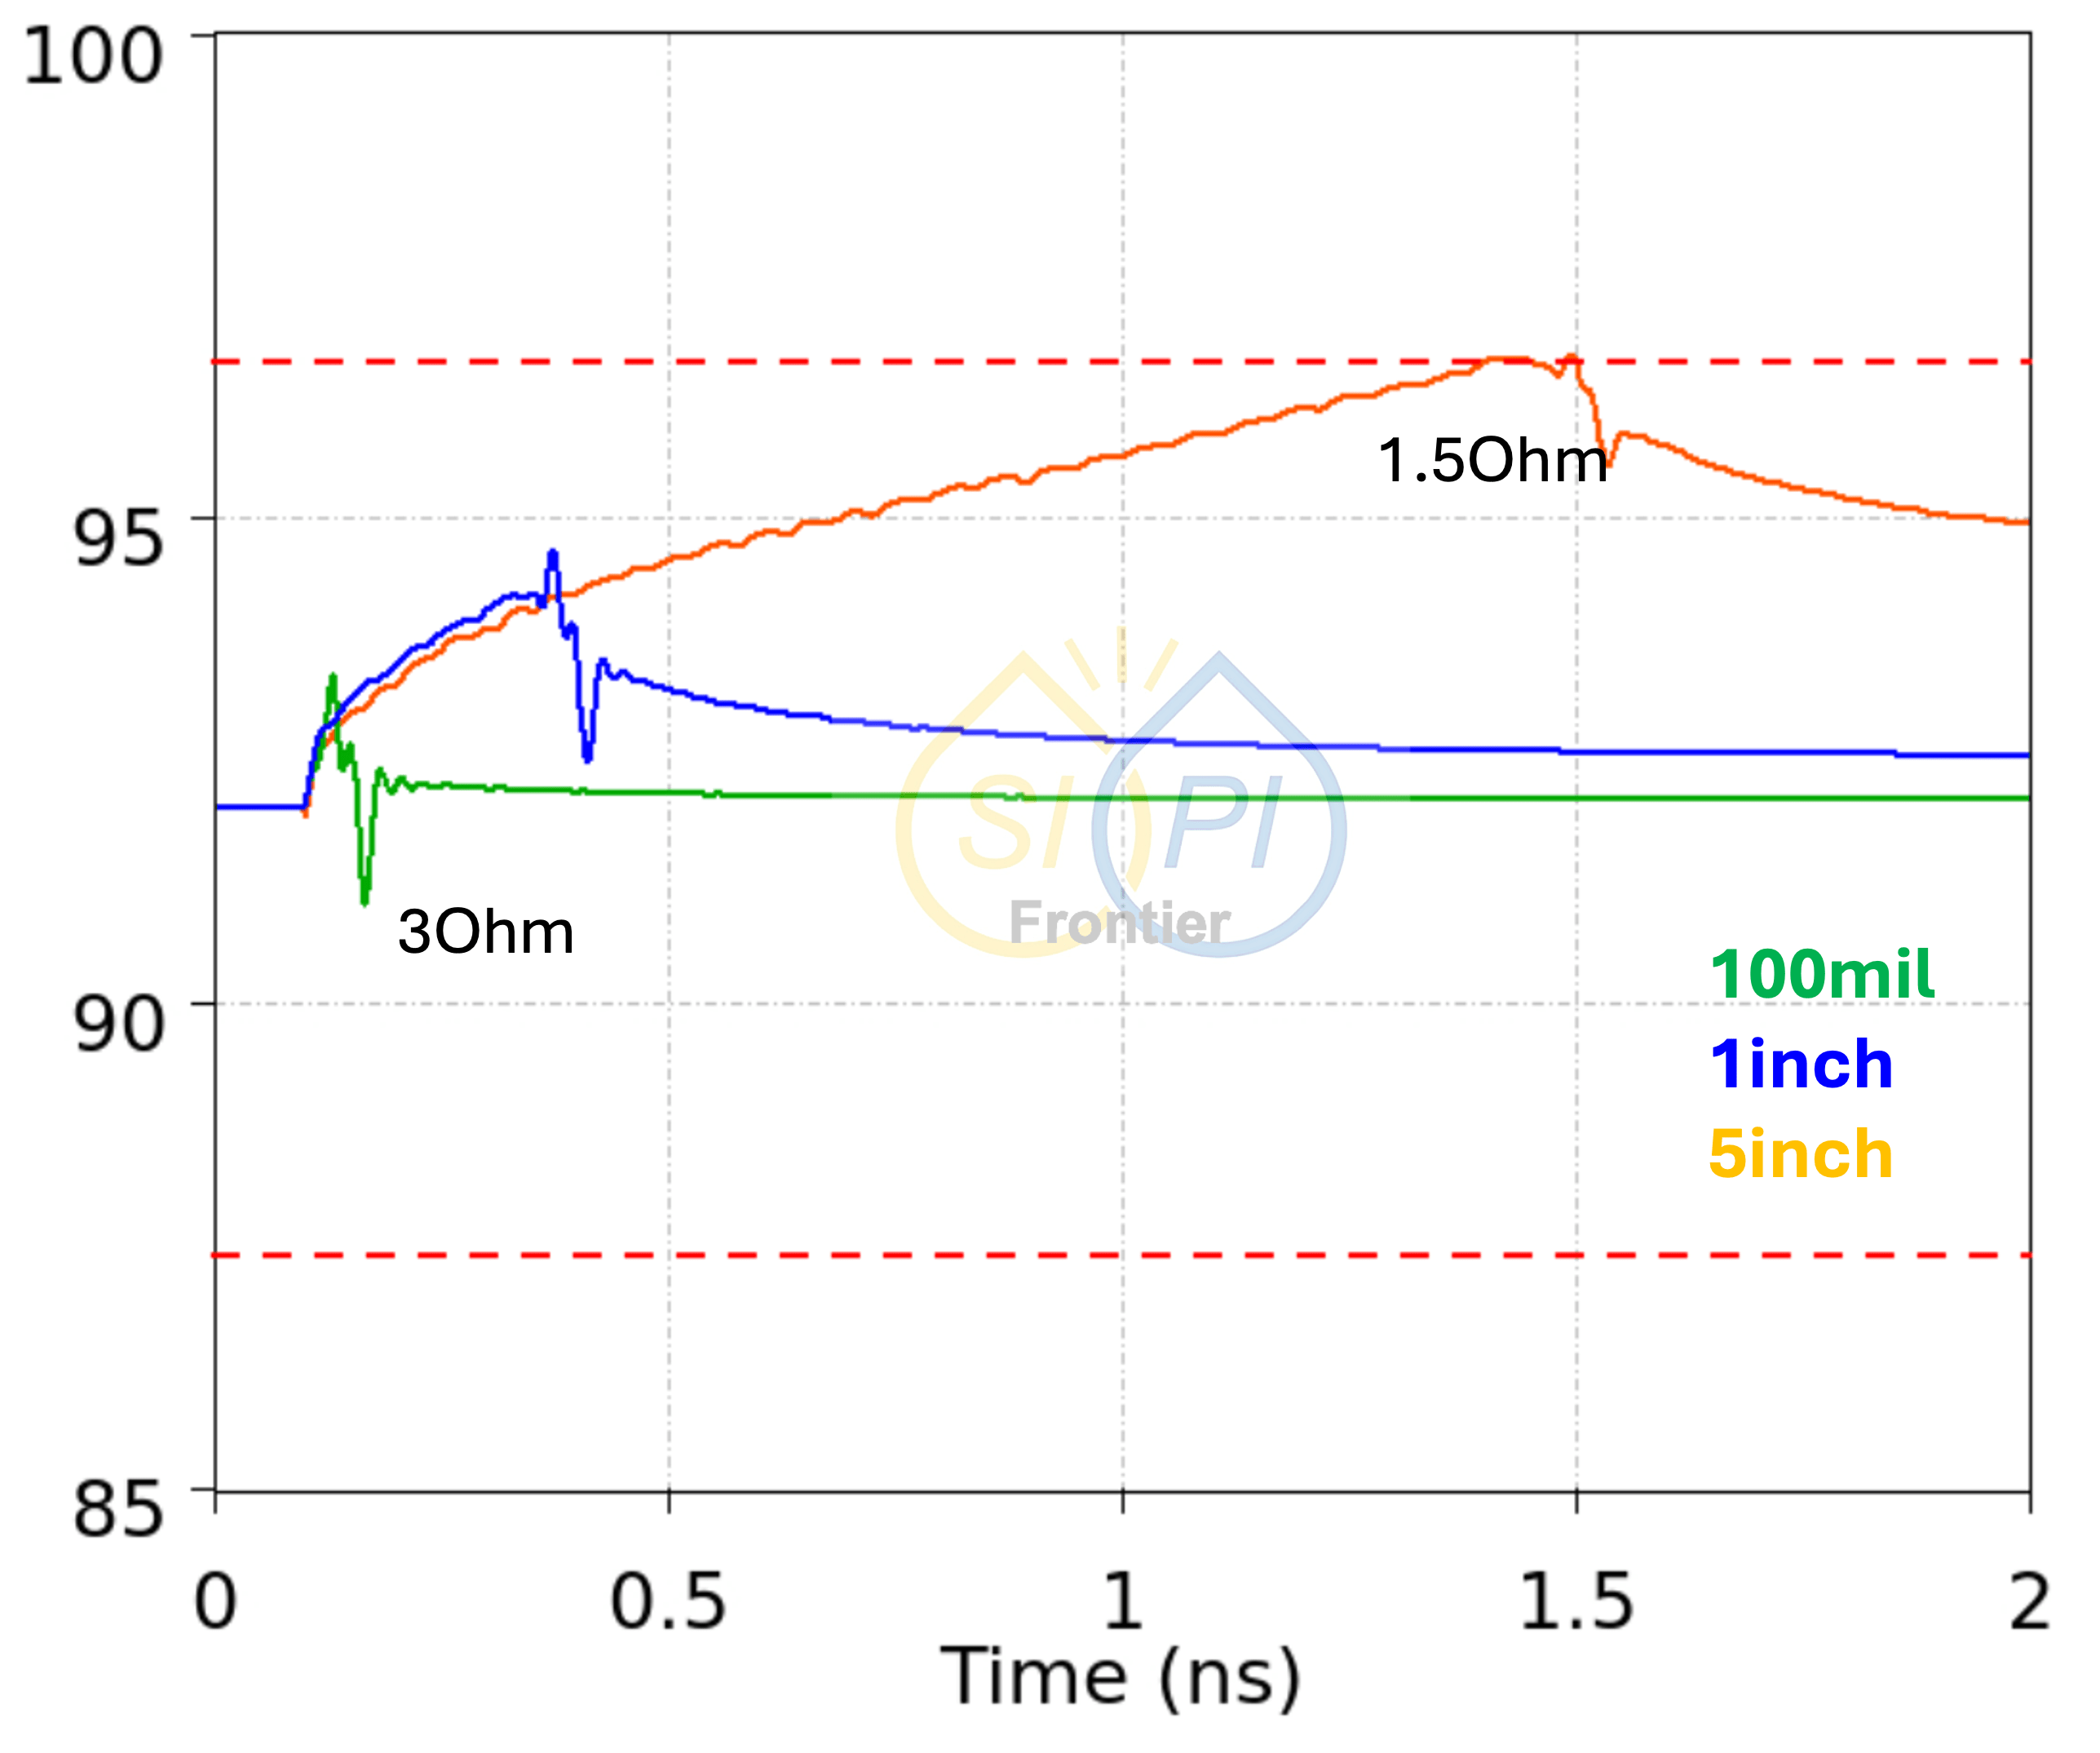
工程师必读! 3 个最常被忽略的 TDR 测试关键细节与原理
TDR真的是一个用来看阻抗跟Delay的好工具,通过一个Port的测试就可以看到通道各个位置的阻抗变化。 可是使用上其实没这么单纯,有很多细节需要非常地小心,才可以真正地看到您想看的信息! 就让我们整理3个极为重要的TDR使用小细节&…...

C++中的各式类型转换
隐式转换: 基本类型的隐式转换: 当函数参数类型非精确匹配,但是可以转换的时候发生 如: void func1(double x){cout << x << endl; }void func2(char c){cout << c << endl; }int main(){func1(2);//…...
)
2025年阿里云ACP人工智能高级工程师认证模拟试题(附答案解析)
这篇文章的内容是阿里云ACP人工智能高级工程师认证考试的模拟试题。 所有模拟试题由AI自动生成,主要为了练习和巩固知识,并非所谓的 “题库”,考试中如果出现同样试题那真是纯属巧合。 1、在PAl-Studio实验运行完毕后,可以右键单…...

如何使用scp命令拉取其他虚拟机中的文件
使用 SCP 命令拉取远程虚拟机文件 scp(Secure Copy)是基于 SSH 协议的安全文件传输工具,可以在本地与远程主机之间复制文件。以下是使用scp从其他虚拟机拉取文件的详细指南: 一、基本语法 bash # 从远程主机复制到本地 scp [选…...
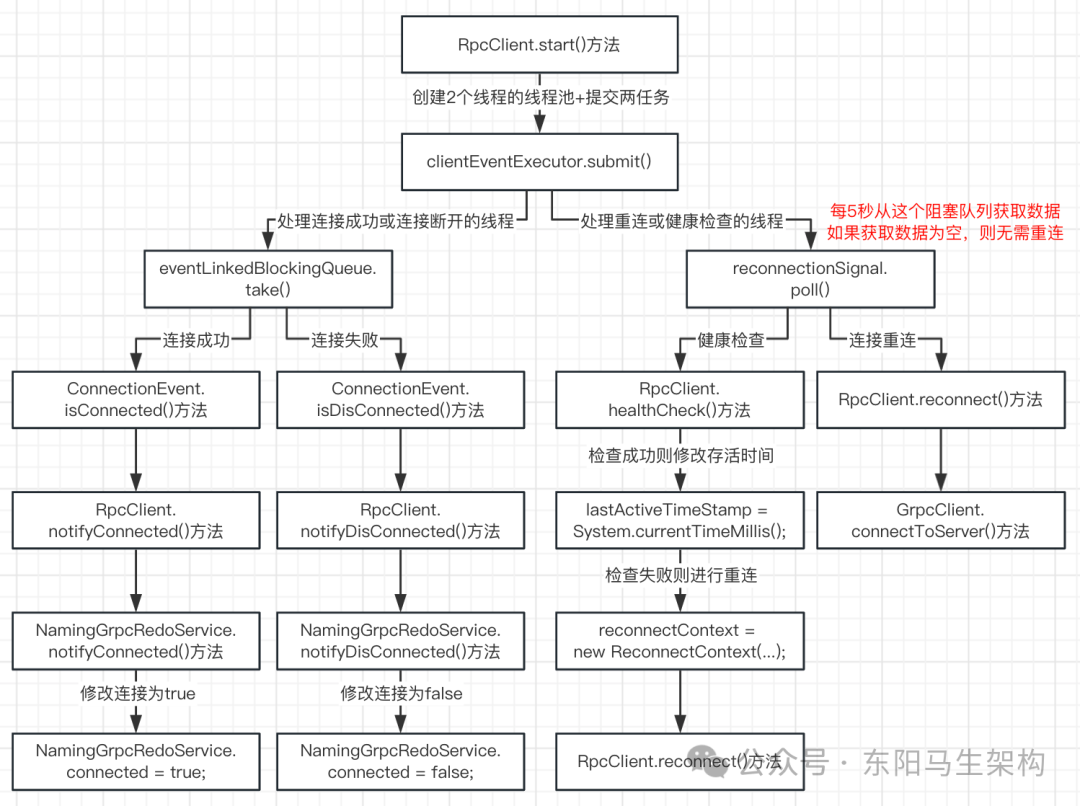
Nacos源码—9.Nacos升级gRPC分析七
大纲 10.gRPC客户端初始化分析 11.gRPC客户端的心跳机制(健康检查) 12.gRPC服务端如何处理客户端的建立连接请求 13.gRPC服务端如何映射各种请求与对应的Handler处理类 14.gRPC简单介绍 10.gRPC客户端初始化分析 (1)gRPC客户端代理初始化的源码 (2)gRPC客户端启动的源码…...

从入门到精通:Drools全攻略
目录 一、Drools 初相识二、快速上手 Drools2.1 环境搭建2.2 第一个 Drools 程序 三、深入理解 Drools 核心概念3.1 规则(Rule)3.2 工作内存(Working Memory)3.3 知识库(Knowledge Base, KieBase)3.4 会话&…...
)
最大子段和(递推)
题目描述 给出一个长度为 n 的序列 a,选出其中连续且非空的一段使得这段和最大。 输入格式 第一行是一个整数,表示序列的长度 n。 第二行有 n 个整数,第 i 个整数表示序列的第 i 个数字 ai。 输出格式 输出一行一个整数表示答案。 输…...
【计算机视觉】基于深度学习的实时情绪检测系统:emotion-detection项目深度解析
基于深度学习的实时情绪检测系统:emotion-detection项目深度解析 1. 项目概述2. 技术原理与模型架构2.1 核心算法1) 数据预处理流程2) 改进型MobileNetV2 2.2 系统架构 3. 实战部署指南3.1 环境配置3.2 数据集准备3.3 模型训练3.4 实时推理 4. 常见问题与解决方案4.…...

Windows CMD通过adb检查触摸屏Linux驱动是否被编译
检查 CONFIG_TOUCHSCREEN_GT9XX 是否启用,检查内核是否编译了Goodix GT9XX系列触摸屏的驱动支持 Windows CMD.exe输入: adb shell “zcat /proc/config.gz | grep CONFIG_TOUCHSCREEN_GT9XX” 如果返回CONFIG_TOUCHSCREEN_GT9XXy,表示驱动已编…...

【图像处理基石】什么是油画感?
在图像处理中,“油画感”通常指图像呈现出类似油画的块状纹理、笔触痕迹或色彩过渡不自然的现象,表现为细节模糊、边缘不锐利、颜色断层或人工纹理明显。这种问题常见于照片处理、视频帧截图或压缩后的图像,本质是画质受损的一种表现。以下是…...
AD PCB布线的常用命令
PCB布线顺序:先信号,再电源,再GNG 1.多根走线的应用 将IC上的引脚分类 更改一类引脚以及引线的颜色,画出走线(将脚引出) 选中这些走线,点击‘交互式总线布线’,便可以多根拉线 shi…...

Python操作Elasticsearch实战指南:从安装到性能调优的全链路解析
一、引言:为什么选择Python+Elasticsearch? Elasticsearch作为分布式搜索引擎,在日志分析、全文检索等场景中表现卓越。Python凭借其简洁语法和丰富生态,成为操作ES的首选语言。本文将带您从环境搭建到性能调优,系统掌握Python操作ES的核心技能。 二、环境准备:三步完成…...
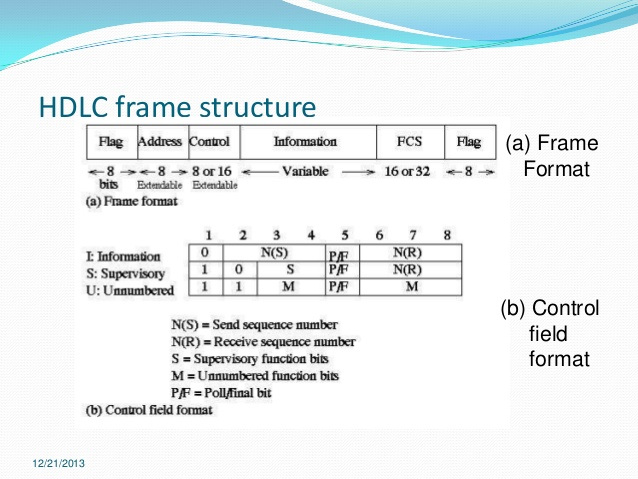
【3-2】HDLC
前言 前面我们提到了 PSTN(Public Switched Telephone Network) ,今天介绍一种很少见的数据链路层的协议,HDLC! 文章目录 前言1. 定义2. 帧边界3. 零比特填充4. 控制字段4.1. 信息帧(I帧)4.2. …...

MySQL 学习(八)如何打开binlog日志
目录 一、默认状态二、如何检查 binlog 状态三、如何开启 binlog3.1 临时开启(重启后失效)3.2 永久开启(需修改配置文件)3.3 验证是否开启成功3.4 查看 binlog 内容 四、高级配置建议五、注意事项六、开启后的日常维护 知识回顾&a…...

《数据库原理》部分习题解析
《数据库原理》部分习题解析 1. 课本pg196.第1题。 (1)函数依赖 若对关系模式 R(U) 的任何可能的关系 r,对于任意两个元组 t₁ 和 t₂,若 t₁[X] t₂[X],则必须有 t₁[Y] t₂[Y],则称属性集 Y 函数依赖…...
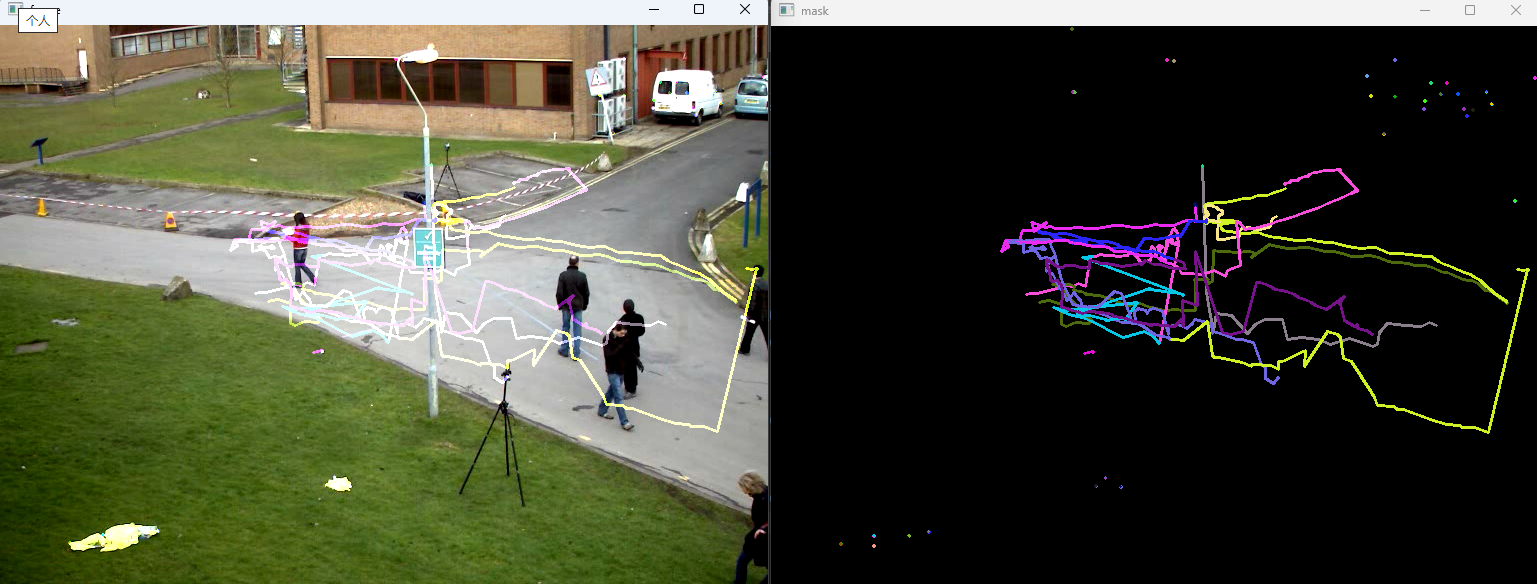
OpenCV进阶操作:光流估计
文章目录 前言一、光流估计1、光流估计是什么?2、光流估计的前提?1)亮度恒定2)小运动3)空间一致 3、OpenCV中的经典光流算法1)Lucas-Kanade方法(稀疏光流)2) Farneback方…...

uniapp+vue3开发项目之引入vuex状态管理工具
前言: 我们在vue2的时候常用的状态管理工具就是vuex,vue3开发以后,又多了一个pinia的选项,相对更轻便,但是vuex也用的非常多的,这里简单说下在uni-app中vuex的使用。 实现步骤: 1、安装&#x…...

SparkSQL 连接 MySQL 并添加新数据:实战指南
SparkSQL 连接 MySQL 并添加新数据:实战指南 在大数据处理中,SparkSQL 作为 Apache Spark 的重要组件,能够方便地与外部数据源进行交互。MySQL 作为广泛使用的关系型数据库,与 SparkSQL 的结合可以充分发挥两者的优势。本文将详细…...
的实现方式)
面试题:请解释Java中的设计模式,并举例说明单例模式(Singleton Pattern)的实现方式
Java中的设计模式 设计模式是在软件开发过程中针对特定场景而使用的通用解决方案。设计模式可以帮助开发者编写出更加清晰、灵活和可维护的代码。设计模式分为三大类: 创建型模式:用于对象的创建过程,如单例模式、工厂模式、建造者模式等。…...

4. 文字效果/2D-3D转换 - 3D翻转卡片
4. 文字效果/2D-3D转换 - 3D翻转卡片 案例:3D产品展示卡片 <!DOCTYPE html> <html><head><meta charset"utf-8"><title></title></head><style type"text/css">.scene {width: 300px;height…...

嵌入式学习笔记 - 关于单片机的位数
通常我们经常说一个单片机是8位的,16位的,32位的,那么怎么判断一款单片机的位数是多少位呢,判断的依据是什么呢, 一 单片机的位数 单片机的位数是指单片机数据总线的宽度,也就是一次能处理的数据的位数&a…...