Java详解LeetCode 热题 100(23):LeetCode 206. 反转链表(Reverse Linked List)详解
文章目录
- 1. 题目描述
- 1.1 链表节点定义
- 2. 理解题目
- 2.1 反转前后对比
- 2.2 核心思路
- 3. 解法一:迭代法(三指针法)
- 3.1 算法思路
- 3.2 详细图解
- 3.3 Java代码实现
- 3.4 代码执行过程演示
- 3.5 执行结果示例
- 3.6 优化版本(简化代码)
- 3.7 复杂度分析
- 3.8 适用场景
- 4. 解法二:递归法
- 4.1 递归思路
- 4.2 Java递归实现
- 4.3 递归过程详细演示
- 4.4 递归执行过程
- 4.5 递归的图解说明
- 4.6 递归算法的关键理解
- 4.7 复杂度分析
- 4.8 递归法的优缺点
- 5. 完整测试用例和边界处理
- 5.1 完整测试代码
- 6. 常见错误与调试技巧
- 6.1 常见错误分析
- 错误1:忘记保存下一个节点
- 错误2:返回错误的头节点
- 错误3:边界条件处理不当
- 错误4:递归中形成环
- 6.2 调试技巧
- 技巧1:添加调试输出
- 技巧2:单元测试验证
- 技巧3:可视化工具
- 7. 扩展题目与变种
- 7.1 反转链表 II (LeetCode 92)
- 7.2 两两交换链表中的节点 (LeetCode 24)
- 7.3 K个一组翻转链表 (LeetCode 25)
- 7.4 判断链表是否为回文 (LeetCode 234)
- 8. 实际应用场景
- 8.1 浏览器历史记录
- 8.2 音乐播放器
- 8.3 文档编辑器的撤销功能
- 9. 性能分析与优化
- 9.1 时间复杂度对比
- 9.2 性能测试代码
- 10. 总结与学习建议
- 10.1 核心要点总结
- 10.2 学习收获
- 10.3 面试准备建议
- 10.4 进阶学习方向
1. 题目描述
给你单链表的头节点 head ,请你反转链表,并返回反转后的链表。
示例 1:
输入:head = [1,2,3,4,5]
输出:[5,4,3,2,1]
示例 2:
输入:head = [1,2]
输出:[2,1]
示例 3:
输入:head = []
输出:[]
提示:
- 链表中节点的数目范围是
[0, 5000] -5000 <= Node.val <= 5000
进阶: 链表可以选用迭代或递归方式完成反转。你能否用两种方法解决这道题?
1.1 链表节点定义
/*** 单链表节点的定义*/
public class ListNode {int val;           // 节点的值ListNode next;     // 指向下一个节点的指针// 无参构造函数ListNode() {}// 带值的构造函数ListNode(int val) { this.val = val; }// 带值和下一个节点的构造函数ListNode(int val, ListNode next) { this.val = val; this.next = next; }
}
2. 理解题目
这道题要求我们反转一个单链表。具体来说:
- 输入是一个链表的头节点
head - 需要将链表中所有节点的指针方向反转
- 返回新的头节点(原来的尾节点)
关键点:
- 链表的方向需要完全颠倒
- 原来的头节点将变成尾节点,原来的尾节点将变成头节点
- 每个节点的
next指针都要改变方向 - 需要处理空链表和单节点链表的特殊情况
2.1 反转前后对比
反转前:
1 -> 2 -> 3 -> 4 -> 5 -> NULL
反转后:
NULL <- 1 <- 2 <- 3 <- 4 <- 5
实际上就是:
5 -> 4 -> 3 -> 2 -> 1 -> NULL
2.2 核心思路
反转链表的关键在于:
- 改变指针方向:将每个节点的
next指针从指向后一个节点改为指向前一个节点 - 保存节点信息:在改变指针之前,必须先保存下一个节点的信息,否则会丢失链表的后续部分
- 逐步处理:从头到尾遍历链表,逐个处理每个节点
3. 解法一:迭代法(三指针法)
3.1 算法思路
迭代法是最直观、最容易理解的方法。我们使用三个指针:
prev:指向当前节点的前一个节点(反转后的下一个节点)curr:指向当前正在处理的节点next:临时保存当前节点的下一个节点,防止丢失
核心步骤:
- 初始化
prev = null,curr = head - 循环处理每个节点:
- 保存
curr.next到next - 将
curr.next指向prev(反转指针) - 将
prev和curr都向前移动一步
- 保存
- 返回
prev(新的头节点)
3.2 详细图解
让我们通过图解来理解每一步:
初始状态:
prev = NULL
curr = 1 -> 2 -> 3 -> 4 -> 5 -> NULL
next = ?
第一步:处理节点1
1. next = curr.next = 2 -> 3 -> 4 -> 5 -> NULL  (保存下一个节点)
2. curr.next = prev = NULL                       (反转指针)
3. prev = curr = 1                               (移动prev)
4. curr = next = 2 -> 3 -> 4 -> 5 -> NULL       (移动curr)结果:NULL <- 1    2 -> 3 -> 4 -> 5 -> NULLprev  curr
第二步:处理节点2
1. next = curr.next = 3 -> 4 -> 5 -> NULL
2. curr.next = prev = 1
3. prev = curr = 2
4. curr = next = 3 -> 4 -> 5 -> NULL结果:NULL <- 1 <- 2    3 -> 4 -> 5 -> NULLprev  curr
继续这个过程直到 curr 为 NULL…
3.3 Java代码实现
/*** 迭代法反转链表(三指针法)* 时间复杂度:O(n),其中 n 是链表的长度,需要遍历链表一次* 空间复杂度:O(1),只使用常数级额外空间*/
class Solution {public ListNode reverseList(ListNode head) {// 边界条件:空链表或只有一个节点if (head == null || head.next == null) {return head;}// 初始化三个指针ListNode prev = null;    // 前一个节点,初始为nullListNode curr = head;    // 当前节点,从头节点开始ListNode next = null;    // 下一个节点,用于临时保存// 遍历链表,逐个反转节点while (curr != null) {// 步骤1:保存下一个节点,防止丢失链表后续部分next = curr.next;// 步骤2:反转当前节点的指针,指向前一个节点curr.next = prev;// 步骤3:移动指针,为下一次迭代做准备prev = curr;         // prev移动到当前节点curr = next;         // curr移动到下一个节点}// 循环结束时,prev指向原链表的最后一个节点,即新链表的头节点return prev;}
}
3.4 代码执行过程演示
让我们用示例 [1,2,3,4,5] 来详细演示代码执行过程:
/*** 迭代过程详细演示类*/
public class IterativeReverseDemo {public ListNode reverseList(ListNode head) {System.out.println("=== 开始反转链表 ===");System.out.println("原链表:" + printList(head));if (head == null || head.next == null) {System.out.println("链表为空或只有一个节点,直接返回");return head;}ListNode prev = null;ListNode curr = head;ListNode next = null;int step = 1;while (curr != null) {System.out.println("\n--- 第" + step + "步 ---");System.out.println("当前状态:");System.out.println("  prev: " + (prev == null ? "null" : prev.val));System.out.println("  curr: " + curr.val);System.out.println("  next: " + (curr.next == null ? "null" : curr.next.val));// 保存下一个节点next = curr.next;System.out.println("保存下一个节点:next = " + (next == null ? "null" : next.val));// 反转指针curr.next = prev;System.out.println("反转指针:" + curr.val + ".next = " + (prev == null ? "null" : prev.val));// 移动指针prev = curr;curr = next;System.out.println("移动指针:");System.out.println("  prev = " + prev.val);System.out.println("  curr = " + (curr == null ? "null" : curr.val));// 打印当前已反转部分System.out.println("当前已反转部分:" + printReversedPart(prev, curr));step++;}System.out.println("\n=== 反转完成 ===");System.out.println("最终结果:" + printList(prev));return prev;}// 辅助方法:打印链表private String printList(ListNode head) {if (head == null) return "[]";StringBuilder sb = new StringBuilder();sb.append("[");while (head != null) {sb.append(head.val);if (head.next != null) sb.append(" -> ");head = head.next;}sb.append(" -> null]");return sb.toString();}// 辅助方法:打印已反转部分private String printReversedPart(ListNode reversed, ListNode remaining) {StringBuilder sb = new StringBuilder();sb.append("已反转:");if (reversed == null) {sb.append("null");} else {// 需要从前往后打印已反转部分,但我们只有指向最后一个的指针// 为了演示,我们简化显示sb.append("... -> ").append(reversed.val).append(" -> null");}sb.append(" | 待处理:");if (remaining == null) {sb.append("null");} else {ListNode temp = remaining;sb.append("[");while (temp != null) {sb.append(temp.val);if (temp.next != null) sb.append(" -> ");temp = temp.next;}sb.append(" -> null]");}return sb.toString();}
}
3.5 执行结果示例
=== 开始反转链表 ===
原链表:[1 -> 2 -> 3 -> 4 -> 5 -> null]--- 第1步 ---
当前状态:prev: nullcurr: 1next: 2
保存下一个节点:next = 2
反转指针:1.next = null
移动指针:prev = 1curr = 2
当前已反转部分:已反转:... -> 1 -> null | 待处理:[2 -> 3 -> 4 -> 5 -> null]--- 第2步 ---
当前状态:prev: 1curr: 2next: 3
保存下一个节点:next = 3
反转指针:2.next = 1
移动指针:prev = 2curr = 3
当前已反转部分:已反转:... -> 2 -> null | 待处理:[3 -> 4 -> 5 -> null]--- 第3步 ---
当前状态:prev: 2curr: 3next: 4
保存下一个节点:next = 4
反转指针:3.next = 2
移动指针:prev = 3curr = 4
当前已反转部分:已反转:... -> 3 -> null | 待处理:[4 -> 5 -> null]--- 第4步 ---
当前状态:prev: 3curr: 4next: 5
保存下一个节点:next = 5
反转指针:4.next = 3
移动指针:prev = 4curr = 5
当前已反转部分:已反转:... -> 4 -> null | 待处理:[5 -> null]--- 第5步 ---
当前状态:prev: 4curr: 5next: null
保存下一个节点:next = null
反转指针:5.next = 4
移动指针:prev = 5curr = null
当前已反转部分:已反转:... -> 5 -> null | 待处理:null=== 反转完成 ===
最终结果:[5 -> 4 -> 3 -> 2 -> 1 -> null]
3.6 优化版本(简化代码)
/*** 迭代法的简洁版本* 功能完全相同,但代码更简洁*/
class SolutionOptimized {public ListNode reverseList(ListNode head) {ListNode prev = null;ListNode curr = head;while (curr != null) {ListNode next = curr.next;  // 保存下一个节点curr.next = prev;           // 反转指针prev = curr;                // 移动prevcurr = next;                // 移动curr}return prev;  // prev指向新的头节点}
}
3.7 复杂度分析
时间复杂度: O(n)
- 其中 n 是链表的长度
- 我们需要遍历链表一次,每个节点只访问一次
- 每次操作都是常数时间
空间复杂度: O(1)
- 只使用了常数级的额外空间(三个指针变量)
- 不依赖于输入链表的长度
3.8 适用场景
迭代法是解决链表反转问题的首选方法,因为:
- 空间效率高:只使用常数级额外空间
- 易于理解:逻辑直观,容易掌握
- 性能优秀:没有递归调用开销
- 适用性广:适合处理长链表,不会出现栈溢出问题
4. 解法二:递归法
4.1 递归思路
递归的核心思想是将大问题分解为小问题:
- 递归假设:假设
reverseList(head.next)能够正确反转从第二个节点开始的子链表 - 处理当前节点:将当前节点接到已反转的子链表末尾
- 返回新头节点:返回反转后链表的头节点
递归过程分析:
对于链表 1 -> 2 -> 3 -> 4 -> 5 -> null:
reverseList(1->2->3->4->5)
├── 递归处理子链表:reverseList(2->3->4->5) 返回 5->4->3->2
├── 将当前节点1接到反转后的链表末尾:5->4->3->2->1
└── 返回新的头节点5最终结果:5->4->3->2->1->null
4.2 Java递归实现
/*** 递归法反转链表* 时间复杂度:O(n),其中 n 是链表的长度* 空间复杂度:O(n),递归调用栈的深度为 n*/
class RecursiveSolution {public ListNode reverseList(ListNode head) {// 递归终止条件:空链表或单节点链表if (head == null || head.next == null) {return head;}// 递归反转子链表,获得新的头节点ListNode newHead = reverseList(head.next);// 反转当前节点和下一个节点的连接// head.next 现在指向子链表的第一个节点(反转前的第二个节点)// 我们让这个节点指向当前节点head.next.next = head;// 断开当前节点到下一个节点的连接,避免形成环head.next = null;// 返回新的头节点(整个递归过程中保持不变)return newHead;}
}
4.3 递归过程详细演示
/*** 递归过程可视化演示*/
public class RecursiveReverseDemo {private int depth = 0;  // 递归深度计数器public ListNode reverseList(ListNode head) {String indent = "  ".repeat(depth);  // 缩进显示递归层次System.out.println(indent + "→ 进入递归 depth=" + depth + ", 当前节点: " + (head == null ? "null" : head.val));// 递归终止条件if (head == null || head.next == null) {System.out.println(indent + "← 递归边界,返回: " + (head == null ? "null" : head.val));return head;}System.out.println(indent + "当前处理: " + head.val + " -> " + (head.next == null ? "null" : head.next.val));depth++;  // 递归深度增加// 递归处理子链表System.out.println(indent + "递归处理子链表...");ListNode newHead = reverseList(head.next);depth--;  // 递归深度减少System.out.println(indent + "← 递归返回,继续处理节点: " + head.val);System.out.println(indent + "子链表已反转,新头节点: " + newHead.val);// 反转当前节点和下一个节点的连接System.out.println(indent + "反转连接: " + head.val + " <-> " + head.next.val);System.out.println(indent + "执行: " + head.next.val + ".next = " + head.val);head.next.next = head;System.out.println(indent + "断开: " + head.val + ".next = null");head.next = null;System.out.println(indent + "当前层处理完成,返回头节点: " + newHead.val);return newHead;}
}
4.4 递归执行过程
对于输入 [1,2,3,4,5],递归过程如下:
→ 进入递归 depth=0, 当前节点: 1
当前处理: 1 -> 2
递归处理子链表...→ 进入递归 depth=1, 当前节点: 2当前处理: 2 -> 3递归处理子链表...→ 进入递归 depth=2, 当前节点: 3当前处理: 3 -> 4递归处理子链表...→ 进入递归 depth=3, 当前节点: 4当前处理: 4 -> 5递归处理子链表...→ 进入递归 depth=4, 当前节点: 5← 递归边界,返回: 5← 递归返回,继续处理节点: 4子链表已反转,新头节点: 5反转连接: 4 <-> 5执行: 5.next = 4断开: 4.next = null当前层处理完成,返回头节点: 5← 递归返回,继续处理节点: 3子链表已反转,新头节点: 5反转连接: 3 <-> 4执行: 4.next = 3断开: 3.next = null当前层处理完成,返回头节点: 5← 递归返回,继续处理节点: 2子链表已反转,新头节点: 5反转连接: 2 <-> 3执行: 3.next = 2断开: 2.next = null当前层处理完成,返回头节点: 5
← 递归返回,继续处理节点: 1
子链表已反转,新头节点: 5
反转连接: 1 <-> 2
执行: 2.next = 1
断开: 1.next = null
当前层处理完成,返回头节点: 5
4.5 递归的图解说明
原链表:1 -> 2 -> 3 -> 4 -> 5 -> null递归调用栈展开:
reverseList(1->2->3->4->5) {newHead = reverseList(2->3->4->5) {newHead = reverseList(3->4->5) {newHead = reverseList(4->5) {newHead = reverseList(5) {return 5;  // 递归出口}// 处理节点4// 当前状态:5  4->54.next.next = 4;  // 5.next = 44.next = null;    // 断开 4->5// 结果:5->4  (4指向null)return 5;}// 处理节点3// 当前状态:5->4  3->43.next.next = 3;  // 4.next = 33.next = null;    // 断开 3->4// 结果:5->4->3  (3指向null)return 5;}// 处理节点2// 当前状态:5->4->3  2->32.next.next = 2;  // 3.next = 22.next = null;    // 断开 2->3// 结果:5->4->3->2  (2指向null)return 5;}// 处理节点1// 当前状态:5->4->3->2  1->21.next.next = 1;  // 2.next = 11.next = null;    // 断开 1->2// 结果:5->4->3->2->1  (1指向null)return 5;
}最终结果:5 -> 4 -> 3 -> 2 -> 1 -> null
4.6 递归算法的关键理解
-
递归假设的重要性:
- 我们假设
reverseList(head.next)能正确反转子链表 - 基于这个假设,我们只需要处理当前节点与子链表的连接
- 我们假设
-
"反转"的具体操作:
head.next.next = head; // 让下一个节点指向当前节点 head.next = null; // 断开当前节点到下一个节点的连接 -
返回值的传递:
- 新的头节点(原链表的尾节点)在整个递归过程中保持不变
- 每层递归都返回这个相同的头节点
4.7 复杂度分析
时间复杂度: O(n)
- 每个节点被访问一次,总共 n 次递归调用
- 每次递归的操作都是常数时间
空间复杂度: O(n)
- 递归调用栈的深度为 n(链表长度)
- 每层递归需要常数级的额外空间
- 总空间复杂度为 O(n)
4.8 递归法的优缺点
优点:
- 代码简洁:递归版本的代码更加简洁优雅
- 思路清晰:递归思维符合问题的分解特性
- 易于理解:一旦理解递归思想,代码逻辑很清晰
缺点:
- 空间开销大:需要 O(n) 的递归栈空间
- 可能栈溢出:对于很长的链表,可能导致栈溢出
- 性能略差:函数调用有一定开销
5. 完整测试用例和边界处理
5.1 完整测试代码
/*** 反转链表完整测试类*/
public class ReverseListTest {public static void main(String[] args) {ReverseListTest test = new ReverseListTest();System.out.println("=== 反转链表测试套件 ===\n");// 运行所有测试用例test.testCase1_NormalList();test.testCase2_EmptyList();test.testCase3_SingleNode();test.testCase4_TwoNodes();test.testCase5_LargeList();test.testCase6_PerformanceTest();System.out.println("=== 所有测试完成 ===");}/*** 测试用例1:正常链表 [1,2,3,4,5]*/public void testCase1_NormalList() {System.out.println("【测试用例1】正常链表 [1,2,3,4,5]");// 构建测试链表ListNode head = buildList(new int[]{1, 2, 3, 4, 5});System.out.println("原链表:" + printList(head));// 测试迭代法Solution iterativeSol = new Solution();ListNode result1 = iterativeSol.reverseList(copyList(head));System.out.println("迭代法结果:" + printList(result1));// 测试递归法RecursiveSolution recursiveSol = new RecursiveSolution();ListNode result2 = recursiveSol.reverseList(copyList(head));System.out.println("递归法结果:" + printList(result2));// 验证结果boolean isCorrect = isEqual(result1, result2) && isListEqual(result1, new int[]{5, 4, 3, 2, 1});System.out.println("结果验证:" + (isCorrect ? "✅ 通过" : "❌ 失败"));System.out.println();}/*** 测试用例2:空链表 []*/public void testCase2_EmptyList() {System.out.println("【测试用例2】空链表 []");ListNode head = null;System.out.println("原链表:" + printList(head));Solution iterativeSol = new Solution();ListNode result1 = iterativeSol.reverseList(head);System.out.println("迭代法结果:" + printList(result1));RecursiveSolution recursiveSol = new RecursiveSolution();ListNode result2 = recursiveSol.reverseList(head);System.out.println("递归法结果:" + printList(result2));boolean isCorrect = (result1 == null && result2 == null);System.out.println("结果验证:" + (isCorrect ? "✅ 通过" : "❌ 失败"));System.out.println();}/*** 测试用例3:单节点链表 [42]*/public void testCase3_SingleNode() {System.out.println("【测试用例3】单节点链表 [42]");ListNode head = new ListNode(42);System.out.println("原链表:" + printList(head));Solution iterativeSol = new Solution();ListNode result1 = iterativeSol.reverseList(copyList(head));System.out.println("迭代法结果:" + printList(result1));RecursiveSolution recursiveSol = new RecursiveSolution();ListNode result2 = recursiveSol.reverseList(copyList(head));System.out.println("递归法结果:" + printList(result2));boolean isCorrect = isEqual(result1, result2) && result1 != null && result1.val == 42 && result1.next == null;System.out.println("结果验证:" + (isCorrect ? "✅ 通过" : "❌ 失败"));System.out.println();}/*** 测试用例4:两个节点 [1,2]*/public void testCase4_TwoNodes() {System.out.println("【测试用例4】两个节点 [1,2]");ListNode head = buildList(new int[]{1, 2});System.out.println("原链表:" + printList(head));Solution iterativeSol = new Solution();ListNode result1 = iterativeSol.reverseList(copyList(head));System.out.println("迭代法结果:" + printList(result1));RecursiveSolution recursiveSol = new RecursiveSolution();ListNode result2 = recursiveSol.reverseList(copyList(head));System.out.println("递归法结果:" + printList(result2));boolean isCorrect = isEqual(result1, result2) && isListEqual(result1, new int[]{2, 1});System.out.println("结果验证:" + (isCorrect ? "✅ 通过" : "❌ 失败"));System.out.println();}/*** 测试用例5:较大链表 [1,2,3,...,10]*/public void testCase5_LargeList() {System.out.println("【测试用例5】较大链表 [1,2,3,4,5,6,7,8,9,10]");int[] values = {1, 2, 3, 4, 5, 6, 7, 8, 9, 10};ListNode head = buildList(values);System.out.println("原链表:" + printList(head));Solution iterativeSol = new Solution();ListNode result1 = iterativeSol.reverseList(copyList(head));System.out.println("迭代法结果:" + printList(result1));RecursiveSolution recursiveSol = new RecursiveSolution();ListNode result2 = recursiveSol.reverseList(copyList(head));System.out.println("递归法结果:" + printList(result2));int[] expected = {10, 9, 8, 7, 6, 5, 4, 3, 2, 1};boolean isCorrect = isEqual(result1, result2) && isListEqual(result1, expected);System.out.println("结果验证:" + (isCorrect ? "✅ 通过" : "❌ 失败"));System.out.println();}/*** 测试用例6:性能测试*/public void testCase6_PerformanceTest() {System.out.println("【测试用例6】性能测试 - 1000个节点");// 构建1000个节点的链表int[] values = new int[1000];for (int i = 0; i < 1000; i++) {values[i] = i + 1;}ListNode head = buildList(values);System.out.println("构建了包含1000个节点的链表");// 测试迭代法性能long start1 = System.nanoTime();Solution iterativeSol = new Solution();ListNode result1 = iterativeSol.reverseList(copyList(head));long end1 = System.nanoTime();long iterativeTime = end1 - start1;// 测试递归法性能long start2 = System.nanoTime();RecursiveSolution recursiveSol = new RecursiveSolution();ListNode result2 = recursiveSol.reverseList(copyList(head));long end2 = System.nanoTime();long recursiveTime = end2 - start2;System.out.println("迭代法耗时:" + iterativeTime + " 纳秒");System.out.println("递归法耗时:" + recursiveTime + " 纳秒");System.out.println("性能对比:递归法耗时是迭代法的 " + String.format("%.2f", (double) recursiveTime / iterativeTime) + " 倍");// 验证结果正确性boolean isCorrect = isEqual(result1, result2);System.out.println("结果验证:" + (isCorrect ? "✅ 通过" : "❌ 失败"));System.out.println();}// ===== 辅助方法 =====/*** 根据数组构建链表*/private ListNode buildList(int[] values) {if (values == null || values.length == 0) {return null;}ListNode head = new ListNode(values[0]);ListNode curr = head;for (int i = 1; i < values.length; i++) {curr.next = new ListNode(values[i]);curr = curr.next;}return head;}/*** 打印链表*/private String printList(ListNode head) {if (head == null) return "[]";StringBuilder sb = new StringBuilder();sb.append("[");ListNode curr = head;while (curr != null) {sb.append(curr.val);if (curr.next != null) sb.append(", ");curr = curr.next;}sb.append("]");return sb.toString();}/*** 复制链表*/private ListNode copyList(ListNode head) {if (head == null) return null;ListNode newHead = new ListNode(head.val);ListNode newCurr = newHead;ListNode curr = head.next;while (curr != null) {newCurr.next = new ListNode(curr.val);newCurr = newCurr.next;curr = curr.next;}return newHead;}/*** 比较两个链表是否相等*/private boolean isEqual(ListNode l1, ListNode l2) {while (l1 != null && l2 != null) {if (l1.val != l2.val) return false;l1 = l1.next;l2 = l2.next;}return l1 == null && l2 == null;}/*** 检查链表是否与给定数组相等*/private boolean isListEqual(ListNode head, int[] expected) {ListNode curr = head;for (int i = 0; i < expected.length; i++) {if (curr == null || curr.val != expected[i]) {return false;}curr = curr.next;}return curr == null;}
}
6. 常见错误与调试技巧
6.1 常见错误分析
错误1:忘记保存下一个节点
// ❌ 错误代码:会导致链表丢失
public ListNode reverseList(ListNode head) {ListNode prev = null;ListNode curr = head;while (curr != null) {curr.next = prev;    // 直接修改next,丢失了后续节点!prev = curr;curr = curr.next;    // curr.next已经被修改,无法继续遍历}return prev;
}// ✅ 正确代码:先保存再修改
public ListNode reverseList(ListNode head) {ListNode prev = null;ListNode curr = head;while (curr != null) {ListNode next = curr.next;  // 先保存下一个节点curr.next = prev;           // 再修改指针prev = curr;curr = next;                // 使用保存的节点继续遍历}return prev;
}
错误2:返回错误的头节点
// ❌ 错误:返回原头节点
public ListNode reverseList(ListNode head) {ListNode prev = null;ListNode curr = head;while (curr != null) {ListNode next = curr.next;curr.next = prev;prev = curr;curr = next;}return head;  // 错误!head现在是尾节点,应该返回prev
}// ✅ 正确:返回新的头节点
public ListNode reverseList(ListNode head) {// ... 相同的处理逻辑 ...return prev;  // prev指向新的头节点(原来的尾节点)
}
错误3:边界条件处理不当
// ❌ 错误:没有处理特殊情况
public ListNode reverseList(ListNode head) {ListNode prev = null;ListNode curr = head;// 如果head为null,这里会出错while (curr != null) {// ...}return prev;
}// ✅ 正确:先处理边界条件
public ListNode reverseList(ListNode head) {if (head == null || head.next == null) {return head;  // 空链表或单节点直接返回}// ... 正常处理逻辑 ...
}
错误4:递归中形成环
// ❌ 错误:没有断开原连接,形成环
public ListNode reverseList(ListNode head) {if (head == null || head.next == null) {return head;}ListNode newHead = reverseList(head.next);head.next.next = head;  // 反转连接// 忘记断开原连接!会形成环:head <-> head.nextreturn newHead;
}// ✅ 正确:断开原连接
public ListNode reverseList(ListNode head) {if (head == null || head.next == null) {return head;}ListNode newHead = reverseList(head.next);head.next.next = head;head.next = null;       // 必须断开原连接return newHead;
}
6.2 调试技巧
技巧1:添加调试输出
/*** 带调试输出的反转函数*/
public ListNode reverseListWithDebug(ListNode head) {System.out.println("开始反转:" + printList(head));if (head == null || head.next == null) {System.out.println("边界情况,直接返回");return head;}ListNode prev = null;ListNode curr = head;int step = 0;while (curr != null) {System.out.println("步骤 " + (++step) + ":");System.out.println("  处理节点: " + curr.val);System.out.println("  当前状态: prev=" + (prev == null ? "null" : prev.val) + ", curr=" + curr.val);ListNode next = curr.next;curr.next = prev;prev = curr;curr = next;System.out.println("  操作后: prev=" + prev.val + ", curr=" + (curr == null ? "null" : curr.val));System.out.println("  当前已反转部分: " + printPartialList(prev, 3));System.out.println();}System.out.println("反转完成:" + printList(prev));return prev;
}private String printPartialList(ListNode head, int maxNodes) {if (head == null) return "null";StringBuilder sb = new StringBuilder();ListNode curr = head;int count = 0;while (curr != null && count < maxNodes) {sb.append(curr.val);if (curr.next != null && count < maxNodes - 1) sb.append("->");curr = curr.next;count++;}if (curr != null) sb.append("->...");return sb.toString();
}
技巧2:单元测试验证
/*** 单元测试类*/
public class ReverseListUnitTest {@Testpublic void testEmptyList() {Solution sol = new Solution();ListNode result = sol.reverseList(null);assertNull("空链表应返回null", result);}@Testpublic void testSingleNode() {Solution sol = new Solution();ListNode head = new ListNode(1);ListNode result = sol.reverseList(head);assertNotNull("单节点不应为null", result);assertEquals("值应该是1", 1, result.val);assertNull("下一个节点应为null", result.next);}@Testpublic void testTwoNodes() {Solution sol = new Solution();ListNode head = new ListNode(1);head.next = new ListNode(2);ListNode result = sol.reverseList(head);assertEquals("第一个节点值应为2", 2, result.val);assertEquals("第二个节点值应为1", 1, result.next.val);assertNull("第三个节点应为null", result.next.next);}@Testpublic void testNormalList() {Solution sol = new Solution();ListNode head = buildList(new int[]{1, 2, 3, 4, 5});ListNode result = sol.reverseList(head);int[] expected = {5, 4, 3, 2, 1};for (int i = 0; i < expected.length; i++) {assertNotNull("节点不应为null", result);assertEquals("节点值不匹配", expected[i], result.val);result = result.next;}assertNull("最后应为null", result);}
}
技巧3:可视化工具
/*** 链表可视化工具*/
public class ListVisualizer {/*** 生成链表的图形表示*/public static void visualizeList(ListNode head, String title) {System.out.println("\n=== " + title + " ===");if (head == null) {System.out.println("null");return;}// 打印节点值ListNode curr = head;while (curr != null) {System.out.print("┌─────┐");if (curr.next != null) System.out.print("    ");curr = curr.next;}System.out.println();// 打印节点内容curr = head;while (curr != null) {System.out.printf("│  %2d │", curr.val);if (curr.next != null) System.out.print(" -> ");curr = curr.next;}System.out.println(" -> null");// 打印底部边框curr = head;while (curr != null) {System.out.print("└─────┘");if (curr.next != null) System.out.print("    ");curr = curr.next;}System.out.println("\n");}/*** 演示反转过程*/public static void demonstrateReverse() {ListNode head = buildList(new int[]{1, 2, 3, 4, 5});visualizeList(head, "原始链表");Solution sol = new Solution();ListNode reversed = sol.reverseList(head);visualizeList(reversed, "反转后链表");}
}
7. 扩展题目与变种
7.1 反转链表 II (LeetCode 92)
给你单链表的头指针 head 和两个整数 left 和 right,其中 left <= right。请你反转从位置 left 到位置 right 的链表节点,返回反转后的链表。
/*** 反转链表的指定区间*/
public class ReverseListII {public ListNode reverseBetween(ListNode head, int left, int right) {if (head == null || left == right) {return head;}// 创建虚拟头节点ListNode dummy = new ListNode(0);dummy.next = head;// 找到left位置的前一个节点ListNode prevLeft = dummy;for (int i = 1; i < left; i++) {prevLeft = prevLeft.next;}// 反转left到right之间的节点ListNode prev = null;ListNode curr = prevLeft.next;for (int i = left; i <= right; i++) {ListNode next = curr.next;curr.next = prev;prev = curr;curr = next;}// 重新连接prevLeft.next.next = curr;  // 连接反转部分的尾部prevLeft.next = prev;       // 连接反转部分的头部return dummy.next;}
}
7.2 两两交换链表中的节点 (LeetCode 24)
给定一个链表,两两交换其中相邻的节点,并返回交换后的链表。
/*** 两两交换链表节点*/
public class SwapPairs {/*** 迭代法*/public ListNode swapPairs(ListNode head) {ListNode dummy = new ListNode(0);dummy.next = head;ListNode prev = dummy;while (prev.next != null && prev.next.next != null) {// 要交换的两个节点ListNode first = prev.next;ListNode second = prev.next.next;// 交换prev.next = second;first.next = second.next;second.next = first;// 移动prev到下一组的前面prev = first;}return dummy.next;}/*** 递归法*/public ListNode swapPairsRecursive(ListNode head) {if (head == null || head.next == null) {return head;}ListNode second = head.next;head.next = swapPairsRecursive(second.next);second.next = head;return second;}
}
7.3 K个一组翻转链表 (LeetCode 25)
给你一个链表,每 k 个节点一组进行翻转,请你返回翻转后的链表。
/*** K个一组翻转链表*/
public class ReverseKGroup {public ListNode reverseKGroup(ListNode head, int k) {if (head == null || k == 1) {return head;}// 检查是否有k个节点ListNode curr = head;for (int i = 0; i < k; i++) {if (curr == null) {return head;  // 不足k个节点,不反转}curr = curr.next;}// 反转前k个节点ListNode prev = null;curr = head;for (int i = 0; i < k; i++) {ListNode next = curr.next;curr.next = prev;prev = curr;curr = next;}// 递归处理剩余节点head.next = reverseKGroup(curr, k);return prev;}
}
7.4 判断链表是否为回文 (LeetCode 234)
/*** 判断链表是否为回文* 思路:找到中点,反转后半部分,然后比较*/
public class PalindromeLinkedList {public boolean isPalindrome(ListNode head) {if (head == null || head.next == null) {return true;}// 找到中点ListNode slow = head;ListNode fast = head;while (fast.next != null && fast.next.next != null) {slow = slow.next;fast = fast.next.next;}// 反转后半部分ListNode secondHalf = reverseList(slow.next);// 比较前半部分和后半部分ListNode firstHalf = head;while (secondHalf != null) {if (firstHalf.val != secondHalf.val) {return false;}firstHalf = firstHalf.next;secondHalf = secondHalf.next;}return true;}private ListNode reverseList(ListNode head) {ListNode prev = null;ListNode curr = head;while (curr != null) {ListNode next = curr.next;curr.next = prev;prev = curr;curr = next;}return prev;}
}
8. 实际应用场景
8.1 浏览器历史记录
/*** 浏览器历史记录实现* 使用链表反转来实现前进后退功能*/
public class BrowserHistory {private ListNode current;static class HistoryNode extends ListNode {String url;HistoryNode prev;HistoryNode next;HistoryNode(String url) {this.url = url;}}public BrowserHistory(String homepage) {current = new HistoryNode(homepage);}public void visit(String url) {// 清除当前节点之后的历史current.next = null;// 添加新页面HistoryNode newPage = new HistoryNode(url);current.next = newPage;newPage.prev = current;current = newPage;}public String back(int steps) {while (steps > 0 && current.prev != null) {current = current.prev;steps--;}return current.url;}public String forward(int steps) {while (steps > 0 && current.next != null) {current = current.next;steps--;}return current.url;}
}
8.2 音乐播放器
/*** 音乐播放器的播放列表* 支持反转播放顺序*/
public class MusicPlayer {private ListNode playlist;private ListNode current;private boolean reversed = false;static class Song extends ListNode {String title;String artist;Song(String title, String artist) {this.title = title;this.artist = artist;}@Overridepublic String toString() {return title + " - " + artist;}}public void addSong(String title, String artist) {Song newSong = new Song(title, artist);if (playlist == null) {playlist = newSong;current = newSong;} else {ListNode tail = playlist;while (tail.next != null) {tail = tail.next;}tail.next = newSong;}}public void reversePlaylist() {playlist = reverseList(playlist);reversed = !reversed;System.out.println("播放列表已" + (reversed ? "反转" : "恢复"));}public Song getCurrentSong() {return (Song) current;}public Song nextSong() {if (current != null && current.next != null) {current = current.next;}return (Song) current;}private ListNode reverseList(ListNode head) {ListNode prev = null;ListNode curr = head;while (curr != null) {ListNode next = curr.next;curr.next = prev;prev = curr;curr = next;}return prev;}
}
8.3 文档编辑器的撤销功能
/*** 文档编辑器的撤销/重做功能* 使用链表反转实现操作历史管理*/
public class DocumentEditor {private ListNode operationHistory;private ListNode currentState;static class Operation extends ListNode {String type;String content;int position;Operation(String type, String content, int position) {this.type = type;this.content = content;this.position = position;}}public void executeOperation(String type, String content, int position) {Operation op = new Operation(type, content, position);// 清除当前状态之后的历史if (currentState != null) {currentState.next = null;}// 添加新操作if (operationHistory == null) {operationHistory = op;currentState = op;} else {currentState.next = op;currentState = op;}System.out.println("执行操作: " + type + " - " + content);}public void undo() {if (currentState != null) {System.out.println("撤销操作: " + currentState.type);// 找到前一个操作if (currentState == operationHistory) {currentState = null;} else {ListNode prev = operationHistory;while (prev.next != currentState) {prev = prev.next;}currentState = prev;}}}public void redo() {if (currentState == null && operationHistory != null) {currentState = operationHistory;System.out.println("重做操作: " + currentState.type);} else if (currentState != null && currentState.next != null) {currentState = currentState.next;System.out.println("重做操作: " + currentState.type);}}
}
9. 性能分析与优化
9.1 时间复杂度对比
| 方法 | 时间复杂度 | 空间复杂度 | 优点 | 缺点 |
|---|---|---|---|---|
| 迭代法 | O(n) | O(1) | 空间效率高,性能稳定 | 代码稍长 |
| 递归法 | O(n) | O(n) | 代码简洁,思路清晰 | 可能栈溢出 |
9.2 性能测试代码
/*** 性能测试类*/
public class PerformanceTest {public static void comparePerformance() {int[] sizes = {100, 1000, 10000, 100000};System.out.println("链表大小\t迭代法(ns)\t递归法(ns)\t性能比");System.out.println("================================================");for (int size : sizes) {ListNode list1 = createLargeList(size);ListNode list2 = copyList(list1);// 测试迭代法long start1 = System.nanoTime();new Solution().reverseList(list1);long end1 = System.nanoTime();long iterativeTime = end1 - start1;// 测试递归法long start2 = System.nanoTime();try {new RecursiveSolution().reverseList(list2);long end2 = System.nanoTime();long recursiveTime = end2 - start2;double ratio = (double) recursiveTime / iterativeTime;System.out.printf("%d\t\t%d\t\t%d\t\t%.2f\n", size, iterativeTime, recursiveTime, ratio);} catch (StackOverflowError e) {System.out.printf("%d\t\t%d\t\t栈溢出\t\t-\n", size, iterativeTime);}}}private static ListNode createLargeList(int size) {if (size <= 0) return null;ListNode head = new ListNode(1);ListNode curr = head;for (int i = 2; i <= size; i++) {curr.next = new ListNode(i);curr = curr.next;}return head;}private static ListNode copyList(ListNode head) {if (head == null) return null;ListNode newHead = new ListNode(head.val);ListNode newCurr = newHead;ListNode curr = head.next;while (curr != null) {newCurr.next = new ListNode(curr.val);newCurr = newCurr.next;curr = curr.next;}return newHead;}
}
10. 总结与学习建议
10.1 核心要点总结
-
算法理解:
- 反转链表本质是改变指针方向
- 关键是保存下一个节点的信息,避免链表断裂
- 迭代法使用三指针,递归法利用调用栈
-
实现技巧:
- 边界条件:空链表和单节点链表
- 迭代法:
prev、curr、next三指针配合 - 递归法:明确递归终止条件和回溯处理
-
复杂度权衡:
- 迭代法:时间O(n),空间O(1),推荐使用
- 递归法:时间O(n),空间O(n),适合理解递归思想
10.2 学习收获
通过学习反转链表问题,你应该掌握:
- 链表操作的基本技巧
- 指针操作的细节处理
- 迭代与递归两种思维方式
- 边界条件的重要性
- 算法分析和优化方法
10.3 面试准备建议
-
熟练掌握基本实现:
- 能够快速写出迭代法的标准实现
- 理解递归法的思想和实现
- 处理好各种边界条件
-
扩展知识:
- 了解反转链表的变种题目
- 掌握相关的链表操作技巧
- 理解实际应用场景
-
调试能力:
- 能够快速定位和修复常见错误
- 掌握链表问题的调试技巧
- 具备代码review能力
10.4 进阶学习方向
-
更多链表题目:
- 合并两个有序链表
- 环形链表检测
- 链表排序
- 复杂链表的复制
-
高级数据结构:
- 双向链表
- 跳跃表
- 链表与其他数据结构的结合
-
算法设计模式:
- 双指针技巧
- 递归设计模式
- 分治算法思想
反转链表是链表操作的经典问题,掌握它不仅能帮你解决相关题目,更重要的是培养处理链表问题的思维方式和编程技巧。持续练习和思考,你将在链表相关的算法问题上游刃有余!
相关文章:
:LeetCode 206. 反转链表(Reverse Linked List)详解)
Java详解LeetCode 热题 100(23):LeetCode 206. 反转链表(Reverse Linked List)详解
文章目录 1. 题目描述1.1 链表节点定义 2. 理解题目2.1 反转前后对比2.2 核心思路 3. 解法一:迭代法(三指针法)3.1 算法思路3.2 详细图解3.3 Java代码实现3.4 代码执行过程演示3.5 执行结果示例3.6 优化版本(简化代码)…...

StarRocks部署方案详解:从单机到分布式集群
#### 一、引言 StarRocks(原名DorisDB)是一款高性能的MPP(大规模并行处理)分析型数据库,支持实时查询、高并发和复杂分析场景。其基于列式存储和向量化执行引擎的设计,使其在大数据OLAP领域表现优异。本文…...
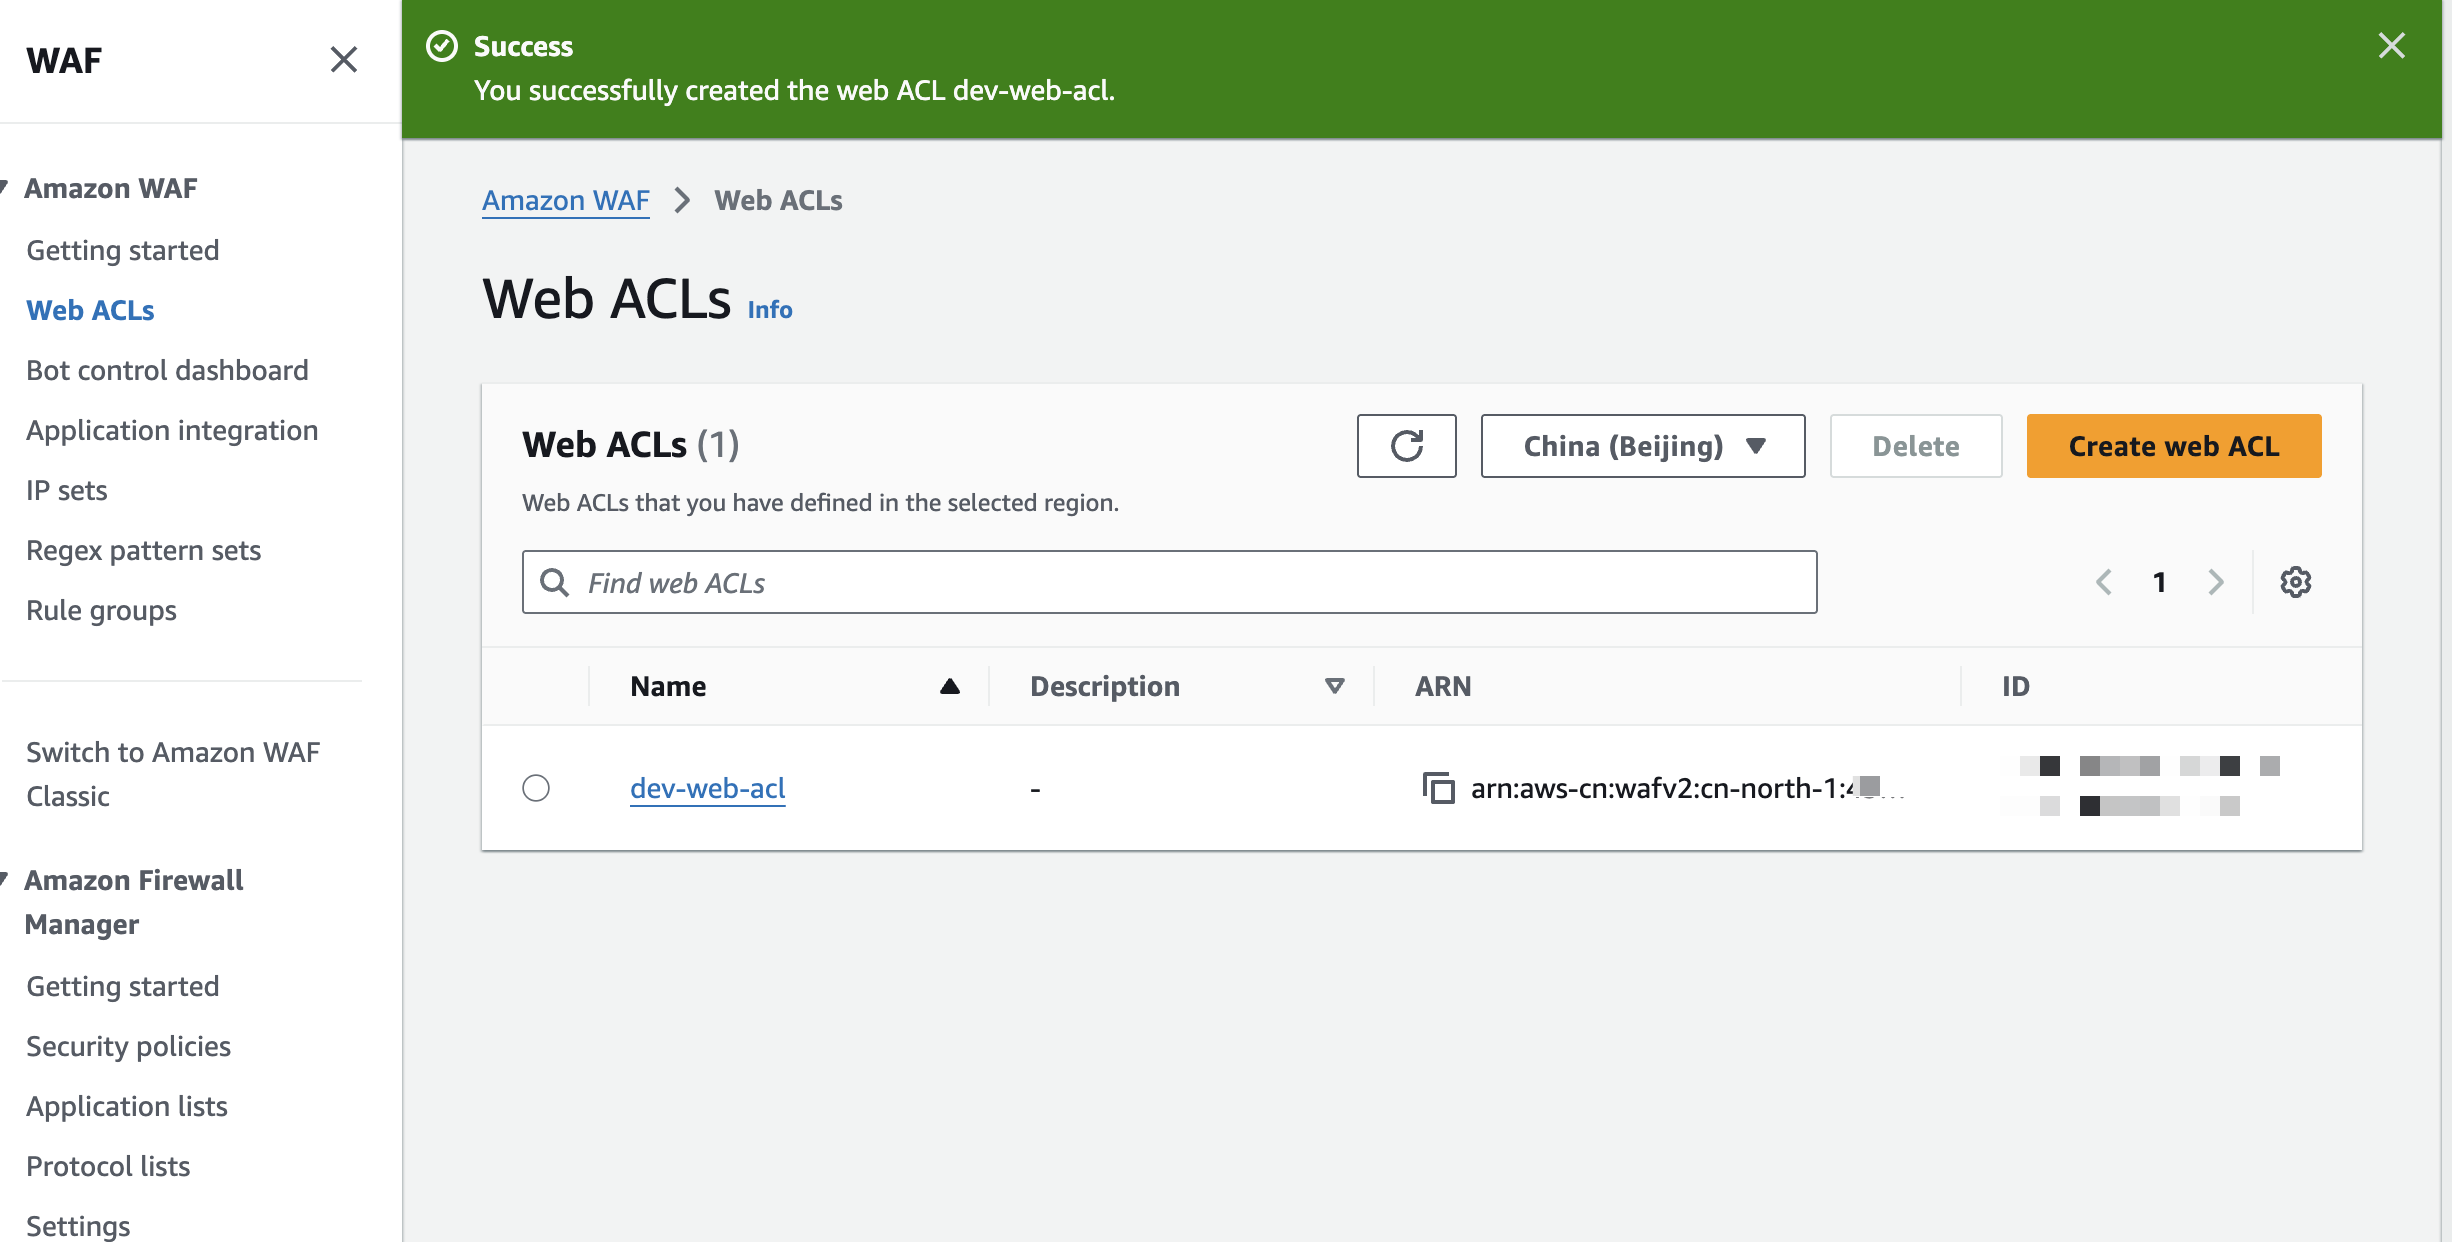
AWS API Gateway 配置WAF(中国区)
问题 需要给AWS API Gateway配置WAF。 AWS WAF设置 打开AWS WAF首页,开始创建和配置WAF,如下图: 设置web acl名称,然后开始添加aws相关资源,如下图: 选择资源类型,但是,我这里出…...

【前端面经】百度一面
写在前面:面经只是记录博主遇到的题目。每题的答案在编写文档的时候已经有问过deepseek,它只是一种比较普世的答案,要学得深入还是靠自己 Q: <html><style>.a {background-color: red;width: 200px;height: 100px;}…...

嵌入式学习笔记 - freeRTOS 动态创建任务跟静态创建任务的区别,以及内存回收问题
FreeRTOS动态创建任务和静态创建任务各有优缺点,选择哪种方式取决于具体的应用场景和需求。 一 动态创建任务 优点: 灵活性高:动态任务在运行时通过pvPortMalloc()动态分配内存,系统自动管理栈和任务控制块…...

[免费]微信小程序网上花店系统(SpringBoot后端+Vue管理端)【论文+源码+SQL脚本】
大家好,我是java1234_小锋老师,看到一个不错的微信小程序网上花店系统(SpringBoot后端Vue管理端)【论文源码SQL脚本】,分享下哈。 项目视频演示 【免费】微信小程序网上花店系统(SpringBoot后端Vue管理端) Java毕业设计_哔哩哔哩_bilibili 项…...

如何给老旧 iOS App 添加安全保护?用 Ipa Guard 对 IPA 文件混淆加固实录
在大多数安全讨论中,我们习惯关注新项目的安全性,从代码结构、API 设计、用户认证机制出发,构建完善的防护体系。但现实是,很多开发者都在维护一些年久失修的老项目——技术架构老旧、团队成员流失、源码混乱甚至缺失。 我最近接…...

C#语音录制:使用NAudio库实现语音录制功能详解
C#语音录制:使用NAudio库实现语音录制功能详解 在音频处理领域,C# 凭借其强大的生态系统和丰富的类库,为开发者提供了便捷的开发工具。NAudio 库就是其中一款用于音频处理的优秀开源库,它支持多种音频格式和音频设备操作。今天&a…...

[蓝桥杯]缩位求和
缩位求和 题目描述 在电子计算机普及以前,人们经常用一个粗略的方法来验算四则运算是否正确。 比如:248153720248153720 把乘数和被乘数分别逐位求和,如果是多位数再逐位求和,直到是 1 位数,得 24814>14524814…...

MySQ-8.42 MGR 组复制部署及详解
目录 1 MGR要求 2 操作系统信息和软件版本 3 集群架构图 4 MySQL MGR 主库部署步骤 1 MGR要求 InnoDB 存储引擎 表上必须存在主键或唯一非空索引 MGR可允许的最大节点9个 2 操作系统信息和软件版本 rootu24-mysql-mgr-42:~# cat /etc/issue Ubuntu 24.04.2 LTS \n \l mysql…...

css使用scoped之后样式失效问题
项目中的vue代码原本用的style标签来写css,现在想改成<style langscss scoped>,但是改完之后发现样式不对: 原来是: 将style改成scoped之后变成了:检查发现是之前定义的一些变量无法被识别,导致这些样…...
【NLP】将 LangChain 与模型上下文协议 (MCP) 结合使用
🔎大家好,我是Sonhhxg_柒,希望你看完之后,能对你有所帮助,不足请指正!共同学习交流🔎 📝个人主页-Sonhhxg_柒的博客_CSDN博客 📃 🎁欢迎各位→点赞…...

使用NMEA Tools生成GPS轨迹图
前言 在现代科技快速发展的时代,GPS定位技术已经广泛应用于各种领域,如导航、物流、运动追踪等。为了获取和分析GPS数据,我们常常需要使用一些专业的工具。本文将详细介绍如何使用一款名为“NMEA Tools”的APK应用,结合GPSVisual…...
1. pytorch手写数字预测
1. pytorch手写数字预测 1.背景2.准备数据集2.定义模型3.dataloader和训练4.训练模型5.测试模型6.保存模型 1.背景 因为自身的研究方向是多模态目标跟踪,突然对其他的视觉方向产生了兴趣,所以心血来潮的回到最经典的视觉任务手写数字预测上来࿰…...

vs中添加三方库的流程
在Visual Studio(VS)中添加第三方库(如OpenCV、PCL等)的流程可以分为以下几个步骤:安装库、配置项目、编写代码。以下是详细的步骤说明: 1. 安装第三方库 首先,需要下载并安装所需的第三方库。…...

JAVASE面相对象进阶之static
JavaSE 面向对象进阶之 static 一、static 的核心作用 static 是 Java 中用于修饰成员(属性/方法)的关键字,作用是让成员与类直接关联,而非依赖对象存在。 二、static 修饰属性(静态变量) 特点…...
)
深入解析 Redis Cluster 架构与实现(一)
#作者:stackofumbrella 文章目录 Redis Cluster特点Redis Cluster与其它集群模式的区别集群目标性能hash tagsMutli-key操作Cluster Bus安全写入(write safety)集群节点的属性集群拓扑节点间handshake重定向与reshardingMOVED重定向ASK重定向…...
java+ selenium->元素定位大法之By_link_text)
(12)java+ selenium->元素定位大法之By_link_text
1.简介 本章节介绍元素定位中的link_text,顾名思义是通过链接定位的(官方说法:超链接文本定位)。什么是link_text呢,就是我们在任何一个网页上都可以看到有一个或者多个链接,上面有一个文字描述,点击这个文字,就可以跳转到其他页面。这个就是link_Text。 注意:link_t…...

数据库MySQL集群MGR
一、MGR原理 一、基本定义 MGR(MySQL Group Replication) 是 MySQL 官方推出的一种高可用、高可靠的数据库集群解决方案,基于分布式系统理论(如 Paxos 协议变种)实现,主要用于构建强一致性的主从复制集群…...

Ubuntu22.04 安装 ROS2 Humble
ROS2 Documentation: Humble Ubuntu 22.04 对应的 ROS 2 版本是 ROS 2 Humble Hawksbill (LTS)。 1.设置系统区域 确保区域设置支持UTF-8 sudo apt update && sudo apt install locales sudo locale-gen en_US en_US.UTF-8 sudo update-locale LC_ALLen_US.UTF-8 L…...

Spring Boot,注解,@RestController
RestController 是 Spring MVC 中用于创建 RESTful Web 服务的核心注解。 RestController 核心知识点 REST 作用: RestController 是一个方便的组合注解,它结合了 Controller 和 ResponseBody 两个注解。 Controller: 将类标记为一个控制器,使其能够处理…...

C++中新式类型转换static_cast、const_cast、dynamic_cast、reinterpret_cast
C中新式类型转换static_cast、const_cast、dynamic_cast、reinterpret_cast 在C中,新式类型转换(也称为强制类型转换)是C标准引入的一种更安全、更明确的类型转换方式,用以替代C语言风格的类型转换。C提供了四种新式类型转换操作…...
AXI 协议补充(二)
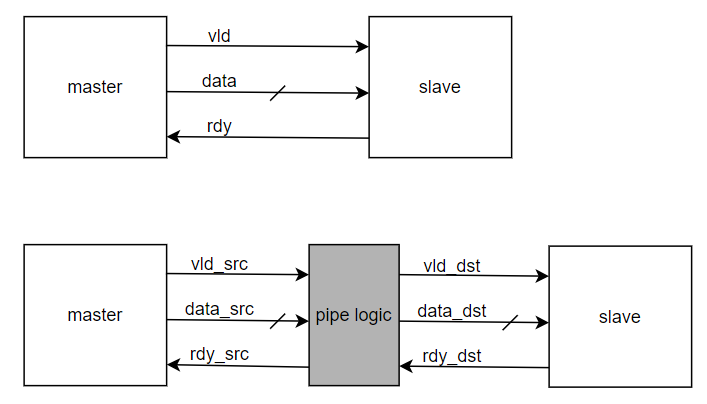
axi协议存在slave 和master 之间的数据交互,在ahb ,axi-stream 高速接口 ,叠加大位宽代码逻辑中,往往有时序问题,valid 和ready 的组合电路中的问题引发的时序问题较多。 本文根据axi 协议和现有解决反压造成的时序问题的方法做一个详细的科普。 1. 解决时序问题的方法:…...

Linux 基础指令入门指南:解锁命令行的实用密码
文章目录 引言:Linux 下基本指令常用选项ls 指令pwd 命令cd 指令touch 指令mkdir 指令rmdir 指令 && rm 指令man 指令cp 指令mv 指令cat 指令more 指令less 指令head 指令tail 指令date 指令cal 指令find 指令按文件名搜索按文件大小搜索按修改时间搜索按文…...
标准精读:2025 《可信数据空间 技术架构》【附全文阅读】
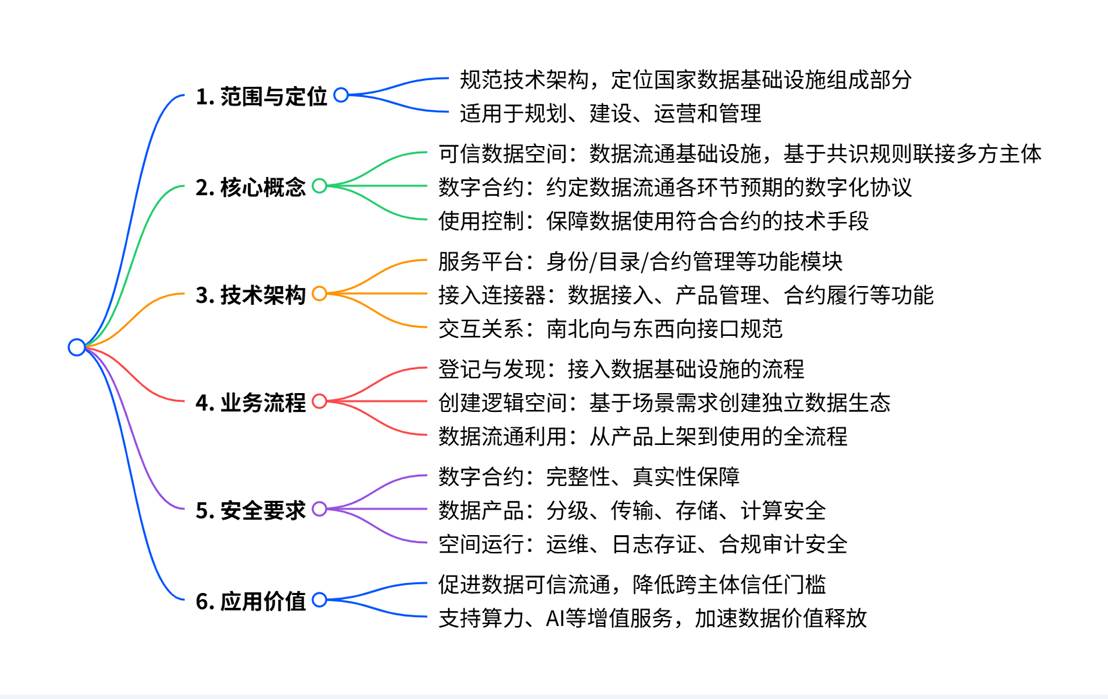
《可信数据空间 技术架构》规范了可信数据空间的技术架构,明确其作为国家数据基础设施的定位,以数字合约和使用控制技术为核心,涵盖功能架构(含服务平台与接入连接器的身份管理、目录管理、数字合约管理等功能)、业务流程(登记、发现、创建空间及数据流通利用)及安全要求…...
山东大学软件学院项目实训-基于大模型的模拟面试系统-面试官和面试记录的分享功能(2)
本文记录在发布文章时,可以添加自己创建的面试官和面试记录到文章中这一功能的实现。 前端 首先是在原本的界面的底部添加了两个多选框(后期需要美化调整) 实现的代码: <el-col style"margin-top: 1rem;"><e…...
Webug4.0靶场通关笔记05- 第5关SQL注入之过滤关键字
目录 一、代码审计 1、源码分析 2、SQL注入分析 (1)大小写绕过 (2)双写绕过 二、第05关 过滤型注入 1、进入靶场 2、sqlmap渗透 (1)bp抓包保存报文 (2)sqlmap渗透 &…...
ONLYOFFICE文档API:更强的安全功能
在数字化办公时代,文档的安全性与隐私保护已成为企业和个人用户的核心关切。如何确保信息在存储、传输及协作过程中的安全,是开发者与IT管理者亟需解决的问题。ONLYOFFICE作为一款功能强大的开源办公套件,不仅提供了高效的文档编辑与协作体验…...

深入浅出MQTT协议:从物联网基础到实战应用全解析
深入浅出MQTT协议:从物联网基础到实战应用全解析 作为一名在物联网领域摸爬滚打多年的老程序员,今天来和大家聊聊物联网通信中最核心的技术之一——MQTT协议。无论是Java后端开发还是嵌入式硬件开发,掌握MQTT都能让你在物联网项目中如鱼得水…...

解析楼宇自控系统:分布式结构的核心特点与优势展现
在建筑智能化发展的进程中,楼宇自控系统作为实现建筑高效运行与管理的关键,其系统结构的选择至关重要。传统的集中式楼宇自控系统在面对日益复杂的建筑环境和多样化的管理需求时,逐渐暴露出诸多弊端,如可靠性低、扩展性差、响应速…...