WifiEspNow库函数详解
WifiEspNow库
项目地址https://github.com/yoursunny/WifiEspNow
WifiEspNow 是 ESP-NOW 的 Arduino 库,ESP-NOW 是乐鑫定义的无连接 WiFi 通信协议。 有关 ESP-NOW 工作原理及其限制的更多信息,请参阅 ESP-NOW 参考。
WifiEspNow是 ESP-IDF 中 ESP-NOW 函数的简单包装器。 在 ESP8266 上,它仅支持单播。 在 ESP32 上,它支持单播和多播。ESP-NOW支持多播,但WifiEspNow库中似乎并没有特殊函数来支持多播
WifiEspNowBroadcast 通过 ESP-NOW 实现伪广播。 每个设备通告一个特定的 WiFi SSID,并通过 BSSID 扫描发现彼此。 然后,消息通过 ESP-NOW 单播分别传输到每个对等体。
ESP - NOW 的伪广播机制是基于设备之间的对等连接。当设备调用 WifiEspNowBroadcast.begin() 初始化后,它会自动搜索同一通道上的其他 ESP - NOW 设备,并建立对等连接。这些连接会在后台自动管理,所以无需显式设置目标设备的 MAC 地址。所有设备都要使用相同的网络名称和通道,以此保证能相互通信。
ESP32 和 ESP8266 可以一起组网进行伪广播通信。因为伪广播是基于单播实现的,而 ESP8266 支持单播通信,ESP32 也支持单播通信,它们可以通过伪广播机制进行组网
单播和多播
在 ESP-NOW 通信中,单播(Unicast) 和多播(Multicast) 是两种不同的数据传输方式,它们在目标地址、通信模式和应用场景上有明显区别。
| 特性 | 单播(Unicast) | 多播(Multicast) |
|---|---|---|
| 目标地址 | 单个接收方的 MAC 地址 | 预定义的多播组 MAC 地址(例如以 01:00:5E 开头) |
| 接收方数量 | 1 个设备 | 加入同一多播组的所有设备 |
| 可靠性 | 高(有 ACK 确认) | 低(无 ACK 确认,不保证所有接收方收到) |
| 效率 | 每次发送到一个设备,开销较大 | 单次发送到多个设备,效率高 |
| 应用场景 | 一对一通信(如控制指令、私密数据) | 一对多通信(如系统广播、配置更新) |
| 场景 | 选择多播 | 选择单播 |
|---|---|---|
| 同时向多个设备发送相同数据 | ✅ 高效(一次发送) | ❌ 需多次发送,效率低 |
| 需要确认消息是否送达 | ❌ 无 ACK 机制 | ✅ 有 ACK 机制,可靠性高 |
| 系统配置更新 | ✅ 简单直接 | ❌ 需要逐个确认 |
| 私密数据传输 | ❌ 所有组成员可见 | ✅ 仅目标设备可见 |
| 网络负载 | ✅ 低(单次传输) | ❌ 高(多次传输) |
WifiEspNow 函数
初始化和终止函数
bool begin():
- 功能:初始化 ESP - NOW。设置 ESP - NOW 角色、注册接收和发送回调函数。
- 返回值:初始化成功返回
true,否则返回false。
void end():
- 功能:停止 ESP - NOW,释放相关资源。
- 返回值:无
密钥设置函数
bool setPrimaryKey(const uint8_t key[WIFIESPNOW_KEYLEN]):
- 功能:设置主加密密钥(KOK 或 PMK)。
- 参数:
key是一个长度为WIFIESPNOW_KEYLEN(通常为 16 字节)的字节数组,表示加密密钥。 - 返回值:设置成功返回
true,否则返回false。
加密密钥必须是 16 字节(128 位) 的随机字节数组。
python小工具:
import secrets# 生成一个长度为16的随机字节数组
key = secrets.token_bytes(16)# 打印生成的密钥数组
print("static const uint8_t ENCRYPTION_KEY[WIFIESPNOW_KEYLEN]  = {", end="")
for i, byte in enumerate(key):if i < 15:print(f"0x{byte:02X}, ", end="")else:print(f"0x{byte:02X}", end="")
print("};")
在调用 WifiEspNow.begin() 之前设置密钥,确保所有设备使用相同的密钥。
所有参与通信的设备必须使用相同的密钥,否则无法解密消息。
单播.ino
#include <WifiEspNow.h>// 定义加密密钥(所有设备必须使用相同的密钥)
static const uint8_t ENCRYPTION_KEY[WIFIESPNOW_KEYLEN] = {0x01, 0x02, 0x03, 0x04, 0x05, 0x06, 0x07, 0x08,0x09, 0x0A, 0x0B, 0x0C, 0x0D, 0x0E, 0x0F, 0x10
};// 接收方 MAC 地址(需要替换为实际接收方的 MAC 地址)
static uint8_t PEER_MAC[6] = {0x00, 0x00, 0x00, 0x00, 0x00, 0x00};// 发送状态变量
WifiEspNowSendStatus lastSendStatus = WifiEspNowSendStatus::NONE;// 接收回调函数
void onReceive(const uint8_t* mac, const uint8_t* data, size_t len, void* arg) {Serial.print("Received from: ");for (int i = 0; i < 6; i++) {Serial.printf("%02X:", mac[i]);}Serial.print(" Data: ");for (size_t i = 0; i < len; i++) {Serial.print((char)data[i]);}Serial.println();
}// 发送消息函数
void sendMessage(const char* message) {size_t len = strlen(message);bool result = WifiEspNow.send(PEER_MAC, (const uint8_t*)message, len);if (result) {Serial.print("Message sent: ");Serial.println(message);} else {Serial.println("Failed to send message");}// 等待一段时间获取发送状态delay(100);lastSendStatus = WifiEspNow.getSendStatus();Serial.print("Send status: ");switch (lastSendStatus) {case WifiEspNowSendStatus::OK:Serial.println("SUCCESS");break;case WifiEspNowSendStatus::FAIL:Serial.println("FAILED");break;case WifiEspNowSendStatus::NONE:Serial.println("PENDING");break;}
}void setup() {Serial.begin(115200);Serial.println("ESP-NOW Unicast Example (Encrypted)");// 设置为 STA 模式(单播通信推荐)WiFi.mode(WIFI_STA);WiFi.disconnect();// 打印本机 MAC 地址Serial.print("My MAC address: ");Serial.println(WiFi.macAddress());// 设置加密密钥(必须在 begin() 之前调用)bool keySet = WifiEspNow.setPrimaryKey(ENCRYPTION_KEY);if (!keySet) {Serial.println("Failed to set encryption key!");ESP.restart();} else {Serial.println("Encryption key set successfully");}// 初始化 ESP-NOWif (!WifiEspNow.begin()) {Serial.println("ESP-NOW initialization failed");ESP.restart();}// 添加对等节点if (!WifiEspNow.addPeer(PEER_MAC)) {Serial.println("Failed to add peer");ESP.restart();} else {Serial.println("Peer added successfully");}// 设置接收回调WifiEspNow.onReceive(onReceive, nullptr);Serial.println("Ready to send/receive messages");
}void loop() {// 每 5 秒发送一条消息static unsigned long lastSendTime = 0;if (millis() - lastSendTime > 5000) {sendMessage("Hello from encrypted ESP-NOW!");lastSendTime = millis();}// 处理其他任务delay(10);
}
伪广播.ino
#include <WifiEspNowBroadcast.h>// 定义加密密钥(16 字节 = 128 位)
// 注意:所有设备必须使用相同的密钥!
static const uint8_t ENCRYPTION_KEY[WIFIESPNOW_KEYLEN] = {0x01, 0x02, 0x03, 0x04, 0x05, 0x06, 0x07, 0x08,0x09, 0x0A, 0x0B, 0x0C, 0x0D, 0x0E, 0x0F, 0x10
};static const int BUTTON_PIN = 0;    // 默认使用 GPIO0(Flash 按钮)
static const int LED_PIN = 2;       // 默认使用 GPIO2(板载 LED)
int ledState = HIGH;                // LED 初始状态(HIGH 通常为熄灭)/*** 接收消息回调函数* 当接收到伪广播消息时被调用*/
void processRx(const uint8_t mac[WIFIESPNOW_ALEN], const uint8_t* buf, size_t count, void* arg) {// 打印发送方 MAC 地址Serial.printf("Message from %02X:%02X:%02X:%02X:%02X:%02X\n", mac[0], mac[1], mac[2], mac[3], mac[4], mac[5]);// 打印接收到的消息内容for (size_t i = 0; i < count; ++i) {Serial.print(static_cast<char>(buf[i]));}Serial.println();// 切换 LED 状态digitalWrite(LED_PIN, ledState);ledState = 1 - ledState;
}void setup() {Serial.begin(115200);Serial.println();WiFi.persistent(false);// 初始化伪广播功能bool ok = WifiEspNowBroadcast.begin("ESPNOW", 3);if (!ok) {Serial.println("WifiEspNowBroadcast.begin() failed");ESP.restart();}// 设置加密密钥(使用 WifiEspNowBroadcast 类的方法)bool keySet = WifiEspNowBroadcast.setPrimaryKey(ENCRYPTION_KEY);if (!keySet) {Serial.println("Failed to set encryption key!");ESP.restart();} else {Serial.println("Encryption key set successfully");}// 设置接收回调函数WifiEspNowBroadcast.onReceive(processRx, nullptr);// 初始化按钮和 LED 引脚pinMode(BUTTON_PIN, INPUT_PULLUP);pinMode(LED_PIN, OUTPUT);digitalWrite(LED_PIN, ledState);// 打印设备 MAC 地址(用于识别不同设备)Serial.print("MAC address of this node is ");Serial.println(WiFi.softAPmacAddress());Serial.println("Press the button to send a message");
}/*** 发送消息函数* 向所有已知的对等设备发送消息(伪广播)*/
void sendMessage() {// 准备包含设备信息和时间戳的消息char msg[60];int len = snprintf(msg, sizeof(msg), "ESP-NOW encrypted broadcast from %s at %lu",WiFi.softAPmacAddress().c_str(), millis());// 发送消息到所有已知对等设备WifiEspNowBroadcast.send(reinterpret_cast<const uint8_t*>(msg), len);// 打印发送信息和已知对等设备列表Serial.println("Sending encrypted message");Serial.println(msg);// 打印已知对等设备列表Serial.print("Known peers: ");const int MAX_PEERS = 20;WifiEspNowPeerInfo peers[MAX_PEERS];int nPeers = std::min(WifiEspNow.listPeers(peers, MAX_PEERS), MAX_PEERS);for (int i = 0; i < nPeers; ++i) {Serial.printf(" %02X:%02X:%02X:%02X:%02X:%02X", peers[i].mac[0], peers[i].mac[1],peers[i].mac[2], peers[i].mac[3],peers[i].mac[4], peers[i].mac[5]);}Serial.println();
}void loop() {// 检测按钮是否按下(LOW 表示按下)if (digitalRead(BUTTON_PIN) == LOW) {// 发送消息sendMessage();// 等待按钮释放,避免重复触发while (digitalRead(BUTTON_PIN) == LOW);}// 处理伪广播库的循环逻辑(必须调用)WifiEspNowBroadcast.loop();// 短暂延时,避免过于频繁地扫描delay(10);
}
对等设备管理函数
int listPeers(WifiEspNowPeerInfo\* peers, int maxPeers) const:
- 功能:列出当前的对等设备信息。
- 参数:
peers为存储对等设备信息的缓冲区,maxPeers为缓冲区大小。 - 返回值:返回对等设备的总数,实际写入
peers的数量为std::min(retval, maxPeers)。
bool hasPeer(const uint8_t mac[WIFIESPNOW_ALEN]) const:
- 功能:检查指定 MAC 地址的对等设备是否存在。
- 参数:
mac为对等设备的 MAC 地址。 - 返回值:存在返回
true,否则返回false。
bool addPeer(const uint8_t mac[WIFIESPNOW_ALEN], int channel = 0, const uint8_t key[WIFIESPNOW_KEYLEN] = nullptr, int netif = ESP_IF_WIFI_AP):
- 功能:添加一个对等设备或更改对等设备的通道。
- 参数:
mac为对等设备的 MAC 地址,channel为对等设备的通道,key为加密密钥,netif为 WiFi 接口(仅 ESP32)。 - 返回值:操作成功返回
true,否则返回false。
bool removePeer(const uint8_t mac[WIFIESPNOW_ALEN]):
- 功能:移除指定 MAC 地址的对等设备。
- 参数:
mac为对等设备的 MAC 地址。 - 返回值:移除成功返回
true,否则返回false。
接收和发送函数
void onReceive(RxCallback cb, void\* arg):
- 功能:设置接收回调函数。
- 参数:
cb为回调函数指针,arg为传递给回调函数的参数。 - 返回值:无
bool send(const uint8_t mac[WIFIESPNOW_ALEN], const uint8_t\* buf, size_t count):
- 功能:发送消息。
- 参数:
mac为目标 MAC 地址,nullptr表示所有对等设备;buf为消息缓冲区,count为消息大小。 - 返回值:消息成功入队发送返回
true,否则返回false。
WifiEspNowSendStatus getSendStatus() const:
- 功能:获取最后一次发送消息的状态。
- 返回值:返回发送状态,枚举类型
WifiEspNowSendStatus,可能值为NONE、OK或FAIL。
// 获取发送状态WifiEspNowSendStatus status = WifiEspNow.getSendStatus();switch (status) {case WifiEspNowSendStatus::OK:Serial.println("Message sent successfully");break;case WifiEspNowSendStatus::FAIL:Serial.println("Message sending failed");break;case WifiEspNowSendStatus::NONE:Serial.println("Message status unknown, still sending");break;
WifiEspNowBroadcast 函数
初始化和终止函数
bool begin(const char\* ssid, int channel = 1, int scanFreq = 15000):
-
功能:初始化 ESP - NOW 并启动伪广播功能。
-
参数:
ssid为用于宣告和发现对等设备的 AP SSID,channel指的是接入点(AP)所使用的 WiFi 通道。在 WiFi 网络里,不同的通道代表着不同的频段,设备要在相同的通道上才能实现相互通信。scanFreq为扫描对等设备的频率(毫秒)。所有设备都要使用相同的网络名称和通道,以此保证能相互通信。 -
返回值:初始化成功返回
true,否则返回false。
void end():
- 功能:停止 ESP - NOW 和伪广播功能。
- 返回值:无
扫描和循环函数
void loop():
- 功能:在 Arduino 的
loop()函数中调用,用于定期扫描对等设备。 - 返回值:无
密钥设置函数
bool setKey(const uint8_t primary[WIFIESPNOW_KEYLEN], const uint8_t peer[WIFIESPNOW_KEYLEN] = nullptr):
- 功能:设置加密密钥。
- 参数:
primary为主密钥,peer为对等设备密钥,nullptr表示禁用加密。 - 返回值:设置成功返回
true,否则返回false。
使用 setKey() 的加密伪广播代码
#include <WifiEspNowBroadcast.h>
#if defined(ARDUINO_ARCH_ESP8266)
#include <ESP8266WiFi.h>
#elif defined(ARDUINO_ARCH_ESP32)
#include <WiFi.h>
#endif// 定义主加密密钥(16 字节 = 128 位)
// 注意:所有设备必须使用相同的主密钥!
static const uint8_t PRIMARY_KEY[WIFIESPNOW_KEYLEN] = {0x01, 0x02, 0x03, 0x04, 0x05, 0x06, 0x07, 0x08,0x09, 0x0A, 0x0B, 0x0C, 0x0D, 0x0E, 0x0F, 0x10
};// 可选:定义对等设备特定密钥(用于特定设备间的额外加密)
static const uint8_t PEER_KEY[WIFIESPNOW_KEYLEN] = {0x11, 0x12, 0x13, 0x14, 0x15, 0x16, 0x17, 0x18,0x19, 0x1A, 0x1B, 0x1C, 0x1D, 0x1E, 0x1F, 0x20
};static const int BUTTON_PIN = 0;    // 默认使用 GPIO0(Flash 按钮)
static const int LED_PIN = 2;       // 默认使用 GPIO2(板载 LED)
int ledState = HIGH;                // LED 初始状态(HIGH 通常为熄灭)/*** 接收消息回调函数* 当接收到伪广播消息时被调用*/
void processRx(const uint8_t mac[WIFIESPNOW_ALEN], const uint8_t* buf, size_t count, void* arg) {// 打印发送方 MAC 地址Serial.printf("Message from %02X:%02X:%02X:%02X:%02X:%02X\n", mac[0], mac[1], mac[2], mac[3], mac[4], mac[5]);// 打印接收到的消息内容for (size_t i = 0; i < count; ++i) {Serial.print(static_cast<char>(buf[i]));}Serial.println();// 切换 LED 状态digitalWrite(LED_PIN, ledState);ledState = 1 - ledState;
}void setup() {Serial.begin(115200);Serial.println();WiFi.persistent(false);// 初始化伪广播功能bool ok = WifiEspNowBroadcast.begin("ESPNOW", 3);if (!ok) {Serial.println("WifiEspNowBroadcast.begin() failed");ESP.restart();}// 设置加密密钥(使用 setKey 函数)// 第一个参数为主密钥,第二个参数为可选的对等设备特定密钥bool keySet = WifiEspNowBroadcast.setKey(PRIMARY_KEY, PEER_KEY);if (!keySet) {Serial.println("Failed to set encryption key!");ESP.restart();} else {Serial.println("Encryption key set successfully");}// 设置接收回调函数WifiEspNowBroadcast.onReceive(processRx, nullptr);// 初始化按钮和 LED 引脚pinMode(BUTTON_PIN, INPUT_PULLUP);pinMode(LED_PIN, OUTPUT);digitalWrite(LED_PIN, ledState);// 打印设备 MAC 地址(用于识别不同设备)Serial.print("MAC address of this node is ");Serial.println(WiFi.softAPmacAddress());Serial.println("Press the button to send a message");
}/*** 发送消息函数* 向所有已知的对等设备发送消息(伪广播)*/
void sendMessage() {// 准备包含设备信息和时间戳的消息char msg[60];int len = snprintf(msg, sizeof(msg), "ESP-NOW encrypted broadcast from %s at %lu",WiFi.softAPmacAddress().c_str(), millis());// 发送消息到所有已知对等设备WifiEspNowBroadcast.send(reinterpret_cast<const uint8_t*>(msg), len);// 打印发送信息和已知对等设备列表Serial.println("Sending encrypted message");Serial.println(msg);// 打印已知对等设备列表Serial.print("Known peers: ");const int MAX_PEERS = 20;WifiEspNowPeerInfo peers[MAX_PEERS];int nPeers = std::min(WifiEspNow.listPeers(peers, MAX_PEERS), MAX_PEERS);for (int i = 0; i < nPeers; ++i) {Serial.printf(" %02X:%02X:%02X:%02X:%02X:%02X", peers[i].mac[0], peers[i].mac[1],peers[i].mac[2], peers[i].mac[3],peers[i].mac[4], peers[i].mac[5]);}Serial.println();
}void loop() {// 检测按钮是否按下(LOW 表示按下)if (digitalRead(BUTTON_PIN) == LOW) {// 发送消息sendMessage();// 等待按钮释放,避免重复触发while (digitalRead(BUTTON_PIN) == LOW);}// 处理伪广播库的循环逻辑(必须调用)WifiEspNowBroadcast.loop();// 短暂延时,避免过于频繁地扫描delay(10);
}
密钥配置:
- 所有设备必须使用相同的主密钥
PRIMARY_KEY - 对等设备特定密钥
PEER_KEY可以为nullptr(如果不需要)或所有设备相同
接收和发送函数
void onReceive(WifiEspNowClass::RxCallback cb, void\* arg):
- 功能:设置接收回调函数。
- 参数:
cb为回调函数指针,arg为传递给回调函数的参数。 - 返回值:无
bool send(const uint8_t\* buf, size_t count):
- 功能:广播消息。
- 参数:
buf为消息缓冲区,count为消息大小。 - 返回值:消息成功入队发送返回
true,否则返回false。
setKey() 和 setPrimaryKey() 的区别
在 ESP-NOW 通信中,setKey() 和 setPrimaryKey() 的区别涉及到加密的粒度和应用场景。
setPrimaryKey()
bool setPrimaryKey(const uint8_t key[WIFIESPNOW_KEYLEN]);
- 功能:设置一个全局主密钥,所有对等设备必须使用相同的主密钥才能通信。
- 应用范围:整个 ESP-NOW 网络的所有设备共享同一个密钥。
- 使用场景:简单的加密通信,所有设备使用相同的安全级别。
setKey()
bool setKey(const uint8_t primary[WIFIESPNOW_KEYLEN], const uint8_t peer[WIFIESPNOW_KEYLEN] = nullptr);
- 功能:设置两个密钥
- 主密钥(Primary Key):与
setPrimaryKey()类似,所有设备必须相同。 - 对等设备特定密钥(Peer Key):可选,用于特定设备间的额外加密。
- 主密钥(Primary Key):与
- 应用范围:主密钥用于全局加密,对等密钥用于特定设备对之间的通信。
- 使用场景:需要更细粒度安全控制的场景(如不同设备组使用不同密钥)。
为什么需要两个密钥?
多层安全保护
- 主密钥:确保整个网络的基本安全性,所有设备必须共享。
- 对等密钥:为特定设备对提供额外的安全层,例如:
- 管理员设备与普通设备之间使用不同的对等密钥。
- 关键设备之间使用更高级别的加密。
灵活的安全策略
通过组合使用两个密钥,可以实现:
- 分层安全:不同类型的设备使用不同的安全级别。
- 设备身份验证:特定设备对之间使用专用密钥,防止中间人攻击。
应用场景对比
| 场景 | 推荐方法 | 说明 |
|---|---|---|
| 所有设备使用相同的加密密钥 | setPrimaryKey() | 简单、统一的加密,所有设备共享一个密钥。 |
| 不同设备组使用不同的安全级别 | setKey(主密钥, 组特定密钥) | 主密钥确保基本安全,组特定密钥区分不同设备组(如管理员组与普通用户组)。 |
| 特定设备对之间需要更高的安全性 | setKey(主密钥, 设备对密钥) | 主密钥用于全局通信,设备对密钥用于敏感通信(如控制指令)。 |
示例
获取MAC地址
#if defined(ARDUINO_ARCH_ESP8266)
#include <ESP8266WiFi.h>
#elif defined(ARDUINO_ARCH_ESP32)
#include <WiFi.h>
#endifvoid setup() {Serial.begin(115200);// 设置WiFi模式为STA(站点模式)WiFi.mode(WIFI_STA);// 获取并打印MAC地址Serial.print("MAC address of this node is ");Serial.println(WiFi.macAddress());
}void loop() {// 主循环可以留空,因为我们只需要在启动时获取一次MAC地址
}
单播
fa.ino
#include <WifiEspNow.h>// 定义接收端的 MAC 地址
const uint8_t receiverMac[WIFIESPNOW_ALEN] = {0x11, 0x22, 0x33, 0x44, 0x55, 0x66};void setup() {Serial.begin(115200);// 初始化 ESP-NOWif (WifiEspNow.begin()) {Serial.println("ESP-NOW 初始化成功");} else {Serial.println("ESP-NOW 初始化失败");return;}// 添加接收端为对等设备if (WifiEspNow.addPeer(receiverMac)) {Serial.println("对等设备添加成功");} else {Serial.println("对等设备添加失败");}
}void loop() {const char* message = "Hello, Receiver!";size_t messageLength = strlen(message);// 向接收端发送消息if (WifiEspNow.send(receiverMac, (const uint8_t*)message, messageLength)) {Serial.println("消息已发送");} else {Serial.println("消息发送失败");}delay(5000); // 每 5 秒发送一次消息
}
shou.ino
#include <WifiEspNow.h>// 定义控制灯的引脚
const int ledPin = 2;// 接收回调函数,当接收到消息时会被调用
void OnDataRecv(const uint8_t *mac_addr, const uint8_t *data, size_t data_len) {Serial.print("Received data from MAC address: ");// 打印发送端的 MAC 地址for (int i = 0; i < WIFIESPNOW_ALEN; i++) {Serial.printf("%02X", mac_addr[i]);if (i < WIFIESPNOW_ALEN - 1) {Serial.print(":");}}Serial.print(", Data: ");// 打印接收到的数据for (size_t i = 0; i < data_len; i++) {Serial.print((char)data[i]);}Serial.println();// 将接收到的数据转换为字符串String receivedData = "";for (size_t i = 0; i < data_len; i++) {receivedData += (char)data[i];}// 根据接收到的数据控制灯的开关if (receivedData == "ON") {digitalWrite(ledPin, HIGH);Serial.println("Light turned on");} else if (receivedData == "OFF") {digitalWrite(ledPin, LOW);Serial.println("Light turned off");}
}void setup() {Serial.begin(115200);// 初始化控制灯的引脚pinMode(ledPin, OUTPUT);digitalWrite(ledPin, LOW);// 初始化 ESP-NOWif (WifiEspNow.begin()) {Serial.println("ESP-NOW initialized successfully");} else {Serial.println("ESP-NOW initialization failed");return;}// 设置接收回调函数WifiEspNow.onReceive(OnDataRecv, nullptr);
}void loop() {// 可以在这里添加其他的循环逻辑delay(100);
}
发送端,点击按钮发送ON
#include <WifiEspNow.h>
#if defined(ARDUINO_ARCH_ESP8266)
#include <ESP8266WiFi.h>
#elif defined(ARDUINO_ARCH_ESP32)
#include <WiFi.h>
#endif// 定义接收方的 MAC 地址
static uint8_t PEER[] {0x02, 0x00, 0x00, 0x45, 0x53, 0x50};// 定义按钮引脚
const int buttonPin = 4;// 上一次按钮状态
int lastButtonState = HIGH;void setup() {Serial.begin(115200);Serial.println();// 初始化按钮引脚为输入模式pinMode(buttonPin, INPUT_PULLUP);bool ok = WifiEspNow.begin();if (!ok) {Serial.println("WifiEspNow.begin() failed");ESP.restart();}ok = WifiEspNow.addPeer(PEER);if (!ok) {Serial.println("WifiEspNow.addPeer() failed");ESP.restart();}
}void loop() {// 读取按钮状态int buttonState = digitalRead(buttonPin);// 检测按钮是否按下if (buttonState == LOW && lastButtonState == HIGH) {// 按钮按下,发送 "ON" 消息const char* msg = "ON";size_t len = strlen(msg);bool sent = WifiEspNow.send(PEER, reinterpret_cast<const uint8_t*>(msg), len);if (sent) {Serial.println("Message 'ON' sent successfully");} else {Serial.println("Failed to send message 'ON'");}}// 更新上一次按钮状态lastButtonState = buttonState;// 短暂延迟以避免抖动delay(50);
}
发送端,点击按钮发送ON,再点击发送OFF
#include <WifiEspNow.h>
#if defined(ARDUINO_ARCH_ESP8266)
#include <ESP8266WiFi.h>
#elif defined(ARDUINO_ARCH_ESP32)
#include <WiFi.h>
#endif// 定义接收方的 MAC 地址
static uint8_t PEER[] {0x02, 0x00, 0x00, 0x45, 0x53, 0x50};// 定义按钮引脚
const int buttonPin = 4;// 上一次按钮状态
int lastButtonState = HIGH;// 消息状态,用于交替发送 "ON" 和 "OFF"
bool isOn = false;void setup() {Serial.begin(115200);Serial.println();// 初始化按钮引脚为输入模式pinMode(buttonPin, INPUT_PULLUP);bool ok = WifiEspNow.begin();if (!ok) {Serial.println("WifiEspNow.begin() failed");ESP.restart();}ok = WifiEspNow.addPeer(PEER);if (!ok) {Serial.println("WifiEspNow.addPeer() failed");ESP.restart();}
}void loop() {// 读取按钮状态int buttonState = digitalRead(buttonPin);// 检测按钮是否按下if (buttonState == LOW && lastButtonState == HIGH) {const char* msg;if (isOn) {msg = "OFF";} else {msg = "ON";}size_t len = strlen(msg);bool sent = WifiEspNow.send(PEER, reinterpret_cast<const uint8_t*>(msg), len);if (sent) {Serial.printf("Message '%s' sent successfully\n", msg);} else {Serial.printf("Failed to send message '%s'\n", msg);}// 切换消息状态isOn = !isOn;}// 更新上一次按钮状态lastButtonState = buttonState;// 短暂延迟以避免抖动delay(50);
}
一对多
ESP - NOW支持多播,但WifiEspNow库中似乎并没有特殊函数来支持多播
通过单播,依次向两个mac地址发送信息,实现多播效果
fa.ino
#include <WifiEspNow.h>// 定义两个目标设备的 MAC 地址
const uint8_t macAddress1[WIFIESPNOW_ALEN] = {0x11, 0x22, 0x33, 0x44, 0x55, 0x66};
const uint8_t macAddress2[WIFIESPNOW_ALEN] = {0xAA, 0xBB, 0xCC, 0xDD, 0xEE, 0xFF};void setup() {Serial.begin(115200);// 初始化 ESP-NOWif (WifiEspNow.begin()) {Serial.println("ESP-NOW 初始化成功");} else {Serial.println("ESP-NOW 初始化失败");return;}// 添加两个对等设备if (WifiEspNow.addPeer(macAddress1) && WifiEspNow.addPeer(macAddress2)) {Serial.println("对等设备添加成功");} else {Serial.println("对等设备添加失败");}
}void loop() {const char* message = "Hello, ESP-NOW!";size_t messageLength = strlen(message);// 向第一个 MAC 地址发送消息if (WifiEspNow.send(macAddress1, (const uint8_t*)message, messageLength)) {Serial.println("消息已发送到第一个设备");} else {Serial.println("消息发送到第一个设备失败");}// 向第二个 MAC 地址发送消息if (WifiEspNow.send(macAddress2, (const uint8_t*)message, messageLength)) {Serial.println("消息已发送到第二个设备");} else {Serial.println("消息发送到第二个设备失败");}delay(5000); // 每 5 秒发送一次消息
}
shou.ino
#include <WifiEspNow.h>// 接收回调函数,当接收到消息时会被调用
void OnDataRecv(const uint8_t *mac_addr, const uint8_t *data, size_t data_len) {Serial.print("Received data from MAC address: ");// 打印发送端的 MAC 地址for (int i = 0; i < WIFIESPNOW_ALEN; i++) {Serial.printf("%02X", mac_addr[i]);if (i < WIFIESPNOW_ALEN - 1) {Serial.print(":");}}Serial.print(", Data: ");// 打印接收到的数据for (size_t i = 0; i < data_len; i++) {Serial.print((char)data[i]);}Serial.println();
}void setup() {Serial.begin(115200);// 初始化 ESP-NOWif (WifiEspNow.begin()) {Serial.println("ESP-NOW initialized successfully");} else {Serial.println("ESP-NOW initialization failed");return;}// 设置接收回调函数WifiEspNow.onReceive(OnDataRecv, nullptr);
}void loop() {// 可以在这里添加其他的循环逻辑delay(100);
}
伪广播
// 实现 ESP-NOW 广播发送和接收消息,收到 'ON' 点亮 LED 的示例代码#include <WifiEspNowBroadcast.h>
#if defined(ARDUINO_ARCH_ESP8266)
#include <ESP8266WiFi.h>
#elif defined(ARDUINO_ARCH_ESP32)
#include <WiFi.h>
#endif// 定义 LED 引脚
#ifdef ARDUINO_ARCH_ESP8266
const int LED_PIN = 2;
#else
const int LED_PIN = LED_BUILTIN;
#endif// 处理接收到的消息的函数
void processRx(const uint8_t mac[WIFIESPNOW_ALEN], const uint8_t* buf, size_t count, void* arg) {Serial.print("Received message from ");for (int i = 0; i < WIFIESPNOW_ALEN; i++) {Serial.printf("%02X", mac[i]);if (i < WIFIESPNOW_ALEN - 1) {Serial.print(":");}}Serial.print(": ");for (size_t i = 0; i < count; i++) {Serial.print((char)buf[i]);}Serial.println();// 检查是否收到 "ON" 消息if (count == 2 && buf[0] == 'O' && buf[1] == 'N') {digitalWrite(LED_PIN, HIGH);Serial.println("Received 'ON', LED is turned on.");}
}// 发送消息的函数
void sendMessage() {const char* msg = "hello";size_t len = strlen(msg);WifiEspNowBroadcast.send(reinterpret_cast<const uint8_t*>(msg), len);Serial.println("Message sent: hello");// 获取并打印已知对等设备列表const int MAX_PEERS = 20;WifiEspNowPeerInfo peers[MAX_PEERS];int nPeers = std::min(WifiEspNow.listPeers(peers, MAX_PEERS), MAX_PEERS);for (int i = 0; i < nPeers; ++i) {Serial.printf(" %02X:%02X:%02X:%02X:%02X:%02X", peers[i].mac[0], peers[i].mac[1],peers[i].mac[2], peers[i].mac[3], peers[i].mac[4], peers[i].mac[5]);}Serial.println();}void setup() {Serial.begin(115200);Serial.println();WiFi.persistent(false); // 禁用 WiFi 配置持久化存储bool ok = WifiEspNowBroadcast.begin("ESPNOW", 3);if (!ok) {Serial.println("WifiEspNowBroadcast.begin() failed");ESP.restart();}WifiEspNowBroadcast.onReceive(processRx, nullptr);// 初始化 LED 引脚pinMode(LED_PIN, OUTPUT);digitalWrite(LED_PIN, LOW);Serial.print("MAC address of this node is ");Serial.println(WiFi.softAPmacAddress());
}void loop() {// 每5秒发送一次消息static unsigned long lastSendTime = 0;if (millis() - lastSendTime >= 5000) {sendMessage();lastSendTime = millis();}WifiEspNowBroadcast.loop();delay(10);
}
伪广播认证
#include <WifiEspNowBroadcast.h>// 合法设备的 MAC 地址列表
uint8_t allowedMacs[][WIFIESPNOW_ALEN] = {{0xAA, 0xBB, 0xCC, 0xDD, 0xEE, 0xFF},// 可以添加更多合法 MAC 地址
};
int numAllowedMacs = sizeof(allowedMacs) / sizeof(allowedMacs[0]);bool isMacAllowed(const uint8_t mac[WIFIESPNOW_ALEN]) {for (int i = 0; i < numAllowedMacs; i++) {if (memcmp(mac, allowedMacs[i], WIFIESPNOW_ALEN) == 0) {return true;}}return false;
}void processRx(const uint8_t mac[WIFIESPNOW_ALEN], const uint8_t* buf, size_t count, void* arg) {if (isMacAllowed(mac)) {// 处理合法设备发送的消息for (size_t i = 0; i < count; i++) {Serial.print((char)buf[i]);}Serial.println();} else {// 忽略非法设备发送的消息Serial.println("Received message from unauthorized device");}
}void setup() {Serial.begin(115200);WiFi.persistent(false);bool ok = WifiEspNowBroadcast.begin("ESPNOW", 3);if (!ok) {Serial.println("WifiEspNowBroadcast.begin() failed");ESP.restart();}WifiEspNowBroadcast.onReceive(processRx, nullptr);
}void loop() {WifiEspNowBroadcast.loop();delay(10);
}
相关文章:

WifiEspNow库函数详解
WifiEspNow库 项目地址https://github.com/yoursunny/WifiEspNow WifiEspNow 是 ESP-NOW 的 Arduino 库,ESP-NOW 是乐鑫定义的无连接 WiFi 通信协议。 有关 ESP-NOW 工作原理及其限制的更多信息,请参阅 ESP-NOW 参考。 WifiEspNow是 ESP-IDF 中 ESP-N…...

rsync使用守护进程启动服务
rsync 本身通常使用 SSH(Secure Shell)协议来进行数据传输,因此它默认使用 SSH 的端口 22。如果使用 rsync 进行通过 SSH 的数据同步,它会通过端口 22 来建立连接。 然而,如果你使用 rsync 作为一个守护进程进行文件同步(即不通过 SSH),则可以配置它使用 TCP 端口 873…...

React 核心概念与生态系统
1. React 简介 React 是由 Facebook 开发并开源的一个用于构建用户界面的 JavaScript 库。它主要用于构建单页应用(SPA),其核心理念是组件化和声明式编程,即 ui render(data)。 2. 核心特点 2.1. 声明式编程 React 使用声明式…...

使用React Native开发新闻资讯类鸿蒙应用的准备工作
以下是一篇关于使用React Native开发新闻资讯类鸿蒙应用的准备工作指南,结合鸿蒙生态特性与React Native技术栈整合要点: 一、环境搭建与工具链配置 基础依赖安装 Node.js 18:需支持ES2020语法(如可选链操…...

node-sass 报错
背景:一些老项目使用"node-sass": “^4.14.1” ,node版本要求 14.x,高版本不兼容 解决方案如下: 方案一:替换安装sass (无须降级Node版本) 卸载node-sass npm uninstall node-sass安装sass(Dart…...
Redis的安装与使用
网址:Spring Data Redis 安装包:Releases tporadowski/redis GitHub 解压后 在安装目录中打开cmd 打开服务(注意:每次客户端连接都有先打开服务!!!) 按ctrlC退出服务 客户端连接…...

Linux服务器运维10个基础命令
结合多篇权威资料,以下是运维工程师必须掌握的10个核心命令,涵盖文件管理、系统监控、网络操作等高频场景 1. "ls" 代码分析 "ls" 用于列出目录内容,通过参数组合可增强展示效果: "-l" 显示文件…...

2024年数维杯国际大学生数学建模挑战赛C题时间信号脉冲定时噪声抑制与大气时延抑制模型解题全过程论文及程序
2024年数维杯国际大学生数学建模挑战赛 C题 时间信号脉冲定时噪声抑制与大气时延抑制模型 原题再现: 脉冲星是一种快速旋转的中子星,具有连续稳定的旋转,因此被称为“宇宙灯塔”。脉冲星的空间观测在深空航天器导航和时间标准维护中发挥着至…...
C# 控制台程序获取用户输入数据验证 不合规返回重新提示输入
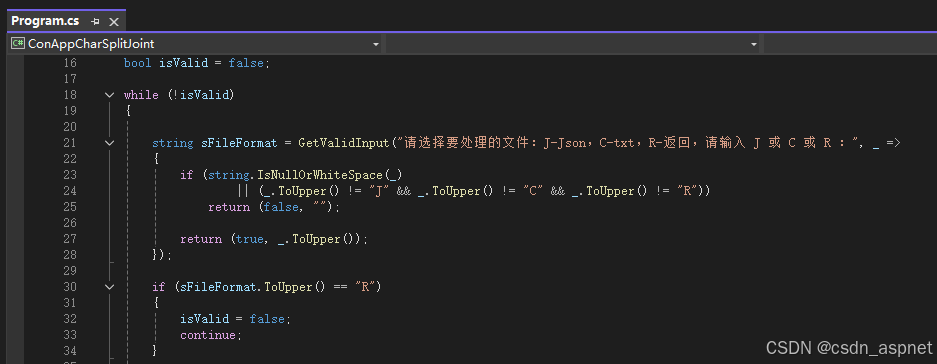
在 C# 控制台程序中实现输入验证并循环重试,可以通过以下方式实现高效且用户友好的交互。以下是包含多种验证场景的完整解决方案: 一、通用输入验证框架 public static T GetValidInput<T>(string prompt, Func<string, (bool IsValid, T Val…...

【大模型面试每日一题】Day 31:LoRA微调方法中低秩矩阵的秩r如何选取?
【大模型面试每日一题】Day 31:LoRA微调方法中低秩矩阵的秩r如何选取? 📌 题目重现 🌟🌟 面试官:LoRA微调方法中低秩矩阵的秩r如何选取?: #mermaid-svg-g5hxSxV8epzWyP98 {font-family:"…...

使用source ~/.bashrc修改环境变量之后,关闭服务器,在重启,环境变量还有吗?
环境变量在服务器重启后的留存性分析 1. 环境变量的存储机制 临时环境变量: 通过命令直接设置的环境变量(如 export MY_VARvalue)仅存在于当前 shell 会话中,服务器重启后会丢失。永久环境变量: 写入 配置文件&#…...

SQL 窗口函数深度解析:ROW_NUMBER 实战指南
SQL 窗口函数深度解析:ROW_NUMBER 实战指南 一、窗口函数核心概念 窗口函数(Window Function)是SQL中用于在结果集的"窗口"(即特定行集合)上执行计算的高级功能。与聚合函数不同,窗口函数不会将多行合并为单行,而是为每行返回一个计算值。 关键特性:窗口函数通…...
)
React从基础入门到高级实战:React 生态与工具 - React 国际化(i18n)
React 国际化(i18n) 引言 随着全球化的加速,开发支持多语言的应用已成为现代Web开发的重要需求。无论是面向国际市场的电商平台,还是提供多语言服务的SaaS应用,国际化(i18n)功能都是提升用户体…...

leetcode93.复原IP地址:回溯算法中段控制与前导零处理的深度解析
一、题目深度解析与IP地址规则 题目描述 给定一个只包含数字的字符串s,返回所有可能的有效IP地址组合。有效IP地址需满足以下条件: 由4个0-255的整数组成,用.分隔每个整数不能以0开头(除非该整数本身是0)例如输入s&…...

TDengine 运维——巡检工具(安装前检查)
简介 本文档旨在介绍 TDengine 安装部署前后配套的巡检工具。 相关工具的功能简介: 工具名称功能简介安装前检查部署前对 TDengine 安装部署的依赖要素进行安装前检查安装前预配置部署前对 TDengine 安装部署的依赖要素进行安装前预配置安装部署指定环境安装部署…...

MySQL主从复制深度解析:原理、架构与实战部署指南
一、主从复制核心原理 复制流程解析 MySQL主从复制本质是通过二进制日志(binlog)实现数据同步的异步复制机制: 写操作记录:主库执行写操作时,将变更记录到binlog 日志传输:主库的binlog dump线程将日志发送给从库 中继存储&am…...
)
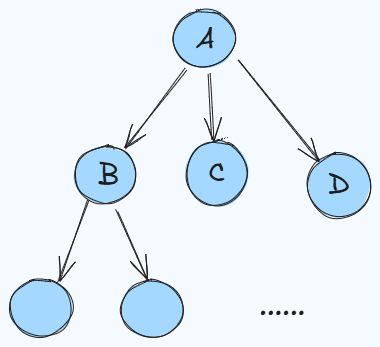
[SC]SystemC dont_initialize的应用场景详解(二)
SystemC dont_initialize的应用场景详解(二) 摘要:下面给出一个稍复杂一点的 SystemC 示例,包含三个模块(Producer/Filter/Consumer)和一个 Testbench(Top)模块,演示了在不同的进程类型中如何使用 dont_initialize() 来抑制 time 0 的自动调用。 一、源代码 …...

【Linux】权限chmod命令+Linux终端常用快捷键
目录 linux中权限表示形式 解析标识符 权限的数字序号 添加权限命令chmod 使用数字表示法设置权限 使用符号表示法设置权限 linux终端常用快捷键 🔥个人主页 🔥 😈所属专栏😈 在 Linux 系统里,权限管理是保障系…...

Java八股文智能体——Agent提示词(Prompt)
这个智能体能够为正在学习Java八股文的同学提供切实帮助:不仅可以帮你优化答案表述,还能直接解答八股文相关问题——它会以面试者的视角,给出贴合求职场景的专业回答。 将以下内容发送给任何一个LLM,他会按照你提示词的内容&…...
Go语言的context
Golang context 实现原理 本篇文章是基于小徐先生的文章的修改和个人注解,要查看原文可以点击上述的链接查看 目前我这篇文章的go语言版本是1.24.1 context上下文 context被当作第一个参数(官方建议),并且不断的传递下去&…...

快速掌握 GO 之 RabbitMQ 结合 gin+gorm 案例
更多个人笔记见: (注意点击“继续”,而不是“发现新项目”) github个人笔记仓库 https://github.com/ZHLOVEYY/IT_note gitee 个人笔记仓库 https://gitee.com/harryhack/it_note 个人学习,学习过程中还会不断补充&…...

JVM——SubstrateVM:AOT编译框架
引入 在现代软件开发领域,应用程序的启动性能和内存开销一直是影响用户体验的关键因素。对于 Java 应用程序而言,传统的即时编译(JIT)模式虽然能够在运行时对热点代码进行优化,提高程序的执行效率,但却无法…...

【HarmonyOS 5】鸿蒙Taro跨端框架
Taro跨端框架 支持React语法开发鸿蒙应用,架构分为三层: ArkVM层运行业务代码和React核心TaroElement树处理节点创建和属性绑定TaroRenderNode虚拟节点树与上屏节点一一对应 import { Component } from tarojs/taro export default class MyCompon…...
数据库原理 试卷
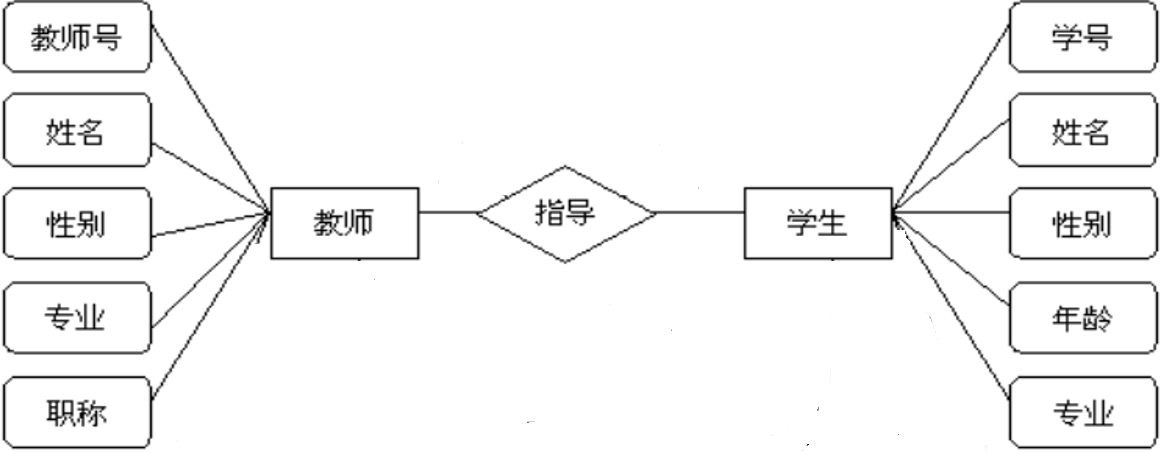
以下是某高校教学管理系统的毕业论文指导ER图,数据信息:一名教师指导多名学生,一名学生只能选择一名教师,试分析完成以下各题,如用SQL命令完成的,在SQL Server2008验证后把答案写在题目的下方。 图1 毕业论…...
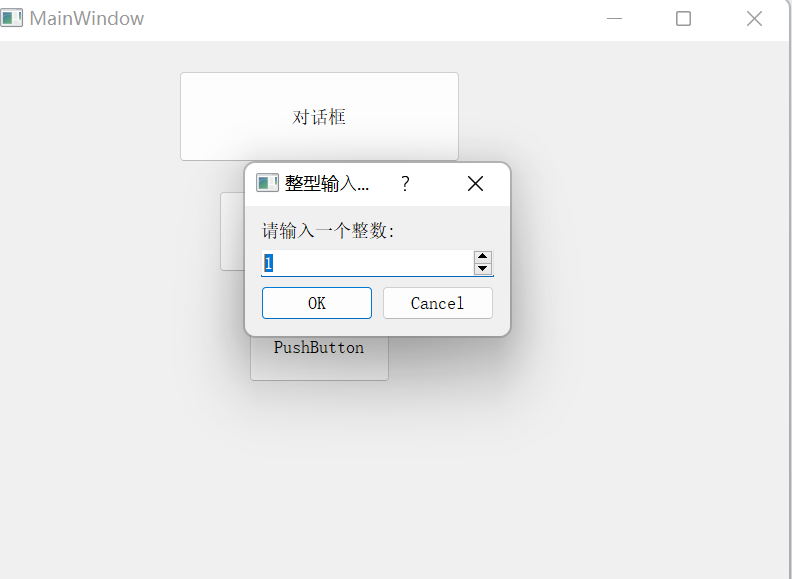
【Qt开发】对话框
目录 1,对话框的介绍 2,Qt内置对话框 2-1,消息对话框QMessageBox 2-2,颜色对话框QColorDialog 2-3,文件对话框QFileDialog 2-4,字体对话框QFontDialog 2-5,输入对话框QInputDialog 1&…...

Ubuntu上进行VS Code的配置
1. 安装VS code sudo snap install code --classic 2. 安装GCC sudo apt install build-essential 3. 安装VS Code中文包 打开 VS Code 点击左侧活动栏中的扩展图标(或按Ctrl+Shift+X) 在搜索框中输入:Chinese (Simplified) 选择由 Microsoft 提供的 中文(简体)语言包…...

阴盘奇门 api数据接口
阴盘奇门,又称"道家阴盘遁甲"或"法术奇门",与阳盘奇门(奇门排盘)并称"奇门双雄"。由王凤麟教授整合道家三式(奇门、六壬、太乙)精髓创立,独创行为风水与立体全息预测技术,广…...

2025年渗透测试面试题总结-匿名[校招]攻防研究员(应用安全)(题目+回答)
安全领域各种资源,学习文档,以及工具分享、前沿信息分享、POC、EXP分享。不定期分享各种好玩的项目及好用的工具,欢迎关注。 目录 匿名[校招]攻防研究员(应用安全) 基础部分 1. HTTP状态码 2. HTTP请求方法及作用 3. 网络分层及协议 OW…...

碰一碰发视频系统--基于H5场景开发
#碰一碰发视频# 旨在构建一个基于移动网页(H5)的视频“碰传”交互系统,提供类似华为/苹果设备 NFC 轻碰分享的便捷体验。其核心技术依赖于移动端可用的近场通信(NFC 或 H5 相关 API)和可靠的媒体数据传输方案。实现细节…...

MagicAnimate 论文解读:引入时间一致性的视频人物动画生成方法
1. 前言/动机 问题:现有动画生成方法缺乏对时间信息的建模,常常出现时间一致性差的问题 描述: 现有的动画生成方法通常采用帧变形(frame-warping)技术,将参考图像变形以匹配目标动作。尽管这类方法能生成较…...