SpringBoot插件化架构的4种实现方案
在复杂业务场景下,传统的单体应用架构往往面临着功能扩展困难、代码耦合严重、迭代效率低下等问题。
插件化架构作为一种模块化设计思想的延伸,能够使系统具备更好的扩展性和灵活性,实现"热插拔"式的功能扩展。
本文将介绍SpringBoot环境下实现插件化架构的4种实现方案。
方案一:基于Spring的条件注解实现
原理介绍
这种方案利用Spring提供的条件注解(如@Conditional、@ConditionalOnProperty等)实现插件的动态加载。通过配置文件或环境变量控制哪些插件被激活,适合简单的插件化需求。
实现步骤
- 定义插件接口
- 实现多个插件实现类
- 使用条件注解控制插件加载
- 在主应用中使用插件
代码示例
1. 定义插件接口
public interface PaymentPlugin {String getName();boolean support(String payType);PaymentResult pay(PaymentRequest request);
}
2. 实现插件类
@Component
@ConditionalOnProperty(prefix = "plugins.payment", name = "alipay", havingValue = "true")
public class AlipayPlugin implements PaymentPlugin {@Overridepublic String getName() {return "alipay";}@Overridepublic boolean support(String payType) {return "alipay".equals(payType);}@Overridepublic PaymentResult pay(PaymentRequest request) {// 支付宝支付逻辑System.out.println("Processing Alipay payment");return new PaymentResult(true, "Alipay payment successful");}
}@Component
@ConditionalOnProperty(prefix = "plugins.payment", name = "wechat", havingValue = "true")
public class WechatPayPlugin implements PaymentPlugin {@Overridepublic String getName() {return "wechat";}@Overridepublic boolean support(String payType) {return "wechat".equals(payType);}@Overridepublic PaymentResult pay(PaymentRequest request) {// 微信支付逻辑System.out.println("Processing WeChat payment");return new PaymentResult(true, "WeChat payment successful");}
}
3. 插件管理器
@Component
public class PaymentPluginManager {private final List<PaymentPlugin> plugins;@Autowiredpublic PaymentPluginManager(List<PaymentPlugin> plugins) {this.plugins = plugins;}public PaymentPlugin getPlugin(String payType) {return plugins.stream().filter(plugin -> plugin.support(payType)).findFirst().orElseThrow(() -> new IllegalArgumentException("Unsupported payment type: " + payType));}public List<String> getSupportedPayments() {return plugins.stream().map(PaymentPlugin::getName).collect(Collectors.toList());}
}
4. 配置文件设置
plugins:payment:alipay: truewechat: truepaypal: false
5. 在服务中使用
@Service
public class PaymentService {private final PaymentPluginManager pluginManager;@Autowiredpublic PaymentService(PaymentPluginManager pluginManager) {this.pluginManager = pluginManager;}public PaymentResult processPayment(String payType, PaymentRequest request) {PaymentPlugin plugin = pluginManager.getPlugin(payType);return plugin.pay(request);}public List<String> getSupportedPaymentMethods() {return pluginManager.getSupportedPayments();}
}
优缺点分析
优点:
- 实现简单,无需额外的框架支持
- 与Spring生态完全兼容
- 启动时即完成插件加载,性能稳定
缺点:
- 不支持运行时动态加载/卸载插件
- 所有插件代码都需要在编译时确定
- 插件之间可能存在依赖冲突
适用场景
- 功能模块相对稳定,变化不频繁的系统
- 简单的SaaS多租户系统中不同租户的功能定制
- 不同部署环境需要不同功能模块的场景
方案二:基于SPI机制实现
原理介绍
SPI(Service Provider Interface)是Java提供的一种服务发现机制,允许第三方为系统提供实现。SpringBoot也提供了类似机制的扩展,可以利用它实现一种松耦合的插件化架构。
实现步骤
- 定义插件接口和抽象类
- 实现SPI配置
- 创建插件实现类
- 实现插件加载器
代码示例
1. 定义插件接口
public interface ReportPlugin {String getType();boolean support(String reportType);byte[] generateReport(ReportRequest request);
}
2. 创建SPI配置文件
在META-INF/services/目录下创建与接口全限定名同名的文件,如:
META-INF/services/com.example.plugin.ReportPlugin
文件内容为实现类的全限定名:
com.example.plugin.impl.PdfReportPlugin
com.example.plugin.impl.ExcelReportPlugin
com.example.plugin.impl.HtmlReportPlugin
3. 实现插件类
public class PdfReportPlugin implements ReportPlugin {@Overridepublic String getType() {return "pdf";}@Overridepublic boolean support(String reportType) {return "pdf".equals(reportType);}@Overridepublic byte[] generateReport(ReportRequest request) {System.out.println("Generating PDF report");// PDF生成逻辑return "PDF Report Content".getBytes();}
}// 其他插件实现类类似
4. 插件加载器
@Component
public class SpiPluginLoader {private static final Logger logger = LoggerFactory.getLogger(SpiPluginLoader.class);private final Map<String, ReportPlugin> reportPlugins = new HashMap<>();@PostConstructpublic void loadPlugins() {ServiceLoader<ReportPlugin> serviceLoader = ServiceLoader.load(ReportPlugin.class);for (ReportPlugin plugin : serviceLoader) {logger.info("Loading report plugin: {}", plugin.getType());reportPlugins.put(plugin.getType(), plugin);}logger.info("Loaded {} report plugins", reportPlugins.size());}public ReportPlugin getReportPlugin(String type) {ReportPlugin plugin = reportPlugins.get(type);if (plugin == null) {throw new IllegalArgumentException("Unsupported report type: " + type);}return plugin;}public List<String> getSupportedReportTypes() {return new ArrayList<>(reportPlugins.keySet());}
}
5. 在服务中使用
@Service
public class ReportService {private final SpiPluginLoader pluginLoader;@Autowiredpublic ReportService(SpiPluginLoader pluginLoader) {this.pluginLoader = pluginLoader;}public byte[] generateReport(String reportType, ReportRequest request) {ReportPlugin plugin = pluginLoader.getReportPlugin(reportType);return plugin.generateReport(request);}public List<String> getSupportedReportTypes() {return pluginLoader.getSupportedReportTypes();}
}
优缺点分析
优点:
- 标准的Java SPI机制,无需引入额外依赖
- 插件实现与主程序解耦,便于第三方扩展
- 配置简单,只需添加配置文件
缺点:
- 不支持运行时动态加载/卸载插件
- 无法控制插件加载顺序
适用场景
- 需要支持第三方扩展的开源框架
- 系统中的通用功能需要多种实现的场景
- 插件之间无复杂依赖关系的系统
方案三:基于SpringBoot自动配置实现
原理介绍
SpringBoot的自动配置机制是实现插件化的另一种强大方式。通过创建独立的starter模块,每个插件可以自包含所有依赖和配置,实现"即插即用"。
实现步骤
- 创建核心模块定义插件接口
- 为每个插件创建独立的starter
- 实现自动配置类
- 在主应用中集成插件
代码示例
1. 核心模块接口定义
// plugin-core模块
public interface StoragePlugin {String getType();boolean support(String storageType);String store(byte[] data, String path);byte[] retrieve(String path);
}
2. 插件实现模块
// local-storage-plugin模块
public class LocalStoragePlugin implements StoragePlugin {private final String rootPath;public LocalStoragePlugin(String rootPath) {this.rootPath = rootPath;}@Overridepublic String getType() {return "local";}@Overridepublic boolean support(String storageType) {return "local".equals(storageType);}@Overridepublic String store(byte[] data, String path) {// 本地存储实现String fullPath = rootPath + "/" + path;System.out.println("Storing data to: " + fullPath);// 实际存储逻辑return fullPath;}@Overridepublic byte[] retrieve(String path) {// 本地读取实现System.out.println("Retrieving data from: " + path);// 实际读取逻辑return "Local file content".getBytes();}
}
3. 自动配置类
@Configuration
@ConditionalOnProperty(prefix = "storage", name = "type", havingValue = "local")
@EnableConfigurationProperties(LocalStorageProperties.class)
public class LocalStorageAutoConfiguration {@Bean@ConditionalOnMissingBeanpublic StoragePlugin localStoragePlugin(LocalStorageProperties properties) {return new LocalStoragePlugin(properties.getRootPath());}
}@ConfigurationProperties(prefix = "storage.local")
public class LocalStorageProperties {private String rootPath = "/tmp/storage";// getter and setterpublic String getRootPath() {return rootPath;}public void setRootPath(String rootPath) {this.rootPath = rootPath;}
}
4. spring.factories配置
在META-INF/spring.factories文件中添加:
org.springframework.boot.autoconfigure.EnableAutoConfiguration=\
com.example.storage.local.LocalStorageAutoConfiguration
5. 类似地实现其他存储插件
// s3-storage-plugin模块
public class S3StoragePlugin implements StoragePlugin {// 实现亚马逊S3存储...
}@Configuration
@ConditionalOnProperty(prefix = "storage", name = "type", havingValue = "s3")
@EnableConfigurationProperties(S3StorageProperties.class)
public class S3StorageAutoConfiguration {@Bean@ConditionalOnMissingBeanpublic StoragePlugin s3StoragePlugin(S3StorageProperties properties) {return new S3StoragePlugin(properties.getAccessKey(), properties.getSecretKey(), properties.getBucket());}
}
6. 主应用使用插件
@Service
public class FileService {private final StoragePlugin storagePlugin;@Autowiredpublic FileService(StoragePlugin storagePlugin) {this.storagePlugin = storagePlugin;}public String saveFile(byte[] data, String path) {return storagePlugin.store(data, path);}public byte[] getFile(String path) {return storagePlugin.retrieve(path);}
}
7. 配置文件设置
storage:type: local # 可选值: local, s3, oss等local:root-path: /data/files
优缺点分析
优点:
- 符合SpringBoot规范,易于集成
- 插件可以包含完整的依赖和配置
- 可通过配置动态切换插件
- 插件可以访问Spring上下文
缺点:
- 需要重启应用才能更换插件
- 所有可能的插件需要预先定义
- 多个插件同时存在可能引起依赖冲突
适用场景
- 企业级应用中需要支持多种技术实现的场景
- 不同部署环境使用不同技术栈的情况
- 需要将复杂功能模块化的大型应用
方案四:动态加载JAR实现
原理介绍
这种方案实现了真正的运行时动态加载插件,通过自定义ClassLoader加载外部JAR文件,实现插件的热插拔。
实现步骤
- 设计插件接口和扩展点
- 实现插件加载器
- 创建插件管理服务
- 实现插件生命周期管理
代码示例
1. 核心接口定义
// 插件接口
public interface Plugin {String getId();String getName();String getVersion();void initialize(PluginContext context);void start();void stop();
}// 插件上下文
public interface PluginContext {ApplicationContext getApplicationContext();ClassLoader getClassLoader();File getPluginDirectory();
}
2. 自定义类加载器
public class PluginClassLoader extends URLClassLoader {private final File pluginJarFile;public PluginClassLoader(File pluginJarFile, ClassLoader parent) throws MalformedURLException {super(new URL[]{pluginJarFile.toURI().toURL()}, parent);this.pluginJarFile = pluginJarFile;}public File getPluginJarFile() {return pluginJarFile;}
}
3. 插件加载器
@Component
public class JarPluginLoader {private static final Logger logger = LoggerFactory.getLogger(JarPluginLoader.class);@Value("${plugins.directory:/plugins}")private String pluginsDirectory;@Autowiredprivate ApplicationContext applicationContext;public Plugin loadPlugin(File jarFile) throws Exception {logger.info("Loading plugin from: {}", jarFile.getAbsolutePath());PluginClassLoader classLoader = new PluginClassLoader(jarFile, getClass().getClassLoader());// 查找plugin.properties文件URL pluginPropertiesUrl = classLoader.findResource("plugin.properties");if (pluginPropertiesUrl == null) {throw new IllegalArgumentException("Missing plugin.properties in plugin JAR");}Properties pluginProperties = new Properties();try (InputStream is = pluginPropertiesUrl.openStream()) {pluginProperties.load(is);}String mainClass = pluginProperties.getProperty("plugin.main-class");if (mainClass == null) {throw new IllegalArgumentException("Missing plugin.main-class in plugin.properties");}// 加载并实例化插件主类Class<?> pluginClass = classLoader.loadClass(mainClass);if (!Plugin.class.isAssignableFrom(pluginClass)) {throw new IllegalArgumentException("Plugin main class must implement Plugin interface");}Plugin plugin = (Plugin) pluginClass.getDeclaredConstructor().newInstance();// 创建插件上下文PluginContext context = new DefaultPluginContext(applicationContext, classLoader, new File(pluginsDirectory, plugin.getId()));// 初始化插件plugin.initialize(context);return plugin;}// 简单的插件上下文实现private static class DefaultPluginContext implements PluginContext {private final ApplicationContext applicationContext;private final ClassLoader classLoader;private final File pluginDirectory;public DefaultPluginContext(ApplicationContext applicationContext, ClassLoader classLoader, File pluginDirectory) {this.applicationContext = applicationContext;this.classLoader = classLoader;this.pluginDirectory = pluginDirectory;if (!pluginDirectory.exists()) {pluginDirectory.mkdirs();}}@Overridepublic ApplicationContext getApplicationContext() {return applicationContext;}@Overridepublic ClassLoader getClassLoader() {return classLoader;}@Overridepublic File getPluginDirectory() {return pluginDirectory;}}
}
4. 插件管理服务
@Service
public class PluginManagerService {private static final Logger logger = LoggerFactory.getLogger(PluginManagerService.class);@Value("${plugins.directory:/plugins}")private String pluginsDirectory;@Autowiredprivate JarPluginLoader pluginLoader;private final Map<String, Plugin> loadedPlugins = new ConcurrentHashMap<>();private final Map<String, PluginClassLoader> pluginClassLoaders = new ConcurrentHashMap<>();@PostConstructpublic void init() {loadAllPlugins();}public void loadAllPlugins() {File directory = new File(pluginsDirectory);if (!directory.exists() || !directory.isDirectory()) {directory.mkdirs();return;}File[] jarFiles = directory.listFiles((dir, name) -> name.endsWith(".jar"));if (jarFiles != null) {for (File jarFile : jarFiles) {try {loadPlugin(jarFile);} catch (Exception e) {logger.error("Failed to load plugin: {}", jarFile.getName(), e);}}}}public Plugin loadPlugin(File jarFile) throws Exception {Plugin plugin = pluginLoader.loadPlugin(jarFile);String pluginId = plugin.getId();// 如果插件已加载,先停止并卸载if (loadedPlugins.containsKey(pluginId)) {unloadPlugin(pluginId);}// 启动插件plugin.start();// 保存插件和类加载器loadedPlugins.put(pluginId, plugin);pluginClassLoaders.put(pluginId, (PluginClassLoader) plugin.getClass().getClassLoader());logger.info("Plugin loaded and started: {}", plugin.getName());return plugin;}public void unloadPlugin(String pluginId) {Plugin plugin = loadedPlugins.get(pluginId);if (plugin != null) {try {plugin.stop();logger.info("Plugin stopped: {}", plugin.getName());} catch (Exception e) {logger.error("Error stopping plugin: {}", plugin.getName(), e);}loadedPlugins.remove(pluginId);// 清理类加载器PluginClassLoader classLoader = pluginClassLoaders.remove(pluginId);if (classLoader != null) {try {classLoader.close();} catch (IOException e) {logger.error("Error closing plugin class loader", e);}}}}public List<PluginInfo> getLoadedPlugins() {return loadedPlugins.values().stream().map(plugin -> new PluginInfo(plugin.getId(), plugin.getName(), plugin.getVersion())).collect(Collectors.toList());}@Data@AllArgsConstructorpublic static class PluginInfo {private String id;private String name;private String version;}
}
5. 插件控制器
@RestController
@RequestMapping("/api/plugins")
public class PluginController {@Autowiredprivate PluginManagerService pluginManager;@GetMappingpublic List<PluginManagerService.PluginInfo> getPlugins() {return pluginManager.getLoadedPlugins();}@PostMapping("/upload")public ResponseEntity<String> uploadPlugin(@RequestParam("file") MultipartFile file) {if (file.isEmpty() || !file.getOriginalFilename().endsWith(".jar")) {return ResponseEntity.badRequest().body("Please upload a valid JAR file");}try {// 保存上传的JAR文件File tempFile = File.createTempFile("plugin-", ".jar");file.transferTo(tempFile);// 加载插件Plugin plugin = pluginManager.loadPlugin(tempFile);return ResponseEntity.ok("Plugin uploaded and loaded: " + plugin.getName());} catch (Exception e) {return ResponseEntity.status(HttpStatus.INTERNAL_SERVER_ERROR).body("Failed to load plugin: " + e.getMessage());}}@DeleteMapping("/{pluginId}")public ResponseEntity<String> unloadPlugin(@PathVariable String pluginId) {try {pluginManager.unloadPlugin(pluginId);return ResponseEntity.ok("Plugin unloaded: " + pluginId);} catch (Exception e) {return ResponseEntity.status(HttpStatus.INTERNAL_SERVER_ERROR).body("Failed to unload plugin: " + e.getMessage());}}@PostMapping("/reload")public ResponseEntity<String> reloadAllPlugins() {try {pluginManager.loadAllPlugins();return ResponseEntity.ok("All plugins reloaded");} catch (Exception e) {return ResponseEntity.status(HttpStatus.INTERNAL_SERVER_ERROR).body("Failed to reload plugins: " + e.getMessage());}}
}
6. 插件示例实现
// 在独立项目中开发插件
public class ReportGeneratorPlugin implements Plugin {private PluginContext context;private boolean running = false;@Overridepublic String getId() {return "report-generator";}@Overridepublic String getName() {return "Report Generator Plugin";}@Overridepublic String getVersion() {return "1.0.0";}@Overridepublic void initialize(PluginContext context) {this.context = context;}@Overridepublic void start() {running = true;System.out.println("Report Generator Plugin started");// 注册REST接口或服务try {ApplicationContext appContext = context.getApplicationContext();// 这里需要特殊处理来注册新的Controller} catch (Exception e) {e.printStackTrace();}}@Overridepublic void stop() {running = false;System.out.println("Report Generator Plugin stopped");}// 插件特定功能public byte[] generateReport(String type, Map<String, Object> data) {// 报表生成逻辑return "Report Content".getBytes();}
}
7. 插件描述文件 (plugin.properties)
plugin.id=report-generator
plugin.name=Report Generator Plugin
plugin.version=1.0.0
plugin.main-class=com.example.plugin.report.ReportGeneratorPlugin
plugin.author=Your Name
plugin.description=A plugin for generating various types of reports
优缺点分析
优点:
- 支持真正的运行时动态加载/卸载插件
- 插件可以完全独立开发和部署
- 主应用无需重启即可更新插件
缺点:
- 实现复杂,需要处理类加载器和资源隔离问题
- 可能存在内存泄漏风险
- 插件与主应用的通信需要精心设计
- 版本兼容性问题难以处理
适用场景
- 需要在运行时动态更新功能的系统
- 第三方开发者需要扩展的平台
- 插件开发和主应用开发由不同团队负责的情况
- 微内核架构的应用系统
方案对比
| 特性 | 条件注解 | SPI机制 | 自动配置 | 动态JAR |
|---|---|---|---|---|
| 实现复杂度 | 低 | 低 | 中 | 高 |
| 运行时加载 | 否 | 否 | 否 | 是 |
| 资源隔离 | 无 | 弱 | 弱 | 中 |
| Spring集成 | 很好 | 一般 | 很好 | 一般 |
| 开发门槛 | 低 | 低 | 中 | 高 |
| 部署复杂度 | 低 | 低 | 中 | 高 |
| 适合规模 | 小型 | 小型 | 中型 | 中大型 |
总结
插件化架构不仅是一种技术选择,更是一种系统设计思想。
通过将系统分解为核心框架和可插拔组件,我们能够构建更加灵活、可维护和可扩展的应用系统,更好地应对不断变化的业务需求。
相关文章:

SpringBoot插件化架构的4种实现方案
在复杂业务场景下,传统的单体应用架构往往面临着功能扩展困难、代码耦合严重、迭代效率低下等问题。 插件化架构作为一种模块化设计思想的延伸,能够使系统具备更好的扩展性和灵活性,实现"热插拔"式的功能扩展。 本文将介绍Spring…...
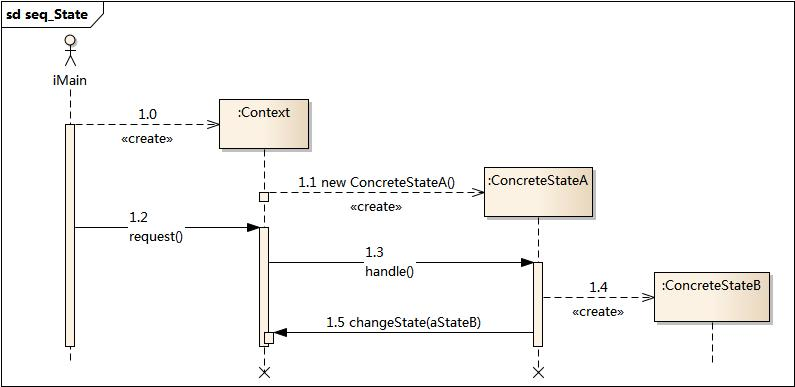
设计模式——状态设计模式(行为型)
摘要 状态设计模式是一种行为型设计模式,核心在于允许对象在内部状态改变时改变行为。它通过状态对象封装不同行为,使状态切换灵活清晰。该模式包含环境类、抽象状态类和具体状态类等角色,具有避免大量分支判断、符合单一职责和开闭原则等特…...

CppCon 2014 学习:Lightning Talk: Writing a Python Interpreter for Fun and Profit
Lightning Talk: Writing a Python Interpreter for Fun and Profit 这段内容在讲的是 Python 的执行模型,尤其是 CPython 的工作流程。下面是逐步解析: Python 是动态类型语言(Dynamically typed) 变量类型在运行时决定。x 4…...
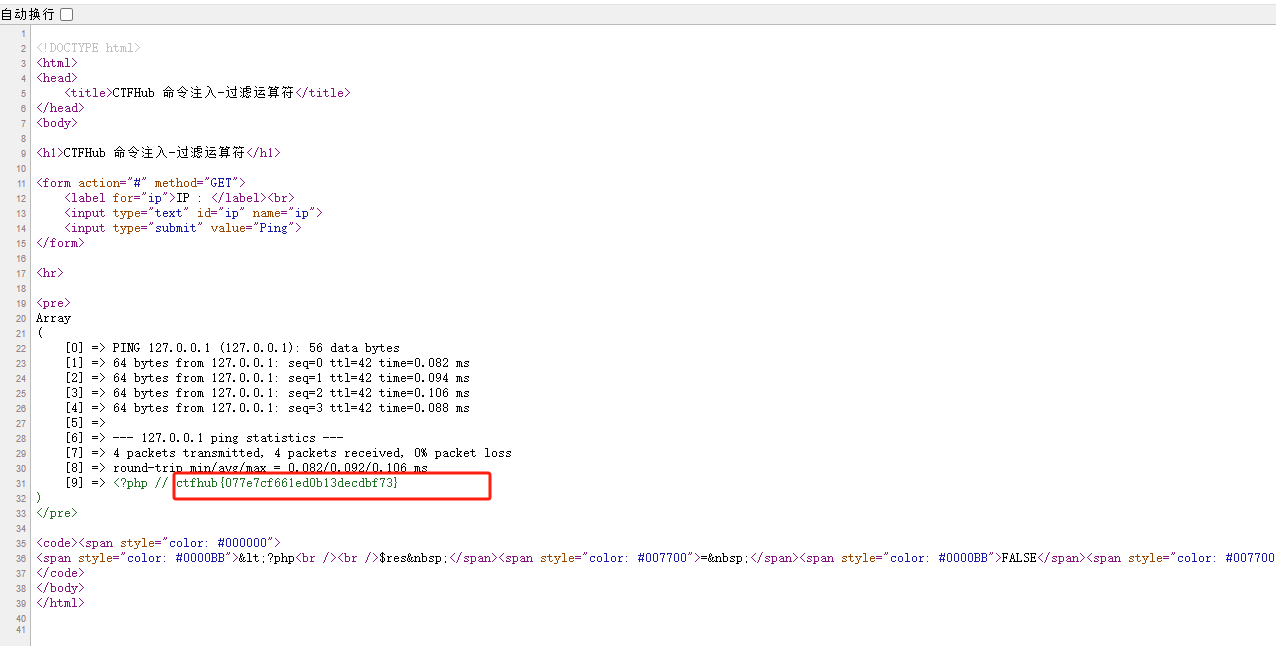
CTFHub-RCE 命令注入-过滤运算符
观察源代码 代码里面可以发现过滤了运算符,我们可以尝试分号; 判断是Windows还是Linux 源代码中有 ping -c 4 说明是Linux 查看有哪些文件 127.0.0.1;ls 打开flag文件 cat这个php文件 127.0.0.1;cat flag_257413168915334.php 可是发现 文本内容显示…...
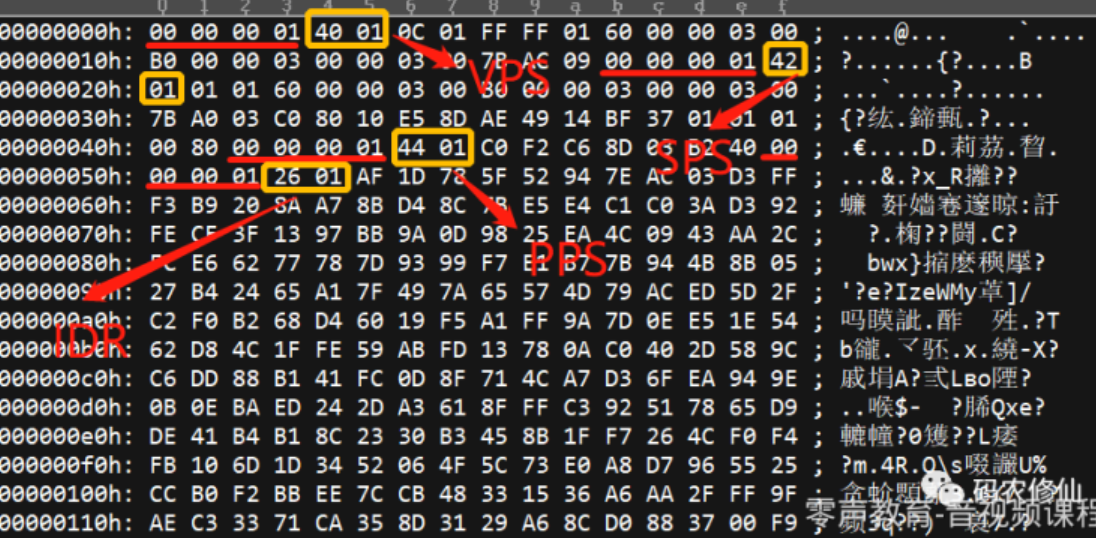
【音视频】H265 NALU分析
1 H265 概述 H264 与 H265 的区别 传输码率:H264 由于算法优化,可以低于 2Mbps 的速度实现标清数字图像传送;H.265 High Profile 可实现低于 1.5Mbps 的传输带宽下,实现 1080p 全高清视频传输。 编码架构:H.265/HEVC…...
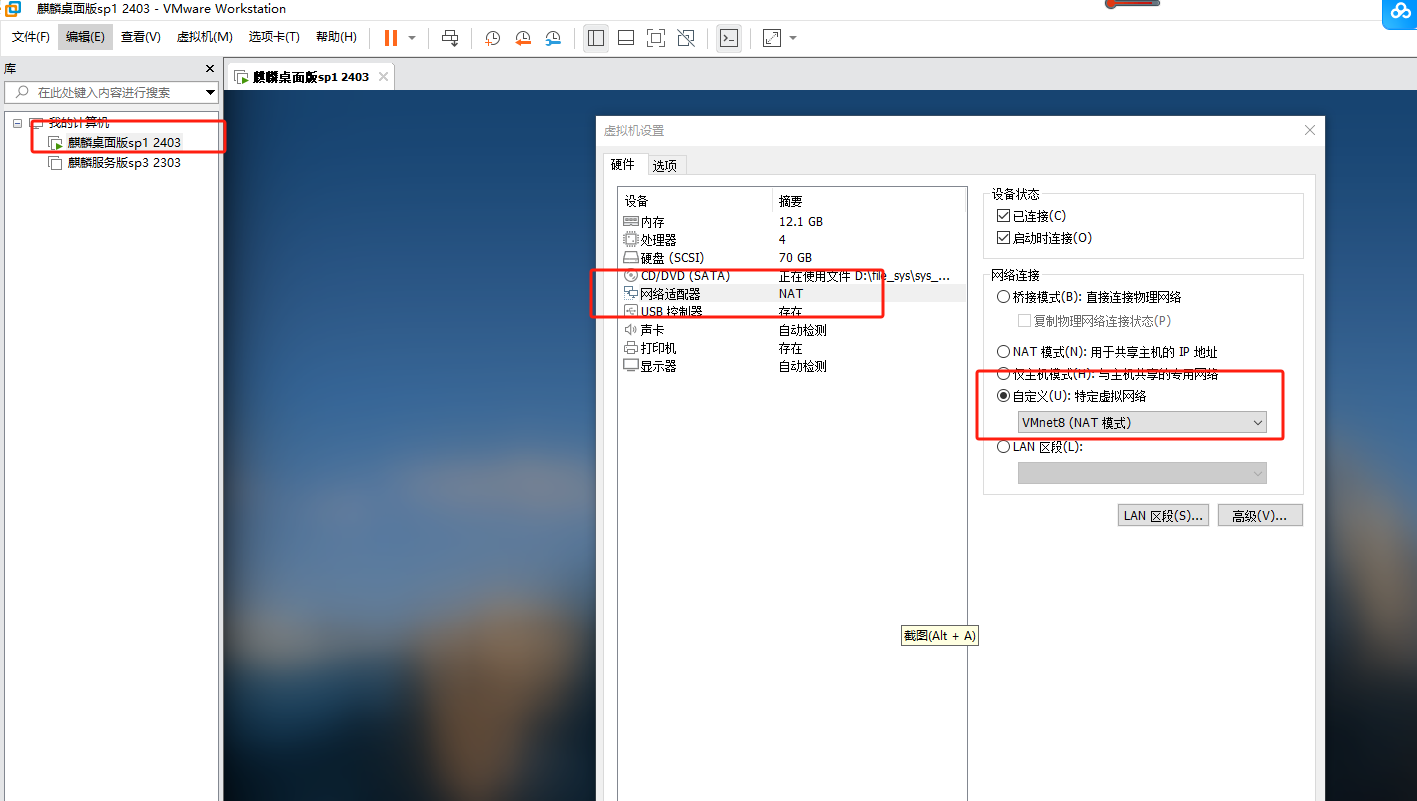
运维 vm 虚拟机ip设置
虚拟网络设置 nat 模式 网卡 主机设置网卡地址 虚拟机绑定网卡...
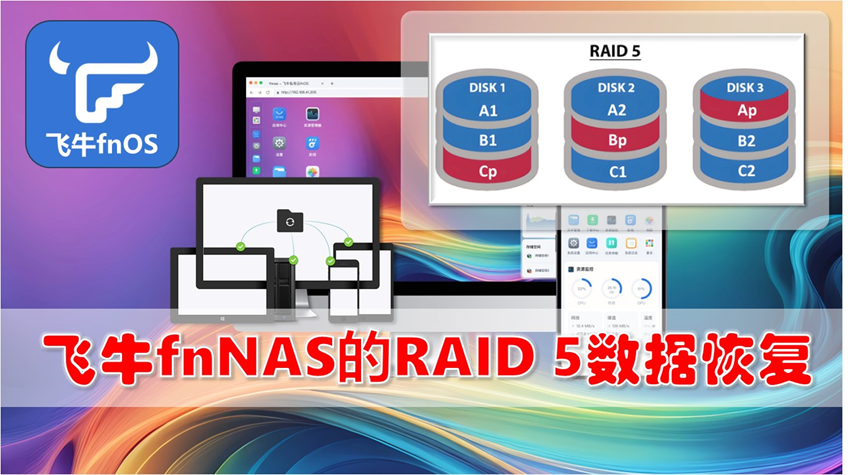
飞牛fnNAS存储模式RAID 5数据恢复
目录 一、添加硬盘 二、创建RAID 5 存储空间 三、上传测试文件 四、拆除硬盘 五、更换硬盘 六、修复RAID 5 七、验证其内文件 八、NAS系统崩溃后的数据盘 前文《飞牛fnNAS存储空间模式详解》 中介绍了fnNAS存储空间的几个模式,细心的网友应该能感受到,我是非常推崇R…...
论文笔记:DreamDiffusion
【初中生也能看得懂的讲解】 想象一下,我们能不能直接用“脑子想”来画画?比如你想到一只猫,电脑就能画出一只猫。这听起来是不是很酷?科学家们一直在努力实现这个“意念画画”的梦想。 以前,科学家们可能会用一种叫…...

户外摄像头监控如何兼顾安全实时监控
一、技术手段提升隐私安全性 硬件与功能设计 采用支持隐私保护技术的设备,例如带电子开关的摄像头(可远程控制摄像头启闭)3,或搭载本地AI算法的设备,仅识别人形、车辆等目标,减少无关信息采集。 使用安全…...

Neo4j 备份与恢复:原理、技术与最佳实践
在数据驱动的应用中,图数据库Neo4j承载着至关重要的关联数据。确保其数据安全与业务连续性依赖于强大的备份与恢复策略。本文将深入探讨Neo4j备份恢复的核心原理、关键技术、实用技巧及行业最佳实践,内容基于官方最新文档。 构建健壮的 Neo4j 备份恢复体…...
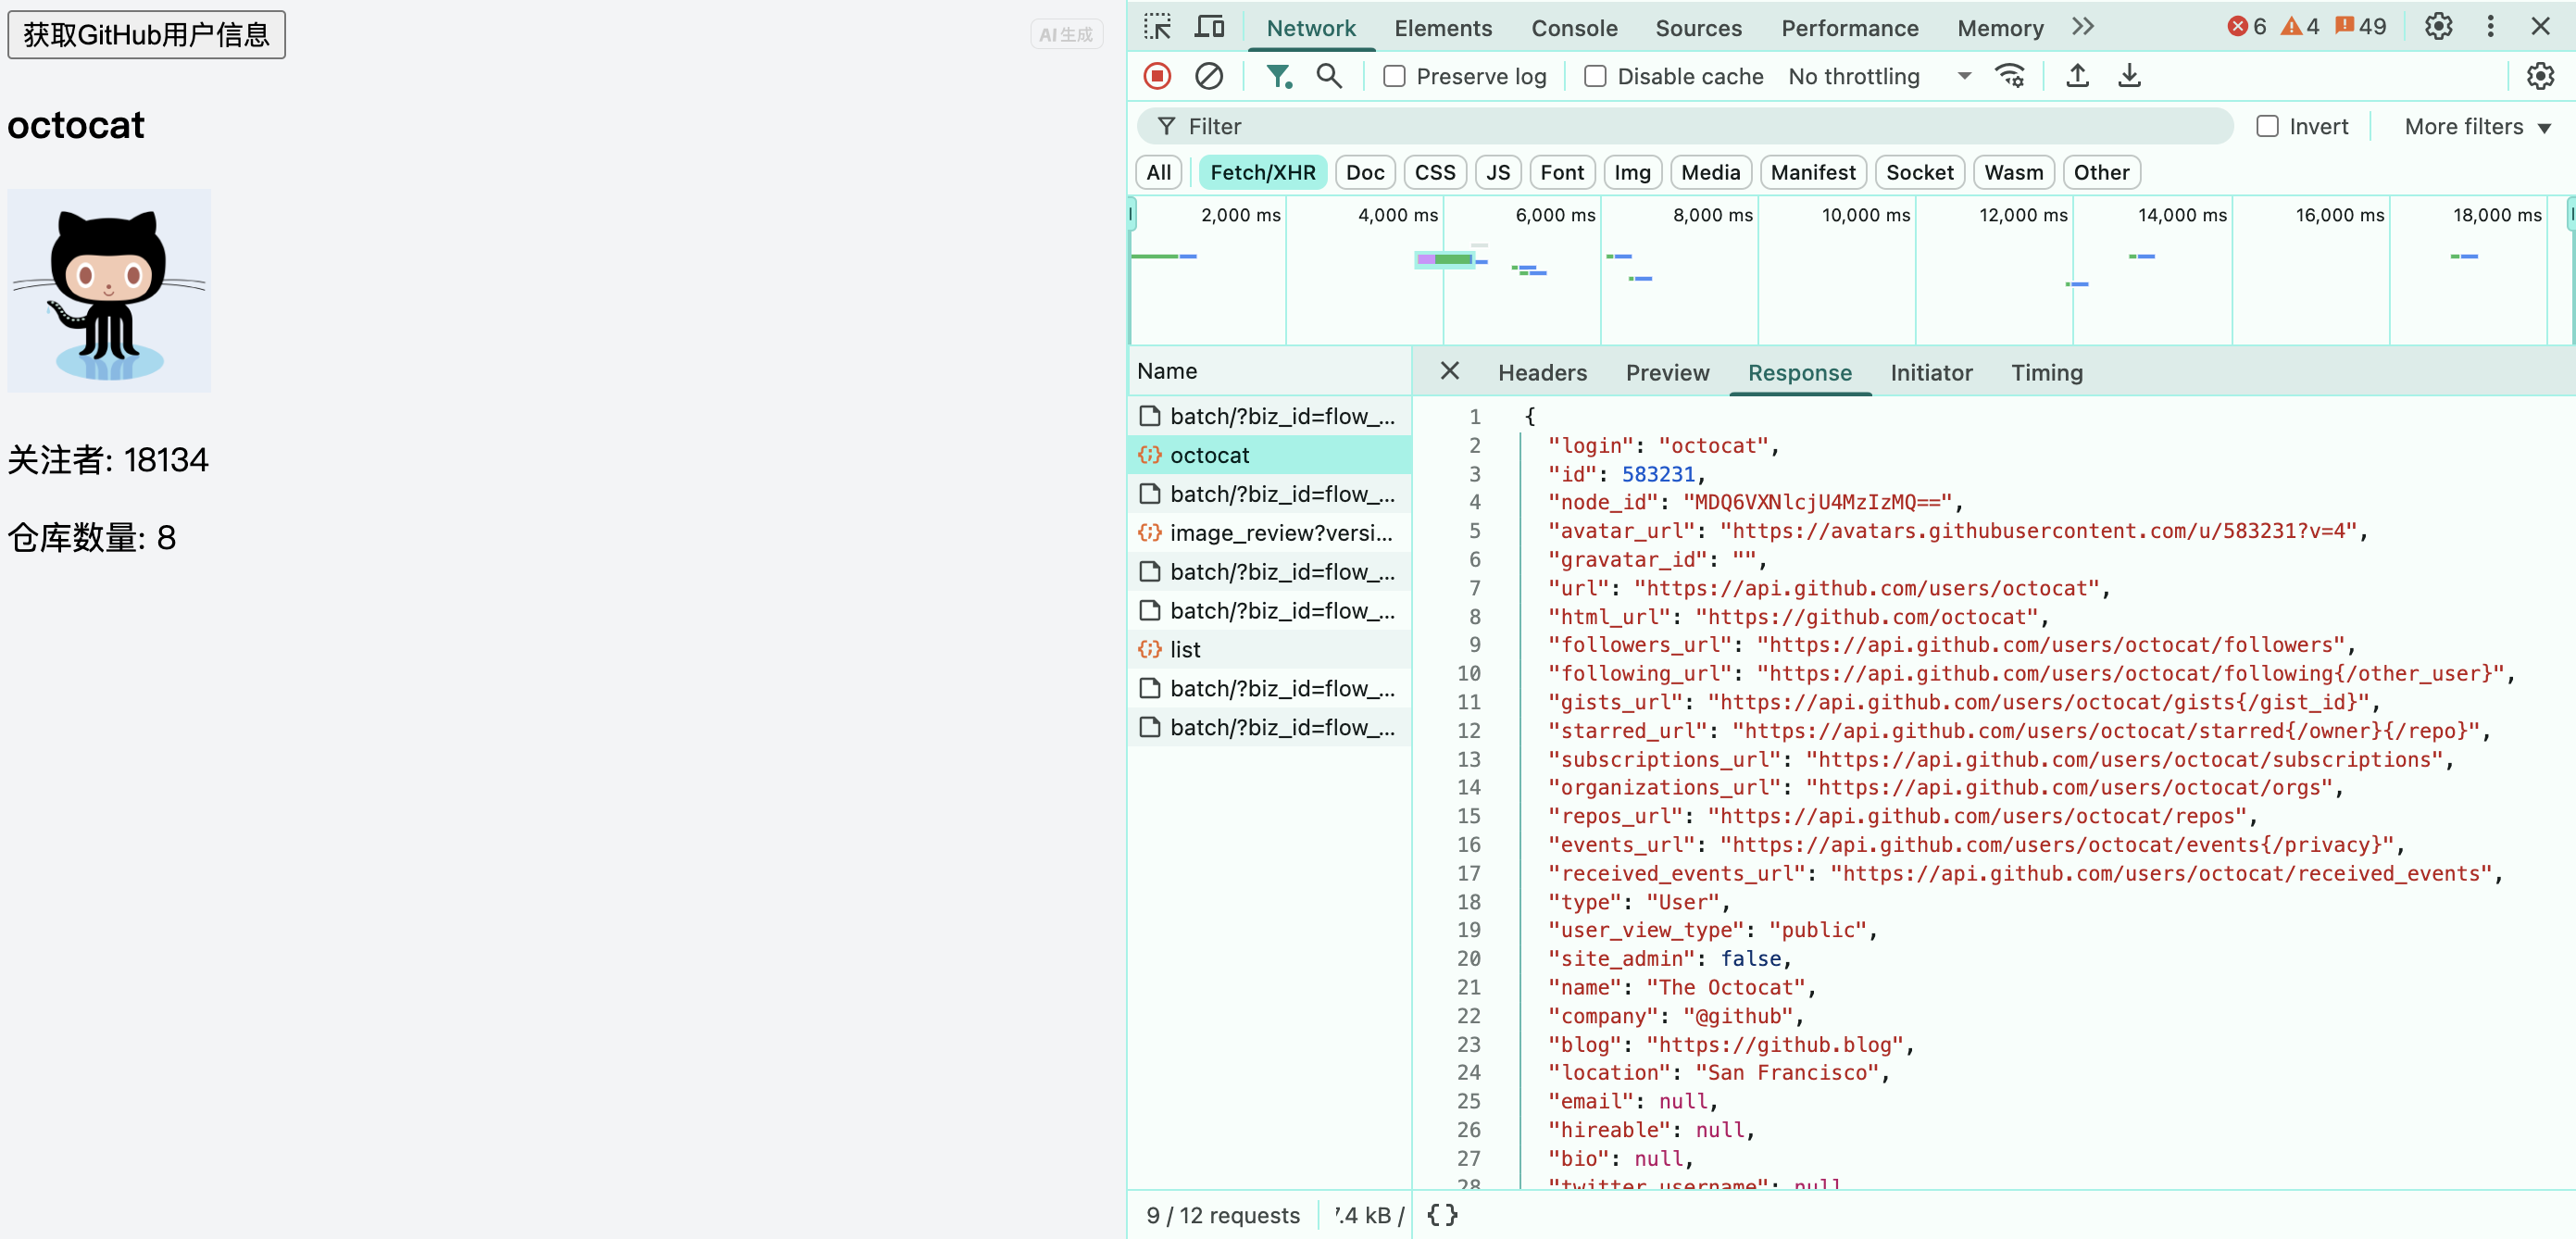
简单实现Ajax基础应用
Ajax不是一种技术,而是一个编程概念。HTML 和 CSS 可以组合使用来标记和设置信息样式。JavaScript 可以修改网页以动态显示,并允许用户与新信息进行交互。内置的 XMLHttpRequest 对象用于在网页上执行 Ajax,允许网站将内容加载到屏幕上而无需…...

关于 java:3. Java 常用类库与数据结构
一、String 1.1 String 是什么? public final class String implements java.io.Serializable, Comparable<String>, CharSequence特点: 是 不可变对象(immutable) 是 final 类,不能被继承 内部使用 字符数组…...

数据挖掘顶刊《IEEE Transactions on Knowledge and Data Engineering》2025年5月研究热点都有些什么?
本推文对2025年5月出版的数据挖掘领域国际顶级期刊《IEEE Transactions on Knowledge and Data Engineering》进行了分析,对收录的62篇论文的关键词与研究主题进行了汇总,并对其中的研究热点进行了深入分析,希望能为相关领域的研究人员提供有…...
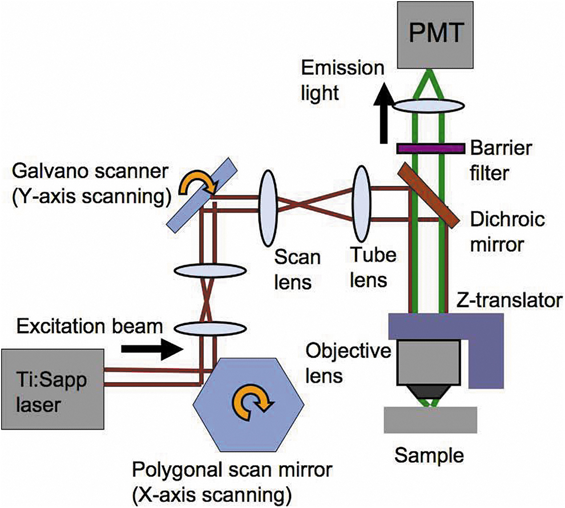
LabVIEW双光子显微镜开发
基于LabVIEW 开发高性能双光子显微镜系统,聚焦于生物样本深层成像与纳米材料三维表征。实现了超快激光控制、多维数据采集与实时图像重建。系统采用飞秒激光光源与高精度振镜扫描模块,结合 LabVIEW 的 FPGA 实时控制能力,可对活体组织、荧光纳…...

WordPress 6.5版本带来的新功能
WordPress 6.5正式上线了!WordPress团队再一次为我们带来了许多新的改进。在全球开发者的共同努力下,WordPress推出了许多新的功能,本文将对其进行详细总结。 Hostease的虚拟主机现已支持一键安装最新版本的WordPress。对于想要体验WordPres…...

将材质球中的纹理属性对应的贴图保存至本地
通过Texture2D的EncodeToPNG方法将纹理转为图片形式 material.GetTexture方法通过属性名获取纹理贴图 material.SetTexture方法通过属性名设置纹理贴图 属性名可在shader代码中查看 using UnityEngine; using System.IO;public class TextureSaver : MonoBehaviour {public…...

Linux应用开发之网络套接字编程
套接字(Socket)是计算机网络数据通信的基本概念和编程接口,允许不同主机上的进程(运行中的程序)通过网络进行数据交换。它为应用层软件提供了发送和接收数据的能力,使得开发者可以在不用深入了解底层网络细…...

实现RabbitMQ多节点集群搭建
目录 引言 一、环境准备 二、利用虚拟机搭建 三、镜像集群配置 四、HAProxy实现负载均衡(主用虚拟机操作) 五、测试RabbitMQ集群搭建情况 引言 在现代分布式系统中,消息队列(Message Queue)扮演着至关重要的角色,而 RabbitMQ 作为…...
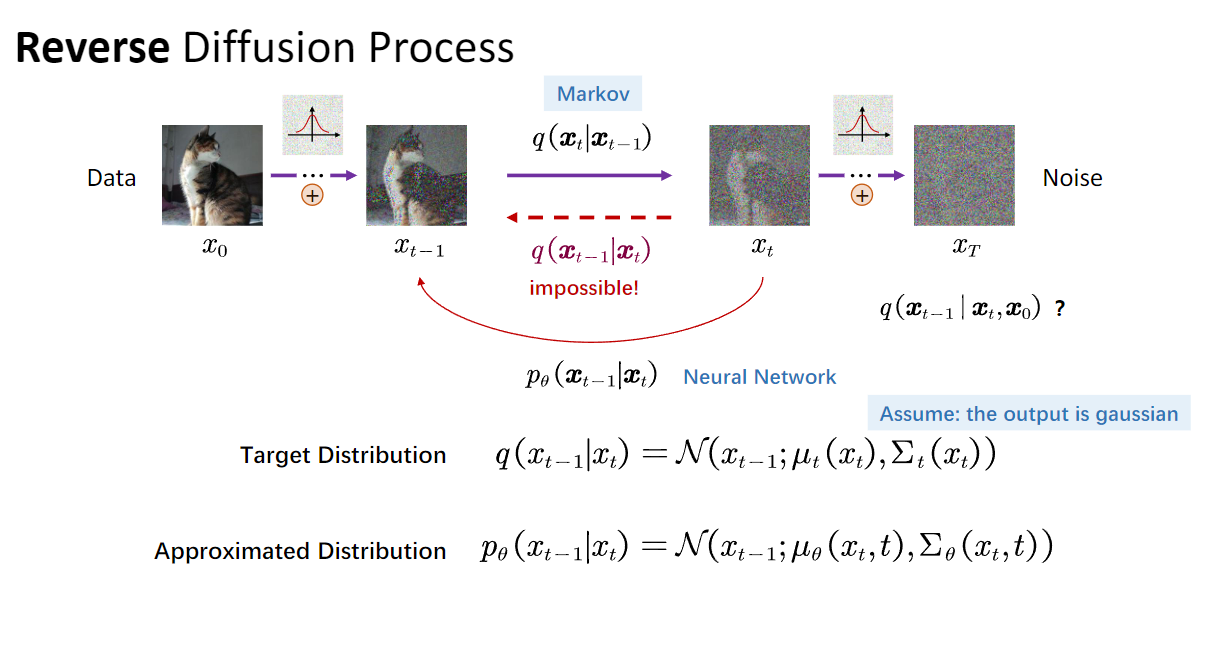
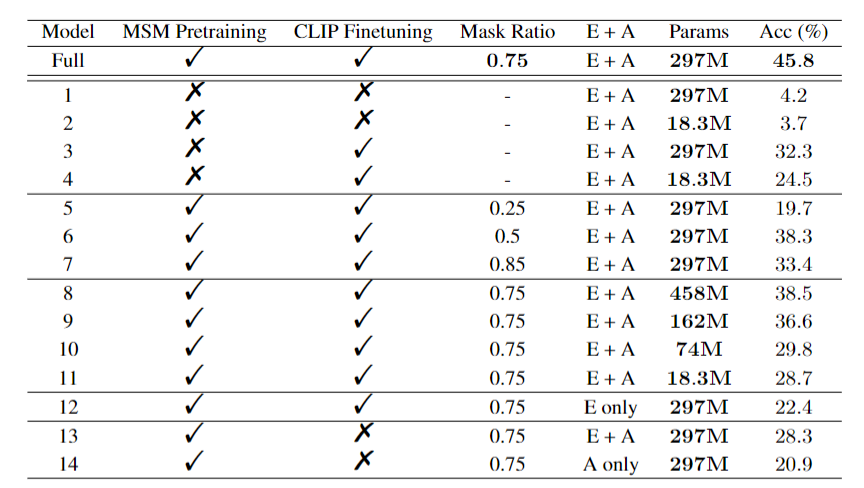
GLIDE论文阅读笔记与DDPM(Diffusion model)的原理推导
Abstract 扩散模型(Diffusion model)最近被证明可以生成高质量的合成图像,尤其是当它们与某种引导技术结合使用时,可以在生成结果的多样性与保真度之间进行权衡。本文探讨了在文本条件图像生成任务中使用扩散模型,并比…...
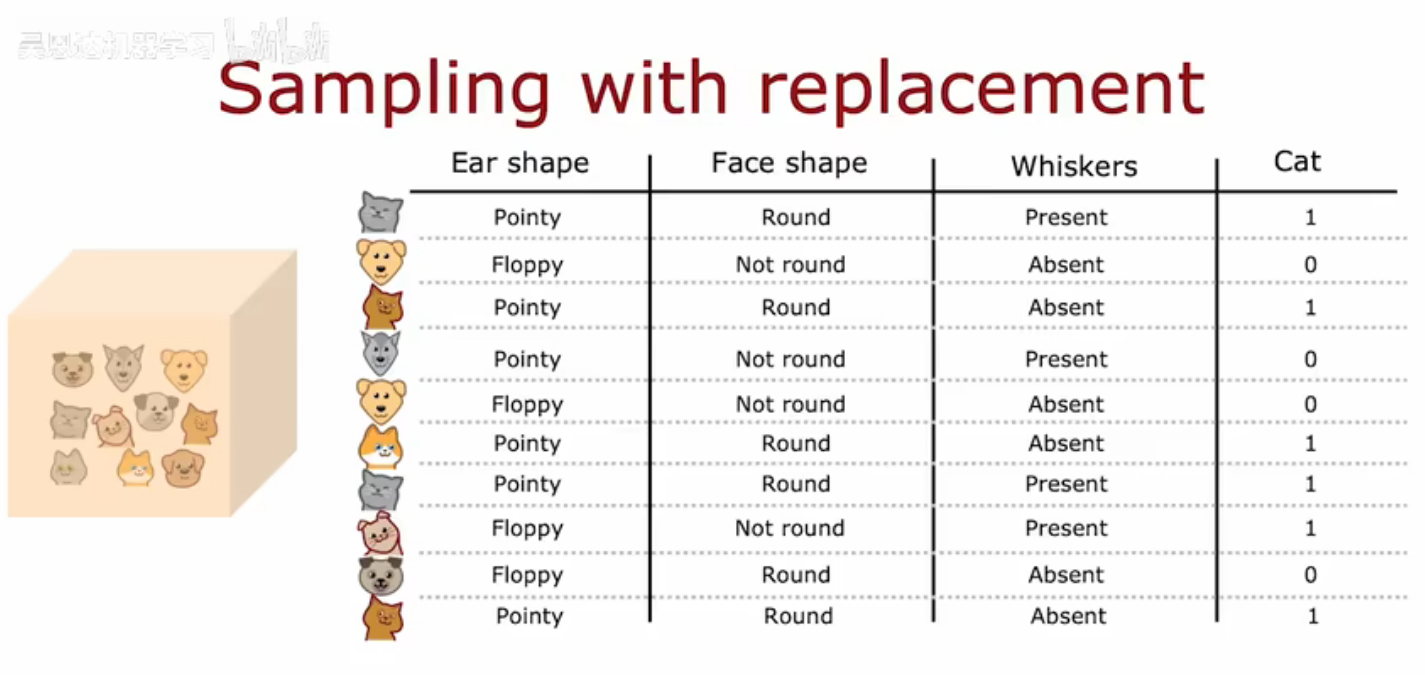
机器学习——放回抽样
为了构建树集成模型,需要一种叫做有放回采样的技术。 以4个标记为演示,分别是红色、黄色、绿色和蓝色,用一个黑色的袋子把这四个标记的例子放进去,然后从这个袋子里有放回地抽取四次,抽出一个标记,结果是绿…...

前端内存泄漏:原理、检测与防范实践
一、什么是内存泄漏 内存泄漏(Memory Leak)是指程序中已动态分配的堆内存由于某种原因未能被释放或无法被释放,造成系统内存的浪费,导致程序运行速度减慢甚至系统崩溃等严重后果。 在前端开发中,虽然现代浏览器具备垃…...

Go的隐式接口机制
正确使用Interface 不要照使用C/Java等OOP语言中接口的方式去使用interface。 Go的Interface的抽象不仅可以用于dynamic-dispatch 在工程上、它最大的作用是:隔离实现和抽象、实现完全的dependency inversion 以及interface segregation(SOLID principle中的I和D)。…...

UE音频中间件wwise插件
虚幻引擎用wwise插件有什么用? 没有这个插件不是也能播放声音吗? 为什么要用他? 在Unreal Engine(UE)中使用 Wwise 插件,不是因为 UE 不能做声音,而是因为 Wwise 更强、更专业,适合复杂的音频需求。 🎧 …...

C++.cstring string
C.cstring string 1. C 中的字符串概述1.1 C 中字符串的两种表示方式C 中的 cstring示例代码 C 中的 string示例代码 1.2 C 中字符串的使用场景使用 cstring 的场景使用 string 的场景示例对比使用 cstring 的示例使用 string 的示例 2. C 中的 cstring2.1 cstring 的定义与基本…...

Spring AOP 和 AspectJ 有什么区别
1. 织入方式 Spring AOP: 运行时织入:Spring AOP 使用动态代理技术(如 JDK 动态代理或 CGLIB 代理)在运行时创建代理对象。 依赖 Spring 容器:仅支持 Spring 管理的 Bean。 AspectJ: 编译时织入…...

报表/报告组件(二)-实例与实现解释
上篇《报表/报告组件(一)-指标/属性组件设计》介绍了组件核心指标/属性设计,本文以实例介绍各个特性的实现和效果,实例是多个报告融合,显示所有的特性。 设计 指标/属性组件是报告/报表关键部分,上篇已介绍过,本节回顾…...

linux的实时性
Linux 的实时性取决于其内核配置和使用场景。标准 Linux 内核(非实时内核)在设计上更注重吞吐量和公平调度,而非严格的实时性。但通过以下方式可以显著提升其实时性能: 1. 标准 Linux 内核的实时性 优点: 适用于大多数…...

Opencv4 c++ 自用笔记 04 图像滤波与边缘检测
图像滤波与边缘检测 直接采集到的图像可能带有噪声的干扰,因此去除噪声是图像预处理中十分重要的一步。图像滤波是图像噪声去除的重要方式。 图像卷积 卷积操作广泛应用于信号处理领域,而图像本质上可以视为一种二维信号数据。 卷积过程可以理解为一…...

流媒体基础解析:音视频封装格式与传输协议
在视频处理与传输的完整流程中,音视频封装格式和传输协议扮演着至关重要的角色。它们不仅决定了视频文件的存储方式,还影响着视频在网络上的传输效率和播放体验。今天,我们将深入探讨音视频封装格式和传输协议的相关知识。 音视频封装格式 什…...
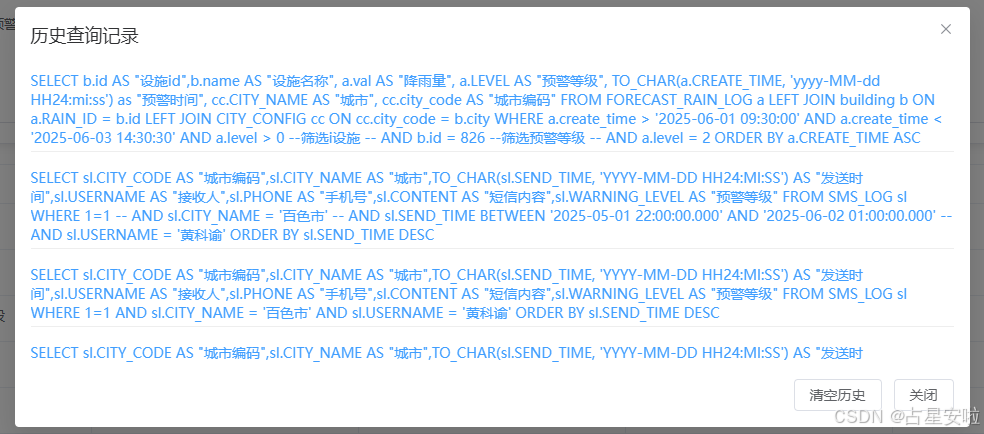
一个html实现数据库自定义查询
使用场景 应用上线后甲方频繁的找开发查询数据库数据,且没有固定的查询规律,产品经理也没有规划报表需求。 实现方案 后端开放自定义sql查询,屏蔽所有数据库的高危操作,将常用查询的sql放在一个html中的js中直接查询࿰…...