谷粒商城-分布式微服务项目-高级篇[三]
十五、商城业务-支付
15.1 支付宝支付
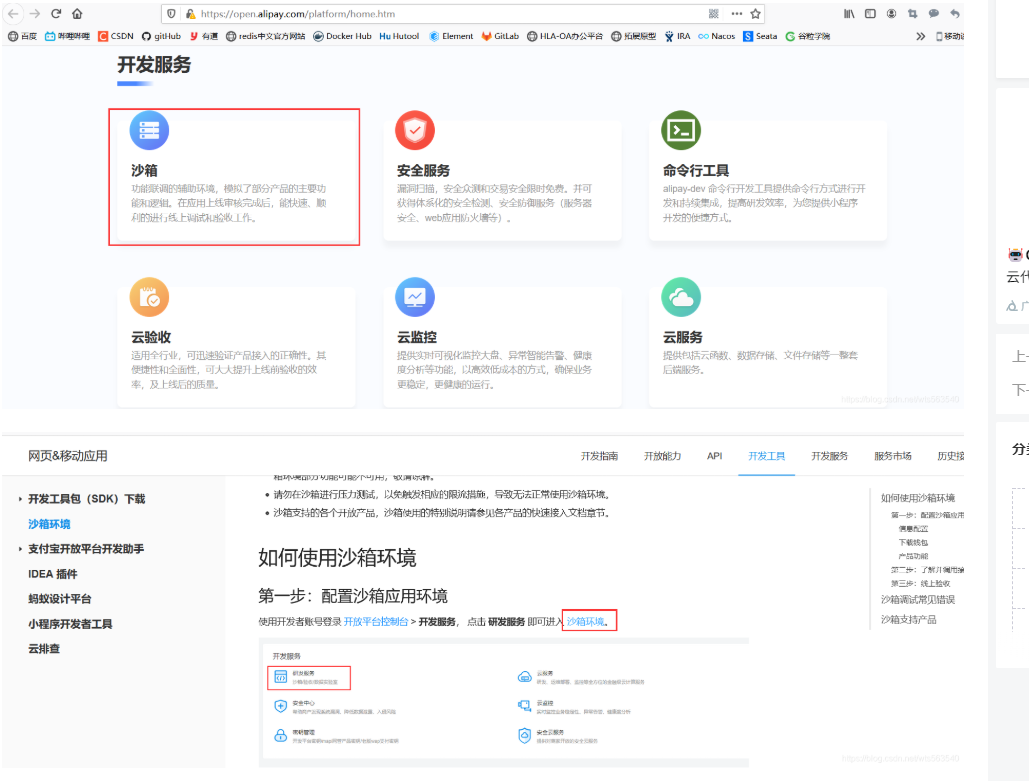
15.1.1 进入“蚂蚁金服开放平台”
支付宝开放 平台地址:
支付宝开放平台
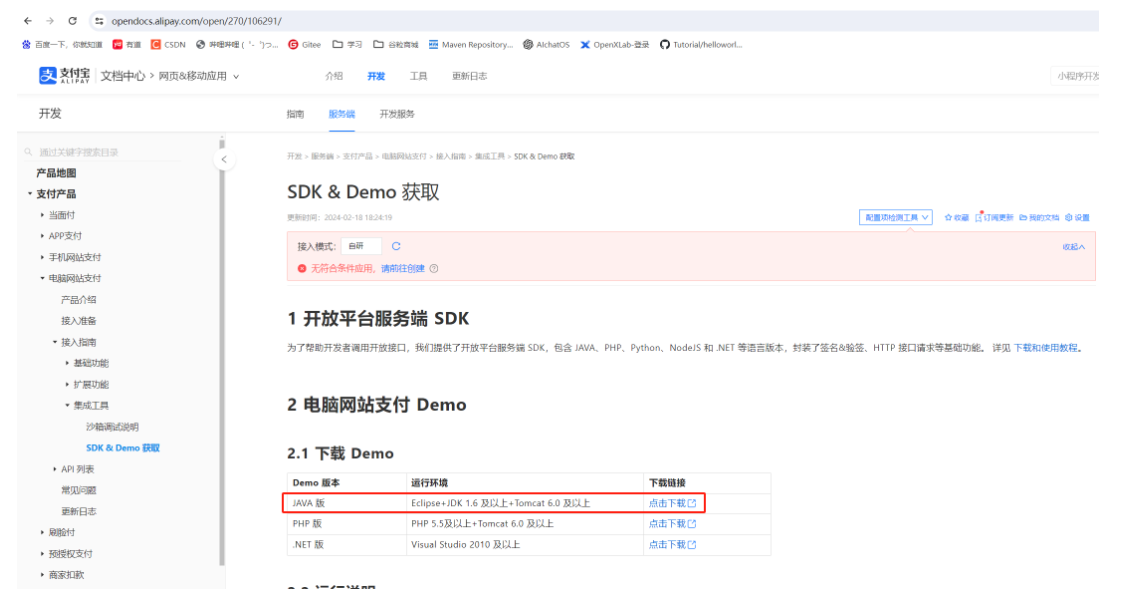
15.1.2 下载支付宝官方 demo,进行配置和测试
开发者文档:支付宝开放平台文档中心
电脑网站支付文档:小程序文档 - 支付宝文档中心
下载 demo
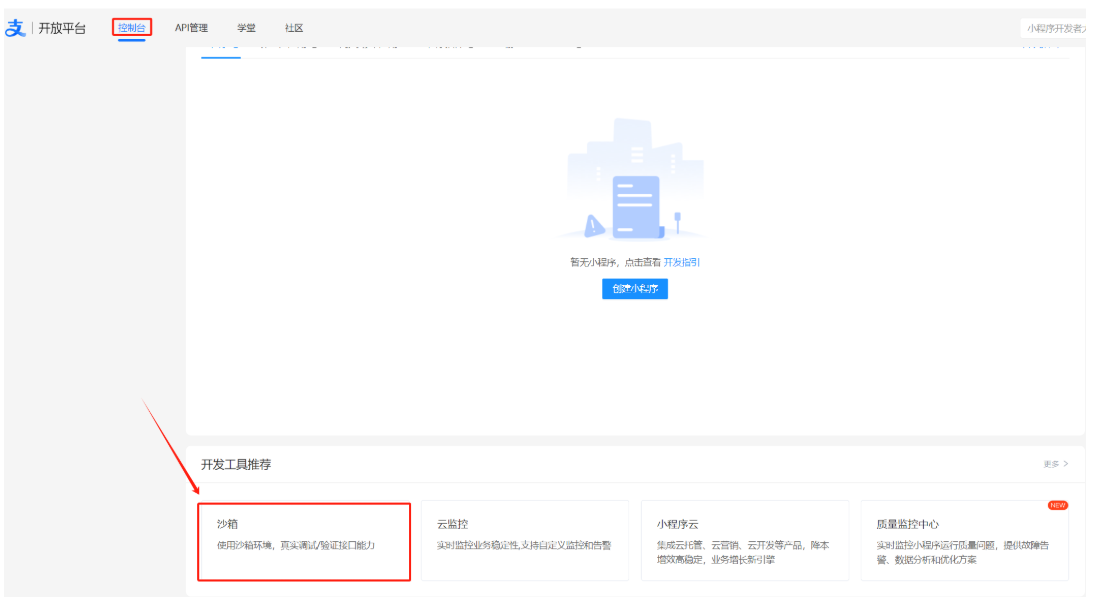
15.1.3 配置使用沙箱进行测试
- 使用 RSA 工具生成签名
- 下载沙箱版钱包
- 运行官方 demo 进行测试
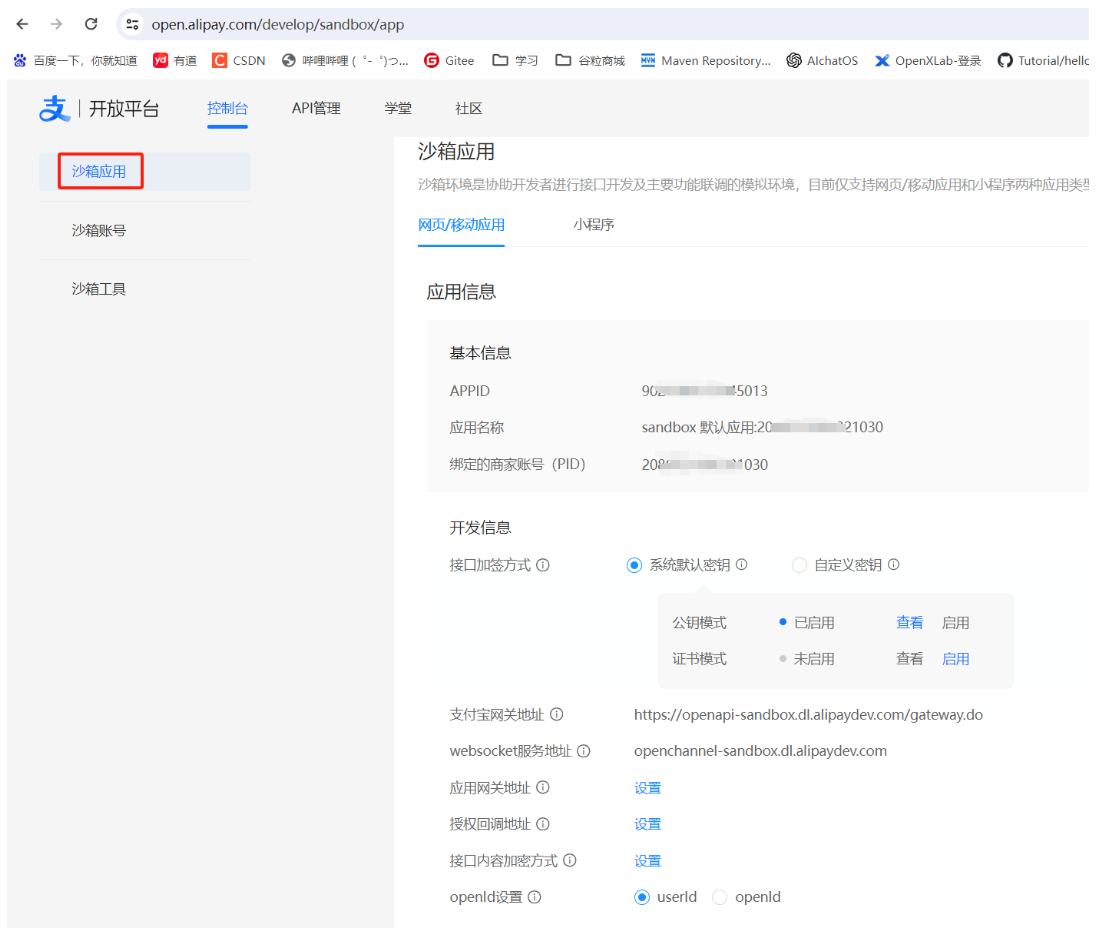
 沙箱应用基本信息
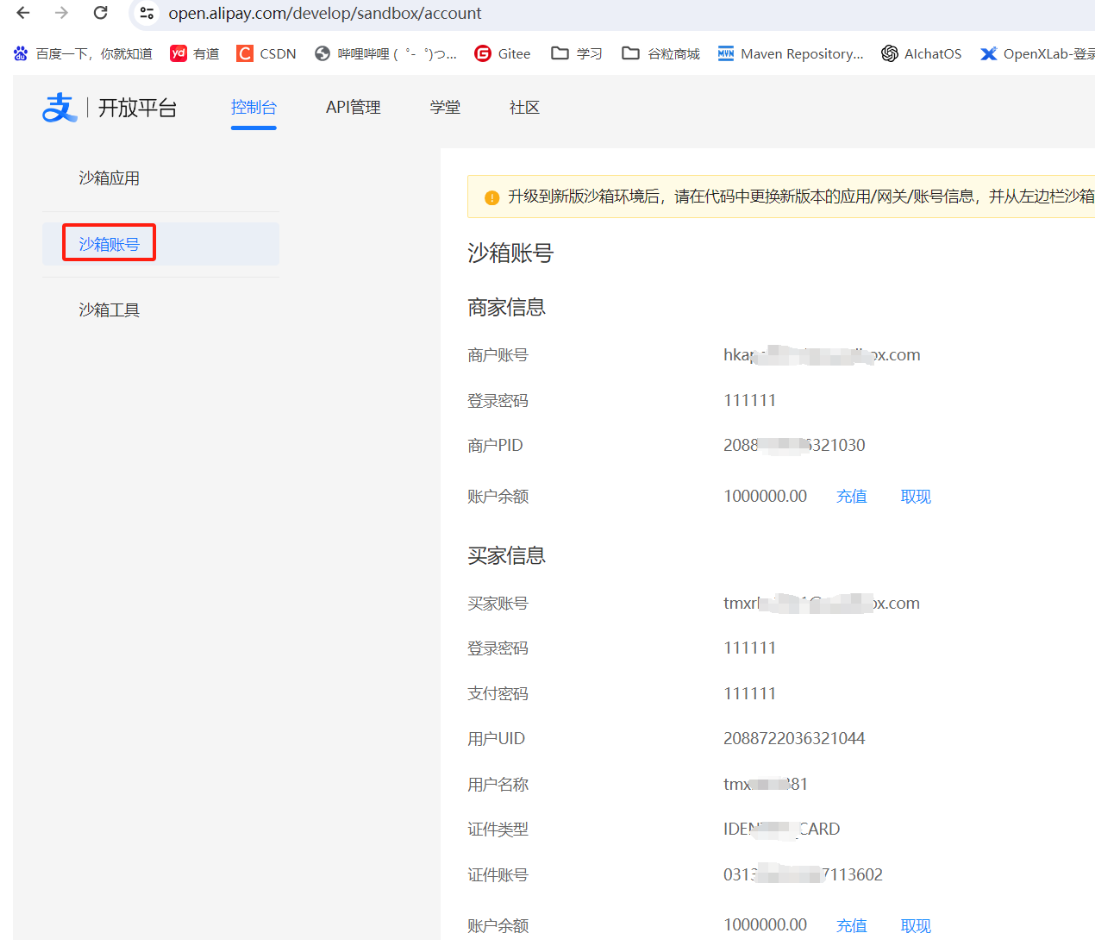
沙箱账号
15.1.4 什么是公钥、私钥、加密、签名和验签?
1 、公钥私钥
公钥和私钥是一个相对概念
它们的公私性是相对于生成者来说的。
一对密钥生成后,保存在生成者手里的就是私钥,生成者发布出去大家用的就是公钥
2 、加密和数字签名
- 加密是指:
- 我们使用一对公私钥中的一个密钥来对数据进行加密,而使用另一个密钥来进行解密的技术。
-
公钥和私钥都可以用来加密,也都可以用来解密。
-
但这个加解密必须是一对密钥之间的互相加解密,否则不能成功。
-
加密的目的是:
-
为了确保数据传输过程中的不可读性,就是不想让别人看到。
-
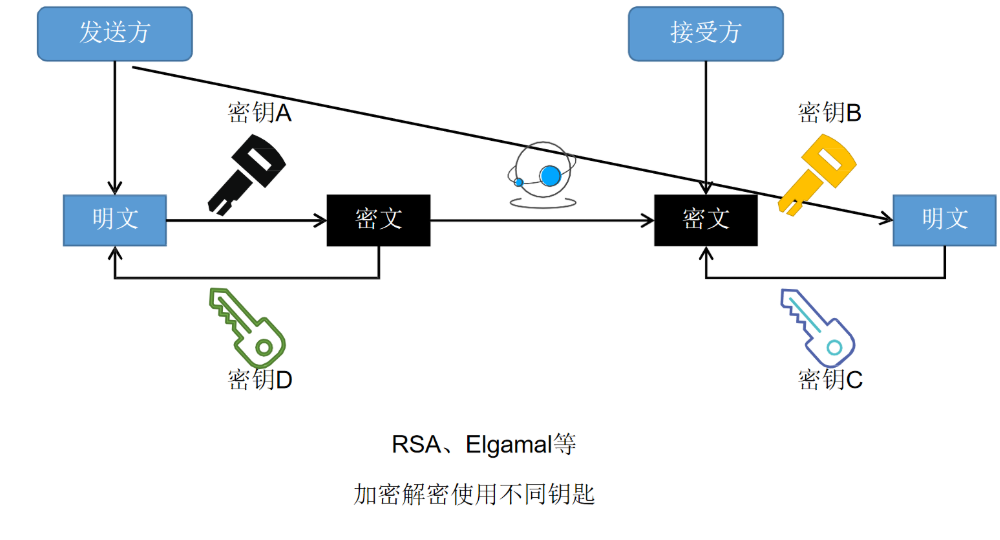
- 加密方式:
-
对称加密
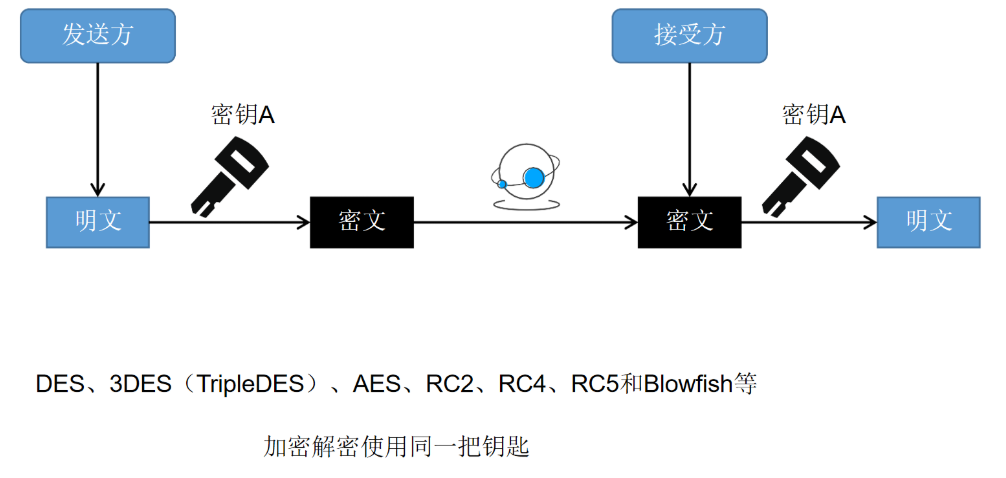
-
非对称加密
-
- 签名:
- 给我们将要发送的数据,做上一个唯一签名(类似于指纹)
- 用来互相验证接收方和发送方的身份;
-
在验证身份的基础上再验证一下传递的数据是否被篡改过。因此使用数字签名可以用来达到数据的明文传输。
- 验签:
- 支付宝为了验证请求的数据是否商户本人发的
- 商户为了验证响应的数据是否支付宝发的
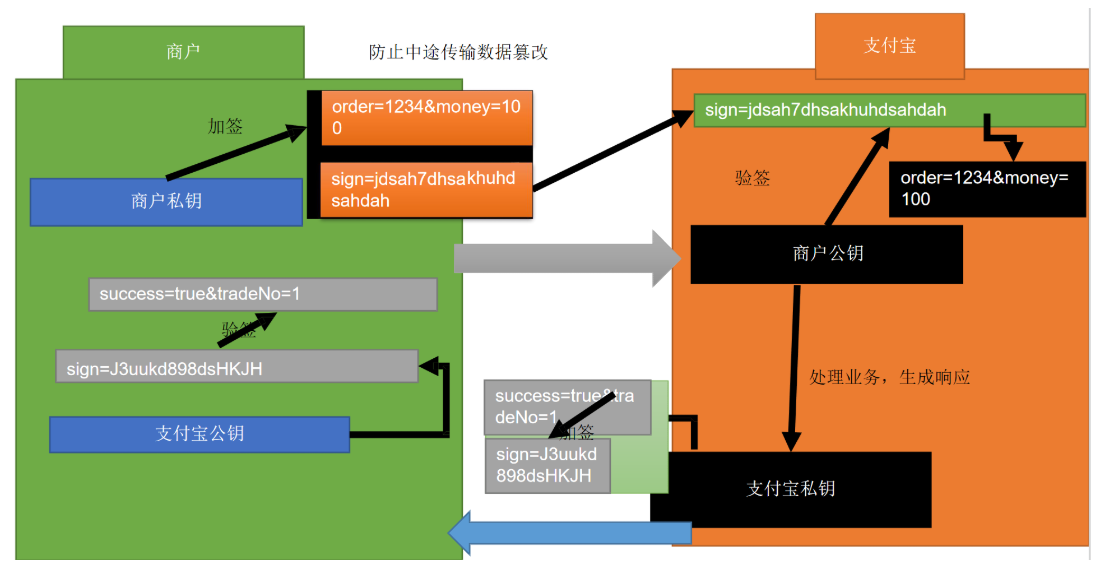
15.1.5 支付宝加密原理
- 支付宝加密采用RSA非对称加密,分别在商户端和支付宝端有两对公钥和私钥
- 在发送订单数据时,直接使用明文,但会使用
商户私钥加一个对应的签名,支付宝端会使用商户公钥对签名进行验签,只有数据明文和签名对应的时候才能说明传输正确 - 支付成功后,支付宝发送支付成功数据之外,还会使用
支付宝私钥加一个对应的签名,商户端收到支付成功数据之后也会使用支付宝公钥延签,成功后才能确认
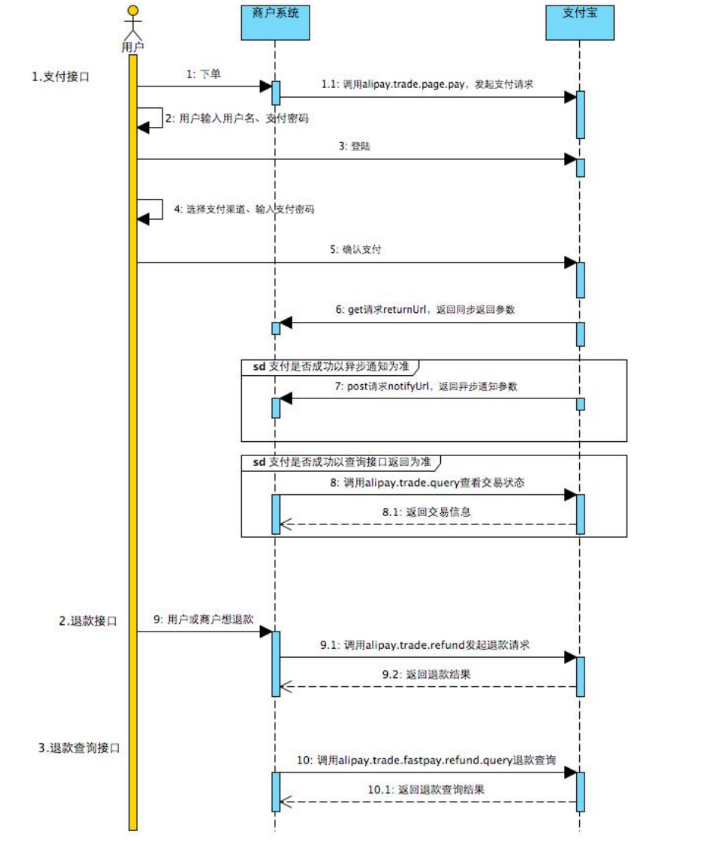
15.1.6 支付宝支付流程
15.2 内网穿透
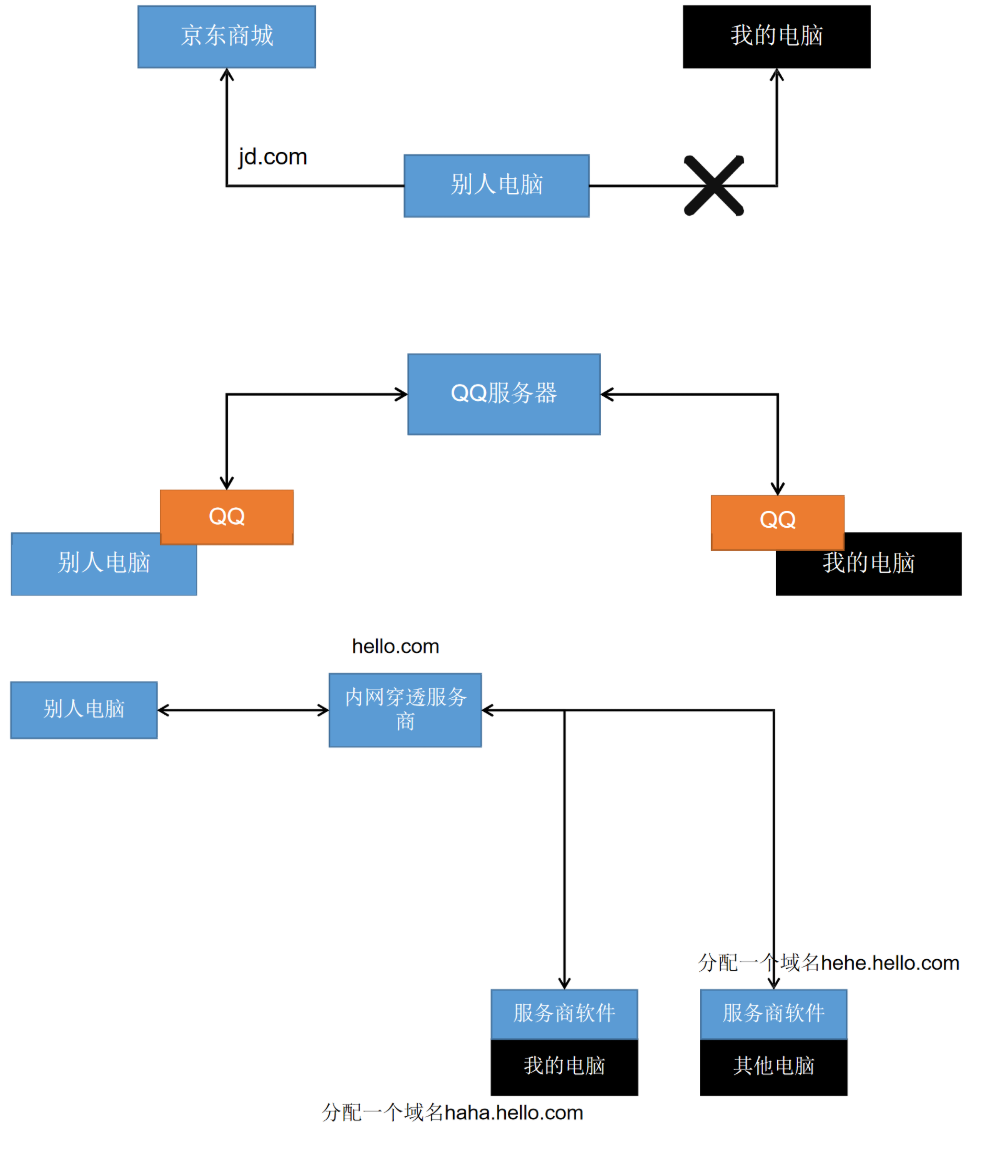
15. 2.1 简介
内网穿透功能可以允许我们使用外网的网址来访问主机;
正常的外网需要访问我们项目的流程是:
- 买服务器并且有公网固定 IP
- 买域名映射到服务器的 IP
- 域名需要进行备案和审核
15.2.2 使用场景
- 开发测试(微信、支付宝)
- 智慧互联
- 远程控制
- 私有云
15.2.3 内网穿透的几个常用软件
- natapp:https://natapp.cn/ 优惠码:022B93FD(9 折)[仅限第一次使用]
- 续断:www.zhexi.tech 优惠码:SBQMEA(95 折)[仅限第一次使用]
- 花生壳:https://www.oray.com/
15.2.4 内网穿透常用软件安装
续断:https://www.zhexi.tech/
第一步:登录
第二步:安装客户端
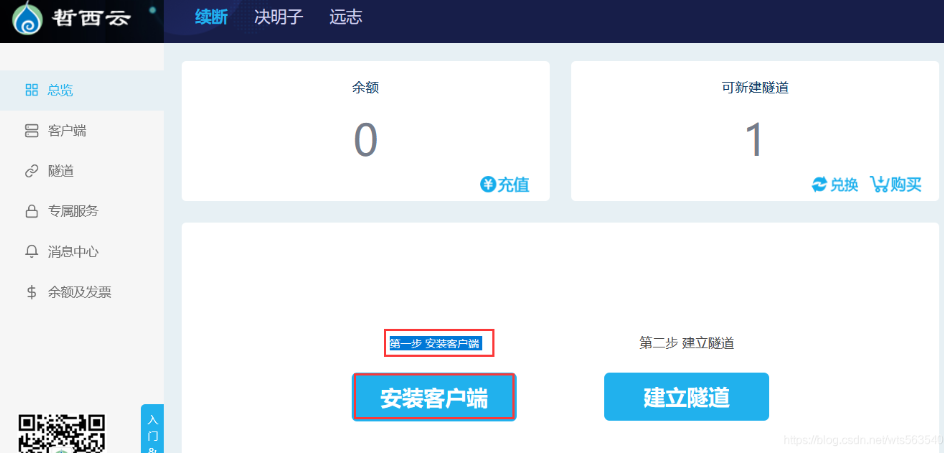
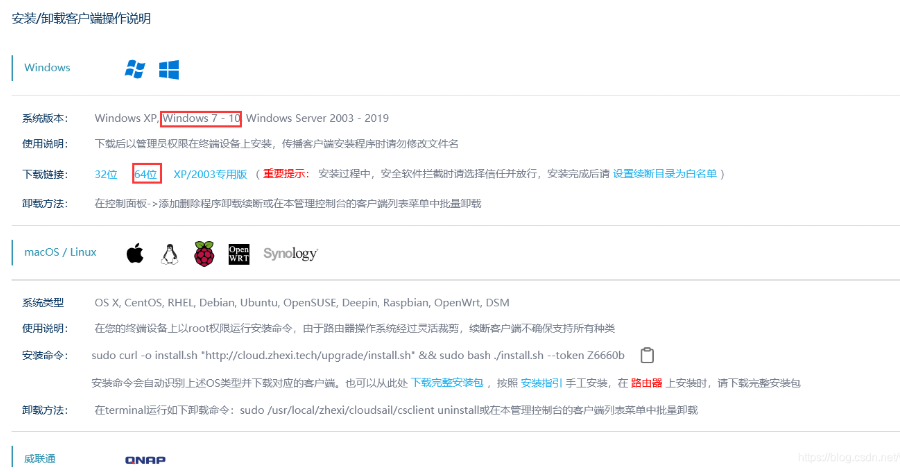
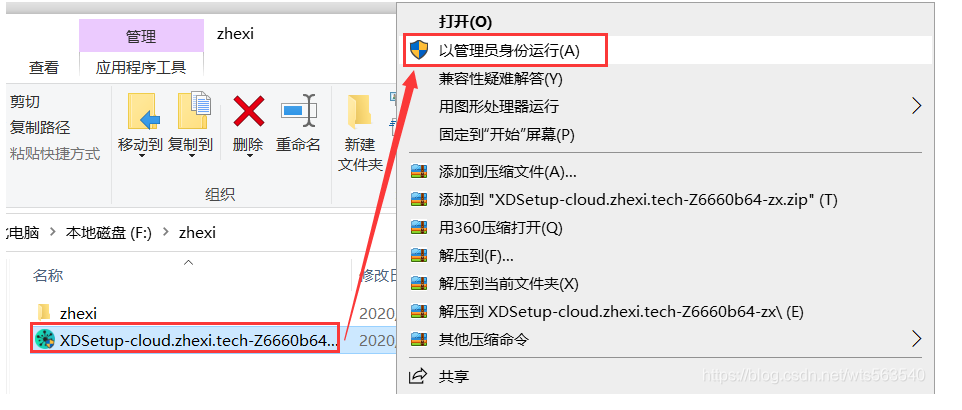
第三步:安装(一定使用管理员身份安装,否则安装失败)
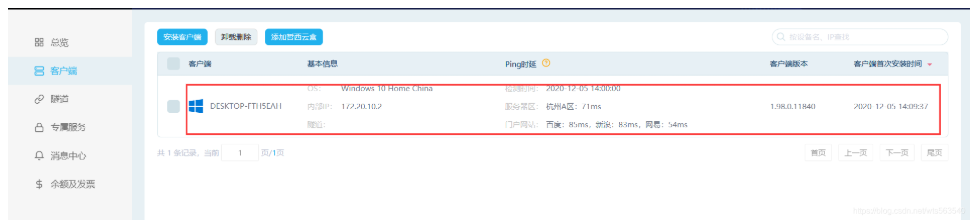
安装好之后,会网站会感应到我们的主机
第四步:新建隧道
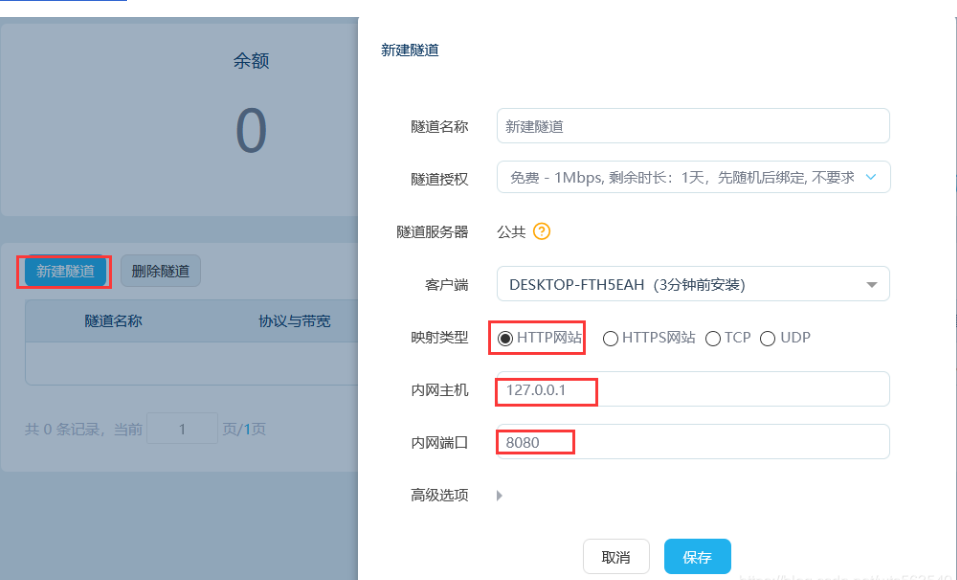
隧道建立好,会给我们生成一个域名

15.3 订单服务-整合支付
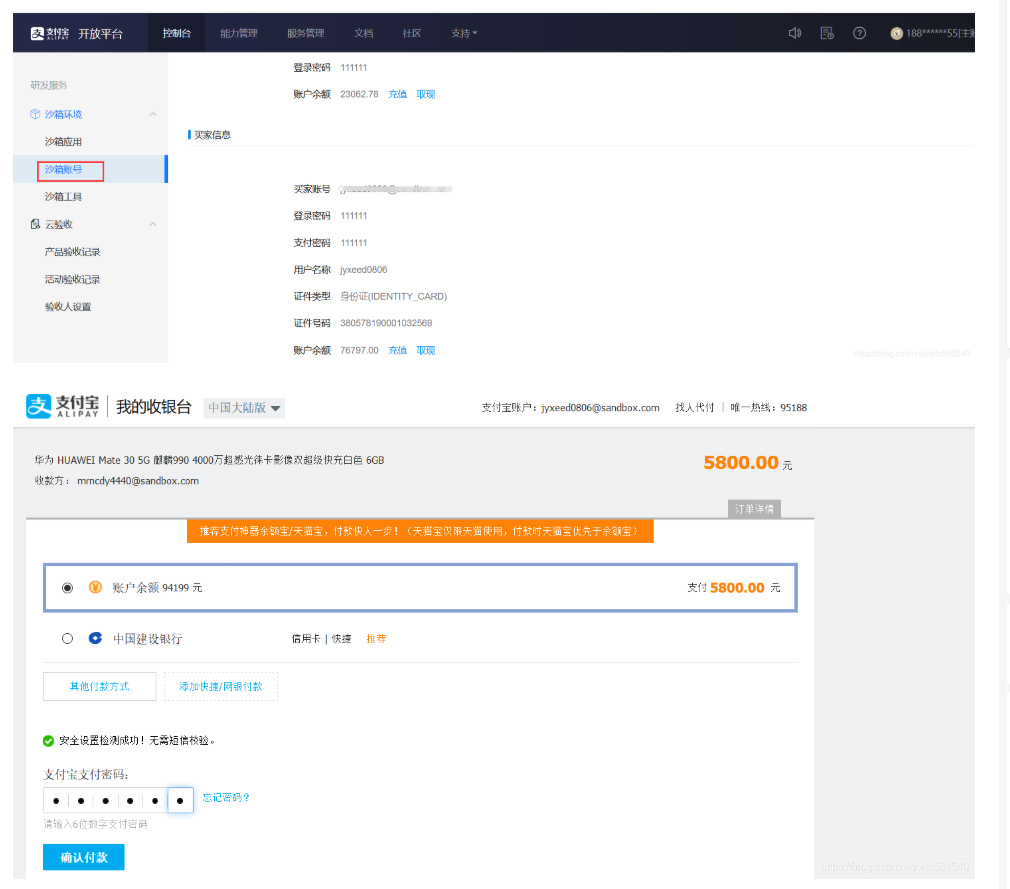
15.3.1 搭建支付宝沙箱环境
1、导入依赖
<!--阿里支付模块--><!-- https://mvnrepository.com/artifact/com.alipay.sdk/alipay-sdk-java --><dependency><groupId>com.alipay.sdk</groupId><artifactId>alipay-sdk-java</artifactId><version>4.9.28.ALL</version></dependency>2、抽取支付工具类并进行配置
成功调用该接口后,返回的数据就是支付页面的html,因此后续会使用@ResponseBody
添加“com.yr.gulimall.order.config.AlipayTemplate”类,代码如下:
@ConfigurationProperties(prefix = "alipay")
@Component
@Data
public class AlipayTemplate {//在支付宝创建的应用的idprivate   String app_id = "2016102600763190";// 商户私钥,您的PKCS8格式RSA2私钥private String merchant_private_key = "MjXN6Hnj8k2GAriRFt0BS9gjihbl9Rt38VMNbBi3Vt3Cy6TOwANLLJ/DfnYjRqwCG81fkyKlDqdsamdfCiTysCa0gQKBgQDYQ45LSRxAOTyM5NliBmtev0lbpDa7FqXL0UFgBel5VgA1Ysp0+6ex2n73NBHbaVPEXgNMnTdzU3WF9uHF4Gj0mfUzbVMbj/YkkHDOZHBggAjEHCB87IKowq/uAH/++Qes2GipHHCTJlG6yejdxhOsMZXdCRnidNx5yv9+2JI37QKBgQCw0xn7ZeRBIOXxW7xFJw1WecUV7yaL9OWqKRHat3lFtf1Qo/87cLl+KeObvQjjXuUe07UkrS05h6ijWyCFlBo2V7Cdb3qjq4atUwScKfTJONnrF+fwTX0L5QgyQeDX5a4yYp4pLmt6HKh34sI5S/RSWxDm7kpj+/MjCZgp6Xc51g==";// 支付宝公钥,查看地址:https://openhome.alipay.com/platform/keyManage.htm 对应APPID下的支付宝公钥。private String alipay_public_key = "MIIBIjA74UKxt2F8VMIRKrRAAAuIMuawIsl4Ye+G12LK8P1ZLYy7ZJpgZ+Wv5nOs3DdoEazgCERj/ON8lM1KBHZOAV+TkrIcyi7cD1gfv4a1usikrUqm8/qhFvoiUfyHJFv1ymT7C4BI6aHzQ2zcUlSQPGoPl4C11tgnSkm3DlH2JZKgaIMcCOnNH+qctjNh9yIV9zat2qUiXbxmrCTtxAmiI3I+eVsUNwvwIDAQAB";// 服务器[异步通知]页面路径  需http://格式的完整路径,不能加?id=123这类自定义参数,必须外网可以正常访问// 支付宝会悄悄的给我们发送一个请求,告诉我们支付成功的信息private  String notify_url="http://**.natappfree.cc/payed/notify";// 页面跳转同步通知页面路径 需http://格式的完整路径,不能加?id=123这类自定义参数,必须外网可以正常访问//同步通知,支付成功,一般跳转到成功页private  String return_url="http://order.gulimall.com/memberOrder.html";// 签名方式private  String sign_type = "RSA2";// 字符编码格式private  String charset = "utf-8";// 支付宝网关; https://openapi.alipaydev.com/gateway.doprivate  String gatewayUrl = "https://openapi.alipaydev.com/gateway.do";public  String pay(PayVo vo) throws AlipayApiException {//AlipayClient alipayClient = new DefaultAlipayClient(AlipayTemplate.gatewayUrl, AlipayTemplate.app_id, AlipayTemplate.merchant_private_key, "json", AlipayTemplate.charset, AlipayTemplate.alipay_public_key, AlipayTemplate.sign_type);//1、根据支付宝的配置生成一个支付客户端AlipayClient alipayClient = new DefaultAlipayClient(gatewayUrl,app_id, merchant_private_key, "json",charset, alipay_public_key, sign_type);//2、创建一个支付请求 //设置请求参数AlipayTradePagePayRequest alipayRequest = new AlipayTradePagePayRequest();alipayRequest.setReturnUrl(return_url);alipayRequest.setNotifyUrl(notify_url);//商户订单号,商户网站订单系统中唯一订单号,必填String out_trade_no = vo.getOut_trade_no();//付款金额,必填String total_amount = vo.getTotal_amount();//订单名称,必填String subject = vo.getSubject();//商品描述,可空String body = vo.getBody();alipayRequest.setBizContent("{\"out_trade_no\":\""+ out_trade_no +"\","+ "\"total_amount\":\""+ total_amount +"\","+ "\"subject\":\""+ subject +"\","+ "\"body\":\""+ body +"\","+ "\"product_code\":\"FAST_INSTANT_TRADE_PAY\"}");String result = alipayClient.pageExecute(alipayRequest).getBody();//会收到支付宝的响应,响应的是一个页面,只要浏览器显示这个页面,就会自动来到支付宝的收银台页面System.out.println("支付宝的响应:"+result);return result;}
3、添加“com.yr.gulimall.order.vo.PayVo”类,代码如下:
@Data
public class PayVo {private String out_trade_no; // 商户订单号 必填private String subject; // 订单名称 必填private String total_amount;  // 付款金额 必填private String body; // 商品描述 可空
}
4、添加配置
支付宝相关的设置
alipay.app_id=自己的APPID
5、修改gulimall-order模块的pay.html(支付页)的支付宝按钮
<li><img src="/static/order/pay/img/zhifubao.png" style="weight:auto;height:30px;" alt=""><a th:href="'http://order.gulimall.com/payOrder?orderSn='+${submitOrderResp.order.orderSn}">支付宝</a></li>15.3.2 订单支付与同步通知
添加“com.yr.gulimall.order.web.PayWebController”类,代码如下:
@Controller
public class PayWebController {@Autowiredprivate AlipayTemplate alipayTemplate;@Autowiredprivate OrderService orderService;/*** 支付订单*/@ResponseBody@GetMapping("/payOrder")public String payOrder(@RequestParam("orderSn") String orderSn) throws AlipayApiException {//        PayVo payVo = new PayVo();
//        payVo.setBody();//订单备注
//        payVo.setOut_trade_no();//订单号
//        payVo.setSubject();//订单主题
//        payVo.setTotal_amount();//订单金额PayVo payVo = orderService.getOrderPay(orderSn);// 返回的是一个页面。将此页面直接交给浏览器就行String pay = alipayTemplate.pay(payVo);System.out.println(pay);return "hello";}
}
修改“com.yr.gulimall.order.service.OrderService”类,代码如下:
/*** 根据订单号获取当前订单支付信息** @param orderSn* @return*/PayVo getOrderPay(String orderSn);修改“com.yr.gulimall.order.service.impl.OrderServiceImpl”类,代码如下:
支付宝的响应:<form name="punchout_form" method="post" action="https://openapi.alipaydev.com/gateway.do?charset=utf-8&method=alipay.trade.page.pay&sign=YdraUOF%2Bu9lnoN9WVg22AQhniZXf28ffZf5V5vb7ajRtZ5I76lCZNCiH8%2BKJ0lCLLfb6PIvXXAQQFbiO9P89xou%2B11I%2FUm51ysptIsR7rzIFOiGQfSH2TpCjKIIZifPFAgZI8V7AKShdL6ejq0kcW%2FqMG0Jj14H0l1KqyfcGi6aPAc8JPJ3gXc8irUAzDkE5qNq7kzoZOjKIy%2FEv63L4lvBa8aDCRuV4dABti%2BhglYKaOj0IhDSh5BumWnrBll%2F%2FDuG1UDiXjILL5ddKGSE%2FIXPv3ZbNTneqD6OdGYuKXMDT0yEX4MiuZncrqThlJ2tMFmE5%2BLHX%2B6%2FROpoCZPL7iQ%3D%3D&version=1.0&app_id=2021000116660265&sign_type=RSA2×tamp=2020-12-05+15%3A17%3A57&alipay_sdk=alipay-sdk-java-dynamicVersionNo&format=json">
<input type="hidden" name="biz_content" value="{"out_trade_no":"202012051517520571335121191551672321","total_amount":"5800.00","subject":"华为 HUAWEI Mate 30 5G 麒麟990 4000万超感光徕卡影像双超级快充白色 6GB","body":"颜色:白色;内存:6GB","product_code":"FAST_INSTANT_TRADE_PAY"}">
<input type="submit" value="立即支付" style="display:none" >
</form>
<script>document.forms[0].submit();</script> @Overridepublic PayVo getOrderPay(String orderSn) {PayVo payVo = new PayVo();OrderEntity order = this.getOrderByOrderSn(orderSn);// 支付金额设置为两位小数,否则会报错BigDecimal bigDecimal = order.getPayAmount().setScale(2, BigDecimal.ROUND_UP);payVo.setTotal_amount(bigDecimal.toString());// 商户订单号payVo.setOut_trade_no(order.getOrderSn());List<OrderItemEntity> order_sn = orderItemService.list(new QueryWrapper<OrderItemEntity>().eq("order_sn", orderSn));OrderItemEntity entity = order_sn.get(0);// 订单名称payVo.setSubject(entity.getSkuName());// 商品描述payVo.setBody(entity.getSkuAttrsVals());return payVo;}http://order.gulimall.com/payOrder?orderSn=202012051517520571335121191551672321
运行结果
支付宝的响应:<form name="punchout_form" method="post" action="https://openapi.alipaydev.com/gateway.do?charset=utf-8&method=alipay.trade.page.pay&sign=YdraUOF%2Bu9lnoN9WVg22AQhniZXf28ffZf5V5vb7ajRtZ5I76lCZNCiH8%2BKJ0lCLLfb6PIvXXAQQFbiO9P89xou%2B11I%2FUm51ysptIsR7rzIFOiGQfSH2TpCjKIIZifPFAgZI8V7AKShdL6ejq0kcW%2FqMG0Jj14H0l1KqyfcGi6aPAc8JPJ3gXc8irUAzDkE5qNq7kzoZOjKIy%2FEv63L4lvBa8aDCRuV4dABti%2BhglYKaOj0IhDSh5BumWnrBll%2F%2FDuG1UDiXjILL5ddKGSE%2FIXPv3ZbNTneqD6OdGYuKXMDT0yEX4MiuZncrqThlJ2tMFmE5%2BLHX%2B6%2FROpoCZPL7iQ%3D%3D&version=1.0&app_id=2021000116660265&sign_type=RSA2×tamp=2020-12-05+15%3A17%3A57&alipay_sdk=alipay-sdk-java-dynamicVersionNo&format=json">
<input type="hidden" name="biz_content" value="{"out_trade_no":"202012051517520571335121191551672321","total_amount":"5800.00","subject":"华为 HUAWEI Mate 30 5G 麒麟990 4000万超感光徕卡影像双超级快充白色 6GB","body":"颜色:白色;内存:6GB","product_code":"FAST_INSTANT_TRADE_PAY"}">
<input type="submit" value="立即支付" style="display:none" >
</form>
<script>document.forms[0].submit();</script>我们可以看出返回的结果是html 。所以我们直接修改这个接口,让他返回是html页面
@ResponseBody@GetMapping(value = "payOrder", produces = "text/html")public String payOrder(@RequestParam("orderSn") String orderSn) throws AlipayApiException {// PayVo payVo = new PayVo();
// payVo.setBody();//订单备注
// payVo.setOut_trade_no();//订单号
// payVo.setSubject();//订单主题
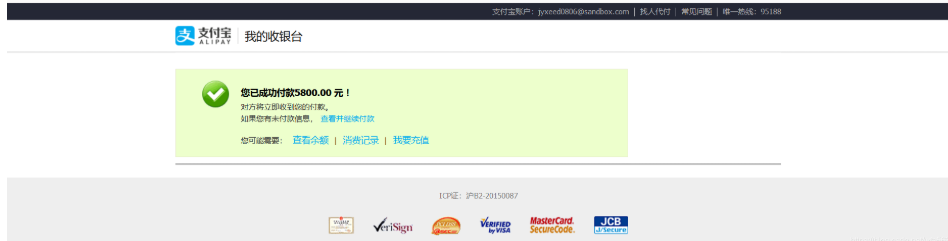
// payVo.setTotal_amount();//订单金额PayVo payVo = orderService.getOrderPay(orderSn);// 返回的是一个页面。将此页面直接交给浏览器就行String pay = alipayTemplate.pay(payVo);System.out.println(pay);return pay;}测试

- 1、将支付页让浏览器显示
- 2、支付成功以后,我们要跳到用户的订单列表页
修改“com.yr.gulimall.order.config.AlipayTemplate”类,代码如下:
// 页面跳转同步通知页面路径 需http://格式的完整路径,不能加?id=123这类自定义参数,必须外网可以正常访问// 同步通知,支付成功,一般跳转到成功页private String return_url = "http://member.gulimall.com/memberOrder";gulimall-member
1、添加thymeleaf模板引擎
<!--模板引擎 thymeleaf--><dependency><groupId>org.springframework.boot</groupId><artifactId>spring-boot-starter-thymeleaf</artifactId></dependency>2、添加订单页的html(orderList.html)
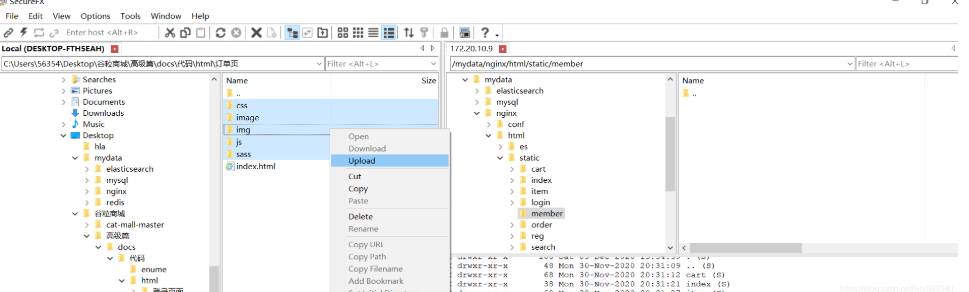
3、往虚拟机的添加订单页的静态资源(在/mydata/nginx/html/static/目录下,创建member文件夹)
4、修改静态资源访问路径

5、做登录拦截添加SpringSession依赖
<!--整合SpringSession完成session共享问题--><dependency><groupId>org.springframework.session</groupId><artifactId>spring-session-data-redis</artifactId></dependency><!--引入redis--><dependency><groupId>org.springframework.boot</groupId><artifactId>spring-boot-starter-data-redis</artifactId><exclusions><exclusion><groupId>io.lettuce</groupId><artifactId>lettuce-core</artifactId></exclusion></exclusions></dependency><dependency><groupId>redis.clients</groupId><artifactId>jedis</artifactId></dependency>6、添加配置
spring:#关闭thymeleaf的缓存thymeleaf:cache: false#配置redisredis:host: 192.168.56.10port: 6379#配置SpringSession存储类型session:store-type: redis7、主启动类添加SpringSession自动开启
@EnableRedisHttpSession
@EnableFeignClients(basePackages="com.atguigu.gulimall.member.feign")
@EnableDiscoveryClient
@SpringBootApplication
public class GulimallMemberApplication {public static void main(String[] args) {SpringApplication.run(GulimallMemberApplication.class, args);}}
8、添加“com.yr.gulimall.member.config.GulimallSessionConfig”类,代码如下:
@Configuration
public class GulimallSessionConfig {@Beanpublic CookieSerializer cookieSerializer(){DefaultCookieSerializer cookieSerializer = new DefaultCookieSerializer();cookieSerializer.setDomainName("gulimall.com");cookieSerializer.setCookieName("GULISESSION");return cookieSerializer;}@Beanpublic RedisSerializer<Object> springSessionDefaultRedisSerializer(){return new GenericJackson2JsonRedisSerializer();}
}
添加登录拦截器“com.yr.gulimall.member.interceptor.LoginUserInterceptor”
@Component
public class LoginUserInterceptor implements HandlerInterceptor {public static ThreadLocal<MemberResponseVO> loginUser = new ThreadLocal<>();@Overridepublic boolean preHandle(HttpServletRequest request, HttpServletResponse response, Object handler) throws Exception {String requestURI = request.getRequestURI();AntPathMatcher matcher = new AntPathMatcher();boolean status = matcher.match("/member/**", requestURI);if (status){return true;}MemberResponseVO attribute = (MemberResponseVO) request.getSession().getAttribute(AuthServerConstant.LOGIN_USER);if (attribute != null){loginUser.set(attribute);return true;}else {//没登录就去登录request.getSession().setAttribute("msg","请先进行登录");response.sendRedirect("http://auth.gulimall.com/login.html");return false;}}
}
把登录拦截器配置到spring里
添加“com.yr.gulimall.member.config.MemberWebConfig”类,代码如下:
@Configuration
public class MemberWebConfig implements WebMvcConfigurer {@AutowiredLoginUserInterceptor loginUserInterceptor;@Overridepublic void addInterceptors(InterceptorRegistry registry) {registry.addInterceptor(loginUserInterceptor).addPathPatterns("/**");}
}
在gulimall-gateway配置路由:
- id: gulimall_member_routeuri: lb://gulimall-memberpredicates:- Host=member.gulimall.com添加域名(C:\Windows\System32\drivers\etc\hosts)
#----------gulimall----------
192.168.56.16 gulimall.com
192.168.56.16 search.gulimall.com
192.168.56.16 item.gulimall.com
192.168.56.16 auth.gulimall.com
192.168.56.16 cart.gulimall.com
192.168.56.16 order.gulimall.com
192.168.56.16 member.gulimall.com
修改首页我的订单地访问路径gulimall-product (index.html)
<li><a href="http://member.gulimall.com/memberOrder.html">我的订单</a></li>找到沙箱环境里面有沙箱账号
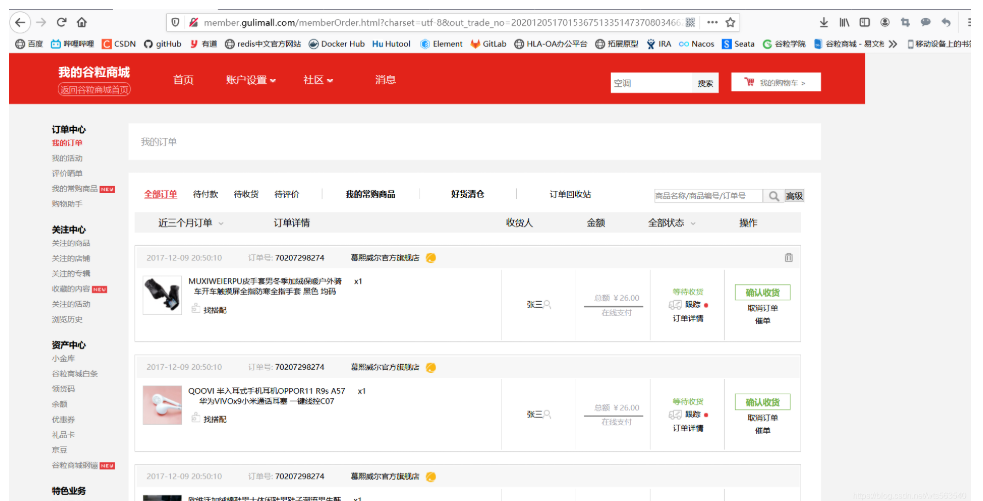
15.3.3 订单列表页渲染完成
修改“com.yr.gulimall.member.web.MemberWebController”类,代码如下“:
@Controller
public class MemberWebController {@Autowiredprivate OrderFeignService orderFeignService;@GetMapping("/memberOrder.html")public String memberOrderPage(@RequestParam(value = "pageNum", defaultValue = "1") Integer pageNum, Model model) {//查出当前登录用户的所有订单列表数据Map<String, Object> page = new HashMap<>();page.put("page", pageNum.toString());//分页查询当前用户的所有订单及对应订单项R r = orderFeignService.listWithItem(page);model.addAttribute("orders", r);return "orderList";}
}
添加“com.yr.gulimall.member.feign.OrderFeignService”类,代码如下:
@FeignClient("gulimall-order")
public interface OrderFeignService {@PostMapping("/order/order/listWithItem")public R listWithItem(@RequestBody Map<String, Object> params);
}
因为订单服务做了用户登录的拦截,所以远程调用订单服务需要用户信息,我们给它共享cookies
添加“com.yr.gulimall.member.config.GuliFeignConfig”类,代码如下:
@Configuration
public class GuliFeignConfig {@Bean("requestInterceptor")public RequestInterceptor requestInterceptor() {return new RequestInterceptor() {@Overridepublic void apply(RequestTemplate requestTemplate) {System.out.println("RequestInterceptor线程..." + Thread.currentThread().getId());//1、RequestContextHolder拿到刚进来的请求ServletRequestAttributes attributes = (ServletRequestAttributes) RequestContextHolder.getRequestAttributes();if (attributes != null) {HttpServletRequest request = attributes.getRequest();//老请求if (request != null) {//同步请求头数据。CookieString cookie = request.getHeader("Cookie");//给新请求同步了老请求的cookierequestTemplate.header("Cookie", cookie);System.out.println("feign远程之前先执行RequestInterceptor.apply()");}}}};}
}
远程服务:gulimall-order
修改“com.yr.gulimall.order.controller.OrderController”类,代码如下:
/*** 分页查询当前登录用户的所有订单* @param params* @return*/@PostMapping("/listWithItem")public R listWithItem(@RequestBody Map<String, Object> params){PageUtils page = orderService.queryPageWithItem(params);return R.ok().put("page", page);}修改“com.yr.gulimall.order.service.OrderService”类,代码如下:
PageUtils queryPageWithItem(Map<String, Object> params);修改“com.yr.gulimall.order.service.impl.OrderServiceImpl”类,代码如下:
@Overridepublic PageUtils queryPageWithItem(Map<String, Object> params) {MemberResponseVO memberResponseVO = LoginUserInterceptor.loginUser.get();IPage<OrderEntity> page = this.page(new Query<OrderEntity>().getPage(params),new QueryWrapper<OrderEntity>().eq("member_id", memberResponseVO.getId()).orderByDesc("id"));List<OrderEntity> order_sn = page.getRecords().stream().map(order -> {List<OrderItemEntity> entities = orderItemService.list(new QueryWrapper<OrderItemEntity>().eq("order_sn", order.getOrderSn()));order.setItemEntities(entities);return order;}).collect(Collectors.toList());page.setRecords(order_sn);return new PageUtils(page);}修改OrderEntity

修改orderList.html
<table class="table" th:each="order:${orders.page.list}"><tr><td colspan="7" style="background:#F7F7F7" ><span style="color:#AAAAAA">2017-12-09 20:50:10</span><span><ruby style="color:#AAAAAA">订单号:</ruby>[[${order.orderSn}]] 70207298274</span><span>谷粒商城<i class="table_i"></i></span><i class="table_i5 isShow"></i></td></tr><tr class="tr" th:each="item,itemStat:${order.itemEntities}"><td colspan="3" style="border-right: 1px solid #ccc"><img style="height: 60px; width: 60px;" th:src="${item.skuPic}" alt="" class="img"><div><p style="width: 242px; height: auto;overflow: auto">[[${item.skuName}]]</p><div><i class="table_i4"></i>找搭配</div></div><div style="margin-left:15px;">x[[${item.skuQuantity}]]</div><div style="clear:both"></div></td><td th:if="${itemStat.index==0}" th:rowspan="${itemStat.size}">[[${order.receiverName}]]<i><i class="table_i1"></i></i></td><td th:if="${itemStat.index==0}" th:rowspan="${itemStat.size}" style="padding-left:10px;color:#AAAAB1;"><p style="margin-bottom:5px;">总额 ¥[[${order.payAmount}]]</p><hr style="width:90%;"><p>在线支付</p></td><td th:if="${itemStat.index==0}" th:rowspan="${itemStat.size}"><ul><li style="color:#71B247;" th:if="${order.status==0}">待付款</li><li style="color:#71B247;" th:if="${order.status==1}">已付款</li><li style="color:#71B247;" th:if="${order.status==2}">已发货</li><li style="color:#71B247;" th:if="${order.status==3}">已完成</li><li style="color:#71B247;" th:if="${order.status==4}">已取消</li><li style="color:#71B247;" th:if="${order.status==5}">售后中</li><li style="color:#71B247;" th:if="${order.status==6}">售后完成</li><li style="margin:4px 0;" class="hide"><i class="table_i2"></i>跟踪<i class="table_i3"></i><div class="hi"><div class="p-tit">普通快递 运单号:390085324974</div><div class="hideList"><ul><li>[北京市] 在北京昌平区南口公司进行签收扫描,快件已被拍照(您的快件已签收,感谢您使用韵达快递)签收</li><li>[北京市] 在北京昌平区南口公司进行签收扫描,快件已被拍照(您的快件已签收,感谢您使用韵达快递)签收</li><li>[北京昌平区南口公司] 在北京昌平区南口公司进行派件扫描</li><li>[北京市] 在北京昌平区南口公司进行派件扫描;派送业务员:业务员;联系电话:17319268636</li></ul></div></div></li><li class="tdLi">订单详情</li></ul></td><td th:if="${itemStat.index==0}" th:rowspan="${itemStat.size}"><button>确认收货</button><p style="margin:4px 0; ">取消订单</p><p>催单</p></td></tr></table> 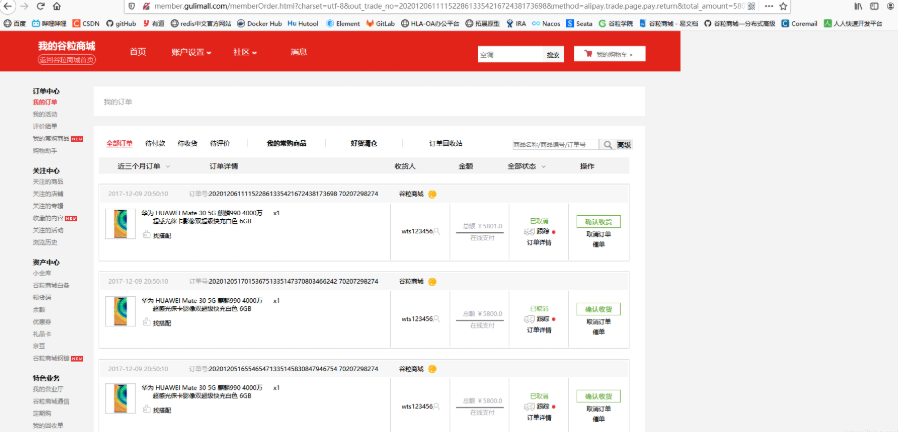
15.3.4 异步通知内网穿透环境搭建
- 订单支付成功后支付宝会回调商户接口,这个时候需要修改订单状态
- 由于同步跳转可能由于网络问题失败,所以使用异步通知
- 支付宝使用的是最大努力通知方案,保障数据一致性,隔一段时间会通知商户支付成功,直到返回
success
1)、内网穿透设置异步通知地址
内网穿透联调流程

下面我们根据内网穿透联调的流程进行具体操作:
将外网映射到本地的
order.gulimall.com:80由于回调的请求头不是
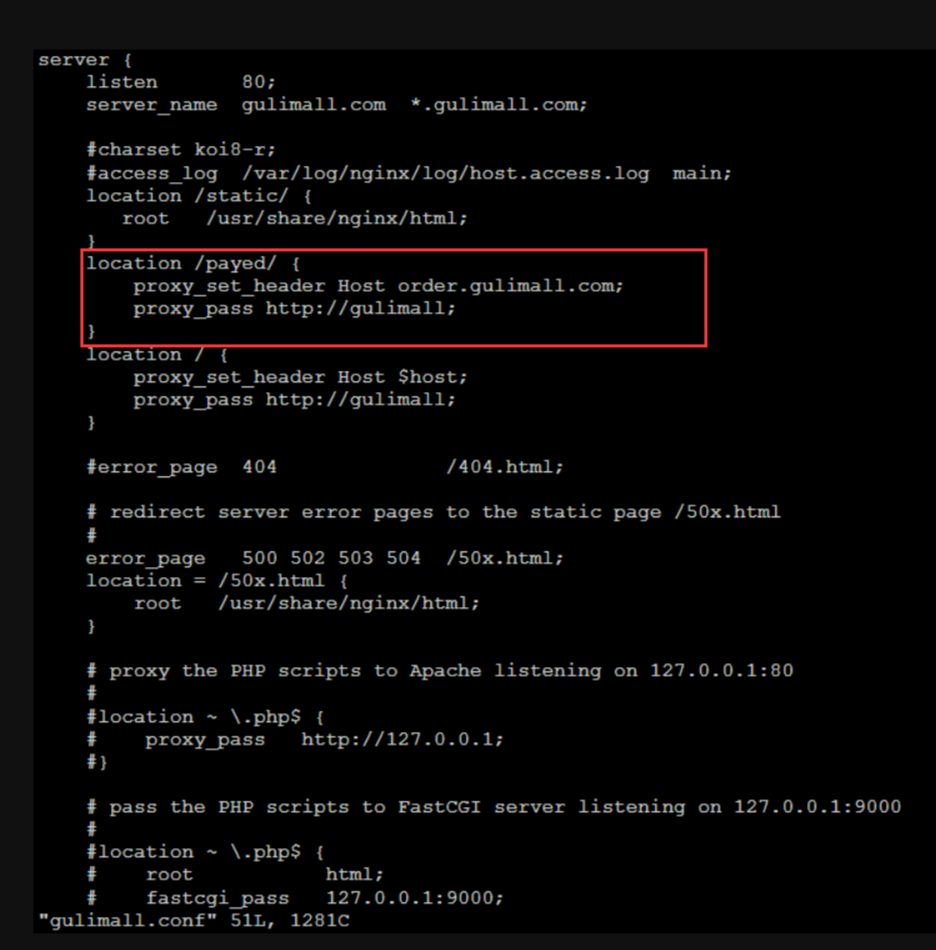
order.gulimall.com,因此nginx转发到网关后找不到对应的服务,所以需要对nginx进行设置将/payed/notify异步通知转发至订单服务
1、设置异步通知的地址
// 服务器[异步通知]页面路径  需http://格式的完整路径,不能加?id=123这类自定义参数,必须外网可以正常访问
// 支付宝会悄悄的给我们发送一个请求,告诉我们支付成功的信息
private String notify_url = "http://8xlc1ea491.*****.tech/payed/notify"; 2、修改内网穿透:将外网映射到本地的order.gulimall.com:80

3、nginx配置访问/payed/notify异步通知转发至订单服务
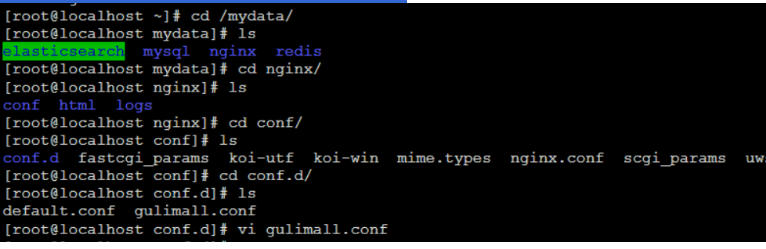
配置好之后,重启nginx

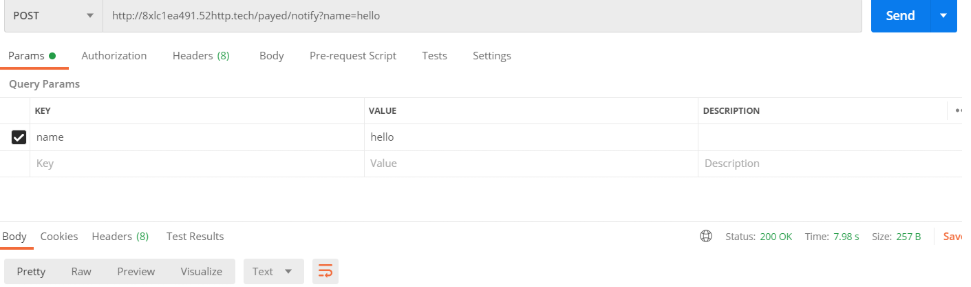
http://8xlc1ea491.52http.tech/payed/notify?name=hello 访问还是404,查看日志
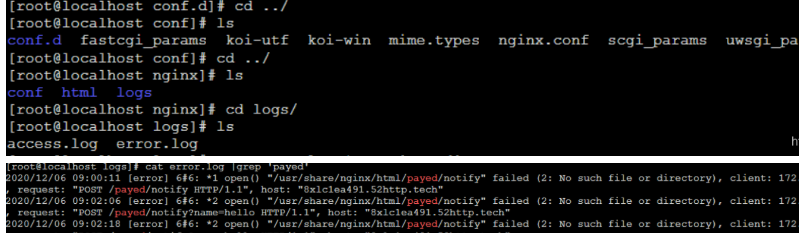
上面日志显示默认以本地的方式访问所以直接访问静态资源/static/..,我们访问这个域名下的/payed路径,我们要添加这个域名,并把host改成order.gulimall.com服务。不然默认以本地的方式访问

再次重启niginx
![]()
修改登录拦截器给他放行
修改“com.yr.gulimall.order.interceptor.LoginUserInterceptor”类,代码如下:
@Component
public class LoginUserInterceptor implements HandlerInterceptor {public static ThreadLocal<MemberResponseVO> loginUser = new ThreadLocal<>();@Overridepublic boolean preHandle(HttpServletRequest request, HttpServletResponse response, Object handler) throws Exception {String uri = request.getRequestURI();// 该路径只是远程调用,你不需要登录拦截String requestURI = request.getRequestURI();AntPathMatcher matcher = new AntPathMatcher();boolean status = matcher.match("/order/order/status/**", requestURI);boolean payed = matcher.match("/payed/**", requestURI);if (status || payed) {return true;}MemberResponseVO attribute = (MemberResponseVO) request.getSession().getAttribute(AuthServerConstant.LOGIN_USER);if (attribute != null) {loginUser.set(attribute);return true;} else {// 没登录就去登录request.getSession().setAttribute("msg", "请先进行登录");response.sendRedirect("http://auth.gulimall.com/login.html");return false;}}
}
2)、验证签名
添加“com.yr.gulimall.order.listener.OrderPayedListener”类,代码如下:
@Slf4j
@RestController
public class OrderPayedListener {@Autowiredprivate OrderService orderService;@Autowiredprivate AlipayTemplate alipayTemplate;/*** 支付宝成功异步通知** @param request* @return*/@PostMapping("/payed/notify")public String handleAlipayed(PayAsyncVo vo, HttpServletRequest request) throws AlipayApiException {log.info("收到支付宝异步通知******************");// 只要收到支付宝的异步通知,返回 success 支付宝便不再通知// 获取支付宝POST过来反馈信息// 需要验签Map<String, String> params = new HashMap<>();Map<String, String[]> requestParams = request.getParameterMap();for (String name : requestParams.keySet()) {String[] values = requestParams.get(name);String valueStr = "";for (int i = 0; i < values.length; i++) {valueStr = (i == values.length - 1) ? valueStr + values[i]: valueStr + values[i] + ",";}// 乱码解决,这段代码在出现乱码时使用// valueStr = new String(valueStr.getBytes("ISO-8859-1"), "utf-8");params.put(name, valueStr);}boolean signVerified = AlipaySignature.rsaCheckV1(params, alipayTemplate.getAlipay_public_key(),alipayTemplate.getCharset(), alipayTemplate.getSign_type()); //调用SDK验证签名if (signVerified){log.info("支付宝异步通知验签成功");// 修改订单状态orderService.handlePayResult(vo);return "success";}else {log.info("支付宝异步通知验签失败");return "error";}}}
添加“com.yr.gulimall.order.vo.PayAsyncVo”类,代码如下:
@ToString
@Data
public class PayAsyncVo {private String gmt_create;private String charset;private String gmt_payment;private Date notify_time;private String subject;private String sign;private String buyer_id;//支付者的idprivate String body;//订单的信息private String invoice_amount;//支付金额private String version;private String notify_id;//通知idprivate String fund_bill_list;private String notify_type;//通知类型; trade_status_syncprivate String out_trade_no;//订单号private String total_amount;//支付的总额private String trade_status;//交易状态  TRADE_SUCCESSprivate String trade_no;//流水号private String auth_app_id;//private String receipt_amount;//商家收到的款private String point_amount;//private String app_id;//应用idprivate String buyer_pay_amount;//最终支付的金额private String sign_type;//签名类型private String seller_id;//商家的id}
修改“com.yr.gulimall.order.service.OrderService”类,代码如下:
/*** 处理支付成功返回结果** @param vo*/String handlePayResult(PayAsyncVo vo);修改“com.yr.gulimall.order.service.impl.OrderServiceImpl”类,代码如下:
@Overridepublic String handlePayResult(PayAsyncVo vo) {// 1、保存交易流水PaymentInfoEntity infoEntity = new PaymentInfoEntity();infoEntity.setAlipayTradeNo(vo.getTrade_no());infoEntity.setAlipayTradeNo(vo.getOut_trade_no());infoEntity.setPaymentStatus(vo.getTrade_status());infoEntity.setCallbackTime(vo.getNotify_time());paymentInfoService.save(infoEntity);// 2、修改订单状态信息if (vo.getTrade_status().equals("TRADE_SUCCESS") || vo.getTrade_status().equals("TRADE_FINISHED")){//支付成功状态String outTradeNo = vo.getOut_trade_no();this.baseMapper.updateOrderStatus(outTradeNo,OrderStatusEnum.PAYED.getCode());}return "success";}修改“com.yr.gulimall.order.dao.OrderDao”类,代码如下:
@Mapper
public interface OrderDao extends BaseMapper<OrderEntity> {/*** 修改订单状态** @param outTradeNo* @param code*/void updateOrderStatus(@Param("outTradeNo") String outTradeNo, @Param("code") Integer code);
}
OrderDao.xml
<update id="updateOrderStatus">update oms_order set status = #{code} where order_sn = #{outTradeNo}</update>#springMVC的日期格式化
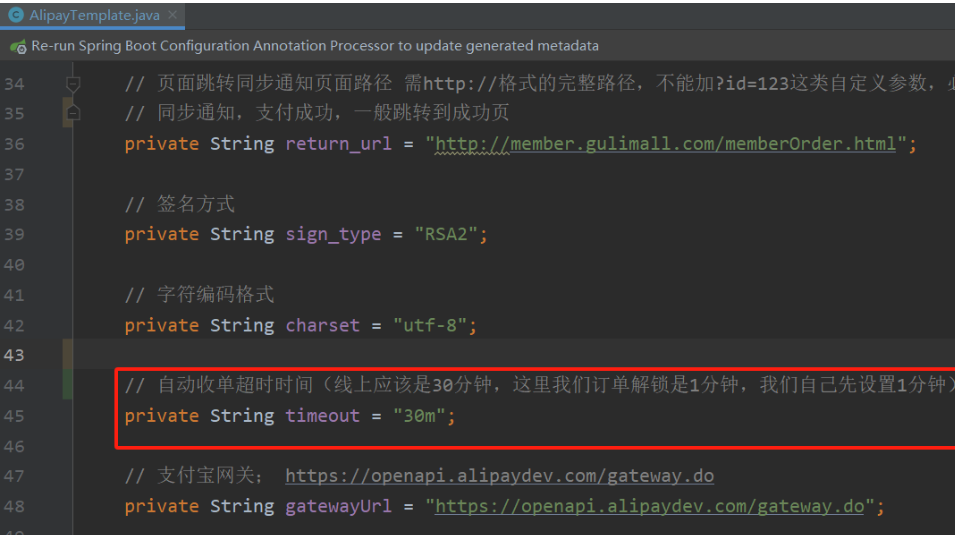
spring.mvc.date-format=yyyy-MM-dd HH:mm:ss15.3.5 收单
- 订单在支付页,不支付,一直刷新,订单过期了才支付,订单状态改为已支付了,但是库 存解锁了。
- 使用支付宝自动收单功能解决。只要一段时间不支付,就不能支付了。
- 由于时延等问题。订单解锁完成,正在解锁库存的时候,异步通知才到订单解锁,手动调用收单。
- 网络阻塞问题,订单支付成功的异步通知一直不到达。
- 查询订单列表时,ajax获取当前未支付的订单状态,查询订单状态时,再获取一下支付宝 此订单的状态。
- 其他各种问题
- 每天晚上闲时下载支付宝对账单,一一进行对账。
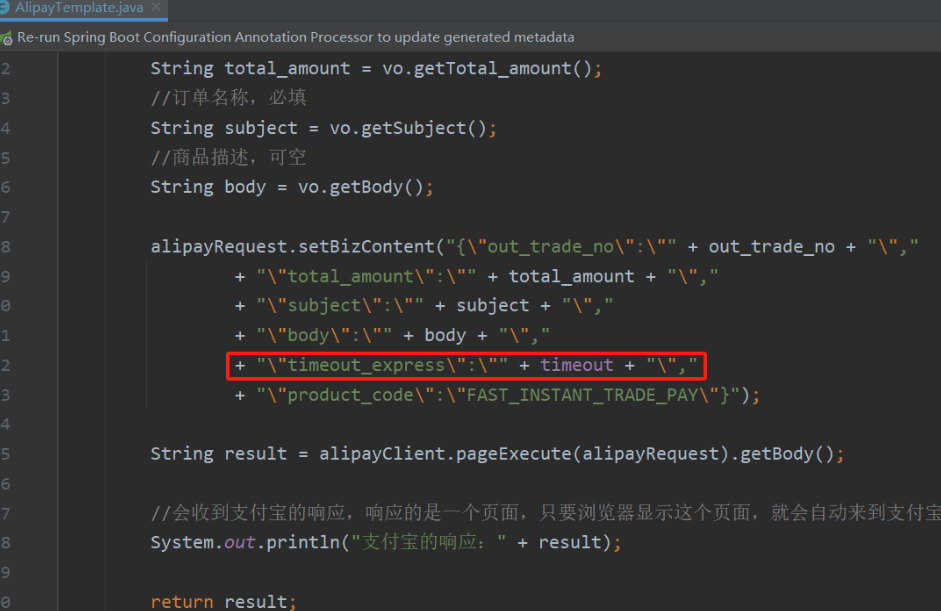
添加超时时间
十六、商城业务-秒杀服务
16.1 后台添加秒杀商品
1、配置网关(转发到优惠服务)
- id: coupon_routeuri: lb://gulimall-couponpredicates:- Path=/api/coupon/**filters:- RewritePath=/api/(?<segment>.*),/$\{segment}2、每日秒杀关联商品功能实现
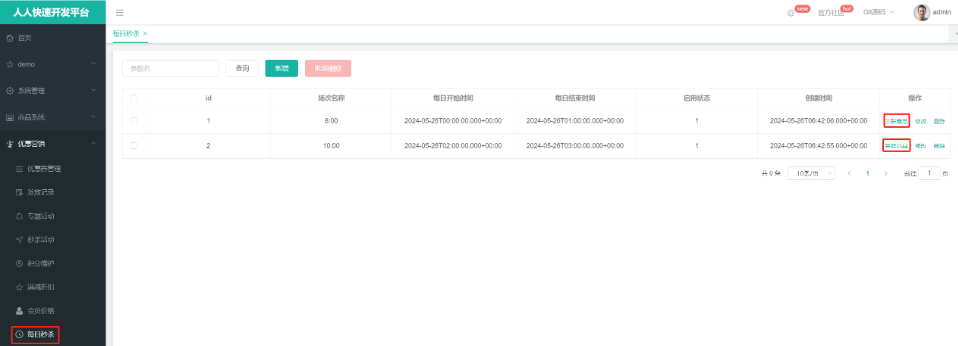
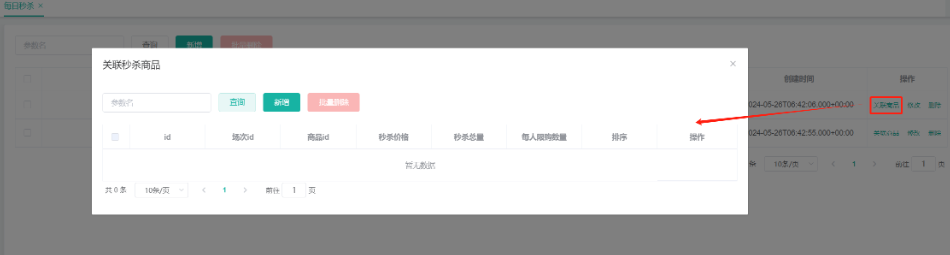
点击关联商品的时候,会弹出一个页面,并且F12可以看到会调用一个url请求:
http://localhost:88/api/coupon/seckillskurelation/list?t=1716706075726&page=1&limit=10&key=&promotionSessionId=1
根据此url去完善该接口
修改“com.yr.gulimall.coupon.service.impl.SeckillSkuRelationServiceImpl”代码如下:
@Service("seckillSkuRelationService")
public class SeckillSkuRelationServiceImpl extends ServiceImpl<SeckillSkuRelationDao, SeckillSkuRelationEntity> implements SeckillSkuRelationService {@Overridepublic PageUtils queryPage(Map<String, Object> params) {QueryWrapper<SeckillSkuRelationEntity> queryWrapper = new QueryWrapper<SeckillSkuRelationEntity>();// 场次id不是nullString promotionSessionId = (String) params.get("promotionSessionId");if (!StringUtils.isEmpty(promotionSessionId)) {queryWrapper.eq("promotion_session_id", promotionSessionId);}IPage<SeckillSkuRelationEntity> page = this.page(new Query<SeckillSkuRelationEntity>().getPage(params), queryWrapper);return new PageUtils(page);}}
16.2 搭建秒杀服务环境
1、导入pom.xml依赖
<?xml version="1.0" encoding="UTF-8"?>
<project xmlns="http://maven.apache.org/POM/4.0.0" xmlns:xsi="http://www.w3.org/2001/XMLSchema-instance"xsi:schemaLocation="http://maven.apache.org/POM/4.0.0 https://maven.apache.org/xsd/maven-4.0.0.xsd"><modelVersion>4.0.0</modelVersion><parent><groupId>org.springframework.boot</groupId><artifactId>spring-boot-starter-parent</artifactId><version>2.3.4.RELEASE</version><relativePath/> <!-- lookup parent from repository --></parent><groupId>com.atguigu.gulimall</groupId><artifactId>gulimall-seckill</artifactId><version>0.0.1-SNAPSHOT</version><name>gulimall-seckill</name><description>秒杀</description><properties><java.version>1.8</java.version><spring-cloud.version>Hoxton.SR8</spring-cloud.version></properties><dependencies><!--以后使用redis.client作为所有分布式锁,分布式对象等功能框架--><dependency><groupId>org.redisson</groupId><artifactId>redisson</artifactId><version>3.13.4</version></dependency><dependency><groupId>com.auguigu.gulimall</groupId><artifactId>gulimall-commom</artifactId><version>0.0.1-SNAPSHOT</version><exclusions><exclusion><groupId>com.alibaba.cloud</groupId><artifactId>spring-cloud-starter-alibaba-seata</artifactId></exclusion></exclusions></dependency><dependency><groupId>org.springframework.boot</groupId><artifactId>spring-boot-starter-data-redis</artifactId></dependency><dependency><groupId>org.springframework.boot</groupId><artifactId>spring-boot-starter-web</artifactId></dependency><dependency><groupId>org.springframework.cloud</groupId><artifactId>spring-cloud-starter-openfeign</artifactId></dependency><dependency><groupId>org.springframework.boot</groupId><artifactId>spring-boot-devtools</artifactId><scope>runtime</scope><optional>true</optional></dependency><dependency><groupId>org.projectlombok</groupId><artifactId>lombok</artifactId><optional>true</optional></dependency><dependency><groupId>org.springframework.boot</groupId><artifactId>spring-boot-starter-test</artifactId><scope>test</scope></dependency></dependencies><dependencyManagement><dependencies><dependency><groupId>org.springframework.cloud</groupId><artifactId>spring-cloud-dependencies</artifactId><version>${spring-cloud.version}</version><type>pom</type><scope>import</scope></dependency></dependencies></dependencyManagement><build><plugins><plugin><groupId>org.springframework.boot</groupId><artifactId>spring-boot-maven-plugin</artifactId></plugin></plugins></build><repositories><repository><id>spring-milestones</id><name>Spring Milestones</name><url>https://repo.spring.io/milestone</url></repository></repositories></project>
2、添加配置
spring.application.name=gulimall-seckill
server.port=25000
spring.cloud.nacos.discovery.server-addr=127.0.0.1:8848
spring.redis.host=192.168.56.10
3、主启动类添加注解
@EnableFeignClients
@EnableDiscoveryClient
@SpringBootApplication(exclude = {DataSourceAutoConfiguration.class})
public class GulimallSeckillApplication {public static void main(String[] args) {SpringApplication.run(GulimallSeckillApplication.class, args);}}
16.3 定时任务
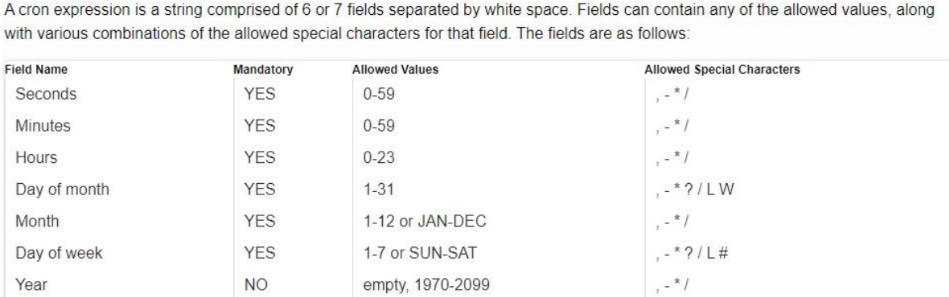
16.3.1 cron 表达式
语法:秒 分 时 日 月 周 年(Spring 不支持)
http://www.quartz-scheduler.org/documentation/quartz-2.3.0/tutorials/crontrigger.html
特殊字符:
- ,:枚举:
- (cron="7,9,23 * * * * ?"):任意时刻的 7,9,23 秒启动这个任务;
- -:范围:
- (cron="7-20 * * * * ?"):任意时刻的 7-20 秒之间,每秒启动一次
- *:任意:
- 指定位置的任意时刻都可以
- /:步长:
- (cron="7/5 * * * * ?"):第 7 秒启动,每 5 秒一次;
- (cron="*/5 * * * * ?"):任意秒启动,每 5 秒一次;
- ?:(出现在日和周几的位置):为了防止日和周冲突,在周和日上如果要写通配符使用?
- (cron="* * * 1 * ?"):每月的 1 号,启动这个任务;
- L:(出现在日和周的位置):last:最后一个
- (cron="* * * ? * 3L"):每月的最后一个周二
- W:Work Day:工作日
- (cron="* * * W * ?"):每个月的工作日触发
- (cron="* * * LW * ?"):每个月的最后一个工作日触发
- #:第几个
- (cron="* * * ? * 5#2"):每个月的第 2 个周 4
16.3.2 SpringBoot 整合定时任务
springboot整合定时任务流程:
1、@EnableScheduling 开启定时任务
2、@Scheduled 开启一个定时任务
3、自动配置类 TaskSchedulingAutoConfiguration
异步任务
1、@EnableAsync 开启异步任务功能
2、@Async 给希望异步执行的方法上标注
3、自动配置类 TaskExecutionAutoConfiguration 属性绑定在TaskExecutionProperties
添加“com.yr.gulimall.seckill.scheduled.HelloSchedule”类,代码如下:
@Slf4j
@Component
@EnableAsync
@EnableScheduling
public class HelloSchedule {/*** 1、Spring中6位组成,不允许7位d的年* 2、周的位置,1-7代表周一到周日* 3、定时任务不应该阻塞。默认是阻塞的*      1)、可以让业务运行以异步的方式,自己提交到线程池*      2)、支持定时任务线程池;设置TaskSchedulingProperties;*              spring.task.scheduling.pool.size=5*      3)、让定时任务异步执行*          异步任务**      解决:使用异步任务来完成定时任务不阻塞的功能*/@Async@Scheduled(cron = "*/5 * * * * ?")public void hello() throws InterruptedException {log.info("hello......");Thread.sleep(3000);}
}
配置定时任务参数
spring.task.execution.pool.core-size=20
spring.task.execution.pool.max-size=50
16.4 秒杀商品上架
16.4.1 秒杀商品上架思路
- 项目独立部署,独立秒杀模块
gulimall-seckill - 使用定时任务每天三点上架最新秒杀商品,削减高峰期压力
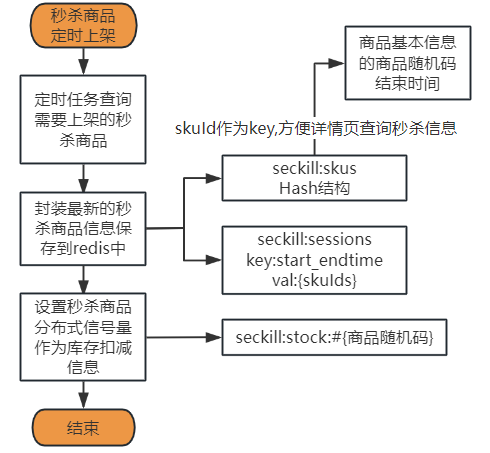
16.4.2 秒杀商品上架流程
16.4.3 存储模型设计
1、查询秒杀活动场次和sku信息的存储模型
添加“com.yr.gulimall.seckill.vo.SeckillSessionWithSkus”类,代码如下:
@Data
public class SeckillSessionWithSkus {private Long id;/*** 场次名称*/private String name;/*** 每日开始时间*/private Date startTime;/*** 每日结束时间*/private Date endTime;/*** 启用状态*/private Integer status;/*** 创建时间*/private Date createTime;private List<SeckillSkuVo> relationEntities;}
2、查询秒杀活动商品关联的存储模型
添加“com.yr.gulimall.seckill.vo.SeckillSkuVo”类,代码如下:
@Data
public class SeckillSkuVo {private Long id;/*** 活动id*/private Long promotionId;/*** 活动场次id*/private Long promotionSessionId;/*** 商品id*/private Long skuId;/*** 秒杀价格*/private BigDecimal seckillPrice;/*** 秒杀总量*/private Integer seckillCount;/*** 每人限购数量*/private Integer seckillLimit;/*** 排序*/private Integer seckillSort;}
3、查询商品信息的存储模型
添加“com.yr.gulimall.seckill.vo.SkuInfoVo”类,代码如下:
@Data
public class SkuInfoVo {private Long skuId;/*** spuId*/private Long spuId;/*** sku名称*/private String skuName;/*** sku介绍描述*/private String skuDesc;/*** 所属分类id*/private Long catalogId;/*** 品牌id*/private Long brandId;/*** 默认图片*/private String skuDefaultImg;/*** 标题*/private String skuTitle;/*** 副标题*/private String skuSubtitle;/*** 价格*/private BigDecimal price;/*** 销量*/private Long saleCount;
}
4、缓存获得秒杀活动场次和sku信息的存储模型
添加"com.yr.gulimall.seckill.to.SeckillSkuRedisTo"类,代码如下:
@Data
public class SeckillSkuRedisTo {private Long id;/*** 活动id*/private Long promotionId;/*** 活动场次id*/private Long promotionSessionId;/*** 商品id*/private Long skuId;/*** 秒杀价格*/private BigDecimal seckillPrice;/*** 秒杀总量*/private Integer seckillCount;/*** 每人限购数量*/private Integer seckillLimit;/*** 排序*/private Integer seckillSort;//以上都为SeckillSkuRelationEntity的属性//skuInfoprivate SkuInfoVo skuInfo;//当前商品秒杀的开始时间private Long startTime;//当前商品秒杀的结束时间private Long endTime;//当前商品秒杀的随机码private String randomCode;
}
16.4.4 定时上架
配置定时任务
添加“com.yr.gulimall.seckill.config.ScheduledConfig”类,代码如下:
@EnableAsync // 开启对异步的支持,防止定时任务之间相互阻塞
@EnableScheduling // 开启对定时任务的支持
@Configuration
public class ScheduledConfig {
}
每天凌晨三点远程调用
coupon服务上架最近三天的秒杀商品
添加“com.yr.gulimall.seckill.scheduled.SeckillSkuScheduled”类,代码如下
@Slf4j
@Component
public class SeckillSkuScheduled {@Autowiredprivate SeckillService seckillService;/*** TODO 幂等性处理* 上架最近三天的秒杀商品*/@Scheduled(cron = "0 0 3 * * ?")public void uploadSeckillSkuLatest3Days() {// 重复上架无需处理log.info("上架秒杀的信息......");seckillService.uploadSeckillSkuLatest3Days();}
}
添加“com.yr.gulimall.seckill.service.SeckillService”类,代码如下
public interface SeckillService {void uploadSeckillSkuLatest3Days();
}
添加“com.yr.gulimall.seckill.service.impl.SeckillServiceImpl”类,代码如下
@Service
public class SeckillServiceImpl implements SeckillService {@Autowiredprivate CouponFeignService couponFeignService;@Autowiredprivate ProductFeignService productFeignService;@Autowiredprivate StringRedisTemplate stringRedisTemplate;@Autowiredprivate RedissonClient redissonClient;private final String SESSIONS_CACHE_PREFIX = "seckill:sessions:"; //秒杀活动信息private final String SKUKILL_CACHE_PREFIX = "seckill:skus:"; // 秒杀商品信息private final String SKU_STOCK_SEMAPHORE = "seckill:stock:"; //+商品随机码@Overridepublic void uploadSeckillSkuLatest3Days() {// 1、扫描最近三天需要参与秒杀的活动的场次和sku信息R session = couponFeignService.getLasts3DaySession();if (session.getCode() == 0){// 上架商品List<SeckillSessionWithSkus> data = session.getData(new TypeReference<List<SeckillSessionWithSkus>>() {});// 2、缓存到redis// 2.1、缓存活动信息saveSessionInfos(data);// 2.2、缓存获得关联商品信息saveSessionSkuInfos(data);}}}
16.4.4.1 获取最近三天的秒杀信息
获取最近三天的秒杀场次信息,再通过秒杀场次id查询对应的商品信息
添加“com.yr.gulimall.seckill.fegin.ProductFeignService”类,代码如下:
@FeignClient("gulimall-coupon")
public interface CouponFeignService {@GetMapping("/coupon/seckillsession/lasts3DaySession")R getLasts3DaySession();
}
gulimall-coupon
修改“com.yr.gulimall.coupon.controller.SeckillSessionController”类,代码如下:
/*** 获取最近3天的秒杀商品*/@GetMapping("/lasts3DaySession")public R getLasts3DaySession(){List<SeckillSessionEntity> session = seckillSessionService.getLasts3DaySession();return R.ok().setData(session);}添加“com.yr.gulimall.coupon.service.SeckillSessionService”类,代码如下:
/*** 获取最近3天的秒杀商品** @return*/List<SeckillSessionEntity> getLasts3DaySession();添加“com.yr.gulimall.coupon.service.impl.SeckillSessionServiceImpl”类,代码如下:
@Overridepublic List<SeckillSessionEntity> getLasts3DaySession() {// 计算最近三天List<SeckillSessionEntity> list = this.list(new QueryWrapper<SeckillSessionEntity>().between("start_time", startTime(), endTime()));if (!CollectionUtils.isEmpty(list)) {return list.stream().map(session -> {Long id = session.getId();List<SeckillSkuRelationEntity> relationEntities = seckillSkuRelationService.list(new QueryWrapper<SeckillSkuRelationEntity>().eq("promotion_session_id", id));session.setRelationEntities(relationEntities);return session;}).collect(Collectors.toList());}return null;}/*** 起始时间** @return*/private String startTime() {LocalDate now = LocalDate.now();LocalTime time = LocalTime.MIN;LocalDateTime start = LocalDateTime.of(now, time);String format = start.format(DateTimeFormatter.ofPattern("yyyy-MM-dd HH:mm:ss"));return format;}/*** 结束时间** @return*/private String endTime() {LocalDate now = LocalDate.now();LocalDate localDate = now.plusDays(2);LocalTime time = LocalTime.MIN;LocalDateTime end = LocalDateTime.of(localDate, time);String format = end.format(DateTimeFormatter.ofPattern("yyyy-MM-dd HH:mm:ss"));return format;}16.4.4.2 在redis中缓存秒杀活动信息
/*** 缓存秒杀活动信息** @param sessions*/private void saveSessionInfos(List<SeckillSessionWithSkus> sessions) {sessions.stream().forEach(session -> {Long startTime = session.getStartTime().getTime();Long endTime = session.getEndTime().getTime();String key = SESSIONS_CACHE_PREFIX + startTime + "_" + endTime;Boolean hasKey = stringRedisTemplate.hasKey(key);if (!hasKey) {List<String> collect = session.getRelationEntities().stream().map(item -> item.getPromotionSessionId().toString() + "_" + item.getSkuId().toString()).collect(Collectors.toList());System.out.println("saveSessionInfos------------------------" + collect);// 缓存活动信息(list操作)stringRedisTemplate.opsForList().leftPushAll(key, collect);}});}16.4.4.3 在redis中缓存获得关联秒杀活动的商品信息
/*** 缓存获得关联秒杀的商品信息** @param sessions*/private void saveSessionSkuInfos(List<SeckillSessionWithSkus> sessions) {// 准备hash操作BoundHashOperations<String, Object, Object> ops = stringRedisTemplate.boundHashOps(SKUKILL_CACHE_PREFIX);sessions.stream().forEach(session -> {session.getRelationEntities().stream().forEach(seckillSkuVo -> {if (!ops.hasKey(seckillSkuVo.getPromotionSessionId().toString() + "_" + seckillSkuVo.getSkuId().toString())) {// 缓存商品SeckillSkuRedisTo redisTo = new SeckillSkuRedisTo();// 1、sku的基本信息R r = productFeignService.getSkuInfo(seckillSkuVo.getSkuId());if (0 == r.getCode()) {SkuInfoVo skuInfo = r.getData("skuInfo", new TypeReference<SkuInfoVo>() {});redisTo.setSkuInfo(skuInfo);}// 2、sku的秒杀信息BeanUtils.copyProperties(seckillSkuVo, redisTo);// 3、设置当前商品的秒杀时间信息redisTo.setStartTime(session.getStartTime().getTime());redisTo.setEndTime(session.getEndTime().getTime());// 4、随机码String token = UUID.randomUUID().toString().replace("_", "");redisTo.setRandomCode(token);// 如果当前这个场次的商品的库存信息已经上架就不需要上架// 5、使用库存作为分布式信号量 ==》限流RSemaphore semaphore = redissonClient.getSemaphore(SKU_STOCK_SEMAPHORE + token);// 5.1、商品可以秒杀的数量作为信号量semaphore.trySetPermits(seckillSkuVo.getSeckillCount());String jsonString = JSON.toJSONString(redisTo);log.info("saveSessionSkuInfos------------------------" + jsonString);ops.put(seckillSkuVo.getPromotionSessionId().toString() + "_" + seckillSkuVo.getSkuId().toString(), jsonString);}});});}添加“com.yr.gulimall.seckill.fegin.ProductFeignService”类,代码如下:
@FeignClient("gulimall-product")
public interface ProductFeignService {@RequestMapping("/product/skuinfo/info/{skuId}")R getSkuInfo(@PathVariable("skuId") Long skuId);
}
16.4.5 幂等性保证
定时任务-分布式下的问题
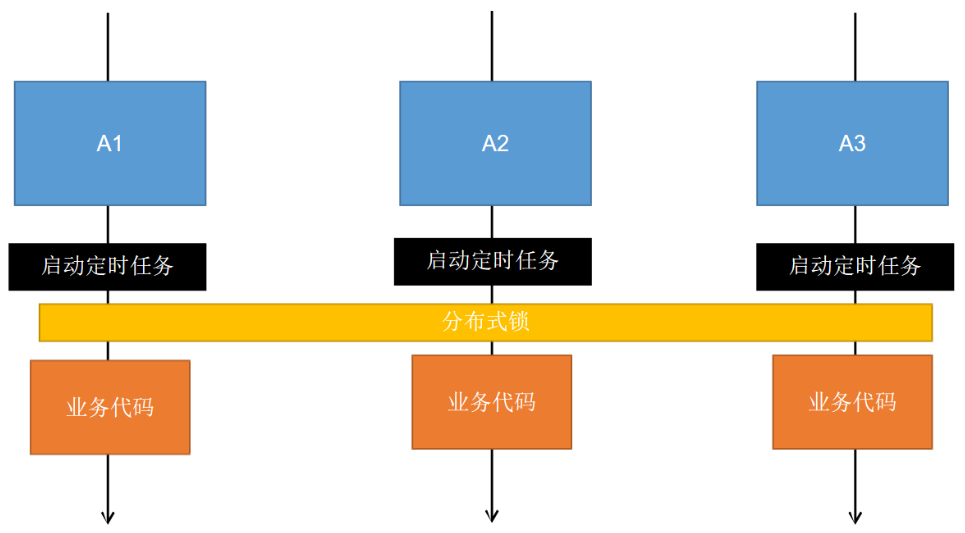
- 由于在分布式情况下该方法可能同时被调用多次,因此加入分布式锁,同时只有一个服务可以调用该方法
- 分布式锁:锁的业务执行完成,状态已经更新完成。释放锁以后。其他人获取到就会拿到最新的状态
修改“com.yr.gulimall.seckill.scheduled.SeckillSkuScheduled”类,代码如下:
@Slf4j
@Component
public class SeckillSkuScheduled {@Autowiredprivate SeckillService seckillService;@Autowiredprivate RedissonClient redissonClient;private final String upload_lock = "seckill:upload:lock";/*** 上架最近3天的秒杀商品* 幂等性处理*/@Scheduled(cron = "*/3 0 0 * * ?")public void uploadSeckillSkuLatest3Days() {// 重复上架无需处理log.info("上架秒杀的信息......");// 分布式锁。锁的业务执行完成,状态已经更新完成。释放锁以后。其他人获取到就会拿到最新的状态RLock lock = redissonClient.getLock(upload_lock);lock.lock(10, TimeUnit.SECONDS);try {seckillService.uploadSeckillSkuLatest3Days();} finally {lock.unlock();}}
}
16.5 获取当前秒杀商品
16.5.1 获取到当前可以参加秒杀的商品信息
添加“com.yr.gulimall.seckill.controller.SeckillController”类,代码如下
@Controller
public class SeckillController {@Autowiredprivate SeckillService seckillService;/*** 获取到当前可以参加秒杀的商品信息** @return*/@ResponseBody@GetMapping(value = "/getCurrentSeckillSkus")public R getCurrentSeckillSkus() {List<SeckillSkuRedisTo> vos = seckillService.getCurrentSeckillSkus();return R.ok().setData(vos);}
}
添加“com.yr.gulimall.seckill.service.SeckillService”类:代码如下:
List<SeckillSkuRedisTo> getCurrentSeckillSkus();修改“com.yr.gulimall.seckill.service.impl.SeckillServiceImpl”类,代码如下:
@Overridepublic List<SeckillSkuRedisTo> getCurrentSeckillSkus() {// 获取秒杀活动的所有keySet<String> keys = stringRedisTemplate.keys(SESSIONS_CACHE_PREFIX + "*");long currentTime = System.currentTimeMillis();for (String key : keys) {String replace = key.replace(SESSIONS_CACHE_PREFIX, "");String[] split = replace.split("_");long startTime = Long.parseLong(split[0]);long endTime = Long.parseLong(split[1]);// 当前秒杀活动处于有效期内if (currentTime > startTime && currentTime < endTime) {// 获取这个秒杀场次的所有商品信息List<String> range = stringRedisTemplate.opsForList().range(key, -100, 100);BoundHashOperations<String, String, String> hashOps = stringRedisTemplate.boundHashOps(SKUKILL_CACHE_PREFIX);assert range != null;List<String> strings = hashOps.multiGet(range);if (!CollectionUtils.isEmpty(strings)) {return strings.stream().map(item -> JSON.parseObject(item, SeckillSkuRedisTo.class)).collect(Collectors.toList());}break;}}return null;}16.5.2 首页获取并拼装数据
1、配置网关
- id: gulimall_seckill_routeuri: lb://gulimall-seckillpredicates:- Host=seckill.gulimall.com2、配置域名
#配置gulimall
192.168.56.10 gulimall.com
192.168.56.10 search.gulimall.com
192.168.56.10 item.gulimall.com
192.168.56.10 auth.gulimall.com
192.168.56.10 cart.gulimall.com
192.168.56.10 order.gulimall.com
192.168.56.10 member.gulimall.com
192.168.56.10 seckill.gulimall.com
3、修改gulimall-product模块的index.html页面,代码如下:
<div class="swiper-container swiper_section_second_list_left"><div class="swiper-wrapper"><div class="swiper-slide"><!-- 动态拼装秒杀商品信息 --><ul id="seckillSkuContent"></ul></div><script type="text/javascript">/*** 检索商品*/function search() {var keyword = $("#searchText").val()window.location.href = "http://search.gulimall.com/list.html?keyword=" + keyword;}/*** 获取秒杀当前活动商品信息*/$.get("http://seckill.gulimall.com/getCurrentSeckillSkus", function (res) {if (res.data.length > 0) {res.data.forEach(function (item) {$("<li onclick='toDetail(" + item.skuId + ")'></li>").append($("<img style='width: 130px; height: 130px' src='" + item.skuInfo.skuDefaultImg + "' />")).append($("<p>" + item.skuInfo.skuTitle + "</p>")).append($("<span>" + item.seckillPrice + "</span>")).append($("<s>" + item.skuInfo.price + "</s>")).appendTo("#seckillSkuContent");})}})/*** 商品详情* @param skuId*/function toDetail(skuId) {location.href = "http://item.gulimall.com/" + skuId + ".html";}
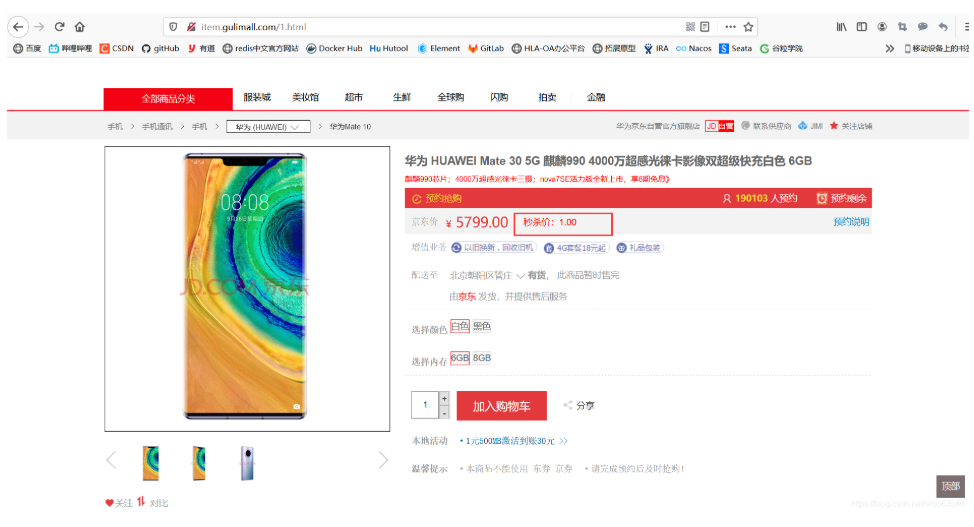
</script>4、首页效果展示

16.6 商品详情页获取当前商品的秒杀信息
修改“com.yr.gulimall.product.service.impl.SkuInfoServiceImpl”类,代码如下:
@Overridepublic SkuItemVo item(Long skuId) {SkuItemVo skuItemVo = new SkuItemVo();// 使用异步编排CompletableFuture<SkuInfoEntity> infoFuture = CompletableFuture.supplyAsync(() -> {// 1、sku基本信息获取 pms_sku_infoSkuInfoEntity info = getById(skuId);skuItemVo.setInfo(info);return info;}, executor);CompletableFuture<Void> imageFuture = CompletableFuture.runAsync(() -> {// 2、sku的图片信息 pms_sku_imagesList<SkuImagesEntity> images = skuImagesService.getImagesBySkuId(skuId);skuItemVo.setImages(images);}, executor);CompletableFuture<Void> saleAttrFuture = infoFuture.thenAcceptAsync((res) -> {// 3、获取spu的销售属性组合List<SkuItemSaleAttrVo> saleAttrVos = skuSaleAttrValueService.getSaleAttrsBySpuId(res.getSpuId());skuItemVo.setSaleAttr(saleAttrVos);}, executor);CompletableFuture<Void> descFuture = infoFuture.thenAcceptAsync(res -> {// 4、获取spu的介绍 pms_spu_info_descSpuInfoDescEntity desc = spuInfoDescService.getById(res.getSpuId());skuItemVo.setDesc(desc);}, executor);CompletableFuture<Void> baseAttrFuture = infoFuture.thenAcceptAsync((res) -> {// 5、获取spu的规格参数信息List<SpuItemAttrGroupVo> attrGroupVos = attrGroupService.getAttrGroupWithAttrsBySpuId(res.getSpuId(), res.getCatalogId());skuItemVo.setGroupAttrs(attrGroupVos);}, executor);CompletableFuture<Void> seckillFuture = CompletableFuture.runAsync(() -> {// 6、查询当前sku是否参与秒杀优惠R r = seckillFeignService.getSkuSecKillInfo(skuId);if (0 == r.getCode()) {SeckillInfoVo skillInfo = r.getData(new TypeReference<SeckillInfoVo>() {});skuItemVo.setSeckillInfo(skillInfo);}}, executor);// 等待所有任务执行完成try {CompletableFuture.allOf(saleAttrFuture, imageFuture, descFuture, baseAttrFuture, seckillFuture).get();} catch (InterruptedException e) {log.error("1等待所有任务执行完成异常{}", e);} catch (ExecutionException e) {log.error("2等待所有任务执行完成异常{}", e);}return skuItemVo;}加“com.yr.gulimall.product.vo.SeckillInfoVo”类,代码如下:
@Data
public class SeckillInfoVo {private Long id;/*** 活动id*/private Long promotionId;/*** 活动场次id*/private Long promotionSessionId;/*** 商品id*/private Long skuId;/*** 秒杀价格*/private BigDecimal seckillPrice;/*** 秒杀总量*/private Integer seckillCount;/*** 每人限购数量*/private Integer seckillLimit;/*** 排序*/private Integer seckillSort;/*** 当前商品秒杀的开始时间*/private Long startTime;/*** 当前商品秒杀的结束时间*/private Long endTime;/*** 当前商品秒杀的随机码*/private String randomCode;
}
修改“com.yr.gulimall.product.vo.SkuItemVo”类,代码如下:

远程调用gulimall-seckill
添加“com.yr.gulimall.product.feign.SeckillFeignService”类,代码如下:
@FeignClient("gulimall-seckill")
public interface SeckillFeignService {@GetMapping("/sku/seckill/{skuId}")R getSkuSecKillInfo(@PathVariable("skuId") Long skuId);
}
修改“com.yr.gulimall.seckill.controller.SeckillController”类,代码如下:
/*** 获取秒杀商品的详情信息*/@ResponseBody@GetMapping("/sku/seckill/{skuId}")public R getSkuSecKillInfo(@PathVariable("skuId") Long skuId){SeckillSkuRedisTo to = seckillService.getSkuSecKillInfo(skuId);return R.ok().setData(to);}修改“com.yr.gulimall.seckill.service.SeckillService”类,代码如下:
SeckillSkuRedisTo getSkuSecKillInfo(Long skuId);修改“com.atguigu.gulimall.seckill.service.impl.SeckillServiceImpl”类,代码如下:
@Overridepublic SeckillSkuRedisTo getSkuSecKillInfo(Long skuId) {// 1、获取所有需要参与秒杀的商品的keyBoundHashOperations<String, String, String> hashOps = stringRedisTemplate.boundHashOps(SKUKILL_CACHE_PREFIX);Set<String> keys = hashOps.keys();if (null != keys){// 1_10(正则表达式)String regx = "\\d_" + skuId;for (String key : keys) {// 匹配场次商品idif (Pattern.matches(regx, key)){String json = hashOps.get(key);SeckillSkuRedisTo skuRedisTo = JSON.parseObject(json, SeckillSkuRedisTo.class);// 随机码long current = new Date().getTime();// 不在秒杀时间范围内的随机码置空,不返回if (current < skuRedisTo.getStartTime() || current > skuRedisTo.getEndTime()){skuRedisTo.setRandomCode(null);}return skuRedisTo;}}}return null;}修改gulimall-product模块的item.html页面,代码如下:
<div class="box-summary clear"><ul><li>京东价</li><li><span>¥</span><span th:text="${#numbers.formatDecimal(item.info.price,3,2)}">4499.00</span></li><li style="color: red" th:if="${item.seckillInfo != null}"><span th:if="${#dates.createNow().getTime() <= item.seckillInfo.startTime}">商品将会在[[${#dates.format(new java.util.Date(item.seckillInfo.startTime),"yyyy-MM-dd HH:mm:ss")}]]进行秒杀</span><span th:if="${item.seckillInfo.startTime <= #dates.createNow().getTime() && #dates.createNow().getTime() <= item.seckillInfo.endTime}">秒杀价:[[${#numbers.formatDecimal(item.seckillInfo.seckillPrice,1,2)}]]</span></li><li><a href="/static/item/">预约说明</a></li></ul></div>详情页效果展示:
16.7 登录检查
1、pom引入SpringSession依赖和redis
<!--整合SpringSession完成session共享问题--><dependency><groupId>org.springframework.session</groupId><artifactId>spring-session-data-redis</artifactId></dependency><!--引入redis--><dependency><groupId>org.springframework.boot</groupId><artifactId>spring-boot-starter-data-redis</artifactId><exclusions><exclusion><groupId>io.lettuce</groupId><artifactId>lettuce-core</artifactId></exclusion></exclusions></dependency>2、在配置文件中添加SpringSession的保存方式
#SpringSession保存方式
spring.session.store-type=redis
3、SpringSession的配置
添加“com.yr.gulimall.seckill.config.GulimallSessionConfig”类,代码如下:
@Configuration
public class GulimallSessionConfig {@Beanpublic CookieSerializer cookieSerializer(){DefaultCookieSerializer cookieSerializer = new DefaultCookieSerializer();cookieSerializer.setDomainName("gulimall.com");cookieSerializer.setCookieName("GULISESSION");return cookieSerializer;}@Beanpublic RedisSerializer<Object> springSessionDefaultRedisSerializer(){return new GenericJackson2JsonRedisSerializer();}
}
4、主启动类开启RedisHttpSession这个功能
@EnableRedisHttpSession
@EnableFeignClients
@EnableDiscoveryClient
@SpringBootApplication(exclude = {DataSourceAutoConfiguration.class})
public class GulimallSeckillApplication {public static void main(String[] args) {SpringApplication.run(GulimallSeckillApplication.class, args);}}
添加用户登录拦截器
添加“com.yr.gulimall.seckill.interceptor.LoginUserInterceptor”类,代码如下:
@Component
public class LoginUserInterceptor implements HandlerInterceptor {public static ThreadLocal<MemberResponseVO> loginUser = new ThreadLocal<>();@Overridepublic boolean preHandle(HttpServletRequest request, HttpServletResponse response, Object handler) throws Exception {String requestURI = request.getRequestURI();AntPathMatcher matcher = new AntPathMatcher();boolean match = matcher.match("/kill", requestURI);// 如果是秒杀,需要判断是否登录,其他路径直接放行不需要判断if (match) {MemberResponseVO attribute = (MemberResponseVO) request.getSession().getAttribute(AuthServerConstant.LOGIN_USER);if (attribute != null){loginUser.set(attribute);return true;}else {//没登录就去登录request.getSession().setAttribute("msg","请先进行登录");response.sendRedirect("http://auth.gulimall.com/login.html");return false;}}return true;}
}
- 把拦截器配置到spring中,否则拦截器不生效。
- 添加addInterceptors表示当前项目的所有请求都要讲过这个拦截请求
添加“com.yr.gulimall.seckill.config.SeckillWebConfig”类,代码如下:
@Configuration
public class SeckillWebConfig implements WebMvcConfigurer {@AutowiredLoginUserInterceptor loginUserInterceptor;@Overridepublic void addInterceptors(InterceptorRegistry registry) {registry.addInterceptor(loginUserInterceptor).addPathPatterns("/**");}
}
修改item.html
<div class="box-btns-two" th:if="${item.seckillInfo != null && (item.seckillInfo.startTime <= #dates.createNow().getTime() && #dates.createNow().getTime() <= item.seckillInfo.endTime)}"><a href="#" id="seckillA" th:attr="skuId=${item.info.skuId},sessionId=${item.seckillInfo.promotionSessionId},code=${item.seckillInfo.randomCode}">立即抢购</a></div><div class="box-btns-two" th:if="${item.seckillInfo == null || (item.seckillInfo.startTime > #dates.createNow().getTime() || #dates.createNow().getTime() > item.seckillInfo.endTime)}"><a href="#" id="addToCart" th:attr="skuId=${item.info.skuId}">加入购物车</a></div>
- 前端要考虑秒杀系统设计的限流思想
- 在进行立即抢购之前,前端先进行判断是否登录
/*** 立即抢购*/$("#seckillA").click(function () {var isLogin = [[${session.loginUser != null}]];//trueif (isLogin) {var killId = $(this).attr("sessionId") + "_" + $(this).attr("skuId");var key = $(this).attr("code");var num = $("#numInput").val();location.href = "http://seckill.gulimall.com/kill?killId=" + killId + "&key=" + key + "&num=" + num;} else {alert("秒杀请先登录!");}return false;});16.8 秒杀系统设计
16.8.1 秒杀业务
16.8.1 秒杀业务
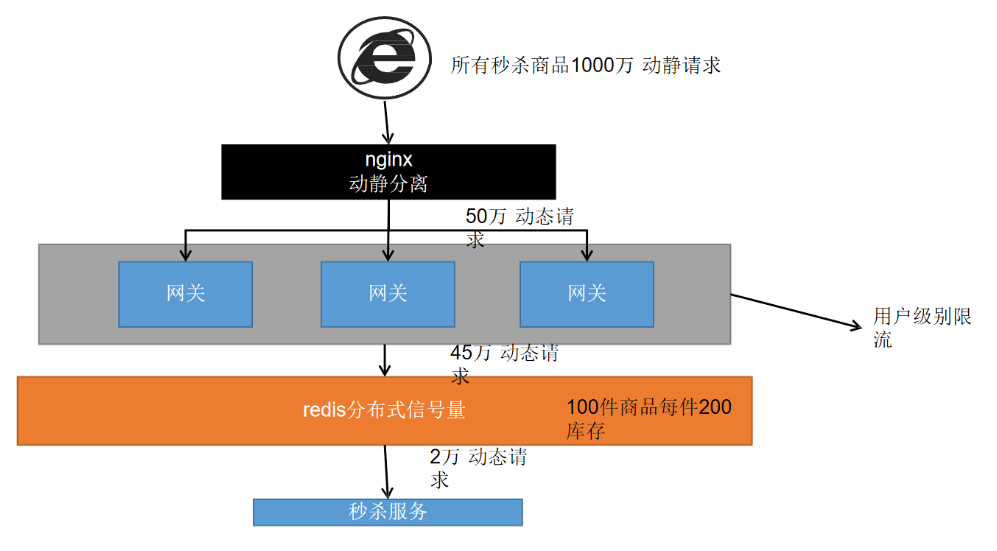
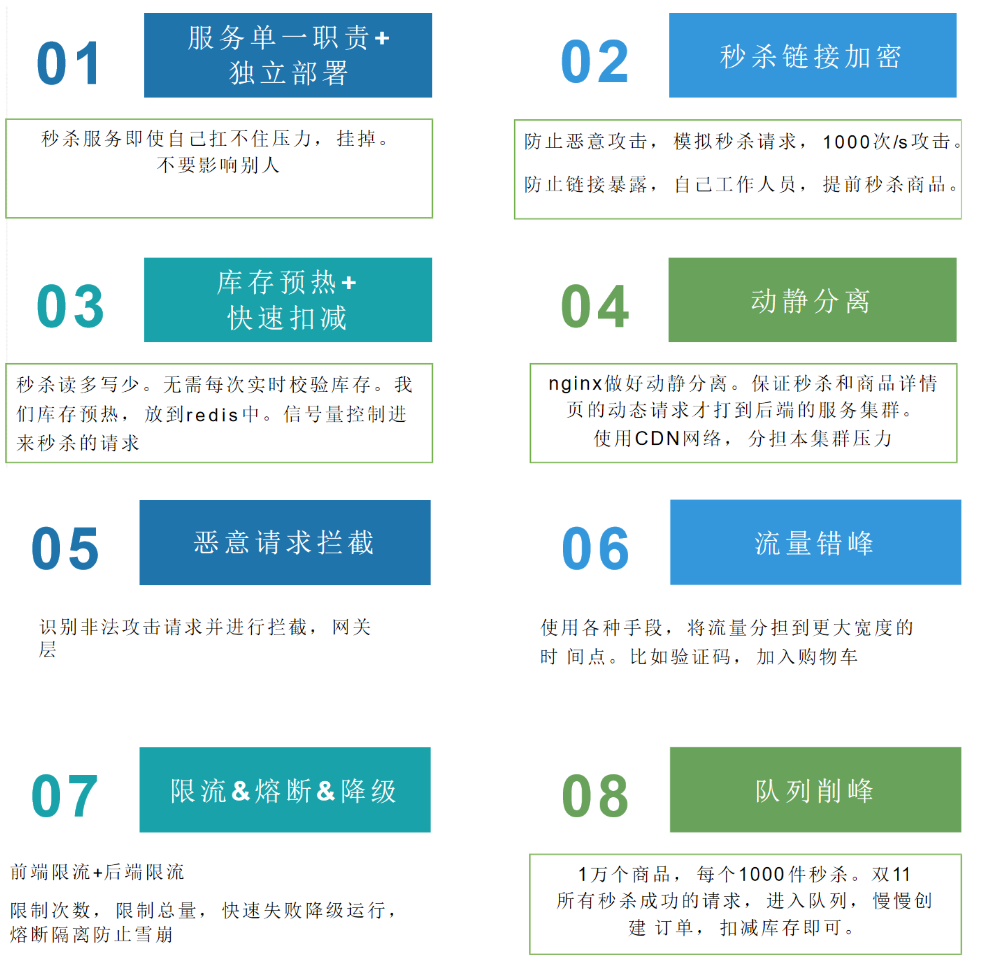
秒杀具有瞬间高并发的特点,针对这一特点,必须要做限流 + 异步 + 缓存(页面静态化)+ 独立部署。
限流方式:
- 前端限流,一些高并发的网站直接在前端页面开始限流,例如:小米的验证码设计
- nginx 限流,直接负载部分请求到错误的静态页面:令牌算法 漏斗算法
- 网关限流,限流的过滤器
- 代码中使用分布式信号量
- rabbitmq 限流(能者多劳:chanel.basicQos(1)),保证发挥所有服务器的性能。
16.8.2 秒杀架构
秒杀架构思路
- 项目独立部署,独立秒杀模块
gulimall-seckill - 使用定时任务每天三点上架最新秒杀商品,削减高峰期压力
- 秒杀链接加密,为秒杀商品添加唯一商品随机码,在开始秒杀时才暴露接口
- 库存预热,先从数据库中扣除一部分库存以
redisson信号量的形式存储在redis中 - 队列削峰,秒杀成功后立即返回,然后以发送消息的形式创建订单
秒杀架构图
16.8.3 秒杀( 高并发) 系统关注的问题
16. 8.4 秒杀流程
- 秒杀流程图一
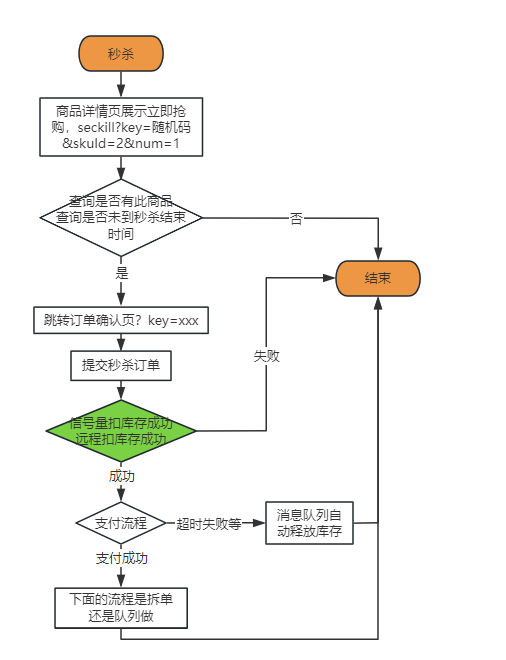
- 秒杀流程图二
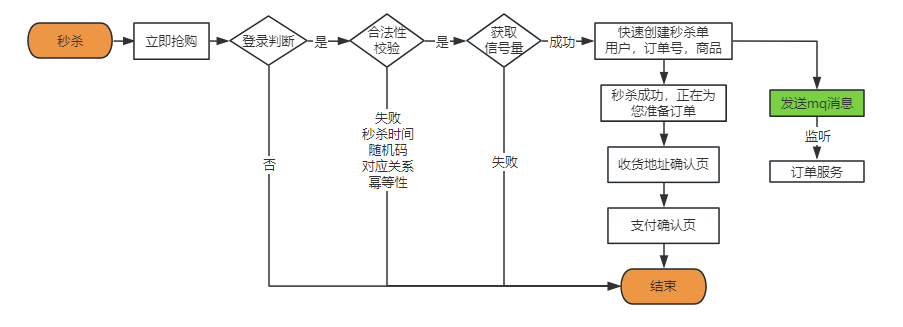
我们使用秒杀流程图二来实现功能
16.8.5 代码实现
16.8.5.1 秒杀接口
点击立即抢购时,会发送请求
秒杀请求会对请求校验时效、商品随机码、当前用户是否已经抢购过当前商品、库存和购买量,通过校验的则秒杀成功,发送消息创建订单
添加“com.yr.gulimall.seckill.controller.SeckillController”类,代码如下:
@GetMapping("/kill")public R seckill(@RequestParam("killId") String killId,@RequestParam("key") String key,@RequestParam("num") Integer num){// 1、判断是否登录(登录拦截器已经自动处理)String orderSn = seckillService.kill(killId, key, num);return R.ok().setData(orderSn);}修改“com.yr.gulimall.seckill.service.SeckillService”类,代码如下:
/*** 秒杀** @param killId 秒杀商品id* @param key 随机码* @param num 数量* @return*/String kill(String killId, String key, Integer num);使用队列削峰 做流量削峰

引入rabbitMQ依赖
<dependency><groupId>org.springframework.boot</groupId><artifactId>spring-boot-starter-amqp</artifactId></dependency>在配置文件中添加rabbitMQ的配置
#RabbitMQ的地址
spring.rabbitmq.host=192.168.56.10
spring.rabbitmq.port=5672
spring.rabbitmq.virtual-host=/
配置RabbitMQ(消息确认机制暂未配置)
添加“com.yr.gulimall.seckill.config.MyRabbitConfig”类,代码如下:
@Configuration
public class MyRabbitConfig {/*** 使用JSON序列化机制,进行消息转换* @return*/@Beanpublic MessageConverter messageConverter(){return new Jackson2JsonMessageConverter();}}
主启动类不用启动//@EnableRabbit 不用监听RabbitMQ, 因为我们只用来发送消息,不接收消息
重要
修改“com.yr.gulimall.seckill.service.impl.SeckillServiceImpl”类,代码如下:
// TODO 上架秒杀商品的时候,每一个数据都有一个过期时间。// TODO 秒杀后续的流程,简化了 收货地址等信息。@Overridepublic String kill(String killId, String key, Integer num) {long s1 = System.currentTimeMillis();// 0、从拦截器获取用户信息MemberResponseVO repsVo = LoginUserInterceptor.loginUser.get();// 1、获取当前商品的详细信息BoundHashOperations<String, String, String> hashOps = stringRedisTemplate.boundHashOps(SKUKILL_CACHE_PREFIX);String json = hashOps.get(killId);if (!StringUtils.isEmpty(json)){SeckillSkuRedisTo redis = JSON.parseObject(json, SeckillSkuRedisTo.class);// 2、校验合法性Long startTime = redis.getStartTime();Long endTime = redis.getEndTime();long current = new Date().getTime();long ttl = endTime - startTime; // 场次存活时间// 2.1、校验时间的合法性if (current >= startTime && current <= endTime){// 2.2、校验随机码和商品idString randomCode = redis.getRandomCode();String skuId = redis.getPromotionSessionId() + "_" + redis.getSkuId();if (randomCode.equals(key) && skuId.equals(killId)){// 2.3、验证购物的数量是否合理if (num <= redis.getSeckillLimit()){// 2.4、验证这个人是否购买过。幂等性处理。如果只要秒杀成功,就去占位 userId_sessionId_skillId// SETNXString redisKey = repsVo.getId() + "_" + skuId;// 2.4.1、自动过期--通过在redis中使用 用户id_skuId 来占位看是否买过Boolean ifAbsent = stringRedisTemplate.opsForValue().setIfAbsent(redisKey, num.toString(), ttl, TimeUnit.MILLISECONDS);if (ifAbsent){// 2.5、占位成功,说明该用户未秒杀过该商品,则继续尝试获取库存信号量RSemaphore semaphore = redissonClient.getSemaphore(SKU_STOCK_SEMAPHORE + randomCode);boolean b = semaphore.tryAcquire(num);if (b){// 秒杀成功// 2.6、快速下单发送MQ消息 10msString orderSn = IdWorker.getTimeId();SeckillOrderTo orderTo = new SeckillOrderTo();orderTo.setOrderSn(orderSn);orderTo.setMemberId(repsVo.getId());orderTo.setNum(num);orderTo.setPromotionSessionId(redis.getPromotionSessionId());orderTo.setSkuId(redis.getSkuId());orderTo.setSeckillPrice(redis.getSeckillPrice());rabbitTemplate.convertAndSend("order-event-exchange", "order.seckill.order", orderTo);long s2 = System.currentTimeMillis();log.info("耗时..." + (s2-s1));return orderSn;}return null;}else {// 2.4.2、说明已经买过return null;}}}else {return null;}}else {return null;}}return null;}新建“com.yr.common.to.mq.SeckillOrderTo”类,代码如下:
@Data
public class SeckillOrderTo {/*** 订单号*/private String orderSn;/*** 活动场次id*/private Long promotionSessionId;/*** 商品id*/private Long skuId;/*** 秒杀价格*/private BigDecimal seckillPrice;/*** 购买数量*/private Integer num;/*** 会员id*/private Long memberId;}
16.8.5.2 创建订单
gulimall-order
1、创建秒杀队列,并绑定队列到订单交换机
修改“com.yr.gulimall.order.config.MyMQConfig”类,代码如下:
/*** 订单秒杀队列*/@Beanpublic Queue orderSeckillOrderQueue() {return new Queue("order.seckill.order.queue", true, false, false);}/*** 绑定订单秒杀队列*/@Beanpublic Binding orderSeckillOrderQueueBinding() {return new Binding("order.seckill.order.queue",Binding.DestinationType.QUEUE,"order-event-exchange","order.seckill.order",null);}2、监听消息队列
添加“com.yr.gulimall.order.listener.OrderSeckillListener”类,代码如下:
@Slf4j
@RabbitListener(queues = "order.seckill.order.queue")
@Component
public class OrderSeckillListener {@Autowiredprivate OrderService orderService;@RabbitHandlerpublic void listener(SeckillOrderTo seckillOrder, Channel channel, Message message) throws IOException {try {log.info("准备创建秒杀单的详细信息。。。");orderService.createSeckillOrder(seckillOrder);channel.basicAck(message.getMessageProperties().getDeliveryTag(), false);} catch (Exception e) {// 修改失败 拒绝消息 使消息重新入队channel.basicReject(message.getMessageProperties().getDeliveryTag(), true);}}
}
3、创建秒杀订单
添加“com.yr.gulimall.order.service.OrderService”类,代码如下:
/*** 创建秒杀订单* * @param seckillOrder*/void createSeckillOrder(SeckillOrderTo seckillOrder);修改“com.yr.gulimall.order.service.impl.OrderServiceImpl”类,代码如下:
@Overridepublic void createSeckillOrder(SeckillOrderTo seckillOrder) {// TODO 1、保存订单信息OrderEntity orderEntity = new OrderEntity();orderEntity.setOrderSn(seckillOrder.getOrderSn());orderEntity.setMemberId(seckillOrder.getMemberId());orderEntity.setStatus(OrderStatusEnum.CREATE_NEW.getCode());BigDecimal multiply = seckillOrder.getSeckillPrice().multiply(new BigDecimal("" + seckillOrder.getNum()));orderEntity.setPayAmount(multiply);this.save(orderEntity);// TODO 2、保存订单项信息OrderItemEntity entity = new OrderItemEntity();entity.setOrderSn(seckillOrder.getOrderSn());entity.setRealAmount(multiply);//TODO 3、获取当前sku的详细信息进行设置entity.setSkuQuantity(seckillOrder.getNum());orderItemService.save(entity);}16.8.5.3 秒杀页面完成
把gulimall-cart服务的成功页面放到gulimall-seckill服务里
修改里面的静态资源路径,我们借用购物车的资源,替换如下:

引入thymeleaf依赖
<!--模板引擎 thymeleaf--><dependency><groupId>org.springframework.boot</groupId><artifactId>spring-boot-starter-thymeleaf</artifactId></dependency>在配置里关闭thymeleaf缓存
#关闭缓存
spring.thymeleaf.cache=false
修改“com.yr.gulimall.seckill.controller.SeckillController”类,代码如下:
@GetMapping("/kill")public String seckill(@RequestParam("killId") String killId,@RequestParam("key") String key,@RequestParam("num") Integer num,Model model){// 1、判断是否登录(登录拦截器已经自动处理)String orderSn = seckillService.kill(killId, key, num);model.addAttribute("orderSn", orderSn);return "success";}<div class="main"><div class="success-wrap"><div class="w" id="result"><div class="m succeed-box"><div th:if="${orderSn != null}" class="mc success-cont"><h1>恭喜,秒杀成功,订单号[[${orderSn}]]</h1><h2>正在准备订单数据,10s以后自动跳转支付 <a style="color: red" th:href="${'http://order.gulimall.com/payOrder?orderSn='+orderSn}">去支付</a></h2></div><div th:if="${orderSn == null}"><h1>手气不好,秒杀失败,下次再来</h1></div></div></div></div></div>效果

十七、Sentinel
17.1 基本概念
17.1.1 熔断降级限流
1、什么是熔断
A 服务调用 B 服务的某个功能,由于网络不稳定问题,或者 B 服务卡机,导致功能时间超长。如果这样子的次数太多。我们就可以直接将 B 断路了( A 不再请求 B 接口),凡是调用 B 的直接返回降级数据,不必等待 B 的超长执行。 这样 B 的故障问题,就不会级联影响到 A 。
2、什么是降级
整个网站处于流量高峰期,服务器压力剧增,根据当前业务情况及流量,对一些服务和页面进行有策略的降级[ 停止服务,所有的调用直接返回降级数据 ] 。以此缓解服务器资源的的压力,以保证核心业务的正常运行,同时也保持了客户和大部分客户的得到正确的相应。
异同:
- 相同点:
- 为了保证集群大部分服务的可用性和可靠性,防止崩溃,牺牲小我
- 用户最终都是体验到某个功能不可用
- 不同点:
- 熔断是被调用方故障,触发的系统主动规则
- 降级是基于全局考虑,停止一些正常服务,释放资源
3、什么是限流
对打入服务的请求流量进行控制,使服务能够承担不超过自己能力的流量压力
17.1.2 Sentinel 简介
官方文档: 介绍 · alibaba/Sentinel Wiki · GitHub
项目地址: GitHub - alibaba/Sentinel: A powerful flow control component enabling reliability, resilience and monitoring for microservices. (面向云原生微服务的高可用流控防护组件)
随着微服务的流行,服务和服务之间的稳定性变得越来越重要。Sentinel 以流量为切入点,从流量控制、熔断降级、系统负载保护等多个维度保护服务的稳定性。
Sentinel 具有以下特征:
- 丰富的应用场景:Sentinel 承接了阿里巴巴近 10 年的双十一大促流量的核心场景,例如秒杀(即突发流量控制在系统容量可以承受的范围)、消息削峰填谷、集群流量控制、实时熔断下游不可用应用等。
- 完备的实时监控:Sentinel 同时提供实时的监控功能。您可以在控制台中看到接入应用的单台机器秒级数据,甚至 500 台以下规模的集群的汇总运行情况。
- 广泛的开源生态:Sentinel 提供开箱即用的与其它开
- 源框架/库的整合模块,例如与 Spring Cloud、Dubbo、gRPC 的整合。您只需要引入相应的依赖并进行简单的配置即可快速地接入 Sentinel。
- 完善的 SPI 扩展点:Sentinel 提供简单易用、完善的 SPI 扩展接口。您可以通过实现扩展接口来快速地定制逻辑。例如定制规则管理、适配动态数据源等。
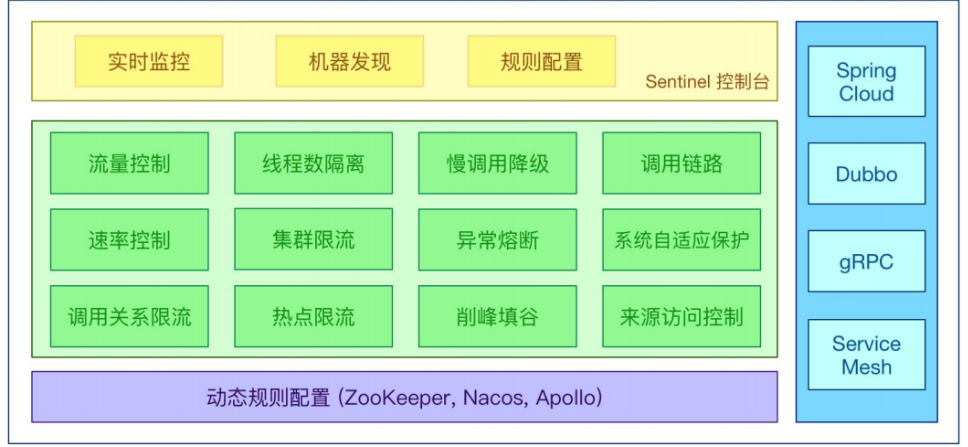
Sentinel 分为两个部分 :
- 核心库(Java 客户端)不依赖任何框架/库,能够运行于所有 Java 运行时环境,同时对 Dubbo / Spring Cloud 等框架也有较好的支持。
- 控制台(Dashboard)基于 Spring Boot 开发,打包后可以直接运行,不需要额外的Tomcat 等应用容器。
Sentinel 基本概念
- 资源
资源是 Sentinel 的关键概念。它可以是 Java 应用程序中的任何内容,例如,由应用程序提供的服务,或由应用程序调用的其它应用提供的服务,甚至可以是一段代码。在接下来的文档中,我们都会用资源来描述代码块。
只要通过 Sentinel API 定义的代码,就是资源,能够被 Sentinel 保护起来 。大部分情况下,可以使用方法签名,URL ,甚至服务名称作为资源名来标示资源。
- 规则
围绕资源的实时状态设定的规则,可以包括 流量控制规则 、 熔断降级规则 以及 系统保护规 则 。所有规则可以动态实时调整。
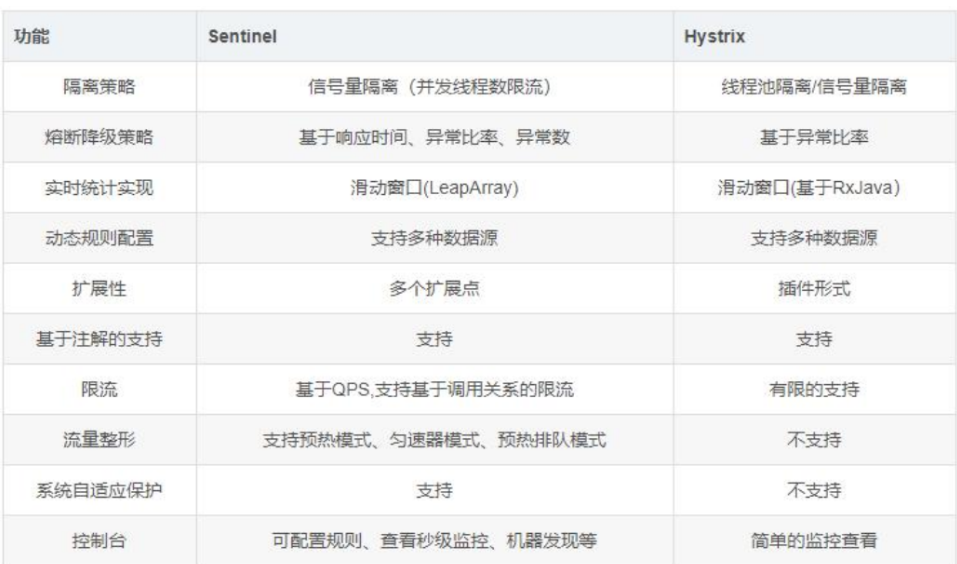
17.1.3 Hystrix 与 Sentinel 比较
17.2 整合SpringBoot
1、整合sentinel流程:
1)、导入依赖 spring-cloud-starter-alibaba-sentinel
2)、下载Sentinel的控制台
3)、配置sentinel控制台地址信息
4)、在控制台调整参数【默认所有的流控设置保存在项目内存中,重启失效】
2、每一个微服务导入信息审计模块spring-boot-starter-actuator
并配置management.endpoints.web.exposure.include=* (暴露Sentinel的信息)
3、自定义Sentinel的流控返回数据
gulimall-common模块的pom.xml文件添加sentinel熔断、限流依赖
<!--sentinel熔断、限流--><dependency><groupId>com.alibaba.cloud</groupId><artifactId>spring-cloud-starter-alibaba-sentinel</artifactId></dependency>gulimall-seckill模块的pom.xml文件添加统计审计信息依赖
<!--统计审计信息--><dependency><groupId>org.springframework.boot</groupId><artifactId>spring-boot-starter-actuator</artifactId></dependency>找到项目里sentinel对应的版本
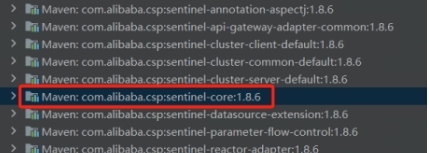
去官网下载该版本的控制台
Tags · alibaba/Sentinel · GitHub
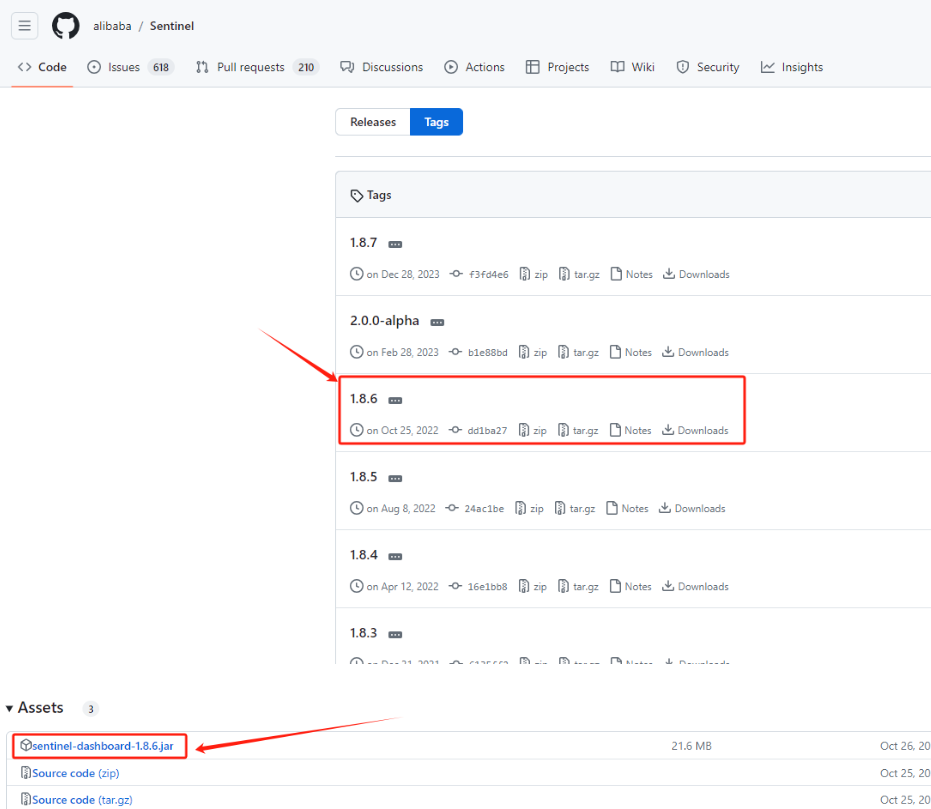
java -jar sentinel-dashboard-1.8.6.jar --server.port=8333
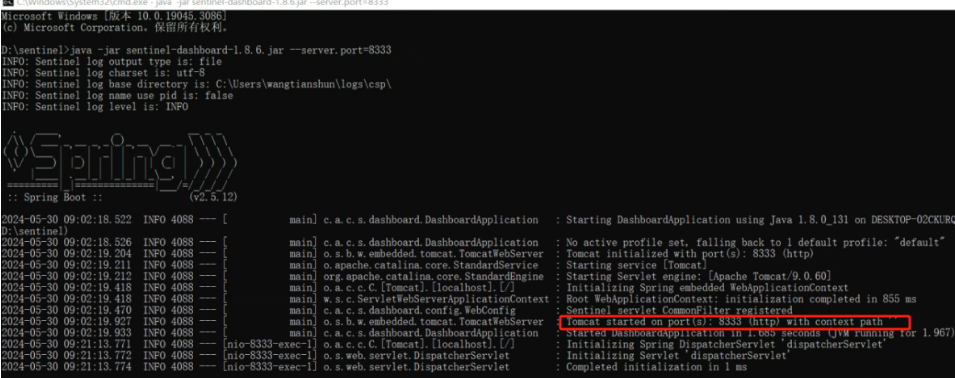
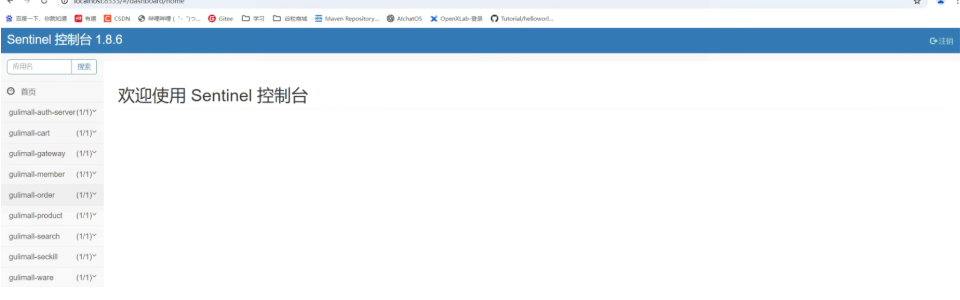
打开http://localhost:8333
用户名:sentinel
密码:sentinel
在每个服务配置里配置Sentinel
#Sentinel
#Sentinel控制台地址
spring.cloud.sentinel.transport.dashboard=localhost:8333
#Sentinel传输端口:默认 8719,假如被占用了会自动从 8719 开始依次 +1 扫描,直至找到未被占用的端口
spring.cloud.sentinel.transport.port=8719
#暴露的 endpoint 路径为 /actuator/sentinel
#Sentinel Endpoint 里暴露的信息非常有用。包括当前应用的所有规则信息、日志目录、
#当前实例的 IP,Sentinel Dashboard 地址,Block Page,应用与 Sentinel Dashboard 的心跳频率等等信息。
management.endpoints.web.exposure.include=*
17.3 自定义流控响应
添加“com.yr.gulimall.seckill.config.SeckillSentinelConfig”类,代码如下:
@Configuration
public class SeckillSentinelConfig implements BlockExceptionHandler {/*** 2.2.0以后的版本实现的是BlockExceptionHandler;以前的版本实现的是WebCallbackManager* @param httpServletRequest* @param httpServletResponse* @param e* @throws Exception*/@Overridepublic void handle(HttpServletRequest httpServletRequest, HttpServletResponse httpServletResponse, BlockException e) throws Exception {R error = R.error(BizCodeEnume.TOO_MANY_REQUESTS_EXCEPTION.getCode(), BizCodeEnume.TOO_MANY_REQUESTS_EXCEPTION.getMsg());httpServletResponse.setCharacterEncoding("UTF-8");httpServletResponse.setContentType("application/json");httpServletResponse.getWriter().write(JSON.toJSONString(error));}/*** 因为版本冲突导致无法引入 WebCallbackManager*/
//    public SeckillSentinelConfig() {
//        WebCallbackManager.setUrlBlockHandler((request, response, ex) -> {
//            R error = R.error(BizCodeEnum.TOO_MANY_REQUESTS_EXCEPTION.getCode(), BizCodeEnum.TOO_MANY_REQUESTS_EXCEPTION.getMsg());
//            response.setCharacterEncoding("UTF-8");
//            response.setContentType("application/json");
//            response.getWriter().write(JSON.toJSONString(error));
//        });
//    }
}
http://seckill.gulimall.com/getCurrentSeckillSkus

17.4 Sentinel全服务引入
- 每个微服务引入actuator依赖
<!--统计审计信息--><dependency><groupId>org.springframework.boot</groupId><artifactId>spring-boot-starter-actuator</artifactId></dependency>- 每个配置文件配置以下参数
#Sentinel
#Sentinel控制台地址
spring.cloud.sentinel.transport.dashboard=localhost:8333
#Sentinel传输端口:默认 8719,假如被占用了会自动从 8719 开始依次 +1 扫描,直至找到未被占用的端口
spring.cloud.sentinel.transport.port=8719
#暴露的 endpoint 路径为 /actuator/sentinel
#Sentinel Endpoint 里暴露的信息非常有用。包括当前应用的所有规则信息、日志目录、
#当前实例的 IP,Sentinel Dashboard 地址,Block Page,应用与 Sentinel Dashboard 的心跳频率等等信息。
management.endpoints.web.exposure.include=*
17.5 feign熔断降级
https://github.com/alibaba/Sentinel/wiki/%E4%B8%BB%E9%A1%B5
什么是熔断降级
除了流量控制以外,对调用链路中不稳定的资源进行熔断降级也是保障高可用的重要措施之一。一个服务常常会调用别的模块,可能是另外的一个远程服务、数据库,或者第三方 API 等。例如支付的时候,可能需要远程调用银联提供的 API;查询某个商品的价格,可能需要进行数据库查询。然而,这个被依赖服务的稳定性是不能保证的。如果依赖的服务出现了不稳定的情况,请求的响应时间变长,那么调用服务的方法的响应时间也会变长,线程会产生堆积,最终可能耗尽业务自身的线程池,服务本身也变得不可用。

现代微服务架构都是分布式的,由非常多的服务组成。不同服务之间相互调用,组成复杂的调用链路。以上的问题在链路调用中会产生放大的效果。复杂链路上的某一环不稳定,就可能会层层级联,最终导致整个链路都不可用。因此我们需要对不稳定的弱依赖服务调用进行熔断降级,暂时切断不稳定调用,避免局部不稳定因素导致整体的雪崩。熔断降级作为保护自身的手段,通常在客户端(调用端)进行配置。
注意:本文档针对 Sentinel 1.8.0 及以上版本。1.8.0 版本对熔断降级特性进行了全新的改进升级,请使用最新版本以更好地利用熔断降级的能力。
熔断降级设计理念
在限制的手段上, Sentinel 和 Hystrix 采取了完全不一样的方法。
Hystrix 通过线程池隔离的方式,来对依赖(在 Sentinel 的概念中对应资源)进行了隔离。这样做的好处是资源和资源之间做到了最彻底的隔离。缺点是除了增加了线程切换的成本(过多的线程池导致线程数目过多),还需要预先给各个资源做线程池大小的分配。
Sentinel 对这个问题采取了两种手段 :
- 通过并发线程数进行限制
和资源池隔离的方法不同, Sentinel 通过限制资源并发线程的数量,来减少不稳定资源对其
它资源的影响。这样不但没有线程切换的损耗,也不需要您预先分配线程池的大小。当某个
资源出现不稳定的情况下,例如响应时间变长,对资源的直接影响就是会造成线程数的逐步
堆积。当线程数在特定资源上堆积到一定的数量之后,对该资源的新请求就会被拒绝。堆积
的线程完成任务后才开始继续接收请求。
- 通过响应时间对资源进行降级
除了对并发线程数进行控制以外, Sentinel 还可以通过响应时间来快速降级不稳定的资源。
当依赖的资源出现响应时间过长后,所有对该资源的访问都会被直接拒绝,直到过了指定的
时间窗口之后才重新恢复。
熔断策略
Sentinel 提供以下几种熔断策略:
- 慢调用比例 (SLOW_REQUEST_RATIO):选择以慢调用比例作为阈值,需要设置允许的慢调用 RT(即最大的响应时间),请求的响应时间大于该值则统计为慢调用。当单位统计时长(statIntervalMs)内请求数目大于设置的最小请求数目,并且慢调用的比例大于阈值,则接下来的熔断时长内请求会自动被熔断。经过熔断时长后熔断器会进入探测恢复状态(HALF-OPEN 状态),若接下来的一个请求响应时间小于设置的慢调用 RT 则结束熔断,若大于设置的慢调用 RT 则会再次被熔断。
-
异常比例 (ERROR_RATIO):当单位统计时长(statIntervalMs)内请求数目大于设置的最小请求数目,并且异常的比例大于阈值,则接下来的熔断时长内请求会自动被熔断。经过熔断时长后熔断器会进入探测恢复状态(HALF-OPEN 状态),若接下来的一个请求成功完成(没有错误)则结束熔断,否则会再次被熔断。异常比率的阈值范围是 [0.0, 1.0],代表 0% - 100%。
- 异常数 (
ERROR_COUNT):当单位统计时长内的异常数目超过阈值之后会自动进行熔断。经过熔断时长后熔断器会进入探测恢复状态(HALF-OPEN 状态),若接下来的一个请求成功完成(没有错误)则结束熔断,否则会再次被熔断。
整合测试:
https://github.com/alibaba/spring-cloud-alibaba/blob/master/spring-cloud-alibaba-examples/se ntinel-example/sentinel-feign-example/readme-zh.md
默认情况下,sentinel是不会对feign进行监控的,需要开启配置
在gulimall-product类配置文件添加配置
#sentinel是不会对feign进行监控的,需要开启配置
feign.sentinel.enabled=true
17.5.1 fegin的熔断
使用Sentinel来保护feign远程调用:熔断。
- 调用方的熔断保护开启 feign.sentinel.enabled=true
- 调用方手动指定远程服务的降级策略。远程服务被降级处理,触发我们的熔断回调方法
- 超大浏览的时候,必须牺牲一些远程服务。在服务的提供方(远程服务)指定降级策略; 提供方是在运行。但是不运行自己的业务逻辑。返回的是默认的降级数据(限流的数据)
- gulimall-product服务远程调用gulimall-seckill服务。调用前直接把gulimall-seckill服务宕机,以前不使用sentinel的熔断的时候直接调用会报错。
- 现在使用sentinel的熔断保护机制,远程调用失败,我们会在调用方实现远程调用类,自定义返回信息给页面。
- 后台配置熔断策略
@Slf4j
@Component
public class SeckillFeignServiceFallBack implements SeckillFeignService {@Overridepublic R getSkuSecKillInfo(Long skuId) {log.info("熔断方法调用.....getSkuSecKillInfo");return R.error(BizCodeEnume.TOO_MANY_REQUESTS_EXCEPTION.getCode(),BizCodeEnume.TOO_MANY_REQUESTS_EXCEPTION.getMsg());}
}- 定义FeignClient及其降级配置
修改“com.yr.gulimall.product.feign.SeckillFeignService”类,代码如下:
@FeignClient(value = "gulimall-seckill",fallback = SeckillFeignServiceFallBack.class)
public interface SeckillFeignService {@GetMapping("/sku/seckill/{skuId}")R getSkuSecKillInfo(@PathVariable("skuId") Long skuId);
}- 自定义--远程调用失败具体的fallback 实现
添加“com.yr.gulimall.product.feign.fallback.SeckillFeignServiceFallBack”类,代码如下:
@Slf4j
@Component
public class SeckillFeignServiceFallBack implements SeckillFeignService {@Overridepublic R getSkuSecKillInfo(Long skuId) {log.info("熔断方法调用.....getSkuSecKillInfo");return R.error(BizCodeEnume.TOO_MANY_REQUESTS_EXCEPTION.getCode(),BizCodeEnume.TOO_MANY_REQUESTS_EXCEPTION.getMsg());}
}
17.6 自定义受保护资源
https://github.com/alibaba/spring-cloud-alibaba/blob/2.2.x/spring-cloud-alibaba-examples/sentinel-example/sentinel-core-example/readme-zh.md
注意异常降级仅针对业务异常,对 Sentinel 限流降级本身的异常(BlockException)不生效。为了统计异常比例或异常数,需要通过 Tracer.trace(ex) 记录业务异常。示例:
Entry entry = null;
try {entry = SphU.entry(key, EntryType.IN, key);// Write your biz code here.// <<BIZ CODE>>
} catch (Throwable t) {if (!BlockException.isBlockException(t)) {Tracer.trace(t);}
} finally {if (entry != null) {entry.exit();}
}
开源整合模块,如 Sentinel Dubbo Adapter, Sentinel Web Servlet Filter 或 @SentinelResource 注解会自动统计业务异常,无需手动调用。
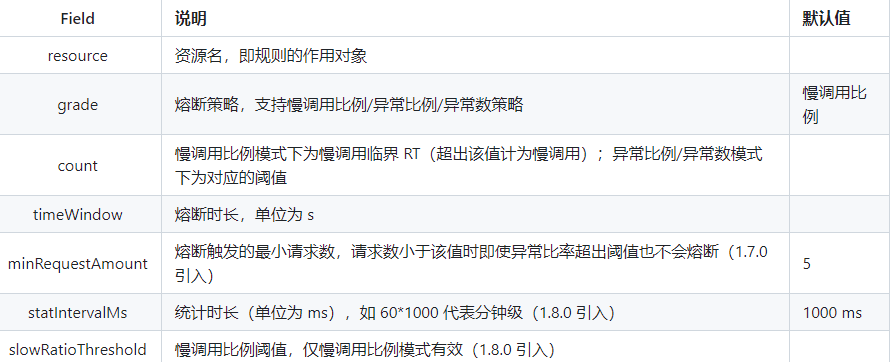
熔断降级规则说明
熔断降级规则(DegradeRule)包含下面几个重要的属性:
熔断器事件监听
Sentinel 支持注册自定义的事件监听器监听熔断器状态变换事件(state change event)。示例:
EventObserverRegistry.getInstance().addStateChangeObserver("logging",(prevState, newState, rule, snapshotValue) -> {if (newState == State.OPEN) {// 变换至 OPEN state 时会携带触发时的值System.err.println(String.format("%s -> OPEN at %d, snapshotValue=%.2f", prevState.name(),TimeUtil.currentTimeMillis(), snapshotValue));} else {System.err.println(String.format("%s -> %s at %d", prevState.name(), newState.name(),TimeUtil.currentTimeMillis()));}});自定义受保护的资源方法:
1)、代码:
try(Entry entry = SphU.entry("seckillSkus")){
// 业务逻辑
}catch(Exception e){
}
2)、基于注解
@SentinelResource(value = "getCurrentSeckillSkusResource",blockHandler = "blockHandler")
无论1.2一定要配置被限流以后的默认返回
url请求可以设置统一返回 SeckillSentinelConfig
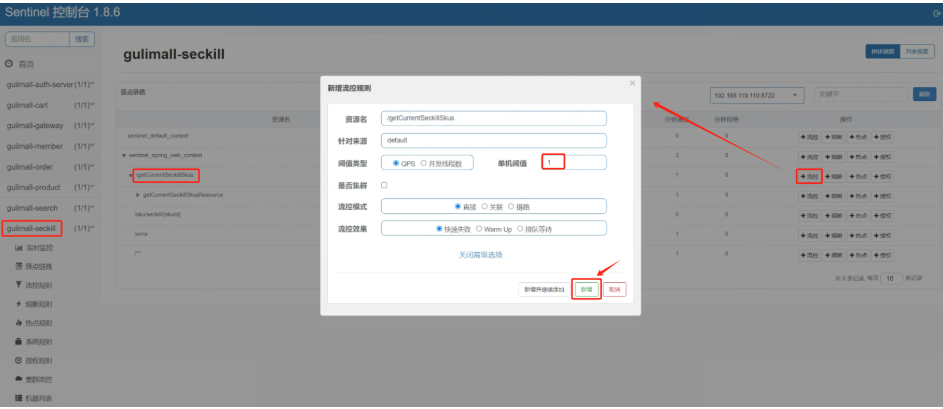
17.6.1 基于代码的限流
修改“com.yr.gulimall.seckill.service.impl.SeckillServiceImpl”类,代码如下:
@Overridepublic List<SeckillSkuRedisTo> getCurrentSeckillSkus() {try (Entry entry = SphU.entry("seckillSkus")) {// 获取秒杀活动的所有keySet<String> keys = stringRedisTemplate.keys(SESSIONS_CACHE_PREFIX + "*");long currentTime = System.currentTimeMillis();for (String key : keys) {String replace = key.replace(SESSIONS_CACHE_PREFIX, "");String[] split = replace.split("_");long startTime = Long.parseLong(split[0]);long endTime = Long.parseLong(split[1]);// 当前秒杀活动处于有效期内if (currentTime > startTime && currentTime < endTime) {// 获取这个秒杀场次的所有商品信息List<String> range = stringRedisTemplate.opsForList().range(key, -100, 100);BoundHashOperations<String, String, String> hashOps = stringRedisTemplate.boundHashOps(SKUKILL_CACHE_PREFIX);assert range != null;List<String> strings = hashOps.multiGet(range);if (!CollectionUtils.isEmpty(strings)) {return strings.stream().map(item -> JSON.parseObject(item, SeckillSkuRedisTo.class)).collect(Collectors.toList());}break;}}} catch (BlockException e) {log.error("资源被限流{}", e.getMessage());}return null;}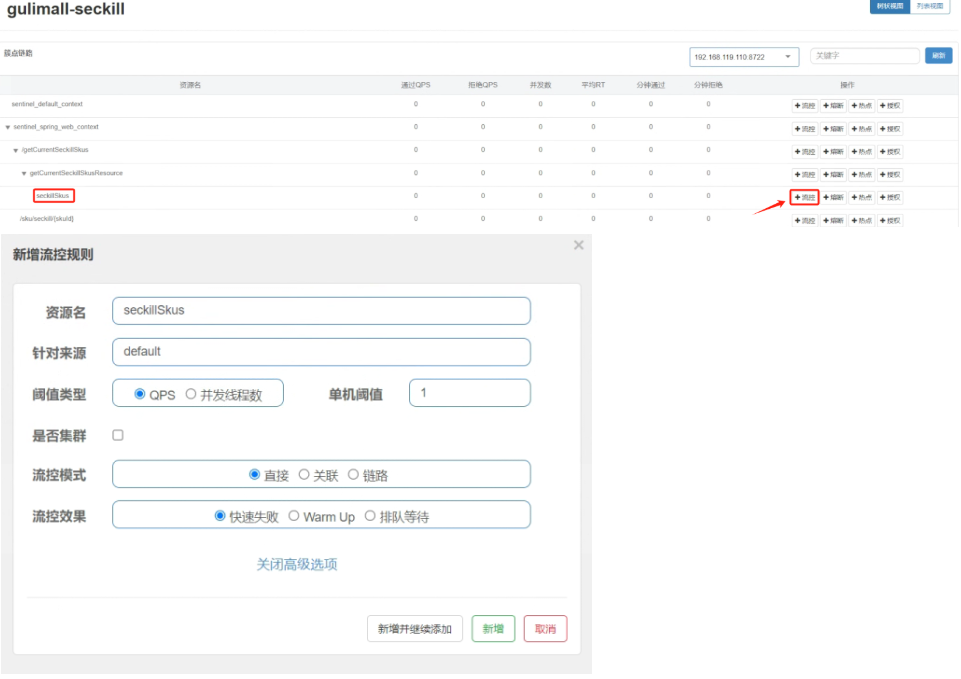
17.6.2 基于注解的自定义限流
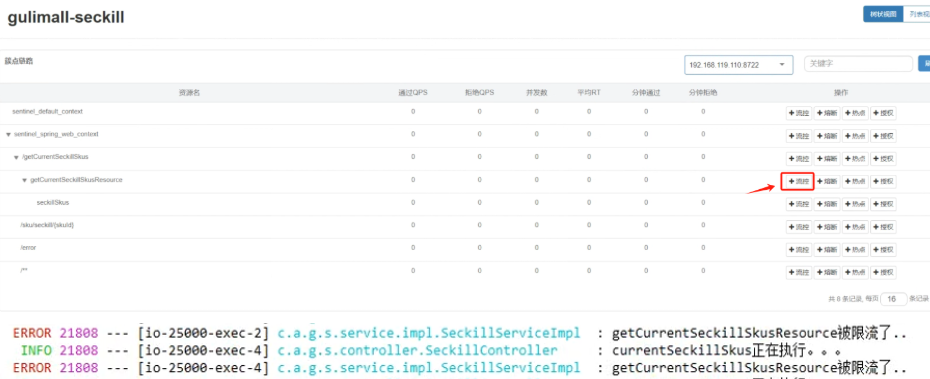
public List<SeckillSkuRedisTo> blockHandler(BlockException e){log.error("getCurrentSeckillSkusResource被限流了。。。。");return null;}// blockHandler 函数会在原方法被限流/降级/系统保护的时候调用,而fallback函数会针对所有类型的异常//基于注解的限流@SentinelResource(value = "getCurrentSeckillSkusResource", blockHandler = "blockHandler")@Overridepublic List<SeckillSkuRedisTo> getCurrentSeckillSkus() {try (Entry entry = SphU.entry("seckillSkus")) {// 获取秒杀活动的所有keySet<String> keys = stringRedisTemplate.keys(SESSIONS_CACHE_PREFIX + "*");long currentTime = System.currentTimeMillis();for (String key : keys) {String replace = key.replace(SESSIONS_CACHE_PREFIX, "");String[] split = replace.split("_");long startTime = Long.parseLong(split[0]);long endTime = Long.parseLong(split[1]);// 当前秒杀活动处于有效期内if (currentTime > startTime && currentTime < endTime) {// 获取这个秒杀场次的所有商品信息List<String> range = stringRedisTemplate.opsForList().range(key, -100, 100);BoundHashOperations<String, String, String> hashOps = stringRedisTemplate.boundHashOps(SKUKILL_CACHE_PREFIX);assert range != null;List<String> strings = hashOps.multiGet(range);if (!CollectionUtils.isEmpty(strings)) {return strings.stream().map(item -> JSON.parseObject(item, SeckillSkuRedisTo.class)).collect(Collectors.toList());}break;}}} catch (BlockException e) {log.error("资源被限流{}", e.getMessage());}return null;}17.7 网关流控
相关文章:
谷粒商城-分布式微服务项目-高级篇[三]
十五、商城业务-支付 15.1 支付宝支付 15.1.1 进入“蚂蚁金服开放平台” 支付宝开放 平台地址: 支付宝开放平台 15.1.2 下载支付宝官方 demo,进行配置和测试 开发者文档:支付宝开放平台文档中心 电脑网站支付文档:小程序文…...
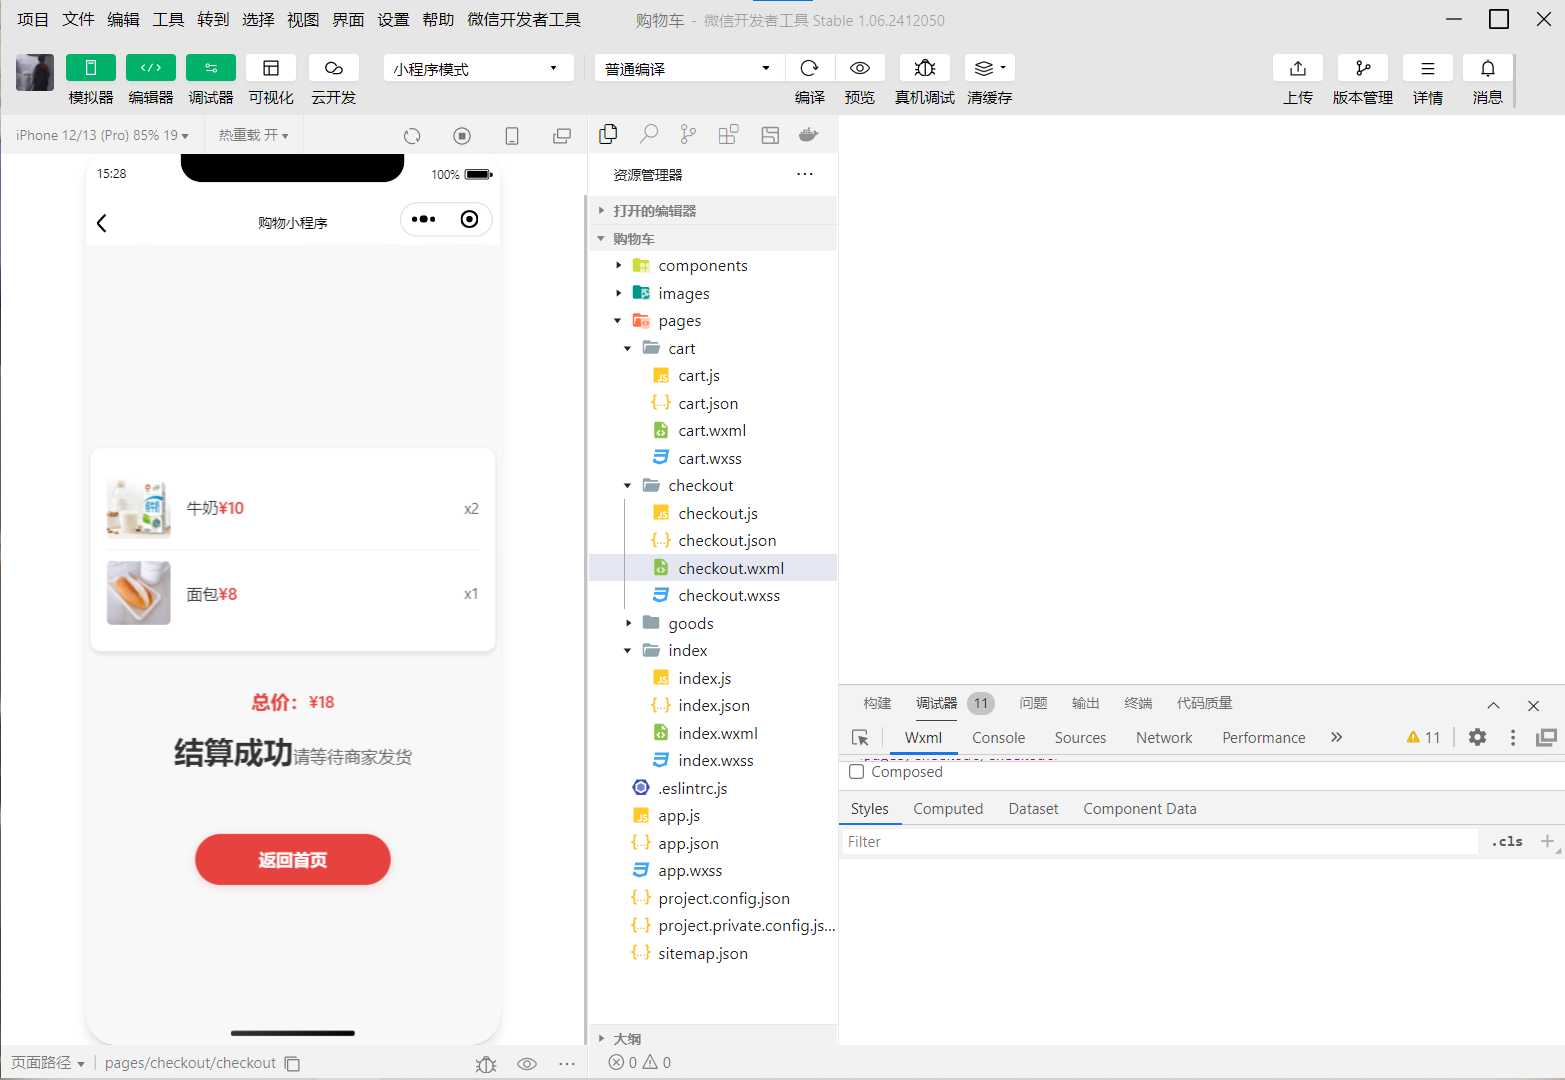
实现购物车微信小程序
实现一个微信小程序购物车页面,包含以下功能: 需求说明: 商品列表:显示商品名称、价格、数量加减按钮,支持修改商品数量(数量≥1)。 全选 / 反选功能:顶部 “全选” 复选框&#…...
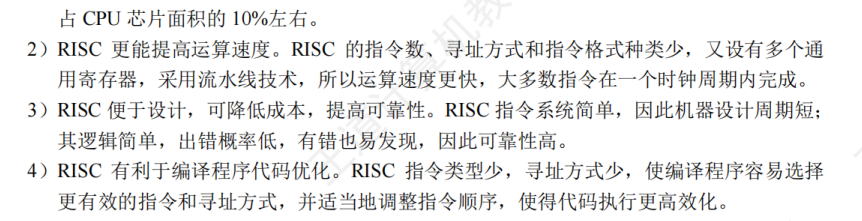
26考研 | 王道 | 计算机组成原理 | 四、指令系统
26考研 | 王道 | 计算机组成原理 | 四、指令系统 文章目录 26考研 | 王道 | 计算机组成原理 | 四、指令系统1.指令系统0.指令集体系结构1. 指令格式1.按地址码数目不同来分2.指令-按指令长度分类3.指令-按操作码长度分类4.指令-按操作类型分类 2. 扩展操作码指令格式 2.指令的寻…...

互联网大厂Java求职面试:AI与大模型技术在企业知识库中的深度应用
互联网大厂Java求职面试:AI与大模型技术在企业知识库中的深度应用 第一轮:场景引入与基础架构设计 面试官(技术总监): “郑薪苦,我们先从一个实际场景开始吧。假设我们要为企业知识库设计一个深度融合AI大…...

在 Windows 系统安装 Git
前往官网下载Git - Downloads 目录 一、下载安装包 二、安装 Git 三、安装完成 四、验证安装 五、问题解决 解决步骤 一、下载安装包 点击页面右侧 “Download for Windows” 按钮。 点击页面最上方 “Click here to download” ,下载 Git for Windows/x64 …...

JavaSec-SSTI - 模板引擎注入
简介 SSTI(Server Side Template Injection):模板引擎是一种通过将模板中的占位符替换为实际数据来动态生成内容的工具,如HTML页面、邮件等。它简化了视图层的设计,但如果未对用户输入进行有效校验,可能导致安全风险如任意代码执行…...
基于InternLM的情感调节大师FunGPT
基于书生系列大模型,社区用户不断创造出令人耳目一新的项目,从灵感萌发到落地实践,每一个都充满智慧与价值。“与书生共创”将陆续推出一系列文章,分享这些项目背后的故事与经验。欢迎订阅并积极投稿,一起分享经验与成…...

【性能调优系列】深入解析火焰图:从基础阅读到性能优化实战
博客目录 一、火焰图基础:结构与阅读方法二、深入分析火焰图:关键观察点与性能瓶颈识别1. 识别最宽的函数块2. HTTP 请求处理分析3. 数据库操作分析4. 业务逻辑分析 三、性能优化实战:从火焰图到解决方案1. 线程池性能优化2. 数据库访问优化3…...
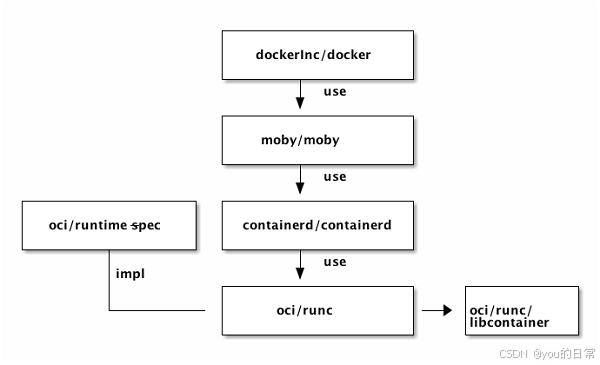
Docker 与容器技术的未来:从 OCI 标准到 eBPF 的演进
Docker 的出现无疑是云计算发展史上的一个里程碑。它以其直观的打包、分发和运行方式,极大地简化了应用程序的部署和管理,从而推动了微服务架构和 DevOps 文化的普及。然而,容器技术的未来并非仅仅局限于 Docker,它正朝着更深层次的标准化和更底层的操作系统内核创新方向演…...
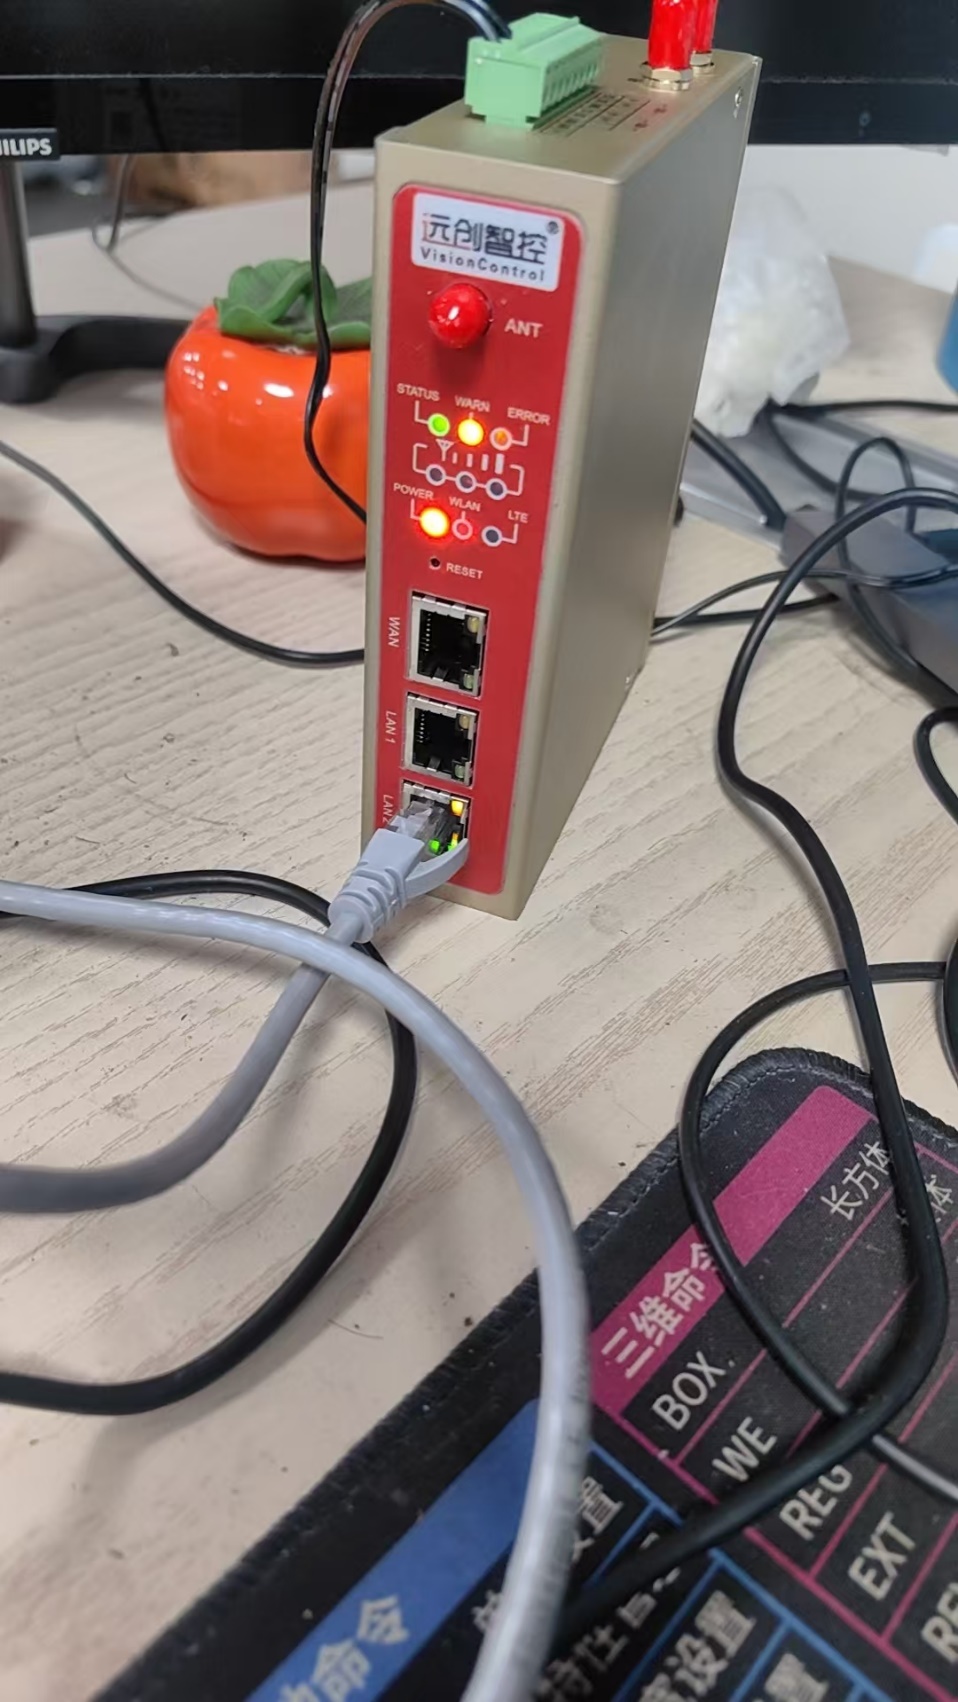
PLC远程控制网关支持多塘口水环境数据边缘计算与远程安全传输的配置指南
一、项目背景 渔业养殖是关系到我国食物安全和海洋经济发展的重要产业,随着科技的不断进步,传统的养殖模式面临着诸多挑战,如养殖环境复杂、水质变化难以实时监测、设备运行状态不稳定等,这些问题不仅增加了养殖成本,还…...

3.3 HarmonyOS NEXT原子化服务开发:卡片设计、轻量部署与场景化编排实战
HarmonyOS NEXT原子化服务开发:卡片设计、轻量部署与场景化编排实战 在HarmonyOS NEXT的全场景生态中,原子化服务作为"设备即服务"理念的核心载体,通过免安装、跨设备流转的轻量化形态,重新定义了用户与服务的交互方式…...

C++11 中 final 和 override 从入门到精通
文章目录 一、引言二、final 关键字2.1 final 关键字的基本概念2.2 final 关键字的语法2.3 final 关键字的使用示例2.3.1 防止类被继承2.3.2 防止虚函数被重写 2.4 final 关键字的使用场景2.5 final 关键字的注意事项 三、override 关键字3.1 override 关键字的基本概念3.2 ove…...

跨多个微服务使用 Redis 共享数据时,如何管理数据一致性?
在跨多个微服务使用 Redis 共享数据时,管理数据一致性是一个复杂但至关重要的问题。Redis 本身提供的原子操作和一些数据结构可以提供帮助,但大部分一致性保障需要应用层面的设计和策略。 首先要明确一点:在分布式系统中,强一致性…...

Linux网络——socket网络通信udp
文章目录 UDP通信基础UDP的特点 Linux下UDP通信核心步骤创建UDP套接字绑定本地地址(可选)发送数据函数:sendto()函数原型参数详解典型使用示例 接收数据函数:recvfrom()函数原型参数详解返回值典型使用示例 关键设计原因无连接特性…...

大数据-275 Spark MLib - 基础介绍 机器学习算法 集成学习 随机森林 Bagging Boosting
点一下关注吧!!!非常感谢!!持续更新!!! 大模型篇章已经开始! 目前已经更新到了第 22 篇:大语言模型 22 - MCP 自动操作 FigmaCursor 自动设计原型 Java篇开…...

大模型微调技术全景图:从全量更新到参数高效适配
在预训练大语言模型(LLM)展现出惊人能力之后,如何让这些“通才”模型蜕变为特定领域的“专家”?微调(Fine-Tuning)正是解锁这一潜力的核心技术。本文将深入解析主流微调技术,助你找到最适合任务…...

c++ chrono头文件含义
在C中,<chrono> 是一个标准库头文件,用于处理时间相关的操作,包括时间点、时间间隔和时钟。它提供了一套强大的时间处理功能,支持高精度的时间测量、时间间隔的计算以及时间点的表示。 1. <chrono> 的主要功能 <…...

git互联GitHub 使用教程
一、下载git Git 公司 右键 git config --global user.name "name" git config --global user.email "email" ssh-keygen -t rsa -C email :生成的ssh密钥需要到github 网站中保存ssh 二、GitHub新建repository 三、本地git互联GitHub 找…...

Python爬虫与Java爬虫深度对比:从原理到实战案例解析
在当今数据驱动的时代,网络爬虫技术已成为获取和分析网络数据的重要手段。作为两种最流行的爬虫开发语言,Python和Java各有其独特的优势和适用场景。本文将全面对比Python爬虫与Java爬虫的核心差异,并通过实际代码示例展示它们的具体实现方式,帮助开发者根据项目需求做出合…...

汇编语言综合程序设计:子程序、分支与循环深度解析
本文将通过一个完整的控制台计算器案例,深入探讨汇编语言中子程序、分支结构和循环结构的综合应用,展示模块化编程、输入输出处理和算法实现的核心技术。 一、模块化编程架构设计 1. 系统架构规划 Calculator System ├── main.asm (主程序)…...
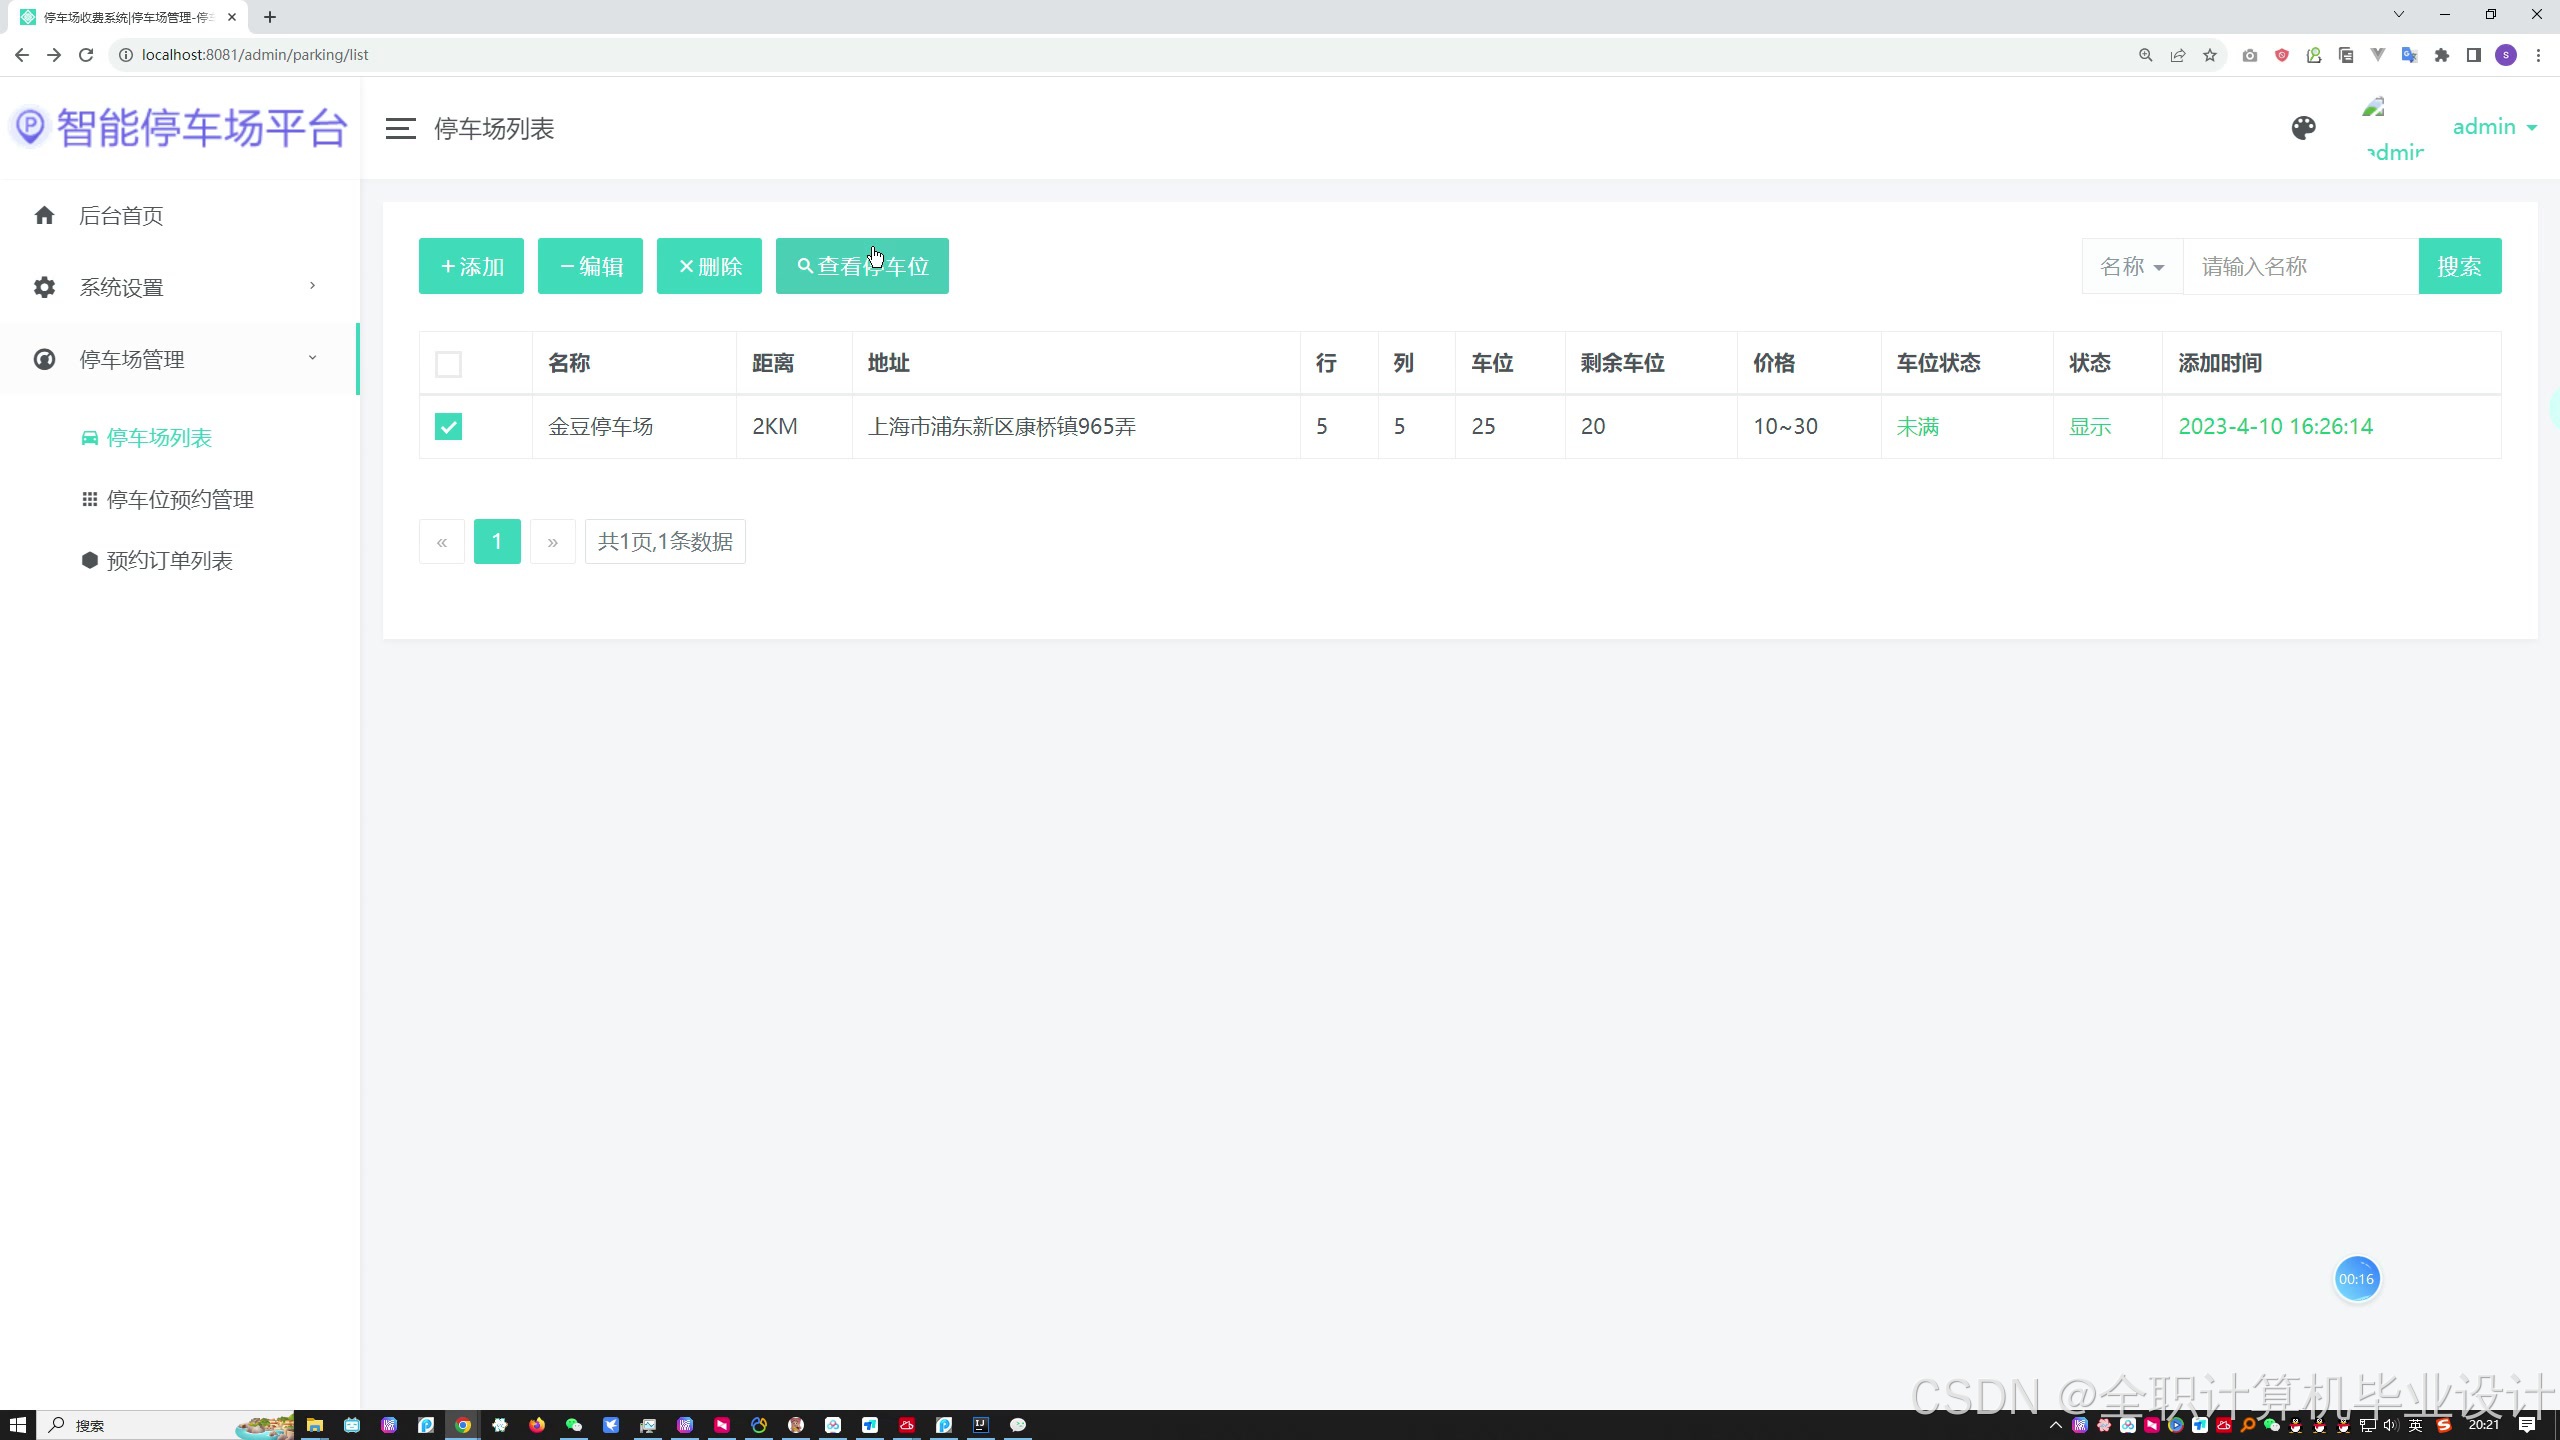
SpringBoot+Mysql实现的停车场收费小程序系统+文档
💗博主介绍💗:✌在职Java研发工程师、专注于程序设计、源码分享、技术交流、专注于Java技术领域和毕业设计✌ 温馨提示:文末有 CSDN 平台官方提供的老师 Wechat / QQ 名片 :) Java精品实战案例《700套》 2025最新毕业设计选题推荐…...
面向对象进阶 | 深入探究 Java 静态成员与继承体系
个人主页 文章专栏 文章目录 个人主页文章专栏 一、static(静态)1.static 静态变量代码展示内存图 2.static 静态方法工具类:练习: 3.static注意事项4.重新认识main方法 二、继承1.继承概述2.继承的特点3.子类到底能继承父类中的…...
人脸识别技术成为时代需求,视频智能分析网关视频监控系统中AI算法的应用
一、应用背景:时代需求与技术革新的双重驱动 1)传统安防系统的困境:传统监控系统依赖人工逐帧筛查海量视频,在人流密集场所极易漏检,且缺乏实时锁定和主动预警能力,面对突发安全事件响应迟缓。 2&a…...

青岛国瑞数据采集网关软件平台:工业互联的智能基石——安全、高效、开放,驱动企业数字化转型
一、产品定位:工业数据的智能枢纽 青岛国瑞数据采集网关软件平台,以“连接万物、赋能智能”为核心理念,专为工业场景打造,解决设备互联、数据互通、业务融合的核心痛点。无需深奥技术背景,通过极简配置,…...

Git的由来与应用详解:从Linux内核到现代开发的革命性工具
1. Git的诞生背景与历史 1.1 Linux内核开发的困境 1991年,Linus Torvalds创建了开源的Linux操作系统。随着Linux的不断发展壮大,全球各地的志愿者纷纷参与到Linux内核的开发中。然而,在2002年之前,Linux内核的代码管理却处于一种原始状态——世界各地的开发者通过diff方式…...
)
@Prometheus 监控-MySQL (Mysqld Exporter)
文章目录 **Prometheus 监控 MySQL ****1. 目标****2. 环境准备****2.1 所需组件****2.2 权限要求** **3. 部署 mysqld_exporter****3.1 下载与安装****3.2 创建配置文件****3.3 创建 Systemd 服务****3.4 验证 Exporter** **4. 配置 Prometheus****4.1 添加 Job 到 prometheus…...

pc端小卡片功能-原生JavaScript金融信息与节日日历
代码如下 <!DOCTYPE html> <html lang"zh-CN"> <head><meta charset"UTF-8"><meta name"viewport" content"widthdevice-width, initial-scale1.0"><title>金融信息与节日日历</title><…...

窗口聚合窗口聚合
taskmanager.memory.managed.fraction 在 Apache Flink 中,配置项 taskmanager.memory.managed.fraction 用于控制任务管理器(TaskManager)所占用的总内存中,分配给管理内存(Managed Memory)的比例。管理内…...

es在Linux安装
如果服务器能访问外网: wget https://artifacts.elastic.co/downloads/elasticsearch/elasticsearch-6.4.0.zip不能就手动下载,解压文件到合适目录 unzip elasticsearch-6.4.0.zip -d /opt/ mv /opt/elasticsearch-6.4.0 /opt/elasticsearch创建和日志…...
Go语言学习-->第一个go程序--hello world!
Go语言学习–>第一个go程序–hello world! 1 写代码前的准备 1 创建编写代码的文件夹 2 使用vscode打开3 项目初始化 **go mod init*(初始化一个go mod)Go Module 是 Go 1.11 版本引入的官方依赖管理系统,用于替代传统的 GOPATH…...