以下是对华为 HarmonyOS NETX 5属性动画(ArkTS)文档的结构化整理,通过层级标题、表格和代码块提升可读性:
一、属性动画概述NETX
- 作用:实现组件通用属性的渐变过渡效果,提升用户体验。
- 支持属性:
width、height、backgroundColor、opacity、scale、rotate、translate等。 - 注意事项:
-
- 布局类属性(如宽高)变化时,若需内容跟随变化,需通过
renderFit属性配置。 - 生效范围:仅对写在
animation接口前面的属性生效,对组件构造器中的属性(如Column的space)无效。
- 布局类属性(如宽高)变化时,若需内容跟随变化,需通过
二、接口定义
animation(value: AnimateParam)
- 支持版本:
-
- 基础支持:API version 7。
- 卡片能力:API version 9(支持在ArkTS卡片中使用)。
- 元服务API:API version 11。
- 系统能力:
SystemCapability.ArkUI.ArkUI.Full。 - 参数说明:
| 参数 | 类型 | 必填 | 描述 |
|
|
| 是 | 设置动画效果相关参数 |
AnimateParam参数详解
| 属性名 | 类型 | 说明 |
|
|
| 动画持续时间(毫秒),必填。 |
|
|
| 动画曲线(如 |
|
|
| 动画延迟时间(毫秒),默认 |
|
|
| 动画循环次数: |
|
|
| 动画播放模式: |
|
|
| 期望帧率范围(优化性能),可选。 |
三、示例代码
示例1:尺寸变化动画
// xxx.ets
@Entry
@Component
struct AttrAnimationExample {@State widthSize: number = 250@State heightSize: number = 100@State rotateAngle: number = 0@State flag: boolean = truebuild() {Column() {Button('change size').onClick(() => {if (this.flag) {this.widthSize = 150this.heightSize = 60} else {this.widthSize = 250this.heightSize = 100}this.flag = !this.flag}).margin(30).width(this.widthSize).height(this.heightSize).animation({duration: 2000,curve: Curve.EaseOut,iterations: 3,playMode: PlayMode.Normal})Button('change rotate angle').onClick(() => {this.rotateAngle = 90}).margin(50).rotate({ angle: this.rotateAngle }).animation({duration: 1200,curve: Curve.Friction,delay: 500,iterations: -1, // 设置-1表示动画无限循环playMode: PlayMode.Alternate,expectedFrameRateRange: {min: 20,max: 120,expected: 90,}})}.width('100%').margin({ top: 20 })}
}
示例 2:组件出现时的动画(带循环和回调)
typescript
@Entry
@Component
struct AnimateToExample {@State widthSize: number = 250;@State heightSize: number = 100;@State rotateAngle: number = 0;build() {Column() {Button('change size').width(widthSize).height(heightSize).onClick(() => {// 使用UIContext调用(推荐)this.getUIContext()?.animateTo({duration: 2000,curve: Curve.EaseOut,iterations: 3,playMode: PlayMode.Normal,onFinish: () => console.info('动画结束'),}, () => {widthSize = this.flag ? 150 : 250;heightSize = this.flag ? 60 : 100;this.flag = !this.flag;});});Button('stop rotating').rotate({ z: 1, angle: rotateAngle }).onAppear(() => {this.getUIContext()?.animateTo({duration: 1200,curve: Curve.Friction,delay: 500,iterations: -1, // 无限循环playMode: PlayMode.Alternate,}, () => {rotateAngle = 360; // 持续旋转});}).onClick(() => {// 停止动画:设置duration=0并修改属性this.getUIContext()?.animateTo({ duration: 0 }, () => {rotateAngle = 0;});});}}
}
示例 3:动画结束后组件消失
typescript
// xxx.ets
@Entry
@Component
struct AttrAnimationExample {@State heightSize: number = 100;@State isShow: boolean= true;@State count: number= 0;private isToBottom: boolean = true; // 向下build() {Column() {if (this.isShow) {Column().width(200).height(this.heightSize).backgroundColor('blue').onClick(() => {// 建议使用this.getUIContext()?.animateTo()animateTo({duration: 2000,curve: Curve.EaseOut,iterations: 1,playMode: PlayMode.Normal,onFinish: () => {this.count--;if (this.count == 0 && !this.isToBottom) { // 组件只有在向下做完动画才会消失this.isShow = false;}}}, () => {this.count++;if (this.isToBottom) {this.heightSize = 60;} else {this.heightSize = 100;}this.isToBottom = !this.isToBottom;})})}}.width('100%').height('100%').margin({ top: 5 }).justifyContent(FlexAlign.End)}
}
示例 4: KeyframeAnimateParam(关键帧动画)
typescript
// xxx.ets
import { UIContext } from '@kit.ArkUI';@Entry
@Component
struct KeyframeDemo {@State myScale: number = 1.0;uiContext: UIContext | undefined = undefined;aboutToAppear() {this.uiContext = this.getUIContext?.();}build() {Column() {Circle().width(100).height(100).fill("#46B1E3").margin(100).scale({ x: this.myScale, y: this.myScale }).onClick(() => {if (!this.uiContext) {console.info("no uiContext, keyframe failed");return;}this.myScale = 1;// 设置关键帧动画整体播放3次this.uiContext.keyframeAnimateTo({ iterations: 3 }, [{// 第一段关键帧动画时长为800ms,scale属性做从1到1.5的动画duration: 800,event: () => {this.myScale = 1.5;}},{// 第二段关键帧动画时长为500ms,scale属性做从1.5到1的动画duration: 500,event: () => {this.myScale = 1;}}]);})}.width('100%').margin({ top: 5 })}
}
示例 5:自定义入场 / 退场动画(缩放 + 透明度)
typescript
// index.ets
import { router } from '@kit.ArkUI';@Entry
@Component
struct Index {@State scale1: number = 1;@State opacity1: number = 1;build() {Column() {Image($r("app.media.transition_image1")).width('100%').height('100%')}.width('100%').height('100%').scale({ x: this.scale1 }).opacity(this.opacity1).onClick(() => {router.pushUrl({ url: 'pages/Page1' })})}pageTransition() {PageTransitionEnter({ duration: 1200, curve: Curve.Linear }).onEnter((type: RouteType, progress: number) => {if (type == RouteType.Push || type == RouteType.Pop) {this.scale1 = progress;this.opacity1 = progress;}})PageTransitionExit({ duration: 1200, curve: Curve.Ease }).onExit((type: RouteType, progress: number) => {if (type == RouteType.Push) {this.scale1 = 1 - progress;this.opacity1 = 1 - progress;}})}
}
// page1.ets
import { router } from '@kit.ArkUI';@Entry
@Component
struct Page1 {@State scale2: number = 1;@State opacity2: number = 1;build() {Column() {Image($r("app.media.transition_image2")).width('100%').height('100%') // 图片存放在media文件夹下}.width('100%').height('100%').scale({ x: this.scale2 }).opacity(this.opacity2).onClick(() => {router.pushUrl({ url: 'pages/Index' })})}pageTransition() {PageTransitionEnter({ duration: 1200, curve: Curve.Linear }).onEnter((type: RouteType, progress: number) => {if (type == RouteType.Push || type == RouteType.Pop) {this.scale2 = progress;}this.opacity2 = progress;})PageTransitionExit({ duration: 1200, curve: Curve.Ease }).onExit((type: RouteType, progress: number) => {if (type == RouteType.Pop) {this.scale2 = 1 - progress;this.opacity2 = 1 - progress;}})}
}
示例 6:使用系统默认滑动效果
typescript
// index.ets
@Entry
@Component
struct PageTransitionExample {build() {Column() {Navigator({ target: 'pages/page1', type: NavigationType.Push }) {Image($r('app.media.bg1')).width('100%').height('100%') // 图片存放在media文件夹下}}}// 自定义方式2:使用系统提供的多种默认效果(平移、缩放、透明度等)pageTransition() {// 该页面进入动画时长为1200ms,尽量与另一页面的退出动画时长匹配PageTransitionEnter({ duration: 1200 }).slide(SlideEffect.Left)// 该页面退出动画时长为1000ms,尽量与另一页面的进入动画时长匹配PageTransitionExit({ duration: 1000 }).translate({ x: 100.0, y: 100.0 }).opacity(0)}
}
// page1.ets
@Entry
@Component
struct PageTransitionExample1 {build() {Column() {Navigator({ target: 'pages/index', type: NavigationType.Push }) {Image($r('app.media.bg2')).width('100%').height('100%') // 图片存放在media文件夹下}}}// 自定义方式2:使用系统提供的多种默认效果(平移、缩放、透明度等)pageTransition() {// 该页面进入动画时长为1000ms,尽量与另一页面的退出动画时长匹配PageTransitionEnter({ duration: 1000 }).slide(SlideEffect.Left)// 该页面退出动画时长为1200ms,尽量与另一页面的进入动画时长匹配PageTransitionExit({ duration: 1200 }).translate({ x: 100.0, y: 100.0 }).opacity(0)}
}
示例 7:对称转场效果(出现 / 消失使用相同动画)
typescript
// xxx.ets
@Entry
@Component
struct TransitionEffectExample1 {@State flag: boolean = true;@State show: string = 'show';build() {Column() {Button(this.show).width(80).height(30).margin(30).onClick(() => {// 点击Button控制Image的显示和消失if (this.flag) {this.show = 'hide';} else {this.show = 'show';}this.flag = !this.flag;})if (this.flag) {// Image的显示和消失配置为相同的过渡效果(出现和消失互为逆过程)// 出现时从指定的透明度为0、绕z轴旋转180°的状态,变为默认的透明度为1、旋转角为0的状态,透明度与旋转动画时长都为2000ms// 消失时从默认的透明度为1、旋转角为0的状态,变为指定的透明度为0、绕z轴旋转180°的状态,透明度与旋转动画时长都为2000msImage($r('app.media.testImg')).width(200).height(200).transition(TransitionEffect.OPACITY.animation({ duration: 2000, curve: Curve.Ease }).combine(TransitionEffect.rotate({ z: 1, angle: 180 })))}}.width('100%')}
}
示例 8:非对称转场效果(出现 / 消失动画不同)
typescript
// xxx.ets
@Entry
@Component
struct TransitionEffectExample2 {@State flag: boolean = true;@State show: string = 'show';build() {Column() {Button(this.show).width(80).height(30).margin(30).onClick(() => {// 点击Button控制Image的显示和消失if (this.flag) {this.show = 'hide';} else {this.show = 'show';}animateTo({ duration: 2000 }, () => {// 第一张图的TransitionEffect包含了animation,transition的动画参数由TransitionEffect指定// 第二张图的TransitionEffect不包含animation,transition的动画参数由animateTo指定this.flag = !this.flag;});})if (this.flag) {// Image的显示和消失配置为不同的过渡效果// 出现时做从指定的透明度为0变为默认的透明度1的动画,该动画时长为1000ms,以及做从指定的绕z轴旋转180°变为默认的旋转角为0的动画,该动画1000ms后播放,时长为1000ms// 消失时做从默认的透明度为1变为指定的透明度0的动画,该动画1000ms后播放,时长为1000ms,以及做从默认的旋转角0变为指定的绕z轴旋转180°的动画,该动画时长为1000msImage($r('app.media.testImg')).width(200).height(200).transition(TransitionEffect.asymmetric(TransitionEffect.OPACITY.animation({ duration: 1000 }).combine(TransitionEffect.rotate({ z: 1, angle: 180 }).animation({ delay: 1000, duration: 1000 })),TransitionEffect.OPACITY.animation({ delay: 1000, duration: 1000 }).combine(TransitionEffect.rotate({ z: 1, angle: 180 }).animation({ duration: 1000 }))))// 出现时做从x方向和y方向scale都为0变为默认的x方向和y方向scale都为1的动画,该动画时长为animateTo中指定的2000ms// 消失时无转场效果Image($r('app.media.testImg')).width(200).height(200).margin({ top: 100 }).transition(TransitionEffect.asymmetric(TransitionEffect.scale({ x: 0, y: 0 }),TransitionEffect.IDENTITY))}}.width('100%')}
}
示例 9:父子组件联动转场
typescript
// xxx.ets
@Entry
@Component
struct TransitionEffectExample3 {@State flag: boolean = true;@State show: string = 'show';build() {Column() {Button(this.show).width(80).height(30).margin(30).onClick(() => {// 点击Button控制Image的显示和消失if (this.flag) {this.show = 'hide';} else {this.show = 'show';}this.flag = !this.flag;})if (this.flag) {// 改flag条件时,会触发id为"column1"、"image1"、"image2"的transition动画。// id为"column1"的组件是这棵新出现/消失的子树的根节点。Column() {Row() {Image($r('app.media.testImg')).width(150).height(150).id("image1").transition(TransitionEffect.OPACITY.animation({ duration: 1000 }))}Image($r('app.media.testImg')).width(150).height(150).margin({ top: 50 }).id("image2").transition(TransitionEffect.scale({ x: 0, y: 0 }).animation({ duration: 1000 }))Text("view").margin({ top: 50 })}.id("column1").transition(TransitionEffect.opacity(0.99).animation({ duration: 1000 }),// 结束回调设置在消失的第一层节点上,确保能有消失的结束回调(transitionIn: boolean) => {console.info("transition finish, transitionIn:" + transitionIn);})}}.width('100%')}
}
示例10:图片跳转的共享元素动画
typescript
// xxx.ets
@Entry
@Component
struct SharedTransitionExample {@State active: boolean = falsebuild() {Column() {Navigator({ target: 'pages/PageB', type: NavigationType.Push }) {Image($r('app.media.ic_health_heart')).width(50).height(50).sharedTransition('sharedImage', { duration: 800, curve: Curve.Linear, delay: 100 })}.padding({ left: 20, top: 20 }).onClick(() => {this.active = true})}}
}
// PageB.ets
@Entry
@Component
struct pageBExample {build() {Stack() {Image($r('app.media.ic_health_heart')).width(150).height(150).sharedTransition('sharedImage', { duration: 800, curve: Curve.Linear, delay: 100 })}.width('100%').height('100%')}
}
示例11:图片与容器的几何过渡
typescript
// xxx.ets
@Entry
@Component
struct Index {@State isShow: boolean = false;build() {Stack({ alignContent: Alignment.Center }) {if (this.isShow) {Image($r('app.media.pic')).autoResize(false).clip(true).width(300).height(400).offset({ y: 100 }).geometryTransition("picture", { follow: false }).transition(TransitionEffect.OPACITY)} else {// geometryTransition此处绑定的是容器,那么容器内的子组件需设为相对布局跟随父容器变化,// 套多层容器为了说明相对布局约束传递Column() {Column() {Image($r('app.media.icon')).width('100%').height('100%')}.width('100%').height('100%')}.width(80).height(80)// geometryTransition会同步圆角,但仅限于geometryTransition绑定处,此处绑定的是容器// 则对容器本身有圆角同步而不会操作容器内部子组件的borderRadius.borderRadius(20).clip(true).geometryTransition("picture")// transition保证组件离场不被立即析构,可设置其他转场效果.transition(TransitionEffect.OPACITY)}}.onClick(() => {animateTo({ duration: 1000 }, () => {this.isShow = !this.isShow;})})}
}
示例12:设置组件进行位移动画时的运动路径
该示例主要演示如何设置组件进行位移动画时的运动路径。
// xxx.ets
@Entry
@Component
struct MotionPathExample {@State toggle: boolean = true;build() {Column() {Button('click me').margin(50).motionPath({path: 'Mstart.x start.y L300 200 L300 500 Lend.x end.y',from: 0.0,to: 1.0,rotatable: true}) // 执行动画:从起点移动到(300,200),再到(300,500),再到终点.onClick(() => {animateTo({ duration: 4000, curve: Curve.Linear }, () => {this.toggle = !this.toggle // 通过this.toggle变化组件的位置})})}.width('100%').height('100%').alignItems(this.toggle ? HorizontalAlign.Start : HorizontalAlign.Center)}
}
示例 13:该示例主要演示如何设置组件进行位移动画时的运动路径。
typescript
// xxx.ets
@Entry
@Component
struct MotionPathExample {@State toggle: boolean = true;build() {Column() {Button('click me').margin(50).motionPath({path: 'Mstart.x start.y L300 200 L300 500 Lend.x end.y',from: 0.0,to: 1.0,rotatable: true}) // 执行动画:从起点移动到(300,200),再到(300,500),再到终点.onClick(() => {animateTo({ duration: 4000, curve: Curve.Linear }, () => {this.toggle = !this.toggle // 通过this.toggle变化组件的位置})})}.width('100%').height('100%').alignItems(this.toggle ? HorizontalAlign.Start : HorizontalAlign.Center)}
}
示例14(圆形初始化粒子)
描述粒子动画基础用法,通过圆形初始化粒子。
typescript
// xxx.ets
@Entry
@Component
struct ParticleExample {build() {Stack() {Text().width(300).height(300).backgroundColor(Color.Black)Particle({particles: [{emitter: {particle: {type: ParticleType.POINT, //粒子类型config: {radius: 10//圆点半径},count: 500, //粒子总数lifetime: 10000, //粒子生命周期,单位mslifetimeRange: 100//粒子生命周期取值范围,单位ms},emitRate: 10, //每秒发射粒子数position: [0, 0],shape: ParticleEmitterShape.RECTANGLE//发射器形状},color: {range: [Color.Red, Color.Yellow], //初始颜色范围updater: {type: ParticleUpdater.CURVE, //变化方式为曲线变化config: [{from: Color.White, //变化起始值to: Color.Pink, //变化终点值startMillis: 0, //开始时间endMillis: 3000, //结束时间curve: Curve.EaseIn//变化曲线},{from: Color.Pink,to: Color.Orange,startMillis: 3000,endMillis: 5000,curve: Curve.EaseIn},{from: Color.Orange,to: Color.Pink,startMillis: 5000,endMillis: 8000,curve: Curve.EaseIn},]}},opacity: {range: [0.0, 1.0], //粒子透明度的初始值从【0.0到1.0】随机产生updater: {type: ParticleUpdater.CURVE,config: [{from: 0.0,to: 1.0,startMillis: 0,endMillis: 3000,curve: Curve.EaseIn},{from: 1.0,to: 0.0,startMillis: 5000,endMillis: 10000,curve: Curve.EaseIn}]}},scale: {range: [0.0, 0.0],updater: {type: ParticleUpdater.CURVE,config: [{from: 0.0,to: 0.5,startMillis: 0,endMillis: 3000,curve: Curve.EaseIn}]}},acceleration: {//加速度的配置,从大小和方向两个维度变化,speed表示加速度大小,angle表示加速度方向speed: {range: [3, 9],updater: {type: ParticleUpdater.RANDOM, //Speed的变化方式是随机变化config: [1, 20]}},angle: {range: [90, 90]}}}]}).width(300).height(300)}.width("100%").height("100%").align(Alignment.Center)}
}
}
示例15(图片初始化粒子)
描述粒子动画基础用法,通过图片初始化粒子。
@Entry
@Component
struct ParticleExample {@StatemyCount: number = 100flag: boolean = false;build() {Column() {Stack() {Particle({particles: [{emitter: {particle: {type: ParticleType.IMAGE,config: {src: $r("app.media.book"),size: [10, 10]},count: this.myCount,lifetime: 10000,lifetimeRange: 100},emitRate: 3,shape: ParticleEmitterShape.CIRCLE},color: {range: [Color.White, Color.White]},opacity: {range: [1.0, 1.0],updater: {type: ParticleUpdater.CURVE,config: [{from: 0,to: 1.0,startMillis: 0,endMillis: 6000},{from: 1.0,to: .0,startMillis: 6000,endMillis: 10000}]}},scale: {range: [0.1, 1.0],updater: {type: ParticleUpdater.CURVE,config: [{from: 0,to: 1.5,startMillis: 0,endMillis: 8000,curve: Curve.EaseIn}]}},acceleration: {speed: {range: [3, 9],updater: {type: ParticleUpdater.CURVE,config: [{from: 10,to: 20,startMillis: 0,endMillis: 3000,curve: Curve.EaseIn},{from: 10,to: 2,startMillis: 3000,endMillis: 8000,curve: Curve.EaseIn}]}},angle: {range: [0, 180],updater: {type: ParticleUpdater.CURVE,config: [{from: 1,to: 2,startMillis: 0,endMillis: 1000,curve: Curve.EaseIn},{from: 50,to: -50,startMillis: 1000,endMillis: 3000,curve: Curve.EaseIn},{from: 3,to: 5,startMillis: 3000,endMillis: 8000,curve: Curve.EaseIn}]}}},spin: {range: [0.1, 1.0],updater: {type: ParticleUpdater.CURVE,config: [{from: 0,to: 360,startMillis: 0,endMillis: 8000,curve: Curve.EaseIn}]}},}, {emitter: {particle: {type: ParticleType.IMAGE,config: {src: $r('app.media.heart'),size: [10, 10]},count: this.myCount,lifetime: 10000,lifetimeRange: 100},emitRate: 3,shape: ParticleEmitterShape.CIRCLE},color: {range: [Color.White, Color.White]},opacity: {range: [1.0, 1.0],updater: {type: ParticleUpdater.CURVE,config: [{from: 0,to: 1.0,startMillis: 0,endMillis: 6000},{from: 1.0,to: .0,startMillis: 6000,endMillis: 10000}]}},scale: {range: [0.1, 1.0],updater: {type: ParticleUpdater.CURVE,config: [{from: 0,to: 2.0,startMillis: 0,endMillis: 10000,curve: Curve.EaseIn}]}},acceleration: {speed: {range: [3, 9],updater: {type: ParticleUpdater.CURVE,config: [{from: 10,to: 20,startMillis: 0,endMillis: 3000,curve: Curve.EaseIn},{from: 10,to: 2,startMillis: 3000,endMillis: 8000,curve: Curve.EaseIn}]}},angle: {range: [0, 180],updater: {type: ParticleUpdater.CURVE,config: [{from: 1,to: 2,startMillis: 0,endMillis: 1000,curve: Curve.EaseIn},{from: 50,to: -50,startMillis: 0,endMillis: 3000,curve: Curve.EaseIn},{from: 3,to: 5,startMillis: 3000,endMillis: 10000,curve: Curve.EaseIn}]}}},spin: {range: [0.1, 1.0],updater: {type: ParticleUpdater.CURVE,config: [{from: 0,to: 360,startMillis: 0,endMillis: 10000,curve: Curve.EaseIn}]}},}, {emitter: {particle: {type: ParticleType.IMAGE,config: {src: $r('app.media.sun'),size: [10, 10]},count: this.myCount,lifetime: 10000,lifetimeRange: 100},emitRate: 3,shape: ParticleEmitterShape.CIRCLE},color: {range: [Color.White, Color.White]},opacity: {range: [1.0, 1.0],updater: {type: ParticleUpdater.CURVE,config: [{from: 0,to: 1.0,startMillis: 0,endMillis: 6000},{from: 1.0,to: .0,startMillis: 6000,endMillis: 10000}]}},scale: {range: [0.1, 1.0],updater: {type: ParticleUpdater.CURVE,config: [{from: 0,to: 2.0,startMillis: 0,endMillis: 10000,curve: Curve.EaseIn}]}},acceleration: {speed: {range: [3, 9],updater: {type: ParticleUpdater.CURVE,config: [{from: 10,to: 20,startMillis: 0,endMillis: 3000,curve: Curve.EaseIn},{from: 10,to: 2,startMillis: 3000,endMillis: 8000,curve: Curve.EaseIn}]}},angle: {range: [0, 180],updater: {type: ParticleUpdater.CURVE,config: [{from: 1,to: 2,startMillis: 0,endMillis: 1000,curve: Curve.EaseIn},{from: 50,to: -50,startMillis: 1000,endMillis: 3000,curve: Curve.EaseIn},{from: 3,to: 5,startMillis: 3000,endMillis: 8000,curve: Curve.EaseIn}]}}},spin: {range: [0.1, 1.0],updater: {type: ParticleUpdater.CURVE,config: [{from: 0,to: 360,startMillis: 0,endMillis: 10000,curve: Curve.EaseIn}]}},}]}).width(300).height(300)}.width(500).height(500).align(Alignment.Center)}.width("100%").height("100%")}
}

示例16(粒子扰动场的干扰下运动轨迹发生变化)
该示例主要演示如何通过粒子扰动场的干扰下来实现运动轨迹发生变化的效果。
@Entry
@Component
struct ParticleExample {build() {Stack() {Text().width(300).height(300).backgroundColor(Color.Black)Particle({particles: [{emitter: {particle: {type: ParticleType.POINT, //粒子类型config: {radius: 10//圆点半径},count: 500, //粒子总数lifetime: 10000//粒子生命周期,单位ms},emitRate: 10, //每秒发射粒子数position: [0, 0],shape: ParticleEmitterShape.RECTANGLE//发射器形状},color: {range: [Color.Red, Color.Yellow], //初始颜色范围updater: {type: ParticleUpdater.CURVE, //变化方式为曲线变化config: [{from: Color.White, //变化起始值to: Color.Pink, //变化终点值startMillis: 0, //开始时间endMillis: 3000, //结束时间curve: Curve.EaseIn//变化曲线},{from: Color.Pink,to: Color.Orange,startMillis: 3000,endMillis: 5000,curve: Curve.EaseIn},{from: Color.Orange,to: Color.Pink,startMillis: 5000,endMillis: 8000,curve: Curve.EaseIn},]}},opacity: {range: [0.0, 1.0], //粒子透明度的初始值从[0.0,1.0]随机产生updater: {type: ParticleUpdater.CURVE,config: [{from: 0.0,to: 1.0,startMillis: 0,endMillis: 3000,curve: Curve.EaseIn},{from: 1.0,to: 0.0,startMillis: 5000,endMillis: 10000,curve: Curve.EaseIn}]}},scale: {range: [0.0, 0.0],updater: {type: ParticleUpdater.CURVE,config: [{from: 0.0,to: 0.5,startMillis: 0,endMillis: 3000,curve: Curve.EaseIn}]}},acceleration: {//加速度的配置,从大小和方向两个维度变化,speed表示加速度大小,angle表示加速度方向speed: {range: [3, 9],updater: {type: ParticleUpdater.RANDOM,config: [1, 20]}},angle: {range: [90, 90]}}}]}).width(300).height(300).disturbanceFields([{strength: 10,shape: DisturbanceFieldShape.RECT,size: { width: 100, height: 100 },position: { x: 100, y: 100 },feather: 15,noiseScale: 10,noiseFrequency: 15,noiseAmplitude: 5}])}.width("100%").height("100%").align(Alignment.Center)}
}
示例17(调整粒子发射器位置)
通过emitter()调整粒子发射器的位置。
@Entry
@Component
struct ParticleExample {@State emitterProperties: Array<EmitterProperty> = [{index: 0,emitRate: 100,position: { x: 60, y: 80 },size: { width: 200, height: 200 }}]build() {Stack() {Text().width(300).height(300).backgroundColor(Color.Black)Particle({particles: [{emitter: {particle: {type: ParticleType.POINT, // 粒子类型config: {radius: 5// 圆点半径},count: 400, // 粒子总数lifetime: -1// 粒子的生命周期,-1表示粒子生命周期无限大},emitRate: 10, // 每秒发射粒子数position: [0, 0], // 粒子发射位置shape: ParticleEmitterShape.CIRCLE// 发射器形状},color: {range: [Color.Red, Color.Yellow], // 初始颜色范围updater: {type: ParticleUpdater.CURVE, // 变化方式为曲线变化config: [{from: Color.White,to: Color.Pink,startMillis: 0,endMillis: 3000,curve: Curve.EaseIn},{from: Color.Pink,to: Color.Orange,startMillis: 3000,endMillis: 5000,curve: Curve.EaseIn},{from: Color.Orange,to: Color.Pink,startMillis: 5000,endMillis: 8000,curve: Curve.EaseIn},]}},},]}).width(300).height(300).emitter(this.emitterProperties)}.width("100%").height("100%").align(Alignment.Center)}
}
示例 18:显式动画立即下发( AnimateToImmediately目前还不能跨平台使用)
// xxx.ets
@Entry
@Component
struct AnimateToImmediatelyExample {@State widthSize: number = 250;@State heightSize: number = 100;@State opacitySize: number = 0;private flag: boolean = true;build() {Column() {Column().width(this.widthSize).height(this.heightSize).backgroundColor(Color.Green).opacity(this.opacitySize)Button('change size').margin(30).onClick(() => {if (this.flag) {animateToImmediately({delay: 0,duration: 1000}, () => {this.opacitySize = 1;})animateTo({delay: 1000,duration: 1000}, () => {this.widthSize = 150;this.heightSize = 60;})} else {animateToImmediately({delay: 0,duration: 1000}, () => {this.widthSize = 250;this.heightSize = 100;})animateTo({delay: 1000,duration: 1000}, () => {this.opacitySize = 0;})}this.flag = !this.flag;})}.width('100%').margin({ top: 5 })}
}
四、关键限制
- 属性生效顺序:需将目标属性(如
width)写在animation接口之前,否则动画不生效。 - 构造器属性无效:组件构造器中的属性(如
Column({ space: this.space })中的space)无法通过动画修改。 - 多次调用覆盖:若同一组件多次调用
animation,后调用的配置会覆盖前一次的设置。
五、相关资源
- 官方文档:HarmonyOS属性动画开发指南
- 扩展学习:显式动画(
animateTo)可实现更复杂的动画控制,需结合状态管理使用。
如需进一步了解特定属性或高级用法,请提供具体场景,我将补充说明。
相关文章:
以下是对华为 HarmonyOS NETX 5属性动画(ArkTS)文档的结构化整理,通过层级标题、表格和代码块提升可读性:
一、属性动画概述NETX 作用:实现组件通用属性的渐变过渡效果,提升用户体验。支持属性:width、height、backgroundColor、opacity、scale、rotate、translate等。注意事项: 布局类属性(如宽高)变化时&#…...
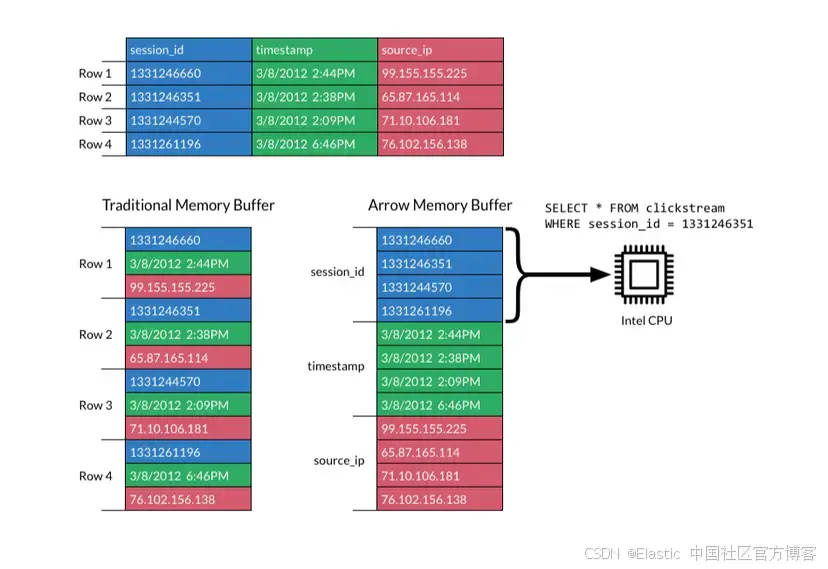
JavaScript 中的 ES|QL:利用 Apache Arrow 工具
作者:来自 Elastic Jeffrey Rengifo 学习如何将 ES|QL 与 JavaScript 的 Apache Arrow 客户端工具一起使用。 想获得 Elastic 认证吗?了解下一期 Elasticsearch Engineer 培训的时间吧! Elasticsearch 拥有众多新功能,助你为自己…...
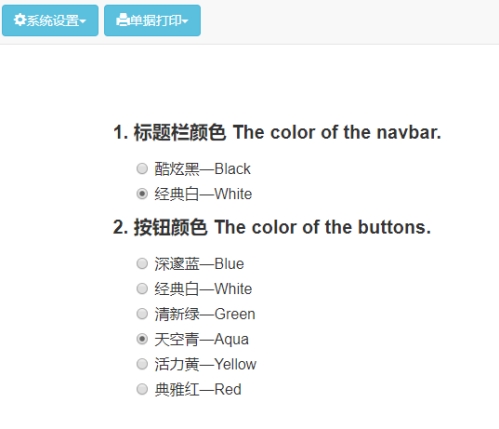
基于ASP.NET+ SQL Server实现(Web)医院信息管理系统
医院信息管理系统 1. 课程设计内容 在 visual studio 2017 平台上,开发一个“医院信息管理系统”Web 程序。 2. 课程设计目的 综合运用 c#.net 知识,在 vs 2017 平台上,进行 ASP.NET 应用程序和简易网站的开发;初步熟悉开发一…...

Java 8 Stream API 入门到实践详解
一、告别 for 循环! 传统痛点: Java 8 之前,集合操作离不开冗长的 for 循环和匿名类。例如,过滤列表中的偶数: List<Integer> list Arrays.asList(1, 2, 3, 4, 5); List<Integer> evens new ArrayList…...

Admin.Net中的消息通信SignalR解释
定义集线器接口 IOnlineUserHub public interface IOnlineUserHub {/// 在线用户列表Task OnlineUserList(OnlineUserList context);/// 强制下线Task ForceOffline(object context);/// 发布站内消息Task PublicNotice(SysNotice context);/// 接收消息Task ReceiveMessage(…...

从零实现富文本编辑器#5-编辑器选区模型的状态结构表达
先前我们总结了浏览器选区模型的交互策略,并且实现了基本的选区操作,还调研了自绘选区的实现。那么相对的,我们还需要设计编辑器的选区表达,也可以称为模型选区。编辑器中应用变更时的操作范围,就是以模型选区为基准来…...

边缘计算医疗风险自查APP开发方案
核心目标:在便携设备(智能手表/家用检测仪)部署轻量化疾病预测模型,实现低延迟、隐私安全的实时健康风险评估。 一、技术架构设计 #mermaid-svg-iuNaeeLK2YoFKfao {font-family:"trebuchet ms",verdana,arial,sans-serif;font-size:16px;fill:#333;}#mermaid-svg…...

.Net框架,除了EF还有很多很多......
文章目录 1. 引言2. Dapper2.1 概述与设计原理2.2 核心功能与代码示例基本查询多映射查询存储过程调用 2.3 性能优化原理2.4 适用场景 3. NHibernate3.1 概述与架构设计3.2 映射配置示例Fluent映射XML映射 3.3 查询示例HQL查询Criteria APILINQ提供程序 3.4 高级特性3.5 适用场…...

Oracle查询表空间大小
1 查询数据库中所有的表空间以及表空间所占空间的大小 SELECTtablespace_name,sum( bytes ) / 1024 / 1024 FROMdba_data_files GROUP BYtablespace_name; 2 Oracle查询表空间大小及每个表所占空间的大小 SELECTtablespace_name,file_id,file_name,round( bytes / ( 1024 …...

智慧工地云平台源码,基于微服务架构+Java+Spring Cloud +UniApp +MySql
智慧工地管理云平台系统,智慧工地全套源码,java版智慧工地源码,支持PC端、大屏端、移动端。 智慧工地聚焦建筑行业的市场需求,提供“平台网络终端”的整体解决方案,提供劳务管理、视频管理、智能监测、绿色施工、安全管…...
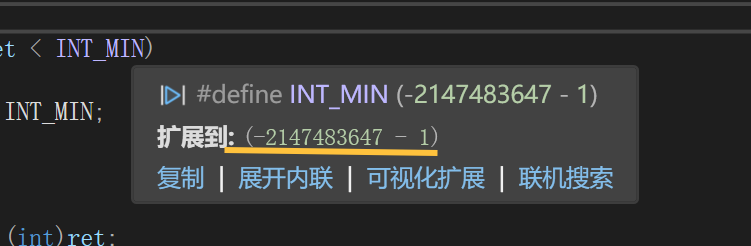
练习(含atoi的模拟实现,自定义类型等练习)
一、结构体大小的计算及位段 (结构体大小计算及位段 详解请看:自定义类型:结构体进阶-CSDN博客) 1.在32位系统环境,编译选项为4字节对齐,那么sizeof(A)和sizeof(B)是多少? #pragma pack(4)st…...

Python:操作 Excel 折叠
💖亲爱的技术爱好者们,热烈欢迎来到 Kant2048 的博客!我是 Thomas Kant,很开心能在CSDN上与你们相遇~💖 本博客的精华专栏: 【自动化测试】 【测试经验】 【人工智能】 【Python】 Python 操作 Excel 系列 读取单元格数据按行写入设置行高和列宽自动调整行高和列宽水平…...
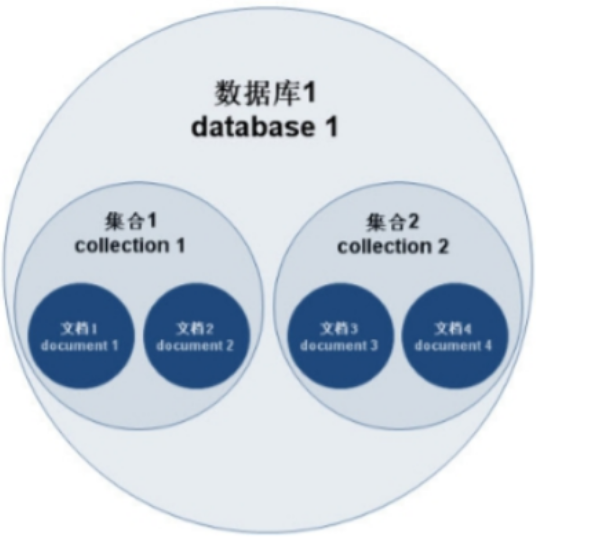
MongoDB学习和应用(高效的非关系型数据库)
一丶 MongoDB简介 对于社交类软件的功能,我们需要对它的功能特点进行分析: 数据量会随着用户数增大而增大读多写少价值较低非好友看不到其动态信息地理位置的查询… 针对以上特点进行分析各大存储工具: mysql:关系型数据库&am…...

云启出海,智联未来|阿里云网络「企业出海」系列客户沙龙上海站圆满落地
借阿里云中企出海大会的东风,以**「云启出海,智联未来|打造安全可靠的出海云网络引擎」为主题的阿里云企业出海客户沙龙云网络&安全专场于5.28日下午在上海顺利举办,现场吸引了来自携程、小红书、米哈游、哔哩哔哩、波克城市、…...

FFmpeg 低延迟同屏方案
引言 在实时互动需求激增的当下,无论是在线教育中的师生同屏演示、远程办公的屏幕共享协作,还是游戏直播的画面实时传输,低延迟同屏已成为保障用户体验的核心指标。FFmpeg 作为一款功能强大的多媒体框架,凭借其灵活的编解码、数据…...

中南大学无人机智能体的全面评估!BEDI:用于评估无人机上具身智能体的综合性基准测试
作者:Mingning Guo, Mengwei Wu, Jiarun He, Shaoxian Li, Haifeng Li, Chao Tao单位:中南大学地球科学与信息物理学院论文标题:BEDI: A Comprehensive Benchmark for Evaluating Embodied Agents on UAVs论文链接:https://arxiv.…...

Redis相关知识总结(缓存雪崩,缓存穿透,缓存击穿,Redis实现分布式锁,如何保持数据库和缓存一致)
文章目录 1.什么是Redis?2.为什么要使用redis作为mysql的缓存?3.什么是缓存雪崩、缓存穿透、缓存击穿?3.1缓存雪崩3.1.1 大量缓存同时过期3.1.2 Redis宕机 3.2 缓存击穿3.3 缓存穿透3.4 总结 4. 数据库和缓存如何保持一致性5. Redis实现分布式…...

【Java学习笔记】Arrays类
Arrays 类 1. 导入包:import java.util.Arrays 2. 常用方法一览表 方法描述Arrays.toString()返回数组的字符串形式Arrays.sort()排序(自然排序和定制排序)Arrays.binarySearch()通过二分搜索法进行查找(前提:数组是…...

通过Wrangler CLI在worker中创建数据库和表
官方使用文档:Getting started Cloudflare D1 docs 创建数据库 在命令行中执行完成之后,会在本地和远程创建数据库: npx wranglerlatest d1 create prod-d1-tutorial 在cf中就可以看到数据库: 现在,您的Cloudfla…...
相机Camera日志实例分析之二:相机Camx【专业模式开启直方图拍照】单帧流程日志详解
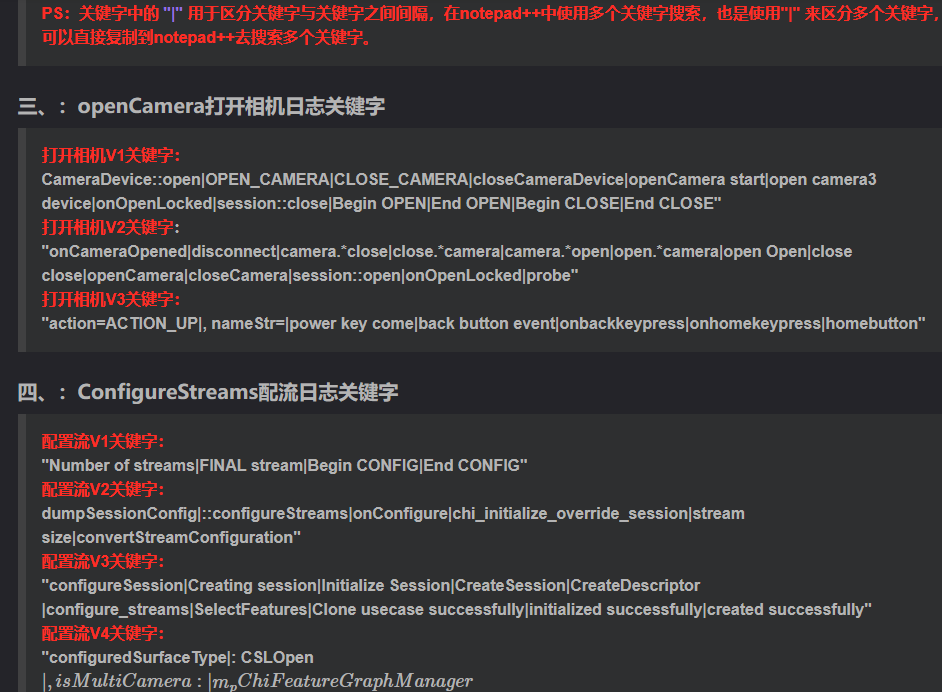
【关注我,后续持续新增专题博文,谢谢!!!】 上一篇我们讲了: 这一篇我们开始讲: 目录 一、场景操作步骤 二、日志基础关键字分级如下 三、场景日志如下: 一、场景操作步骤 操作步…...

在HarmonyOS ArkTS ArkUI-X 5.0及以上版本中,手势开发全攻略:
在 HarmonyOS 应用开发中,手势交互是连接用户与设备的核心纽带。ArkTS 框架提供了丰富的手势处理能力,既支持点击、长按、拖拽等基础单一手势的精细控制,也能通过多种绑定策略解决父子组件的手势竞争问题。本文将结合官方开发文档,…...
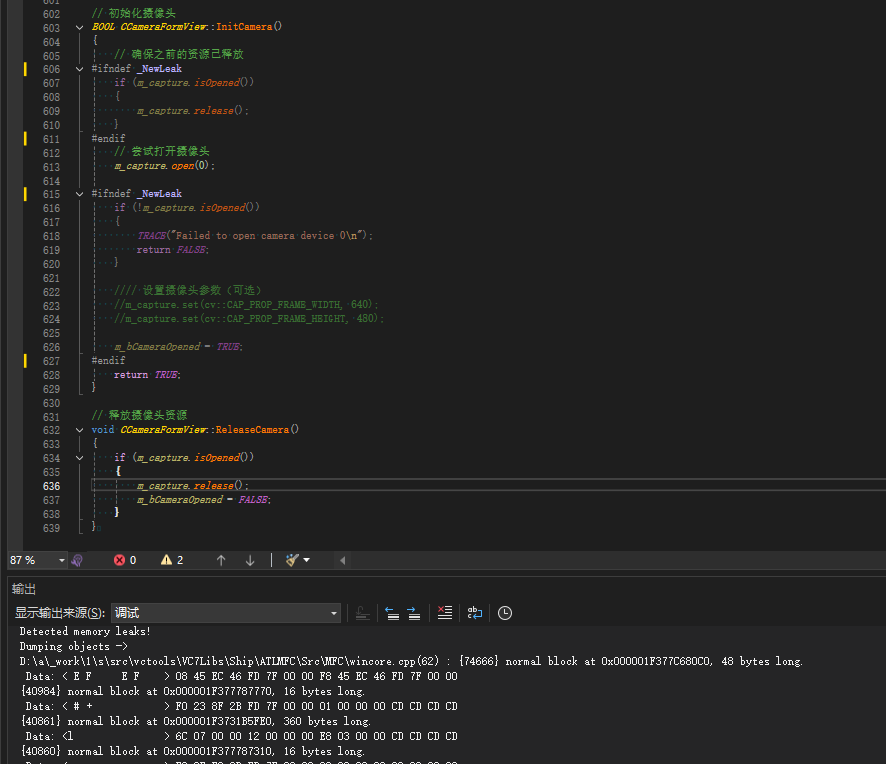
MFC内存泄露
1、泄露代码示例 void X::SetApplicationBtn() {CMFCRibbonApplicationButton* pBtn GetApplicationButton();// 获取 Ribbon Bar 指针// 创建自定义按钮CCustomRibbonAppButton* pCustomButton new CCustomRibbonAppButton();pCustomButton->SetImage(IDB_BITMAP_Jdp26)…...
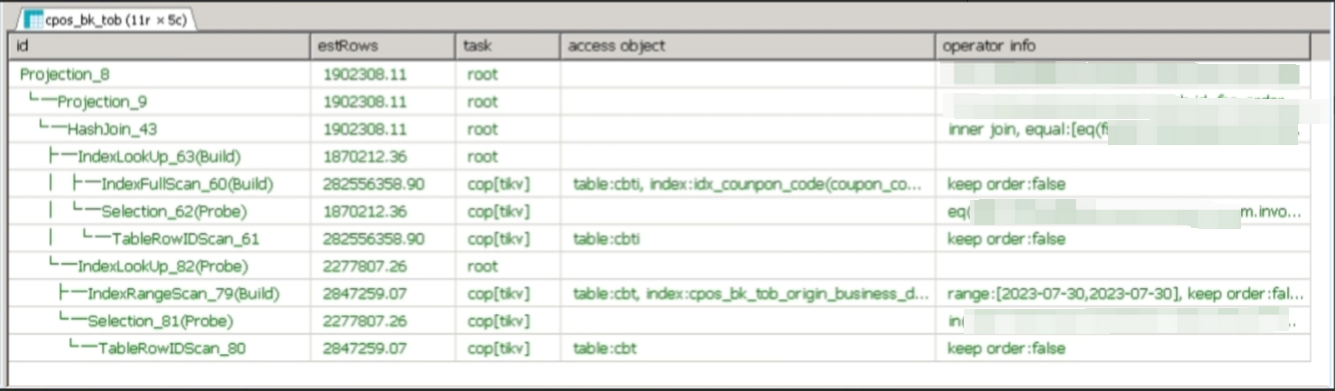
【入坑系列】TiDB 强制索引在不同库下不生效问题
文章目录 背景SQL 优化情况线上SQL运行情况分析怀疑1:执行计划绑定问题?尝试:SHOW WARNINGS 查看警告探索 TiDB 的 USE_INDEX 写法Hint 不生效问题排查解决参考背景 项目中使用 TiDB 数据库,并对 SQL 进行优化了,添加了强制索引。 UAT 环境已经生效,但 PROD 环境强制索…...
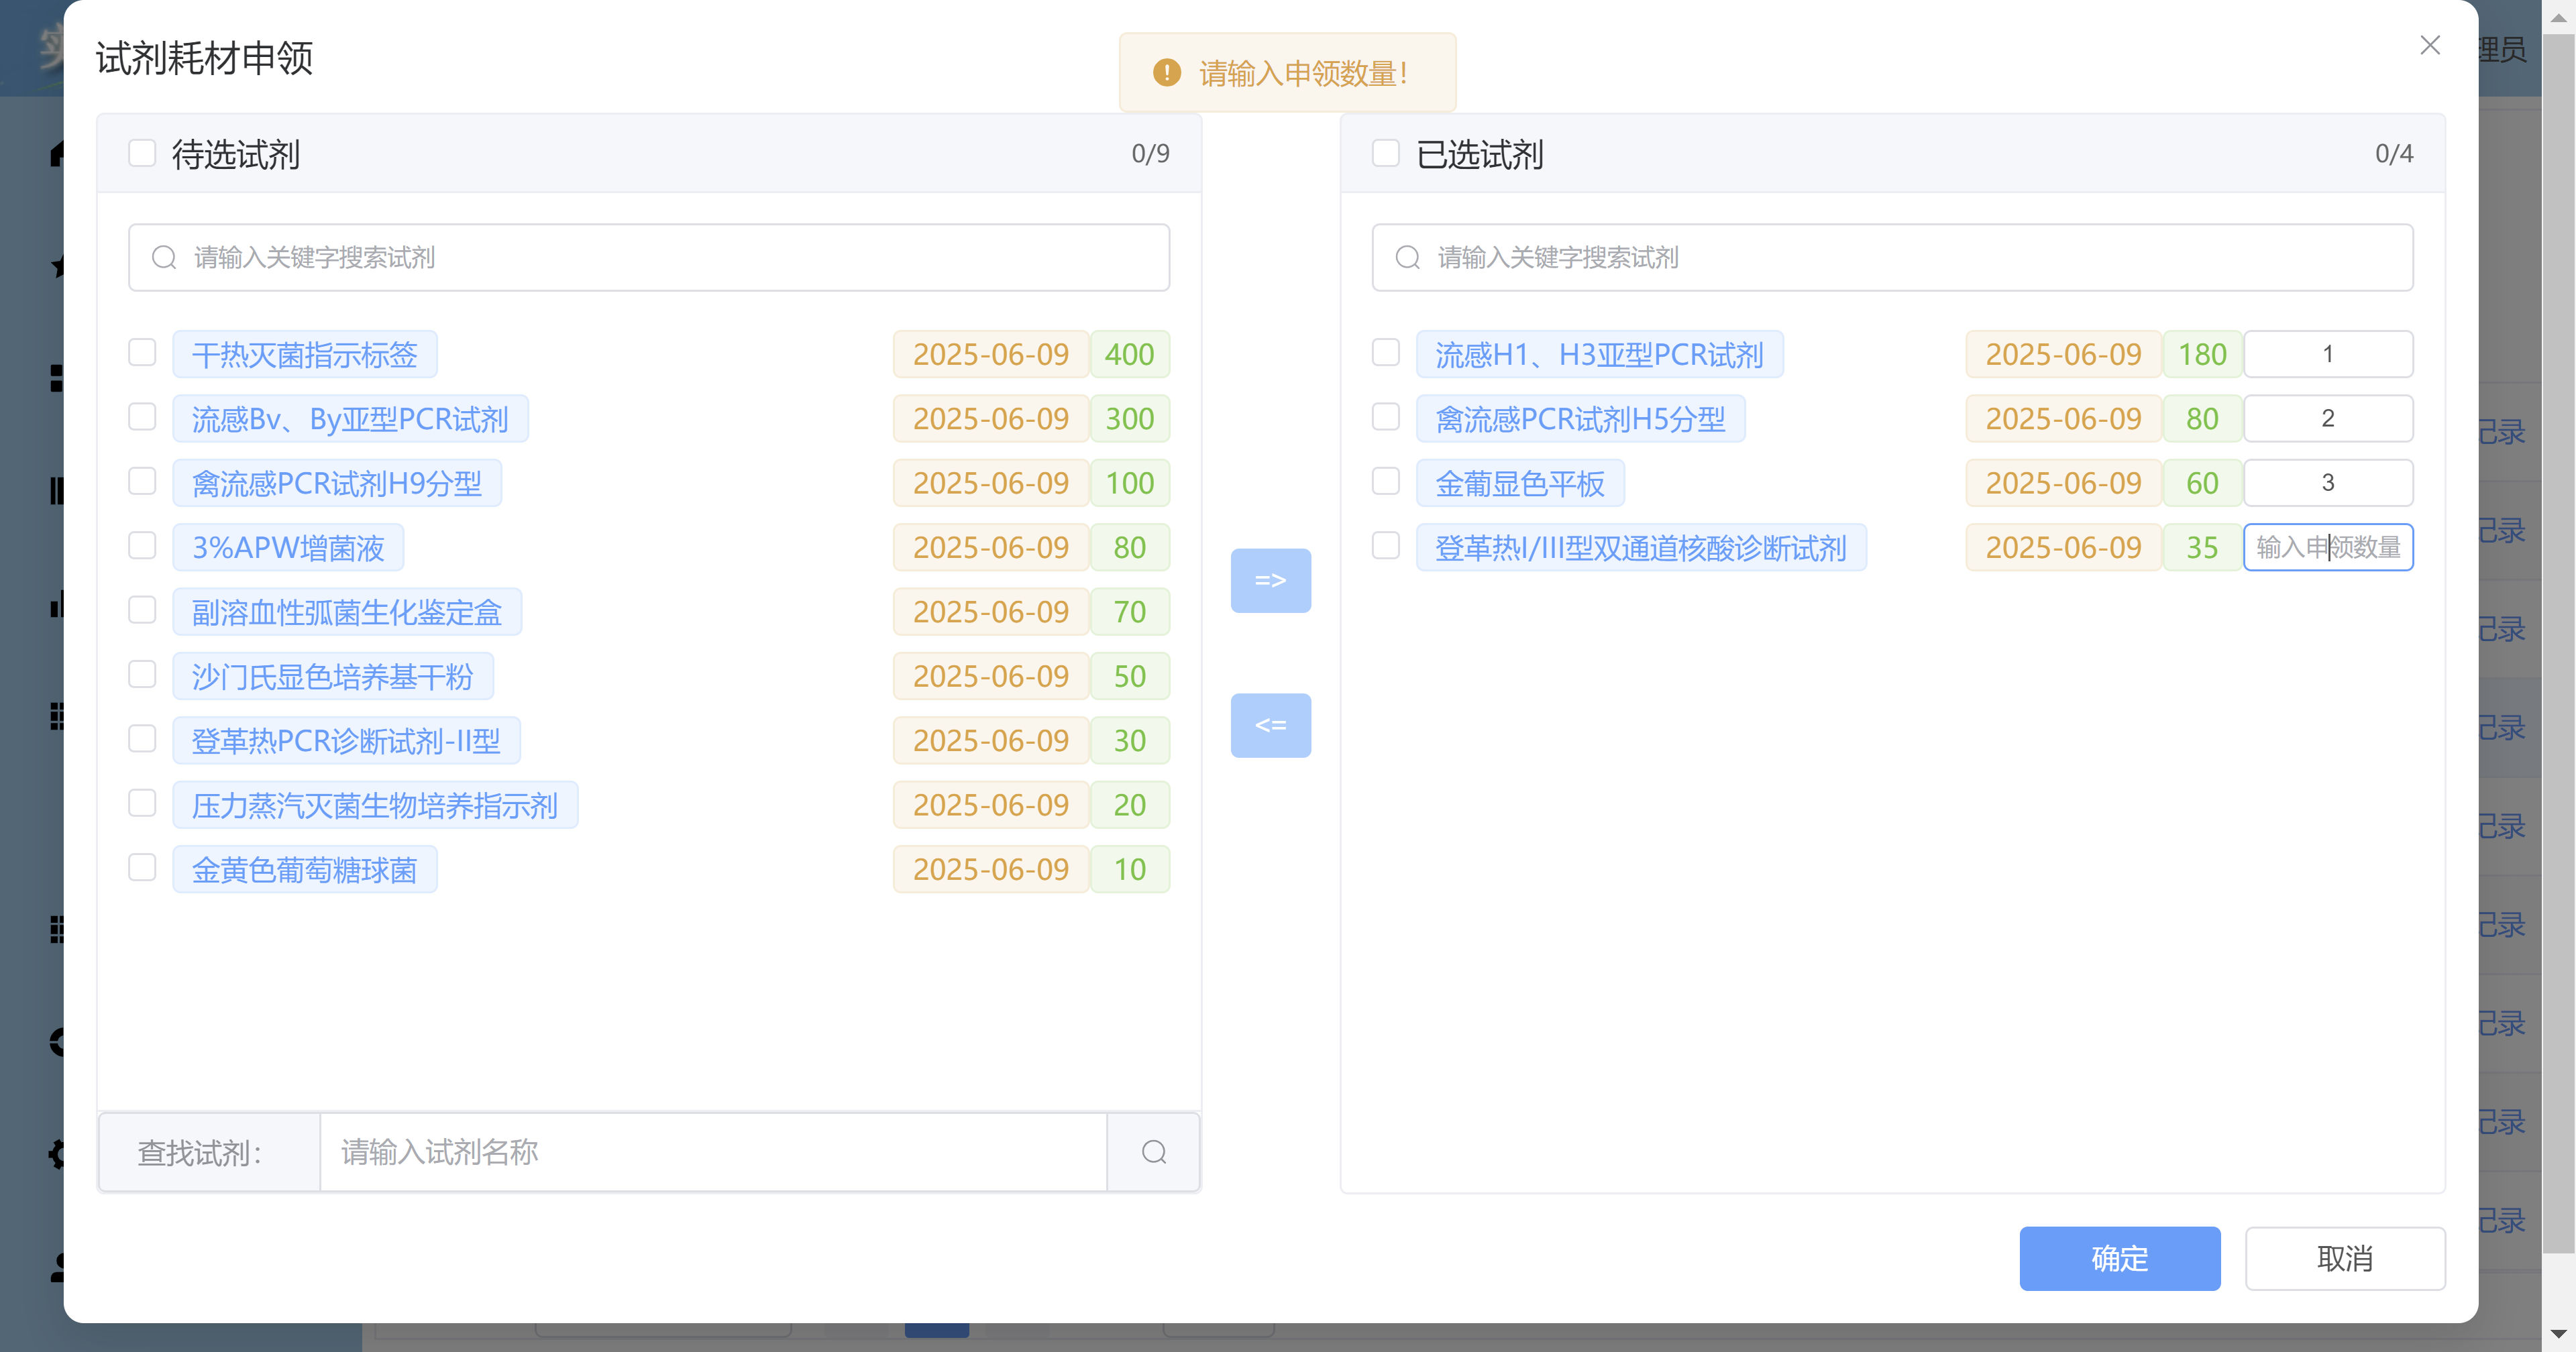
Vue3 + Element Plus + TypeScript中el-transfer穿梭框组件使用详解及示例
使用详解 Element Plus 的 el-transfer 组件是一个强大的穿梭框组件,常用于在两个集合之间进行数据转移,如权限分配、数据选择等场景。下面我将详细介绍其用法并提供一个完整示例。 核心特性与用法 基本属性 v-model:绑定右侧列表的值&…...

前端倒计时误差!
提示:记录工作中遇到的需求及解决办法 文章目录 前言一、误差从何而来?二、五大解决方案1. 动态校准法(基础版)2. Web Worker 计时3. 服务器时间同步4. Performance API 高精度计时5. 页面可见性API优化三、生产环境最佳实践四、终极解决方案架构前言 前几天听说公司某个项…...
23-Oracle 23 ai 区块链表(Blockchain Table)
小伙伴有没有在金融强合规的领域中遇见,必须要保持数据不可变,管理员都无法修改和留痕的要求。比如医疗的电子病历中,影像检查检验结果不可篡改行的,药品追溯过程中数据只可插入无法删除的特性需求;登录日志、修改日志…...
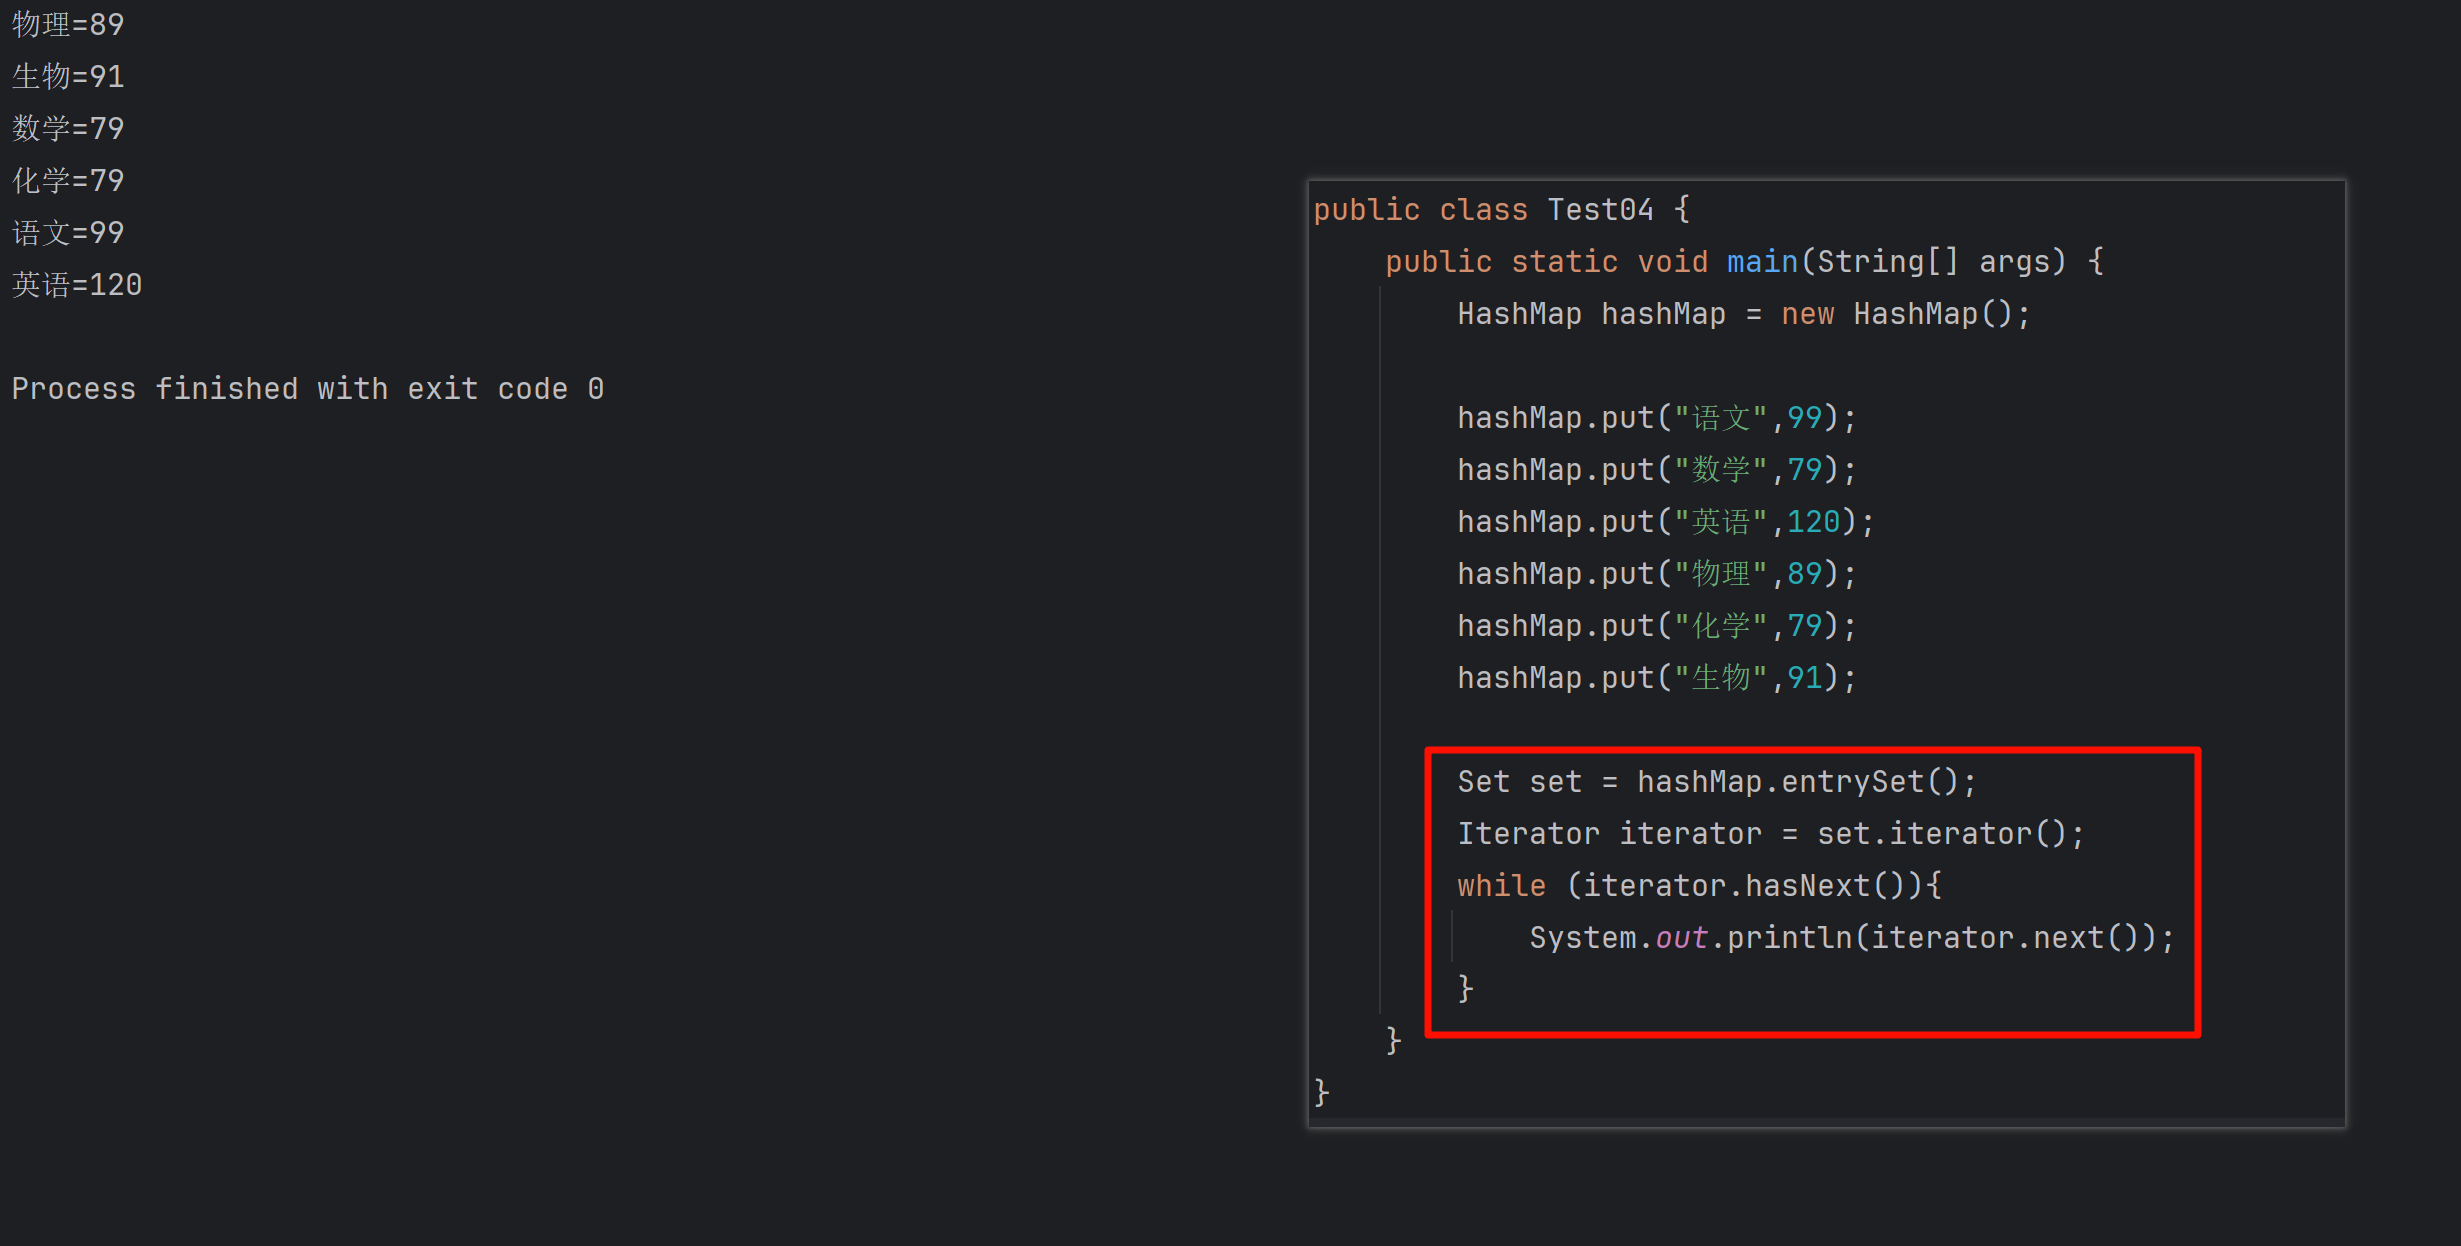
遍历 Map 类型集合的方法汇总
1 方法一 先用方法 keySet() 获取集合中的所有键。再通过 gey(key) 方法用对应键获取值 import java.util.HashMap; import java.util.Set;public class Test {public static void main(String[] args) {HashMap hashMap new HashMap();hashMap.put("语文",99);has…...

【Linux】C语言执行shell指令
在C语言中执行Shell指令 在C语言中,有几种方法可以执行Shell指令: 1. 使用system()函数 这是最简单的方法,包含在stdlib.h头文件中: #include <stdlib.h>int main() {system("ls -l"); // 执行ls -l命令retu…...

3.3.1_1 检错编码(奇偶校验码)
从这节课开始,我们会探讨数据链路层的差错控制功能,差错控制功能的主要目标是要发现并且解决一个帧内部的位错误,我们需要使用特殊的编码技术去发现帧内部的位错误,当我们发现位错误之后,通常来说有两种解决方案。第一…...

Debian系统简介
目录 Debian系统介绍 Debian版本介绍 Debian软件源介绍 软件包管理工具dpkg dpkg核心指令详解 安装软件包 卸载软件包 查询软件包状态 验证软件包完整性 手动处理依赖关系 dpkg vs apt Debian系统介绍 Debian 和 Ubuntu 都是基于 Debian内核 的 Linux 发行版ÿ…...