【NGINX入门指北】Nginx Web 架构实验
Nginx Web 架构实验
文章目录
- Nginx Web 架构实验
- 一、动态网站结构
- 二、LNMP 动态网站环境部署
- 三、fastcgi & php-fpm:
- 四、php-fpm初始化配置
- 五、Nginx Location、
- 六、Nginx Rewrite
- 七、CA&HTTPS
- 八、Nginx 的平滑升级

一、动态网站结构
资源
资源文件识别——语言识别——框架识别
-
index.php
开源的php:Windows/Linux+nginx+php+mysql -
index.py
开源的python:Windows/Linux+apache+python+mysql -
index.jsp
商业JAVA:Windows/Linux+tomcat+JDK+Oracle -
index.asp
商业 C#:Windows+iis+asp.net+sql-server/oracle/mogodb
二、LNMP 动态网站环境部署
1.linux部署
-
关闭防火墙
-
关闭selinux
2.nginx部署
- 安装nginx
[root@nginx1 ~]# yum list | grep nginx
Could not retrieve mirrorlist http://mirrors.elrepo.org/mirrors-elrepo.el7 error was
14: curl#7 - "Failed connect to mirrors.elrepo.org:80; 拒绝连接"
nginx.x86_64                             1:1.22.1-1.el7.ngx            @nginx-stable
nginx-filesystem.noarch                  1:1.20.1-10.el7               @epel
rh-nginx116-nginx.x86_64                 1:1.16.1-6.el7                @centos-sclo-rh
rh-nginx116-runtime.x86_64               1.16-1.el7                    @centos-sclo-rh
zabbix-nginx-conf-scl.noarch             5.0.28-1.el7                  @zabbix-frontend
collectd-nginx.x86_64                    5.8.1-1.el7                   epel
munin-nginx.noarch                       2.0.69-5.el7                  epel
nginx-all-modules.noarch                 1:1.20.1-10.el7               epel
nginx-debug.x86_64                       1:1.8.0-1.el7.ngx             nginx-stable
nginx-debuginfo.x86_64                   1:1.22.1-1.el7.ngx            nginx-stable
nginx-mod-devel.x86_64                   1:1.20.1-10.el7               epel
nginx-mod-http-image-filter.x86_64       1:1.20.1-10.el7               epel
nginx-mod-http-perl.x86_64               1:1.20.1-10.el7               epel
nginx-mod-http-xslt-filter.x86_64        1:1.20.1-10.el7               epel
nginx-mod-mail.x86_64                    1:1.20.1-10.el7               epel
nginx-mod-stream.x86_64                  1:1.20.1-10.el7               epel
nginx-module-geoip.x86_64                1:1.22.1-1.el7.ngx            nginx-stable
nginx-module-geoip-debuginfo.x86_64      1:1.22.1-1.el7.ngx            nginx-stable
nginx-module-image-filter.x86_64         1:1.22.1-1.el7.ngx            nginx-stable
nginx-module-image-filter-debuginfo.x86_641:1.22.1-1.el7.ngx            nginx-stable
nginx-module-njs.x86_64                  1:1.22.1+0.7.10-1.el7.ngx     nginx-stable
nginx-module-njs-debuginfo.x86_64        1:1.22.1+0.7.10-1.el7.ngx     nginx-stable
nginx-module-perl.x86_64                 1:1.22.1-1.el7.ngx            nginx-stable
nginx-module-perl-debuginfo.x86_64       1:1.22.1-1.el7.ngx            nginx-stable
nginx-module-xslt.x86_64                 1:1.22.1-1.el7.ngx            nginx-stable
nginx-module-xslt-debuginfo.x86_64       1:1.22.1-1.el7.ngx            nginx-stable
nginx-nr-agent.noarch                    2.0.0-12.el7.ngx              nginx-stable
pagure-web-nginx.noarch                  5.13.3-2.el7                  epel
pcp-pmda-nginx.x86_64                    4.3.2-13.el7_9                updates
python2-certbot-nginx.noarch             1.11.0-1.el7                  epel
sympa-nginx.x86_64                       6.2.70-2.el7                  epel
zabbix-nginx-conf-scl.noarch             5.0.31-1.el7                  zabbix-frontend
[root@nginx1 ~]# yum install -y nginx
[root@nginx1 ~]# systemctl start nginx
[root@nginx1 ~]# systemctl status nginx
● nginx.service - nginx - high performance web serverLoaded: loaded (/usr/lib/systemd/system/nginx.service; disabled; vendor preset: disabled)Active: active (running) since 三 2023-02-08 23:46:45 CST; 2 days agoDocs: http://nginx.org/en/docs/Process: 11615 ExecStop=/bin/sh -c /bin/kill -s TERM $(/bin/cat /var/run/nginx.pid) (code=exited, status=0/SUCCESS)Process: 11621 ExecStart=/usr/sbin/nginx -c /etc/nginx/nginx.conf (code=exited, status=0/SUCCESS)Main PID: 11623 (nginx)Tasks: 2CGroup: /system.slice/nginx.service├─11623 nginx: master process /usr/sbin/nginx -c /etc/nginx/nginx.conf└─11624 nginx: worker process2月 08 23:46:45 nginx1 systemd[1]: Stopped nginx - high performance web server.
2月 08 23:46:45 nginx1 systemd[1]: Starting nginx - high performance web server...
2月 08 23:46:45 nginx1 systemd[1]: PID file /var/run/nginx.pid not readable (yet?) after start.
2月 08 23:46:45 nginx1 systemd[1]: Started nginx - high performance web server.
[root@nginx1 ~]#
3.php-fpm部署
部署方式
- 方式一:RPM 部署
# php-fpm:php接收动态请求的程序
# php-mysql:php 连接mysql的程序
# php-gd:图形程序(GD库可以处理图片,或者生成图片)
[root@nginx1 ~]# yum install -y php-fpm php-mysql php-gd
已加载插件:fastestmirror, langpacks
Loading mirror speeds from cached hostfile
Could not retrieve mirrorlist http://mirrors.elrepo.org/mirrors-elrepo.el7 error was
14: curl#7 - "Failed connect to mirrors.elrepo.org:80; 拒绝连接"* base: mirrors.aliyun.com* elrepo: elrepo.org* extras: mirrors.aliyun.com* updates: mirrors.aliyun.com
Ceph | 1.5 kB 00:00:00
Ceph-noarch | 1.5 kB 00:00:00
base | 3.6 kB 00:00:00
ceph-source | 1.5 kB 00:00:00
http://repos.lax-noc.com/elrepo/elrepo/el7/x86_64/repodata/repomd.xml: [Errno 14] curl#7 - "Failed to connect to 2607:fcd0:0:a::2: 网络不可达"
正在尝试其它镜像。
elrepo | 3.0 kB 00:00:00
epel | 4.7 kB 00:00:00
extras | 2.9 kB 00:00:00
nginx-stable | 2.9 kB 00:00:00
percona-release-noarch | 1.5 kB 00:00:00
percona-release-x86_64 | 2.9 kB 00:00:00
prel-release-noarch | 1.5 kB 00:00:00
updates | 2.9 kB 00:00:00
zabbix | 2.9 kB 00:00:00
zabbix-frontend | 2.9 kB 00:00:00
zabbix-non-supported | 2.9 kB 00:00:00
软件包 php-mysql-5.4.16-48.el7.x86_64 已安装并且是最新版本
软件包 php-gd-5.4.16-48.el7.x86_64 已安装并且是最新版本
正在解决依赖关系
--> 正在检查事务
---> 软件包 php-fpm.x86_64.0.5.4.16-48.el7 将被 安装
--> 解决依赖关系完成依赖关系解决=======================================================================================================Package 架构 版本 源 大小
=======================================================================================================
正在安装:php-fpm x86_64 5.4.16-48.el7 base 1.4 M事务概要
=======================================================================================================
安装 1 软件包总下载量:1.4 M
安装大小:4.5 M
Downloading packages:
php-fpm-5.4.16-48.el7.x86_64.rpm | 1.4 MB 00:00:06
Running transaction check
Running transaction test
Transaction test succeeded
Running transaction正在安装 : php-fpm-5.4.16-48.el7.x86_64 1/1 验证中 : php-fpm-5.4.16-48.el7.x86_64 1/1 已安装:php-fpm.x86_64 0:5.4.16-48.el7 完毕!
[root@nginx1 ~]#
[root@nginx1 ~]# systemctl status php-fpm
● php-fpm.service - The PHP FastCGI Process ManagerLoaded: loaded (/usr/lib/systemd/system/php-fpm.service; disabled; vendor preset: disabled)Active: active (running) since 六 2023-02-11 21:35:07 CST; 5s agoMain PID: 17515 (php-fpm)Status: "Ready to handle connections"Tasks: 6CGroup: /system.slice/php-fpm.service├─17515 php-fpm: master process (/etc/php-fpm.conf)├─17519 php-fpm: pool www├─17520 php-fpm: pool www├─17521 php-fpm: pool www├─17522 php-fpm: pool www└─17523 php-fpm: pool www2月 11 21:35:07 nginx1 systemd[1]: Starting The PHP FastCGI Process Manager...
2月 11 21:35:07 nginx1 systemd[1]: Started The PHP FastCGI Process Manager.# 开机启动php-fpm
[root@nginx1 ~]# systemctl enable php-fpm
Created symlink from /etc/systemd/system/multi-user.target.wants/php-fpm.service to /usr/lib/systemd/system/php-fpm.service.
[root@nginx1 ~]# netstat -napt | grep 9000
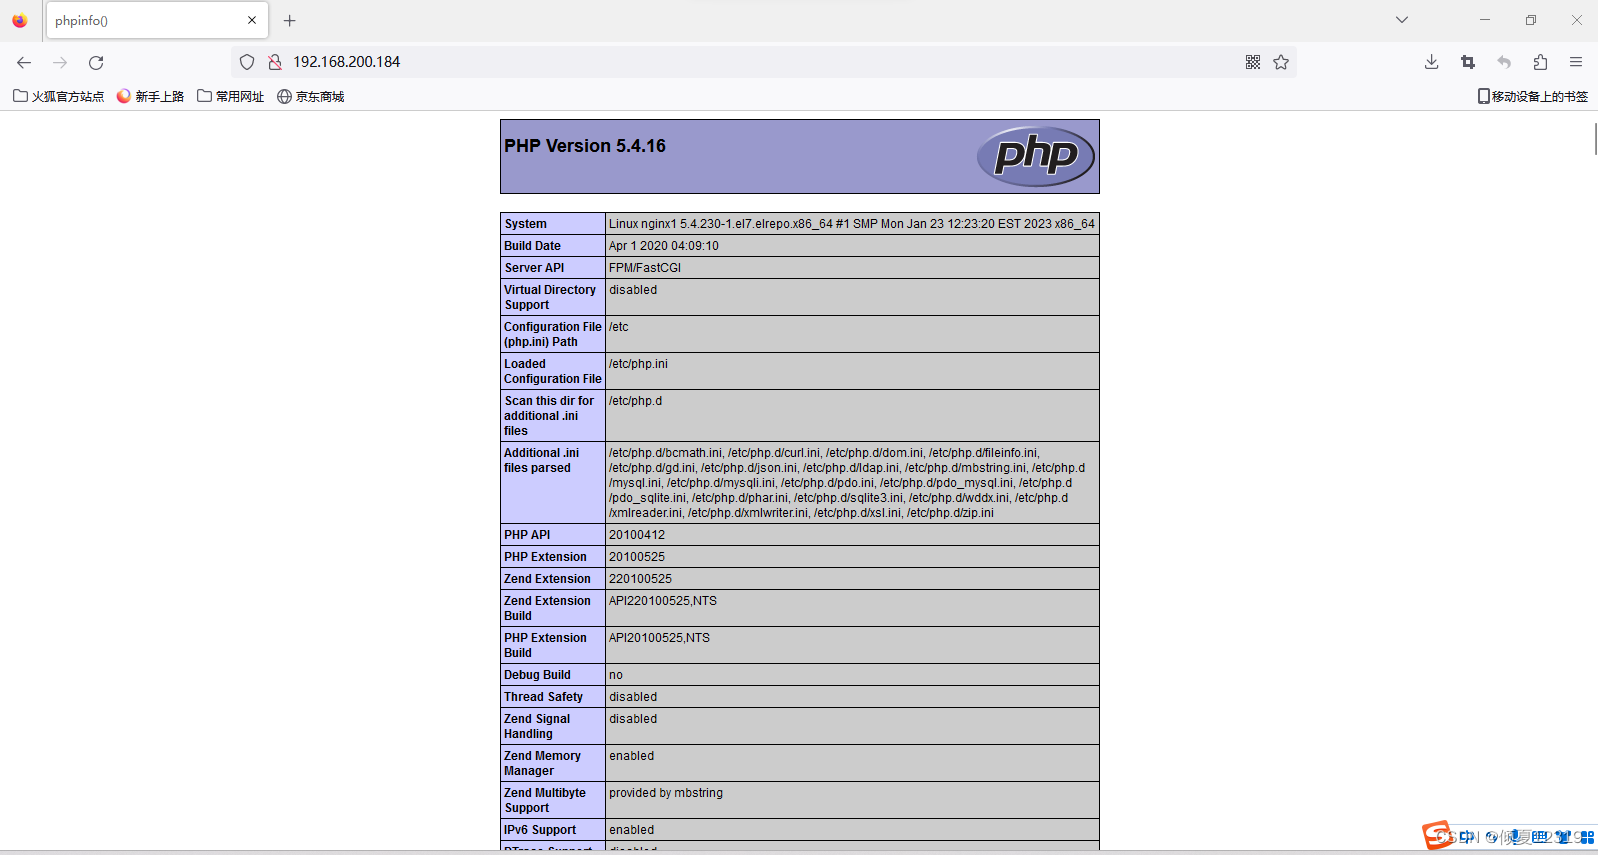
tcp 0 0 127.0.0.1:9000 0.0.0.0:* LISTEN 17515/php-fpm: mast # 测试php页面(php基本信息)
[root@nginx1 ~]# vim /usr/share/nginx/html/index.php
[root@nginx1 ~]# cat /usr/share/nginx/html/index.php
<?php
phpinfo();
?># 增加PHP主页名称:index.php
[root@nginx1 ~]# vim /etc/nginx/conf.d/default.conf
server {
location / {
...
index index.php index.html
...
}
}# 启动nginx_fastcgi功能,去掉#注释修改权限即可
server {
location ~ \.php$ {root /usr/share/nginx/html;fastcgi_pass 127.0.0.1:9000;fastcgi_index index.php;fastcgi_param SCRIPT_FILENAME $document_root$fastcgi_script_name;include fastcgi_params;}
}[root@nginx1 ~]# systemctl restart nginx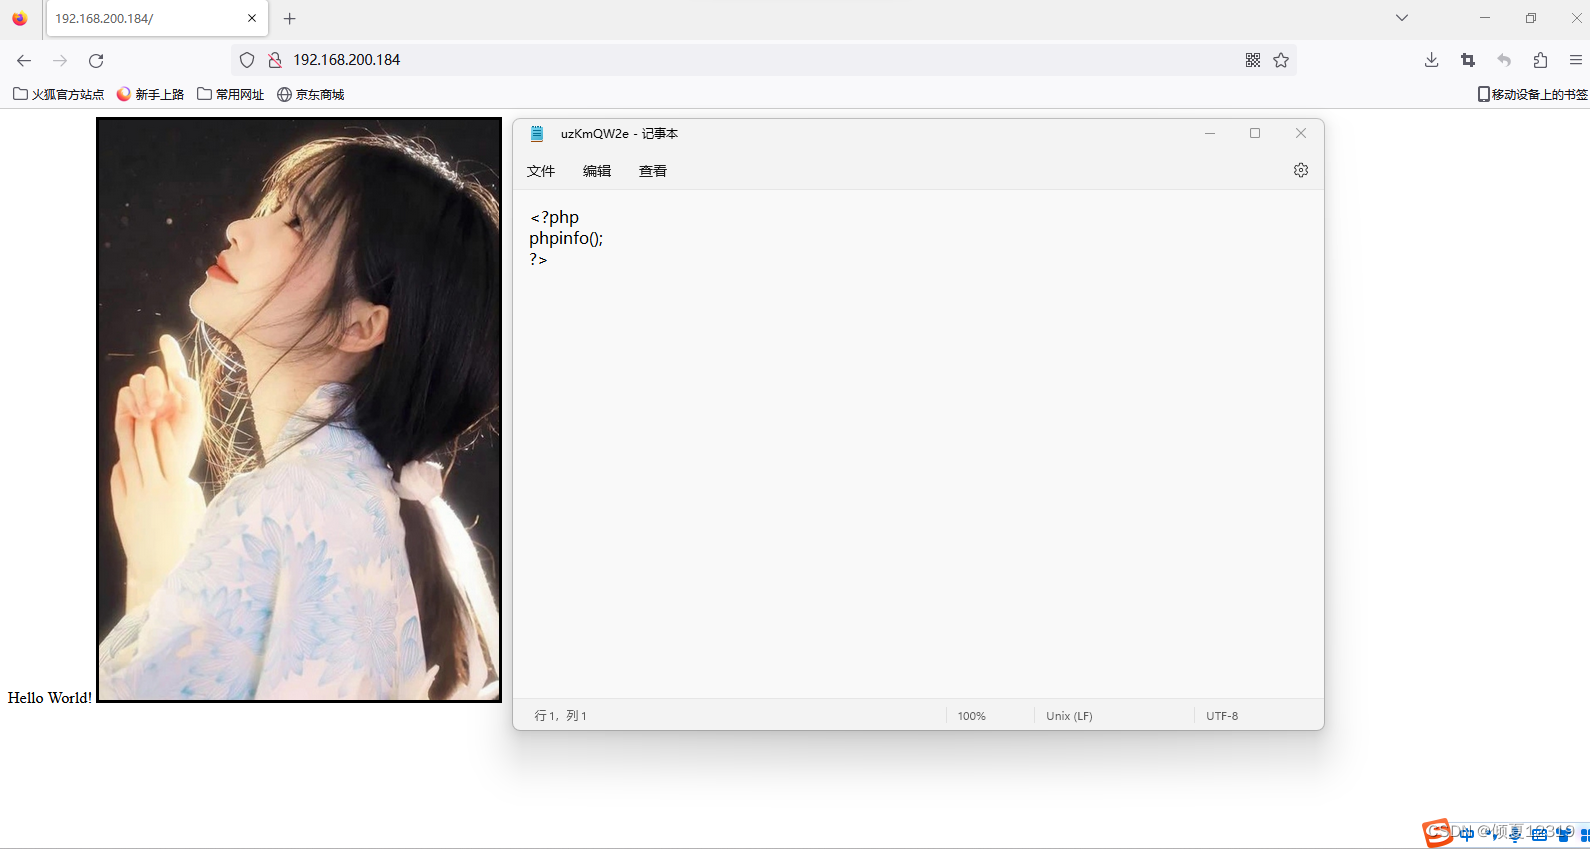
- 方式二:源码部署
4.mysql部署
部署方式:
- RPM部署
# 安装mysql服务器程序和客户机程序
#yum install -y mariadb-server mariadb
#systemctl start mariadb
#systemctl enable mariadb
# 修改mysql的root密码为‘123456’
# 准备数据库,存放app
#mysqladmin password '123456' create database bbs;
#grant all on bbs.* to phptest@'192.168.200.184' identified by '123456';
#flush privileges;
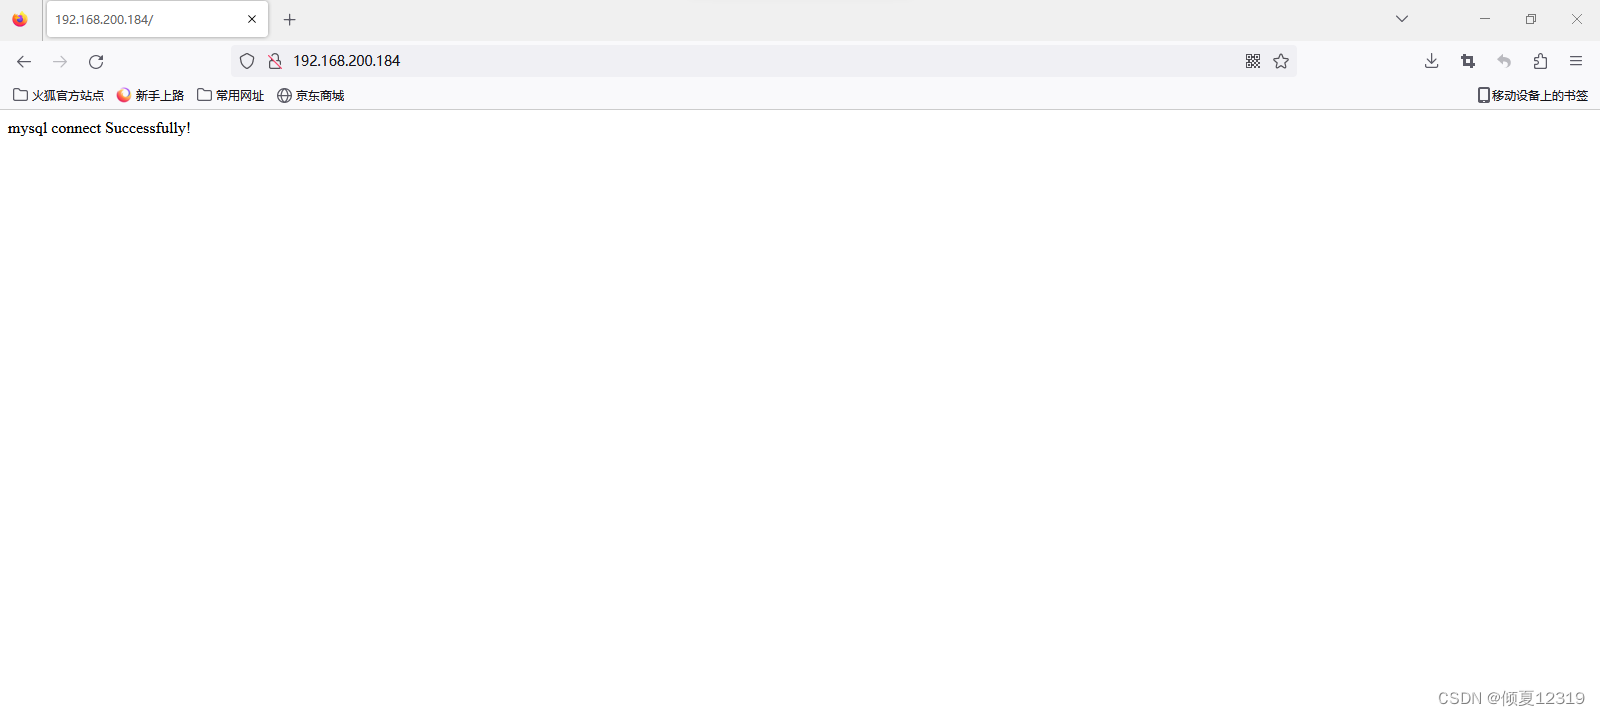
测试php是否成功调用mysql
[root@nginx1 ~]# vim /usr/share/nginx/html/index.php
[root@nginx1 ~]# cat  /usr/share/nginx/html/index.php
<?php
$link=mysql_connect('192.168.200.184','phptest','123456');
if($link)echo "mysql connect Successfully!";
elseecho "mysql connect faile!";
mysql_close();
?>
[root@nginx1 ~]#
重新访问的结果:
- 源码部署
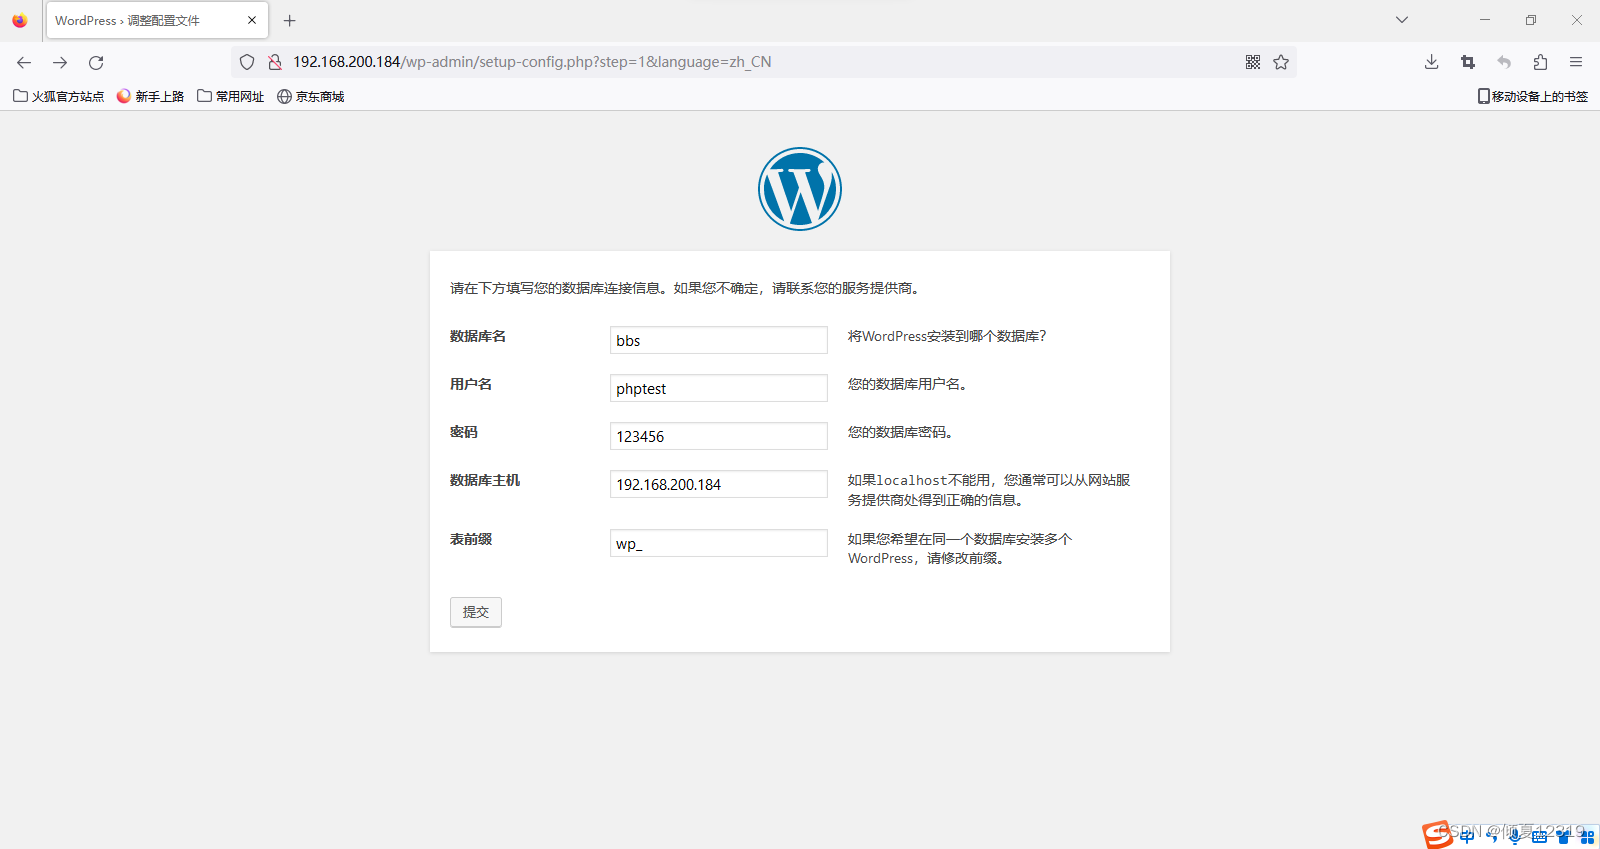
5.业务上线
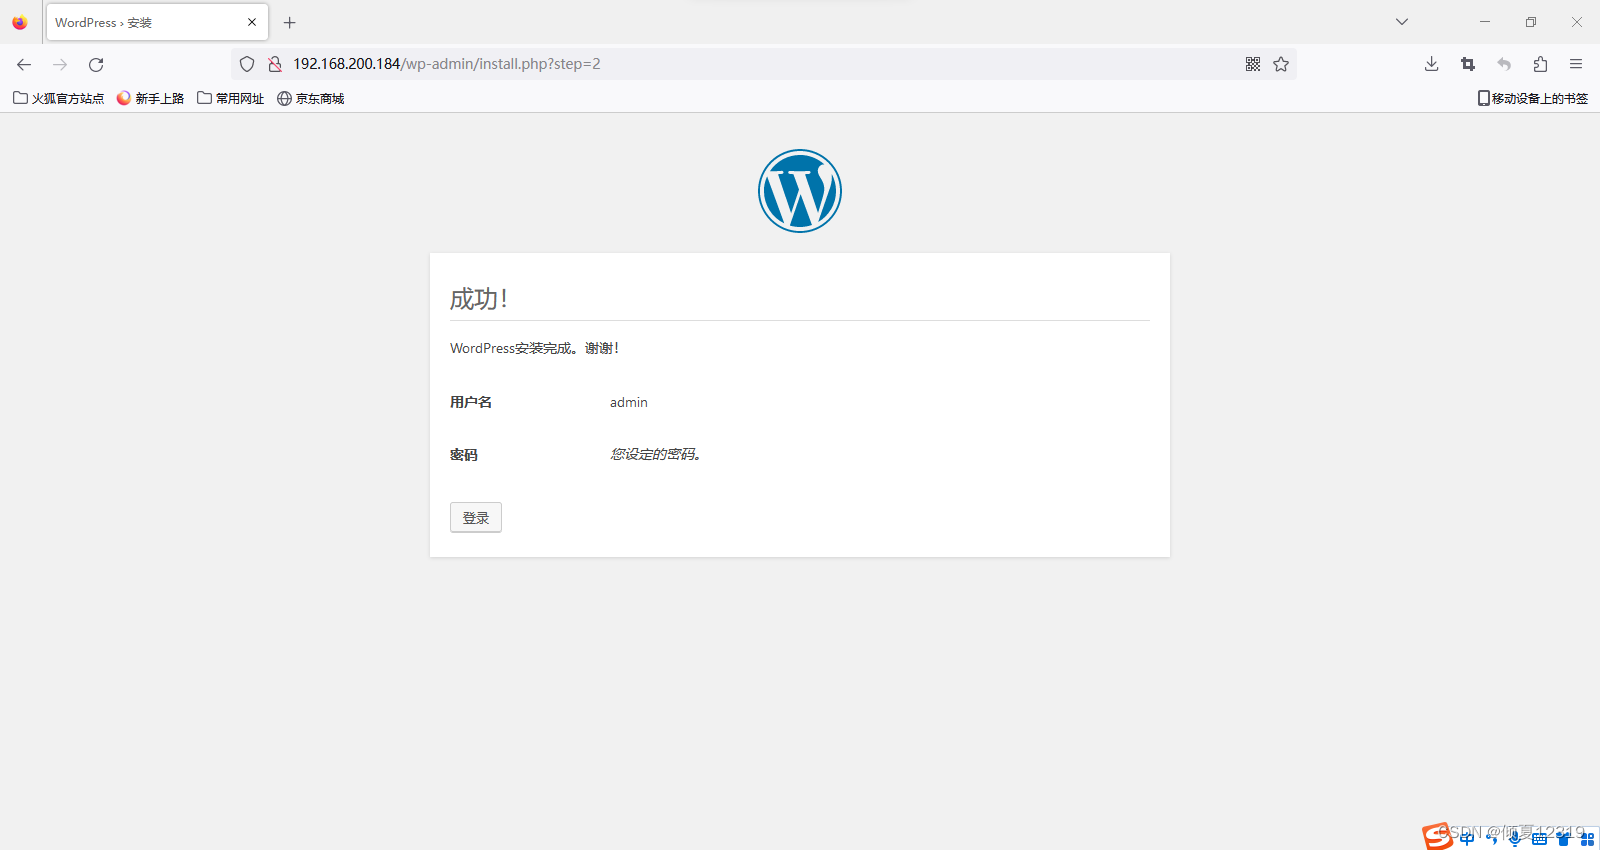
[root@nginx1 ~]# wget https://cn.wordpress.org/wordpress-4.9.4-zh_CN.zip
[root@nginx1 ~]# unzip wordpress-4.9.4-zh_CN.zip
[root@nginx1 ~]# ls
nginx-1.22.1.tar.gz 公共 模板 桌面
wordpress 视频
wordpress-4.9.4-zh_CN.zip 图片 文档 下载 音乐
zabbix initial-setup-ks.cfg [root@nginx1 ~]# rm -rf /usr/share/nginx/html/index.php
[root@nginx1 ~]# cp -rf /root/wordpress/* /usr/share/nginx/html
[root@nginx1 ~]# chown -R nginx.nginx /usr/share/nginx/html/*
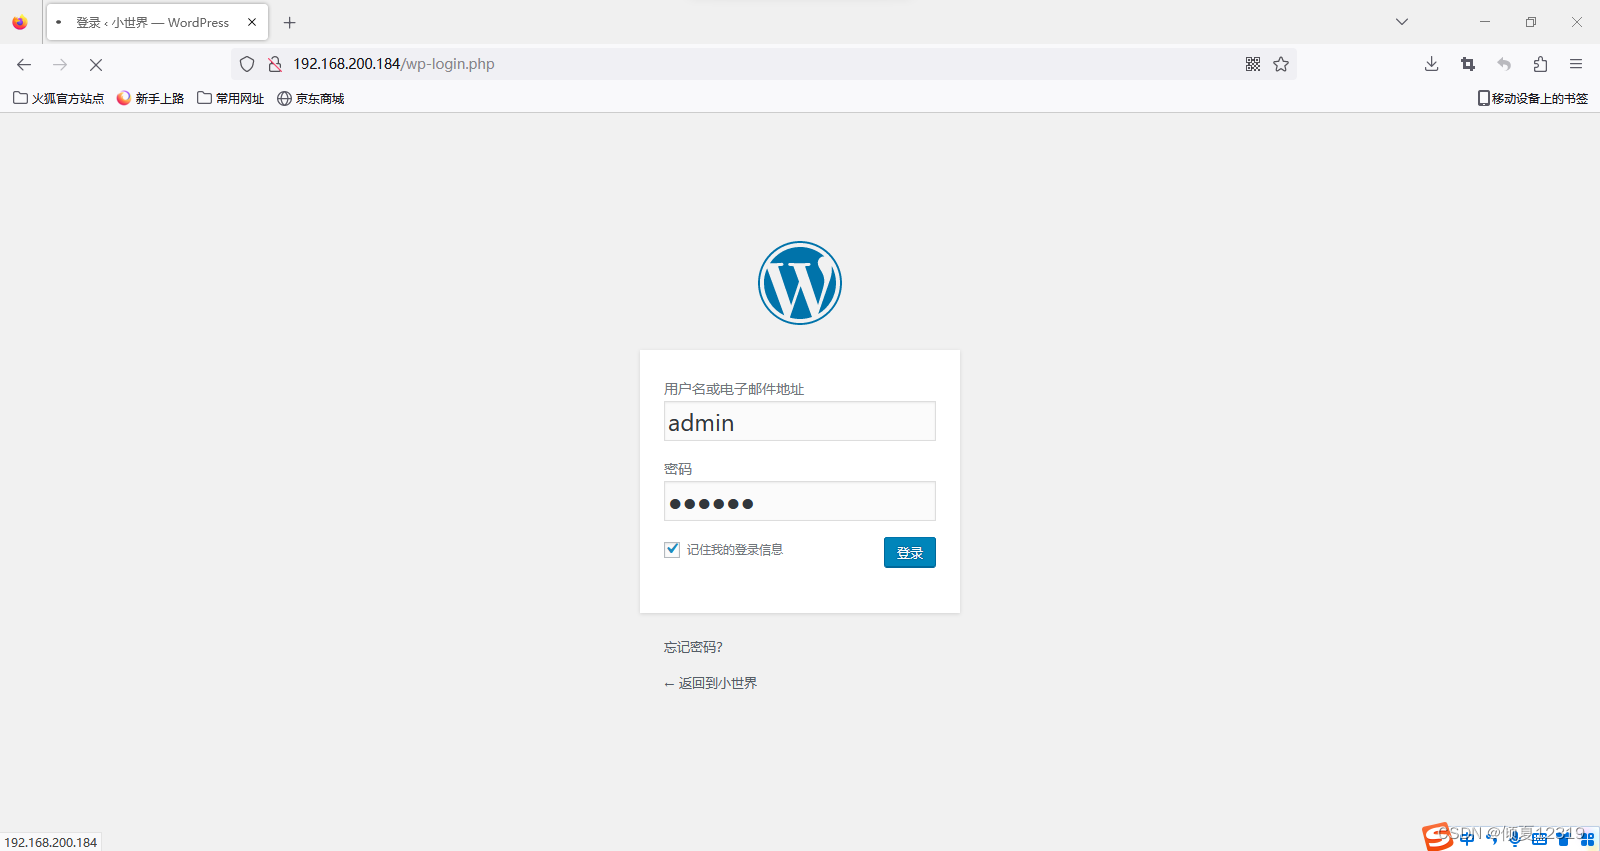
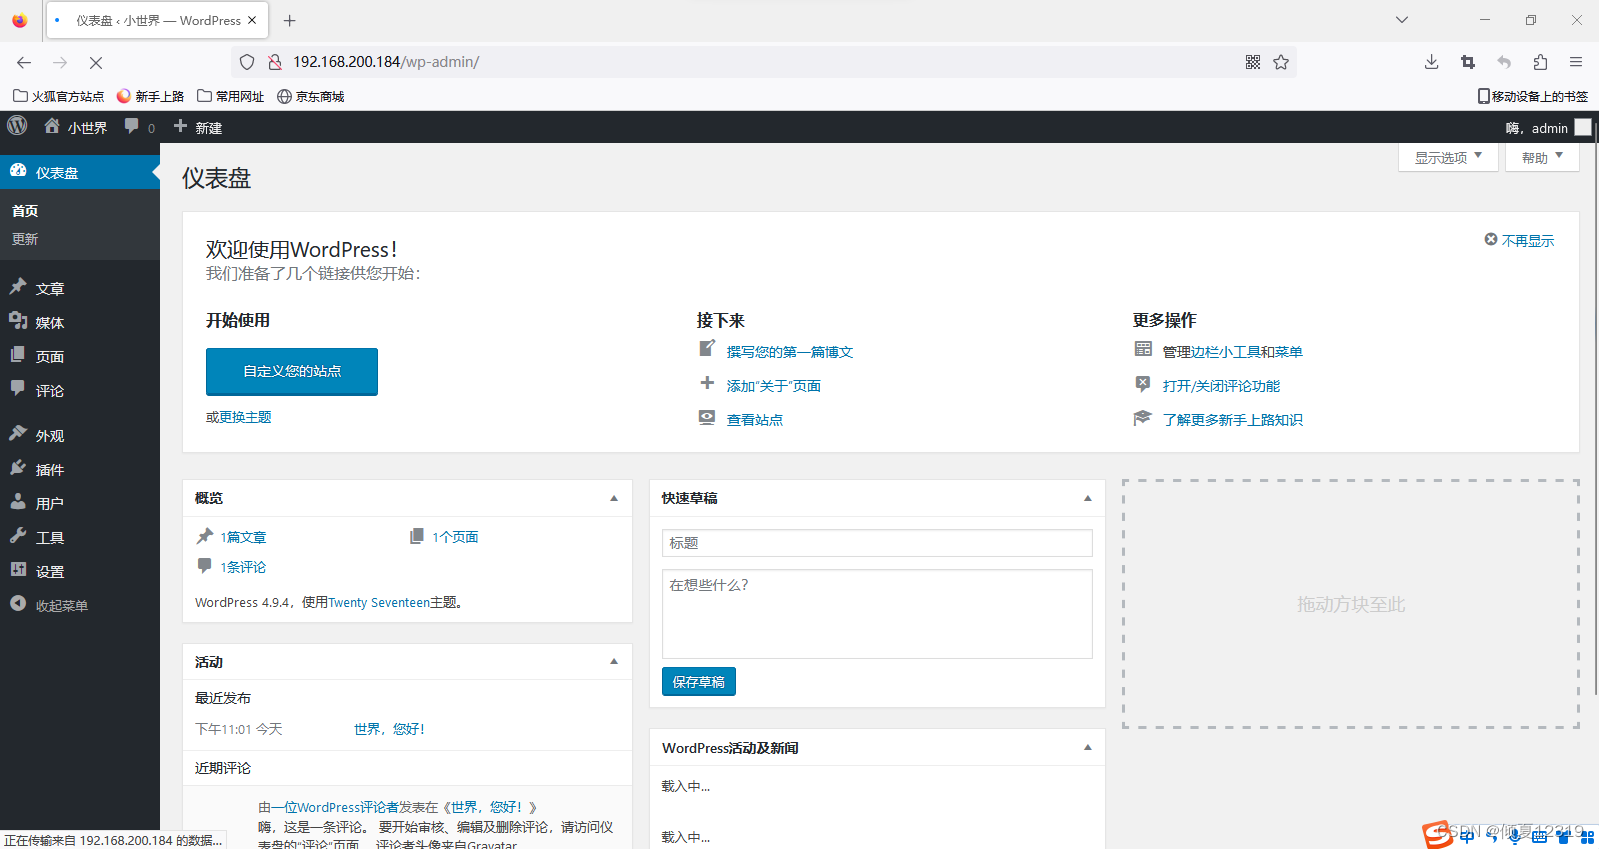
[root@nginx1 ~]# chmod 777 /usr/share/nginx/html修改为wordpress的页面,再次访问


PHP开发相关内容
学习站点:https://www.w3school.com.cn/
- 技术点:
UI:构图
前端:通过表单,文本框,提交按钮,页面布局
后端:php连接函数
DBA:实现后台数据库的写入
OP:业务上线 - 准备前台页面
[root@nginx1 conf]# cd /usr/share/nginx/html
[root@nginx1 html]# ls
index.html  test.jpg
[root@nginx1 html]# cat /usr/share/nginx/html/index.html
<html>
<body>
<img src="test.jpg" width="250" height="300" /><form action="insert.php" method="post">
Firstname: <input type="text" name="firstname" />
Lastname: <input type="text" name="lastname" />
Age: <input type="text" name="age" />
<input type="submit" />
</form></body>
</html>[root@nginx1 html]# 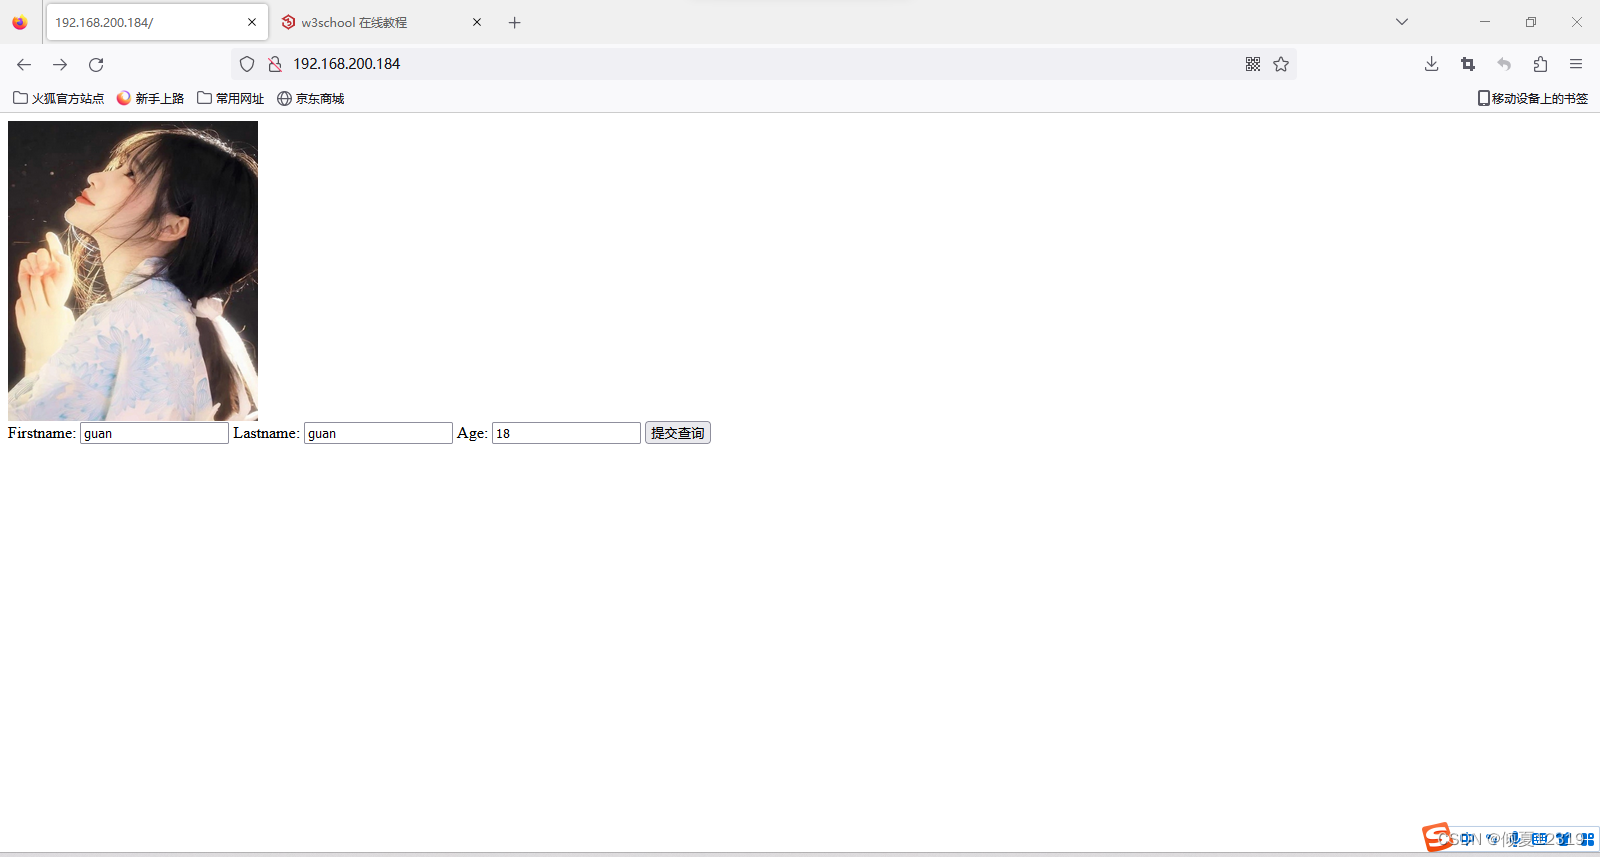
- 准备php中间件
[root@nginx1 html]#vim insert.php
<?php
$con = mysql_connect("192.168.200.184","root","123456");
if(!$con)
{
die('could not connectxulei:'.mysql_error());
}mysql_select_db("test_db",$con);$sql="INSERT INTO Persons (FirstName,LastName,Age) VALUES ('$_POST[firstname]','$_POST[lastname]','$_POST[age]')";if(!mysql_query($sql,$con))
{
die('Error:'.mysql_error());
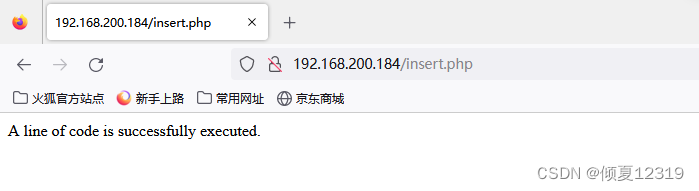
}echo"A line of code is successfully executed.";mysql_close($con);
?>
[root@nginx1 html]# ls
index.html insert.php test.jpg
[root@nginx1 html]# - 准备表和库
mysql> create database test_db;
Query OK, 1 row affected (0.01 sec)mysql> use test_db;
Database changed
mysql> create table Persons(FirstName varchar(50),LastName varchar(50),Age int);
Query OK, 0 rows affected (0.02 sec)mysql> show tables;
+-------------------+
| Tables_in_test_db |
+-------------------+
| Persons           |
+-------------------+
1 row in set (0.00 sec)mysql> desc Persons;+-----------+-------------+------+-----+---------+-------+
| Field     | Type        | Null | Key | Default | Extra |
+-----------+-------------+------+-----+---------+-------+
| FirstName | varchar(50) | YES  |     | NULL    |       |
| LastName  | varchar(50) | YES  |     | NULL    |       |
| Age       | int(11)     | YES  |     | NULL    |       |
+-----------+-------------+------+-----+---------+-------+
3 rows in set (0.00 sec)mysql> grant all on *.* to root@'%' identified by '123456';
Query OK, 0 rows affected, 1 warning (0.00 sec)mysql> grant all on *.* to root@'192.168.200.184' identified by '123456';
Query OK, 0 rows affected, 1 warning (0.00 sec)mysql> - 输入页面
点击提交
- 后台数据
登录数据库即可看到数据
mysql> use test_db;
Reading table information for completion of table and column names
You can turn off this feature to get a quicker startup with -ADatabase changed
mysql> select * from Persons;
+-----------+----------+------+
| FirstName | LastName | Age  |
+-----------+----------+------+
| guan      | guan     |   18 |
+-----------+----------+------+
1 row in set (0.00 sec)mysql> - 输出页面
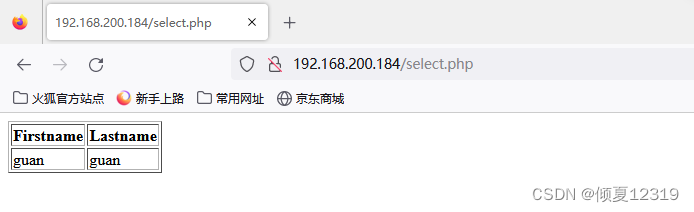
[root@nginx1 html]# vim /usr/share/nginx/html/select.php
[root@nginx1 html]# cat /usr/share/nginx/html/select.php
<?php
$con = mysql_connect("localhost","root","123456");
if (!$con){die('Could not connect: ' . mysql_error());}mysql_select_db("test_db", $con);$result = mysql_query("SELECT * FROM Persons");echo "<table border='1'>
<tr>
<th>Firstname</th>
<th>Lastname</th>
</tr>";while($row = mysql_fetch_array($result)){echo "<tr>";echo "<td>" . $row['FirstName'] . "</td>";echo "<td>" . $row['LastName'] . "</td>";echo "</tr>";}
echo "</table>";mysql_close($con);
?>[root@nginx1 html]# - 前台输出
三、fastcgi & php-fpm:
-
静态网站:nginx服务器能处理的是静态元素 .html .jpg .mp4 .css
-
Nginx模块:ngx_fastcgi_modul
ngx_fastcgi_modul:处理动态请求的接口。
nginx 通过ngx_fastcgi_modul模块 链接 php-fpm处理动态请求。 -
PHP :php-fpm
PHP-FPM(FastCGI Process Manager:FastCGI进程管理器)是一个PHP FastCGI管理器。
PHP通过php-fpm接收前台nginx的动态访问的请求,比如向后端Mysql进行查询请求后,将查询结果返回给前台nginx。 -
PHP-MYSQL
php-mysql:是php连接mysql的接口程序。 -
MYSQL存储数据
重要知识点:
1.什么是 FastCGI
2.Nginx+FastCGI运行原理
3.LNMP的运行原理
四、php-fpm初始化配置
- php-fpm相关配置文件
1.核心配置文件:
vim /etc/php.ini
date.timezone = PRC # 设置PHP的时区
open_basedir # 设置PHP脚本允许访问的目录.
open_basedir 将PHP所能打开的文件限制在指定的目录树中,包括文件本身。当程序要使用例如fopen()或file_get_contents()打开一个文件时,这个文件的位置将会被检查。当文件在指定的目录树之外,程序将拒绝打开。
2.全局配置文件:
vim /etc/php-fpm.conf
pid = /run/php-fpm/php-fpm.pid  # 设置pid文件的位置
error_log = log/php-fpm.log  # 记录错误日志的文件
log_level = notice # 记录日志的等级
# alert(必须立即处理), error(错误情况), warning(警告情况), notice(一般重要信息), debug(调试信息). 默认: notice.process.max = 3 # 默认没设置# process.max: 控制子进程最大数的全局变量, 后边的设置子进程数量的指令受到这个值的限制, 0表示无限制daemonize = yes # 将fpm转至后台运行3.扩展配置文件
vim /etc/php-fpm.d/www.conf
user = nginx # 设置用户和用户组
listen.allowed_clients = 127.0.0.1
# 允许访问FastCGI进程的IP,设置any为不限制IP,如果要设置其他主机的nginx也能访问这台FPM进程,listen处要设置成本地可被访问的IP。默认值是any。每个地址是用逗号分隔. 如果没有设置或者为空,则允许任何服务器请求连接
listen = 127.0.0.1:9000
# fpm监听端口,即nginx中php处理的地址,一般默认值即可。可用格式为: 'ip:port'
slowlog = /var/log/php-fpm/$pool-slow.log # 开启慢日志
pm=dynamic # 动态模式进程管理开启
start_servers=5 # 最初开启多少进程
min_spare_server =5 # 最小的多余进程数。最少空闲。用户访问会消耗掉进程。然后为了满足后续游湖随时随地开启进程保持空闲数为5。
max_children = 50 # 最大进程数
# max_children是PHP-FPM Pool 最大的子进程数,他数值取决于你的服务器内存。 假设你打算给10G内存给当前配置的PHP-FPM Pool,一般一个PHP请求占用内存10M-40M,我们按站点每个PHP请求占用内存25M,这样max_children = 10G/25M = 409。所以,这个值可以根据情况算出来
max_spare_servers=10 # 最大的多余进程。大规模断开后,高并发访问过后,还剩多少。
max_requests = 500 # 每个子进程能响应的请求数量,到达此数字,该PHP进程就被释放掉了。
# max_requests是每个子进程重生之前处理的请求数, 默认值为unlimited(默认为1024),可以设置小一点(如500左右),这样可以避免内存泄露带来的问题
- 初始化php-fpm
初始化前
ps aux |grep php # 观察php程序存在十个进程。
vim /etc/php-fpm.d/www.conf  # 设置生产环境下常用数值
pm = dynamic  # dynamic:启动动态管理模式
pm.start_servers = 32  # start_servers:初始启动32个进程
pm.max_children = 512  # max_children:最大进程数。(子进程数会在最大和最小数范围中变化)512个进程数是在大于16G内存的前提下。pm.min_spare_servers = 32  # min_spare:随着用户访问的增加,保持32个空闲进程。
pm.max_spare_servers = 64  # max_spare:随着用户离去。杀死大量空闲进程来节约资源。
pm.max_requests = 1500  # max_requests:是每个子进程重生之前处理的请求数, 默认值为unlimited(为1024)# max_children是PHP-FPM Pool 最大的子进程数,他数值取决于你的服务器内存。 假设你打算给10G内存给当前配置的PHP-FPM Pool,一般一个PHP请求占用内存10M-40M,我们按站点每个PHP请求占用内存25M,这样max_children = 10G/25M = 409。所以,这个值可以根据情况算出来
systemctl restart php-fpm
初始化后
ps aux |grep php
- 启动php状态监控页面功能
1.启动测试页功能
[root@nginx1 ~]# vim  /etc/php-fpm.d/www.conf
pm.status_path = /php_status # ;为php中的注释,去掉pm.status_path之前的逗号
2.nginx配置页面转发
[root@nginx1 ~]# vim /etc/nginx/conf.d/default.conf
location = /php_status {
fastcgi_pass 127.0.0.1:9000;
fastcgi_param SCRIPT_FILENAME $fastcgi_script_name;
include fastcgi_params;
}
[root@nginx1 ~]# systemctl restart nginx php-fpm
[root@nginx1 ~]#
3.访问测试页:http://192.168.200.184/php_status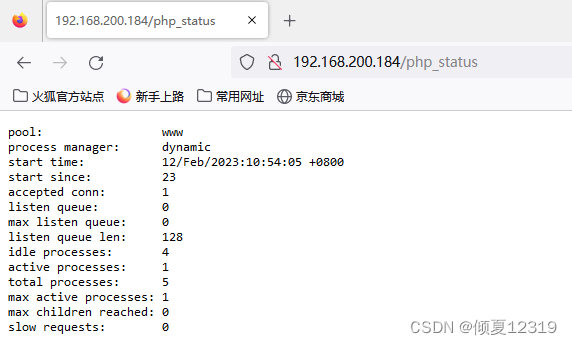
pool – fpm池子名称,大多数为www
process manager – 进程管理方式,值:static, dynamic or ondemand. dynamic
start time – 启动日期,如果reload了php-fpm,时间会更新
start since – 运行时长
accepted conn – 当前池子接受的请求数
listen queue – 请求等待队列,如果这个值不为0,那么要增加FPM的进程数量
max listen queue – 请求等待队列最高的数量
listen queue len – socket等待队列长度
idle processes – 空闲进程数量
active processes – 活跃进程数量
total processes – 总进程数量
max active processes – 最大的活跃进程数量(FPM启动开始算)
max children reached - 进程最大数量限制的次数,如果这个数量不为0,那说明你的最大进程数量太小了,请改大一点。
slow requests – 启用了php-fpm slow-log,缓慢请求的数量
五、Nginx Location、
前言:
通常网站的部分页面,需要特殊设置。
比如,/test.html 页面,需要用户访问控制(如allow all)。
location = /test.html {
allow all;
}
那部分页面该如何表达呢?
答案:就是位置 Location URL { module }. 其中URL的表达方式中使用的正则表达式,常会有冲突的情况,请通过下面的实验,了解常见的冲突符号,并掌握其中的优先级。
语法规则:
location [=|~|~*|!~|!~*|^~] /uri/ {module;module;
}
| 符号 | 含义 |
|---|---|
| = | 表示精确匹配,优先级也是最高的 |
| ~ | 区分大小写的正则匹配 |
| ~* | 不区分大小写的正则匹配 |
| / | 通用匹配,任何请求都会匹配到 |
| ^~ | 以某些字符串开头 |
| !~ | 非(区分大小写匹配的正则) |
| !~* | 非(不区分大小写匹配的正则) |
Location优先级:
= >>  ^~  >>  ~|~*|!~|!~*   >>   /
# 精确匹配》字符开头》正则匹配》通配
Location 案例:
目的:通过不同的表达式,观察表达式间的优先级
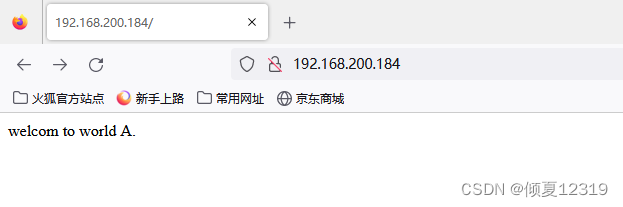
server {listen 192.168.200.184;root /abcd;index  index.html;
location = / { index a.html; }
location ~ / { index b.html; }
location   / { index c.html; }
}
a.html、b.html、c.html分别存储不同内容。
访问页面,观察显示的内容。理解正则符号间的优先级。
# location / {# expires 24h;#root /usr/share/nginx/html;#index index.php index.html;# root /app;# random_index on;# }root /abc;index index.html;location = / {index a.html;}location ~/ {index b.html;}location / {index c.html;}[root@nginx1 ~]# mkdir /abc
[root@nginx1 ~]# cd /abc
[root@nginx1 abc]# ls
[root@nginx1 abc]# echo "welcom to world A." > a.html
[root@nginx1 abc]# echo "welcom to world B." > b.html
[root@nginx1 abc]# echo "welcom to world C." > c.html
[root@nginx1 abc]# ls
a.html b.html c.html
[root@nginx1 abc]# [root@nginx1 abc]# systemctl restart nginx
# location / {# expires 24h;#root /usr/share/nginx/html;#index index.php index.html;# root /app;# random_index on;# }root /abc;index index.html;#location = / {# index a.html;# }location ~/ {index b.html;}location / {index c.html;}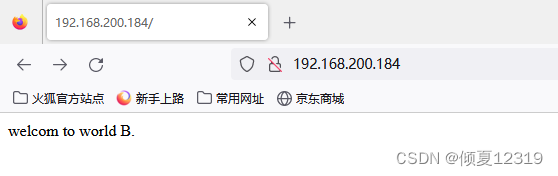
# location / {# expires 24h;#root /usr/share/nginx/html;#index index.php index.html;# root /app;# random_index on;# }root /abc;index index.html;#location = / {# index a.html;# }# location ~/ {# index b.html;# }location / {index c.html;}
# location / {# expires 24h;#root /usr/share/nginx/html;#index index.php index.html;# root /app;# random_index on;# }root /abc;index index.html;#location = / {# index a.html;# }# location ~/ {# index b.html;# }# location / {# index c.html;# }[root@nginx1 abc]# echo "welcom to world INDEX." > index.html
[root@nginx1 abc]# vim /etc/nginx/conf.d/default.conf
[root@nginx1 abc]# systemctl restart nginx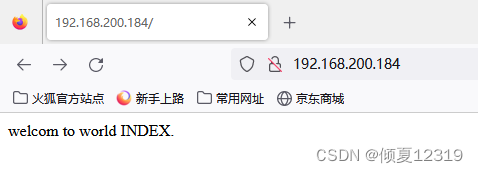
基于用户(username&password)
module:ngx_http_auth_basic_module
语法:
Syntax:auth_basic string | off;
Context: http,server,location,limit_execpt
Syntax:auth_basic_user_file file;
Context: http,server,location,limit_execpt
启用控制
- 建立认证文件
[root@node3 conf.d]# yum install -y httpd-tools
```bash
[root@nginx1 ~]# htpasswd -cm /etc/nginx/conf.d/passwd user10
New password:
Re-type new password:
Adding password for user user10
[root@nginx1 ~]# cat /etc/nginx/conf.d/passwd
user10:$apr1$IElgoR53$WTFSAWMmIfZo985jrlcxM.
[root@nginx1 ~]# - 启动认证
[root@nginx1 ~]# vim /etc/nginx/conf.d/default.conf
server {auth_basic "welcom to big world!";auth_basic_user_file /etc/nginx/conf.d/passwd;...
}
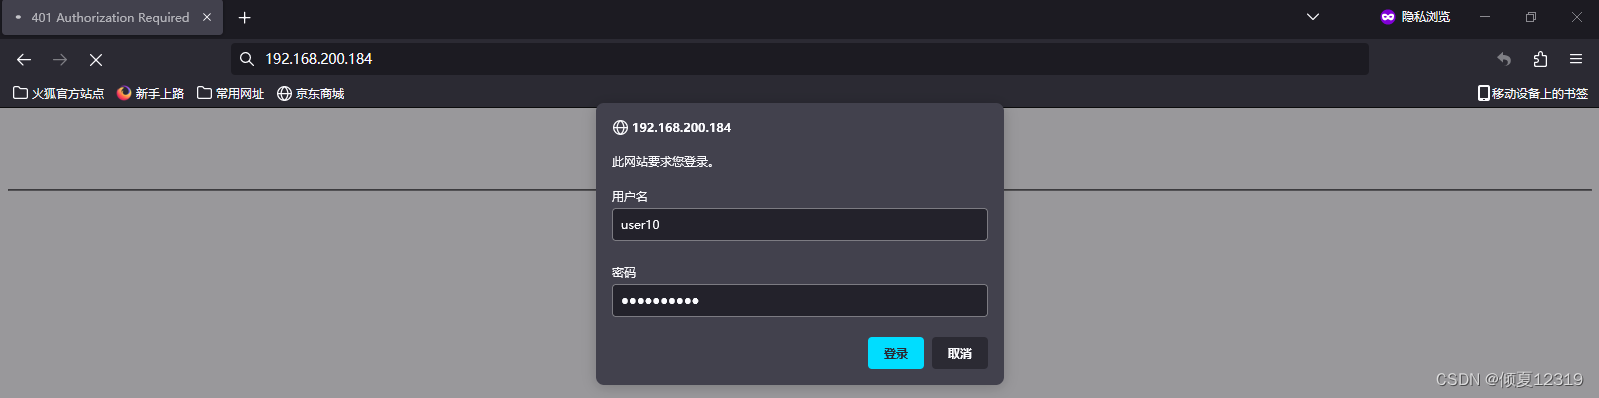
[root@nginx1 ~]# vim /etc/nginx/conf.d/default.conf
server {...location = /php_status {auth_basic "welcom to big world!";auth_basic_user_file /etc/nginx/conf.d/passwd;fastcgi_pass   127.0.0.1:9000;fastcgi_index  index.php;fastcgi_param  SCRIPT_FILENAME  $fastcgi_script_name;include        fastcgi_params;}
}
六、Nginx Rewrite
Nginx URL重写
- 什么是Rewrite
-
URL Rewrite最常见的应用是URL伪静态化,是将动态页面显示为静态页面方式的一种技术。比如
http://www.123.com/news/index.php?id=123 使用URLRewrite 转换后可以显示为 http://www.123
.com/news/123.html对于追求完美主义的网站设计师,就算是网页的地址也希望看起来尽量简洁明快。
理论上,搜索引擎更喜欢静态页面形式的网页,搜索引擎对静态页面的评分一般要高于动态页面。所
以,UrlRewrite可以让我们网站的网页更容易被搜索引擎所收录。 -
从安全角度上讲,如果在URL中暴露太多的参数,无疑会造成一定量的信息泄漏,可能会被一些黑客
利用,对你的系统造成一定的破坏,所以静态化的URL地址可以给我们带来更高的安全性。 -
实现网站地址跳转,例如用户访问360buy.com,将其跳转到jd.com。
- Rewrite相关指令
重定向:rewrite
将用户的访问(url),更换成指定的文件。
if 语句
应用环境:server,location
语法:if (condition) { … }
条件判断
| 符号 | 含义 |
|---|---|
| ~* | 正则匹配 (不区分大小写) |
| !~ | 非正则匹配 (区分大小写) |
| !~* | 非正则匹配 (不区分大小写) |
| -f 和!-f | 用来判断是否存在文件 |
| -d 和!-d | 用来判断是否存在目录 |
| -e 和!-e | 用来判断是否存在文件或目录 |
| -x 和!-x | 用来判断文件是否可执行 |
全局变量
| $document_root | 针对当前请求的根路径设置值 |
| $remote_addr | 客户端地址 |
| $request_filename | 当前请求的文件路径名(带网站的主目录/usr/local/nginx/html/images/test.jpg) |
| $request_uri | 当前请求的文件路径名(不带网站的主目录/images/test.jpg) |
| $scheme | 用的协议,比如http或者是https |
| $server_name | 请求到达的服务器名 |
| $args | 请求中的参数 |
| $host | 请求信息中的"Host",如果请求中没有Host行,则等于设置的服务器名 |
| $limit_rate | 对连接速率的限制; |
| $request_method | 请求的方法,比如"GET"、"POST"等 |
| $remote_port | 客户端端口号 |
| $remote_user | 客户端用户名,认证用 |
| $query_string | 与$args相同 |
| $server_protocol | 请求的协议版本,“HTTP/1.0"或"HTTP/1.1” |
| $server_addr | 服务器地址,如果没有用listen指明服务器地址,使用这个变量将发起一次系统调用以取得地址(造成资源浪费) |
| $document_uri | 与$uri一样,URI地址 |
| $server_port | 请求到达的服务器端口号 |
-
Rewrite flag
-
Rewrite匹配参考示例
案例1:
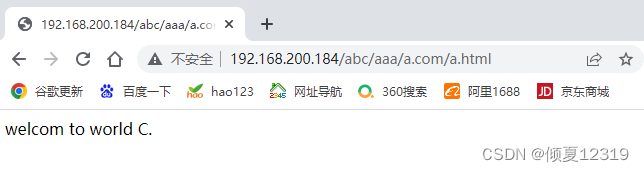
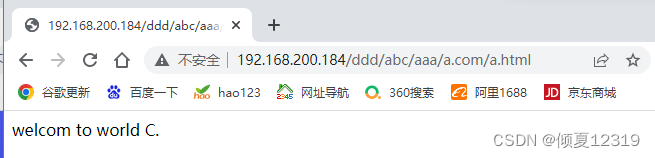
目的:当用户访问http://192.168.200.184/abc/aaa/a.com/a.html地址时,
通过redirect 重定向至http://192.168.200.184/ccc/c.com/c.html
注意:
- 192.168.200.184/abc/aaa/a.com/a.html是否存在已经不重要了。
- 192.168.200.184/ccc/c.com/c.html页面必须存在。

1.还原默认站点
#cat /etc/nginx/conf.d/default.conf
server {listen 80;location / {root /usr/share/nginx/html;index index.html index.php;}
}
#vim /usr/share/nginx/html/index.html  # 默认主页
2.配置地址重写
# 创建待测试目录
[root@nginx1 html]#mkdir /usr/share/nginx/html/abc/aaa/a.com/ -p
[root@nginx1 html]#mkdir /usr/share/nginx/html/ccc/a.com/ -p
# 创建待测试目标页面
[root@nginx1 html]#vim /usr/share/nginx/html/abc/aaa/a.com/a.html
[root@nginx1 a.com]# cat /usr/share/nginx/html/abc/aaa/a.com/a.html
welcom to world A.
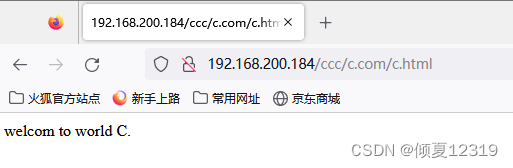
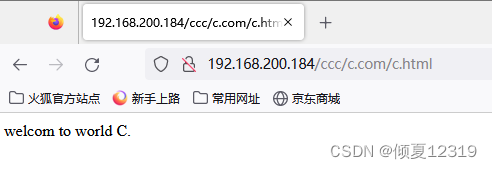
[root@nginx1 html]#vim /usr/share/nginx/html/ccc/c.com/c.html
[root@nginx1 a.com]# cat /usr/share/nginx/html/ccc/c.com/c.html
welcom to world C.
[root@nginx1 a.com]# vim /etc/nginx/conf.d/default.conf
...location /abc {rewrite .* /ccc/c.com/c.html permanent;}
...
[root@nginx1 a.com]# systemctl restart nginx3.访问旧页面进行测试
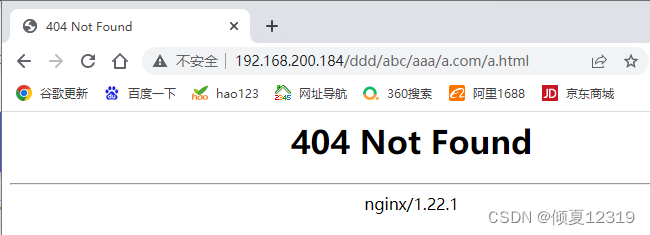
浏览器访问:http://192.168.200.184/abc/aaa/a.com/a.html
结果如下:说明重定向成功,由网址http://192.168.200.184/abc/aaa/a.com/a.html 重定向到http://192.168.200.184/ccc/c.com/c.html
4.关于permanent
permanent 会将地址显示为新的URL地址(重定向之后的URL)
没有添加permanent之前
添加上permanenturl被替换生成两次请求。
服务器只转换了url,客户端重新申请。
添加permanent之后
不添加permanent
url是老的服务器内部转换请求。
服务器内部转换URL,内部转换页面。
5.请思考表达式问题1
用以下匹配方式,对URL(http://192.168.200.184/abc/aaa/a.com/a.html )进行匹配有什么区别
Location = /abc
通过此URL:http://192.168.200.184/abc/aaa/a.com/a.html访问服务器,结果是否会重定向
答案:不可行,因为需要完全匹配
Location ~ /abc
通过此URL:http://192.168.200.184/abc/aaa/a.com/a.html 访问服务器,结果是否会重定向
答案:可行,因为部分匹配即可
Location ^~ /abc
通过此URL:http://192.168.200.184/abc/aaa/a.com/a.html 访问服务器,结果是否会重定向
答案:可行,因为部分匹配即可
6.请思考表达式问题2
用户访问如下URL( http://192.168.200.184/bbb/abc/aaa/a.com/a.html )是否会这样的语句(Location ~ /abc)匹配
答案:会
如何阻止这样的url重定向:location ~ ^/abc
案例2:
目的:利用正则中的”()和\1 “,
替换url中一部分的内容。
将http://192.168.200.184/2016/a/b/c/test.html
换http://192.168.200.184/2017/a/b/c/test.html
方法:
location /2016 {rewrite ^/2016/(.*)$ /2017/$1 permanent;}
1.注释掉上一个实验中的重定向部分。
避免实验出现交叉影响
2.配置地址重写
# 准备目标目录
[root@nginx1 ~]# mkdir /usr/share/nginx/html/2017/a/b/c/ -p
# 准备目标 页面
[root@nginx1 ~]# vim /usr/share/nginx/html/2017/a/b/c/test.html[root@nginx1 a.com]# vim /etc/nginx/conf.d/default.conflocation   /abc {rewrite  ^/abc/(.*)$   /efg/$1 permanent;}
3.访问旧页面进行测试
在浏览器输入:192.168.200.184/2016/a/b/c/test.html
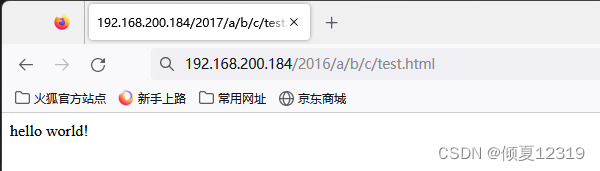
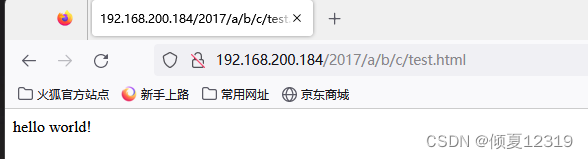
url因为permanent被重新改写,请求也变为2次。客户端重新申请了两次
[root@nginx1 ~]# cat /var/log/nginx/access.log
192.168.200.1 - user10 [12/Feb/2023:16:22:25 +0800] "GET /2016/a/b/c/test.html HTTP/1.1" 301 169 "-" "Mozilla/5.0 (Windows NT 10.0; Win64; x64; rv:109.0) Gecko/20100101 Firefox/109.0" "-"
192.168.200.1 - user10 [12/Feb/2023:16:22:25 +0800] "GET /2017/a/b/c/test.html HTTP/1.1" 200 13 "-" "Mozilla/5.0 (Windows NT 10.0; Win64; x64; rv:109.0) Gecko/20100101 Firefox/109.0" "-"
案例3:
目的:了解判断在重定向中的使用方法。
location { rewrite } 只能替换url中的目录路径,
使用if (){rewrite}可以替换协议主机目录全部能容。
将http://www.qianfeng.com换为http://jd.com
1.注释掉上一个实验中的重定向部分。
2.配置地址重写
[root@nginx1 ~]# vim /etc/nginx/conf.d/default.conf if ( $host ~* qianfeng.com ) {rewrite .* http://jd.com permanent;}[root@nginx1 ~]# systemctl restart nginx3.访问旧页面进行测试
注意:客户端 guan.com的域名解析,和jd.com的域名解析。
[root@nginx1 ~]# cat /etc/hosts
127.0.0.1   localhost localhost.localdomain localhost4 localhost4.localdomain4
::1         localhost localhost.localdomain localhost6 localhost6.localdomain6
192.168.200.184 guan.com a.com b.com nginx1
浏览器输入guan.com

案例4
目的:上一个试验中,不论输入的url中页面内容是什么:
http://guan.com/1.html
http://guan.com/2.html
其结果。把主机地址由guan.com换成cloud.com。$request全部都重定向至
http://cloud.com/1.html主页。
http://cloud.com/2.html
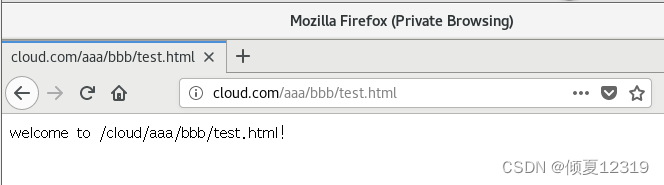
需求:如果希望替换掉域名中的主机,保留后端url路径。可以使用nginx内置变量调用老的url目录路径。
示例:
将http://qianfeng.com/ccc/bbb/2.html
换成http://cloud.com/ccc/bbb/2.html
1.延续上一个实验
准备一个新网站cloud.com
[root@nginx1 ~]# vim /etc/nginx/conf.d/cloud.com.conf
[root@nginx1 ~]# cat /etc/nginx/conf.d/cloud.com.conf
server {listen 80;server_name cloud.com;location / {root   /cloud;index index.html;
}
}
新页面aaa/bbb/test.html
[root@nginx1 ~]# mkdir /cloud
[root@nginx1 ~]# cd /cloud
[root@nginx1 cloud]# vim index.html
[root@nginx1 cloud]# cat index.html
welcome to cloud!
[root@nginx1 cloud]# mkdir aaa/bbb -p
[root@nginx1 cloud]# vim  aaa/bbb/test.html
[root@nginx1 cloud]# pwd
/cloud
[root@nginx1 cloud]# vim  aaa/bbb/test.html
[root@nginx1 cloud]# cat  aaa/bbb/test.html
welcome to /cloud/aaa/bbb/test.html!
[root@nginx1 cloud]# 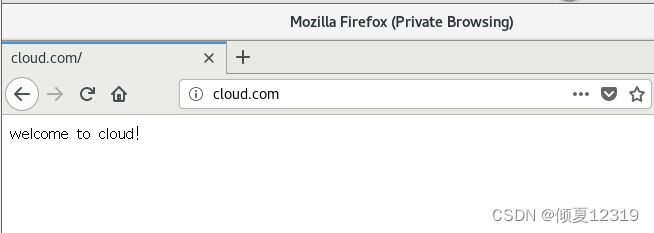
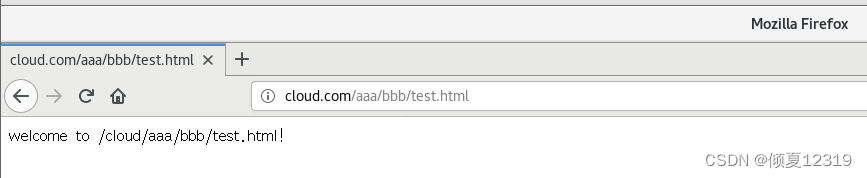
2.配置地址重写
[root@nginx1 ~]# vim /etc/nginx/conf.d/default.conf
...
server_name  guan.com
....if ( $host ~* guan.com ) {
rewrite .*      http://cloud.com$request_uri permanent;
}
注意客户端解析cloud.com的问题。
注意:因为无法管理京东站点。
这次实验中的目的站点,使用的自己管理的cloud.com/aaa/bbb/test.html
3.访问旧页面进行测试
浏览器访问:http://guan.com/aaa/bbb/test.html
案例5:
目的:在访问的url是目录时,在URL自动添加一个“/” (如果不是目录,则不加/)
(但是先做个判断,是目录才需要加,不是目录就不加。)
当用户访问网站时,输入的URL不完整。
1.输入的URL是目录时,自动添加“/”
http://www.baidu.com/abc
2.输入的URL是文件时,不添加“/”
http://www.baidu.com/abc/index.html
3.输入的URL是目录,但已经添加"/"时,不添加“/”
http://www.baidu.com/abc/
1.注释掉上一个实验中的重定向部分。
2.配置地址重写
[root@nginx1 ~]# vim /etc/nginx/conf.d/default.conf
...
server_name  guan.com
....
if (-d $request_filename) {
rewrite ^(.*)([^/])$ http://$host$1$2/ permanent;
}
准备目标目录
[root@nginx1 ~]# mkdir /usr/share/nginx/html/dir
[root@nginx1 ~]# echo 'welcome to /usr/share/nginx/html/dir' > /usr/share/nginx/html/dir/index.html
3.访问页面进行测试
访问目录:http://guan.com/dir/
注意发生重定向现象,观察url后方多了“/”。
访问文件:http://guan.com/dir/index.html
没有触发重定向现象,观察url后方没有变化。
案例6(了解):
目的:将旧url中的字段,引入重定向后新url中。
http://www.tianyun.com/login/tianyun.html
转为 http://www.tianyun.com/reg/login.php?user=tianyun
演示:
location /login {rewrite ^/login/(.*)\.html$ /reg/login.php?user=$1;}
因涉及动态站点环境,理解概念即可。
案例7:
目的:目录的表达方式发生变化,原先的“-”分割,变成了“/"目录层次。
将http://www.tianyun.com/qf/11-22-33/1.html
转换为http://www.tianyun.com/qf/11/22/33/1.html
1.注释掉上一个实验中的重定向部分。
2.配置地址重写
[root@nginx1 ~]# vim /etc/nginx/conf.d/default.conf
...
server_name  guan.com
....
location /dir {rewrite ^/dir/([0-9]+)-([0-9]+)-([0-9]+)(.*)$ /dir/$1/$2/$3$4 permanent;root /usr/share/nginx/html;}
准备目标目录
[root@nginx1 ~]# mkdir /usr/share/nginx/html/dir/123/456/789/ -p准备目标页面
[root@nginx1 ~]# vim   /usr/share/nginx/html/dir/123/456/789/test.html [root@nginx1 ~]# echo 'welcome to /usr/share/nginx/html/dir/123/456/789/test.html ' > /usr/share/nginx/html/dir/123/456/789/test.html
[root@nginx1 ~]# cat   /usr/share/nginx/html/dir/123/456/789/test.html
welcome to /usr/share/nginx/html/dir/123/456/789/test.html
3.访问页面进行测试
在浏览器输入:http://guan.com/dir/123-456-789/test.html

案例8:
目的:引用原URL当中的信息,重定向至目标的URL
http://alice.guan.com ==> http://www.guan.com/alice
http://jack.guan.com ==> http://www.guan.com/jack
1.注释掉上一个实验中的重定向部分。
2.配置地址重写
[root@nginx1 ~]# vim /etc/nginx/conf.d/default.conf
...
server_name  guan.com
....if ($host ~* "^www.guan.com$" ) {break;}if ($host ~* "^(.*)\.guan\.com$" ) {set $user $1;rewrite .* http://www.guan.com/$user permanent;}
这里break是为了跳出循环,如不加break,每一次重写后,主机名都符合if的判断结果,会再次被重写。
set 指令是用于定义一个变量,并且赋值。应用于server,location,if环境。
准备目标页面
[root@nginx1 ~]# mkdir /usr/share/nginx/html/{jack,alice}
[root@nginx1 ~]# echo "jack" > /usr/share/nginx/html/jack/index.html
[root@nginx1 ~]# echo "alice" > /usr/share/nginx/html/alice/index.html
准备客户端DNS记录
[root@nginx1 ~]# vim /etc/hosts
[root@nginx1 ~]# cat /etc/hosts
192.168.200.184 guan.com  nginx1  cloud.com jack.guan.com alice.guan.com www.guan.com
3.访问页面进行测试
alice.guan.com
jack.guan.com
案例9:
目的:如果访问服务器中的特殊文件。
如:.sh结尾的文件,则返回403操作拒绝错误
1.阅读理解示例
[root@node1 html]# vim /usr/share/nginx/html/test.sh
[root@node1 html]# cat /usr/share/nginx/html/test.sh
echo "hello world."
2.示例
[root@node1 html]# vim /etc/nginx/conf.d/default.conf
...
server_name  guan.com
....
location ~* \.sh$ {return 403;#return 301 http://www.guan.com;
}
[root@node1 html]# systemctl restart nginx3.访问页面进行测试

案例10:
目的:last标记
1.准备三个页面
[root@node1 html]# mkdir /usr/share/nginx/html/test
[root@node1 html]# echo 'break' > /usr/share/nginx/html/test/break.html
[root@node1 html]# echo 'last' > /usr/share/nginx/html/test/last.html
[root@node1 html]# echo 'test' > /usr/share/nginx/html/test/test.html
2.邀请break,last标记
[root@node1 html]# vim /etc/nginx/conf.d/default.conf
...
server_name guan.com
....
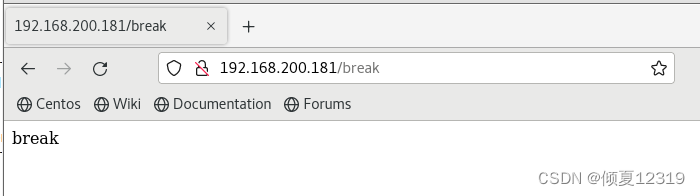
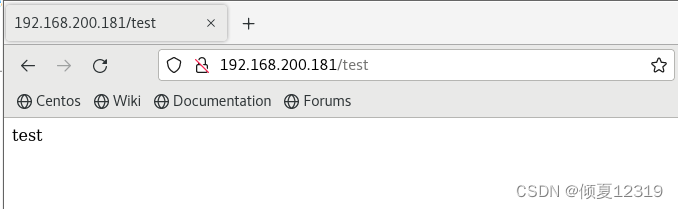
location /break {rewrite .* /test/break.html break;root /usr/share/nginx/html;
}
location /last {rewrite .* /test/last.html last;root /usr/share/nginx/html;
}
location /test {rewrite .* /test/test.html break;root /usr/share/nginx/html;
}[root@node1 html]# systemctl restart nginx3.验证,理解last
http://192.168.200.181/break
http://192.168.200.181/last
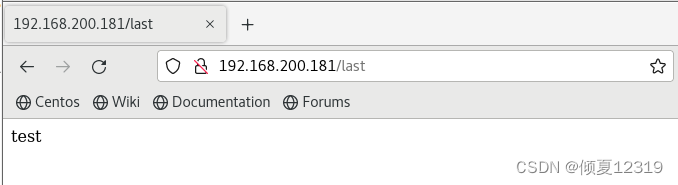
last 新的URL是个开始。拿新UR匹配(下一个URL),结果匹配到test了。
注意:last标记在本条rewrite规则执行完后,会对其所在的server { … } 标签重新发起请求;
break标记则在本条规则匹配完成后,停止匹配,不再做后续的匹配。
另有些时候必须使用last,比如在使用alias指令时,而使用proxy_pass指令时则必须使用break。
如果location中rewrite后,还需要进行其他处理,如动态fastcgi请求(.PHP,.jsp)等,要用last继续发起新的请求
(根的location使用last比较好, 因为如果有.php等fastcgi请求还要继续处理)
http://192.168.200.181/test
案例11(了解):
目的:80 ======> 443
1 申请证书
2 上传到服务器上
3 解压证书
4 启动证书功能
https的独立server{}
# Settings for a TLS enabled server.server {listen 443 ssl;server_name www.xuleicloud.top;location / {root /usr/share/nginx/html;index index.php index.html;}ssl on;ssl_certificate cert/214025315060640.pem;ssl_certificate_key cert/214025315060640.key;ssl_session_cache shared:SSL:1m;ssl_session_timeout 10m;ssl_ciphers HIGH:!aNULL:!MD5;ssl_prefer_server_ciphers on;}
把这个文件解压后,会有两个文件,分别为***.pem和***.key(可以修改成你需要的名字),将这两个文件拷贝到你的Nginx根目录下的cert文件夹内(自己创建的,也可以命名成其他名字)。
或者拷贝到绝对路径也可以。/abc/aaa.pem
5 配置地址重写
http的独立server{}
方式1:
server {listen 80;server_name www.xuleicloud.top xuleicloud.top;return 301 https://www.xuleicloud.top$request_uri;}方式2:
rewrite ^(.*) https://$server_name$1 permanent;
6访问http 跳转到https了
http://www.xuleicloud.top:8080
案例12(了解):
目的:apache 开启重定向,开启443
[root@aliyun ~]# vim /etc/httpd/conf.d/discuz.conf
<VirtualHost *:80>RewriteEngine        onRewriteRule ^(.*)$ https://www.xuleicloud.top$1 [R=301,L]
</VirtualHost>
七、CA&HTTPS
私有CA
前言:
CA 证书颁发机构(CA, Certificate Authority), 基于https的协议工作的一中虚拟主机,要构建这样的网站需要mod_ssl模块的支持。且需要提供两个文件:证书文件和私钥文件,证书文件是标识这个网站服务器身份的,私钥文件主要用来实现在服务器端对数据进行加密,然后在网站中传输的。证书在生产生活中需要到对应的机构去申请,在实验环境中本应该搭建一台证书服务器。
1、生成证书及秘钥文件
1.准备存放证书和秘钥的目录
[root@nginx ~]# mkdir -p /etc/nginx/ssl
2.生成私钥
使用openssl生成基于rsa数学算法长度为1024bit的秘钥,文件必须以key为结尾
[root@nginx ~]# openssl genrsa 1024 > /etc/nginx/ssl/server.key
Generating RSA private key, 1024 bit long modulus
...............................................................++++++
................................................................++++++
e is 65537 (0x10001)
3.使用秘钥文件生成证书-申请书
[root@nginx ~]# openssl req -new -key /etc/nginx/ssl/server.key > /etc/nginx/ssl/server.csr
You are about to be asked to enter information that will be incorporated
into your certificate request.
What you are about to enter is what is called a Distinguished Name or a DN.
There are quite a few fields but you can leave some blank
For some fields there will be a default value,
If you enter '.', the field will be left blank.
-----
Country Name (2 letter code) [XX]:CN       ###国家名(两个字
State or Province Name (full name) []:BJ  ###省会(两个字
Locality Name (eg, city) [Default City]:BJ    ###城市
Organization Name (eg, company) [Default Company Ltd]::GG ###组织名
Organizational Unit Name (eg, section) []:cloud		##组织单位名
Common Name (eg, your name or your server's hostname) []:nginx.linux.com ##服务器的名字或者你的名字
Email Address []:12345678@qq.com   ###可选
Please enter the following 'extra' attributes
to be sent with your certificate request
A challenge password []:       ###密码为空
An optional company name []:     ####密码为空
Common Name (eg, your name or your server's hostname) []:   ###公司名空
查看申请书
[root@nginx ~]# ls /etc/nginx/ssl/
server.csr   (证书申请)    server.key     (私钥)
4.同意申请,生成证书
[root@nginx ~]# openssl req -x509 -days 365 -key /etc/nginx/ssl/server.key -in /etc/nginx/ssl/server.csr > /etc/nginx/ssl/server.crt
注释:
-x509:证书的格式,固定的
days:证书的有效期,生产生活中时间不同,价格不同
key:指定秘钥文件
in:指定证书申请文件
查看证书
[root@nginx ~]# ll /etc/nginx/ssl/
总用量 12
-rw-r--r--. 1 root root 1021 7月  12 17:31 server.crt     ####证书文件
-rw-r--r--. 1 root root  676 7月  12 17:30 server.csr     ####申请书。可以销毁
-rw-r--r--. 1 root root  887 7月  12 17:12 server.key    ####私钥文件
2、私有CA的https部署实战
1.创建目录
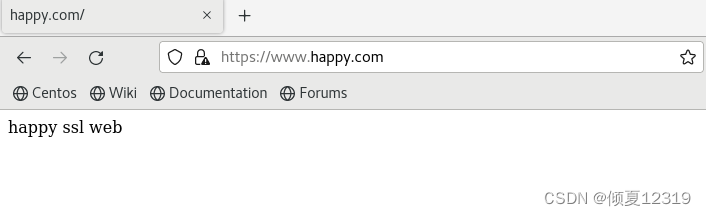
[root@nginx ~]#  mkdir /happy
[root@nginx ~]# echo "happy ssl web" > /happy/index.html
2.编辑nginx.conf文件
[root@nginx ~]# vim /etc/nginx/conf.d/happy.confserver {listen 443 ssl;server_name www.bj.com;ssl_certificate /etc/nginx/ssl/server.crt; ##路径自定义ssl_certificate_key /etc/nginx/ssl/server.key;location / {root /happy;index index.html index.htm;}}[root@nginx ~]# nginx -t
[root@nginx ~]# nginx -s reload[root@nginx ~]# ss -antp | grep nginx
LISTEN 0 128 *:80 *:* users:(("nginx",pid=11700,fd=6),("nginx",pid=11699,fd=6),("nginx",pid=8347,fd=6))
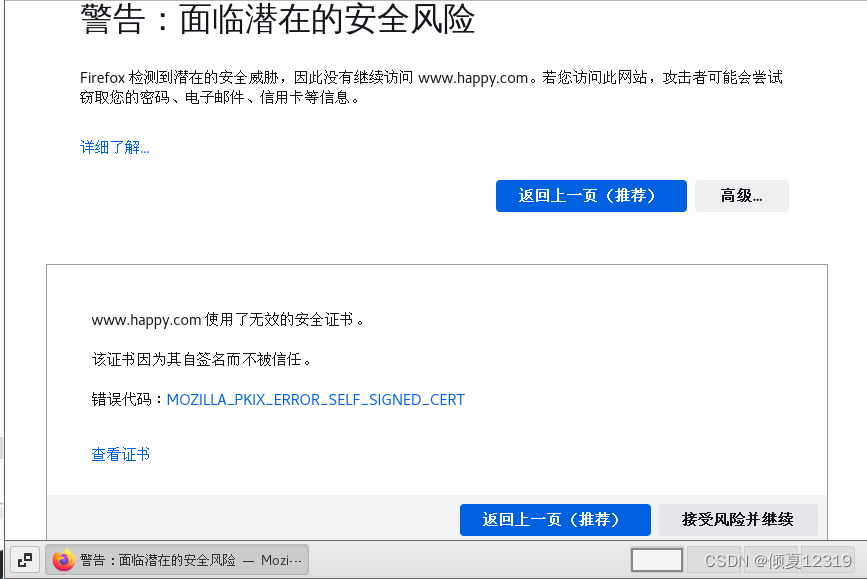
LISTEN 0 128 *:443 *:* users:(("nginx",pid=11700,fd=20),("nginx",pid=11699,fd=20),("nginx",pid=8347,fd=20))3、测试访问
https://www.happy.com
风险提示

公网CA
[root@xiaochen ~]# ll /etc/nginx/214194377980730.*
-rw-r--r-- 1 root root 1679 May 11 14:41 /etc/nginx/214194377980730.key
-rw-r--r-- 1 root root 3916 May 11 14:41 /etc/nginx/214194377980730.pem[root@xiaochen ~]# cat /etc/nginx/conf.d/default.conf
server {listen       80;server_name  www.xuleicloud.top ;return     301  https://www.xuleicloud.top$request_uri;# rewrite .* https://www.xuleicloud.top$request_uri permanent;
}
server {listen 443 ssl;ssl on;ssl_certificate  /etc/nginx/214194377980730.pem;ssl_certificate_key /etc/nginx/214194377980730.key;location / {root /usr/share/nginx/html;index index.html index.php;}
}
[root@xiaochen ~]# systemctl  restart nginx
八、Nginx 的平滑升级
原理:
当需要将正在运行中的nginx升级,添加/删除服务模块时,可以在不中断服务的情况下,使用新版本,重编译的Nginx可执行程序替换旧版本的可执行程序,步骤如下:
• 使用新的可执行程序替换旧的可执行程序,对于编译安装的Nginx,可以将新版本编译安装到旧版本的nginx安装路径中.替换之前,最好备份一下旧的可执行程序
• 发送以下指令: Kill –USR2 旧版本的nginx主进程号
• 旧版本的主进程将重命名它的pid文件为.oldbin (例如:/usr/local/nginx/logs/nginx.pid.oldbin),然后执行新版本的nginx可执行程序,依次启动新的主进程和新的工作进程.
• 此时,新,旧版本的nginx实例会同时运行,共同处理输入的请求.要逐步停止旧版本的nginx实例,你必须发送WINCH信号给旧的主进程,然后,它的工作进程就将开始从容关闭:kill –WINCH 旧版本的Nginx主进程号
• 一段时间后,旧的工作进程(worker process)处理了所有已连接的请求后退出,仅由新的工作进程来处理输入的请求了.
• 这时候,我们可以决定是使用新版本,还是恢复到旧的版本;
Kill –HUP 旧的主进程号:Nginx将在不重载配置文件的情况下启动它的工作进程;
Kill –QUIT 新的主进程号:从容关闭其他工作进程(woker process);
Kill –TERM 新的主进程号:强制退出;
Kill 新的主进程号或旧的主进程号:如果因为某些原因新的工作进程不能退出,则向其发送kill信号.
新的主进程退出后,旧的主进程会移除.oldbin前缀,恢复为他的.pid文件,这样,一切就都恢复到升级之前了,如果尝试升级成功,而你也希望保留新的服务器时,可发送QUIT信号给旧的主进程,使其退出而只留下新的服务器运行:
平滑升级1.12版本到1.14版本
1、编译安装新版本的nginx,指定安装目录为新目录
[root@server nginx]# tar xf nginx-1.14.2.tar.gz -C /usr/local/src/
[root@server nginx]# cd /usr/local/src/nginx-1.14.2/
[root@server nginx-1.14.2]# ./configure --user=nginx --group=nginx --prefix=/usr/local/nginx14 --with-http_stub_status_module --with-http_ssl_module && make && make install
2、查看就的nginx的主进程号和工作进程号
[root@server ~]# ps aux |grep ngin[x]
root      68595  0.0  0.1  20640  1548 ?        Ss   12:12   0:00 nginx: master process /usr/local/nginx/sbin/nginx
nobody    75083  0.0  0.1  21060  1632 ?        S    12:17   0:00 nginx: worker process
3、替换旧的执行程序
[root@server ~]# mv /usr/local/nginx/sbin/nginx{,.bak}
[root@server ~]# cp /usr/local/nginx14/sbin/nginx /usr/local/nginx/sbin/nginx
[root@server ~]# /usr/local/nginx/sbin/nginx -v
nginx version: nginx/1.14.2
4、 给主进程发送USR2信号
[root@server ~]# cat /usr/local/nginx/logs/nginx.pid
68595
[root@server ~]# kill -USR2 68595
[root@server ~]# cat /usr/local/nginx/logs/nginx.pid.oldbin
68595
旧版本的主进程将重命名它的pid文件为.oldbin (例如:/usr/local/nginx/logs/nginx.pid.oldbin),然后执行新版本的nginx可执行程序,依次启动新的主进程和新的工作进程.
5、给进程发送WINCH信号
[root@server ~]# kill -WINCH 68595
[root@server ~]# ps aux |grep ngin[x]
root      58943  0.0  0.3  45940  3260 ?        S    13:34   0:00 nginx: master process /usr/local/nginx/sbin/nginx
nginx     58944  0.0  0.1  46388  1888 ?        S    13:34   0:00 nginx: worker process
root      68595  0.0  0.1  20640  1548 ?        Ss   12:12   0:00 nginx: master process /usr/local/nginx/sbin/nginx
一段时间后,旧的工作进程(worker process)处理了所有已连接的请求后退出,仅由新的工作进程来处理输入的请求了.
回退到以前版本
这时因为旧的服务器还尚未关闭它监听的套接字,所以通过下面的几步还可以恢复旧版本:
• 发送 HUP 信号给旧的主进程 - 它将在不重加载配置文件的情况下启动它的工作进程。
• 发送 QUIT 信号给新的主进程,要求其从容关闭其工作进程
• 发送 TERM 信号给新的主进程,迫使其退出
• 如果因为某些原因新的工作进程不能退出,则直接将其杀死 KILL 信号
第一步
[root@server ~]# kill -HUP 68595
[root@server ~]# ps aux |grep ngin[x]
root      58943  0.0  0.3  45940  3260 ?        S    13:34   0:00 nginx: master process /usr/local/nginx/sbin/nginx
nginx     58944  0.0  0.1  46388  1888 ?        S    13:34   0:00 nginx: worker process
root      68595  0.0  0.1  20640  1548 ?        Ss   12:12   0:00 nginx: master process /usr/local/nginx/sbin/nginx
nobody    80008  0.0  0.1  21060  1388 ?        S    13:50   0:00 nginx: worker process
第二步
[root@server ~]# kill -QUIT 58943
[root@server ~]# ps aux |grep ngin[x]
root      68595  0.0  0.1  20640  1548 ?        Ss   12:12   0:00 nginx: master process /usr/local/nginx/sbin/nginx
nobody    80008  0.0  0.1  21060  1388 ?        S    13:50   0:00 nginx: worker process[root@server ~]# cat /usr/local/nginx/logs/nginx.pid
68595
总结: 新的主进程退出后,旧的主进程会自动移除 .oldbin 后缀,恢复为.pid的后缀名,如此:一切就都恢复到升级之前了。如果尝试升级成功,而你也希望保留新的服务器时,发送 QUIT 信号给旧的主进程使其退出而只留下新的服务器运行。
相关文章:
【NGINX入门指北】Nginx Web 架构实验
Nginx Web 架构实验 文章目录Nginx Web 架构实验一、动态网站结构二、LNMP 动态网站环境部署三、fastcgi & php-fpm:四、php-fpm初始化配置五、Nginx Location、六、Nginx Rewrite七、CA&HTTPS八、Nginx 的平滑升级一、动态网站结构 资源 资源文件识别——…...

rtt-nano移植
nano其他功能移植 添加finsh组件打开宏实现rt_hw_console_getchar函数添加finsh组件到工程总结问题1. 移植到stm32G0过程中出现Undefined symbol rt_hw_interrupt_disable (referred from clock.o)??2. “implict declaration of function ‘ ‘ is invalid in c99??3. 关于…...
cnn+transformer
好的,下面是使用 Transformer 加 CNN 实现语义分割的代码,使用的数据集是 Semantic Segmentation Drone Dataset。 首先,我们需要导入必要的 Python 库和模块。我们将使用 PyTorch 深度学习框架来实现模型: #python import torch import torch.nn as nn import torch.nn.fu…...

Python fileinput模块:逐行读取多个文件
前面章节中,我们学会了使用 open() 和 read()(或者 readline()、readlines() )组合,来读取单个文件中的数据。但在某些场景中,可能需要读取多个文件的数据,这种情况下,再使用这个组合࿰…...
Vue3路由传参
vue3路由和vue2差别不是很大,不过在传参形式上略有改变 在Vue3中使用路由必须引入 useRouter 和 useRoute import { useRoute, useRouter } from vue-routerconst Router useRouter() //跳转const Route useRoute() //获取到值 同Vue2一样,query使用p…...

用户管理——认证功能JWT和Session
目录用户认证功能的技术选型JWT和Session的区别基于JWT和Session的认证流程基于JWT的认证流程基于Session的认证流程基于JWT和Session的认证的优缺点基于JWT和Session的认证的安全性基于JWT和Session的认证的性能分析基于JWT的一次性和无法废弃基于JWT和Session的认证的续签选择…...

hashlib — 加密哈希算法
hashlib — 加密哈希算法 1.概述 加密可以保护消息的安全,以便验证它们的准确性并且使它们受保护不被拦截。 Python 的加密方式支持包括利用像 MD5 和 SHA 这样的标准算法对消息内容产生签名的 hashlib 和验证消息没有在传输过程中被改变的 hmac hashlib 哈希库模…...

四喜临门选股预警源码指标
{四喜临门选股预警} AP1:CROSS(MA(C,5),MA(C,10)); RSV:(CLOSE-LLV(LOW,9))/(HHV(HIGH,9)-LLV(LOW,9))*100; K:SMA(RSV,3,1); D:SMA(K,3,1); AP2:CROSS(K,D); DIFF:EMA(CLOSE,12) - EMA(CLOSE,26); DEA:EMA(DIFF,9); AP3:CROSS(DIFF,DEA); AP4:CROSS(MA(V,5),MA(V,10)); GYTJ1:…...
)
Kotlin新手教程五(扩展)
一、扩展 在Kotlin中可以给一个类添加一个新的方法而不用继承该类或者使用设计模式,这样的方法称为扩展。 1.扩展函数 声明一个扩展函数,我们需要用一个 接收者类型 也就是被扩展的类型来作为他的前缀。 下面代码为 MutableList 添加一个swap 函数&am…...
QT入门Containers之Widget、Frame
目录 一、QWidget界面相关 1、布局介绍 2、基本界面属性 3、特殊属性 二、QFrame 三、Demo展示 此文为作者原创,创作不易,转载请标明出处! 一、QWidget界面相关 1、布局介绍 为什么将QWidget容器放在第一个,因为目前使用过…...

数据结构与算法基础-学习-12-线性表之顺序队
一、个人理解队列是线性表的衍生之一,具有先进先出的特性,在队尾进行插入操作,在队头进行删除操作。队列的存储结构分为两个大类,一种是顺序队,就是用数组实现。另一种就是链队,使用链表实现。顺序队存在真…...
小窍门)
Python 字典(Dictionary)小窍门
字典是另一种可变容器模型,且可存储任意类型对象。字典的每个键值 key:value 对用冒号 : 分割,每个键值对之间用逗号 , 分割,整个字典包括在花括号 {} 中 ,格式如下所示:d {key1 : value1, key2 : value2 }注意:dict …...

知识图谱构建技术综述
摘要 *知识图谱为实现语义化智能搜索以及知识互联打下了基础,。, *随着知识的发展,传统的基于模板和规则构建的知识图谱已经被深度学习所替代。 知识组织得原则中:知识的充分性、有序性和标准化规则。深度学习的效果在很大程度上…...
环境变量和进程地址空间
目录 环境变量: env:显示所有的环境变量: echo $环境变量名表示查看环境变量的值 理解环境变量: getenv:显示环境变量的值 export set命令:显示所有变量 unset取消变量: pwd:当…...
【数据结构】栈和队列
目录 一、栈 1、栈的定义 2、栈的模拟实现(顺序栈) 1、创建一个顺序结构的栈 2、实现压栈方法(push) 3、模拟实现pop方法(出栈) 4、模拟实现peek(查看) 5、测试上述方法 3、栈的应用场景 1、改变元…...
sql复习(视图、Top-N分析、其他数据库对象)
一、视图view 1.视图定义 视图是一种虚表。 视图建立在已有表的基础上, 视图赖以建立的这些表称为基表。 向视图提供数据内容的语句为 SELECT 语句, 可以将视图理解为存储起来的 SELECT 语句。 视图向用户提供基表数据的另一种表现形式。 2.使用视图的好处 控制数据访问 简…...

2023年私募股权基金研究报告
第一章 概况 PE是私募,也即私募投资基金,是指以非公开发行方式向合格投资者募集的,投资于股票、股权、债券、期货、期权、基金份额及投资合同约定的其他投资标的(如艺术品、红酒等)的投资基金,简称私募基金…...

Redis单点故障+红锁原理
提示:文章写完后,目录可以自动生成,如何生成可参考右边的帮助文档 文章目录 一、Redis单点故障二、红锁原理三、Redission实现了红锁一、Redis单点故障 单台redis容易出单点故障采用集群,获取到锁之后数据持久化到rdb,aof文件中从节点有可能在从主节点拿到数据之前,主节点…...

数据库中的存储过程
1、创建存储过程create procedure sp_name[参数名] [类型],[参数名] [类型]asbegin.........end以上格式还可以简写成:create proc sp_name[参数名] [类型],[参数名] [类型]asbegin.........end/*注:“sp_name”为需要创建的存储过程的名字,该…...

基于 VPX 总线的工件台运动控制系统研究与开发-DSP+FPGA硬件架构(一)
作为光刻机核心单元之一,超精密工件台主要负责实现快速扫描、上下片、精密定位、调平调焦等功能。目前,较为成熟的方案大多采用 VME 并行总线架构来建立超精密工件台控制系统,由于随着系统性能要求的提升,VME 总线以及相应的处理器…...

【亲测免费】 普冉PY32F002A移植FreeRTOS资源文件
普冉PY32F002A移植FreeRTOS资源文件 【下载地址】普冉PY32F002A移植FreeRTOS资源文件 本资源文件提供了将FreeRTOS V9.0移植到普冉M0芯片PY32F002A的完整示例。开发环境基于KEIL,并使用了LL库进行移植。该示例展示了如何在PY32F002A芯片上运行四个任务,并…...

利用模型广场为你的智能客服场景挑选合适模型
🚀 告别海外账号与网络限制!稳定直连全球优质大模型,限时半价接入中。 👉 点击领取海量免费额度 利用模型广场为你的智能客服场景挑选合适模型 智能客服是当前许多应用接入大模型的核心场景之一。开发者需要根据业务对响应速度、…...

告别跑飞!S32K3xx Standby模式唤醒后程序复位?手把手教你用WKPU和RTC保留关键数据
S32K3xx低功耗实战:WKPU与RTC协同解决Standby模式数据丢失难题 引言 在嵌入式系统设计中,低功耗优化一直是工程师们面临的永恒挑战。S32K3xx系列微控制器凭借其出色的电源管理能力,成为汽车电子、工业控制等领域的热门选择。然而,…...

YOLOv8从零部署到实战:一站式环境配置与核心功能解析
1. YOLOv8环境搭建全攻略 第一次接触YOLOv8时,我也被各种依赖项搞得头晕眼花。经过多次实践,我总结出一套最稳妥的安装方案,特别适合刚入门的新手。YOLOv8作为当前最先进的目标检测框架之一,其安装过程确实比传统CV库复杂些&#…...

convoai-cli:命令行集成AI对话,提升开发效率的自动化利器
1. 项目概述:一个面向对话式AI的命令行利器如果你和我一样,经常需要和各类大语言模型(LLM)打交道,无论是调试一个提示词(Prompt),还是批量处理一堆文档,又或者只是想快速…...

MD5是哈希,不是加密,防君子不防小人
一、先把概念说清楚很多开发者在日常交流中习惯说“MD5加密”,这个说法流传太久,以至于不少人真的以为MD5是一种加密算法。实际上,MD5属于哈希(Hash)算法,也叫散列算法或消息摘要算法。加密和哈希的本质区别…...
)
告别云台乱晃!手把手教你用Arduino+SG90舵机实现‘鸡头稳定’效果(附PID模拟器使用心得)
从鸡头稳定到智能云台:ArduinoPID算法实战指南 你是否注意过鸡在行走时头部能保持惊人的稳定?这种被称为"鸡头稳定"的生物现象,启发了工程师们设计出能自动补偿晃动的智能云台系统。本文将带你用Arduino、SG90舵机和MPU6050传感器&…...

C语言实现终端菜单系统:从字符串解析到表驱动设计
1. 项目概述:为什么我们需要一个终端菜单系统?在嵌入式开发、服务器运维或者任何需要在纯命令行终端环境下工作的场景里,我们打交道最多的就是一个“黑框框”。这个黑框框,也就是终端,功能强大但交互原始。每次调试、测…...

Freeplane思维导图模板:如何10分钟创建专业级思维导图的终极解决方案
Freeplane思维导图模板:如何10分钟创建专业级思维导图的终极解决方案 【免费下载链接】Freeplane-MindMap-Template Freeplane-MindMap-Template(Freeplane 思维导图模板) 项目地址: https://gitcode.com/gh_mirrors/fr/Freeplane-MindMap-…...

从8251A芯片实战出发:手把手教你用8086汇编完成串口通信初始化编程
从8251A芯片实战出发:手把手教你用8086汇编完成串口通信初始化编程 在嵌入式系统与硬件接口开发领域,掌握串口通信编程是工程师的必修技能。8251A作为经典的通用同步/异步收发器(USART)芯片,至今仍在教学和工业控制领域广泛应用。本文将带您从…...