《Qt6开发及实例》6-2 Qt6基础图形的绘制
目录
一、绘图框架设计
二、绘图区的实现
2.1 PaintArea类
2.2 PaintArea类讲解
三、主窗口的实现
3.1 MainWidget类
3.2 MainWidget类讲解
3.3 槽函数编写
3.5 其他内容
一、绘图框架设计
界面
两个类
二、绘图区的实现
2.1 PaintArea类
paintarea.h
#ifndef PAINTAREA_H
#define PAINTAREA_H#include <QWidget>
#include <QPen>
#include <QBrush>class PaintArea : public QWidget
{Q_OBJECT
public:enum Shape{ Line, Rectangle, RoundRect, Ellipse, Polygon, PolyLine, Points, Arc, Path, Text, Pixmap };explicit PaintArea(QWidget *parent = nullptr);void setShape(Shape);void setPen(QPen);void setBrush(QBrush);void setFileRule(Qt::FillRule);void paintEvent(QPaintEvent *);signals:private:Shape shape;QPen pen;QBrush brush;Qt::FillRule fillRule;
};#endif // PAINTAREA_H
paintarea.cpp
#include "paintarea.h"
#include <QPainter>
#include <QPainterPath>PaintArea::PaintArea(QWidget *parent) : QWidget(parent)
{//QPalete::Window——通常指窗口部件的背景色;setPalette(QPalette(Qt::white)); //给窗口设置背景图片无效//上面的代码可替换为下面三行//QPalette p = palette();//p.setColor(QPalette::Window, Qt::white);//setPalette(p);setAutoFillBackground(true);setMinimumSize(400, 400);
}//设置形状
void PaintArea::setShape(PaintArea::Shape s)
{shape = s;update();
}// 设置画笔
void PaintArea::setPen(QPen p)
{pen = p;update();
}// 设置画刷
void PaintArea::setBrush(QBrush b)
{brush = b;update();
}// 设置填充模式
void PaintArea::setFileRule(Qt::FillRule rule)
{fillRule = rule;update();
}void PaintArea::paintEvent(QPaintEvent *)
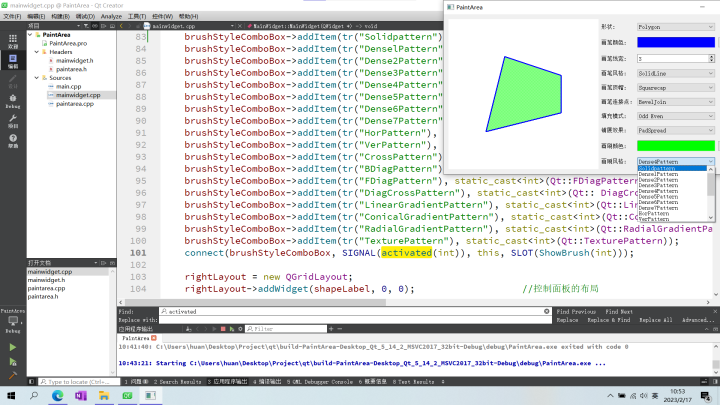
{QPainter p(this); //新建一个QPainter对象p.setPen(pen); //设置QPainter对象的画笔p.setBrush(brush); //设置QPainter对象的画刷QRect rect(50, 100, 300, 200); //(a)static const QPoint points[4] = //(b){QPoint(150, 100),QPoint(300, 150),QPoint(300, 250),QPoint(100, 300)};int startAngle = 30 * 16; //(c)int spanAngle = 120 * 16;QPainterPath path; //新建一个QPainterPath对象为路径做准备path.addRect(150, 150, 100, 100);path.moveTo(100, 100);path.cubicTo(300, 100, 200, 200, 300, 300);path.cubicTo(100, 300, 200, 200, 100, 100);path.setFillRule(fillRule);switch (shape) //(d){case Line: //直线p.drawLine(rect.topLeft(), rect.bottomRight()); break;case Rectangle: //长方形p.drawRect(rect); break;case RoundRect: //圆角方形p.drawRoundedRect(rect, 4, 4); break;case Ellipse: //椭圆形p.drawEllipse(rect); break;case Polygon: //多边形p.drawPolygon(points, 4); break;case Points: //点p.drawPoints(points, 4); break;case Arc: //弧p.drawArc(rect, startAngle, spanAngle); break;case Path: //路径p.drawPath(path); break;case Text: //文字p.drawPolygon(points, 4); break;case DrawPixmap: //图片p.Pixmap(150, 150, QPixmap("butterfly.png")); break;default: break;}
}2.2 PaintArea类讲解
(a) 用QPainter画弧形所使用的角度值,是以 1/16° 为单位的,startAngle=30*16 和 spanAngle=120*16 能绘制出下面的图像
(d) QPainter 对象内置了很多函数,能绘制多种图形
(d) QPointerPath 类为 QPointer 类提供了一个存储容器,里面包含了所要绘制的内容的集合及绘制的顺序,我们只需要调用 QPainter 类的 drawPath() 函数即可
QPointer 对象提供了许多函数接口。可以很方便地加入一些规则图形。例如,addRect() 函数加入一个方形,addEllipse() 函数加入一个椭圆形,addText() 函数加入一个字符串,addPolygon() 函数加入一个多边形等。同时,QPainterPath 类还提供了 addPath() 函数,用于加入另一个 QPainter 对象中保存的内容
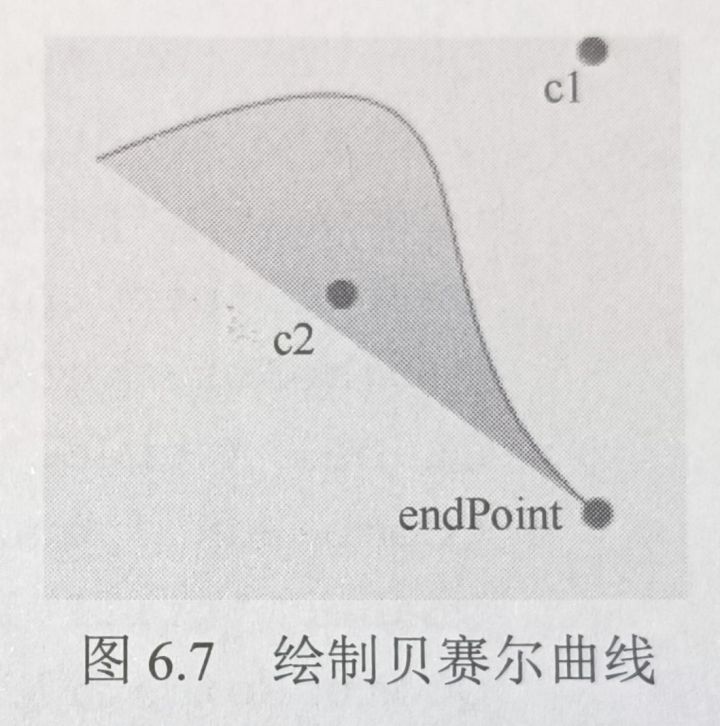
QPainterPath 对象的当前点自动处在上一部分图形内容的结束点上,若下一部分图形的起点不在此结束点,则需调用 moveTo() 函数将当前点移动到下一部分图形的起点
cubicTo() 函数绘制的是贝塞尔曲线,需要三个点的坐标 cubicTo(c1, c2, endPoint)
QPainterPath path;
path.moveTo(0,0);
path.lineTo(200, 0);
path.lineTo(200,100);
三、主窗口的实现
3.1 MainWidget类

mainwidget.h
#ifndef MAINWIDGET_H
#define MAINWIDGET_H#include <QWidget>
#include "paintarea.h"
#include <QLabel>
#include <QComboBox>
#include <QSpinBox>
#include <QPushButton>
#include <QGridLayout>
#include <QGradient>class MainWidget : public QWidget
{Q_OBJECTpublic:MainWidget(QWidget *parent = nullptr);~MainWidget();private:PaintArea *paintArea;QLabel *shapeLabel;QComboBox *shapeComboBox;QLabel *penWidthLabel;QSpinBox *penWidthSpinBox;QLabel *penColorLabel;QFrame *penColorFrame;QPushButton *penColorBtn;QLabel *penStyleLabel;QComboBox *penStyleComboBox;QLabel *penCapLabel;QComboBox *penCapComboBox;QLabel *penJoinLabel;QComboBox *penJoinComboBox;QLabel *fillRuleLabel;QComboBox *fillRuleComboBox;QLabel *spreadLabel;QComboBox *spreadComboBox;QGradient::Spread spread;QLabel *brushStyleLabel;QComboBox *brushStyleComboBox;QLabel *brushColorLabel;QFrame *brushColorFrame;QPushButton *brushColorBtn;QGridLayout *rightLayout;protected slots:void ShowShape(int);void ShowPenWidth(int);void ShowPenColor();void ShowPenStyle(int);void ShowPenCap(int);void ShowPenJoin(int);void ShowSpreadStyle();void ShowFillRule();void ShowBrushColor();void ShowBrush(int);
};
#endif // MAINWIDGET_H
mainwidget.cpp
#include "mainwidget.h"
#include <QColorDialog>MainWidget::MainWidget(QWidget *parent): QWidget(parent)
{paintArea = new PaintArea;shapeLabel = new QLabel(tr("形状:"));                       //形状选择下拉列表框shapeComboBox = new QComboBox;shapeComboBox->addItem(tr("Line"), PaintArea::Line);        //(a)shapeComboBox->addItem(tr("Rectangle"), PaintArea::Rectangle);shapeComboBox->addItem(tr("RoundedRect"), PaintArea::RoundRect);shapeComboBox->addItem(tr("Ellipse"), PaintArea::Ellipse);shapeComboBox->addItem(tr("Polygon"), PaintArea::Polygon);shapeComboBox->addItem(tr("PolyLine"), PaintArea::PolyLine);shapeComboBox->addItem(tr("Points"), PaintArea::Points);shapeComboBox->addItem(tr("Arc"), PaintArea::Arc);shapeComboBox->addItem(tr("Path"), PaintArea::Path);shapeComboBox->addItem(tr("Text"), PaintArea::Text);shapeComboBox->addItem(tr("Pixmap"), PaintArea::Pixmap);connect(shapeComboBox, SIGNAL(activated(int)), this, SLOT(ShowShape(int)));penColorLabel = new QLabel(tr("画笔颜色: "));                 //画笔颜色选择控件penColorFrame = new QFrame;penColorFrame->setFrameStyle(QFrame::Panel|QFrame::Sunken);penColorFrame->setAutoFillBackground(true);penColorFrame->setPalette(QPalette(Qt::blue));penColorBtn = new QPushButton(tr("更改"));connect(penColorBtn,SIGNAL(clicked()),this,SLOT(ShowPenColor()));penWidthLabel = new QLabel(tr("画笔线宽: "));                 //画笔线宽选择控件penWidthSpinBox = new QSpinBox;penWidthSpinBox->setRange(0,20);connect(penWidthSpinBox, SIGNAL(valueChanged(int)), this, SLOT(ShowPenWidth(int)));penStyleLabel = new QLabel(tr("画笔风格: "));                 //画笔风格选择下拉列表框penStyleComboBox= new QComboBox;penStyleComboBox->addItem(tr("SolidLine"), static_cast<int>(Qt::SolidLine));  //(b)penStyleComboBox->addItem(tr("DashLine"), static_cast<int>(Qt::DashLine));penStyleComboBox->addItem(tr("DotLine"), static_cast<int>(Qt::DotLine));penStyleComboBox->addItem(tr("DashDotLine"), static_cast<int>(Qt::DashDotLine));penStyleComboBox->addItem(tr("DashDotDotLine"), static_cast<int>(Qt::DashDotDotLine));penStyleComboBox->addItem(tr("CustomDashLine"), static_cast<int>(Qt::CustomDashLine));connect(penStyleComboBox, SIGNAL(activated(int)), this, SLOT(ShowPenStyle(int)));penCapLabel = new QLabel(tr("画笔顶帽: "));                   //画笔顶帽风格选择下拉列表框penCapComboBox= new QComboBox;penCapComboBox->addItem(tr("Squarecap"), Qt::SquareCap);    //(c)penCapComboBox->addItem(tr("FlatCap"), Qt::FlatCap);penCapComboBox->addItem(tr("RoundCap"), Qt::RoundCap);connect(penCapComboBox, SIGNAL(activated(int)), this, SLOT(ShowPenCap(int)));penJoinLabel = new QLabel(tr("画笔连接点:"));                //画笔连接点风格选择下拉列表框penJoinComboBox = new QComboBox;penJoinComboBox->addItem(tr("BevelJoin"), Qt::BevelJoin);   //(d)penJoinComboBox->addItem(tr("MiterJoin"), Qt::MiterJoin);penJoinComboBox->addItem(tr("RoundJoin"), Qt::RoundJoin);connect(penJoinComboBox, SIGNAL(activated(int)), this, SLOT(ShowPenJoin(int)));fillRuleLabel = new QLabel(tr("填充模式: "));                 //填充模式选择下拉列表能fillRuleComboBox = new QComboBox;fillRuleComboBox->addItem(tr("Odd Even"), Qt::OddEvenFill);fillRuleComboBox->addItem(tr("Winding"), Qt::WindingFill);    //(e)connect(fillRuleComboBox, SIGNAL(activated(int)), this, SLOT(ShowFillRule()));spreadLabel = new QLabel(tr("铺展效果: "));                   //铺展效果选择下拉列表框spreadComboBox = new QComboBox;spreadComboBox->addItem(tr("PadSpread"),QGradient::PadSpread); //(f)spreadComboBox->addItem(tr("RepeatSpread"), QGradient::RepeatSpread);spreadComboBox->addItem(tr("ReflectSpread"), QGradient::ReflectSpread);connect (spreadComboBox, SIGNAL(activated(int)), this, SLOT(ShowSpreadStyle()));brushColorLabel = new QLabel(tr("画刷颜色: "));               //画刷颜色选择控件brushColorFrame = new QFrame;brushColorFrame->setFrameStyle(QFrame::Panel|QFrame::Sunken);brushColorFrame->setAutoFillBackground(true);brushColorFrame->setPalette(QPalette(Qt::green));brushColorBtn = new QPushButton(tr("更改"));connect (brushColorBtn,SIGNAL(clicked()),this,SLOT(ShowBrushColor()));brushStyleLabel = new QLabel(tr("画刷风格: "));               //画刷风格选择下拉列表框brushStyleComboBox = new QComboBox;                         brushStyleComboBox->addItem(tr("Solidpattern"), static_cast<int>(Qt::SolidPattern));  //(g)brushStyleComboBox->addItem(tr("DenselPattern"), static_cast<int>(Qt::Dense1Pattern));brushStyleComboBox->addItem(tr("Dense2Pattern"), static_cast<int>(Qt::Dense2Pattern));brushStyleComboBox->addItem(tr("Dense3Pattern"), static_cast<int>(Qt::Dense3Pattern));brushStyleComboBox->addItem(tr("Dense4Pattern"), static_cast<int>(Qt::Dense4Pattern));brushStyleComboBox->addItem(tr("Dense5Pattern"), static_cast<int>(Qt::Dense5Pattern));brushStyleComboBox->addItem(tr("Dense6Pattern"), static_cast<int>(Qt::Dense6Pattern));brushStyleComboBox->addItem(tr("Dense7Pattern"), static_cast<int>(Qt::Dense7Pattern));brushStyleComboBox->addItem(tr("HorPattern"), static_cast<int>(Qt::HorPattern));brushStyleComboBox->addItem(tr("VerPattern"), static_cast<int>(Qt::VerPattern));brushStyleComboBox->addItem(tr("CrossPattern"), static_cast<int>(Qt::CrossPattern));brushStyleComboBox->addItem(tr("BDiagPattern"), static_cast<int>(Qt::BDiagPattern));brushStyleComboBox->addItem(tr("FDiagPattern"), static_cast<int>(Qt::FDiagPattern));brushStyleComboBox->addItem(tr("DiagCrossPattern"), static_cast<int>(Qt:: DiagCrossPattern));brushStyleComboBox->addItem(tr("LinearGradientPattern"), static_cast<int>(Qt::LinearGradientPattern));brushStyleComboBox->addItem(tr("ConicalGradientPattern"), static_cast<int>(Qt::ConicalGradientPattern));brushStyleComboBox->addItem(tr("RadialGradientPattern"), static_cast<int>(Qt::RadialGradientPattern));brushStyleComboBox->addItem(tr("TexturePattern"), static_cast<int>(Qt::TexturePattern));connect(brushStyleComboBox, SIGNAL(activated(int)), this, SLOT(ShowBrush(int)));rightLayout = new QGridLayout;rightLayout->addWidget(shapeLabel, 0, 0);                   //控制面板的布局rightLayout->addWidget(shapeComboBox, 0, 1);rightLayout->addWidget(penColorLabel, 1, 0);rightLayout->addWidget(penColorFrame, 1, 1);rightLayout->addWidget(penColorBtn, 1, 2);rightLayout->addWidget(penWidthLabel, 2, 0);rightLayout->addWidget(penWidthSpinBox, 2, 1);rightLayout->addWidget (penStyleLabel, 3, 0);rightLayout->addWidget(penStyleComboBox, 3, 1);rightLayout->addWidget(penCapLabel, 4, 0);rightLayout->addWidget(penCapComboBox, 4, 1);rightLayout->addWidget(penJoinLabel, 5, 0);rightLayout->addWidget(penJoinComboBox, 5, 1);rightLayout->addWidget(fillRuleLabel, 6, 0);rightLayout->addWidget(fillRuleComboBox, 6, 1);rightLayout->addWidget(spreadLabel, 7, 0);rightLayout->addWidget(spreadComboBox, 7, 1);rightLayout->addWidget(brushColorLabel, 8, 0);rightLayout->addWidget(brushColorFrame, 8, 1);rightLayout->addWidget(brushColorBtn, 8, 2);rightLayout->addWidget (brushStyleLabel, 9, 0);rightLayout->addWidget(brushStyleComboBox, 9, 1);QHBoxLayout *mainLayout = new QHBoxLayout(this);            //整体的布局mainLayout->addWidget(paintArea);mainLayout->addLayout(rightLayout);mainLayout->setStretchFactor(paintArea, 1);mainLayout->setStretchFactor(rightLayout, 0);ShowShape(shapeComboBox->currentIndex());                   //显示默认的图形
}MainWidget::~MainWidget()
{
}void MainWidget::ShowShape(int)
{}void MainWidget::ShowPenWidth(int)
{}void MainWidget::ShowPenColor()
{}void MainWidget::ShowPenStyle(int)
{}void MainWidget::ShowPenCap(int)
{}void MainWidget::ShowPenJoin(int)
{}void MainWidget::ShowSpreadStyle()
{}void MainWidget::ShowFillRule()
{}void MainWidget::ShowBrushColor()
{}void MainWidget::ShowBrush(int)
{}
3.2 MainWidget类讲解
(a) shapeComboBox 增加选项。可以只插入前面的这个文本,也可以同时插入文本相应的具体数据(通常为枚举类型)

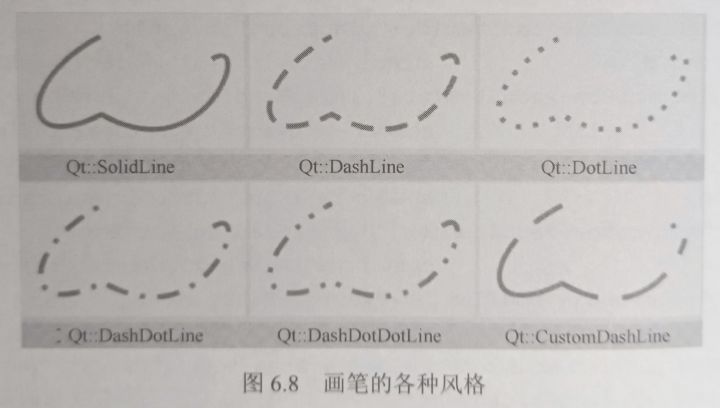
(b) penStyleComboBox->addItem(tr("SolidLine"), static_cast<int>(Qt::SolidLine));
这里是选择画笔的风格
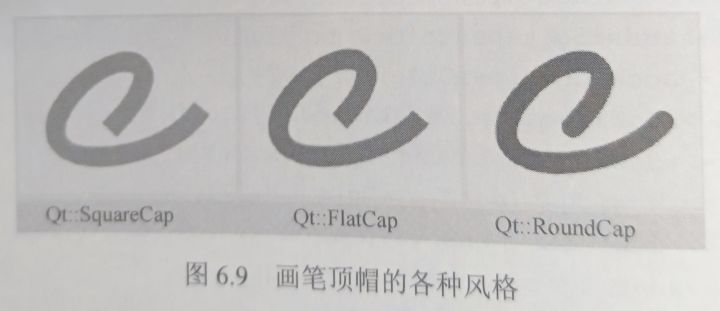
(c) penCapComboBox->addItem(tr("Squarecap"), Qt::SquareCap);
画笔顶帽风格
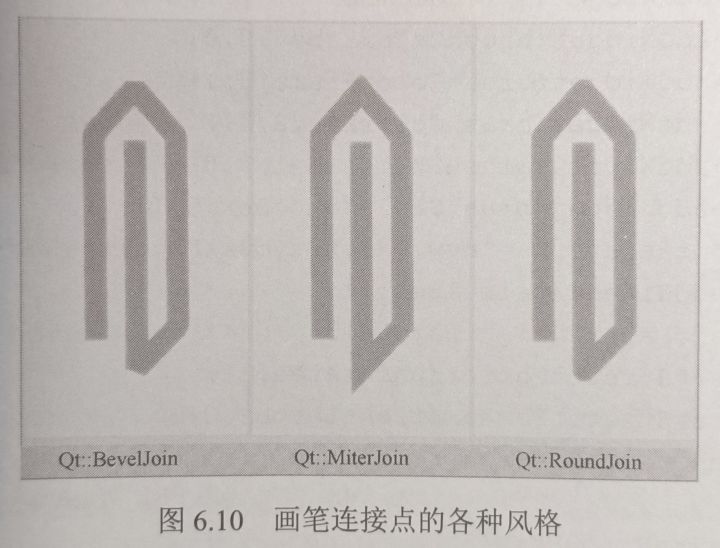
(d) penJoinComboBox->addItem(tr("BevelJoin"), Qt::BevelJoin);
画笔连接点风格,分别是方、尖、圆
(e) fillRuleComboBox->addItem(tr("Winding"), Qt::WindingFill);
Qt 为 QPainterPath 类提供了两种填充规则,分别是 Qt::OddEvenFill 和 Qt::WindingFill,如下图所示
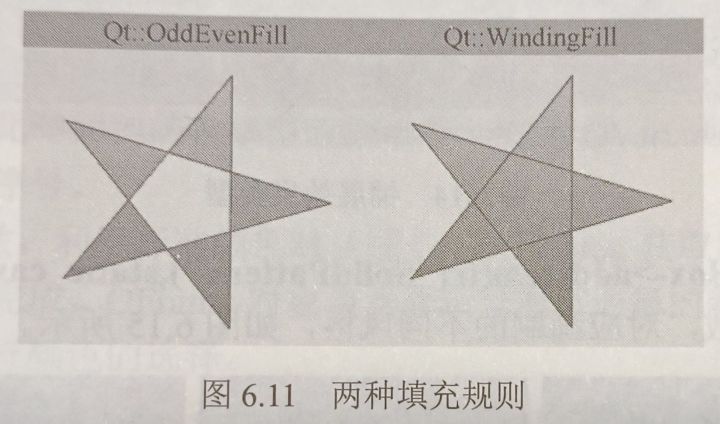
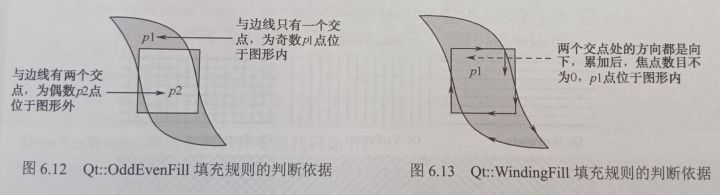
这两种填充规则在判定图形中某一点是处内部还是外部时,判断依据不同:
Qt::OddEvenFill 填充规则判断依据是从图形中某一点画一条水平线到图形外。若这条水平线与图形边线的交点数目为奇数,则说明此点位于图形的内部;若焦点数目为偶数,则此点位于图形的外部,如图 6.12
Qt::WindingFill 填充规则的判断依据是从图形中某一点画一条水平线到图形外,每个点外边线的方向可能向上,也可能向下,若最后结果为 0 则说明在图形外,如图 6.13 (边线的方向是由 QPainterPath 创建时根据描述的顺序决定的时候。如果采用 addRect() 或 addPolygon() 等函数加入的图形,默认是按照顺时针方向)
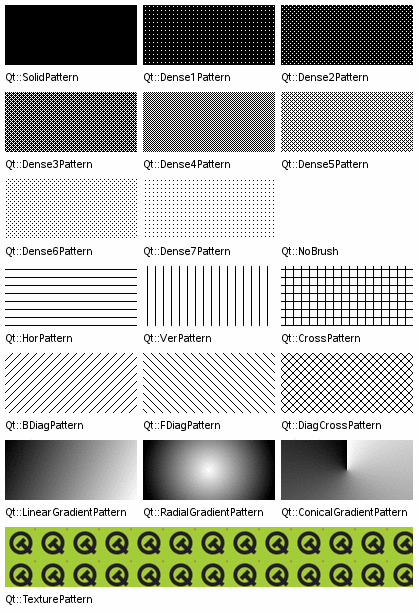
(g) brushStyleComboBox->addItem(tr("Solidpattern"), static_cast<int>(Qt::SolidPattern));
画刷的各种风格:
3.3 槽函数编写

showShape() 槽函数,根据当前下拉列表框中选择的选项,调用 PaintArea 类的 setShape() 函数来设置 PaintArea 对象的形状参数:
void MainWidget::ShowShape(int value)
{PaintArea::Shape shape = PaintArea::Shape(shapeComboBox->itemData(value, Qt::UserRole).toInt());paintArea->setShape(shape);
}
QComboBox 类的 itemData 方法返回当前显示的下拉列表框数据,是一个 QVariant 对象,此对象与控件初始化时插入的枚举型数据相关,调用 QVariant 类的 toInt() 函数获得此数据在枚举型数据集合中的序号
其他槽函数比较简单就不做过多赘述。其中铺展效果好像演示不了,我不知道是不是我版本是 QT5 的缘故,还是我抄代码抄错了,有小伙伴知道的告诉我一声
//设置画笔颜色(边线颜色)
void MainWidget::ShowPenColor()
{QColor color = QColorDialog::getColor(static_cast<int>(Qt::blue));penColorFrame->setPalette(QPalette(color));int value = penWidthSpinBox->value();Qt::PenStyle style = Qt::PenStyle(penStyleComboBox->itemData(penStyleComboBox->currentIndex(), Qt::UserRole).toInt());Qt::PenCapStyle cap = Qt:: PenCapStyle(penCapComboBox->itemData(penCapComboBox->currentIndex(), Qt::UserRole).toInt());Qt::PenJoinStyle join = Qt::PenJoinStyle(penJoinComboBox->itemData(penJoinComboBox->currentIndex(), Qt::UserRole).toInt());paintArea->setPen(QPen(color, value, style, cap, join));
}//设置画笔宽度
void MainWidget::ShowPenWidth(int value)
{QColor color = penColorFrame->palette().color(QPalette::Window);Qt::PenStyle style = Qt::PenStyle(penStyleComboBox->itemData(penStyleComboBox->currentIndex(), Qt::UserRole).toInt());Qt::PenCapStyle cap = Qt::PenCapStyle(penCapComboBox->itemData(penCapComboBox->currentIndex(), Qt::UserRole).toInt());Qt::PenJoinStyle join = Qt::PenJoinStyle(penJoinComboBox->itemData(penJoinComboBox->currentIndex(), Qt::UserRole).toInt());paintArea->setPen(QPen(color, value, style, cap, join));
}//设置画笔风格
void MainWidget::ShowPenStyle(int stylevalue)
{QColor color = penColorFrame->palette().color(QPalette::Window);int value = penWidthSpinBox->value();Qt::PenStyle style = Qt::PenStyle(penStyleComboBox->itemData(stylevalue, Qt::UserRole).toInt());Qt::PenCapStyle cap = Qt::PenCapStyle(penCapComboBox->itemData(penCapComboBox->currentIndex(), Qt::UserRole).toInt());Qt::PenJoinStyle join = Qt::PenJoinStyle(penJoinComboBox->itemData(penJoinComboBox->currentIndex(), Qt::UserRole).toInt());paintArea->setPen(QPen(color, value, style, cap, join));
}//设置画笔顶帽
void MainWidget::ShowPenCap(int capValue)
{QColor color = penColorFrame->palette().color(QPalette::Window);int value = penWidthSpinBox->value();Qt::PenStyle style = Qt::PenStyle(penStyleComboBox->itemData(penStyleComboBox->currentIndex(), Qt::UserRole).toInt());Qt::PenCapStyle cap = Qt::PenCapStyle(penCapComboBox->itemData(capValue,Qt::UserRole).toInt());Qt::PenJoinStyle join = Qt::PenJoinStyle(penJoinComboBox->itemData(penJoinComboBox->currentIndex(), Qt::UserRole).toInt());paintArea->setPen(QPen(color,value,style,cap,join));
}//设置画笔连接点
void MainWidget::ShowPenJoin(int joinValue)
{QColor color = penColorFrame->palette().color (QPalette::Window);int value = penWidthSpinBox->value();Qt::PenStyle style = Qt::PenStyle(penStyleComboBox->itemData(penStyleComboBox->currentIndex(),Qt::UserRole).toInt());Qt::PenCapStyle cap = Qt::PenCapStyle(penCapComboBox->itemData(penCapComboBox->currentIndex(),Qt::UserRole).toInt());Qt::PenJoinStyle join = Qt::PenJoinStyle(penJoinComboBox->itemData(joinValue, Qt::UserRole).toInt());paintArea->setPen(QPen(color, value, style, cap, join));
}//设置填充模式(点在图形内还是图形外的判定规则)
void MainWidget::ShowFillRule()
{Qt::FillRule rule = Qt::FillRule(fillRuleComboBox->itemData(fillRuleComboBox->currentIndex(), Qt::UserRole).toInt());paintArea->setFileRule(rule);
}// 设置扩散方式
void MainWidget::ShowSpreadStyle()
{spread = QGradient::Spread(spreadComboBox->itemData(spreadComboBox->currentIndex(), Qt::UserRole).toInt());
}// 设置画刷颜色(内部颜色)
void MainWidget::ShowBrushColor()
{QColor color = QColorDialog::getColor(static_cast<int>(Qt::blue));brushColorFrame->setPalette(QPalette(color));ShowBrush(brushStyleComboBox->currentIndex());
}// 设置画刷风格(边线)和颜色(内部)
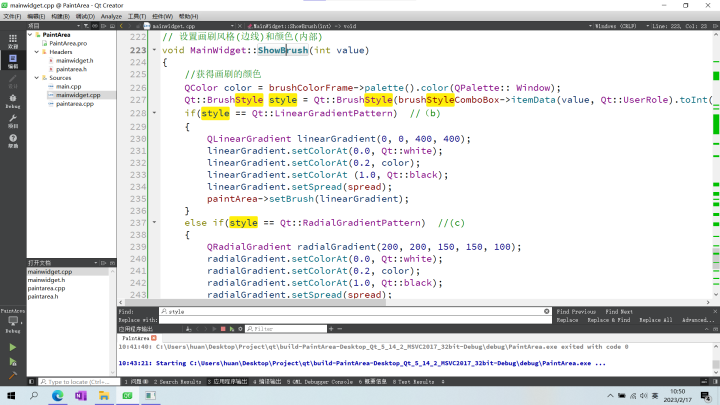
void MainWidget::ShowBrush(int value)
{//获得画刷的颜色QColor color = brushColorFrame->palette().color(QPalette:: Window);Qt::BrushStyle style = Qt::BrushStyle(brushStyleComboBox->itemData(value, Qt::UserRole).toInt()); //(a)if(style == Qt::LinearGradientPattern) //(b){QLinearGradient linearGradient(0, 0, 400, 400);linearGradient.setColorAt(0.0, Qt::white);linearGradient.setColorAt(0.2, color);linearGradient.setColorAt (1.0, Qt::black);linearGradient.setSpread(spread);paintArea->setBrush(linearGradient);}else if(style == Qt::RadialGradientPattern) //(c){QRadialGradient radialGradient(200, 200, 150, 150, 100);radialGradient.setColorAt(0.0, Qt::white);radialGradient.setColorAt(0.2, color);radialGradient.setColorAt(1.0, Qt::black);radialGradient.setSpread(spread);paintArea->setBrush(radialGradient);}else if(style == Qt::ConicalGradientPattern){QConicalGradient conicalGradient(200, 200, 30);conicalGradient.setColorAt(0.0, Qt::white);conicalGradient.setColorAt (0.2, color);conicalGradient.setColorAt(1.0, Qt::black);paintArea->setBrush(conicalGradient);}else if(style == Qt::TexturePattern){paintArea->setBrush(QBrush(QPixmap("butterfly.png")));}else{paintArea->setBrush(QBrush(color, style));}
}
最后一个函数涉及到的内容很多,可以自己看一下源码。简单的意思就是下面两个图,根据 value 选择的值来对应 style,然后根据 style 的不同值做不同的处理。进入这个函数是 画刷风格触发的槽函数 或者 ShowBrushColor()函数
3.5 其他内容
Qt 画图的坐标系默认以左上角为原点,x 轴向右,y 轴向下。此坐标系可受到 QPainter 类的控制,QPainter 类提供了相应的变形函数,包括旋转、缩放、平移和切边。调用这些函数时,看起来是对绘制内容的改变,实际上是坐标系的改变。如果还需要实现更复杂的变形,则可以采用 QTransform 类实现
相关文章:
《Qt6开发及实例》6-2 Qt6基础图形的绘制
目录 一、绘图框架设计 二、绘图区的实现 2.1 PaintArea类 2.2 PaintArea类讲解 三、主窗口的实现 3.1 MainWidget类 3.2 MainWidget类讲解 3.3 槽函数编写 3.5 其他内容 一、绘图框架设计 界面 两个类 二、绘图区的实现 2.1 PaintArea类 paintarea.h #ifndef…...

LeetCode 382. 链表随机节点
原题链接 难度:middle\color{orange}{middle}middle 题目描述 给你一个单链表,随机选择链表的一个节点,并返回相应的节点值。每个节点 被选中的概率一样 。 实现 SolutionSolutionSolution 类: Solution(ListNodehead)Solution…...
iOS开发AppleDeveloper中给别人授权开发者权限后,对方一直显示不了我的开发账号team
在iOS开发经常出现多人协作开发的情况。这时我们通常要发邮件邀请别的用户为开发者或者app管理就可以开发我们自己的项目了。但是这次我给别人授权开发者权限后,发现别人权限中没有证书相关权限如图:并且别人登录该账号后,在xcode中只有一个看…...

FreeRTOS数据类型和编程规范
目录 数据类型 变量名 函数名 宏的名 数据类型 每个移植的版本都含有自己的portmacro.h头文件,里面定义了2个数据类型 TickType_t FreeRTOS配置了一个周期性的时钟中断:Tick Interrupt每发生一次中断,中断次数累加,这被称为t…...

【python知识】win10下如何用python将网页转成pdf文件
一、说明 本篇记录一个自己享用的简单工具。在大量阅读网上文章中,常常遇到一个专题对应多篇文章,用浏览器的收藏根本不够。能否见到一篇文章具有搜藏价值,就转到线下,以备日后慢慢消化吸收。这里终于找到一个办法,将在…...
C语言常见关键字
写在前面 这个博客是结合C语言深度解剖这本书和我以前学的知识综合而成的,我希望可以更见详细的谈一下C语言的关键字,内容有点多,有错误还请斧正. 常见关键字 下面我们说下C语言的关键字,所谓的关键字是指具有特定功能的单词,我们可以使用关键字来帮助我们完成不同的事物.C语…...

【MT7628】固件开发-SDK4320添加MT7612E WiFi驱动操作说明
解压5G WiFi MT7612E驱动1.1解压指令 tar -xvf MT76x2E_MT7620_LinuxAP_V3.0.4.0_P2_DPA_20160308.tar.bz2 1.2解压之后会出现以下两个目录 rlt_wifi rlt_wifi_ap 1.3将解压后的文件拷贝到系统下 拷贝路径 RT288x_SDK/source/linux-2.6.36.x/drivers/net/wireless 内核中打开驱…...
如何从手工测试进阶自动化测试?阿里10年测开经验分享...
随着行业的竞争加剧,互联网产品迭代速度越来越快,QA 与测试工程师都需要在越来越短的测试周期内充分保证质量。可是,App 测试面临着很多挑战,比如多端发布、多版本发布、多机型发布等等,导致了手工测试很难完全胜任。因…...
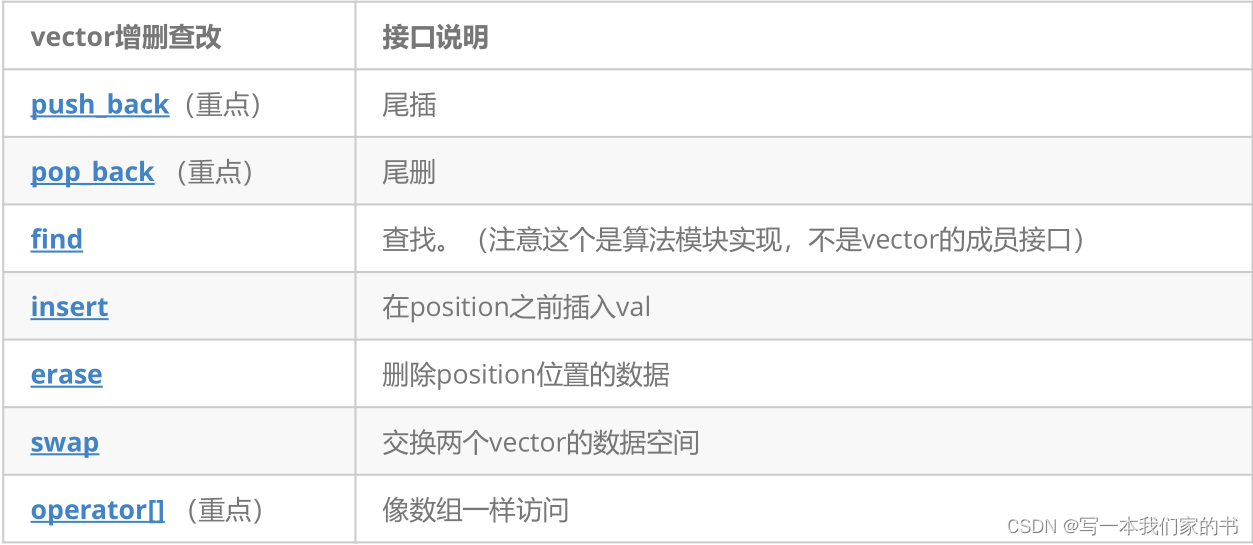
C++复习笔记11
1. vector是表示可变大小数组的序列容器。 2. 就像数组一样,vector也采用的连续存储空间来存储元素。也就是意味着可以采用下标对vector的元素进行访问,和数组一样高效。但是又不像数组,它的大小是可以动态改变的,而且它的大小会被…...

【MT7628】固件开发-SDK4320添加MT7628 WiFi驱动操作说明
解压2.4G WiFi MT7628驱动1.1解压指令 tar -xvf MT7628_LinuxAP_V4.1.0.0_DPA_20160310.tar.bz2 1.2解压之后会出现以下两个目录 mt_wifi mt_wifi_ap 1.3将解压后的文件拷贝到系统下 拷贝路径 RT288x_SDK/source/linux-2.6.36.x/drivers/net/wireless 内核中打开驱动编译修改R…...
C#开发的OpenRA游戏加载界面的实现
C#开发的OpenRA游戏加载界面的实现 游戏的UI是一个游戏必备, 但是游戏的UI都是自己处理的,不能使用像Windows自带的UI。 这样游戏的UI,其实也是使用游戏的方式来显示的, 只不过使用了低帧率的方式来显示。 比如OpenRA游戏界面,就会显示如下: 游戏的界面有很多,先从一个简…...

渲染农场优势是什么_云渲染农场怎么用?
在回答渲染农场的优势这个问题之前,我先申明一下本文中提到的渲染农场/云渲染平台/云渲染农场,都特指CG领域内的专业3D渲染平台,有一些文章会强调这个叫法的区别,但是业内一般都不会分这么细,所以也就不赘述了。渲染农…...
SoapUI、Jmeter、Postman三种接口测试工具的比较分析
目录 前言 1. 用例组织方式 2. 支持的接口类型与测试类型 3. 配置不同接口类型 4. 自定义变量以及变量的作用域 5. 数据源、生成器,进行参数化 6. 流程控制 7. 结果解析、展示 8. 断言 9. 脚本扩展能力 10. 团队协作 总结 重点:配…...

Python内置函数 — sort,sorted
1、sort 列表的属性方法,对列表进行排序,默认升序,返回None值。 源码注释: """ Sort the list in ascending order and return None.The sort is in-place (i.e. the list itself is modified) and stable (i.e.…...
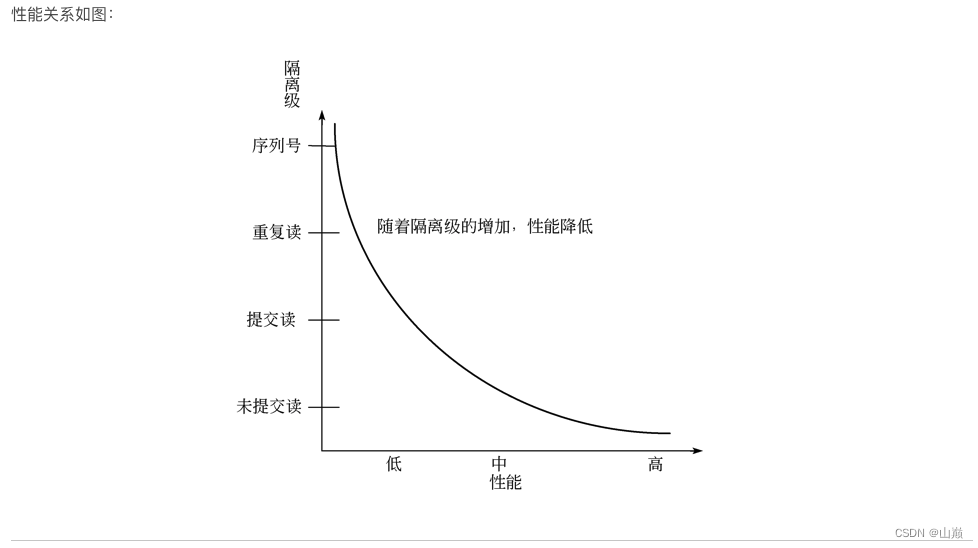
mysql事务隔离级别
mysql锁机制及原理1.隔离级别2.实践2.1查看事务隔离级别2.2 设置隔离级别2.3 不可重复读2.4 幻读3.幻读怎么解决3.1 Record Lock3.2 Gap Lock3.3 Next-Key Lock引用:https://blog.csdn.net/xinyuan_java/article/details/1284932051.隔离级别 SERIALIZABLE(序列化)…...
【C++】string类(下)
文章目录1.迭代器(正向遍历)begin有两个版本2.反向迭代器(反向遍历)rbegin由两个版本3. at4. insert ——头插在pos位置前插入一个字符串在pos位置前插入n个字符在迭代器前插入一个字符5. erase从pos位置开始删除len个字符从迭代器位置开始删除6. replace——替换从pos位置开始…...

Elasticsearch: Prefix queries - 前缀查询
Prefix queries 被用于在查询时返回在提供的字段中包含特定前缀的文档。有时我们可能想使用前缀查询单词,例如 Leonardo 的 Leo 或 Marlon Brando、Mark Hamill 或 Martin Balsam 的 Mar。 Elasticsearch 提供了一个前缀查询,用于获取匹配单词开头部分&a…...
GEE学习笔记 七十七:GEE学习方法简介
这是一篇关于学习方法的思考探索,当然我不会大篇文章介绍什么学习方法(因为我也不是这方面的专家?),这个只是总结一下我是如何学习GEE以及在学习中遇到问题时如何解决问题的。我写这篇文章的目的就是在和一些学习GEE的新同学接触…...
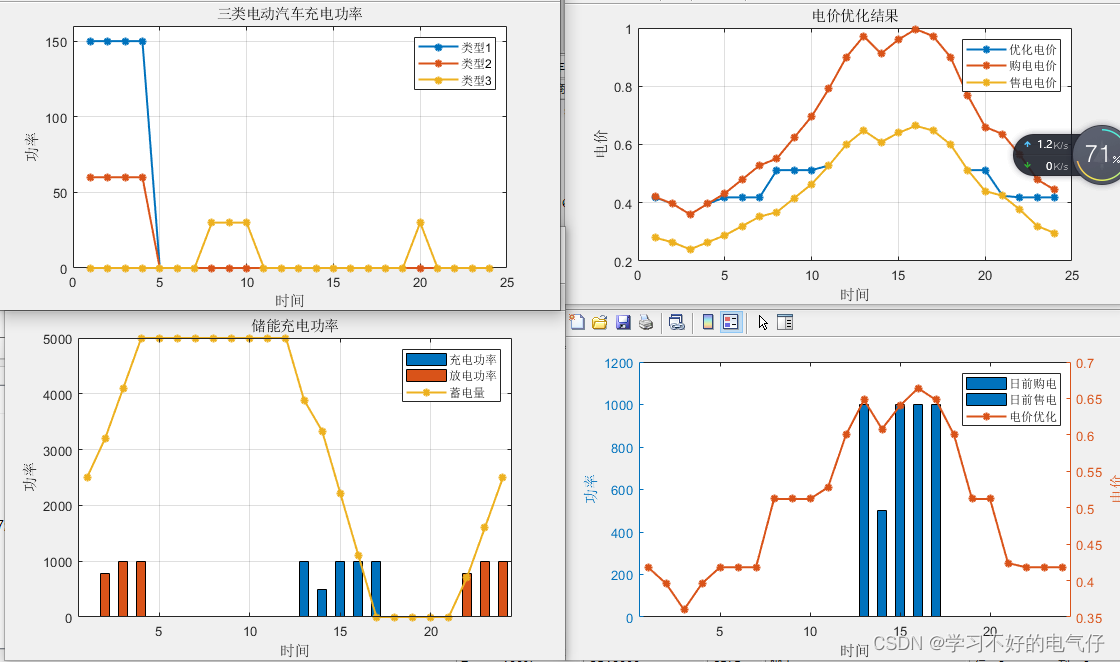
20基于主从博弈的智能小区代理商定价策略及电动汽车充电管理MATLAB程序
参考文档:《基于主从博弈的智能小区代理商定价策略及电动汽车充电管理》基本复现仿真平台:MATLABCPLEX/gurobi平台优势:代码具有一定的深度和创新性,注释清晰,非烂大街的代码,非常精品!主要内容…...
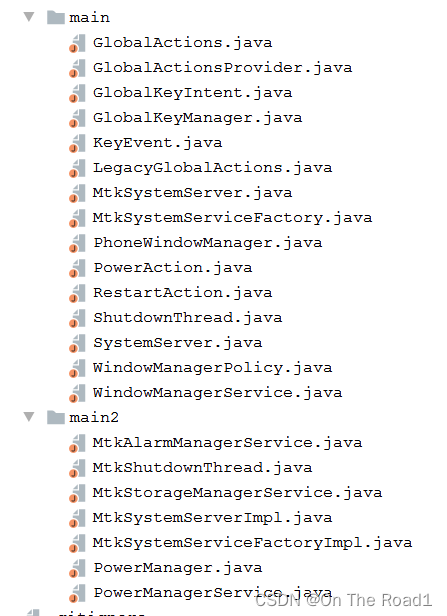
长按power键,点击重启按钮,系统重启流程一
1.有可能会涉及到如下文件 2.文件流程...

基于MCP协议与向量数据库的AI代码记忆系统实战指南
1. 项目概述:当AI助手拥有“长期记忆”最近在折腾AI应用开发的朋友,可能都遇到过同一个痛点:你让Claude或者GPT帮你分析一个复杂的代码库,第一次对话时,它能把项目结构、核心逻辑讲得头头是道。但当你第二天再打开聊天…...

模块化前端框架设计:从原子状态到组合式架构的工程实践
1. 项目概述:一个轻量级、模块化的现代Web应用框架最近在梳理手头的几个前端项目,发现随着功能迭代,代码越来越臃肿,不同项目间的基础工具函数、状态管理逻辑、路由配置总是要重新写一遍,或者复制粘贴,维护…...

视频解密神器:3步搞定Widevine加密,重新掌控你的数字内容
视频解密神器:3步搞定Widevine加密,重新掌控你的数字内容 【免费下载链接】video_decrypter Decrypt video from a streaming site with MPEG-DASH Widevine DRM encryption. 项目地址: https://gitcode.com/gh_mirrors/vi/video_decrypter 还在为…...

ArcGIS符号库“隐身”之谜:从DAO组件缺失到完整恢复的实战指南
1. 当符号选择器突然"罢工":一个GISer的崩溃瞬间 那天早上我正赶着完成客户的地图项目,准备给水系图层换个漂亮的蓝色符号。像往常一样双击图层打开属性窗口,点击Symbol Selector准备挑选样式时,整个人瞬间僵住了——本…...

Verilog分频器进阶:从6分频到1.5分频的实战设计与波形分析
1. 分频器基础与设计思路 在数字电路设计中,时钟信号就像人的心跳一样重要。分频器的作用,就是把这个"心跳"调整到我们需要的节奏。简单来说,分频器就是把输入时钟的频率降低N倍,得到一个新的时钟信号。比如6分频&#…...
)
别再折腾官网了!手把手教你从Kaggle快速下载20bn-jester-v1手势数据集(附完整合并教程)
高效获取20bn-jester-v1手势数据集的Kaggle实战指南 在计算机视觉和手势识别领域,20bn-jester-v1数据集因其大规模、高质量的视频标注而备受研究者青睐。然而,许多开发者在第一步——数据获取上就遇到了意想不到的障碍。官方下载渠道不仅速度缓慢&#…...

Unitree GO2 ROS2系统架构深度解析与智能导航实现
Unitree GO2 ROS2系统架构深度解析与智能导航实现 【免费下载链接】go2_ros2_sdk Unofficial ROS2 SDK support for Unitree GO2 AIR/PRO/EDU 项目地址: https://gitcode.com/gh_mirrors/go/go2_ros2_sdk 本文深入探讨Unitree GO2 ROS2 SDK的架构设计与实现原理…...

ComfyUI图像修复终极指南:5个高效技巧解决安装与使用难题
ComfyUI图像修复终极指南:5个高效技巧解决安装与使用难题 【免费下载链接】comfyui-inpaint-nodes Nodes for better inpainting with ComfyUI: Fooocus inpaint model for SDXL, LaMa, MAT, and various other tools for pre-filling inpaint & outpaint areas…...

PyCharm配置PyQt5开发环境:一站式集成Qt Designer、PyUIC与PyRcc实战指南
1. 环境准备与基础安装 第一次用PyCharm搞PyQt5开发时,我对着满屏的英文文档差点放弃。后来发现只要搞定这三个核心工具链——Qt Designer画界面、PyUIC转代码、PyRcc管资源,开发效率能翻倍。先说最基础的安装,别被那些复杂的配置吓到&#x…...

机器人导航中的深度估计与SLAM技术实践
1. 机器人导航中的深度估计技术解析深度估计作为计算机视觉领域的核心技术,在机器人自主导航中扮演着关键角色。简单来说,它就像给机器人安装了一双能感知距离的"眼睛"——通过分析摄像头捕获的二维图像,计算出场景中每个像素点与相…...