Ansible 的脚本 --- playbook 剧本
目录
playbook 剧本
playbooks 本身由以下各部分组成
定义、引用变量
指定远程主机sudo切换用户
when条件判断
迭代
Templates 模块
1.先准备一个以 .j2 为后缀的 template 模板文件,设置引用的变量
2.修改主机清单文件,使用主机变量定义一个变量名相同,而值不同的变量
3.编写 playbook
用剧本安装lnmp
Roles 模块
roles 的目录结构:
roles 内各目录含义解释
在一个 playbook 中使用 roles 的步骤:
编写httpd模块
编写mysql模块
编写php模块
编写roles示例
playbook 剧本
playbooks 本身由以下各部分组成
(1)Tasks:任务,即通过 task 调用 ansible 的模板将多个操作组织在一个 playbook 中运行
(2)Variables:变量
(3)Templates:模板
(4)Handlers:处理器,当changed状态条件满足时,(notify)触发执行的操作
(5)Roles:角色
示例:
vim test1.yaml
---     #yaml文件以---开头,以表明这是一个yaml文件,可省略
- name: first play       #定义一个play的名称,可省略gather_facts: false    #设置不进行facts信息收集,这可以加快执行速度,可省略hosts: webservers      #指定要执行任务的被管理主机组,如多个主机组用冒号分隔remote_user: root      #指定被管理主机上执行任务的用户tasks:                 #定义任务列表,任务列表中的各任务按次序逐个在hosts中指定的主机上执行- name: test connection           #自定义任务名称ping:                           #使用 module: [options] 格式来定义一个任务- name: disable selinuxcommand: '/sbin/setenforce 0'   #command模块和shell模块无需使用key=value格式ignore_errors: True             #如执行命令的返回值不为0,就会报错,tasks停止,可使用ignore_errors忽略失败的任务- name: disable firewalldservice: name=firewalld state=stopped    #使用 module: options 格式来定义任务,option使用key=value格式- name: install httpdyum: name=httpd state=latest- name: install configuration file for httpdcopy: src=/opt/httpd.conf dest=/etc/httpd/conf/httpd.conf    #这里需要一个事先准备好的/opt/httpd.conf文件notify: "restart httpd"    #如以上操作后为changed的状态时,会通过notify指定的名称触发对应名称的handlers操作- name: start httpd serviceservice: enabled=true name=httpd state=startedhandlers:               #handlers中定义的就是任务,此处handlers中的任务使用的是service模块- name: restart httpd    #notify和handlers中任务的名称必须一致service: name=httpd state=restarted
##Ansible在执行完某个任务之后并不会立即去执行对应的handler,而是在当前play中所有普通任务都执行完后再去执行handler,这样的好处是可以多次触发notify,但最后只执行一次对应的handler,从而避免多次重启。
- name: the first play for install apachegather_facts: falsehosts: dbserversremote_user: roottasks:- name: disable firewalldservice: name=firewalld state=stopped enabled=no- name: disable selinuxcommand: '/usr/sbin/setenforce 0'ignore_errors: true- name: disable selinux foreverreplace: path=/etc/selinux/config regexp="enforcing" replace="disabled"- name: mount cdrommount: src=/dev/sr0 path=/mnt fstype=iso9660 state=mounted- name: copy local yum configuration filecopy: src=/etc/yum.repos.d/repo.bak/local.repo dest=/etc/yum.repos.d/local.repo- name: install apacheyum: name=httpd state=latest- name: prepare httpd configuration filecopy: src=/etc/ansible/playbook/httpd.conf dest=/etc/httpd/conf/httpd.confnotify: "reload httpd"- name: start apacheservice: name=httpd state=started enabled=yeshandlers: - name: reload httpdservice: name=httpd state=reloaded运行playbook
ansible-playbook demo1.yaml在另一台机器上就会发现apache已经安装,并暴露出端口号
netstat -lntp | grep 80
tcp6       0      0 :::80                   :::*                    LISTEN      11454/httpd
补充参数:
-k(–ask-pass):用来交互输入ssh密码
-K(-ask-become-pass):用来交互输入sudo密码
-u:指定用户
ansible-playbook test1.yaml --syntax-check #检查yaml文件的语法是否正确
ansible-playbook test1.yaml --list-task #检查tasks任务
ansible-playbook test1.yaml --list-hosts #检查生效的主机
ansible-playbook test1.yaml --start-at-task='install httpd' #指定从某个task开始运行
定义、引用变量
- name: second playhosts: dbserversremote_user: rootvars: #定义变量- groupname: mysql #格式为 key: value- username: nginxtasks:- name: create groupgroup: name={{groupname}} system=yes gid=306 #使用 {{key}} 引用变量的值- name: create useruser: name={{username}} uid=306 group={{groupname}} - name: copy filecopy: content="{{ansible_default_ipv4}}" dest=/opt/vars.txt #在setup模块中可以获取facts变量信息示例
- name: second playhosts: dbserversremote_user: rootbecome: yesbecome_user: zxrvars:- username: ggl- groupname: zxr- filename: /opt/ggl.txt- uid: 1234gather_facts: truetasks:- name: create groupgroup: name={{groupname}} gid=1314- name: create user join groupuser: name={{username}} uid={{uid}} groups={{groupname}}- name: copy filecopy: content="{{ansible_default_ipv4.address}}" dest={{filename}}- name: modify username and groupname of filefile: path={{filename}} owner={{username}} group={{groupname}}
在另一个主机上输入id ggl
id ggl
uid=1234(ggl) gid=1234(ggl) 组=1234(ggl),1314(zxr)
在外面传参
ansible-playbook test1.yaml -e "username=nginx" #在命令行里定义变量在另一个主机上输入id nginx
id nginx
uid=1235(nginx) gid=1235(nginx) 组=1235(nginx),1314(zxr)
指定远程主机sudo切换用户
---
- hosts: dbserversremote_user: zhangsan            become: yes                     #2.6版本以后的参数,之前是sudo,意思为切换用户运行become_user: root               #指定sudo用户为root
执行playbook时:ansible-playbook test1.yml -k -K 示例
- name: second playhosts: dbserversremote_user: zxrbecome: yesbecome_user: rootvars:- username: ycx- groupname: zxr- filename: /opt/ggl.txt- uid: 1236gather_facts: truetasks:- name: create groupgroup: name={{groupname}} gid=1314- name: create user join groupuser: name={{username}} uid={{uid}} groups={{groupname}}- name: copy filecopy: content="{{ansible_default_ipv4.address}}" dest={{filename}}- name: modify username and groupname of filefile: path={{filename}} owner={{username}} group={{groupname}}ansible-playbook demo2.yaml -k -K
SSH password:
BECOME password[defaults to SSH password]:PLAY [second play] *************************************************************TASK [Gathering Facts] *********************************************************
ok: [192.168.110.70]TASK [create group] ************************************************************
ok: [192.168.110.70]TASK [create user join group] **************************************************
changed: [192.168.110.70]TASK [copy file] ***************************************************************
ok: [192.168.110.70]TASK [modify username and groupname of file] ***********************************
changed: [192.168.110.70]PLAY RECAP *********************************************************************
192.168.110.70 : ok=5 changed=2 unreachable=0 failed=0 skipped=0 rescued=0 ignored=0注:在另一台主机上要确保用户加入到/etc/sudoers文件中,确保zxr要有root权限
when条件判断
在Ansible中,提供的唯一一个通用的条件判断是when指令,当when指令的值为true时,则该任务执行,否则不执行该任务。
//when一个比较常见的应用场景是实现跳过某个主机不执行任务或者只有满足条件的主机执行任务
vim demo2.yaml
---
- hosts: allremote_user: roottasks:- name: shutdown host command: /sbin/shutdown -r nowwhen: ansible_default_ipv4.address == "192.168.110.70"      #when指令中的变量名不需要手动加上 {{}}
或 when: inventory_hostname == "<主机名>"
示例
- name: third playhosts: allremote_user: roottasks:- name: touch filefile: path=/opt/zzz.txt state=touch#when: ansible_default_ipv4.address != "192.168.110.70"when: inventory_hostname == "192.168.110.70"ansible-playbook demo3.yamlPLAY [third play] **************************************************************TASK [Gathering Facts] *********************************************************
ok: [192.168.110.90]
ok: [192.168.110.70]TASK [touch file] **************************************************************
skipping: [192.168.110.90]
changed: [192.168.110.70]PLAY RECAP *********************************************************************
192.168.110.70 : ok=2 changed=1 unreachable=0 failed=0 skipped=0 rescued=0 ignored=0
192.168.110.90 : ok=1 changed=0 unreachable=0 failed=0 skipped=1 rescued=0 ignored=0迭代
Ansible提供了很多种循环结构,一般都命名为with_items,作用等同于 loop 循环。
vim test3.yaml
---
- name: play1hosts: dbserversgather_facts: falsetasks: - name: create filefile:path: "{{item}}"state: touchwith_items: [ /opt/a, /opt/b, /opt/c, /opt/d ]- name: play2hosts: dbserversgather_facts: false        vars:test:- /tmp/test1- /tmp/test2- /tmp/test3- /tmp/test4tasks: - name: create directoriesfile:path: "{{item}}"state: directorywith_items: "{{test}}"- name: play3hosts: dbserversgather_facts: falsetasks:- name: add usersuser: name={{item.name}} state=present groups={{item.groups}}with_items:- name: test1groups: wheel- name: test2groups: root
或with_items:- {name: 'test1', groups: 'wheel'}- {name: 'test2', groups: 'root'}
示例
- name: fouth playhosts: dbserversremote_user: rootvars:myfile:- /opt/a- /opt/b- /opt/c- /opt/dtasks:- name: touch directorywith_items: "{{myfile}}"file: path={{item}} state=directory- name: touch filewith_items:- /root/a- /root/b- /root/c- /root/dfile:path: "{{item}}"state: touchansible-playbook demo4.yamlPLAY [fouth play] **************************************************************TASK [Gathering Facts] *********************************************************
ok: [192.168.110.70]TASK [touch directory] *********************************************************
changed: [192.168.110.70] => (item=/opt/a)
changed: [192.168.110.70] => (item=/opt/b)
changed: [192.168.110.70] => (item=/opt/c)
changed: [192.168.110.70] => (item=/opt/d)TASK [touch file] **************************************************************
changed: [192.168.110.70] => (item=/root/a)
changed: [192.168.110.70] => (item=/root/b)
changed: [192.168.110.70] => (item=/root/c)
changed: [192.168.110.70] => (item=/root/d)PLAY RECAP *********************************************************************
192.168.110.70 : ok=3 changed=2 unreachable=0 failed=0 skipped=0 rescued=0 ignored=0
Templates 模块
Jinja是基于Python的模板引擎。Template类是Jinja的一个重要组件,可以看作是一个编译过的模板文件,用来产生目标文本,传递Python的变量给模板去替换模板中的标记。
1.先准备一个以 .j2 为后缀的 template 模板文件,设置引用的变量
cp /etc/httpd/conf/httpd.conf /opt/httpd.conf.j2vim /opt/httpd.conf.j2
Listen {{http_port}} #42行,修改
ServerName {{server_name}} #95行,修改
DocumentRoot "{{root_dir}}" #119行,修改2.修改主机清单文件,使用主机变量定义一个变量名相同,而值不同的变量
vim /etc/ansible/hosts
[webservers]
192.168.110.90 http_port=192.168.80.11:80 server_name=www.zxr.com:80 root_dir=/var/www/html/zxr[dbservers]
192.168.110.70 http_port=192.168.80.12:80 server_name=www.yyds.com:80 root_dir=/var/www/html/yyds
3.编写 playbook
- name: sixth playhosts: webserversremote_user: rootvars:- pkg: httpdtasks:- name: install apacheyum: name=httpd state=latest- name: create root dirfile: state=directory path={{item}}with_items:- /var/www/html/zxr- /var/www/html/yyds- name: create index.html in www.zxr.comcopy: content="<h1>this is zxr web</h1>" dest=/var/www/html/zxr/index.htmlwhen: ansible_default_ipv4.address == "192.168.110.90"- name: create index.html in www.yyds.comcopy: content="<h1>this is yyds web</h1>" dest=/var/www/html/yyds/index.htmlwhen: inventory_hostname == "192.168.110.70"- name: prepare configuration filetemplate: src=/opt/playbook/httpd.conf.j2 dest=/etc/httpd/conf/httpd.confnotify: "reload apache"- name: start apacheservice: name={{pkg}} state=started enabled=yeshandlers:- name: reload apacheservice: name={{pkg}} state=reloadedansible-playbook demo6.yamlPLAY [sixth play] **************************************************************TASK [Gathering Facts] *********************************************************
ok: [192.168.110.90]TASK [install apache] **********************************************************
ok: [192.168.110.90]TASK [create root dir] *********************************************************
ok: [192.168.110.90] => (item=/var/www/html/zxr)
ok: [192.168.110.90] => (item=/var/www/html/yyds)TASK [create index.html in www.zxr.com] ****************************************
ok: [192.168.110.90]TASK [create index.html in www.yyds.com] ***************************************
skipping: [192.168.110.90]TASK [prepare configuration file] **********************************************
changed: [192.168.110.90]TASK [start apache] ************************************************************
ok: [192.168.110.90]RUNNING HANDLER [reload apache] ************************************************
changed: [192.168.110.90]PLAY RECAP *********************************************************************
192.168.110.90 : ok=7 changed=2 unreachable=0 failed=0 skipped=1 rescued=0 ignored=0tags 模块
可以在一个playbook中为某个或某些任务定义“标签”,在执行此playbook时通过ansible-playbook命令使用--tags选项能实现仅运行指定的tasks。
playbook还提供了一个特殊的tags为always。作用就是当使用always作为tags的task时,无论执行哪一个tags时,定义有always的tags都会执行。
- name: seventh playhosts: dbserversremote_user: roottasks:- name: create abc.txtfile: path=/opt/abc.txt state=touchtags:- zxr- name: create bac.txtfile: path=/opt/123.txt state=touchtags:- ycx- name: create cba.txtcopy: content="ggl like dancing" dest=/opt/ggl.txttags:- gglansible-playbook dbhosts.yaml --tags="zxr"分别去两台被管理主机上去查看文件创建情况
ansible-playbook demo7.yaml --tags="zxr"PLAY [seventh play] ************************************************************TASK [Gathering Facts] *********************************************************
ok: [192.168.110.70]TASK [create abc.txt] **********************************************************
changed: [192.168.110.70]PLAY RECAP *********************************************************************
192.168.110.70             : ok=2    changed=1    unreachable=0    failed=0    skipped=0    rescued=0    ignored=0
示例
用剧本安装lnmp
- name: lnmp playhosts: dbserversremote_user: roottasks:- name: perpare condifurecopy: src=/etc/yum.repos.d/nginx.repo dest=/etc/yum.repos.d/nginx.repo- name: install nginxyum: name=nginx state=latest- name: start nginxservice: name=nginx state=started enabled=yes- name: install mysqlyum: name=mysql57-community-release-el7-10.noarch.rpm state=latest- name: modify filereplace:path: /etc/yum.repos.d/mysql-community.reporegexp: 'gpgcheck=1'replace: 'gpgcheck=0'- name: install mysql-community-serveryum: name=mysql-community-server state=latest- name: start mysqlservice: name=mysqld state=started enabled=yes- name: add yum filecommand: 'wget -i -c http://dev.mysql.com/get/mysql57-community-release-el7-10.noarch.rpm -P /etc/yum.repos.d' - name: rpm epelcommand: 'rpm -Uvh https://dl.fedoraproject.org/pub/epel/epel-release-latest-7.noarch.rpm'- name: rpm el7command: 'rpm -Uvh https://mirror.webtatic.com/yum/el7/webtatic-release.rpm'- name: install phpcommand: 'yum install -y php72w php72w-cli php72w-common php72w-devel php72w-embedded php72w-gd php72w-mbstring php72w-pdo php72w-xml php72w-fpm php72w-mysqlnd php72w-opcache'- name: start php-fpmservice: name=php-fpm state=started enabled=yes- name: copy configurecopy: src=/usr/local/nginx/conf/nginx.conf dest=/etc/nginx/conf.d/default.conf- name: restart nginxservice: name=nginx state=started enabled=yesRoles 模块
roles用于层次性、结构化地组织playbook。roles能够根据层次型结构自动装载变量文件、tasks以及handlers等。要使用roles只需要在playbook中使用include指令引入即可。
简单来讲,roles就是通过分别将变量、文件、任务、模板及处理器放置于单独的目录中,并可以便捷的include它们的一种机制。roles一般用于基于主机构建服务的场景中,但也可以是用于构建守护进程等场景中。主要使用场景代码复用度较高的情况下。
假如我们现在有3个被管理主机,第一个要配置成httpd,第二个要配置成haproxy服务器,第三个要配置成MySQL(mariadb)服务器。我们如何来定义playbook?
第一个play用到第一个主机上,用来构建httpd,第二个play用到第二个主机上,用来构建haproxy。这些个play定义在playbook中比较麻烦,将来也不利于模块化调用,不利于多次调用。比如说后来又加进来一个主机,这第3个主机既是httpd服务器,又是haproxy服务器,我们只能写第3个play,上面写上安装httpd和haproxy。这样playbook中的代码就重复了。
为了避免代码重复,可以定义一个角色叫httpd,第二个角色叫haproxy,并使用roles实现代码重复被调用。
roles 的目录结构:
cd /etc/ansible/
tree roles/
roles/
├── web/    #相当于 playbook 中的 每一个 play 主题
│   ├── files/
│   ├── templates/
│   ├── tasks/
│   ├── handlers/
│   ├── vars/
│   ├── defaults/
│   └── meta/
└── db/├── files/├── templates/├── tasks/├── handlers/├── vars/├── defaults/└── meta/
roles 内各目录含义解释
●files
用来存放由 copy 模块或 script 模块调用的文件。
●templates
用来存放 jinjia2 模板,template 模块会自动在此目录中寻找 jinjia2 模板文件。
●tasks
此目录应当包含一个 main.yml 文件,用于定义此角色的任务列表,此文件可以使用 include 包含其它的位于此目录的 task 文件。
●handlers
此目录应当包含一个 main.yml 文件,用于定义此角色中触发条件时执行的动作。
●vars
此目录应当包含一个 main.yml 文件,用于定义此角色用到的变量。
●defaults
此目录应当包含一个 main.yml 文件,用于为当前角色设定默认变量。 这些变量具有所有可用变量中最低的优先级,并且可以很容易地被任何其他变量覆盖。所以生产中我们一般不在这里定义变量
●meta
此目录应当包含一个 main.yml 文件,用于定义此角色的元数据信息及其依赖关系。
在一个 playbook 中使用 roles 的步骤:
(1)创建以 roles 命名的目录
mkdir /etc/ansible/roles/ -p #yum装完默认就有
(2)创建全局变量目录(可选)
mkdir /etc/ansible/group_vars/ -p
touch /etc/ansible/group_vars/all #文件名自己定义,引用的时候注意
(3)在 roles 目录中分别创建以各角色名称命名的目录,如 httpd、mysql
mkdir /etc/ansible/roles/httpd
mkdir /etc/ansible/roles/mysql
(4)在每个角色命名的目录中分别创建files、handlers、tasks、templates、meta、defaults和vars目录,用不到的目录可以创建为空目录,也可以不创建
mkdir /etc/ansible/roles/httpd/{files,templates,tasks,handlers,vars,defaults,meta}
mkdir /etc/ansible/roles/mysql/{files,templates,tasks,handlers,vars,defaults,meta}
(5)在每个角色的 handlers、tasks、meta、defaults、vars 目录下创建 main.yml 文件,千万不能自定义文件名
touch /etc/ansible/roles/httpd/{defaults,vars,tasks,meta,handlers}/main.yml
touch /etc/ansible/roles/mysql/{defaults,vars,tasks,meta,handlers}/main.yml
(6)修改 site.yml 文件,针对不同主机去调用不同的角色
vim /etc/ansible/site.yml
---
- hosts: webserversremote_user: rootroles:- httpd
- hosts: dbserversremote_user: rootroles:- mysql
(7)运行 ansible-playbook
cd /etc/ansible
ansible-playbook site.yml示例:
mkdir /etc/ansible/roles/httpd/{files,templates,tasks,handlers,vars,defaults,meta} -p
mkdir /etc/ansible/roles/mysql/{files,templates,tasks,handlers,vars,defaults,meta} -p
mkdir /etc/ansible/roles/php/{files,templates,tasks,handlers,vars,defaults,meta} -ptouch /etc/ansible/roles/httpd/{defaults,vars,tasks,meta,handlers}/main.yml
touch /etc/ansible/roles/mysql/{defaults,vars,tasks,meta,handlers}/main.yml
touch /etc/ansible/roles/php/{defaults,vars,tasks,meta,handlers}/main.yml
编写httpd模块
写一个简单的tasks/main.yml
vim /etc/ansible/roles/httpd/tasks/main.yml
- name: install apacheyum: name={{pkg}} state=latest
- name: start apacheservice: enabled=true name={{svc}} state=started
定义变量:可以定义在全局变量中,也可以定义在roles角色变量中,一般定义在角色变量中
vim /etc/ansible/roles/httpd/vars/main.yml
pkg: httpd
svc: httpd
编写mysql模块
vim /etc/ansible/roles/mysql/tasks/main.yml
- name: install mysqlyum: name={{pkg}} state=latest
- name: start mysqlservice: enabled=true name={{svc}} state=startedvim /etc/ansible/roles/mysql/vars/main.yml
pkg:- mariadb- mariadb-server
svc: mariadb
编写php模块
vim /etc/ansible/roles/php/tasks/main.yml
- name: install phpyum: name={{pkg}} state=latest
- name: start php-fpmservice: enabled=true name={{svc}} state=started
vim /etc/ansible/roles/php/vars/main.yml
pkg:- php- php-fpm
svc: php-fpm
编写roles示例
vim /etc/ansible/site.yml
---
- hosts: webserversremote_user: rootroles:- httpd- mysql- php
cd /etc/ansible
ansible-playbook site.yml
相关文章:

Ansible 的脚本 --- playbook 剧本
目录 playbook 剧本 playbooks 本身由以下各部分组成 定义、引用变量 指定远程主机sudo切换用户 when条件判断 迭代 Templates 模块 1.先准备一个以 .j2 为后缀的 template 模板文件,设置引用的变量 2.修改主机清单文件,使用主机变量定义一个变…...

CSP-J模拟赛 / 买文具
限制条件 时间限制: 1000 ms, 空间限制: 256 MB 输入文件: pen.in, 输出文件:pen.out 题目描述 开学啦,为了准备新学期的课程学习,小贝到商店买文具。小贝买完文具回家,告诉妈妈说她买了钢笔、圆珠笔和铅笔总共x支,…...

leecode算法--每日一题1
二分查找 给定一个 n 个元素有序的(升序)整型数组 nums 和一个目标值 target ,写一个函数搜索 nums 中的 target,如果目标值存在返回下标,否则返回 -1。 前提条件必须满足: 目标数组必须是有序数组 所以…...

LViT:语言与视觉Transformer在医学图像分割
论文链接:https://arxiv.org/abs/2206.14718 代码链接:GitHub - HUANGLIZI/LViT: This repo is the official implementation of "LViT: Language meets Vision Transformer in Medical Image Segmentation" (IEEE Transactions on Medical I…...
!!!)
蓝桥杯上岸每日N题 第五期(山)!!!
蓝桥杯上岸每日N题第五期 ❗️ ❗️ ❗️ 同步收录 👇 蓝桥杯Java 省赛B组(初赛)填空题 大家好 我是寸铁💪 冲刺蓝桥杯省一模板大全来啦 🔥 蓝桥杯4月8号就要开始了 🙏 距离蓝桥杯省赛倒数第3天 ❗️ ❗️ ❗️ 还没背熟模…...

IDEA Writing classes... 比较慢
IDEA配置修改如下: 1、File -> Settings… 2、Build,Execution,Deployment -> Compiler Build process heap size 配置为 20483、Build,Execution,Deployment -> Compiler -> ActionScript & Flex C…...
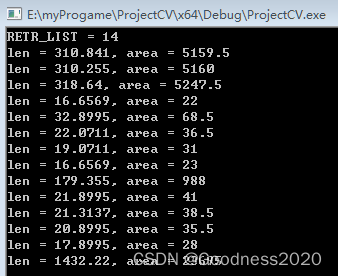
opencv中轮廓相关属性
一、介绍 findContours() :The function retrieves contours from the binary image。 二、代码 void main() {Mat src imread("match00.bmp", IMREAD_GRAYSCALE);Mat mask;threshold(src, mask, 128, 255, cv::THRESH_BINARY_INV);Mat element cv::g…...
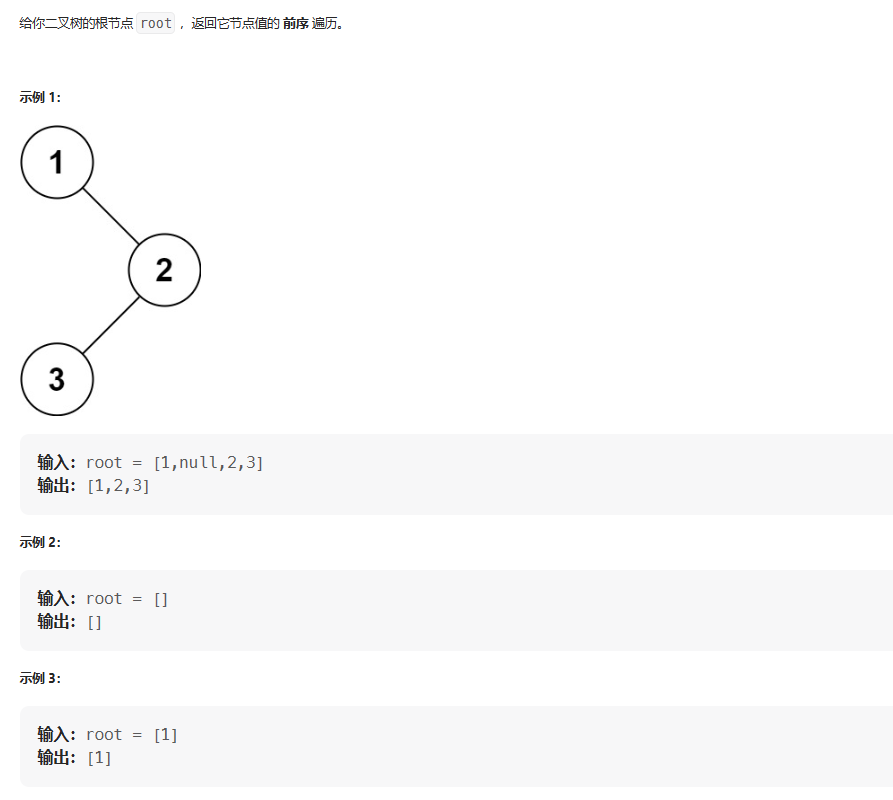
Leetcode 144. 二叉树的前序遍历
题目描述 题目链接:https://leetcode.cn/problems/binary-tree-preorder-traversal/description/ 代码实现 class Solution {List<Integer> l new ArrayList<>();public List<Integer> preorderTraversal(TreeNode root) {preoder(root);re…...

医学影像PACS系统源码:多功能服务器和阅片系统
PACS系统是以最新的IT技术为基础,遵循医疗卫生行业IHE/DICOM3.0和HL7标准,开发的多功能服务器和阅片系统。通过简单高性能的阅片功能,支持繁忙时的影像诊断业务,拥有保存影像的院内Web传输及离线影像等功能,同时具有备…...

php 生成连续递增的Excel列索引 可以控制多少列
今天遇到需要生成对应的下拉,下拉的类 需要PHP 输出一个数组 如 A、B、C、D 到Z 列后 Excel 的列就变成 AA 、AB、 AC 依次类推 查询得知 Excel 最大列数 16384 最大行数 1048576 下面演示3000列或行 <?php$idx [idx > 0];for ($i …...

Openstack等私有云
1 OpenStack 计算:部署管理虚拟机存储:块存储 Cinder 和 对象存储 Swift网路:管理网络身份:管理用户和权限镜像:管理镜像用于快速部署新的虚拟机仪表盘:Web界面 2 RAID 如果使用的软件已经在多个硬件设备…...
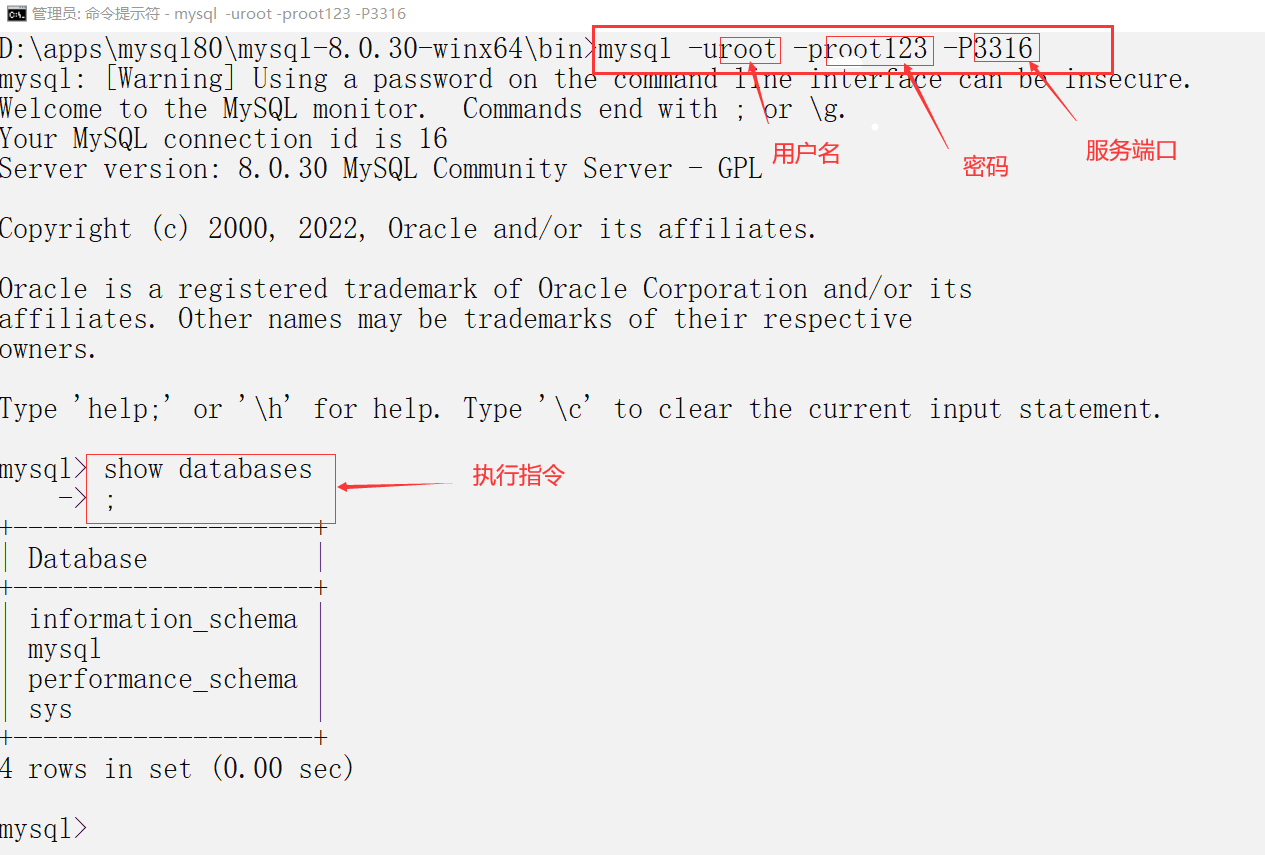
MySQL 8.0详细安装配置教程
一. 前言 MySQL是目前最为流行的开源数据库产品,是完全网络化跨平台的关系型数据库系统。它起初是由瑞典MySQLAB公司开发,后来被Oracle公司收购,目前属于Oracle公司。因为开源,所以任何人都能从官网免费下载MySQL软件,…...
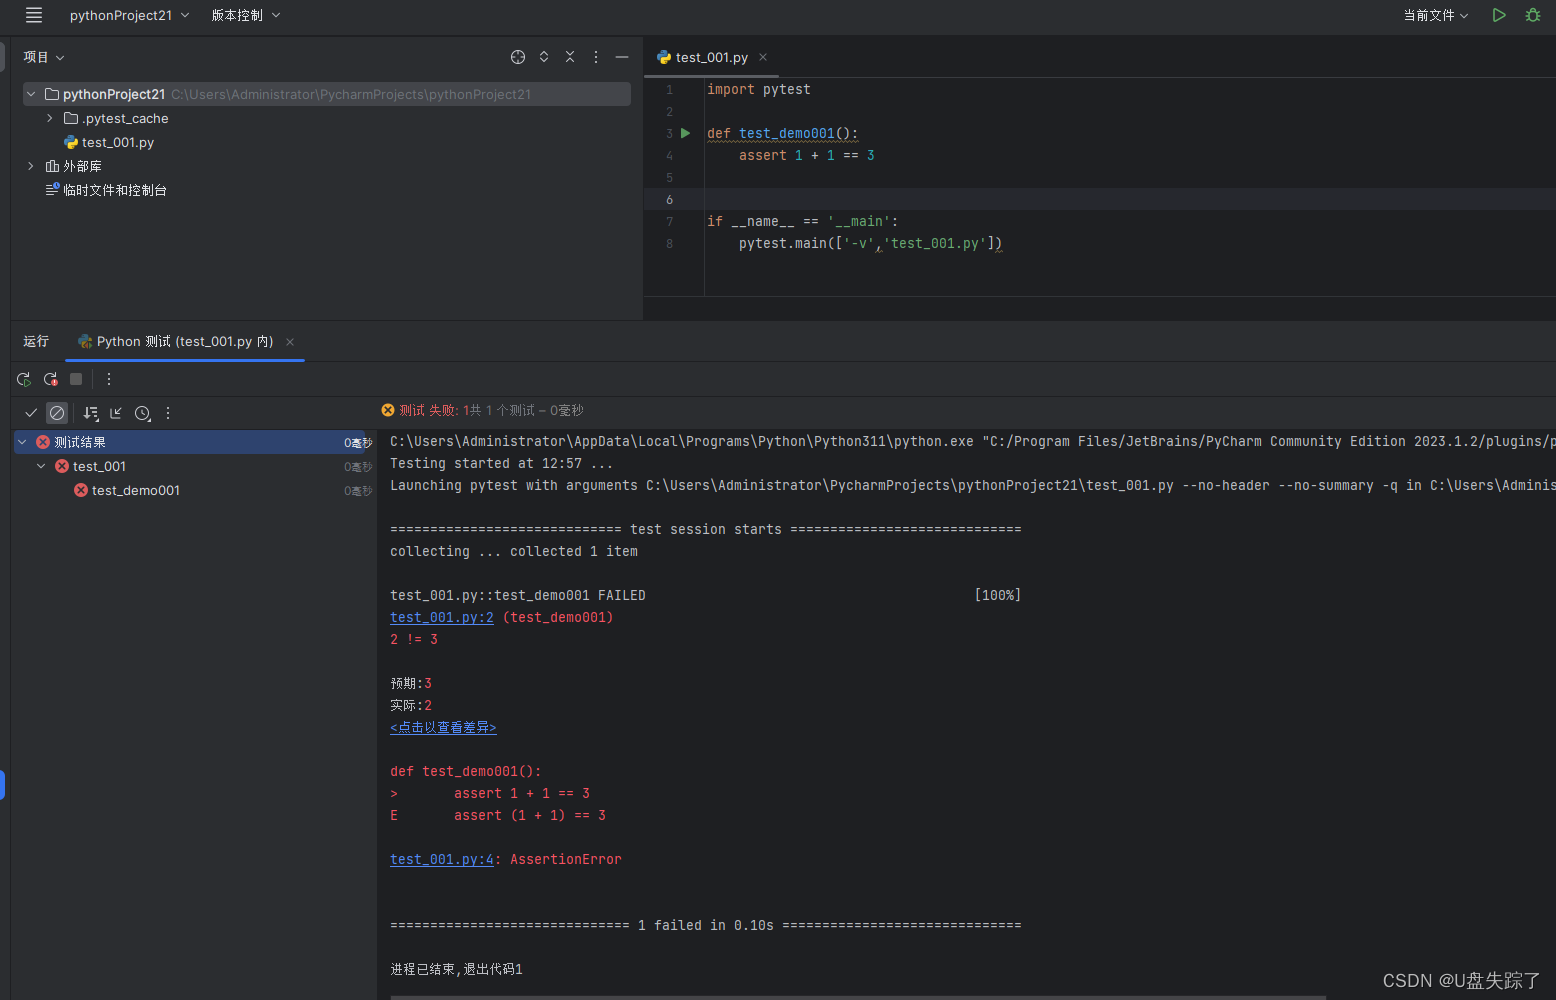
pytest 入门
1,安装pytest 打开终端或命令提示符窗口,在终端中运行以下命令来安装pytest: pip install pytestpip install -i https://pypi.tuna.tsinghua.edu.cn/simple pytest 确保您的系统上已经安装了Python。您可以在终端中运行以下命令来检查Python的安装情况: pytest --version…...

分布式缓存数据一致性-解决方案
如果是用户维度,并发几率小(用户修改订单)。不需要考虑一致性问题,缓存数据加上过期时间,每隔一段时间出发读数据,主动更新缓存即可。(缓存过期删除数据,触发读请求主动更新…...

Java设计模式-享元模式
享元模式 1.享元模式含义 享元模式,运用共享技术有效地支持大量细粒度的对象。 其实享元模式很好理解,就是共享元数据的意思。比如一个小狗类对象,里面的属性有头,耳朵,眼睛,毛色这几个属性,…...
idea模块的pom.xml被划横线,不识别的解决办法
目录 问题: 解决办法: 1.打开设置 2. 取消勾选 3.点击确认 4.解决 问题提出: 写shi山的过程中,给模块取错名字了,改名的时候不知道点到了什么,一个模块的pom.xml变成灰色了࿰…...

ffmpeg 中 av_log 是怎样工作的?
---------------------------------------- author: hjjdebug date: 2023年 07月 27日 星期四 14:56:38 CST descriptor: ffmpeg 中 av_log 是怎样工作的? ---------------------------------------- av_log 功能其实只是添加了颜色,LOG级别,及log上下文名称,没有添加时间,函…...

HTML+CSS+JavaScript:轮播图自动播放
一、需求 轮播图如下图所示,需求是每隔一秒轮播图自动切换一次 二、代码素材 以下是缺失JS部分的代码,感兴趣的小伙伴可以先自己试着写一写 <!DOCTYPE html> <html lang"en"><head><meta charset"UTF-8" /&…...

python 自动化数据提取之正则表达式
>>>> 前 言 我们在做接口自动化的时候,处理接口依赖的相关数据时,通常会使用正则表达式来进行提取相关的数据,今天在这边和大家聊聊如何在python中使用正则表达式。 正则表达式,又称正规表示式、正规表示法、正规…...

分布式事务之本地事务
🚀 分布式事务 🚀 🌲 AI工具、AI绘图、AI专栏 🍀 🌲 如果你想学到最前沿、最火爆的技术,赶快加入吧✨ 🌲 作者简介:硕风和炜,CSDN-Java领域优质创作者🏆&…...

轻量级嵌入式软传感库:用双BME280实现太阳辐射实时反演
1. 项目概述FiaPhy 是一个面向嵌入式环境的轻量级软传感(Soft-Sensing)库,核心实现差分时间导数软传感(Differential Temporal Derivative Soft-Sensing, DTDSS)算法。该库不依赖专用辐射计硬件,而是通过部…...

OpenClaw技能组合:Qwen3-4B串联多个自动化模块完成复杂任务
OpenClaw技能组合:Qwen3-4B串联多个自动化模块完成复杂任务 1. 为什么需要技能组合? 去年我接手了一个数据分析项目,需要每周从三个不同来源收集数据,清洗后生成可视化报告。最初我手动执行这些步骤,每次耗时近3小时…...

STM32F4用CubeMX HAL库驱动STP-23激光模块,实测921600波特率串口中断接收避坑指南
STM32F4高波特率串口通信实战:激光测距模块稳定接收全解析 在机器人导航和智能小车开发中,激光测距模块的实时数据采集往往成为系统精度的关键瓶颈。当波特率提升至921600这一工业级速率时,传统的中断处理方式常会出现数据丢失、帧错位等问题…...

米哈游面经规律总结:我看了大量面经,挂掉的人都卡在同一层
米哈游面经规律总结:我看了大量面经,挂掉的人都卡在同一层 offer直通车-校招大礼包获取:入口 几乎所有挂掉的人,都挂在同一个地方 最近整理米哈游的面经,看到一个反复出现的场面。 面试官问:"说说智…...

仿真波形截图](https://example.com/waveform.jpg
永磁同步电机全速域无位置传感器控制仿真,高频注入改进滑膜控制,PMSM矢量控制仿真 1,在零低速域,采用无数字滤波器高频方波注入法,减少滤波的相位影响,且对凸极性要求不高; 2,在中高…...

代码随想录 300.最长递增子序列
思路:根据题意得,子序列是由数组派生而来的序列,删除(或不删除)数组中的元素不改变其余元素的顺序。动规五部曲:1.dp[i]的定义:dp[i]表示i之前包括i的以nums[i]结尾的最长递增子序列的长度。2.确…...

从混乱到有序:大数据规范性分析的转型之路
从混乱到有序:大数据规范性分析的转型之路 关键词:大数据分析、数据治理、规范性分析、数据质量、ETL流程、数据仓库、数据可视化 摘要:本文深入探讨了大数据分析从混乱无序状态向规范性分析转型的关键路径。文章首先分析了大数据环境下面临的典型数据质量问题,然后系统性地…...

W25Q16 Flash存储器的5个常见应用场景及避坑指南
W25Q16 Flash存储器的5个常见应用场景及避坑指南 在嵌入式系统开发中,数据存储一直是个绕不开的话题。想象一下,你花了一周时间调试的设备,重启后所有用户设置都消失了;或者精心设计的UI界面,因为字库加载失败变成了乱…...
)
无人驾驶车辆轨迹跟踪MPC、LQR、PP算法对比仿真(带说明文档)
✅作者简介:热爱科研的Matlab仿真开发者,擅长毕业设计辅导、数学建模、数据处理、建模仿真、程序设计、完整代码获取、论文复现及科研仿真。🍎 往期回顾关注个人主页:Matlab科研工作室👇 关注我领取海量matlab电子书和…...

Youtu-VL-4B-Instruct-GGUF助力开源社区:如何向GitHub提交高质量的模型使用案例
Youtu-VL-4B-Instruct-GGUF助力开源社区:如何向GitHub提交高质量的模型使用案例 1. 引言:从使用者到贡献者 不知道你有没有这样的经历:在网上找到一个看起来很酷的开源项目,兴致勃勃地打开它的GitHub页面,结果发现文…...