Spring系列三:基于注解配置bean
文章目录
- 💗通过注解配置bean
- 🍝基本介绍
- 🍝快速入门
- 🍝注意事项和细节
- 💗自己实现Spring注解配置Bean机制
- 🍝思路分析
- 🍝注意事项和细节
- 💗自动装配 @Autowired
- 🍝`案例1:` @Autowired引出
- 🍝`案例2:` @Autowired解读
- 🍚`案例3:` @Resource解读
- 🍝小结
- 💗泛型依赖注入
上文中, 我们学习到了 Spring系列二:基于XML配置bean
接下来我们学习, 通过注解配置bean
💗通过注解配置bean
🍝基本介绍
基于注解的方式配置bean, 主要是项目开发中的组件, 比如Controller, Service和Dao.
- 组件注解的形式有
1.@Component 表示当前注解标识的是一个组件
2.@Controller 表示当前注解标识的是一个控制器, 通常用于Servlet
3.@Service 表示当前注解表示的是一个处理业务逻辑的类, 通常用于Service类
4.@Repository表示当前注解标识的是一个持久化的类, 通常用于Dao类
🍝快速入门
-
应用实例
使用注解的方式来配置 Controller / Service / Repository / Component -
代码实现
1引入spring-aop-5.3.8.jar, 在 spring/lib 目录下拷贝即可
2.在spring/component包下 创建 UserAction .java, UserService.java, UserDao.java, MyComponent.java
//使用 @Repository 标识该类是一个Repository, 即是一个持久化层的类/对象
@Repository
public class UserDao {}
//@Service 标识该类是一个Service类/对象
@Service
public class UserService {}
//@Controller 标识该类是一个控制器Controller, 通常该类是一个Servlet
@Controller
public class UserAction {}
//@Component 标识该类是一个组件, 是一个通用的注解
@Component
public class MyComponent {}
配置文件

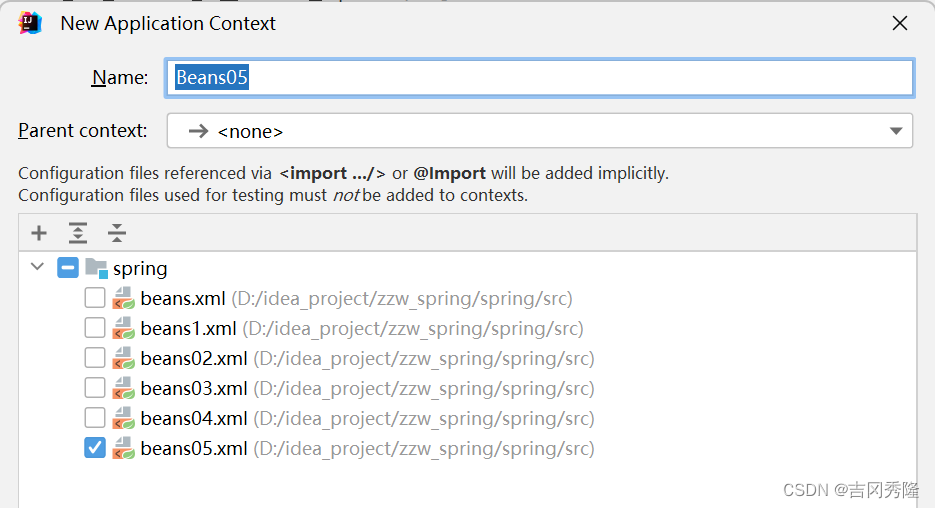
beans05.xml
<!--配置容器要扫描的包
解读:
1.component-scan 要对指定包下的类进行扫描, 并创建对象到我们的容器中
2.base-package 指定要扫描的包
3.含义是当spring容器创建/初始化时, 就会扫描com.zzw.spring.component包下的所有的 有注解 @Controller / @Service / @Repository / @Component 的类将其实例化, 生成对象, 放入到ioc容器
-->
<context:component-scan base-package="com.zzw.spring.component"/>
通过注解来配置bean
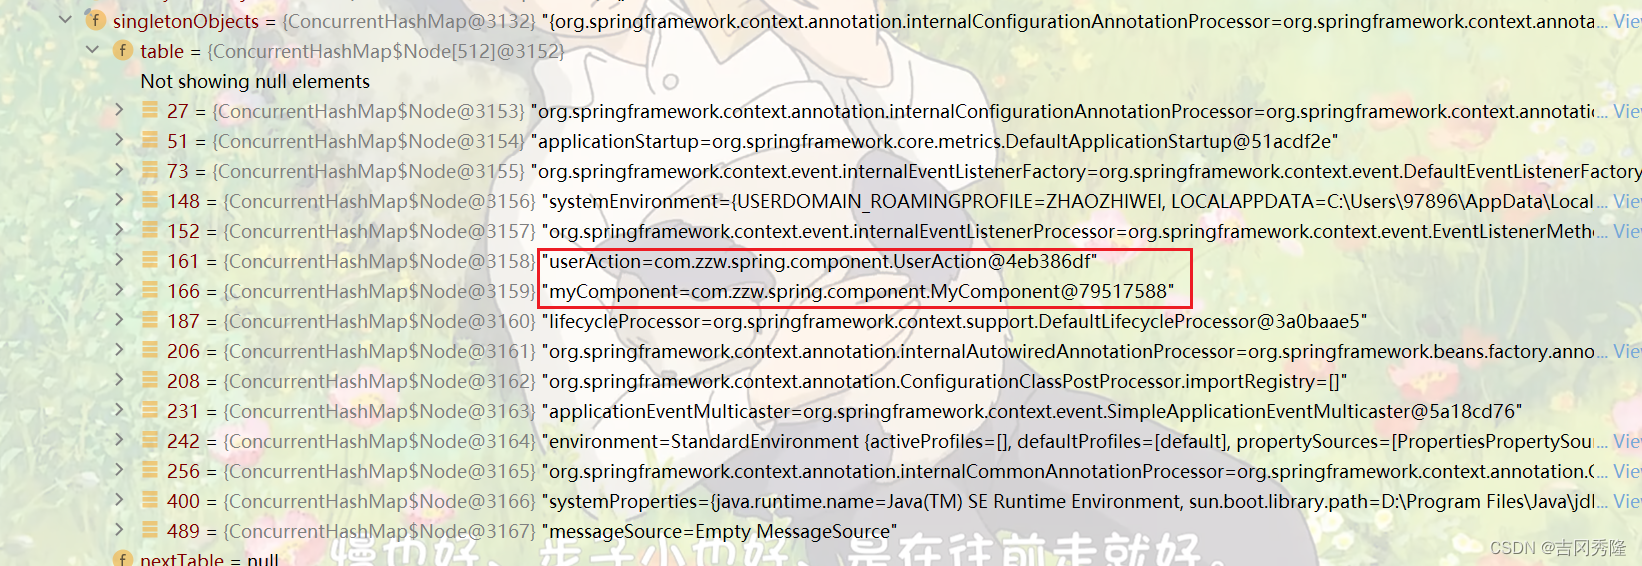
public class SpringBeanTest {//通过注解来配置bean@Testpublic void setBeanByAnnotation() {ApplicationContext ioc =new ClassPathXmlApplicationContext("beans05.xml");UserAction userAction = ioc.getBean(UserAction.class);UserService userService = ioc.getBean(UserService.class);UserDao userDao = ioc.getBean(UserDao.class);MyComponent myComponent = ioc.getBean(MyComponent.class);System.out.println("userDao=" + userDao);System.out.println("userService=" + userService);System.out.println("userAction=" + userAction);System.out.println("myComponent=" + myComponent);System.out.println("ok");}
}
🍝注意事项和细节
1.需要导入spring-aop-5.3.8.jar, 别忘了
2.必须在Spring配置文件中指定 “自动扫描的包”, IOC容器才能够检测到当前项目中哪些类被标识了注解, 注意必须导入context名称空间
<!–配置自动扫描的包–>
<context:component-scan base-package="com.zzw.spring.component"/>
可以使用通配符 * 来指定, 比如 com.zzw.spring.* 表示
问题: com.zzw.spring.component 会不会去扫描它的子包? 会
3.Spring的IOC容器不能检测一个使用了@Controller注解的类到底是不是一个真正的控制器. 注解的名称是用于程序员自己识别当前标识的是什么组件. 其它的@Service, @Repository也是一样的道理. [也就是说spring的IOC容器只要检查到注解就会生成对象, 但是这个注解的含义spring不会识别, 注解是给程序员编程方便看的.]
4.<context:component-scan base-package=“com.zzw.spring.component” resource-pattern=“User*.class”/>
注意1: resource-pattern=“User*.class”: 表示只扫描 com.zzw.spring.component包 和 它的子包下的User打头的类.[使用的少, 不想扫描, 不写注解就可以]
注意2: 真正运行的是out目录, 所以扫描的是.class文件

5.排除一些类, 以annotation注解为例
<context: exclude-filter type=“annotation” expression=“org.springframework.stereotype.Service”/>
<!--需求: 如果我们希望排除某个包/子包下的某种类型的注解, 可以通过exclude-filter来指定1.context:exclude-filter 指定要排除哪些类2.type 指定排除方式 annotation表示按照注解来排除3.expression="org.springframework.stereotype.Service" 指定要排除的注解的全路径
-->
<context:component-scan base-package="com.zzw.spring.component"><context:exclude-filter type="annotation" expression="org.springframework.stereotype.Service"/><context:exclude-filter type="annotation" expression="org.springframework.stereotype.Repository"/>
</context:component-scan>
– 通过Debug IOC容器结构, 可以一目了然.
解读
1)<context:exclude-filter> 放在 <context:component-scan>内, 表示扫描需要过滤掉当前包及其子包的某些类
2)type=“annotation”* 按照注解类型进行过滤
3)expression: 就是注解的全类名, 比如org.springframework.stereotype.Service就是@Service注解的全类名, 其他比如@Controller @Repository等, 依此类推
4)上面表示过滤掉com.zzw.spring.component包及其子包下, 加入了@Service 注解的类
5)测试, 修改beans05.xml, 增加exclude-filter, 发现UserService, 不会注入到容器.
6.指定自动扫描哪些注解类
<!--需求: 如果我们希望按照自己的规则, 来扫描包/子包下的某些注解, 可以通过include-filter来指定1.use-default-filters="false" 表示不使用默认的 扫描机制/过滤机制2.context:include-filter 表示要去扫描哪些类3.type="annotation" 按照注解的方式去 扫描/过滤4.expression="org.springframework.stereotype.Service" 指定要扫描的注解的全路径
-->
<context:component-scan base-package="com.zzw.spring.component" use-default-filters="false"><context:include-filter type="annotation" expression="org.springframework.stereotype.Service"/><context:include-filter type="annotation" expression="org.springframework.stereotype.Controller"/>
</context:component-scan>
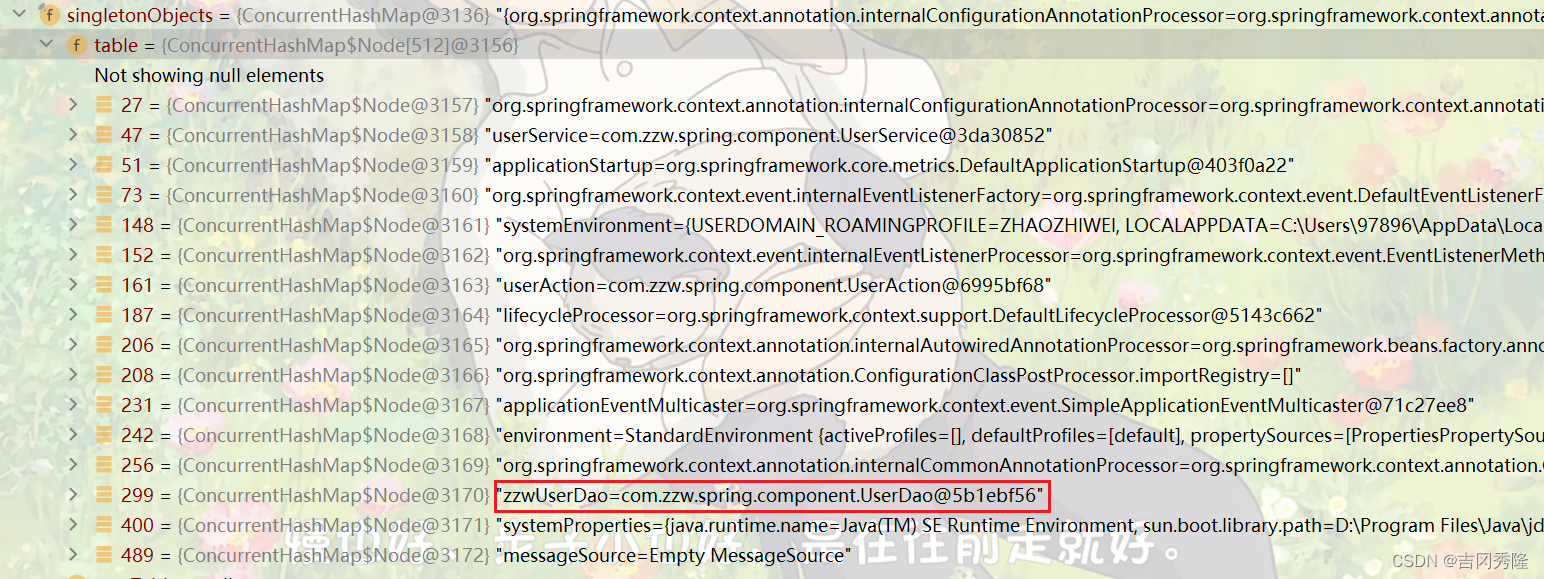
7.默认情况: 标记注解后, 类名首字母小写作为id的值, 也可以使用注解的value属性指定id值, 并且value可以省略.
//在默认情况下, 注解标识的类创建对象后, 在容器中, id 为类名的首字母小写
UserDao userDao1 = ioc.getBean("userDao", UserDao.class);
System.out.println("userDao1=" + userDao1);
 /** * 解读* 1.标记注解后, 类名首字母小写作为id的值(默认)* 2.value="zzwUserDao" 使用指定的 zzwUserDao作为UserDao对象的id*/
@Repository(value = "zzwUserDao")
public class UserDao {}
8.关于@Controller, @Service, @Component区别:
https://zhuanlan.zhihu.com/p/454638478
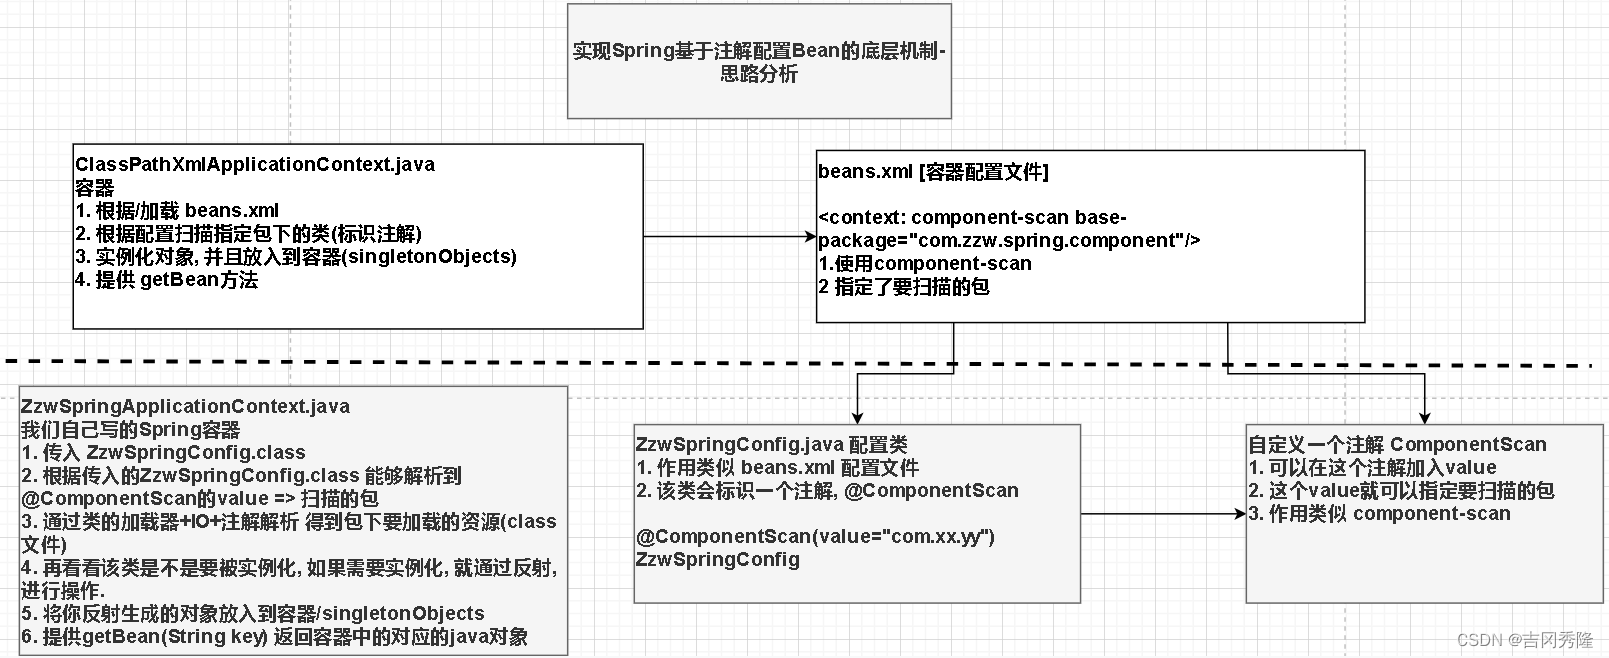
💗自己实现Spring注解配置Bean机制
IO知识,传送门 - 注解知识,传送门 - 反射知识,传送门 - 集合知识,传送门
🍝思路分析
1)思路分析+程序结构
2)我们使用注解方式完成, 这里我们不使用xml来配置
3)程序框架图
1.搭建基本结构并获取扫描的包
自定义注解 ComponentScan
/*** 1. @Target(ElementType.TYPE)指定我们的ComponentScan注解可以修饰 Type程序元素* 2. @Retention(RetentionPolicy.RUNTIME)指定ComponentScan注解 保留范围* 3. String value() default "": 表示ComponentScan注解可以传入 value*/
@Target(ElementType.TYPE)
@Retention(RetentionPolicy.RUNTIME)
public @interface ComponentScan {String value() default "";
}
容器配置文件 ZzwSpringConfig
//这是一个配置类, 它的作用类似于我们原生spring的 beans.xml 容器配置文件
@ComponentScan(value = "com.zzw.spring.component")
public class ZzwSpringConfig {}
模拟Spring-ioc容器 ZzwSpringApplicationContext
//ZzwSpringApplicationContext 类的作用类似Spring原生ioc容器
@SuppressWarnings({"all"})
public class ZzwSpringApplicationContext {private Class configClass;//ioc存放的就是通过反射创建的对象(基于注解方式)private final ConcurrentHashMap<String, Object> ioc =new ConcurrentHashMap<>();//构造器public ZzwSpringApplicationContext(Class configClass) {this.configClass = configClass;//System.out.println("this.configClass=" + this.configClass);//获取要扫描的包//1.先得到ZzwSpringConfig配置类的 @ComponentScan(value = "com.zzw.spring.component")ComponentScan componentScan =(ComponentScan) this.configClass.getDeclaredAnnotation(ComponentScan.class);//2.获取componentScan的value => 即要扫描的包String path = componentScan.value();System.out.println("要扫描的包=" + path);}
}
测试
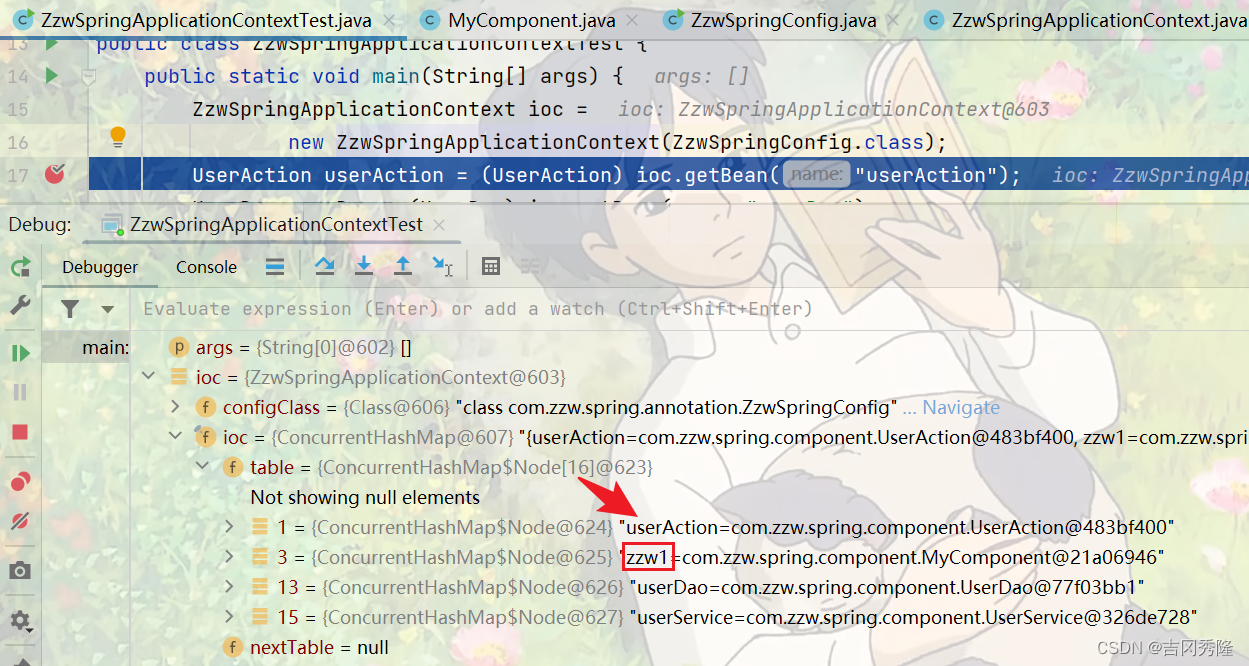
public class ZzwSpringApplicationContextTest {public static void main(String[] args) {ZzwSpringApplicationContext ioc =new ZzwSpringApplicationContext(ZzwSpringConfig.class);}
}
2.获取扫描包下所有的.class文件 [扫描的out目录下的component目录, 里面都是.class后缀的文件]

public class ZzwSpringApplicationContext {private Class configClass;//ioc存放的就是通过反射创建的对象(基于注解方式)private final ConcurrentHashMap<String, Object> ioc =new ConcurrentHashMap<>();//构造器public ZzwSpringApplicationContext(Class configClass) {this.configClass = configClass;//System.out.println("this.configClass=" + this.configClass);//获取要扫描的包//1.先得到ZzwSpringConfig配置类的 @ComponentScan(value = "com.zzw.spring.component")ComponentScan componentScan =(ComponentScan) this.configClass.getDeclaredAnnotation(ComponentScan.class);//2.通过componentScan的value => 即要扫描的包String path = componentScan.value();System.out.println("要扫描的包=" + path);//com.zzw.spring.component//得到要扫描的包下的所有资源(.class 类)//1.得到类的加载器ClassLoader classLoader = ZzwApplicationContext.class.getClassLoader();//2.通过类的加载器获取到要扫描包的资源url =>类似一个路径path = path.replace(".", "/");//一定要把 .替换成 /URL resource = classLoader.getResource(path);//file:/D:/idea_project/zzw_spring/spring/out/production/spring/com/zzw/spring/componentSystem.out.println("resource=" + resource);//3.将要加载的资源(.class) 路径下的文件进行遍历File file = new File(resource.getFile());//在io中, 目录也是文件if (file.isDirectory()) {//检查是否是目录File[] files = file.listFiles();for (File f : files) {System.out.println("=============================");System.out.println(f.getAbsolutePath());}}}
}
测试
public class ZzwSpringApplicationContextTest {public static void main(String[] args) {ZzwSpringApplicationContext ioc =new ZzwSpringApplicationContext(ZzwSpringConfig.class);}
}
3.获取全类名 反射对象 放入容器
public class ZzwSpringApplicationContext {private Class configClass;//ioc存放的就是通过反射创建的对象(基于注解方式)private final ConcurrentHashMap<String, Object> ioc =new ConcurrentHashMap<>();//构造器public ZzwSpringApplicationContext(Class configClass) {this.configClass = configClass;System.out.println("this.configClass=" + this.configClass);//获取要扫描的包//1.先得到ZzwSpringConfig配置类的 @ComponentScan(value = "com.zzw.spring.component")ComponentScan componentScan =(ComponentScan) this.configClass.getDeclaredAnnotation(ComponentScan.class);//2.通过componentScan的value => 即要扫描的包String path = componentScan.value();System.out.println("要扫描的包=" + path);//com.zzw.spring.component//得到要扫描的包下的所有资源(.class 类)//1.得到类的加载器ClassLoader classLoader = ZzwApplicationContext.class.getClassLoader();//2.通过类的加载器获取到要扫描包的资源url =>类似一个路径path = path.replace(".", "/");//一定要把 .替换成 / com/zzw/spring/componentURL resource = classLoader.getResource(path);//file:/D:/idea_project/zzw_spring/spring/out/production/spring/com/zzw/spring/componentSystem.out.println("resource=" + resource);//3.将要加载的资源(.class) 路径下的文件进行遍历File file = new File(resource.getFile());//在io中, 目录也是文件if (file.isDirectory()) {File[] files = file.listFiles();for (File f : files) {System.out.println("=============================");System.out.println(f.getAbsolutePath());//fileAbsolutePath: D:\idea_project\zzw_spring\spring\out\production\spring\com\zzw\spring\component\UserDao.class//获取到 com.zzw.spring.component.UserDaoString fileAbsolutePath = f.getAbsolutePath();//这里我们只处理.class文件if (fileAbsolutePath.endsWith(".class")) {//1.获取类名String className =fileAbsolutePath.substring(fileAbsolutePath.lastIndexOf("\\") + 1, fileAbsolutePath.lastIndexOf(".class"));System.out.println("className="+className);//2.获取类的完整的路径(全类名)// path.replace("/", ".") => com.zzw.spring.componentString classFullName = path.replace("/", ".") + "." + className;//比如 com.zzw.spring.component.UserDao//System.out.println("classFullName=" + classFullName);//3.判断该类是不是需要注入到容器, 就看该类是不是有注解 @Component @Controller...try {//这时, 我们就得到了该类的Class对象//Class clazz = Class.forName(classFullName)//说明//1. Class clazz = Class.forName(classFullName) 可以反射加载类//2. classLoader.loadClass(classFullName); 可以反射类的Class//3. 区别是: 上面方式会调用该类的静态方法, 下面方式不会//4. aClass.isAnnotationPresent(Component.class) 判断该类是否有 Component注解Class<?> aClass = classLoader.loadClass(classFullName);if (aClass.isAnnotationPresent(Component.class) ||aClass.isAnnotationPresent(Repository.class) ||aClass.isAnnotationPresent(Service.class) ||aClass.isAnnotationPresent(Controller.class)) {//这时就可以反射对象, 并放入到容器中Class<?> clazz = Class.forName(classFullName);Object instance = clazz.newInstance();//放入到容器中, 将类名的首字母小写作为id//StringUtils 工具类 import org.springframework.util.StringUtils;ioc.put(StringUtils.uncapitalize(className), instance);}} catch (Exception e) {throw new RuntimeException(e);}}}}}//编写方法返回容器对象public Object getBean(String name) {return ioc.get(name);}
}
测试
public class ZzwSpringApplicationContextTest {public static void main(String[] args) {ZzwSpringApplicationContext ioc =new ZzwSpringApplicationContext(ZzwSpringConfig.class);UserAction userAction = (UserAction) ioc.getBean("userAction");UserDao userDao = (UserDao) ioc.getBean("userDao");UserService userService = (UserService) ioc.getBean("userService");MyComponent myComponent = (MyComponent) ioc.getBean("myComponent");System.out.println("userAction=" + userAction);System.out.println("userDao=" + userDao);System.out.println("userService=" + userService);System.out.println("myComponent=" + myComponent);System.out.println("ok");}
}
🍝注意事项和细节
案例:还可以通过 @Component(value = “xx”) @Controller(value = “yy”) @Service(value = “zz”) 中指定的 value, 给bean分配id
@Component(value = "zzw1")
public class MyComponent {}
if (aClass.isAnnotationPresent(Component.class) ||aClass.isAnnotationPresent(Repository.class) ||aClass.isAnnotationPresent(Service.class) ||aClass.isAnnotationPresent(Controller.class)) {//这里我们演示一个Component注解指定value, 分配id//这里就是演示了一下机制if (aClass.isAnnotationPresent(Component.class)) {//获取到该注解Component component = aClass.getDeclaredAnnotation(Component.class);//获取component的value =>即要分配的idString id = component.value();if (!"".equals(id)) {className = id;}}//这时就可以反射对象, 并放入到容器中Class<?> clazz = Class.forName(classFullName);Object instance = clazz.newInstance();//放入到容器中, 将类名的首字母小写作为id//StringUtils 工具类ioc.put(StringUtils.uncapitalize(className), instance);
}
测试结果
💗自动装配 @Autowired
基本说明
1.基于注解配置bean, 也可实现自动装配. 使用的注解是: @Autowired 或者 @Resource
- @Autowired的规则说明
-
在ioc容器中查找待装配的组件的类型, 如果有唯一的bean则匹配.
-
如果装配的类型对应的bean在ioc容器中有多个, 则使用待装配的属性的属性名作为id值再进行查找, 找到就装配, 找不到就抛异常.
-
- @Resource的规则说明
-
@Resource有两个属性是有两个属性是比较重要的, 分别是name和type. Spring将@Resource注解的name属性解析为bean的名字, 将type属性解析为bean的类型.
-
如果使用name属性, 则使用byName的自动注入策略; 而使用type属性时, 则使用byType自动注入策略.
-
如果@Resource 没有指定 name 和 type, 则优先使用byName注入策略 (即使用待装配的属性的属性名作为id值进行查找), 如果匹配不上, 再使用byType策略(即查找待装配的组件的类型). 如果都不成功, 就会报错.
-
- 不管是@Autowired 还是 @Resource 都保证属性名是规范写法就可以 注入.
🍝案例1: @Autowired引出
@Service
public class UserService {public void hi() {System.out.println("UserService hi()...");}
}
@Controller
public class UserAction {private UserService userService;public void sayOK() {System.out.println("UserAction sayOK()....");userService.hi();}
}
<?xml version="1.0" encoding="UTF-8"?>
<beans xmlns="http://www.springframework.org/schema/beans"xmlns:xsi="http://www.w3.org/2001/XMLSchema-instance"xmlns:context="http://www.springframework.org/schema/context"xsi:schemaLocation="http://www.springframework.org/schema/beans http://www.springframework.org/schema/beans/spring-beans.xsd http://www.springframework.org/schema/context https://www.springframework.org/schema/context/spring-context.xsd"><context:component-scan base-package="com.zzw.spring.component"/>
</beans>
public class SpringBeanTest {@Testpublic void setPropertyByAutowired() {ApplicationContext ioc =new ClassPathXmlApplicationContext("beans06.xml");UserAction userAction = ioc.getBean("userAction", UserAction.class);System.out.println("userAction=" + userAction);//这里会输出userAction.sayOK();//这里会报空指针异常}
}
加入@Autowired, 就不会报错了.
@Controller
public class UserAction {@Autowiredprivate UserService userService;public void sayOK() {System.out.println("UserAction sayOK()....");userService.hi();}
}
🍝案例2: @Autowired解读
下面的代码中, UserAction中的userService200 和 SpringBeanTest中的userService是同一个对象. 因为ioc容器中只有一个UserService类型的对象, 此时按照类型来匹配.
@Service
public class UserService {public void hi() {System.out.println("UserService hi()...");}
}
@Controller
public class UserAction {//原先的xml配置, 我们会配置ref. 但是注解配置的情况下, 我们会用@Autowired//说明//1.在ioc容器中查找待装配的组件的类型, 如果有唯一的bean匹配(按照类型), 则使用该bean匹配//2.如果待装配的类型对应的bean在ioc容器中有多个, 则使用待装配的属性的属性名作为id值再进行查找//  找到就装配, 找不到就抛异常@Autowiredprivate UserService userService200;public void sayOK() {System.out.println("UserAction sayOK()....");System.out.println("UserAction 装配的 userService属性=" + userService200);userService200.hi();}
}
<?xml version="1.0" encoding="UTF-8"?>
<beans xmlns="http://www.springframework.org/schema/beans"xmlns:xsi="http://www.w3.org/2001/XMLSchema-instance"xmlns:context="http://www.springframework.org/schema/context"xsi:schemaLocation="http://www.springframework.org/schema/beans http://www.springframework.org/schema/beans/spring-beans.xsd http://www.springframework.org/schema/context https://www.springframework.org/schema/context/spring-context.xsd"><!--通过注解获取的对象id是类名首字母小写--><context:component-scan base-package="com.zzw.spring.component"/>
</beans>
public class SpringBeanTest {@Testpublic void setPropertyByAutowired() {ApplicationContext ioc = new ClassPathXmlApplicationContext("beans06.xml");UserService userService = ioc.getBean("userService", UserService.class);System.out.println("ioc容器中的userService=" + userService);userAction.sayOK();}
}
如果在beans06.xml中加入了同一类型(UserService)的对象, 如下. 那么UserAction中的userService200 和 SpringBeanTest中的userService将不再是同一个对象(SpringBeanTest还会报错呢). 因为ioc容器中UserService类型的对象有多个, 此时将按照待匹配属性的属性名作为id值来匹配, 匹配到的是id为userService200的对象.
<?xml version="1.0" encoding="UTF-8"?>
<beans xmlns="http://www.springframework.org/schema/beans"xmlns:xsi="http://www.w3.org/2001/XMLSchema-instance"xmlns:context="http://www.springframework.org/schema/context"xsi:schemaLocation="http://www.springframework.org/schema/beans http://www.springframework.org/schema/beans/spring-beans.xsd http://www.springframework.org/schema/context https://www.springframework.org/schema/context/spring-context.xsd"><!--通过注解获取的对象id是类名首字母小写--><context:component-scan base-package="com.zzw.spring.component"/><!--id=userService--><!--配置两个UserService对象--><bean class="com.zzw.spring.component.UserService" id="userService200"/><bean class="com.zzw.spring.component.UserService" id="userService300"/>
</beans>
如果UserAction改为如下情况, 那么将会报错. 因为此时是按照待匹配属性的属性名作为id值来匹配的, 但beans06.xml中并没有id=userService400的bean对象, 所以报错.
@Controller
public class UserAction {//原先的xml配置, 我们会配置ref. 但是注解配置的情况下, 我们会用@Autowired//说明//1.在ioc容器中查找待装配的组件的类型, 如果有唯一的bean匹配(按照类型), 则使用该bean匹配//2.如果待装配的类型对应的bean在ioc容器中有多个, 则使用待装配的属性的属性名作为id值再进行查找//  找到就装配, 找不到就抛异常@Autowiredprivate UserService userService400;public void sayOK() {System.out.println("UserAction sayOK()....");System.out.println("UserAction 装配的 userService属性=" + userService400);userService400.hi();}
}
指定id进行组装. 可以使用@Autowired和@Qualifier(value=“userService200”). 这时, 是装配的 id=userService200, 两个注解要配合使用, 类似于@Resource(name="userService200").
此时, UserAction中的userService 和 SpringBeanTest中的userService200是同一个对象.
@Controller
public class UserAction {//指定id进行组装. 可以使用@Autowired和@Qualifier(value="userService200"). //这时, 是装配的 id=userService200, 类似于@Resource(name="userService200").//前提是需要两个注解都写上. @Autowired@Qualifier(value = "userService200")private UserService userService;public void sayOK() {System.out.println("UserAction sayOK()....");System.out.println("UserAction 装配的 userService属性=" + userService);userService.hi();}
}
public class SpringBeanTest {@Testpublic void setPropertyByAutowired() {ApplicationContext ioc = new ClassPathXmlApplicationContext("beans06.xml");//UserService userService = ioc.getBean("userService", UserService.class);//System.out.println("ioc容器中的userService=" + userService);UserService userService200 = ioc.getBean("userService200", UserService.class);System.out.println("ioc容器中的userService200=" + userService);userAction.sayOK();}
}
🍚案例3: @Resource解读
@Resource源码解读: 通过解析注解来支撑, 底层是注解来支撑的.
String name() default "";
Class<?> type() default java.lang.Object.class;
@Resource(name = "userService") 代表把beans06.xml对应的容器里的id=userService的对象注入到属性上去, 所以UserAction中的userService400 和 SpringBeanTest中的userService是同一个对象
@Controller
public class UserAction {//1.@Resource 有两个属性是比较重要的, 分别是name和type, Spring将@Resource注解的name属性解析为bean的名字,//  将type属性解析为bean的类型. 所以如果使用name属性, 则使用byName的自动注入策略, 而使用type属性时则使用//  byType自动注入策略//  比如 @Resource(name="userService") 表示装配id=userService的对象//  比如 @Resource(type="UserService.class") 表示按照UserService.class类型进行装配. 这时要求容器中,只能有一个这样类型的对象//2.如果@Resource 没有指定 name 和 type, 则先使用byName注入策略 (即使用待装配的属性的属性名作为id值进行查找),//  如果匹配不上, 再使用byType策略. 如果都不成功, 就会报错.@Resource(name = "userService")private UserService userService400;public void sayOK() {System.out.println("UserAction sayOK()....");System.out.println("UserAction 装配的 userService属性=" + userService400);userService400.hi();}
}
<?xml version="1.0" encoding="UTF-8"?>
<beans xmlns="http://www.springframework.org/schema/beans"xmlns:xsi="http://www.w3.org/2001/XMLSchema-instance"xmlns:context="http://www.springframework.org/schema/context"xsi:schemaLocation="http://www.springframework.org/schema/beans http://www.springframework.org/schema/beans/spring-beans.xsd http://www.springframework.org/schema/context https://www.springframework.org/schema/context/spring-context.xsd"><!--通过注解获取的对象id是类名首字母小写, 这里是userService--><context:component-scan base-package="com.zzw.spring.component"/><!--id=userService--><!--配置两个UserService对象--><bean class="com.zzw.spring.component.UserService" id="userService200"/><bean class="com.zzw.spring.component.UserService" id="userService300"/>
</beans>
public class SpringBeanTest {@Testpublic void setPropertyByAutowired() {ApplicationContext ioc =new ClassPathXmlApplicationContext("beans06.xml");UserService userService = ioc.getBean("userService", UserService.class);System.out.println("ioc容器中的userService=" + userService);UserAction userAction = ioc.getBean("userAction", UserAction.class);userAction.sayOK();}
}
如果将代码改为@Resource(name = "userService200") 代表把beans06.xml对应的容器里的id=userService200的对象注入到属性上去, 那么UserAction中的userService400 和 SpringBeanTest中的userService200将是同一个对象,
@Controller
public class UserAction {//1.@Resource 有两个属性是比较重要的, 分别是name和type, Spring将@Resource注解的name属性解析为bean的名字,//  将type属性解析为bean的类型. 所以如果使用name属性, 则使用byName的自动注入策略, 而使用type属性时则使用//  byType自动注入策略//  比如 @Resource(name="userService") 表示装配id=userService的对象@Resource(name = "userService200")private UserService userService400;public void sayOK() {System.out.println("UserAction sayOK()....");System.out.println("UserAction 装配的 userService属性=" + userService400);userService400.hi();}
}
<?xml version="1.0" encoding="UTF-8"?>
<beans xmlns="http://www.springframework.org/schema/beans"xmlns:xsi="http://www.w3.org/2001/XMLSchema-instance"xmlns:context="http://www.springframework.org/schema/context"xsi:schemaLocation="http://www.springframework.org/schema/beans http://www.springframework.org/schema/beans/spring-beans.xsd http://www.springframework.org/schema/context https://www.springframework.org/schema/context/spring-context.xsd"><!--通过注解获取的对象id是类名首字母小写, 这里是userService--><context:component-scan base-package="com.zzw.spring.component"/><!--id=userService--><!--配置两个UserService对象--><bean class="com.zzw.spring.component.UserService" id="userService200"/><bean class="com.zzw.spring.component.UserService" id="userService300"/>
</beans>
public class SpringBeanTest {@Testpublic void setPropertyByAutowired() {ApplicationContext ioc =new ClassPathXmlApplicationContext("beans06.xml");UserService userService = ioc.getBean("userService", UserService.class);System.out.println("ioc容器中的userService=" + userService);UserService userService200 = ioc.getBean("userService200", UserService.class);System.out.println("ioc容器中的userService200=" + userService200);UserAction userAction = ioc.getBean("userAction", UserAction.class);userAction.sayOK();}
}
如果将代码改为@Resource(name = "userService600") 会直接报错. 因为beans06.xml对应的容器中没有id为userService600的对象, 所以报错.
@Controller
public class UserAction {//1.@Resource 有两个属性是比较重要的, 分别是name和type, Spring将@Resource注解的name属性解析为bean的名字,//  将type属性解析为bean的类型. 所以如果使用name属性, 则使用byName的自动注入策略, 而使用type属性时则使用//  byType自动注入策略//  比如 @Resource(name="userService") 表示装配id=userService的对象@Resource(name = "userService600")private UserService userService400;public void sayOK() {System.out.println("UserAction sayOK()....");System.out.println("UserAction 装配的 userService属性=" + userService400);userService400.hi();}
}
<?xml version="1.0" encoding="UTF-8"?>
<beans xmlns="http://www.springframework.org/schema/beans"xmlns:xsi="http://www.w3.org/2001/XMLSchema-instance"xmlns:context="http://www.springframework.org/schema/context"xsi:schemaLocation="http://www.springframework.org/schema/beans http://www.springframework.org/schema/beans/spring-beans.xsd http://www.springframework.org/schema/context https://www.springframework.org/schema/context/spring-context.xsd"><!--通过注解获取的对象id是类名首字母小写, 这里是userService--><context:component-scan base-package="com.zzw.spring.component"/><!--id=userService--><!--配置两个UserService对象--><bean class="com.zzw.spring.component.UserService" id="userService200"/><bean class="com.zzw.spring.component.UserService" id="userService300"/>
</beans>
如果按照类型来装配, @Resource(type = UserService.class), 那么必须保证容器中该类型的对象只有一个.
像下面的情况就会报错.
public class UserAction {@Resource(type = UserService.class)private UserService userService400;public void sayOK() {System.out.println("UserAction sayOK()....");System.out.println("UserAction 装配的 userService属性=" + userService400);userService400.hi();}
}
<?xml version="1.0" encoding="UTF-8"?>
<beans xmlns="http://www.springframework.org/schema/beans"xmlns:xsi="http://www.w3.org/2001/XMLSchema-instance"xmlns:context="http://www.springframework.org/schema/context"xsi:schemaLocation="http://www.springframework.org/schema/beans http://www.springframework.org/schema/beans/spring-beans.xsd http://www.springframework.org/schema/context https://www.springframework.org/schema/context/spring-context.xsd"><!--通过注解获取的对象id是类名首字母小写--><context:component-scan base-package="com.zzw.spring.component"/><!--id=userService--><!--配置两个UserService对象--><bean class="com.zzw.spring.component.UserService" id="userService200"/><bean class="com.zzw.spring.component.UserService" id="userService300"/>
</beans>
如果@Resource 没有指定 name 和 type, 则先使用byName注入策略 (即使用待装配的属性的属性名作为id值进行查找),如果匹配不上, 再使用byType策略. 如果都不成功, 就会报错. 像下面的代码就会报错.
public class UserAction {//2.如果@Resource 没有指定 name 和 type, 则先使用byName注入策略 (即使用待装配的属性的属性名作为id值进行查找),//  如果匹配不上, 再使用byType策略. 如果都不成功, 就会报错.@Resourceprivate UserService userService400;public void sayOK() {System.out.println("UserAction sayOK()....");System.out.println("UserAction 装配的 userService属性=" + userService400);userService400.hi();}
}
<?xml version="1.0" encoding="UTF-8"?>
<beans xmlns="http://www.springframework.org/schema/beans"xmlns:xsi="http://www.w3.org/2001/XMLSchema-instance"xmlns:context="http://www.springframework.org/schema/context"xsi:schemaLocation="http://www.springframework.org/schema/beans http://www.springframework.org/schema/beans/spring-beans.xsd http://www.springframework.org/schema/context https://www.springframework.org/schema/context/spring-context.xsd"><!--通过注解获取的对象id是类名首字母小写--><context:component-scan base-package="com.zzw.spring.component"/><!--id=userService--><!--配置两个UserService对象--><bean class="com.zzw.spring.component.UserService" id="userService200"/><bean class="com.zzw.spring.component.UserService" id="userService300"/>
</beans>
下面代码会成功
public class UserAction {//2.如果@Resource 没有指定 name 和 type, 则先使用byName注入策略 (即使用待装配的属性的属性名作为id值进行查找),//  如果匹配不上, 再使用byType策略. 如果都不成功, 就会报错.@Resourceprivate UserService userService;public void sayOK() {System.out.println("UserAction sayOK()....");System.out.println("UserAction 装配的 userService属性=" + userService);userService.hi();}
}
下面代码依然会成功
public class UserAction {//2.如果@Resource 没有指定 name 和 type, 则先使用byName注入策略 (即使用待装配的属性的属性名作为id值进行查找),//  如果匹配不上, 再使用byType策略. 如果都不成功, 就会报错.@Resourceprivate UserService userService200;public void sayOK() {System.out.println("UserAction sayOK()....");System.out.println("UserAction 装配的 userService属性=" + userService200);userService200.hi();}
}
下面代码会失败. 因为beans.xml中没有id=userServise600的bean对象, byName注入策略不成功, 并且byType注入策略也不成功, 所以会失败.
public class UserAction {//2.如果@Resource 没有指定 name 和 type, 则先使用byName注入策略 (即使用待装配的属性的属性名作为id值进行查找),//  如果匹配不上, 再使用byType策略. 如果都不成功, 就会报错.@Resourceprivate UserService userService600;public void sayOK() {System.out.println("UserAction sayOK()....");System.out.println("UserAction 装配的 userService属性=" + userService600);userService600.hi();}
}
但是下面的代码会成功. 虽然beans.xml中没有id=userServise600的bean对象, 即byName注入策略不成功, 但是由于beans06.xml对应的容器中只有一个UserService类型的对象, 所以byType策略成功, 所以下面代码不会报错.
public class UserAction {//2.如果@Resource 没有指定 name 和 type, 则先使用byName注入策略 (即使用待装配的属性的属性名作为id值进行查找),//  如果匹配不上, 再使用byType策略. 如果都不成功, 就会报错.@Resourceprivate UserService userService600;public void sayOK() {System.out.println("UserAction sayOK()....");System.out.println("UserAction 装配的 userService属性=" + userService600);userService600.hi();}
}
<?xml version="1.0" encoding="UTF-8"?>
<beans xmlns="http://www.springframework.org/schema/beans"xmlns:xsi="http://www.w3.org/2001/XMLSchema-instance"xmlns:context="http://www.springframework.org/schema/context"xsi:schemaLocation="http://www.springframework.org/schema/beans http://www.springframework.org/schema/beans/spring-beans.xsd http://www.springframework.org/schema/context https://www.springframework.org/schema/context/spring-context.xsd"><!--通过注解获取的对象id是类名首字母小写--><context:component-scan base-package="com.zzw.spring.component"/><!--id=userService--><!--配置两个UserService对象--><!--<bean class="com.zzw.spring.component.UserService" id="userService200"/>--><!--<bean class="com.zzw.spring.component.UserService" id="userService300"/>-->
</beans>
🍝小结
1.如果装配的类型对应的bean在IOC容器中有多个, 则使用待装配的属性的属性名作为id值再进行查找, 找到就装配, 找不到就抛异常.
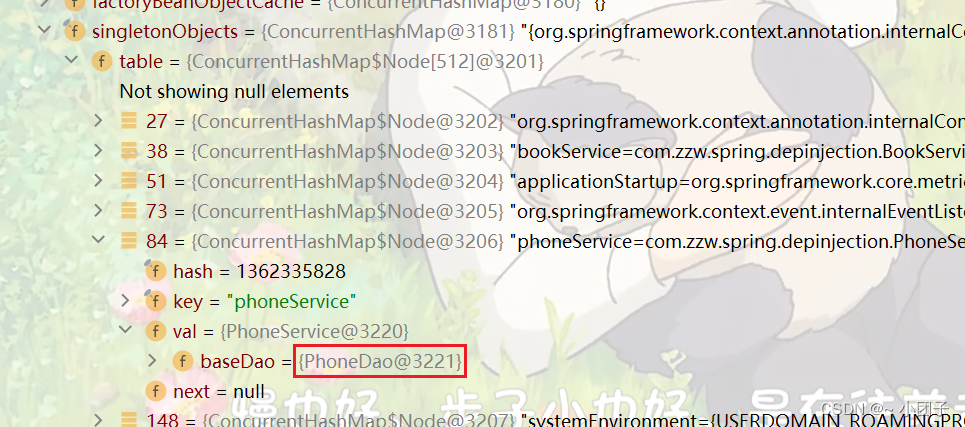
💗泛型依赖注入
基本说明
1.为了更好地管理有继承和相互依赖的bean的自动装配, spring还提供基于泛型依赖的注入机制.
2.在继承关系复杂情况下, 泛型依赖注入就会有很大的优越性.
各个类关系图

传统方法是将 PhoneDao / BookDao 自动装配到 BookService / PhoneService中, 当这种继承关系多时, 就比较麻烦. 可以使用spring提供的泛型依赖注入.
public class Book {}
public class Phone {}
//自定义泛型类
public abstract class BaseDao<T> {public abstract void save();
}
@Repository
public class BookDao extends BaseDao<Book> {@Overridepublic void save() {System.out.println("BookDao的 save方法....");}
}
@Repository
public class PhoneDao extends BaseDao<Phone> {@Overridepublic void save() {System.out.println("PhoneDao的 save方法...");}
}
//自定义泛型类
public class BaseService<T> {@Autowiredprivate BaseDao<T> baseDao;public void save() {baseDao.save();}
}
@Service
public class BookService extends BaseService<Book> {//并没有写属性
}
@Service
public class PhoneService extends BaseService<Phone> {//没有写属性
}
beans07.xml
<?xml version="1.0" encoding="UTF-8"?>
<beans xmlns="http://www.springframework.org/schema/beans"xmlns:xsi="http://www.w3.org/2001/XMLSchema-instance"xmlns:context="http://www.springframework.org/schema/context"xsi:schemaLocation="http://www.springframework.org/schema/beans http://www.springframework.org/schema/beans/spring-beans.xsd http://www.springframework.org/schema/context https://www.springframework.org/schema/context/spring-context.xsd"><context:component-scan base-package="com.zzw.spring.depinjection"/>
</beans>
public class SpringBeanTest {@Testpublic void setProByDependencyInjection() {ApplicationContext ioc =new ClassPathXmlApplicationContext("beans07.xml");PhoneService phoneService = ioc.getBean("phoneService", PhoneService.class);phoneService.save();//PhoneDao的 save方法...System.out.println("OK");}
}
 下乘: Spring系列四:AOP切面编程
相关文章:
Spring系列三:基于注解配置bean
文章目录 💗通过注解配置bean🍝基本介绍🍝快速入门🍝注意事项和细节 💗自己实现Spring注解配置Bean机制🍝思路分析🍝注意事项和细节 💗自动装配 Autowired🍝案例1: Autow…...
git的简单介绍和使用
git学习 1. 概念git和svn的区别和优势1.1 区别1.2 git优势 2. git的三个状态和三个阶段2.1 三个状态:2.2 三个阶段: 3. 常用的git命令3.1 下面是最常用的命令3.2 git命令操作流程图如下: 4. 分支内容学习4.1 项目远程仓库4.2 项目本地仓库4.3…...
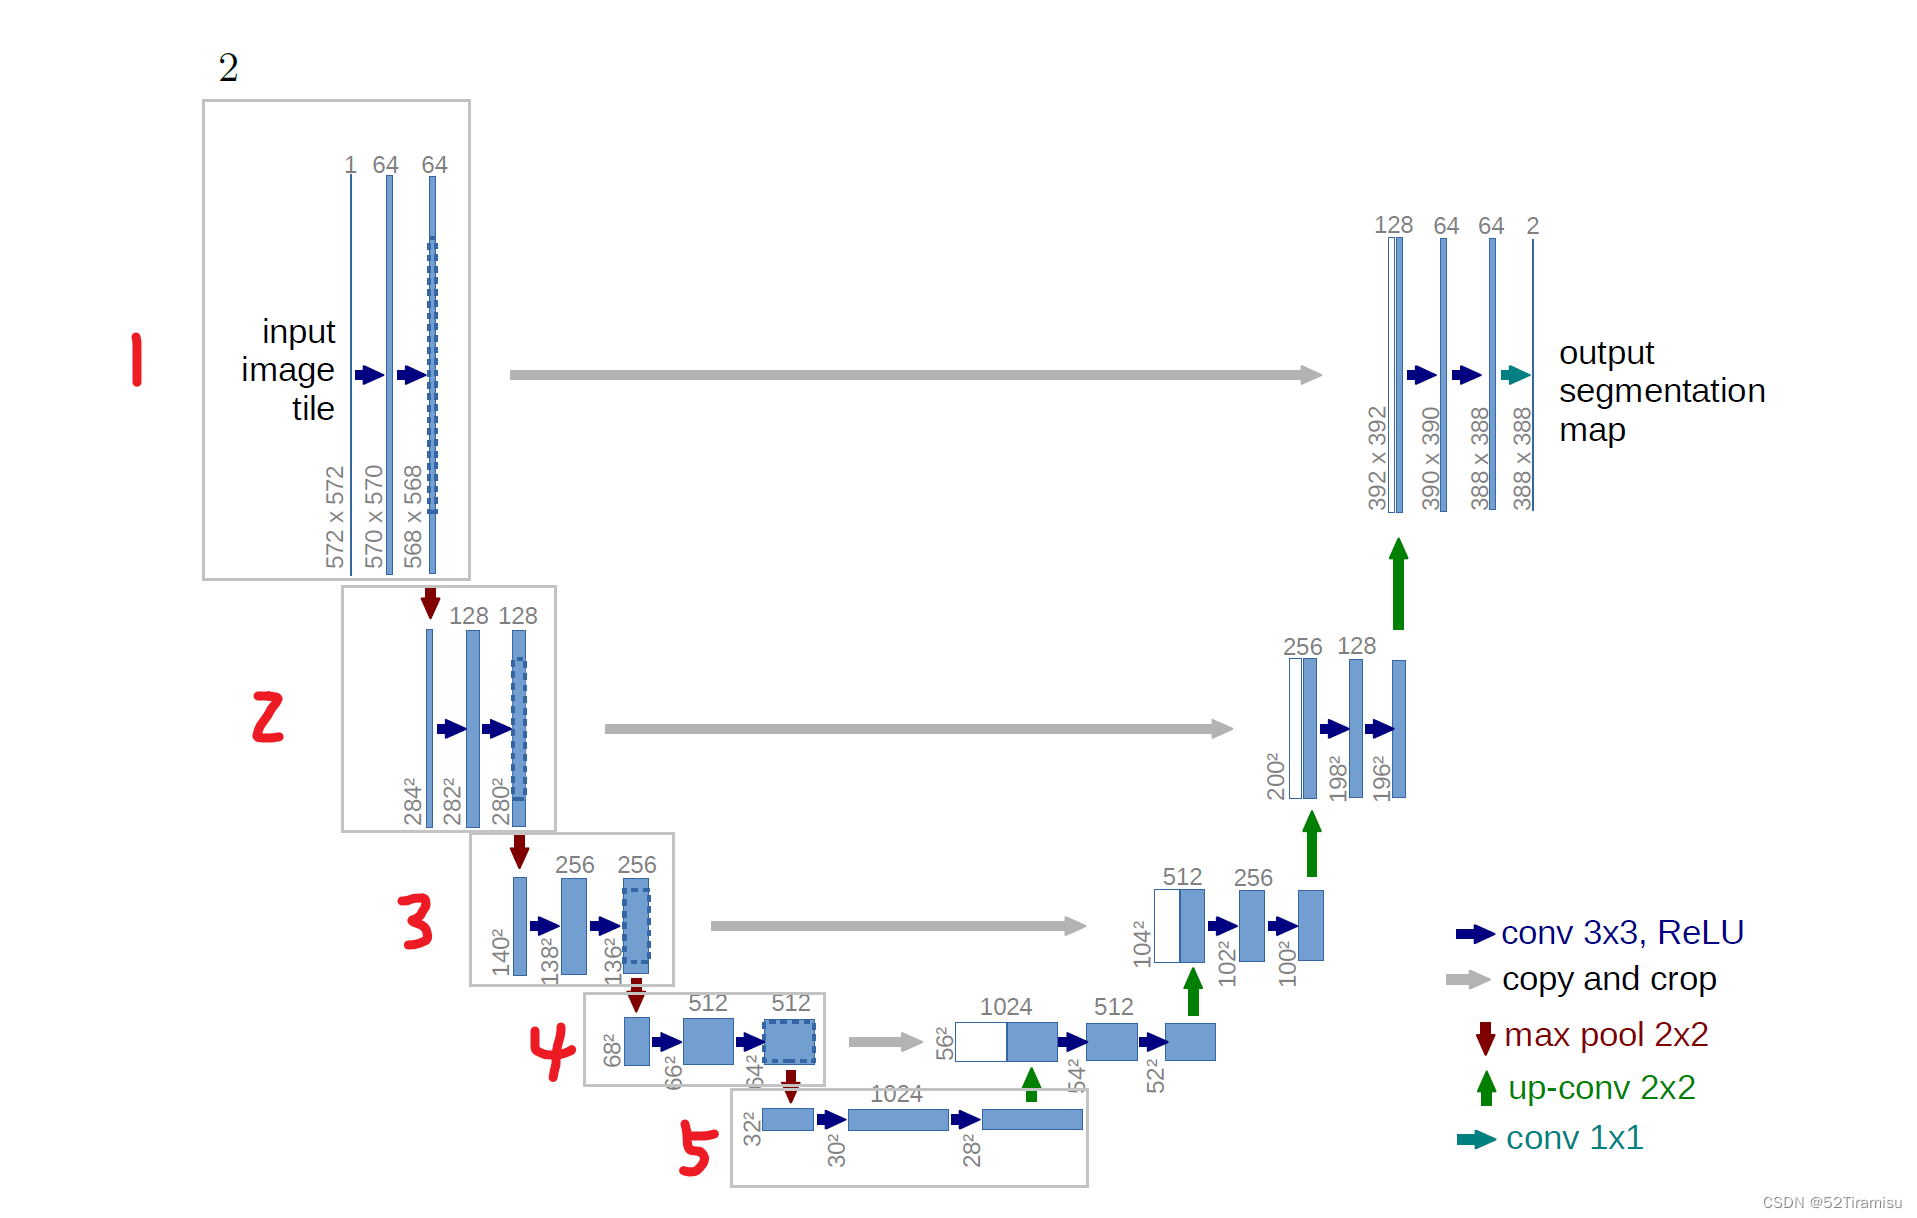
UNet Model
论文地址 第一阶段 conv2d(33) first conv:5725721 → 57057064 second conv:57057064 → 56856864 代码 # first 33 convolutional layer self.first nn.Conv2d(in_channels, out_channels, kernel_size3, padding1) self.act1 nn.ReLU() # Seco…...

vue+iviewUi+oss直传阿里云上传文件
前端实现文件上传到oss(阿里云)适用于vue、react、uni-app,获取视频第一帧图片 用户获取oss配置信息将文件上传到阿里云,保证了安全性和减轻服务器负担。一般文件资源很多直接上传到服务器会加重服务器负担此时可以选择上传到oss&…...
)
算法leetcode|68. 文本左右对齐(rust重拳出击)
文章目录 68. 文本左右对齐:样例 1:样例 2:样例 3:提示: 分析:题解:rust:go:c:python:java: 68. 文本左右对齐: 给定一个…...
)
基于MATLAB实现小波算法仿真(附上多个完整源码+数据集)
小波变换是一种常用的信号处理技术,广泛应用于图像处理、音频处理、压缩等领域。本文将介绍MATLAB中小波变换的基本原理和实现方法,并给出一个示例来说明如何使用MATLAB进行小波变换和逆变换。 文章目录 1. 引言2. 小波变换的基本原理3. MATLAB中的小波变…...
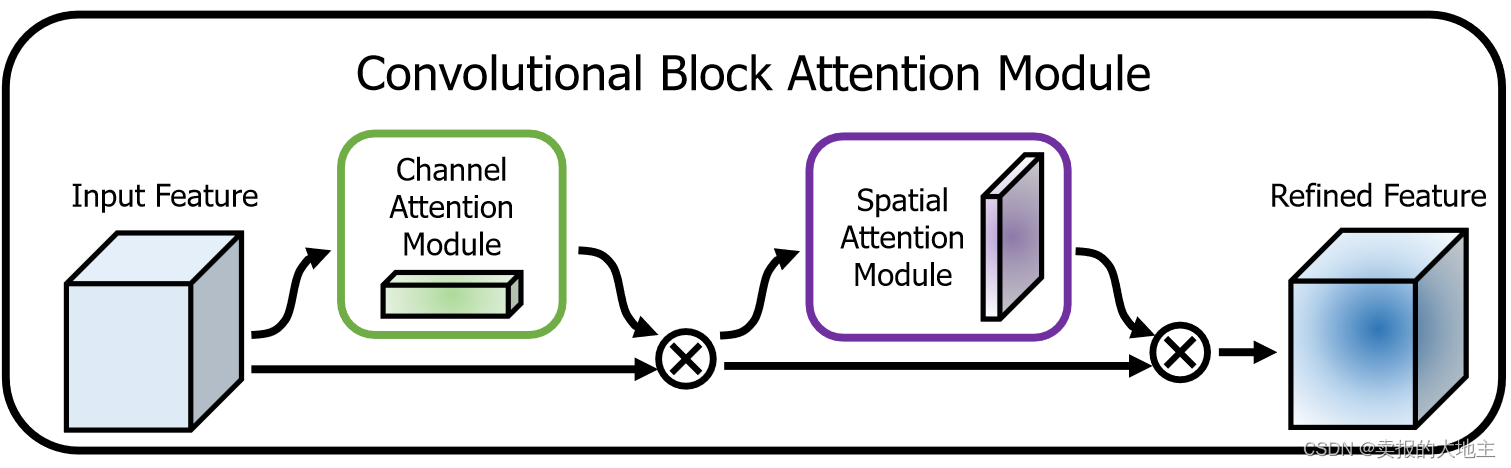
【深度学习注意力机制系列】—— CBAM注意力机制(附pytorch实现)
CBAM(Convolutional Block Attention Module)是一种用于增强卷积神经网络(CNN)性能的注意力机制模块。它由Sanghyun Woo等人在2018年的论文[1807.06521] CBAM: Convolutional Block Attention Module (arxiv.org)中提出。CBAM的主…...

【资料分享】全志科技T507-H工业核心板规格书
1 核心板简介 创龙科技SOM-TLT507是一款基于全志科技T507-H处理器设计的4核ARM Cortex-A53全国产工业核心板,主频高达1.416GHz。核心板CPU、ROM、RAM、电源、晶振等所有元器件均采用国产工业级方案,国产化率100%。 核心板通过邮票孔连接方式引出MIPI C…...
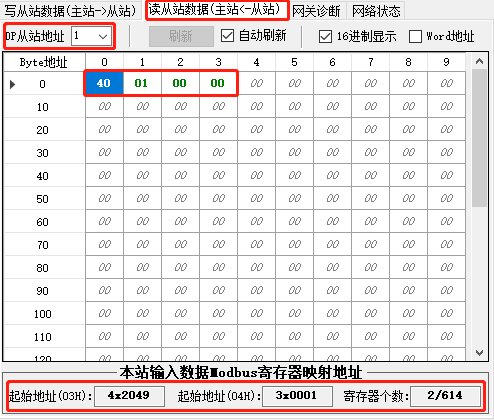
Profibus-DP转modbus RTU网关modbus rtu和tcp的区别
捷米JM-DPM-RTU网关在Profibus总线侧实现主站功能,在Modbus串口侧实现从站功能。可将ProfibusDP协议的设备(如:EH流量计、倍福编码器等)接入到Modbus网络中;通过增加DP/PA耦合器,也可将Profibus PA从站接入…...

AlmaLinux 9 安装 Edge 和 Chrome
AlmaLinux 9 安装 Edge 和 Chrome 1. 安装 Edge2. 安装 Chrome 1. 安装 Edge 更新源, sudo dnf update -y # sudo dnf install dnf-utils -y添加 Edge 源, sudo dnf config-manager --add-repo https://packages.microsoft.com/yumrepos/edge再次更新…...

NGINX——负载均衡
负载均衡————>通过反向代理来实现 nginx反向代理的七层代理和四层代理 七层代理: 七层代理时最常用的反向代理方式,其只能配置在nginx的配置文件的http模块中,而且方法名称必须要定义成“upstream”模块,注意不能写在se…...

C#实现端口扫描和执行cmd命令、调用摄像头
C#端口扫描 using System; using System.Collections.Generic; using System.Linq; using System.Net; using System.Net.Sockets; using System.Threading;namespace PortScanner {class Program{static void Main(string[] args){// 设置扫描参数string host "localho…...

【图像恢复】基于交替乘子方法(ADMM)图像恢复算法研究[固定点收敛和应用](Matlab代码实现)
💥💥💞💞欢迎来到本博客❤️❤️💥💥 🏆博主优势:🌞🌞🌞博客内容尽量做到思维缜密,逻辑清晰,为了方便读者。 ⛳️座右铭&a…...

Qt 使用QLabel的派生类实现QLabel的双击响应
1 介绍 在QLabel中没有双击等事件响应,需要构建其派生类,自定义信号(signals)、重载事件函数(event),最后在Qwidget中使用connect链接即可,进而实现响应功能。 对于其余没有需求事件响应的QObject同样适用。 此外,该功…...
关于@JSONField的使用
1.此注解来自jar包com.alibaba.fastjson 今天分享一个有意思的事情。这个注解作用与类的属性上,如下: ApiModelProperty(value"开始时间,格式:yyyy-MM-dd",required true) JSONField(name"start_date",ordinal 1) private String…...
Centos7单机部署ElasticSearch
Centos7单机部署ElasticSearch 引言 Elasticsearch是一种广泛使用的开源搜索引擎,专门为分布式环境设计,但也可以在单机上运行。它使存储、搜索和分析大量数据变得更加容易和高效。此教程将引导你通过在Centos7上单机部署Elasticsearch,涵盖…...

js玩儿爬虫
前言 提到爬虫可能大多都会想到python,其实爬虫的实现并不限制任何语言。 下面我们就使用js来实现,后端为express,前端为vue3。 实现功能 话不多说,先看结果: 这是项目链接:https://gitee.com/xi1213/w…...

新利好带动 POSE 持续上扬,月内几近翻倍
PoseiSwap 是 Nautilus Chain 上的首个 DEX,得益于 Nautilus Chain 的模块化 Layer3 构架,PoseiSwap 正在基于 zk-Rollup 方案构建全新的应用层,并基于此构建隐私、合规等全新的特性,为未来其布局 RWA 领域推动 Web2、Web3 世界的…...
Windows terminal 添加 git bash 解决git中文乱码显示问题
Windows terminal 添加 git bash 解决git中文乱码显示问题 在 windows terminal 中配置git 说明: 点击箭头选择设置 说明: 点击"添加新配置文件"配置名称命令行,可执行文件的具体语句 C:\Program Files\Git\bin\bash.exe启动目录…...

终极指南:5步让老款Mac安装最新macOS系统
终极指南:5步让老款Mac安装最新macOS系统 【免费下载链接】OpenCore-Legacy-Patcher Experience macOS just like before 项目地址: https://gitcode.com/GitHub_Trending/op/OpenCore-Legacy-Patcher 想让2008年甚至更早的MacBook也能运行最新的macOS Sequo…...

蓝桥杯10天备战-day3基础算法
二分:int xxlower_bound(a,an,x)-a;返回>x的指针,减去a才是下标int yyupper_bound(a,an,x)-a;二分万能模板:#include<bits/stdc.h> using namespace std; #define int long long int a[10000]; int n, m; bool isblue(int mid) {if …...

2026年降AI工具第一梯队实测:这3款AI率降到10%以下最稳
降AI工具这个赛道现在品牌太多,光我知道的就有七八个。但实测下来,真正能把AI率稳定压到10%以下的,没几个。 说一下我自己的测试方法:用同一批论文段落,分别在知网、维普检测,看哪款工具能把AI率降到10%以…...

【Python实战解析】从数据采集到模型预测:一个完整天气数据分析项目的技术实现
1. 项目背景与核心价值 天气数据分析是数据科学领域最经典的实战项目之一。去年我在帮某气象机构做数据中台改造时,就完整实施过类似的流程。这种项目最大的价值在于:用真实业务场景串联Python技术栈,从原始数据到智能预测形成闭环。 为什么选…...

从零理解RISC-V链接脚本:用一张图搞懂VMA、LMA与启动代码的搬运逻辑
RISC-V链接脚本深度解析:VMA与LMA的内存搬运艺术 当第一次在RISC-V启动代码中看到那段神秘的"数据搬运"汇编时,我盯着屏幕发呆了十分钟——为什么程序要把已经烧写到Flash的数据再复制到RAM?这个看似简单的操作背后,隐藏…...
)
避开风控!影刀RPA抓取小红书评论的保姆级配置指南(含60秒间隔、Excel文本格式设置)
影刀RPA小红书评论采集实战:高稳定性配置与风控规避手册 第一次用影刀RPA抓取小红书评论时,我连续被封了三个账号——因为没意识到平台对高频请求的敏感度。后来通过反复测试发现,间隔时间设置差5秒就可能触发完全不同的风控等级。这份指南将…...

线性规划实战指南:从基础理论到优化应用
1. 线性规划基础:从菜市场砍价到数学建模 第一次听说线性规划时,我正蹲在菜市场跟大妈讨价还价。大妈说:"西红柿3块一斤,买5斤送半斤",我脑子里瞬间闪过一道光——这不就是典型的线性约束条件吗?…...

AScript动态脚本语言:3大实战场景深度解析与iOS热更新解决方案
AScript动态脚本语言:3大实战场景深度解析与iOS热更新解决方案 【免费下载链接】ascript 用as3写的脚本解释器,语法类似as3 项目地址: https://gitcode.com/gh_mirrors/as/ascript 想要在不重新提交App Store的情况下动态更新iOS应用逻辑…...

基于扩展卡尔曼滤波算法EKF的锂电池SOC动态估算:考虑充放电倍率与环境温度的综合辨识
扩展卡尔曼滤波soc估算 基于EKF算法的锂电池SOC 卡尔曼滤波估计电池soc ,simulink模型,对电池SOC参数进行辨识,充分考虑充放电倍率和环境温度,结合传统安时积分法和扩展卡尔曼滤波算法EKF对锂电池soc进行动态估算。锂电池的SOC&am…...

杰理之A2DP解码去除开头杂音数据【篇】
添加淡入效果...