Spring-Cloud-Loadblancer详细分析_3
前两篇文章介绍了加载过程,本文从Feign的入口开始分析执行过程,还是从FeignBlockingLoadBalancerClient.execute来入手
public class FeignBlockingLoadBalancerClient implements Client {private static final Log LOG = LogFactory.getLog(FeignBlockingLoadBalancerClient.class);private final Client delegate;private final LoadBalancerClient loadBalancerClient;private final LoadBalancerClientFactory loadBalancerClientFactory;@Overridepublic Response execute(Request request, Request.Options options) throws IOException {//请求路径final URI originalUri = URI.create(request.url());//获取到要调用的服务idString serviceId = originalUri.getHost();DefaultRequest<RequestDataContext> lbRequest = new DefaultRequest<>(new RequestDataContext(buildRequestData(request), hint));//在这步创建了每个服务的子容器 Set<LoadBalancerLifecycle> supportedLifecycleProcessors = LoadBalancerLifecycleValidator.getSupportedLifecycleProcessors(//在这步创建了每个服务的子容器loadBalancerClientFactory.getInstances(serviceId, LoadBalancerLifecycle.class),RequestDataContext.class, ResponseData.class, ServiceInstance.class);supportedLifecycleProcessors.forEach(lifecycle -> lifecycle.onStart(lbRequest)); //执行loadBalancer的负载均衡策略,返回将过滤后的服务,非常重要ServiceInstance instance = loadBalancerClient.choose(serviceId, lbRequest);org.springframework.cloud.client.loadbalancer.Response<ServiceInstance> lbResponse = new DefaultResponse(instance);//省略...//将ServiceInstance进行解析后,转换为真正的http方式进行远程调用服务String reconstructedUrl = loadBalancerClient.reconstructURI(instance, originalUri).toString();Request newRequest = buildRequest(request, reconstructedUrl);LoadBalancerProperties loadBalancerProperties = loadBalancerClientFactory.getProperties(serviceId);return executeWithLoadBalancerLifecycleProcessing(delegate, options, newRequest, lbRequest, lbResponse,supportedLifecycleProcessors, loadBalancerProperties.isUseRawStatusCodeInResponseData());}protected Request buildRequest(Request request, String reconstructedUrl) {return Request.create(request.httpMethod(), reconstructedUrl, request.headers(), request.body(),request.charset(), request.requestTemplate());}private String getHint(String serviceId) {LoadBalancerProperties properties = loadBalancerClientFactory.getProperties(serviceId);String defaultHint = properties.getHint().getOrDefault("default", "default");String hintPropertyValue = properties.getHint().get(serviceId);return hintPropertyValue != null ? hintPropertyValue : defaultHint;}}
loadBalancerClientFactory.getInstances(serviceId, LoadBalancerLifecycle.class)
在这步是创建了每个服务的负载均衡子容器,loadBalancerClientFactory的生成过程在上篇文章已经分析了,这里getInstances实际调用的是父类NamedContextFactory
NamedContextFactory.getInstances
public <T> Map<String, T> getInstances(String name, Class<T> type) {AnnotationConfigApplicationContext context = getContext(name);return BeanFactoryUtils.beansOfTypeIncludingAncestors(context, type);
}
NamedContextFactory.getContext
protected AnnotationConfigApplicationContext getContext(String name) {if (!this.contexts.containsKey(name)) {synchronized (this.contexts) {if (!this.contexts.containsKey(name)) {//创建子容器,name为服务名 value为容器this.contexts.put(name, createContext(name));}}}return this.contexts.get(name);
}
NamedContextFactory.createContext
protected AnnotationConfigApplicationContext createContext(String name) {AnnotationConfigApplicationContext context;//创建容器if (this.parent != null) {DefaultListableBeanFactory beanFactory = new DefaultListableBeanFactory();if (parent instanceof ConfigurableApplicationContext) {beanFactory.setBeanClassLoader(((ConfigurableApplicationContext) parent).getBeanFactory().getBeanClassLoader());}else {beanFactory.setBeanClassLoader(parent.getClassLoader());}context = new AnnotationConfigApplicationContext(beanFactory);context.setClassLoader(this.parent.getClassLoader());}else {context = new AnnotationConfigApplicationContext();}//configurations就是LoadBalancerClientSpecification类型的LoadBalancerAutoConfiguration和BlockingLoadBalancerClientAutoConfiguration//这里是将@LoadBalancerClient对应的负载均衡配置注册到对应的容器中//由以上可知通过此步我们可以使用@LoadBalancerClient自定义负载均衡策略//如果不自定义的话,这里为falseif (this.configurations.containsKey(name)) {for (Class<?> configuration : this.configurations.get(name).getConfiguration()) {context.register(configuration);}}//也就是将configurations中LoadBalancerClientSpecification类型的LoadBalancerAutoConfiguration和BlockingLoadBalancerClientAutoConfiguration注册到容器中//这样每个容器就拥有了for (Map.Entry<String, C> entry : this.configurations.entrySet()) {if (entry.getKey().startsWith("default.")) {for (Class<?> configuration : entry.getValue().getConfiguration()) {context.register(configuration);}}}//defaultConfigType就是LoadBalancerClientConfiguration,在子类LoadBalancerClientFactory的构造方法传入//在刚才分析LoadBalancerClientFactory的时候介绍过context.register(PropertyPlaceholderAutoConfiguration.class, this.defaultConfigType);context.getEnvironment().getPropertySources().addFirst(new MapPropertySource(this.propertySourceName,Collections.<String, Object>singletonMap(this.propertyName, name)));//将父容器添加进去if (this.parent != null) {// Uses Environment from parent as well as beanscontext.setParent(this.parent);}context.setDisplayName(generateDisplayName(name));context.refresh();return context;
}
可以看到当每个服务创建子容器后,LoadBalancerAutoConfiguration、BlockingLoadBalancerClientAutoConfiguration、LoadBalancerClientConfiguration到注册到了每个子容器中
服务的子容器创建完成后,下面就开始执行负载均衡的流程了
BlockingLoadBalancerClient.choose
public <T> ServiceInstance choose(String serviceId, Request<T> request) {//获取负载均衡器ReactiveLoadBalancer<ServiceInstance> loadBalancer = loadBalancerClientFactory.getInstance(serviceId);if (loadBalancer == null) {return null;}Response<ServiceInstance> loadBalancerResponse = Mono.from(loadBalancer.choose(request)).block();if (loadBalancerResponse == null) {return null;}return loadBalancerResponse.getServer();
}
loadBalancerClientFactory.getInstance(serviceId)
public ReactiveLoadBalancer<ServiceInstance> getInstance(String serviceId) {return getInstance(serviceId, ReactorServiceInstanceLoadBalancer.class);
}
这时的getInstance调用的是父类NamedContextFactory.getInstance
NamedContextFactory.getInstance
public <T> T getInstance(String name, Class<T> type) {AnnotationConfigApplicationContext context = getContext(name);try {return context.getBean(type);}catch (NoSuchBeanDefinitionException e) {// ignore}return null;
}
protected AnnotationConfigApplicationContext getContext(String name) {if (!this.contexts.containsKey(name)) {synchronized (this.contexts) {if (!this.contexts.containsKey(name)) {this.contexts.put(name, createContext(name));}}}return this.contexts.get(name);
}
刚才介绍了,在BlockingLoadBalancerClient.choose执行之前,子容器已经创建完毕,这里就执行返回
容器返回后,获取ReactorServiceInstanceLoadBalancer类型的对象,此类型的对象就是在LoadBalancerClientConfiguration创建的,我们再看一眼
@Configuration(proxyBeanMethods = false)
@ConditionalOnDiscoveryEnabled
public class LoadBalancerClientConfiguration {private static final int REACTIVE_SERVICE_INSTANCE_SUPPLIER_ORDER = 193827465;@Bean@ConditionalOnMissingBeanpublic ReactorLoadBalancer<ServiceInstance> reactorServiceInstanceLoadBalancer(Environment environment,LoadBalancerClientFactory loadBalancerClientFactory) {String name = environment.getProperty(LoadBalancerClientFactory.PROPERTY_NAME);return new RoundRobinLoadBalancer(loadBalancerClientFactory.getLazyProvider(name, ServiceInstanceListSupplier.class), name);}//省略
}
RoundRobinLoadBalancer结构图
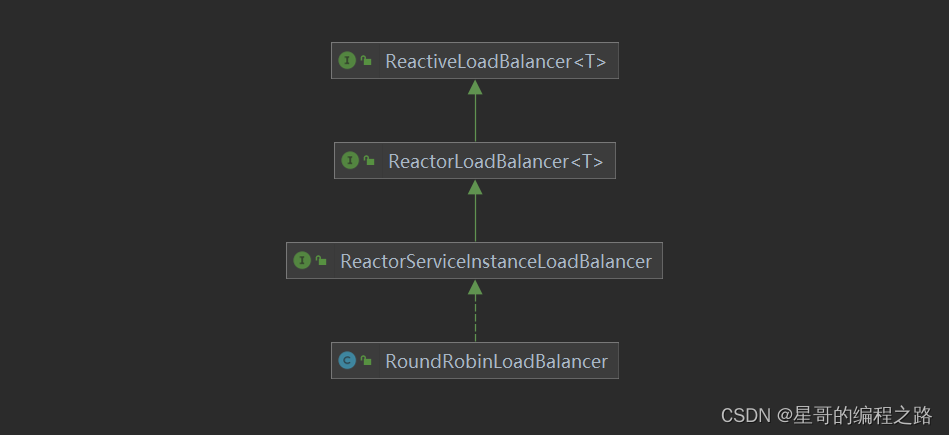
所以loadBalancerClientFactory.getInstance(serviceId)返回的就是RoundRobinLoadBalancer,然后就会调用此策略进行执行
RoundRobinLoadBalancer.choose
public Mono<Response<ServiceInstance>> choose(Request request) {ServiceInstanceListSupplier supplier = serviceInstanceListSupplierProvider.getIfAvailable(NoopServiceInstanceListSupplier::new);return supplier.get(request).next().map(serviceInstances -> processInstanceResponse(supplier, serviceInstances));
}
serviceInstanceListSupplierProvider.getIfAvailable(NoopServiceInstanceListSupplier::new)就是获取注册中心的服务列表了processInstanceResponse执行具体的负载均衡策略
serviceInstanceListSupplierProvider
public T getIfAvailable(Supplier<T> defaultSupplier) throws BeansException {return delegate().getIfAvailable(defaultSupplier);
}default T getIfAvailable(Supplier<T> defaultSupplier) throws BeansException {T dependency = getIfAvailable();//dependency 的类型是CachingServiceInstanceListSupplierreturn (dependency != null ? dependency : defaultSupplier.get());
}
RoundRobinLoadBalancer.processInstanceResponse
private Response<ServiceInstance> processInstanceResponse(ServiceInstanceListSupplier supplier,List<ServiceInstance> serviceInstances) {//serviceInstances就是获取的服务列表了	//getInstanceResponse(serviceInstances)就是真正的负债均衡策略了Response<ServiceInstance> serviceInstanceResponse = getInstanceResponse(serviceInstances);if (supplier instanceof SelectedInstanceCallback && serviceInstanceResponse.hasServer()) {//((SelectedInstanceCallback) supplier).selectedServiceInstance(serviceInstanceResponse.getServer());}return serviceInstanceResponse;
}
RoundRobinLoadBalancer.getInstanceResponse
private Response<ServiceInstance> getInstanceResponse(List<ServiceInstance> instances) {if (instances.isEmpty()) {if (log.isWarnEnabled()) {log.warn("No servers available for service: " + serviceId);}return new EmptyResponse();}// Do not move position when there is only 1 instance, especially some suppliers// have already filtered instancesif (instances.size() == 1) {return new DefaultResponse(instances.get(0));}// Ignore the sign bit, this allows pos to loop sequentially from 0 to// Integer.MAX_VALUEint pos = this.position.incrementAndGet() & Integer.MAX_VALUE;ServiceInstance instance = instances.get(pos % instances.size());return new DefaultResponse(instance);
}
可以看到是轮训的策略
那么服务列表是怎么获取的呢,在下篇文章中我们回详细的分析
相关文章:
Spring-Cloud-Loadblancer详细分析_3
前两篇文章介绍了加载过程,本文从Feign的入口开始分析执行过程,还是从FeignBlockingLoadBalancerClient.execute来入手 public class FeignBlockingLoadBalancerClient implements Client {private static final Log LOG LogFactory.getLog(FeignBlock…...
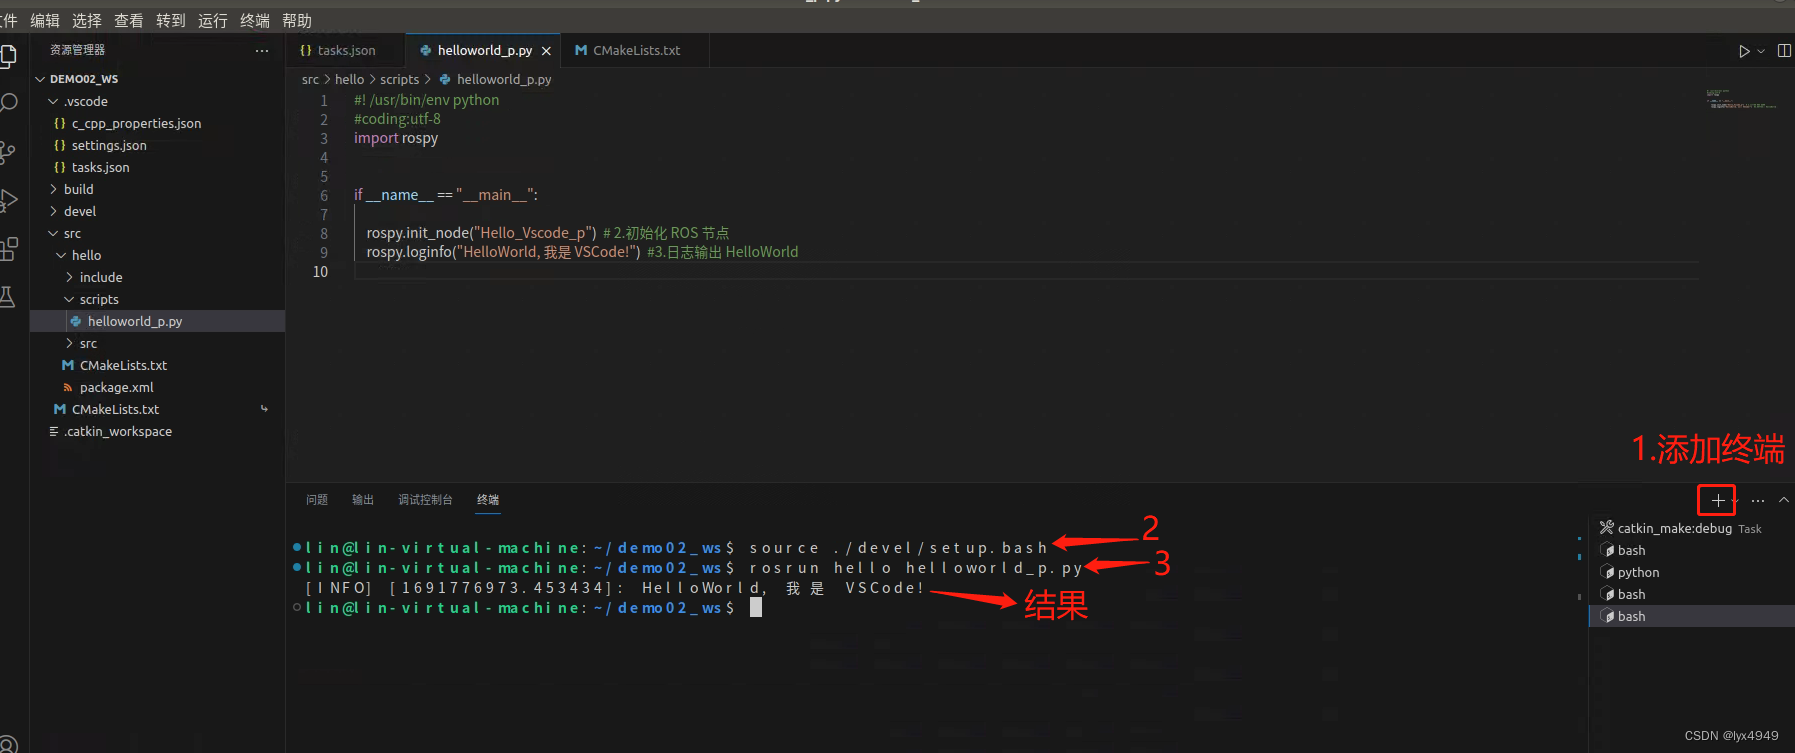
使用 VScode 开发 ROS 的Python程序(简例)
一、任务介绍 本篇作为ROS学习的第二篇,是关于如何在Ubuntu18.04中使用VSCode编写一个Python程序,输出“Hello!”的内容介绍。 首先我们来了解下ROS的文件系统,ROS文件系统级指的是在硬盘上ROS源代码的组织形式,其结构…...

2022年03月 C/C++(一级)真题解析#中国电子学会#全国青少年软件编程等级考试
第1题:双精度浮点数的输入输出 输入一个双精度浮点数,保留8位小数,输出这个浮点数。 时间限制:1000 内存限制:65536 输入 只有一行,一个双精度浮点数。 输出 一行,保留8位小数的浮点数。 样例输…...

HarmonyOS/OpenHarmony应用开发-ArkTSAPI系统能力SystemCapability列表
SysCap,全称SystemCapability,即系统能力,指操作系统中每一个相对独立的特性。 开发者使用某个接口进行开发前,建议先阅读系统能力使用说明,了解Syscap的定义和使用指导。 说明 当前列表枚举出3.1 Beta版本中支持的…...
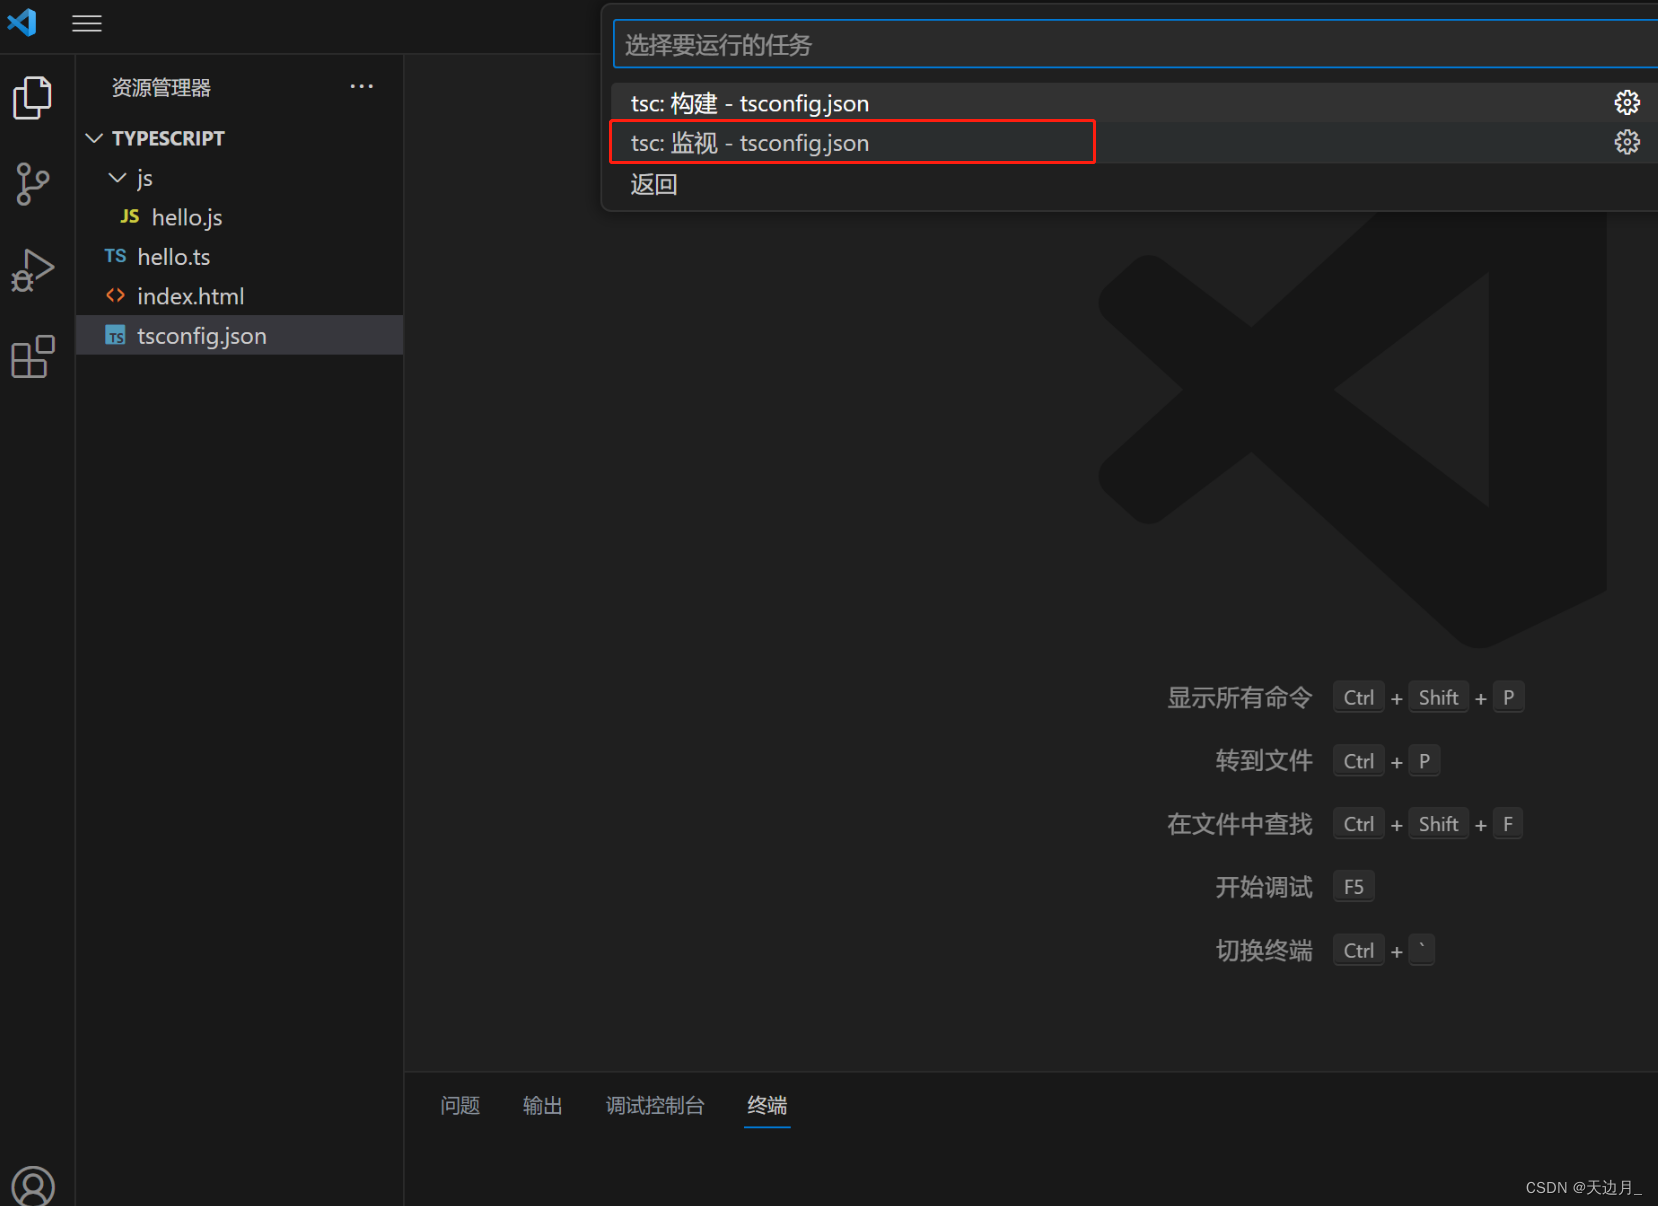
【01】基础知识:typescript安装及使用,开发工具vscode配置
一、typescript 了解 typeScript 是由微软开发的一款开源的编程语言。 typeScript 是 javascript 的超级,遵循最新的 es6、es5规范。 typeScript 扩展了 javaScript 的语法。 typeScript 更像后端 java、C# 这样的面向对象语言,可以让 js 开发大型企…...
)
用C++实现的RTS游戏的路径查找算法(A*、JPS、Wall-tracing)
在实时策略(RTS)游戏中,路径查找是一个关键的问题。游戏中的单位需要能够找到从一个地方到另一个地方的最佳路径。这个问题在计算机科学中被广泛研究,有许多已经存在的算法可以解决这个问题。在本文中,我们将探讨三种在…...

helm 制作应用的离线安装包
helm 制作应用的离线安装包 1、安装helm 到helm下载对应的压缩包:https://github.com/helm/helm/releases 解压,将helm文件cp到/usr/local/bin/ 文件夹下,查看helm版本;不同的k8s对应不同的helm版本,下载时留心注意…...

RN实现混合式开发-内嵌html
介绍 React Native WebView是一个用于在React Native应用中嵌入Web内容的组件。它允许你在应用中显示网页、加载HTML字符串、运行JavaScript代码等。 使用 首先,你需要在你的React Native项目中安装React Native WebView库。可以使用以下命令进行安装:…...
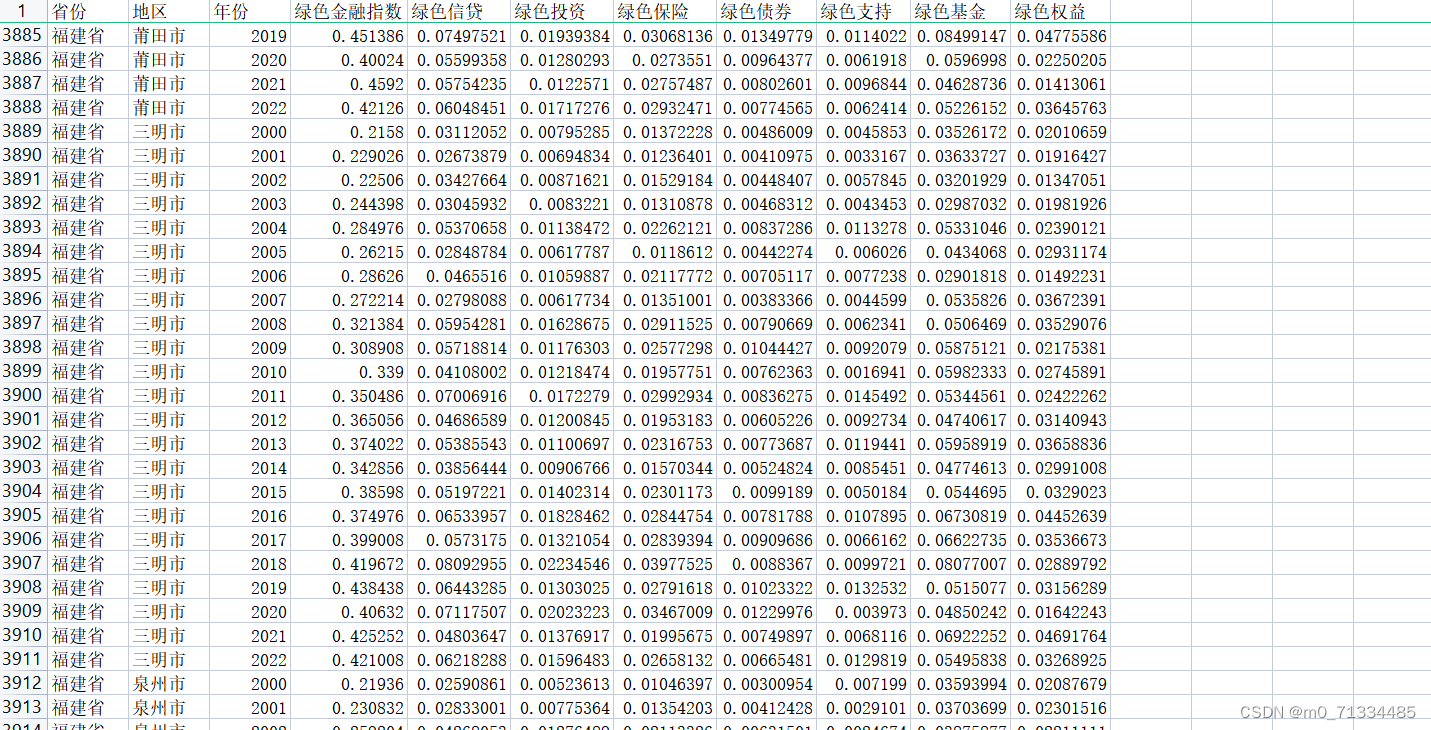
2000-2022年全国各地级市绿色金融指数数据
2000-2022年全国各地级市绿色金融指数数据 1、时间:2000-2022年 2、来源:来源:统计局、科技部、中国人民银行等权威机构网站及各种权威统计年鉴,包括全国及各省市统计年鉴、环境状况公报及一些专业统计年鉴,如 《中国…...
MachineLearningWu_13/P60-P64_Tensorflow
P60-P64的学习目录如下, x.1 TF网络模型实现 以一个简单的TF的分类网络为例,将模型翻译成框架下的语义,即如右侧所表达的。 当然上面对于分类网络的解释是一个简洁的解释,我们来进行更加具象的了解一下。左边是机器学习的三步骤&…...

centos7实现负载均衡
目录 一、基于 CentOS 7 构建 LVS-DR 集群。 1.1 配置lvs负载均衡服务 1.1.1 下载ipvsadm 1.1.2 增加vip 1.1.3 配置ipvsadm 1.2 配置rs1 1.2.1 编写测试页面 1.2.2 手工在RS端绑定VIP、添加路由 1.2.3 抑制arp响应 1.3 配置rs2 1.4 测试 二、配置nginx负载…...

Django笔记之数据库函数之日期函数
日期函数主要介绍两个大类,Extract() 和 Trunc() Extract() 函数作用是提取日期,比如我们可以提取一个日期字段的年份,月份,日等数据 Trunc() 的作用则是截取,比如 2022-06-18 12:12:12,我们可以根据需求…...

系统架构师---开发方法---敏捷开发
目录 前言 极限编程 四大价值观 沟通 简单 反馈 勇气 尊重: 十二个最佳实践 计划游戏 小型发布 隐喻 简单设计 测试先行 重构 结对编程 集体代码所所有制 持续集成 每周工作40小时 现场客户 编码标准 前言 2001年2月,在美国的犹他州…...

数据中心液冷技术:规模扩张的新里程碑
数据中心液冷技术:规模扩张的新里程碑 数据中心的液冷技术正处在规模扩张的关键阶段。这篇文章将深入探讨液冷技术的发展历程,当前的应用状况,以及未来的发展趋势。 目录 液冷技术的发展历程液冷技术的当前应用状况液冷技术的优势与挑战数据…...
页面静态化(模板引擎Freemarker)
1、浏览器请求web服务器 2、服务器渲染页面,渲染的过程就是向jsp页面(模板)内填充数据(模型)。 3、服务器将渲染生成的页面返回给浏览器。 所以模板引擎就是:模板数据输出,Jsp页面就是模板,页面中嵌入的jsp标签就是数据&#x…...
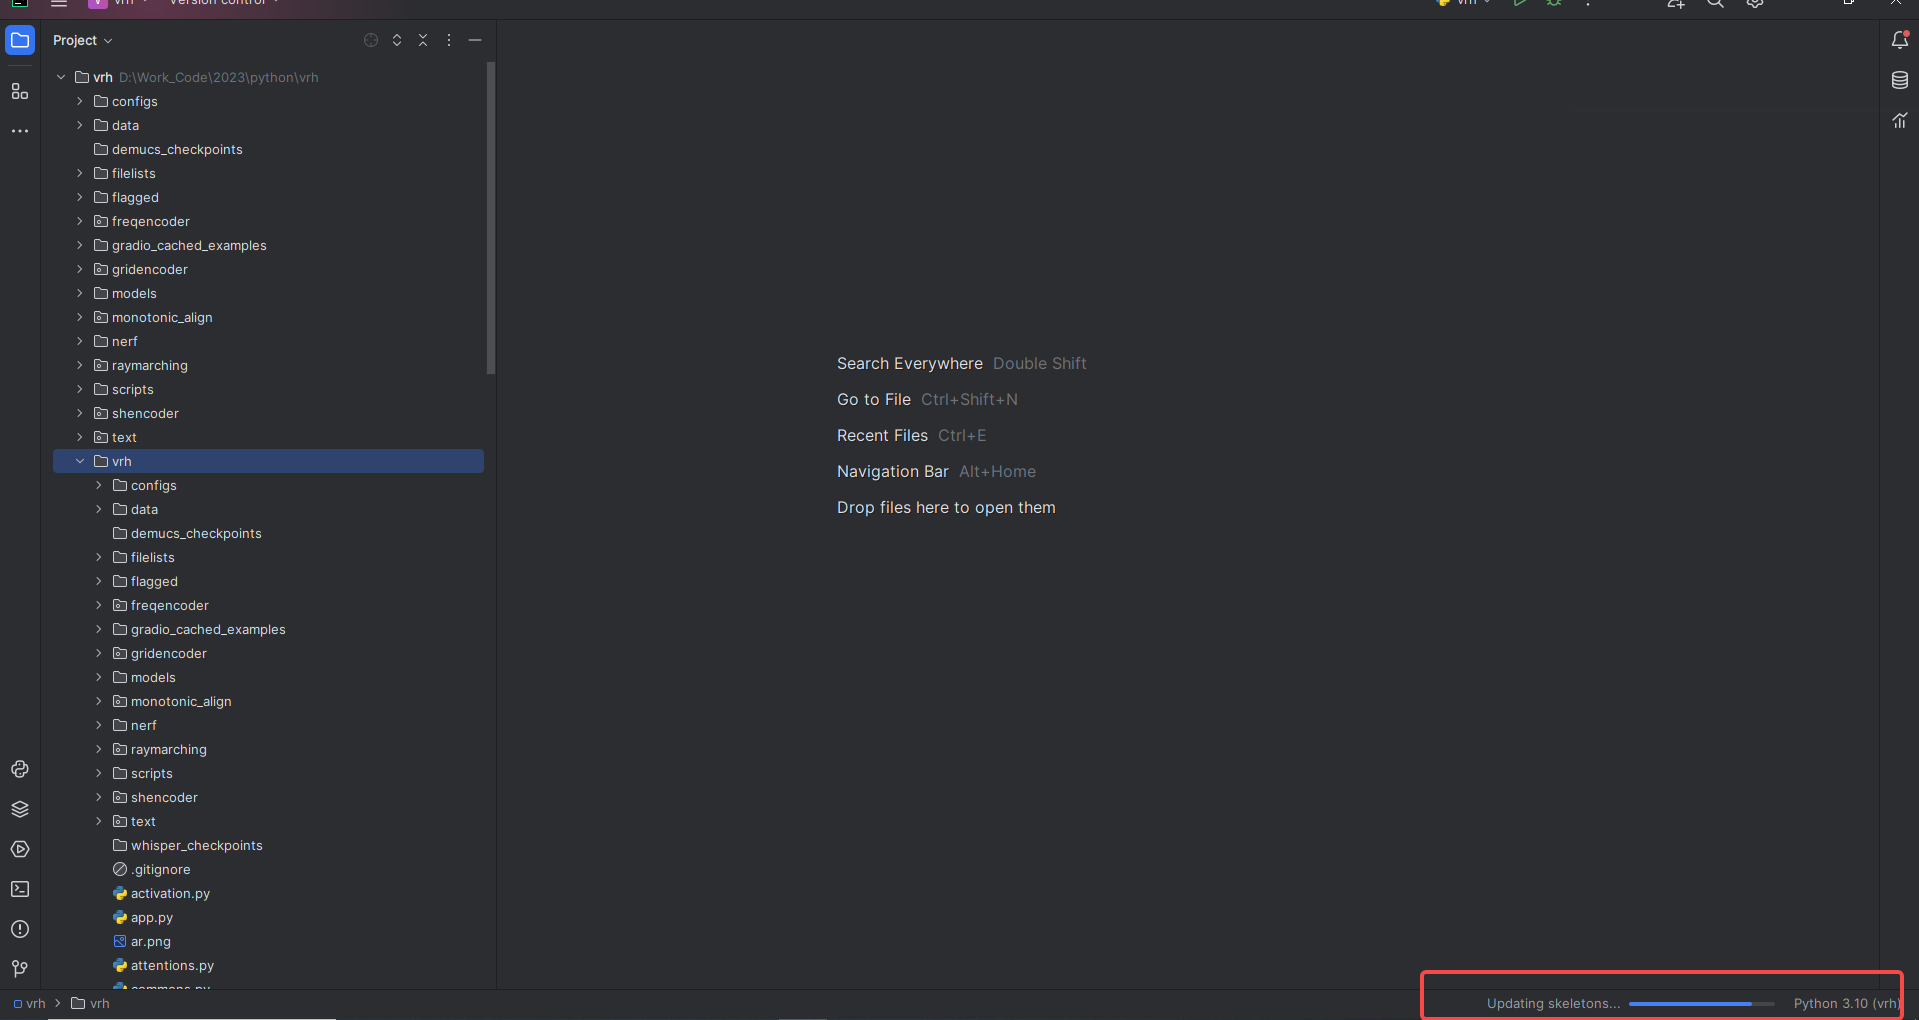
详细记录Pycharm配置已安装好的Conda虚拟环境
当安装好conda环境之后,想要在Pycharm中使用,那么就要在Pycharm中导入,我这里使用的pycharm-professional-2023.2这个版本,下面是详细步骤: 1.打开File->Settings: 2.找到Project——>Python Inter…...
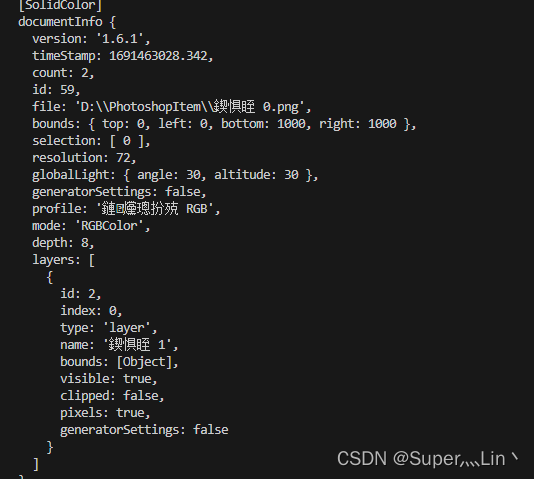
photoshop生成器引入到electron项目(electron与photoshop建立通信)
Photoshop引入了nodejs,在启动的时候,通过pipe调起nodejs运行时核心generator-builtin,通过KLVR机制与ps进行通信和交互,同时会加载用户编写的扩展。 这里记录一下引入时的踩坑过程 generator-core就是它的源码,elect…...
Stable Diffuion webui Mac版本安装过程
系统环境 操作系统:MacOS Ventura13.5 芯片:Apple M2 Max Python: 3.10 安装前置准备 git clone https://github.com/AUTOMATIC1111/stable-diffusion-webui.git注意事项:修改源码内全部 git clone 链接,设置代理 https://ghpr…...

ARM64 指令用法学习整理
1. CBZ 当我们谈论ARM64指令集时,CBZ(Compare and Branch on Zero)是一种条件分支指令。它用于在寄存器上进行比较,并且如果该寄存器的值为零,则跳转到指定的标签或地址。 CBZ指令的基本语法如下: CBZ &…...

stable-diffusion 模型效果+prompt
摘自个人印象笔记,图不完整可查看原笔记:https://app.yinxiang.com/fx/55cda0c6-2af5-4d66-bd86-85da79c5574ePrompt运用规则及技巧 : 1. https://publicprompts.art/(最适用于OpenArt 线上模型 https://openart.ai/)…...

GPT Image 2用了停不下来,5大维度深度测评
大家好,我是吾鳴。专注于分享提升工作与生活效率的工具,无偿分享AI领域相关的精选报告,持续关注AI的前沿动向。 这两天彻底的AI圈彻底的被GPT Image 2给炸锅了,Nano Banana 独领风骚了那么久,终于出现对手了࿰…...

OceanBase-Desktop-Setup-1.6.0.exe
OceanBase-Desktop 安装 CPU虚拟化未启用。 当前状态: False 请在BIOS设置中启用虚拟化后重试。 请参考以下步骤手动启用虚拟化: https://www.oceanbase.com/docs/common-oceanbase-database-cn-1000000002866370 确定...

2.6万亿天量成交却跌破4100点!A股这波“性能调优”,咱们程序员该怎么看懂?
大家好,我是Kyle,今天收盘估计不少持仓的兄弟跟我一样,看着K线的波动,心跳频率都跟着大盘震荡走了——这行情,简直比线上服务高峰期的QPS波动还刺激。先给大家上最新的“生产环境数据”:今天两市成交量干到…...
)
现在不升级VSCode工业配置,下季度可能无法通过ASPICE CL3审计(附TÜV官方检查项映射表)
更多请点击: https://intelliparadigm.com 第一章:VSCode工业配置的ASPICE CL3合规性紧迫性 在汽车电子与航空航天等高安全关键领域,ASPICE(Automotive SPICE)能力等级3(CL3)已从“推荐实践”演…...

Spring Boot 3.x 连接MongoDB 6.0踩坑记:UncategorizedMongoDbException: error 13 权限问题保姆级排查
Spring Boot 3.x 与 MongoDB 6.0 权限问题深度排查指南 最近在升级技术栈时,不少开发者反馈Spring Boot 3.x连接MongoDB 6.0时频繁遇到UncategorizedMongoDbException: error 13权限问题。这个错误表面看是认证失败,实则背后隐藏着版本迭代带来的安全策略…...

C语言学习笔记 - 15.C编程预备计算机专业知识 - CPU 内存条 硬盘 显卡 主板 显示器 之间的关系
一、计算机核心硬件组成计算机程序运行的核心硬件包含以下组件,所有组件通过主板完成物理连接与数据通信:CPU(中央处理器):计算机的运算与控制核心。内存条(内存):程序运行时的临时数…...

STM32CubeMX HAL库实战:手把手教你解析ATGM336H GPS/北斗模块的NMEA数据
STM32CubeMX HAL库实战:从底层解析ATGM336H GPS/北斗模块的NMEA协议 当你第一次看到串口助手输出的$GNRMC,085120.307,A,2232.6434,N,11354.9335,E,0.00,0.00,050123,,,A*68这样的字符串时,是否感到无从下手?这些看似杂乱的数据实际上遵循着严…...

别再只盯着地图看!5分钟搞懂OSM文件里那些‘点、线、面’到底在说什么
别再只盯着地图看!5分钟搞懂OSM文件里那些‘点、线、面’到底在说什么 第一次打开OSM文件时,很多人都会被满屏的XML标签吓到——这堆<node>、<way>和<relation>到底对应着地图上的什么?作为开发者或数据分析师,…...

5分钟快速搭建乳腺癌预测神经网络教程
1. 项目概述:5分钟快速搭建乳腺癌预测神经网络去年在Kaggle社区看到一个乳腺癌预测比赛时,我意识到很多医疗从业者其实并不需要深入理解神经网络的所有数学细节,他们更关注如何快速验证一个基础模型的效果。这就是为什么我开发了一套极简流程…...

3D CNN 网络结构
在8.4节内容中,我们详细介绍了一种用于对时空数据进行特征提取的ConvLSTM模型,其有效地结合了RNN和CNN各自的优点对输入数据在时间和空间两个维度进行建模。在接下来的这节内容中将会介绍另外一种拓展自传统卷积网络的3D卷积模型来对时空数据进行特征提取…...