使用 PyTorch 逐步检测单个对象
一、说明
在对象检测任务中,我们希望找到图像中对象的位置。我们可以搜索一种类型的对象(单对象检测,如本教程所示)或多个对象(多对象检测)。通常,我们使用边界框定义对象的位置。有几种方法可以表示边界框:
- 左上角的宽度和高度点 — [x0, y0, w, h],其中 x0 是框的左侧,y0 是框的顶部,w 和 h 分别是框的宽度和高度。
- 左上点和右下点 — [x0 ,y0 ,x1 ,y1],其中 x0 是框的左侧,y0 是框的顶部,x1 是框的右侧,y1 是框的底部。
- 具有宽度和高度的中心点 — [xc, yc, w, h],其中 xc 是框中心的 x 坐标,yc 是框中心的 y 坐标,w 和 h 分别是框的宽度和高度。
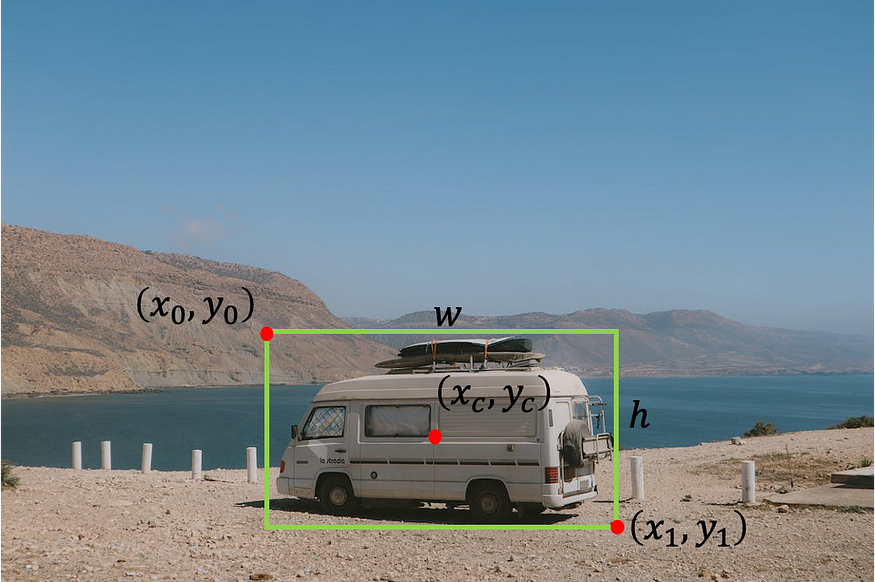
照片由Pexels的Indiana Barriopedro拍摄,由作者编辑。
在本教程中,我们将重点介绍在iChallenge-AMD竞赛的医学眼部图像中找到中央凹的中心。
二、获取数据
我们将使用年龄相关性黄斑变性(AMD)患者的眼睛图像。

来自 AMD 数据集的眼睛图像
有两个主要资源可以获取数据。第一个是iChallenge-AMD网站 https://amd.grand-challenge.org/。您首先需要注册参加比赛,然后可以下载数据。第二种方式不需要注册,它是从 https://ai.baidu.com/broad/download 下载。在这里,您需要下载图像的“[训练]图像和AMD标签”和带有标签的Excel文件的“[训练]光盘和中央凹注释”。
下载并提取数据后,您应该有一个文件夹 Training400,其中包含子文件夹 AMD(包含 89 张图像)和非 AMD(包含 311 张图像)以及一个 Excel 文件Fovea_location.xlsx,其中包含每个图像中中央凹的中心位置。
三、探索数据
让我们首先使用 Pandas 加载 Excell 文件
从 pathlib 导入  路径
导入熊猫作为 pdpath_to_parent_dir = 路径('.')
path_to_labels_file = path_to_parent_dir / 'Training400' /'Fovea_location.xlsx'labels_df = pd.read_excel(path_to_labels_file, index_col='ID')print('Head')print(labels_df.head()) # 显示 excell 文件中
的前 5 行 print('\nTail')print(labels_df.tail()) # 显示 excell 文件中的最后 5 行
数据框的打印结果
我们看到该表由四列组成:
- ID — 我们将其用作数据框的索引
- imgName ― 图像的名称。我们注意到,带有 AMD 的图像以 A 开头,而没有 AMD 的图像以 N 开头。
- Fovea_X — 图像中中央凹质心的 x 坐标
- Fovea_Y — 图像中中央凹质心的 y 坐标
我们可以在图像中绘制中央凹的质心,以了解中央凹位置的分布。
%matplotlib inline # 如果使用 Jupyter notebook 或 Colabimport seaborn as snsimport matplotlib.pyplot as  pltplt.rcParams['figure.figsize'] = (10, 6)amd_or_non_amd = ['AMD' if name.startswith('A') else 'Non-AMD' for name inlabels_df.imgName]
sns.scatterplot(x='Fovea_X', y='Fovea_Y', hue=amd_or_non_amd, data=labels_df, alpha=0.7)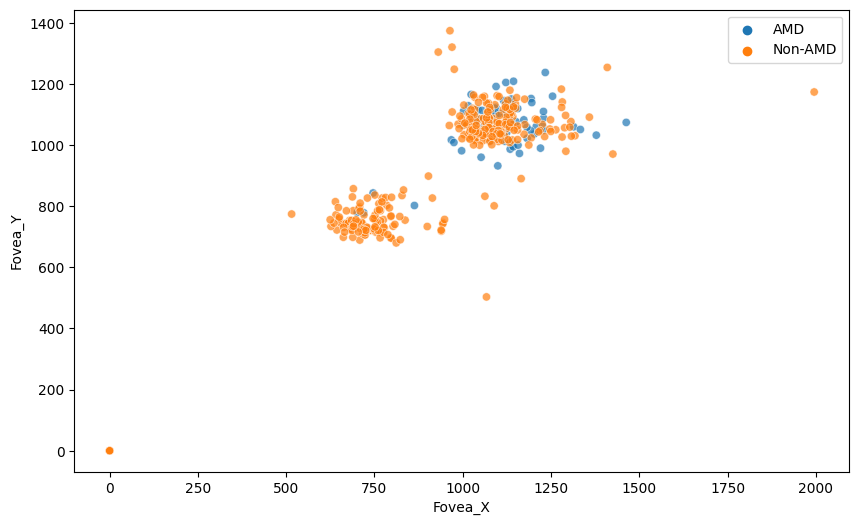
我们可以看到中央凹位置的两个主要组,但更重要的是,对于某些图像,中央凹质心的标签是(0,0)。最好从数据框中移除这些图像。
labels_df = labels_df[(labels_df[['Fovea_X', 'Fovea_Y']] != 0)。all(axis=1)]
amd_or_non_amd = ['AMD' if name.startswith('A') else 'Non-AMD' for name in labels_df.imgName]
现在我们想查看图像的随机样本并标记中央凹的中心。为此,让我们定义一个函数来加载带有标签的图像,另一个函数根据标签在中央凹周围绘制一个边界框。
从 PIL import Image, ImageDrawdef 导入 numpy 作为 npload_image_with_label(labels_df, id):image_name = labels_df.loc[id, 'imgName']data_type = 'AMD' 如果 image_name.startswith('A') else 'Non-AMD'image_path = path_to_ parent_dir / 'Training400' / data_type / image_name 图像 =图像。open(image_path) label = (labels_df.loc[id, 'Fovea_X'], labels_df.loc[id, 'Fovea_Y'])返回图像, label def show_image_with_bounding_box(图像, 标签, w_h_bbox=(50, 50), 厚度=2):W, h =w_h_bbox c_x , c_y = labelimage = image.copy() ImageDraw.Draw(image).rectangle(((c_x-w//2, c_y-h//2), (c_x+w//2, c_y+h//2)), outline='green', width=thick) plt.imshow(image)We randomly sample six images and show them.
rng = np.random.default_rng(42) # 创建具有种子的生成器对象 42 n_rows = 2 # 图像子图中的行数 n_cols = 3 # # 图像子图中
的列数 索引 = rng.choice(labels_df.index,
n_rows *
n_cols)对于 ii, 枚举中的 id (索引, 1):
image, label = load_image_with_label(labels_df, id) plt.subplot(n_rows, n_cols, ii) show_image_with_bounding_box(image, label, (250, 250), 20)plt.title(labels_df.loc[id, 'imgName'])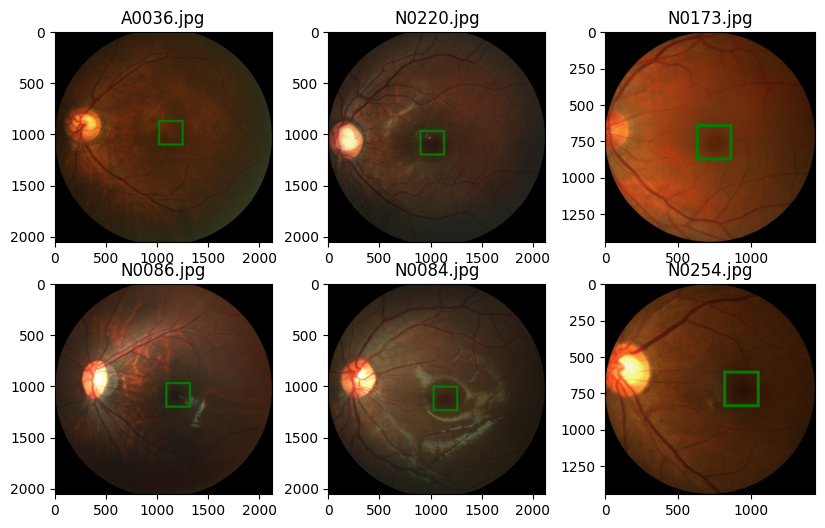
从上图中我们需要注意的第一件事是,对于不同的图像,图像的尺寸是不同的。我们现在想了解图像尺寸的分布。为此,我们在数据集中收集图像的高度和宽度。
heights = []widths = []for image_name, data_type in zip(labels_df['imgName'], amd_or_non_amd):image_path = path_to_parent_dir / 'Training400' / data_type / image_nameh, w = Image。open(image_path).sizeheights.append(h) widths.append(w)sns.histplot(x=heights, hue=amd_or_non_amd)

sns.histplot(x=widths, hue=amd_or_non_amd) 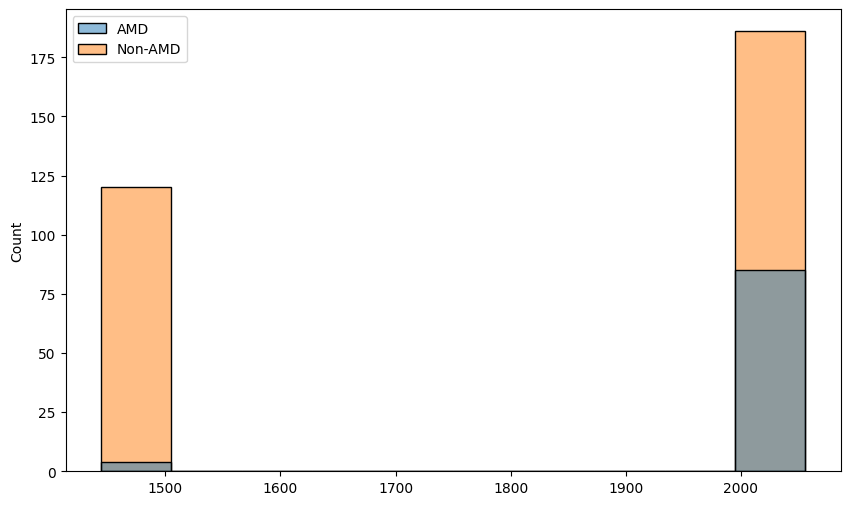
四、数据增强和转换
数据增强是非常重要的一步,它让我们扩展数据集(特别是当我们有一个小数据集时,就像我们的情况一样)并使网络更加健壮。我们还想应用一些转换来使网络的输入保持一致(在我们的例子中,我们需要调整图像的大小,使它们具有恒定的维度)。
除了图像的增强和转换外,我们还需要照顾标签。例如,如果我们垂直翻转图像,中央凹的质心将获得我们需要更新的新坐标。为了更新标签和图像的转换,我们将自己编写一些转换类。
import torch
import torchvision.transforms.functional as tfclass Resize:'''Resize the image and convert the labelto the new shape of the image'''def __init__(self, new_size=(256, 256)):self.new_width = new_size[0]self.new_height = new_size[1]def __call__(self, image_label_sample):image = image_label_sample[0]label = image_label_sample[1]c_x, c_y = labeloriginal_width, original_height = image.sizeimage_new = tf.resize(image, (self.new_width, self.new_height))c_x_new = c_x * self.new_width /original_widthc_y_new = c_y * self.new_height / original_heightreturn image_new, (c_x_new, c_y_new)class RandomHorizontalFlip:'''Horizontal flip the image with probability p.Adjust the label accordingly'''def __init__(self, p=0.5):if not 0 <= p <= 1:raise ValueError(f'Variable p is a probability, should be float between 0 to 1')self.p = p  # float between 0 to 1 represents the probability of flippingdef __call__(self, image_label_sample):image = image_label_sample[0]label = image_label_sample[1]w, h = image.sizec_x, c_y = labelif np.random.random() < self.p:image = tf.hflip(image)label = w - c_x, c_yreturn image, labelclass RandomVerticalFlip:'''Vertically flip the image with probability p.Adjust the label accordingly'''def __init__(self, p=0.5):if not 0 <= p <= 1:raise ValueError(f'Variable p is a probability, should be float between 0 to 1')self.p = p  # float between 0 to 1 represents the probability of flippingdef __call__(self, image_label_sample):image = image_label_sample[0]label = image_label_sample[1]w, h = image.sizec_x, c_y = labelif np.random.random() < self.p:image = tf.vflip(image)label = c_x, h - c_yreturn image, labelclass RandomTranslation:'''Translate the image by randomaly amount inside a range of values.Translate the label accordingly'''def __init__(self, max_translation=(0.2, 0.2)):if (not 0 <= max_translation[0] <= 1) or (not 0 <= max_translation[1] <= 1):raise ValueError(f'Variable max_translation should be float between 0 to 1')self.max_translation_x = max_translation[0]self.max_translation_y = max_translation[1]def __call__(self, image_label_sample):image = image_label_sample[0]label = image_label_sample[1]w, h = image.sizec_x, c_y = labelx_translate = int(np.random.uniform(-self.max_translation_x, self.max_translation_x) * w)y_translate = int(np.random.uniform(-self.max_translation_y, self.max_translation_y) * h)image = tf.affine(image, translate=(x_translate, y_translate), angle=0, scale=1, shear=0)label = c_x + x_translate, c_y + y_translatereturn image, labelclass ImageAdjustment:'''Change the brightness and contrast of the image and apply Gamma correction.No need to change the label.'''def __init__(self, p=0.5, brightness_factor=0.8, contrast_factor=0.8, gamma_factor=0.4):if not 0 <= p <= 1:raise ValueError(f'Variable p is a probability, should be float between 0 to 1')self.p = pself.brightness_factor = brightness_factorself.contrast_factor = contrast_factorself.gamma_factor = gamma_factordef __call__(self, image_label_sample):image = image_label_sample[0]label = image_label_sample[1]if np.random.random() < self.p:brightness_factor = 1 + np.random.uniform(-self.brightness_factor, self.brightness_factor)image = tf.adjust_brightness(image, brightness_factor)if np.random.random() < self.p:contrast_factor = 1 + np.random.uniform(-self.brightness_factor, self.brightness_factor)image = tf.adjust_contrast(image, contrast_factor)if np.random.random() < self.p:gamma_factor = 1 + np.random.uniform(-self.brightness_factor, self.brightness_factor)image = tf.adjust_gamma(image, gamma_factor)return image, labelclass ToTensor:'''Convert the image to a Pytorch tensor withthe channel as first dimenstion and values between 0 to 1. Also convert the label to tensorwith values between 0 to 1'''def __init__(self, scale_label=True):self.scale_label = scale_labeldef __call__(self, image_label_sample):image = image_label_sample[0]label = image_label_sample[1]w, h = image.sizec_x, c_y = labelimage = tf.to_tensor(image)if self.scale_label:label = c_x/w, c_y/hlabel = torch.tensor(label, dtype=torch.float32)return image, labelclass ToPILImage:'''Convert a tensor image to PIL Image. Also convert the label to a tuple withvalues with the image units'''def __init__(self, unscale_label=True):self.unscale_label = unscale_labeldef __call__(self, image_label_sample):image = image_label_sample[0]label = image_label_sample[1].tolist()image = tf.to_pil_image(image)w, h = image.sizeif self.unscale_label:c_x, c_y = labellabel = c_x*w, c_y*hreturn image, label
让我们尝试一下新的转换。我们为每个转换类创建对象,并使用 torchvision 将它们连接起来。然后,我们将完整转换应用于带有标签的图像。Compose
from torchvision.transforms import Compose
image, label = load_image_with_label(labels_df, 1)
transformation = Compose([Resize(), RandomHorizontalFlip(), RandomVerticalFlip(), RandomTranslation(), ImageAdjustment(), ToTensor()])
new_image, new_label = transformation((image, label))
print(f'new_im type {new_image.dtype}, shape = {new_image.shape}')
print(f'{new_label=}')# new_im type torch.float32, shape = torch.Size([3, 256, 256]
# new_label=tensor([0.6231, 0.3447])
我们如预期的那样得到了结果。我们还希望将新的张量转换为 PIL 图像,并将标签转换回图像坐标,以便我们可以使用我们的 show 方法显示它。
new_image, new_label = ToPILImage()((new_image, new_label))
show_image_with_bounding_box(new_image, new_label)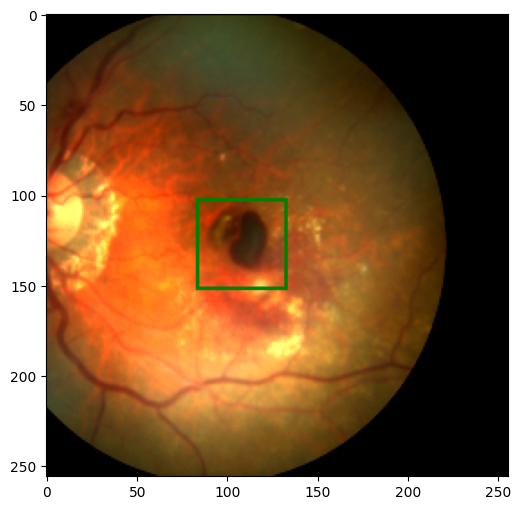
五、制作数据集和数据加载器
要将数据加载到我们的模型中,我们首先需要构建一个自定义数据集类(它是 PyTorch 数据集类的子类)。为此,我们需要实现三种方法:
__init__()- 构造和初始化数据集对象__getitem__()- 处理我们可以通过索引从整个数据集中获取图像和标签的方式__len__()- 返回我们拥有的数据集的长度
import torch
from torch.utils.data import Dataset, DataLoaderdevice = 'cuda' if torch.cuda.is_available() else 'cpu'class AMDDataset(Dataset):def __init__(self, data_path, labels_df, transformation):self.data_path = Path(data_path)self.labels_df = labels_df.reset_index(drop=True)self.transformation = transformationdef __getitem__(self, index):image_name = self.labels_df.loc[index, 'imgName']image_path = self.data_path / ('AMD' if image_name.startswith('A') else 'Non-AMD') / image_nameimage = Image.open(image_path)label = self.labels_df.loc[index, ['Fovea_X','Fovea_Y']].values.astype(float)image, label = self.transformation((image, label))return image.to(device), label.to(device)def __len__(self):return len(self.labels_df)在实际创建数据集对象之前,我们需要将数据拆分为训练集和验证集。我们用于将其拆分为训练数据帧和验证数据帧。scikit-learnlabels_df
from sklearn.model_selection import train_test_split
labels_df_train, labels_df_val = train_test_split(labels_df, test_size=0.2, shuffle=True, random_state=42)train_transformation = Compose([Resize(), RandomHorizontalFlip(), RandomVerticalFlip(), RandomTranslation(), ImageAdjustment(), ToTensor()])
val_transformation = Compose([Resize(), ToTensor()])train_dataset = AMDDataset('Training400', labels_df_train, train_transformation)
val_dataset = AMDDataset('Training400', labels_df_val, val_transformation)
我们可以通过显示图像样本来检查我们的数据集对象。
image, label = train_dataset[0]
show_image_with_bounding_box(*(ToPILImage()((image, label))))
image, label = val_dataset[0]
show_image_with_bounding_box(*(ToPILImage()((image, label))))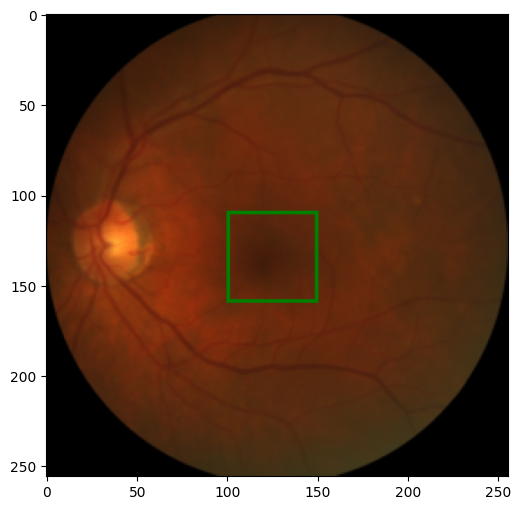
下一步是定义一个数据加载程序,一个用于训练数据集,一个用于验证数据集。
train_dataloader = DataLoader(train_dataset, batch_size=8)
val_dataloader = DataLoader(val_dataset, batch_size=16)
我们不必在 DataLoader 中进行随机排序,因为当我们将数据拆分为训练数据集和验证数据集时,我们已经对数据进行了随机排序。现在让我们看一个批处理,看看结果是否符合预期。
image_batch, labels_batch = next(iter(train_dataloader))
print(image_batch.shape, image_batch.dtype)
print(labels_batch, labels_batch.dtype)# torch.Size([8, 3, 256, 256]) torch.float32
# tensor([[0.4965, 0.3782],
#        [0.6202, 0.6245],
#         [0.5637, 0.4887],
#         [0.5114, 0.4908],
#         [0.3087, 0.4657],
#         [0.5330, 0.5309],
#         [0.6800, 0.6544],
#         [0.5828, 0.4034]], device='cuda:0') torch.float32
六、构建模型
我们希望构建一个模型,该模型获取调整大小的 RGB 图像,并为 x 和 y 坐标返回两个值。我们将以类似于使用跳过连接的 ResNet 的方式使用残差块。我们从定义基本的重新块开始
from torch.nn.modules.batchnorm import BatchNorm2d
import torch.nn as nnclass ResBlock(nn.Module):def __init__(self, in_channels, out_channels):super().__init__()self.base1 = nn.Sequential(nn.Conv2d(in_channels, in_channels, kernel_size=3, padding='same'),nn.BatchNorm2d(in_channels),nn.ReLU(True) )self.base2 = nn.Sequential(nn.Conv2d(in_channels, out_channels, kernel_size=3, padding='same'),nn.BatchNorm2d(out_channels),nn.ReLU(True))def forward(self, x):x = self.base1(x) + xx = self.base2(x)return x
此块有两个步骤。首先,它使用卷积层,然后进行批量归一化和 ReLU。然后我们将原始输入添加到结果中并应用第二步,该步骤再次由卷积层组成,然后是批量归一化和 ReLU,但这次我们更改了过滤器的数量。现在,我们已准备好构建模型。
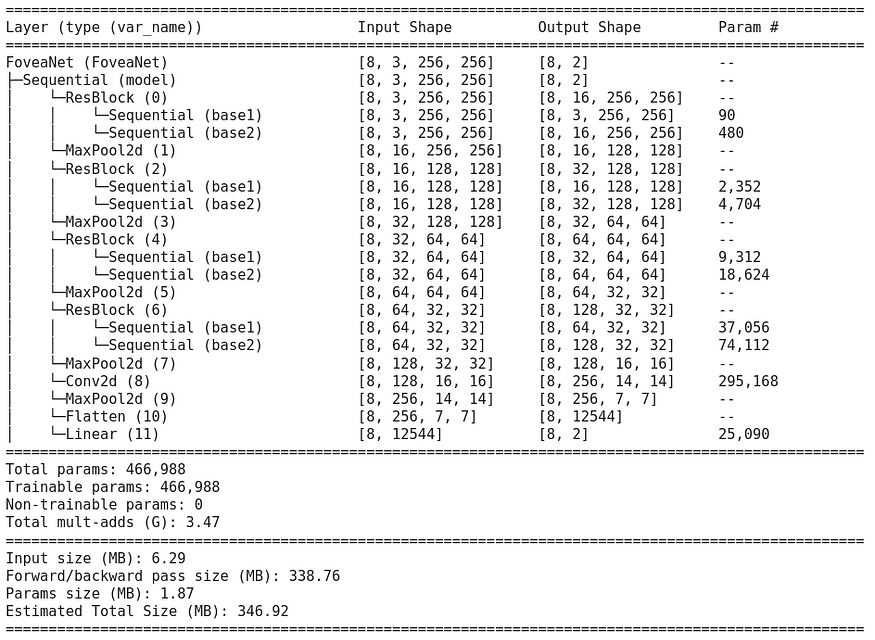
class FoveaNet(nn.Module):def __init__(self, in_channels, first_output_channels):super().__init__()self.model = nn.Sequential(ResBlock(in_channels, first_output_channels),nn.MaxPool2d(2),ResBlock(first_output_channels, 2 * first_output_channels),nn.MaxPool2d(2),ResBlock(2 * first_output_channels, 4 * first_output_channels),nn.MaxPool2d(2),ResBlock(4 * first_output_channels, 8 * first_output_channels),nn.MaxPool2d(2),nn.Conv2d(8 * first_output_channels, 16 * first_output_channels, kernel_size=3),nn.MaxPool2d(2),nn.Flatten(),nn.Linear(7 * 7 * 16 * first_output_channels, 2))def forward(self, x):return self.model(x)我们可以使用包更好地查看我们的模型torchinfo
! pip install torchinfo -q # install torchinfofrom torchinfo import summary
net = FoveaNet(3, 16)summary(model=net, input_size=(8, 3, 256, 256), # (batch_size, color_channels, height, width)col_names=["input_size", "output_size", "num_params"],col_width=20,row_settings=["var_names"]
)
七、损失和优化器
我们首先使用平滑 L1 损失定义损失函数。通常,当绝对差值小于 2 时,此损失的行为类似于 L1,否则与 L1 类似。
loss_func = nn.SmoothL1Loss()对于优化器,我们将使用 Adam。
optimizer = torch.optim.Adam(net.parameters(), lr=1e-4)作为性能指标,我们使用“交集于联合”指标 (IoU)。此指标计算两个边界框的交点与其并集之间的比率。

首先,我们需要定义一个函数,该函数获取质心作为输入,并返回形式为 [x0, y0, x1, y1] 的边界框作为输出
def centroid_to_bbox(centroids, w=50/256, h=50/256):x0_y0 = centroids - torch.tensor([w/2, h/2]).to(device)x1_y1 = centroids + torch.tensor([w/2, h/2]).to(device)return torch.cat([x0_y0, x1_y1], dim=1)以及计算一批标签的 IoU 的函数
from torchvision.ops import box_iou
def iou_batch(output_labels, target_labels):output_bbox = centroid_to_bbox(output_labels)target_bbox = centroid_to_bbox(target_labels)return torch.trace(box_iou(output_bbox, target_bbox)).item()
接下来,我们为批处理定义一个损失函数
def batch_loss(loss_func, output, target, optimizer=None):loss = loss_func(output, target)with torch.no_grad():iou_metric = iou_batch(output, target)if optimizer is not None:optimizer.zero_grad()loss.backward()optimizer.step()return loss.item(), iou_metric八、训练模型
在此步骤中,我们将训练模型以找到中央凹。我们首先定义一个辅助函数来进行训练步骤,这意味着遍历数据加载器中的所有数据,使用我们之前的函数获取损失(并更新训练案例中的权重),并跟踪损失和 IoU 指标。batch_loss
def train_val_step(dataloader, model, loss_func, optimizer=None):if optimizer is not None:model.train()else:model.eval()running_loss = 0running_iou = 0for image_batch, label_batch in dataloader:output_labels = model(image_batch)loss_value, iou_metric_value = batch_loss(loss_func, output_labels, label_batch, optimizer)running_loss += loss_valuerunning_iou += iou_metric_valuereturn running_loss/len(dataloader.dataset), running_iou/len(dataloader.dataset)现在,我们有了进行培训所需的一切。我们定义了两个字典来跟踪损失和 IoU 指标,以便在每个 epoch 之后进行训练和验证。我们还保存了提供最佳结果的模型权重。
num_epoch = 100
loss_tracking = {'train': [], 'val': []}
iou_tracking = {'train': [], 'val': []}
best_loss = float('inf')model = FoveaNet(3, 16).to(device)
loss_func = nn.SmoothL1Loss(reduction="sum")
optimizer = torch.optim.Adam(model.parameters(), lr=5e-5)for epoch in range(num_epoch):print(f'Epoch {epoch+1}/{num_epoch}')training_loss, trainig_iou = train_val_step(train_dataloader, model, loss_func, optimizer)loss_tracking['train'].append(training_loss)iou_tracking['train'].append(trainig_iou)with torch.inference_mode():val_loss, val_iou = train_val_step(val_dataloader, model, loss_func, None)loss_tracking['val'].append(val_loss)iou_tracking['val'].append(val_iou)if val_loss < best_loss:print('Saving best model')torch.save(model.state_dict(), 'best_model.pt')best_loss = val_lossprint(f'Training loss: {training_loss:.6}, IoU: {trainig_iou:.2}')print(f'Validation loss: {val_loss:.6}, IoU: {val_iou:.2}')
让我们绘制每个纪元的平均损失和平均 IoU 作为纪元的函数。
plt.plot(range(1, num_epoch+1), loss_tracking['train'], label='train')
plt.plot(range(1, num_epoch+1), loss_tracking['val'], label='validation')
plt.xlabel('epoch')
plt.ylabel('loss')
plt.legend()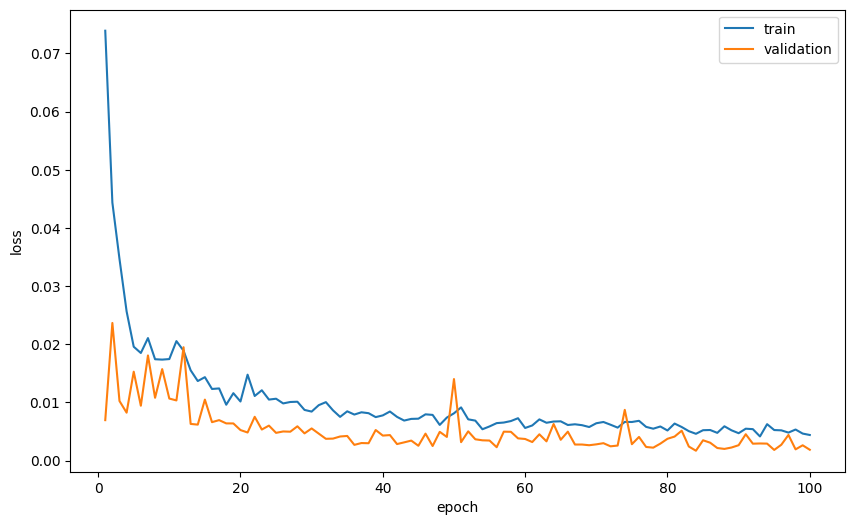
plt.plot(range(1, num_epoch+1), iou_tracking['train'], label='train')
plt.plot(range(1, num_epoch+1), iou_tracking['val'], label='validation')
plt.xlabel('epoch')
plt.ylabel('iou')
plt.legend()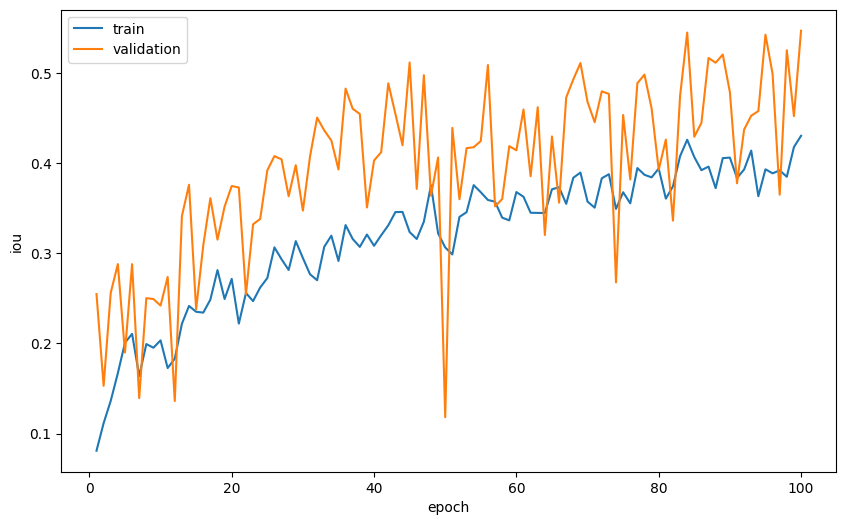
最后,我们想看一些图像,看看模型的预测在多大程度上接近中央凹的真实坐标。为此,我们基于之前的函数定义一个新函数,但这次我们为预测(绿色)和目标(红色)绘制边界框。show_image_with_bounding_box
def show_image_with_2_bounding_box(image, label, target_label, w_h_bbox=(50, 50), thickness=2):w, h = w_h_bboxc_x , c_y = labelc_x_target , c_y_target = target_labelimage = image.copy()ImageDraw.Draw(image).rectangle(((c_x-w//2, c_y-h//2), (c_x+w//2, c_y+h//2)), outline='green', width=thickness)ImageDraw.Draw(image).rectangle(((c_x_target-w//2, c_y_target-h//2), (c_x_target+w//2, c_y_target+h//2)), outline='red', width=thickness)plt.imshow(image)现在我们加载我们得到的最佳模型,并对图像样本进行预测并查看结果
model.load_state_dict(torch.load('best_model.pt'))
model.eval()
rng = np.random.default_rng(0)  # create Generator object with seed 0
n_rows = 2  # number of rows in the image subplot
n_cols = 3  # # number of cols in the image subplot
indexes = rng.choice(range(len(val_dataset)), n_rows * n_cols, replace=False)for ii, id in enumerate(indexes, 1):image, label = val_dataset[id]output = model(image.unsqueeze(0))iou = iou_batch(output, label.unsqueeze(0))_, label = ToPILImage()((image, label))image, output = ToPILImage()((image, output.squeeze()))plt.subplot(n_rows, n_cols, ii)show_image_with_2_bounding_box(image, output, label)plt.title(f'{iou:.2f}')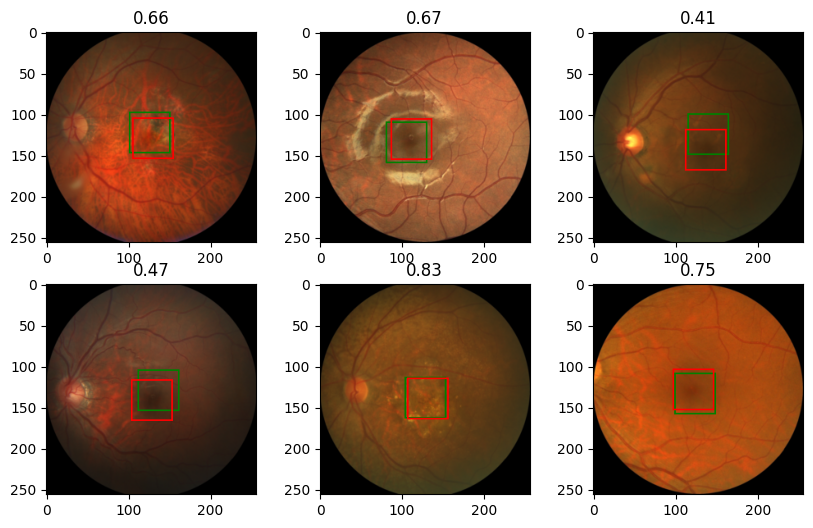
九、结论
在本教程中,我们介绍了为单个对象检测任务构建网络所需的所有主要步骤。我们首先探索数据,清理和排列数据,然后构建数据增强函数以及数据集和DataLoader对象,最后构建和训练模型。我们得到了相对不错的结果,欢迎您尝试通过更改模型的学习参数和架构来提高性能。
相关文章:
使用 PyTorch 逐步检测单个对象
一、说明 在对象检测任务中,我们希望找到图像中对象的位置。我们可以搜索一种类型的对象(单对象检测,如本教程所示)或多个对象(多对象检测)。通常,我们使用边界框定义对象的位置。有几种方法可以…...
Node.js |(二)Node.js API:fs模块 | 尚硅谷2023版Node.js零基础视频教程
学习视频:尚硅谷2023版Node.js零基础视频教程,nodejs新手到高手 文章目录 📚文件写入🐇writeFile 异步写入🐇writeFileSync 同步写入🐇appendFile / appendFileSync 追加写入🐇createWriteStrea…...

Android 13 Hotseat定制化修改——002 hotseat图标数量修改
目录 一.背景 二.实践方案 一.背景 由于需求是需要自定义修改Hotseat,所以此篇文章是记录如何自定义修改hotseat的,应该可以覆盖大部分场景,修改点有修改hotseat布局方向,hotseat图标数量,hotseat图标大小࿰…...
Flask实现接口mock,安装及使用教程(一)
1、什么是接口mock 主要是针对单元测试的应用,它可以很方便的解除单元测试中各种依赖,大大的降低了编写单元测试的难度 2、什么是mock server 正常情况下:测试客户端——测试——> 被测系统 ——依赖——>外部服务依赖 在被测系统和…...

分立式BUCK电路原理与制作持续更新
目录 一、分立式BUCK电路总体原理图 二、BUCK电路与LDO的区别 三、BUCK电路为什么要加电感 四、BUCK电路要加续流二极管 五、BUCK电路导通与断开的回路 六、电源公式的中的几个表示方式 1、输入功率用Pin表示 2、输出功率用Po表示 3、电源的效率公式:电源的…...

2023年大数据与计算国际会议 (WBDC 2023)| EI、Scoups检索
会议简介 Brief Introduction 2023年大数据与计算国际会议(WBDC 2023) 会议时间:2023年11月17 -19日 召开地点:中国西安 大会官网:www.iwbdc.org 2023年大数据与计算国际会议(WBDC 2023)将围绕“…...
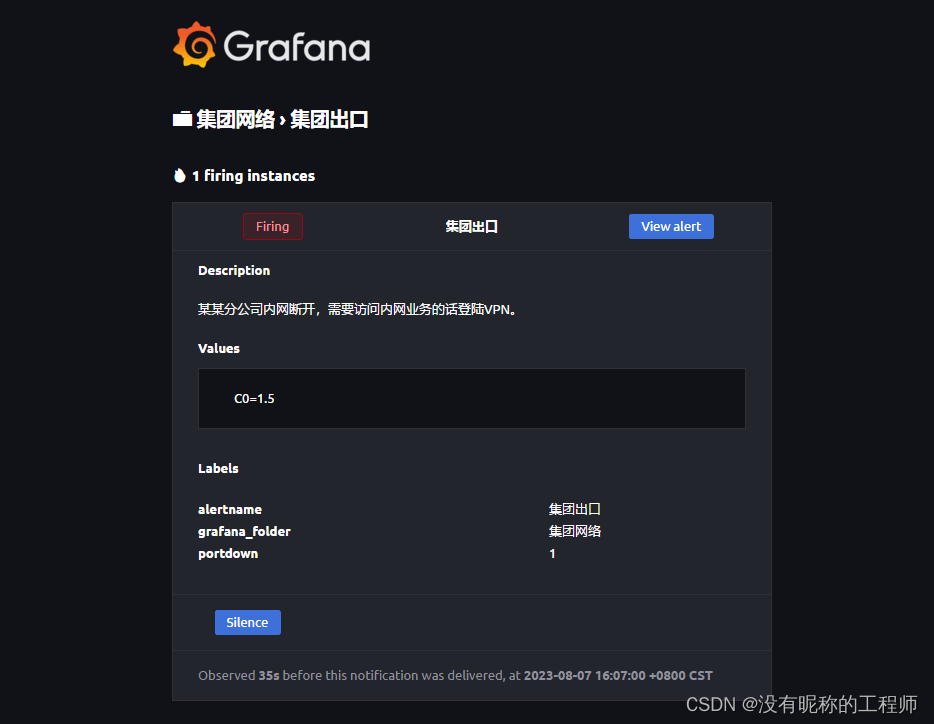
Grafana V10 告警推送 邮件
最近项目建设完成,一个城域网项目,相关zabbix和grafana展示已经完,想了想,不想天天看平台去盯网络监控平台,索性对告警进行分类调整,增加告警的推送,和相关部门的提醒,其他部门看不懂…...

【OpenCV常用函数:视频捕获函数】cv2.VideoCapture
文章目录 1、cv2.VideoCapture() 1、cv2.VideoCapture() 输入视频路径,创建VideoCapture的对象 cv2.VideoCapture(filename) filename: 视频文件的路径视频名扩展名该类的函数有: 1)video.isOpened: 检查视频捕获是否成功 2)vid…...

OptaPlanner笔记2
1.5.3 使用maven 修改pom.xml 导入optaplanner-bom以避免为每一个依赖项重复添加版本号 <project>...<dependencyManagement><dependencies><dependency><groupId>org.optaplanner</groupId><artifactId>optaplanner-bom</art…...

c++文件流详细笔记
c++流 IO :向设备输入数据和输出数据 C++的IO流 设备: 文件控制台特定的数据类型(stringstream)c++中,必须通过特定的已经定义好的类, 来处理IO(输入输出) 文件流 文件流: 对文件进行读写操作 头文件: 类库: ifstream 对文件输入(读文件) ofstream 对文件输出(写…...

CNN经典网络模型之GoogleNet论文解读
目录 1. GoogleNet 1.1 Inception模块 1.1.1 1x1卷积 1.2 辅助分类器结构 1.3 GoogleNet网络结构图 1. GoogleNet GoogleNet,也被称为Inception-v1,是由Google团队在2014年提出的一种深度卷积神经网络架构,专门用于图像分类和特征提取任…...

【C++】开源:CGAL计算几何库配置使用
😏★,:.☆( ̄▽ ̄)/$:.★ 😏 这篇文章主要介绍CGAL计算几何库配置使用。 无专精则不能成,无涉猎则不能通。——梁启超 欢迎来到我的博客,一起学习,共同进步。 喜欢的朋友可以关注一下,…...

Redis分布式锁相关
Redis分布式锁实现Redisson 15问 分布式锁:Redisson源码解析-MultiLock、RedLock 看懂Redisson分布式锁源码,其实并不难...

Nginx环境搭建以及Docker环境部署
目录 Nginx环境搭建 1.首先创建Nginx的目录并进入 2.下载Nginx的安装包 可以通过FTP工具上传离线环境包,也可通过wget命令在线获取安装包 没有wget命令的可通过yum命令安装 3.解压Nginx的压缩包 4.下载并安装Nginx所需的依赖库和包 安装方式一 安装方式二 --- 也…...
2023牛客暑期多校训练营7(C/I/M)
目录 C.Beautiful Sequence I.We Love Strings M.Writing Books C.Beautiful Sequence 思路:显然若得到了a[1],则整个序列a我们都知道了。所以我们要求出第k大的a[1],这个可以利用序列a为不递减序列的性质来得出。 首先,由题…...

阿里云服务器手动搭建FTP教程(Windows操作系统)
阿里云百科介绍使用阿里云服务器搭建FTP教程,云服务器为Windows操作系统,当需要远程连接Windows实例进行文件传输时,可以通过搭建FTP站点实现。本文将介绍如何在Windows实例中搭建FTP站点。 目录 准备工作 步骤一:添加IIS以及F…...
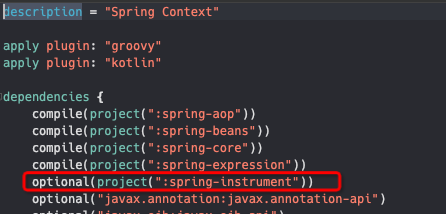
idea+gradle阅读spring5.2.9源码之源码构建报错解决方案
注意 1、先确保gradle版本和spring、jdk版本对应 本文:gradle:5.6.4/spring 5.2.9/jdk1.8(gradle和jdk都要先安装好,gradle还要配置好本地资源文件路径) 2、原来项目乱了的话,先重新导入下载的源码项目 3、进入源码所在根目录&…...
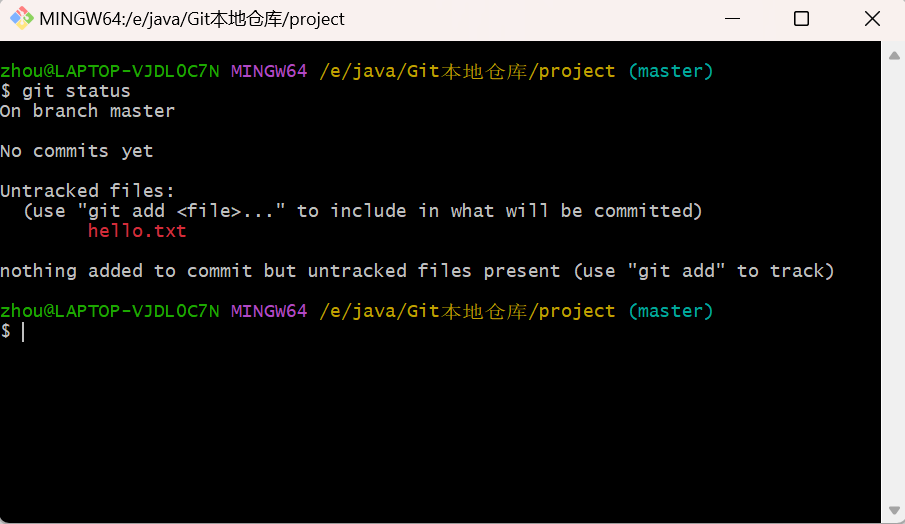
一文详解Git
一. Git 概述 1.1 什么是 Git Git 是一个免费的、开源的分布式版本控制工具, 主要用于管理开发过程中的源代码文件,在软件开发过程中被广泛使用。通过Git仓库来存储和管理这些文件,Git仓库分为二种: 本地仓库:开发人…...
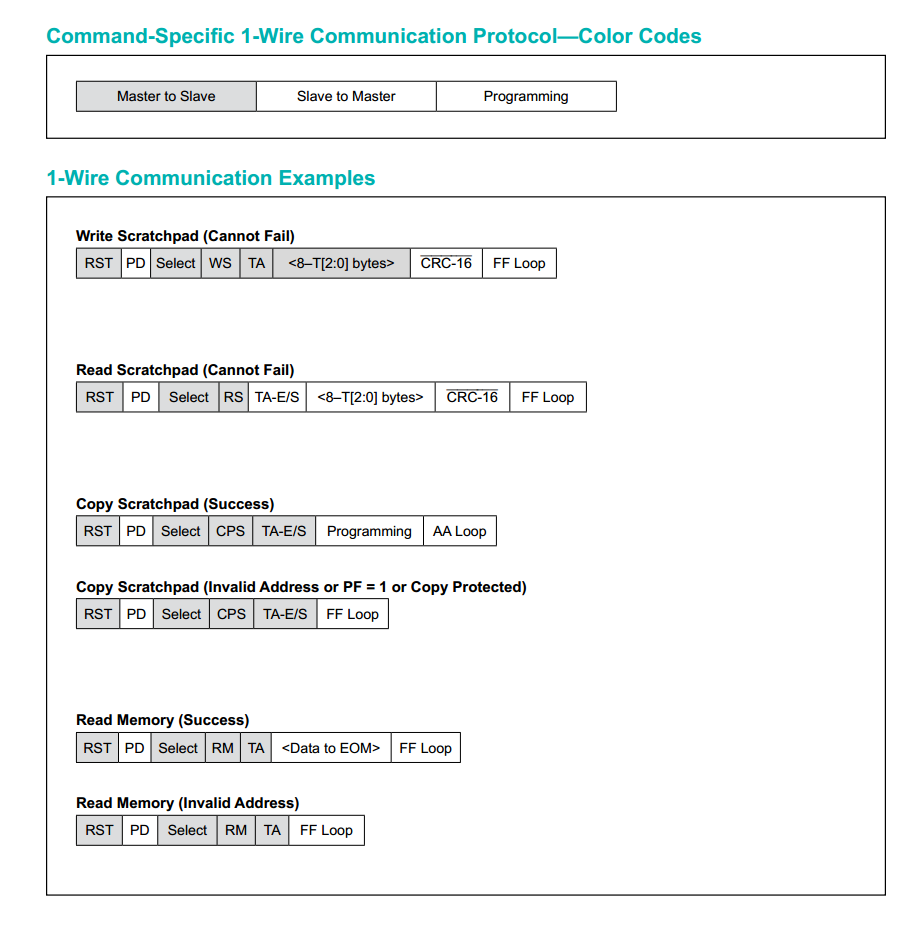
【单片机】DS2431英文手册,中文手册,翻译
DS2431是一款1024位的1-Wire EEPROM芯片,以每个256位的四个内存页面组织。数据被写入8字节的暂存区,经过验证,然后复制到EEPROM存储器中。作为一个特殊功能,四个内存页面可以单独地被写保护,或者被置于EPROM仿真模式&a…...

centos7部署openldap开启memberof并接入jumpserver
文章目录 前言1.yum安装openldap2.配置密码3.导入配置4.定义域5.配置memberof6.配置base dn7.安装phpldapadmin管理8.调整httpd的配置9.调整php的配置10.登陆php管理页面11.同步旧ldapsever用户数据(可省略)12.客户端配置13.对接jumpserver 前言 介绍如何在centos7上部署openl…...

Anything to RealCharacters 2.5D转真人引擎:个性化AI写真服务开发入门
Anything to RealCharacters 2.5D转真人引擎:个性化AI写真服务开发入门 你有没有想过,把心爱的动漫头像、游戏角色或者二次元插画,一键变成一张以假乱真的真人照片?这听起来像是电影里的黑科技,但现在,借助…...

AtCoder Beginner Contest 443
atcoder abc443 题解 https://www.bilibili.com/video/BV1rFZQB4Em4/ 【做题录制】Denso Create Programming Contest 2026(AtCoder Beginner Contest 443) https://www.bilibili.com/video/BV1di6nBSEet/ AtCoder-ABC443题解 https://www.bilibili.com/…...

终极Windows软件清理指南:5分钟学会批量卸载与深度清理
终极Windows软件清理指南:5分钟学会批量卸载与深度清理 【免费下载链接】Bulk-Crap-Uninstaller Remove large amounts of unwanted applications quickly. 项目地址: https://gitcode.com/gh_mirrors/bu/Bulk-Crap-Uninstaller 你是否曾为电脑中堆积如山的无…...

掌握大模型,产品经理的逆袭之路:高效、精准、智能,未来已来!
产品经理学习大模型(如GPT-3、BERT等)能显著提升工作效率和决策质量。大模型可助力进行高效用户需求分析、精准市场趋势预测、高效项目管理、智能产品设计以及基于数据的预测分析。此外,学习大模型还能帮助产品经理快速适应技术发展ÿ…...
【乖乖数学】)
全域数学本源公理(素数-偶数对称破缺与运动本源)【乖乖数学】
全域数学本源公理(素数-偶数对称破缺与运动本源)【乖乖数学】 作者:乖乖数学 时间:20260422 核心公理素数 不对称性本源 素数是不可再分的基本单元,其结构天然破缺对称、无法均分、自成孤立个体,是宇宙一切…...

Qianfan-OCR科研提效:数学教材截图→公式LaTeX+概念解释文本同步生成
Qianfan-OCR科研提效:数学教材截图→公式LaTeX概念解释文本同步生成 1. 工具简介 Qianfan-OCR是一款基于百度千帆InternVL架构开发的单卡GPU专属文档解析工具。它完美解决了科研人员在处理数学教材、论文等复杂文档时的痛点问题——传统OCR工具无法准确识别数学公…...

Python数据分析Pandas实战技巧
Python数据分析Pandas实战技巧 在当今数据驱动的时代,Python凭借其强大的数据分析库Pandas,成为数据科学领域的核心工具之一。Pandas以其高效的数据结构和灵活的操作方式,帮助用户轻松完成数据清洗、转换和分析任务。无论是处理金融数据、用…...

测试工程师消亡论:人类堡垒——在自动化洪流中重铸价值高地
浪潮中的迷思在软件技术日新月异的演进中,一股名为“测试工程师消亡论”的思潮,如同幽灵般在行业上空徘徊。它伴随着自动化工具、人工智能乃至智能测试体的每一次重大突破而愈演愈烈。从自动化脚本替代重复劳动,到AI生成测试用例,…...

2025年12月CCF-GESP编程能力等级认证Python编程四级真题解析
本文收录于专栏《Python等级认证CCF-GESP真题解析》,专栏总目录:点这里,订阅后可阅读专栏内所有文章。 一、单选题(每题 2 分,共 30 分) 第 1 题 近日,空中客车公司表示,约 6000 架空客 A320 系列飞机需要紧急更换一种易受太阳辐射影响的飞行控制软件。空客表示,在对…...

BERT分词器定制指南:从原理到实践
1. 为什么需要定制BERT分词器BERT等预训练语言模型的核心组件之一就是分词器(Tokenizer)。虽然Hugging Face等平台提供了多语言的预训练分词器,但在以下场景中,我们需要从头训练自己的分词器:处理专业领域文本…...