英伟达结构化剪枝工具Nvidia Apex Automatic Sparsity [ASP](2)——代码分析
伟达结构化剪枝工具Nvidia Apex Automatic Sparsity [ASP](2)——代码分析
ASP整个模块的结果如下:
.
├── COPYRIGHT
├── README.md
├── __init__.py
├── asp.py
├── permutation_lib.py
├── permutation_search_kernels
│   ├── CUDA_kernels
│   │   └── permutation_search_kernels.cu
│   ├── __init__.py
│   ├── call_permutation_search_kernels.py
│   ├── channel_swap.py
│   ├── exhaustive_search.py
│   └── permutation_utilities.py
├── permutation_tests
│   ├── README.md
│   ├── ablation_studies.sh
│   ├── permutation_test.py
│   ├── runtime_table.sh
│   └── unstructured_study.sh
├── sparse_masklib.py
└── test├── checkpointing_test_part1.py├── checkpointing_test_part2.py├── checkpointing_test_reference.py├── test_permutation_application.py└── toy_problem.py
共包含三个主要文件:
- asp.py
- permutation_lib. py
- sparse_masklib.py
以及三个主要目录
- permutation_search_kernels
- permutation_tests
- test
其中目录test用于展示一些具体的实例,目录permutation_tests是一个单独的模块,用于复现论文中的实验,这两个目录不用关注。如果不需要使用通道置换算法的话,目录permutation_search_kernels和文件permutation_lib.py也不需要关注。
因此,ASP源代码中最主要的还是asp.py文件和sparse_masklib.py文件,如果需要使用通道置换算法的话,可以在此基础上探询一下permutation_search相关的算法和代码实现。
asp.py文件
ASP类
asp.py中主定义了ASP类,其成员函数定义了init_model_for_pruning、init_optimizer_for_pruning、compute_sparse_masks、already_init_asp_model、restore_pruned_weights、is_sparsity_enabled、prune_trained_model、set_permutation_saving_params八个静态方法,分别用于对模型、优化器进行稀疏初始化、计算稀疏mask、检查模型是否已经进行稀疏初始化,检查模型是否进行了稀疏化,恢复模型的权重以及为通道设置算法设置参数。其中最主要的是prune_trained_model及其调用的init_model_for_pruning、init_optimizer_for_pruning、compute_sparse_masks三个方法。
成员变量
__model = None # 待处理的模型__verbosity = 0 # 输出信息的详细程度__optimizer = None # 待处理的优化器__sparse_parameters = [] # 用于保存稀疏参数信息__calculate_mask = None # 一个函数指针,能够通过传入的tensor的shape为tensor生成相应的mask__allow_permutation = True # 是否需要开启通道置换算法__all_parameters = [] # 用于保存模型中所有参数的信息__save_permutation_graph = False # 是否保存通道置换的graph__permutation_output_dir = '' # 通道置换信息的输出目录
成员函数
- prune_trained_model
prune_trained_model是用法介绍中需要在模型训练文件中需要添加的两行代码之一,也是ASP模块的使用入口:
@classmethod
def prune_trained_model(cls, model, optimizer):# add mask buffers to model (init_model_for_pruning), augment optimizer (init_optimizer_for_pruning) and compute masks (compute_sparse_masks)cls.init_model_for_pruning(model, mask_calculator="m4n2_1d", verbosity=2, whitelist=[torch.nn.Linear, torch.nn.Conv2d, torch.nn.MultiheadAttention], allow_recompute_mask=False)cls.init_optimizer_for_pruning(optimizer)cls.compute_sparse_masks()
prune_trained_model方法接受两个参数,分别是需要训练后的模型和优化器。
该方法中又分别调用了三个方法:首先使用init_model_for_pruning,init_optimizer_for_pruning方法分别对模型和优化器中的权重进行分析和初始化准备工作(为模型添加mask buffer),并通过compute_sparse_masks方法为每个权重计算生成对应的稀疏mask。
- init_model_for_pruning
def init_model_for_pruning(cls, model, mask_calculator="m4n2_1d",verbosity=3,whitelist=[torch.nn.Linear, torch.nn.Conv1d, torch.nn.Conv2d, torch.nn.Conv3d, torch.nn.MultiheadAttention], allowed_layer_names=None, disallowed_layer_names=[],allow_recompute_mask=False, custom_layer_dict={},allow_permutation=True):assert (cls.__model is None), "ASP has been initialized already."cls.__model = modelcls.__verbosity = verbositycls.__allow_permutation = allow_permutationif isinstance(mask_calculator, str):def create_mask_from_pattern(param):return create_mask(param, mask_calculator).bool()cls.__calculate_mask = create_mask_from_patternelse:cls.__calculate_mask = mask_calculator #user defined function# function to extract variables that will be sparsified. # idea is that you will add one of these functions for each module type that can be sparsified.if torchvision_imported:print("[ASP] torchvision is imported, can work with the MaskRCNN/KeypointRCNN from torchvision.")torchvision_version = str(torchvision.__version__)torchvision_version_major = int(torchvision_version.split('.')[0])torchvision_version_minor = int(torchvision_version.split('.')[1])if torchvision_version_major == 0 and torchvision_version_minor < 12:sparse_parameter_list = {torch.nn.Linear: ['weight'], torch.nn.Conv1d: ['weight'], torch.nn.Conv2d: ['weight'], torch.nn.Conv3d: ['weight'], torch.nn.modules.linear.NonDynamicallyQuantizableLinear: ['weight'], torch.nn.MultiheadAttention: ['q_proj_weight', 'k_proj_weight', 'v_proj_weight', 'in_proj_weight'], torchvision.ops.misc.Conv2d: ['weight']}else: # Torchvision remove APIs that were deprecated before 0.8 (#5386) in 0.12.0, torchvision.ops.misc.Conv2d is removedsparse_parameter_list = {torch.nn.Linear: ['weight'], torch.nn.Conv1d: ['weight'], torch.nn.Conv2d: ['weight'], torch.nn.Conv3d: ['weight'], torch.nn.modules.linear.NonDynamicallyQuantizableLinear: ['weight'], torch.nn.MultiheadAttention: ['q_proj_weight', 'k_proj_weight', 'v_proj_weight', 'in_proj_weight']}else:sparse_parameter_list = {torch.nn.Linear: ['weight'], torch.nn.Conv1d: ['weight'], torch.nn.Conv2d: ['weight'], torch.nn.Conv3d: ['weight'], torch.nn.modules.linear.NonDynamicallyQuantizableLinear: ['weight'], torch.nn.MultiheadAttention: ['q_proj_weight', 'k_proj_weight', 'v_proj_weight', 'in_proj_weight']}if custom_layer_dict: # Update default list to include user supplied custom (layer type : parameter tensor), make sure this tensor type is something ASP knows how to prunesparse_parameter_list.update(custom_layer_dict)whitelist += list(custom_layer_dict.keys())for module_type in whitelist:assert (module_type in sparse_parameter_list), "Module %s :: Don't know how to sparsify module." % module.dtype()
先看看官方给出的注释:
Call this method to modify your model to take advantage of sparse matrix multiplication.
Note that this call alone only augments the model with additional buffers needed for sparse MMA, it does not enable use of sparse MMA.
注释指出init_model_for_pruning方法仅仅为模型添加了额外的mask buffer,并没有实际上启用sparse MMA.
参数列表:
model The modelmask_calculator Either callable that computes mask given a tensor OR pattern string for sparse mask lib.verbosity Integer controling verbosity level.0 -> Only errors.1 -> Errors and warnings.2 -> Errors, warnings and info.3 -> Errors, warnings, info and debug.whitelist Module types approved for sparsity.allowed_layer_names If not None, only layer names that appear in this list are considered for sparsity.disallowed_layer_names If not [], only layer names that do not appear in this list are considered for sparsity.allow_recompute_mask If True, stores pruned values so that dense weights can be restored.Pruned weights are stored in CPU memory, hence this option does not increase GPU memory usage.custom_layer_dict Dictionary of additional layer paremeters to sparsify. e.g. {CustomLinear: ['weight']}allow_permutation If True, allow the input channel permutation to ease the influence of weight pruning.
init_model_for_pruning方法主要做了这样几件事情:
- 使用传入的参数对静态类ASP进行初始化,以便后续的处理
cls.__model = model
cls.__verbosity = verbosity
cls.__allow_permutation = allow_permutation
- 设置了一个函数指针,用来为特定的tensor生成sparse mask。
if isinstance(mask_calculator, str):def create_mask_from_pattern(param):return create_mask(param, mask_calculator).bool()cls.__calculate_mask = create_mask_from_pattern
else:cls.__calculate_mask = mask_calculator #user defined function""" returns a sparse mask """
def create_mask(tensor, pattern="m4n2_1d", density=0.5):# Reshape tensor and mask.shape = tensor.shapettype = tensor.type()t = tensor.float().contiguous()# 1d-tensorif len(shape) == 1:t = t.view(1, shape[0])func = getattr(sys.modules[__name__], pattern, None)mask = func(t, density)return mask.view(shape).type(ttype)# 2d-tensor (K, C)elif len(shape) == 2:# lineart = t.view(shape[0], shape[1])func = getattr(sys.modules[__name__], pattern, None)mask = func(t, density)return mask.view(shape).type(ttype)# 3d-tensor (K, C, R)elif len(shape) == 3:# 1d convst = t.permute(0,2,1).contiguous().view(shape[0]*shape[2], shape[1])func = getattr(sys.modules[__name__], pattern, None)mask = func(t, density)mask = mask.view(shape[0], shape[2], shape[1]).permute(0,2,1).contiguous() return mask.view(shape).type(ttype)# 4d-tensor (K, C, R, S)elif len(shape) == 4:"""# transformers (bmm)t = t.view(shape[0]*shape[1]*shape[2], shape[3])func = getattr(sys.modules[__name__], pattern, None)mask = func(t, density)return mask.view(shape).type(ttype)"""# 2d convst = t.permute(2,3,0,1).contiguous().view(shape[2]*shape[3]*shape[0], shape[1])func = getattr(sys.modules[__name__], pattern, None)mask = func(t, density)mask = mask.view(shape[2], shape[3], shape[0], shape[1]).permute(2,3,0,1).contiguous() return mask.view(shape).type(ttype)def m4n2_1d(mat, density):return mn_1d_best(mat, 4, 2)def mn_1d_best(matrix, m, n):# Find all possible patterns.patterns = compute_valid_1d_patterns(m,n).cuda()# Find the best m:n pattern (sum of non-masked weights).mask = torch.cuda.IntTensor(matrix.shape).fill_(1).view(-1,m)mat,shape = reshape_1d(matrix,m)pmax = torch.argmax(torch.matmul(mat.abs(),patterns.t()), dim=1)mask[:] = patterns[pmax[:]]mask = mask.view(matrix.shape)return mask- 遍历模型中每一层的权重,为特定层的特定权重申请buffer并将权重加入
__sparse_parameters中,用于后续mask的计算。
那么,如何确定到底为哪些层的哪些权重来申请buffer、生成mask呢?
init_model_for_pruning方法首先会根据是否导入了torchvision、以及torchvision的版本来确定一个sparse_parameter_list,其实际是以一个字典的形式记录着目前所支持的被稀疏的模块以及对应的参数:
torchvision_imported=True
try:import torchvision
except ImportError:print("[ASP][Warning] torchvision cannot be imported.")torchvision_imported=Falseif torchvision_imported:print("[ASP] torchvision is imported, can work with the MaskRCNN/KeypointRCNN from torchvision.")torchvision_version = str(torchvision.__version__)torchvision_version_major = int(torchvision_version.split('.')[0])torchvision_version_minor = int(torchvision_version.split('.')[1])if torchvision_version_major == 0 and torchvision_version_minor < 12:sparse_parameter_list = {torch.nn.Linear: ['weight'], torch.nn.Conv1d: ['weight'], torch.nn.Conv2d: ['weight'], torch.nn.Conv3d: ['weight'], torch.nn.modules.linear.NonDynamicallyQuantizableLinear: ['weight'], torch.nn.MultiheadAttention: ['q_proj_weight', 'k_proj_weight', 'v_proj_weight', 'in_proj_weight'], torchvision.ops.misc.Conv2d: ['weight']}else: # Torchvision remove APIs that were deprecated before 0.8 (#5386) in 0.12.0, torchvision.ops.misc.Conv2d is removedsparse_parameter_list = {torch.nn.Linear: ['weight'], torch.nn.Conv1d: ['weight'], torch.nn.Conv2d: ['weight'], torch.nn.Conv3d: ['weight'], torch.nn.modules.linear.NonDynamicallyQuantizableLinear: ['weight'], torch.nn.MultiheadAttention: ['q_proj_weight', 'k_proj_weight', 'v_proj_weight', 'in_proj_weight']}else:sparse_parameter_list = {torch.nn.Linear: ['weight'], torch.nn.Conv1d: ['weight'], torch.nn.Conv2d: ['weight'], torch.nn.Conv3d: ['weight'], torch.nn.modules.linear.NonDynamicallyQuantizableLinear: ['weight'], torch.nn.MultiheadAttention: ['q_proj_weight', 'k_proj_weight', 'v_proj_weight', 'in_proj_weight']}除此之外,init_model_for_pruning方法还会根据传入的custom_layer_dict, whitelist, allowed_layer_names, disallowed_layer_names等参数来最终确定到底需要为当前模型中具体哪个模块的哪个参数进行稀疏化。除此之外,还会检查这些参数的shape是否符合要求,如果不符合要求会跳过该参数,不做稀疏。
接下来,init_model_for_pruning方法会为符合要求的参数创建一个buffer,命名为xxx_mma_mask,如果allow_recompute_mask=True,那么还会为参数创建一个额外的buffer,名为xxx_mma_pruned_p。
最后,init_model_for_pruning方法会将所有符合条件的参数的相关信息加入__sparse_parameters中
关于permutation search的部分暂且不提。
# 找到需要稀疏化且支持进行稀疏化的模块
def eligible_modules(model, whitelist_layer_types, allowed_layer_names, disallowed_layer_names):eligible_modules_list = []for name, mod in model.named_modules():if isinstance(mod, whitelist_layer_types) and name not in disallowed_layer_names:if allowed_layer_names is not None and name not in allowed_layer_names:continueeligible_modules_list.append((name, mod))return eligible_modules_list# 对需要且支持进行稀疏化的模块进行处理
for name, sparse_module in eligible_modules(model, tuple(whitelist), allowed_layer_names, disallowed_layer_names):add_sparse_attributes(name, sparse_module)# 对每个模块中的支持的参数类型进行处理
def add_sparse_attributes(module_name, module):sparse_parameters = sparse_parameter_list[type(module)]for p_name, p in module.named_parameters():if p_name in sparse_parameters and p.requires_grad:# check for NVIDIA's TC compatibility: we check along the horizontal directionif p.dtype == torch.float32 and ((p.size()[0] % 8) != 0 or (p.size()[1] % 16) != 0): #User defines FP32 and APEX internally uses FP16 mathcontinueif p.dtype == torch.float16 and ((p.size()[0] % 8) != 0 or (p.size()[1] % 16) != 0): #For Conv2d dim= K x CRS; we prune along Ccontinuep = p.t().contiguous()print("---------------{}", p.shape)model.state_dict[p_name] = p mask = torch.ones_like(p).bool()buffname = p_name.split(".")[-1] # buffer names cannot contain "."module.register_buffer('__%s_mma_mask' % buffname, mask)# 如果需要多次计算mask,那么需要将模型中被剪枝的参数保存下来,方便重新计算mask的时候使用# 因此需要额外申请一个用于存储原始数据的Buffer,以xxx_mma_pruned_p来命名if allow_recompute_mask:pruned = torch.zeros_like(p).cpu()module.register_buffer('__%s_mma_pruned_p' % buffname, pruned)else:pruned = Nonecls.__sparse_parameters.append((module_name, module, p_name, p, mask, pruned))else:continueif allow_permutation:......
- init_optimizer_for_pruning
Call this method to monkey patch optimizer step function so that masks can be applied to gradients and weights during training.
You must call init_model_for_pruning(…) before calling init_optimizer_for_pruning(…)
官方给出的注释中,说明了两点:
首先,init_optimizer_for_pruning方法的作用是在训练时让mask参与梯度和权重的计算。
其次,强调调用init_optimizer_for_pruning前必须调用init_optimizer_for_pruning方法。
接下来是源代码:
@classmethoddef init_optimizer_for_pruning(cls, optimizer):assert (cls.__optimizer is None), "ASP has initialized optimizer already."assert (cls.__calculate_mask is not None), "Called ASP.init_optimizer_for_pruning before ASP.init_model_for_pruning."# store pointer to original optimizer step methodcls.__optimizer = optimizercls.__optimizer.__step = optimizer.stepdef __step(opt_self, *args, **kwargs):# prune gradients before step methodwith torch.no_grad():for module_name, module, p_name, p, mask, pruned in cls.__sparse_parameters:if p.grad is not None: #thx pjuddp.grad.mul_(mask)# call original optimizer step methodrval = opt_self.__step(*args, **kwargs)# prune parameters after step methodwith torch.no_grad():for module_name, module, p_name, p, mask, pruned in cls.__sparse_parameters:p.mul_(mask)return rvalcls.__optimizer.step = types.MethodType(__step, cls.__optimizer)
init_optimizer_for_pruning方法主要通过对原来的optimizer的step方法进行重写,从而实现在optimizer每次执行step方法前后对梯度和权重进行剪枝。
首先ASP先将__optimier指向原始的optimizer,由于Python对复杂对象的赋值操作其实相当于是为optimizer建立了一个新的引用 ,二者指向同一个对象。
同时又为__optimizer创建了一个名为__step的引用,指向optimizer的step方法。
紧接着,init_optimizer_for_pruning方法定义了一个内部方法__step,该方法调用了原来optimizer的step方法,并在调用前后分别对__sparse_parameters中的梯度和参数进行剪枝。
最后,将新定义的__step方法绑定给__optimizer,并让optimizer的step方法指向它,实现optimizer的step方法的重写
为了方便理解,内存模型画了一个示意图:

- compute_sparse_masks
做完了准备工作,下面才是真正enable sparsity特性的时候。
为了方便阅读,删掉了打印提示信息的部分代码
@classmethod
def compute_sparse_masks(cls):"""Call this method to enable sparsity.If init(...) was called with allow_recompute_mask=False AND sparsity is disabled, pruned field can be None."""with torch.no_grad():if cls.__allow_permutation:......for module_name, module, p_name, p, mask, pruned in cls.__sparse_parameters:# mask在init_model_pruning中初始化为ones_like(p)# 如果mask.sum() < mask.numel(),则代表mask和p是稀疏的,之前已经enable 过sparsity特性了,现在是再次调用compute_mask方法if mask.sum() < mask.numel(): # when recalculating masks# restore dense parameter if allow_recompute_mask is enabled# allow_recompute_mask=True : pruned = zeros_like(p)# allow_recompute_mask=False: pruned = Noneassert (pruned is not None), "Unable to restore dense parameter because allow_recompute_mask == False"p.add_(pruned.cuda())mask.set_(cls.__calculate_mask(p))if pruned is not None: # stow away pruned weights to cpupruned.set_((p * (~mask)).cpu())p.mul_(mask) # in-place multiplication, so pruned weights are 0-values, hence checkpoint will have 0s for pruned weights
跳过permutation search的部分,compute_sparse_masks方法先通过ask.sum() < mask.numel()?判断之前是否计算过mask的值,从而判断之前是否已经对模型进行过剪枝。如果之前已经进行过剪枝,则需要先从pruned中将之前保存的完整参数进行恢复。随后调用init_model_for_pruning方法中设置好的函数指针
.__calculate_mask为每个参数计算sparse mask,并将其乘上对应的参数,从而实现对参数的剪枝。
相关文章:
英伟达结构化剪枝工具Nvidia Apex Automatic Sparsity [ASP](2)——代码分析
伟达结构化剪枝工具Nvidia Apex Automatic Sparsity [ASP](2)——代码分析 ASP整个模块的结果如下: . ├── COPYRIGHT ├── README.md ├── __init__.py ├── asp.py ├── permutation_lib.py ├── permutation_search_kernels…...

FileNotFoundError: [WinError 2] 系统找不到指定的文件。
pyspark demo程序创建spark上下文 完整报错如下: sc SparkContext(“local”, “Partition ID Example”) File “C:\ProgramData\anaconda3\envs\python36\lib\site-packages\pyspark\context.py”, line 133, in init SparkContext._ensure_initialized(self, ga…...

Linux: sysctl:net: IPV4_DEVCONF_ALL ignore_routes_with_linkdown; all vs default
文章目录 简介实例 ignore_routes_with_linkdownlinkdown 的引入dead的引入简介 一般下边这种类型的配置都有三种类型选项:all,default,specific net.ipv6.conf.acc.ignore_routes_with_linkdown = 0 net.ipv6.conf.all.ignore_routes_with_linkdown = 0 net.ipv6.conf.def…...

光耦继电器:实现电气隔离的卓越选择
光耦继电器是一种常用的电子元件,用于实现电气隔离和信号传输。在工业控制、自动化系统和电力电子等领域,光耦继电器具有独特的特点和优势。本文将从可靠性、隔离性、响应速度和适应性等方面对光耦继电器的特点进行概述。 光耦继电器是一种典型的固态继电…...

鸿蒙开发学习笔记2——实现页面之间跳转
鸿蒙开发学习笔记2——实现页面之间跳转 问题背景 上篇文章中,介绍了鸿蒙开发如何新建一个项目跑通hello world,本文将介绍在新建的项目中实现页面跳转的功能。 问题分析 ArkTS工程目录结构(FA模型) 各目录和路径的介绍如下…...

电子商务类网站需要什么配置的服务器?
随着电子商务的迅猛发展,越来越多的企业和创业者选择在互联网上开设自己的电商网站。为了确保电商网站能够高效运行,给用户提供良好的体验,选择合适的服务器配置至关重要。今天飞飞将和你分享电子商务类网站所需的服务器配置,希望…...
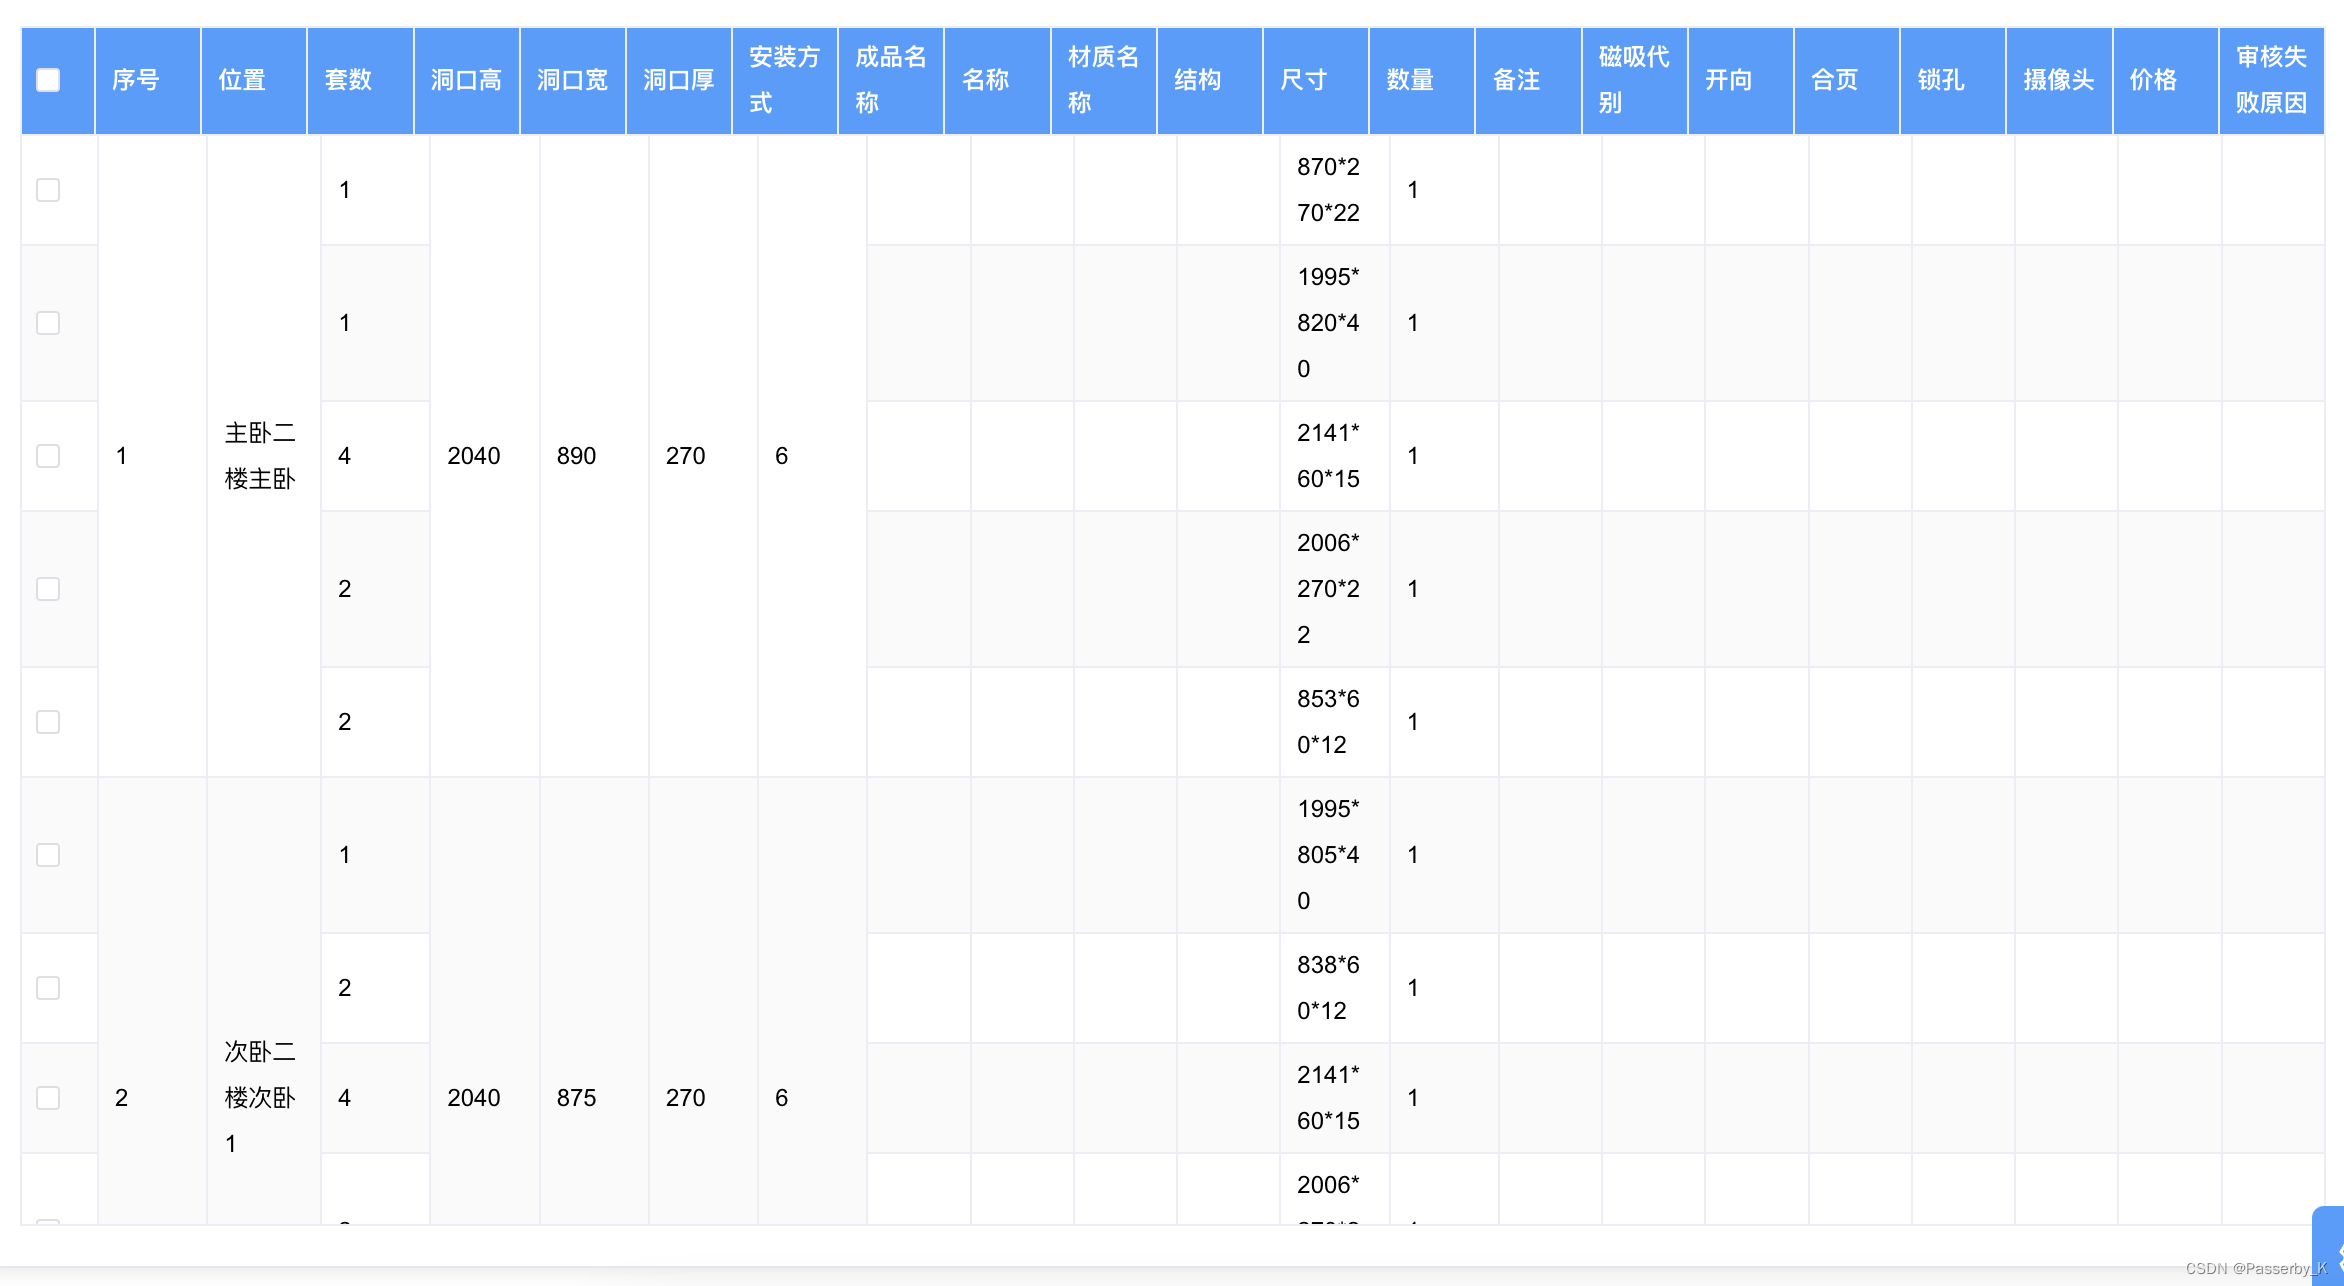
table 根据窗口缩放,自适应
element-plus中,直接应用在页面样式上, ::v-deep .el-table{width: 100%; } ::v-deep .el-table__header-wrapper table,::v-deep .el-table__body-wrapper table{width: 100% !important; } ::v-deep .el-table__body,::v-deep .el-table__footer,::v-d…...
应急响应-Webshell
文章目录 一、Webshell概述什么是WebshellWebshell分类基于编程语言基于文件大小/提供的功能多少 Webshell 检测方法 二、常规处置方法三、技术指南1、初步预判2、 Webshell排查3、Web日志分析(查找攻击路径及失陷原因)4、系统排查4.1 Windows4.2 Linux …...
【调整奇数偶数顺序】
调整奇数偶数顺序 1.题目 输入一个整数数组,实现一个函数, 来调整该数组中数字的顺序使得数组中所有的奇数位于数组的前半部分, 所有偶数位于数组的后半部分。 2.题目分析 这道题首先用到的方法是冒泡排序的思想,首先通过冒泡排序…...
系统临时IP以及静态IP配置(关闭、启动网卡等操作))
Linux(Ubuntu)系统临时IP以及静态IP配置(关闭、启动网卡等操作)
1 Ubuntu临时IP设置2 Ubuntu静态IP设置3 多个网卡IP设置4 关闭、启动网卡前提是Linux下的网络桥接不能用,不能通过识别网卡来添加IP地址,只能通过静态写死的方式去设置IP 对于CentOS版本下的静态IP的配置可以参考这篇 Linux系统静态IP配置(CentOS) 1 Ubuntu临时IP设置 Li…...

2023-08-11 LeetCode每日一题(矩阵对角线元素的和)
2023-08-11每日一题 一、题目编号 1572. 矩阵对角线元素的和二、题目链接 点击跳转到题目位置 三、题目描述 给你一个正方形矩阵 mat,请你返回矩阵对角线元素的和。 请你返回在矩阵主对角线上的元素和副对角线上且不在主对角线上元素的和。 示例 1࿱…...

Github 80 个键盘快捷键和一些搜索技巧的备忘清单
文章目录 键盘快捷键站点范围的快捷方式资料库源代码编辑源码浏览注释问题和拉取请求列表问题和拉取请求拉取请求的变化项目板通知网络图 搜索技巧范围搜索文件路径完全符合布尔运算符基于仓库的条件基于 issue 的条件基于用户的条件 参考网址 键盘快捷键 站点范围的快捷方式 …...
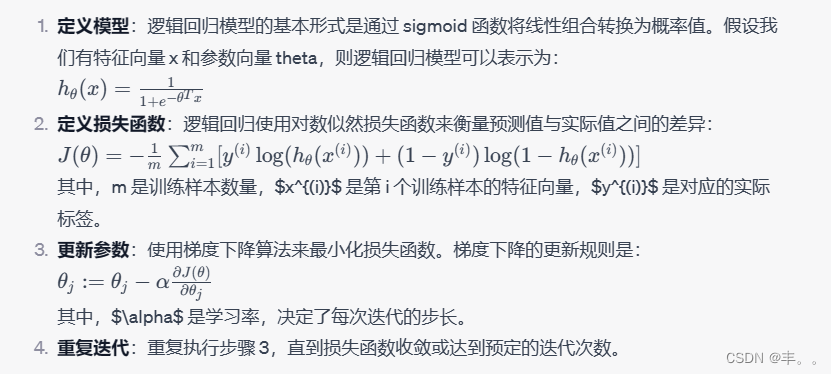
神经网络基础-神经网络补充概念-08-逻辑回归中的梯度下降算法
概念 逻辑回归是一种用于分类问题的机器学习算法,而梯度下降是优化算法,用于更新模型参数以最小化损失函数。在逻辑回归中,我们使用梯度下降算法来找到最优的模型参数,使得逻辑回归模型能够更好地拟合训练数据。 逻辑回归中的梯…...

npm ERR! cb.apply is not a function
当NPM版本过低导致 npm ERR! cb.apply is not a function 1. win r 打开运行,输入%appdata% 2. 删除 npm 和 npm-cache 文件夹 3. 执行npm cache clean --force命令 如果还不行,就执行卸载Node.js重新安装。...
iShot Pro for Mac 2.3.9最新中文版
iShot Pro是一款非常优秀的Mac截图软件,软件非常易于操作,主页面还设置了学习教程,可以轻松玩转软件所有功能,并且功能非常强大,不仅可以实现多种截图方式,还可以进行标注、贴图、取色、录屏、录音、OCR识别…...
FiboSearch Pro – Ajax Search for WooCommerce 商城AJAX实时搜索插件
FiboSearch Pro是最受欢迎的WooCommerce 产品搜索插件。它为您的用户提供精心设计的高级 AJAX 搜索栏,并提供实时搜索建议。默认情况下,WooCommerce 提供非常简单的搜索解决方案,没有实时产品搜索,甚至没有 SKU 搜索。FiboSearch&…...
k8s dns 解析service异常
查看kube-dns日志 for p in $(kubectl get pods --namespacekube-system -l k8s-appkube-dns -o name); \ do kubectl logs --namespacekube-system $p; done k8s教程(service篇)-总结_阿甘兄的技术博客_51CTO博客...

P6464 [传智杯 #2 决赛] 传送门
[P6464 传智杯 #2 决赛] 传送门 - 洛谷 | 计算机科学教育新生态 (luogu.com.cn) 问题描述:增加一个传送门,求最小的任意点对间距离和最小值。 思路: n很小,100左右。又要求各个点对之间的距离,dijkstra、spfa不行…...

如何通过CSS选择器选择一个元素的子元素?如何选择第一个子元素和最后一个子元素?
聚沙成塔每天进步一点点 ⭐ 专栏简介⭐ 选择一个元素的子元素⭐ 选择第一个子元素和最后一个子元素⭐ 注意事项⭐ 写在最后 ⭐ 专栏简介 前端入门之旅:探索Web开发的奇妙世界 记得点击上方或者右侧链接订阅本专栏哦 几何带你启航前端之旅 欢迎来到前端入门之旅&…...
---串口通信(语音识别)控制线程封装)
智能家居(2)---串口通信(语音识别)控制线程封装
封装语音线程(语音通过串口和主控设备进行交流)实现对智能家居中各种灯光的控制 mainPro.c(主函数) #include <stdio.h> #include "controlDevice.h" #include "inputCommand.h" #include <pthread.h>struct Devices …...

【Java后端开发】花了2k+多的人民币,烧了几十亿Token,慢慢整理出来适用于Java开发人员的codex配置,还在持续优化中
📕我是廖志伟,一名Java开发工程师、《Java项目实战——深入理解大型互联网企业通用技术》(基础篇)、(进阶篇)、《解密程序员的思维密码——沟通、演讲、思考的实践》作者、清华大学出版社签约作家、Java领域…...

解锁 Codex 逆向能力!一键部署 JS 逆向全能 Skill
让 Codex 默认支持 JS 逆向 Codex GPT-5.4 默认对逆向和爬虫类请求比较保守,常见表现是只讲原则,不继续落地。市面上的常规做法是先发提示词,我这边因为每次重复发送比较麻烦,所以进一步封装成了 Skill,实际验证可行。…...

毕业论文神器!2026年必备AI论文软件榜单,免费版也能写合规初稿
2026 年实测 10 款主流 AI 论文工具,千笔AI以全流程覆盖 语义级降重 免费查重领跑综合榜;ThouPen 稳坐留学生毕业全流程工具头把交椅;免费工具中DeepSeek Scholar、豆包学术版表现亮眼,30 分钟即可生成万字高质量初稿࿰…...

ScriptHookV解决方案:如何安全扩展GTA V游戏功能而不修改原始文件
ScriptHookV解决方案:如何安全扩展GTA V游戏功能而不修改原始文件 【免费下载链接】ScriptHookV An open source hook into GTAV for loading offline mods 项目地址: https://gitcode.com/gh_mirrors/sc/ScriptHookV ScriptHookV是一个专为《侠盗猎车手V》&…...

3分钟解决网易云音乐格式限制:免费NCM转换工具完全指南
3分钟解决网易云音乐格式限制:免费NCM转换工具完全指南 【免费下载链接】ncmdump 项目地址: https://gitcode.com/gh_mirrors/ncmd/ncmdump 你是否曾因网易云音乐下载的NCM格式文件无法在车载音响或普通播放器中播放而烦恼?今天,我将…...

降AI率天花板!AI率92%暴降至5%!实测10款降AIGC平台!免费额度狂薅攻略
2026 年各大高校和期刊平台的 AI 检测系统又升级了,知网 AIGC、维普 AI、万方智能检测三大平台的算法迭代速度越来越快,上个月能蒙混过关的改写方式,这个月直接就会被标红预警。单纯的同义词替换、语序调整早就不管用了,想要有效降…...

机器学习真实难点:知识断裂、工具混沌与数据偏差
1. 这不是一份职业指南,而是一份“入行前必读的清醒剂”“Why it’s Super Hard to be an ML Researcher or Developer?”——这个标题我第一次看到时,正坐在凌晨两点的实验室里,盯着第17版模型在验证集上掉点0.3%的结果发呆。旁边三台GPU服…...

DeepSeek技术搜索RAG Pipeline重构实录:从模糊匹配到精准意图识别的6次AB测试数据全公开
更多请点击: https://kaifayun.com 第一章:DeepSeek技术搜索RAG Pipeline重构实录:从模糊匹配到精准意图识别的6次AB测试数据全公开 在DeepSeek内部技术文档搜索系统升级中,我们对原有RAG Pipeline进行了深度重构,核心…...

AI能力认知地图:从工具体验到工程落地的系统化拆解
1. 项目概述:这不是一份“AI工具清单”,而是一份可复用的AI能力认知地图你点开这篇文章,大概率不是为了收藏十个网站链接——而是想搞清楚:当AI能力已经像水电一样开始渗入日常工具链时,一个真实从业者该如何判断哪些能…...

用Delphi 7打造动物农场小游戏:一场编程与数据结构的趣味之旅
文章来自:用Delphi 7打造动物农场小游戏:一场编程与数据结构的趣味之旅 当经典的Pascal语言遇上可爱的动物农场,会擦出怎样的火花? 前言 还记得第一次接触编程时的兴奋吗?当你敲下第一行代码,看到"He…...