Android 蓝牙开发( 二 )
前言
上一篇文章给大家分享了Android蓝牙的基础知识和基础用法,不过上一篇都是一些零散碎片化的程序,这一篇给大家分享Android蓝牙开发实战项目的初步使用
效果演示 :
Android蓝牙搜索,配对,连接,通信
Android蓝牙实战开发步骤
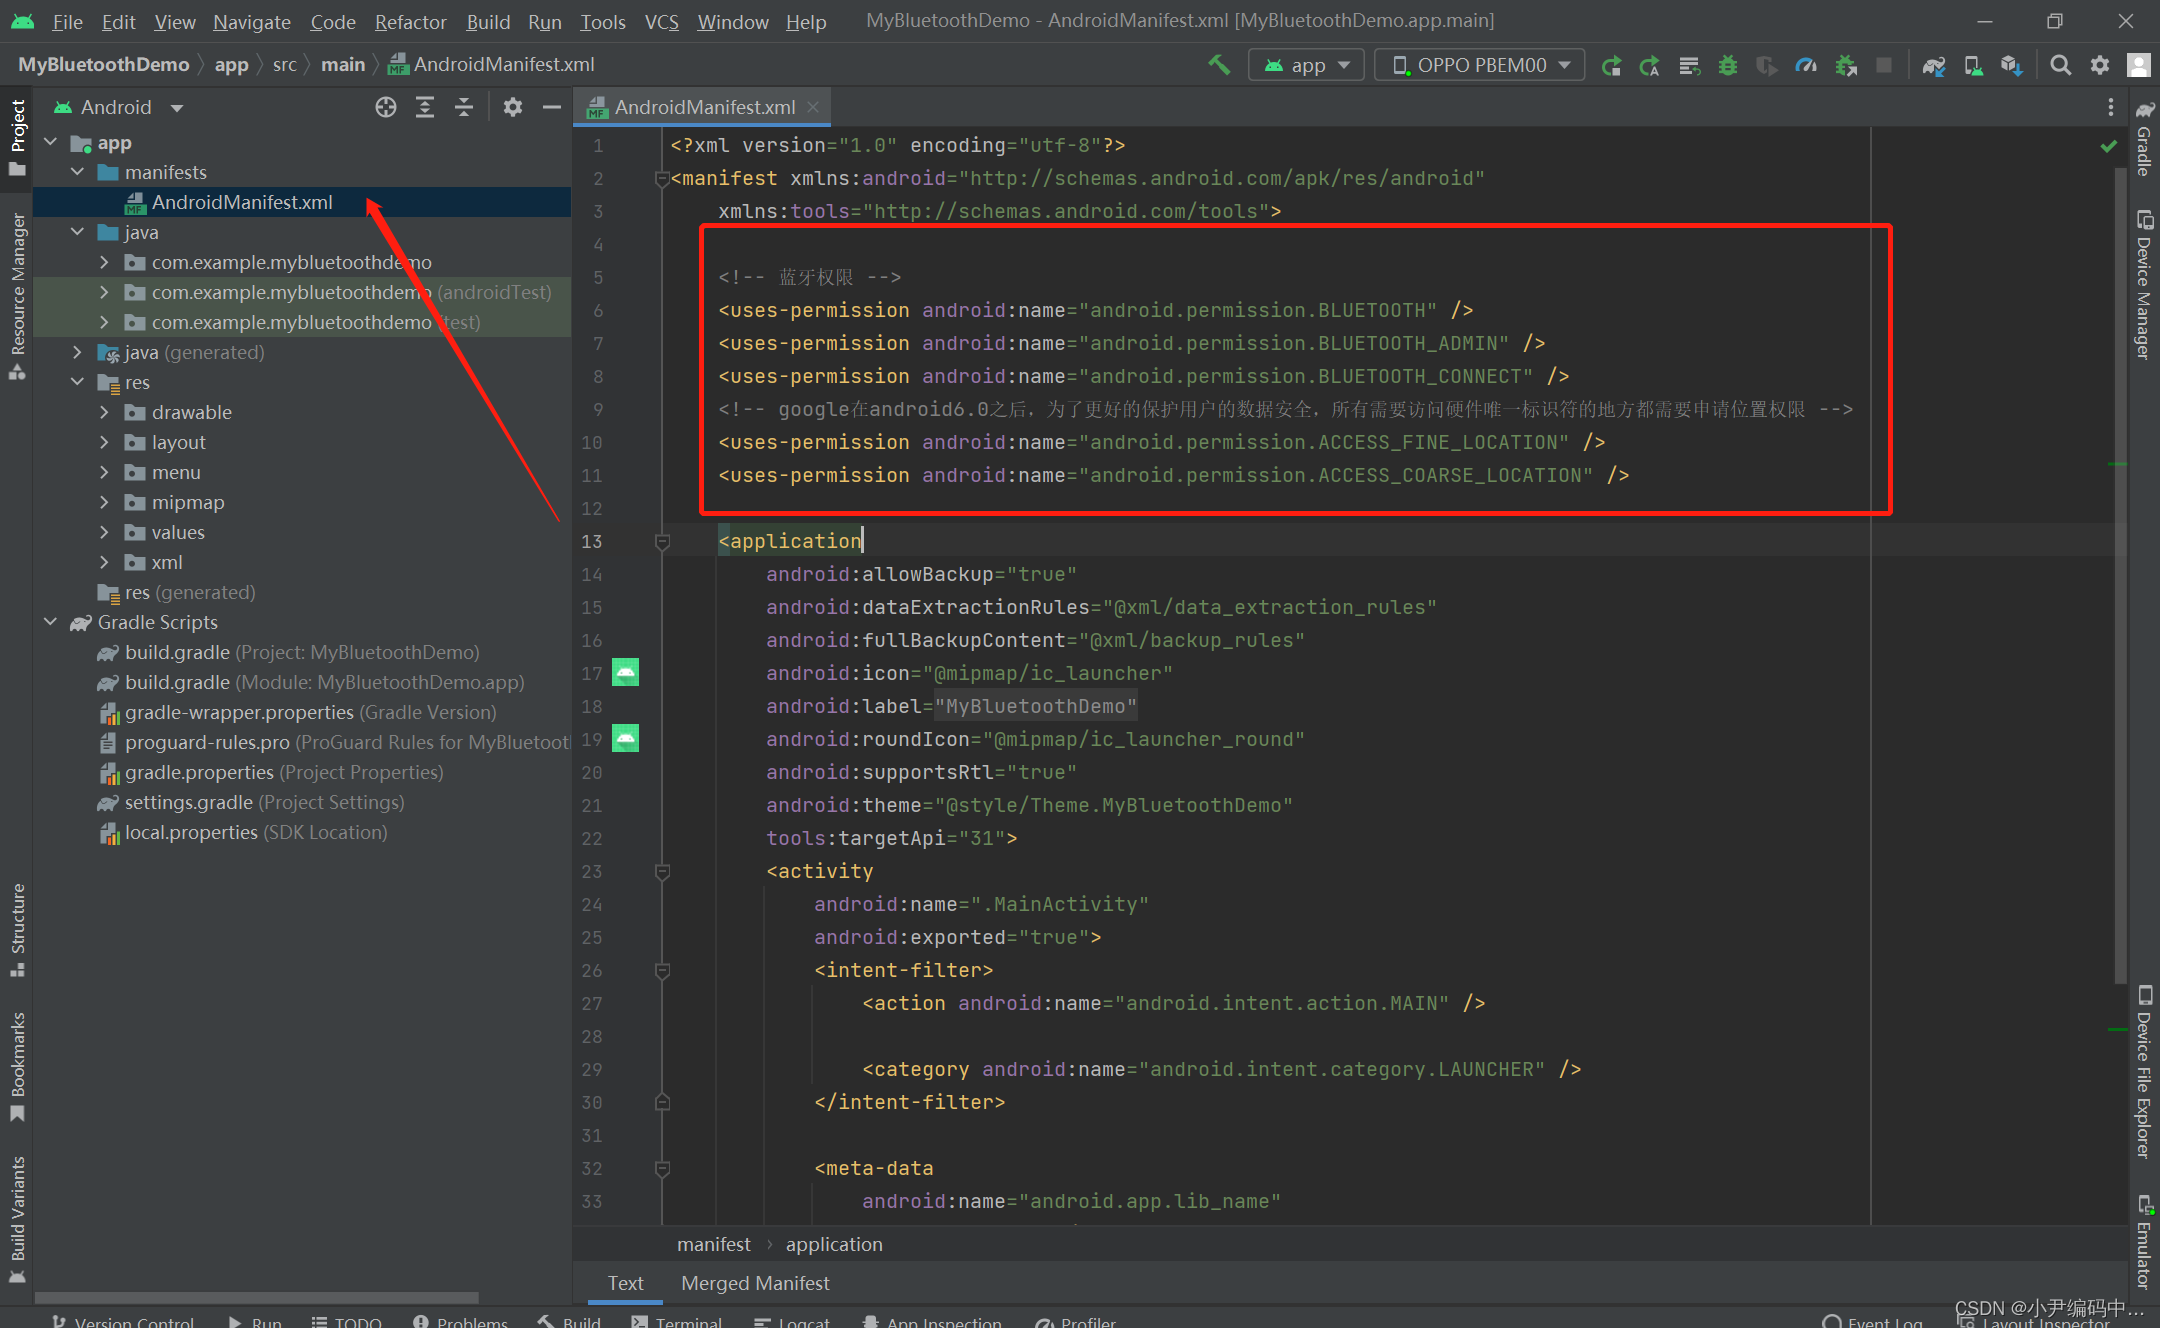
1.新建Android项目添加蓝牙权限
下图所示:MyBluetoothDemo为刚刚创建的Android空项目,我们现在清单文件中把我们需要用到的权限声明一下,其中定位权限还需要做动态申请
2.封装BluetoothAdapter类
BluetoothAdapter类提供了常用的蓝牙API,我这里创建了一个BlueToothController类,小编这里是先将这些API封装到了一个BlueToothController类中,方便后续使用和操作
package com.example.mybluetoothdemo;import android.annotation.SuppressLint;
import android.app.Activity;
import android.bluetooth.BluetoothAdapter;
import android.bluetooth.BluetoothDevice;
import android.bluetooth.BluetoothSocket;
import android.content.Context;
import android.content.Intent;import java.util.ArrayList;
import java.util.List;public class BlueToothController {private BluetoothAdapter mBluetoothAdapter;public BlueToothController(){//初始化蓝牙适配器mBluetoothAdapter = BluetoothAdapter.getDefaultAdapter();}public BluetoothAdapter getBluetoothAdapter() {return mBluetoothAdapter;}/*** 检查设备是否支持蓝牙*/public boolean isBluetoothSupport(){if(mBluetoothAdapter == null){return false;}else {return true;}}/*** 检查该设备蓝牙是否开启*/public boolean isBluetoothEnabled(){if(mBluetoothAdapter.isEnabled()){return true;}else {return false;}}/*** 打开蓝牙*/@SuppressLint("MissingPermission")public void turnOnBlueTooth(Activity activity, int requestCode) {Intent intent = new Intent(BluetoothAdapter.ACTION_REQUEST_ENABLE);activity.startActivityForResult(intent, requestCode);}/*** 打开蓝牙可见性*/@SuppressLint("MissingPermission")public void enableVisibily(Context context){Intent intent = new Intent(BluetoothAdapter.ACTION_REQUEST_DISCOVERABLE);intent.putExtra(BluetoothAdapter.EXTRA_DISCOVERABLE_DURATION,300);context.startActivity(intent);}/*** 停止查找设备*/@SuppressLint("MissingPermission")public void cancelFindDevice(){mBluetoothAdapter.cancelDiscovery();}/*** 判断当前设备是否在查找蓝牙设备*/@SuppressLint("MissingPermission")public boolean isStartDiscovering(){if(mBluetoothAdapter.isDiscovering()){return true;}else {return false;}}/*** 判断当前设备是否未在查找蓝牙设备*/@SuppressLint("MissingPermission")public boolean isCancelDiscovering(){if(!mBluetoothAdapter.isDiscovering()){return true;}else {return false;}}/*** 查找设备*/@SuppressLint("MissingPermission")public void findDevice() {mBluetoothAdapter.startDiscovery();}/*** 获取已绑定设备*/@SuppressLint("MissingPermission")public List<BluetoothDevice> getBondedDeviceList(){return new ArrayList<>(mBluetoothAdapter.getBondedDevices());}/*** 判断蓝牙是否连接*/@SuppressLint("MissingPermission")public boolean isConnectBlue(BluetoothSocket bluetoothSocket){return bluetoothSocket !=null && bluetoothSocket.isConnected();}
}
3. 编写UI页面
activity_main.xml:这是我们MainActivity的UI,放置了一个ListView和一个按钮,ListView用来显示搜索到的蓝牙设备和已配对的蓝牙设备,Button控件用来与连接后的设备发送信息时使用
<?xml version="1.0" encoding="utf-8"?>
<RelativeLayout xmlns:android="http://schemas.android.com/apk/res/android"android:layout_width="match_parent"android:layout_height="match_parent"android:paddingLeft="16.dp"android:paddingRight="16.dp"android:paddingBottom="16.dp"><ListViewandroid:id="@+id/device_list"android:layout_width="match_parent"android:layout_height="match_parent"android:divider="#e90423"android:dividerHeight="1px"></ListView><Buttonandroid:id="@+id/btn_write_1"android:layout_width="wrap_content"android:layout_height="wrap_content"android:layout_alignParentRight="true"android:layout_alignParentBottom="true"android:text="发送消息"/></RelativeLayout>
既然有了ListView,那就一定有ListView的每条子元素UI,新建list_item.xml
list_item.xml: 用来显示ListView列表的子内容
<?xml version="1.0" encoding="utf-8"?>
<LinearLayout xmlns:android="http://schemas.android.com/apk/res/android"android:layout_width="match_parent"android:orientation="horizontal"android:layout_height="wrap_content"><LinearLayoutandroid:layout_width="match_parent"android:layout_height="match_parent"android:orientation="vertical"><TextView android:id="@+id/text1"android:layout_width="match_parent"android:layout_height="wrap_content"android:textStyle="bold"android:textSize="18sp"/><TextView android:id="@+id/text3"android:layout_width="match_parent"android:layout_height="wrap_content"android:textSize="13sp"/></LinearLayout></LinearLayout>
然后,我们再为页面右上角写一个menu列表按钮,新建menu_main.xml
menu_main.xml:
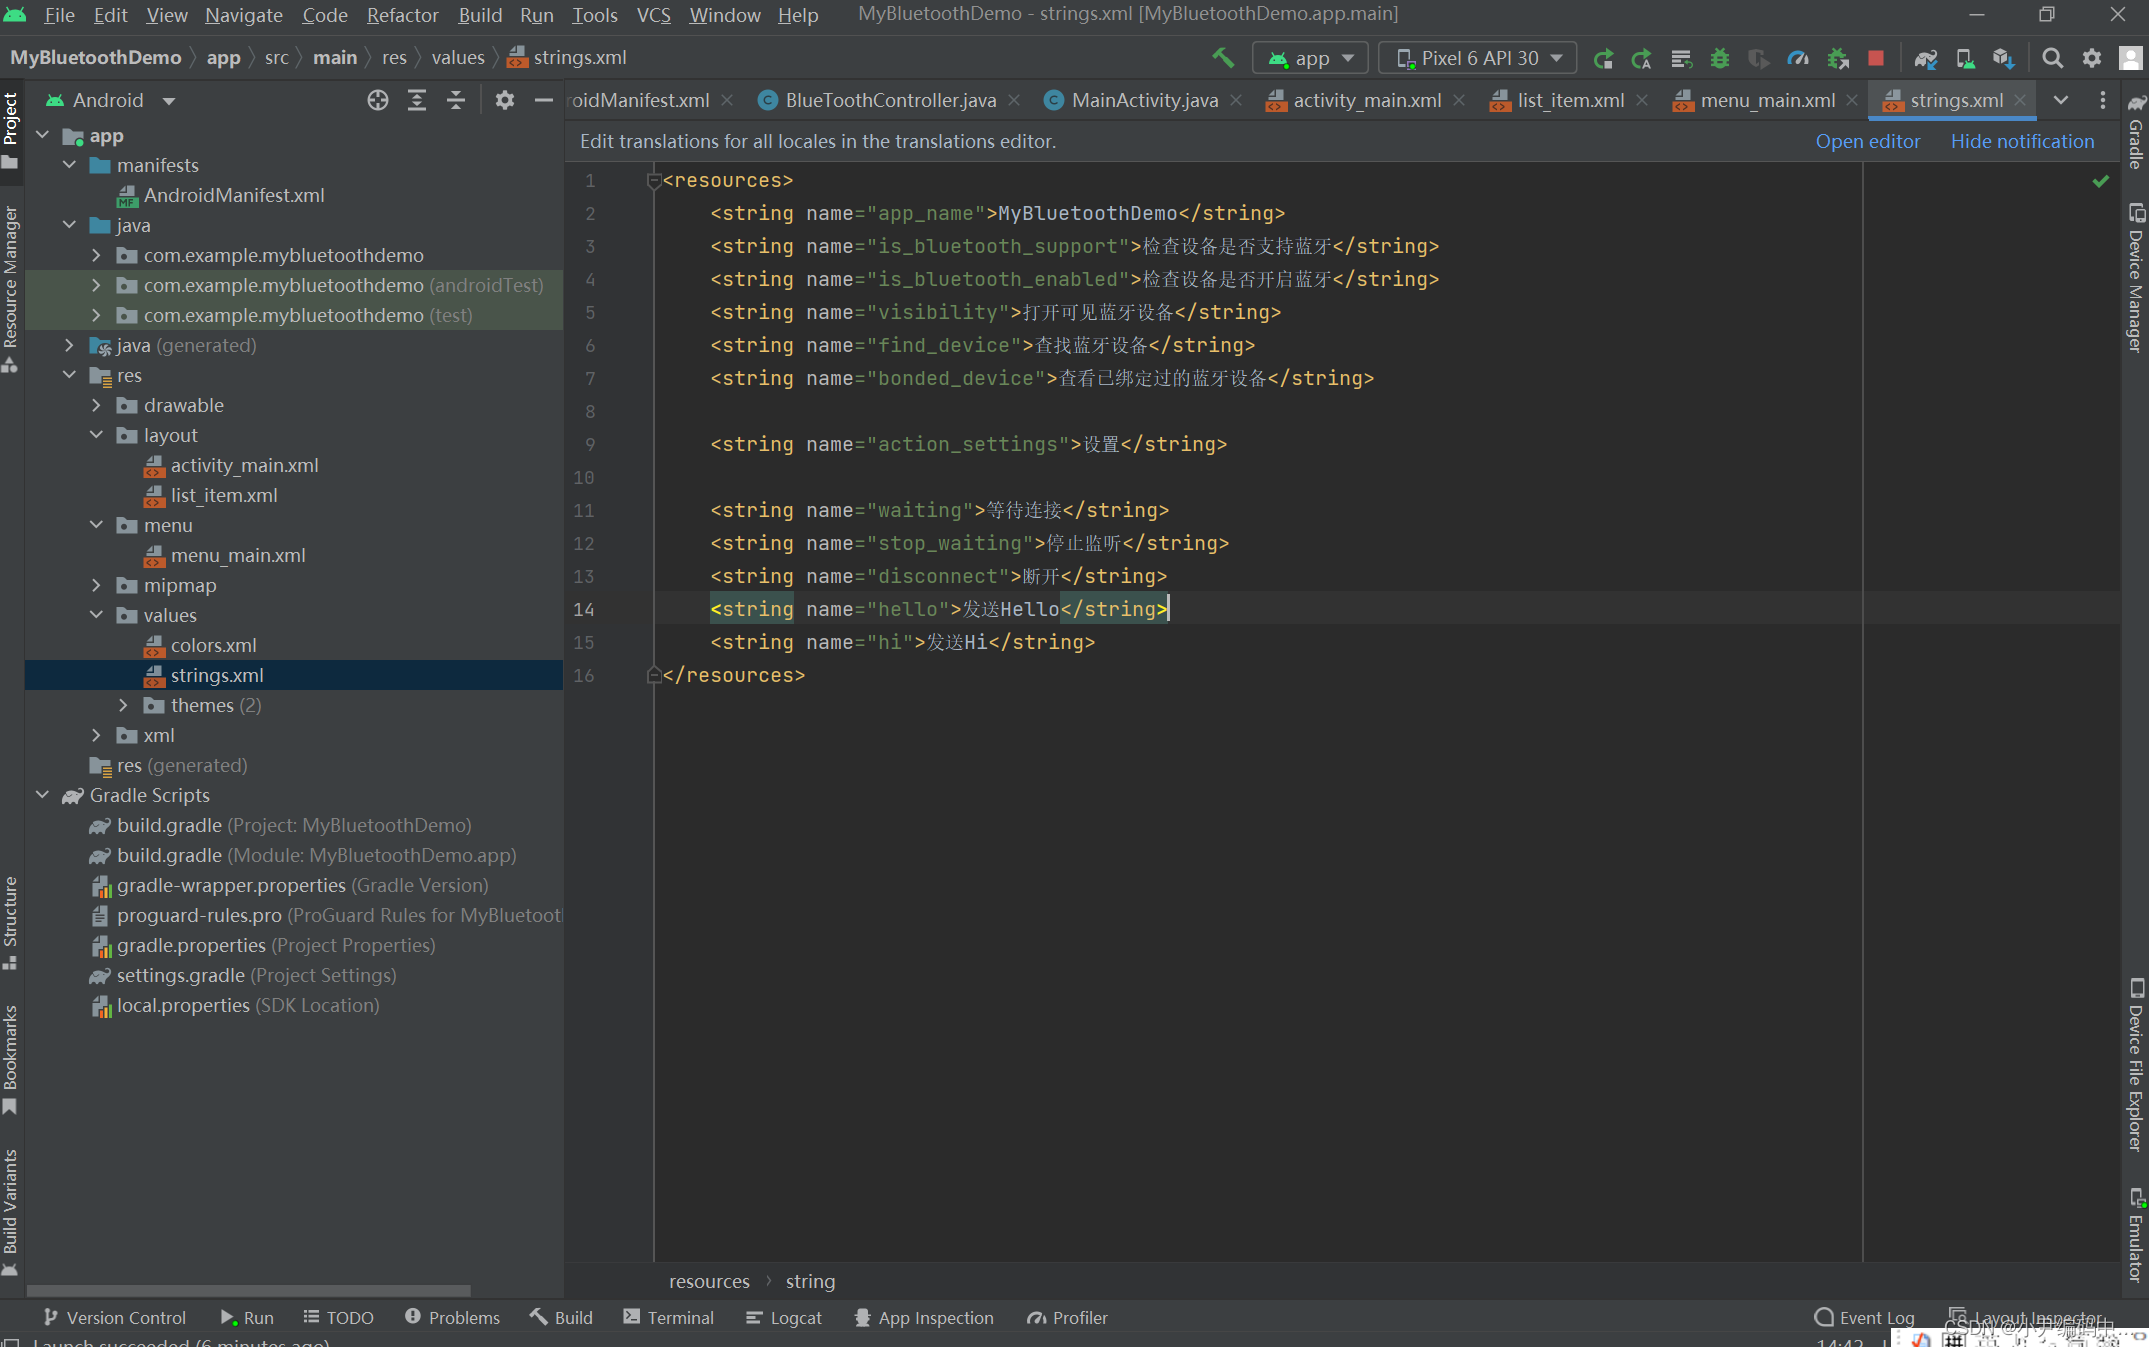
<menu xmlns:android="http://schemas.android.com/apk/res/android"xmlns:tools="http://schemas.android.com/tools"tools:context=".MainActivity" ><itemandroid:id="@+id/is_bluetooth_support"android:title="@string/is_bluetooth_support"android:orderInCategory="1" /><itemandroid:id="@+id/is_bluetooth_enabled"android:title="@string/is_bluetooth_enabled"android:orderInCategory="2" /><itemandroid:id="@+id/bonded_device"android:title="@string/bonded_device"android:orderInCategory="2" /><itemandroid:id="@+id/find_device"android:title="@string/find_device"android:orderInCategory="3" /></menu>最后,再为大家分享一下string.xml字符串配置信息
4. 蓝牙列表适配器
创建DeviceAdapter类,具体如下图所示:
package com.example.mybluetoothdemo;import android.annotation.SuppressLint;
import android.bluetooth.BluetoothDevice;
import android.content.Context;
import android.graphics.Color;
import android.view.LayoutInflater;
import android.view.View;
import android.view.ViewGroup;
import android.widget.BaseAdapter;
import android.widget.TextView;import java.util.List;public class DeviceAdapter extends BaseAdapter{private List<BluetoothDevice> mData;private Context mContext;public DeviceAdapter(List<BluetoothDevice> data, Context context){mData = data;mContext = context.getApplicationContext();}@Overridepublic int getCount() {return mData.size();}@Overridepublic Object getItem(int i) {return mData.get(i);}@Overridepublic long getItemId(int i) {return i;}@SuppressLint("MissingPermission")@Overridepublic View getView(int i, View view, ViewGroup viewGroup) {View itemView = view;//复用view,优化性能if(itemView == null){itemView = LayoutInflater.from(mContext).inflate(R.layout.list_item, viewGroup,false);}TextView text1 = itemView.findViewById(R.id.text1);TextView text2 = itemView.findViewById(R.id.text3);text1.setTextColor(Color.BLACK);text2.setTextColor(Color.BLACK);//获取对应的蓝牙设备BluetoothDevice device = (BluetoothDevice) getItem(i);//显示设备名称if(device.getName()==null){text1.setText("N/A");}else {text1.setText(device.getName());}//显示设备地址text2.setText(device.getAddress());return itemView;}//刷新列表,防止搜索结果重复出现public void refresh(List<BluetoothDevice> data){mData = data;notifyDataSetChanged();}}
5. 蓝牙搜索,配对,连接,通信
小编这里为了让大家方便,便将搜索,配对,连接都写在了MainActivity中了
package com.example.mybluetoothdemo;import androidx.annotation.NonNull;
import androidx.appcompat.app.AppCompatActivity;import android.Manifest;
import android.annotation.SuppressLint;
import android.bluetooth.BluetoothAdapter;
import android.bluetooth.BluetoothDevice;import android.bluetooth.BluetoothGatt;
import android.bluetooth.BluetoothGattCallback;
import android.bluetooth.BluetoothGattCharacteristic;
import android.bluetooth.BluetoothGattDescriptor;
import android.bluetooth.BluetoothGattService;
import android.bluetooth.BluetoothProfile;
import android.content.BroadcastReceiver;
import android.content.Context;
import android.content.Intent;
import android.content.IntentFilter;
import android.content.pm.PackageManager;
import android.os.Build;
import android.os.Bundle;
import android.util.Log;
import android.view.Menu;
import android.view.MenuItem;import android.view.View;
import android.widget.AdapterView;
import android.widget.ListView;
import android.widget.Toast;import java.util.ArrayList;
import java.util.List;
import java.util.UUID;public class MainActivity extends AppCompatActivity {private final String TAG = "yf";private BlueToothController blueToothController = new BlueToothController();private static final int REQUEST_ENABLE_BT = 1;private ListView listView;private DeviceAdapter blueToothDeviceAdapter,bondBlueToothDeviceAdapter;private List<BluetoothDevice> deviceList = new ArrayList<>();private List<BluetoothDevice> bondedDeviceList = new ArrayList<>();private BluetoothDevice device;private BluetoothGatt bluetoothGatt;@Overrideprotected void onCreate(Bundle savedInstanceState) {super.onCreate(savedInstanceState);setContentView(R.layout.activity_main);initUI();//判断是否有访问位置的权限,没有权限,直接申请位置权限isPermission();registerBluetoothReceiver();}@SuppressLint("MissingPermission")private void initUI(){listView = findViewById(R.id.device_list);blueToothDeviceAdapter = new DeviceAdapter(deviceList,this);bondBlueToothDeviceAdapter = new DeviceAdapter(bondedDeviceList,this);findViewById(R.id.btn_write_1).setOnClickListener(view -> {if (null == mWriter){Log.e("cx12345","ble:发送失败:null == writer !!!!");}else {mWriter.setValue(new byte[]{(byte)0x0c,(byte)0x11,(byte)0x09,(byte)0x41,(byte)0x23,(byte)0x00,(byte)0x01,(byte)0x03,(byte)0xFF});mGatt.writeCharacteristic(mWriter);}});}@Overridepublic boolean onCreateOptionsMenu(Menu menu) {getMenuInflater().inflate(R.menu.menu_main,menu);return true;}@SuppressLint("MissingPermission")@Overridepublic boolean onOptionsItemSelected(MenuItem item) {int id = item.getItemId();switch (id){case R.id.is_bluetooth_support:if (blueToothController.isBluetoothSupport()){Toast.makeText(MainActivity.this, "该设备支持蓝牙功能", Toast.LENGTH_SHORT).show();}else {Toast.makeText(MainActivity.this, "该设备不支持蓝牙功能", Toast.LENGTH_SHORT).show();}break;case R.id.is_bluetooth_enabled:if (blueToothController.isBluetoothEnabled()){Toast.makeText(MainActivity.this, "蓝牙已开启", Toast.LENGTH_SHORT).show();}else {blueToothController.turnOnBlueTooth(this,REQUEST_ENABLE_BT);}break;case R.id.bonded_device:setTitle("已配对的设备");bondedDeviceList = blueToothController.getBondedDeviceList();listView.setAdapter(bondBlueToothDeviceAdapter);bondBlueToothDeviceAdapter.refresh(bondedDeviceList);break;case R.id.find_device:setTitle("可用设备");if(blueToothController.isStartDiscovering()){blueToothController.cancelFindDevice();}blueToothController.findDevice();
//                blueToothController.getBluetoothAdapter().startLeScan(leScanCallback);listView.setAdapter(blueToothDeviceAdapter);blueToothDeviceAdapter.refresh(deviceList);listView.setOnItemClickListener(deviceBluetooth);break;default:break;}return super.onOptionsItemSelected(item);}private AdapterView.OnItemClickListener deviceBluetooth = new AdapterView.OnItemClickListener() {@SuppressLint("MissingPermission")public void onItemClick(AdapterView<?> adapterView, View view, int i, long l) {device = deviceList.get(i);if (Build.VERSION.SDK_INT >= Build.VERSION_CODES.KITKAT) {//蓝牙绑定
//                device.createBond();//Gatt协议连接蓝牙bluetoothGatt = device.connectGatt(MainActivity.this,true,mGattCallback);bluetoothGatt.connect();}}};//动态获取位置权限private void isPermission(){if ((checkSelfPermission(Manifest.permission.ACCESS_COARSE_LOCATION) != PackageManager.PERMISSION_GRANTED)|| (checkSelfPermission(Manifest.permission.ACCESS_FINE_LOCATION) != PackageManager.PERMISSION_GRANTED)) {requestPermissions(new String[]{Manifest.permission.ACCESS_COARSE_LOCATION, Manifest.permission.ACCESS_FINE_LOCATION}, 200);}}@SuppressLint("MissingPermission")@Overrideprotected void onDestroy() {super.onDestroy();// 停止设备搜索blueToothController.getBluetoothAdapter().cancelDiscovery();//注销广播unregisterReceiver(receiver);}private void registerBluetoothReceiver(){//filter注册广播接收器IntentFilter filter = new IntentFilter();//蓝牙当前状态filter.addAction(BluetoothAdapter.ACTION_STATE_CHANGED);//开始扫描蓝牙设备广播filter.addAction(BluetoothAdapter.ACTION_DISCOVERY_STARTED);//找到蓝牙设备广播filter.addAction(BluetoothDevice.ACTION_FOUND);//扫描蓝牙设备结束广播filter.addAction(BluetoothAdapter.ACTION_DISCOVERY_FINISHED);//蓝牙设备配对状态改变广播filter.addAction(BluetoothDevice.ACTION_BOND_STATE_CHANGED);//设备扫描模式改变广播filter.addAction(BluetoothAdapter.ACTION_SCAN_MODE_CHANGED);registerReceiver(receiver, filter);}//处理找到蓝牙设备和搜索完成的广播消息BroadcastReceiver receiver = new BroadcastReceiver() {@SuppressLint("MissingPermission")@Overridepublic void onReceive(Context context, Intent intent) {String action = intent.getAction();//开始查找设备if(BluetoothAdapter.ACTION_DISCOVERY_STARTED.equals(action)){//初始化适配器列表deviceList.clear();bondedDeviceList.clear();blueToothDeviceAdapter.refresh(deviceList);bondBlueToothDeviceAdapter.refresh((bondedDeviceList));}//找到蓝牙设备else if(BluetoothDevice.ACTION_FOUND.equals(action)){//搜到蓝牙设备BluetoothDevice device = intent.getParcelableExtra(BluetoothDevice.EXTRA_DEVICE);//把搜索到的设备添加到已找到列表中,显示它的信息deviceList.add(device);blueToothDeviceAdapter.refresh(deviceList);}//查找设备结束else if(BluetoothAdapter.ACTION_DISCOVERY_FINISHED.equals(action)){//搜索完毕Toast.makeText(MainActivity.this, "选择要配对的蓝牙设备", Toast.LENGTH_SHORT).show();blueToothDeviceAdapter.refresh(deviceList);}//配对状态else if(BluetoothDevice.ACTION_BOND_STATE_CHANGED.equals(action)){BluetoothDevice device = intent.getParcelableExtra(BluetoothDevice.EXTRA_DEVICE);if(device == null){Toast.makeText(MainActivity.this, "无设备", Toast.LENGTH_SHORT).show();return;}int state = intent.getIntExtra(BluetoothDevice.EXTRA_BOND_STATE,0);if(state == BluetoothDevice.BOND_BONDED){Toast.makeText(MainActivity.this, "已配对", Toast.LENGTH_SHORT).show();}else if(state == BluetoothDevice.BOND_BONDING){Toast.makeText(MainActivity.this, "正在配对", Toast.LENGTH_SHORT).show();}else if(state == BluetoothDevice.BOND_NONE){Toast.makeText(MainActivity.this, "未配对", Toast.LENGTH_SHORT).show();}}}};private BluetoothGatt mGatt;private BluetoothGattCharacteristic mWriter;/*** @param gatt     返回连接建立的gatt对象* @param status   返回的是此次gatt操作的结果,成功了返回0* @param newState 每次client连接或断开连接状态变化,*                 STATE_CONNECTED 0,*                 STATE_CONNECTING 1,*                 STATE_DISCONNECTED 2,*                 STATE_DISCONNECTING 3*/private BluetoothGattCallback mGattCallback = new BluetoothGattCallback() {@SuppressLint("MissingPermission")@Overridepublic void onConnectionStateChange(BluetoothGatt gatt, int status, int newState) {//连接成功if(newState == BluetoothProfile.STATE_CONNECTED){//进行服务发现gatt.discoverServices();Log.d(TAG,"连接成功");}else if(newState == BluetoothProfile.STATE_DISCONNECTED){//连接断开,处理断开逻辑Log.d(TAG,"连接断开");}}@SuppressLint("MissingPermission")@Overridepublic void onServicesDiscovered(BluetoothGatt gatt, int status) {Log.d(TAG,"onServicesDiscovered : " + status + " ==>> " + gatt.toString());//发现服务成功,处理服务和特征值if(status == BluetoothGatt.GATT_SUCCESS){//发送消息mGatt = gatt;BluetoothGattService service = gatt.getService(UUID.fromString("0000180a-0000-1000-8000-00805F9B34FB"));mWriter = service.getCharacteristic(UUID.fromString("00002ad9-0000-1000-8000-00805F9B34FB"));//打开消息通知mGatt.setCharacteristicNotification(mWriter,true);BluetoothGattDescriptor descriptor = mWriter.getDescriptor(UUID.fromString("00002902-0000-1000-8000-00805f9b34fb"));descriptor.setValue(BluetoothGattDescriptor.ENABLE_NOTIFICATION_VALUE);mGatt.writeDescriptor(descriptor);}else {Log.d(TAG,"发现服务失败");}}@Overridepublic void onCharacteristicRead(BluetoothGatt gatt, BluetoothGattCharacteristic characteristic, int status) {Log.e(TAG,"onCharacteristicRead " + status);//读取特征成功,处理特征值if(status == BluetoothGatt.GATT_SUCCESS){}}@Overridepublic void onCharacteristicWrite(BluetoothGatt gatt, BluetoothGattCharacteristic characteristic, int status) {Log.e(TAG,"onCharacteristicWrite " + status);//写入特征成功if(status == BluetoothGatt.GATT_SUCCESS){Log.d(TAG,"发送成功");}else {Log.d(TAG,"发送失败");}}@Overridepublic void onCharacteristicChanged(BluetoothGatt gatt, BluetoothGattCharacteristic characteristic) {//接收到数据byte[] data = characteristic.getValue();//处理接收到的数据Log.d(TAG,"Received data: " + bytesToHexFun2(data));}@Overridepublic void onDescriptorRead(BluetoothGatt gatt, BluetoothGattDescriptor descriptor, int status) {super.onDescriptorRead(gatt, descriptor, status);}@Overridepublic void onDescriptorWrite(BluetoothGatt gatt, BluetoothGattDescriptor descriptor, int status) {super.onDescriptorWrite(gatt, descriptor, status);}@Overridepublic void onReliableWriteCompleted(BluetoothGatt gatt, int status) {super.onReliableWriteCompleted(gatt, status);}@Overridepublic void onReadRemoteRssi(BluetoothGatt gatt, int rssi, int status) {super.onReadRemoteRssi(gatt, rssi, status);}@Overridepublic void onMtuChanged(BluetoothGatt gatt, int mtu, int status) {super.onMtuChanged(gatt, mtu, status);}@Overridepublic void onServiceChanged(@NonNull BluetoothGatt gatt) {super.onServiceChanged(gatt);}@Overridepublic void onPhyUpdate(BluetoothGatt gatt, int txPhy, int rxPhy, int status) {super.onPhyUpdate(gatt, txPhy, rxPhy, status);}@Overridepublic void onPhyRead(BluetoothGatt gatt, int txPhy, int rxPhy, int status) {super.onPhyRead(gatt, txPhy, rxPhy, status);}};private char[] HEX_CHAR = {'0', '1', '2', '3', '4', '5','6', '7', '8', '9', 'a', 'b', 'c', 'd', 'e', 'f'};private  String bytesToHexFun2(byte[] bytes) {char[] buf = new char[bytes.length * 2];int index = 0;for(byte b : bytes) { // 利用位运算进行转换,可以看作方法一的变种buf[index++] = HEX_CHAR[b >>> 4 & 0xf];buf[index++] = HEX_CHAR[b & 0xf];}return new String(buf);}}
到此为止,我们的程序就到这里了,蓝牙搜索,配对,连接,通信便已经成功实现了,大家可以把代码copy一下拿去运行,具体效果演示图在文章最上方,大家还想了解更多关于Android蓝牙开发的可以继续看我下一篇给大家的分享
相关文章:
Android 蓝牙开发( 二 )
前言 上一篇文章给大家分享了Android蓝牙的基础知识和基础用法,不过上一篇都是一些零散碎片化的程序,这一篇给大家分享Android蓝牙开发实战项目的初步使用 效果演示 : Android蓝牙搜索,配对,连接,通信 Android蓝牙实…...
C#调用barTender打印标签示例
使用的电脑需要先安装BarTender 我封装成一个类 using System; using System.Windows.Forms;namespace FT_Tools {public class SysContext{public static BarTender.Application btapp new BarTender.Application();public static BarTender.Format btFormat;public void Q…...
Spring——Spring读取文件
文章目录 1.通过 value 读取比较简单的配置信息2.通过ConfigurationProperties读取并与 bean 绑定3.通过ConfigurationProperties读取并校验4. PropertySource 读取指定 properties 文件5.题外话:Spring加载配置文件的优先级 很多时候我们需要将一些常用的配置信息比如阿里云os…...

这是一条求助贴(postman测试的时候一直是404)
看到这个问题是404的时候总感觉不该求助大家,404多常见一看就是简单的路径问题,我的好像不是,我把我的问题奉上。 首先我先给出我的url http://10.3.22.195:8080/escloud/rest/escloud_contentws/permissionStatistics/jc-haojl/sz 这是我…...

信号完整性分析基础知识之有损传输线、上升时间衰减和材料特性(四):有损传输线建模
传输线中信号衰减的两个损耗过程是通过信号和返回路径导体的串联电阻以及通过有损耗介电材料的分流电阻。这两个电阻器的电阻都与频率相关。 值得注意的是,理想电阻器的电阻随频率恒定。我们已经证明,在理想的有损传输线中,用于描述损耗的两个…...
elk日志收集系统
目录 前言 一、概述 二、案例 (一)、环境配置 安装node1与node2节点的elasticsearch node1的elasticsearch-head插件 (二)、node1服务器安装logstash 测试1: 标准输入与输出 测试2:使用rubydebug解…...

perl 语言中 AUTOLOAD 的用法
这里的 AUTOLOAD可以理解为自动加载。具体来说就是,在正常情况下,我们不能调用一个尚未定义的函数(子例程)。不过,如果在未定义函数的包中有一个名为 AUTOLOAD的函数,那么对未定义函数的调用都会路由至这个…...
服务器放在香港好用吗?
相较于国内服务器,将网站托管在香港服务器上最直观的好处是备案层面上的。香港服务器上的网站无需备案,因此更无备案时限,购买之后即可使用。 带宽优势 香港服务器的带宽一般分为香港本地带宽和国际带宽、直连中国骨干网 CN2三种。香港…...
C++设计模式_01_设计模式简介(多态带来的便利;软件设计的目标:复用)
文章目录 本栏简介1. 什么是设计模式2. GOF 设计模式3. 从面向对象谈起4. 深入理解面向对象5. 软件设计固有的复杂性5.1 软件设计复杂性的根本原因5.2 如何解决复杂性 ? 6. 结构化 VS. 面向对象6.1 同一需求的分解写法6.1.1 Shape1.h6.1.2 MainForm1.cpp 6.2 同一需求的抽象的…...

Docker技术--WordPress博客系统部署初体验
如果使用的是传统的项目部署方式,你要部署WordPress博客系统,那么你需要装备一下的环境,才可以部署使用。 -1:操作系统linux -2:PHP5.6或者是更高版本环境 -3:MySQL数据环境 -4:Apache环境 但是如果使用Docker技术,那么就只需要进行如下的几行简单的指令: docker run …...

提高代码可读性和可维护性的命名建议
当进行接口自动化测试时,良好的命名可以提高代码的可读性和可维护性。以下是一些常用的命名建议: 变量和函数命名: 使用具有描述性的名称,清晰地表达变量或函数的用途和含义。使用小写字母和下划线来分隔单词,例如 log…...

Docker基础入门:Docker网络与微服务项目发布
Docker基础入门:Docker网络与微服务项目发布 一、前言二、Docker0理解2.1 ip a查看当前网络环境2.2 实战--启动一个tomact01容器(查看网络环境)2.3 实战--启动一个tomact02容器(查看网络环境)2.4 容器与容器之间的通信…...
Docker安装详细步骤
Docker安装详细步骤 1、安装环境准备 主机:192.168.40.5 zch01 设置主机名 # hostnamectl set-hostname zch01 && bash 配置hosts文件 [root ~]# vi /etc/hosts 添加如下内容: 192.168.40.5 zch01 关闭防火墙 [rootzch01 ~]# systemct…...
十六、pikachu之SSRF
文章目录 1、SSRF概述2、SSRF(URL)3、SSRF(file_get_content) 1、SSRF概述 SSRF(Server-Side Request Forgery:服务器端请求伪造):其形成的原因大都是由于服务端提供了从其他服务器应用获取数据的功能&…...
最新PHP短网址生成系统/短链接生成系统/URL缩短器系统源码
全新PHP短网址系统URL缩短器平台,它使您可以轻松地缩短链接,根据受众群体的位置或平台来定位受众,并为缩短的链接提供分析见解。 系统使用了Laravel框架编写,前后台双语言使用,可以设置多域名,还可以开设套…...

漱玉平民大药房:多元化药店变革的前夜
作者 | 王聪彬 编辑 | 舞春秋 来源 | 至顶网 本文介绍了漱玉平民大药房在药品零售领域的数字化转型和发展历程。通过技术创新, 漱玉平民 建设了覆盖医药全生命周期的大健康生态圈,采用混合云架构和国产分布式数据库 TiDB,应对庞大的会员数据处…...
如何实现AI的矢量数据库
推荐:使用 NSDT场景编辑器 助你快速搭建3D应用场景 然而,人工智能模型有点像美食厨师。他们可以创造奇迹,但他们需要优质的成分。人工智能模型在大多数输入上都做得很好,但如果它们以最优化的格式接收输入,它们就会真正…...

Java与Modbus-TCP/IP网络通讯
1.需求样例 举例5:浮点数参数读取(读取温度测量值)查看参数列表,温度测量值地址为320,根据Modbus协议,读取参数地址转换为16进制为:00H A0H,读取长度为2个字:00H 02H。 …...

音视频 ffmpeg命令图片与视频互转
截取一张图片 ffmpeg -i test.mp4 -y -f image2 -ss 00:00:02 -vframes 1 -s 640x360 test.jpg ffmpeg -i test.mp4 -y -f image2 -ss 00:00:02 -vframes 1 -s 640x360 test.bmp -i 输入 -y 覆盖 -f 格式 image2 一种格式 -ss 起始值 -vframes 帧 如果大于1 那么 输出加%03d t…...
C++的基类和派生类构造函数
基类的成员函数可以被继承,可以通过派生类的对象访问,但这仅仅指的是普通的成员函数,类的构造函数不能被继承。构造函数不能被继承是有道理的,因为即使继承了,它的名字和派生类的名字也不一样,不能成为派生…...
的实战避坑指南)
遥感影像分割选哪个?eCognition里8种方法(棋盘、多尺度、分水岭...)的实战避坑指南
遥感影像分割实战指南:eCognition八大算法深度解析与选型策略 1. 遥感影像分割的技术演进与核心挑战 在数字地球时代,高分辨率遥感影像已成为地理信息提取的重要数据源。与传统基于像素的分类方法相比,面向对象影像分析(OBIA&am…...

Whisky革新指南:在macOS上优雅运行Windows程序的全新体验
Whisky革新指南:在macOS上优雅运行Windows程序的全新体验 【免费下载链接】Whisky A modern Wine wrapper for macOS built with SwiftUI 项目地址: https://gitcode.com/gh_mirrors/wh/Whisky 你是否曾经在macOS上渴望运行某个Windows专用软件,却…...

「阅读」APP书源配置与管理完整指南:从新手到高级用户的实用教程
「阅读」APP书源配置与管理完整指南:从新手到高级用户的实用教程 【免费下载链接】Yuedu 📚「阅读」自用书源分享 项目地址: https://gitcode.com/gh_mirrors/yu/Yuedu 「阅读」APP作为一款开源的小说阅读工具,其核心功能依赖于书源的…...

2026黑科技对决:UWB硬件瓶颈 vs 镜像视界无感定位・跨镜追踪自由
2026黑科技对决:UWB硬件瓶颈 vs 镜像视界无感定位・跨镜追踪自由 一、UWB:厘米级精度,困在硬件里的“昂贵精准” UWB(超宽带)凭借短脉冲、宽频谱特性,在理想视距环境下可实现5–10厘米定位精度࿰…...

快速上手Notepad2-mod:5个步骤打造你的专属轻量级代码编辑器
快速上手Notepad2-mod:5个步骤打造你的专属轻量级代码编辑器 【免费下载链接】notepad2-mod LOOKING FOR DEVELOPERS - Notepad2-mod, a Notepad2 fork, a fast and light-weight Notepad-like text editor with syntax highlighting 项目地址: https://gitcode.c…...

毕业论文难写?2026年AI写作辅助网站排行榜权威发布,轻松定稿不是梦!
写论文效率低、熬夜赶稿、查重不过关?别慌!2026 年最新 AI 论文写作工具合集来了,覆盖选题、大纲、初稿、润色、降重、格式、文献引用全流程,帮你精准匹配最适合的学术助手,彻底告别论文内耗!🏆…...

8255与74LS273实现流水灯控制原理
箱图片和题目要求,这是一个经典的微机原理/接口技术实验。你需要构建一个包含输入(开关)、处理(8255读取)、输出(74LS273锁存驱动LED)的系统。由于我无法直接为你绘制CAD图纸,我为你…...
 (rat))
GRF (1-43) (rat)
一、基础信息中文名称:大鼠生长激素释放因子 (1-43)英文名称:Growth Hormone-Releasing Factor (1-43), rat三字母序列:His-Ala-Asp-Ala-Ile-Phe-Thr-Ser-Ser-Tyr-Arg-Arg-Ile-Leu-Gly-Gln-Leu-Tyr-Ala-Arg-Lys-Leu-Leu-His-Glu-Ile-Met-Asn-…...
完整使用指南:NDI技术在OBS中的高效应用)
DistroAV(原OBS-NDI)完整使用指南:NDI技术在OBS中的高效应用
DistroAV(原OBS-NDI)完整使用指南:NDI技术在OBS中的高效应用 【免费下载链接】obs-ndi DistroAV (formerly OBS-NDI): NDI integration for OBS Studio 项目地址: https://gitcode.com/gh_mirrors/ob/obs-ndi DistroAV(原名…...
)
从暗房到云端:一位古籍修复师用Midjourney蓝晒法重制《天工开物》插图的72小时实录(含失败21次原始日志)
更多请点击: https://intelliparadigm.com 第一章:从暗房到云端:一场古籍图像的跨时空显影 在胶片时代,古籍修复师需在幽暗的暗房中,借助红光灯与显影液,一帧一帧唤醒沉睡于纸背的墨痕;而今&am…...