spring boot——自定义依赖实现自动配置
需求
要实现的功能是:实现一个可以支持minio+oss两种方式,上传下载文件的自定义依赖。其中还包括一些创建桶、删除桶、删除文件等功能,但是最主要的是实现自动配置。
如果对spring理解很深的话,自动配置这些东西很容易理解,但是对于技术小白来讲只能按葫芦画瓢。
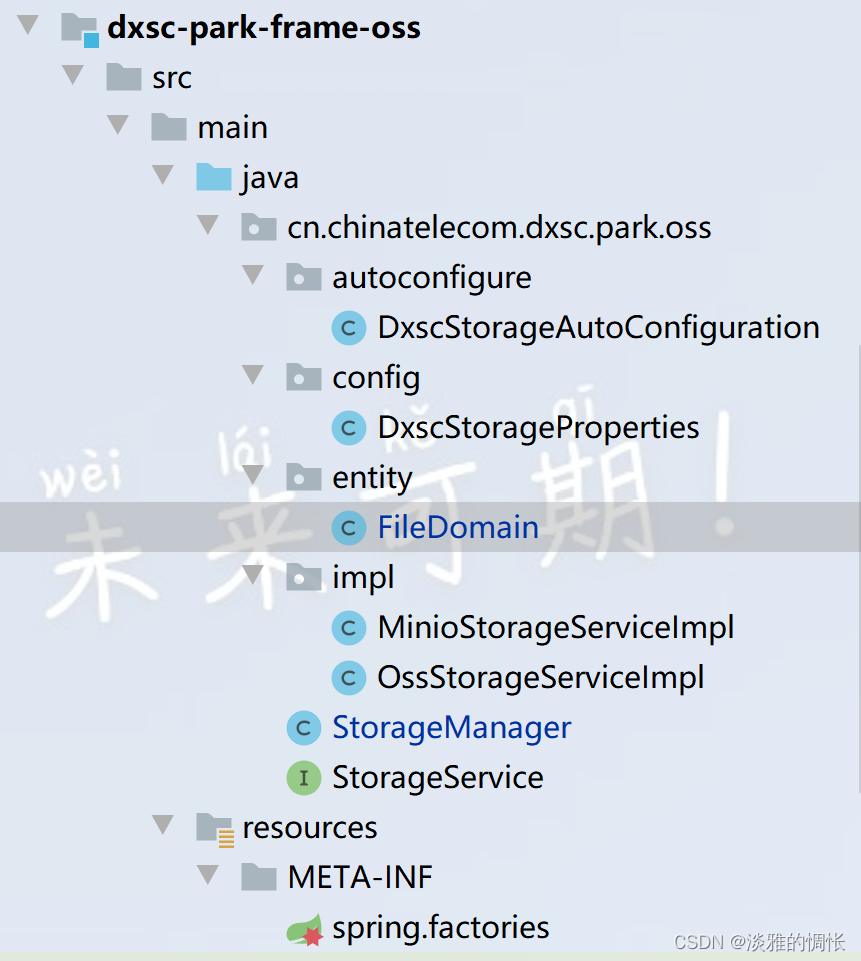
首先,StorageManager是我的自定义依赖对外提供的要注入spring的对象,其中的方法是对外提供的方法,方法返回的是StorageService接口。
package cn.chinatelecom.dxsc.park.oss;import cn.chinatelecom.dxsc.park.oss.entity.FileDomain;
import org.slf4j.Logger;
import org.slf4j.LoggerFactory;
import org.springframework.web.multipart.MultipartFile;import java.io.IOException;
import java.io.InputStream;
import java.time.LocalDate;
import java.time.format.DateTimeFormatter;
import java.util.UUID;public class StorageManager {private static final Logger log = LoggerFactory.getLogger(StorageManager.class);private final StorageService storageService;public StorageManager(StorageService storageService) {this.storageService = storageService;}/*** 创建存储桶** @param bucketName 桶名称*/public void createBucket(String bucketName) {storageService.createBucket(bucketName);}/*** 删除桶* @param bucketName 桶名称* @return*/public Boolean removeBucket(String bucketName) {Boolean removeBucket = storageService.removeBucket(bucketName);return removeBucket;}/*** 删除文件* @param fileName* @return*/public Boolean remove(String fileName){return storageService.remove(fileName);}/*** 下载文件** @param filePath 文件路径* @return 文件流*/public InputStream getObject(String filePath) {return storageService.getObject(filePath);}/*** 上传文件* @param file* @return*/public FileDomain saveFile(MultipartFile file) {FileDomain result = new FileDomain();try {InputStream in = file.getInputStream();long size = file.getSize();String contentType = file.getContentType();String fileName = generateName(file.getOriginalFilename());String filePath = generateKey(fileName);String url = storageService.saveFile(in, size, contentType, filePath);result.setSize(size);result.setUrl(url);result.setKey(filePath);result.setType(contentType);} catch (IOException e) {log.error("保存文件失败", e);throw new RuntimeException(e);}return result;}private String generateName(String originalFilename) {return UUID.randomUUID().toString().replace("-", "")  + originalFilename.substring(originalFilename.lastIndexOf("."));}private String generateKey(String fileName) {// 2022-10/24/b4c9106e3f574a61841ce4624494f0cc.jpg  在删除和下载文件时需要传入路径才可以删除和下载return LocalDate.now().format(DateTimeFormatter.ofPattern("yyyy-MM/dd")) + "/" + fileName;}}
StorageService接口定义:
package cn.chinatelecom.dxsc.park.oss;import io.minio.errors.*;import java.io.IOException;
import java.io.InputStream;
import java.security.InvalidKeyException;
import java.security.NoSuchAlgorithmException;public interface StorageService {/*** 创建存储桶* @param bucketName 桶名称*/void createBucket(String bucketName);/*** 存储文件* @param inputStream 文件流* @param fileSize 文件大小* @param contentType 文件类型* @param keyName 文件名及路径*/String saveFile(InputStream inputStream, long fileSize, String contentType, String keyName);/*** 下载文件* @param filePath 文件路径* @return*/InputStream getObject(String filePath);/*** 删除文件* @param fileName* @return*/Boolean remove(String fileName);/*** 删除桶* @param bucketName 桶名称* @return*/Boolean removeBucket(String bucketName);
}
FileDomain是上传文件时返回的对象,其中包括文件url,文件在服务器的存储路径,文件类型、大小等等可以自己定义,这里没有使用@Data注解而是手写get和set方法,没有引入Lombok依赖是因为在实现自定义依赖的时候,尽量能不引入依赖就不引入依赖。如果你在自定义依赖里面引入版本2.0的Lombok,但是当别人引用你的依赖的时候,同时也引用的1.0的Lombok,这样就会出现最让人头疼的版本冲突问题,为了避免这种问题出现,尽量不要在底层引用过多依赖。
package cn.chinatelecom.dxsc.park.oss.entity;public class FileDomain {/*** 路径名称*/private String key;/*** 文件url*/private String url;/*** 文件类型(contentType)*/private String type;/*** 文件大小*/private Long size;public String getKey() {return key;}public void setKey(String key) {this.key = key;}public String getUrl() {return url;}public void setUrl(String url) {this.url = url;}public String getType() {return type;}public void setType(String type) {this.type = type;}public Long getSize() {return size;}public void setSize(Long size) {this.size = size;}
}
接下来是自动配置的相关代码
DxscStorageProperties是需要配置的一些属性,比如accessKey以及accessSecret等等。
@ConfigurationProperties注解,在 SpringBoot 中,当想需要获取到配置文件数据时,除了可以用 Spring 自带的 @Value 注解外,SpringBoot 还提供了一种更加方便的方式:@ConfigurationProperties。只要在 Bean 上添加上了这个注解,指定好配置文件的前缀,那么对应的配置文件数据就会自动填充到 Bean 中。
package cn.chinatelecom.dxsc.park.oss.config;import org.springframework.boot.context.properties.ConfigurationProperties;@ConfigurationProperties(prefix = "dxsc.storage")
public class DxscStorageProperties {/*** 激活哪种存储*/private String active;/*** oss地址*/private String endpoint;/*** 桶名称*/private String bucketName;private String accessKey;private String accessSecret;public String getActive() {return active;}public void setActive(String active) {this.active = active;}public String getEndpoint() {return endpoint;}public void setEndpoint(String endpoint) {this.endpoint = endpoint;}public String getBucketName() {return bucketName;}public void setBucketName(String bucketName) {this.bucketName = bucketName;}public String getAccessKey() {return accessKey;}public void setAccessKey(String accessKey) {this.accessKey = accessKey;}public String getAccessSecret() {return accessSecret;}public void setAccessSecret(String accessSecret) {this.accessSecret = accessSecret;}}
接下来的代码才是重中之重DxscStorageAutoConfiguration,此类将DxscStorageProperties注入到spring中,Spring Boot 会扫描到类路径下的META-INF/spring.factories配置文件,把DxscStorageAutoConfiguration对应的的Bean值添加到容器中。
package cn.chinatelecom.dxsc.park.oss.autoconfigure;import cn.chinatelecom.dxsc.park.oss.StorageManager;
import cn.chinatelecom.dxsc.park.oss.StorageService;
import cn.chinatelecom.dxsc.park.oss.config.DxscStorageProperties;
import cn.chinatelecom.dxsc.park.oss.impl.MinioStorageServiceImpl;
import cn.chinatelecom.dxsc.park.oss.impl.OssStorageServiceImpl;
import org.springframework.beans.factory.annotation.Autowired;
import org.springframework.boot.autoconfigure.condition.ConditionalOnProperty;
import org.springframework.boot.context.properties.EnableConfigurationProperties;
import org.springframework.context.annotation.Bean;
import org.springframework.context.annotation.Configuration;@EnableConfigurationProperties(DxscStorageProperties.class)
@Configuration
public class DxscStorageAutoConfiguration {@Autowiredprivate DxscStorageProperties dxscStorageProperties;@Beanpublic StorageManager storageManager(StorageService storageService) {return new StorageManager(storageService);}@Bean@ConditionalOnProperty(prefix = "dxsc.storage", value = "active", havingValue = "minio")public StorageService minioService() {return new MinioStorageServiceImpl(dxscStorageProperties);}
//prefix为前缀,value为选择哪个属性,havingValue就是启用哪种方式,当active属性为minio时就调用上面的,oss就调用下面的,
//大概就是这个意思@Bean@ConditionalOnProperty(prefix = "dxsc.storage", value = "active", havingValue = "oss")public StorageService OssService() {return new OssStorageServiceImpl(dxscStorageProperties);}}
spring.factories文件:
org.springframework.boot.autoconfigure.EnableAutoConfiguration=\
cn.chinatelecom.dxsc.park.oss.autoconfigure.DxscStorageAutoConfiguration
其中MinioStorageServiceImpl和OssStorageServiceImpl就是实现的文件上传下载的接口,再此展示minion的接口:
oss接口可以查看官方文档,其中写得很清楚。
package cn.chinatelecom.dxsc.park.oss.impl;import cn.chinatelecom.dxsc.park.oss.StorageService;
import cn.chinatelecom.dxsc.park.oss.config.DxscStorageProperties;
import io.minio.*;
import io.minio.http.Method;import java.io.InputStream;public class MinioStorageServiceImpl implements StorageService {private final DxscStorageProperties dxscStorageProperties;private final MinioClient minioClient;public MinioStorageServiceImpl(DxscStorageProperties dxscStorageProperties) {this.dxscStorageProperties =dxscStorageProperties;this.minioClient = MinioClient.builder().endpoint(dxscStorageProperties.getEndpoint()).credentials(dxscStorageProperties.getAccessKey(), dxscStorageProperties.getAccessSecret()).build();}@Overridepublic void createBucket(String bucketName){boolean isExist = false;// 检查存储桶是否已经存在try{isExist = minioClient.bucketExists(BucketExistsArgs.builder().bucket(bucketName).build());if (!isExist) {//创建桶minioClient.makeBucket(MakeBucketArgs.builder().bucket(bucketName).build());minioClient.setBucketPolicy(SetBucketPolicyArgs.builder().bucket(bucketName).config("{\"Version\":\"2023-2-20\",\"Statement\":[]}").build());}}catch (Exception e){throw new RuntimeException(e);}}@Overridepublic String saveFile(InputStream inputStream, long fileSize, String contentType, String keyName) {try {PutObjectArgs objectArgs = PutObjectArgs.builder().bucket(dxscStorageProperties.getBucketName()).object(keyName).stream(inputStream, fileSize, -1).contentType(contentType).build();//文件名称相同会覆盖minioClient.putObject(objectArgs);// 查看文件地址GetPresignedObjectUrlArgs build = new GetPresignedObjectUrlArgs().builder().bucket(dxscStorageProperties.getBucketName()).object(keyName).method(Method.GET).build();try {return minioClient.getPresignedObjectUrl(build);} catch (Exception e) {throw new RuntimeException(e);}} catch (Exception e) {throw new RuntimeException(e);}}@Overridepublic InputStream getObject(String filePath) {try{GetObjectArgs objectArgs = GetObjectArgs.builder().bucket(dxscStorageProperties.getBucketName()).object(filePath).build();return minioClient.getObject(objectArgs);}catch (Exception e){System.out.println("下载失败");throw new RuntimeException(e);}}@Overridepublic Boolean remove(String fileName) {try {minioClient.removeObject(RemoveObjectArgs.builder().bucket(dxscStorageProperties.getBucketName()).object(fileName).build());} catch (Exception e) {return false;}return true;}@Overridepublic Boolean removeBucket(String bucketName) {try {//在删除桶时,需要注意一下不能删除自身,当你的配置文件里的bucketName的test时还要删除test,是不能删除成功的//bucketName为test1时,删除test,是可以的minioClient.removeBucket(RemoveBucketArgs.builder().bucket(bucketName).build());} catch (Exception e) {return false;}return true;}
}
至此,自定义依赖完成,接下来是引用,引用方法为先将自定义依赖上传至本地maven库,然后才可以导入依赖,
<dependency><artifactId>dxsc-park-frame-oss</artifactId><groupId>cn.chinatelecom</groupId><version>1.0.0-SNAPSHOT</version></dependency>
然后,配置minio或者oss的accessKey和accessSecret等属性:
(active为minio就是通过minion方式实现文件上传下载)
dxsc:storage:active: minioendpoint: http://***.168.30.27:9000bucketName: dxsc-parkaccessKey: minioadminaccessSecret: minioadmin
#  storage:
#    active: oss
#    endpoint: https://oss-cn-beijing.aliyuncs.com
#    bucketName: dxsc-park
#    accessKey: ***
#    accessSecret: ***
server:port: 1101
最后注入StorageManager,在一开始的时候就说过StorageManager是对外提供的:
package cn.chinatelecom.dxsc.park.test.controller;import cn.chinatelecom.dxsc.park.oss.StorageManager;
import cn.chinatelecom.dxsc.park.oss.entity.FileDomain;
import org.apache.tomcat.util.http.fileupload.IOUtils;
import org.springframework.beans.factory.annotation.Autowired;
import org.springframework.web.bind.annotation.PostMapping;
import org.springframework.web.bind.annotation.RequestMapping;
import org.springframework.web.bind.annotation.RequestParam;
import org.springframework.web.bind.annotation.RestController;
import org.springframework.web.multipart.MultipartFile;import javax.servlet.http.HttpServletResponse;
import java.io.IOException;
import java.io.InputStream;@RestController
@RequestMapping("/minio")
public class TestController {@Autowiredprivate StorageManager storageManager;@PostMapping("/createBucket")public void createBucket(@RequestParam("bucketName") String bucketName){storageManager.createBucket(bucketName);}@PostMapping("/removeBucket")public void removeBucket(@RequestParam("bucketName") String bucketName){storageManager.removeBucket(bucketName);}@PostMapping("/upload")public String upload(@RequestParam("file") MultipartFile file){FileDomain fileDomain = storageManager.saveFile(file);System.out.println(fileDomain.getUrl());return fileDomain.getKey();}@PostMapping("/remove")public Boolean remove(@RequestParam("fileName") String fileName){Boolean remove = storageManager.remove(fileName);return remove;}@PostMapping("/getObject")public void getObject(@RequestParam("filePath") String filePath, HttpServletResponse response) throws IOException {InputStream object = storageManager.getObject(filePath);response.setContentType("application/octet-stream");response.addHeader("Content-Disposition", "attachment;filename=" + "fileName");IOUtils.copy(object, response.getOutputStream());IOUtils.closeQuietly(object);}}
以上就是我在实现自动配置的全部内容
一个集坚强与自信于一身的菇凉。
相关文章:
spring boot——自定义依赖实现自动配置
需求 要实现的功能是:实现一个可以支持miniooss两种方式,上传下载文件的自定义依赖。其中还包括一些创建桶、删除桶、删除文件等功能,但是最主要的是实现自动配置。 如果对spring理解很深的话,自动配置这些东西很容易理解&#…...

QMap 判断是否value是否已经存在,结合Sleep函数测试
网上查了资料,基本说的都是通过.value判断是否已经之前的key值,但是尝试.了一下发现有.key的函数,对比着来就感觉这个函数是用来判断是否已经存在value值,于是开始百度也几乎没有找到相关资料,只好自己看官方文档&…...
vue后台管理系统项目-table选择多行数据分页列表、一键全选重置功能
table选择多行数据 功能介绍: 1.列表分页功能; 2.一键全选,选中列表所有数据; 3.全选,选中当前页数据; 4.重置,清除选中状态; 5.列表搜索查询; 效果: 1.列表分…...
论文解读 | [CVPR2019] 基于自适应文本区域表示的任意形状场景文本检测
目录 1 研究背景及意义 2 总体设计 3 方法论 3.1 自适应文本区域表示 3.2 文本建议 3.3 建议改进 4 损失函数 5 实验及结果 1 研究背景及意义 现有的场景文本检测方法使用固定点数的多边形来 表示文本区域。例如,水平文本使用2个点(左上/右下)表示文本区域&…...

2月编程语言排行榜谁还没有看?
近日,TIOBE公布了2023年2月编程语言排行榜,本月各个语言表现如何?谁又摘得桂冠?一起来看看吧! TIOBE 2月Top15编程语言: 详细榜单查看TIOBE官网 https://www.tiobe.com/tiobe-index/ 关注IT行业的小伙伴们…...

nginx.conf配置方法详细介绍
从前面的内容学习中,我们知道Nginx的核心配置文件默认是放在/usr/local/nginx/conf/nginx.conf,这一节,我们就来学习下nginx.conf的内容和基本配置方法。读取Nginx自带的Nginx配置文件,我们将其中的注释部分【学习一个技术点就是在…...

【微信小程序】一文带你吃透开发中的常用组件
写在前面 小程序中的组件也是由宿主环境提供的,开发者可以基于组件快速搭建出漂亮的页面结构。 官方把小程序的组件分为了9大类,分别是: 1.视图容器 2.基础内容 3.表单组件 4.导航组件 5.媒体组件 6.地图组件 7.画布组件 …...
Nginx 部署 Vue 项目以及 Vue 项目刷新出现 404 的问题(完整步骤)(亲测有效)
Nginx 部署 Vue 项目以及 Vue 项目刷新出现 404 的问题(完整步骤)(亲测有效) 1.流程步骤(本教程下载的是1.20.2版本,放在D盘) 1-1. 首先去官方下载 nginx ,然后在当前目录下创建ht…...
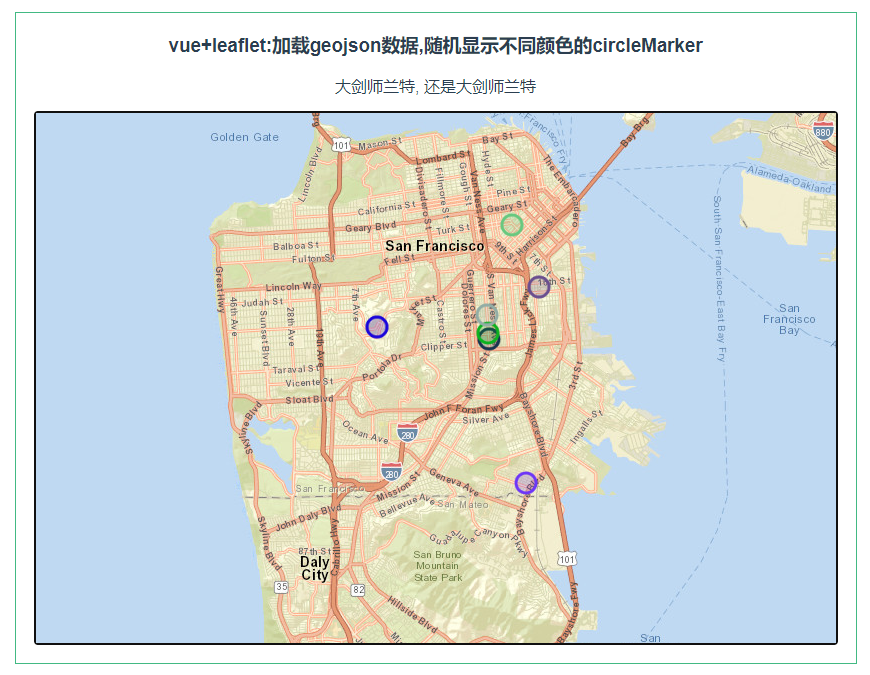
leaflet 加载geojson数据,随机显示不同颜色的circleMarker
第086个 点击查看专栏目录 本示例的目的是介绍演示如何在vue+leaflet项目中加载geojson数据,随机显示不同颜色的circleMarker. 直接复制下面的 vue+leaflet源代码,操作2分钟即可运行实现效果 文章目录 示例效果配置方式示例源代码(共89行)相关API专栏目标示例效果 配置方式…...
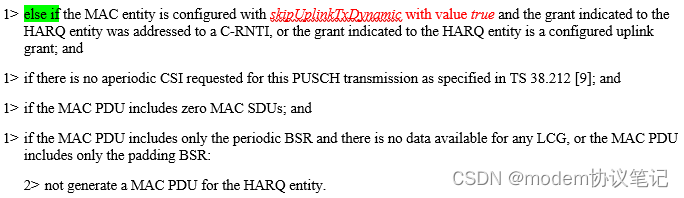
UL grant的分配(LCP)
欢迎关注同名微信公众号“modem协议笔记”。 UE有UL data时,会发送BSR的告知网络侧自己详细的请求,期望网络能够如期下发UL grant,正常情况下网络侧会给UE足够的UL grant去发送UL data,整个过程都会比较顺利。UE收到UL grant后&a…...
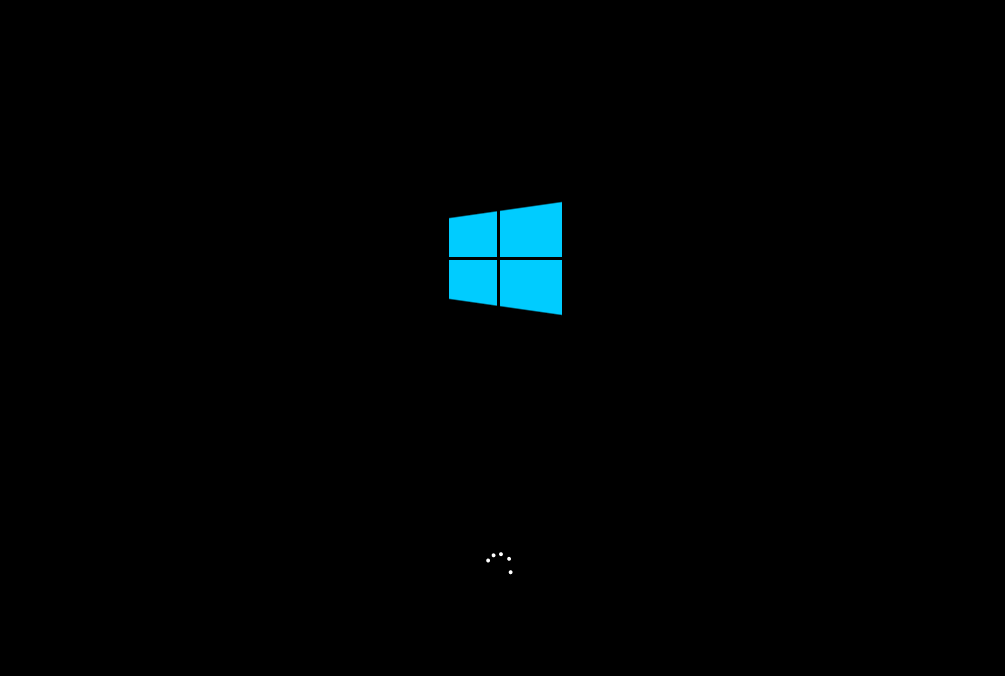
真我air笔记本电脑怎么重装Win10系统?
真我air笔记本电脑怎么重装Win10系统?最近真我air笔记本电脑挺多用户购买的,因为这款电脑性价比比较高,适合学生和一些办公人员来使用。但是系统预制了Win11系统,有用户想要将系统重装到Win10来使用。那么如何去进行系统的重装呢&…...
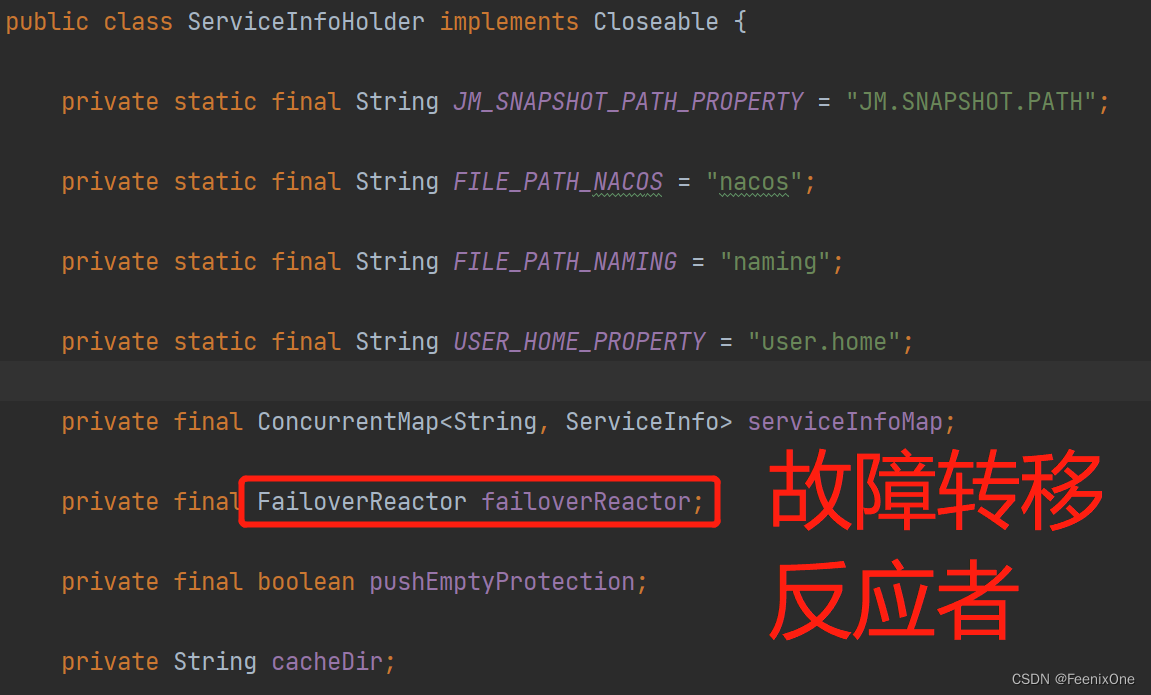
【闲聊杂谈】深入剖析SpringCloud Alibaba之Nacos源码
Nacos核心功能点 服务注册 Nacos Client会通过发送REST请求的方式向Nacos Server注册自己的服务,提供自身的元数据,比如ip地址、端口等信息。Nacos Server接收到注册请求后,就会把这些元数据信息存储在一个双层的内存Map中; 服…...

MySQL删除或清空表内数据的方法
MySQL删除或清空表内数据的方法 一、使用MySQL清空表数据命令:truncate SQL语法为: truncate table 表名注意: truncate该命令会直接将数据表内数据清空;truncate该命令删除数据后会重置Identity(标识列、自增字段…...
: 动态权限讲解)
Android 权限(二): 动态权限讲解
1. 前言 继上一篇文章说到Android权限汇总, 请移步笔者的文章Android 权限(一):权限大全_broadview_java的博客-CSDN博客_android 仅使用中允许权限 先要理清楚权限分类和定义,本篇文章继续说一下动态权限的申请和框架层的实现流程, 以及如何实现赋予系统应用默认的…...
【C++】2.类和对象(上)
1.面向过程和面向对象 C语言是面向过程的,关注的是过程,分析出求解问题的步骤,通过函数调用逐步解决问题。C是基于面向对象的,关注的是对象,将一件事情拆分成不同的对象,靠对象之间的交互完成。 2.类的引入…...

扬帆优配|3300点半日游!上证指数冲高回落;再迎重磅利好!
今天早盘,A股冲高回落,上证指数3300点得而复失,深证成指也于12000点无功而返。 盘面上,煤炭、钢铁、房地产、才智政务等板块涨幅居前,酿酒、酒店餐饮、日用化工、IT设备等板块跌幅居前。北上资金净流入7.77亿元。 房地…...
如何编写性能测试计划?一篇文章教你设计符合项目的性能测试计划
上篇文章,我们讲过性能测试计划,接下来我们就来讲讲如何设计符合项目的性能测试计划。到上篇为止,我们了解了性能测试计划中包含的内容,但是,这个颗粒度,我觉得作为一名测试经验不够丰富的性能工程师来说&a…...

第3章 Windows 下安装 Memcached教程
官网上并未提供 Memcached 的 Windows 平台install 包,咱们可以使用以下链接来download ,需要根据自己的去下载: 点击下载 在 1.4.5 版本以前 memcached 可以作为一个服务install ,而在 1.4.5 及之后的版本删除了该功能。因此咱…...

RXjava中的操作符
要使用Rxjava首先要导入两个包,其中rxandroid是rxjava在android中的扩展 implementation io.reactivex:rxandroid:1.2.1implementation io.reactivex:rxjava:1.2.0Rxjava中的操作符 创建型操作符 interval 创建一个按固定时间间隔发射整数序列的Observable…...
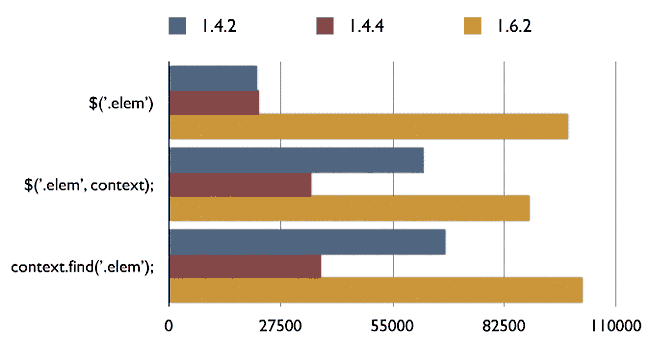
前端页面jquery规范写法
使用最新版本的 jQuery 最新版本的 jQuery 会改进性能和增加新功能,若不是为了兼容旧浏览器,建议使用最新版本的 jQuery。以下是三条常见的 jQuery 语句,版本越新,性能越好: $(.elem) $(.elem, context) context.find(.elem) 结果 1.6.2 版执行次数远超两个老版本。 jQ…...
)
DeepSeek RAG系统渗透测试全链路复现(含PoC代码与防御加固清单)
更多请点击: https://kaifayun.com 第一章:DeepSeek RAG系统渗透测试全链路复现概览 DeepSeek RAG系统作为面向企业级知识检索增强生成的典型架构,其安全边界不仅涵盖LLM服务层,更延伸至向量数据库、检索代理、提示工程网关及外部…...

机器学习模型评估中的构念效度:超越基准测试分数的科学推断
1. 项目概述与核心问题在机器学习的日常研究和工程实践中,我们每天都在和各种各样的基准测试(Benchmark)打交道。无论是为了比较新提出的ResNet变体在ImageNet上的Top-1准确率,还是评估一个大型语言模型在MMLU上的常识推理能力&am…...

Tftpd32/Tftpd64不止是TFTP!手把手教你玩转它的DHCP和Syslog服务器功能
Tftpd32/Tftpd64:解锁DHCP与Syslog服务的隐藏潜力当大多数人提起Tftpd32/Tftpd64时,第一反应往往是它作为TFTP服务器的功能。这款轻量级工具确实在文件传输领域表现出色,但它的能力远不止于此。今天,我们将深入探索这款软件中两个…...

我靠这个测试设计方法,把漏测率降低了80%
当“直觉测试”撞上南墙很长一段时间里,我和许多测试同行一样,测试用例的设计主要依靠两样东西:需求文档和“测试直觉”。这种模式在业务逻辑相对简单、迭代速度平缓时还能勉强应付。一旦面对复杂的企业级应用、高频的敏捷迭代,或…...

阿波罗登月,不可能:读心术与影子叙事 ——不是向全世界展示登月,而是向全世界注射登月
阿波罗登月,不可能:读心术与影子叙事 ——不是向全世界展示登月,而是向全世界注射登月 Jianbing Zhu 1^{1}1 1^{1}1 ECT-OS-JiuHuaShan 文明实验室 ORCID: 0009-0006-8591-1891 DOI: 10.5281/zenodo.20373157 Email: ect-os-jiuhuashanzoho…...
)
微信聊天图片丢了别慌!保姆级教程:找回并解密DAT文件(支持新旧版微信路径)
微信DAT图片恢复实战:从文件定位到批量解密的完整指南 微信聊天记录中的图片突然消失?别急着放弃!那些看似无法打开的DAT文件里,可能藏着您的重要回忆或工作资料。本文将带您深入微信存储机制,手把手完成从文件定位到…...

UE4SS终极指南:从零开始掌握虚幻引擎脚本系统
UE4SS终极指南:从零开始掌握虚幻引擎脚本系统 【免费下载链接】RE-UE4SS Injectable LUA scripting system, SDK generator, live property editor and other dumping utilities for UE4/5 games 项目地址: https://gitcode.com/gh_mirrors/re/RE-UE4SS UE4S…...

如何优化 MySQL 千万级数据分页查询的性能?
它的本质是:**传统 LIMIT offset, size 在大数据量下性能急剧下降,是因为 MySQL 必须 扫描并丢弃 前 offset 行数据。当 offset 很大时(如 LIMIT 1000000, 10),MySQL 需要读取 1,000,010 行记录,执行 1,000…...
)
YOLOv8道路交通信号标志识别检测系统(项目源码+YOLO数据集+模型权重+UI界面+python+深度学习+环境配置)
摘要 道路交通信号标志的自动检测是智能驾驶与交通管理系统中的核心环节。本文基于YOLOv8目标检测算法,构建了一个涵盖21类常见交通信号标志的检测系统,包括禁令标志、指示标志、警告标志及信号灯等。模型在包含1376张训练图像、488张验证图像和229张测…...

使用curl命令调试Taotoken API接口的常见问题排查
🚀 告别海外账号与网络限制!稳定直连全球优质大模型,限时半价接入中。 👉 点击领取海量免费额度 使用curl命令调试Taotoken API接口的常见问题排查 基础教程类,面向所有需要通过HTTP直接与API交互的开发者,…...