AI大模型的使用-让AI帮你写单元测试
1.体验多步提示语
我们本节就让AI帮我们写一个单元测试,全程用AI给我们答案,首先单元测试前需要有代码,那么我们让AI给我们生成一个代码,要求如下:
用Python写一个函数,进行时间格式化输出,比如:
输入  输出
1  1s
61  1min1s
要求仅需要格式化到小时(?h?min?s),即可
假如AI给了我们这样一段代码,比如,输入 1 就返回 1s,输入 61 就返回 1min1s,代码如下:
def format_time(seconds):minutes, seconds = divmod(seconds, 60)hours, minutes = divmod(minutes, 60)if hours > 0:return f"{hours}h{minutes}min{seconds}s"elif minutes > 0:return f"{minutes}min{seconds}s"else:return f"{seconds}s"
print(format_time(1))
我们可以用单元测试一下下面代码,单元测试包采取pytest
!pip install pytest
import pytestdef test_format_time():assert format_time(1) == "1s"assert format_time(59) == "59s"assert format_time(60) == "1min0s"assert format_time(61) == "1min1s"assert format_time(3600) == "1h0min0s"assert format_time(3661) == "1h1min1s"
ok,没有问题,但是关注点放入这个单元测试,我们发现这个单元测试过于简单,很多边界情况或者容易出现异常的情况都没有测试到,如,没有包含异常情况以及类型不一致或者空情况的测试。
我们想让AI生成完美的单元测试就需要一步一步引导,让它理解代码是干什么的,才能进行单元测试的编写。
下面我们就给出代码让它解释出我们的代码是干嘛的,看解释的是否准确,代码比较简单,
1.定义代码变量code母的是将代码给到openAI让它解释这段代码,
2.定义prompt跟Ai说明需求,这里需求是“让它写单元测试,并用Python 3.10和pytest高级特性写代码出合适的单元测试代码验证有效性,写代码之前,先去了解作者的意图”将需求promot和代码传给 AI即可,
3.最后我们防止直接给出代测试代码(不完美的单元测试),我们需要用stop及时停止,让它只返回代码解释说明,看看它有没有理解。
#! pip install openai
import openai
openai.api_key='sk'
# 使用text-davinci-002模型,是一个通过监督学习微调的生成文本的模型。因为这里我们希望生成目标明确的文本的代码解释,所以选用了这个模型。
# openAI调用
def gpt35(prompt, model="text-davinci-002", temperature=0.4, max_tokens=1000, top_p=1, stop=["\n\n", "\n\t\n", "\n    \n"]):response = openai.Completion.create(model=model,prompt = prompt,temperature = temperature,max_tokens = max_tokens,top_p = top_p,stop = stop)message = response["choices"][0]["text"]return message# 代码
code = """
def format_time(seconds):minutes, seconds = divmod(seconds, 60)hours, minutes = divmod(minutes, 60)if hours > 0:return f"{hours}h{minutes}min{seconds}s"elif minutes > 0:return f"{minutes}min{seconds}s"else:return f"{seconds}s"
"""# promot跟AI说明要做什么
def explain_code(function_to_test, unit_test_package="pytest"):prompt = f""""# How to write great unit tests with {unit_test_package}In this advanced tutorial for experts, we'll use Python 3.10 and `{unit_test_package}` to write a suite of unit tests to verify the behavior of the following function.
```python
{function_to_test}Before writing any unit tests, let's review what each element of the function is doing exactly and what the author's intentions may have been.
- First,"""response = gpt35(prompt)return response, prompt
# 在最后一行用 “- First” 开头,引导 GPT 模型,逐步分行描述要测试的代码干了什么。# 封装调用
code_explaination, prompt_to_explain_code = explain_code(code)-
print(code_explaination)
结果:
the function `format_time` takes in a single parameter `seconds` which should be a `float` or an `int`.
- The function then uses `divmod` to calculate the number of `minutes` and `seconds` from the total number of `seconds`.
- Next, `divmod` is used again to calculate the number of `hours` and `minutes` from the total number of `minutes`.
- Finally, the function returns a `string` formatted according to the number of `hours`, `minutes`, and `seconds`.
接下来根据上面的反馈以及进一步的需求,让它帮忙写出一个简单的但是包含多种情况的单元测试例子,我们提出测试单元的需求,看看它能否给出可靠的全面的测试要求,代码如下,
# 要求如下
# 1.我们要求测试用例,尽量考虑输入的范围广一些。
# 2.我们要求 AI 想一些连代码作者没有想到过的边界条件。
# 3.我们希望 AI 能够利用好 pytest 这个测试包的特性。
# 4.希望测试用例清晰易读,测试的代码要干净。
# 5.我们要求测试代码的输出结果是确定的,要么通过,要么失败,不要有随机性。
def generate_a_test_plan(full_code_explaination, unit_test_package="pytest"):prompt_to_explain_a_plan = f"""A good unit test suite should aim to:
- Test the function's behavior for a wide range of possible inputs
- Test edge cases that the author may not have foreseen
- Take advantage of the features of `{unit_test_package}` to make the tests easy to write and maintain
- Be easy to read and understand, with clean code and descriptive names
- Be deterministic, so that the tests always pass or fail in the same way`{unit_test_package}` has many convenient features that make it easy to write and maintain unit tests. We'll use them to write unit tests for the function above.For this particular function, we'll want our unit tests to handle the following diverse scenarios (and under each scenario, we include a few examples as sub-bullets):
-"""prompt = full_code_explaination + prompt_to_explain_a_planresponse = gpt35(prompt)return response, prompttest_plan, prompt_to_get_test_plan = generate_a_test_plan(prompt_to_explain_code + code_explaination)
print(test_plan)
结果:当然每次执行返回不一样,因为大模型的随机性。可以看到它能够考虑到异常情况,以及字符不符合会出现什么问题。
 Normal inputs- `format_time(0)` should return `"0s"`- `format_time(1)` should return `"1s"`- `format_time(59)` should return `"59s"`- `format_time(60)` should return `"1min0s"`- `format_time(61)` should return `"1min1s"`- `format_time(3599)` should return `"59min59s"`- `format_time(3600)` should return `"1h0min0s"`- `format_time(3601)` should return `"1h0min1s"`- `format_time(3660)` should return `"1h1min0s"`- `format_time(7199)` should return `"1h59min59s"`- `format_time(7200)` should return `"2h0min0s"`
- Invalid inputs- `format_time(None)` should raise a `TypeError`- `format_time("1")` should raise a `TypeError`- `format_time(-1)` should raise a `ValueError`
可以根据它提供的修改为可执行的单元测试:
import pytestdef test_format_time():assert format_time(0) == "0s"assert format_time(1) == "1s"assert format_time(59) == "59s"assert format_time(60) == "1min0s"assert format_time(61) == "1min1s"assert format_time(3600) == "1h0min0s"assert format_time(3661) == "1h1min1s"assert format_time(7200) == "2h0min0s"assert format_time(None) == "TypeError"assert format_time("1") == "TypeError"assert format_time(-1) == "ValueError"没问题继续往下走,要是生成的测试计划数不满意,可以判断用例数是否小于指定的数,如果是那么就继续promot让其再生成按照如下的要求。
not_enough_test_plan = """The function is called with a valid number of seconds- `format_time(1)` should return `"1s"`- `format_time(59)` should return `"59s"`- `format_time(60)` should return `"1min"`
"""approx_min_cases_to_cover = 7
# 上下文用例数是否小于指定数字
elaboration_needed = test_plan.count("\n-") +1 < approx_min_cases_to_cover
# 是的话就提需求,在调用下AI
if elaboration_needed:prompt_to_elaborate_on_the_plan = f"""In addition to the scenarios above, we'll also want to make sure we don't forget to test rare or unexpected edge cases (and under each edge case, we include a few examples as sub-bullets):
-"""more_test_plan, prompt_to_get_test_plan = generate_a_test_plan(prompt_to_explain_code + code_explaination + not_enough_test_plan + prompt_to_elaborate_on_the_plan)print(more_test_plan)
结果:
The function is called with a valid number of seconds- `format_time(1)` should return `"1s"`- `format_time(59)` should return `"59s"`- `format_time(60)` should return `"1min"`
- The function is called with an invalid number of seconds- `format_time(-1)` should raise a `ValueError`- `format_time("1")` should raise a `TypeError`
- The function is called with a valid number of minutes- `format_time(60)` should return `"1min"`- `format_time(119)` should return `"1min59s"`
- The function is called with an invalid number of minutes- `format_time(-1)` should raise a `ValueError`- `format_time("1")` should raise a `TypeError`
- The function is called with a valid number of hours- `format_time(3600)` should return `"1h"`- `format_time(7199)` should return `"1h59min"`
- The function is called with an invalid number of hours- `format_time(-1)` should raise a `ValueError`- `format_time("1")` should raise a `TypeError`
2.根据测试计划生成测试代码
我们根据上面给的需求以及AI给的答案拼装到新添加的prompt的给到AI,然后让它给我们一个测试单元代码
def generate_test_cases(function_to_test, unit_test_package="pytest"):# 将内容加载到prompt的{starter_comment}中starter_comment = "Below, each test case is represented by a tuple passed to the @pytest.mark.parametrize decorator"# promptprompt_to_generate_the_unit_test = f"""Before going into the individual tests, let's first look at the complete suite                 of unit tests as a cohesive whole. We've added helpful comments to explain what      each line does.```pythonimport {unit_test_package}  # used for our unit tests{function_to_test}#{starter_comment}"""# 将所有的需求和ai给的结果拼接到prompt里,目的为了给的结果更准确full_unit_test_prompt = prompt_to_explain_code + code_explaination + test_plan + prompt_to_generate_the_unit_testreturn gpt35(model="text-davinci-003", prompt=full_unit_test_prompt, stop="```"), prompt_to_generate_the_unit_testunit_test_response, prompt_to_generate_the_unit_test = generate_test_cases(code)
print(unit_test_response)
结果:可以拿过去直接执行
#The first element of the tuple is the name of the test case, and the second element is a dict
#containing the arguments to be passed to the function.
@pytest.mark.parametrize("test_case_name, test_case_args",[("positive_integer", {"seconds": 1}),("positive_integer_60", {"seconds": 60}),("positive_integer_3600", {"seconds": 3600}),("positive_integer_3601", {"seconds": 3601}),("negative_integer", {"seconds": -1}),("negative_integer_60", {"seconds": -60}),("negative_integer_3600", {"seconds": -3600}),("negative_integer_3601", {"seconds": -3601}),("float", {"seconds": 1.5}),("float_60", {"seconds": 60.5}),("float_3600", {"seconds": 3600.5}),("string", {"seconds": "1"}),("string_60", {"seconds": "60"}),("string_3600", {"seconds": "3600"}),("string_3601", {"seconds": "3601"}),("decimal", {"seconds": Decimal("1")}),("decimal_60", {"seconds": Decimal("60")}),("decimal_3600", {"seconds": Decimal("3600")}),("decimal_3601", {"seconds": Decimal("3601")}),],
)
def test_format_time(test_case_name, test_case_args):# Here, we use the test case name to determine the expected output.# This allows us to DRY up our code and avoid repeating ourselves.if "positive_integer" in test_case_name:expected = f"{test_case_args['seconds']}s"elif "positive_integer_60" in test_case_name:expected = "1min"elif "positive_integer_3600" in test_case_name:expected = "1h"elif "positive_integer_3601" in test_case_name:expected = "1h0min1s"elif "negative_integer" in test_case_name:expected = f"-{test_case_args['seconds']}s"elif "negative_integer_60" in test_case_name:expected = "-1min"elif "negative_integer_3600" in test_case_name:expected = "-1h"elif "negative_integer_3601" in test_case_name:expected = "-1h0min1s"elif "float" in test_case_name:expected = f"{test_case_args['seconds']}s"elif "float_60" in test_case_name:expected = "1min0.5s"elif "float_3600" in test_case_name:expected = "1h0.5s"elif "string" in test_case_name:expected = f"{test_case_args['seconds']}s"elif "string_60" in test_case_name:expected = "1min"elif "string_3600" in test_case_name:expected = "1h"elif "string_3601" in test_case_name:expected = "1h0min1s"elif "decimal" in test_case_name:expected = f"{test_case_args['seconds']}s"elif "decimal_60" in test_case_name:expected = "1min"elif "decimal_3600" in test_case_name:expected = "1h"elif "decimal_3601" in test_case_name:expected = "1h0min1s"# Now that we have the expected output, we can call the function and assert that the output is
那么如果全程自动化的话,我并不知道是否给的代码是否是有语句错误等行为,所以我们可以借用AST 库进行语法检查。
3.通过AST 库进行语法检查
可以检测下AI生成的代码,用Python 的 AST 库来完成。代码也是很简单,我们找到代码片段,将代码传给ast.parse()进行校验,有问题则抛出异常
# 语义检查
import ast
# 找到代码的索引
code_start_index = prompt_to_generate_the_unit_test.find("```python\n") + len("```python\n")
# 找到prompt_to_generate_the_unit_test里从187到最后的内容,并拼接单元测试代码的内容
code_output = prompt_to_generate_the_unit_test[code_start_index:] + unit_test_response
print("code_output:",code_output)# 进行语义检查
try:ast.parse(code_output)
except SyntaxError as e:print(f"Syntax error in generated code: {e}")
本节知识资料感谢徐文浩老师的《AI大模型之美》,让我感受它是真的美!
相关文章:

AI大模型的使用-让AI帮你写单元测试
1.体验多步提示语 我们本节就让AI帮我们写一个单元测试,全程用AI给我们答案,首先单元测试前需要有代码,那么我们让AI给我们生成一个代码,要求如下: 用Python写一个函数,进行时间格式化输出,比…...
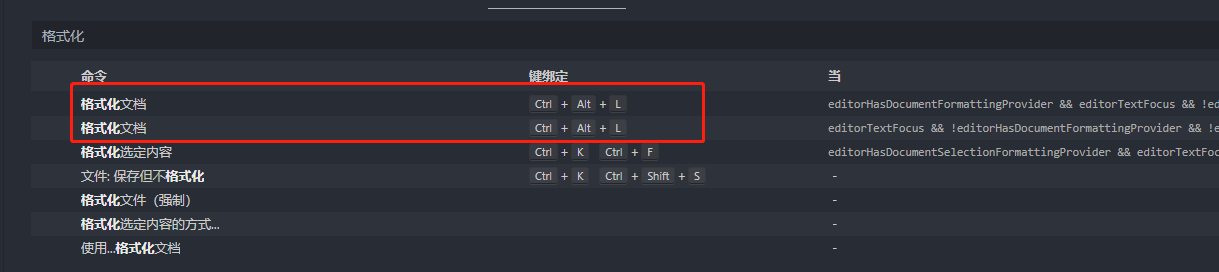
vscode调教配置:快捷修复和格式化代码
配置vscode快捷键,让你像使用idea一样使用vscode,我们最常用的两个功能就是格式化代码和快捷修复,所以这里修改一下快捷修复和格式化代码的快捷键。 在设置中,找到快捷键配置: 然后搜索:快捷修复 在快捷键…...

pear admin 后端启动
pear admin 后端启动 一、项目结构二、启动 一、项目结构 应用结构: Pear Admin Flask ├─applications # 应用 │ ├─rights # │ ├─system # 静态资源文件 │ ├─users # │ └─views # 视图部分 ├─common # 公共模块 ├─models # 数据模…...
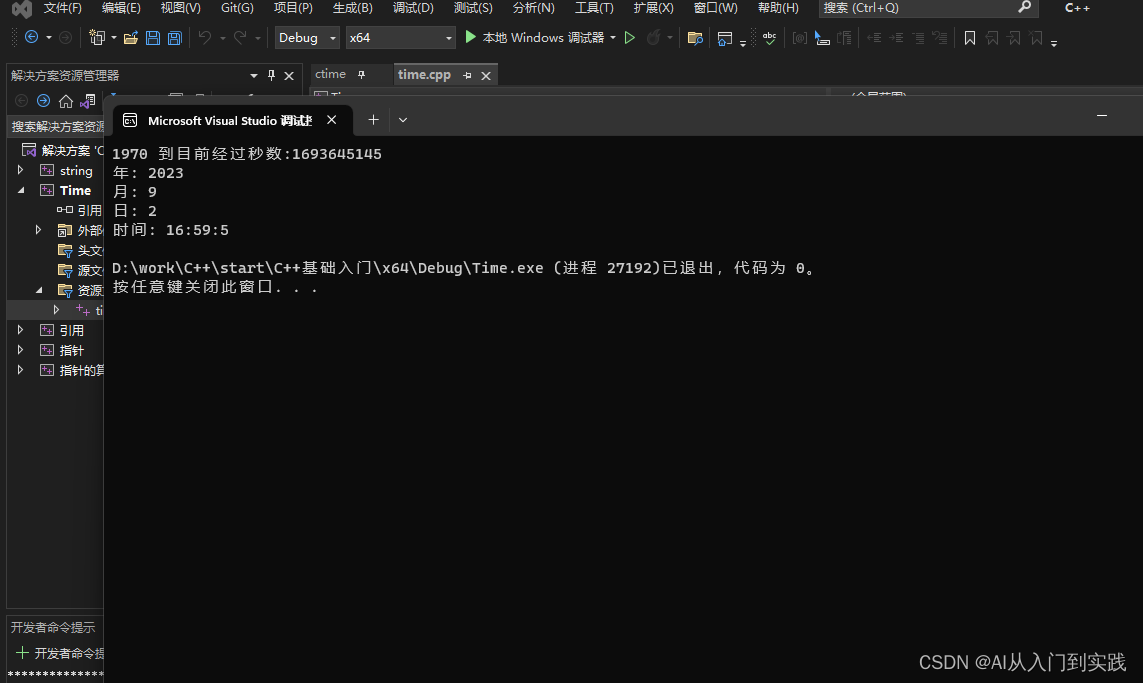
C++:输出系统时间(及报错处理)
#include <iostream> #include <ctime>using namespace std;int main() {// 基于当前系统的当前日期/时间time_t now time(0);cout << "1970 到目前经过秒数:" << now << endl;tm* ltm localtime(&now);// 输出 tm 结构的各个组…...
使用Windbg动态调试排查软件启动不了的问题
目录 1、问题说明 2、初步分析 3、使用Windbg启动程序进行动态调试 4、进一步分析 5、何时使用Windbg静态分析?何时使用Windbg进行动态调试? 6、最后 VC常用功能开发汇总(专栏文章列表,欢迎订阅,持续更新...&…...
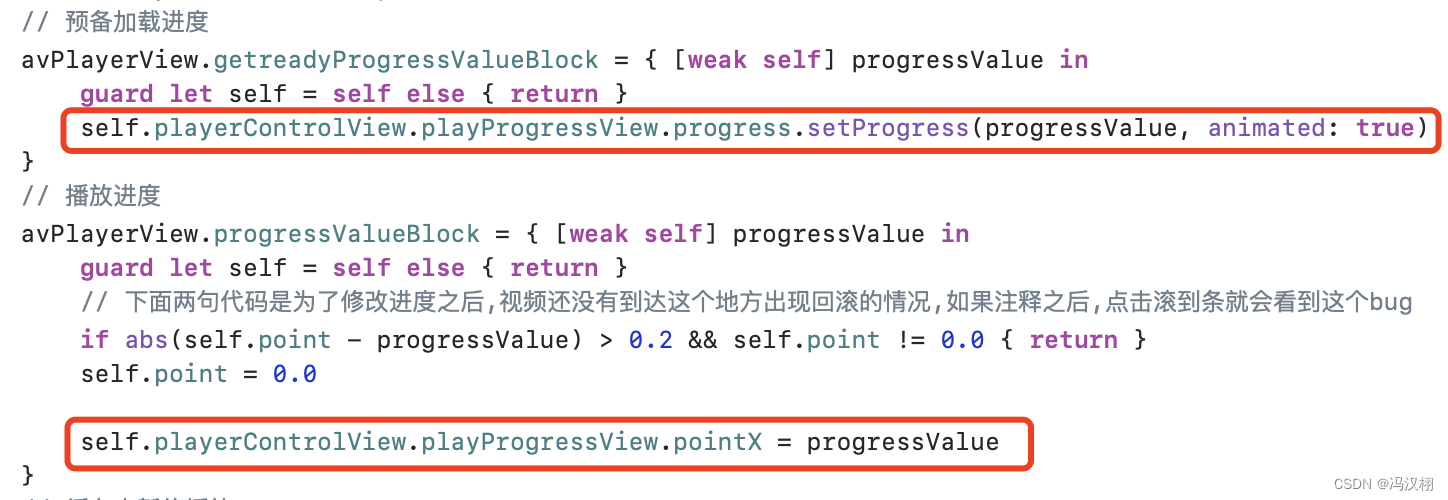
Swift 技术 视频播放器滚动条(源码)
一直觉得自己写的不是技术,而是情怀,一个个的教程是自己这一路走来的痕迹。靠专业技能的成功是最具可复制性的,希望我的这条路能让你们少走弯路,希望我能帮你们抹去知识的蒙尘,希望我能帮你们理清知识的脉络࿰…...

PixelSNAIL论文代码学习(2)——门控残差网络的实现
文章目录 引言正文门控残差网络介绍门控残差网络具体实现代码使用pytorch实现 总结 引言 阅读了pixelSNAIL,很简短,就用了几页,介绍了网络结构,介绍了试验效果就没有了,具体论文学习链接 这段时间看他的代码,还是挺痛…...
---使用Pipeline Overridable Constants)
WebGPU学习(9)---使用Pipeline Overridable Constants
使用Pipeline Overridable Constants WebGPU 的着色器语言是 WGSL,但与 GLSL 和 HLSL 不同,不支持 #ifdef 等宏。为了实现各种着色器变体,迄今为止,宏一直是着色器编程中非常重要的功能。那么应该如何处理没有宏的 WGSLÿ…...
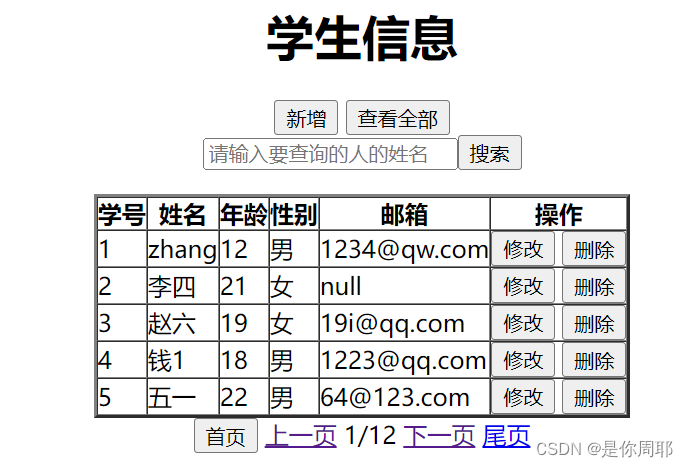
javaweb入门版学生信息管理系统-增删改查+JSP+Jstl+El
dao public class StudentDao {QueryRunner queryRunner QueryRunnerUtils.getQueryRunner();//查询全部学生信息public List<Student> selectStudent(){String sql "select * from tb_student";List<Student> students null;try {students queryRunn…...
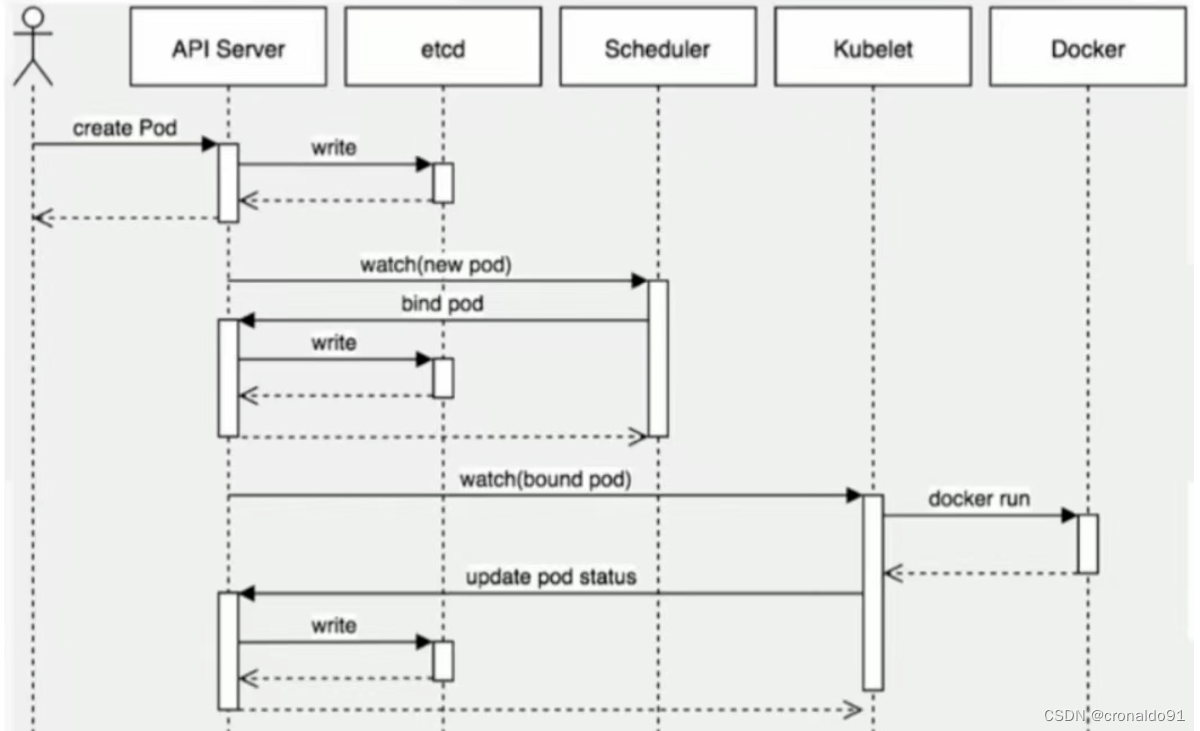
云原生Kubernetes:K8S概述
目录 一、理论 1.云原生 2.K8S 3.k8s集群架构与组件 二、总结 一、理论 1.云原生 (1)概念 云原生是一种基于容器、微服务和自动化运维的软件开发和部署方法。它可以使应用程序更加高效、可靠和可扩展,适用于各种不同的云平台。 如果…...

nmap的使用
目录 nmap简介 主要作用 nmap原理 namp使用 options nmap列举远程机器开放端口 普通扫描 扫描范围端口 对几个端口探测 对所有端口进行探测 指定协议探测端口 扫描对应协议的所有端口 端口状态 nmap识别目标机器上服务的指纹 服务指纹 识别目标机器服务信息 …...

Python爬虫-某网酒店数据
前言 本文是该专栏的第5篇,后面会持续分享python爬虫案例干货,记得关注。 本文以某网的酒店数据为例,实现根据目标城市获取酒店数据。具体思路和方法跟着笔者直接往下看正文详细内容。(附带完整代码) 正文 地址:aHR0cHM6Ly93d3cuYnRoaG90ZWxzLmNvbS9saXN0L3NoYW5naGFp …...

了解atoi和offsetof
提示:文章写完后,目录可以自动生成,如何生成可参考右边的帮助文档 文章目录 目录 文章目录 一、简介 二、深度剖析 1.atoi 2.offsetof 三、应用场景 一、简介二、深度剖析 1.atoi2.offsetof三、应用场景 一、简介 在C语言中,有许多…...
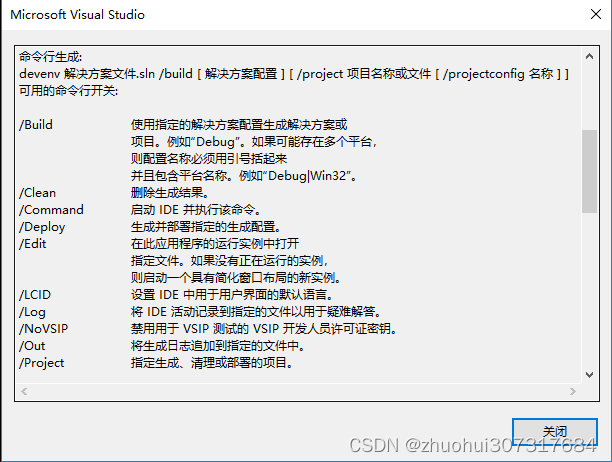
命令行编译VS工程
先输入以下命令,因为命令出错了,就会弹出帮助,如下: "C:\Program Files (x86)\Microsoft Visual Studio 11.0\Common7\IDE\devenv.exe" /help 反正就是Microsoft Visual Studio 的安装路径。 帮助界面如下:…...

Linux防火墙命令
开启防火墙 systemctl start firewalld关闭防火墙 systemctl stop firewalld # 暂时关闭防火墙 systemctl disable firewalld # 永久关闭防火墙(禁用开机自启) systemctl enable firewalld # 永久开启防火墙(启用开机自启)重启防火墙 systemctl restart firewalld重载规则 …...

大数据平台数据脱敏是什么意思?有哪些方案?
大数据平台包含了海量多样化数据,所以保障大数据平台数据安全非常重要,数据脱敏就是手段之一。今天我们就来简单聊聊大数据平台数据脱敏是什么意思?有哪些方案? 大数据平台数据脱敏是什么意思? 大数据平台数据脱敏简…...

前后端分离不存在会话,sessionid不一致问题
目录 1.使用拦截器解决跨域的示例: 2.使用redis,不使用session 前后端不分离项目我们可以通过session存储数据,但是前后端分离时不存在会话,每次请求sessionid都会改变,当值我们储存的数据不能取出来。 1.使用拦截器…...

Python 3+ 安装及pip配置
Python 3 安装及pip安装升级 1. 安装Python依赖2. 在Linux服务器下载3. 创建python链接4. 配置pip 服务器环境:Linux CentOS 7 内核版本3.10 Python版本:3.10.6 由于CentOS 7默认安装python2.7,使用yum可以查到最新的python3版本为3.6.8&…...

StarRocks入门到熟练
1、部署 1.1、注意事项 需要根据业务需求设计严谨的集群架构,一般来说,需要注意以下几项: 1.1.1、FE数量及高可用 FE的Follower要求为奇数个,且并不建议部署太多,通常我们推荐部署1个或3个Follower。在三个Followe…...

Zabbix Api监控项值推送:zabbix_sender
用法示例: zabbix_sender [-v] -z server [-p port] [-I IP-address] [-t timeout] -s host -k key -o value其中: -z 即 --zabbix-server,Zabbix server的主机名或IP地址。如果主机由proxy监控,则应使用proxy的主机名或IP地址-…...

多自由度冗余空间机械臂位姿一体化规划与控制【附代码】
✨ 长期致力于空间机械臂、对偶四元数、位姿一体化、路径规划、跟踪控制研究工作,擅长数据搜集与处理、建模仿真、程序编写、仿真设计。 ✅ 专业定制毕设、代码 ✅ 如需沟通交流,点击《获取方式》 (1)基于对偶四元数的冗余机械臂运…...
 —— SPI相关概念)
STM32单片机学习(27) —— SPI相关概念
文章目录概述SPI通信的核心特性I2C和SPI的简单对比SPI学习的补充说明SPI硬件电路设计SPI的四条通信线SPI通信的片选线低电平选中不支持广播通信SPI通信的时序结构(重点)SPI通信的比特序通信空闲状态,SPI时钟极性采样时机,SPI时钟相…...

Python基础语法:常用内置函数
round():四舍五入 # 省略 ndigits print(round(3.14)) # 输出 3(int) print(round(3.66)) # 输出 4# 指定 ndigits print(round(3.14159, 2)) # 输出 3.14(float) print(round(3.666, 2)) # 输出 3.67# …...

潮州东方轻奢风全屋高定找哪家
开篇引言根据《2026年中国全屋定制行业发展报告》,潮州市全屋定制市场规模同比增长38%,其中全屋高端定制细分市场同比增长52%。目前,潮州市家庭全屋定制需求占比72%,高端定制需求占比45%。为了帮助潮州市消费者选择合规、靠谱、差…...
)
保姆级教程:Windows系统下Arcgis 10.2从下载、安装到汉化一次搞定(附常见License启动失败解决方案)
Windows系统下Arcgis 10.2完整安装与汉化实战指南第一次接触Arcgis的新手往往会被复杂的安装流程和神秘的License Manager搞得晕头转向。作为一款功能强大的地理信息系统软件,Arcgis在科研、城市规划、环境监测等领域有着广泛应用,但它的安装过程确实会让…...

【紧急预警】Lindy衰减临界点已提前至第8.3个月!2024最新《营销自动化寿命健康度白皮书》限时开放前500份
更多请点击: https://kaifayun.com 第一章:Lindy衰减临界点的理论重构与实证突破 Lindy效应传统上描述“越老越长寿”的非线性生存规律,但其在现代软件系统、开源生态与协议层技术栈中的适用边界正遭遇结构性挑战。本文首次将Lindy模型从静…...

从游戏引擎到仿真平台:手把手教你用AirSim+UE4搭建你的第一个无人机/自动驾驶仿真环境
从游戏引擎到仿真平台:构建AirSimUE4无人机与自动驾驶仿真环境实战指南当游戏引擎遇上机器人算法测试,会碰撞出怎样的火花?微软开源的AirSim项目将虚幻引擎(Unreal Engine)从游戏开发领域引入到自动驾驶和无人机研究的…...

如何快速解锁艾尔登法环帧率限制:终极性能优化指南
如何快速解锁艾尔登法环帧率限制:终极性能优化指南 【免费下载链接】EldenRingFpsUnlockAndMore A small utility to remove frame rate limit, change FOV, add widescreen support and more for Elden Ring 项目地址: https://gitcode.com/gh_mirrors/el/EldenR…...

告别Postman!用APIfox搞定接口测试+自动化,这份保姆级教程带你从环境配置到报告生成
从Postman到APIfox:接口测试自动化的高效迁移指南如果你还在为接口测试中的重复劳动和多环境切换头疼,是时候考虑从Postman迁移到APIfox了。作为一名经历过这个转型过程的开发者,我想分享一些实战经验,帮助你平滑过渡并最大化利用…...

关于软件版本升级的故事
起因在群里有网友说软件的版本升级比较简单,俺就回了四个字母“PACS”,并补上了一个表情 然后看见开始细说了:一、PACS 属于哪一类?PACS 软件 第二类医疗器械(独立软件)国家药监局分类:Ⅱ 类 2…...