AI项目六:WEB端部署YOLOv5
若该文为原创文章,转载请注明原文出处。
一、介绍
最近接触网页大屏,所以就想把YOLOV5部署到WEB端,通过了解,知道了两个方法:
1、基于Flask部署YOLOv5目标检测模型。
2、基于Streamlit部署YOLOv5目标检测。
代码在github上,个人感觉两个比较好的,所以基于两份代码测试。
https://github.com/ngzhili/Yolov5-Real-Time-Object-Detection
GitHub - harshit-tech03/Fire_Detection: A fire detection web app using yolov5.
一、虚拟环境创建
1、创建虚拟环境
conda create -n yolov5_env python=3.8 2、激活环境
conda activate yolov5_env3、下载yolov5
https://github.com/ultralytics/yolov54、安装yolov5
pip install -r requirements.txt注意以下测试都是基于此环境测试
二、基于Flask部署YOLOv5目标检测模型。
1、安装环境
requirements.txt
flask
requests
blackmatplotlib>=3.2.2
numpy>=1.18.5
opencv-python>=4.1.2
Pillow
PyYAML>=5.3.1
scipy>=1.4.1
torch>=1.7.0
torchvision>=0.8.1
tqdm>=4.41.0tensorboard>=2.4.1seaborn>=0.11.0
pandasthop  # FLOPs computation
代码感觉相对简单,而且也挺详细的,所以直接上代码。
2、前端代码
index.html
<!DOCTYPE html>
<html><head><meta charset="utf-8"><meta content="width=device-width, initial-scale=1.0" name="viewport"><title>YOLOV5 Real Time Inference</title><style>.corner {border-radius: 25px;border: 5px solid #212aad;padding: 0px;width:60%;height:auto;text-align: center;}.video-container {justify-content: center;text-align: center;height:100%;/*border: 1px solid black;*/}</style></head><body ><div class="container"><div class="row" style="text-align: center; width:100%;"><img src="../static/pytorch.png" style="width:40px; position:relative; left: -10px; display:inline-block;"><h1 style="text-align: center; display:inline-block;">Template for YOLOV5 Object Detection Model Real-Time Inference Using Web Cam</h1></img><h2 style="text-align: center;">Built by Zhili</h2></div></div><div class="video-container"><img src="{{ url_for('video') }}" class="corner"></img><!--<img src="../static/pytorch.png" class="corner"></img>--><!--<img src="{{ url_for('video') }}" width="50%"/>--></div></body>
</html>
3、后端代码
app.py
"""
Simple app to upload an image via a web form
and view the inference results on the image in the browser.
"""
import argparse
import io
import os
from PIL import Image
import cv2
import numpy as npimport torch
from flask import Flask, render_template, request, redirect, Responseapp = Flask(__name__)#'''
# Load Pre-trained Model
#model = torch.hub.load(
#        "ultralytics/yolov5", "yolov5s", pretrained=True, force_reload=True
#        )#.autoshape()  # force_reload = recache latest code
#'''
# Load Custom Model
#model = torch.hub.load("ultralytics/yolov5", "custom", path = "./best_damage.pt", force_reload=True)
model = torch.hub.load('./yolov5', 'custom', './yolov5s.pt',source='local')
# Set Model Settings
model.eval()
model.conf = 0.6  # confidence threshold (0-1)
model.iou = 0.45  # NMS IoU threshold (0-1) from io import BytesIOdef gen():cap=cv2.VideoCapture(0)# Read until video is completedwhile(cap.isOpened()):# Capture frame-by-fram ## read the camera framesuccess, frame = cap.read()if success == True:ret,buffer=cv2.imencode('.jpg',frame)frame=buffer.tobytes()#print(type(frame))img = Image.open(io.BytesIO(frame))results = model(img, size=640)#print(results)#print(results.pandas().xyxy[0])#results.render()  # updates results.imgs with boxes and labelsresults.print()  # print results to screen#results.show() #print(results.imgs)#print(type(img))#print(results)#plt.imshow(np.squeeze(results.render()))#print(type(img))#print(img.mode)#convert remove single-dimensional entries from the shape of an arrayimg = np.squeeze(results.render()) #RGB# read image as BGRimg_BGR = cv2.cvtColor(img, cv2.COLOR_RGB2BGR) #BGR#print(type(img))#print(img.shape)#frame = img#ret,buffer=cv2.imencode('.jpg',img)#frame=buffer.tobytes()#print(type(frame))#for img in results.imgs:#img = Image.fromarray(img)#ret,img=cv2.imencode('.jpg',img)#img=img.tobytes()#encode output image to bytes#img = cv2.imencode('.jpg', img)[1].tobytes()#print(type(img))else:break#print(cv2.imencode('.jpg', img)[1])#print(b)#frame = img_byte_arr# Encode BGR image to bytes so that cv2 will convert to RGBframe = cv2.imencode('.jpg', img_BGR)[1].tobytes()#print(frame)yield(b'--frame\r\n'b'Content-Type: image/jpeg\r\n\r\n' + frame + b'\r\n')@app.route('/')
def index():return render_template('index.html')@app.route('/video')
def video():"""Video streaming route. Put this in the src attribute of an img tag."""return Response(gen(),mimetype='multipart/x-mixed-replace; boundary=frame')
'''
@app.route('/video')
def video():return Response(generate_frames(),mimetype='multipart/x-mixed-replace; boundary=frame')
'''
'''
@app.route("/", methods=["GET", "POST"])
def predict():if request.method == "POST":if "file" not in request.files:return redirect(request.url)file = request.files["file"]if not file:returnimg_bytes = file.read()img = Image.open(io.BytesIO(img_bytes))results = model(img, size=640)# for debugging# data = results.pandas().xyxy[0].to_json(orient="records")# return dataresults.render()  # updates results.imgs with boxes and labelsfor img in results.imgs:img_base64 = Image.fromarray(img)img_base64.save("static/image0.jpg", format="JPEG")return redirect("static/image0.jpg")return render_template("index.html")
'''if __name__ == "__main__":parser = argparse.ArgumentParser(description="Flask app exposing yolov5 models")parser.add_argument("--port", default=5000, type=int, help="port number")args = parser.parse_args()'''model = torch.hub.load("ultralytics/yolov5", "yolov5s", pretrained=True, force_reload=True).autoshape()  # force_reload = recache latest codemodel.eval()'''app.run(host="0.0.0.0", port=args.port)  # debug=True causes Restarting with stat# Docker Shortcuts
# docker build --tag yolov5 .
# docker run --env="DISPLAY" --volume="/tmp/.X11-unix:/tmp/.X11-unix:rw" --device="/dev/video0:/dev/video0" yolov5
4、运行结果
执行python app.py


三、基于Streamlit部署YOLOv5目标检测。
1、什么是Streamlit
Streamlit 是一个用于数据科学和机器学习的开源 Python 框架。它提供了一种简单的方式来构建交互式应用程序,使数据科学家和机器学习工程师可以更轻松地将他们的模型展示给其他人。
以下是 Streamlit 常用的一些方法:
st.write():打印文本、数据框、图表等。st.title():创建标题。st.header():创建大标题。st.subheader():创建小标题。st.text():打印文本。st.markdown():打印 Markdown 文本。st.latex():打印 LaTeX 公式。st.dataframe():显示数据框。st.table():显示表格。st.line_chart():创建线形图。st.area_chart():创建面积图。st.bar_chart():创建条形图。st.map():创建地图。st.pyplot():显示 Matplotlib 图表。st.altair_chart():显示 Altair 图表。st.vega_lite_chart():显示 Vega-Lite 图表。st.bokeh_chart():显示 Bokeh 图表。st.plotly_chart():显示 Plotly 图表。st.image():显示图像。st.audio():显示音频。st.video():显示视频。st.file_uploader():上传文件。st.download_button():下载文件。
以上是 Streamlit 的一些常用方法,可以根据需要选择使用。
只能説Streamlit比Flask更简单,更容易看懂。
在上面环境的基础上在安装一次环境
2、安装环境
requirements.txt
yolov5
opencv_python_headless
streamlit
numpy
Pillow
torch
torchvision
PyYAML
tqdm
matplotlib
requests
scipy
tensorboard
pandas
seaborn
streamlit-webrtc
IPython
3、代码
代码不分前后端
Fire_Detection.py
import streamlit as st
import cv2
import numpy as np
import av
import torch
import tempfile
from PIL import Image@st.cache
def load_model():model = torch.hub.load('ultralytics/yolov5','custom',path="weights/last.pt",force_reload=True)return modeldemo_img = "fire.9.png"
demo_video = "Fire_Video.mp4"st.title('Fire Detection')
st.sidebar.title('App Mode')app_mode = st.sidebar.selectbox('Choose the App Mode',['About App','Run on Image','Run on Video','Run on WebCam'])if app_mode == 'About App':st.subheader("About")st.markdown("<h5>This is the Fire Detection App created with custom trained models using YoloV5</h5>",unsafe_allow_html=True)st.markdown("- <h5>Select the App Mode in the SideBar</h5>",unsafe_allow_html=True)st.image("Images/first_1.png")st.markdown("- <h5>Upload the Image and Detect the Fires in Images</h5>",unsafe_allow_html=True)st.image("Images/second_2.png")st.markdown("- <h5>Upload the Video and Detect the fires in Videos</h5>",unsafe_allow_html=True)st.image("Images/third_3.png")st.markdown("- <h5>Live Detection</h5>",unsafe_allow_html=True)st.image("Images/fourth_4.png")st.markdown("- <h5>Click Start to start the camera</h5>",unsafe_allow_html=True)st.markdown("- <h5>Click Stop to stop the camera</h5>",unsafe_allow_html=True)st.markdown("""## Features
- Detect on Image
- Detect on Videos
- Live Detection
## Tech Stack
- Python
- PyTorch
- Python CV
- Streamlit
- YoloV5
## 🔗 Links
[](https://github.com/AntroSafin)
""")if app_mode == 'Run on Image':st.subheader("Detected Fire:")text = st.markdown("")st.sidebar.markdown("---")# Input for Imageimg_file = st.sidebar.file_uploader("Upload an Image",type=["jpg","jpeg","png"])if img_file:image = np.array(Image.open(img_file))else:image = np.array(Image.open(demo_img))st.sidebar.markdown("---")st.sidebar.markdown("**Original Image**")st.sidebar.image(image)# predict the imagemodel = load_model()results = model(image)length = len(results.xyxy[0])output = np.squeeze(results.render())text.write(f"<h1 style='text-align: center; color:red;'>{length}</h1>",unsafe_allow_html = True)st.subheader("Output Image")st.image(output,use_column_width=True)if app_mode == 'Run on Video':st.subheader("Detected Fire:")text = st.markdown("")st.sidebar.markdown("---")st.subheader("Output")stframe = st.empty()#Input for Videovideo_file = st.sidebar.file_uploader("Upload a Video",type=['mp4','mov','avi','asf','m4v'])st.sidebar.markdown("---")tffile = tempfile.NamedTemporaryFile(delete=False)if not video_file:vid = cv2.VideoCapture(demo_video)tffile.name = demo_videoelse:tffile.write(video_file.read())vid = cv2.VideoCapture(tffile.name)st.sidebar.markdown("**Input Video**")st.sidebar.video(tffile.name)# predict the videowhile vid.isOpened():ret, frame = vid.read()if not ret:breakframe = cv2.cvtColor(frame,cv2.COLOR_BGR2RGB)model = load_model()results = model(frame)length = len(results.xyxy[0])output = np.squeeze(results.render())text.write(f"<h1 style='text-align: center; color:red;'>{length}</h1>",unsafe_allow_html = True)stframe.image(output)if app_mode == 'Run on WebCam':st.subheader("Detected Fire:")text = st.markdown("")st.sidebar.markdown("---")st.subheader("Output")stframe = st.empty()run = st.sidebar.button("Start")stop = st.sidebar.button("Stop")st.sidebar.markdown("---")cam = cv2.VideoCapture(0)if(run):while(True):if(stop):breakret,frame = cam.read()frame = cv2.cvtColor(frame,cv2.COLOR_BGR2RGB)model = load_model()results = model(frame)length = len(results.xyxy[0])output = np.squeeze(results.render())text.write(f"<h1 style='text-align: center; color:red;'>{length}</h1>",unsafe_allow_html = True)stframe.image(output)
4、运行结果
运行指令
streamlit run Fire_Detection.py
会自动打开网页
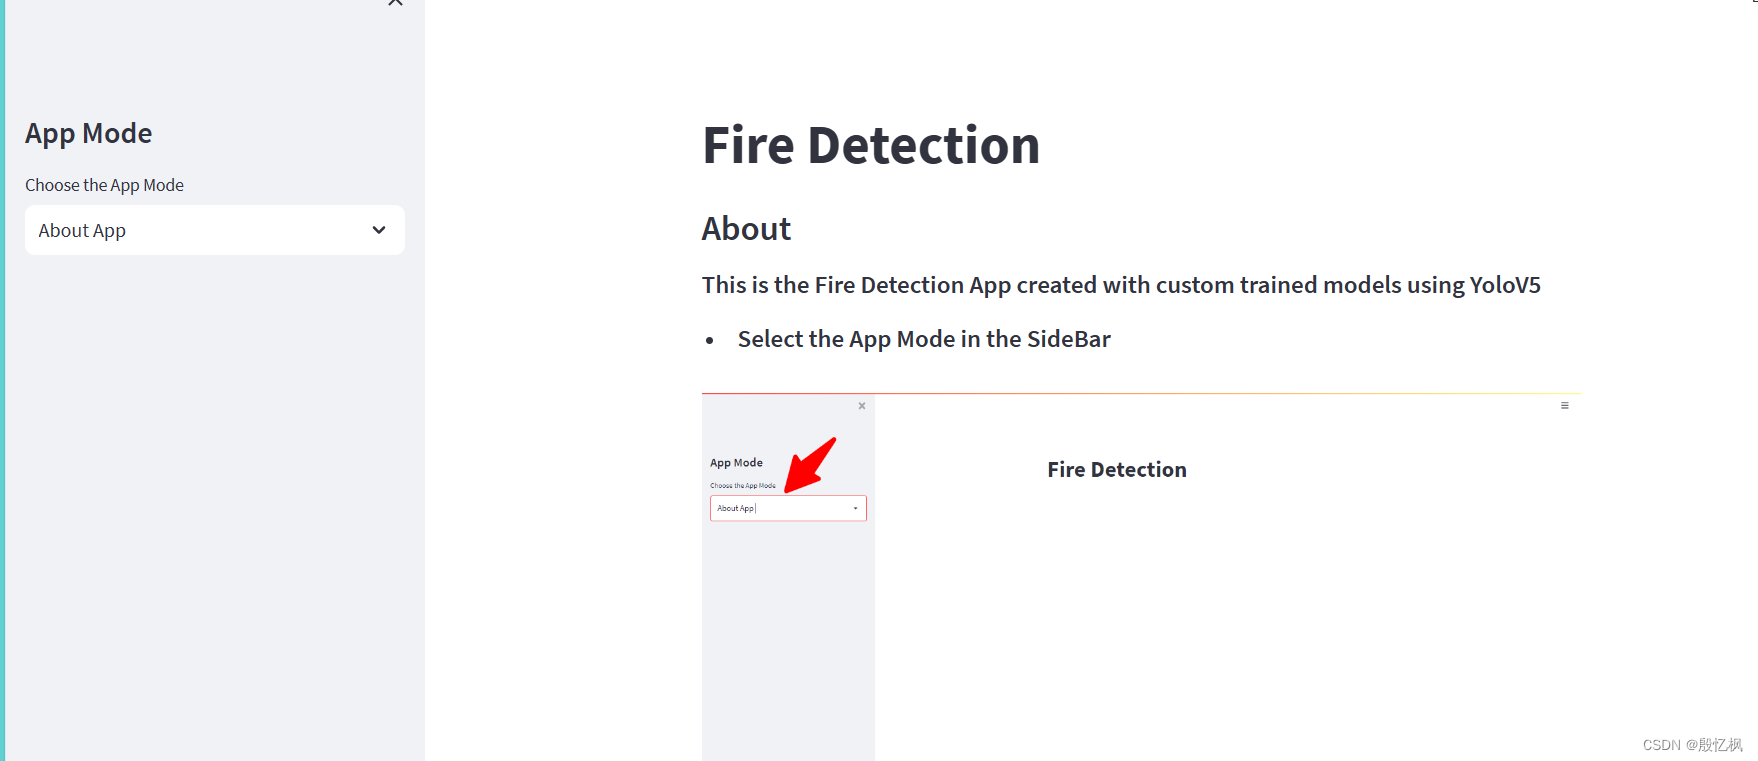
demo提供了图片测试,视频测试,和摄像头几个方式的测试方法。由于使用的模型是训练好的模型,所以yolo版本不能修改,只能联网下载。

如果想用自己的yolov5
那修改加载模型,改成本地加载,模型也需要修改。

四、总结
通过两个方式,个人对部署web有了个相对的简单的认识。
在此感谢github,和网友提供的代码。
如有侵权,或需要完整代码,请及时联系博主。
相关文章:
AI项目六:WEB端部署YOLOv5
若该文为原创文章,转载请注明原文出处。 一、介绍 最近接触网页大屏,所以就想把YOLOV5部署到WEB端,通过了解,知道了两个方法: 1、基于Flask部署YOLOv5目标检测模型。 2、基于Streamlit部署YOLOv5目标检测。 代码在…...

敲代码常用快捷键
1、代码拖动 PyCharm:按住 shiftalt鼠标选中某一区域来拖动,即可实现拖动这一区域至指定区域。Visual Studio Code (VSCode): - Windows/Linux:Alt 鼠标左键拖动 - MacOS:Option 鼠标左键拖动 IntelliJ IDEA: - Win…...

MyBatis: 分页插件PageHelper直接传递分页参数的用法
一、加分页插件依赖 <dependency><groupId>com.github.pagehelper</groupId><artifactId>pagehelper-spring-boot-starter</artifactId><version>1.2.13</version></dependency>二、配置分页插件,并配置相关属性&a…...
Python基于Flask的高校舆情分析,舆情监控可视化系统
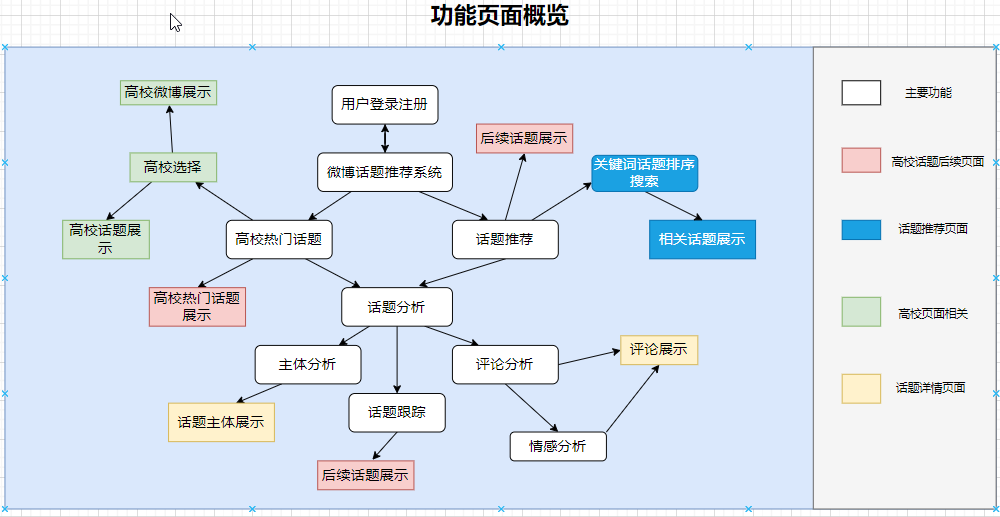
博主介绍:✌程序员徐师兄、7年大厂程序员经历。全网粉丝30W,Csdn博客专家、掘金/华为云/阿里云/InfoQ等平台优质作者、专注于Java技术领域和毕业项目实战✌ 运行效果图 基于Python的微博大数据舆情分析,舆论情感分析可视化系统 系统介绍 微博舆情分析系…...

Python第一次作业练习
题目分析: """ 参考学校的相关规定。 对于四分制,百分制中的90分及以上可视为绩点中的4分,80 分及以上为3分,70 分以上为2分,60 分以上为1分; 五分制中的5分为四分制中的4分,4分为3分&#…...

InstallShield打包升级时不覆盖原有文件的解决方案
一个.NET Framework的Devexpress UI Windows Form项目,用的InstallShield,前些个版本都好好的,最近几个版本突然就没法更新了,每次更新的时候都覆盖不了原文件,而且这样更新后第一次打开程序(虽然是老程序&…...

服务器巡检表-监控指标
1、巡检指标 系统资源K8S集群NginxJAVA应用RabbitMQRedisPostgreSQLElasticsearchELK日志系统 2、巡检项 检查项目 检查指标 检查标准 系统资源 CPU 使用率 正常:<70% 低风险:≥ 70% 中风险:≥ 85% 高风险:≥ 9…...
无涯教程-JavaScript - DDB函数
描述 DDB函数使用双倍余额递减法或您指定的某些其他方法返回指定期间内资产的折旧。 语法 DDB (cost, salvage, life, period, [factor])争论 Argument描述Required/OptionalCostThe initial cost of the asset.RequiredSalvage 折旧结束时的价值(有时称为资产的残值)。 该…...
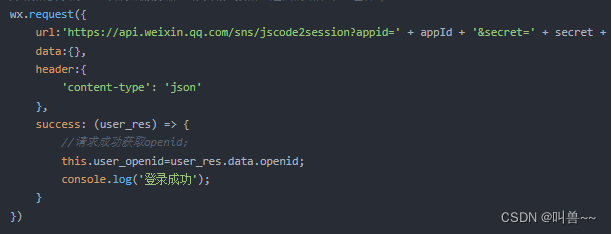
uniapp打包微信小程序。报错:https://api.weixin.qq.com 不在以下 request 合法域名列表
场景:在进行打包上传测试时,发现登录失效,但在测试中【勾选不效应合法域名】就可以。 出现原因:我在获取到用户code后,直接使用调用官方接口换取openid 解决方案: 可以把code带给后端,让他们返…...
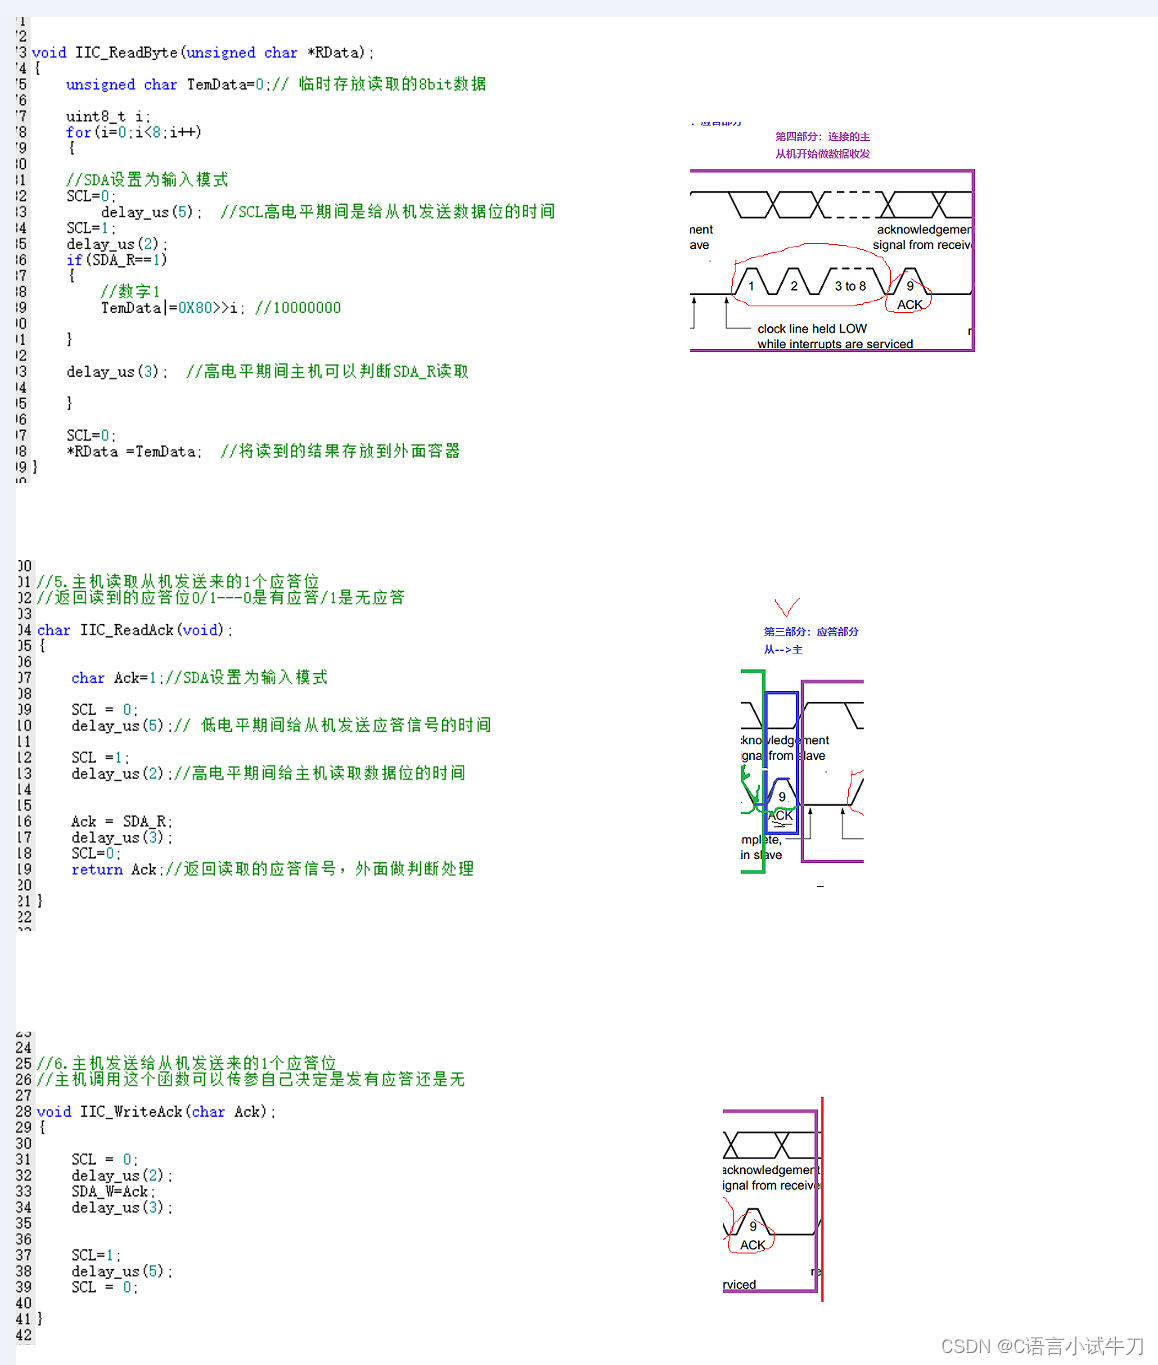
stm32之31.iic
iic双线制。一根是SCL,作为时钟同步线;一根是SDA,作为数据传输线 SDN #include "iic.h"#define SCL PBout(8)#define SDA_W PBout(9) #define SDA_R PBin(9)void IIC_GPIOInit(void) {GPIO_InitTypeDef GPIO_InitStructure;//使能时钟GR…...

新的 ChatGPT 提示工程技术:程序模拟
即时工程的世界在各个层面上都令人着迷,并且不乏巧妙的方法来推动像 ChatGPT 这样的代理生成特定类型的响应。思想链 (CoT)、基于指令、N-shot、Few-shot 等技术,甚至奉承/角色分配等技巧都是充满提示的库背后的灵感,旨在满足各种需求。 在本文中,我将深入研究一项技术,据…...
【Python】爬虫基础
爬虫是一种模拟浏览器实现,用以抓取网站信息的程序或者脚本。常见的爬虫有三大类: 通用式爬虫:通用式爬虫用以爬取一整个网页的信息。 聚焦式爬虫:聚焦式爬虫可以在通用式爬虫爬取到的一整个网页的信息基础上只选取一部分所需的…...
(三、优先队列用于归并排序))
leetcode分类刷题:队列(Queue)(三、优先队列用于归并排序)
1、当TopK问题出现在多个有序序列中时,就要用到归并排序的思想了 2、将优先队列初始化为添加多个有序序列的首元素的形式,再循环K次优先队列的出队和出队元素对应序列下个元素的入队,就能得到TopK的元素了 3、这些题目好像没有TopK 大用小顶堆…...
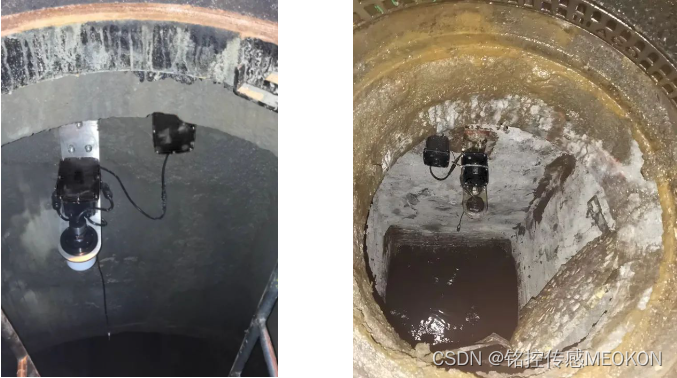
无线窨井水位监测仪|排水管网智慧窨井液位计安装案例
城市窨井在城市排水、雨水、污水输送等方面发挥着重要作用,是污水管网、排水管网 建设重要的组成部分。随着城镇精细化建设及人民安全防范措施水平的提高,对窨井内水位的监测提出了更高的要求,他是排水管网问题的晴雨表,窨井信息化…...

024 - STM32学习笔记 - 液晶屏控制(一) - LTDC与DMA2D初始
024- STM32学习笔记 - LTDC控制液晶屏 在学习如何控制液晶屏之前,先了解一下显示屏的分类,按照目前市场上存在的各种屏幕材质,主要分为CRT阴极射线管显示屏、LCD液晶显示屏、LED显示屏、OLED显示屏,在F429的开发板上,…...
)
Python数据容器:dict(字典、映射)
1、什么是字典 Python中的字典是通过key找到对应的Value(相当于现实生活中通过“字”找到“该字的含义” 我们前面所学习过的列表、元组、字符串以及集合都不能够提供通过某个东西找到其关联的东西的相关功能,字典可以。 例如 这里有一份成绩单…...

2023年基因编辑行业研究报告
第一章 行业发展概况 1.1 定义 基因编辑(Gene Editing),又称基因组编辑(Genome Editing)或基因组工程(Genome Engineering),是一项精确的科学技术,可以对含有遗传信息的…...
Spring MVC:请求转发与请求重定向
Spring MVC 请求转发请求重定向附 请求转发 转发( forward ),指服务器接收请求后,从一个资源跳转到另一个资源中。请求转发是一次请求,不会改变浏览器的请求地址。 简单示例: 1.通过 String 类型的返回值…...

按键灯待机2秒后灭掉
修改文件:/device/mediatek/mt6580/init.mt6580.rc chown system system /sys/class/leds/red/triggerchown system system /sys/class/leds/green/triggerchown system system /sys/class/leds/blue/triggerchown system system sys/devices/platform/device_info/…...

SpringBoot通过自定义注解实现日志打印
目录 前言: 正文 一.Spring AOP 1.JDK动态代理 2.Cglib动态代理 使用AOP主要的应用场景: SpringBoot通过自定义注解实现日志打印 一.Maven依赖 二.ControllerMethodLog.class自定义注解 三.Spring AOP切面方法的执行顺序 四.ControllerMethodL…...

Marathon已过时?迁移到Swift Package Manager的完整步骤
Marathon已过时?迁移到Swift Package Manager的完整步骤 【免费下载链接】Marathon [DEPRECATED] Marathon makes it easy to write, run and manage your Swift scripts 🏃 项目地址: https://gitcode.com/gh_mirrors/mar/Marathon Marathon作为…...

Fast-Planner核心思想拆解:从B样条优化到时间重分配,如何让无人机飞得更快更稳?
Fast-Planner核心思想解析:从B样条优化到时间重分配的无人机高速运动规划 无人机在复杂环境中的高速飞行一直是运动规划领域的重大挑战。传统方法往往在速度提升后出现轨迹抖动或避障失效的问题,而Fast-Planner通过创新的算法架构实现了"又快又稳&q…...

对比直接使用官方API体验Taotoken在稳定性与成本上的差异
🚀 告别海外账号与网络限制!稳定直连全球优质大模型,限时半价接入中。 👉 点击领取海量免费额度 对比直接使用官方API体验Taotoken在稳定性与成本上的差异 在将大模型能力集成到个人项目或小团队工作流中时,开发者通常…...

Unity3D项目跨平台部署实战:从Windows到Linux的完整流程与避坑指南
1. 环境准备:搭建跨平台开发基础 跨平台部署的第一步是确保开发环境配置正确。很多开发者容易忽略这一步,结果在后续流程中遇到各种奇怪的问题。我在实际项目中遇到过多次因为环境不匹配导致的编译失败,所以特别强调环境准备的重要性。 首先需…...

企业级浏览器自动化测试架构设计:Chrome for Testing的高可用解决方案与实践指南
企业级浏览器自动化测试架构设计:Chrome for Testing的高可用解决方案与实践指南 【免费下载链接】chrome-for-testing 项目地址: https://gitcode.com/gh_mirrors/ch/chrome-for-testing Chrome for Testing是Google ChromeLabs团队为解决浏览器自动化测试…...
)
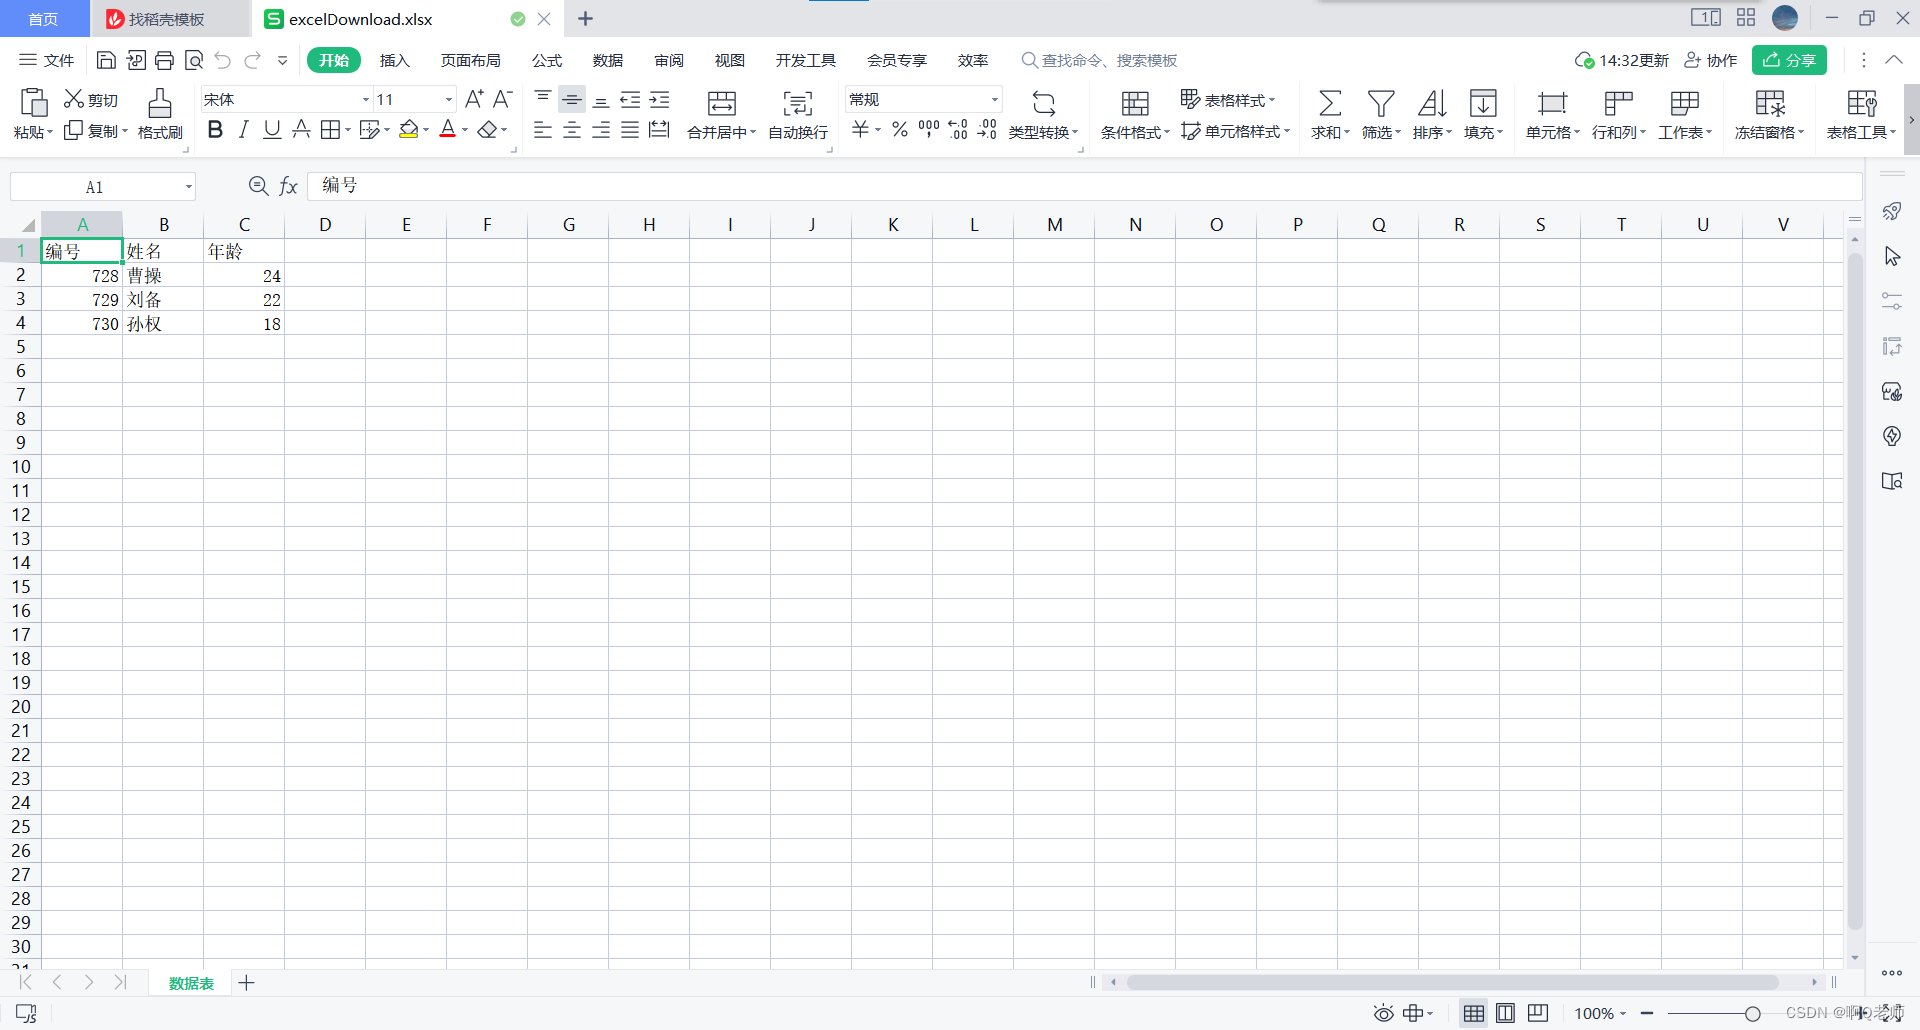
告别手动填坑:用SSC工具+Excel快速搞定LAN9252 EtherCAT从站XML配置(附64点IO实例)
高效配置LAN9252 EtherCAT从站的自动化工具链实践 在嵌入式工业通信领域,EtherCAT因其卓越的实时性能被广泛采用,而LAN9252作为高性价比的从站控制器芯片,配合SPI接口成为许多开发者的首选方案。然而传统XML配置流程的复杂性往往成为项目瓶颈…...

第14章:C++ 代码规范评审
第14章:C++ 代码规范评审 本章定位:第四卷《实战卷》第四篇"工程化与编译链接"第 14 章。 与第 13 章《静态分析工具》构成"机器查 + 人查"互补:能机器查的让 lint 拦,必须人脑判断的进 review。 目录 01.规范与评审定位 1.1 规范的三个层级 1.2 评审解…...
)
从Figma到Midjourney的极简工作流革命:1套可复用的“视觉降噪SOP”(含内部团队验证版Checklist)
更多请点击: https://intelliparadigm.com 第一章:从Figma到Midjourney的极简工作流革命 设计师不再需要在多个平台间反复导出、重命名、上传——一个轻量级自动化桥接层,即可将 Figma 的视觉输出精准转化为 Midjourney 的提示工程输入。核心…...

抖音视频批量下载难题如何解决?douyin-downloader开源工具完整指南
抖音视频批量下载难题如何解决?douyin-downloader开源工具完整指南 【免费下载链接】douyin-downloader A practical Douyin downloader for both single-item and profile batch downloads, with progress display, retries, SQLite deduplication, and browser fa…...

16nm FinFET与3D-IC设计验证的技术突破与应用
1. 16nm FinFET与3D-IC设计验证的技术突破2013年9月,ANSYS子公司Apache Design与台积电(TSMC)达成重要合作,将RedHawk和Totem工具集成到TSMC 16nm FinFET参考流程和3D-IC参考流程中。这一合作标志着半导体设计验证技术迈入新阶段&…...