Java使用FFmpeg对视频文件打标记
免安装 FFmpeg
<dependency><groupId>ws.schild</groupId><artifactId>jave-all-deps</artifactId><version>3.0.1</version><exclusions><!--  排除windows 32位系统      --><exclusion><groupId>ws.schild</groupId><artifactId>jave-nativebin-win32</artifactId></exclusion><!--  排除linux 32位系统      --><exclusion><groupId>ws.schild</groupId><artifactId>jave-nativebin-linux32</artifactId></exclusion><!-- 排除Mac系统--><exclusion><groupId>ws.schild</groupId><artifactId>jave-nativebin-osx64</artifactId></exclusion></exclusions>
</dependency>
import org.apache.commons.lang3.StringUtils;
import org.slf4j.Logger;
import org.slf4j.LoggerFactory;
import ws.schild.jave.Encoder;
import ws.schild.jave.EncoderException;
import ws.schild.jave.MultimediaObject;
import ws.schild.jave.encode.AudioAttributes;
import ws.schild.jave.encode.EncodingAttributes;
import ws.schild.jave.encode.VideoAttributes;
import ws.schild.jave.info.MultimediaInfo;
import ws.schild.jave.process.ProcessWrapper;
import ws.schild.jave.process.ffmpeg.DefaultFFMPEGLocator;import javax.imageio.ImageIO;
import java.awt.*;
import java.awt.image.BufferedImage;
import java.io.*;
import java.net.URL;
import java.util.List;
import java.util.*;
import java.util.concurrent.CompletableFuture;
import java.util.stream.Collectors;/*** @author Mr.superbeyone* @project * @className FfmpegUtil* @description* @date 2023-10-19 13:37**/
public class FfmpegUtil {private static Logger logger = LoggerFactory.getLogger(FfmpegUtil.class);/*** 通过本地路径获取多媒体文件信息(宽,高,时长,编码等)** @param localPath 本地路径* @return MultimediaInfo 对象,包含 (宽,高,时长,编码等)* @throws EncoderException*/public static MultimediaInfo getMultimediaInfo(String localPath) {MultimediaInfo multimediaInfo = null;try {multimediaInfo = new MultimediaObject(new File(localPath)).getInfo();} catch (EncoderException e) {System.out.println("获取多媒体文件信息异常");e.printStackTrace();}return multimediaInfo;}/*** 通过URL获取多媒体文件信息** @param url 网络url* @return MultimediaInfo 对象,包含 (宽,高,时长,编码等)* @throws EncoderException*/public static MultimediaInfo getMultimediaInfoFromUrl(String url) {MultimediaInfo multimediaInfo = null;try {multimediaInfo = new MultimediaObject(new URL(url)).getInfo();} catch (Exception e) {System.out.println("获取多媒体文件信息异常");e.printStackTrace();}return multimediaInfo;}private static final int SAMPLING_RATE = 16000;private static final int SINGLE_CHANNEL = 1;/*** 音频格式化为wav,并设置单声道和采样率** @param url        需要转格式的音频* @param targetPath 格式化后要保存的目标路径*/public static boolean formatAudio(String url, String targetPath) {File target = new File(targetPath);MultimediaObject multimediaObject;try {// 若是本地文件: multimediaObject = new MultimediaObject(new File("你的本地路径"));multimediaObject = new MultimediaObject(new URL(url));// 音频参数//  此处按需自定义音频参数AudioAttributes audio = new AudioAttributes();// 采样率audio.setSamplingRate(SAMPLING_RATE);// 单声道audio.setChannels(SINGLE_CHANNEL);Encoder encoder = new Encoder();EncodingAttributes attrs = new EncodingAttributes();// 输出格式attrs.setOutputFormat("wav");attrs.setAudioAttributes(audio);encoder.encode(multimediaObject, target, attrs);return true;} catch (Exception e) {System.out.println("格式化音频异常");return false;}}/*** 视频格式化为mp4** @param url* @param targetPath* @return*/public static boolean formatToMp4(String url, String targetPath) {File target = new File(targetPath);MultimediaObject multimediaObject;try {// 若是本地文件: multimediaObject = new MultimediaObject(new File("你的本地路径"));multimediaObject = new MultimediaObject(new URL(url));EncodingAttributes attributes = new EncodingAttributes();// 设置视频的音频参数AudioAttributes audioAttributes = new AudioAttributes();attributes.setAudioAttributes(audioAttributes);// 设置视频的视频参数VideoAttributes videoAttributes = new VideoAttributes();// 设置帧率videoAttributes.setFrameRate(25);attributes.setVideoAttributes(videoAttributes);// 设置输出格式attributes.setOutputFormat("mp4");Encoder encoder = new Encoder();encoder.encode(multimediaObject, target, attributes);return true;} catch (Exception e) {System.out.println("格式化视频异常");e.printStackTrace();return false;}}/*** 获取视频缩略图 获取视频第0秒的第一帧图片** <p>执行的ffmpeg 命令为: ffmpeg -i 你的视频文件路径 -ss 指定的秒数 生成文件的全路径地址** @param localPath  本地路径* @param targetPath 存放的目标路径* @return*/public static boolean getTargetThumbnail(String localPath, String targetPath) {// 该方法基本可作为执行ffmpeg命令的模板方法,之后的几个方法与此类似try {ProcessWrapper ffmpeg = new DefaultFFMPEGLocator().createExecutor();ffmpeg.addArgument("-i");ffmpeg.addArgument(localPath);ffmpeg.addArgument("-ss");// 此处可自定义视频的秒数ffmpeg.addArgument("10");ffmpeg.addArgument(targetPath);ffmpeg.execute();try (BufferedReader br = new BufferedReader(new InputStreamReader(ffmpeg.getErrorStream()))) {blockFfmpeg(br);}} catch (IOException e) {System.out.println("获取视频缩略图失败");e.printStackTrace();return false;}return true;}/*** 等待命令执行成功,退出** @param br* @throws IOException*/private static void blockFfmpeg(BufferedReader br) throws IOException {String line;// 该方法阻塞线程,直至合成成功while ((line = br.readLine()) != null) {doNothing(line);}}/*** 打印日志** @param line*/private static void doNothing(String line) {// 正式使用时注释掉此行,仅用于观察日志
//        System.out.println(line);}/*** 视频增加字幕** @param originVideoPath 原视频地址* @param targetVideoPath 目标视频地址* @param srtPath         固定格式的srt文件地址或存储位置,字母文件名: xxx.srt,样例看博客* @return* @throws Exception*/public static boolean addSubtitle(String originVideoPath, String srtPath, String targetVideoPath) {try {ProcessWrapper ffmpeg = new DefaultFFMPEGLocator().createExecutor();ffmpeg.addArgument("-i");ffmpeg.addArgument(originVideoPath);ffmpeg.addArgument("-i");ffmpeg.addArgument(srtPath);ffmpeg.addArgument("-c");ffmpeg.addArgument("copy");ffmpeg.addArgument(targetVideoPath);ffmpeg.execute();try (BufferedReader br = new BufferedReader(new InputStreamReader(ffmpeg.getErrorStream()))) {blockFfmpeg(br);}} catch (IOException e) {System.out.println("字幕增加失败");e.printStackTrace();}return true;}/*** 常用命令** @return*/public static void cmd() {// FIXME: 2023/1/31  还有很多类似命令 不再一一列举 ,附上命令,具体写法参考 getTargetThumbnail或addSubtitle方法// FIXME: 2023/1/31 ffmpeg命令网上搜索即可// 剪切视频// ffmpeg -ss 00:00:00 -t 00:00:30 -i test.mp4 -vcodec copy -acodec copy output.mp4// * -ss 指定从什么时间开始// * -t 指定需要截取多长时间// * -i 指定输入文件// ffmpeg -ss 10 -t 15 -accurate_seek -i test.mp4 -codec copy cut.mp4// ffmpeg -ss 10 -t 15 -accurate_seek -i test.mp4 -codec copy -avoid_negative_ts 1 cut.mp4// 拼接MP4// 第一种方法:// ffmpeg -i "concat:1.mp4|2.mp4|3.mp4" -codec copy out_mp4.mp4// 1.mp4 第一个视频文件的全路径// 2.mp4 第二个视频文件的全路径// 提取视频中的音频// ffmpeg -i input.mp4 -acodec copy -vn output.mp3// -vn: 去掉视频;-acodec: 音频选项, 一般后面加copy表示拷贝// 音视频合成// ffmpeg -y –i input.mp4 –i input.mp3 –vcodec copy –acodec copy output.mp4// -y 覆盖输出文件// 剪切视频//  ffmpeg -ss 0:1:30 -t 0:0:20 -i input.mp4 -vcodec copy -acodec copy output.mp4// -ss 开始时间; -t 持续时间// 视频截图//  ffmpeg –i test.mp4 –f image2 -t 0.001 -s 320x240 image-%3d.jpg// -s 设置分辨率; -f 强迫采用格式fmt;// 视频分解为图片//   ffmpeg –i test.mp4 –r 1 –f image2 image-%3d.jpg// -r 指定截屏频率// 将图片合成视频//  ffmpeg -f image2 -i image%d.jpg output.mp4// 视频拼接//  ffmpeg -f concat -i filelist.txt -c copy output.mp4// 将视频转为gif//    ffmpeg -i input.mp4 -ss 0:0:30 -t 10 -s 320x240 -pix_fmt rgb24 output.gif// -pix_fmt 指定编码// 视频添加水印//  ffmpeg -i input.mp4 -i logo.jpg// -filter_complex[0:v][1:v]overlay=main_w-overlay_w-10:main_h-overlay_h-10[out] -map [out] -map// 0:a -codec:a copy output.mp4// main_w-overlay_w-10 视频的宽度-水印的宽度-水印边距;}//=========================================================================================//private static final int WIDTH = 50, HEIGHT = 50;public static String generateTagVideo(String srcVideoPath) {long start = System.currentTimeMillis();String targetVideo = generateTagVideo(srcVideoPath, null);logger.info("generateTagVideo 耗时 {}", (System.currentTimeMillis() - start));logger.info("generateTagVideo srcVideo {} targetVideo {}", srcVideoPath, targetVideo);return targetVideo;}public static String generateTagVideo(String srcVideoPath, String targetVideoPath) {long start = System.currentTimeMillis();//视频文件路径File srcVideoFile = new File(srcVideoPath);if (!srcVideoFile.exists() || !srcVideoFile.isFile()) {logger.info("generateTagVideo srcVideoPath is not video file {}", srcVideoPath);return "";}//图片文件、视频保存跟路径File genRoot = new File(StringUtils.isBlank(targetVideoPath) ? srcVideoFile.getParentFile().getAbsolutePath() : targetVideoPath,StringUtils.replace(srcVideoFile.getName(), ".", "_") + "_gen");String targetFileName = StringUtils.substringBeforeLast(srcVideoFile.getName(), ".") + "_gen" + ".mp4";//判断是否存在已生成的视频文件if (genRoot.exists() && genRoot.isDirectory()) {Optional<File> optionalFile = Arrays.stream(Objects.requireNonNull(genRoot.listFiles())).filter(f -> StringUtils.equals(f.getName(), targetFileName)).findFirst();if (optionalFile.isPresent()) {return optionalFile.get().getAbsolutePath();}}//图片路径File imgDir = new File(genRoot, "img");imgDir.mkdirs();//视频文件拆分成图片splitVideo2Img(srcVideoPath, imgDir.getAbsolutePath());//获取要RPC调用的文件List<File> imgList = getImgList(imgDir);//TODO 跟进图片,比对后,获取图片及坐标信息int x = 1000, y = 500;//TODO 获取需要标注的图片文件集合,及标注坐标// imgList = new ArrayList<>();//替换文件replaceImgFile(imgList, x, y, WIDTH, HEIGHT);//合并图片文件为视频String targetPath = mergeImg2Video(genRoot, targetFileName, imgDir.getAbsolutePath());logger.info("generateTagVideo 耗时:{},src:\t {},\t target:\t{}",(System.currentTimeMillis() - start), srcVideoPath, targetPath);//删除图片文件//deleteFile(imgDir);return targetPath;}private static String mergeImg2Video(File videoPath, String targetFileName, String imgPath) {try (ProcessWrapper ffmpeg = new DefaultFFMPEGLocator().createExecutor()) {ffmpeg.addArgument("-f");ffmpeg.addArgument("image2");ffmpeg.addArgument("-i");ffmpeg.addArgument(imgPath + File.separator + "image_%6d.jpg");String video = videoPath + File.separator + targetFileName;ffmpeg.addArgument(video);ffmpeg.execute();hold(ffmpeg);return video;} catch (Exception e) {logger.error("mergeImg2Video error imgPath {}", imgPath, e);}return "";}public static String splitVideo2Img(String path, String target) {try (ProcessWrapper ffmpeg = new DefaultFFMPEGLocator().createExecutor()) {long start = System.currentTimeMillis();ffmpeg.addArgument("-i");ffmpeg.addArgument(path);ffmpeg.addArgument("-r");ffmpeg.addArgument("10"); //提取图片频率,视频默认一秒25帧,数字越小,视频播放越快ffmpeg.addArgument("-f");ffmpeg.addArgument("image2");ffmpeg.addArgument(target + File.separator + "image_%6d.jpg");ffmpeg.execute();ffmpeg.getProcessExitCode();logger.info("split2Img 耗时:{}", (System.currentTimeMillis() - start));} catch (Exception e) {logger.error("splitVideo2Img error ", e);}return target;}private static void hold(ProcessWrapper ffmpeg) throws Exception {try (BufferedReader br = new BufferedReader(new InputStreamReader(ffmpeg.getErrorStream()))) {blockFfmpeg(br);}}private static void replaceImgFile(List<File> imgList, int x, int y, int width, int height) {long start = System.currentTimeMillis();logger.info("替换文件开始 {}", start);imgList.stream().map(file ->CompletableFuture.runAsync(() ->drawImg(file, x, y, width, height))).collect(Collectors.toList()).stream().map(CompletableFuture::join).collect(Collectors.toList());logger.info("替换文件结束 ,共耗时:{}", (System.currentTimeMillis() - start));}/*** 获取根目录下的所有文件** @param imgRoot 根目录* @return 所有文件*/private static List<File> getImgList(File imgRoot) {File[] files = imgRoot.listFiles();return Arrays.stream(files).collect(Collectors.toList());}/*** 删除文件** @param file 要删除的文件*/private static void deleteFile(File file) {//删除图片文件Arrays.stream(Objects.requireNonNull(file.listFiles())).map(f -> CompletableFuture.runAsync(f::delete)).collect(Collectors.toList()).stream().map(CompletableFuture::join).collect(Collectors.toList());file.delete();}/*** 对图片文件 画矩形标注** @param file   图片文件* @param x      位置x* @param y      位置y* @param width  标注宽度* @param height 标注高度*/public static void drawImg(File file, int x, int y, int width, int height) {try  {BufferedImage image = ImageIO.read(file);Graphics graphics = image.getGraphics();graphics.setColor(Color.RED);graphics.drawRect(x, y, width, height);FileOutputStream outputStream = new FileOutputStream(file);ImageIO.write(image, "jpeg", outputStream);outputStream.close();} catch (Exception e) {logger.error("drawImg error ", e);}}public static void main(String[] args) {String path = "D:\\WorkSpace\\video\\src\\b.mp4";String result = generateTagVideo(path);System.out.println(result);}}
参考
相关文章:

Java使用FFmpeg对视频文件打标记
免安装 FFmpeg <dependency><groupId>ws.schild</groupId><artifactId>jave-all-deps</artifactId><version>3.0.1</version><exclusions><!-- 排除windows 32位系统 --><exclusion><groupId>ws.sch…...

Redux 学习笔记
在使用 React Redux 前,我们首先了解一下 Redux 的一些基础知识。 Redux 是 JavaScript 应用程序中用于状态管理的容器。它不依赖于任何框架,可以与任何 UI 库和框架一起使用。在应用程序中使用 Redux 时,Redux 是以可预测的方式管理状态。 …...
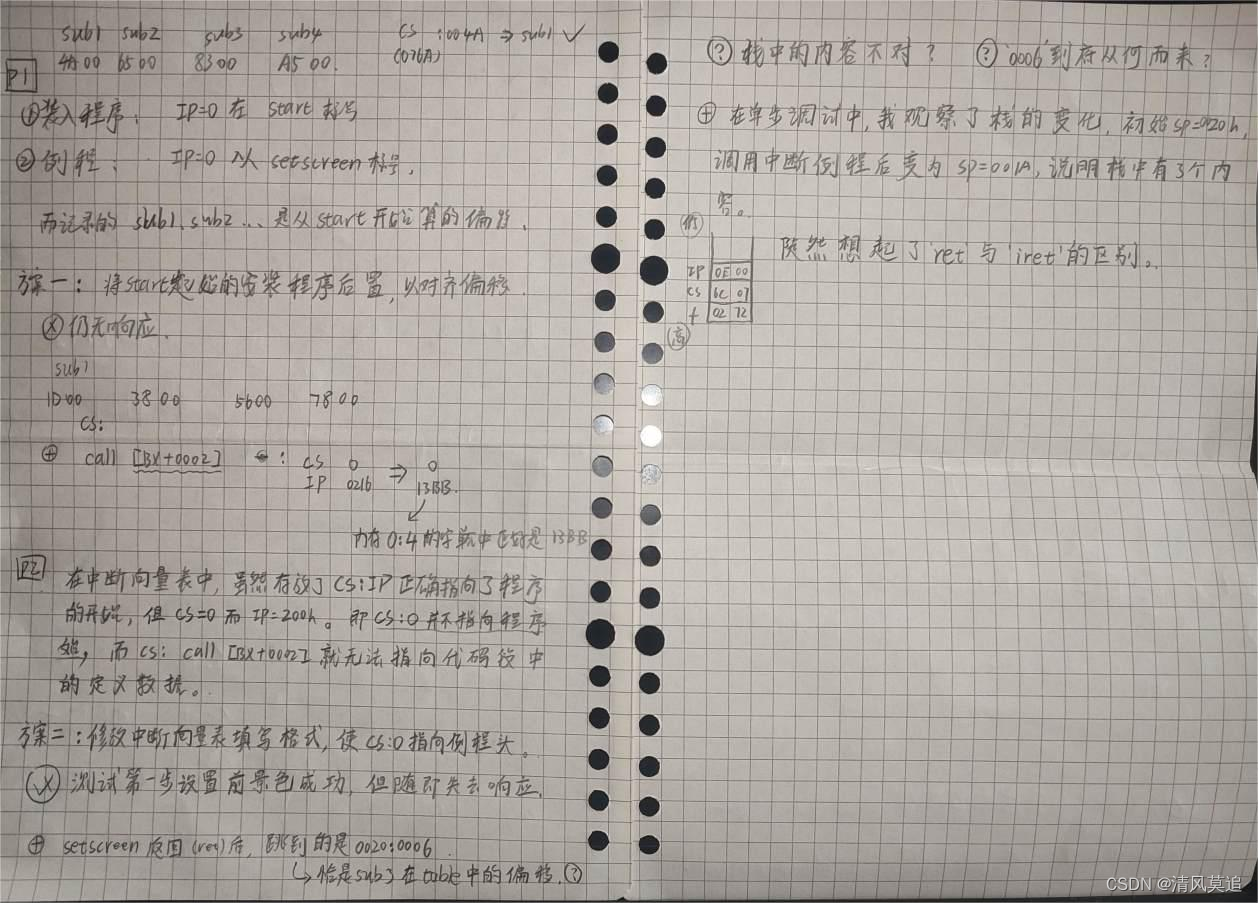
【Bug】8086汇编学习
文章目录 随笔Bug1、masm编译报错:Illegal use of register2、debug中使用段前缀3、[idata]在编译器中的处理4、push立即数报错5、报错:improper operand type6、程序莫名跳转到未知位置 (doing)7、DOSBox失去响应8、程序运行显示乱码9、程序运行导致DOS…...

JetBrains系列IDE全家桶激活
jetbrains全家桶 正版授权,这里有账号授权的渠道: https://www.mano100.cn/thread-1942-1-1.html 附加授权后的一张图片...
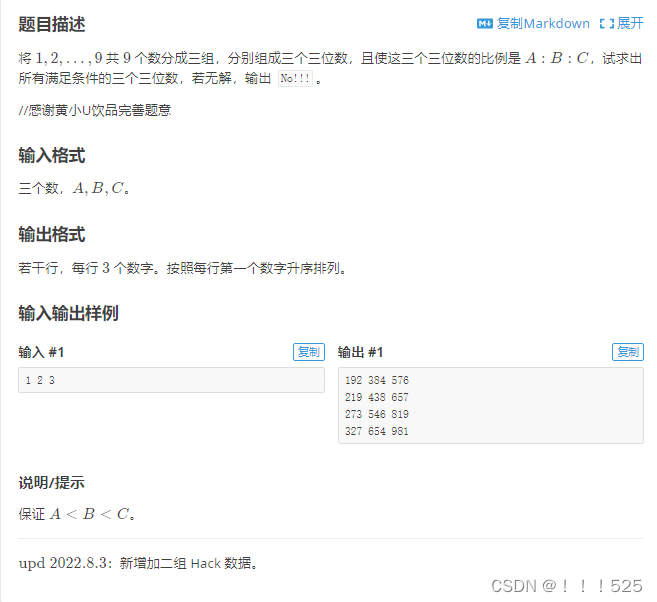
洛谷p1618三连击
import java.util.Scanner; //将 1-9 共9个数分成3组,分别组成3个三位数,且使这3个三位数构成A:B:C的比例,试求出所有满足条件的3个三位数。不满足输出“No!!!”。 public class Main {public static void main(String[] args) {Scanner sc …...

微信公众号h5写一个全局调用微信分享功能
1. 首先先安装依赖 npm install weixin-js-sdk --save 2. app.vue文件 <script> export default { onLaunch: function(e) {}, onShow: function(e) { console.log(App Show页面初始); // 路由参数存缓存的 这是为了防止他…...
聊聊精益需求的产生过程
这是鼎叔的第七十八篇原创文章。行业大牛和刚毕业的小白,都可以进来聊聊。 欢迎关注本公众号《敏捷测试转型》,星标收藏,大量原创思考文章陆续推出。本人新书《无测试组织-测试团队的敏捷转型》已出版ÿ…...

Linux - 还不懂 gdb 调试器?(调试软件)
前言 当前,我们可以使用 make/makefile 来程序化执行代码文件;可以使用 gcc/g 等编译器来编译代码;可以使用 vim 编辑器来编写代码;其实在 Linux 当中还有一个工具,可以实现调试工作,这个工具就是 -- gdb。…...
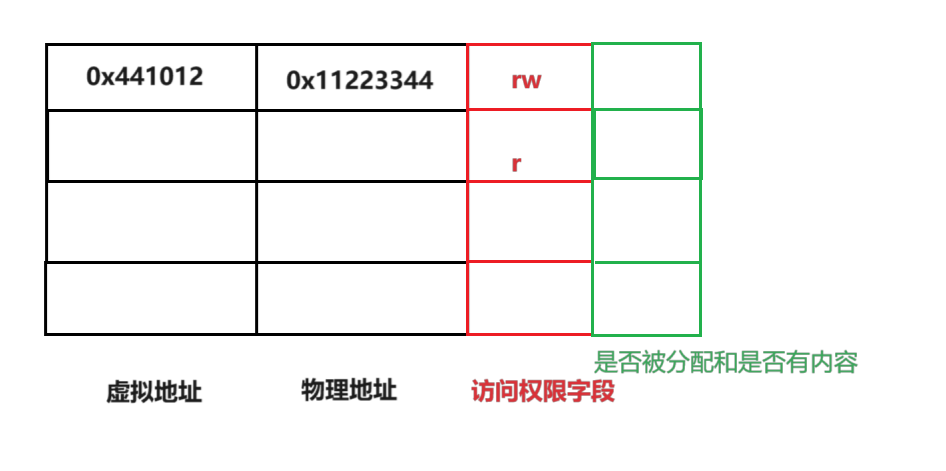
Linux:程序地址空间/虚拟地址等相关概念理解
文章目录 程序地址空间虚拟地址和物理地址地址的转换地址空间是什么? 程序地址空间 在C和C程序中,一直有一个观点是,程序中的各个变量等都会有一定的地址空间,因此才会有诸如取地址,通过地址访问等操作,那…...

Python之爬虫
目录 HTTP请求HTTP响应获得页面响应伪装用户访问打包数据爬取豆瓣top250 HTTP请求 HTTP:HypertextTransferProtcol 超文本传输协议 1、请求行 POST/user/info?new_usertrue HTTP/1.1#资源了路径user/info 查询参数new_usertrue 协议版本HTTP/1.1 2、请求头 Ho…...
打造自己的前端组件库(奶妈版,超详细)
打造自己的前端组件库 demo是开源的,自己上npm 或者 github 上都能搜到 新建vue项目(sass js vue2) vue create yt-ui 修改文件目录(如下) 修改: 1.src 更名 examples; 2. src/components移动到项目最外层;3.vue.config.js更改入口文件 /…...

6.调制阶数相关
1、调制阶数与峰均比的关系 调制阶数(modulation order)对峰均比(有一定的影响。 峰均比是用于衡量调制信号或波形在幅度上的动态范围的指标。它表示信号的最大峰值与平均功率之间的比值。较高的峰均比可能导致信号在传输或放大过程中出现过…...
)
Maven多模块管理(转载)
注意:父模块需设定打包方式为pom https://cloud.tencent.com/developer/article/1667275 dependencyManagement 统一管理子类依赖版本 在父类maven中加入,不会继承给子类,只能规定子类的依赖版本,子类加入dependence后无需写入 …...

运维学习CentOS 7进行Nightingale二进制部署
.因为Nightingale需要MySQL保存一些数据,所以可以参考《CentOS 7.6使用mysql-8.0.31-1.el7.x86_64.rpm-bundle.tar安装Mysql 8.0》部署MySQL。 https://github.com/ccfos/nightingale/releases是可以github上下载Nightingale二进制安装包。 https://n9e.github.io/…...
安装Docker
本安装教程参考Docker官方文档,地址如下:https://docs.docker.com/engine/install/centos/ 卸载旧版 首先如果系统中已经存在旧的Docker,则先卸载: yum remove docker \ docker-client \ docker-client-latest \ docker-common…...
【uniapp/uView】解决消息提示框悬浮在下拉框之上
需要实现这样的效果,即 toast 消息提示框在 popup 下拉框之上: 解决方法,把 <u-toast ref"uToast" /> 放在 u-popup 里面即可,这样就可以提升 toast 的优先级: <!-- 弹出下拉框 --><u-popu…...

有效管理token,充分发挥ChatGPT的能力
目录 给提供了 Token 的计算工具,来理解一下Token的计算方式,网址如下: 窗口如下: 实际消耗 Token 数量为 59个,换算之后为2.1-2.2的比例,即一个汉字消耗2.12.2个Token, 再测一下英文的Token消耗,包含空格在内,一共52个英文字母,消耗Token 13个,正好对应13个单词,…...
Python —— 验证码的处理执行JavaScript语句
1、验证码的处理 1、概述&绕过验证码的方案 很多的网站都在登录页面加入了识别文字,识别图片,拖动拼图的验证码方式来防止爬虫、恶意注册 等,如果是做自动化,需要绕过验证码才能进入下一步操作,那么有4种方案可以…...
MS12_020 3389远程溢出漏洞
1.search ms12_020 搜索ms12_020 2.use auxiliary/scanner/rdp/ms12_020_check 检查是否存在ms12_020漏洞 show options 查看所需参数 set RHOSTS x.x.x.x 设置目标IP地址 run 执行 检测出来有Ms12_020漏洞 3.use auxiliary/dos/windows/rdp/ms12_020_maxchannelids 选择…...

Pytorch ddp切换forward函数 验证ddp是否生效
DDP及其在pytorch中应用 ddp默认调用forward函数,有些模型无法使用forward函数,可以对模型包装一下。 class modelWraper(nn.Module):def __init__(self, model):super().__init__()self.model modeldef forward(self, *args, **kwargs):return self.…...

深入浅出聊5G DMRS:从Gold序列到ZC序列,如何为你的上行传输选择最佳参考信号?
5G上行DMRS序列选型实战:从理论特性到工程决策的黄金法则 在5G NR上行调度中,解调参考信号(DMRS)的设计直接影响着信道估计精度和系统性能。面对Type 1(ZC序列)和Type 2(Gold序列)两种DMRS序列选项,以及transform precoding启用/禁用两种模式…...

DIY无人机必备:用GY-MPU9250实现姿态控制的5个关键步骤
DIY无人机姿态控制实战:基于GY-MPU9250的5个关键步骤 1. 传感器基础与硬件连接 GY-MPU9250作为一款9轴运动跟踪传感器,集成了三轴加速度计、三轴陀螺仪和三轴磁力计,是无人机姿态控制系统的核心组件。这款传感器采用QFN封装,支持I…...
)
保姆级教程:手把手教你用GMTSAR处理哨兵数据做D-InSAR(附完整配置文件详解)
从零开始掌握GMTSAR处理哨兵数据的D-InSAR全流程 第一次打开GMTSAR的配置文件时,那种面对天书般的无助感我至今记忆犹新。作为地表形变监测的重要工具,D-InSAR技术能捕捉到毫米级的地表位移,而GMTSAR则是处理哨兵数据最常用的开源工具链之一。…...

从原理到实战:深入剖析内存ECC的检错与纠错机制
1. 内存ECC技术:数据安全的隐形守护者 想象一下你正在玩一个大型拼图游戏,突然发现有几块拼图的颜色不对劲——这就是内存中可能发生的比特翻转问题。内存ECC(Error Correcting Code)就像一位细心的拼图检查员,不仅能发…...

抖音批量下载工具终极指南:告别手动操作,5分钟学会无水印视频采集
抖音批量下载工具终极指南:告别手动操作,5分钟学会无水印视频采集 【免费下载链接】douyin-downloader A practical Douyin downloader for both single-item and profile batch downloads, with progress display, retries, SQLite deduplication, and …...

避坑指南:为什么你用自己的数据聚类Anchors后,YOLO模型效果反而变差了?
为什么自定义Anchors聚类后YOLO性能下降?5个关键陷阱与解决方案 当你兴奋地将自定义数据集聚类得到的Anchors应用到YOLO模型时,却发现检测精度不升反降——这种挫败感我深有体会。去年在开发工业缺陷检测系统时,我曾连续三周被困在这个问题里…...

3步掌握ReTerraForged地形引擎:打造你的专属Minecraft世界
3步掌握ReTerraForged地形引擎:打造你的专属Minecraft世界 【免费下载链接】ReTerraForged TerraForged for modern MC versions 项目地址: https://gitcode.com/gh_mirrors/re/ReTerraForged 想要在Minecraft中告别千篇一律的地形,创建令人惊叹的…...

Hitboxer:键盘玩家的SOCD冲突终结者,提升游戏操作精度的终极方案
Hitboxer:键盘玩家的SOCD冲突终结者,提升游戏操作精度的终极方案 【免费下载链接】socd Key remapper for epic gamers 项目地址: https://gitcode.com/gh_mirrors/so/socd 在竞技游戏中,你是否曾因同时按下W和S键导致角色卡顿&#x…...

【分布式】分布式核心组件——分布式熔断降级:熔断器状态机、熔断策略、降级方案、Resilience4j/Sentinel实现
文章目录分布式熔断降级知识体系一、基础定位:熔断降级的核心价值与边界1. 核心解决的问题:分布式服务雪崩2. 核心概念边界厘清3. 分布式容错体系中的定位二、核心模型:熔断器状态机(Circuit Breaker)1. 三大核心基础状…...

从Java转行大模型应用,多模态模型,多模态模型的部署
一、模型打包格式选择(核心前提)模型打包格式直接决定部署的兼容性、效率和可维护性,需结合部署场景(云侧/端侧)、硬件环境、推理框架选择,核心目标是“轻量、高效、可移植”,以下是主流格式对比…...