【Ubuntu】Ubuntu arm64 部署 Blazor Server 应用
部署步骤
- 发布
- 安装运行环境:
dotnet-sdk(必装)、aspnetcore-runtime、dotnet-runtime - 安装证书
- 设置环境变量:
临时变量、当前用户永久变量、所有用户的永久变量 - 运行:
终端运行、后台运行
基本情况
开发系统环境
- 系统:Windows 10 专业版 22H2 19045.3693
- 开发软件IDE:Microsoft Visual Studio Community 2022 (64 位) - Current 版本 17.6.5
- 项目框架:Blazor Server 应用
- 目标框架:.NET 6.0
- 系统架构:x64

发布系统环境
- 系统:Ubuntu 20.04.6 LTS focal
- 架构:arm64
系统信息
lsb_release -a
No LSB modules are available.
Distributor ID: Ubuntu
Description: Ubuntu 20.04.6 LTS
Release: 20.04
Codename: focal
查看架构
sudo dpkg --print-architecture
arm64
二、部署
2.1 准备部署文件
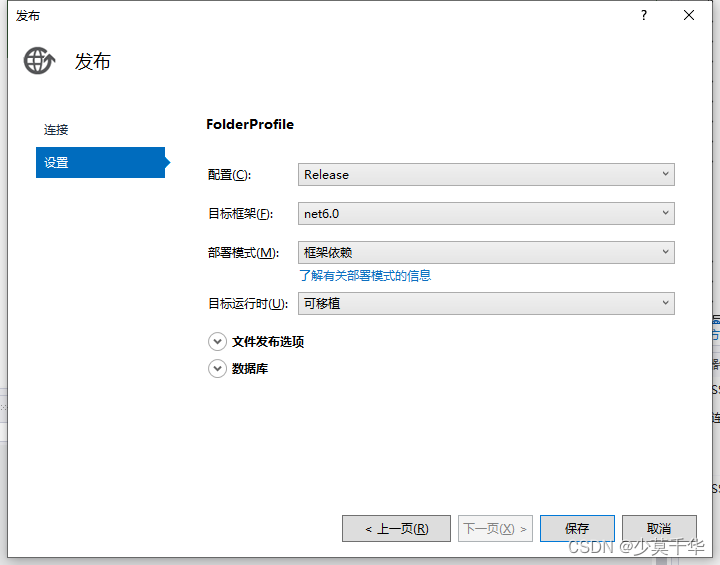
2.1.1 发布
- 配置: Release
- 目标框架(F): net6.0
- 部署模式(M): 框架依赖
- 目标运行时(U): 可移植
2.1.2 打包文件 - 压缩zip
如:RSS_NCD_MINI_BlazorServer.zip
2.1.3 将打包文件从Windows拷贝到Ubuntu系统
推荐将文件放在/home/<用户>/<新建公司名/产品名>/<项目名>目录下
如:/home/signway/rsszy/webapp3/
2.1.4 释放文件 - 解压zip
- 打开Ubuntu终端
- 跳转到
RSS_NCD_MINI_BlazorServer.zip所在目录
cd /home/signway/rsszy/webapp3/
- 使用
unzip指令解压RSS_NCD_MINI_BlazorServer.zip文件
unzip RSS_NCD_MINI_BlazorServer.zip
Archive: RSS_NCD_MINI_BlazorServer.zipinflating: Microsoft.IdentityModel.Protocols.OpenIdConnect.dll inflating: Microsoft.IdentityModel.Tokens.dll inflating: RSS_NCD(MINI)_BlazorServer.deps.json inflating: RSS_NCD(MINI)_BlazorServer.dll inflating: RSS_NCD(MINI)_BlazorServer.exe inflating: RSS_NCD(MINI)_BlazorServer.pdb inflating: RSS_NCD(MINI)_BlazorServer.runtimeconfig.json inflating: System.IdentityModel.Tokens.Jwt.dll inflating: web.config creating: wwwroot/creating: wwwroot/css/creating: wwwroot/css/bootstrap/inflating: wwwroot/css/bootstrap/bootstrap.min.css inflating: wwwroot/css/bootstrap/bootstrap.min.css.map creating: wwwroot/css/open-iconic/creating: wwwroot/css/open-iconic/font/creating: wwwroot/css/open-iconic/font/css/inflating: wwwroot/css/open-iconic/font/css/open-iconic-bootstrap.min.css creating: wwwroot/css/open-iconic/font/fonts/inflating: wwwroot/css/open-iconic/font/fonts/open-iconic.eot inflating: wwwroot/css/open-iconic/font/fonts/open-iconic.otf inflating: wwwroot/css/open-iconic/font/fonts/open-iconic.svg inflating: wwwroot/css/open-iconic/font/fonts/open-iconic.ttf inflating: wwwroot/css/open-iconic/font/fonts/open-iconic.woff inflating: wwwroot/css/open-iconic/FONT-LICENSE inflating: wwwroot/css/open-iconic/ICON-LICENSE inflating: wwwroot/css/open-iconic/README.md inflating: wwwroot/css/site.css inflating: wwwroot/favicon.ico inflating: wwwroot/RSS_NCD(MINI)_BlazorServer.styles.css inflating: appsettings.Development.json inflating: appsettings.json inflating: Microsoft.AspNetCore.Authentication.JwtBearer.dll inflating: Microsoft.IdentityModel.JsonWebTokens.dll inflating: Microsoft.IdentityModel.Logging.dll inflating: Microsoft.IdentityModel.Protocols.dll
2.2 安装框架
2.2.1 下载框架
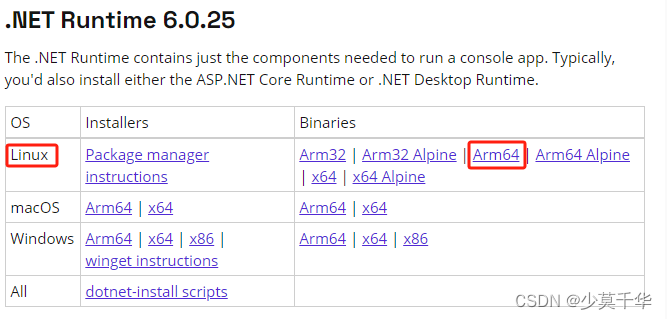
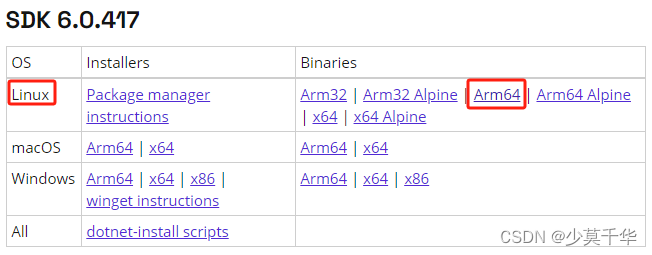
.NET 6.0下载地址
-
dotnet-runtime-6.0.25-linux-arm64.tar.gz
-
dotnet-sdk-6.0.417-linux-arm64.tar.gz
- aspnetcore-runtime-6.0.25-linux-arm64.tar.gz
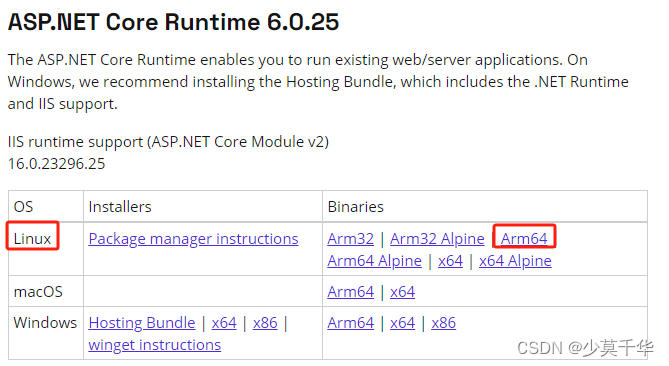
注意: 必须安装SDK,才能使用dotnet指令运行程序。
2.2.2 安装dotnet-sdk
- 将下载的文件拷贝到Ubuntu系统目录
推荐将文件放在/home/<用户>/<功能>/<框架名>目录下
如:/home/signway/install/dotnet/ - 打开终端跳转到文件目录
cd /home/signway/install/dotnet/
- 安装
dotnet-sdk、dotnet-runtime、aspnetcore-runtime
mkdir -p $HOME/dotnet && tar zxf dotnet-sdk-6.0.417-linux-arm64.tar.gz -C $HOME/dotnet
mkdir -p $HOME/dotnet && tar zxf dotnet-runtime-6.0.25-linux-arm64.tar.gz -C $HOME/dotnet
mkdir -p $HOME/dotnet && tar zxf aspnetcore-runtime-6.0.25-linux-arm64.tar.gz -C $HOME/dotnet
export DOTNET_ROOT=$HOME/dotnet
export PATH=$PATH:$HOME/dotnet
上述指令只会在运行它的终端生效。
你可以编辑shell配置文件以永久添加命令。Linux有几个不同的shell,每个shell都有不同的配置文件。例如:
- Bash Shell:
~/.bash_profile或~/.bashrc - Korn Shell:
~/.kshrc或.profile - Z Shell:
~/.zshrc或.zprofile
编辑shell的相应源文件,并在现有PATH语句的末尾添加:$HOME/dotnet。如果没有包含PATH语句,则添加一个新行,export DOTNET_ROOT=$HOME/dotnet。同时将export PATH=$PATH:$HOME/dotnet添加到文件末尾。
# ...
export DOTNET_ROOT=$HOME/dotnet
export PATH=$PATH:$HOME/dotnet
2.3 安装证书
2.3.1 安装证书
dotnet dev-certs https --trust
dotnet dev-certs https -t
signway@RK3588:~/rsszy/webapp2$ dotnet dev-certs https --trust
| Trusting the HTTPS development certificate was requested. Trusting the certificate on Linux distributions automatically is not supported. For instructions on how to manually trust the certificate on your Linux distribution, go to https://aka.ms/dev-certs-trust |
2.3.2 未安装会出现什么情况?
The command could not be loaded, possibly because:* You intended to execute a .NET application:The application 'dev-certs' does not exist.* You intended to execute a .NET SDK command:No .NET SDKs were found.Download a .NET SDK:
https://aka.ms/dotnet-downloadLearn about SDK resolution:
https://aka.ms/dotnet/sdk-not-found
Unable to configure HTTPS endpoint. No server certificate was specified, and the default developer certificate could not be found or is out of date.Unhandled exception. System.InvalidOperationException: Unable to configure HTTPS endpoint. No server certificate was specified, and the default developer certificate could not be found or is out of date.
To generate a developer certificate run 'dotnet dev-certs https'. To trust the certificate (Windows and macOS only) run 'dotnet dev-certs https --trust'.
For more information on configuring HTTPS see https://go.microsoft.com/fwlink/?linkid=848054.at Microsoft.AspNetCore.Server.Kestrel.KestrelConfigurationLoader.Reload()at Microsoft.AspNetCore.Server.Kestrel.KestrelConfigurationLoader.Load()at Microsoft.AspNetCore.Server.Kestrel.Core.KestrelServerImpl.BindAsync(CancellationToken cancellationToken)at Microsoft.AspNetCore.Server.Kestrel.Core.KestrelServerImpl.StartAsync[TContext](IHttpApplication`1 application, CancellationToken cancellationToken)at Microsoft.AspNetCore.Hosting.GenericWebHostService.StartAsync(CancellationToken cancellationToken)at Microsoft.Extensions.Hosting.Internal.Host.StartAsync(CancellationToken cancellationToken)at Microsoft.Extensions.Hosting.HostingAbstractionsHostExtensions.RunAsync(IHost host, CancellationToken token)at Microsoft.Extensions.Hosting.HostingAbstractionsHostExtensions.RunAsync(IHost host, CancellationToken token)at Microsoft.Extensions.Hosting.HostingAbstractionsHostExtensions.Run(IHost host)at Microsoft.AspNetCore.Builder.WebApplication.Run(String url)at Program.<Main>$(String[] args) in E:\SVN\RCSoft1\RSS_NCD(MINI)\RSS_NCD(MINI)_BlazorServer\RSS_NCD(MINI)_BlazorServerAPI\Program.cs:line 85
已放弃 (核心已转储)
2.4 添加环境变量
2.4.1 临时运行
每次打开终端运行以下命令来设置临时变量
export DOTNET_ROOT=$HOME/dotnet
export PATH=$PATH:$HOME/dotnet
2.4.2 永久添加 - 当前登录用户
1. 打开 ~/.bashrc文件
vi ~/.bashrc
# ~/.bashrc: executed by bash(1) for non-login shells.
# see /usr/share/doc/bash/examples/startup-files (in the package bash-doc)
# for examples# If not running interactively, don't do anything
case $- in*i*) ;;*) return;;
esac# don't put duplicate lines or lines starting with space in the history.
# See bash(1) for more options
HISTCONTROL=ignoreboth# append to the history file, don't overwrite it
shopt -s histappend# for setting history length see HISTSIZE and HISTFILESIZE in bash(1)
HISTSIZE=1000
HISTFILESIZE=2000# check the window size after each command and, if necessary,
# update the values of LINES and COLUMNS.
shopt -s checkwinsize# If set, the pattern "**" used in a pathname expansion context will
# match all files and zero or more directories and subdirectories.
#shopt -s globstar# make less more friendly for non-text input files, see lesspipe(1)
[ -x /usr/bin/lesspipe ] && eval "$(SHELL=/bin/sh lesspipe)"# set variable identifying the chroot you work in (used in the prompt below)
if [ -z "${debian_chroot:-}" ] && [ -r /etc/debian_chroot ]; thendebian_chroot=$(cat /etc/debian_chroot)
fi# set a fancy prompt (non-color, unless we know we "want" color)
case "$TERM" inxterm-color|*-256color) color_prompt=yes;;
esac# uncomment for a colored prompt, if the terminal has the capability; turned
# off by default to not distract the user: the focus in a terminal window
# should be on the output of commands, not on the prompt
#force_color_prompt=yesif [ -n "$force_color_prompt" ]; thenif [ -x /usr/bin/tput ] && tput setaf 1 >&/dev/null; then# We have color support; assume it's compliant with Ecma-48# (ISO/IEC-6429). (Lack of such support is extremely rare, and such# a case would tend to support setf rather than setaf.)color_prompt=yeselsecolor_prompt=fi
fiif [ "$color_prompt" = yes ]; thenPS1='${debian_chroot:+($debian_chroot)}\[\033[01;32m\]\u@\h\[\033[00m\]:\[\033[01;34m\]\w\[\033[00m\]\$ '
elsePS1='${debian_chroot:+($debian_chroot)}\u@\h:\w\$ '
fi
unset color_prompt force_color_prompt# If this is an xterm set the title to user@host:dir
case "$TERM" in
xterm*|rxvt*)PS1="\[\e]0;${debian_chroot:+($debian_chroot)}\u@\h: \w\a\]$PS1";;
*);;esac# enable color support of ls and also add handy aliases
if [ -x /usr/bin/dircolors ]; thentest -r ~/.dircolors && eval "$(dircolors -b ~/.dircolors)" || eval "$(dircolors -b)"alias ls='ls --color=auto'#alias dir='dir --color=auto'#alias vdir='vdir --color=auto'alias grep='grep --color=auto'alias fgrep='fgrep --color=auto'alias egrep='egrep --color=auto'
fi# colored GCC warnings and errors
#export GCC_COLORS='error=01;31:warning=01;35:note=01;36:caret=01;32:locus=01:quote=01'# some more ls aliases
alias ll='ls -alF'
alias la='ls -A'
alias l='ls -CF'# Add an "alert" alias for long running commands.  Use like so:
#   sleep 10; alert
alias alert='notify-send --urgency=low -i "$([ $? = 0 ] && echo terminal || echo error)" "$(history|tail -n1|sed -e '\''s/^\s*[0-9]\+\s*//;s/[;&|]\s*alert$//'\'')"'# Alias definitions.
# You may want to put all your additions into a separate file like
# ~/.bash_aliases, instead of adding them here directly.
# See /usr/share/doc/bash-doc/examples in the bash-doc package.if [ -f ~/.bash_aliases ]; then. ~/.bash_aliases
fi# enable programmable completion features (you don't need to enable
# this, if it's already enabled in /etc/bash.bashrc and /etc/profile
# sources /etc/bash.bashrc).
if ! shopt -oq posix; thenif [ -f /usr/share/bash-completion/bash_completion ]; then. /usr/share/bash-completion/bash_completionelif [ -f /etc/bash_completion ]; then. /etc/bash_completionfi
fiexport PATH=$PATH:$HOME/dotnet
export DOTNET_ROOT=$HOME/dotnet
2. 设置环境变量
按I键,退出命令模式进入编辑模式, ~/.bashrc文件末尾添加以下内容设置环境变量。
export PATH=$PATH:$HOME/dotnet
export DOTNET_ROOT=$HOME/dotnet
3. 保存退出
按Esc键,退出编辑模式进入命令模式,输入以下指令保存。
:wq!
2.4.3 永久添加 - 所有用户
1. 打开 /etc/profile文件
sudo vim /etc/profile
# /etc/profile: system-wide .profile file for the Bourne shell (sh(1))
# and Bourne compatible shells (bash(1), ksh(1), ash(1), ...).if [ "${PS1-}" ]; thenif [ "${BASH-}" ] && [ "$BASH" != "/bin/sh" ]; then# The file bash.bashrc already sets the default PS1.# PS1='\h:\w\$ 'if [ -f /etc/bash.bashrc ]; then. /etc/bash.bashrcfielseif [ "`id -u`" -eq 0 ]; thenPS1='# 'elsePS1='$ 'fifi
fiif [ -d /etc/profile.d ]; thenfor i in /etc/profile.d/*.sh; doif [ -r $i ]; then. $ifidoneunset i
fi
2. 设置环境变量
按I键,退出命令模式进入编辑模式, ~/.bashrc文件末尾添加以下内容设置环境变量。
export PATH=$PATH:$HOME/dotnet
export DOTNET_ROOT=$HOME/dotnet
3. 保存退出
按Esc键,退出编辑模式进入命令模式,输入以下指令保存。
:wq!
4. 重新加载
执行以下指令生效
source /etc/profile
2.4.4 查看设置的环境变量
1 只看PATH变量
echo $PATH
/sbin:/bin:/usr/bin:/usr/local/bin:/snap/bin:/home/signway/dotnet
2 查看所有环境变量
env
SHELL=/bin/bash
SESSION_MANAGER=local/RK3588:@/tmp/.ICE-unix/20779,unix/RK3588:/tmp/.ICE-unix/20779
QT_ACCESSIBILITY=1
COLORTERM=truecolor
XDG_MENU_PREFIX=gnome-
GNOME_DESKTOP_SESSION_ID=this-is-deprecated
GNOME_KEYRING_CONTROL=/home/signway/.cache/keyring-ZRVEE2
DOTNET_ROOT=/home/signway/dotnet
SSH_AUTH_SOCK=/home/signway/.cache/keyring-ZRVEE2/ssh
XMODIFIERS=@im=ibus
SSH_AGENT_PID=20915
GTK_MODULES=gail:atk-bridge
PWD=/home/signway
LOGNAME=signway
XDG_SESSION_TYPE=x11
GPG_AGENT_INFO=/run/user/1000/gnupg/S.gpg-agent:0:1
PULSE_SCRIPT=/etc/xrdp/pulse/default.pa
HOME=/home/signway
LANG=zh_CN.UTF-8
LS_COLORS=rs=0:di=01;34:ln=01;36:mh=00:pi=40;33:so=01;35:do=01;35:bd=40;33;01:cd=40;33;01:or=40;31;01:mi=00:su=37;41:sg=30;43:ca=30;41:tw=30;42:ow=34;42:st=37;44:ex=01;32:*.tar=01;31:*.tgz=01;31:*.arc=01;31:*.arj=01;31:*.taz=01;31:*.lha=01;31:*.lz4=01;31:*.lzh=01;31:*.lzma=01;31:*.tlz=01;31:*.txz=01;31:*.tzo=01;31:*.t7z=01;31:*.zip=01;31:*.z=01;31:*.dz=01;31:*.gz=01;31:*.lrz=01;31:*.lz=01;31:*.lzo=01;31:*.xz=01;31:*.zst=01;31:*.tzst=01;31:*.bz2=01;31:*.bz=01;31:*.tbz=01;31:*.tbz2=01;31:*.tz=01;31:*.deb=01;31:*.rpm=01;31:*.jar=01;31:*.war=01;31:*.ear=01;31:*.sar=01;31:*.rar=01;31:*.alz=01;31:*.ace=01;31:*.zoo=01;31:*.cpio=01;31:*.7z=01;31:*.rz=01;31:*.cab=01;31:*.wim=01;31:*.swm=01;31:*.dwm=01;31:*.esd=01;31:*.jpg=01;35:*.jpeg=01;35:*.mjpg=01;35:*.mjpeg=01;35:*.gif=01;35:*.bmp=01;35:*.pbm=01;35:*.pgm=01;35:*.ppm=01;35:*.tga=01;35:*.xbm=01;35:*.xpm=01;35:*.tif=01;35:*.tiff=01;35:*.png=01;35:*.svg=01;35:*.svgz=01;35:*.mng=01;35:*.pcx=01;35:*.mov=01;35:*.mpg=01;35:*.mpeg=01;35:*.m2v=01;35:*.mkv=01;35:*.webm=01;35:*.ogm=01;35:*.mp4=01;35:*.m4v=01;35:*.mp4v=01;35:*.vob=01;35:*.qt=01;35:*.nuv=01;35:*.wmv=01;35:*.asf=01;35:*.rm=01;35:*.rmvb=01;35:*.flc=01;35:*.avi=01;35:*.fli=01;35:*.flv=01;35:*.gl=01;35:*.dl=01;35:*.xcf=01;35:*.xwd=01;35:*.yuv=01;35:*.cgm=01;35:*.emf=01;35:*.ogv=01;35:*.ogx=01;35:*.aac=00;36:*.au=00;36:*.flac=00;36:*.m4a=00;36:*.mid=00;36:*.midi=00;36:*.mka=00;36:*.mp3=00;36:*.mpc=00;36:*.ogg=00;36:*.ra=00;36:*.wav=00;36:*.oga=00;36:*.opus=00;36:*.spx=00;36:*.xspf=00;36:
XDG_CURRENT_DESKTOP=GNOME
VTE_VERSION=6003
XRDP_SOCKET_PATH=/run/xrdp/sockdir
XRDP_PULSE_SOURCE_SOCKET=xrdp_chansrv_audio_in_socket_10
GNOME_TERMINAL_SCREEN=/org/gnome/Terminal/screen/af8cf72d_9406_4502_87df_7737e813f8a2
LESSCLOSE=/bin/lesspipe %s %s
XDG_SESSION_CLASS=user
TERM=xterm-256color
LESSOPEN=| /bin/lesspipe %s
USER=signway
GNOME_TERMINAL_SERVICE=:1.393
XRDP_SESSION=1
DISPLAY=:10.0
XRDP_PULSE_SINK_SOCKET=xrdp_chansrv_audio_out_socket_10
SHLVL=1
QT_IM_MODULE=ibus
XDG_DATA_DIRS=/usr/share/gnome:/usr/local/share:/usr/share:/var/lib/snapd/desktop
PATH=/sbin:/bin:/usr/bin:/usr/local/bin:/snap/bin:/home/signway/dotnet
DBUS_SESSION_BUS_ADDRESS=unix:abstract=/tmp/dbus-LY2CUzKESO,guid=88d0510cbc94cdf2015ed92765542918
UID=1000
_=/bin/env
2.5 运行
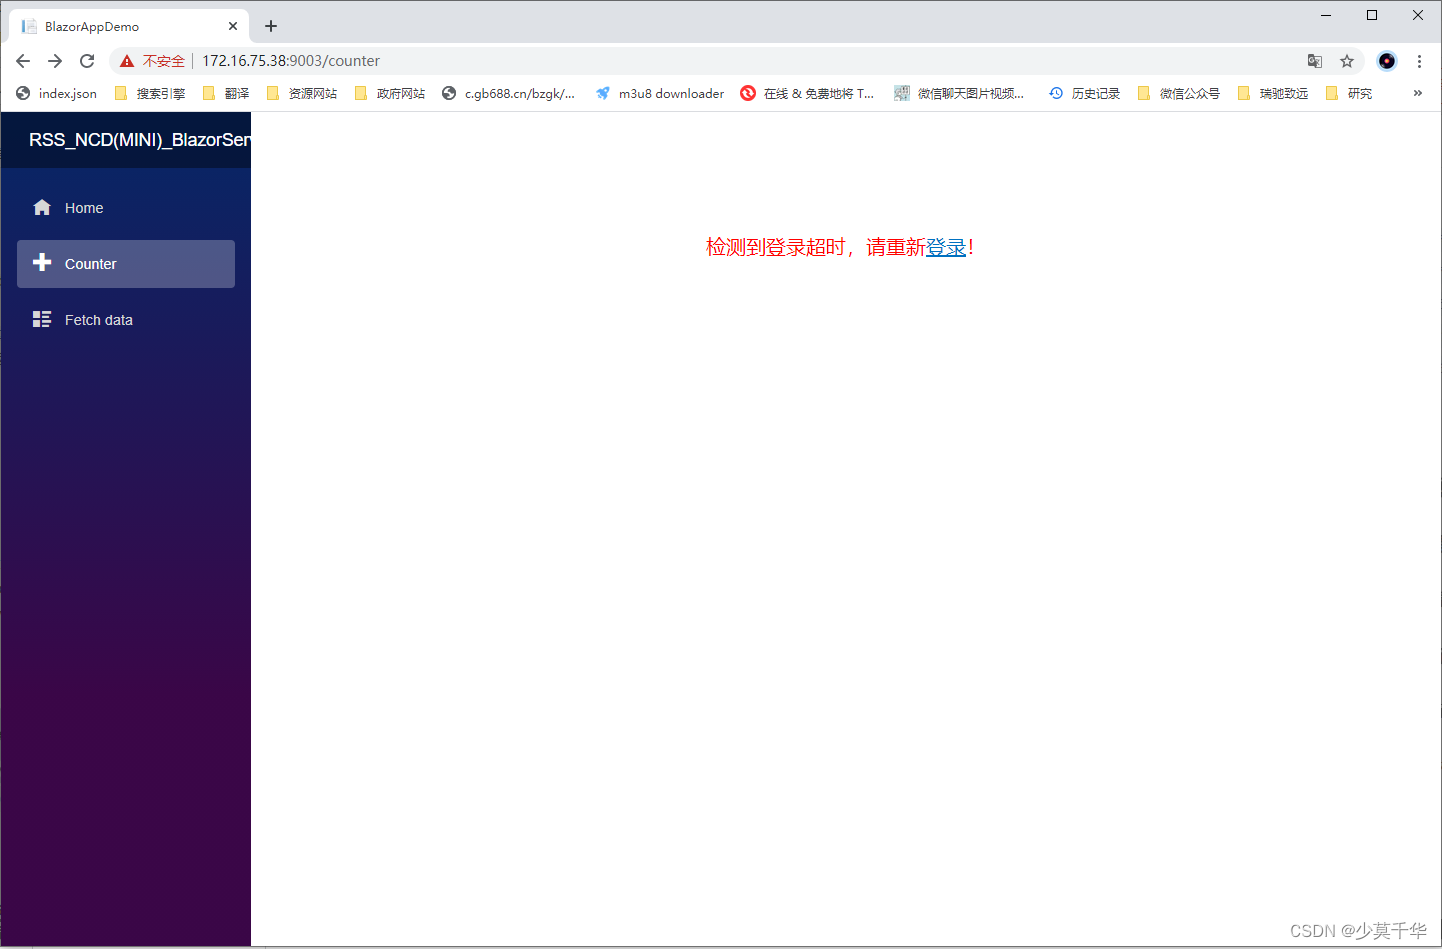
**注意:一定要到根目录下运行,不要使用全路径,不然一些资源加载不了导致页面显示不正常**
2.5.1 临时变量运行程序
export DOTNET_ROOT=$HOME/dotnet
export PATH=$PATH:$HOME/dotnet
cd /home/signway/rsszy/webapp2/
dotnet 'RSS_NCD(MINI)_BlazorServer.dll'
2.5.2 永久变量运行程序
cd /home/signway/rsszy/webapp2/
dotnet 'RSS_NCD(MINI)_BlazorServer.dll'
signway@RK3588:~$ cd /home/signway/rsszy/webapp2/
signway@RK3588:~/rsszy/webapp2$
signway@RK3588:~/rsszy/webapp2$ dotnet 'RSS_NCD(MINI)_BlazorServer.dll'
info: Microsoft.Hosting.Lifetime[14]Now listening on: http://[::]:9002
info: Microsoft.Hosting.Lifetime[14]Now listening on: https://[::]:9003
info: Microsoft.Hosting.Lifetime[0]Application started. Press Ctrl+C to shut down.
info: Microsoft.Hosting.Lifetime[0]Hosting environment: Production
info: Microsoft.Hosting.Lifetime[0]Content root path: /home/signway/rsszy/webapp2/
2.5.3 永久变量静默运行(后台运行)
cd /home/signway/rsszy/webapp2/
nohup dotnet 'RSS_NCD(MINI)_BlazorServer.dll' > /dev/null 2>&1 &
signway@RK3588:~/rsszy/webapp2$ cd /home/signway/rsszy/webapp2/
signway@RK3588:~/rsszy/webapp2$
signway@RK3588:~/rsszy/webapp2$ nohup dotnet 'RSS_NCD(MINI)_BlazorServer.dll' > /dev/null 2>&1 &
[1] 70286
signway@RK3588:~/rsszy/webapp2$
2.5.4 查看后台运行
ps aux | grep <运行程序名称>
ps aux | grep BlazorServer
signway@RK3588:~/rsszy/webapp2$ ps aux | grep BlazorServer
signway    70286  0.6  2.2 24527624 90396 pts/2  Sl   17:59   0:01 dotnet RSS_NCD(MINI)_BlazorServer.dll
signway    70327  0.0  0.0  11664   664 pts/2    S+   18:03   0:00 grep --color=auto BlazorServer
2.5.5 终止运行程序
kill <PID>
kill 70286
signway@RK3588:~/rsszy/webapp2$ kill 70286
signway@RK3588:~/rsszy/webapp2$
2.5.6 强制终止运行程序
kill -9 <PID>
kill -9 70286
signway@RK3588:~/rsszy/webapp2$ kill -9 70336
signway@RK3588:~/rsszy/webapp2$
相关文章:
【Ubuntu】Ubuntu arm64 部署 Blazor Server 应用
部署步骤 发布安装运行环境:dotnet-sdk(必装)、aspnetcore-runtime、dotnet-runtime安装证书设置环境变量:临时变量、当前用户永久变量、所有用户的永久变量运行:终端运行、后台运行 基本情况 开发系统环境 系统&am…...
Android加固为何重要?很多人不学
为什么要加固? APP加固是对APP代码逻辑的一种保护。原理是将应用文件进行某种形式的转换,包括不限于隐藏,混淆,加密等操作,进一步保护软件的利益不受损坏。总结主要有以下三方面预期效果: 1.防篡改&#x…...

【C/PTA】函数专项练习(一)
本文结合PTA专项练习带领读者掌握函数,刷题为主注释为辅,在代码中理解思路,其它不做过多叙述。 目录 6-1 输出星期名6-2 三整数最大值6-3 数据排序6-4 多项式求值 6-1 输出星期名 请编写函数,根据星期数输出对应的星期名。 函数原…...

SUDS: Scalable Urban Dynamic Scenes
SUDS: Scalable Urban Dynamic Scenes:可扩展的城市动态场景 创新点 1.将场景分解为三个单独的哈希表数据结构,以高效地编码静态、动态和远场辐射场 2.利用无标签的目标信号,包括RGB图像、稀疏LiDAR、现成的自监督2D描述符,以及…...

蓝桥杯算法双周赛心得——迷宫逃脱(记忆化搜索)
大家好,我是晴天学长,非常经典实用的记忆化搜索题,当然也可以用dp做,我也会发dp的题解,需要的小伙伴可以关注支持一下哦!后续会继续更新的。💪💪💪 1) .迷宫逃脱 迷官逃脱…...
nodejs+vue线上生活超市购物商城系统w2c42
超市管理系统的开发流程包括对超市管理系统的需求分析,软件的设计建模以及编写程序实现系统所需功能这三个阶段。对超市管理系统的需求分析。在这个阶段,通过查阅书籍,走访商场搜集相关资料,了解经营者对软件功能的具体所需和建议…...
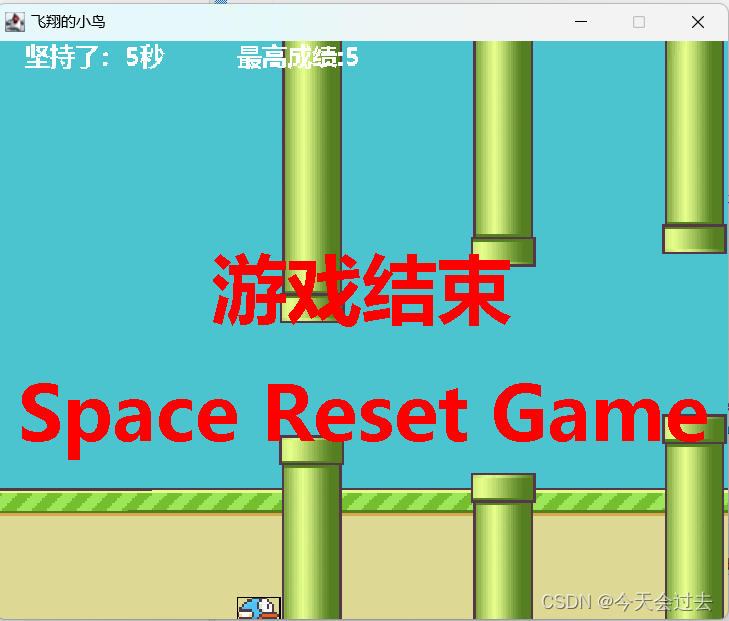
飞翔的小鸟
运行游戏如下: 碰到柱子就结束游戏 App GameApp类 package App;import main.GameFrame;public class GameApp {public static void main(String[] args) {//游戏的入口new GameFrame();} } main Barrier 类 package main;import util.Constant; import util.Ga…...

浅析OKR的敏捷性
前言 OKR对于工作的提升有着一定的不可替代的作用。特别在敏捷方面。 OKR的敏捷性 OKR(Objectives and Key Results)是一种目标设定框架,它的敏捷性主要体现在以下几个方面: 公开透明 OKR要求完全公开透明,让每个员…...
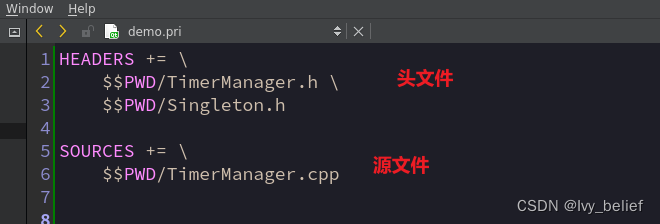
Linux+qt:创建动态库so,以及如何使用(详细步骤)
目录 1、根据安装Qt Creator的向导进行创建 2、开发动态库注意的一些细节 3、给动态库添加一个对外开放的接口文件 4、了解下Qt的 .pri文件(非常实用) 5、如何调用动态库.so 1、根据安装Qt Creator的向导进行创建 (1)选择“…...

如何将Docker的构建时间减少40%
与许多公司类似,我们为产品中使用的所有组件构建docker映像。随着时间的推移,其中一些映像变得越来越大,我们的CI构建花费的时间也越来越长。我的目标是CI构建不超过5分钟——差不多是喝杯咖啡休息的理想时间。如果构建花费的时间超过这个时间…...
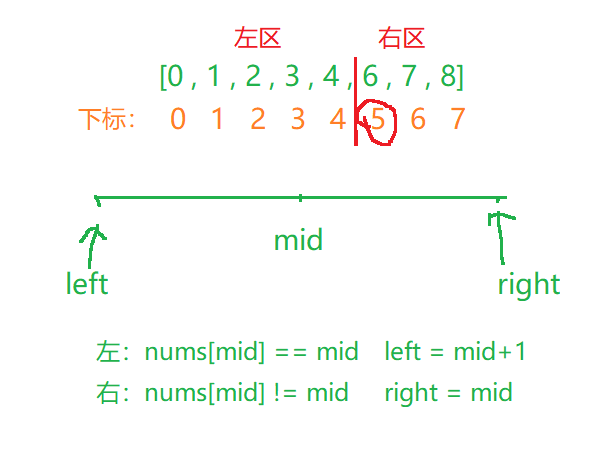
二分查找——经典题目合集
文章目录 🦜69. x 的平方根🌼题目🌻算法原理🌷代码实现 🐳35. 搜索插入位置🌼题目🌻算法原理🌷代码实现 🦭852. 山脉数组的峰顶索引🌼题目🌻算法原…...

在Jupyter Lab中使用多个环境,及魔法命令简介
一、Jupyter Lab使用conda虚拟环境 1、给虚拟环境添加 ipykernel 方法一: 创建环境时直接添加ipykernel 方法:conda create -n 【虚拟环境名称】python3.8 ipykernel实例如下: conda create -n tensorflow_cpu python3.8 ipykernel 方法二ÿ…...

知虾数据软件:电商人必备知虾数据软件,轻松掌握市场趋势
在当今数字化时代,数据已经成为了企业决策的重要依据。对于电商行业来说,数据更是至关重要。如果你想在电商领域中脱颖而出,那么你需要一款强大的数据分析工具来帮助你更好地了解市场、分析竞争对手、优化运营策略。而知虾数据软件就是这样一…...

c语言中*p1++和p1++有啥区别
在C语言中,*p1和p1是两个不同的表达式,有以下区别: *p1:这是一个后缀递增运算符的组合。首先,*p1会取出指针p1所指向的值,并且对p1进行递增操作。简而言之,这个表达式会先取出p1指向的值&#x…...

2
【任务 2】私有云服务运维[10 分] 【适用平台】私有云 【题目 1】OpenStack 开放镜像权限[0.5 分] 使 用 OpenStack 私 有 云 平 台 , 在 OpenStack 平台的 admin 项 目 中 使 用 cirros-0.3.4-x86_64-disk.img 镜像文件创建名为 glance-cirros 的镜像,通…...
)
SELinux零知识学习二十二、SELinux策略语言之类型强制(7)
接前一篇文章:SELinux零知识学习二十一、SELinux策略语言之类型强制(6) 二、SELinux策略语言之类型强制 3. 访问向量规则 AV规则就是按照对客体类别的访问许可指定具体含义的规则,SELinux策略语言目前支持四类AV规则:…...
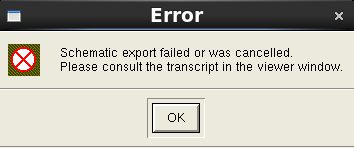
cadence layout lvs时出现error
Error:Schematic export failed or was cancelled.Please consult the transcript in the viewer window. 解决办法同下: cadence layout lvs时出现error-CSDN博客...

python练习题(markdown中的60道题)
1.Demo01 摄氏温度转化为华氏温度 celsius float(input(输入摄氏温度:)) fahrenheit (9/5)*celsius 32 print(%0.1f 摄氏温度转为华氏温度为 %0.1f % (celsius, fahrenheit))结果: 2.Demo02 计算圆柱体的体积 h, r map(float, input().split())# …...

【JavaSE】-4-单层循环结构
回顾 运算符: 算术 --、逻辑 && & || |、比较 、三元 、赋值 int i 1; i; j i; //j2 i3 syso(--j"-----"i) //1 3 选择结构 if(){} if(){}else{} if(){}else if(){}else if(){}else{}//支持byte、short、int //支持char //支持枚举…...

12、人工智能、机器学习、深度学习的关系
很多年前听一个机器学习的公开课,在Q&A环节,一个同学问了老师一个问题“机器学习和深度学习是什么关系”? 老师先没回答,而是反问了在场的同学,结果问了2-3个,没有人可以回答的很到位,我当时也是初学一脸懵,会场准备的小礼品也没有拿到。 后来老师解释“机器学习和…...
)
蓝桥杯单片机CT107D平台:用PCF8591的DAC做个简易数字电压表(附完整代码)
蓝桥杯单片机CT107D平台:基于PCF8591的闭环数字电压表设计与实现 在蓝桥杯单片机竞赛中,CT107D开发平台因其丰富的外设和稳定的性能成为热门选择。其中,PCF8591这颗集成了ADC和DAC功能的芯片,常被用于模拟信号处理的经典案例。本文…...

Docker 与 Kubernetes 中的 Java 应用监控:确保应用健康运行
Docker 与 Kubernetes 中的 Java 应用监控:确保应用健康运行 核心概念 在容器化和云原生环境中,监控 Java 应用是确保应用健康运行的关键。通过监控,可以及时发现和解决问题,提高应用的可靠性和可用性。Docker 和 Kubernetes 提供…...

S32K3安全启动实战:从HSE固件安装到SMR配置的完整避坑指南
S32K3安全启动实战:从HSE固件安装到SMR配置的完整避坑指南 在嵌入式系统开发中,安全启动功能已成为保护设备固件完整性和防止未授权代码执行的关键防线。NXP S32K3系列微控制器通过硬件安全引擎(HSE)提供了强大的安全启动能力,但实际配置过程…...

Phi-3.5-Mini-Instruct多场景落地:跨境电商客服话术生成+多语言翻译辅助
Phi-3.5-Mini-Instruct多场景落地:跨境电商客服话术生成多语言翻译辅助 1. 项目背景与价值 在跨境电商运营中,客服话术生成和多语言翻译是两大核心痛点。传统解决方案往往需要分别使用不同工具,效率低下且成本高昂。微软Phi-3.5-Mini-Instr…...

基于Web Audio与Canvas实现浏览器端音视频动态合成
1. 项目概述与核心价值最近在折腾一些个人项目,想给静态页面加点“活”的交互,比如让用户上传一张图片,然后生成一个带点律动感的音乐视频。这听起来像是需要一整套复杂的音视频处理流水线,从音频分析到视觉生成,没个几…...

Python实现本地网络摄像头服务器:MJPEG流原理与Flask部署实战
1. 项目概述:从“玩具”到“利器”的本地网络摄像头如果你手头有一台闲置的旧手机、一个吃灰的USB摄像头,或者只是想用电脑自带的摄像头搭建一个简单的监控、直播或视频会议服务器,那么mehmetkahya0/local-web-camera这个项目绝对值得你花时间…...

2026届必备的五大AI写作神器推荐榜单
Ai论文网站排名(开题报告、文献综述、降aigc率、降重综合对比) TOP1. 千笔AI TOP2. aipasspaper TOP3. 清北论文 TOP4. 豆包 TOP5. kimi TOP6. deepseek 在学术写作这个范畴当中,可以用来写论文的人工智能工具已然变为能够提高效率以及…...
)
告别时间漂移:手把手教你用RX8111CE RTC芯片实现高精度时间戳(附I2C驱动避坑指南)
RX8111CE高精度时间戳实战:从硬件设计到I2C驱动全解析 在工业自动化、电力监测和医疗设备等关键领域,系统事件的精确时间标记往往决定着数据分析的可靠性与事故追溯的有效性。爱普生RX8111CE实时时钟芯片凭借其1/256秒分辨率的时间戳功能,正在…...

BilibiliDown:三分钟掌握B站视频下载的终极指南
BilibiliDown:三分钟掌握B站视频下载的终极指南 【免费下载链接】BilibiliDown (GUI-多平台支持) B站 哔哩哔哩 视频下载器。支持稍后再看、收藏夹、UP主视频批量下载|Bilibili Video Downloader 😳 项目地址: https://gitcode.com/gh_mirrors/bi/Bili…...

TechXueXi终极指南:提升学习效率的10个实用技巧
TechXueXi终极指南:提升学习效率的10个实用技巧 【免费下载链接】TechXueXi 强国通 科技强国 学习强国 xuexiqiangguo 全网最好用开源网页学习强国助手:TechXueXi (懒人刷分工具 自动学习)技术强国,支持答题࿰…...