黑马React18: Redux
黑马React: Redux
Date: November 19, 2023
Sum: Redux基础、Redux工具、调试、美团案例
Redux介绍
Redux 是React最常用的集中状态管理工具,类似于Vue中的Pinia(Vuex),可以独立于框架运行
作用:通过集中管理的方式管理应用的状态
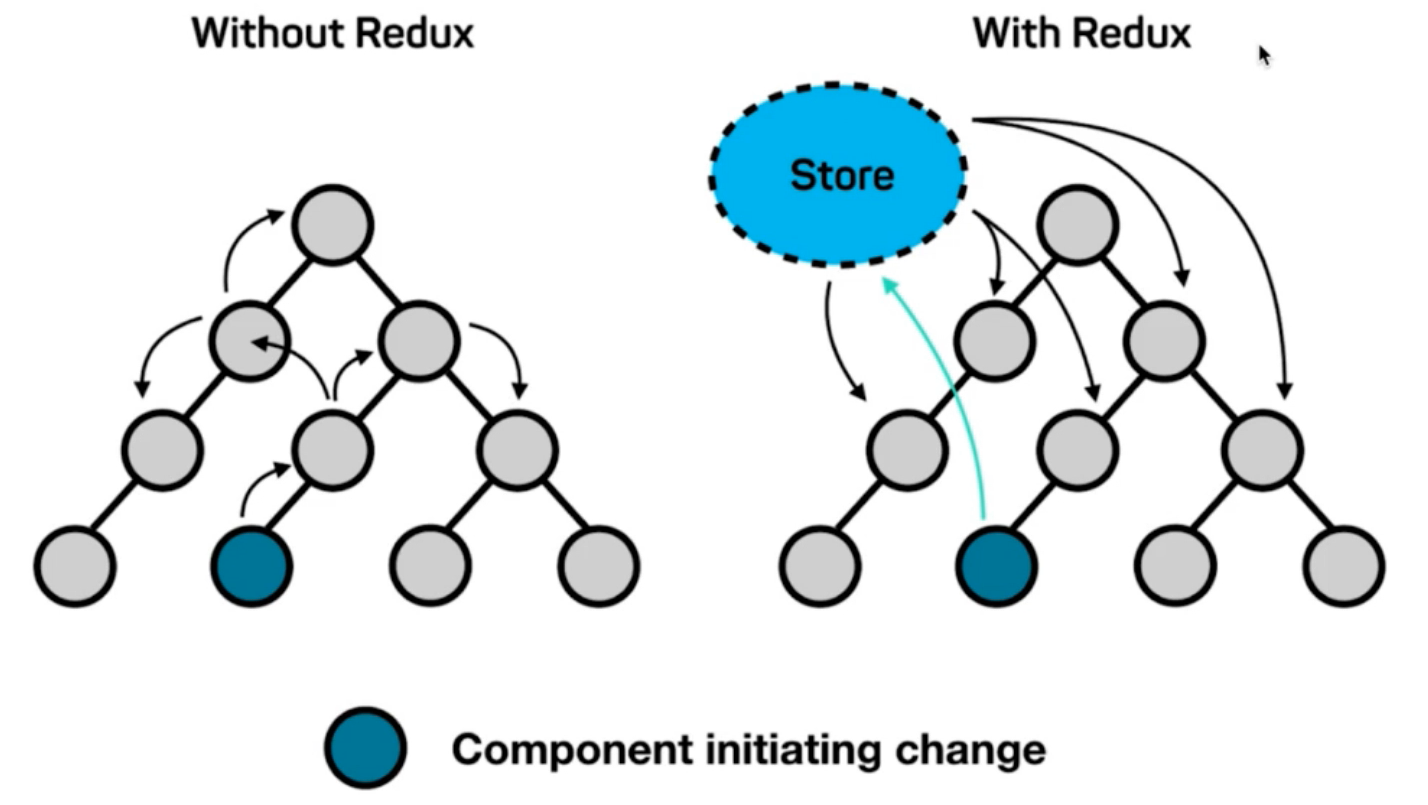
为什么要使用Redux?
- 独立于组件,无视组件之间的层级关系,简化通信问题
- 单项数据流清晰,易于定位bug
- 调试工具配套良好,方便调试
Redux快速体验
1. 实现计数器
需求:不和任何框架绑定,不使用任何构建工具,使用纯Redux实现计数器

使用步骤:
- 定义一个 reducer 函数 (根据当前想要做的修改返回一个新的状态)
- 使用createStore方法传入 reducer函数 生成一个store实例对象
- 使用store实例的 subscribe方法 订阅数据的变化(数据一旦变化,可以得到通知)
- 使用store实例的 dispatch方法提交action对象 触发数据变化(告诉reducer你想怎么改数据)
- 使用store实例的 getState方法 获取最新的状态数据更新到视图中
代码实现:
<button id="decrement">-</button>
<span id="count">0</span>
<button id="increment">+</button><script src="https://unpkg.com/redux@latest/dist/redux.min.js"></script><script>// 定义reducer函数// 内部主要的工作是根据不同的action 返回不同的statefunction counterReducer (state = { count: 0 }, action) {switch (action.type) {case 'INCREMENT':return { count: state.count + 1 }case 'DECREMENT':return { count: state.count - 1 }default:return state}}// 使用reducer函数生成store实例const store = Redux.createStore(counterReducer)// 订阅数据变化store.subscribe(() => {console.log(store.getState())document.getElementById('count').innerText = store.getState().count})// 增const inBtn = document.getElementById('increment')inBtn.addEventListener('click', () => {store.dispatch({type: 'INCREMENT'})})// 减const dBtn = document.getElementById('decrement')dBtn.addEventListener('click', () => {store.dispatch({type: 'DECREMENT'})})
</script>
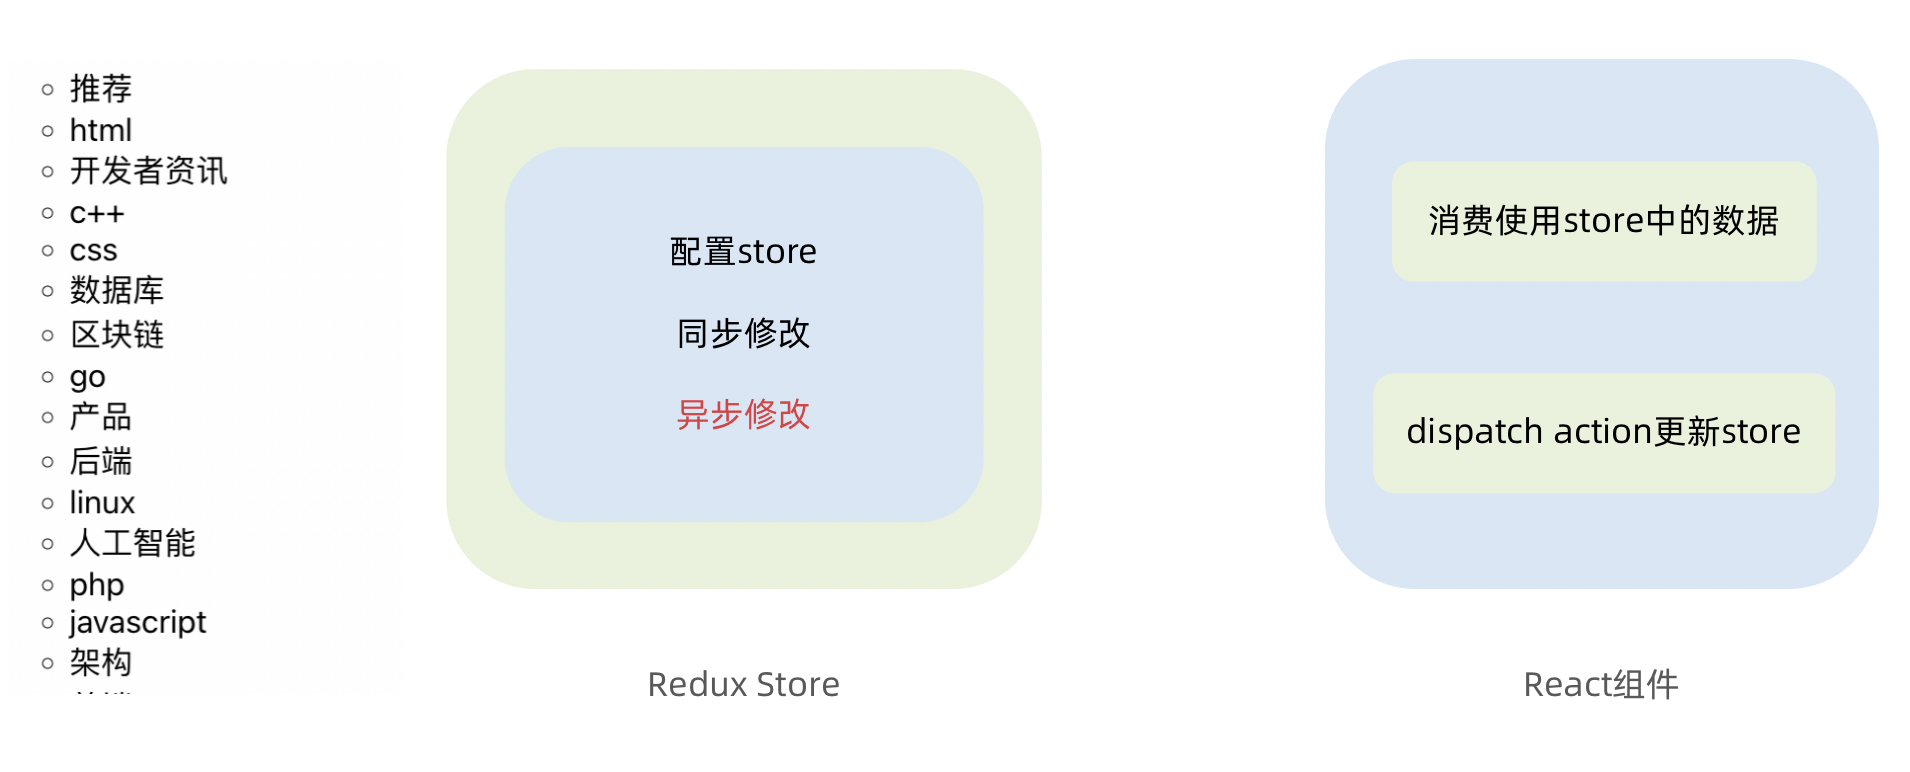
2. Redux数据流架构
Redux的难点是理解它对于数据修改的规则, 下图动态展示了在整个数据的修改中,数据的流向
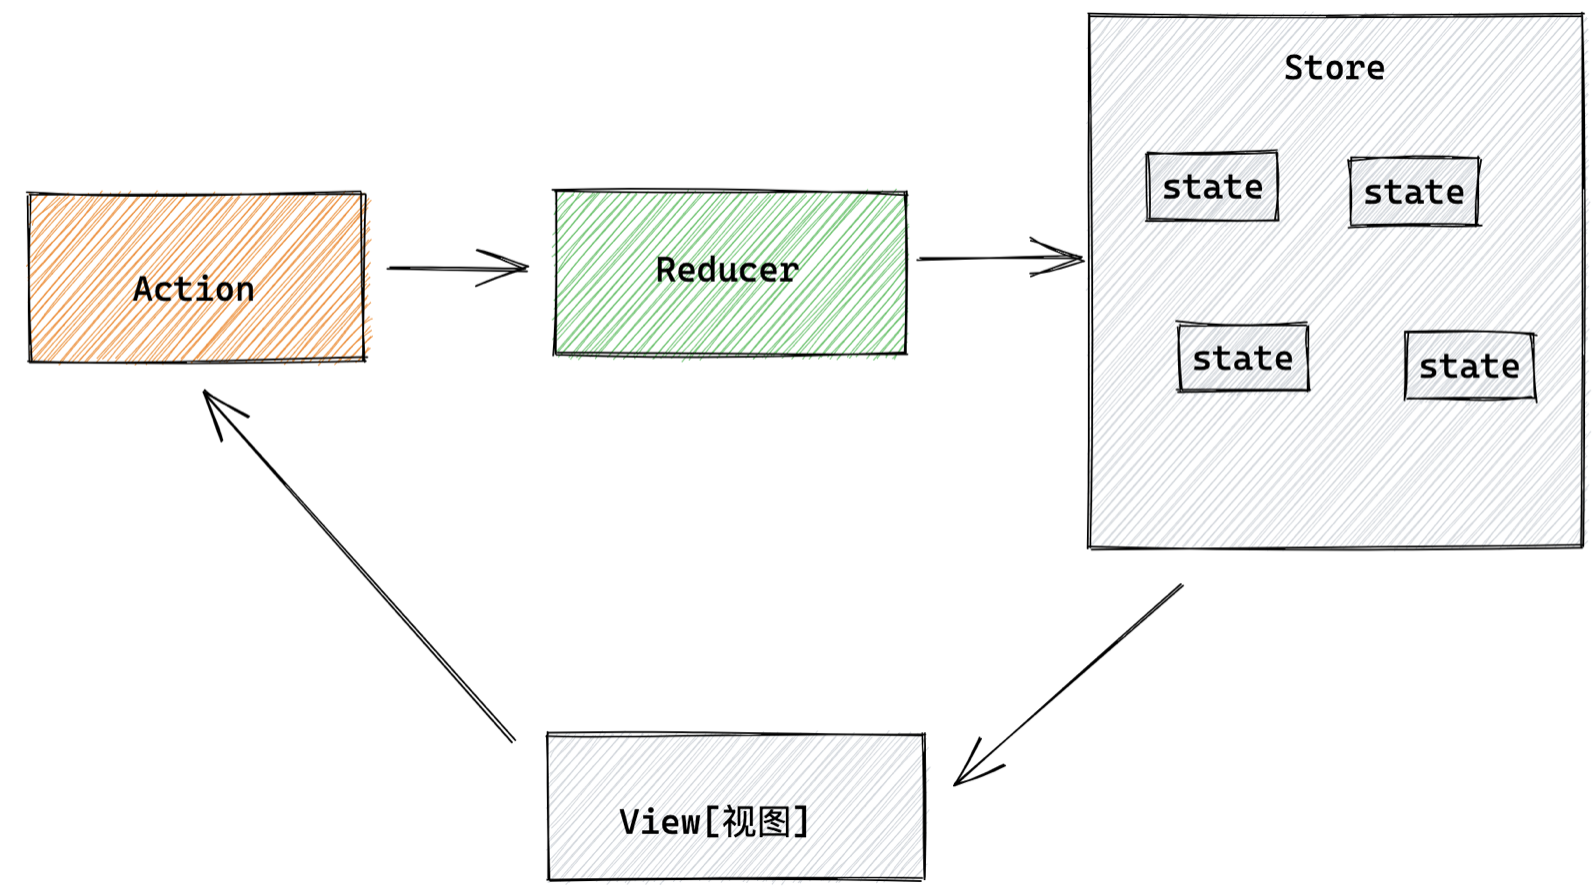
为了职责清晰,Redux代码被分为三个核心的概念,我们学redux,其实就是学这三个核心概念之间的配合,三个概念分别是:
- state: 一个对象 存放着我们管理的数据
- action: 一个对象 用来描述你想怎么改数据
- reducer: 一个函数 根据action的描述更新state
Redux与React - 环境准备
Redux虽然是一个框架无关可以独立运行的插件,但是社区通常还是把它与React绑定在一起使用,以一个计数器案例体验一下Redux + React 的基础使用
1. 配套工具
在React中使用redux,官方要求安装俩个其他插件 - Redux Toolkit 和 react-redux
- Redux Toolkit(RTK)- 官方推荐编写Redux逻辑的方式,是一套工具的集合集,简化书写方式
- react-redux - 用来 链接 Redux 和 React组件 的中间件

2. 配置基础环境
- 使用 CRA 快速创建 React 项目
npx create-react-app react-redux
- 安装配套工具
npm i @reduxjs/toolkit react-redux
- 启动项目
npm run start
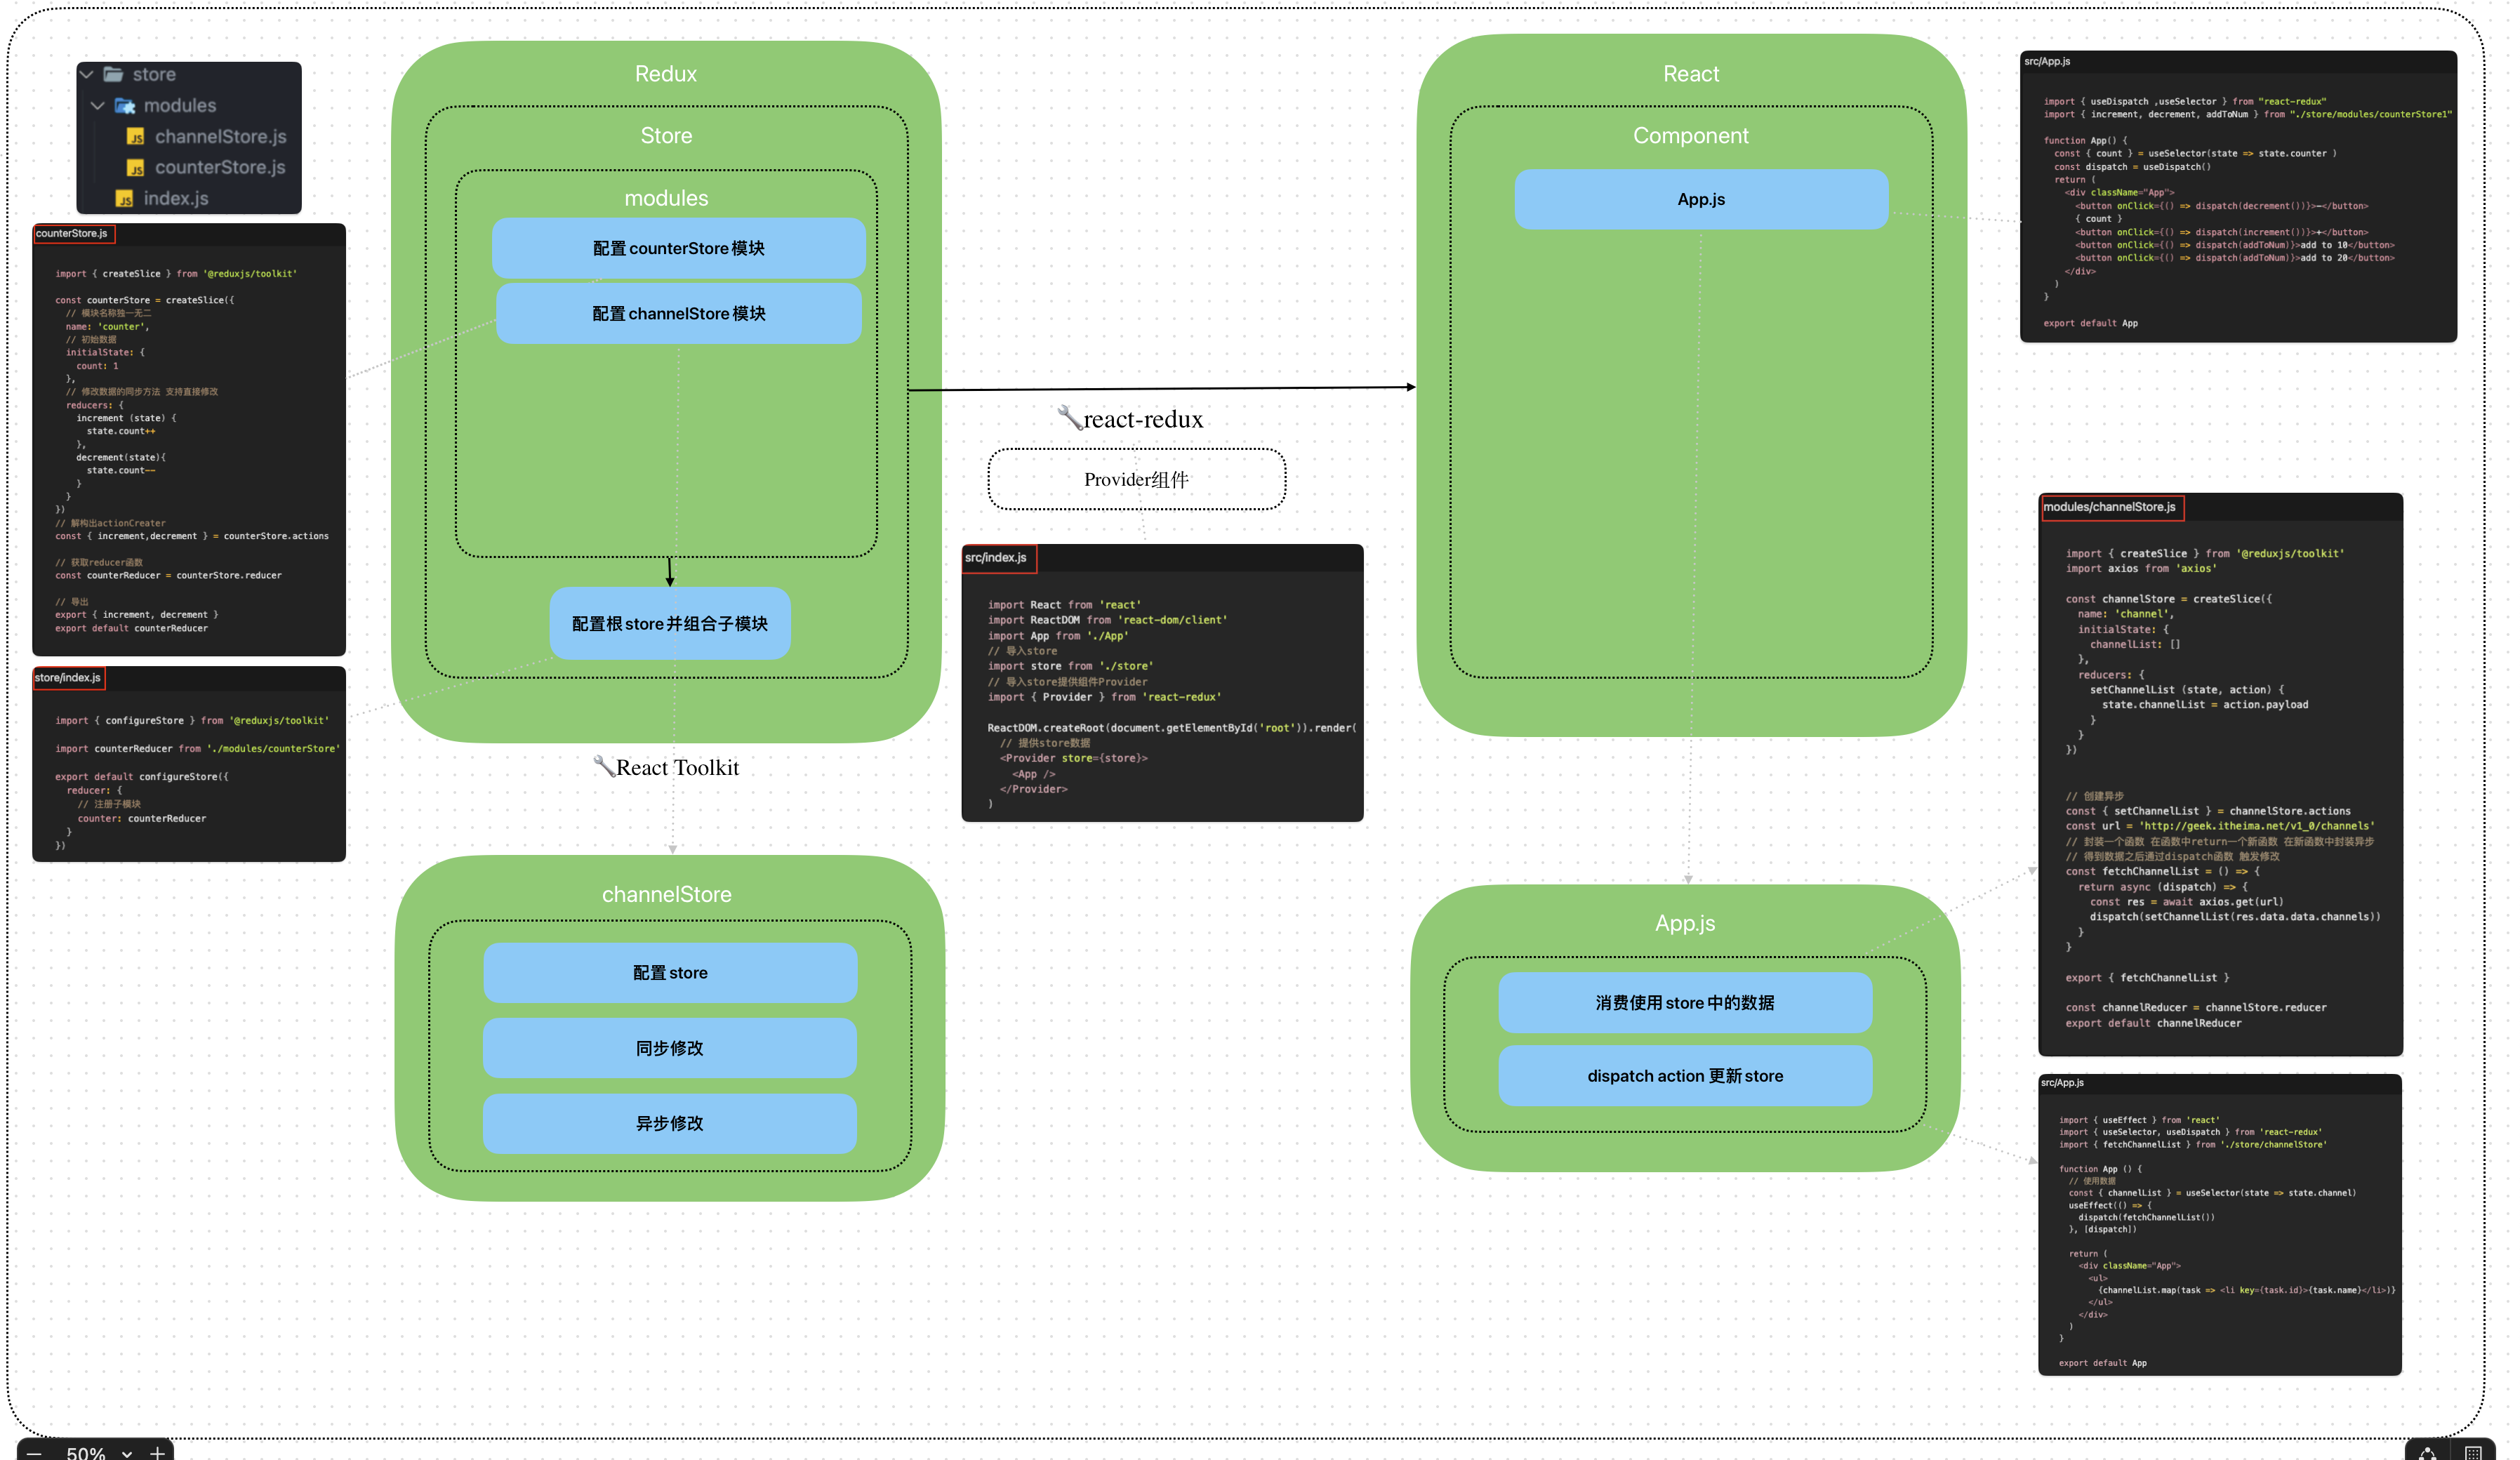
3. store目录结构设计
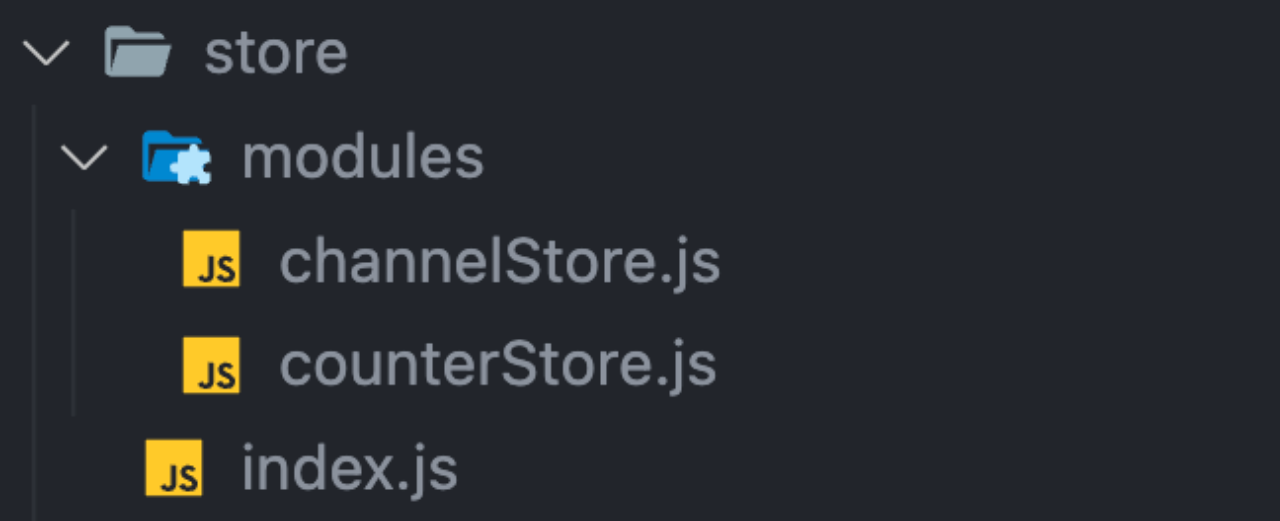
- 通常集中状态管理的部分都会单独创建一个单独的
store目录 - 应用通常会有很多个子store模块,所以创建一个
modules目录,在内部编写业务分类的子store - store中的入口文件 index.js 的作用是组合modules中所有的子模块,并导出store
Redux与React - 实现counter
1. 整体路径熟悉

2. 使用 React Toolkit 创建 counterStore
modules/counterStore.js
import { createSlice } from '@reduxjs/toolkit'const counterStore = createSlice({// 模块名称独一无二name: 'counter',// 初始数据initialState: {count: 1},// 修改数据的同步方法 支持直接修改reducers: {increment (state) {state.count++},decrement(state){state.count--}}
})
// 解构出actionCreater
const { increment,decrement } = counterStore.actions// 获取reducer函数
const counterReducer = counterStore.reducer// 导出
export { increment, decrement }
export default counterReducer
store/index.js
import { configureStore } from '@reduxjs/toolkit'import counterReducer from './modules/counterStore'export default configureStore({reducer: {// 注册子模块counter: counterReducer}
})
3. 为React注入store
react-redux负责把Redux和React 链接 起来,内置 Provider组件 通过 store 参数把创建好的store实例注入到应用中,链接正式建立
src/index.js
import React from 'react'
import ReactDOM from 'react-dom/client'
import App from './App'
// 导入store
import store from './store'
// 导入store提供组件Provider
import { Provider } from 'react-redux'ReactDOM.createRoot(document.getElementById('root')).render(// 提供store数据<Provider store={store}><App /></Provider>
)
✅4. React组件使用store中的数据 - useSelector
在React组件中使用store中的数据,需要用到一个钩子函数 - useSelector,它的作用是把store中的数据映射到组件中,使用样例如下:
useSelector作用:把store中的数据映射到组件中
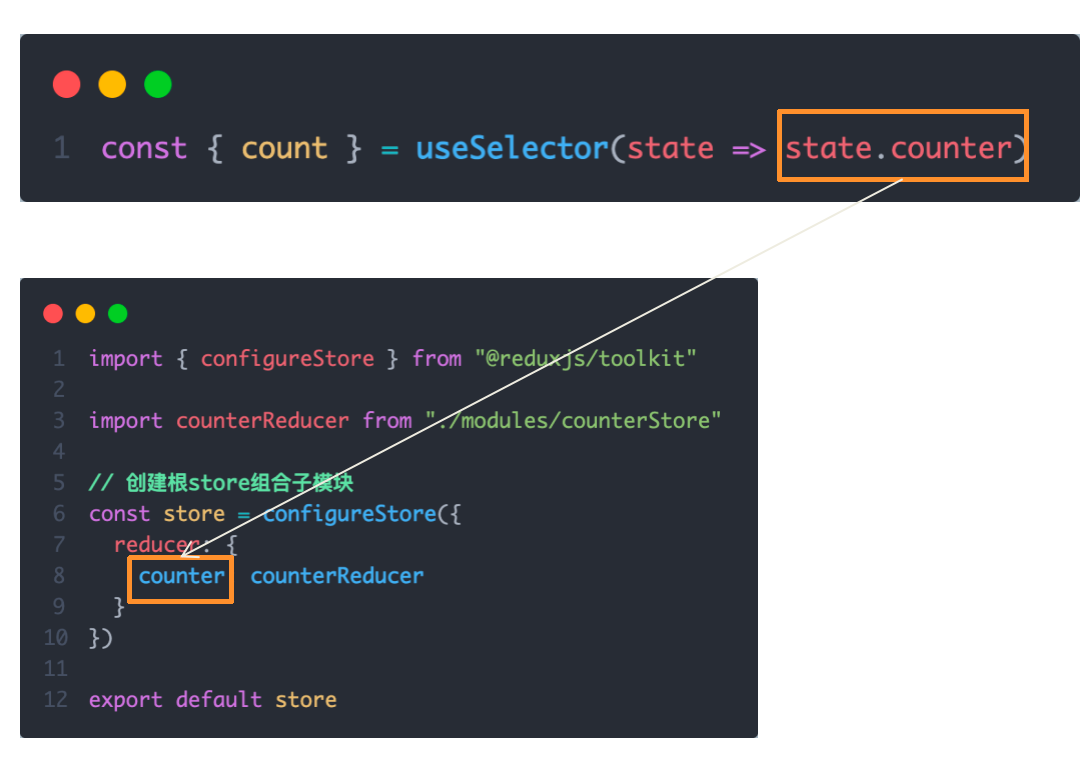
注:上面是组件counterStore,下面是store/index.js. 即根组件
src/App.js
import { useDispatch ,useSelector } from "react-redux"
import { increment, decrement, addToNum } from "./store/modules/counterStore1"function App() {const { count } = useSelector(state => state.counter )const dispatch = useDispatch()return (<div className="App"><button onClick={() => dispatch(decrement())}>-</button>{ count }<button onClick={() => dispatch(increment())}>+</button><button onClick={() => dispatch(addToNum)}>add to 10</button><button onClick={() => dispatch(addToNum)}>add to 20</button></div>)
}export default App
✅5. React组件修改store中的数据 - dispatch
React组件中修改store中的数据需要借助另外一个hook函数 - useDispatch,它的作用是生成提交action对象的dispatch函数
dispatch作用:在组件中提交action对象,从而修改store中数据
使用样例如下:

✅Redux与React - 提交action传参
需求:组件中有俩个按钮2
add to 10
和
add to 20
可以直接把count值修改到对应的数字,目标count值是在组件中传递过去的,需要在提交action的时候传递参数
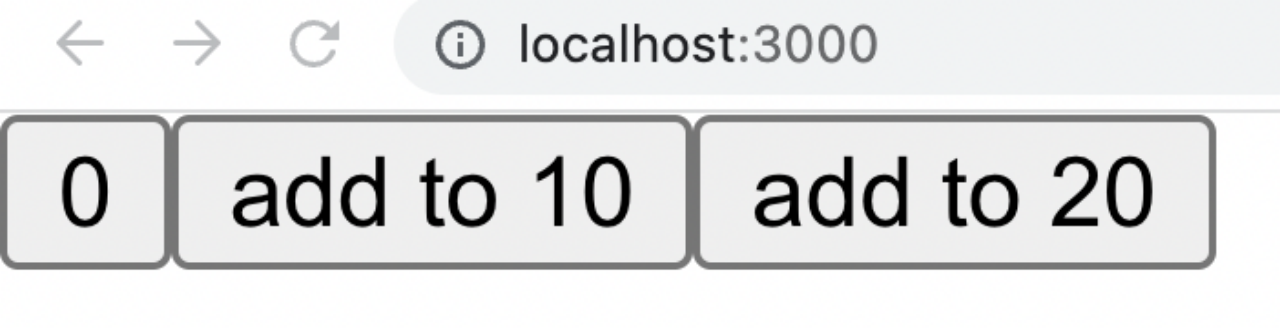
实现方式:利用action传参实现
1-在reducers的同步修改方法中添加action对象参数
在调用actionCreater的时候传递参数,参数会被传递到action对象payload属性上
理解:这边直接理解 addToNum 接受的参数会被传递到 action.payload 即可

总结:
- 组件中使用哪个hook函数获取store中的数据?
useSelector - 组件中使用哪个hook函数获取dispatch方法?
useDispatch - 如何得到要提交action对象?
执行store模块中导出的actionCreater方法
Redux与React - 异步action处理
需求理解
实现步骤
-
创建store的写法保持不变,配置好同步修改状态的方法
-
单独封装一个函数,在函数内部return一个新函数,在新函数中
2.1 封装异步请求获取数据
2.2 调用同步actionCreater传入异步数据生成一个action对象,并使用dispatch提交
-
组件中dispatch的写法保持不变
代码实现 > 测试接口地址: http://geek.itheima.net/v1_0/channels
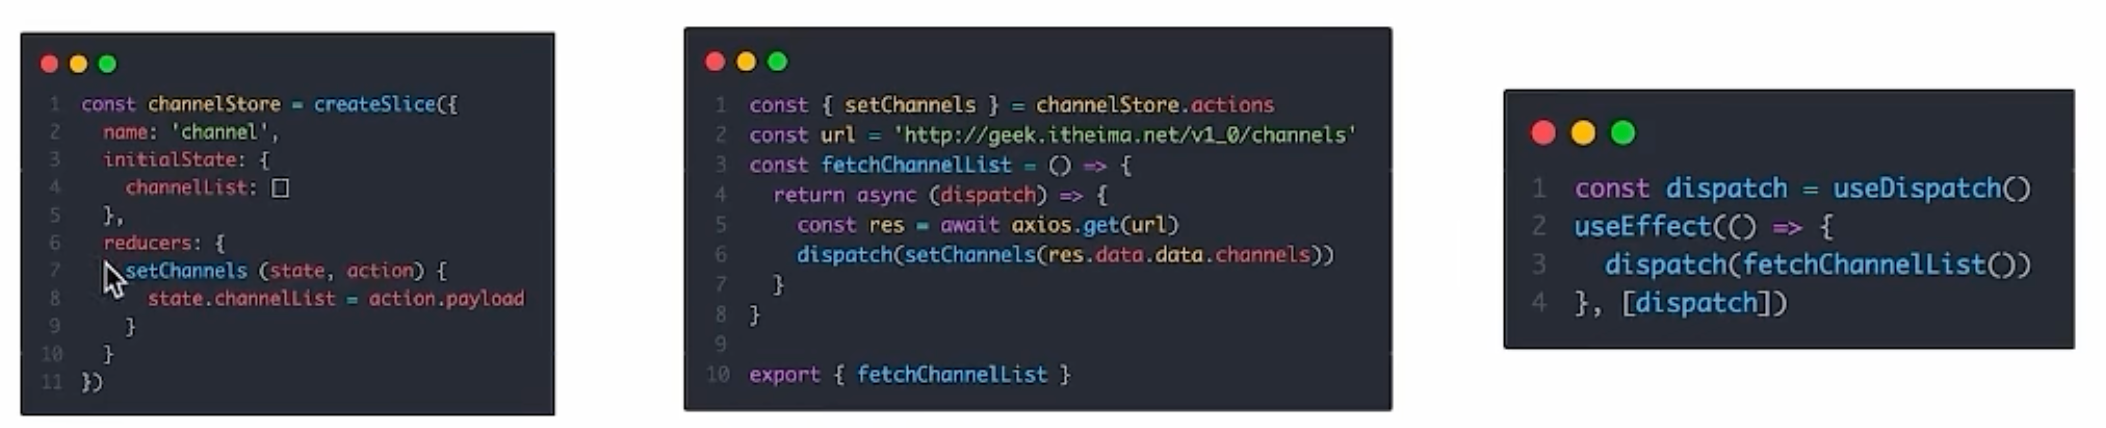
modules/channelStore.js
import { createSlice } from '@reduxjs/toolkit'
import axios from 'axios'const channelStore = createSlice({name: 'channel',initialState: {channelList: []},reducers: {setChannelList (state, action) {state.channelList = action.payload}}
})// 创建异步
const { setChannelList } = channelStore.actions
const url = 'http://geek.itheima.net/v1_0/channels'
// 封装一个函数 在函数中return一个新函数 在新函数中封装异步
// 得到数据之后通过dispatch函数 触发修改
const fetchChannelList = () => {return async (dispatch) => {const res = await axios.get(url)dispatch(setChannelList(res.data.data.channels))}
}export { fetchChannelList }const channelReducer = channelStore.reducer
export default channelReducer
src/App.js
import { useEffect } from 'react'
import { useSelector, useDispatch } from 'react-redux'
import { fetchChannelList } from './store/channelStore'function App () {// 使用数据const { channelList } = useSelector(state => state.channel)useEffect(() => {dispatch(fetchChannelList())}, [dispatch])return (<div className="App"><ul>{channelList.map(task => <li key={task.id}>{task.name}</li>)}</ul></div>)
}export default App
Redux-React链路过程
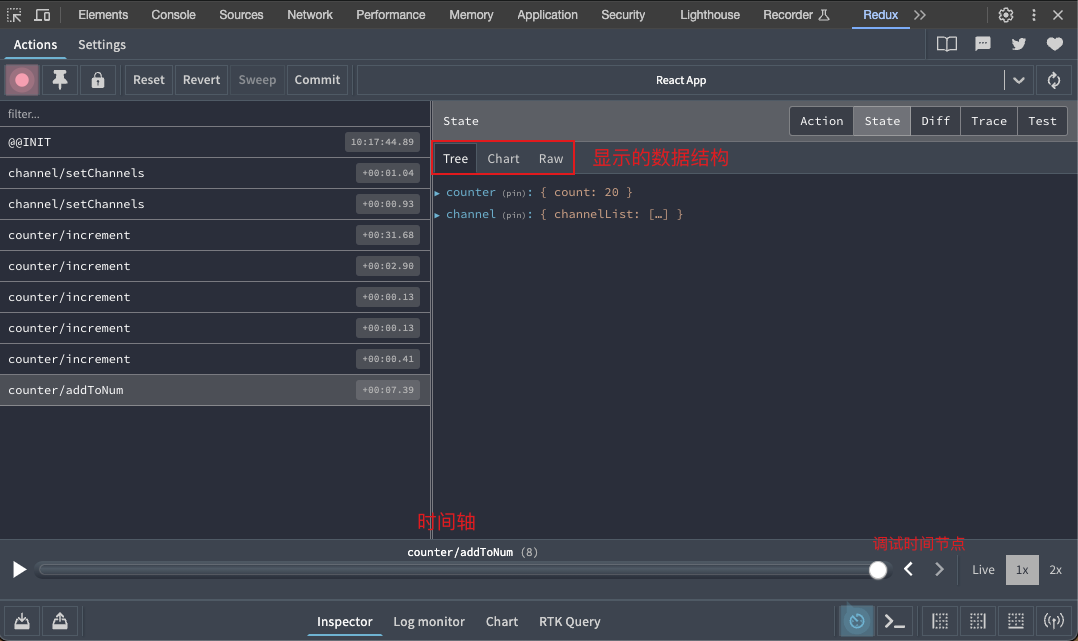
Redux调试 - devtools
Redux官方提供了针对于Redux的调试工具,支持实时state信息展示,action提交信息查看等
工具处理:
美团小案例
1. 案例演示
基本开发思路:
使用 RTK(Redux Toolkit)来管理应用状态, 组件负责 数据渲染 和 dispatch action
2. 准备并熟悉环境
- 克隆项目到本地(内置了基础静态组件和模版)
git clone http://git.itcast.cn/heimaqianduan/redux-meituan.git
- 安装所有依赖
npm i
- 启动mock服务(内置了json-server)
npm run serve
- 启动前端服务
npm run start
3. 分类和商品列表渲染
1- 编写store逻辑
// 编写store
import { createSlice } from "@reduxjs/toolkit"
import axios from "axios"const foodsStore = createSlice({name: 'foods',initialState: {// 商品列表foodsList: []},reducers: {// 更改商品列表setFoodsList (state, action) {state.foodsList = action.payload}}
})// 异步获取部分
const { setFoodsList } = foodsStore.actions
const fetchFoodsList = () => {return async (dispatch) => {// 编写异步逻辑const res = await axios.get('http://localhost:3004/takeaway')// 调用dispatch函数提交actiondispatch(setFoodsList(res.data))}
}export { fetchFoodsList }const reducer = foodsStore.reducerexport default reducer
2- 组件使用store数据
// 省略部分代码
import { useDispatch, useSelector } from 'react-redux'
import { fetchFoodsList } from './store/modules/takeaway'
import { useEffect } from 'react'const App = () => {// 触发action执行// 1. useDispatch -> dispatch 2. actionCreater导入进来 3.useEffectconst dispatch = useDispatch()useEffect(() => {dispatch(fetchFoodsList())}, [dispatch])return (<div className="home">{/* 导航 */}<NavBar />{/* 内容 */}<div className="content-wrap"><div className="content"><Menu /><div className="list-content"><div className="goods-list">{/* 外卖商品列表 */}{foodsList.map(item => {return (<FoodsCategorykey={item.tag}// 列表标题name={item.name}// 列表商品foods={item.foods}/>)})}</div></div></div></div>{/* 购物车 */}<Cart /></div>)
}export default App
4. 点击分类激活交互实现

1- 编写store逻辑
// 编写storeimport { createSlice } from "@reduxjs/toolkit"
import axios from "axios"const foodsStore = createSlice({name: 'foods',initialState: {// 菜单激活下标值activeIndex: 0},reducers: {// 更改activeIndexchangeActiveIndex (state, action) {state.activeIndex = action.payload}}
})// 导出
const { changeActiveIndex } = foodsStore.actionsexport { changeActiveIndex }const reducer = foodsStore.reducerexport default reducer
2- 编写组件逻辑
const Menu = () => {const { foodsList, activeIndex } = useSelector(state => state.foods)const dispatch = useDispatch()const menus = foodsList.map(item => ({ tag: item.tag, name: item.name }))return (<nav className="list-menu">{/* 添加active类名会变成激活状态 */}{menus.map((item, index) => {return (<div// 提交action切换激活indexonClick={() => dispatch(changeActiveIndex(index))}key={item.tag}// 动态控制active显示className={classNames('list-menu-item',activeIndex === index && 'active')}>{item.name}</div>)})}</nav>)
}
5. 商品列表切换显示
image.png
 <div className="list-content"><div className="goods-list">{/* 外卖商品列表 */}{foodsList.map((item, index) => {return (activeIndex === index && <FoodsCategorykey={item.tag}// 列表标题name={item.name}// 列表商品foods={item.foods}/>)})}</div>
</div>
6. 添加购物车实现
1- 编写store逻辑
// 编写storeimport { createSlice } from "@reduxjs/toolkit"
import axios from "axios"const foodsStore = createSlice({name: 'foods',reducers: {// 添加购物车addCart (state, action) {// 是否添加过?以action.payload.id去cartList中匹配 匹配到了 添加过const item = state.cartList.find(item => item.id === action.payload.id)if (item) {item.count++} else {state.cartList.push(action.payload)}}}
})// 导出actionCreater
const { addCart } = foodsStore.actionsexport { addCart }const reducer = foodsStore.reducerexport default reducer
关键:
a.判断商品是否添加过
// 是否添加过?以action.payload.id去cartList中匹配 匹配到了 添加过
const item = state.cartList.find(item => item.id === action.payload.id)
2- 编写组件逻辑
<div className="goods-count">{/* 添加商品 */}<spanclassName="plus"onClick={() => dispatch(addCart({id,picture,name,unit,description,food_tag_list,month_saled,like_ratio_desc,price,tag,count}))}></span>
</div>
Bug修复:
修复count增加问题
7. 统计区域实现

image.png
实现思路
- 基于store中的cartList的length渲染数量
- 基于store中的cartList累加price * count
- 购物车cartList的length不为零则高亮
// 计算总价
const totalPrice = cartList.reduce((a, c) => a + c.price * c.count, 0){/* fill 添加fill类名购物车高亮*/}
{/* 购物车数量 */}
<div onClick={onShow} className={classNames('icon', cartList.length > 0 && 'fill')}>{cartList.length > 0 && <div className="cartCornerMark">{cartList.length}</div>}
</div>
拓展:
react中不存在computed计算属性,因为每次数值的变化都会引起组件的重新渲染
8. 购物车列表功能实现
image.png
1-控制列表渲染
const Cart = () => {return (<div className="cartContainer">{/* 添加visible类名 div会显示出来 */}<div className={classNames('cartPanel', 'visible')}>{/* 购物车列表 */}<div className="scrollArea">{cartList.map(item => {return (<div className="cartItem" key={item.id}><img className="shopPic" src={item.picture} alt="" /><div className="main"><div className="skuInfo"><div className="name">{item.name}</div></div><div className="payableAmount"><span className="yuan">¥</span><span className="price">{item.price}</span></div></div><div className="skuBtnWrapper btnGroup">{/* 数量组件 */}<Countcount={item.count}/></div></div>)})}</div></div></div>)
}export default Cart
2- 购物车增减逻辑实现
// count增
increCount (state, action) {// 关键点:找到当前要修改谁的count idconst item = state.cartList.find(item => item.id === action.payload.id)item.count++
},
// count减
decreCount (state, action) {// 关键点:找到当前要修改谁的count idconst item = state.cartList.find(item => item.id === action.payload.id)if (item.count === 0) {return}item.count--
}
<div className="skuBtnWrapper btnGroup">{/* 数量组件 */}<Countcount={item.count}onPlus={() => dispatch(increCount({ id: item.id }))}onMinus={() => dispatch(decreCount({ id: item.id }))}/>
</div>
3-清空购物车实现
// 清除购物车clearCart (state) { state.cartList = []}
<div className="header"><span className="text">购物车</span><spanclassName="clearCart"onClick={() => dispatch(clearCart())}>清空购物车</span>
</div>
9. 控制购物车显示和隐藏
image.png
// 控制购物车打开关闭的状态
const [visible, setVisible] = useState(false)const onShow = () => {if (cartList.length > 0) {setVisible(true)}
}{/* 遮罩层 添加visible类名可以显示出来 */}
<divclassName={classNames('cartOverlay', visible && 'visible')}onClick={() => setVisible(false)}
/>
相关文章:
黑马React18: Redux
黑马React: Redux Date: November 19, 2023 Sum: Redux基础、Redux工具、调试、美团案例 Redux介绍 Redux 是React最常用的集中状态管理工具,类似于Vue中的Pinia(Vuex),可以独立于框架运行 作用:通过集中管理的方式管…...

visionOS空间计算实战开发教程Day 5 纹理和材质
在Day 4中我们使用了ImmersiveSpace并在其中添加了一个立方体,但对这个立方体我们只配置了长宽高,并没有做进一步的操作。 本文中我们会通过纹理和材质对这个立方体的六个面分别进行不同的绘制。首先我们将ImmersiveView分拆…...
低代码PaaS开发平台
目录 一、低代码概念 低代码目的 低代码核心功能 二、PaaS平台 PaaS服务的低代码平台 1.私有化部署,为数据安全保驾护航 2.业内领先技术,为开发强势赋能 3.超强集成能力,系统对接无忧 4.源代码交付,实现二开自由 三、小结 一、低代…...
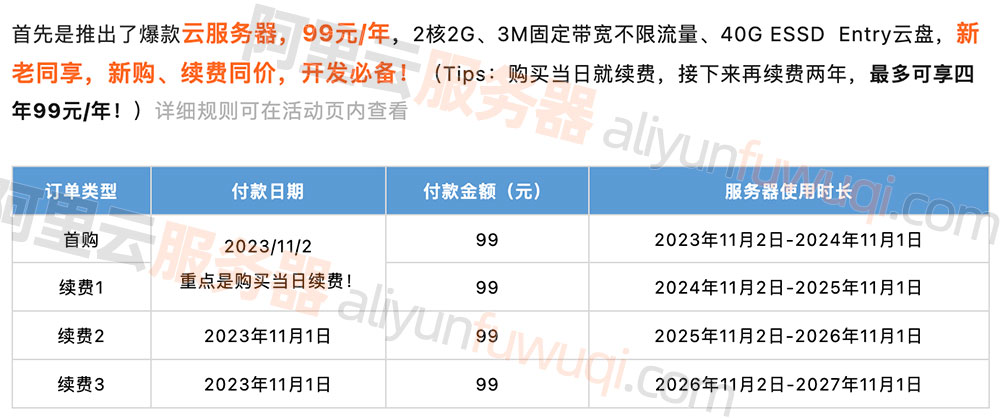
阿里云99元服务器ECS经济型e实例性能如何?测评来了
阿里云服务器优惠99元一年,配置为云服务器ECS经济型e实例,2核2G配置、3M固定带宽和40G ESSD Entry系统盘,CPU采用Intel Xeon Platinum架构处理器,2.5 GHz主频,3M带宽下载速度384KB/秒,上传速度1028KB/秒&am…...
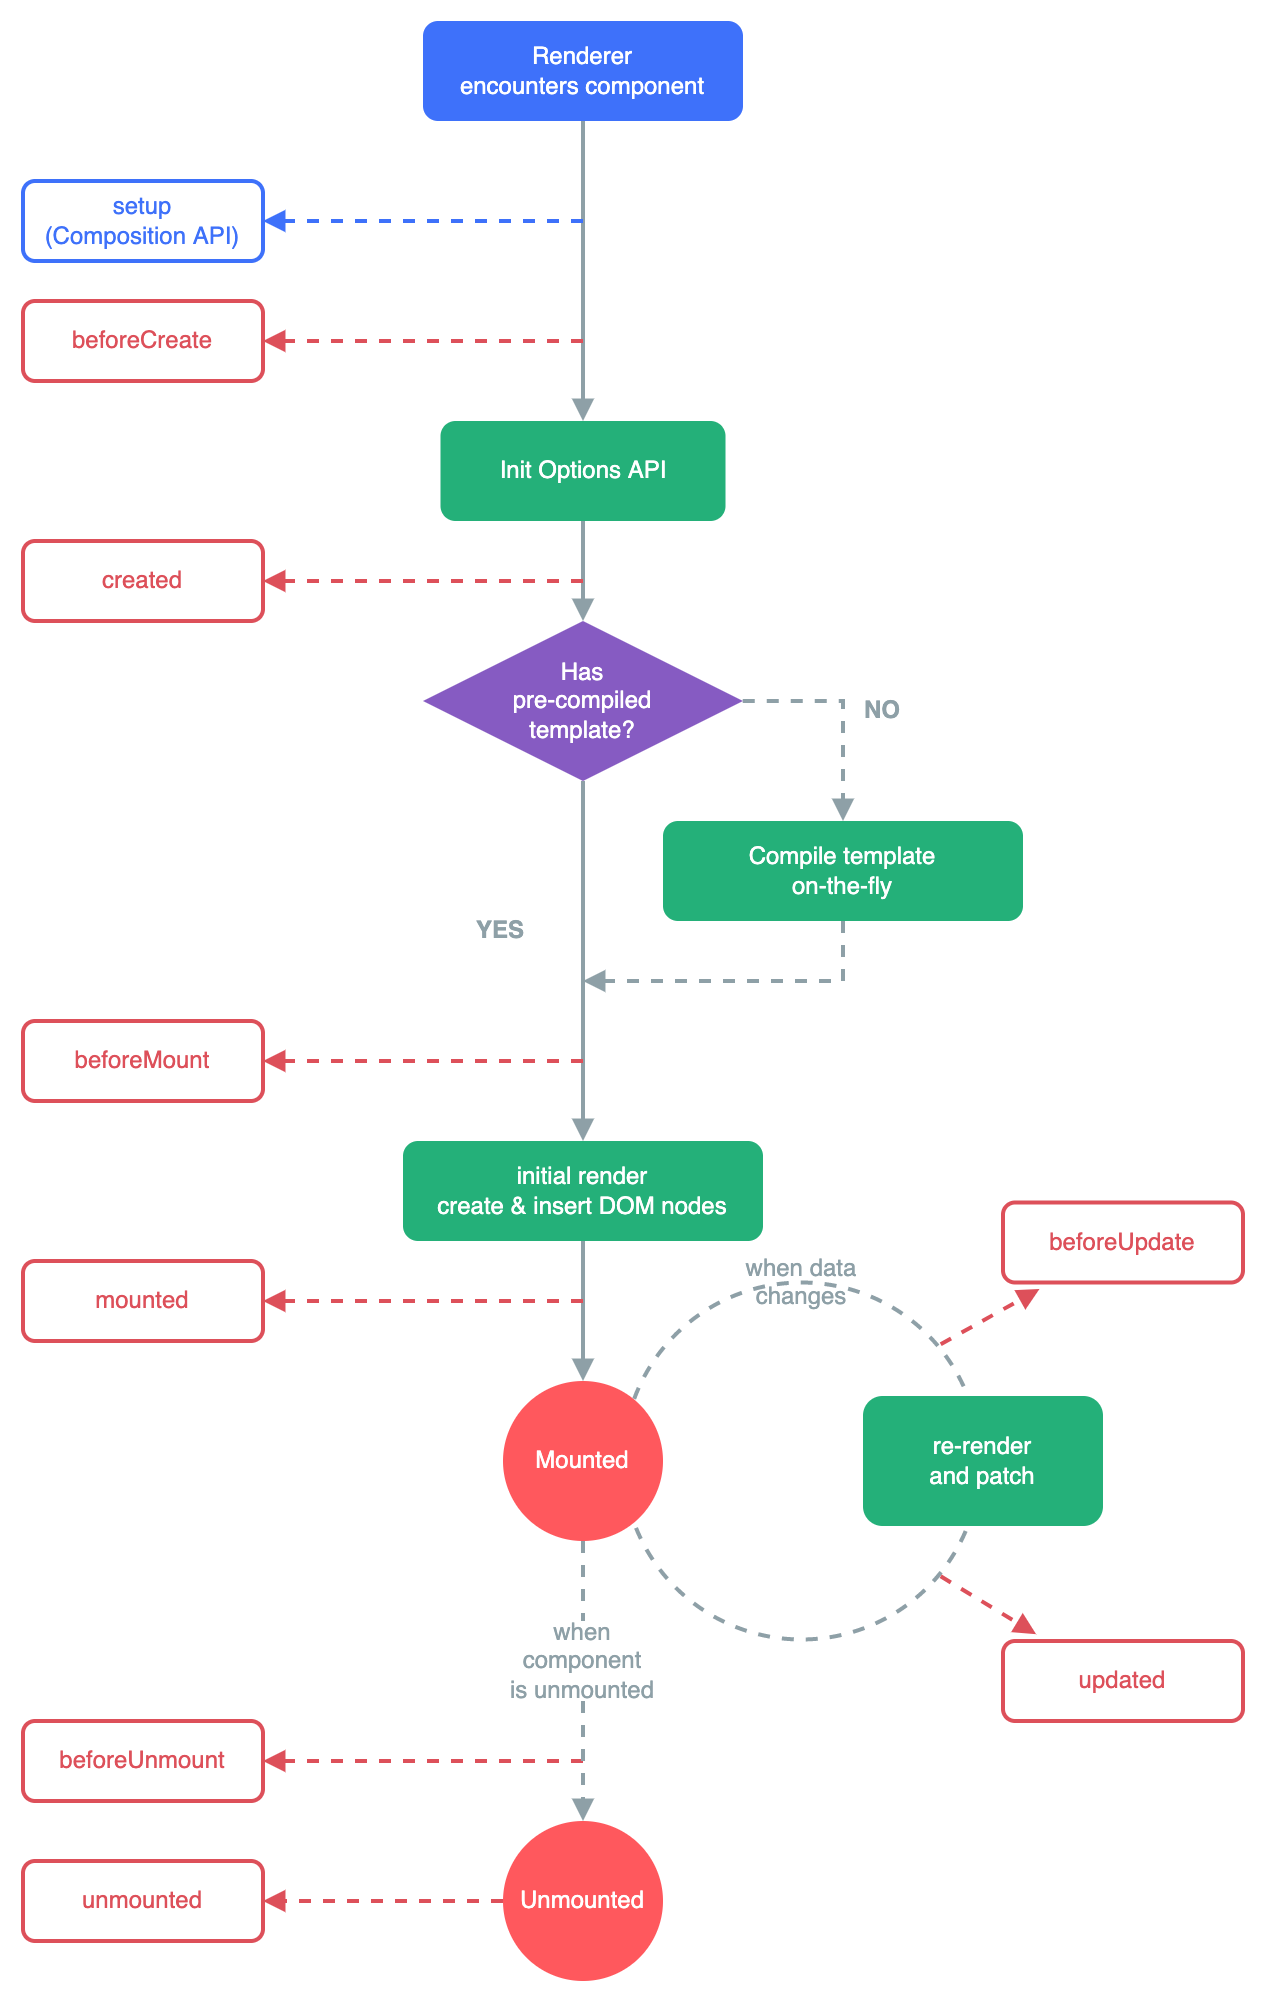
vue3-生命周期
🌈个人主页:前端青山 🔥系列专栏:Vue篇 🔖人终将被年少不可得之物困其一生 依旧青山,本期给大家带来vue篇专栏内容:vue3-生命周期 目录 vue3生命周期 vue3生命周期钩子 1.1 onMounted() 1.2 onUpdated() 1.3 onU…...

23. 深度学习 - 多维向量自动求导
Hi, 你好。我是茶桁。 前面几节课中,我们从最初的理解神经网络,到讲解函数,多层神经网络,拓朴排序以及自动求导。 可以说,最难的部分已经过去了,这节课到了我们来收尾的阶段,没错,生…...

挺扎心!好不容易有了一个offer,就因为背调出之前有仲裁记录,offer黄了,这已经是第二次了!...
仲裁记录会影响之后求职吗? 最近有一位程序员向我们讲述了他的遭遇: 大环境不好,好不容易有了一个offer,却因为背调出跟之前公司有仲裁经历,offer黄了,这已经是第二次因为这个原因黄offer了。 他说自己快抑…...

【brpc学习实践四】异步请求案例详解
注意 使用的还是源码的案例,添加个人注解。在前面的篇章我们讲解了客户端、服务端rpc构造的基本流程及同步、异步的案例基础之后,再理解此案例就容易了。 想直接看案例实现请看: server端实现 client端实现 服务端要点概览 controller ser…...

git命令 cherry-pick
参考:https://blog.csdn.net/weixin_42585386/article/details/128256149 https://blog.csdn.net/weixin_44799217/article/details/128279250 merge和cherry-pick的区别: merge:是把某一个代码分支完全合并到当前的代码分支。完全合并的意…...

手动添加扩展到composer中
如果拓展包第三方没有提供composer安装方式,可以将扩展包手动添加到vendor目录下 将拓展包复制到vendor文件夹下 拓展包需要配置好composer.json文件中的autoload和包里面的命名空间 配置vendor/composer/autoload_psr4.php文件 xx\\xx\\ > array($vendorDir…...

TCP/IP
分层模型 TCP 传输控制协议 UDP 用户数据包协议 四层 应用层 负责发送/接收消息 传输层 负责拆分和组装 .期间会有编号 网络层 TCP/UDP 属于网络层, 不会判断和处理编号 数据链路层 以太网 ,网络设备 TCP 连接 TCP连接需要端口,进行通信 Java 通过Socket 接收消息 发送 …...
NX二次开发UF_CAM_set_clear_plane_data 函数介绍
文章作者:里海 来源网站:https://blog.csdn.net/WangPaiFeiXingYuan UF_CAM_set_clear_plane_data Defined in: uf_cam_planes.h int UF_CAM_set_clear_plane_data(tag_t object_tag, double origin [ 3 ] , double normal [ 3 ] ) overview 概述 De…...

如何在 ASP.NET Core 中使用 Quartz.NET
当我们在web开发中,常常会遇到这么一个需求,在后台执行某一项具体的任务,具体的说就是这些任务必须在后台定时执行。 Quartz.NET 是一个开源的 JAVA 移植版,它有着悠久的历史并且提供了强大的 Cron 表达式,这篇我们就…...

阿里云3M固定带宽服务器速度快吗?是否够用?
阿里云服务器3M带宽下载速度是384KB/秒,上传速度是1280KB/s(折合1.25M/秒),3M固定带宽够用吗?对于一般流量不是太大的个人博客、企业官网、论坛社区、小型电商网站或搭建个人学习环境或测试环境是完全够用的࿰…...

跨越行业边界,CodeMeter护航AI领域安全与合规
在人工智能(AI)技术如ChatGPT的推动下,工业视觉、医疗诊断和智能驾驶等领域正在经历重大变革。这些技术不仅扩大了应用范围,也带来了数据安全、软件授权保护和合规性等新挑战。 AI工业视觉正在推动制造和自动化的快速发展&#x…...

地磁传感器在城市交通智能监控系统的作用
地磁传感器的功能作用 地磁传感器的功能是相当强大的:当驾驶员把车辆停在车位上,地磁传感器能自动感应车辆的到来并开始计时;待车辆要离开时,传感器会自动把停车时间传送到中继站进行计费。因此,解决停车收费效率低下…...

自动解决IP冲突的问题 利用批处理更改末位IP循环+1直到网络畅通为止 解放双手 事半功倍
好久没出来写点什么了,难道今天有点时间,顺便把这两天碰到的问题出个解决方法吧。 这几天去客户那儿解决网络问题,因为客户的网络是固定的静态IP,因为没做MAC绑定,IP固定在本地电脑上,只要上不了网…...

目标检测 Faster RCNN全面解读复现
Faster RCNN 解读 经过R-CNN和Fast RCNN的积淀,Ross B. Girshick在2016年提出了新的Faster RCNN,在结构上,Faster RCNN已经将特征抽取(feature extraction),proposal提取,bounding box regression(rect refine)&…...

HarmonyOS ArkTS 基础组件的使用(四)
1 组件介绍 组件(Component)是界面搭建与显示的最小单位,HarmonyOS ArkUI声明式开发范式为开发者提供了丰富多样的UI组件,我们可以使用这些组件轻松的编写出更加丰富、漂亮的界面。 组件根据功能可以分为以下五大类:…...

elasticsearch 7安装
问题提前报 max virtual memory areas error max virtual memory areas vm.max_map_count [65530] is too low, increase to at least [262144] 如果您的环境是Linux,注意要做以下操作,否则es可能会启动失败 1 用编辑工具打开文件/etc/sysctl.conf 2 …...

阿里云OSS Java SDK安全升级指南:从硬编码AK到环境变量,我这样管理敏感配置
阿里云OSS密钥管理进阶:从环境变量到企业级安全方案实战 在Java开发者的日常工作中,阿里云OSS作为对象存储服务被广泛使用。许多开发者最初接触OSS时,往往直接在代码中硬编码AccessKey进行身份验证——这就像把家门钥匙贴在门框上,…...

避坑指南:TMS320F28377D的TMU加速库,在CCS里到底该怎么正确配置与验证?
TMS320F28377D TMU加速库实战:CCS工程配置与性能验证全解析 在C2000系列DSP开发中,TMU(Trigonometric Math Unit)作为28377D独有的硬件加速模块,能显著提升三角函数和除法运算效率。但许多工程师反映,即便在…...

2025届最火的五大AI辅助论文神器实测分析
Ai论文网站排名(开题报告、文献综述、降aigc率、降重综合对比) TOP1. 千笔AI TOP2. aipasspaper TOP3. 清北论文 TOP4. 豆包 TOP5. kimi TOP6. deepseek .DeepSeek当作AI写作方面的工具,于论文写作当中能够起到辅助的功用 ,…...

Java面向对象
一 定义 面向对象编程的本质是:以类的方式组织代码,以对象的组织(封装)数据 三大特性:封装,继承,多态 二 类与对象的创建 new去实例化 package opp.Demo2; //学生类 public class Student {…...

为ubuntu上的开源agent工具hermes配置taotoken自定义提供商
为 Ubuntu 上的开源 Agent 工具 Hermes 配置 Taotoken 自定义提供商 1. 准备工作 在开始配置之前,请确保您的 Ubuntu 系统已安装以下组件: Node.js 16 或更高版本npm 或 yarn 包管理器Hermes Agent 已正确安装并初始化 您还需要准备好以下信息&#…...

tkinter 第六章 变量类型
第六章 变量类型 基础变量类型 编程概念里的变量是用来存储数据的,它可以在程序执行过程中改变其值。 在tkinter模块中,为了与Widget控件的参数进行交互,也提供了一系列的变量类别。 有些Widget控件的内容在执行过程中可能需要更改&#…...
的核心机密:USB HID PID 力反馈协议深度)
自制直驱方向盘(Direct Drive)的核心机密:USB HID PID 力反馈协议深度
前言:在传统的单片机控制中,我们习惯了发送具体的数值,比如“转到 90 度”或者“以 500RPM 旋转”。但在模拟赛车领域,直驱方向盘(如 Simucube 或开源的 OpenFFBoard)的工作逻辑完全不同。PC 游戏端绝对不会…...

在自动化测试流水线中集成Taotoken进行智能代码审查与报告生成
在自动化测试流水线中集成Taotoken进行智能代码审查与报告生成 1. 自动化测试与智能代码审查的结合价值 现代软件开发流程中,持续集成与持续交付(CI/CD)已成为团队提升效率的关键实践。传统自动化测试主要覆盖功能验证与回归测试࿰…...

从RDM迁移到RedisInsight:一个后端开发者的真实体验与避坑指南
从RDM迁移到RedisInsight:一个后端开发者的真实体验与避坑指南 作为一名长期与Redis打交道的后端开发者,我几乎每天都要与Redis的GUI工具打交道。RDM(Redis Desktop Manager)曾是我的主力工具,直到遇到一系列兼容性问题…...

终极指南:DVC如何统一管理HDFS与S3分布式文件系统
终极指南:DVC如何统一管理HDFS与S3分布式文件系统 【免费下载链接】dvc 🦉 Data Versioning and ML Experiments 项目地址: https://gitcode.com/gh_mirrors/dv/dvc DVC(Data Versioning and ML Experiments)是一款强大的数…...