第96步 深度学习图像目标检测:FCOS建模
基于WIN10的64位系统演示
一、写在前面
本期开始,我们继续学习深度学习图像目标检测系列,FCOS(Fully Convolutional One-Stage Object Detection)模型。
二、FCOS简介
FCOS(Fully Convolutional One-Stage Object Detection)是一种无锚框的目标检测方法,由 Tian et al. 在 2019 年提出。与传统的基于锚框的目标检测方法(如 Faster R-CNN 和 SSD)不同,FCOS 完全摒弃了锚框的概念,使得模型结构更为简洁和高效。
以下是 FCOS 模型的主要特点:
(1)无锚框设计:
FCOS 不使用预定义的锚框来生成候选框。相反,它直接在特征图上的每个位置进行预测。这消除了与锚框大小和形状相关的超参数,简化了模型设计。
(2)位置编码:
对于特征图上的每个位置,FCOS 不仅预测类别分数,还预测与真实边界框的四个边的距离。这四个距离值为:左、右、上、下,与目标中心的相对距离。
(3)训练时的位置限制:
为了使每个位置只对特定大小的目标负责,FCOS 在训练时为特征图的每个层级引入了一个目标大小的范围。这确保了大的物体由底层的特征图来检测,小的物体由高层的特征图来检测。
(4)中心性偏置:
由于物体的中心位置通常包含更明确的语义信息,FCOS 引入了一个中心性分支来预测每个位置是否接近物体的中心。这有助于减少检测的假阳性。
(5)简洁与高效:
由于其无锚框的设计,FCOS 的结构相对简单,计算量较小,但在多个标准数据集上的性能与其他一流的目标检测方法相当或更好。
三、数据源
来源于公共数据,文件设置如下:


大概的任务就是:用一个框框标记出MTB的位置。
四、FCOS实战
直接上代码:
import os
import random
import torch
import torchvision
from torchvision.models.detection import fcos_resnet50_fpn
from torchvision.models.detection.fcos import FCOS_ResNet50_FPN_Weights
from torchvision.transforms import functional as F
from PIL import Image
from torch.utils.data import DataLoader
import xml.etree.ElementTree as ET
import matplotlib.pyplot as plt
from torchvision import transforms
import albumentations as A
from albumentations.pytorch import ToTensorV2
import numpy as np# Function to parse XML annotations
def parse_xml(xml_path):tree = ET.parse(xml_path)root = tree.getroot()boxes = []for obj in root.findall("object"):bndbox = obj.find("bndbox")xmin = int(bndbox.find("xmin").text)ymin = int(bndbox.find("ymin").text)xmax = int(bndbox.find("xmax").text)ymax = int(bndbox.find("ymax").text)# Check if the bounding box is validif xmin < xmax and ymin < ymax:boxes.append((xmin, ymin, xmax, ymax))else:print(f"Warning: Ignored invalid box in {xml_path} - ({xmin}, {ymin}, {xmax}, {ymax})")return boxes# Function to split data into training and validation sets
def split_data(image_dir, split_ratio=0.8):all_images = [f for f in os.listdir(image_dir) if f.endswith(".jpg")]random.shuffle(all_images)split_idx = int(len(all_images) * split_ratio)train_images = all_images[:split_idx]val_images = all_images[split_idx:]return train_images, val_images# Dataset class for the Tuberculosis dataset
class TuberculosisDataset(torch.utils.data.Dataset):def __init__(self, image_dir, annotation_dir, image_list, transform=None):self.image_dir = image_dirself.annotation_dir = annotation_dirself.image_list = image_listself.transform = transformdef __len__(self):return len(self.image_list)def __getitem__(self, idx):image_path = os.path.join(self.image_dir, self.image_list[idx])image = Image.open(image_path).convert("RGB")xml_path = os.path.join(self.annotation_dir, self.image_list[idx].replace(".jpg", ".xml"))boxes = parse_xml(xml_path)# Check for empty bounding boxes and return Noneif len(boxes) == 0:return Noneboxes = torch.as_tensor(boxes, dtype=torch.float32)labels = torch.ones((len(boxes),), dtype=torch.int64)iscrowd = torch.zeros((len(boxes),), dtype=torch.int64)target = {}target["boxes"] = boxestarget["labels"] = labelstarget["image_id"] = torch.tensor([idx])target["iscrowd"] = iscrowd# Apply transformationsif self.transform:image = self.transform(image)return image, target# Define the transformations using torchvision
data_transform = torchvision.transforms.Compose([torchvision.transforms.ToTensor(), # Convert PIL image to tensortorchvision.transforms.Normalize(mean=[0.485, 0.456, 0.406], std=[0.229, 0.224, 0.225]) # Normalize the images
])# Adjusting the DataLoader collate function to handle None values
def collate_fn(batch):batch = list(filter(lambda x: x is not None, batch))return tuple(zip(*batch))def get_fcos_model_for_finetuning(num_classes):# Load an FCOS model with a ResNet-50-FPN backbone without pre-trained weightsmodel = fcos_resnet50_fpn(weights=None, num_classes=num_classes)return model# Function to save the model
def save_model(model, path="fcos_mtb.pth", save_full_model=False):if save_full_model:torch.save(model, path)else:torch.save(model.state_dict(), path)print(f"Model saved to {path}")# Function to compute Intersection over Union
def compute_iou(boxA, boxB):xA = max(boxA[0], boxB[0])yA = max(boxA[1], boxB[1])xB = min(boxA[2], boxB[2])yB = min(boxA[3], boxB[3])interArea = max(0, xB - xA + 1) * max(0, yB - yA + 1)boxAArea = (boxA[2] - boxA[0] + 1) * (boxA[3] - boxA[1] + 1)boxBArea = (boxB[2] - boxB[0] + 1) * (boxB[3] - boxB[1] + 1)iou = interArea / float(boxAArea + boxBArea - interArea)return iou# Adjusting the DataLoader collate function to handle None values and entirely empty batches
def collate_fn(batch):batch = list(filter(lambda x: x is not None, batch))if len(batch) == 0:# Return placeholder batch if entirely emptyreturn [torch.zeros(1, 3, 224, 224)], [{}]return tuple(zip(*batch))#Training function with modifications for collecting IoU and loss
def train_model(model, train_loader, optimizer, device, num_epochs=10):model.train()model.to(device)loss_values = []iou_values = []for epoch in range(num_epochs):epoch_loss = 0.0total_ious = 0num_boxes = 0for images, targets in train_loader:# Skip batches with placeholder dataif len(targets) == 1 and not targets[0]:continue# Skip batches with empty targetsif any(len(target["boxes"]) == 0 for target in targets):continueimages = [image.to(device) for image in images]targets = [{k: v.to(device) for k, v in t.items()} for t in targets]loss_dict = model(images, targets)losses = sum(loss for loss in loss_dict.values())optimizer.zero_grad()losses.backward()optimizer.step()epoch_loss += losses.item()# Compute IoU for evaluationwith torch.no_grad():model.eval()predictions = model(images)for i, prediction in enumerate(predictions):pred_boxes = prediction["boxes"].cpu().numpy()true_boxes = targets[i]["boxes"].cpu().numpy()for pred_box in pred_boxes:for true_box in true_boxes:iou = compute_iou(pred_box, true_box)total_ious += iounum_boxes += 1model.train()avg_loss = epoch_loss / len(train_loader)avg_iou = total_ious / num_boxes if num_boxes != 0 else 0loss_values.append(avg_loss)iou_values.append(avg_iou)print(f"Epoch {epoch+1}/{num_epochs} Loss: {avg_loss} Avg IoU: {avg_iou}")# Plotting loss and IoU valuesplt.figure(figsize=(12, 5))plt.subplot(1, 2, 1)plt.plot(loss_values, label="Training Loss")plt.title("Training Loss across Epochs")plt.xlabel("Epochs")plt.ylabel("Loss")plt.subplot(1, 2, 2)plt.plot(iou_values, label="IoU")plt.title("IoU across Epochs")plt.xlabel("Epochs")plt.ylabel("IoU")plt.show()# Save model after trainingsave_model(model)# Validation function
def validate_model(model, val_loader, device):model.eval()model.to(device)with torch.no_grad():for images, targets in val_loader:images = [image.to(device) for image in images]targets = [{k: v.to(device) for k, v in t.items()} for t in targets]model(images)# Paths to your data
image_dir = "tuberculosis-phonecamera"
annotation_dir = "tuberculosis-phonecamera"# Split data
train_images, val_images = split_data(image_dir)# Create datasets and dataloaders
train_dataset = TuberculosisDataset(image_dir, annotation_dir, train_images, transform=data_transform)
val_dataset = TuberculosisDataset(image_dir, annotation_dir, val_images, transform=data_transform)# Updated DataLoader with new collate function
train_loader = DataLoader(train_dataset, batch_size=4, shuffle=True, collate_fn=collate_fn)
val_loader = DataLoader(val_dataset, batch_size=4, shuffle=False, collate_fn=collate_fn)# Model and optimizer
model = get_fcos_model_for_finetuning(2)
optimizer = torch.optim.Adam(model.parameters(), lr=0.001)# Train and validate
train_model(model, train_loader, optimizer, device="cuda", num_epochs=100)
validate_model(model, val_loader, device="cuda")#######################################Print Metrics######################################
def calculate_metrics(predictions, ground_truths, iou_threshold=0.5):TP = 0 # True PositivesFP = 0 # False PositivesFN = 0 # False Negativestotal_iou = 0 # to calculate mean IoUfor pred, gt in zip(predictions, ground_truths):pred_boxes = pred["boxes"].cpu().numpy()gt_boxes = gt["boxes"].cpu().numpy()# Match predicted boxes to ground truth boxesfor pred_box in pred_boxes:max_iou = 0matched = Falsefor gt_box in gt_boxes:iou = compute_iou(pred_box, gt_box)if iou > max_iou:max_iou = iouif iou > iou_threshold:matched = Truetotal_iou += max_iouif matched:TP += 1else:FP += 1FN += len(gt_boxes) - TPprecision = TP / (TP + FP) if (TP + FP) != 0 else 0recall = TP / (TP + FN) if (TP + FN) != 0 else 0f1_score = (2 * precision * recall) / (precision + recall) if (precision + recall) != 0 else 0mean_iou = total_iou / (TP + FP)return precision, recall, f1_score, mean_ioudef evaluate_model(model, dataloader, device):model.eval()model.to(device)all_predictions = []all_ground_truths = []with torch.no_grad():for images, targets in dataloader:images = [image.to(device) for image in images]predictions = model(images)all_predictions.extend(predictions)all_ground_truths.extend(targets)precision, recall, f1_score, mean_iou = calculate_metrics(all_predictions, all_ground_truths)return precision, recall, f1_score, mean_ioutrain_precision, train_recall, train_f1, train_iou = evaluate_model(model, train_loader, "cuda")
val_precision, val_recall, val_f1, val_iou = evaluate_model(model, val_loader, "cuda")print("Training Set Metrics:")
print(f"Precision: {train_precision:.4f}, Recall: {train_recall:.4f}, F1 Score: {train_f1:.4f}, Mean IoU: {train_iou:.4f}")print("\nValidation Set Metrics:")
print(f"Precision: {val_precision:.4f}, Recall: {val_recall:.4f}, F1 Score: {val_f1:.4f}, Mean IoU: {val_iou:.4f}")#sheet
header = "| Metric | Training Set | Validation Set |"
divider = "+----------+--------------+----------------+"train_metrics = f"| Precision | {train_precision:.4f} | {val_precision:.4f} |"
recall_metrics = f"| Recall | {train_recall:.4f} | {val_recall:.4f} |"
f1_metrics = f"| F1 Score | {train_f1:.4f} | {val_f1:.4f} |"
iou_metrics = f"| Mean IoU | {train_iou:.4f} | {val_iou:.4f} |"print(header)
print(divider)
print(train_metrics)
print(recall_metrics)
print(f1_metrics)
print(iou_metrics)
print(divider)#######################################Train Set######################################
import numpy as np
import matplotlib.pyplot as pltdef plot_predictions_on_image(model, dataset, device, title):# Select a random image from the datasetidx = np.random.randint(5, len(dataset))image, target = dataset[idx]img_tensor = image.clone().detach().to(device).unsqueeze(0)# Use the model to make predictionsmodel.eval()with torch.no_grad():prediction = model(img_tensor)# Inverse normalization for visualizationinv_normalize = transforms.Normalize(mean=[-0.485/0.229, -0.456/0.224, -0.406/0.225],std=[1/0.229, 1/0.224, 1/0.225])image = inv_normalize(image)image = torch.clamp(image, 0, 1)image = F.to_pil_image(image)# Plot the image with ground truth boxesplt.figure(figsize=(10, 6))plt.title(title + " with Ground Truth Boxes")plt.imshow(image)ax = plt.gca()# Draw the ground truth boxes in bluefor box in target["boxes"]:rect = plt.Rectangle((box[0], box[1]), box[2]-box[0], box[3]-box[1],fill=False, color='blue', linewidth=2)ax.add_patch(rect)plt.show()# Plot the image with predicted boxesplt.figure(figsize=(10, 6))plt.title(title + " with Predicted Boxes")plt.imshow(image)ax = plt.gca()# Draw the predicted boxes in redfor box in prediction[0]["boxes"].cpu():rect = plt.Rectangle((box[0], box[1]), box[2]-box[0], box[3]-box[1],fill=False, color='red', linewidth=2)ax.add_patch(rect)plt.show()# Call the function for a random image from the train dataset
plot_predictions_on_image(model, train_dataset, "cuda", "Selected from Training Set")#######################################Val Set####################################### Call the function for a random image from the validation dataset
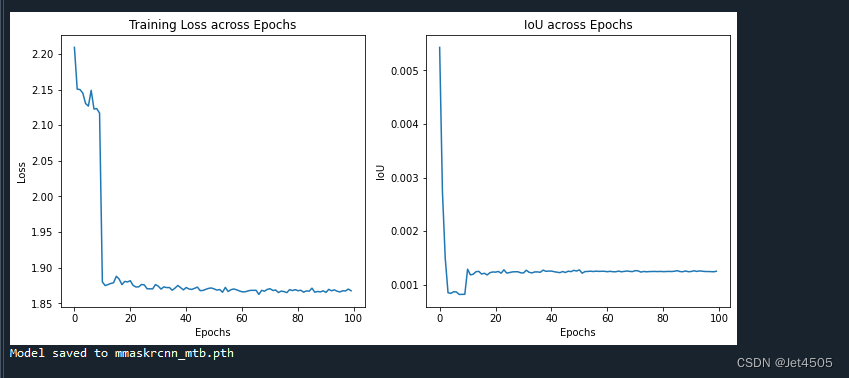
plot_predictions_on_image(model, val_dataset, "cuda", "Selected from Validation Set")这回是从头训练的,因此结果不理想:
(1)loss曲线图:
(2)性能指标:

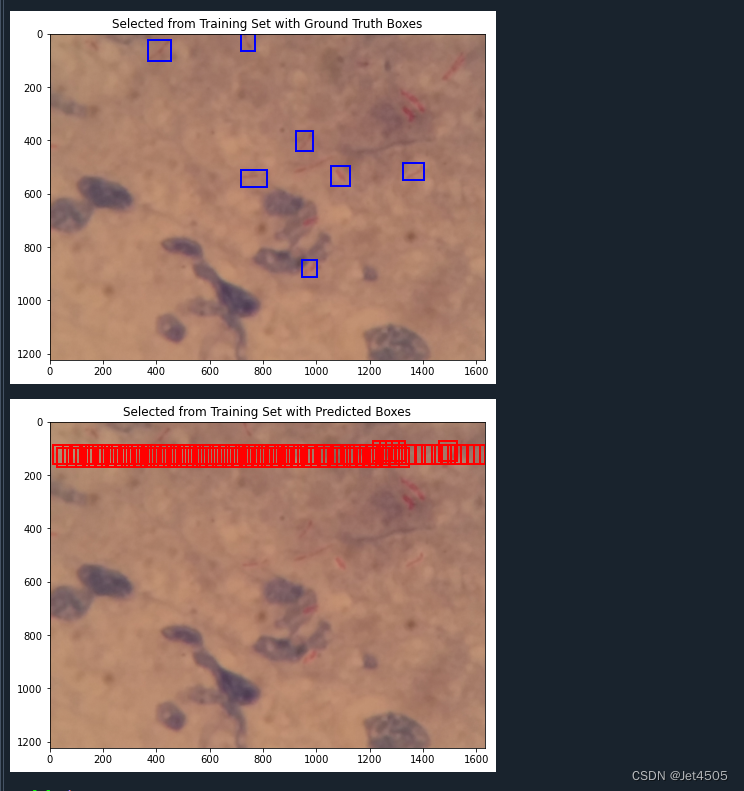
(3)训练的图片测试结果:
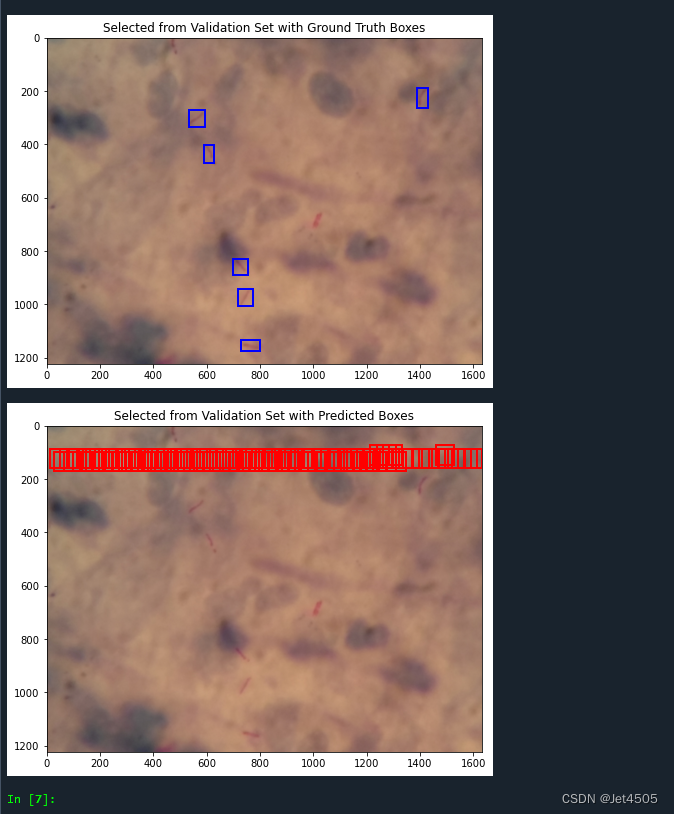
(4)验证集的图片测试结果:
五、写在后面
这回没有使用预训练模型,因为在运行过程中有个问题还没解决,因此只能从头训练,但默认参数也没达到很好的效果。哪位大佬解决了告诉我一声~
相关文章:
第96步 深度学习图像目标检测:FCOS建模
基于WIN10的64位系统演示 一、写在前面 本期开始,我们继续学习深度学习图像目标检测系列,FCOS(Fully Convolutional One-Stage Object Detection)模型。 二、FCOS简介 FCOS(Fully Convolutional One-Stage Object D…...

常用的git命令完整详细109条
Git是一个很强大的分布式版本控制系统,以下是一些常用的git命令: git init:在当前目录下创建一个新的Git仓库。git add 文件名:将指定的文件添加到暂存区,准备提交。git commit -m “备注”:提交暂存区的文…...

Ansible的错误处理
环境 管理节点:Ubuntu 22.04控制节点:CentOS 8Ansible:2.15.6 ignore_errors 使用 ignore_errors: true 来让Ansible忽略错误(运行结果是 failed ): --- - hosts: alltasks:- name: task1shell: cat /t…...
MySQL-04-InnoDB存储引擎锁和加锁分析
Latch一般称为闩锁(轻量级锁),因为其要求锁定的时间必须非常短。在InnoDB存储引擎中,latch又分为mutex(互斥量)和rwlock(读写锁)。 Lock的对象是事务,用来锁定的是…...

tcp/ip协议2实现的插图,数据结构2 (19 - 章)
(68) 68 十九1 选路请求与消息 函rtalloc,rtalloc1,rtfree (69) 69 十九2 选路请求与消息 函rtrequest (70)...

2023.11.22 -数据仓库的概念和发展
目录 https://blog.csdn.net/m0_49956154/article/details/134320307?spm1001.2014.3001.5501 1经典传统数仓架构 2离线大数据数仓架构 3数据仓库三层 数据运营层,源数据层(ODS)(Operational Data Store) 数据仓库层&#…...
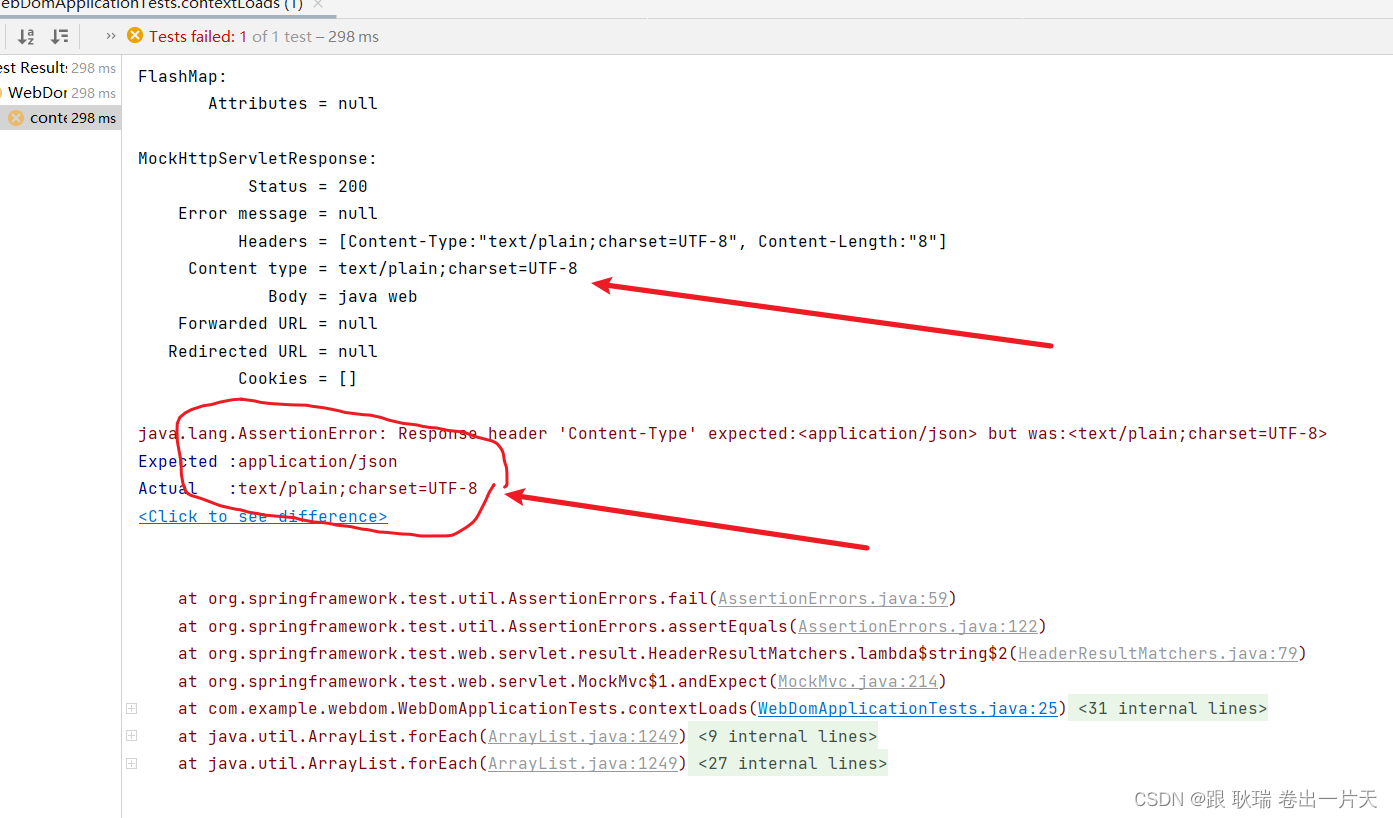
java springboot测试类虚拟MVC环境 匹配请求头指定key与预期值是否相同
上文 java springboot测试类虚拟MVC环境 匹配返回值与预期内容是否相同 (JSON数据格式) 版 中 我们展示 json匹配内容的方式 那么 本文我们来看看Content-Type属性的匹配方式 首先 我们从返回体可以看出 Content-Type 在请求头信息 Headers 中 我们直接将测试类代码更改如下 …...

Rust生态系统:探索常用的库和框架
大家好!我是lincyang。 今天我们来探索Rust的生态系统,特别是其中的一些常用库和框架。 Rust生态系统虽然相比于一些更成熟的语言还在成长阶段,但已经有很多强大的工具和库支持各种应用的开发。 常用的Rust库和框架 Serde:一个…...

01-了解微服务架构的演变过程和微服务技术栈
微服务 微服务架构演变 单体架构:将业务的所有功能集中在一个项目中开发最后打成一个包部署 优点: 架构简单, 部署成本低,适合小型项目缺点: 耦合度高, 升级维护困难 分布式架构:根据业务功能对系统做拆分,每个业务功能模块作为独立项目开发称为一个服务 优点: 降低服务耦合…...

阿里入局鸿蒙!鸿蒙原生应用再添两员新丁
今日HarmonyOS微博称,阿里钉钉、蚂蚁集团旗下的移动开发平台mPaaS与华为达成合作,宣布启动鸿蒙原生应用的开发!相关应用将以原生方式适配#HarmonyOS NEXT#系统。 #HarmonyOS#市场或迎来爆发式增长! 阿里钉钉 阿里钉钉与华为达成合…...

亚马逊运营中动态/静态住宅IP代理的应用有哪些?
作为全球最大的电商平台之一,亚马逊已经成为许多商家的首选销售平台。而代理IP作为近几天互联网的热门工具,在跨境电商界也起着非常强大的作用。那么在亚马逊运营中,适合动态住宅代理还是静态住宅代理呢?下面我们一起来探索&#…...
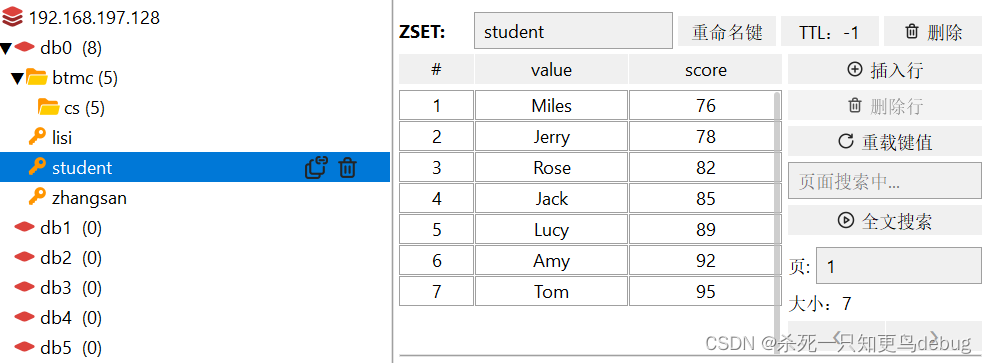
redis基本数据结构(String,Hash,Set,List,SortedSet)【学习笔记】
redis数据结构介绍 redis是一个key-value的数据库,key一般是String类型,但是value的类型多种多样。 redis 通用命令 keys : 查看符合模板的所有key (keys partten ,匹配表达式支持一些特殊字符 * ?)del:删…...
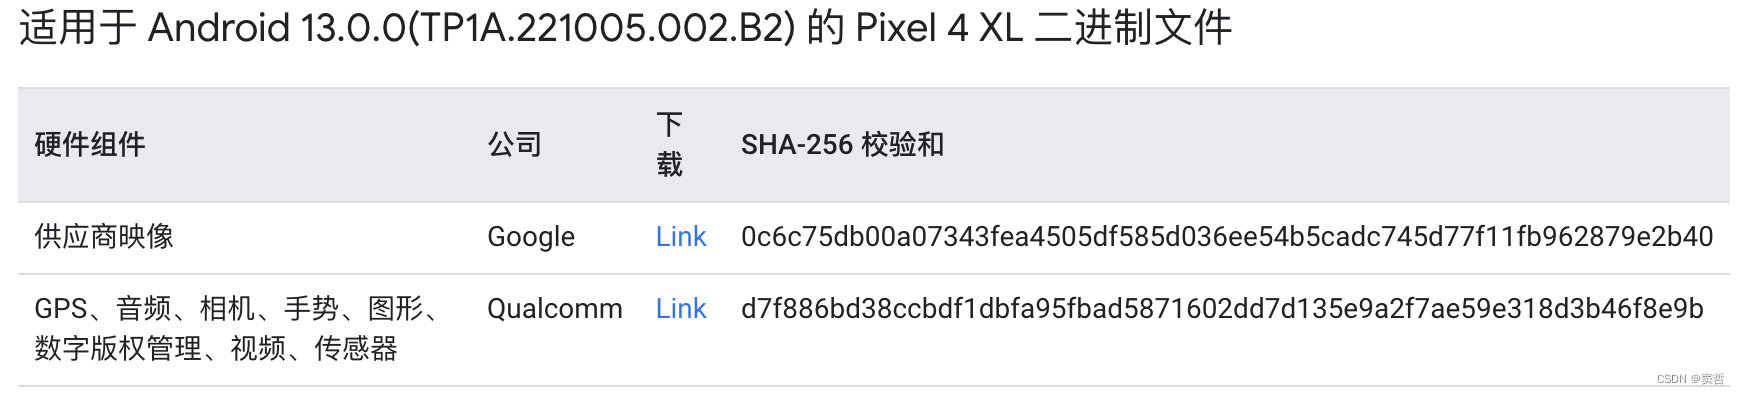
Ubuntu 22.04.3编译AOSP13刷机
文章目录 设备信息下载AOSP并切换分支获取设备驱动编译系统编译遇到的问题Cannot allocate memoryUbuntu设置USB调试刷机参考链接 设备信息 手机:Pixel 4XL 下载AOSP并切换分支 在清华大学开源软件镜像站下载初始化包aosp-latest.tar。 解压缩,切换到…...
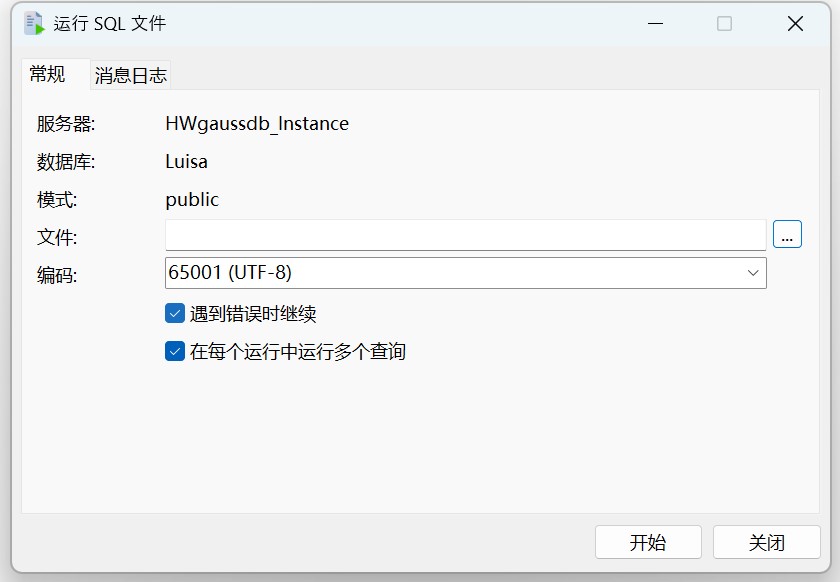
Navicat 技术指引 | 适用于 GaussDB 的数据迁移工具
Navicat Premium(16.2.8 Windows版或以上) 已支持对 GaussDB 主备版的管理和开发功能。它不仅具备轻松、便捷的可视化数据查看和编辑功能,还提供强大的高阶功能(如模型、结构同步、协同合作、数据迁移等),这…...

算法基础之表达式求值
算法基础之表达式求值 中序表达式求值 用栈 将字符和数字分别用栈存储 由下往上计算 左子树算完再算右子树 判断方法:当前符号优先级<前一个符号优先级 则左右子树已遍历完 #include<iostream>#include<cstring>#include<stack>#include&l…...
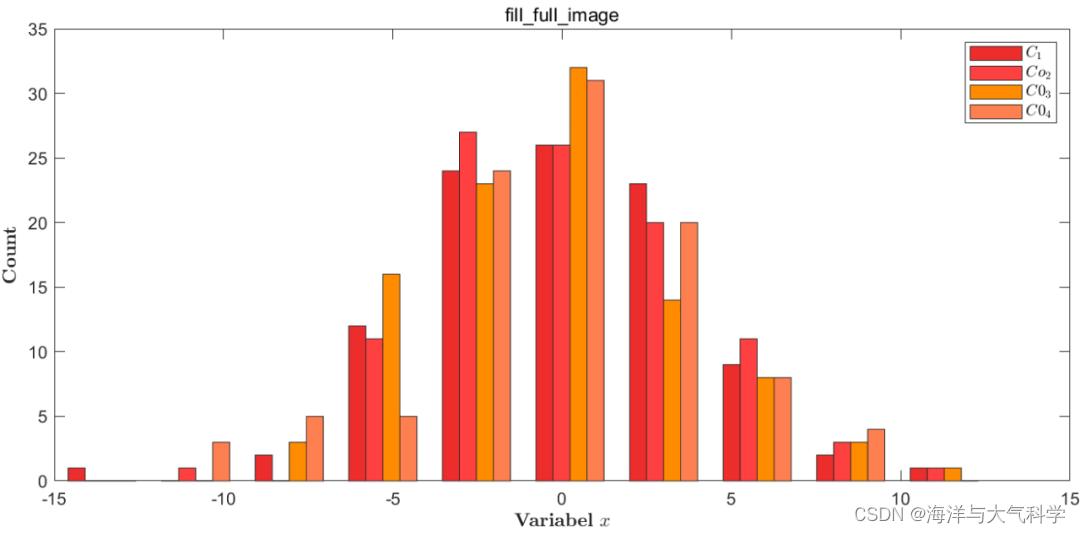
【matlab程序】图像最大化填充画布
【matlab程序】图像最大化填充画布 不做任何修饰: 修饰: 图片 往期推荐 图片 【python海洋专题一】查看数据nc文件的属性并输出属性到txt文件 【python海洋专题二】读取水深nc文件并水深地形图 【python海洋专题三】图像修饰之画布和坐标轴 【Pytho…...
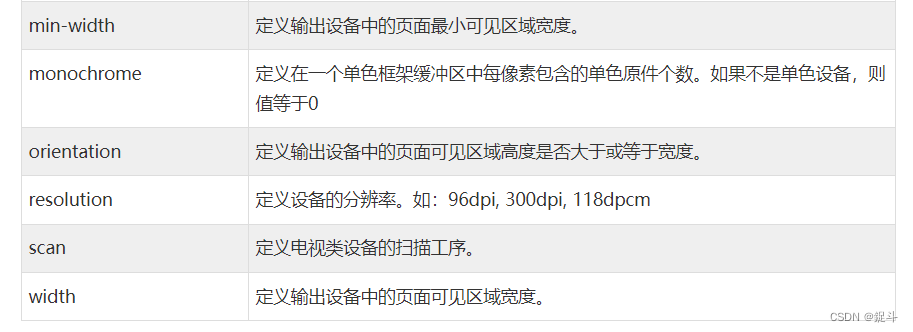
C3 多媒体查询
文章目录 前言CSS3 多媒体查询CSS2 多媒体类型CSS3 多媒体查询浏览器支持多媒体查询语法CSS3 多媒体类型多媒体查询简单实例 媒体类型媒体功能更多实例后言 前言 hello world欢迎来到前端的新世界 😜当前文章系列专栏:CSS 🐱👓博…...

网站监控是什么
在当今高度互联的世界中,网站已成为企业和个人成功的关键因素。无论是提供产品或服务,还是建立品牌形象,网站都是不可或缺的工具。然而,随着互联网用户对访问速度和用户体验的高要求,保持网站的稳定性和可用性变得至关…...

基于DCT变换的图像压缩解压缩算法matlab仿真
目录 1.算法运行效果图预览 2.算法运行软件版本 3.部分核心程序 4.算法理论概述 4.1、DCT变换原理 4.2、基于DCT的图像压缩 4.3、基于DCT的图像解压缩 5.算法完整程序工程 1.算法运行效果图预览 2.算法运行软件版本 MATLAB2022a 3.部分核心程序 ...................…...

基于单片机压力传感器MPX4115检测-报警系统proteus仿真+源程序
一、系统方案 1、本设计采用这51单片机作为主控器。 2、MPX4115采集压力值、DS18B20采集温度值送到液晶1602显示。 3、按键设置报警值。 4、蜂鸣器报警。 二、硬件设计 原理图如下: 三、单片机软件设计 1、首先是系统初始化 /*********************************…...

GLM-4.7-Flash从部署到应用:完整实战案例,助你效率翻倍
GLM-4.7-Flash从部署到应用:完整实战案例,助你效率翻倍 1. 为什么选择GLM-4.7-Flash 在当今AI大模型百花齐放的时代,GLM-4.7-Flash凭借其独特的优势脱颖而出。作为智谱AI推出的最新一代大语言模型,它采用了创新的MoE(…...

【SQL注入】SQLMAP v1.10.3 稳定汉化版
简介 CN_Sqlmap 是由 GitHub 开发者 Datch666 基于开源渗透测试工具 sqlmap 深度汉化的版本,专为中文用户优化,降低英语使用门槛。该工具专注于自动化检测和利用 Web 应用程序中的SQL 注入漏洞,帮助安全测试人员高效验证目标系统的安全性。通…...
 URDF实战:从语法到机器人建模)
【ROS进阶篇】第八讲(下) URDF实战:从语法到机器人建模
1. URDF实战:从理论到建模的关键一步 在上一讲中我们已经系统学习了URDF的语法结构,就像学完了乐高积木的所有零件说明书。现在该动手搭建真正的机器人模型了。很多初学者常犯的错误是直接复制粘贴别人的URDF文件,结果在Rviz里看到模型支离破…...

终极指南:PINRemoteImage内存管理完全解析,避免iOS应用内存泄漏的关键技巧
终极指南:PINRemoteImage内存管理完全解析,避免iOS应用内存泄漏的关键技巧 【免费下载链接】PINRemoteImage A thread safe, performant, feature rich image fetcher 项目地址: https://gitcode.com/gh_mirrors/pi/PINRemoteImage PINRemoteImag…...

降AI率工具哪个好?背后的判断逻辑你可能没想过
降AI率工具哪个好?背后的判断逻辑你可能没想过 一、一个被问烂了的问题,却很少有人答对 “降AI率工具哪个好?”——这是2026年毕业季被问得最多的问题之一。打开知乎、小红书、百度贴吧,铺天盖地的测评、排行榜、推荐帖,但真正能帮你做决策的内容寥寥无几。 为什…...

STM32F103驱动AD9959 DDS信号发生器:从CubeMX引脚配置到四通道频率调节实战
STM32F103驱动AD9959 DDS信号发生器实战指南 在电子设计竞赛和嵌入式系统开发中,DDS(直接数字频率合成)技术因其高精度、快速频率切换和相位可编程等优势,成为信号发生器设计的首选方案。AD9959作为一款四通道DDS芯片,…...

zmq源码分析之io_thread_t
文章目录概述继承关系核心成员构造函数启动与停止启动停止事件处理读事件处理(核心)其他事件(理论上不会被调用)停止处理架构图事件循环流程与其他组件的关系线程创建流程关键设计点命令处理类型性能特点总结概述 io_thread_t 是…...

【IdraScriptsParker】软件启动报错“Run-time error ‘429‘ :ActiveX component can‘ t create object”解决方案
IdraScriptsParker软件启动报错429解决方案IdraScriptsParker软件IdraScriptsParker软件存放位置打开注册表注册到电脑复制GEM.dll文件并且注册相关资料下载地址IdraScriptsParker软件 一款意德拉IDRA压铸机厂家在旧系统使用的一款数据采集、状态监控、数据接收的一个通讯框架…...

简历怎么写:我做了什么,取得了什么成果,凸显JD 关键词
简历怎么写:我做了什么,取得了什么成果;凸显JD 关键词 这里写目录标题 简历怎么写:我做了什么,取得了什么成果;凸显JD 关键词 一、先搞清楚:HR到底是做什么的? 二、HR是怎么筛选简历的?说出来你可能不信 1. 关键词!关键词!关键词! 2. 这些信息,写了反而减分 3. 一…...

用Modbus Poll/Slave和串口助手调试STM32 Modbus主从机的完整流程
用Modbus Poll/Slave和串口助手调试STM32 Modbus主从机的完整流程 在工业自动化领域,Modbus协议因其简单可靠的特点成为最常用的通信协议之一。对于嵌入式开发者而言,掌握Modbus协议的调试技巧至关重要。本文将详细介绍如何使用Modbus Poll、Modbus Slav…...