关于tf.gather函数batch_dims参数用法的理解
关于tf.gather函数batch_dims参数用法的理解
- 0 前言
- 1. 不考虑batch_dims
- 2. 批处理(考虑batch_dims)
- 2.1 batch_dims=1
- 2.2 batch_dims=0
- 2.3 batch_dims>=2
- 2.4 batch_dims再降为1
- 2.5 再将axis降为1
- 2.6 batch_dims<0
- 2.7 batch_dims总结
- 3. 补充
- 4. 参数和返回值
- 5. 其他相关论述
- 6. 附件
截至发稿(2023年3月2日)之前,全网对这个问题的解释都不是很清楚(包括官网和英文互联网),尤其是对batch_dims本质物理含义的解释,以下内容根据tf.gather官网进行翻译,并补充。
0 前言
根据索引indices从参数 axis 轴收集切片。 (弃用的参数,应该指下文的validate_indices)
tf.gather(params, indices, validate_indices=None, axis=None, batch_dims=0, name=None
)
已弃用:一些参数已弃用:(validate_indices)。 它们将在未来的版本中被删除。 更新说明: validate_indices参数无效。 索引(indices)总是在 CPU 上验证,从不在 GPU 上验证。
1. 不考虑batch_dims
根据索引indices从轴参数axis收集切片。indices必须是任意维度(通常是1-D)的整数张量。
Tensor.getitem适用于标量、tf.newaxis 和 python切片
tf.gather 扩展索引功能以处理索引(indices)张量。
在最简单的情况下,它与标量索引功能相同:
>>> params = tf.constant(['p0', 'p1', 'p2', 'p3', 'p4', 'p5'])
>>> params[3].numpy()
b'p3'
>>> tf.gather(params, 3).numpy()
b'p3'
最常见的情况是传递索引的单轴张量(这不能表示为python切片,因为索引不是连续的):
>>> indices = [2, 0, 2, 5]
>>> tf.gather(params, indices).numpy()
array([b'p2', b'p0', b'p2', b'p5'], dtype=object)
过程如下图所示:
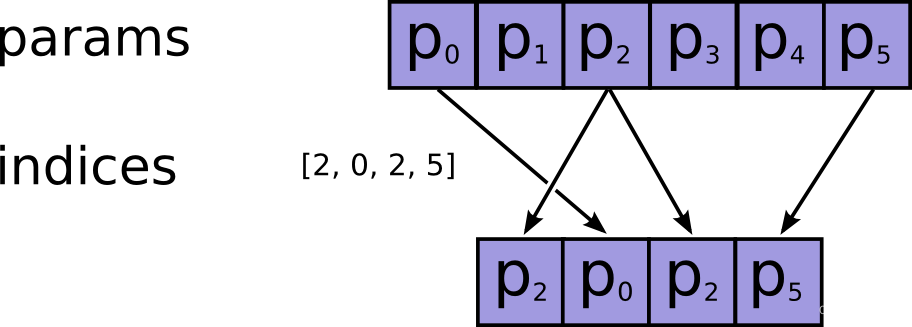
索引可以有任何形状(shape)。 当参数params有 1 个轴(axis)时,输出形状等于输入形状:
>>> tf.gather(params, [[2, 0], [2, 5]]).numpy()
array([[b'p2', b'p0'],
[b'p2', b'p5']], dtype=object)
参数params也可以有任何形状。 gather 可以根据参数axis(默认为 0)在任何轴(axis)上选择切片。 它下面例程用于收集(gather)矩阵中的第一行,然后是列:
>>> params = tf.constant([[0, 1.0, 2.0],
...                       [10.0, 11.0, 12.0],
...                       [20.0, 21.0, 22.0],
...                       [30.0, 31.0, 32.0]])
>>> tf.gather(params, indices=[3,1]).numpy()
array([[30., 31., 32.],[10., 11., 12.]], dtype=float32)
>>> tf.gather(params, indices=[2,1], axis=1).numpy()
array([[ 2., 1.],[12., 11.],[22., 21.],[32., 31.]], dtype=float32)
更一般地说:输出形状与输入形状相同,索引轴(indexed-axis)由索引(indices)的形状代替。
>>> def result_shape(p_shape, i_shape, axis=0):
...   return p_shape[:axis] + i_shape + p_shape[axis+1:]
>>>
>>> result_shape([1, 2, 3], [], axis=1)
[1, 3]
>>> result_shape([1, 2, 3], [7], axis=1)
[1, 7, 3]
>>> result_shape([1, 2, 3], [7, 5], axis=1)
[1, 7, 5, 3]
例如下面的例程:
>>> params.shape.as_list()
[4, 3]
>>> indices = tf.constant([[0, 2]])
>>> tf.gather(params, indices=indices, axis=0).shape.as_list()
[1, 2, 3]
>>> tf.gather(params, indices=indices, axis=1).shape.as_list()
[4, 1, 2]
>>> params = tf.random.normal(shape=(5, 6, 7, 8))
>>> indices = tf.random.uniform(shape=(10, 11), maxval=7, dtype=tf.int32)
>>> result = tf.gather(params, indices, axis=2)
>>> result.shape.as_list()
[5, 6, 10, 11, 8]
这是因为每个索引都从params中获取一个切片,并将其放置在输出中的相应位置。 对于上面的例子
>>> # For any location in indices
>>> a, b = 0, 1
>>> tf.reduce_all(
...     # the corresponding slice of the result
...     result[:, :, a, b, :] ==
...     # is equal to the slice of `params` along `axis` at the index.
...     params[:, :, indices[a, b], :]
...  ).numpy()
True
除此之外,我们再给indices增加一个元素,当进行gather的时候是沿着params的axis=1的上一个维度的元素进行循环的。即params的axis=0的元素分别为[0, 1.0, 2.0]、[10.0, 11.0, 12.0]、[20.0, 21.0, 22.0]、[30.0, 31.0, 32.0],然后逐次对这四个元素里面的params的axis=1的元素进行取indices对应的元素,四次循环完成整个gather
>>> tf.gather(params, indices=[[2,1], [1,0]], axis=1).numpy()
array([[[ 2.,  1.],[ 1.,  0.]],[[12., 11.],[11., 10.]],[[22., 21.],[21., 20.]],[[32., 31.],[31., 30.]]], dtype=float32)
2. 批处理(考虑batch_dims)
batch_dims参数可以让您从批次的每个元素中收集不同的项目。
ps:
可以先直接跳到到2.7 batch_dims总结,前后对照阅读。
2.1 batch_dims=1
使用batch_dims=1相当于在params和indices的第一个轴(是指axis=0轴)上有一个外循环(在axis=0轴上的元素上进行循环):
>>> params = tf.constant([
...     [0, 0, 1, 0, 2],
...     [3, 0, 0, 0, 4],
...     [0, 5, 0, 6, 0]])
>>> indices = tf.constant([
...     [2, 4],
...     [0, 4],
...     [1, 3]])
>>> tf.gather(params, indices, axis=1, batch_dims=1).numpy()
array([[1, 2],
[3, 4],
[5, 6]], dtype=int32)
等价于:
>>> def manually_batched_gather(params, indices, axis):
...            batch_dims=1
...            result = []
...            for p,i in zip(params, indices):  # 这就是上文所说的外循环
...                   r = tf.gather(p, i, axis=axis-batch_dims)
...                   result.append(r)
...            return tf.stack(result)
>>> manually_batched_gather(params, indices, axis=1).numpy()
array([[1, 2],[3, 4],[5, 6]], dtype=int32)
接下来将循环里zip的结果打印如下,说明外循环将params和indices在第一个轴上先zip成三个元组
pprint(list(zip(params.numpy().tolist(), indices.numpy().tolist())))
# [([0, 0, 1, 0, 2], [2, 4]),
# ([3, 0, 0, 0, 4], [0, 4]),
# ([0, 5, 0, 6, 0], [1, 3])]
然后分别对[0, 0, 1, 0, 2]与[2, 4]、[3, 0, 0, 0, 4]与 [0, 4]、[0, 5, 0, 6, 0]与[1, 3],沿着重组之后的axis = 0(即重组之前的axis = 1,这就是为什么后面所说的必须axis>=batch_dims)进行gather。
2.2 batch_dims=0
所以可以总结:batch_dims是指最终对哪一个维度的张量进行对照gather,所以当batch_dims=0时,实际上就是将两个整个张量组包,也就是上面第一阶段的省略batch_dims的状态。
此时,相当于将两个张量在外面添加一个维度之后再zip,相当于没zip直接gather。所以,以下两条指令等价,因为batch_dims默认值为0。
params = tf.constant([[  # 相对于上文该张量增加了一个维度[0, 0, 1, 0, 2],[3, 0, 0, 0, 4],[0, 5, 0, 6, 0]]])
indices = tf.constant([[  # 相对于上文该张量增加了一个维度[2, 4],[0, 4],[1, 3]]])
pprint(list(zip(params.numpy().tolist(), indices.numpy().tolist())))
# [([[0, 0, 1, 0, 2], [3, 0, 0, 0, 4], [0, 5, 0, 6, 0]],
#   [[2, 4], [0, 4], [1, 3]])]tf.gather(params, indices, axis=1, batch_dims=0).numpy()
# 等价于
tf.gather(params, indices, axis=1).numpy()
# 输出结果为
# array([[[1, 2],
#         [0, 2],
#         [0, 0]],
#
#        [[0, 4],
#         [3, 4],
#         [0, 0]],
#
#        [[0, 0],
#         [0, 0],
#         [5, 6]]], dtype=int32)
2.3 batch_dims>=2
较高的batch_dims值相当于在params和indices的外轴上进行多个嵌套循环。 所以整体形状函数是
>>> def batched_result_shape(p_shape, i_shape, axis=0, batch_dims=0):
...             return p_shape[:axis] + i_shape[batch_dims:] + p_shape[axis+1:]>>> batched_result_shape(
...              p_shape=params.shape.as_list(),
...              i_shape=indices.shape.as_list(),
...              axis=1,
...              batch_dims=1)
[3, 2]
>>> tf.gather(params, indices, axis=1, batch_dims=1).shape.as_list()
[3, 2]
举例来说,params和indices升高一个维度,即batch_dims=2,这时按照约束条件只能axis=2
params = tf.constant([  # 升高一个维度[[0, 0, 1, 0, 2],[3, 0, 0, 0, 4],[0, 5, 0, 6, 0]],[[1, 8, 4, 2, 2],[9, 6, 2, 3, 0],[7, 2, 8, 6, 3]]])
indices = tf.constant([  # 升高一个维度[[2, 4],[0, 4],[1, 3]],[[1, 3],[2, 1],[4, 2]]])
# 进行batch_dims高值gather计算
tf.gather(params, indices, axis=2, batch_dims=2).numpy()
# 则上面的运算等价于
def manually_batched_gather_3d(params, indices, axis):batch_dims=2result = []for p,i in zip(params, indices):  # 这里面进行了batch_dims层(也就是2层)嵌套for循环result_2 = []for p_2, i_2 in zip(p,i):r = tf.gather(p_2, i_2, axis=axis-batch_dims)  # 这里告诉我们为什么axis必须>=batch_dimsresult_2.append(r)result.append(result_2)return tf.stack(result)
manually_batched_gather_3d(params, indices, axis=2).numpy()
# array([[[1, 2],
#         [3, 4],
#         [5, 6]],
#
#        [[8, 2],
#         [2, 6],
#         [3, 8]]], dtype=int32)
下面来解释一下上面程序的运行过程,在上面的manually_batched_gather_3d运行过程中第一层zip的作用如下
pprint(list(zip(params.numpy().tolist(), indices.numpy().tolist())))
# 打印得到如下list,该list有两个元组组成,都是将两个参数的axis=0轴上的两个二维张量,分别进行了组包
# [([[0, 0, 1, 0, 2],
#    [3, 0, 0, 0, 4],
#    [0, 5, 0, 6, 0]],  # 到这儿为params的axis=0轴上的[0]二维张量
#   [[2, 4],
#    [0, 4],
#    [1, 3]]),  # 到这儿为indices的axis=0轴上的[0]二维张量
#
#  ([[1, 8, 4, 2, 2],
#    [9, 6, 2, 3, 0],
#    [7, 2, 8, 6, 3]],  # 到这儿为params的axis=0轴上的[1]二维张量
#   [[1, 3],
#    [2, 1],
#    [4, 2]])]  # 到这儿为indices的axis=0轴上的[1]二维张量
然后进入第一层for循环的第一次循环,将zip之后的两个元组中的第一个元组,拿过来分别赋给p、i:
p=tf.Tensor(
[[0 0 1 0 2][3 0 0 0 4][0 5 0 6 0]], shape=(3, 5), dtype=int32)
i=tf.Tensor(
[[2 4][0 4][1 3]], shape=(3, 2), dtype=int32)
在第二层for之前插入,得到第二层的zip结果
print(list(zip(p.numpy().tolist(), i.numpy().tolist())))
# [([0, 0, 1, 0, 2], [2, 4]),
#  ([3, 0, 0, 0, 4], [0, 4]),
#  ([0, 5, 0, 6, 0], [1, 3])]
则开始第二层for的第一次循环,则
# p_2 = tf.Tensor([0 0 1 0 2], shape=(5,), dtype=int32)
# i_2 = tf.Tensor([2 4], shape=(2,), dtype=int32)
# r = tf.Tensor([1 2], shape=(2,), dtype=int32)
这之后第二层for循环再进行2次循环,退回到第一层大循环,第一层大循环再进行一次上述循环即完成了整个循环。
2.4 batch_dims再降为1
你会发现,下面两条指令等价,即batch_dims=1只有一层循环,只zip一次
tf.gather(params, indices, axis=2, batch_dims=1).numpy()
# 等价于
manually_batched_gather(params, indices, axis=2).numpy()
# [[[[1 2]
#    [0 2]
#    [0 0]]
#
#   [[0 4]
#    [3 4]
#    [0 0]]
#
#   [[0 0]
#    [0 0]
#    [5 6]]]
#
#
#  [[[8 2]
#    [4 8]
#    [2 4]]
#
#   [[6 3]
#    [2 6]
#    [0 2]]
#
#   [[2 6]
#    [8 2]
#    [3 8]]]]
2.5 再将axis降为1
还需修改一下indices,因为下文有对indices的约束——必须在 [0, params.shape[axis]] 范围内,此时params.shape为(2, 3, 5),则params.shape[1]=3,所以indices只能等于0或1或2,如果>=3索引的时候就会溢出。此时还是batch_dims=1只有一层循环,只zip一次,只是改变了索引轴。
indices = tf.constant([[[1, 0],[2, 1],[2, 0]],[[2, 0],[0, 1],[1, 2]]])
tf.gather(params, indices, axis=1, batch_dims=1).numpy()
# 等价于
manually_batched_gather(params, indices, axis=1).numpy()
# array([[[[3, 0, 0, 0, 4],
#          [0, 0, 1, 0, 2]],
#
#         [[0, 5, 0, 6, 0],
#          [3, 0, 0, 0, 4]],
#
#         [[0, 5, 0, 6, 0],
#          [0, 0, 1, 0, 2]]],
#
#
#        [[[7, 2, 8, 6, 3],
#          [1, 8, 4, 2, 2]],
#
#         [[1, 8, 4, 2, 2],
#          [9, 6, 2, 3, 0]],
#
#         [[9, 6, 2, 3, 0],
#          [7, 2, 8, 6, 3]]]], dtype=int32)>>
2.6 batch_dims<0
因为params和indices一共由3各维度——0、1、2,其对应的负维度就是-3、-2、-1,所以下面两条指令等价
a = tf.gather(params, indices, axis=2, batch_dims=1).numpy()
pprint(a)
# 等价于
a = tf.gather(params, indices, axis=2, batch_dims=-2).numpy()
pprint(a)
2.7 batch_dims总结
故个人认为,batch_dims是由batch和dimensions两个单词缩写而成,因为dimensions为复数所以可以翻译为“批量维度数”(自己翻译没有查到文献),可以指批处理batch_dims个维度,如果是正数可以理解成嵌套几层循环或者进行几次zip,如果是负数需要转化为对应的正维度再进行上述理解;也可以是指组包到哪一个维度上,如果是负数也同样适用于这种解释。
batch_dims极大的扩展了gather的功能,使你可以将params和indices在对应的某个维度上分别进行gather然后再stack。
ps:关于batch_dims的这个解释同样也适用于tf.gather_nd。
3. 补充
如果您需要使用诸如 tf.argsort 或 tf.math.top_k 之类的操作的索引,其中索引的最后一个维度在相应位置索引到输入的最后一个维度,这自然会出现。 在这种情况下,您可以使用 tf.gather(values, indices, batch_dims=-1)。
4. 参数和返回值
| 参数 | |
|---|---|
params | 从中收集值的Tensor(张量)。其秩(rank)必须至少为axis + 1。 |
indices | 索引张量。 必须是以下类型之一:int32、int64。 这些值必须在 [0, params.shape[axis]] 范围内。 |
validate_indices | 已弃用,没有任何作用。 索引总是在 CPU 上验证,从不在 GPU 上验证。 注意:在 CPU 上,如果发现越界索引,则会引发错误。 在 GPU 上,如果发现越界索引,则将 0 存储在相应的输出值中。 |
axis | 一个Tensor((张量))。 必须是以下类型之一:int32、int64。 从参数params中的axis轴收集索引。 必须大于或等于batch_dims。 默认为第一个** |
batch_dims | 一个integer(整数)。 批量维度(batch dimensions)的数量。 必须小于或等于 rank(indices)。 |
name | 操作的名称(可选)。 |
| 返回值 |
|---|
一个Tensor(张量), 与params具有相同的类型。 |
5. 其他相关论述
下面几篇博客,相对于官网手册都有新的信息增量,可以作为参考
- 知网《tf.gather()函数》,使用索引推演的方式在维度和操作两个方面进行理解,但是其关于
batch_dims的描述不够充分且有些片面; - 知乎《tf.gather()函数总结》,举了一个新的例子,但是
batch_dims还是只到了1,没有很好的归纳其真正的物理意义; - CSDN《tf.gather函数》,跟上一篇的情况差不多。
6. 附件
上文用到的调试程序,可以忽略
import tensorflow as tf
from pprint import pprintparams = tf.constant([[0, 1.0, 2.0],[10.0, 11.0, 12.0],[20.0, 21.0, 22.0],[30.0, 31.0, 32.0]])
a = tf.gather(params, indices=[[2,1], [1,0]], axis=1).numpy()
pprint(a)params = tf.constant([[0, 0, 1, 0, 2],[3, 0, 0, 0, 4],[0, 5, 0, 6, 0]])
indices = tf.constant([[2, 4],[0, 4],[1, 3]])a = tf.gather(params, indices, axis=1, batch_dims=1).numpy()
pprint(a)
a = tf.gather(params, indices, axis=1, batch_dims=-1).numpy()
pprint(a)def manually_batched_gather(params, indices, axis):batch_dims=1result = []for p,i in zip(params, indices):r = tf.gather(p, i, axis=axis-batch_dims)result.append(r)return tf.stack(result)
manually_batched_gather(params, indices, axis=1).numpy()pprint(list(zip(params.numpy().tolist(), indices.numpy().tolist())))tf.gather(params, indices, axis=1, batch_dims=0).numpy()
tf.gather(params, indices, axis=1).numpy()
# tf.gather(params, indices, axis=0, batch_dims=0).numpy()params = tf.constant([[[0, 0, 1, 0, 2],[3, 0, 0, 0, 4],[0, 5, 0, 6, 0]]])
indices = tf.constant([[[2, 4],[0, 4],[1, 3]]])
pprint(list(zip(params.numpy().tolist(), indices.numpy().tolist())))# [([[0, 0, 1, 0, 2], [3, 0, 0, 0, 4], [0, 5, 0, 6, 0]],
#   [[2, 4], [0, 4], [1, 3]])]params_1 = [[0, 0, 1, 0, 2],[3, 0, 0, 0, 4],[0, 5, 0, 6, 0]],
indices_1 = [[2, 4],[0, 4],[1, 3]]# a = tf.gather(params_1, indices_1, axis=0).numpy()params = tf.constant([[[0, 0, 1, 0, 2],[3, 0, 0, 0, 4],[0, 5, 0, 6, 0]],[[1, 8, 4, 2, 2],[9, 6, 2, 3, 0],[7, 2, 8, 6, 3]]])
indices = tf.constant([[[2, 4],[0, 4],[1, 3]],[[1, 3],[2, 1],[4, 2]]])a = tf.gather(params, indices, axis=2, batch_dims=2).numpy()
pprint(a)
a = tf.gather(params, indices, axis=2, batch_dims=-1).numpy()
pprint(a)print(list(zip(params.numpy().tolist(), indices.numpy().tolist())))# [([[0, 0, 1, 0, 2],
#    [3, 0, 0, 0, 4],
#    [0, 5, 0, 6, 0]],
#   [[2, 4],
#    [0, 4],
#    [1, 3]]),
#
#  ([[1, 8, 4, 2, 2],
#    [9, 6, 2, 3, 0],
#    [7, 2, 8, 6, 3]],
#   [[1, 3],
#    [2, 1],
#    [4, 2]])]def manually_batched_gather_3(params, indices, axis):batch_dims=2result = []for p,i in zip(params, indices):result_2 = []print(list(zip(p.numpy().tolist(), i.numpy().tolist())))for p_2, i_2 in zip(p,i):r = tf.gather(p_2, i_2, axis=axis-batch_dims)result_2.append(r)result.append(result_2)return tf.stack(result)
manually_batched_gather_3(params, indices, axis=2).numpy()# <tf.Tensor: shape=(2, 3, 2), dtype=int32, numpy=
# array([[[1, 2],
#         [3, 4],
#         [5, 6]],
#
#        [[8, 2],
#         [2, 6],
#         [3, 8]]], dtype=int32)>># [([0, 0, 1, 0, 2], [2, 4]),
#  ([3, 0, 0, 0, 4], [0, 4]),
#  ([0, 5, 0, 6, 0], [1, 3])]a = tf.gather(params, indices, axis=2, batch_dims=1).numpy()
pprint(a)
a = tf.gather(params, indices, axis=2, batch_dims=-2).numpy()
pprint(a)
manually_batched_gather(params, indices, axis=2).numpy()
# [[[[1 2]
#    [0 2]
#    [0 0]]
#
#   [[0 4]
#    [3 4]
#    [0 0]]
#
#   [[0 0]
#    [0 0]
#    [5 6]]]
#
#
#  [[[8 2]
#    [4 8]
#    [2 4]]
#
#   [[6 3]
#    [2 6]
#    [0 2]]
#
#   [[2 6]
#    [8 2]
#    [3 8]]]]indices = tf.constant([[[1, 0],[2, 1],[2, 0]],[[2, 0],[0, 1],[1, 2]]])a = tf.gather(params, indices, axis=1, batch_dims=1).numpy()
pprint(a)
a = tf.gather(params, indices, axis=1, batch_dims=-2).numpy()
pprint(a)
manually_batched_gather(params, indices, axis=1).numpy()
# array([[[[3, 0, 0, 0, 4],
#          [0, 0, 1, 0, 2]],
#
#         [[0, 5, 0, 6, 0],
#          [3, 0, 0, 0, 4]],
#
#         [[0, 5, 0, 6, 0],
#          [0, 0, 1, 0, 2]]],
#
#
#        [[[7, 2, 8, 6, 3],
#          [1, 8, 4, 2, 2]],
#
#         [[1, 8, 4, 2, 2],
#          [9, 6, 2, 3, 0]],
#
#         [[9, 6, 2, 3, 0],
#          [7, 2, 8, 6, 3]]]], dtype=int32)>>
相关文章:
关于tf.gather函数batch_dims参数用法的理解
关于tf.gather函数batch_dims参数用法的理解0 前言1. 不考虑batch_dims2. 批处理(考虑batch_dims)2.1 batch_dims12.2 batch_dims02.3 batch_dims>22.4 batch_dims再降为12.5 再将axis降为12.6 batch_dims<02.7 batch_dims总结3. 补充4. 参数和返回值5. 其他相关论述6. 附…...

日常操作linux常用命令
cd /mnt/opt/cqstt/logs/stt-erp docker logs -f --tail1000 stt-erp # 查看物理CPU个数 cat /proc/cpuinfo| grep "physical id"| sort| uniq| wc -l # 查看每个物理CPU中core的个数(即核数) cat /proc/cpuinfo| grep "cpu cores"| uniq # 查看逻辑CPU的…...

【Java集合框架】篇二:Collection接口方法
JDK不提供此接口的任何直接实现类,而是提供更具体的子接口(如:Set和List)去实现。 Collection 接口是 List和Set接口的父接口,该接口里定义的方法既可用于操作 Set 集合,也可用于操作 List 集合。方法如下…...

PHP入门指南:简单易学的语法和丰富的调试工具与安全性最佳实践
PHP是一种非常流行的服务器端编程语言,它被广泛地应用于Web开发中。如果您想学习Web开发,那么PHP是一个非常好的选择。在本文中,我将介绍PHP的一些基础知识,包括语法、变量、函数、数组、数据库连接、调试和安全性等。PHP的语法PH…...

前端面试题--HTML篇
一、src和href的区别src指向外部资源的位置,指向的内容会嵌入到文档中当前标签所在的位置;href指向网络资源的位置,建立和当前元素或当前文档之间的链接。二、对HTML语义化的理解根据内容的结构化,选择合适的标签。优点࿱…...
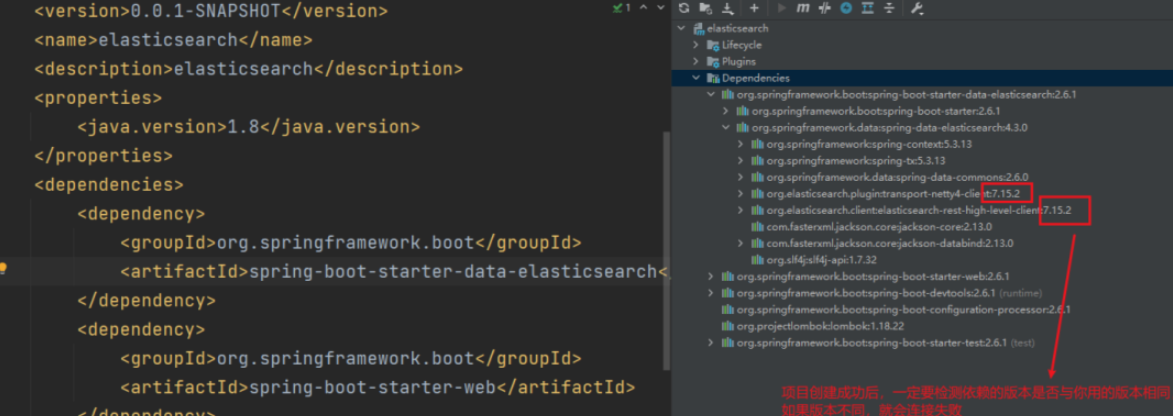
SpringBoot集成ElasticSearch,实现模糊查询,批量CRUD,排序,分页,高亮
导入elasticsearch依赖在pom.xml里加入如下依赖:<dependency><groupId>org.springframework.boot</groupId><artifactId>spring-boot-starter-data-elasticsearch</artifactId> </dependency>非常重要:检查依赖版本…...
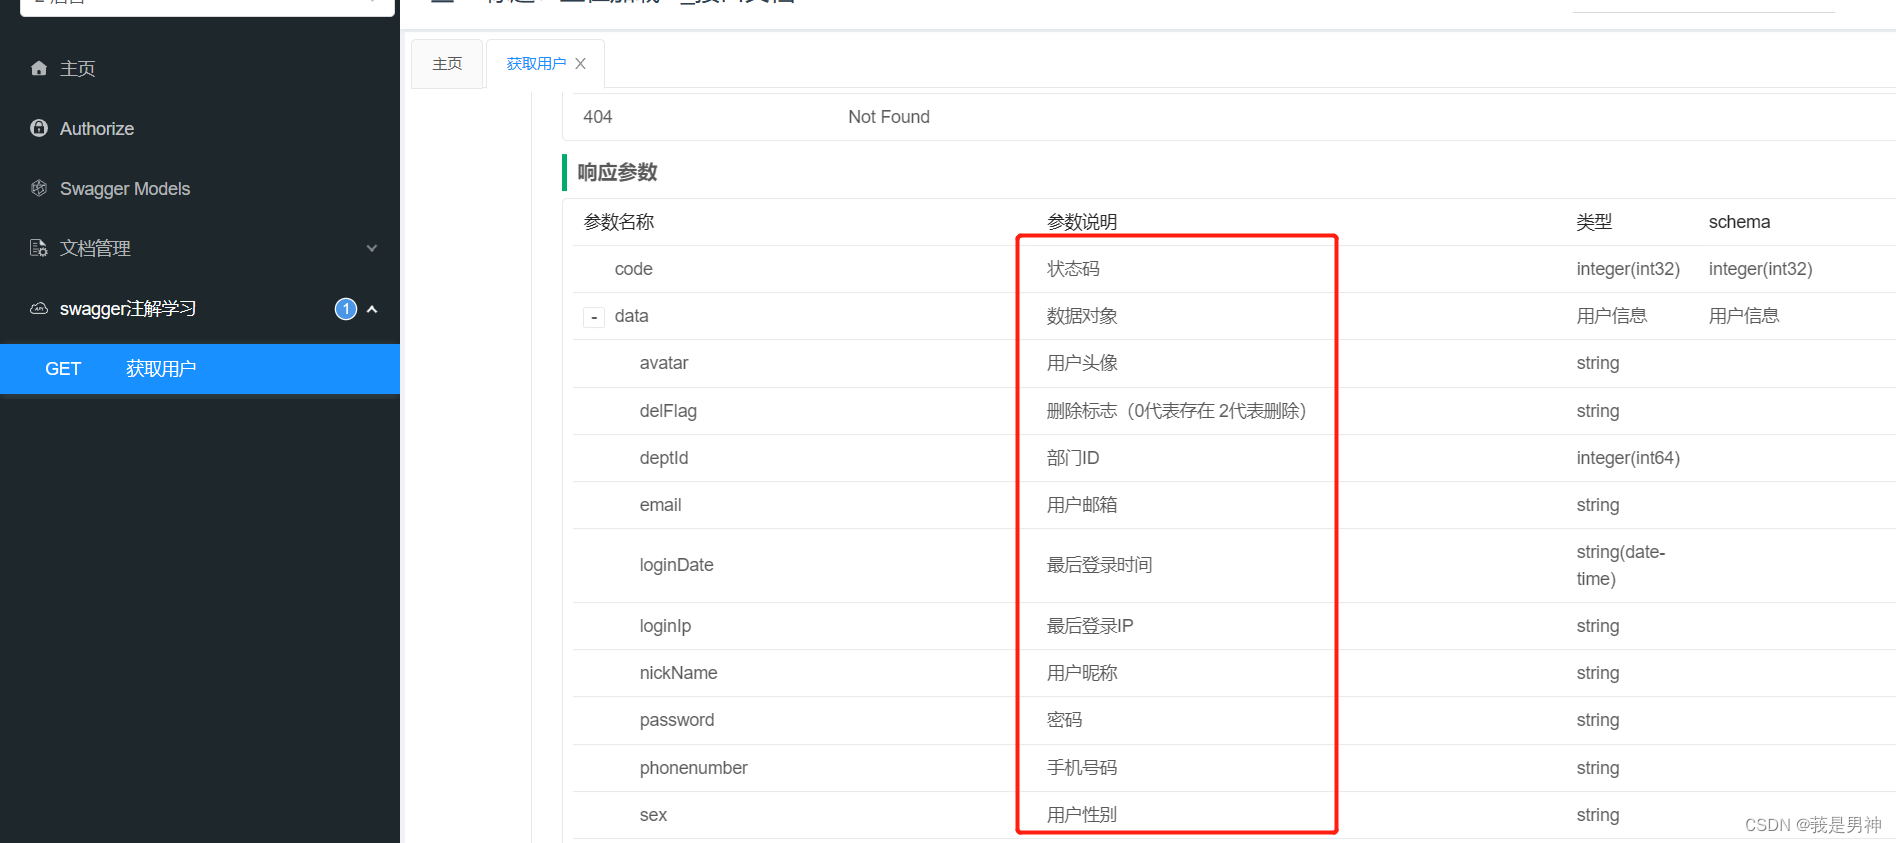
常用Swagger注解汇总
常用Swagger注解汇总 前言 在实际编写后端代码的过程中,我们可能经常使用到 swagger 注解,但是会用不代表了解,你知道每个注解都有什么属性吗?你都用过这些属性吗?了解它们的作用吗?本文在此带大家总结一下…...

关于 TypeScript 声明文件
declare var 声明全局变量declare function 声明全局方法declare class 声明全局类declare enum 声明全局枚举类型declare namespace 声明(含有子属性的)全局对象interface 和 type 声明全局类型export 导出变量export namespace 导出(含有子…...

SpringBoot学习-原理篇
SpringBoot原理篇springboot技术本身就是为了加速spring程序的开发的,可以大胆的说,springboot技术没有自己的原理层面的设计,仅仅是实现方案进行了改进。将springboot定位成工具,你就不会去想方设法的学习其原理了。就像是将木头…...
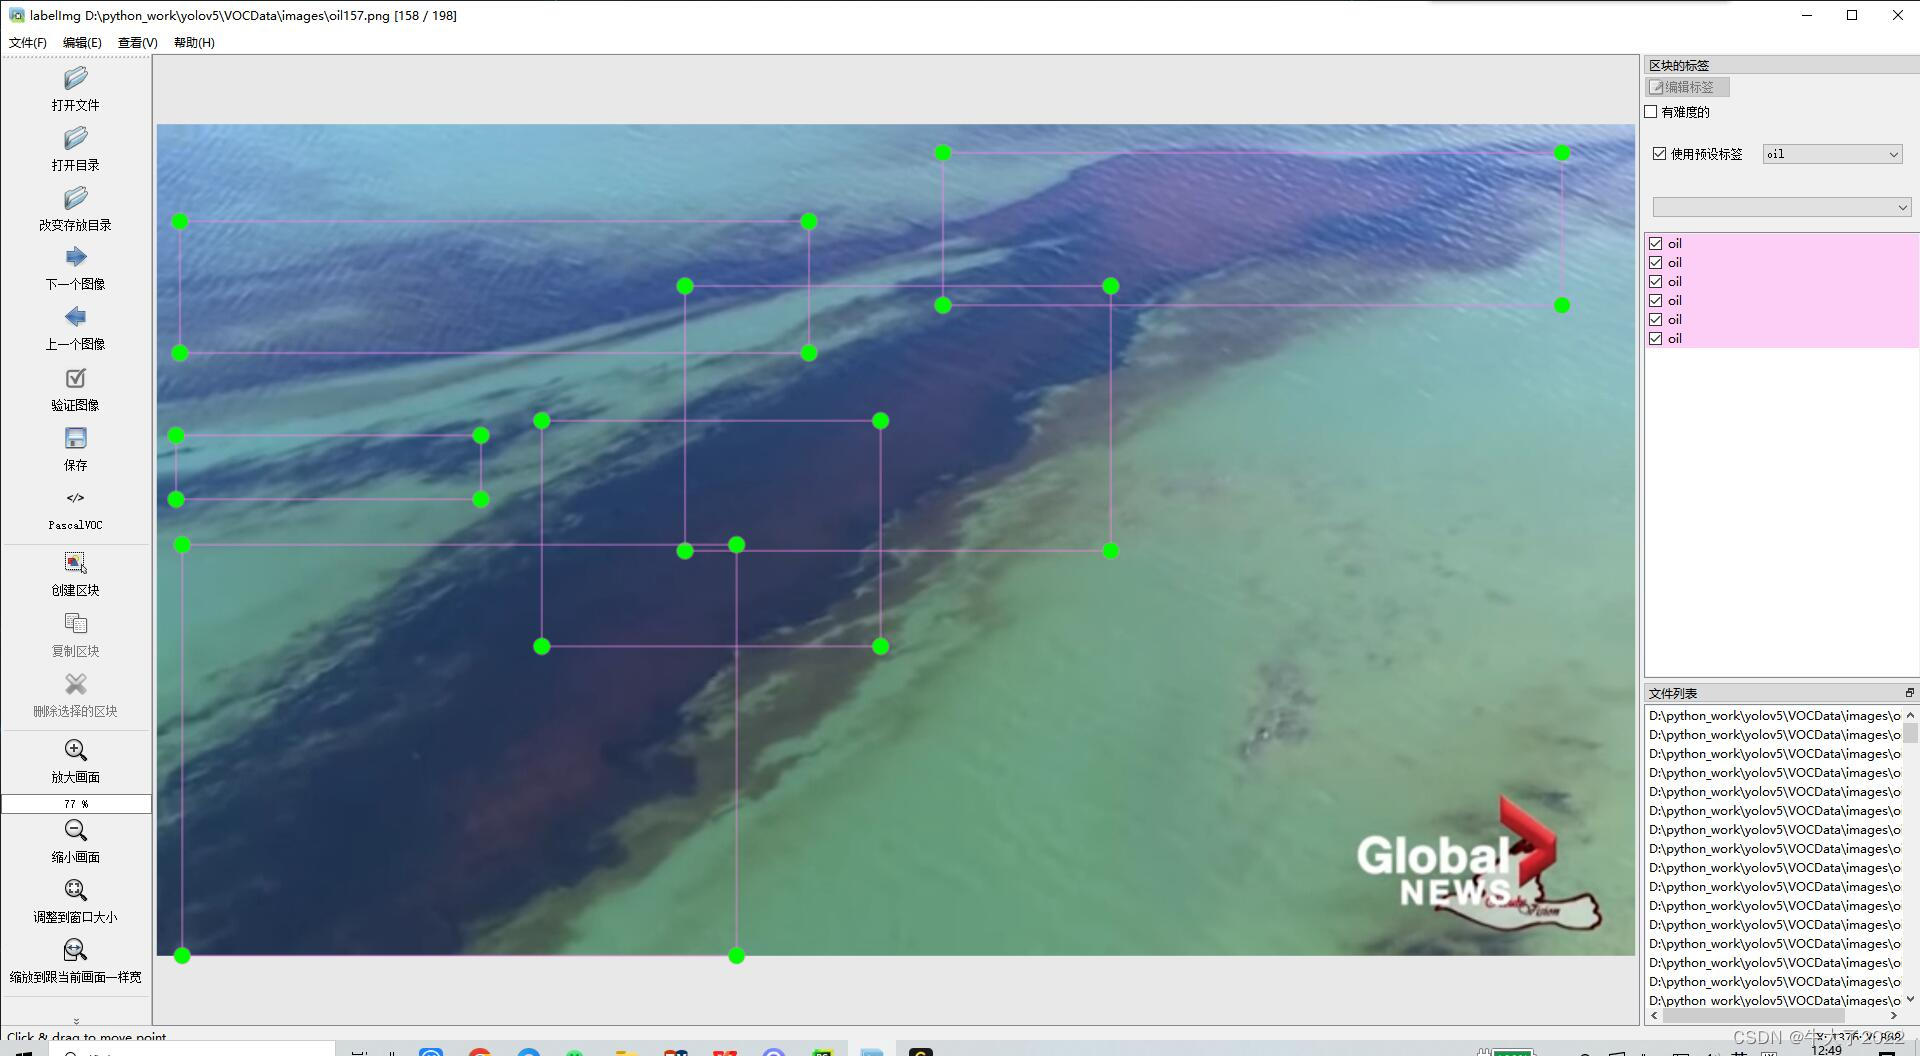
目标检测YOLOv5数据集怎么找?
完整的配置-标注-训练-识别在我这篇博客小白YOLOv5全流程-训练实现数字识别_yolov5数字识别_牛大了2022的博客-CSDN博客 模型部分剖析可以看我每周深度学习笔记部分。关于训练的数据集怎么搞很多人问过我,我在这篇文章给大家一点我的经验和建议。 数据集是什么 简…...
安卓短信自动填充踩坑
安卓短信自动填充踩坑 前言 最近弄了个短信自动填充功能,一开始觉得很简单,不就是动态注册个广播接收器去监听短信消息不就可以了吗?结果没这么简单,问题就出在机型的适配上。小米的短信权限、荣耀的短信监听都是坑,…...

【抽象类和接口的区别】
抽象类和接口都是Java中实现多态的机制,它们都是用来约束子类必须要实现的方法。但是它们有以下区别: 实现方式 实现方式:抽象类是一个类,而接口是一个接口。一个类只能继承一个抽象类,但可以实现多个接口。 构造方…...

接口导出文件功能
1.写接口 export function getExport(params) { return fetch({ url: ******.export, method: post, data: params, responseType:blob, }) } 2.编写前端页面 <el-button :loading"exportDisable" :disabled&quo…...

深圳大学计软《面向对象的程序设计》实验9 期中复习
A. 机器人变身(类与对象)【期中模拟】 题目描述 编写一个机器人类,包含属性有机器名、血量、伤害值、防御值、类型和等级。其中血量、伤害和防御和等级、类型相关: 普通型机器人,类型为N,血量、伤害、防…...

python之异步编程
一、异步编程概述 异步编程是一种并发编程的模式,其关注点是通过调度不同任务之间的执行和等待时间,通过减少处理器的闲置时间来达到减少整个程序的执行时间;异步编程跟同步编程模型最大的不同就是其任务的切换,当遇到一个需要等…...

为什么很多计算机专业大学生毕业后还会参加培训?
基于IT互联网行业越来越卷的现状,就算是科班出身,很多也是达不到用人单位的要求。面对这样的现实情况,有的同学会选择继续深造,比如考个研,去年考研人数457万人次,可见越来越的同学是倾向考研提升学历来达到…...
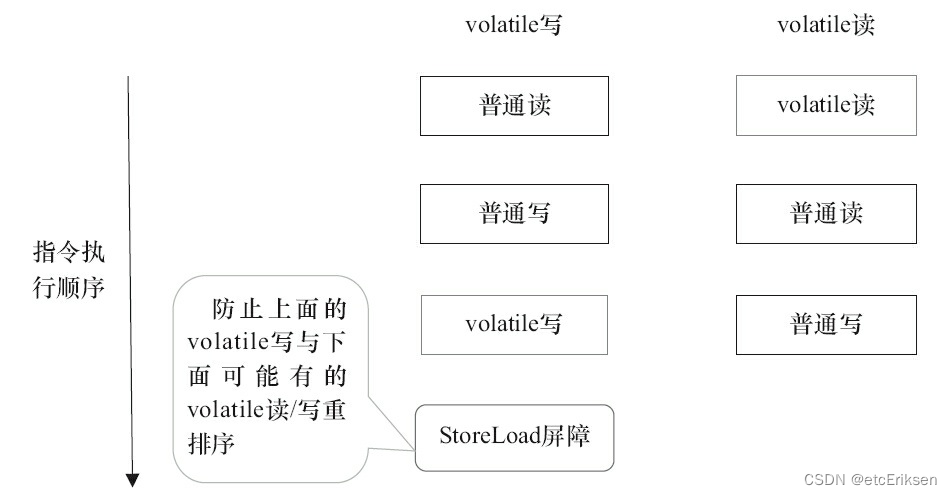
JUC并发编程之JMM_synchronized_volatile
目录 JUC并发编程之JMM_synchronized_volatile 什么是JMM模型? JMM和JVM的区别 JMM不同于JVM内存区域模型 主内存 工作内存 Java内存模型与硬件内存架构的关系 JMM存在的必要性 数据同步八大原子操作 同步规则分析 并发编程的可见性,原子性与有序…...
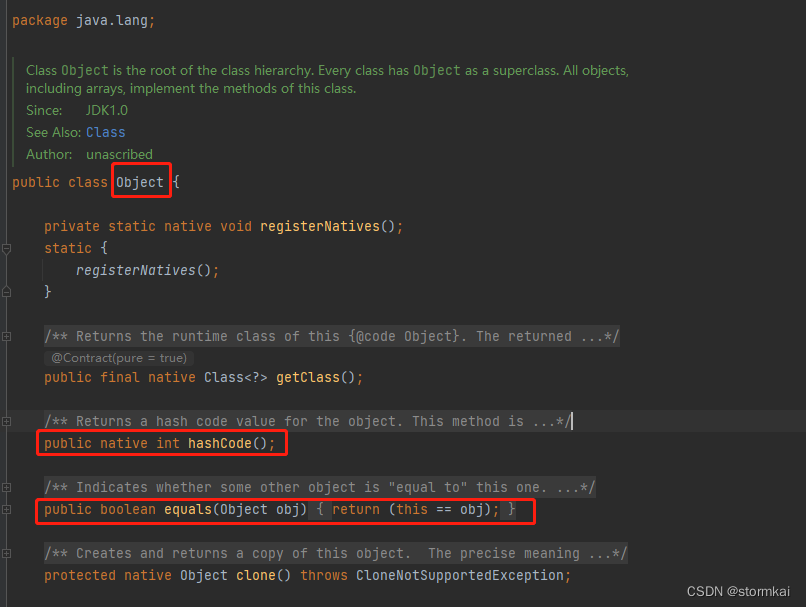
hashCode 和 equals 的处理
文章目录hashCode 和 equals 的处理1. 阿里巴巴编程规范要求2. equals和hashcode的分析2.1 Object方法2.2 只覆写(Override)equals带来的问题问题演示问题分析问题处理hashCode 和 equals 的处理 1. 阿里巴巴编程规范要求 2. equals和hashcode的分析 2…...

17. OPenGL实现旋转移动物体
1. 说明: 整体思路:如果想实现动态,可以使用一个矩阵和我们给定的坐标值进行相乘,实时的改变坐标值 类似于坐标的齐次变换,然后使用一个定时器,在规定时间内触发重新绘制的函数。 实际效果: OP…...

《SQL基础》14. 存储过程 · 存储函数
存储过程 存储函数存储过程基本语法变量系统变量用户定义变量局部变量if判断参数case判断while循环repeat循环loop循环游标条件处理程序存储函数存储过程 存储过程是事先经过编译并存储在数据库中的一段SQL语句的集合。调用存储过程可以简化应用开发人员的工作,减…...

如何设计完美的 TypeScript 错误消息模拟测试数据:深入理解 pretty-ts-errors 测试策略 [特殊字符]
如何设计完美的 TypeScript 错误消息模拟测试数据:深入理解 pretty-ts-errors 测试策略 🔍 【免费下载链接】pretty-ts-errors 🔵 Make TypeScript errors prettier and human-readable in VSCode 🎀 项目地址: https://gitcode…...

GroundTruth-MCP:为AI生成代码构建实时事实核查防火墙
1. 项目概述:当AI助手自信地写出过时代码时你的AI助手刚刚又“自信满满”地给你生成了一堆过时的代码。它告诉你React 19里forwardRef用得没问题,Next.js 15的cookies()还是同步函数,或者用字符串模板拼接SQL查询“既简洁又高效”。更糟的是&…...

Discord集成Claude智能体:极简Docker容器化部署与安全实践
1. 项目概述:一个为Discord量身定制的Claude智能体运行栈 如果你和我一样,既想在日常工作的Discord频道里无缝调用Claude这样的强大AI助手,又对复杂、臃肿的Bot框架感到头疼,那么 nanoclaw-discord 这个项目可能就是你在找的答…...

应对2026检测算法:论文AI率居高不下怎么救?5款降AI工具深度实测
最近不少学弟学妹在后台跟我倒苦水,说查重率好不容易低了,结果AI率越改越高。眼看临近DDL,生怕又因为这个耽误答辩。 作为已经摸爬滚打出来的老学长,今天我就根据我总结出来的经验,从检测系统的底层逻辑开始讲起&…...

Go语言极简Web框架Meridian:依赖注入与清晰架构实践
1. 项目概述:一个“极简”的现代Web应用框架最近在GitHub上闲逛,又看到了一个名为rynfar/meridian的项目。点进去一看,简介写着“A modern web framework for building APIs and web applications in Go”。说实话,现在Go语言的We…...
)
AI原生图计算不是“加个GNN层”那么简单:SITS 2026定义的5层工程化成熟度模型(附自测清单+迁移路线图)
更多请点击: https://intelliparadigm.com 第一章:AI原生图计算应用:SITS 2026图神经网络工程化方案 SITS 2026 是面向大规模动态图场景的AI原生图计算框架,深度融合GNN训练、图拓扑实时更新与边缘-云协同推理能力。其核心设计摒…...

STM32F103C8T6驱动5V LCD1602,开漏输出+上拉电阻的硬件连接与代码避坑指南
STM32F103C8T6驱动5V LCD1602的硬件设计与代码实战指南 当3.3V的STM32遇到5V供电的LCD1602模块时,电平不匹配问题常常让初学者头疼不已。本文将深入解析开漏输出配合上拉电阻的解决方案,通过硬件原理分析、示波器实测对比和完整代码示例,带你…...

终极指南:如何用WarcraftHelper彻底解决魔兽争霸3的现代系统兼容性问题
终极指南:如何用WarcraftHelper彻底解决魔兽争霸3的现代系统兼容性问题 【免费下载链接】WarcraftHelper Warcraft III Helper , support 1.20e, 1.24e, 1.26a, 1.27a, 1.27b 项目地址: https://gitcode.com/gh_mirrors/wa/WarcraftHelper 你是否还在为魔兽争…...

别再死记公式了!用“信号与系统”的视角,5分钟看懂卡尔曼滤波与互补滤波的本质区别
从频域视角解析卡尔曼滤波与互补滤波的本质差异 在机器人控制和姿态估计领域,数据融合算法始终是工程师们关注的焦点。当我们面对陀螺仪和加速度计这两种各具特色的传感器数据时,如何有效融合它们的长处,同时规避各自的短板,成为构…...
)
别再到处找激活码了!手把手教你用vlmcsd在Windows上自建KMS服务器(附各版本密钥)
企业级Windows批量激活解决方案:安全高效的本地KMS部署指南 在数字化办公环境中,批量激活Windows操作系统一直是IT管理员面临的常见挑战。传统单机激活方式效率低下,而依赖外部KMS服务器又存在连接不稳定、隐私泄露等潜在风险。本文将深入探讨…...