Android的setContentView流程
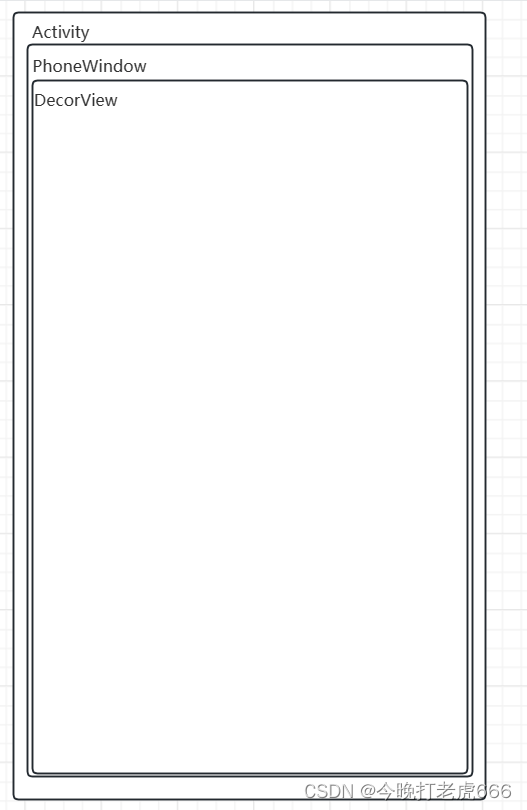
一.Activity里面的mWindow是啥
在ActivityThread的performLaunchActivity方法里面:
private Activity performLaunchActivity(ActivityClientRecord r, Intent customIntent) {ActivityInfo aInfo = r.activityInfo;if (r.packageInfo == null) {r.packageInfo = getPackageInfo(aInfo.applicationInfo, r.compatInfo,Context.CONTEXT_INCLUDE_CODE);}ComponentName component = r.intent.getComponent();if (component == null) {component = r.intent.resolveActivity(mInitialApplication.getPackageManager());r.intent.setComponent(component);}if (r.activityInfo.targetActivity != null) {component = new ComponentName(r.activityInfo.packageName,r.activityInfo.targetActivity);}ContextImpl appContext = createBaseContextForActivity(r);Activity activity = null;try {java.lang.ClassLoader cl = appContext.getClassLoader();//创建一个activityactivity = mInstrumentation.newActivity(cl, component.getClassName(), r.intent);StrictMode.incrementExpectedActivityCount(activity.getClass());r.intent.setExtrasClassLoader(cl);r.intent.prepareToEnterProcess();if (r.state != null) {r.state.setClassLoader(cl);}} catch (Exception e) {if (!mInstrumentation.onException(activity, e)) {throw new RuntimeException("Unable to instantiate activity " + component+ ": " + e.toString(), e);}}try {//LoadedApk 构建 makeApplication Application app = r.packageInfo.makeApplication(false, mInstrumentation);if (localLOGV) Slog.v(TAG, "Performing launch of " + r);if (localLOGV) Slog.v(TAG, r + ": app=" + app+ ", appName=" + app.getPackageName()+ ", pkg=" + r.packageInfo.getPackageName()+ ", comp=" + r.intent.getComponent().toShortString()+ ", dir=" + r.packageInfo.getAppDir());if (activity != null) {CharSequence title = r.activityInfo.loadLabel(appContext.getPackageManager());Configuration config = new Configuration(mCompatConfiguration);if (r.overrideConfig != null) {config.updateFrom(r.overrideConfig);}if (DEBUG_CONFIGURATION) Slog.v(TAG, "Launching activity "+ r.activityInfo.name + " with config " + config);Window window = null;if (r.mPendingRemoveWindow != null && r.mPreserveWindow) {window = r.mPendingRemoveWindow;r.mPendingRemoveWindow = null;r.mPendingRemoveWindowManager = null;}// Activity resources must be initialized with the same loaders as the// application context.appContext.getResources().addLoaders(app.getResources().getLoaders().toArray(new ResourcesLoader[0]));appContext.setOuterContext(activity);//会在这个方法中创建Activity的PhoneWindow,并绑定对应的WindowManager。activity.attach(appContext, this, getInstrumentation(), r.token,r.ident, app, r.intent, r.activityInfo, title, r.parent,r.embeddedID, r.lastNonConfigurationInstances, config,r.referrer, r.voiceInteractor, window, r.configCallback,r.assistToken);if (customIntent != null) {activity.mIntent = customIntent;}r.lastNonConfigurationInstances = null;checkAndBlockForNetworkAccess();activity.mStartedActivity = false;int theme = r.activityInfo.getThemeResource();if (theme != 0) {activity.setTheme(theme);}activity.mCalled = false;// 设置 mLifecycleState 为 ON_CREATEif (r.isPersistable()) {mInstrumentation.callActivityOnCreate(activity, r.state, r.persistentState);} else {mInstrumentation.callActivityOnCreate(activity, r.state);}if (!activity.mCalled) {throw new SuperNotCalledException("Activity " + r.intent.getComponent().toShortString() +" did not call through to super.onCreate()");}r.activity = activity;mLastReportedWindowingMode.put(activity.getActivityToken(),config.windowConfiguration.getWindowingMode());}// 设置 mLifecycleState 为 ON_CREATEr.setState(ON_CREATE);// updatePendingActivityConfiguration() reads from mActivities to update// ActivityClientRecord which runs in a different thread. Protect modifications to// mActivities to avoid race.synchronized (mResourcesManager) {mActivities.put(r.token, r);}} catch (SuperNotCalledException e) {throw e;} catch (Exception e) {if (!mInstrumentation.onException(activity, e)) {throw new RuntimeException("Unable to start activity " + component+ ": " + e.toString(), e);}}return activity;}在这个方法里面我们可以看到创建一个activity后,调用这个activity的attach方法:
final void attach(Context context, ActivityThread aThread,Instrumentation instr, IBinder token, int ident,Application application, Intent intent, ActivityInfo info,CharSequence title, Activity parent, String id,NonConfigurationInstances lastNonConfigurationInstances,Configuration config, String referrer, IVoiceInteractor voiceInteractor,Window window, ActivityConfigCallback activityConfigCallback, IBinder assistToken) {attachBaseContext(context);mFragments.attachHost(null /*parent*/);// PhoneWindow mWindow = new PhoneWindow(this, window, activityConfigCallback);mWindow.setWindowControllerCallback(mWindowControllerCallback);// PhoneWindow 的 callback 设置为activitymWindow.setCallback(this);mWindow.setOnWindowDismissedCallback(this);mWindow.getLayoutInflater().setPrivateFactory(this);if (info.softInputMode != WindowManager.LayoutParams.SOFT_INPUT_STATE_UNSPECIFIED) {mWindow.setSoftInputMode(info.softInputMode);}if (info.uiOptions != 0) {mWindow.setUiOptions(info.uiOptions);}mUiThread = Thread.currentThread();mMainThread = aThread;mInstrumentation = instr;mToken = token;mAssistToken = assistToken;mIdent = ident;mApplication = application;mIntent = intent;mReferrer = referrer;mComponent = intent.getComponent();mActivityInfo = info;mTitle = title;mParent = parent;mEmbeddedID = id;mLastNonConfigurationInstances = lastNonConfigurationInstances;if (voiceInteractor != null) {if (lastNonConfigurationInstances != null) {mVoiceInteractor = lastNonConfigurationInstances.voiceInteractor;} else {mVoiceInteractor = new VoiceInteractor(voiceInteractor, this, this,Looper.myLooper());}}//设置 PhoneWindow的WindowManagermWindow.setWindowManager((WindowManager)context.getSystemService(Context.WINDOW_SERVICE),mToken, mComponent.flattenToString(),(info.flags & ActivityInfo.FLAG_HARDWARE_ACCELERATED) != 0);if (mParent != null) {mWindow.setContainer(mParent.getWindow());}// 获取 WindowManagerImpl 作为windowManagermWindowManager = mWindow.getWindowManager();mCurrentConfig = config;mWindow.setColorMode(info.colorMode);mWindow.setPreferMinimalPostProcessing((info.flags & ActivityInfo.FLAG_PREFER_MINIMAL_POST_PROCESSING) != 0);setAutofillOptions(application.getAutofillOptions());setContentCaptureOptions(application.getContentCaptureOptions());}可以清晰的看到在ActivityThread的performLaunchActivity调用activity的attach方法,在activity的attach方法里面mWindow = new PhoneWindow(this, window, activityConfigCallback)。所以activity里面的mWindow就是PhoneWindow。
PhoneWindow创建:
1.Activity
2.Dialog
3.Popwindow
4.Toast
二.继承自Activity的setContentView流程
总流程
public void setContentView(@LayoutRes int layoutResID) {getWindow().setContentView(layoutResID);initWindowDecorActionBar();}这里的getWindow拿到的是PhoneWindow,进入PhoneWindow里面的setContentView流程:
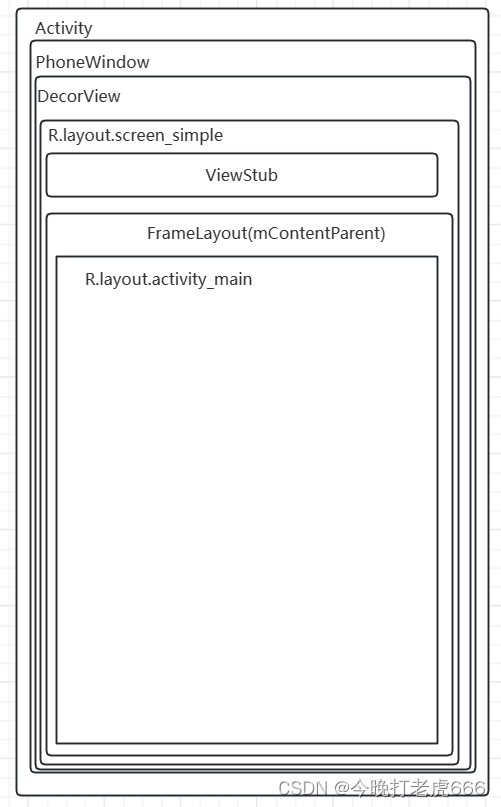
@Overridepublic void setContentView(int layoutResID) {// Note: FEATURE_CONTENT_TRANSITIONS may be set in the process of installing the window// decor, when theme attributes and the like are crystalized. Do not check the feature// before this happens.if (mContentParent == null) {installDecor();} else if (!hasFeature(FEATURE_CONTENT_TRANSITIONS)) {mContentParent.removeAllViews();}if (hasFeature(FEATURE_CONTENT_TRANSITIONS)) {final Scene newScene = Scene.getSceneForLayout(mContentParent, layoutResID,getContext());transitionTo(newScene);} else {mLayoutInflater.inflate(layoutResID, mContentParent);}mContentParent.requestApplyInsets();final Callback cb = getCallback();if (cb != null && !isDestroyed()) {cb.onContentChanged();}mContentParentExplicitlySet = true;}我们可以看到总流程里面先执行installDecor方法,然后通过mLayoutInflater.inflate(layoutResID, mContentParent)把我们的xml文件加载到这个mContentParent里面去,最后设置mContentParentExplicitlySet = true。
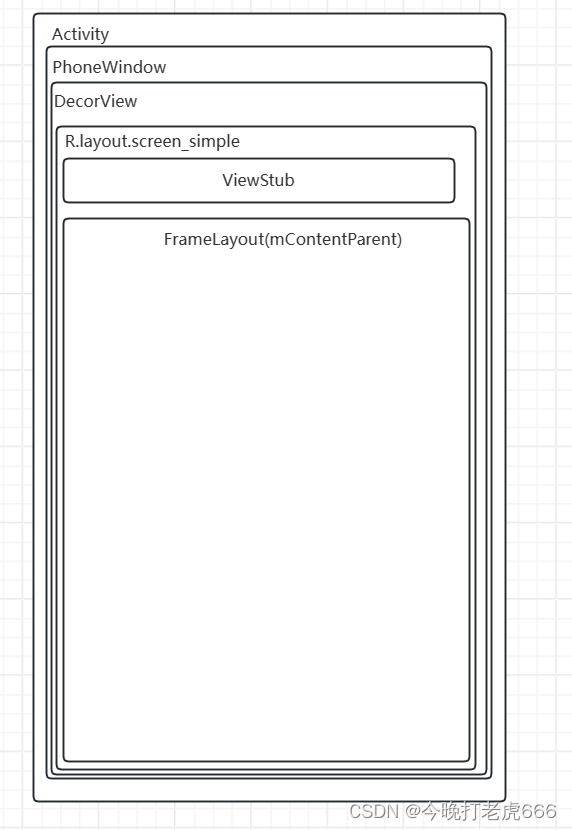
创建DecorView与mContentParent
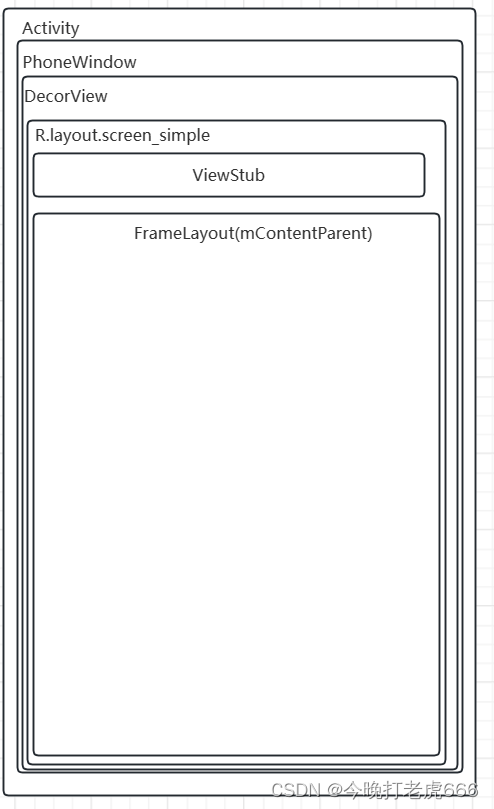
首次进入mContentParent为空,走到installDecor方法里面:
private void installDecor() {mForceDecorInstall = false;if (mDecor == null) {mDecor = generateDecor(-1);mDecor.setDescendantFocusability(ViewGroup.FOCUS_AFTER_DESCENDANTS);mDecor.setIsRootNamespace(true);if (!mInvalidatePanelMenuPosted && mInvalidatePanelMenuFeatures != 0) {mDecor.postOnAnimation(mInvalidatePanelMenuRunnable);}} else {mDecor.setWindow(this);}if (mContentParent == null) {mContentParent = generateLayout(mDecor);......}这个方法一进入就判断mDecor是否为空,肯定是空的,然后调用generateDecor创建一个DecorView:
protected DecorView generateDecor(int featureId) {// System process doesn't have application context and in that case we need to directly use// the context we have. Otherwise we want the application context, so we don't cling to the// activity.Context context;if (mUseDecorContext) {Context applicationContext = getContext().getApplicationContext();if (applicationContext == null) {context = getContext();} else {context = new DecorContext(applicationContext, this);if (mTheme != -1) {context.setTheme(mTheme);}}} else {context = getContext();}return new DecorView(context, featureId, this, getAttributes());}回到installDecor方法里面,创建完DecorView之后mContentParent依旧为空,接下来调用generateLayout(mDecor)方法:
protected ViewGroup generateLayout(DecorView decor) {// Apply data from current theme.TypedArray a = getWindowStyle();......// Inflate the window decor.int layoutResource;int features = getLocalFeatures();// System.out.println("Features: 0x" + Integer.toHexString(features));if ((features & ((1 << FEATURE_LEFT_ICON) | (1 << FEATURE_RIGHT_ICON))) != 0) {if (mIsFloating) {TypedValue res = new TypedValue();getContext().getTheme().resolveAttribute(R.attr.dialogTitleIconsDecorLayout, res, true);layoutResource = res.resourceId;} else {layoutResource = R.layout.screen_title_icons;}// XXX Remove this once action bar supports these features.removeFeature(FEATURE_ACTION_BAR);// System.out.println("Title Icons!");} else if ((features & ((1 << FEATURE_PROGRESS) | (1 << FEATURE_INDETERMINATE_PROGRESS))) != 0&& (features & (1 << FEATURE_ACTION_BAR)) == 0) {// Special case for a window with only a progress bar (and title).// XXX Need to have a no-title version of embedded windows.layoutResource = R.layout.screen_progress;// System.out.println("Progress!");} else if ((features & (1 << FEATURE_CUSTOM_TITLE)) != 0) {// Special case for a window with a custom title.// If the window is floating, we need a dialog layoutif (mIsFloating) {TypedValue res = new TypedValue();getContext().getTheme().resolveAttribute(R.attr.dialogCustomTitleDecorLayout, res, true);layoutResource = res.resourceId;} else {layoutResource = R.layout.screen_custom_title;}// XXX Remove this once action bar supports these features.removeFeature(FEATURE_ACTION_BAR);} else if ((features & (1 << FEATURE_NO_TITLE)) == 0) {// If no other features and not embedded, only need a title.// If the window is floating, we need a dialog layoutif (mIsFloating) {TypedValue res = new TypedValue();getContext().getTheme().resolveAttribute(R.attr.dialogTitleDecorLayout, res, true);layoutResource = res.resourceId;} else if ((features & (1 << FEATURE_ACTION_BAR)) != 0) {layoutResource = a.getResourceId(R.styleable.Window_windowActionBarFullscreenDecorLayout,R.layout.screen_action_bar);} else {layoutResource = R.layout.screen_title;}// System.out.println("Title!");} else if ((features & (1 << FEATURE_ACTION_MODE_OVERLAY)) != 0) {layoutResource = R.layout.screen_simple_overlay_action_mode;} else {// Embedded, so no decoration is needed.layoutResource = R.layout.screen_simple;// System.out.println("Simple!");}mDecor.startChanging();mDecor.onResourcesLoaded(mLayoutInflater, layoutResource);ViewGroup contentParent = (ViewGroup)findViewById(ID_ANDROID_CONTENT);if (contentParent == null) {throw new RuntimeException("Window couldn't find content container view");}......mDecor.finishChanging();return contentParent;}这个方法非常重要,一开始拿到窗口属性,根据我们的属性去设置窗口。我们重点看一下contentParent是怎么获取到的。
int layoutResource;int features = getLocalFeatures();// System.out.println("Features: 0x" + Integer.toHexString(features));if ((features & ((1 << FEATURE_LEFT_ICON) | (1 << FEATURE_RIGHT_ICON))) != 0) {if (mIsFloating) {TypedValue res = new TypedValue();getContext().getTheme().resolveAttribute(R.attr.dialogTitleIconsDecorLayout, res, true);layoutResource = res.resourceId;} else {layoutResource = R.layout.screen_title_icons;}// XXX Remove this once action bar supports these features.removeFeature(FEATURE_ACTION_BAR);// System.out.println("Title Icons!");} else if ((features & ((1 << FEATURE_PROGRESS) | (1 << FEATURE_INDETERMINATE_PROGRESS))) != 0&& (features & (1 << FEATURE_ACTION_BAR)) == 0) {// Special case for a window with only a progress bar (and title).// XXX Need to have a no-title version of embedded windows.layoutResource = R.layout.screen_progress;// System.out.println("Progress!");} else if ((features & (1 << FEATURE_CUSTOM_TITLE)) != 0) {// Special case for a window with a custom title.// If the window is floating, we need a dialog layoutif (mIsFloating) {TypedValue res = new TypedValue();getContext().getTheme().resolveAttribute(R.attr.dialogCustomTitleDecorLayout, res, true);layoutResource = res.resourceId;} else {layoutResource = R.layout.screen_custom_title;}// XXX Remove this once action bar supports these features.removeFeature(FEATURE_ACTION_BAR);} else if ((features & (1 << FEATURE_NO_TITLE)) == 0) {// If no other features and not embedded, only need a title.// If the window is floating, we need a dialog layoutif (mIsFloating) {TypedValue res = new TypedValue();getContext().getTheme().resolveAttribute(R.attr.dialogTitleDecorLayout, res, true);layoutResource = res.resourceId;} else if ((features & (1 << FEATURE_ACTION_BAR)) != 0) {layoutResource = a.getResourceId(R.styleable.Window_windowActionBarFullscreenDecorLayout,R.layout.screen_action_bar);} else {layoutResource = R.layout.screen_title;}// System.out.println("Title!");} else if ((features & (1 << FEATURE_ACTION_MODE_OVERLAY)) != 0) {layoutResource = R.layout.screen_simple_overlay_action_mode;} else {// Embedded, so no decoration is needed.layoutResource = R.layout.screen_simple;// System.out.println("Simple!");}这段代码是根据属性去拿对应的xml文件,我们拿一个最简单的R.layout.screen_simple来看看:
<LinearLayout xmlns:android="http://schemas.android.com/apk/res/android"android:layout_width="match_parent"android:layout_height="match_parent"android:fitsSystemWindows="true"android:orientation="vertical"><ViewStub android:id="@+id/action_mode_bar_stub"android:inflatedId="@+id/action_mode_bar"android:layout="@layout/action_mode_bar"android:layout_width="match_parent"android:layout_height="wrap_content"android:theme="?attr/actionBarTheme" /><FrameLayoutandroid:id="@android:id/content"android:layout_width="match_parent"android:layout_height="match_parent"android:foregroundInsidePadding="false"android:foregroundGravity="fill_horizontal|top"android:foreground="?android:attr/windowContentOverlay" />
</LinearLayout>
拿到xml后通过 mDecor.onResourcesLoaded(mLayoutInflater, layoutResource)把我们的xml加载到DecorView里面:
void onResourcesLoaded(LayoutInflater inflater, int layoutResource) {if (mBackdropFrameRenderer != null) {loadBackgroundDrawablesIfNeeded();mBackdropFrameRenderer.onResourcesLoaded(this, mResizingBackgroundDrawable, mCaptionBackgroundDrawable,mUserCaptionBackgroundDrawable, getCurrentColor(mStatusColorViewState),getCurrentColor(mNavigationColorViewState));}mDecorCaptionView = createDecorCaptionView(inflater);final View root = inflater.inflate(layoutResource, null);if (mDecorCaptionView != null) {if (mDecorCaptionView.getParent() == null) {addView(mDecorCaptionView,new ViewGroup.LayoutParams(MATCH_PARENT, MATCH_PARENT));}mDecorCaptionView.addView(root,new ViewGroup.MarginLayoutParams(MATCH_PARENT, MATCH_PARENT));} else {// Put it below the color views.addView(root, 0, new ViewGroup.LayoutParams(MATCH_PARENT, MATCH_PARENT));}mContentRoot = (ViewGroup) root;initializeElevation();}接下来我们在通过findViewById的方式,拿到contentParent。contentParent是通过这一行代码拿到的:
ViewGroup contentParent = (ViewGroup)findViewById(ID_ANDROID_CONTENT);我们清晰的可以看到contentParent就是我们前面R.layout.screen_simple里面id为content的那个FrameLayout。
总结
1.在ActivityThread的performLaunchActivity里面调用Activity的attach方法,创建PhoneWindow。
2.在PhoneWindow里面调用setContentView的installDecor方法里面的generateDecor创建一个DecorView
3.在PhoneWindow里面调用setContentView的installDecor方法里面的generateLayout方法,根据属性选择对应的xml文件,并且把xml文件加载到DecorView里面,并且通过findViewById的方式,从xml里面拿到contentParent。
4.在PhoneWindow里面调用setContentView的mLayoutInflater.inflate(layoutResID, mContentParent),把我们自己的xml文件加载到mContentParent里面。
三.继承自AppCompatActivity的setContentView
总流程
@Overridepublic void setContentView(@LayoutRes int layoutResID) {initViewTreeOwners();getDelegate().setContentView(layoutResID);}@NonNullpublic AppCompatDelegate getDelegate() {if (mDelegate == null) {mDelegate = AppCompatDelegate.create(this, this);}return mDelegate;}@NonNullpublic static AppCompatDelegate create(@NonNull Activity activity,@Nullable AppCompatCallback callback) {return new AppCompatDelegateImpl(activity, callback);}这里的setContentView最后会调到AppCompatDelegateImpl的setContentView里面:
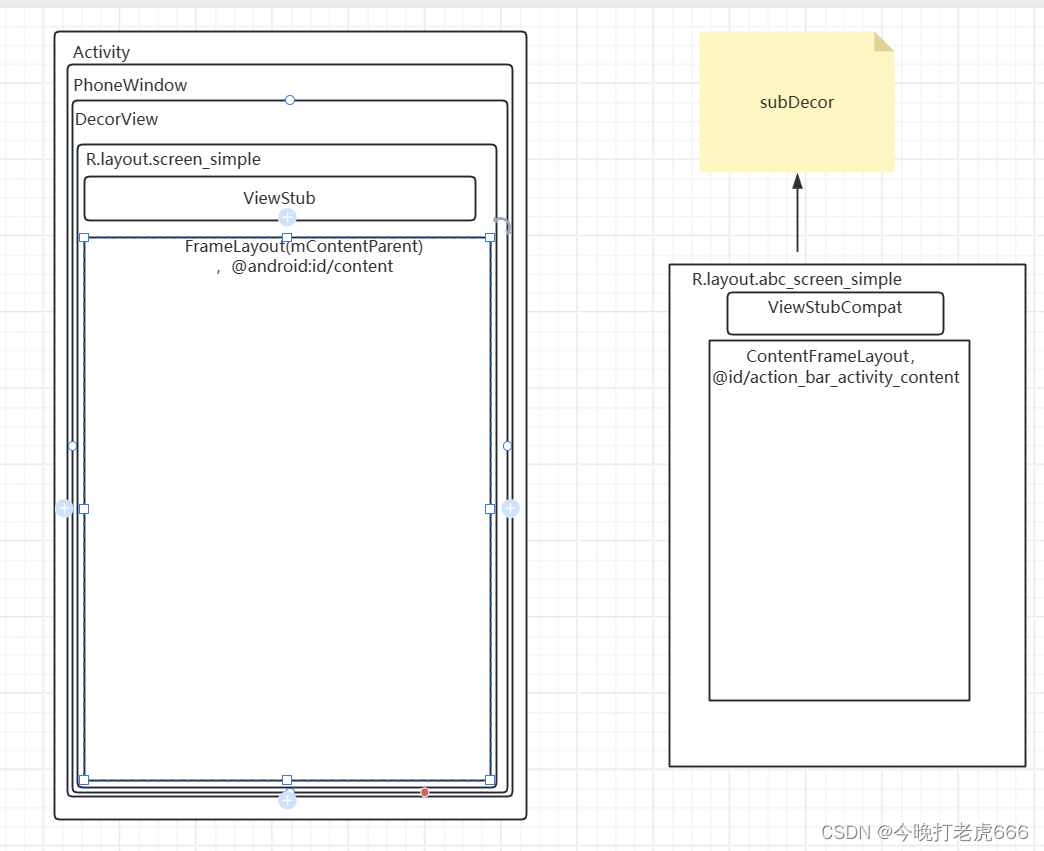
@Overridepublic void setContentView(int resId) {ensureSubDecor();ViewGroup contentParent = mSubDecor.findViewById(android.R.id.content);contentParent.removeAllViews();LayoutInflater.from(mContext).inflate(resId, contentParent);mAppCompatWindowCallback.bypassOnContentChanged(mWindow.getCallback());}这里我们可以看到关键的就是ensureSubDecor方法了,通过这个方法去创建mSubDecor,然后拿到contentParent,通过LayoutInflater.from(mContext).inflate(resId, contentParent)把我们的布局文件加到contentParent里面去。
ensureSubDecor()
private void ensureSubDecor() {if (!mSubDecorInstalled) {mSubDecor = createSubDecor();......}}在这个方法里面createSubDecor才是真正创建mSubDecor的方法:
private ViewGroup createSubDecor() {TypedArray a = mContext.obtainStyledAttributes(R.styleable.AppCompatTheme);......if (a.getBoolean(R.styleable.AppCompatTheme_windowNoTitle, false)) {requestWindowFeature(Window.FEATURE_NO_TITLE);} else if (a.getBoolean(R.styleable.AppCompatTheme_windowActionBar, false)) {// Don't allow an action bar if there is no title.requestWindowFeature(FEATURE_SUPPORT_ACTION_BAR);}......// Now let's make sure that the Window has installed its decor by retrieving itensureWindow();mWindow.getDecorView();final LayoutInflater inflater = LayoutInflater.from(mContext);ViewGroup subDecor = null;if (!mWindowNoTitle) {if (mIsFloating) {// If we're floating, inflate the dialog title decorsubDecor = (ViewGroup) inflater.inflate(R.layout.abc_dialog_title_material, null);// Floating windows can never have an action bar, reset the flagsmHasActionBar = mOverlayActionBar = false;} else if (mHasActionBar) {/*** This needs some explanation. As we can not use the android:theme attribute* pre-L, we emulate it by manually creating a LayoutInflater using a* ContextThemeWrapper pointing to actionBarTheme.*/TypedValue outValue = new TypedValue();mContext.getTheme().resolveAttribute(R.attr.actionBarTheme, outValue, true);Context themedContext;if (outValue.resourceId != 0) {themedContext = new ContextThemeWrapper(mContext, outValue.resourceId);} else {themedContext = mContext;}// Now inflate the view using the themed context and set it as the content viewsubDecor = (ViewGroup) LayoutInflater.from(themedContext).inflate(R.layout.abc_screen_toolbar, null);mDecorContentParent = (DecorContentParent) subDecor.findViewById(R.id.decor_content_parent);mDecorContentParent.setWindowCallback(getWindowCallback());/*** Propagate features to DecorContentParent*/if (mOverlayActionBar) {mDecorContentParent.initFeature(FEATURE_SUPPORT_ACTION_BAR_OVERLAY);}if (mFeatureProgress) {mDecorContentParent.initFeature(Window.FEATURE_PROGRESS);}if (mFeatureIndeterminateProgress) {mDecorContentParent.initFeature(Window.FEATURE_INDETERMINATE_PROGRESS);}}} else {if (mOverlayActionMode) {subDecor = (ViewGroup) inflater.inflate(R.layout.abc_screen_simple_overlay_action_mode, null);} else {subDecor = (ViewGroup) inflater.inflate(R.layout.abc_screen_simple, null);}}if (subDecor == null) {throw new IllegalArgumentException("AppCompat does not support the current theme features: { "+ "windowActionBar: " + mHasActionBar+ ", windowActionBarOverlay: "+ mOverlayActionBar+ ", android:windowIsFloating: " + mIsFloating+ ", windowActionModeOverlay: " + mOverlayActionMode+ ", windowNoTitle: " + mWindowNoTitle+ " }");}if (Build.VERSION.SDK_INT >= 21) {// If we're running on L or above, we can rely on ViewCompat's// setOnApplyWindowInsetsListenerViewCompat.setOnApplyWindowInsetsListener(subDecor, new OnApplyWindowInsetsListener() {@Overridepublic WindowInsetsCompat onApplyWindowInsets(View v,WindowInsetsCompat insets) {final int top = insets.getSystemWindowInsetTop();final int newTop = updateStatusGuard(insets, null);if (top != newTop) {insets = insets.replaceSystemWindowInsets(insets.getSystemWindowInsetLeft(),newTop,insets.getSystemWindowInsetRight(),insets.getSystemWindowInsetBottom());}// Now apply the insets on our viewreturn ViewCompat.onApplyWindowInsets(v, insets);}});} else if (subDecor instanceof FitWindowsViewGroup) {// Else, we need to use our own FitWindowsViewGroup handling((FitWindowsViewGroup) subDecor).setOnFitSystemWindowsListener(new FitWindowsViewGroup.OnFitSystemWindowsListener() {@Overridepublic void onFitSystemWindows(Rect insets) {insets.top = updateStatusGuard(null, insets);}});}if (mDecorContentParent == null) {mTitleView = (TextView) subDecor.findViewById(R.id.title);}// Make the decor optionally fit system windows, like the window's decorViewUtils.makeOptionalFitsSystemWindows(subDecor);final ContentFrameLayout contentView = (ContentFrameLayout) subDecor.findViewById(R.id.action_bar_activity_content);final ViewGroup windowContentView = (ViewGroup) mWindow.findViewById(android.R.id.content);if (windowContentView != null) {// There might be Views already added to the Window's content view so we need to// migrate them to our content viewwhile (windowContentView.getChildCount() > 0) {final View child = windowContentView.getChildAt(0);windowContentView.removeViewAt(0);contentView.addView(child);}// Change our content FrameLayout to use the android.R.id.content id.// Useful for fragments.windowContentView.setId(View.NO_ID);contentView.setId(android.R.id.content);// The decorContent may have a foreground drawable set (windowContentOverlay).// Remove this as we handle it ourselvesif (windowContentView instanceof FrameLayout) {((FrameLayout) windowContentView).setForeground(null);}}// Now set the Window's content view with the decormWindow.setContentView(subDecor);contentView.setAttachListener(new ContentFrameLayout.OnAttachListener() {@Overridepublic void onAttachedFromWindow() {}@Overridepublic void onDetachedFromWindow() {dismissPopups();}});return subDecor;}在这个方法里面,先拿到自定义属性,然后根据属性设置requestWindowFeature。ensureWindow()这个方法是确保mWindow变量是acticity里面的PhoneWindow:
private void ensureWindow() {// We lazily fetch the Window for Activities, to allow DayNight to apply in// attachBaseContextif (mWindow == null && mHost instanceof Activity) {attachToWindow(((Activity) mHost).getWindow());}if (mWindow == null) {throw new IllegalStateException("We have not been given a Window");}}private void attachToWindow(@NonNull Window window) {......mWindow = window;......}这边调一遍是因为在AppCompatDelegateImpl的onCreate方法里面也会调一遍ensureWindow,但不知道谁先谁后。
接下来调用mWindow.getDecorView(),这个mWindow就是PhoneWindow咯,实际上调用的是PhoneWindow的getDecorView方法:
public final @NonNull View getDecorView() {if (mDecor == null || mForceDecorInstall) {installDecor();}return mDecor;}我们发现getDecorView方法里面不正是继承Activity的时候也调用的吗?它的作用是创建一个DecorView,根据属性拿到对应的xml文件,把xml文件加载到DecorView里面去,然后再通过findViewById的方式去拿到xml里面的content赋值给mContentParent。
现在再回到createSubDecor方法里面,现在我们创建好DecorView,帮DecorView添加好布局,并且拿到了DecorView里面的content赋值给mContentParent。
接下来根据各种属性去拿subDecor对应的xml文件,我们拿一个R.layout.abc_screen_simple文件来看一下:
<androidx.appcompat.widget.FitWindowsLinearLayoutxmlns:android="http://schemas.android.com/apk/res/android"android:id="@+id/action_bar_root"android:layout_width="match_parent"android:layout_height="match_parent"android:orientation="vertical"android:fitsSystemWindows="true"><androidx.appcompat.widget.ViewStubCompatandroid:id="@+id/action_mode_bar_stub"android:inflatedId="@+id/action_mode_bar"android:layout="@layout/abc_action_mode_bar"android:layout_width="match_parent"android:layout_height="wrap_content" /><include layout="@layout/abc_screen_content_include" /></androidx.appcompat.widget.FitWindowsLinearLayout><merge xmlns:android="http://schemas.android.com/apk/res/android"><androidx.appcompat.widget.ContentFrameLayoutandroid:id="@id/action_bar_activity_content"android:layout_width="match_parent"android:layout_height="match_parent"android:foregroundGravity="fill_horizontal|top"android:foreground="?android:attr/windowContentOverlay" /></merge>接下来执行这两行代码:
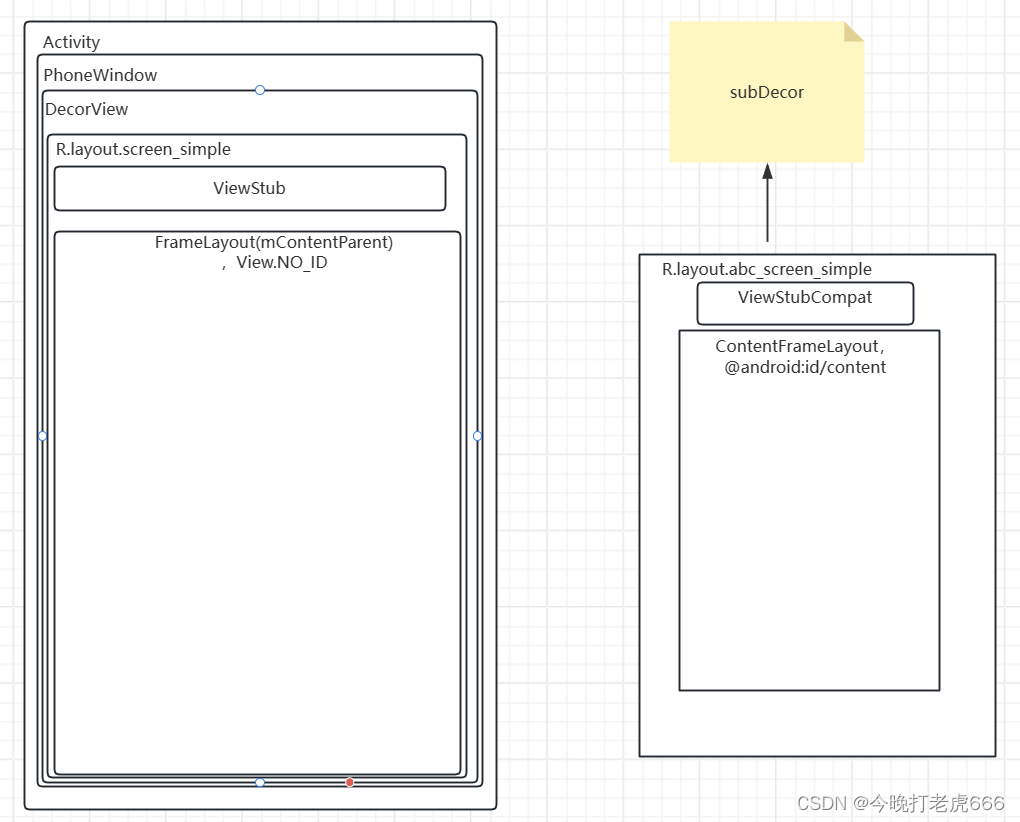
final ContentFrameLayout contentView = (ContentFrameLayout) subDecor.findViewById(R.id.action_bar_activity_content);final ViewGroup windowContentView = (ViewGroup) mWindow.findViewById(android.R.id.content);这一下我们就可以清晰的判断出contentView是R.layout.abc_screen_simple里面的ContentFrameLayout,而windowContentView是DecorView的xml的content,也是activity里面的mContentParent。
接下来做一个关键操作:
if (windowContentView != null) {// There might be Views already added to the Window's content view so we need to// migrate them to our content viewwhile (windowContentView.getChildCount() > 0) {final View child = windowContentView.getChildAt(0);windowContentView.removeViewAt(0);contentView.addView(child);}// Change our content FrameLayout to use the android.R.id.content id.// Useful for fragments.windowContentView.setId(View.NO_ID);contentView.setId(android.R.id.content);// The decorContent may have a foreground drawable set (windowContentOverlay).// Remove this as we handle it ourselvesif (windowContentView instanceof FrameLayout) {((FrameLayout) windowContentView).setForeground(null);}}这段代码里面判断DecorView的xml的content里面有没有子View,有的话全部移除,加入到contentView里面。然后把DecorView的xml的content对应的id设置为View.NO_ID,把contentView的id设置为android.R.id.content。这里其实就是把DecorView的xml的conten拥有的所以东西拿给contentView了。
接下来会调用mWindow.setContentView(subDecor):
@Overridepublic void setContentView(View view) {setContentView(view, new ViewGroup.LayoutParams(MATCH_PARENT, MATCH_PARENT));}@Overridepublic void setContentView(View view, ViewGroup.LayoutParams params) {// Note: FEATURE_CONTENT_TRANSITIONS may be set in the process of installing the window// decor, when theme attributes and the like are crystalized. Do not check the feature// before this happens.if (mContentParent == null) {installDecor();} else if (!hasFeature(FEATURE_CONTENT_TRANSITIONS)) {mContentParent.removeAllViews();}if (hasFeature(FEATURE_CONTENT_TRANSITIONS)) {view.setLayoutParams(params);final Scene newScene = new Scene(mContentParent, view);transitionTo(newScene);} else {mContentParent.addView(view, params);}mContentParent.requestApplyInsets();final Callback cb = getCallback();if (cb != null && !isDestroyed()) {cb.onContentChanged();}mContentParentExplicitlySet = true;}这时候明显mContentParent是不为空的,所以会调用mContentParent.addView(view, params),这一行代码把我们创建好的subDecor加入到DectorView的xml的content上。
接下来回到setContentView方法上面:
@Overridepublic void setContentView(int resId) {ensureSubDecor();ViewGroup contentParent = mSubDecor.findViewById(android.R.id.content);contentParent.removeAllViews();LayoutInflater.from(mContext).inflate(resId, contentParent);mAppCompatWindowCallback.bypassOnContentChanged(mWindow.getCallback());}通过findViewById的方式找到mSubDecor的xml里面的R.id.content,其实就是R.layout.abc_screen_simple里面的ContentFrameLayout,原来的id是R.id.action_bar_activity_content。
最后通过LayoutInflater.from(mContext).inflate(resId, contentParent),把我们的xml文件加载到content里面。
总结
1.创建一个AppCompatDelegateImpl
2.调用AppCompatDelegateImpl的setContentView方法里面的ensureSubDecor的createSubDecor
3.调用PhoneWindow的getDecorView的installDecor
4.给subDecor设置xml文件
5. 把DecorView的FrameLayout的id设置为View.NO_ID,subDecor的ContentFrameLayout的id设置为android.R.id.content。
6.通过调用PhoneWindow的setContentView方法,把subDecor加入到DecorView的FrameLayout中。

7.通过LayoutInflater.from(mContext).inflate(resId, contentParent),把我们的xml文件加入到content中

AppCompatActivity为什么需要对Activity的setContentView再包一层
其实一切都是为了兼容性。AppCompatActivity有自己的主题,是androidX引入的,为了兼容之前的android版本,这里使用了门面模式。
requestWindowFeature的正确设置
1.在setContentView方法后面设置窗口属性会报错
public class MainActivity2 extends Activity {@Overrideprotected void onCreate(Bundle savedInstanceState) {super.onCreate(savedInstanceState);setContentView(R.layout.activity_main);requestWindowFeature(Window.FEATURE_NO_TITLE);}}2.正常应该要这样设置,在setContentView方法前面
public class MainActivity2 extends Activity {@Overrideprotected void onCreate(Bundle savedInstanceState) {super.onCreate(savedInstanceState);requestWindowFeature(Window.FEATURE_NO_TITLE);setContentView(R.layout.activity_main);}}原因就是在PhoneWindow的requestFeature方法里面,mContentParentExplicitlySet为true的话,就会抛出异常:"requestFeature() must be called before adding content"。而mContentParentExplicitlySet这个参数在PhoneWindow的setContentView结束后就设置为true了。
@Overridepublic boolean requestFeature(int featureId) {if (mContentParentExplicitlySet) {throw new AndroidRuntimeException("requestFeature() must be called before adding content");}final int features = getFeatures();final int newFeatures = features | (1 << featureId);if ((newFeatures & (1 << FEATURE_CUSTOM_TITLE)) != 0 &&(newFeatures & ~CUSTOM_TITLE_COMPATIBLE_FEATURES) != 0) {// Another feature is enabled and the user is trying to enable the custom title feature// or custom title feature is enabled and the user is trying to enable another featurethrow new AndroidRuntimeException("You cannot combine custom titles with other title features");}if ((features & (1 << FEATURE_NO_TITLE)) != 0 && featureId == FEATURE_ACTION_BAR) {return false; // Ignore. No title dominates.}if ((features & (1 << FEATURE_ACTION_BAR)) != 0 && featureId == FEATURE_NO_TITLE) {// Remove the action bar feature if we have no title. No title dominates.removeFeature(FEATURE_ACTION_BAR);}if (featureId == FEATURE_INDETERMINATE_PROGRESS &&getContext().getPackageManager().hasSystemFeature(PackageManager.FEATURE_WATCH)) {throw new AndroidRuntimeException("You cannot use indeterminate progress on a watch.");}return super.requestFeature(featureId);}3.继承自AppCompatActivity需要使用supportRequestWindowFeature
相关文章:
Android的setContentView流程
一.Activity里面的mWindow是啥 在ActivityThread的performLaunchActivity方法里面: private Activity performLaunchActivity(ActivityClientRecord r, Intent customIntent) {ActivityInfo aInfo r.activityInfo;if (r.packageInfo null) {r.packageInfo getP…...

【加速排坑】docker设置国内image镜像源
第零步,查看阿里最新的镜像源:https://cr.console.aliyun.com/cn-hangzhou/instances/mirrors 第一步:在/etc/docker/daemon.json中添加镜像源 sudo mkdir -p /etc/docker sudo tee /etc/docker/daemon.json <<-EOF {"registry-m…...
el-table嵌套两层el-dropdown-menu导致样式错乱
问题: 解决方式: <el-table-column label"操作" fixed"right" width"132" align"center"><template slot-scope"scope"><div v-if"scope.row._index ! 合计"><el-d…...

自动化测试:fixture学得好,Pytest测试框架用到老
在pytest中,fixture是一种非常有用的特性,它允许我们在测试函数中注入数据或状态,以便进行测试。而参数化则是fixture的一个特性,它允许我们将不同的数据传递给fixture,从而进行多次测试。 本文将介绍如何在pytest中使…...

Linux上常用网络操作
主机名配置 hostname 查看主机名 hostname xxx 修改主机名 重启后无效 如果想要永久生效,可以修改/etc/sysconfig/network文件 IP地址配置 ifconfig 查看(修改)ip地址(重启后无效) ifconfig eth0 192.168.12.22 修改ip地址 如果想要永久生效,修改 /etc/sysco…...
POI:对Excel的基本读操作 整理2
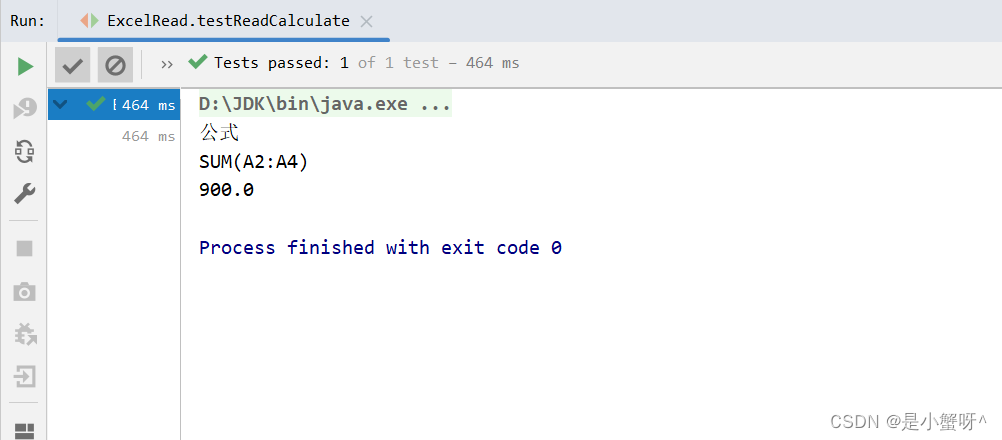
1 简单读取操作 public class ExcelRead {String PATH "D:\\Idea-projects\\POI\\POI_projects";// 读取的一系列方法// ...... } 因为07版本和03版本操作流程大差不差,所以这边就以03版本为例 Testpublic void testRead03() throws IOException {//获取…...

LeetCode每周五题_2024/01/15~01/19
文章目录 82. 删除排序链表中的重复元素 II题目题解 2744. 最大字符串配对数目题目题解 82. 删除排序链表中的重复元素 II 82. 删除排序链表中的重复元素 II 题目 给定一个已排序的链表的头 head , 删除原始链表中所有重复数字的节点,只留下不同的数字…...

免费chartGPT网站汇总
https://s.suolj.com - (支持文心、科大讯飞、智谱等国内大语言模型,Midjourney绘画、语音对讲、聊天插件)国内可以直连,响应速度很快 很稳定 https://seboai.github.io - 国内可以直连,响应速度很快 很稳定 http://gp…...
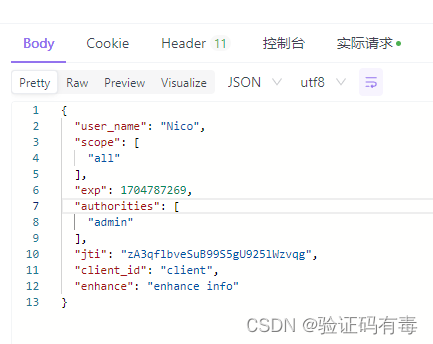
【分布式微服务专题】SpringSecurity OAuth2快速入门
目录 前言阅读对象阅读导航前置知识笔记正文一、OAuth2 介绍1.1 使用场景*1.2 基本概念(角色)1.3 优缺点 二、OAuth2的设计思路2.1 客户端授权模式2.1.0 基本参数说明2.1.1 授权码模式2.1.2 简化(隐式)模式2.1.3 密码模式2.1.4 客…...

Spring Boot实现国际化
src\main\resources\i18n\messages_zh_CN.properties message.hello你好,世界! message.welcome欢迎! src/main/resources/i18n/messages_en_US.properties message.helloHello World! message.welcomeWelcome! 默认语言 src\main\resources\…...

面试题之ElasticSearch
面试题之ElasticSearch 1.es的基础知识2. es的集群、节点、分片、副本分片的定义?3. es为什么快?4. 倒排索引的原理是什么?5. es的segment是什么?6. es的分段存储和分段索引的概念及区别?7. 索引相关的问题?…...
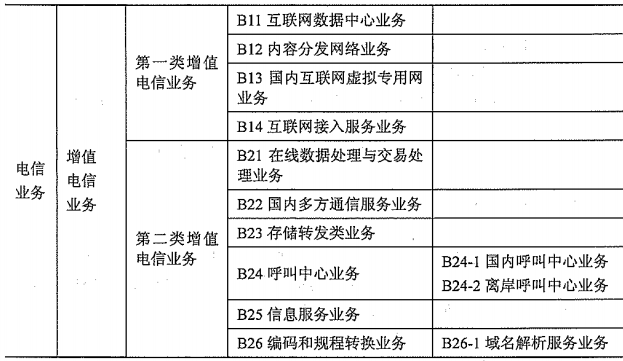
第10章 通信业务
文章目录 10.1.1 通信行业1、通信行业的界定2、通信行业的特点 10.1.2 通信企业10.1.3 通信终端1、通信终端的分类2、终端发展趋势 10.2.1 通信业务的定义及分类10.2.2 基础电信业务1、第一类基础电信业务A11 固定通信业务A12 蜂窝移动通信业务A13 第一类卫星通信业务A14 第一类…...

c++ 指针的安全问题
指针是一个强大的工具,但它们可能导致多种安全问题。接下来我们一起研究一下会出现的安全问题。欢迎大家补充说明!!! 悬挂指针(也称为悬空指针或迷途指针) 是指向一块已经释放或无效内存的指针。悬挂指针…...
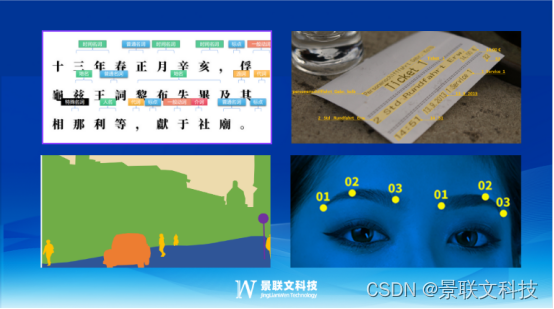
高质量训练数据助力大语言模型摆脱数据困境 | 景联文科技
目前,大语言模型的发展已经取得了显著的成果,如OpenAI的GPT系列模型、谷歌的BERT模型、百度的文心一言模型等。这些模型在文本生成、问答系统、对话生成、情感分析、摘要生成等方面都表现出了强大的能力,为自然语言处理领域带来了新的突破。 …...

elasticsearch查询
(1)简单查询 curl -XGET http://127.0.0.1:9201/_search curl -XGET http://127.0.0.1:9201/test231208/_search curl -XGET http://127.0.0.1:9201/test231208/_doc/_search curl -XGET http://127.0.0.1:9201/test231208/_doc/id (2&…...
Vue + JS + tauri 开发一个简单的PC端桌面应用程序
Vue JS tauri 开发一个简单的PC端桌面应用程序 文章目录 Vue JS tauri 开发一个简单的PC端桌面应用程序1. 环境准备1.1 安装 Microsoft Visual Studio C 生成工具[^2]1.2 安装 Rust[^3] 2. 使用 vite 打包工具创建一个 vue 应用2.1 使用Vite创建前端Vue项目2.2 更改Vite打包…...
7.5 MySQL对数据的增改删操作(❤❤❤)
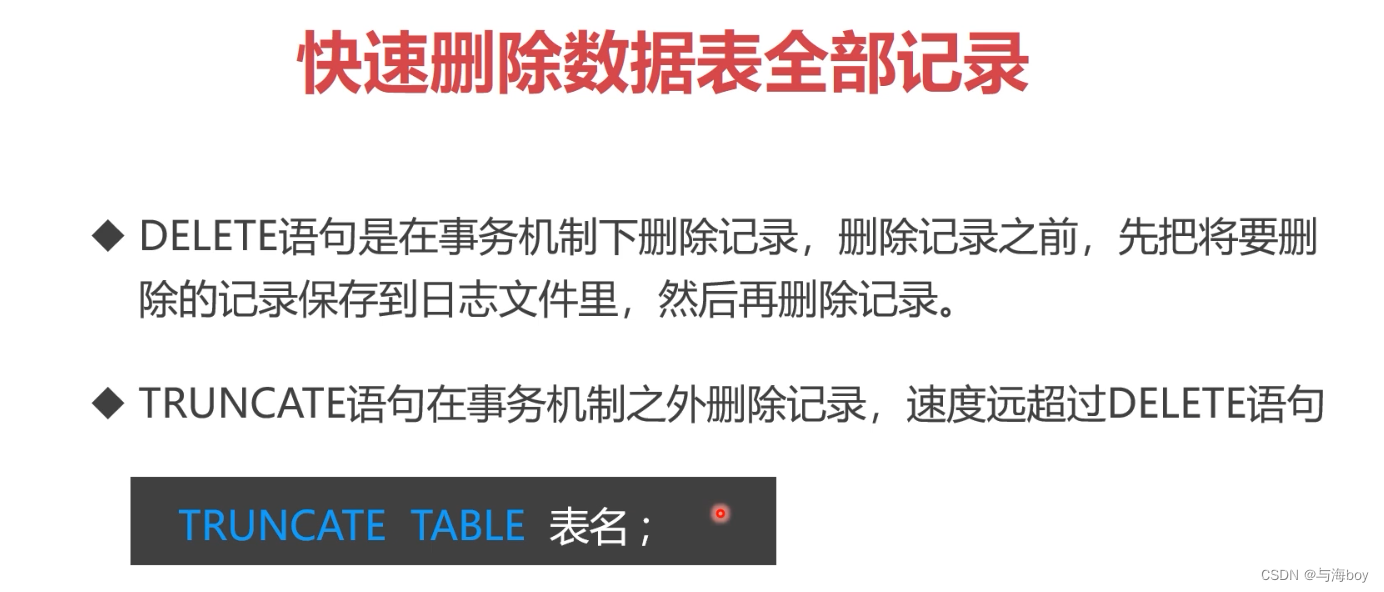
7.5 MySQL对数据的基本操作 1. 提要2. 数据添加2.1 insert语法2.2 insert 子查询2.3 ignore关键字 3. 数据修改3.1 update语句3.2 update表连接 4. 数据删除4.1 delete语句4.2 delete表连接4.3 快速删除数据表全部数据 1. 提要 2. 数据添加 2.1 insert语法 2.2 insert 子查询 …...

kibana查看和展示es数据
本文来说下使用kibana查看和展示es数据 文章目录 数据准备查询所有文档示例kibana查看和展示es数据 数据准备 可以使用es的命令或者java程序来往,es进行新增数据 查询所有文档示例 在 apifox 中,向 ES 服务器发 GET请求 :http://localhost:92…...

若依修改侧边栏
引用:https://blog.csdn.net/Sabrina_cc/article/details/125871591 子菜单选中后,文字和背景改变: .el-submenu__title i{color: #e8e8e8 !important;} #app .sidebar-container .theme-dark .nest-menu .el-submenu .is-active > .el-su…...

Linux篇之Centos中将系统时间设置为本地时间
要在 CentOS 上将系统时间设置为本地时间,可以按照以下步骤进行操作: 1.首先,你需要确定你想要设置的本地时间。例如,如果你想要将系统时间设置为当前时间(假设是北京时间),则可以使用以下命令获…...

为什么你的Windows快捷键突然失效?Hotkey Detective一键定位占用程序终极指南
为什么你的Windows快捷键突然失效?Hotkey Detective一键定位占用程序终极指南 【免费下载链接】hotkey-detective A small program for investigating stolen key combinations under Windows 7 and later. 项目地址: https://gitcode.com/gh_mirrors/ho/hotkey-d…...

转行简历不会衔接?AI一键生成,自然过渡无违和感,邀约率飙升3倍!
“我以前是做销售的,想转行产品经理,简历上怎么写才能不让HR觉得我风马牛不相及?” “干了几年运营,现在想尝试开发,简历里除了写熟悉Word、Excel,还能写啥?” “裸辞转行,简历一片…...

为什么92%的NotebookLM项目在第3轮迭代后风格失控?——基于17个真实客户日志的归因分析与防御协议
更多请点击: https://intelliparadigm.com 第一章:为什么92%的NotebookLM项目在第3轮迭代后风格失控?——基于17个真实客户日志的归因分析与防御协议 在对17个企业级NotebookLM部署案例进行全链路日志回溯后,我们发现一个高度一致…...

PddConsumptionModel.java
package pdd;import java.util.ArrayList; import java.util.List; import java.util.Random;/*** 某多多的商业模式,砍价格算法模拟下哈* * * author ZengWenFeng* email 117791303QQ.com* mobile 13805029595* date 2023.11.17*/ public class PddConsumptionMode…...

TI MSPM0G3105-Q1汽车MCU实战解析:从核心特性到硬件设计
1. 项目概述:为什么是MSPM0G3105-Q1?在汽车电子和工业控制领域摸爬滚打十几年,我经手过的MCU型号少说也有几十款。每次启动一个新项目,选型都是头等大事,它直接决定了后续开发的难易度、系统的稳定性和最终产品的成本。…...

后端架构:事件驱动架构设计与实现
后端架构:事件驱动架构设计与实现 大家好,我是欧阳瑞(Rich Own)。今天想和大家聊聊事件驱动架构这个重要话题。作为一个全栈开发者,事件驱动架构已经成为现代后端系统的重要设计模式。今天就来分享一下事件驱动架构的设…...

Nginx慢速HTTP攻击防护:超时配置与内核级加固实战
1. 这不是误报:当Nginx日志里反复出现“client timed out”时,你面对的已是真实攻击面“检测到目标主机可能存在缓慢的HTTP拒绝服务攻击”——这条告警在安全扫描报告里出现时,很多运维同学第一反应是:又一个误报。毕竟Nginx跑得稳…...

OPD为何如此高效?中科大揭开参数动力学密码,后训练提速3倍
只跑到约 10% 训练进度,OPD 已能恢复约 80% 的最终推理性能,EffOPD 顺势把后训练提速到约 3 倍。虽然 LLMs 的推理能力依靠强化学习(RL)得到了大幅提升,但 RL 训练过程往往漫长、昂贵且充满试错;同时&#…...

如何为Hermes Agent自定义配置Taotoken作为模型提供商
🚀 告别海外账号与网络限制!稳定直连全球优质大模型,限时半价接入中。 👉 点击领取海量免费额度 如何为Hermes Agent自定义配置Taotoken作为模型提供商 对于使用Hermes Agent框架的开发者而言,直接对接多个大模型厂商…...

利用 AI Agent 优化日常办公自动化流程
AI Agent优化办公自动化流程的核心逻辑是「人定规则,AI跑流程」,通过把重复、步骤明确的工作交给AI Agent自主执行,实现提效降本,具体可以按照以下方法落地:一、先明确落地逻辑把目标工作拆成「触发条件→执行步骤→…...