学习Android的第二十天
目录
Android Toast 吐司
常量
常用方法
例子
Android Notification 状态栏通知
Notification 的基本布局
扩展布局
Notification ( 状态栏通知 )
相关的方法
例子:
参考文档
Android AlertDialog 弹出框
Android Dialog 继承图谱
AlertDialog
几种常用的对话框
普通对话框例子
普通列表对话框例子
单选列表对话框例子
多选列表对话框例子
参考文档
Android Toast 吐司
Android 中的 Toast 是一种轻量级的消息提示框,用于在屏幕上显示简短的通知消息,通常用于向用户提供一些临时性的信息反馈。Toast 不包含任何按钮,也不需要用户交互,它会在屏幕上显示一段时间后自动消失。而且Toast 是为数不多的没有 XML 创建代码的 UI 控件。
常量
在 Android 中,Toast 类定义了两个常量 LENGTH_LONG 和 LENGTH_SHORT,用于表示 Toast 消息显示的持续时间。这两个常量分别表示显示较长时间和显示较短时间。
- LENGTH_LONG 表示 Toast 消息将会显示较长时间。
- LENGTH_SHORT 表示 Toast 消息将会显示较短时间。
可以根据自己的需要选择适当的持续时间来显示 Toast 消息。除了使用这两个常量外,你也可以使用 Toast.setDuration(int duration) 方法来自定义持续时间,传入的参数是以毫秒为单位的时间值。
常用方法
- void cancel(): 如果 Toast 已经显示,则关闭 Toast,如果 Toast 还未显示,则取消显示。
- void show(): 显示 Toast 消息。
- int getDuration(): 返回当前 Toast 消息的持续时间。
- int getGravity(): 获取 Toast 应显示在屏幕上的位置。
- float getHorizontalMargin(): 返回水平边距。
- float getVerticalMargin(): 返回垂直边距。
- View getView(): 返回 Toast 的 View。
- int getXOffset(): 以像素为单位返回 X 偏移量。
- int getYOffset(): 以像素为单位返回 Y 偏移量。
- static Toast makeText(Context context, int resId, int duration): 创建 Toast 用于显示给定的资源。
- static Toast makeText(Context context, CharSequence text, int duration): 创建 Toast 用于显示给定的文本。
- void setDuration(int duration): 设置 Toast 的显示时间。
- void setGravity(int gravity, int xOffset, int yOffset): 设置 Toast 在屏幕上显示的位置。
- void setMargin(float horizontalMargin, float verticalMargin): 设置视图的边距。
- void setText(int resId): 用一个资源更新 Toast 要显示的文本或资源。
- void setText(CharSequence s): 用一段文本更新 Toast 要显示的文本或资源。
- void setView(View view): 设置要显示的视图。
例子
package com.example.myapplication;import android.content.Context;
import android.os.Bundle;
import android.view.Gravity;
import android.widget.TextView;
import android.widget.Toast;import androidx.appcompat.app.AppCompatActivity;public class MainActivity extends AppCompatActivity {@Overrideprotected void onCreate(Bundle savedInstanceState) {super.onCreate(savedInstanceState);setContentView(R.layout.activity_main);// 创建并显示一个简单的 Toast 消息showToast("这是一个简单的 Toast 消息");// 创建并显示一个自定义位置和持续时间的 Toast 消息showToastCustom("这是一个自定义位置和持续时间的 Toast 消息", Gravity.TOP | Gravity.CENTER_HORIZONTAL, Toast.LENGTH_LONG);// 创建并显示一个包含自定义视图的 Toast 消息showCustomViewToast();}// 创建并显示一个简单的 Toast 消息private void showToast(String message) {Toast.makeText(this, message, Toast.LENGTH_SHORT).show();}// 创建并显示一个自定义位置和持续时间的 Toast 消息private void showToastCustom(String message, int gravity, int duration) {Toast toast = Toast.makeText(this, message, duration);toast.setGravity(gravity, 0, 0);toast.show();}// 创建并显示一个包含自定义视图的 Toast 消息private void showCustomViewToast() {Toast toast = new Toast(this);toast.setDuration(Toast.LENGTH_SHORT);// 创建一个 TextView 作为 Toast 的视图TextView textView = new TextView(this);textView.setText("自定义视图的 Toast 消息");textView.setBackgroundColor(getResources().getColor(android.R.color.holo_blue_light));textView.setTextColor(getResources().getColor(android.R.color.white));textView.setPadding(20, 20, 20, 20);toast.setView(textView);toast.show();}
}
Android Notification 状态栏通知
通知栏通知(Notification)在现代智能手机中非常常见,用户经常会从屏幕顶部往下滑,查看通知的内容。通知栏通知是一种用于向用户显示重要信息或提醒的方式,通常用于显示来自应用程序的消息、提醒、更新等。
通过通知栏通知,用户可以方便地了解到新的消息、事件或提醒,而不必打开应用程序。通知通常包括标题、内容、图标以及可能的操作按钮,用户可以通过点击通知来执行相应的操作,比如打开应用程序、查看详细信息等。
通知栏通知在移动应用程序中的应用非常广泛,例如社交应用程序、邮件应用程序、新闻应用程序等,都会使用通知来及时通知用户相关信息。它是一种非常重要的用户交互方式,能够提高用户体验,并使用户更容易地与应用程序进行互动。
Notification 的基本布局
通知(Notification)的基本布局通常包括以下组成元素:
- Icon/Photo(大图标):通知的大图标,用于表示通知的来源或者类型。通常是应用程序的图标或者相关图片。
- Title/Name(标题):通知的标题,用于简要描述通知的内容或者来源。通常会放置在通知的顶部。
- Message(内容信息):通知的详细内容或者信息。通常是通知的主要内容,可以是文本、图片、链接等。
- Timestamp(通知时间):通知的时间戳,即通知被创建或发送的时间。默认情况下,通知的时间是通知被创建的时间,但也可以通过 setWhen() 方法来设置自定义的时间。
- Secondary Icon(小图标):通知中的一个较小的图标,通常用于补充说明或者表示附加信息。比如,通知来自某个应用程序,小图标可能是该应用程序的标志性图标。
- 内容文字:在小图标的左侧或者上方的一个文字,用于描述通知的附加信息,例如通知的类别或者状态等。
扩展布局
在 Android 中,通知可以使用扩展布局来显示更多内容,包括消息的前几行或者图片的预览,从而让用户能够在通知栏中更方便地浏览更多信息。
Android 提供了两种常见的扩展布局供开发者使用:
-
文本扩展布局:文本扩展布局允许在通知中显示更多的文字内容。通过文本扩展布局,你可以展示更多的消息内容,让用户在通知栏中浏览到整个消息的内容或者更多的相关信息。
-
图像扩展布局:图像扩展布局允许在通知中显示图片的预览。通过图像扩展布局,你可以在通知中显示图片的缩略图或者预览图,让用户能够在通知栏中快速浏览到图片内容。
Notification ( 状态栏通知 )
在 Android 中,状态栏通知主要涉及到两个类:Notification 和 NotificationManager。
- Notification(通知信息类):Notification 类用于定义通知的各种属性,包括通知的图标、标题、内容、声音、震动、点击行为等。通过设置 Notification 对象的属性,开发者可以创建具有不同特性和行为的通知。Notification 类中的属性对应着通知栏的各个部分,可以通过构建一个 Notification 对象来创建一条通知。
- NotificationManager(状态栏通知管理类):NotificationManager 类是用于管理状态栏通知的管理类,负责发出通知、更新通知、清除通知等操作。开发者通过 NotificationManager 对象来发送创建好的通知,并对通知进行管理。通常,每个应用程序都有自己的 NotificationManager 实例,用于管理其自己的通知。
以下是这两个类的主要作用:
Notification 类:
- 用于定义通知的各种属性,如图标、标题、内容等。
- 可以设置通知的行为,如点击通知时打开某个 Activity 或者执行某个 Intent。
- 通过创建 Notification 对象,可以构建具体的通知内容。
NotificationManager 类:
- 用于发出通知,即将创建好的通知显示在状态栏上。
- 可以更新已有的通知,例如更改通知的内容、图标等。
- 可以取消通知,即清除状态栏上的通知。
使用的基本流程
1、获取 NotificationManager 对象:
NotificationManager notificationManager = (NotificationManager) getSystemService(Context.NOTIFICATION_SERVICE);
2、创建 Notification.Builder 对象:
Notification.Builder builder = new Notification.Builder(context);
3、设置通知的属性:通过 Notification.Builder 对象设置通知的各种属性,如标题、内容、图标、声音、震动、点击行为等。例如:
builder.setContentTitle("标题").setContentText("内容").setSmallIcon(R.drawable.icon).setAutoCancel(true); // 点击通知后自动取消通知
4、构建 Notification 对象:
Notification notification = builder.build();
5、发送通知:使用 NotificationManager 对象的 notify() 方法发送通知。指定一个唯一的通知 ID,以便后续对该通知进行更新或取消。
int notificationId = 1;  // 通知 ID
notificationManager.notify(notificationId, notification);
6、取消通知:如果需要取消通知,可以调用 NotificationManager 对象的 cancel() 方法,并传入对应的通知 ID。
notificationManager.cancel(notificationId);
相关的方法
1、setContentTitle(CharSequence): 设置通知标题。
2、setContentText(CharSequence): 设置通知内容。
3、setSubText(CharSequence): 设置通知的额外小行文字(API 16+才可用)。
4、setTicker(CharSequence): 设置通知到达时在顶部显示的文字信息。
5、setWhen(long): 设置通知时间,通常使用当前系统时间。
6、setSmallIcon(int): 设置通知右下角的小图标,同时通知栏的左侧也会显示这个小图标。
7、setLargeIcon(Bitmap): 设置通知左侧的大图标。
8、setAutoCancel(boolean): 设置是否点击通知后自动取消通知(默认不取消)。
9、setDefaults(int): 用于向通知添加默认的提醒效果,包括声音、闪灯和振动。你可以通过组合多个属性来设置通知的默认提醒效果。以下是可用的默认属性:
- Notification.DEFAULT_VIBRATE: 添加默认的振动提醒。
- Notification.DEFAULT_SOUND: 添加默认的声音提醒。
- Notification.DEFAULT_LIGHTS: 添加默认的三色灯提醒。
- Notification.DEFAULT_ALL: 添加默认的以上三种全部提醒效果。
10、setVibrate(long[]): 用于设置通知的振动方式。
传入一个 long 类型的数组作为参数,数组中的元素依次表示振动的延迟时间和振动持续时间。数组中的第一个元素表示振动开始之前的延迟时间,后续的元素交替表示振动持续时间和停止时间。
比如:
builder.setVibrate(new long[] {0, 300, 500, 700});这样设置后,当通知到达时,会按照指定的振动方式进行振动,即先延迟 0 毫秒,然后振动 300 毫秒,接着延迟 500 毫秒,最后振动 700 毫秒。
11、setLights(int argb, int onMs, int offMs): 设置通知的三色灯效果。参数依次是:灯光的颜色(以 ARGB 格式表示),亮的持续时间(以毫秒为单位),暗的持续时间(以毫秒为单位)。
- argb:灯光的颜色,使用 ARGB 格式表示,即一个 32 位的颜色值,其中包括透明度(A)、红色(R)、绿色(G)和蓝色(B)分量。
- onMs:灯光亮起的持续时间,以毫秒为单位。
- offMs:灯光暗下去的持续时间,以毫秒为单位。
需要注意的是,并不是所有的颜色都能够被所有的设备所支持。有些设备可能不带有三色灯,或者只支持特定颜色。另外,一些设备可能会忽略一些颜色分量,只显示红色和绿色,而忽略蓝色分量。
此外,要使三色灯提醒生效,还需要为 Notification 设置 flags 为 Notification.FLAG_SHOW_LIGHTS。这样才能确保通知到达时三色灯会亮起提醒用户。
比如:
builder.setLights(Color.RED, 1000, 1000);这样设置后,当通知到达时,设备的三色灯会以红色亮起,每次亮起持续 1000 毫秒,然后熄灭 1000 毫秒,以此重复。
12、setSound(Uri): 设置接收到通知时的铃声。你可以使用系统默认的铃声,也可以自定义铃声。
以下是几种常见的设置方式:
- 获取默认铃声:你可以使用 setDefaults(Notification.DEFAULT_SOUND) 来设置通知的默认铃声。这将使用系统默认的铃声来提醒用户。
- 获取自定义铃声:如果你有自定义的铃声文件,你可以通过指定铃声文件的 Uri 来设置通知的铃声。例如:builder.setSound(Uri.parse("file:///sdcard/xx/xx.mp3"));
- 获取 Android 多媒体库内的铃声:也可以从 Android 多媒体库内获取铃声。例如,使用 Uri.withAppendedPath(Audio.Media.INTERNAL_CONTENT_URI, "5") 来获取多媒体库中的第五个铃声。
13、setOngoing(boolean): 设置通知是否为一个正在进行的通知。当参数为 true 时,表示该通知是一个正在进行的通知,通常用于表示用户正在进行的任务或者需要持续显示在通知栏中的通知,例如音乐播放器的通知、正在进行的文件下载、同步操作或者主动网络连接等。
通常情况下,正在进行的通知会显示在通知栏的顶部,不会被用户手动清除,直到相应的任务完成或者用户主动取消。这样可以确保用户可以随时了解到当前任务的状态,而不会因为误操作或者其他原因而意外关闭通知。
14、setProgress(int, int, boolean): 用于设置通知中的进度条。该方法的参数依次为:进度条的最大数值、当前进度以及进度条是否为不确定的。
- max:进度条的最大数值。
- progress:当前的进度值。
- indeterminate:进度条是否为不确定的。如果为 true,则表示进度条为不确定的;如果为 false,则表示进度条为确定的。
当进度条为确定的时候,通常用于表示一个正在进行的任务的进度。你可以调用 setProgress(max, progress, false) 来设置通知的进度条,并在任务进行中不断更新进度值,直到任务完成后移除进度条。
当进度条为不确定的时候,通常用于表示一个持续活动正在进行中,但无法准确获知进度的情况。你可以调用 setProgress(0, 0, true) 来设置通知的进度条为不确定的,在操作结束时调用 setProgress(0, 0, false) 并更新通知以移除进度条。
15、setContentIntent(PendingIntent): 用于设置通知的点击行为,即当用户点击通知时将要执行的操作。通常情况下,会使用 PendingIntent 来启动一个 Activity、Service 或者 Broadcast。PendingIntent 相比于直接使用 Intent,它可以设置执行次数,主要用于远程服务通信、闹铃、通知、启动器、短信等场景。
启动 Activity:使用 PendingIntent.getActivity() 方法来获取 PendingIntent,其中第四个参数表示 PendingIntent 的位标识符,可以使用以下值之一:
- FLAG_ONE_SHOT: 表示返回的 PendingIntent 仅能执行一次,执行完后自动取消。
- FLAG_NO_CREATE: 表示如果描述的 PendingIntent 不存在,则不创建相应的 PendingIntent,而是返回 null。
- FLAG_CANCEL_CURRENT: 表示相应的 PendingIntent 已经存在,则取消前者,然后创建新的 PendingIntent。
- FLAG_UPDATE_CURRENT: 表示更新 PendingIntent。
16、setPriority(int): 设置通知的优先级。根据通知的重要性和紧急程度,你可以选择不同的优先级来提醒用户。
以下是几种常见的优先级:
- Notification.PRIORITY_MAX:用于表示重要且紧急的通知,通知用户这个事件是时间上紧迫的或者需要立即处理的。
- Notification.PRIORITY_HIGH:用于重要的通信内容,例如短消息或者聊天,这些都是对用户来说比较有兴趣的。
- Notification.PRIORITY_DEFAULT:默认优先级,用于没有特殊优先级分类的通知。
- Notification.PRIORITY_LOW:用于通知用户但不是很紧急的事件。
- Notification.PRIORITY_MIN:用于后台消息,例如天气或者位置信息。最低优先级通知将只在状态栏显示图标,只有用户下拉通知抽屉才能看到内容。
例子:
1、修改activity_main.xml
<?xml version="1.0" encoding="utf-8"?>
<LinearLayout xmlns:android="http://schemas.android.com/apk/res/android"android:layout_width="match_parent"android:layout_height="match_parent"xmlns:tools="http://schemas.android.com/tools"android:orientation="vertical"android:gravity="center"tools:context=".MainActivity"><Buttonandroid:id="@+id/btn_show_notification"android:layout_width="wrap_content"android:layout_height="wrap_content"android:text="弹出通知"/><Buttonandroid:id="@+id/btn_clear_notification"android:layout_width="wrap_content"android:layout_height="wrap_content"android:text="清除通知"android:layout_marginTop="16dp"/>
</LinearLayout>
2、修改MainActivity.java
package com.example.myapplication;import android.app.NotificationChannel;
import android.app.NotificationManager;
import android.app.PendingIntent;
import android.content.Intent;
import android.os.Build;
import android.os.Bundle;
import android.view.View;
import android.widget.Button;
import androidx.appcompat.app.AppCompatActivity;
import androidx.core.app.NotificationCompat;public class MainActivity extends AppCompatActivity {private static final String CHANNEL_ID = "my_channel_id";private static final int NOTIFICATION_ID = 1;@Overrideprotected void onCreate(Bundle savedInstanceState) {super.onCreate(savedInstanceState);setContentView(R.layout.activity_main);createNotificationChannel();Button btnShowNotification = findViewById(R.id.btn_show_notification);Button btnClearNotification = findViewById(R.id.btn_clear_notification);btnShowNotification.setOnClickListener(new View.OnClickListener() {@Overridepublic void onClick(View v) {showNotification();}});btnClearNotification.setOnClickListener(new View.OnClickListener() {@Overridepublic void onClick(View v) {clearNotification();}});}private void createNotificationChannel() {if (Build.VERSION.SDK_INT >= Build.VERSION_CODES.O) {CharSequence name = getString(R.string.channel_name);String description = getString(R.string.channel_description);int importance = NotificationManager.IMPORTANCE_DEFAULT;NotificationChannel channel = new NotificationChannel(CHANNEL_ID, name, importance);channel.setDescription(description);NotificationManager notificationManager = getSystemService(NotificationManager.class);notificationManager.createNotificationChannel(channel);}}private void showNotification() {Intent intent = new Intent(this, TargetActivity.class);PendingIntent pendingIntent = PendingIntent.getActivity(this, 0, intent, PendingIntent.FLAG_IMMUTABLE);NotificationCompat.Builder builder = new NotificationCompat.Builder(this, CHANNEL_ID).setSmallIcon(R.drawable.meimei).setContentTitle("我的通知").setContentText("点击查看详情").setContentIntent(pendingIntent).setAutoCancel(true);NotificationManager notificationManager = getSystemService(NotificationManager.class);notificationManager.notify(NOTIFICATION_ID, builder.build());}private void clearNotification() {NotificationManager notificationManager = getSystemService(NotificationManager.class);notificationManager.cancel(NOTIFICATION_ID);}
}
3、创建TargetActivity.java
package com.example.myapplication;import android.os.Bundle;
import androidx.appcompat.app.AppCompatActivity;public class TargetActivity extends AppCompatActivity {@Overrideprotected void onCreate(Bundle savedInstanceState) {super.onCreate(savedInstanceState);setContentView(R.layout.activity_target);}
}
4、创建activity_target.xml
<?xml version="1.0" encoding="utf-8"?>
<LinearLayout xmlns:android="http://schemas.android.com/apk/res/android"android:layout_width="match_parent"android:layout_height="match_parent"android:orientation="vertical" ><TextViewandroid:id="@+id/notify_detail"android:layout_width="match_parent"android:layout_height="wrap_content"android:text="这是通知详情页" /></LinearLayout>
5、更新AndroidManifest.xml
<application...><activity android:name=".MainActivity"><intent-filter><action android:name="android.intent.action.MAIN"/><category android:name="android.intent.category.LAUNCHER"/></intent-filter></activity><activity android:name=".TargetActivity"></activity></application>现在,当用户点击“弹出通知”按钮时,应用会创建并显示一个通知。用户点击这个通知后,应用会打开TargetActivity页面。点击“清除通知”按钮则会移除已显示的通知。
参考文档
-
设计思想 : Notifications in Android 4.4 and Lower
-
API文档 : Notification
-
Notification.Builder 官方 API 文档
Android AlertDialog 弹出框
在Android开发中,AlertDialog是一种弹出框(对话框),用于显示信息、提示用户决策或收集用户输入。它可以包含标题、内容、按钮(如确认、取消)等元素。
Android Dialog 继承图谱
在Android中,Dialog是一个基本的类,用于创建各种类型的对话框。Dialog类位于android.app包中。有几个常用的对话框类都是直接或间接地继承自Dialog类。下面是一个简化的继承图谱,展示了Dialog类及其一些重要的子类和相关类:
android.content.DialogInterface
└── android.app.Dialog└── android.app.AlertDialog├── android.app.DatePickerDialog├── android.app.TimePickerDialog└── android.app.ProgressDialog (APl26+,已废弃)
AlertDialog
AlertDialog在Android中是一个特殊的UI组件,它的创建和使用方式与大多数其他UI控件有所不同。AlertDialog不能直接通过new关键字实例化,也不能在XML布局文件中定义。相反,我们使用AlertDialog的一个内部类,即AlertDialog.Builder,来构建和配置对话框。这种设计模式称为建造者模式(Builder Pattern),它可以帮助我们以更流畅和灵活的方式构建复杂对象。
几种常用的对话框
- 普通对话框
- 普通列表对话框
- 单选列表对话框
- 多选列表对话框
普通对话框例子
<?xml version="1.0" encoding="utf-8"?>
<LinearLayout xmlns:android="http://schemas.android.com/apk/res/android"android:layout_width="match_parent"android:layout_height="match_parent"xmlns:tools="http://schemas.android.com/tools"android:orientation="vertical"android:gravity="center"tools:context=".MainActivity"><Buttonandroid:id="@+id/showDialogButton"android:layout_width="wrap_content"android:layout_height="wrap_content"android:text="显示对话框"android:layout_centerInParent="true" />
</LinearLayout>
package com.example.myapplication;import android.content.DialogInterface;
import android.os.Bundle;
import androidx.appcompat.app.AlertDialog;
import androidx.appcompat.app.AppCompatActivity;
import android.view.View;
import android.widget.Button;
import android.widget.Toast;public class MainActivity extends AppCompatActivity {@Overrideprotected void onCreate(Bundle savedInstanceState) {super.onCreate(savedInstanceState);setContentView(R.layout.activity_main);Button showDialogButton = findViewById(R.id.showDialogButton);showDialogButton.setOnClickListener(new View.OnClickListener() {@Overridepublic void onClick(View v) {AlertDialog.Builder builder = new AlertDialog.Builder(MainActivity.this);builder.setTitle("确认操作");builder.setMessage("你确定要执行这个操作吗?");builder.setPositiveButton("确定", new DialogInterface.OnClickListener() {@Overridepublic void onClick(DialogInterface dialog, int which) {// 用户点击“确定”按钮的操作Toast.makeText(MainActivity.this, "操作已确认!", Toast.LENGTH_SHORT).show();}});builder.setNegativeButton("取消", null); // 点击“取消”按钮不做任何事情builder.show();}});}
}
普通列表对话框例子
<?xml version="1.0" encoding="utf-8"?>
<LinearLayout xmlns:android="http://schemas.android.com/apk/res/android"android:layout_width="match_parent"android:layout_height="match_parent"xmlns:tools="http://schemas.android.com/tools"android:orientation="vertical"android:gravity="center"tools:context=".MainActivity"><Buttonandroid:id="@+id/button_show_list_dialog"android:layout_width="wrap_content"android:layout_height="wrap_content"android:text="显示列表对话框"android:layout_centerInParent="true"/>
</LinearLayout>
package com.example.myapplication;import android.os.Bundle;
import androidx.appcompat.app.AlertDialog;
import androidx.appcompat.app.AppCompatActivity;
import android.view.View;
import android.widget.Button;
import android.widget.Toast;public class MainActivity extends AppCompatActivity {@Overrideprotected void onCreate(Bundle savedInstanceState) {super.onCreate(savedInstanceState);setContentView(R.layout.activity_main);Button buttonShowListDialog = findViewById(R.id.button_show_list_dialog);buttonShowListDialog.setOnClickListener(new View.OnClickListener() {@Overridepublic void onClick(View v) {// 列表项final String[] items = {"Kotlin", "Java", "Python", "PHP", "C#", "C", "C++"};AlertDialog.Builder listDialog = new AlertDialog.Builder(MainActivity.this);listDialog.setTitle("选择你喜欢的开发语言");// 设置列表项和点击事件listDialog.setItems(items, (dialog, which) -> {// which参数表示用户点击的项的索引Toast.makeText(MainActivity.this, "你选择了" + items[which], Toast.LENGTH_SHORT).show();});// 显示对话框listDialog.show();}});}
}
单选列表对话框例子
<?xml version="1.0" encoding="utf-8"?>
<LinearLayout xmlns:android="http://schemas.android.com/apk/res/android"android:layout_width="match_parent"android:layout_height="match_parent"xmlns:tools="http://schemas.android.com/tools"android:orientation="vertical"android:gravity="center"tools:context=".MainActivity"><Buttonandroid:id="@+id/button_show_single_choice_dialog"android:layout_width="wrap_content"android:layout_height="wrap_content"android:text="显示单选对话框"android:layout_centerInParent="true"/></LinearLayout>
package com.example.myapplication;import android.os.Bundle;
import androidx.appcompat.app.AlertDialog;
import androidx.appcompat.app.AppCompatActivity;
import android.view.View;
import android.widget.Button;
import android.widget.Toast;public class MainActivity extends AppCompatActivity {@Overrideprotected void onCreate(Bundle savedInstanceState) {super.onCreate(savedInstanceState);setContentView(R.layout.activity_main);Button buttonShowSingleChoiceDialog = findViewById(R.id.button_show_single_choice_dialog);buttonShowSingleChoiceDialog.setOnClickListener(new View.OnClickListener() {@Overridepublic void onClick(View v) {// 单选列表项final String[] items = {"Kotlin", "Java", "Python", "PHP", "C#", "C", "C++"};int checkedItem = 0; // 初始选中项的索引AlertDialog.Builder singleChoiceDialog = new AlertDialog.Builder(MainActivity.this);singleChoiceDialog.setTitle("选择你喜欢的开发语言");// 设置单选列表项和点击事件singleChoiceDialog.setSingleChoiceItems(items, checkedItem, (dialog, which) -> {// which参数表示用户点击的项的索引Toast.makeText(MainActivity.this, "你选择了" + items[which], Toast.LENGTH_SHORT).show();//dialog.dismiss(); // 关闭对话框});// 显示对话框singleChoiceDialog.show();}});}
}
多选列表对话框例子
<?xml version="1.0" encoding="utf-8"?>
<LinearLayout xmlns:android="http://schemas.android.com/apk/res/android"android:layout_width="match_parent"android:layout_height="match_parent"xmlns:tools="http://schemas.android.com/tools"android:orientation="vertical"android:gravity="center"tools:context=".MainActivity"><Buttonandroid:id="@+id/button_show_multi_choice_dialog"android:layout_width="wrap_content"android:layout_height="wrap_content"android:text="显示多选对话框"android:layout_centerInParent="true"/></LinearLayout>
package com.example.myapplication;import android.os.Bundle;
import androidx.appcompat.app.AlertDialog;
import androidx.appcompat.app.AppCompatActivity;
import android.view.View;
import android.widget.Button;
import android.widget.Toast;public class MainActivity extends AppCompatActivity {@Overrideprotected void onCreate(Bundle savedInstanceState) {super.onCreate(savedInstanceState);setContentView(R.layout.activity_main);Button buttonShowMultiChoiceDialog = findViewById(R.id.button_show_multi_choice_dialog);buttonShowMultiChoiceDialog.setOnClickListener(new View.OnClickListener() {@Overridepublic void onClick(View v) {// 多选列表项final String[] items = {"Kotlin", "Java", "Python", "PHP", "C#", "C", "C++"};boolean[] checkedItems = {false, false, false, false, false, false, false}; // 初始选中状态AlertDialog.Builder multiChoiceDialog = new AlertDialog.Builder(MainActivity.this);multiChoiceDialog.setTitle("请选择一个或多个选项");// 设置多选列表项和点击事件multiChoiceDialog.setMultiChoiceItems(items, checkedItems, (dialog, which, isChecked) -> {// which参数表示用户点击的项的索引,isChecked表示是否被选中checkedItems[which] = isChecked; // 更新选中状态});// 设置确定按钮及其点击事件multiChoiceDialog.setPositiveButton("确定", (dialog, which) -> {StringBuilder result = new StringBuilder("你选择了:");for (int i = 0; i < items.length; i++) {if (checkedItems[i]) {result.append(items[i]).append(" ");}}Toast.makeText(MainActivity.this, result, Toast.LENGTH_SHORT).show();});// 显示对话框multiChoiceDialog.show();}});}
}
参考文档
-
Android AlertDialog
-
Android 对话框
相关文章:

学习Android的第二十天
目录 Android Toast 吐司 常量 常用方法 例子 Android Notification 状态栏通知 Notification 的基本布局 扩展布局 Notification ( 状态栏通知 ) 相关的方法 例子: 参考文档 Android AlertDialog 弹出框 Android Dialog 继承图谱 AlertDialog 几种常…...
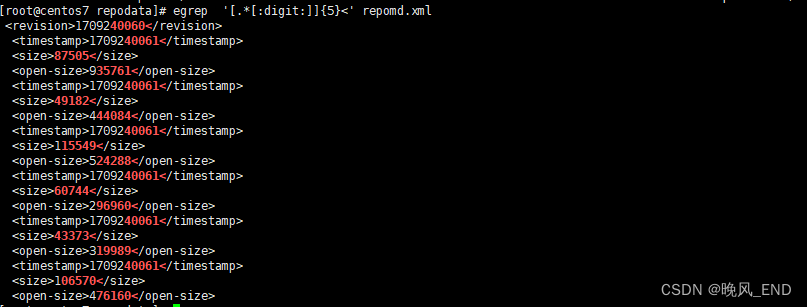
Linux技巧|centos7|重新认识和学习egrep和grep命令
前言: 相信提高文本检索工具,大家脑海里肯定有很多工具会自动跳出来,比如,grep,egrep,sed,cat,more,less,cut,awk,vim,vi…...
css实现背景渐变叠加
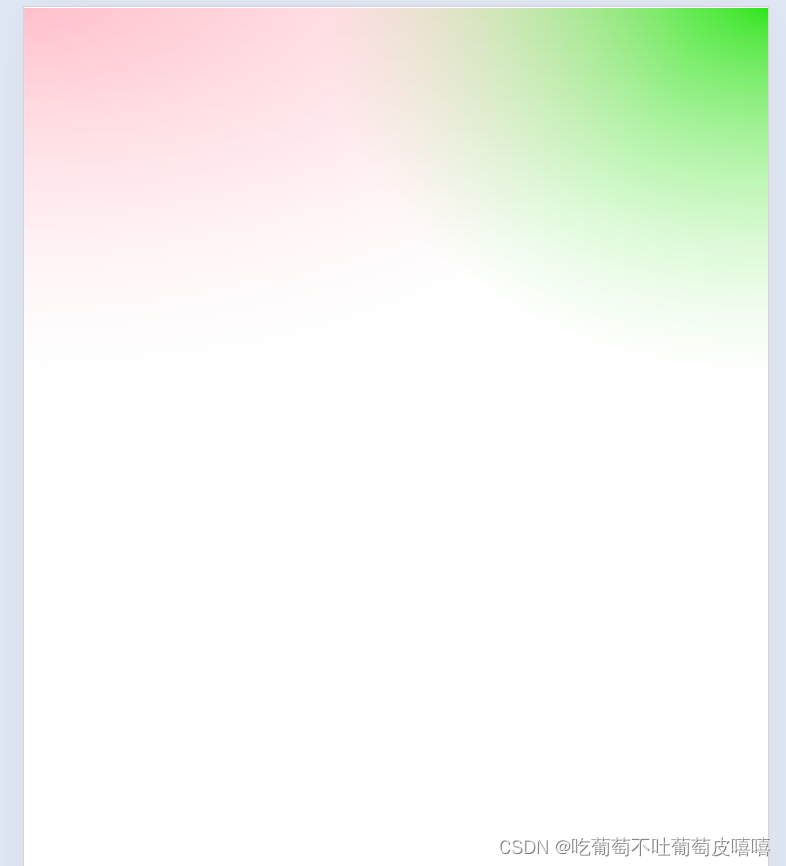
线性渐变效果图: .box{width: 100vw;height: 100vh;background:linear-gradient(to bottom,transparent,#fff 30%),linear-gradient(to right,pink,skyblue);}径像渐变效果图: .box{width: 100vw;height: 100vh;background:linear-gradient(to bottom,transparent,#…...
Unity(第二十四部)UI
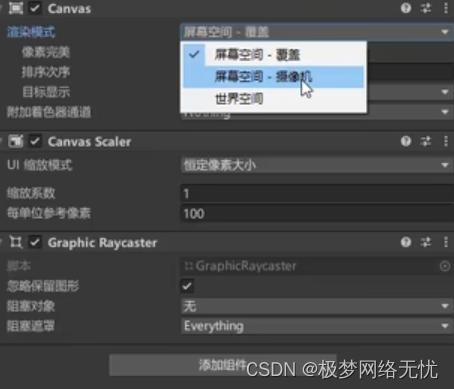
在游戏开发中,用户界面(UI)是至关重要的一部分。它负责与玩家进行交互,提供信息,并增强游戏的整体体验。Unity 提供了强大的工具和功能来创建和管理 UI。 ui的底层就是画布,创建画布的时候会同时创建一个事…...

VSCode通过SSH连接Docker环境进行开发
文章目录 VSCode 插件Docker 镜像构建镜像部署环境 VSCode 连接本地Docker容器VSCode SSH连接Docker容器VSCode 打开容器内目录文件 VSCode 插件 Remote - SSH Docker 镜像 https://hub.docker.com/_/golang # Golang 镜像 docker pull golang:1.22构建镜像 Dockerfile F…...

【QT】QTableView或QTableWidget 搭配QLineEdit实现数据的搜索显示
在 Qt 中,QTableView 和 QTableWidget 都可以用来实现数据的搜索和显示,但它们的适用场景和实现方式有所不同: QTableView 适用场景:QTableView 适用于更复杂的场景,尤其是当需要处理大量数据或需要高度定制化的表格时…...

Apache Flink连载(三十五):Flink基于Kubernetes部署(5)-Kubernetes 集群搭建-1
🏡 个人主页:IT贫道-CSDN博客 🚩 私聊博主:私聊博主加WX好友,获取更多资料哦~ 🔔 博主个人B栈地址:豹哥教你学编程的个人空间-豹哥教你学编程个人主页-哔哩哔哩视频 目录 编辑...
)
快速幂(c++题解)
题目描述 我们通常把a的b次方记作a^b,为了方便,我们经常直接使用C内置函数pow(a,b)来完成这个工作,但a的b次方就是把a垒乘b次,时间复杂度为O(b),当b值很大时,将会耗去大量时间,所以请同学们不能…...
C#单向链表实现:Append,Move,Delete,InsertAscending, InsertUnAscending,Clear
目录 一、链表定义 二、链表设计 1.先定义一个结点类(Node) 2.再定义链表类(LinkedList)并依次设计其方法 3.再实现删除方法 4.再实现Insert 的方法 5.再增加InsertAscending升序插入 6.再增加 InsertUnAscending 的方法…...

python基础-基本数据类型深入-2.1
目录 元组 什么是元组(tuple) 元组练习-1 元组的基本操作 元组常用内建函数 列表和元组的区别与总结 元组练习-2 元组练习-3 元组 什么是元组(tuple) 与列表(list)一样,元组࿰…...

Android LiveData Cannot add the same observer with different lifecycles
https://www.yxhuang.com/2022/05/29/livedata-add-some-observer-error/ 这篇文章已经解释的很好了。 其实在去年我写的文章, https://blog.csdn.net/jzlhll123/article/details/126593235 中提到了, 其实不论是java或者kotlin,不引用外部的…...

MongoDB聚合运算符:$cmp
文章目录 语法用法举例 $cmp聚合运算符返回连个值的比较结果。 语法 { $cmp: [ <expression1>, <expression2> ] }表达式可以是任何类型,使用标准的BSON比较顺序对不同类型的值进行比较。 用法 $cmp对两个值进行比较,返回: …...

【C++基础知识详细记录】
一、基础知识 C基础知识点的汇总涵盖了许多方面,包括但不限于以下内容: 1. 常量定义 使用#define宏定义常量: #define PI 3.14159265358979323846 // 宏定义一个浮点型常量PI使用const关键字定义常量: const int MAX_SIZE 100;…...
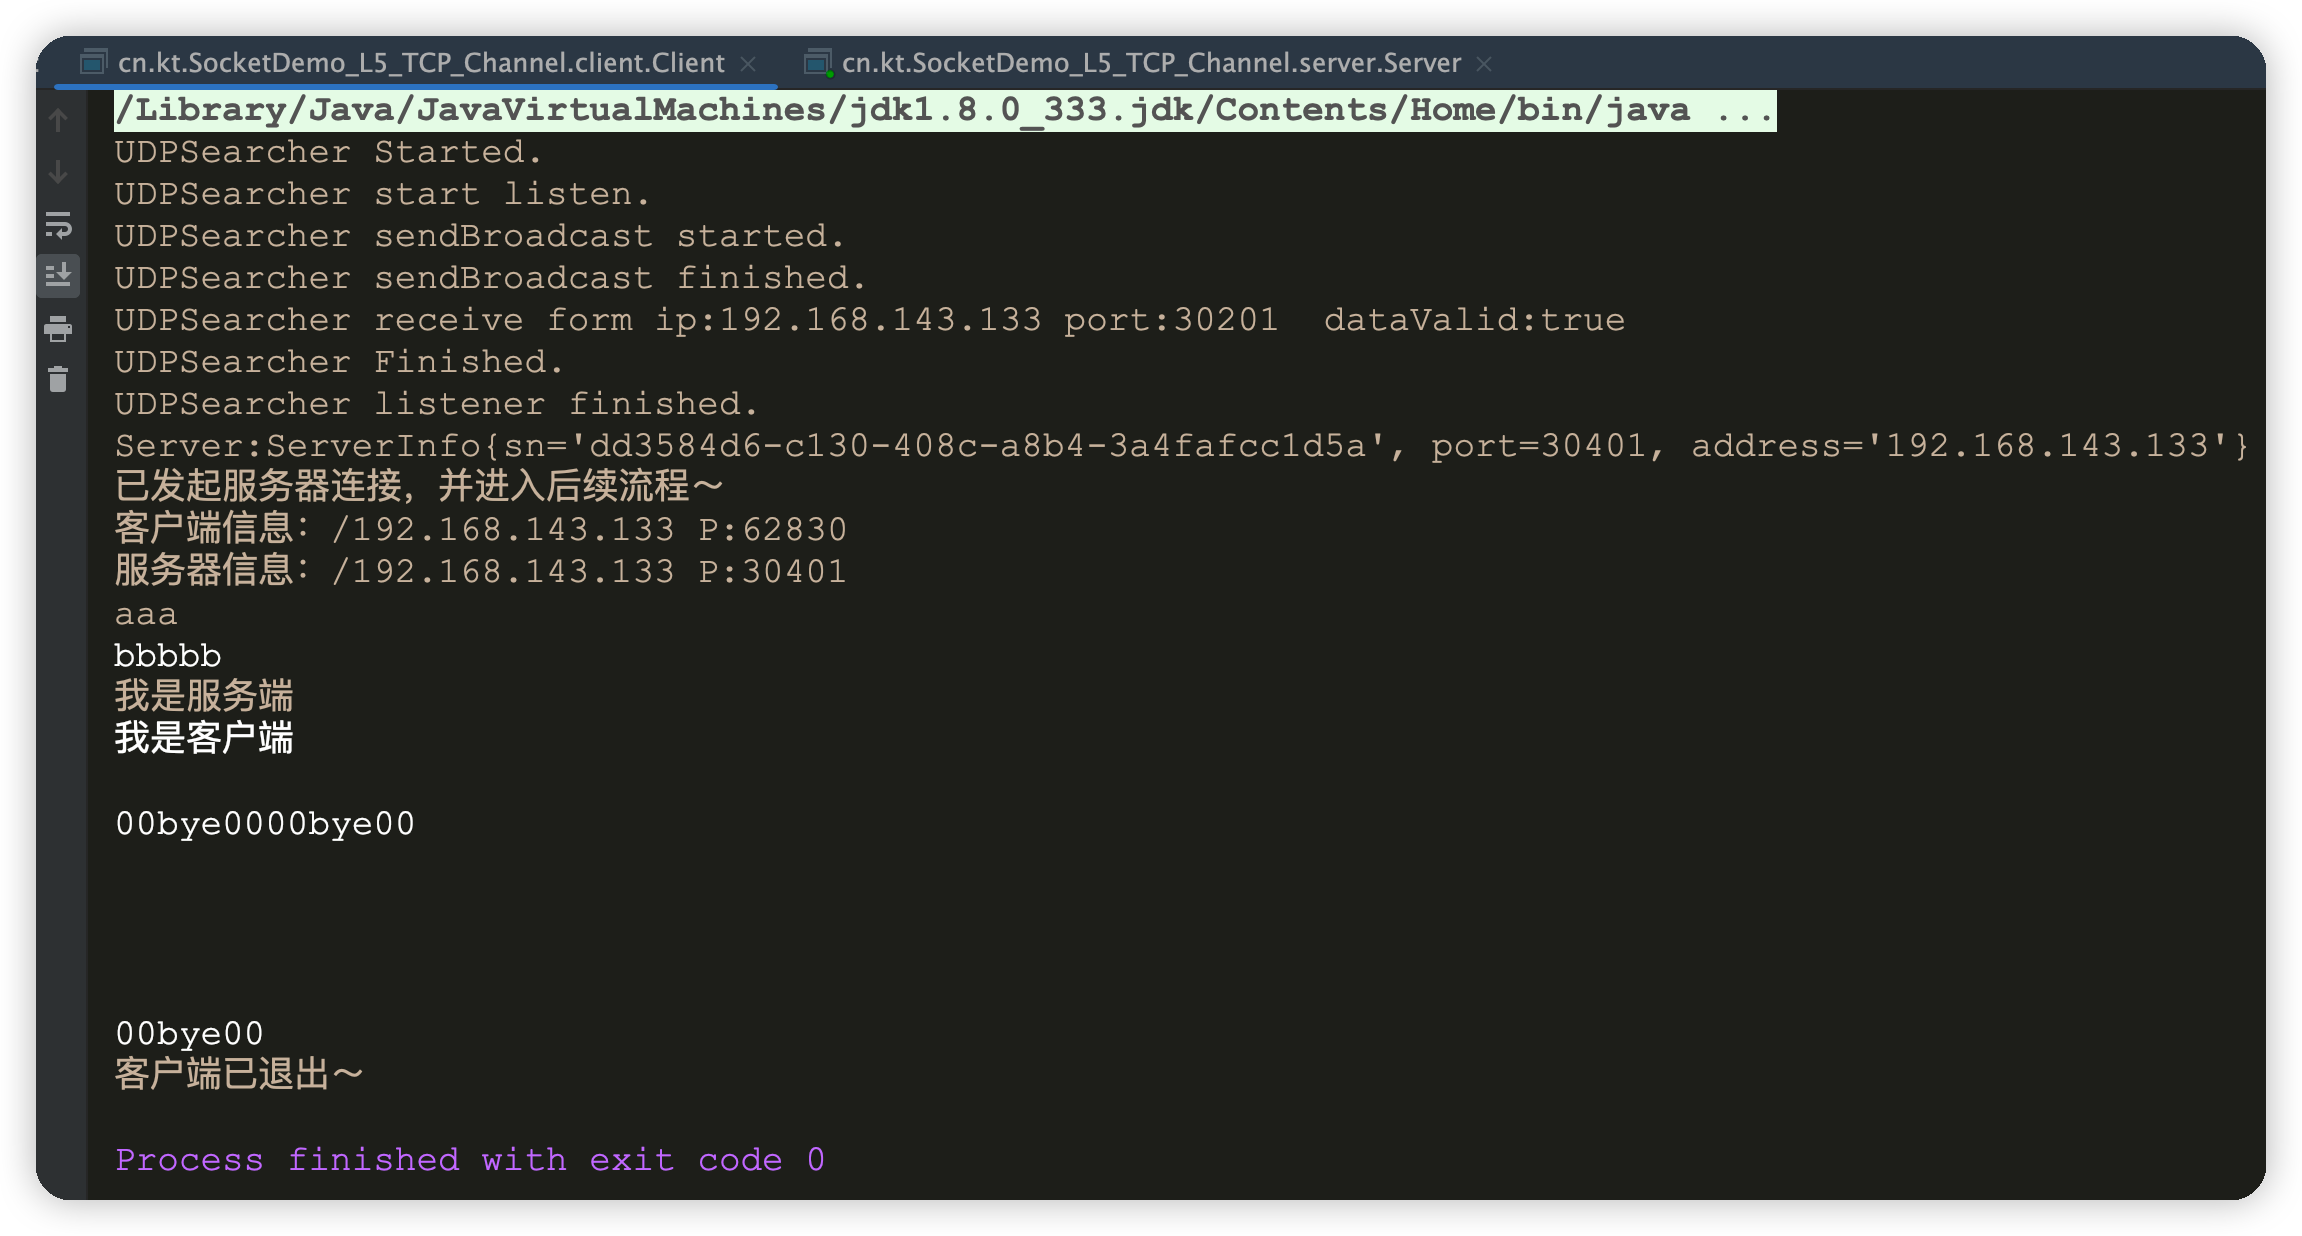
Socket网络编程(五)——TCP数据发送与接收并行
目录 主要实现需求TCP 服务端收发并行重构启动main方法重构重构分离收发消息的操作重构接收消息的操作重构发送消息TCPServer调用发送消息的逻辑监听客户端链接逻辑重构Socket、流的退出与关闭 TCP 客户端收发并行重构客户端 main函数重构客户端接收消息重构客户端发送消息重构…...

2024最新-ubuntu22.04安装最新版QT6.6~6.8教程
1. 在官网下载 online_installer: https://download.qt.io/archive/online_installers/4.7/qt-unified-linux-x64-4.7.0-online.run 或者直接镜像站下载: http://mirrors.ustc.edu.cn/qtproject/archive/online_installers/4.7/qt-unified-linux-x6…...
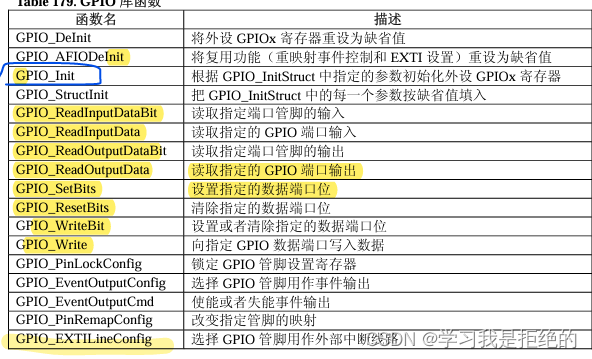
STM32------分析GPIO寄存器
一、初始LED原理图 共阴极led LED发光二极管,需要有电流通过才能点亮,当有电压差就会产生电流 二极管两端的电压差超过2.7v就会有电流通过 电阻的作用 由于公式IV/R 不加电阻容易造成瞬间电流无穷大 发光二极管工作电流为10-20MA 3.3v / 1kΩ 3.…...
)
数学实验-Matlab使用(1)
使用方法以及笔记均在文件中 class1_func1.m function f class1_func1(x) % f为输出,输出有多个时需要用中括号以矩阵的方式包起来 % x为输入f sin(x)class1_func2.m function [a,b,u,v] class1_func2(x,y)[a,b] eig(x)[u,v] eig(y)class1.m % 当语句后有…...
kafka文件存储机制和消费者
1.broker文件存储机制 去查看真正的存储文件: 在/opt/module/kafka/datas/ 路径下 kafka-run-class.sh kafka.tools.DumpLogSegments --files ./00000000000000000000.index 如果是6415那么这个会存储在563的log文件之中,因为介于6410和10090之间。 2.…...
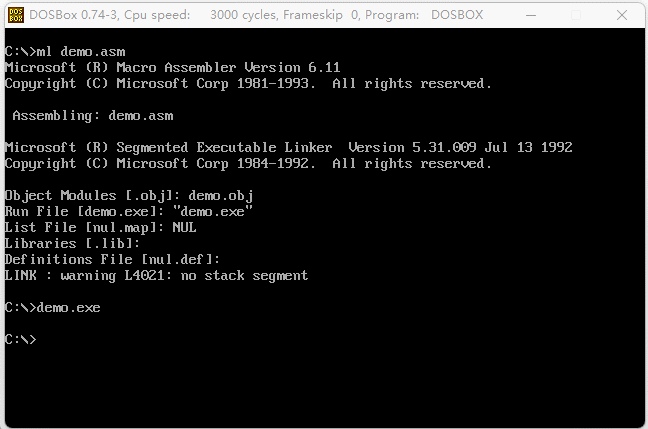
《汇编语言》- 读书笔记 - 第15章-外中断
《汇编语言》- 读书笔记 - 第15章-外中断 15.1 接口芯片和端口15.2 外中断信息1. 可屏蔽中断(Maskable Interrupt)2. 不可屏蔽中断(Non-Maskable Interrupt)设计思想 15.3 PC 机键盘的处理过程1. 键盘输入2. 引发 9 号中断3. 执行…...

【Vue3】CSS 新特性
:slotted <template> <!-- App.vue--><Son ><div class"a">我要插入了</div></Son> </template><script setup lang"ts"> import Son from ./components/Son.vue </script><style></sty…...

Google 迎来「DeepSeek 时刻」:TurboQuant算法实现bit无损、×加速、×压缩、零预处理屹
从 UI 工程师到 AI 应用架构者 13 年前,我的工作是让按钮在 IE6 上对齐; 13 年后,我用 fetch-event-source 订阅大模型的“思维流”,用 OCR 解锁图片中的文字——前端,正在成为 AI 产品的第一道体验防线。 最近&#x…...

【计量经济学学习指南】“入门” vs 进阶版,如何选择你的最佳拍档?
1. 计量经济学入门与进阶的核心差异 刚接触计量经济学时,很多人会被满屏的希腊字母和矩阵运算吓退。其实入门和进阶的核心差异,就像学做菜时"看菜谱操作"和"理解火候原理"的区别。 入门级学习的关键是快速建立直觉。比如习明明的《&…...
)
Conda报错‘Malformed version string’别慌,三步搞定.condarc配置(附清华/阿里云源)
Conda报错‘Malformed version string’深度解析与实战修复指南 遇到Conda报错"Malformed version string"时,很多开发者第一反应是重装环境或切换Python版本。实际上,90%的此类问题源于.condarc配置文件中的版本号格式或镜像源配置错误。本文…...
告别模糊图像:html-to-image 像素比率(Pixel Ratio)完全控制指南
告别模糊图像:html-to-image 像素比率(Pixel Ratio)完全控制指南 【免费下载链接】html-to-image ✂️ Generates an image from a DOM node using HTML5 canvas and SVG. 项目地址: https://gitcode.com/gh_mirrors/ht/html-to-image …...

求助:VS Code 可以跳过Claude code的初始登录,但交互后还是需要登录
小白求助~:我现在用了 ccswitch,然后也在claude.json里用代码跳过了Claude code在VS Code里的登录界面(图1)。所以每次我点右上角那个插件按钮,都可以进入聊天界面(图2)。图1 图2但我一旦输入问…...

Qwen3-TTS-12Hz-1.7B-Base实战:3秒语音克隆技术详解与Python实现
Qwen3-TTS-12Hz-1.7B-Base实战:3秒语音克隆技术详解与Python实现 1. 引言 想象一下,你只需要3秒钟的录音,就能让AI学会任何人的声音,然后用这个声音说出任何你想说的话。这不是科幻电影的情节,而是Qwen3-TTS-12Hz-1.…...

AI失忆症有了新解法,哈佛团队开发海马体仿生技术,要用AI终结人类“遗忘史”
来源:DeepTech深科技排版:胡莉花遗忘是人类共有的经历,无论是对话、事件还是转瞬即逝的瞬间,我们终究会遗忘。但如果遗忘变成一个可选的选项,如果人类能够拥有完美且无限的记忆,世界会变成怎样?…...
AgentCPM-Report深度应用:Pixel Epic智识终端多源数据整合研报生成
AgentCPM-Report深度应用:Pixel Epic智识终端多源数据整合研报生成 1. 产品概览:像素史诗智识终端 Pixel Epic智识终端是一款基于AgentCPM-Report大模型构建的创新研究报告生成系统。它将传统枯燥的科研分析过程转化为一场充满像素美学的数字冒险&…...

S19文件格式详解:从Motorola历史到现代应用
S19文件格式详解:从Motorola历史到现代应用 在嵌入式系统开发的世界里,有一种看似简单却至关重要的文件格式已经默默服务了数十年——它就是S19文件格式。这种由Motorola在上世纪设计的记录格式,至今仍在微控制器编程、固件更新和嵌入式系统调…...

超级千问语音设计世界:电商产品语音详情页批量生成教程
超级千问语音设计世界:电商产品语音详情页批量生成教程 1. 为什么选择语音详情页? 在电商领域,商品详情页是转化用户的关键环节。传统图文详情页虽然内容丰富,但在用户注意力碎片化的今天,很难让消费者完整阅读所有信…...