YOLOv9有效改进|使用动态蛇形卷积Dynamic Snake Convolution
专栏介绍:YOLOv9改进系列 | 包含深度学习最新创新,主力高效涨点!!!
一、改进点介绍
使用ICCV2023中的动态蛇形卷积替换YOLOv9网络中的Conv模块。
二、Dynamic Snake Convolution模块详解
2.1 模块简介
应用场景: 适合 具有细长微弱的局部结构特征与复杂多变的全局形态特征的场景。
三、 Dynamic Snake Convolution模块使用教程
3.1 Dynamic Snake Convolution模块的代码
import torch
import torch.nn as nn
from conv import Conv__all__ = ['DySnakeConv']class DySnakeConv(nn.Module):def __init__(self, inc, ouc, k=3) -> None:super().__init__()c_ = ouc // 3 // 16 * 16self.conv_0 = Conv(inc, ouc - 2 *c_, k)self.conv_x = DSConv(inc, c_, 0, k)self.conv_y = DSConv(inc, c_, 1, k)def forward(self, x):return torch.cat([self.conv_0(x), self.conv_x(x), self.conv_y(x)], dim=1)class DSConv(nn.Module):def __init__(self, in_ch, out_ch, morph, kernel_size=3, if_offset=True, extend_scope=1):"""The Dynamic Snake Convolution:param in_ch: input channel:param out_ch: output channel:param kernel_size: the size of kernel:param extend_scope: the range to expand (default 1 for this method):param morph: the morphology of the convolution kernel is mainly divided into two typesalong the x-axis (0) and the y-axis (1) (see the paper for details):param if_offset: whether deformation is required, if it is False, it is the standard convolution kernel"""super(DSConv, self).__init__()# use the <offset_conv> to learn the deformable offsetself.offset_conv = nn.Conv2d(in_ch, 2 * kernel_size, 3, padding=1)self.bn = nn.BatchNorm2d(2 * kernel_size)self.kernel_size = kernel_size# two types of the DSConv (along x-axis and y-axis)self.dsc_conv_x = nn.Conv2d(in_ch,out_ch,kernel_size=(kernel_size, 1),stride=(kernel_size, 1),padding=0,)self.dsc_conv_y = nn.Conv2d(in_ch,out_ch,kernel_size=(1, kernel_size),stride=(1, kernel_size),padding=0,)self.gn = nn.GroupNorm(out_ch // 4, out_ch)self.act = Conv.default_actself.extend_scope = extend_scopeself.morph = morphself.if_offset = if_offsetdef forward(self, f):offset = self.offset_conv(f)offset = self.bn(offset)# We need a range of deformation between -1 and 1 to mimic the snake's swingoffset = torch.tanh(offset)input_shape = f.shapedsc = DSC(input_shape, self.kernel_size, self.extend_scope, self.morph)deformed_feature = dsc.deform_conv(f, offset, self.if_offset)if self.morph == 0:x = self.dsc_conv_x(deformed_feature.type(f.dtype))x = self.gn(x)x = self.act(x)return xelse:x = self.dsc_conv_y(deformed_feature.type(f.dtype))x = self.gn(x)x = self.act(x)return x# Core code, for ease of understanding, we mark the dimensions of input and output next to the code
class DSC(object):def __init__(self, input_shape, kernel_size, extend_scope, morph):self.num_points = kernel_sizeself.width = input_shape[2]self.height = input_shape[3]self.morph = morphself.extend_scope = extend_scope  # offset (-1 ~ 1) * extend_scope# define feature map shape"""B: Batch size  C: Channel  W: Width  H: Height"""self.num_batch = input_shape[0]self.num_channels = input_shape[1]"""input: offset [B,2*K,W,H]  K: Kernel size (2*K: 2D image, deformation contains <x_offset> and <y_offset>)output_x: [B,1,W,K*H]   coordinate mapoutput_y: [B,1,K*W,H]   coordinate map"""def _coordinate_map_3D(self, offset, if_offset):device = offset.device# offsety_offset, x_offset = torch.split(offset, self.num_points, dim=1)y_center = torch.arange(0, self.width).repeat([self.height])y_center = y_center.reshape(self.height, self.width)y_center = y_center.permute(1, 0)y_center = y_center.reshape([-1, self.width, self.height])y_center = y_center.repeat([self.num_points, 1, 1]).float()y_center = y_center.unsqueeze(0)x_center = torch.arange(0, self.height).repeat([self.width])x_center = x_center.reshape(self.width, self.height)x_center = x_center.permute(0, 1)x_center = x_center.reshape([-1, self.width, self.height])x_center = x_center.repeat([self.num_points, 1, 1]).float()x_center = x_center.unsqueeze(0)if self.morph == 0:"""Initialize the kernel and flatten the kernely: only need 0x: -num_points//2 ~ num_points//2 (Determined by the kernel size)!!! The related PPT will be submitted later, and the PPT will contain the whole changes of each step"""y = torch.linspace(0, 0, 1)x = torch.linspace(-int(self.num_points // 2),int(self.num_points // 2),int(self.num_points),)y, x = torch.meshgrid(y, x, indexing = 'ij')y_spread = y.reshape(-1, 1)x_spread = x.reshape(-1, 1)y_grid = y_spread.repeat([1, self.width * self.height])y_grid = y_grid.reshape([self.num_points, self.width, self.height])y_grid = y_grid.unsqueeze(0)  # [B*K*K, W,H]x_grid = x_spread.repeat([1, self.width * self.height])x_grid = x_grid.reshape([self.num_points, self.width, self.height])x_grid = x_grid.unsqueeze(0)  # [B*K*K, W,H]y_new = y_center + y_gridx_new = x_center + x_gridy_new = y_new.repeat(self.num_batch, 1, 1, 1).to(device)x_new = x_new.repeat(self.num_batch, 1, 1, 1).to(device)y_offset_new = y_offset.detach().clone()if if_offset:y_offset = y_offset.permute(1, 0, 2, 3)y_offset_new = y_offset_new.permute(1, 0, 2, 3)center = int(self.num_points // 2)# The center position remains unchanged and the rest of the positions begin to swing# This part is quite simple. The main idea is that "offset is an iterative process"y_offset_new[center] = 0for index in range(1, center):y_offset_new[center + index] = (y_offset_new[center + index - 1] + y_offset[center + index])y_offset_new[center - index] = (y_offset_new[center - index + 1] + y_offset[center - index])y_offset_new = y_offset_new.permute(1, 0, 2, 3).to(device)y_new = y_new.add(y_offset_new.mul(self.extend_scope))y_new = y_new.reshape([self.num_batch, self.num_points, 1, self.width, self.height])y_new = y_new.permute(0, 3, 1, 4, 2)y_new = y_new.reshape([self.num_batch, self.num_points * self.width, 1 * self.height])x_new = x_new.reshape([self.num_batch, self.num_points, 1, self.width, self.height])x_new = x_new.permute(0, 3, 1, 4, 2)x_new = x_new.reshape([self.num_batch, self.num_points * self.width, 1 * self.height])return y_new, x_newelse:"""Initialize the kernel and flatten the kernely: -num_points//2 ~ num_points//2 (Determined by the kernel size)x: only need 0"""y = torch.linspace(-int(self.num_points // 2),int(self.num_points // 2),int(self.num_points),)x = torch.linspace(0, 0, 1)y, x = torch.meshgrid(y, x, indexing = 'ij')y_spread = y.reshape(-1, 1)x_spread = x.reshape(-1, 1)y_grid = y_spread.repeat([1, self.width * self.height])y_grid = y_grid.reshape([self.num_points, self.width, self.height])y_grid = y_grid.unsqueeze(0)x_grid = x_spread.repeat([1, self.width * self.height])x_grid = x_grid.reshape([self.num_points, self.width, self.height])x_grid = x_grid.unsqueeze(0)y_new = y_center + y_gridx_new = x_center + x_gridy_new = y_new.repeat(self.num_batch, 1, 1, 1)x_new = x_new.repeat(self.num_batch, 1, 1, 1)y_new = y_new.to(device)x_new = x_new.to(device)x_offset_new = x_offset.detach().clone()if if_offset:x_offset = x_offset.permute(1, 0, 2, 3)x_offset_new = x_offset_new.permute(1, 0, 2, 3)center = int(self.num_points // 2)x_offset_new[center] = 0for index in range(1, center):x_offset_new[center + index] = (x_offset_new[center + index - 1] + x_offset[center + index])x_offset_new[center - index] = (x_offset_new[center - index + 1] + x_offset[center - index])x_offset_new = x_offset_new.permute(1, 0, 2, 3).to(device)x_new = x_new.add(x_offset_new.mul(self.extend_scope))y_new = y_new.reshape([self.num_batch, 1, self.num_points, self.width, self.height])y_new = y_new.permute(0, 3, 1, 4, 2)y_new = y_new.reshape([self.num_batch, 1 * self.width, self.num_points * self.height])x_new = x_new.reshape([self.num_batch, 1, self.num_points, self.width, self.height])x_new = x_new.permute(0, 3, 1, 4, 2)x_new = x_new.reshape([self.num_batch, 1 * self.width, self.num_points * self.height])return y_new, x_new"""input: input feature map [N,C,D,W,H];coordinate map [N,K*D,K*W,K*H] output: [N,1,K*D,K*W,K*H]  deformed feature map"""def _bilinear_interpolate_3D(self, input_feature, y, x):device = input_feature.devicey = y.reshape([-1]).float()x = x.reshape([-1]).float()zero = torch.zeros([]).int()max_y = self.width - 1max_x = self.height - 1# find 8 grid locationsy0 = torch.floor(y).int()y1 = y0 + 1x0 = torch.floor(x).int()x1 = x0 + 1# clip out coordinates exceeding feature map volumey0 = torch.clamp(y0, zero, max_y)y1 = torch.clamp(y1, zero, max_y)x0 = torch.clamp(x0, zero, max_x)x1 = torch.clamp(x1, zero, max_x)input_feature_flat = input_feature.flatten()input_feature_flat = input_feature_flat.reshape(self.num_batch, self.num_channels, self.width, self.height)input_feature_flat = input_feature_flat.permute(0, 2, 3, 1)input_feature_flat = input_feature_flat.reshape(-1, self.num_channels)dimension = self.height * self.widthbase = torch.arange(self.num_batch) * dimensionbase = base.reshape([-1, 1]).float()repeat = torch.ones([self.num_points * self.width * self.height]).unsqueeze(0)repeat = repeat.float()base = torch.matmul(base, repeat)base = base.reshape([-1])base = base.to(device)base_y0 = base + y0 * self.heightbase_y1 = base + y1 * self.height# top rectangle of the neighbourhood volumeindex_a0 = base_y0 - base + x0index_c0 = base_y0 - base + x1# bottom rectangle of the neighbourhood volumeindex_a1 = base_y1 - base + x0index_c1 = base_y1 - base + x1# get 8 grid valuesvalue_a0 = input_feature_flat[index_a0.type(torch.int64)].to(device)value_c0 = input_feature_flat[index_c0.type(torch.int64)].to(device)value_a1 = input_feature_flat[index_a1.type(torch.int64)].to(device)value_c1 = input_feature_flat[index_c1.type(torch.int64)].to(device)# find 8 grid locationsy0 = torch.floor(y).int()y1 = y0 + 1x0 = torch.floor(x).int()x1 = x0 + 1# clip out coordinates exceeding feature map volumey0 = torch.clamp(y0, zero, max_y + 1)y1 = torch.clamp(y1, zero, max_y + 1)x0 = torch.clamp(x0, zero, max_x + 1)x1 = torch.clamp(x1, zero, max_x + 1)x0_float = x0.float()x1_float = x1.float()y0_float = y0.float()y1_float = y1.float()vol_a0 = ((y1_float - y) * (x1_float - x)).unsqueeze(-1).to(device)vol_c0 = ((y1_float - y) * (x - x0_float)).unsqueeze(-1).to(device)vol_a1 = ((y - y0_float) * (x1_float - x)).unsqueeze(-1).to(device)vol_c1 = ((y - y0_float) * (x - x0_float)).unsqueeze(-1).to(device)outputs = (value_a0 * vol_a0 + value_c0 * vol_c0 + value_a1 * vol_a1 +value_c1 * vol_c1)if self.morph == 0:outputs = outputs.reshape([self.num_batch,self.num_points * self.width,1 * self.height,self.num_channels,])outputs = outputs.permute(0, 3, 1, 2)else:outputs = outputs.reshape([self.num_batch,1 * self.width,self.num_points * self.height,self.num_channels,])outputs = outputs.permute(0, 3, 1, 2)return outputsdef deform_conv(self, input, offset, if_offset):y, x = self._coordinate_map_3D(offset, if_offset)deformed_feature = self._bilinear_interpolate_3D(input, y, x)return deformed_featureif __name__ == "__main__":model = DySnakeConv(32, 32)print(model(torch.zeros(2, 32, 640, 320)).shape)
3.2 在YOlO v9中的添加教程
阅读YOLOv9添加模块教程或使用下文操作
1. 将YOLOv9工程中models下common.py文件中的最下行增加模块的代码。

2. 将YOLOv9工程中models下yolo.py文件中的第681行(可能因版本变化而变化)增加以下代码。

RepNCSPELAN4, SPPELAN, DySnakeConv}:
3.3 运行配置文件
# YOLOv9
# Powered bu https://blog.csdn.net/StopAndGoyyy
# parameters
nc: 80 # number of classes
depth_multiple: 1 # model depth multiple
width_multiple: 1 # layer channel multiple
#activation: nn.LeakyReLU(0.1)
#activation: nn.ReLU()# anchors
anchors: 3# YOLOv9 backbone
backbone:[[-1, 1, Silence, []], # conv down[-1, 1, Conv, [64, 3, 2]], # 1-P1/2# conv down[-1, 1, Conv, [128, 3, 2]], # 2-P2/4# elan-1 block[-1, 1, RepNCSPELAN4, [256, 128, 64, 1]], # 3# avg-conv down[-1, 1, ADown, [256]], # 4-P3/8# elan-2 block[-1, 1, RepNCSPELAN4, [512, 256, 128, 1]], # 5# avg-conv down[-1, 1, ADown, [512]], # 6-P4/16# elan-2 block[-1, 1, RepNCSPELAN4, [512, 512, 256, 1]], # 7# avg-conv down[-1, 1, ADown, [512]], # 8-P5/32# elan-2 block[-1, 1, RepNCSPELAN4, [512, 512, 256, 1]], # 9]# YOLOv9 head
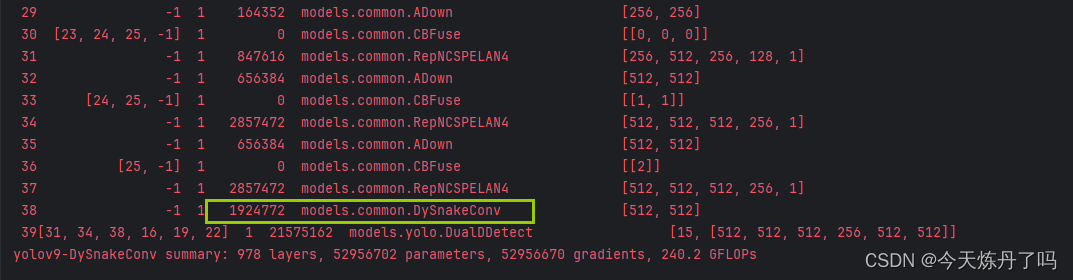
head:[# elan-spp block[-1, 1, SPPELAN, [512, 256]], # 10# up-concat merge[-1, 1, nn.Upsample, [None, 2, 'nearest']],[[-1, 7], 1, Concat, [1]], # cat backbone P4# elan-2 block[-1, 1, RepNCSPELAN4, [512, 512, 256, 1]], # 13# up-concat merge[-1, 1, nn.Upsample, [None, 2, 'nearest']],[[-1, 5], 1, Concat, [1]], # cat backbone P3# elan-2 block[-1, 1, RepNCSPELAN4, [256, 256, 128, 1]], # 16 (P3/8-small)# avg-conv-down merge[-1, 1, ADown, [256]],[[-1, 13], 1, Concat, [1]], # cat head P4# elan-2 block[-1, 1, RepNCSPELAN4, [512, 512, 256, 1]], # 19 (P4/16-medium)# avg-conv-down merge[-1, 1, ADown, [512]],[[-1, 10], 1, Concat, [1]], # cat head P5# elan-2 block[-1, 1, RepNCSPELAN4, [512, 512, 256, 1]], # 22 (P5/32-large)# multi-level reversible auxiliary branch# routing[5, 1, CBLinear, [[256]]], # 23[7, 1, CBLinear, [[256, 512]]], # 24[9, 1, CBLinear, [[256, 512, 512]]], # 25# conv down[0, 1, Conv, [64, 3, 2]], # 26-P1/2# conv down[-1, 1, Conv, [128, 3, 2]], # 27-P2/4# elan-1 block[-1, 1, RepNCSPELAN4, [256, 128, 64, 1]], # 28# avg-conv down fuse[-1, 1, ADown, [256]], # 29-P3/8[[23, 24, 25, -1], 1, CBFuse, [[0, 0, 0]]], # 30 # elan-2 block[-1, 1, RepNCSPELAN4, [512, 256, 128, 1]], # 31# avg-conv down fuse[-1, 1, ADown, [512]], # 32-P4/16[[24, 25, -1], 1, CBFuse, [[1, 1]]], # 33 # elan-2 block[-1, 1, RepNCSPELAN4, [512, 512, 256, 1]], # 34# avg-conv down fuse[-1, 1, ADown, [512]], # 35-P5/32[[25, -1], 1, CBFuse, [[2]]], # 36# elan-2 block[-1, 1, RepNCSPELAN4, [512, 512, 256, 1]], # 37[-1, 1, DySnakeConv, [512]], # 38# detection head# detect[[31, 34, 38, 16, 19, 22], 1, DualDDetect, [nc]], # DualDDetect(A3, A4, A5, P3, P4, P5)]
3.4 训练过程
欢迎关注!
相关文章:
YOLOv9有效改进|使用动态蛇形卷积Dynamic Snake Convolution
专栏介绍:YOLOv9改进系列 | 包含深度学习最新创新,主力高效涨点!!! 一、改进点介绍 使用ICCV2023中的动态蛇形卷积替换YOLOv9网络中的Conv模块。 二、Dynamic Snake Convolution模块详解 2.1 模块简介 应用场景&#x…...

设计模式学习笔记 - 设计原则 - 1.单一职责原则
前言 前面我们提到过 SOLID 原则,实际上 SOLID 由 5 个设计原则组成,分别是:单一职责原则、开闭原则、里氏替换原则、接口隔离原则和依赖反转原则。它们分别对应 SLOID 中的 S、O、L、I、D 这 5 个英文字母。 今天来学习下 SOLID 原则中的第…...
飞天使-学以致用-devops知识点4-SpringBoot项目CICD实现(实验失败,了解大概流程)
文章目录 代码准备创建jenkins 任务测试推送使用项目里面的jenkinsfile 进行升级操作 文字版本流程项目构建 代码准备 推送代码到gitlab 代码去叩叮狼教育找 k8s 创建jenkins 任务 创建一个k8s-cicd-demo 流水线任务 将jenkins 里面构建时候的地址还有token, 给到…...
使用HTML5画布(Canvas)模拟图层(Layers)效果
使用HTML5画布(Canvas)模拟图层(Layers)效果 在图形处理和计算机图形学中,图层(Layers)是指将图像分成不同的可独立编辑、组合和控制的部分的技术或概念。每个图层都可以包含不同的图形元素、效…...

违背祖训,微软骚操作强制用户更新至 Win 11 23H2
话说,大伙儿有让 Windows 操作系统一直保持最新版习惯吗? 根据以往惯例,Windows 系统更新是个比较玄学的存在,谁也不能保证随手更新后会不会出现什么奇葩 Bug。 因此对于不少同学来说,Windows 更新到一个稳定版本后&a…...

MISRA C++ 2023指南:您需要了解的一切
MISRA C 2023可以帮助使用现代C语言的组织开发安全关键型软件。使用新的MISRA标准,开发人员可以通过确保和记录其软件应用程序的MISRA合规性,满足IEC 6108或ISO 26262等功能安全标准给出的静态分析要求。 什么是MISRA C2023? 以便使用C17进行安全可靠…...
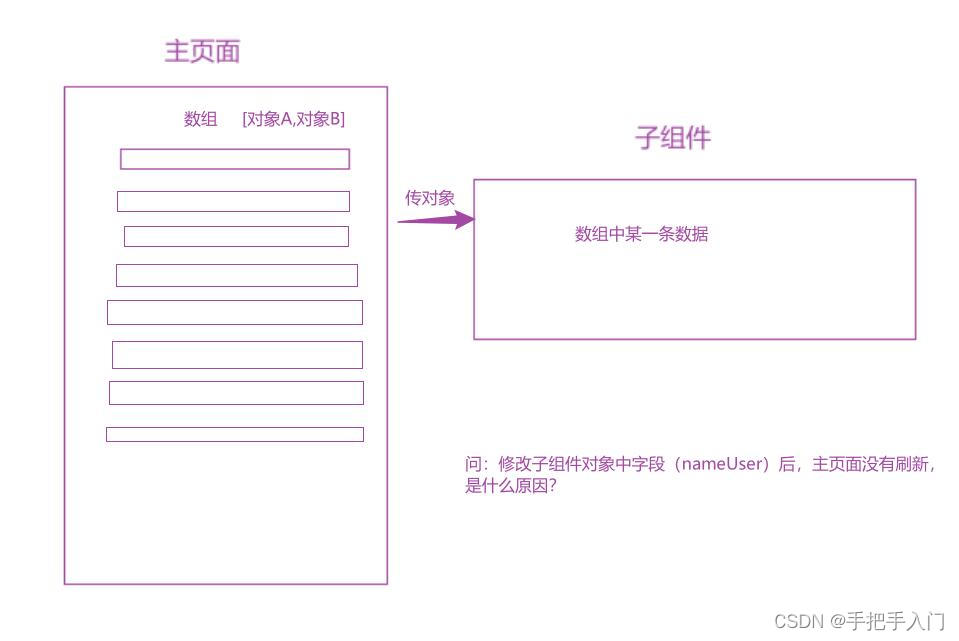
Vue:【亲测可用】父组件数组包对象,传给子组件对象,子组件修改属性(字段)后,父组件没有更新
场景:vue中父组件数组包对象,传给子组件对象,子组件修改属性(字段)后,父组件没有更新 代码: # 父组件 <div v-for"(object, name, index) in arr" :key"index"><…...

hbase学习十:客户端实现与Meta表解析
1、客户端实现 hbase社区的客户端一般是java客户端。 HBase也支持Shell交互式客户端。Shell客户端实质是用JRuby(用Java编写的Ruby解释器,方便Ruby脚本跑在JVM虚拟机上)脚本调用官方HBase客户端来实现的。因此,各种客户端的核心实现都在社区Java版本客户端上。 客户端访…...
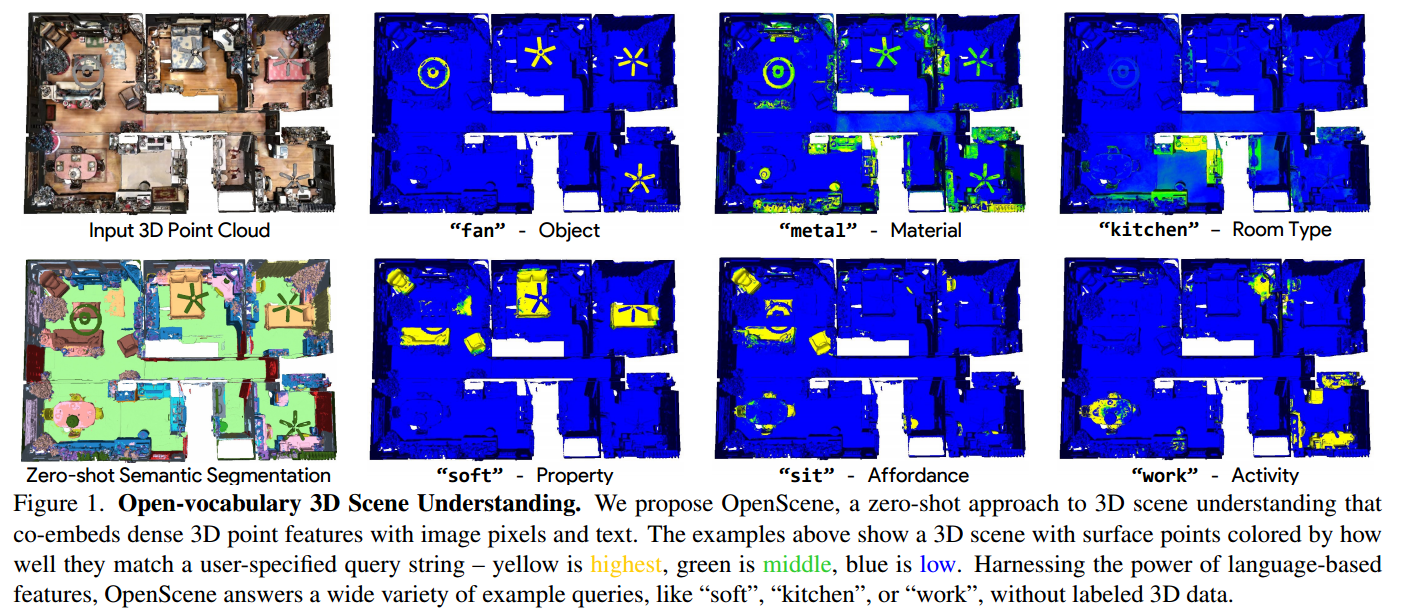
《OpenScene: 3D Scene Understanding with Open Vocabularies》阅读笔记1
传统的3D场景理解方法依赖于带标签的3D数据集,用于训练一个模型以进行单一任务的监督学习。我们提出了OpenScene,一种替代方法,其中模型在CLIP特征空间中预测与文本和图像像素共同嵌入的3D场景点的密集特征。这种零样本方法实现了与任务无关的训练和开放词汇查询。例如,为了…...

数据结构 - Trie树(字符串统计、最大异或对)
文章目录 前言Part 1:Trie字符串统计1.题目描述输入格式输出格式数据范围输入样例输出样例 2.算法 Part 2:最大异或对1.题目描述输入格式输出格式数据范围输入样例输出样例 2.算法 前言 本篇博客将介绍Trie树的常见应用,包括:Trie…...
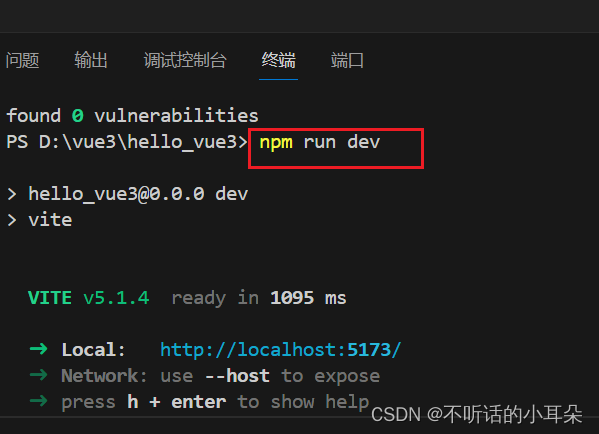
2. vue 工程创建
1. 基于 vite创建 官方文档: https://v3.cn.vuejs.org/guide/installation.html#vite vite官网: https://vitejs.cn 使用vite创建的优势: 开发环境中,无需打包操作,可快速的冷启动。轻量快速的热重载(HMR)。真正的按需编译,不再…...

2024绿色能源、城市规划与环境国际会议(ICGESCE 2024)
2024绿色能源、城市规划与环境国际会议(ICGESCE 2024) 一、【会议简介】 随着全球气候变化和环境问题日益严重,绿色能源和可持续发展已成为全球关注的焦点。本次会议旨在汇聚全球在绿色能源、城市规划与环境领域的专家、学者和实践者,共同探讨和分享关于…...
0门槛电子画册制作
电子画册制作,门槛低至零,也可以制作出如此精美的电子画册吗?别担心,这个问题早已解决,今天就教你如何0门槛制作电子画册。 选择合适的企业宣传册制作软件,如FLBOOK在线制作电子杂志平台等。这个工具提供…...
C语言----冒泡排序进阶
冒泡排序大家应该到写过吧。但大家可能知道到的冒泡排序有两种方法。而我呢,最近学习到了另外一种方法,现在知道三种方法了。所以想与大家分享一下。但是缺点是第三种是第二种的自实现版。第一种就是我们平常写的普通冒泡排序。第二种就是qsort。第三种就…...
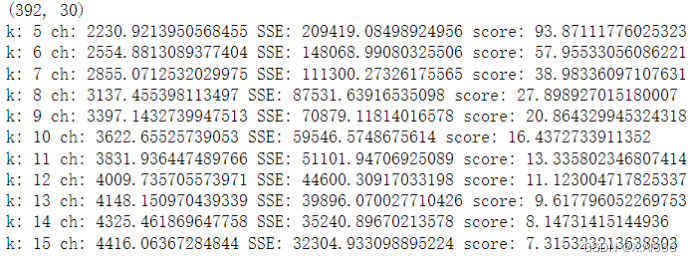
【机器学习】实验5,AAAI 会议论文聚类分析
本次实验以AAAI 2014会议论文数据为基础,要求实现或调用无监督聚类算法,了解聚类方法。 任务介绍 每年国际上召开的大大小小学术会议不计其数,发表了非常多的论文。在计算机领域的一些大型学术会议上,一次就可以发表涉及各个方向…...
安卓虚拟机ART和Dalvik
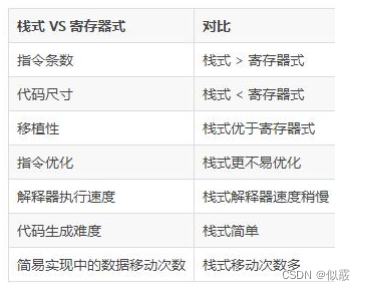
目录 一、JVM和Dalvik1.1 基于栈的虚拟机字节码指令执行过程 1.2 基于寄存器的虚拟机 二、ART与Dalvikdex2aotAndroid N的运作方式 三、总结 一、JVM和Dalvik Android应用程序运行在Dalvik/ART虚拟机,并且每一个应用程序对应有一个单独的Dalvik虚拟机实例。 Dalvik…...
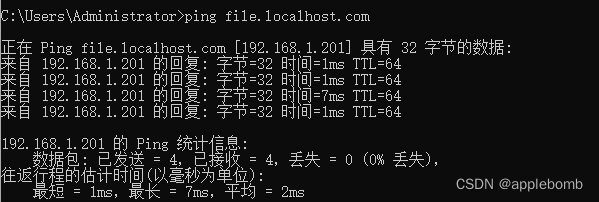
OPENWRT本地局域网模拟域名多IP
本地配置MINIO服务时,会遇到域名多IP的需求。当某一个节点失效时,可以通过域名访问平滑过渡到其它的节点继续服务。 【MINIO搭建过程略】 搭建完毕后,有4个节点,对应的docker搭建命令: docker run --nethost --rest…...
今日学习总结2024.3.2
最近的学习状态比较好,感觉非常享受知识进入脑子的过程,有点上头。 实验室一个星期唯一一天的假期周六,也就是今天,也完全不想放假出去玩啊,在实验室泡了一天。 很后悔之前胆小,没有提前投简历找实习&…...
Java虚拟机(JVM)从入门到实战【上】
Java虚拟机(JVM)从入门到实战【上】,涵盖类加载,双亲委派机制,垃圾回收器及算法等知识点,全系列6万字。 一、基础篇 P1 Java虚拟机导学课程 P2 初识JVM 什么是JVM Java Virtual Machine 是Java虚拟机。…...

SaaS 电商设计 (九) 动态化且易扩展的实现购物车底部弹层(附:一套普适的线上功能切量的发布方案)
目录 一.背景1.1 业务背景1.2 技术负债 二.技术目标三.方案设计3.1 解决移动端频繁发版3.1.1 场景分析3.1.2 技术方案 3.2 减少后端坏味道代码&无法灵活扩展问题3.2.1 通过抽象接口完成各自单独楼层渲染逻辑3.2.2 通过配置能力做到部分字段可配 四.升级上线(普适于高并发大…...

AI赋能引力波数据分析:WCD深度学习框架从噪声中探测暗物质信号
1. 项目概述:当引力波遇见AI,如何从噪声中“看见”暗物质?在引力波天文学这个前沿领域,我们正面临一个激动人心又充满挑战的时代。自从LIGO首次直接探测到引力波以来,我们不仅“听”到了黑洞并合的宇宙巨响,…...

NoderCMS开发者手册:扩展功能与自定义模块开发技巧
NoderCMS开发者手册:扩展功能与自定义模块开发技巧 【免费下载链接】nodercms 轻量级内容管理系统,基于 Node.js MongoDB 开发,拥有灵活的内容模型以及完善的权限角色机制。 项目地址: https://gitcode.com/gh_mirrors/no/nodercms N…...

iOS HTTPS抓包全链路指南:从Charles配置到SSL Pinning绕过
1. 为什么iOS HTTPS抓包比安卓难得多?——从SSL Pinning到系统证书信任链的硬门槛很多人第一次在Mac上打开Charles,连上iPhone,点开App发现一片空白:没有请求、没有响应、全是unknown。不是Charles坏了,也不是手机没连…...

Godot 4.2小课堂:用TileMap图层和AStarGrid2D,5分钟搞定一个可交互的2D导航Demo
Godot 4.2极简导航实战:5分钟构建TileMap智能寻路系统在游戏开发中,2D导航系统是构建沉浸式体验的核心组件之一。Godot 4.2引擎提供的TileMap与AStarGrid2D组合,为开发者提供了一套轻量级却功能强大的解决方案。本文将带你快速实现一个可交互…...

Capsule技术:游戏引擎与数据中心资源隔离的创新方案
1. Capsule技术核心解析:当游戏引擎遇见数据中心资源隔离在云游戏爆发式增长的今天,数据中心的GPU资源利用率成为决定商业成败的关键指标。传统游戏引擎设计存在一个根本性矛盾:现代GPU的计算能力呈指数级增长(如NVIDIA RTX 4090拥…...
)
股市学习心得-技术指标学习(布林线+MACD)
技术指标学习(布林线MACD)(所提供内容仅用于学习交流,不作为股市交易依据)首先,技术指标除了量比和换手率,都有滞后和造假的可能,因此不能用单一指标判断,也需要通过多个指标辅助决策。布林线MA…...

【企业级长文本AI落地红线】:金融/法律/医疗场景中超过64K tokens必踩的4类合规与事实性崩塌风险
更多请点击: https://intelliparadigm.com 第一章:【企业级长文本AI落地红线】:金融/法律/医疗场景中超过64K tokens必踩的4类合规与事实性崩塌风险 在金融、法律与医疗等强监管垂直领域,当AI系统处理超长文档(如IPO招…...

如何用Python脚本实现大麦网90%成功率的自动抢票:终极指南
如何用Python脚本实现大麦网90%成功率的自动抢票:终极指南 【免费下载链接】Automatic_ticket_purchase 大麦网抢票脚本 项目地址: https://gitcode.com/GitHub_Trending/au/Automatic_ticket_purchase 你是否曾经为了抢到心仪演唱会门票而守在电脑前疯狂刷新…...

贝叶斯网络基本概念 CS188 Note12 学习笔记
更好的阅读体验 问题引入 在Note11中我们提及到了联合分布,我们先要想的就是一个问题:如果我们有n个变量,每个变量有d种取值,那联合概率表一共需要dnd^ndn行,这是一个非常庞大的数据量,这时候就引入了贝叶斯网络。贝…...
)
94、【Agent】【OpenCode】edit 工具提示词(参数内容)
【声明】本博客所有内容均为个人业余时间创作,所述技术案例均来自公开开源项目(如Github,Apache基金会),不涉及任何企业机密或未公开技术,如有侵权请联系删除 背景 上篇 blog 【Agent】【OpenCode】edit 工…...