day08_分类品牌管理商品规格管理商品管理
文章目录
- 1 分类品牌管理
- 1.1 菜单添加
- 1.2 表结构介绍
- 1.3 页面制作
- 1.4 品牌列表加载
- 1.4.1 后端接口
- BrandController
- BrandService
- BrandMapper
- BrandMapper.xml
- 1.4.2 前端对接
- brand.js
- categoryBrand.vue
- 1.5 分类数据加载
- 1.6 列表查询
- 1.6.1 需求说明
- 1.6.2 后端接口
- 需求分析
- CategoryBrandDto
- CategoryBrand
- CategoryBrandController
- CategoryBrandService
- CategoryBrandMapper
- CategoryBrandMapper.xml
- 1.6.3 前端对接
- categoryBrand.js
- categoryBrand.vue
- 1.7 添加功能
- 1.7.1 需求说明
- 1.7.2 页面制作
- 1.7.3 后端接口
- CategoryBrandController
- CategoryBrandService
- CategoryBrandMapper
- CategoryBrandMapper.xml
- 1.7.4 前端对接
- 实现思路
- categoryBrand.js
- categoryBrand.vue
- 1.8 修改功能
- 1.8.1 需求说明
- 1.8.2 数据回显
- 1.8.3 提交修改
- 后端接口
- CategoryBrandController
- CategoryBrandService
- CategoryBrandMapper
- CategoryBrandMapper.xml
- 前端对接
- categoryBrand.js
- categoryBrand.vue
- 1.9 删除功能
- 1.9.1 需求说明
- 1.9.2 后端接口
- CategoryBrandController
- CategoryBrandService
- CategoryBrandMapper
- CategoryBrandMapper.xml
- 1.9.3 前端对接
- categoryBrand.js
- categoryBrand.vue
- 2 商品规格管理
- 2.1 商品规格介绍
- 2.2 菜单添加
- 2.3 表结构介绍
- 2.4 页面制作
- 2.5 列表查询
- 2.5.1 后端接口
- ProductSpec
- ProductSpecController
- ProductSpecService
- ProductSpecMapper
- ProductSpecMapper.xml
- 2.5.2 前端对接
- productSpec.js
- productSpec.vue
- 2.6 添加功能
- 2.6.1 需求说明
- 2.6.2 页面制作
- 2.6.3 后端接口
- ProductSpecController
- ProductSpecService
- ProductSpecMapper
- ProductSpecMapper.xml
- 2.6.4 前端对接
- 实现思路
- productSpec.js
- productSpec.vue
- 2.7 修改功能
- 2.7.1 需求说明
- 2.7.2 数据回显
- 2.7.4 后端接口
- ProductSpecController
- ProductSpecService
- ProductSpecMapper
- ProductSpecMapper.xml
- 2.7.5 前端对接
- productSpec.js
- productSpec.vue
- 2.8 删除功能
- 2.8.1 需求说明
- 2.8.2 后端接口
- ProductSpecController
- ProductSpecService
- ProductSpecMapper
- ProductSpecMapper.xml
- 2.8.2 前端对接
- productSpec.js
- productSpec.vue
- 3 商品管理
- 3.1 菜单添加
- 3.2 表结构介绍
- 3.3 页面制作
- 3.4 列表查询
- 3.4.1 需求说明
- 3.4.2 后端接口
- 需求分析
- ProductDto
- Product
- ProductController
- ProductService
- ProductMapper
- ProductMapper.xml
- ProductMapper.xml
1 分类品牌管理
分类品牌管理就是将分类的数据和品牌的数据进行关联,分类数据和品牌数据之间的关系是多对多的关系,因此需要单独使用一张数据表来存储该数据。
1.1 菜单添加
首先在系统中分类品牌管理的菜单,具体步骤如下所示:
1、在后台管理系统中通过系统管理的菜单管理添加分类品牌管理的相关菜单,如下所示:

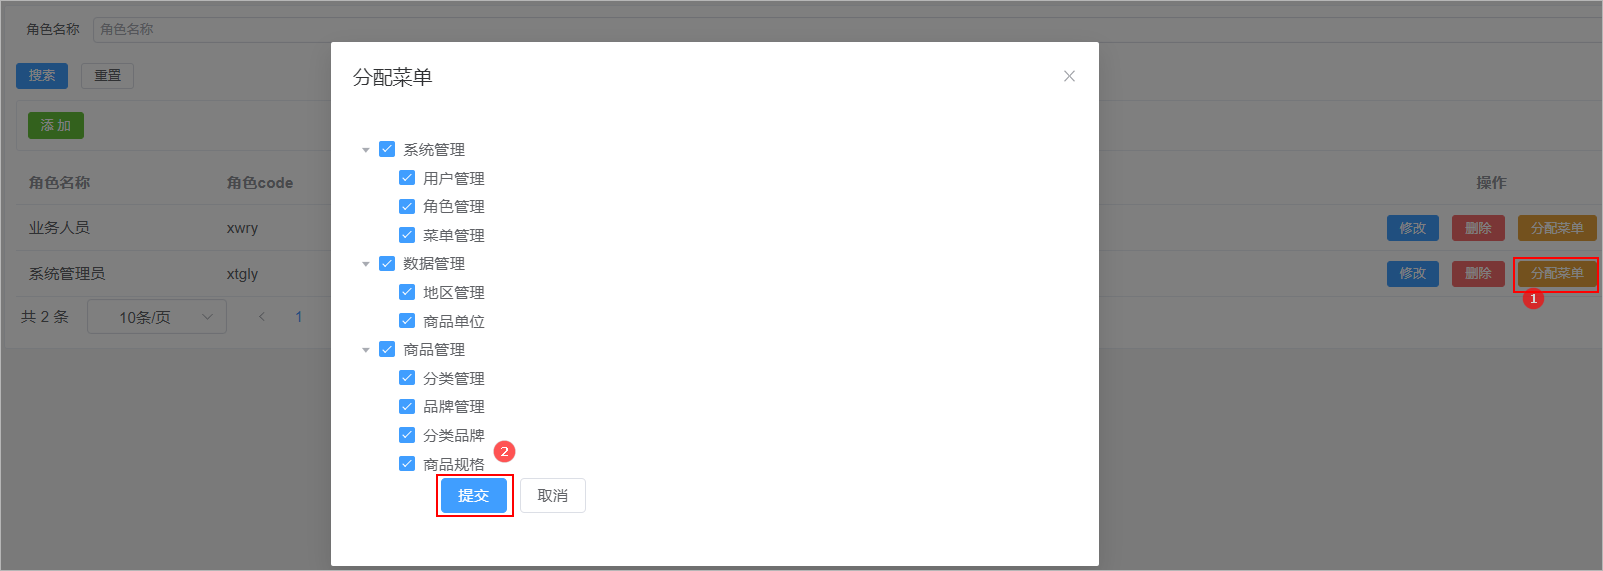
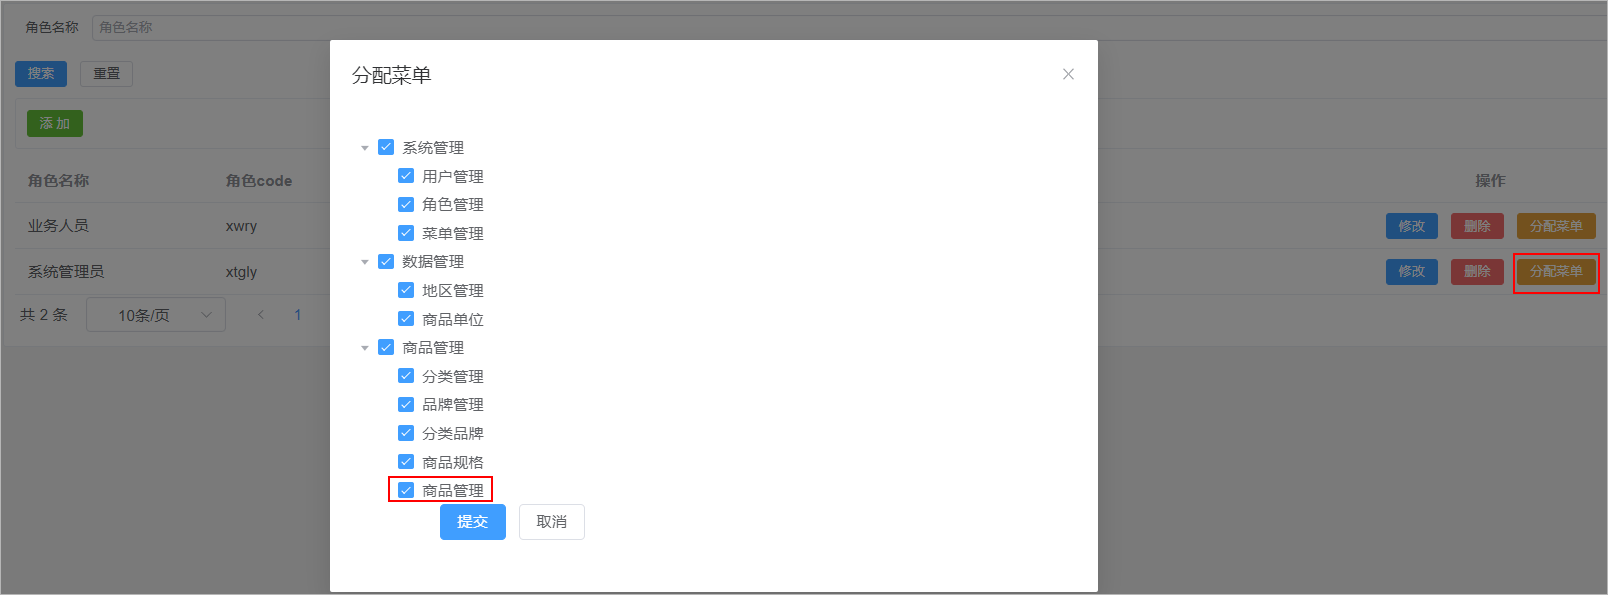
2、给系统管理员角色分配分类品牌管理菜单访问权限:

3、在前端项目中创建对应的页面,以及配置对应的异步路由
在src/views/product的文件夹,在该文件夹中加入分类管理页面文件,如下所示

在src/router/modules文件夹下创建product.js路由文件,文件内容如下所示:
const Layout = () => import('@/layout/index.vue')
const category = () => import('@/views/product/category.vue')
const brand = () => import('@/views/product/brand.vue')
const categoryBrand = () => import('@/views/product/categoryBrand.vue')export default [{path: '/product',component: Layout,name: 'product',meta: {title: '商品管理',},icon: 'Histogram',children: [{path: '/category',name: 'category',component: category,meta: {title: '分类管理',},},{path: '/brand',name: 'brand',component: brand,meta: {title: '品牌管理',},},{path: '/categoryBrand',name: 'categoryBrand',component: categoryBrand,meta: {title: '分类品牌',},},],},
]
1.2 表结构介绍
分类品牌数据所对应的表结构如下所示:
CREATE TABLE `category_brand` (`id` bigint NOT NULL AUTO_INCREMENT COMMENT 'ID',`brand_id` bigint DEFAULT NULL COMMENT '品牌ID',`category_id` bigint DEFAULT NULL COMMENT '分类ID',`create_time` timestamp NOT NULL DEFAULT CURRENT_TIMESTAMP COMMENT '创建时间',`update_time` timestamp NOT NULL DEFAULT CURRENT_TIMESTAMP ON UPDATE CURRENT_TIMESTAMP COMMENT '更新时间',`is_deleted` tinyint NOT NULL DEFAULT '0' COMMENT '删除标记(0:不可用 1:可用)',PRIMARY KEY (`id`)
) ENGINE=InnoDB AUTO_INCREMENT=3 DEFAULT CHARSET=utf8mb4 COLLATE=utf8mb4_0900_ai_ci COMMENT='分类品牌';
1.3 页面制作
对比如下页面结构,使用Element Plus制作出对应的页面,数据可以暂时使用假数据。
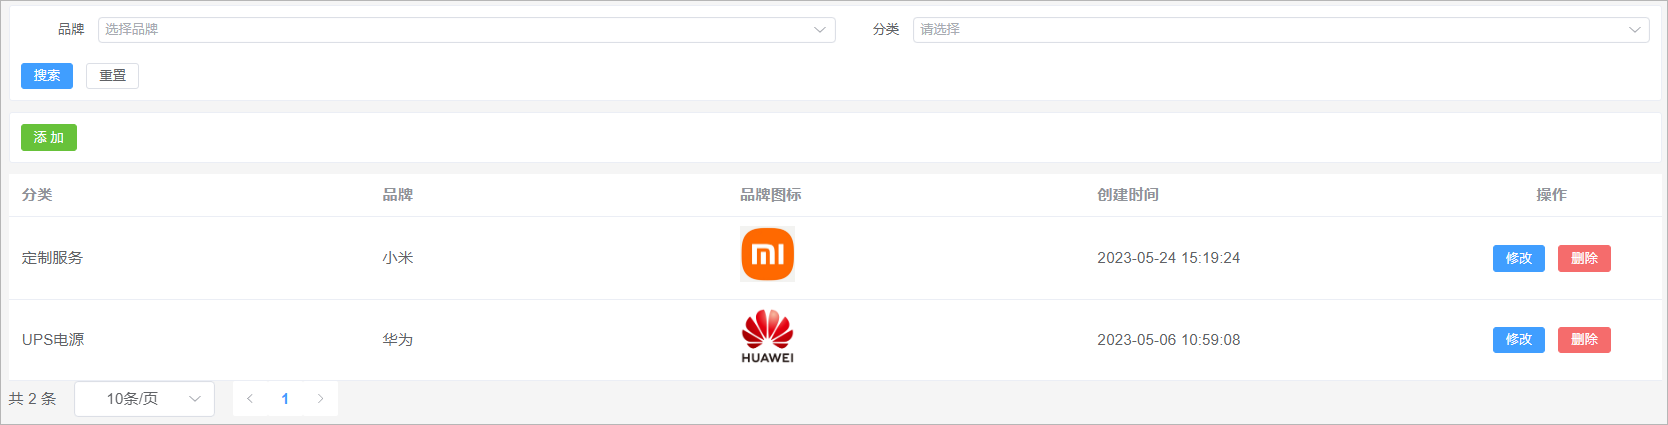
该页面可以将其分为4部分:
1、搜索表单
2、添加按钮
2、数据表格
3、分页组件
代码实现如下所示:
<template><div class="search-div"><el-form label-width="70px" size="small"><el-row><el-col :span="12"><el-form-item label="品牌"><el-selectclass="m-2"placeholder="选择品牌"size="small"style="width: 100%"><el-optionv-for="item in brandList":key="item.id":label="item.name":value="item.id"/></el-select></el-form-item></el-col><el-col :span="12"><el-form-item label="分类"><el-cascader:props="categoryProps"style="width: 100%"/></el-form-item></el-col></el-row><el-row style="display:flex"><el-button type="primary" size="small">搜索</el-button><el-button size="small">重置</el-button></el-row></el-form></div><div class="tools-div"><el-button type="success" size="small">添 加</el-button></div><el-table :data="list" style="width: 100%"><el-table-column prop="categoryName" label="分类" /><el-table-column prop="brandName" label="品牌" /><el-table-column prop="logo" label="品牌图标" #default="scope"><img :src="scope.row.logo" width="50" /></el-table-column><el-table-column prop="createTime" label="创建时间" /><el-table-column label="操作" align="center" width="200" ><el-button type="primary" size="small" >修改</el-button><el-button type="danger" size="small">删除</el-button></el-table-column></el-table><el-pagination:page-sizes="[10, 20, 50, 100]"layout="total, sizes, prev, pager, next":total="total"/></template><script setup>
import { ref } from 'vue'// ================数据模型定义  start ===============================================// 定义搜索表单数据模型
const brandList = ref([{"id": 2,"createTime": "2023-05-06 09:31:19","name": "华为","logo": "http://139.198.127.41:9000/sph/20230506/华为.png"},{"id": 1,"createTime": "2023-05-06 09:30:27","name": "小米","logo": "http://139.198.127.41:9000/sph/20230506/小米.png"}
])const props = {lazy: true,value: 'id',label: 'name',leaf: 'leaf',lazyLoad(node, resolve) {   // 加载数据的方法const data = [{"id": 643,"createTime": "2023-05-22 15:31:18","name": "玩具乐器","imageUrl": "https://lilishop-oss.oss-cn-beijing.aliyuncs.com/0f423fb60f084b2caade164fae25a9a0.png","parentId": 0,"status": 1,"orderNum": 10,"hasChildren": true,"children": null},{"id": 576,"createTime": "2023-05-22 15:31:13","name": "汽车用品","imageUrl": "https://lilishop-oss.oss-cn-beijing.aliyuncs.com/665dd952b54e4911b99b5e1eba4b164f.png","parentId": 0,"status": 1,"orderNum": 10,"hasChildren": true,"children": null},]resolve(data)  // 返回数据}
};
const categoryProps = ref(props)// 定义表格数据模型
const list = ref([{"id": 2,"createTime": "2023-05-24 15:19:24","brandId": 1,"categoryId": 99,"categoryName": "定制服务","brandName": "小米","logo": "http://139.198.127.41:9000/sph/20230506/小米.png"},{"id": 1,"createTime": "2023-05-06 10:59:08","brandId": 2,"categoryId": 76,"categoryName": "UPS电源\t","brandName": "华为","logo": "http://139.198.127.41:9000/sph/20230506/华为.png"}
])// 分页条数据模型
const total = ref(0)// =========   数据模型定义 end======================================================================</script><style scoped>
.search-div {margin-bottom: 10px;padding: 10px;border: 1px solid #ebeef5;border-radius: 3px;background-color: #fff;
}
.tools-div {margin: 10px 0;padding: 10px;border: 1px solid #ebeef5;border-radius: 3px;background-color: #fff;
}
</style>
1.4 品牌列表加载
需求:当页面加载完毕以后需要请求后端接口查询出系统中所有的品牌数据,将品牌数据在搜索表单的品牌下拉框中进行展示
1.4.1 后端接口
BrandController
表现层代码实现:
// com.atguigu.spzx.manager.controller
@GetMapping("/findAll")
public Result findAll() {List<Brand> list = brandService.findAll();return Result.build(list , ResultCodeEnum.SUCCESS) ;
}
BrandService
业务层代码实现:
// com.atguigu.spzx.manager.service.impl;
@Override
public List<Brand> findAll() {return brandMapper.findAll();
}
BrandMapper
持久层代码实现:
// com.atguigu.spzx.manager.mapper
@Mapper
public interface BrandMapper {public abstract List<Brand> findAll();
}
BrandMapper.xml
在BrandMapper.xml映射文件中添加如下的sql语句:
<select id="findAll" resultMap="brandMap">select <include refid="columns" />from brandwhere is_deleted = 0order by id desc
</select>
1.4.2 前端对接
brand.js
在src/api目录下添加brand.js文件,内容如下所示:
// 查询所有的品牌数据
export const FindAllBrand = () => {return request({url: `${api_name}/findAll`,method: 'get',})
}
categoryBrand.vue
修改categoryBrand.vue文件内容,如下所示:
<script setup>
import { ref , onMounted } from 'vue'
import { FindAllBrand } from '@/api/brand.js'// onMounted钩子函数
onMounted(() => {selectAllBrandList() // 查询所有的品牌数据
})const selectAllBrandList = async () => {const { data } = await FindAllBrand()brandList.value = data
}</script>
1.5 分类数据加载
需求:当页面加载完毕以后需要查询出系统中所对应的所有的一级分类数据,将一级分类数据在搜索表单的分类下拉框中进行展示,当用户选择某一个一级分类的时候,需要将该一级分类下所对应的二级分类查询出来…
分析:根据一个分类的id查询该分类下所对应的子分类数据该接口已经编写过了,因此只需要针对前端页面进行修改接口
代码实现:
<script setup>
import { FindCategoryByParentId } from '@/api/category.js'const props = {lazy: true,value: 'id',label: 'name',leaf: 'leaf',async lazyLoad(node, resolve) {   // 加载数据的方法if (typeof node.value == 'undefined') node.value = 0const { data } = await FindCategoryByParentId(node.value)data.forEach(function(item) {       //hasChildren判断是否有子节点item.leaf = !item.hasChildren})resolve(data)  // 返回数据  }
};const categoryProps = ref(props)
</script>
1.6 列表查询
1.6.1 需求说明
需求说明:
1、如果在搜索表单中选择了某一个品牌以及分类,那么此时就需要按照品牌id和分类id进行查询
2、搜索的时候需要进行分页搜索
1.6.2 后端接口
需求分析
1、前端提交请求参数的时候包含了两部分的参数:搜索条件参数、分页参数。搜索条件参数可以通过?拼接到请求路径后面,分页参数【当前页码、每页显示的数据条数】可以让前端通过请求路径传递过来
2、后端查询完毕以后需要给前端返回一个分页对象,分页对象中就封装了分页相关的参数(当前页数据、总记录数、总页数…)
3、前端进行参数传递的时候,不一定会传递搜索条件,因此sql语句的编写需要使用到动态sql
CategoryBrandDto
定义一个用来封装搜索条件的实体类:
// com.atguigu.spzx.model.dto.product
@Data
public class CategoryBrandDto {private Long brandId;private Long categoryId;
}
CategoryBrand
针对当前要操作的数据库表定义一个与之对应的实体类:
// com.atguigu.spzx.model.entity.product
@Data
public class CategoryBrand extends BaseEntity {private Long brandId;private Long categoryId;// 扩展的属性用来封装前端所需要的数据private String categoryName;private String brandName;private String logo;}
CategoryBrandController
表现层代码实现:
// com.atguigu.spzx.manager.controller
@RestController
@RequestMapping(value = "/admin/product/categoryBrand")
public class CategoryBrandController {@Autowiredprivate CategoryBrandService categoryBrandService ;@GetMapping("{/page}/{limit}")public Result<PageInfo<CategoryBrand>> findByPage(@PathVariable Integer page, @PathVariable Integer limit, CategoryBrandDto CategoryBrandDto) {PageInfo<CategoryBrand> pageInfo = categoryBrandService.findByPage(page, limit, CategoryBrandDto);return Result.build(pageInfo , ResultCodeEnum.SUCCESS) ;}}
CategoryBrandService
业务层代码实现:
// com.atguigu.spzx.manager.service.impl;
@Service
public class CategoryBrandServiceImpl implements CategoryBrandService {@Autowiredprivate CategoryBrandMapper categoryBrandMapper ;@Overridepublic PageInfo<CategoryBrand> findByPage(Integer page, Integer limit, CategoryBrandDto CategoryBrandDto) {PageHelper.startPage(page , limit) ;List<CategoryBrand> categoryBrandList = categoryBrandMapper.findByPage(CategoryBrandDto) ;return new PageInfo<>(categoryBrandList);}}
CategoryBrandMapper
持久层代码实现:
// com.atguigu.spzx.manager.mapper;
@Mapper
public interface CategoryBrandMapper {public abstract List<CategoryBrand> findByPage(CategoryBrandDto CategoryBrandDto);
}
CategoryBrandMapper.xml
在CategoryBrandMapper映射文件中添加如下sql语句:
<?xml version="1.0" encoding="UTF-8" ?>
<!DOCTYPE mapper PUBLIC "-//mybatis.org//DTD Mapper 3.0//EN" "http://mybatis.org/dtd/mybatis-3-mapper.dtd">
<mapper namespace="com.atguigu.spzx.manager.mapper.CategoryBrandMapper"><resultMap id="categoryBrandMap" type="com.atguigu.spzx.model.entity.product.CategoryBrand" autoMapping="true"></resultMap><!-- 用于select查询公用抽取的列 --><sql id="columns">id,brand_id,category_id,create_time,update_time,is_deleted</sql><sql id="findPageWhere"><where><if test="brandId != null and brandId != ''">and cb.brand_id = #{brandId}</if><if test="categoryId != null and categoryId != ''">and cb.category_id = #{categoryId}</if>and cb.is_deleted = 0</where></sql><select id="findByPage" resultMap="categoryBrandMap">selectcb.id,cb.brand_id,cb.category_id,cb.create_time,cb.update_time,c.name as categoryName,b.name as brandName, b.logofrom category_brand cbleft join category c on c.id = cb.category_idleft join brand b  on b.id = cb.brand_id<include refid="findPageWhere"/>order by cb.id desc</select></mapper>
1.6.3 前端对接
categoryBrand.js
在src/api文件夹下创建categoryBrand.js文件,如下所示:
import request from '@/utils/request'const api_name = '/admin/product/categoryBrand'// 分页列表
export const GetCategoryBrandPageList = (page, limit, searchObj) => {return request({url: `${api_name}/${page}/${limit}`,method: 'get',params: searchObj,})
}
categoryBrand.vue
修改categoryBrand.vue文件中的内容,如下所示:
<div class="search-div"><el-form label-width="70px" size="small"><el-row><el-col :span="12"><el-form-item label="品牌"><el-selectclass="m-2"placeholder="选择品牌"size="small"style="width: 100%"v-model="queryDto.brandId"><el-optionv-for="item in brandList":key="item.id":label="item.name":value="item.id"/></el-select></el-form-item></el-col><el-col :span="12"><el-form-item label="分类"><el-cascader:props="categoryProps"style="width: 100%"v-model="searchCategoryIdList"/></el-form-item></el-col></el-row><el-row style="display:flex"><el-button type="primary" size="small" @click="fetchData()">搜索</el-button><el-button size="small" @click="resetData">重置</el-button></el-row></el-form>
</div><script setup>
import { GetCategoryBrandPageList } from '@/api/categoryBrand.js'// 搜索表单数据模型
const queryDto = ref({ brandId: '', categoryId: '' })
const searchCategoryIdList = ref([])//分页条数据模型
const pageParamsForm = {page: 1,   // 页码limit: 10, // 每页记录数
}
const pageParams = ref(pageParamsForm)    // onMounted钩子函数
onMounted(() => {selectAllBrandList() // 查询所有的品牌数据fetchData()
})//重置
const resetData = () => {queryDto.value = { brandId: '', categoryId: '' }fetchData()
}//页面变化
const handleSizeChange = size => {pageParams.value.limit = sizefetchData()
}
const handleCurrentChange = number => {pageParams.value.page = numberfetchData()
}// 分页列表查询
//分页列表
const fetchData = async () => {if (searchCategoryIdList.value.length == 3) {queryDto.value.categoryId = searchCategoryIdList.value[2]}const { data } = await GetCategoryBrandPageList( pageParams.value.page, pageParams.value.limit, queryDto.value)list.value = data.listtotal.value = data.total
}</script>
1.7 添加功能
1.7.1 需求说明
当用户点击添加按钮的时候,那么此时就弹出对话框,在该对话框中需要展示添加分类品牌表单。当用户在该表单中点击提交按钮的时候那么此时就需要将表单进行提交,在后端需要将提交过来的表单数据保存到数据库中即可。
如下所示:
1.7.2 页面制作
具体代码如下所示:
<div class="tools-div"><el-button type="success" size="small" @click="addShow">添 加</el-button>
</div><el-dialog v-model="dialogVisible" title="添加或修改" width="30%"><el-form label-width="120px"><el-form-item label="品牌"><el-selectclass="m-2"placeholder="选择品牌"size="small"><el-optionv-for="item in brandList":key="item.id":label="item.name":value="item.id"/></el-select></el-form-item><el-form-item label="分类"><el-cascader:props="categoryProps"/></el-form-item><el-form-item><el-button type="primary">提交</el-button><el-button @click="dialogVisible = false">取消</el-button></el-form-item></el-form>
</el-dialog><script setup>//进入添加
const addShow = () => {dialogVisible.value = true
}</script>
1.7.3 后端接口
CategoryBrandController
表现层代码实现:
// com.atguigu.spzx.manager.controller
@PostMapping("/save")
public Result save(@RequestBody CategoryBrand categoryBrand) {categoryBrandService.save(categoryBrand);return Result.build(null , ResultCodeEnum.SUCCESS) ;
}
CategoryBrandService
业务层代码实现:
// com.atguigu.spzx.manager.service.impl;
@Override
public void save(CategoryBrand categoryBrand) {categoryBrandMapper.save(categoryBrand) ;
}
CategoryBrandMapper
持久层代码实现:
// com.atguigu.spzx.manager.mapper;
@Mapper
public interface CategoryBrandMapper {public abstract void save(CategoryBrand categoryBrand);
}
CategoryBrandMapper.xml
在CategoryBrandMapper映射文件中添加如下sql语句:
<insert id="save">insert into category_brand (id,brand_id,category_id,create_time,update_time ,is_deleted) values (#{id},#{brandId},#{categoryId},now(),now(),0)
</insert>
1.7.4 前端对接
实现思路
1、给表单绑定数据模型
2、给提交按钮绑定点击事件
3、点击按钮请求后端地址
categoryBrand.js
在src/api文件夹下创建categoryBrand.js文件,如下所示:
// 保存信息
export const SaveCategoryBrand = categoryBrand => {return request({url: `${api_name}/save`,method: 'post',data: categoryBrand,})
}
categoryBrand.vue
修改categoryBrand.vue文件中的内容,如下所示:
<el-dialog v-model="dialogVisible" title="添加或修改" width="30%"><el-form label-width="120px"><el-form-item label="品牌"><el-selectclass="m-2"placeholder="选择品牌"size="small"v-model="categoryBrand.brandId"><el-optionv-for="item in brandList":key="item.id":label="item.name":value="item.id"/></el-select></el-form-item><el-form-item label="分类"><el-cascader:props="categoryProps"v-model="categoryBrand.categoryId"/></el-form-item><el-form-item><el-button type="primary" @click="saveOrUpdate">提交</el-button><el-button @click="dialogVisible = false">取消</el-button></el-form-item></el-form>
</el-dialog><script setup>
import { SaveCategoryBrand } from '@/api/categoryBrand.js'
import { ElMessage, ElMessageBox } from 'element-plus'const defaultForm = {       //页面表单数据id: '',brandId: '',categoryId: '',
}
const categoryBrand = ref(defaultForm)    //提交保存与修改
const saveOrUpdate = () => {if (categoryBrand.value.brandId == '') {ElMessage.info('品牌信息必须选择')return}//categoryId为数组:[1,2,3]if (categoryBrand.value.categoryId.length != 3) {ElMessage.info('分类信息必须选择')return}//系统只需要三级分类idcategoryBrand.value.categoryId = categoryBrand.value.categoryId[2]if (!categoryBrand.value.id) {saveData()}
}// 新增
const saveData = async () => {await SaveCategoryBrand(categoryBrand.value)dialogVisible.value = falseElMessage.success('操作成功')fetchData()
}
</script>
1.8 修改功能
1.8.1 需求说明
当用户点击修改按钮的时候,那么此时就弹出对话框,在该对话框中需要将当前行所对应的分类品牌数据在该表单页面进行展示。当用户在该表单中点击提交按钮的时候那么此时就需要将表单进行提交,在后端需要提交过来的表单数据修改数据库中的即可。
效果如下所示:
1.8.2 数据回显
分析:
1、使用添加数据的表单即可
2、要将当前操作行的数据展示在表单中,那么此时需要用到插槽
代码如下所示:
<el-table-column label="操作" align="center" width="200" ><el-button type="primary" size="small" @click="editShow(scope.row)">修改</el-button>
</el-table-column><script setup>//进入修改
const editShow = row => {// ????categoryBrand.value = rowdialogVisible.value = true
}</script>
1.8.3 提交修改
后端接口
CategoryBrandController
表现层代码实现:
// com.atguigu.spzx.manager.controller
@PutMapping("updateById")
public Result updateById(@RequestBody CategoryBrand categoryBrand) {categoryBrandService.updateById(categoryBrand);return Result.build(null , ResultCodeEnum.SUCCESS) ;
}
CategoryBrandService
业务层代码实现:
// com.atguigu.spzx.manager.service.impl;
@Override
public void updateById(CategoryBrand categoryBrand) {categoryBrandMapper.updateById(categoryBrand) ;
}
CategoryBrandMapper
持久层代码实现:
// com.atguigu.spzx.manager.mapper;
@Mapper
public interface CategoryBrandMapper {public abstract void updateById(CategoryBrand categoryBrand);
}
CategoryBrandMapper.xml
在CategoryBrandMapper映射文件中添加如下sql语句:
<update id="updateById" >update category_brand set<if test="brandId != null and brandId != ''">brand_id = #{brandId},</if><if test="categoryId != null and categoryId != ''">category_id = #{categoryId},</if>update_time =  now()whereid = #{id}
</update>
前端对接
categoryBrand.js
在src/api文件夹下创建categoryBrand.js文件,如下所示:
// 修改信息
export const UpdateCategoryBrandById = categoryBrand => {return request({url: `${api_name}/updateById`,method: 'put',data: categoryBrand,})
}
categoryBrand.vue
修改categoryBrand.vue文件中的内容,如下所示:
<script setup>
import { UpdateCategoryBrandById } from '@/api/categoryBrand.js'//提交保存与修改
const saveOrUpdate = () => {...//系统只需要三级分类idcategoryBrand.value.categoryId = categoryBrand.value.categoryId[2]if (!categoryBrand.value.id) {saveData()} else {updateData() }
}// 修改
const updateData = async () => {await UpdateCategoryBrandById(categoryBrand.value)dialogVisible.value = falseElMessage.success('操作成功')fetchData()
}
</script>
1.9 删除功能
1.9.1 需求说明
当点击删除按钮的时候此时需要弹出一个提示框,询问是否需要删除数据?如果用户点击是,那么此时向后端发送请求传递id参数,后端接收id参数进行逻辑删除。
效果如下所示:
1.9.2 后端接口
CategoryBrandController
表现层代码实现:
// com.atguigu.spzx.manager.controller
@DeleteMapping("/deleteById/{id}")
public Result deleteById(@PathVariable Long id) {categoryBrandService.deleteById(id);return Result.build(null , ResultCodeEnum.SUCCESS) ;
}
CategoryBrandService
业务层代码实现:
// com.atguigu.spzx.manager.service.impl;
@Override
public void deleteById(Long id) {categoryBrandMapper.deleteById(id) ;
}
CategoryBrandMapper
持久层代码实现:
// com.atguigu.spzx.manager.mapper;
@Mapper
public interface CategoryBrandMapper {public abstract void deleteById(Long id);
}
CategoryBrandMapper.xml
在CategoryBrandMapper映射文件中添加如下sql语句:
<update id="deleteById">update category_brand setupdate_time = now() ,is_deleted = 1whereid = #{id}
</update>
1.9.3 前端对接
categoryBrand.js
在src/api文件夹下创建categoryBrand.js文件,如下所示:
// 根据id删除数据
export const DeleteCategoryBrandById = id => {return request({url: `${api_name}/deleteById/${id}`,method: 'delete',})
}
categoryBrand.vue
修改categoryBrand.vue文件中的内容,如下所示:
<el-table-column label="操作" align="center" width="200" #default="scope"><el-button type="danger" size="small" @click="remove(scope.row.id)">删除</el-button>
</el-table-column><script setup>
import { DeleteCategoryBrandById } from '@/api/categoryBrand.js'
import { ElMessage, ElMessageBox } from 'element-plus'//删除
const remove = async id => {ElMessageBox.confirm('此操作将永久删除该记录, 是否继续?', 'Warning', {confirmButtonText: '确定',cancelButtonText: '取消',type: 'warning',}).then(async () => {await DeleteCategoryBrandById(id)ElMessage.success('删除成功')fetchData()}).catch(() => {ElMessage.info('取消删除')})
}
</script>
2 商品规格管理
2.1 商品规格介绍
在电商项目中,商品规格指的是商品属性、型号、尺寸、颜色等具体描述商品特点和属性的标准化信息。
以手机为例子,它的规格可能包括以下几个方面:
1、操作系统:Android、iOS、HarmonyOS 等。
2、屏幕尺寸:5.5 吋、6.7 吋等。
3、分辨率:1920x1080、2960x1440、2532x1170 等。
4、运行内存:6GB、8GB、12GB 等。
5、存储容量:64GB、128GB、256GB 等。
6、摄像头:单摄、双摄、四摄等。
7、电池容量:3500mAh、4500mAh、5000mAh 等。
以T恤衫举例子,它的规格可能包括以下几个方面:
1、颜色:白色
2、尺码:S、M、L、XL等
3、款式:圆领、V领、印花等
2.2 菜单添加
首先在系统中添加商品规格管理的菜单,具体步骤如下所示:
1、在后台管理系统中通过系统管理的菜单管理添加商品规格管理的相关菜单,如下所示:

2、给系统管理员角色分配商品规格管理菜单访问权限:
3、在前端项目中创建对应的页面,以及配置对应的异步路由
在src/views/product的文件夹中加入商品规格管理页面文件,如下所示:

在src/router/modules文件夹下创建product.js路由文件,文件内容如下所示:
const Layout = () => import('@/layout/index.vue')
const category = () => import('@/views/product/category.vue')
const brand = () => import('@/views/product/brand.vue')
const categoryBrand = () => import('@/views/product/categoryBrand.vue')
const productSpec = () => import('@/views/product/productSpec.vue')export default [{path: '/product',component: Layout,name: 'product',meta: {title: '商品管理',},icon: 'Histogram',children: [{path: '/category',name: 'category',component: category,meta: {title: '分类管理',},},{path: '/brand',name: 'brand',component: brand,meta: {title: '品牌管理',},},{path: '/categoryBrand',name: 'categoryBrand',component: categoryBrand,meta: {title: '分类品牌',},},{path: '/productSpec',name: 'productSpec',component: productSpec,meta: {title: '商品规格',},},],},
]
2.3 表结构介绍
产品规格数据所对应的表结构如下所示:
CREATE TABLE `product_spec` (`id` bigint NOT NULL AUTO_INCREMENT COMMENT 'ID',`spec_name` varchar(100) CHARACTER SET utf8mb3 COLLATE utf8_general_ci DEFAULT NULL COMMENT '规格名称',`spec_value` text CHARACTER SET utf8mb3 COLLATE utf8_general_ci COMMENT '规格值:"[{"key":"颜色","valueList":["蓝","白","红"]]"',`create_time` timestamp NOT NULL DEFAULT CURRENT_TIMESTAMP COMMENT '创建时间',`update_time` timestamp NOT NULL DEFAULT CURRENT_TIMESTAMP ON UPDATE CURRENT_TIMESTAMP COMMENT '更新时间',`is_deleted` tinyint NOT NULL DEFAULT '0' COMMENT '删除标记(0:不可用 1:可用)',PRIMARY KEY (`id`)
) ENGINE=InnoDB AUTO_INCREMENT=4 DEFAULT CHARSET=utf8mb4 COLLATE=utf8mb4_0900_ai_ci COMMENT='商品规格';
2.4 页面制作
对比如下页面结构,使用Element Plus制作出对应的页面,数据可以暂时使用假数据。

该页面可以将其分为3部分:
1、添加按钮
2、数据表格
3、分页条
代码实现如下所示:
<template><div class="tools-div"><el-button type="success" size="small">添 加</el-button></div><el-table :data="list" style="width: 100%"><el-table-column prop="specName" label="规格名称" /><el-table-column label="规格值" #default="scope"><divv-for="(item1, index1) in scope.row.specValue":key="index1"style="padding: 5px; margin: 0;width: 100%;">{{ item1.key }}:<spanv-for="(item2, index2) in item1.valueList":key="index2"class="div-atrr">{{ item2 }}</span></div></el-table-column><el-table-column prop="createTime" label="创建时间" /><el-table-column label="操作" align="center" width="200"><el-button type="primary" size="small" >修改</el-button><el-button type="danger" size="small">删除</el-button></el-table-column></el-table><el-pagination:page-sizes="[10, 20, 50, 100]"layout="total, sizes, prev, pager, next":total="total"/></template><script setup>
import { ref } from 'vue'// 表格数据模型
const list = ref([{"id": 2,"createTime": "2023-05-06 12:56:08","specName": "笔记本电脑","specValue": [{"key":"内存","valueList":["8G","18G","32G"]}]},{"id": 1,"createTime": "2023-05-06 12:40:22","specName": "小米手机","specValue": [{"key":"颜色","valueList":["白色","红色","黑色"]},{"key":"内存","valueList":["8G","18G"]}]}
])// 分页条数据模型
const total = ref(0)</script><style scoped>
.tools-div {margin: 10px 0;padding: 10px;border: 1px solid #ebeef5;border-radius: 3px;background-color: #fff;
}.div-atrr {padding: 5px 10px;margin: 0 10px;background-color: powderblue;border-radius: 10px;
}</style>
2.5 列表查询
需求说明:当产品规格管理页面加载完毕以后就向后端发送分页查询请求,后端进行分页查询,返回分页结果数据。
2.5.1 后端接口
ProductSpec
创建一个与数据库表相对应的实体类,如下所示:
// com.atguigu.spzx.model.entity.product
@Data
public class ProductSpec extends BaseEntity {private String specName;   // 规格名称private String specValue;  // 规格值}
ProductSpecController
表现层代码实现:
// com.atguigu.spzx.manager.controller
@RestController
@RequestMapping(value="/admin/product/productSpec")
public class ProductSpecController {@Autowiredprivate ProductSpecService productSpecService ;@GetMapping("/{page}/{limit}")public Result<PageInfo<ProductSpec>> findByPage( @PathVariable Integer page, @PathVariable Integer limit) {PageInfo<ProductSpec> pageInfo = productSpecService.findByPage(page, limit);return Result.build(pageInfo , ResultCodeEnum.SUCCESS) ;}}
ProductSpecService
业务层代码实现:
// com.atguigu.spzx.manager.service.impl;
@Service
public class ProductSpecServiceImpl implements ProductSpecService {@Autowiredprivate ProductSpecMapper productSpecMapper ;@Overridepublic PageInfo<ProductSpec> findByPage(Integer page, Integer limit) {PageHelper.startPage(page , limit) ;List<ProductSpec> productSpecList = productSpecMapper.findByPage() ;return new PageInfo<>(productSpecList);}}
ProductSpecMapper
持久层代码实现:
// com.atguigu.spzx.manager.mapper
@Mapper
public interface ProductSpecMapper {public abstract List<ProductSpec> findByPage();
}
ProductSpecMapper.xml
在ProductSpecMapper.xml映射文件中添加如下sql语句:
<?xml version="1.0" encoding="UTF-8" ?>
<!DOCTYPE mapper PUBLIC "-//mybatis.org//DTD Mapper 3.0//EN" "http://mybatis.org/dtd/mybatis-3-mapper.dtd">
<mapper namespace="com.atguigu.spzx.manager.mapper.ProductSpecMapper"><resultMap id="productSpecMap" type="com.atguigu.spzx.model.entity.product.ProductSpec" autoMapping="true"></resultMap><!-- 用于select查询公用抽取的列 --><sql id="columns">id,spec_name,spec_value,create_time,update_time,is_deleted</sql><select id="findByPage" resultMap="productSpecMap">select <include refid="columns" />from product_specwhere is_deleted = 0order by id desc</select></mapper>
2.5.2 前端对接
productSpec.js
在src/api目录下添加productSpec.js文件,内容如下所示:
import request from '@/utils/request'const api_name = '/admin/product/productSpec'// 分页列表
export const GetProductSpecPageList = (page, limit) => {return request({url: `${api_name}/${page}/${limit}`,method: 'get'})
}
productSpec.vue
修改productSpec.vue文件,内容如下所示:
<el-paginationv-model:current-page="pageParams.page"v-model:page-size="pageParams.limit":page-sizes="[10, 20, 50, 100]"layout="total, sizes, prev, pager, next":total="total"@size-change="handleSizeChange"@current-change="handleCurrentChange"
/><script setup>
import { ref , onMounted } from 'vue'
import { GetProductSpecPageList } from '@/api/productSpec.js'//分页条数据模型
const pageParamsForm = {page: 1, // 页码limit: 10, // 每页记录数
}
const pageParams = ref(pageParamsForm)// 钩子函数
onMounted(()=> {fetchData()
})//页面变化
const handleSizeChange = size => {pageParams.value.limit = sizefetchData()
}
const handleCurrentChange = number => {pageParams.value.page = numberfetchData()
}// 分页查询
const fetchData = async () => {const { data } = await GetProductSpecPageList(pageParams.value.page , pageParams.value.limit) data.list.forEach(item => {item.specValue = JSON.parse(item.specValue)       // 将规格字符串转换成规格js对象});list.value = data.listtotal.value = data.total
}</script>
2.6 添加功能
2.6.1 需求说明
用户点击添加按钮,此时需要展示一个添加数据的表单对话框,用户填写表单数据,点击提交按钮,请求后端接口完成数据的保存操作。效果如下所示:
2.6.2 页面制作
页面代码如下所示:
<div class="tools-div"><el-button type="success" size="small" @click="addShow">添 加</el-button>
</div><el-dialog v-model="dialogVisible" title="添加或修改" width="40%"><el-form label-width="120px"><el-form-item label="规格名称"><el-input /></el-form-item><el-form-item><el-button size="default" type="success">添加新规格</el-button></el-form-item><el-form-item label="" v-for="(item , index) in productSpec.specValue" :key="index"><el-row><el-col :span="10"><el-inputv-model="item.key"placeholder="规格"style="width: 90%;"/></el-col><el-col :span="10"><el-inputv-model="item.valueList"placeholder="规格值(如:白色,红色)"style="width: 90%;"/></el-col><el-col :span="4"><el-button size="default" type="danger">删除</el-button></el-col></el-row>  </el-form-item><el-form-item align="right"><el-button type="primary">提交</el-button><el-button @click="dialogVisible = false">取消</el-button></el-form-item></el-form>
</el-dialog><script setup>
// 定义数据模型
const dialogVisible = ref(false)// 添加表单数据模型
const defaultForm = {id: '',specName: '',specValue: [{"key": "颜色","valueList": ["白色","红色","黑色"]},{"key": "内存","valueList": ["8G","18G"]}]
}
const productSpec = ref(defaultForm)//进入添加
const addShow = () => {dialogVisible.value = true
}</script>
2.6.3 后端接口
ProductSpecController
表现层代码实现:
// com.atguigu.spzx.manager.controller
@PostMapping("save")
public Result save(@RequestBody ProductSpec productSpec) {productSpecService.save(productSpec);return Result.build(null , ResultCodeEnum.SUCCESS) ;
}
ProductSpecService
业务层代码实现:
// com.atguigu.spzx.manager.service.impl;
@Override
public void save(ProductSpec productSpec) {productSpecMapper.save(productSpec) ;
}
ProductSpecMapper
持久层代码实现:
// com.atguigu.spzx.manager.mapper
@Mapper
public interface ProductSpecMapper {public abstract void save(ProductSpec productSpec);
}
ProductSpecMapper.xml
在ProductSpecMapper.xml映射文件中添加如下sql语句:
<insert id="save">insert into product_spec (id,spec_name,spec_value,create_time,update_time,is_deleted) values (#{id},#{specName},#{specValue},now(),now(),0)
</insert>
2.6.4 前端对接
实现思路
1、给表单绑定数据模型
2、给提交按钮绑定点击事件
3、点击按钮请求后端地址
productSpec.js
在src/api目录下添加productSpec.js文件,内容如下所示:
// 保存信息
export const SaveProductSpec = productSpec => {return request({url: `${api_name}/save`,method: 'post',data: productSpec,})
}
productSpec.vue
修改productSpec.vue文件,内容如下所示:
<el-dialog v-model="dialogVisible" title="添加或修改" width="40%"><el-form label-width="120px"><el-form-item label="规格名称"><el-input v-model="productSpec.specName"/></el-form-item><el-form-item><el-button size="default" type="success" @click="addSpec">添加新规格</el-button></el-form-item><el-form-item label="" v-for="(item , index) in productSpec.specValue" :key="index"><el-row><el-col :span="10"><el-inputv-model="item.key"placeholder="规格"style="width: 90%;"/></el-col><el-col :span="10"><el-inputv-model="item.valueList"placeholder="规格值(如:白色,红色)"style="width: 90%;"/></el-col><el-col :span="4"><el-button size="default" type="danger" @click="delSpec(index)">删除</el-button></el-col></el-row>  </el-form-item><el-form-item align="right"><el-button type="primary" @click="saveOrUpdate">提交</el-button><el-button @click="dialogVisible = false">取消</el-button></el-form-item></el-form>
</el-dialog><script setup>
import { SaveProductSpec } from '@/api/productSpec.js'
import { ElMessage, ElMessageBox } from 'element-plus'//进入添加
const addShow = () => {dialogVisible.value = trueproductSpec.value = {id: '',specName: '',specValue: []}
}// 页面添加规格操作
const addSpec = () => {productSpec.value.specValue.push({})
}// 页面删除规格元素
const delSpec = (index) => {productSpec.value.specValue.splice(index , 1)
} // 提交表单
const saveOrUpdate = async () => {if(!productSpec.value.id)  {saveData()}}// 保存数据
const saveData = async () => {// 需要将productSpec.value.specValue转换成json字符串提交到后端,通过clone一个新的对象进行实现const productSpecClone = JSON.parse(JSON.stringify(productSpec.value))// 将productSpecClone.specValue.valueList转换成数组,因为后端需要的数组格式的数据[{"key":"内存","valueList":["8G","18G","32G"]}]// v-model绑定的数据模型为字符串productSpecClone.specValue.forEach(item => {     item.valueList = item.valueList.split(",")})productSpecClone.specValue = JSON.stringify(productSpecClone.specValue)console.log(productSpecClone);// 提交表单await SaveProductSpec(productSpecClone)dialogVisible.value = falseElMessage.success('操作成功')fetchData()}
</script>
2.7 修改功能
2.7.1 需求说明
当用户点击修改按钮的时候,那么此时就弹出对话框,在该对话框中需要将当前行所对应的产品规格数据在该表单页面进行展示。当用户在该表单中点击提交按钮的时候那么此时就需要将表单进行提交,在后端需要提交过来的表单数据修改数据库中的即可。
效果如下所示:
2.7.2 数据回显
分析:
1、使用添加数据的表单即可
2、要将当前操作行的数据展示在表单中,那么此时需要用到插槽
代码如下所示:
<el-table-column label="操作" align="center" width="200" #default="scope"><el-button type="primary" size="small" @click="editShow(scope.row)">修改</el-button>
</el-table-column><script setup>//进入修改
const editShow = row => {productSpec.value = row dialogVisible.value = true
}</script>
2.7.4 后端接口
ProductSpecController
表现层代码实现:
// com.atguigu.spzx.manager.controller
@PutMapping("updateById")
public Result updateById(@RequestBody ProductSpec productSpec) {productSpecService.updateById(productSpec);return Result.build(null , ResultCodeEnum.SUCCESS) ;
}
ProductSpecService
业务层代码实现:
// com.atguigu.spzx.manager.service.impl;
@Override
public void updateById(ProductSpec productSpec) {productSpecMapper.updateById(productSpec);
}
ProductSpecMapper
持久层代码实现:
// com.atguigu.spzx.manager.mapper
@Mapper
public interface ProductSpecMapper {public abstract void updateById(ProductSpec productSpec);
}
ProductSpecMapper.xml
在ProductSpecMapper.xml映射文件中添加如下sql语句:
<update id="updateById" >update product_spec set<if test="specName != null and specName != ''">spec_name = #{specName},</if><if test="specValue != null and specValue != ''">spec_value = #{specValue},</if>update_time =  now()whereid = #{id}
</update>
2.7.5 前端对接
productSpec.js
在src/api目录下添加productSpec.js文件,内容如下所示:
// 修改信息
export const UpdateProductSpecById = productSpec => {return request({url: `${api_name}/updateById`,method: 'put',data: productSpec,})
}
productSpec.vue
修改productSpec.vue文件,内容如下所示:
<script setup>
import { UpdateProductSpecById } from '@/api/productSpec.js'// 提交表单
const saveOrUpdate = async () => {if(!productSpec.value.id)  {saveData()}else {updateData()}}// 保存修改
const updateData = async () => {// 需要将productSpec.value.specValue转换成json字符串提交到后端,通过clone一个新的对象进行实现const productSpecClone = JSON.parse(JSON.stringify(productSpec.value))// 将productSpecClone.specValue.valueList转换成数组,因为后端需要的数组格式的数据[{"key":"内存","valueList":["8G","18G","32G"]}]// v-model绑定的数据模型为字符串productSpecClone.specValue.forEach(item => {  console.log(typeof item.valueList)if(typeof item.valueList === 'string') {   // 针对规格数据修改完毕以后数据类型有可能会变成string,针对string类型的数据将其转换成数组item.valueList = item.valueList.split(",")}   })productSpecClone.specValue = JSON.stringify(productSpecClone.specValue)// 提交表单await UpdateProductSpecById(productSpecClone)dialogVisible.value = falseElMessage.success('操作成功')fetchData()}
</script>
2.8 删除功能
2.8.1 需求说明
当点击删除按钮的时候此时需要弹出一个提示框,询问是否需要删除数据?如果用户点击是,那么此时向后端发送请求传递id参数,后端接收id参数进行逻辑删除。
效果如下所示:
2.8.2 后端接口
ProductSpecController
表现层代码实现:
// com.atguigu.spzx.manager.controller
@DeleteMapping("/deleteById/{id}")
public Result removeById(@PathVariable Long id) {productSpecService.deleteById(id);return Result.build(null , ResultCodeEnum.SUCCESS) ;
}
ProductSpecService
业务层代码实现:
// com.atguigu.spzx.manager.service.impl;
@Override
public void deleteById(Long id) {productSpecMapper.deleteById(id);
}
ProductSpecMapper
持久层代码实现:
// com.atguigu.spzx.manager.mapper
@Mapper
public interface ProductSpecMapper {public abstract void deleteById(Long id);
}
ProductSpecMapper.xml
在ProductSpecMapper.xml映射文件中添加如下sql语句:
<update id="deleteById">update product_spec setupdate_time = now() ,is_deleted = 1whereid = #{id}
</update>
2.8.2 前端对接
productSpec.js
在src/api目录下添加productSpec.js文件,内容如下所示:
// 根据id删除数据
export const DeleteProductSpecById = id => {return request({url: `${api_name}/deleteById/${id}`,method: 'delete',})
}
productSpec.vue
修改productSpec.vue文件,内容如下所示:
<el-table-column label="操作" align="center" width="200" #default="scope"><el-button type="danger" size="small" @click="remove(scope.row.id)">删除</el-button>
</el-table-column><script setup>
import { DeleteProductSpecById } from '@/api/productSpec.js'//删除
const remove = async id => {ElMessageBox.confirm('此操作将永久删除该记录, 是否继续?', 'Warning', {confirmButtonText: '确定',cancelButtonText: '取消',type: 'warning',}).then(async () => {await DeleteProductSpecById(id)ElMessage.success('删除成功')fetchData()}).catch(() => {ElMessage.info('取消删除')})
}</script>
3 商品管理
商品管理就是对电商项目中所涉及到的商品数据进行维护。
3.1 菜单添加
首先在系统中添加商品管理的菜单,具体步骤如下所示:
1、在后台管理系统中通过系统管理的菜单管理添加商品管理的相关菜单,如下所示:

2、给系统管理员角色分配商品商品管理菜单访问权限:
3、在前端项目中创建对应的页面,以及配置对应的异步路由
在src/views/product的文件夹中加入商品管理页面文件,如下所示:

在src/router/modules文件夹下创建product.js路由文件,文件内容如下所示:
const Layout = () => import('@/layout/index.vue')
const category = () => import('@/views/product/category.vue')
const brand = () => import('@/views/product/brand.vue')
const categoryBrand = () => import('@/views/product/categoryBrand.vue')
const productSpec = () => import('@/views/product/productSpec.vue')
const product = () => import('@/views/product/product.vue')export default [{path: '/product',component: Layout,name: 'product',meta: {title: '商品管理',},icon: 'Histogram',children: [{path: '/category',name: 'category',component: category,meta: {title: '分类管理',},},{path: '/brand',name: 'brand',component: brand,meta: {title: '品牌管理',},},{path: '/categoryBrand',name: 'categoryBrand',component: categoryBrand,meta: {title: '分类品牌',},},{path: '/productSpec',name: 'productSpec',component: productSpec,meta: {title: '商品规格',},},{path: '/product',name: 'product',component: product,meta: {title: '商品管理',},},],},
]
3.2 表结构介绍
商品数据所对应的表结构如下所示:
CREATE TABLE `product` (`id` bigint NOT NULL AUTO_INCREMENT COMMENT 'ID',`name` varchar(255) CHARACTER SET utf8mb3 COLLATE utf8_general_ci DEFAULT NULL COMMENT '商品名称',`brand_id` bigint DEFAULT NULL COMMENT '品牌ID',`category1_id` bigint DEFAULT NULL COMMENT '一级分类id',`category2_id` bigint DEFAULT NULL COMMENT '二级分类id',`category3_id` bigint DEFAULT NULL COMMENT '三级分类id',`unit_name` varchar(50) CHARACTER SET utf8mb3 COLLATE utf8_general_ci DEFAULT NULL COMMENT '计量单位',`slider_urls` text COMMENT '轮播图',`spec_value` varchar(255) DEFAULT NULL COMMENT '商品规格json',`status` tinyint NOT NULL DEFAULT '0' COMMENT '线上状态:0-初始值,1-上架,-1-自主下架',`audit_status` tinyint NOT NULL DEFAULT '0' COMMENT '审核状态:0-初始值,1-通过,-1-未通过',`audit_message` varchar(255) CHARACTER SET utf8mb3 COLLATE utf8_general_ci DEFAULT NULL COMMENT '审核信息',`create_time` timestamp NOT NULL DEFAULT CURRENT_TIMESTAMP COMMENT '创建时间',`update_time` timestamp NOT NULL DEFAULT CURRENT_TIMESTAMP ON UPDATE CURRENT_TIMESTAMP COMMENT '更新时间',`is_deleted` tinyint NOT NULL DEFAULT '0' COMMENT '删除标记(0:不可用 1:可用)',PRIMARY KEY (`id`)
) ENGINE=InnoDB AUTO_INCREMENT=2 DEFAULT CHARSET=utf8mb4 COLLATE=utf8mb4_0900_ai_ci COMMENT='商品';
3.3 页面制作
直接导入资料中所提供的product.vue页面,以及对应的product.js
3.4 列表查询
3.4.1 需求说明
需求说明:
1、如果在搜索表单中选择了某一个品牌以及分类,那么此时就需要按照品牌id和分类id进行查询
2、搜索的时候需要进行分页搜索
3.4.2 后端接口
需求分析
1、前端提交请求参数的时候包含了两部分的参数:搜索条件参数、分页参数。搜索条件参数可以通过?拼接到请求路径后面,分页参数【当前页码、每页显示的数据条数】可以让前端通过请求路径传递过来
2、后端查询完毕以后需要给前端返回一个分页对象,分页对象中就封装了分页相关的参数(当前页数据、总记录数、总页数…)
3、前端进行参数传递的时候,不一定会传递搜索条件,因此sql语句的编写需要使用到动态sql
ProductDto
定义一个用来封装请求参数的Dto对象,如下所示:
// com.atguigu.spzx.model.dto.product;
@Data
public class ProductDto extends BaseEntity {private Long brandId;private Long category1Id;private Long category2Id;private Long category3Id;}
Product
针对当前要操作的数据库表定义一个与之对应的实体类:
// com.atguigu.spzx.model.entity.product
@Data
public class Product extends BaseEntity {private String name;					// 商品名称private Long brandId;					// 品牌IDprivate Long category1Id;				// 一级分类idprivate Long category2Id;				// 二级分类idprivate Long category3Id;				// 三级分类idprivate String unitName;				// 计量单位private String sliderUrls;				// 轮播图private String specValue;				// 商品规格值json串private Integer status;					// 线上状态:0-初始值,1-上架,-1-自主下架private Integer auditStatus;			// 审核状态private String auditMessage;			// 审核信息// 扩展的属性,用来封装响应的数据private String brandName;				// 品牌private String category1Name;			// 一级分类private String category2Name;			// 二级分类private String category3Name;			// 三级分类}
ProductController
表现层代码实现
// com.atguigu.spzx.manager.controller;
@RestController
@RequestMapping(value="/admin/product/product")
public class ProductController {@Autowiredprivate ProductService productService ;@GetMapping(value = "/{page}/{limit}")public Result<PageInfo<Product>> findByPage(@PathVariable Integer page, @PathVariable Integer limit, ProductDto productDto) {PageInfo<Product> pageInfo = productService.findByPage(page, limit, productDto);return Result.build(pageInfo , ResultCodeEnum.SUCCESS) ;}}
ProductService
业务层代码实现
//  com.atguigu.spzx.manager.service.impl;
@Service
public class ProductServiceImpl implements ProductService {@Autowiredprivate ProductMapper productMapper ;@Overridepublic PageInfo<Product> findByPage(Integer page, Integer limit, ProductDto productDto) {PageHelper.startPage(page , limit) ;List<Product> productList =  productMapper.findByPage(productDto) ;return new PageInfo<>(productList);}}
ProductMapper
持久层代码实现
@Mapper
public interface ProductMapper {public abstract List<Product> findByPage(ProductDto productDto);
}
ProductMapper.xml
在ProductMapper.xml映射文件中添加如下的sql语句:
<?xml version="1.0" encoding="UTF-8" ?>
<!DOCTYPE mapper PUBLIC "-//mybatis.org//DTD Mapper 3.0//EN" "http://mybatis.org/dtd/mybatis-3-mapper.dtd">
<mapper namespace="com.atguigu.spzx.manager.mapper.ProductMapper"><resultMap id="productMap" type="com.atguigu.spzx.model.entity.product.Product" autoMapping="true"></resultMap><!-- 用于select查询公用抽取的列 --><sql id="columns">id,name,brand_id,category1_id,category2_id,category3_id,unit_name,slider_urls,spec_value,status,audit_status,audit_message,create_time,update_time,is_deleted</sql><sql id="findPageWhere"><where><if test="brandId != null and brandId != ''">and p.brand_id = #{brandId}</if><if test="category1Id != null and category1Id != ''">and p.category1_id = #{category1Id}</if><if test="category2Id != null and category2Id != ''">and p.category2_id = #{category2Id}</if><if test="category3Id != null and category3Id != ''">and p.category3_id = #{category3Id}</if>and p.is_deleted = 0</where></sql><select id="findByPage" resultMap="productMap">selectp.id, p.name , p.brand_id , p.category1_id , p.category2_id , p.category3_id, p.unit_name,p.slider_urls , p.spec_value , p.status , p.audit_status , p.audit_message , p.create_time , p.update_time , p.is_deleted ,b.name brandName , c1.name category1Name , c2.name category2Name , c2.name category3Namefrom product pLEFT JOIN brand b on b.id = p.brand_idLEFT JOIN category c1 on c1.id = p.category1_idLEFT JOIN category c2 on c2.id = p.category2_idLEFT JOIN category c3 on c3.id = p.category2_id<include refid="findPageWhere"/>order by id desc</select></mapper>
age , limit) ;
List productList = productMapper.findByPage(productDto) ;
return new PageInfo<>(productList);
}
}
#### ProductMapper持久层代码实现```java
@Mapper
public interface ProductMapper {public abstract List<Product> findByPage(ProductDto productDto);
}
ProductMapper.xml
在ProductMapper.xml映射文件中添加如下的sql语句:
<?xml version="1.0" encoding="UTF-8" ?>
<!DOCTYPE mapper PUBLIC "-//mybatis.org//DTD Mapper 3.0//EN" "http://mybatis.org/dtd/mybatis-3-mapper.dtd">
<mapper namespace="com.atguigu.spzx.manager.mapper.ProductMapper"><resultMap id="productMap" type="com.atguigu.spzx.model.entity.product.Product" autoMapping="true"></resultMap><!-- 用于select查询公用抽取的列 --><sql id="columns">id,name,brand_id,category1_id,category2_id,category3_id,unit_name,slider_urls,spec_value,status,audit_status,audit_message,create_time,update_time,is_deleted</sql><sql id="findPageWhere"><where><if test="brandId != null and brandId != ''">and p.brand_id = #{brandId}</if><if test="category1Id != null and category1Id != ''">and p.category1_id = #{category1Id}</if><if test="category2Id != null and category2Id != ''">and p.category2_id = #{category2Id}</if><if test="category3Id != null and category3Id != ''">and p.category3_id = #{category3Id}</if>and p.is_deleted = 0</where></sql><select id="findByPage" resultMap="productMap">selectp.id, p.name , p.brand_id , p.category1_id , p.category2_id , p.category3_id, p.unit_name,p.slider_urls , p.spec_value , p.status , p.audit_status , p.audit_message , p.create_time , p.update_time , p.is_deleted ,b.name brandName , c1.name category1Name , c2.name category2Name , c2.name category3Namefrom product pLEFT JOIN brand b on b.id = p.brand_idLEFT JOIN category c1 on c1.id = p.category1_idLEFT JOIN category c2 on c2.id = p.category2_idLEFT JOIN category c3 on c3.id = p.category2_id<include refid="findPageWhere"/>order by id desc</select></mapper>
相关文章:
day08_分类品牌管理商品规格管理商品管理
文章目录 1 分类品牌管理1.1 菜单添加1.2 表结构介绍1.3 页面制作1.4 品牌列表加载1.4.1 后端接口BrandControllerBrandServiceBrandMapperBrandMapper.xml 1.4.2 前端对接brand.jscategoryBrand.vue 1.5 分类数据加载1.6 列表查询1.6.1 需求说明1.6.2 后端接口需求分析Categor…...
手写分布式配置中心(二)实现分布式配置中心的简单版本
这一篇文章比较简单,就是一个增删改查的服务端和一个获取配置的客户端,旨在搭建一个简单的配置中心架构,代码在 https://gitee.com/summer-cat001/config-center 服务端 服务端选择用springboot 2.7.14搭建,设计了4个接口/confi…...
跨境知识分享:什么是动态IP?和静态IP有什么区别?
对于我们跨境人来说,清楚地了解IP地址、代理IP等这些基础知识,并学会正确地使用IP地址对于保障店铺的安全性和稳定性至关重要,尤其是理解动态IP和静态IP之间的区别,以及如何利用这些知识来防止账号关联,对于每个电商卖…...
liunx安装jdk、redis、nginx
jdk安装 下载jdk,解压。 sudo tar -zxvf /usr/local/jdk-8u321-linux-x64.tar.gz -C /usr/local/ 在/etc/profile文件中的,我们只需要编辑一下,在文件的最后加上java变量的有关配置(其他内容不要动)。 export JAVA_HOME/usr/l…...
【C++】STL学习之旅——初识STL,认识string类
string类 1 STL 简介2 STL怎么学习3 STL缺陷4 string4.1 初识 string4.2 初步使用构造函数成员函数 5 小试牛刀Thanks♪(・ω・)ノ谢谢阅读!!!下一篇文章见!!! 1 STL 简介 …...
Java学习笔记002——类的修饰符
在Java语言中,类的访问修饰符决定了其它类能够访问该类的方式。类有如下4种访问修饰符,在创建类时用于类的声明: 1、public: 当一个类被声明为public时,它可以从任何其他类中被访问,无论这些类位于哪个包中。通常&am…...

华为交换机常见命令总结
文章目录 查看MAC地址清除MAC地址修改MAC地址的老化时间查询STP信息查询接口与vlan的信息 查看MAC地址 查看所有MAC地址表项 display mac-address 查看静态MAC地址表项 display mac-address static //会把动态的过滤掉 查看动态MAC地址表项 display mac-address dynamic //会…...
Android 签名机制
V1是内部文件单个签 但是增加apk文件目录下面随意增加文件并不会有影响,它只关心meta-info文件 mf汇总清单的各个文件sha256 V2 整个APK文件,按文件进行hash 那么便不能随便在这里面增加文件了,增加了签名分块(不然签名信息存哪里)这里涉及一个文件概念 …...
鸿蒙(HarmonyOS)项目方舟框架(ArkUI)之Scroll容器组件
鸿蒙(HarmonyOS)项目方舟框架(ArkUI)之Scroll容器组件 一、操作环境 操作系统: Windows 10 专业版、IDE:DevEco Studio 3.1、SDK:HarmonyOS 3.1 二、Scroll容器组件 可滚动的容器组件,当子组件的布局尺寸超过父组件…...
FreeRTOS操作系统学习——FreeRTOS工程创建
FreeROTS工程创建 详细步骤 如无特殊情况,大部人都要配置为外部高速时钟 另外,本实验使用了FreeRTOS,FreeRTOS的时基使用的是Systick,而 STM32CubeMX中默认的HAL库时基也是Systick,为了避免可能的冲突,最…...
)
6. 使用 Spring Boot进行开发(Developing with Spring Boot)
6. 使用 Spring Boot进行开发(Developing with Spring Boot) 本节详细介绍了如何使用Spring Boot。它涵盖考虑构建系统、自动配置以及如何运行应用程序等主题。我们还介绍一些 Spring Boot 最新做法。虽然 Spring Boot 没有什么特别之处(它只…...
)
IP地址工具,判断IP是否在指定范围内(支持ipv6)
常用方法,判断一个ip是否在指定的ip范围内,范围可能包括起始ip范围或者掩码形式,无其它依赖, package com.yk.ip;import java.math.BigInteger; import java.net.InetAddress; import java.net.UnknownHostException; import jav…...
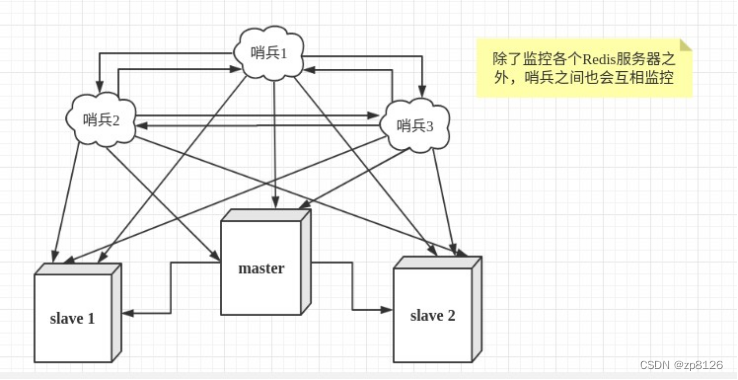
Redis 之六:Redis 的哨兵模式(Sentinel)
Redis 哨兵(Sentinel)模式是一种高可用性解决方案,用于监控和自动故障转移的集群系统。 在 Redis Sentinel 架构中,哨兵是一组运行在特殊模式下的 Redis 进程,它们可以监控一个或多个主从复制结构中的 Redis 主服务器以…...

总线要点笔记
1. AXI/AHB/APB差异 AMBA (Advanced Microcontroller Bus Architecture) 高级处理器总线架构 AHB (Advanced High-performance Bus) 高级高性能总线 ASB (Advanced System Bus) 高级系统总线 APB (Advanced Peripheral Bus) 高级外围总线 AXI (Advanced eXtensible Interface) …...

RK3566 linux iperf网络测试
一、开发环境 系统:buildroot; 在Linux目标板和Windows PC上运行iperf进行测试; 二、调试 1、查询目标板上的iperf 使用终端助手连接目标板,然后输入命令查询iperf的版本: rootrk3566-buildroot:~# iperf -v iperf version …...

【无标题】计算机主要应用于哪些领域
科学计算(或称为数值计算)、数据处理(信息管理)、辅助工程、生产自动化、人工智能。1、科学计算(或称为数值计算):早期的计算机主要用于科学计算。目前,科学计算仍然是计算机应用的一…...
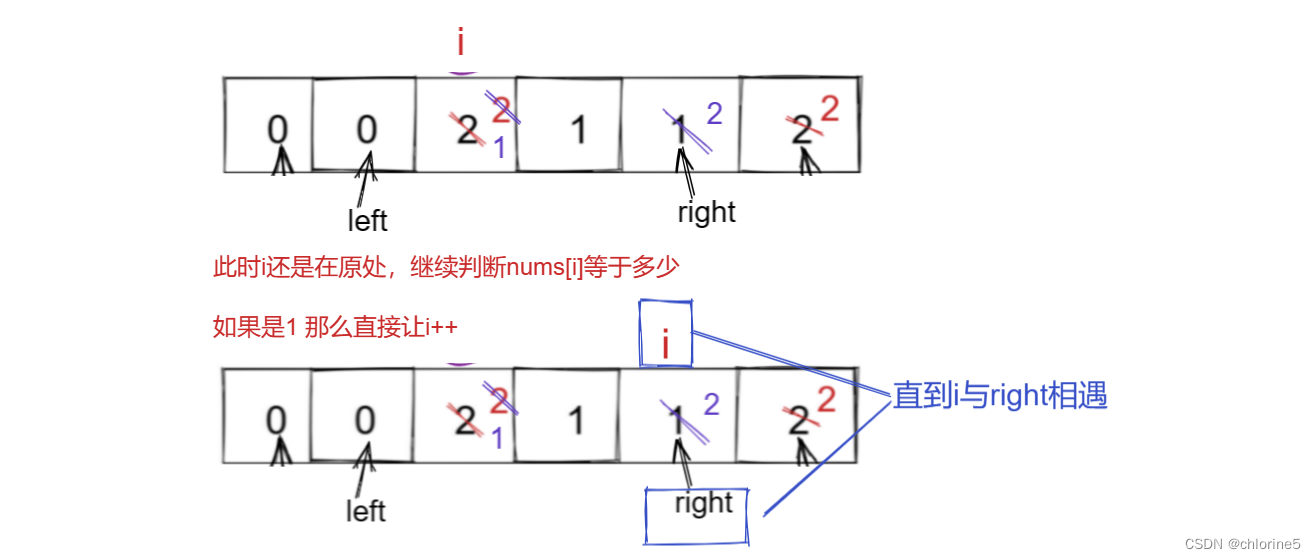
力扣精选算法100道——颜色分类(双指针和三指针俩种方法解决此题)
目录 🚩了解题意 🚩算法分析 第一种方法:双指针 🚩代码实现一 第二种方法:三指针 🚩代码实现二 🚩了解题意 本题将整数0,1,2代表红白篮,nums中的整数并…...
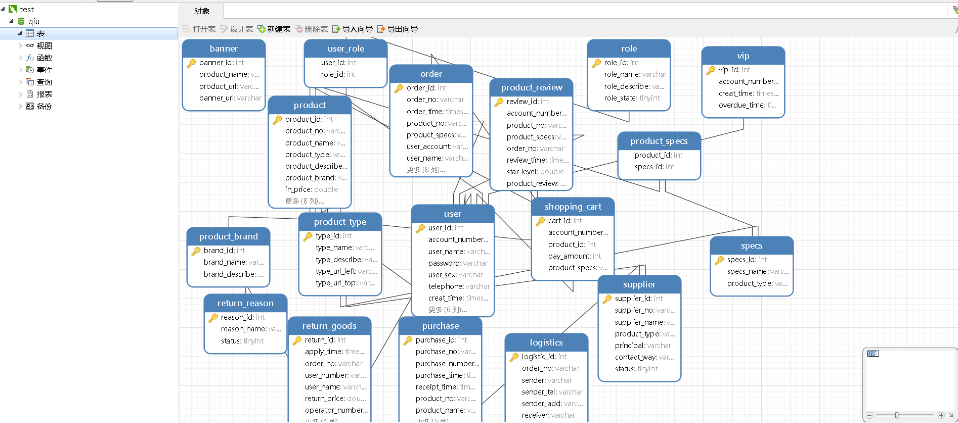
基于Java SSM springboot+VUE+redis实现的前后端分类版网上商城项目
基于Java SSM springbootVUEredis实现的前后端分类版网上商城项目 博主介绍:多年java开发经验,专注Java开发、定制、远程、文档编写指导等,csdn特邀作者、专注于Java技术领域 作者主页 央顺技术团队 Java毕设项目精品实战案例《500套》 欢迎点赞 收藏 ⭐…...

01——什么是人工智能
学习形式分类 1) 有监督学习 有监督学习(supervised learning),需要你事先需要准备好要输入数据(训练样本)与真实的输出结果(参考答案),然后通过计算机的学习得到一个预测模型,再用…...

AI国漫女神这样画!傻瓜式的云端SD(stable diffusion)部署教程 - 白嫖4090、无需代码、一键启动
一、前言:为什么要云端部署stable diffusion? 前段时间一直在用midjourney进行Ai绘画,但是发现Midjourney绘画的限制有点多很死板,很多图都不能画,懂得都懂。想使用Midjourney可以看这个:( 【推荐】Midjo…...

希捷ST20000NM007D深度评测:20TB企业级硬盘,兼顾容量与稳定的实用之选
在企业存储领域,“容量”与“稳定”始终是核心诉求。随着大数据、云存储、边缘计算的快速发展,企业对存储设备的要求愈发严苛——既需要足够大的空间承载海量数据,又要保证724小时不间断运行的稳定性,同时还要控制功耗与运营成本。…...

如何高效配置跨架构模拟器:Box64专业用户的终极实践指南
如何高效配置跨架构模拟器:Box64专业用户的终极实践指南 【免费下载链接】box64 Box64 - Linux Userspace x86_64 Emulator with a twist, targeted at ARM64, RV64 and LoongArch Linux devices 项目地址: https://gitcode.com/gh_mirrors/bo/box64 Box64是…...

ODT怎么转PDF?2026年实测5种转换方法与在线工具对比
ODT(OpenDocument Text)是开源办公软件默认的文档格式,但在实际工作和分享中,PDF的通用性和防篡改特性让它成为更优选择。很多人拿到ODT文件后都会面临同一个问题:怎样才能快速转成PDF?本文将从多个角度展示…...

【ElevenLabs福建话语音落地实战】:20年语音AI专家亲授3大避坑指南与本地化部署全流程
更多请点击: https://codechina.net 第一章:ElevenLabs福建话语音落地的行业价值与技术定位 福建话(闽南语泉州/厦门腔)作为联合国教科文组织认定的“严重濒危语言”,其语音合成能力的工程化落地,已超越单…...

G-Helper完整指南:如何用10MB替代华硕Armoury Crate实现笔记本极致优化
G-Helper完整指南:如何用10MB替代华硕Armoury Crate实现笔记本极致优化 【免费下载链接】g-helper Lightweight Armoury Crate alternative for Asus laptops with nearly the same functionality. Works with ROG Zephyrus, Flow, TUF, Strix, Scar, ProArt, Vivob…...

终极游戏光标解决方案:YoloMouse让你的鼠标在游戏中清晰可见
终极游戏光标解决方案:YoloMouse让你的鼠标在游戏中清晰可见 【免费下载链接】YoloMouse Game Cursor Changer 项目地址: https://gitcode.com/gh_mirrors/yo/YoloMouse 你是否曾在激烈的游戏战斗中迷失了鼠标光标?当屏幕上特效绚烂、技能乱飞时&…...

海外渠道通知短信接口
在跨境业务体系中,企业常面临区域代理商分散、信息同步滞后、补货提醒不及时的问题,传统邮件、即时通讯易出现漏读、延迟,而国际渠道通知短信接口凭借触达稳定、实时性强的优势,成为跨境企业对接代理商的高效通信方案。本文从接口…...

如何用QKeyMapper在5分钟内搞定Windows设备按键映射:终极免费解决方案
如何用QKeyMapper在5分钟内搞定Windows设备按键映射:终极免费解决方案 【免费下载链接】QKeyMapper [按键映射工具] QKeyMapper,Qt开发Win10&Win11可用,不修改注册表、不需重新启动系统,可立即生效和停止。支持游戏手柄映射到…...

Chrome-Charset:三步解决浏览器网页乱码问题的终极指南
Chrome-Charset:三步解决浏览器网页乱码问题的终极指南 【免费下载链接】Chrome-Charset An extension used to modify the page default encoding for Chromium 55 based browsers. 项目地址: https://gitcode.com/gh_mirrors/ch/Chrome-Charset 你是否曾经…...

酷安UWP桌面客户端完整指南:大屏幕高效刷酷安的终极方案
酷安UWP桌面客户端完整指南:大屏幕高效刷酷安的终极方案 【免费下载链接】Coolapk-UWP 一个基于 UWP 平台的第三方酷安客户端 项目地址: https://gitcode.com/gh_mirrors/co/Coolapk-UWP 还在为手机小屏幕刷酷安而感到眼睛酸痛吗?想在27寸大屏幕上…...