Smart Light Random Memory Sprays Retinex 传统图像增强 SLRMSR
文章目录
- 前言
- 1、Smart Light Random Memory Sprays Retinex概况
- 2、Smart Light Random Memory Sprays Retinex的实现
- 2.1、SLRMSR算法的伪代码
- 2.2、初始化记忆喷雾(CreateInitialMemorySpray)
- 2.3、更新记忆喷雾 (UpdateMemorySpray)
- 2.4、计算颜色校正因子(ComputeColorCorrectionFactor)
- 2.5、应用强度重映射(ApplyIntensityRemapping)
- 2.6、应用引导滤波 (ApplyGuidedImageFiltering)
- 3、Smart Light Random Memory Sprays Retinex效果
前言
Smart Light Random Memory Sprays Retinex,即“智能光随机记忆喷雾Retinex”,简称SLRMSR。作为一种新的基于Retinex理论的图像增强算法,旨在解决图像亮度调整和颜色校正的问题。
1、Smart Light Random Memory Sprays Retinex概况
论文名称:
Smart light random memory sprays Retinex: a fast Retinex implementation for high-quality brightness adjustment and color correction
作者:
Nikola Banić,Sven Lončarić
“智能光随机记忆喷雾Retinex”(Smart Light Random Memory Sprays Retinex,简称SLRMSR),该算法提出了记忆喷雾的概念,以减少每个像素操作的数量,从而实现了快速的Retinex基础的局部图像增强。同时提出了一种有效的图像强度重映射的方法,进一步显著地提高了图像的质量。最后通过使用引导滤波作为替代的光照处理方法,减少了原有LRSR算法的光晕效应。作为一种新的基于Retinex理论的图像增强算法,在解决图像亮度调整和颜色校正的问题上,具有显著优势。
2、Smart Light Random Memory Sprays Retinex的实现
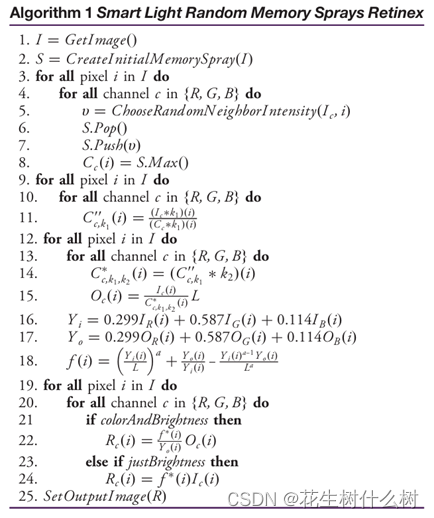
2.1、SLRMSR算法的伪代码
2.2、初始化记忆喷雾(CreateInitialMemorySpray)
图像第一个像素创建一个包含随机选择的邻近像素强度的记忆喷雾。
① 定义喷雾大小:
确定记忆喷雾参数的大小n,作为预设值,决定了喷雾中包含像素的数量。
② 选择邻近像素:
对于图像中每个像素,在其邻域定义一个包含n个随机选择的邻近像素区域。
③ 构建笛卡尔树:
对于选定的每个邻近像素,收集其RGB强度值,进行笛卡尔树的构造,其每个节点包含子树的最大值。
④ 存储喷雾内容:
构建好的笛卡尔树被作为存储记忆喷雾的数据结构,用于后续的像素处理。
2.3、更新记忆喷雾 (UpdateMemorySpray)
① 选择新像素:
当处理新的像素时,算法会从当前像素的局部邻域中选择一个新的邻近像素。
② 更新笛卡尔树:
新选定的像素强度值被添加到笛卡尔树中,同时,最旧的像素强度值被从树中移除。这种“先进先出”的更新机制确保了记忆喷雾始终反应最新的局部信息。
③ 计算最大值:
通过笛卡尔树的根节点,可以快速获取当前记忆喷雾中所有像素强度的最大值。
//基于随机内存喷雾Retinex(Random Memory Sprays Retinex)算法对输入的彩色图像进行白平衡处理
void RandomMemorySpraysRetinexPerformWhiteBalance(Mat source, Mat& destination, int N, int n, double upperBound, int rowsStep, int colsStep, double rFactor) {int rows = source.rows;int cols = source.cols;int R = rFactor * sqrt((double)(rows * rows + cols * cols)) + 0.5;Mat normalized;source.convertTo(normalized, CV_64FC3);int outputRows = rows / rowsStep;int outputCols = cols / colsStep;destination = Mat(outputRows, outputCols, CV_64FC3);Vec3d* input = (Vec3d*)normalized.data;Vec3d* inputPoint = input;Vec3d* output = (Vec3d*)destination.data;Vec3d* outputPoint = output;RNG random;CartesianTree<double>** qhs;qhs = new CartesianTree<double>*[N];for (int i = 0; i < N; ++i) {qhs[i] = new CartesianTree<double>[3];}for (int outputRow = 0; outputRow < outputRows; ++outputRow) {for (int outputCol = 0; outputCol < outputCols; ++outputCol) {int row = outputRow * rowsStep;int col = outputCol * colsStep;inputPoint = input + row * cols + col;outputPoint = output + outputRow * outputCols + outputCol;Vec3d& currentPoint = *inputPoint;Vec3d& finalPoint = *outputPoint;finalPoint = Vec3d(0, 0, 0);for (int i = 0; i < N; ++i) {Vec3d max = Vec3d(0, 0, 0);while (qhs[i][0].Size() < n) {double angle = 2 * CV_PI * random.uniform(0.0, 1.0);double r = R * random.uniform(0.0, 1.0);int newRow = row + r * sin(angle);int newCol = col + r * cos(angle);if (newRow >= 0 && newRow < rows && newCol >= 0 && newCol < cols) {Vec3d& newPoint = input[newRow * cols + newCol];for (int k = 0; k < 3; ++k) {qhs[i][k].Push(newPoint[k]);}}}for (int k = 0; k < 3; ++k) {if (max[k] < qhs[i][k].Max()) {max[k] = qhs[i][k].Max();}qhs[i][k].Pop();}for (int k = 0; k < 3; ++k) {if (max[k] == 0) {max[k] = 1;}finalPoint[k] += currentPoint[k] / max[k];}}finalPoint /= N;for (int i = 0; i < 3; ++i) {if (finalPoint[i] > 1) {finalPoint[i] = 1;}}}}for (int i = 0; i < N; ++i) {delete[] qhs[i];}delete[] qhs;double scaleFactor = upperBound;if (rowsStep > 1 || colsStep > 1) {resize(destination, destination, source.size());}destination = destination * scaleFactor - 1;destination.convertTo(destination, source.type());}
2.4、计算颜色校正因子(ComputeColorCorrectionFactor)
颜色校正因子是基于当前像素亮度值和记忆喷雾的最大强度计算得出。其主要用于调整像素的颜色,以便在不同的光照条件下保持颜色的一致性。
//光照校正算法的实现
void ApplyIllumination(Mat source, Mat illumination, Mat& destination, double upperBound) {vector<Mat> destinationChannels;split(source, destinationChannels);vector<Mat> illuminationChannels;split(illumination, illuminationChannels);for (int i = 0; i < destinationChannels.size(); ++i) {destinationChannels[i].convertTo(destinationChannels[i], CV_64FC1);divide(destinationChannels[i], illuminationChannels[i], destinationChannels[i]);}merge(destinationChannels, destination);double* check = (double*)destination.data;for (int i = 0; i < destination.rows * destination.cols * 3; ++i) {if (check[i] >= upperBound) {check[i] = upperBound - 1;}}destination.convertTo(destination, source.type());}
2.5、应用强度重映射(ApplyIntensityRemapping)
强度重映射主要用于改善图像亮度调整和颜色校正的方法,特别是在处理高光细节处,以防止过度增强造成细节的丢失。即,在增强图像暗区域的同时,保持亮区域的高光细节,从而获得更为自然的视觉效果。
① 计算初始及LRSR的亮度:
对于每个像素,首先计算其初始亮度Yi,及LRSR算法处理后的亮度Yo。
② 确定重映射的参数:
引入重映射参数,用于调整亮度的增加强度。
③ 计算调整后的亮度:
调整后的亮度是初始亮度Yi和处理后亮度Yo的凸组会。即:Yr = λi * Yi + (1 - λi) * Yo
其中,λi 是一个介于0和1之间的权重因子,主要基于初始亮度Yi和一个调整参数a来计算。
④ 计算权重因子:
权重因子λi,即:λi = (Yi / D) / (Yi / D + a)。
其中,D是颜色通道的最大值(对于8bit颜色通道,D通常是255)。λi的值越大,表示保留的初始亮度越多,处理后亮度的影响越小。
⑤ 过滤处理:
为了避免亮度增加的剧烈变化,对λi施以一个滤波器(例如使用5*5的均值核)进行平滑处理,得到平滑后的权重因子λ’i。
⑥ 计算最终亮度:
最终的亮度值,即:OpIci = λ’i * Yo + (1 - λ’i) * Ici。
其中OpIci是最终的输出亮度,Ici是原始图像中的像素亮度通道强度。
//基于随机内存喷雾Retinex算法对输入的彩色图像进行局部光照估计
void LightRandomMemorySpraysRetinexEstimateLocalIlumination(Mat source, Mat& destination, int N, int n, int inputKernelSize, int illuminantKernelSize, bool normalizeIlluminant = false, int rowsStep = 1, int colsStep = 1, double upperBound = 256.0, double rFactor = 1.0) {Mat retinex;RandomMemorySpraysRetinexPerformWhiteBalance(source, retinex, N, n, upperBound, rowsStep, colsStep, rFactor);Mat inputSource;Mat inputRetinex;source.convertTo(inputSource, CV_64FC3);retinex.convertTo(inputRetinex, CV_64FC3);Mat guidance;inputSource.copyTo(guidance);if (normalizeIlluminant) {Mat illuminant;divide(inputSource, inputRetinex, illuminant);vector<Mat> illuminantChannels;split(illuminant, illuminantChannels);Mat illuminantAverage = (illuminantChannels[0] + illuminantChannels[1] + illuminantChannels[2]) / 3;for (int i = 0; i < 3; ++i) {divide(illuminantChannels[i], illuminantAverage, illuminantChannels[i]);}merge(illuminantChannels, illuminant);inputSource = inputRetinex.mul(illuminant);}if (inputKernelSize > 1) {Mat averaging = Mat::ones(inputKernelSize, inputKernelSize, CV_64FC1) / (double)(inputKernelSize * inputKernelSize);boxFilter(inputSource, inputSource, -1, Size(inputKernelSize, inputKernelSize));boxFilter(inputRetinex, inputRetinex, -1, Size(inputKernelSize, inputKernelSize));}Mat illuminant;divide(inputSource, inputRetinex, illuminant);vector<Mat> illuminantChannels;if (illuminantKernelSize > 1) {Mat averaging = Mat::ones(illuminantKernelSize, illuminantKernelSize, CV_64FC1) / (double)(illuminantKernelSize * illuminantKernelSize);boxFilter(illuminant, illuminant, -1, Size(illuminantKernelSize, illuminantKernelSize));}illuminant.copyTo(destination);}
2.6、应用引导滤波 (ApplyGuidedImageFiltering)
使用引导滤波来处理重映射后的像素强度,以减少光晕效果并保留图像边缘。
其中,对图像进一步灰度化作为引导图像,进而采用引导滤波进行处理,最后输出目标图像。
//图像引导滤波
//对输入的图像img进行引导滤波,输出结果保存在result中。
void GuidedImageFilterC1(Mat img, Mat guidance, Mat& result, int r, double epsilon) {Mat p;img.convertTo(p, CV_64F);Mat I;guidance.convertTo(I, CV_64F);Mat meanI;boxFilter(I, meanI, -1, Size(r, r));Mat meanP;boxFilter(p, meanP, -1, Size(r, r));Mat corrI;boxFilter(I.mul(I), corrI, -1, Size(r, r));Mat corrIp;boxFilter(I.mul(p), corrIp, -1, Size(r, r));Mat varI = corrI - meanI.mul(meanI);Mat covIp = corrIp - meanI.mul(meanP);Mat a;divide(covIp, varI + epsilon, a);Mat b = meanP - a.mul(meanI);Mat meanA;boxFilter(a, meanA, -1, Size(r, r));Mat meanB;boxFilter(b, meanB, -1, Size(r, r));Mat q = meanA.mul(I) + meanB;q.convertTo(result, img.type());
}//基于引导图像的彩色图像滤波方法
//基于引导图像guidance对输入的彩色图像img进行引导滤波,输出结果保存在result中。
void GuidedImageFilterC3(Mat img, Mat guidance, Mat& result, int r, double epsilon) {vector<Mat> imgChannels;vector<Mat> guidanceChannels;split(img, imgChannels);split(guidance, guidanceChannels);vector<Mat> resultChannels;for (int i = 0; i < imgChannels.size(); ++i) {Mat channelResult;GuidedImageFilterC1(imgChannels[i], guidanceChannels[i], channelResult, r, epsilon);resultChannels.push_back(channelResult);}merge(resultChannels, result);}//基于引导图像和随机内存喷雾Retinex算法的彩色图像局部光照估计方法
void GuidedLightRandomMemorySpraysRetinexEstimateLocalIlumination(Mat source, Mat& destination, int N, int n, int inputKernelSize, int illuminantKernelSize, bool normalizeIlluminant = false, int rowsStep = 1, int colsStep = 1, double upperBound = 256.0, double rFactor = 1.0) {Mat retinex;//白平衡化处理RandomMemorySpraysRetinexPerformWhiteBalance(source, retinex, N, n, upperBound, rowsStep, colsStep, rFactor);Mat inputSource;Mat inputRetinex;source.convertTo(inputSource, CV_64FC3);retinex.convertTo(inputRetinex, CV_64FC3);Mat guidance;inputSource.copyTo(guidance);//归一化处理if (normalizeIlluminant) {Mat illuminant;divide(inputSource, inputRetinex, illuminant);vector<Mat> illuminantChannels;split(illuminant, illuminantChannels);Mat illuminantAverage = (illuminantChannels[0] + illuminantChannels[1] + illuminantChannels[2]) / 3;for (int i = 0; i < 3; ++i) {divide(illuminantChannels[i], illuminantAverage, illuminantChannels[i]);}merge(illuminantChannels, illuminant);inputSource = inputRetinex.mul(illuminant);}double value = 40;double epsilon = value * value;if (inputKernelSize > 1) {//平滑图像GuidedImageFilterC3(inputSource, guidance, inputSource, inputKernelSize, epsilon);GuidedImageFilterC3(inputRetinex, guidance, inputRetinex, inputKernelSize, epsilon);}Mat illuminant;divide(inputSource, inputRetinex, illuminant);vector<Mat> illuminantChannels;if (illuminantKernelSize > 1) {GuidedImageFilterC3(illuminant, guidance, illuminant, illuminantKernelSize, epsilon);}illuminant.copyTo(destination);}
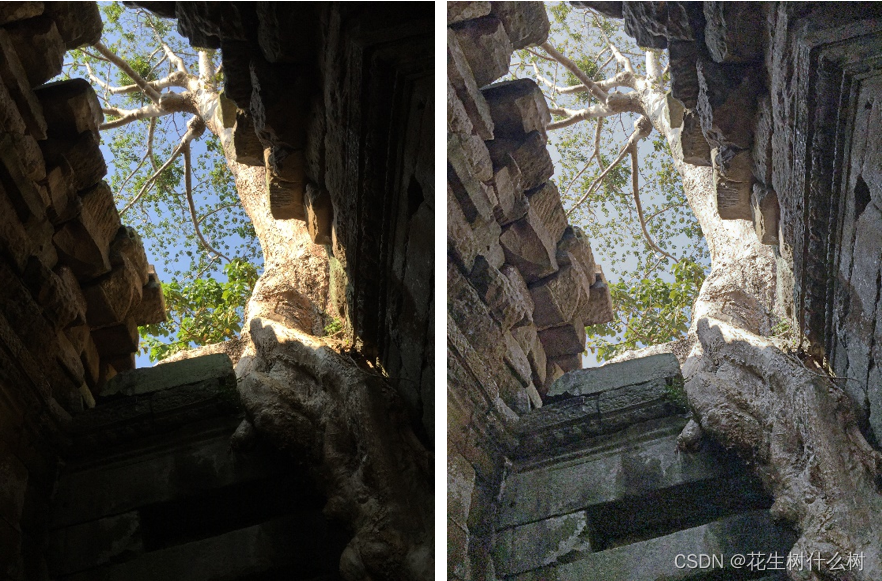
3、Smart Light Random Memory Sprays Retinex效果
相关文章:
Smart Light Random Memory Sprays Retinex 传统图像增强 SLRMSR
文章目录 前言1、Smart Light Random Memory Sprays Retinex概况2、Smart Light Random Memory Sprays Retinex的实现2.1、SLRMSR算法的伪代码2.2、初始化记忆喷雾(CreateInitialMemorySpray)2.3、更新记忆喷雾 (UpdateMemorySpray)2.4、计算颜色校正因子…...

Oracle数据库实例概述
Oracle数据库实例是由内存结构(SGA和PGA)及后台进程这两大部分组成。 内存结构 SGA (System Global Area):这是数据库实例的共享内存区域,所有与该实例连接的进程都可以访问。SGA包含多个内存结构,例如: 数…...
Odoo17免费开源ERP开发技巧:如何在表单视图中调用JS类
文/Odoo亚太金牌服务开源智造 老杨 在Odoo最新V17新版中,其突出功能之一是能够构建个性化视图,允许用户以独特的方式与数据互动。本文深入探讨了如何使用 JavaScript 类来呈现表单视图来创建自定义视图。通过学习本教程,你将获得关于开发Odo…...
[RCTF2015]EasySQL ---不会编程的崽
今天也是sql注入的新类型---二次注入。不得不说花样真的多哦。 既然真的是sql注入了。那就不测试其他地方了。现在注册进去看一下界面 单纯的回显了名字。源代码里发现user.php。 可以修改密码?二次注入应该就在用户名这里了。因为修改密码时,用户名会被…...
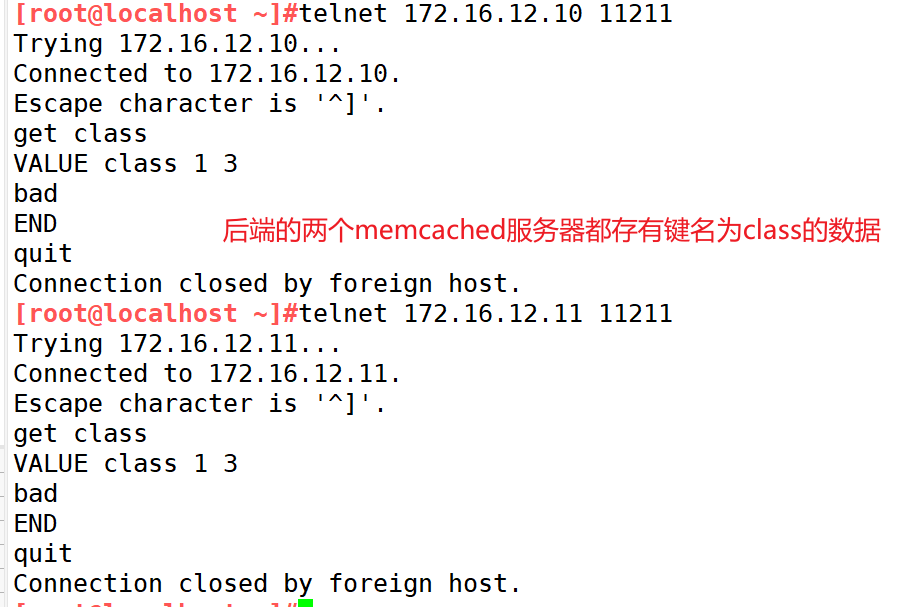
Memcached-分布式内存对象缓存系统
目录 一、NoSQL 介绍 二、Memcached 1、Memcached 介绍 1.1 Memcached 概念 1.2 Memcached 特性 1.3 Memcached 和 Redis 区别 1.4 Memcached 工作机制 1.4.1 内存分配机制 1.4.2 懒惰期 Lazy Expiration 1.4.3 LRU(最近最少使用算法) 1.4.4…...

bash: sqlplus: command not found 问题解决方法
一、问题描述 在Linux中Oracle安装成功后,首次启动使用时,出现 sqlplus 命令不识别的问题,现象如下: $ sqlplus / as sysdba bash: sqlplus: command not found...二、问题分析 查看环境变量是否正确配置: $ vim .ba…...

大模型-Prompt
一、prompt是什么 在大型语言模型集成中,"prompt" 是指您向模型提供的输入文本或指令,以引导模型生成特定类型的响应。这个 prompt 可以是一个问题、一段描述、一个任务说明,甚至是一部分对话历史记录等。通过设计和优化 prompt&a…...

Python实战:SQLAlchemy ORM使用教程
一、SQLAlchemy ORM使用教程 SQLAlchemy是一个流行的Python SQL工具包和对象关系映射(ORM)框架,它为开发人员提供了一种高效、灵活的方式来与数据库进行交互。在本篇博客中,我们将深入探讨SQLAlchemy ORM的核心知识,并…...

能不能绕过c去学c++?
目前做工程开发,基本都是c/c混着用的,c/c是同源的,c/是在c的基础上发展起来的,它们之间有些联系和区别: 区别: 1.可用库不同 c基本是系统底层语言,一般系统底层开发用c(例如&…...

Python 小爬虫:爬取 bing 每日壁纸设为桌面壁纸
请求 URLJSON 版示例代码代码片段注意点headers 中的 User-Agent响应头中的 Content-Type终端通过代理API从 bing.com 找Bing 每日壁纸设置为桌面壁纸代码设定计划任务自动执行 python 脚本请求 URL 通过模仿必应(Bing)自己的 AJAX 调用方式获得请求 URL。 JSON 格式:...
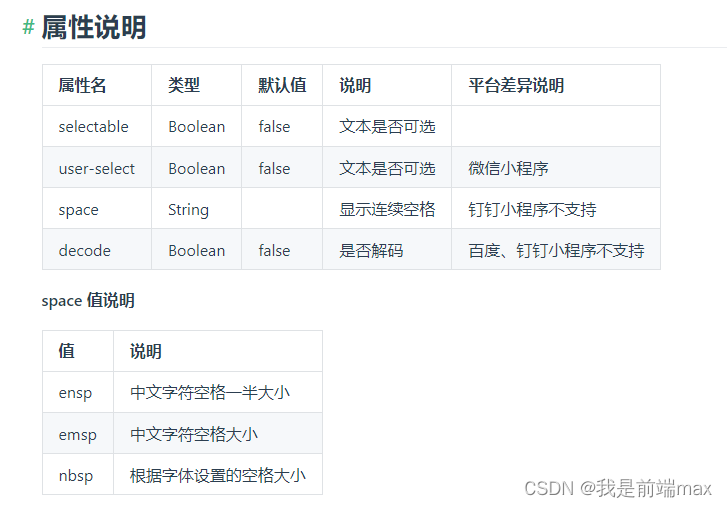
利用textarea和white-space实现最简单的文章编辑器 支持缩进和换行
当你遇到一个非常基础的文章发布和展示的需求,只需要保留换行和空格缩进,你是否会犹豫要使用富文本编辑器?实际上这个用原生的标签两步就能搞定! 1.直接用textarea当编辑器 textarea本身就可以保存空格和换行符,示例如…...
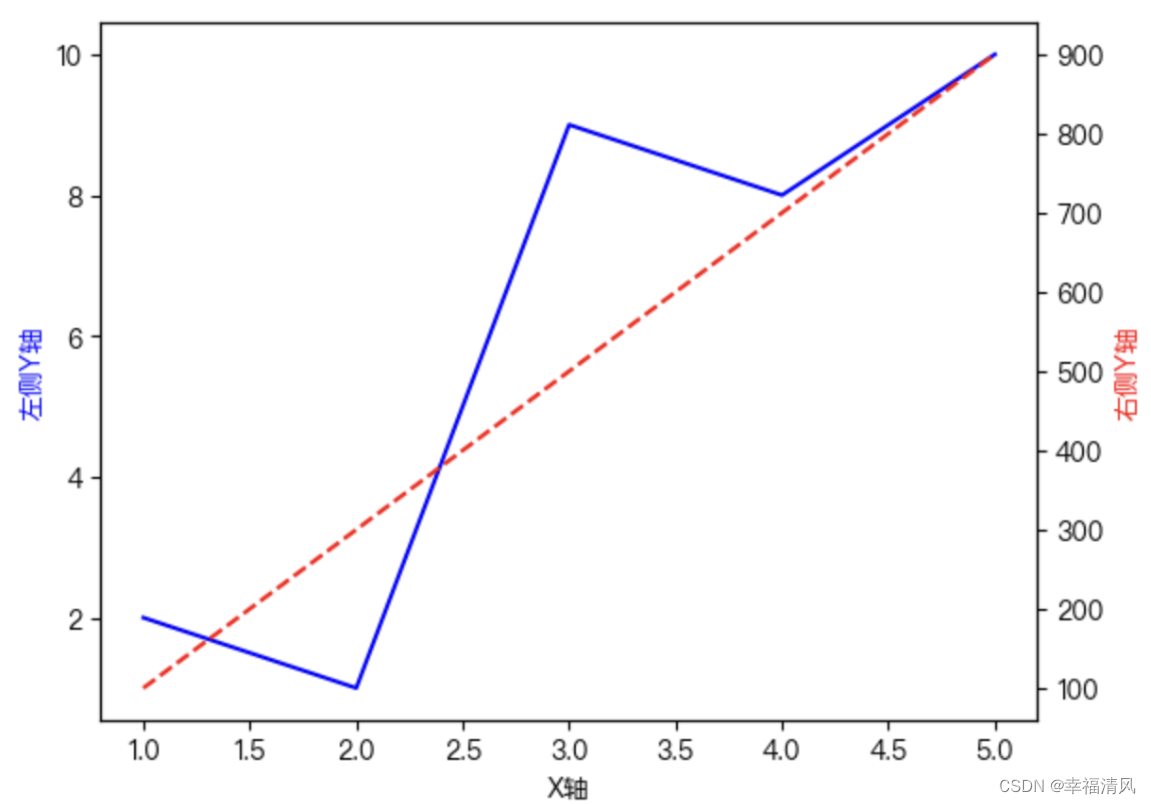
总结mac下解决matplotlib中文显示问题的几种方法
一、前言: 使⽤matplotlib画图时,由于matplotlib默认没有中⽂,显⽰中文时会出现空⽩⼩⽅块。 二、方法: 2.1 matplotlib中使用SimHei字体 1)进入终端后查看matplotlib的字体路径: $ python >>&g…...
探索区块链世界:从加密货币到去中心化应用
相信提到区块链,很多人会想到比特币这样的加密货币,但实际上,区块链技术远不止于此,它正在深刻地改变我们的生活和商业。 首先,让我们来简单了解一下什么是区块链。区块链是一种分布式数据库技术,它通过将…...
GitLab/Github从头开始配置秘钥
1、下载git安装包 CNPM Binaries Mirrorhttps://registry.npmmirror.com/binary.html?pathgit-for-windows/ 拉到页面最底部选择 点进文件夹下载32位或者64位的版本,我的是64位就选择64的版本进行安装 2、傻瓜式安装 3、在相应的文件夹右键选择 UserName为你的用…...

uni.getlocation h5获取定位失败后,阻塞问题
uni.getlocation 在H5中,如果用户未开gps定位或者gps定位信号较差时,定位会失败。这种情况uni.getlocation也不会出现报错,也不会有后续执行,导致代码阻塞,体验极差。 解决方案1:拿不到定位或者定位失败这个…...

Flutter 运行 flutter doctor 命令长时间未响应
由于 Flutter 运行 flutter doctor 命令,会从 pub(https://pub.dev/ 类似于 Node.js 的 npm) 上进行资源的下载,如果没有配置国内镜像,可能会由于其服务器在国外导致资源下载慢或者下载不下来,所以出现了运行 flutter doctor 命令…...
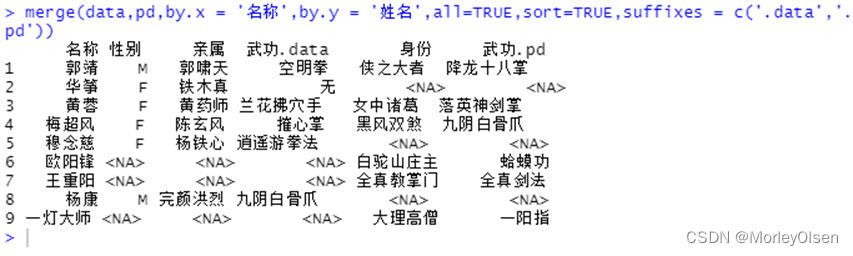
【数据挖掘】练习2:数据管理2
课后作业2:数据管理2 一:上机实验2 # 编写函数stat,要求该函数同时计算均值,最大值,最小值,标准差,峰度和偏度。 install.packages("timeDate") library(timeDate) stat <- func…...
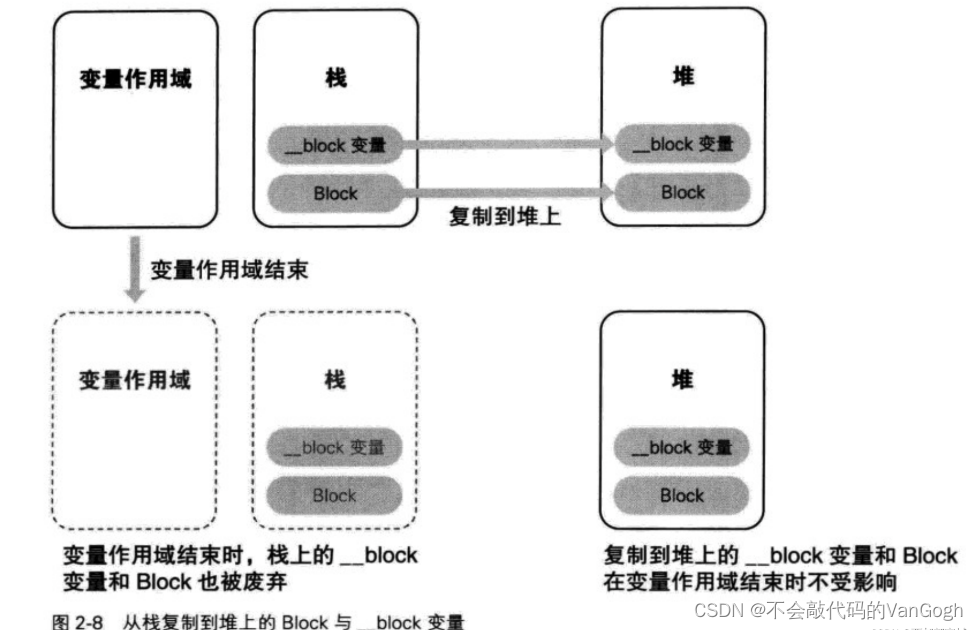
【iOS】——Blocks
文章目录 前言一、Blocks概要1.什么是Blocks 二、Block模式1.block语法2.block类型变量3.截获自动变量值4._Block修饰符5.截获的自动变量 三、Blocks的实现1.Block的实质2.截获自动变量值3._Block说明符4.Block存储域 前言 一、Blocks概要 1.什么是Blocks Blocks是C语言的扩…...
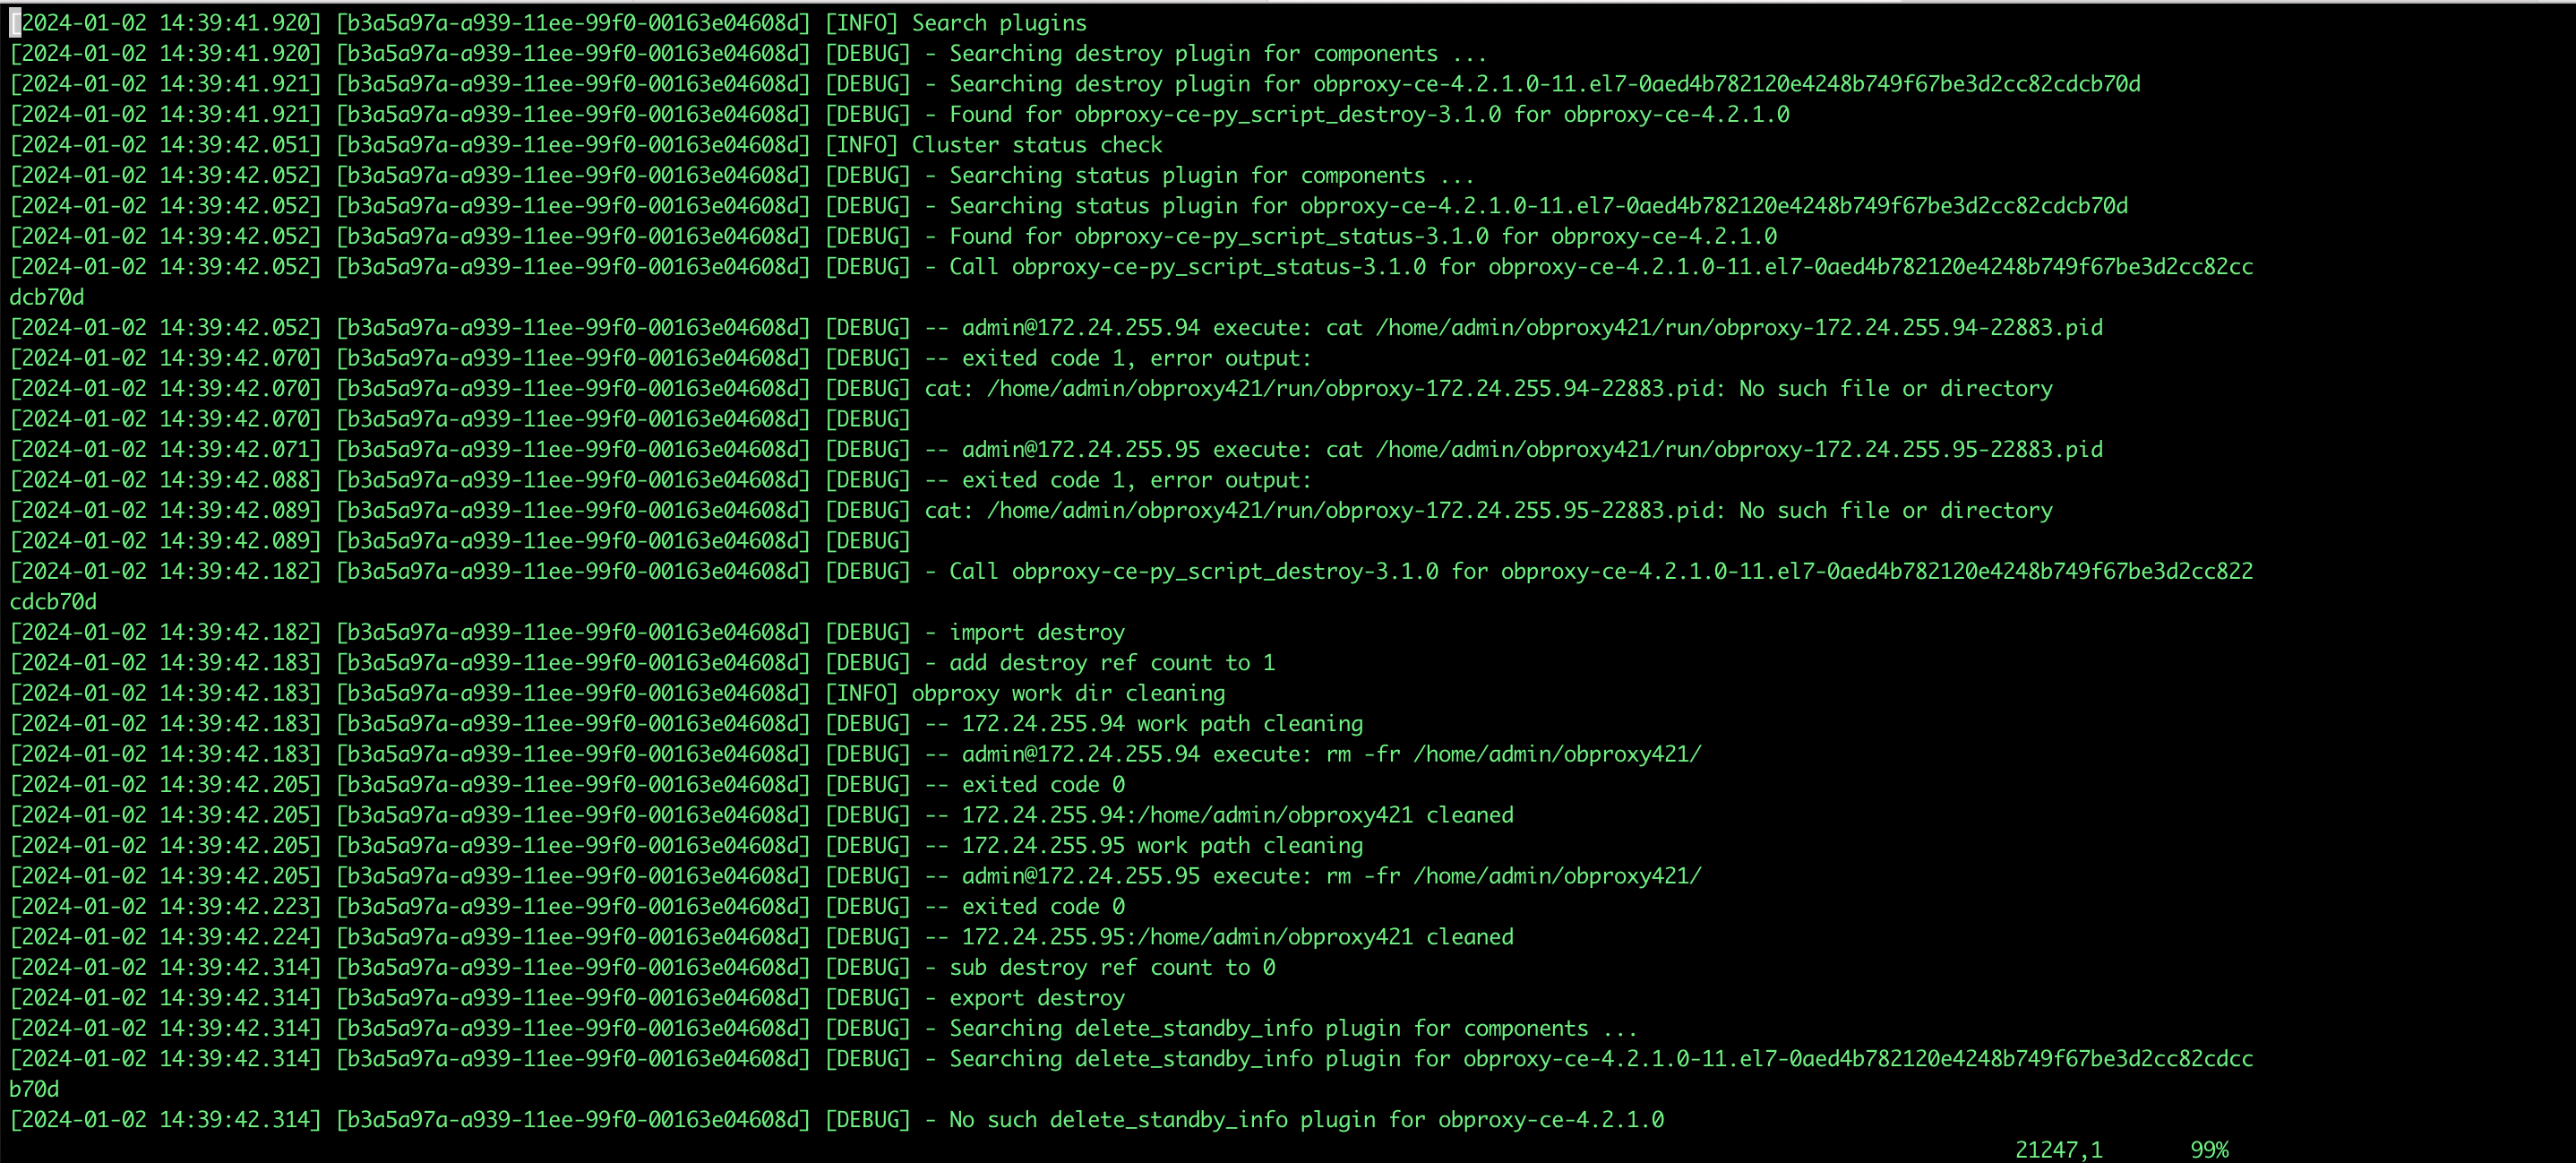
体验OceanBase OBD V2.5.0 组件内扩容和组件变更
背景 OBD 是OceanBase的命令行部署工具,在 obd V2.5.0 版本之前,其主要功能主要是部署各类组件,例如 oceanbase-ce,obproxy-ce,obagent 等。然而,它并不支持组件的变更操作以及组件内部的扩缩容调整。具体来说: 1、若…...

关于前端的学习
目录 前言: 1.初识HTML: 1.1超文本: 1.2标记语言: 2.关于html的基本框架: 3.HTML基本文字标签: 3.1.h标题标签: 3.3 文本内容: 3.4换行的和分割的: 3.5 特殊文字标签: 3.5.1表面上看着三对的结果呈现都是一样的: 3.5.2但是其背后的效果其实是不一样的: 3.6转义字符:…...

【YOLOv11工业级实战】35. DeepStream集成实战——构建高并发视频分析管道
摘要:在智慧交通、智慧工地等工业场景中,多路高清视频的实时分析面临高并发、低延迟、低资源占用的核心诉求。传统PyTorch逐帧推理方案因CPU解码瓶颈、内存拷贝频繁等问题,无法满足500路以上视频流的并发处理需求。本文以NVIDIA DeepStream框架为核心,结合YOLOv11目标检测模…...

VAP:腾讯开源的高性能动画播放引擎,如何让你的应用动起来更流畅?
VAP:腾讯开源的高性能动画播放引擎,如何让你的应用动起来更流畅? 【免费下载链接】vap VAP是企鹅电竞开发,用于播放特效动画的实现方案。具有高压缩率、硬件解码等优点。同时支持 iOS,Android,Web 平台。 项目地址: https://git…...

python基于微信小程序的旅游攻略分享平台
目录需求分析与功能规划技术架构设计数据库设计接口开发小程序前端开发部署与测试运营与迭代注意事项项目技术支持源码获取详细视频演示 :文章底部获取博主联系方式!同行可合作需求分析与功能规划 明确平台核心功能:用户注册登录、攻略发布与…...

TC3XX Autosar系统中文配置手册:包含19个模块的详细解析与联系指南
tc3xx autosar EB中文配置手册,需要联系。 一共有大约19个模块。 在汽车电子开发领域,TC3xx系列芯片AUTOSAR架构的组合越来越常见。最近研究EB(Elektrobit)配置工具时,发现其19个核心模块的配置逻辑其实藏着不少"…...

OpenClaw办公自动化:GLM-4.7-Flash处理Excel与PDF文档
OpenClaw办公自动化:GLM-4.7-Flash处理Excel与PDF文档 1. 为什么需要AI处理办公文档? 上周五下午5点,我正对着电脑屏幕发愁——市场部发来的20份PDF调研报告需要提取关键数据,财务部的季度Excel报表等着合并分析,而我…...
)
VS Code终端切换全攻略:从PowerShell到CMD的保姆级教程(含常见问题解决)
VS Code终端切换全攻略:从PowerShell到CMD的保姆级教程(含常见问题解决) 在开发者的日常工作中,终端是不可或缺的工具。VS Code作为最受欢迎的代码编辑器之一,其内置终端功能强大且高度可定制。然而,许多开…...

OpenClaw环境隔离方案:ollama-QwQ-32B镜像与本地Python虚拟环境整合
OpenClaw环境隔离方案:ollama-QwQ-32B镜像与本地Python虚拟环境整合 1. 为什么需要环境隔离 上周我在尝试将OpenClaw接入本地部署的ollama-QwQ-32B模型时,遇到了一个棘手的问题:我的开发环境突然崩溃了。事后排查发现,是OpenCla…...

python-flask-djangol框架的婚恋相亲交友网站
目录技术选型与框架对比核心功能模块设计数据库模型示例(Django ORM)安全防护措施部署方案开发路线图项目技术支持源码获取详细视频演示 :文章底部获取博主联系方式!同行可合作技术选型与框架对比 Flask:轻量级框架&a…...

别再只懂概念了!用JSEncrypt库5分钟搞定前端RSA密码加密实战
前端RSA加密实战:用JSEncrypt保护用户密码传输安全 1. 为什么前端需要加密? 在Web应用开发中,用户登录是最基础也最敏感的操作之一。传统表单提交直接将密码以明文形式发送到服务器,这在网络传输过程中存在被截获的风险。即使使…...
)
极速上手:Puppeteer + 原生代理IP 突破无头检测(金融与突发新闻抓取 Cheat Sheet)
在金融量化分析、宏观经济数据追踪或突发新闻监控等场景中,数据价值随时间呈指数级衰减。高频并发抓取极易触发目标网站的反爬策略(如 Cloudflare 盾、无头浏览器指纹识别)以及严苛的 IP 封禁。 终极解法: 使用 puppeteer-extra-…...