一、Spring基础 --- 基础内容(二) (咕P4)
一、IOC容器
1.1 基础
1.1.1 容器
1、Spring框架的主要功能是通过其核心容器来实现的。2、Spring容器是生成Bean的工厂,它负责创建Bean的实例,并管理其生命周期。所有的组件都被当成Bean处理,例如数据源、Hibernate的SessionFactory、事务管理器等。应用中的所有组件都处于Spring的管理之下,都被Spring以Bean的方式管理。Bean是Spring容器的基本单位。3、Spring核心容器是由什么组成的?Spring的核心容器由Beans、Core、Context、SpEL等模块组成。所有Spring的其他模块都是建立在Core基础模块上的。该模块规定了创建和维护Bean的方式,提供了控制反转(IoC)和依赖注入(DI)等特性。4、Spring有两个核心接口.分别为BeanFactory和ApplicationContext。其中ApplicationContext是BeanFactory的子接口,它们都可代表Spring容器。也就是说Spring框架提供了两种核心容器,BeanFactory和ApplicationContext。1.1.2 容器的实现
1、Spring 框架带有两个 IOC 容器 —— BeanFactory和ApplicationContext。2、BeanFactory是Spring容器最基本的接口。ApplicationContext是BeanFactory的子接口。 1)pring容器最基本的接口就是BeanFactory。Spring Ioc容器的实现,从根源上是Beanfactory。2)BeanFactory是 IOC 容器的最基本版本,ApplicationContext扩展了BeanFactory的特性。 1、BeanFactory1)BeanFactory是Spring容器最基本的接口。他是 IOC 容器的最基本版本。BeanFactory是Spring中最基本的接口,它是Spring IoC容器中最底层的接口,提供了IoC容器最基本的形式,它具有最基本的 IoC 功能,负责管理 Spring Bean 的生命周期,通过 BeanFactory 可以获取指定 Bean 的实例。 2)BeanFactory就是一个管理Bean的工厂,它主要负责初始化各种Bean,并调用它们的生命周期方法。3)BeanFactory接口提供了几个实现类,其中最常用的是org.springframework.beans. factory.xml.XmlBeanFactory,该类会根据XML配置文件中的定义来装配Bean。4)创建BeanFactory beanFactory = new XmlBeanFactory(new FileSystemResource("D:/applicationContext.xml"));2、ApplicationContext1)ApplicationContext是BeanFactory的子接口,也被称为应用上下文,是另一种常用的Spring核心容器。ApplicationContext是BeanFactory的子接口,ApplicationContext继承了BeanFactory接口的全部功能,同时还提供了其他的一些功能。ApplicationContext是Spring中最重要的接口之一,它是Spring容器的具体实现.在BeanFactory的基础上添加了一些更加实用的功能,比如资源加载、事件发布、AOP和事务等。 因此,可以认为ApplicationContext继承了BeanFactory,拥有了更多的功能和扩展性。 2)BeanFactory是 IOC 容器的最基本版本,ApplicationContext扩展了BeanFactory的特性。1.1.2.1 BeanFactory创建
@Testpublic void testIOC() {//加载配置文件,创建Bean工程Resource rs=(Resource) new ClassPathResource("org/jsoft/a_hello/applicationContext.xml");BeanFactory factory=new XmlBeanFactory(rs);//获取对象User u=(User) factory.getBean("user");System.out.println(u.getAge());}
1.1.2.2 ApplicationContext创建
>>>>>> 基于ClassPathXmlApplicationContext
ClassPathXmlApplicationContext作用:加载classpath根目录下的配置文件,创建IOC容器。1、加载一个配置文件。然后创建IOC容器。加载classpeth根类路径下ApplicationContext ac=new ClassPathXmlApplicationContext("applicationContext.xml");加载指定类路径下ApplicationContext ac=new ClassPathXmlApplicationContext("org/jsoft/a_hello/applicationContext.xml");2、加载多个配置文件。然后创建IOC容器。ApplicationContext ac=new ClassPathXmlApplicationContext("applicationContext.xml","app2.xml");public class AppStart {public static void main(String[] args) {ApplicationContext ac=new ClassPathXmlApplicationContext("applicationContext.xml");Car car = ac.getBean(Car.class);System.out.println(car);}}>>>>>> 基于AnnotationConfigApplicationContext
AnnotationConfigApplicationContext作用:加载配置类,创建IOC容器。a、指定一个或多个配置类,创建IOC容器ApplicationContext ac=new AnnotationConfigApplicationContext(MyConfig.class);ApplicationContext ac=new AnnotationConfigApplicationContext(MyConfig.class,MyConfig2.class);c、指定一个或多个扫描路径,创建IOC容器ApplicationContext ac=new AnnotationConfigApplicationContext("com.hlp.spring.ioc");ApplicationContext ac=new AnnotationConfigApplicationContext("com.hlp.spring.ioc","com.hlp.spring.ioc2");c、不指定配置类,创建IOC容器。【手动注册配置类】//创建无配置类的IOC容器AnnotationConfigApplicationContext ac = new AnnotationConfigApplicationContext();//手动注册配置类【注册后必须刷新】ac.register(MyConfig.class);ac.refresh();1.1.2.3 BeanFactory和ApplicationContext的区别
1、BeanFactory与ApplicationContext的区别1)ApplicationContext、BeanFactory都是IOC容器。 2)ApplicationContext是BeanFactory的子接口。BeanFactory是 IOC 容器的最基本版本。ApplicationContext扩展了BeanFactory的特性(ApplicationContext功能肯定比BeanFactory的功能更强大)。3)ApplicationContext容器在初始化的时候,就会初始化Bean。而BeanFactory容器中的Bean是懒加载,在初始化的时候,不会初始化Bean,只有在调用getBean时,才会创建对象。
1.1.2 类图详解
>>>>>> 类图1
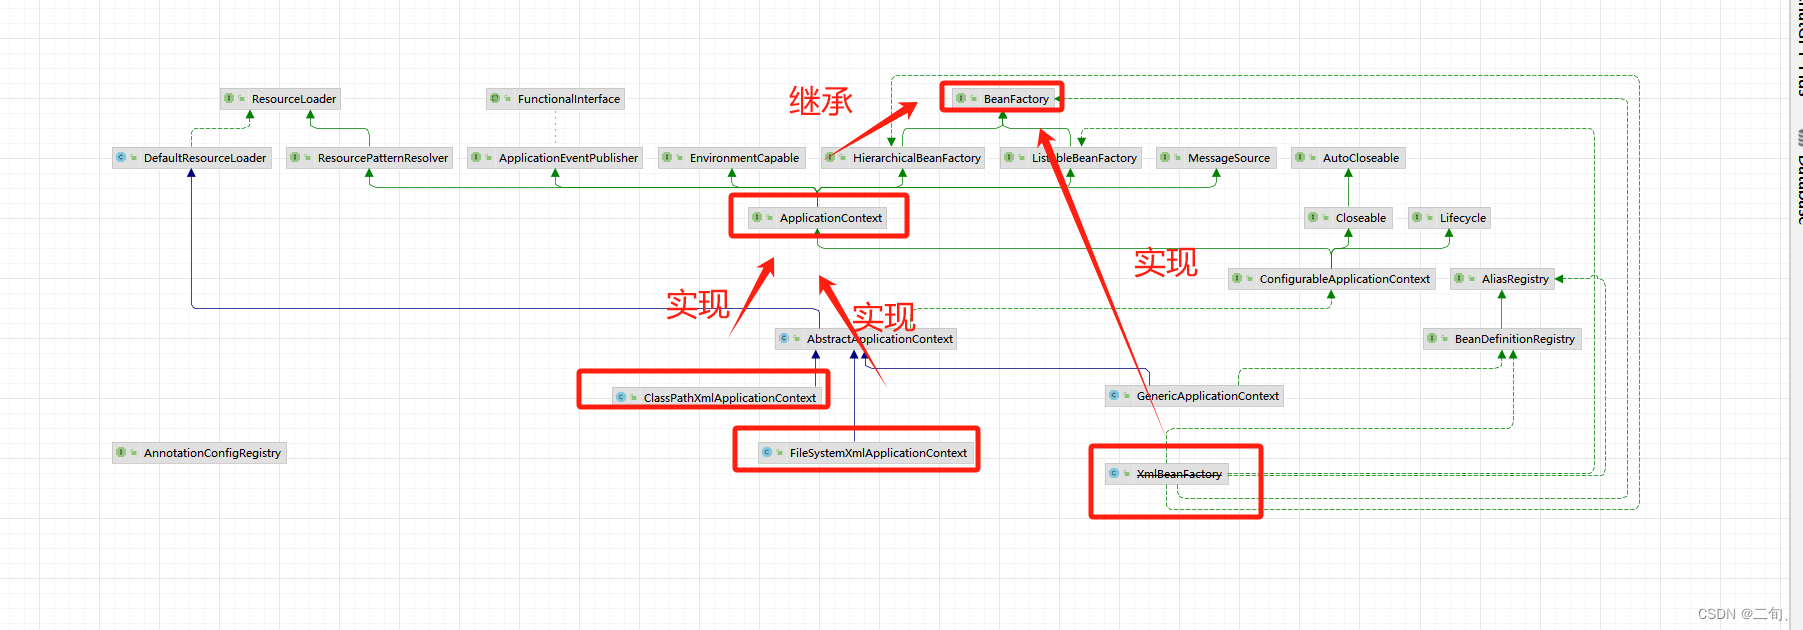
1、BeanFactory是 IOC 容器的最基本版本。它是最基础的容器接口。2、XmlBeanFactory是BeanFactory的直接实现。>>>>>> 类图2
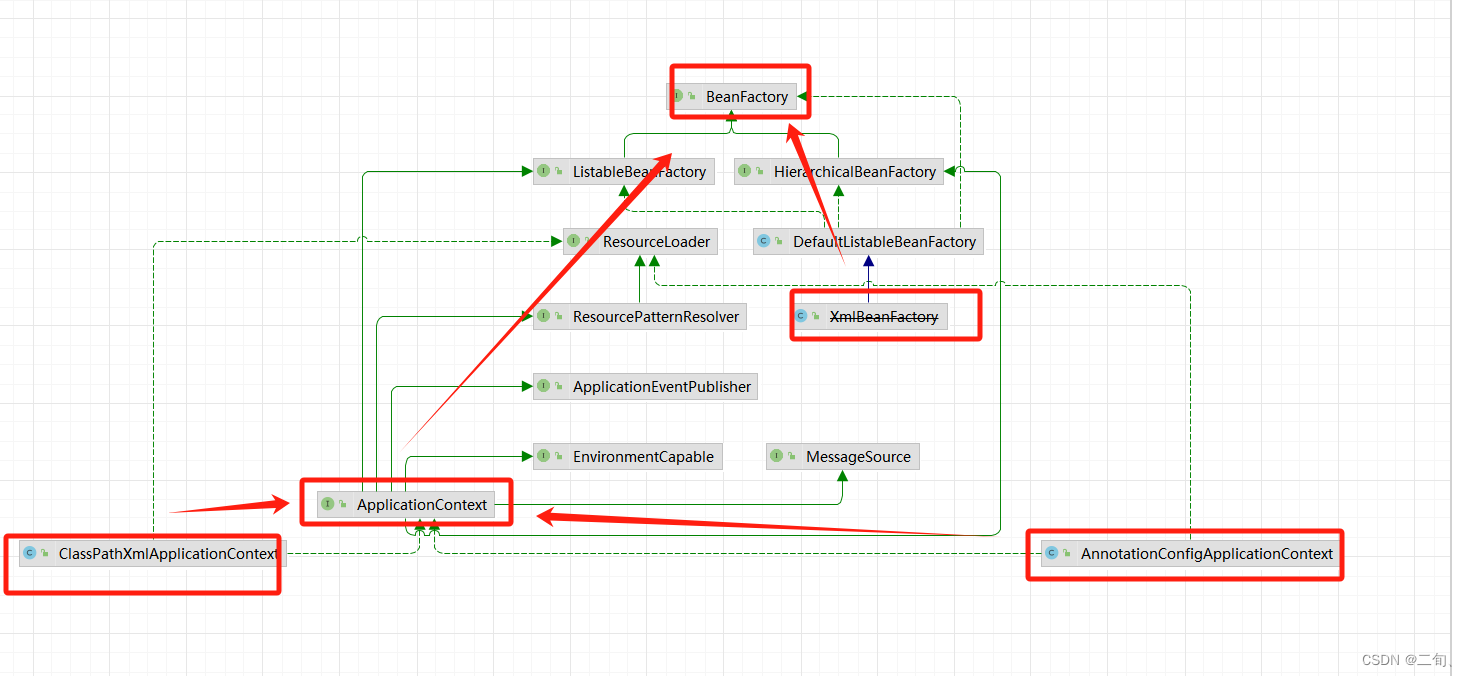
1.2 BeanFatory
1.2.1 概念
1. 什么是BeanFactoryBeanFactory是Spring框架中的一个接口,它是一个工厂类,用来创建和管理Spring中的Bean对象。BeanFactory接口定义了Spring容器的基本规范和行为,它提供了一种机制来将配置文件中定义的Bean实例化、配置和管理起来。2. BeanFactory的作用BeanFactory的主要作用是提供Bean的创建、配置、初始化和销毁等基本操作,它可以根据配置文件或注解来创建并管理Bean实例,并提供了各种方法来获取和操作Bean实例。3. BeanFactory的实现类BeanFactory接口有多个实现类,其中最常用的是XmlBeanFactory和DefaultListableBeanFactory。XmlBeanFactory是通过XML文件来配置Bean的实例化、配置和管理的,而DefaultListableBeanFactory则是通过Java代码来配置Bean的实例化、配置和管理的。下面我们将详细介绍BeanFactory的使用。1.2.2 基于BeanFatory创建IOC容器
创建IOC容器BeanFactory ac = new XmlBeanFactory(new ClassPathResource("applicationContext.xml")); User user = (User) ac.getBean("user");System.out.println(user);>>>>> 案例
User.java
public class User {public User() {System.out.println("构造方法调用");}
}
applicationContext.xml
<?xml version="1.0" encoding="UTF-8"?>
<beans xmlns="http://www.springframework.org/schema/beans"xmlns:p="http://www.springframework.org/schema/p"xmlns:xsi="http://www.w3.org/2001/XMLSchema-instance"xsi:schemaLocation="http://www.springframework.org/schema/beans http://www.springframework.org/schema/beans/spring-beans.xsd"><bean class="com.demo.aop.User" id="user"></bean></beans>
测试
其中,ClassPathResource是一个用于从classpath中加载资源文件的类。XmlBeanFactory是Spring提供的一个实现了BeanFactory接口的IoC容器实例。在实例化XmlBeanFactory时,需要提供一个Resource对象,这里传入的是spring-config.xml文件。
public class App {public static void main(String[] args) {BeanFactory ac = new XmlBeanFactory(new ClassPathResource("applicationContext.xml"));System.out.println("======");User user = (User) ac.getBean("user");System.out.println(user);}
}
1.2.3 BeanFactory的配置
在BeanFactory的配置中,主要包括Bean的定义、依赖和属性等方面。
1)Bean的定义
在Bean的定义中,主要包括Bean的类型、ID和作用域等方面。下面是一个简单的Bean定义示例:
<bean id="userService" class="com.example.UserService" scope="singleton"/>
2)Bean的依赖
在Bean的依赖中,主要包括Bean之间的依赖关系和依赖注入方式等方面。下面是一个简单的Bean依赖示例:
<bean id="userService" class="com.example.UserService"><property name="userDao" ref="userDao"/>
</bean><bean id="userDao" class="com.example.UserDaoImpl"><property name="dataSource" ref="dataSource"/>
</bean><bean id="dataSource" class="org.apache.commons.dbcp2.BasicDataSource"><property name="driverClassName" value="com.mysql.jdbc.Driver"/><property name="url" value="jdbc:mysql://localhost:3306/test"/><property name="username" value="root"/><property name="password" value="123456"/>
</bean>
3)Bean的属性
在Bean的属性中,主要包括Bean的各种属性信息,如普通属性、集合属性和引用属性等。下面是一个简单的Bean属性示例:
<bean id="userService" class="com.example.UserService"><property name="name" value="John"/><property name="age" value="30"/><property name="hobbies"><list><value>reading</value><value>writing</value><value>traveling</value></list></property><property name="userDao" ref="userDao"/>
</bean>
1.2.4 BeanFactory的初始化
在BeanFactory的初始化中,主要包括BeanFactoryAware接口、InitializingBean接口和init-method属性等方面。1)BeanFactoryAware接口
如果一个Bean实现了BeanFactoryAware接口,那么它将能够获取到当前Bean所在的BeanFactory实例。下面是一个简单的BeanFactoryAware接口示例:
public class MyBean implements BeanFactoryAware {private BeanFactory beanFactory;@Overridepublic void setBeanFactory(BeanFactory beanFactory) throws BeansException {this.beanFactory = beanFactory;}}2)InitializingBean接口
如果一个Bean实现了InitializingBean接口,那么它将能够在Bean实例化后、依赖注入后、属性设置后进行一些初始化操作。下面是一个简单的InitializingBean接口示例:
public class MyBean implements InitializingBean {@Overridepublic void afterPropertiesSet() throws Exception {// do something after bean initialization}}
在上面的示例中,MyBean实现了InitializingBean接口,并重写了afterPropertiesSet()方法。该方法将在Bean实例化、依赖注入和属性设置后被调用,可以在该方法中进行一些初始化操作。
3)init-method属性
如果一个Bean配置了init-method属性,那么在Bean实例化、依赖注入和属性设置后,该方法将被调用来进行一些初始化操作。下面是一个简单的init-method属性示例:
<bean id="myBean" class="com.example.MyBean" init-method="init">
在上面的示例中,定义了一个id为myBean的Bean,并配置了init-method属性为init。在Bean实例化、依赖注入和属性设置后,Spring容器将调用MyBean类中的init()方法进行初始化操作。
4)BeanFactory的销毁
1)DisposableBean接口
如果一个Bean实现了DisposableBean接口,那么它将能够在Bean销毁前进行一些操作。下面是一个简单的DisposableBean接口示例:
public class MyBean implements DisposableBean {@Overridepublic void destroy() throws Exception {// do something before bean destruction}}
在上面的示例中,MyBean实现了DisposableBean接口,并重写了destroy()方法。该方法将在Bean销毁前被调用,可以在该方法中进行一些清理操作。
2)destroy-method属性
如果一个Bean配置了destroy-method属性,那么在Bean销毁前,该方法将被调用来进行一些清理操作。下面是一个简单的destroy-method属性示例:
<bean id="myBean" class="com.example.MyBean" destroy-method="cleanup">在上面的示例中,定义了一个id为myBean的Bean,并配置了destroy-method属性为cleanup。在Bean销毁前,Spring容器将调用MyBean类中的cleanup()方法进行清理操作。
1.3 ApplicationContext
1.3.1 概念
1、BeanFactory是Spring中最基本的接口,它是Spring IoC容器中最底层的接口,提供了IoC容器最基本的形式,它具有最基本的 IoC 功能,负责管理 Spring Bean 的生命周期,通过 BeanFactory 可以获取指定 Bean 的实例。 2、ApplicationContext是BeanFactory的子接口,ApplicationContext继承了BeanFactory接口的全部功能,同时还提供了其他的一些功能。ApplicationContext是Spring中最重要的接口之一,它是Spring容器的具体实现。在BeanFactory的基础上添加了一些更加实用的功能,比如资源加载、事件发布、AOP和事务等。 因此,可以认为ApplicationContext继承了BeanFactory,拥有了更多的功能和扩展性。1.3.2 ApplicationContex源码分析
ApplicationContext继承的接口与功能
ResourceLoader:加载资源文件MessageSource:国际化消息的源头ApplicationEventPublisher:应用事件发布EnvironmentCapable:获取当前应用的环境信息ListableBeanFactory:提供了批量操作Bean的方法HierarchicalBeanFactory:层次性的BeanFactory,支持子容器AutowireCapableBeanFactory:Bean自动装配的BeanFactoryBeanDefinitionRegistry:定义和注册BeanDefinition的接口ConfigurableApplicationContext:ApplicationContext可配置的接口,对外提供了修改bean定义、激活环境、注册shut-down hook等能力。
>>>>>> 1、ResourceLoader 接口
这段示例代码通过ApplicationContext实例化了一个ResourceLoader对象,然后通过getResource方法加载了"classpath:test.txt"文件。这个文件在classpath路径下,所以可以使用 classpath: 前缀来定位文件。
public class ResourceLoaderExample { public static void main(String[] args) throws IOException { ApplicationContext context = new ClassPathXmlApplicationContext("spring-config.xml"); ResourceLoader loader = context; Resource resource = loader.getResource("classpath:test.txt"); InputStream inputStream = resource.getInputStream(); BufferedReader reader = new BufferedReader(new InputStreamReader(inputStream)); String line; while ((line = reader.readLine()) != null) { System.out.println(line); } reader.close(); }
}
>>>>>> 2、ApplicationEventPublisher 接口
我们可以在启动时发布一个事件:
public class MyApplicationEvent extends ApplicationEvent { public MyApplicationEvent(Object source) { super(source); }
}
public class PublishEventExample { public static void main(String[] args) { ConfigurableApplicationContext context = new ClassPathXmlApplicationContext("spring-config.xml"); context.addApplicationListener(new ApplicationListener<MyApplicationEvent>() {@Override public void onApplicationEvent(MyApplicationEvent event) {System.out.println("MyApplicationEvent received!"); } }); context.publishEvent(new MyApplicationEvent("Hello World!")); context.close(); }
}
当程序成功运行时,我们可以看到输出了 MyApplicationEvent received! 的信息。
>>>>>> 3、EnvironmentCapable 接口
这个接口用于获取当前运行的环境信息:
public class EnvironmentExample { public static void main(String[] args) { ApplicationContext context = new ClassPathXmlApplicationContext("spring-config.xml"); Environment environment = context.getEnvironment(); System.out.println("The environment is : " + environment.getProperty("os.name")); }
}
1.3.3 基于ApplicationContext创建IOC容器
该接口具有三个常用的实现类:
1、ClassPathXmlApplicationContext:可以加载类路径下的配置文件,要求配置文件必须在类路径之下。
2、FileSystemXmlApplicationContext:可以加载磁盘中任意路径下的配置文件,要求具有访问权限。
3、AnnotationConfigApplicationContext:用于读取注解创建容器。
方式一:通过ClassPathXmlApplicationContext创建//初始化spring容器,加载配置文件ApplicationContext applicationContext = new ClassPathXmlApplicationContext("applicationContext.xml");方式二:通过FileSystemXmlApplicationContext创建//初始化spring容器,加载配置文件ApplicationContext applicationContext = new FileSystemXmlApplicationContext("applicationContext.xml"););方式三:通过ClassPathXmlApplicationContext创建//初始化spring容器,加载配置文件ApplicationContext applicationContext = new AnnotationConfigApplicationContext();二、Spring Aop
AOP:面相切面编程OOP:面相对象编程AOP是OOP的一个有效补充。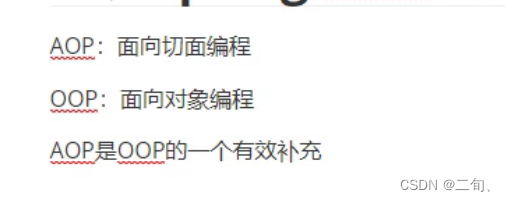
2.1 代理模式
AOP本身是基于动态代理模式实现的,所以掌握代理模式是我们学好AOP的一个重要的前提条件
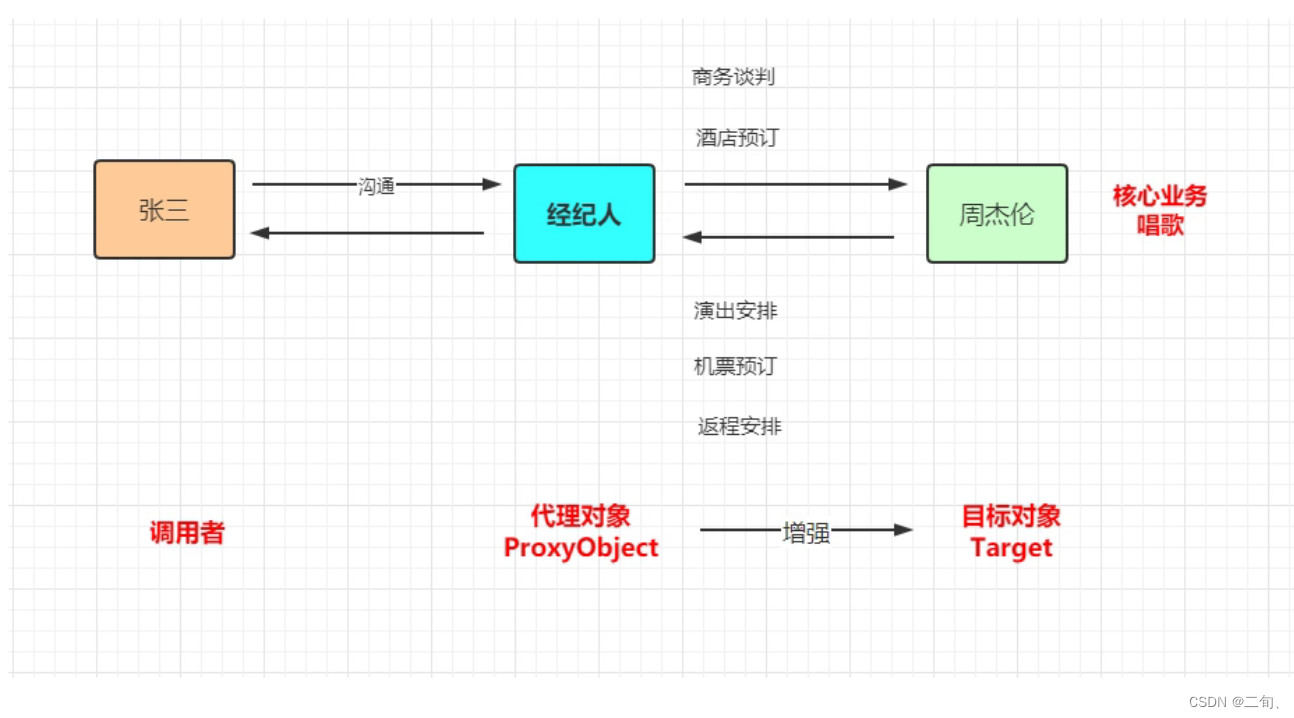
2.1.1 静态代理
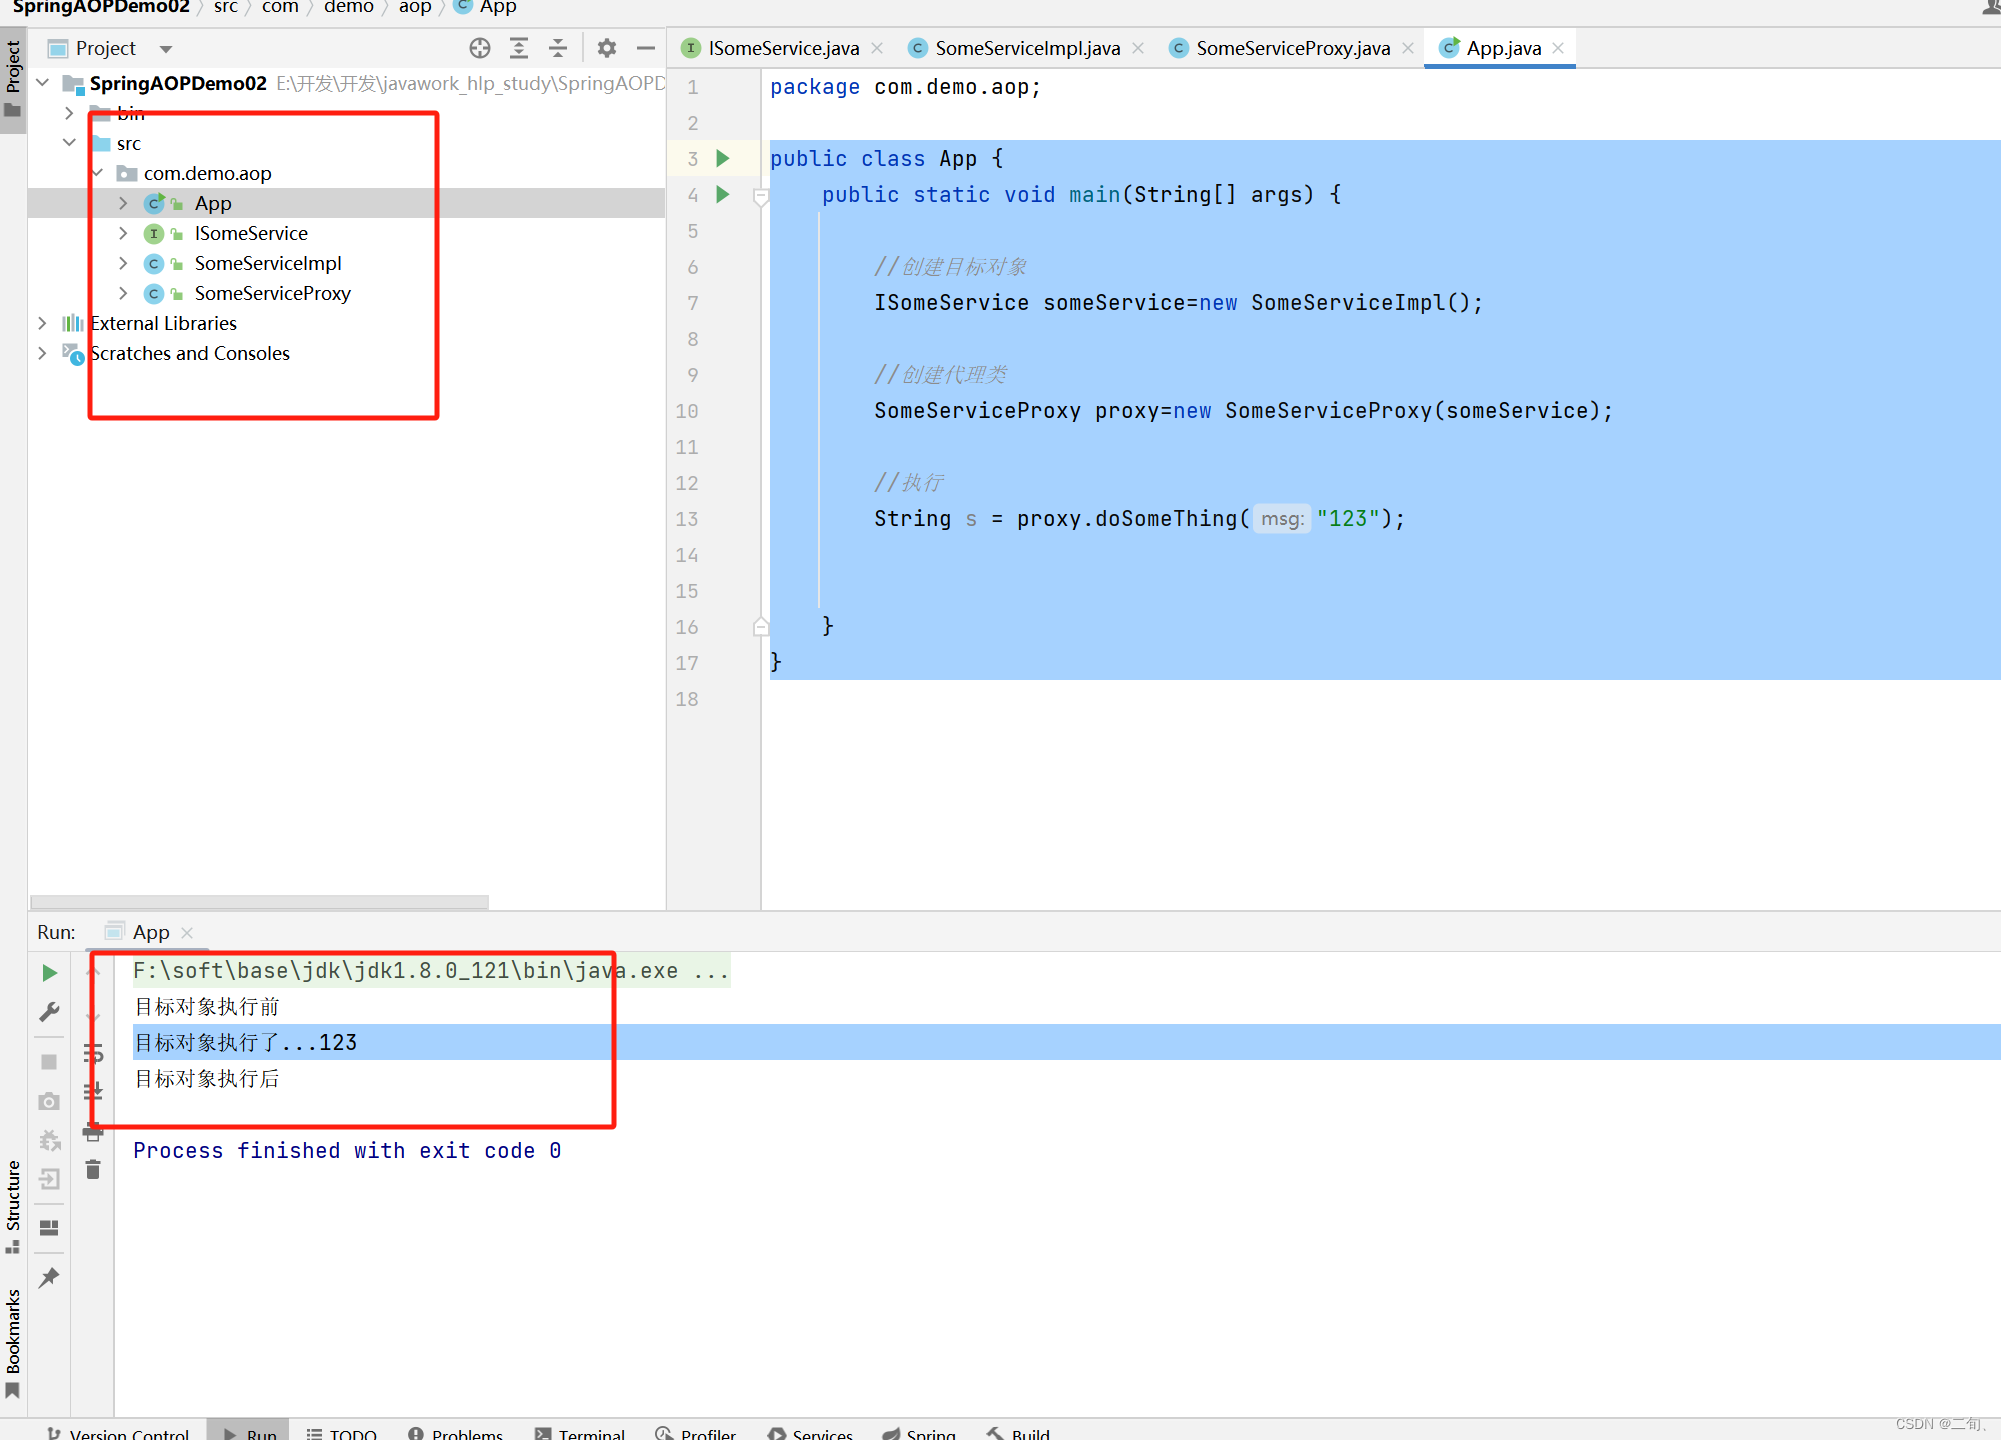
若代理类在程序运行前就已经存在,那么这种代理方式被成为**静态代理** ,这种情况下的代理类通常都是我们在]ava代码中定议的。通常情况下,静态代理中的代理类和目标类会实现同一接口或是派生自相同的父类。1)创建公共接口
ISomeService.java
public interface ISomeService {public String doSomeThing(String msg);
}
2)创建目标对象
SomeServiceImpl .java
public class SomeServiceImpl implements  ISomeService{@Overridepublic String doSomeThing(String msg) {System.out.println("目标对象执行了..."+msg);return "目标对象执行了..."+msg;}
}
3)创建代理对象
SomeServiceProxy .java
public class SomeServiceProxy implements  ISomeService{private ISomeService someService;public SomeServiceProxy(ISomeService someService) {this.someService = someService;}@Overridepublic String doSomeThing(String msg) {System.out.println("目标对象执行前");//目前对象执行String result = someService.doSomeThing(msg);System.out.println("目标对象执行后");return result;}
}
4)测试
App .java
public class App {public static void main(String[] args) {//创建目标对象ISomeService someService=new SomeServiceImpl();//创建代理类SomeServiceProxy proxy=new SomeServiceProxy(someService);//执行String s = proxy.doSomeThing("123");}
}
2.1.2 动态代理
代理类在程序运行时创建的代理方式被成为动态代理。也就是说,这种情况下,代理类并不是在java代码中定义的,而是在运行时根据我们在]ava代码中的“指示”动态生成的。
2.1.2.1 JDK动态代理
1 核心
对于实现接口的目标对象,如果想对进行增强,可以使用JDK动态代理。 Object o = Proxy.newProxyInstance(target.getClass().getClassLoader() //获取目标对象的类加载器, target.getClass().getInterfaces() //获取目标对象的所有实现的接口, new InvocationHandler() {/*** 代理对象执行的方法* 会在该方法中执行目标对象的方法** @return* @throws Throwable*/@Overridepublic Object invoke(Object proxy, Method method, Object[] args) throws Throwable {System.out.println("目标对象执行方法前...");//执行目标对象的方法Object result = method.invoke(target, args);System.out.println("目标对象执行方法后...");return result;}});o.doSomeThing("123");}
}
2 案例
1)创建公共接口
ISomeService.java
public interface ISomeService {public String doSomeThing(String msg);
}
2)创建目标对象
SomeServiceImpl .java
public class SomeServiceImpl implements  ISomeService{@Overridepublic String doSomeThing(String msg) {System.out.println("目标对象执行了..."+msg);return "目标对象执行了..."+msg;}
}
3)JDK动态代理
public class App {public static void main(String[] args) {//目标对象ISomeService target=new SomeServiceImpl();ISomeService o = (ISomeService) Proxy.newProxyInstance(target.getClass().getClassLoader() //获取目标对象的类加载器, target.getClass().getInterfaces()  //获取目标对象的所有实现的接口, new InvocationHandler() {/*** 代理对象执行的方法*          会在该方法中执行目标对象的方法** @return* @throws Throwable*/@Overridepublic Object invoke(Object proxy, Method method, Object[] args) throws Throwable {System.out.println("目标对象执行方法前...");//执行目标对象的方法Object result = method.invoke(target, args);System.out.println("目标对象执行方法后...");return result;}});o.doSomeThing("123");}
}
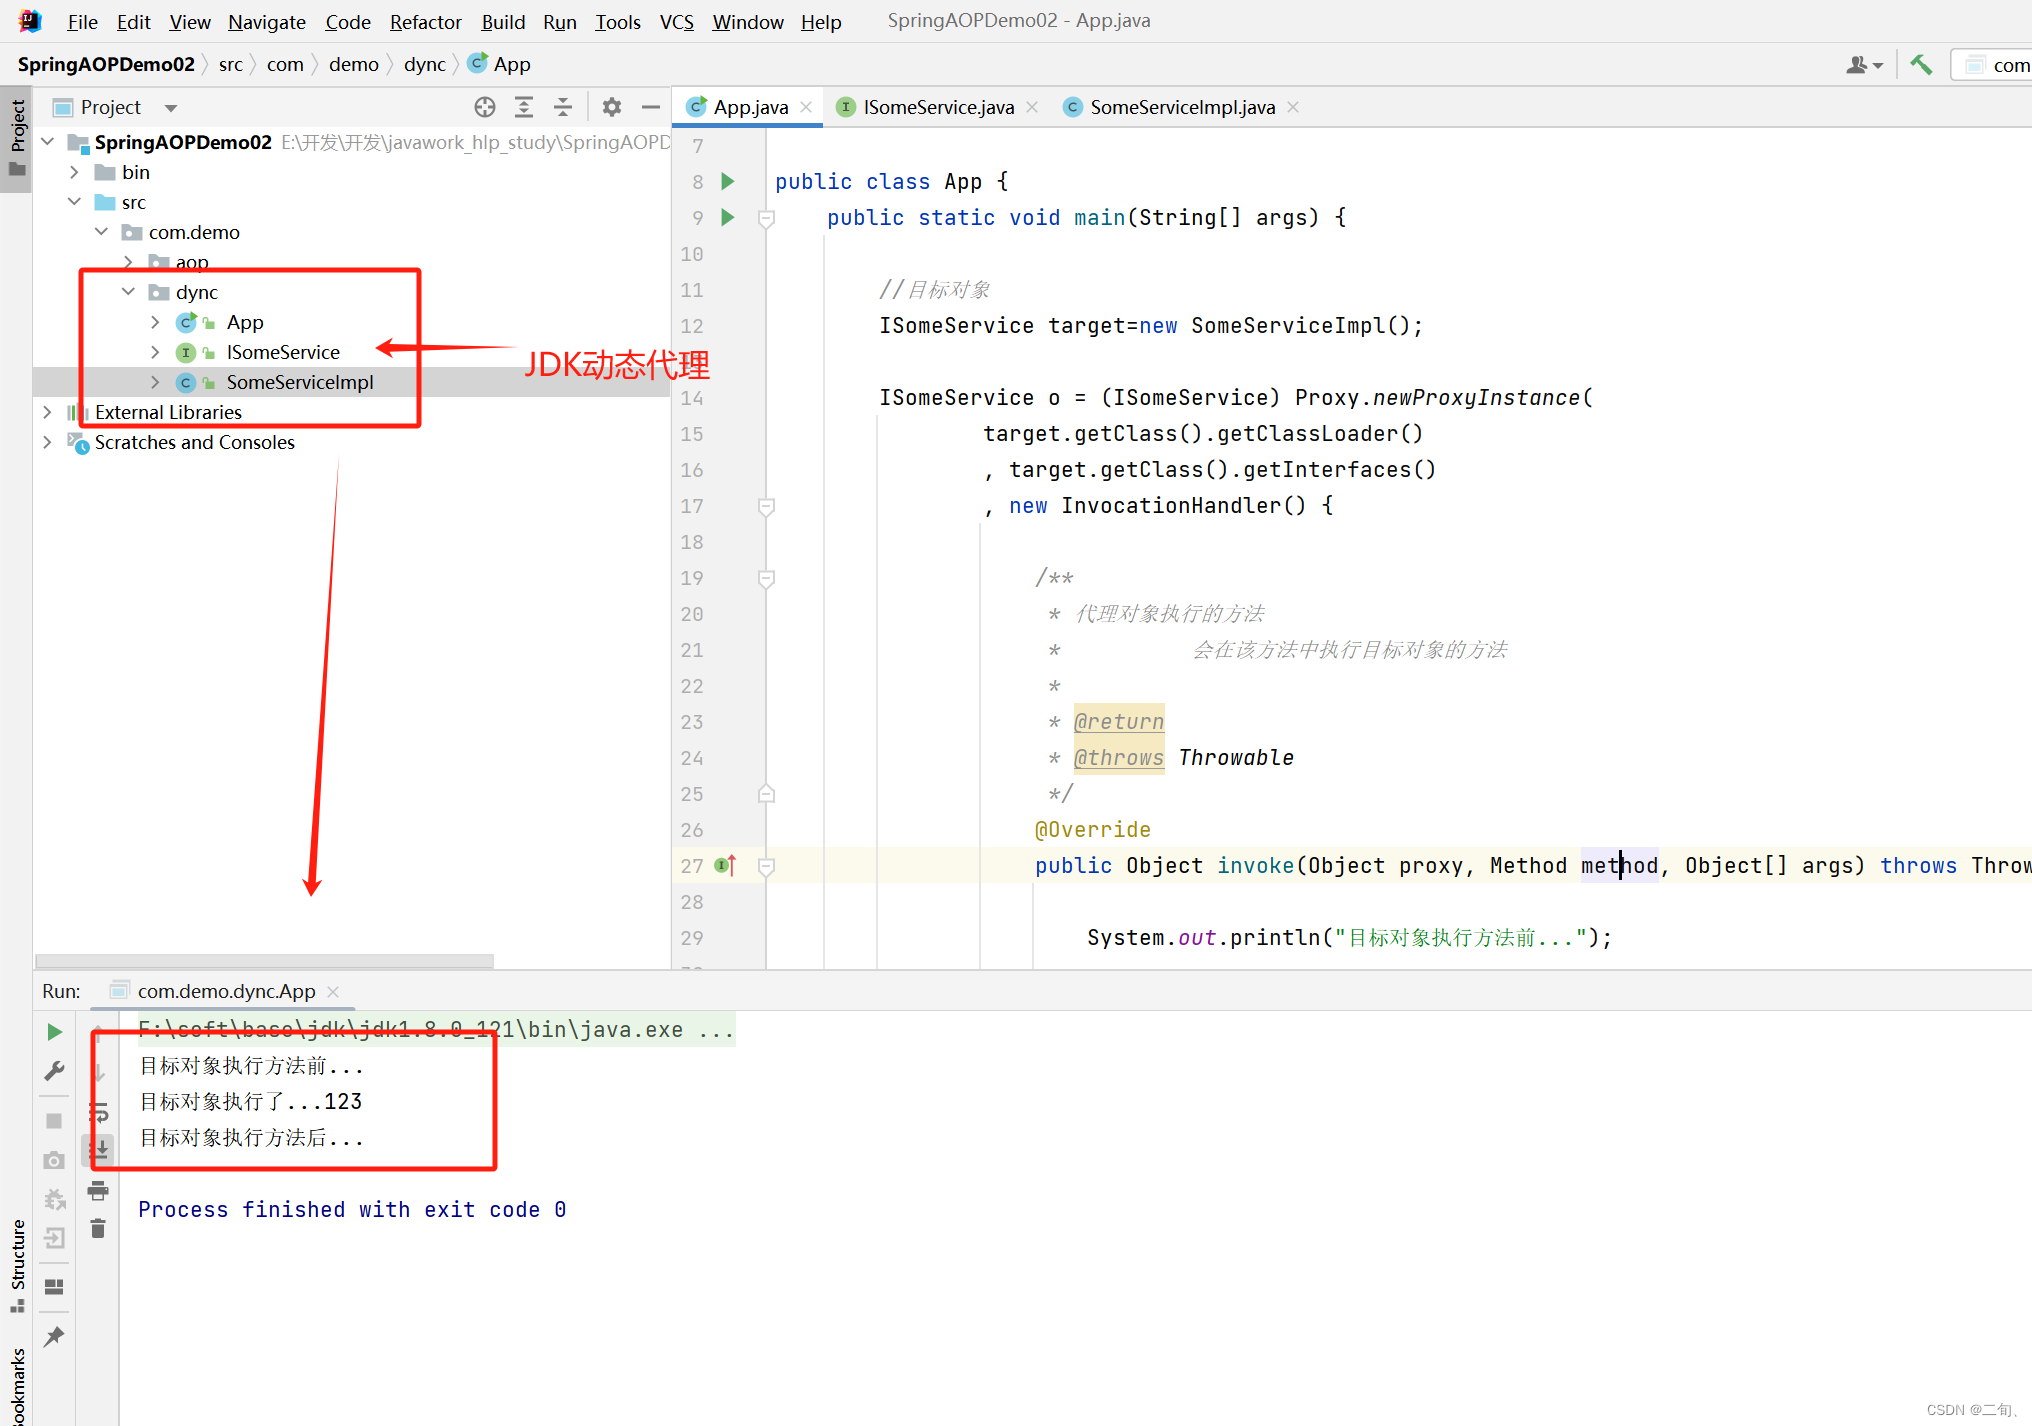
2.1.2.2 CGLIB动态代理
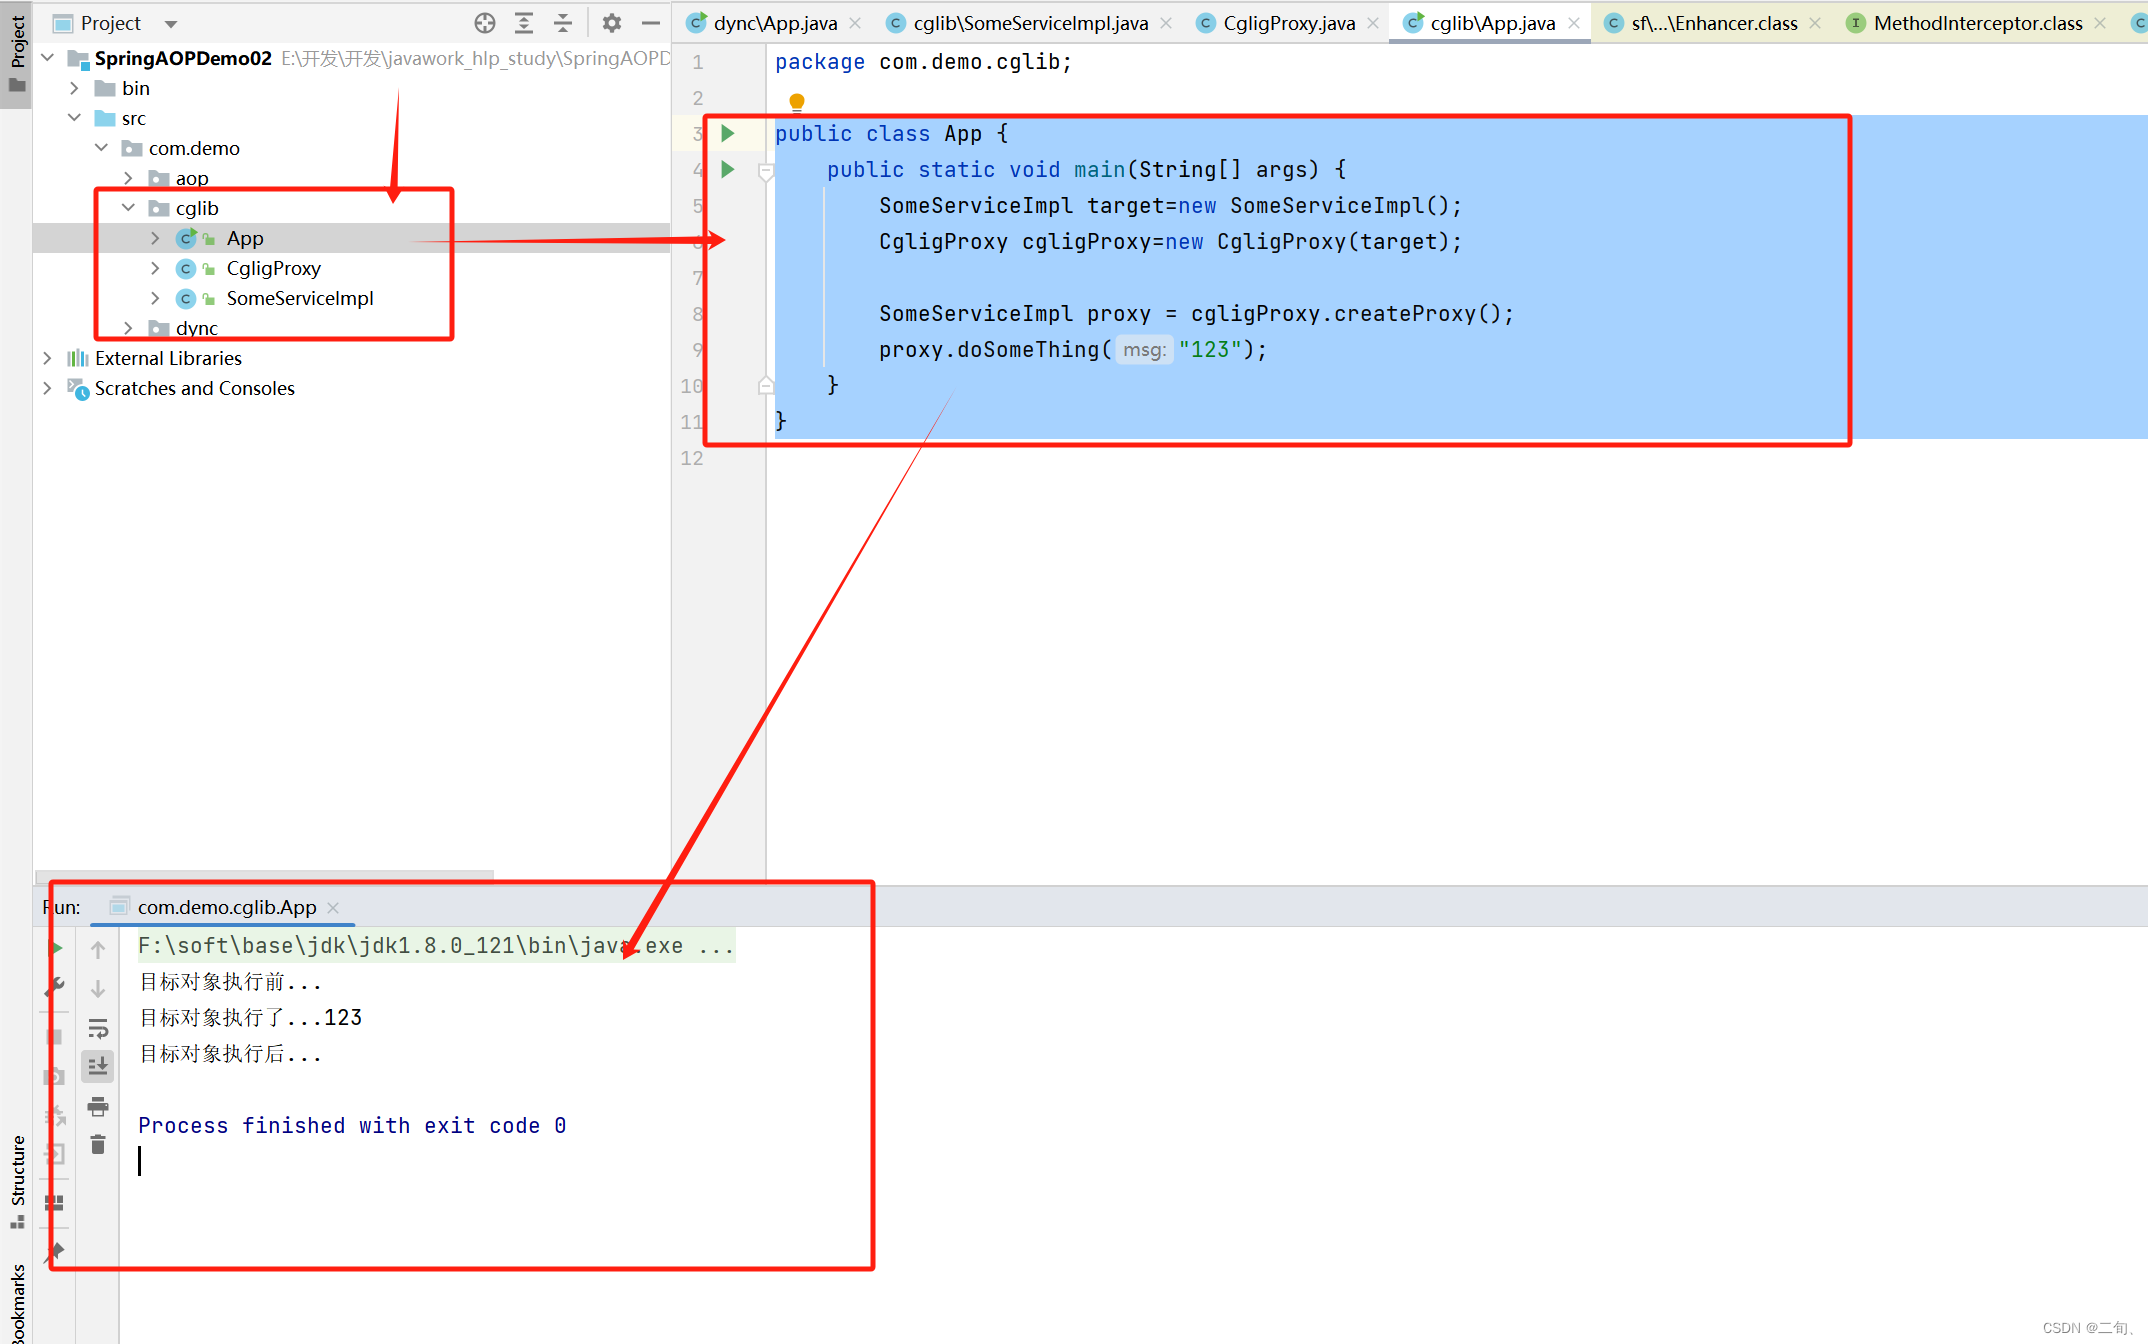
如果目标对象没有实现任何的接口,那么我们是使用不了JDK代理模式的,这时我们只能通过CGLIB代理来实现。CGLIB的实现本质是继承.1)引入cglib包
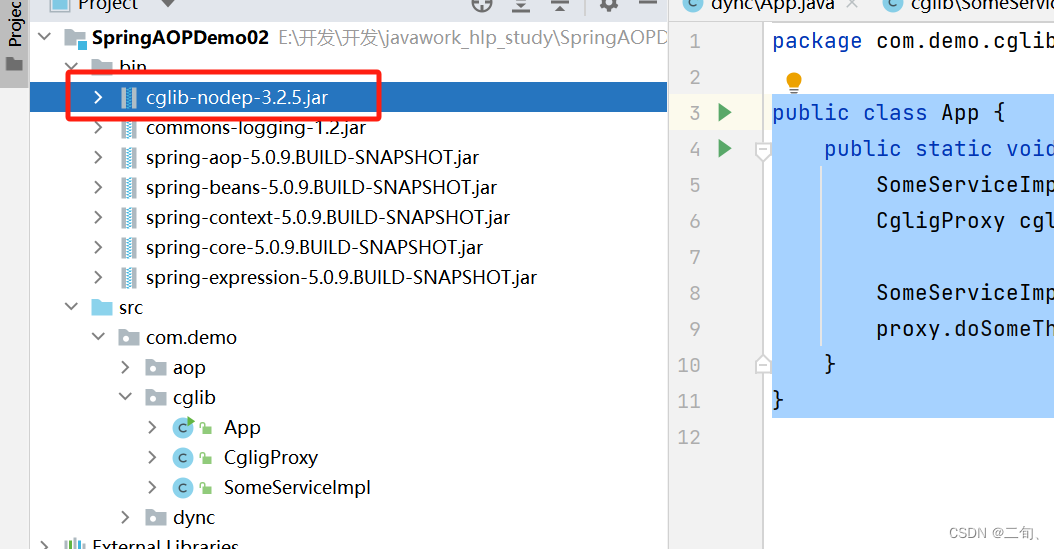
1)创建目标对象
/*** 目标对象*      目标对象没有实现任何的接口*/
public class SomeServiceImpl {public String doSomeThing(String msg) {System.out.println("目标对象执行了..."+msg);return "目标对象执行了..."+msg;}
}
2)创建代理对象工厂
/*** Cglib代理工厂*/
public class CgligProxy implements MethodInterceptor {/*** 传入目标对象*/private SomeServiceImpl target;public CgligProxy(SomeServiceImpl someService) {this.target = someService;}/*** 对外提供创建代理对象的方法** @return*/public SomeServiceImpl createProxy(){//创建增强器Enhancer enhancer=new Enhancer();//指定父类enhancer.setSuperclass(SomeServiceImpl.class);//指定回调接口对象。enhancer.setCallback(this);//返回创建的代理对象return (SomeServiceImpl) enhancer.create();}/*** 和JDK动态代理中的Invoke方法类似* @param o* @param method* @param objects* @param methodProxy* @return* @throws Throwable*/@Overridepublic Object intercept(Object o, Method method, Object[] objects, MethodProxy methodProxy) throws Throwable {System.out.println("目标对象执行前...");//目标对象执行Object result = method.invoke(target, objects);System.out.println("目标对象执行后...");return result;}
}
3)测试
public class App {public static void main(String[] args) {SomeServiceImpl target=new SomeServiceImpl();CgligProxy cgligProxy=new CgligProxy(target);SomeServiceImpl proxy = cgligProxy.createProxy();proxy.doSomeThing("123");}
}
2.2 AOP概念
1、定义:AOP (Aspect Oriented Programming),即面向切面编程,可以说是OOP(Obiect Oriented Programming,面向对象编程)的补充和完善。面向切面是面向对象中的一种方式而已。在代码执行过程中,动态嵌入其他代码,叫做面向切面编程。常见的使用场景:日志。事务数据库操作....2、实质:面向切面编程,就是将交又业务逻辑封装成切面,利用AOP的功能将切面织入到主业务逻辑中,所谓交叉业务罗辑是指,诵用的、与主业务逻辑无关的代码,如安全检查、事务、日志等。若不使用AOP,则会出现代码纠缠,即交叉业务逻辑与主业务逻辑混合在一起。这样,会使主业务逻辑变的混杂不清1)AOP术语
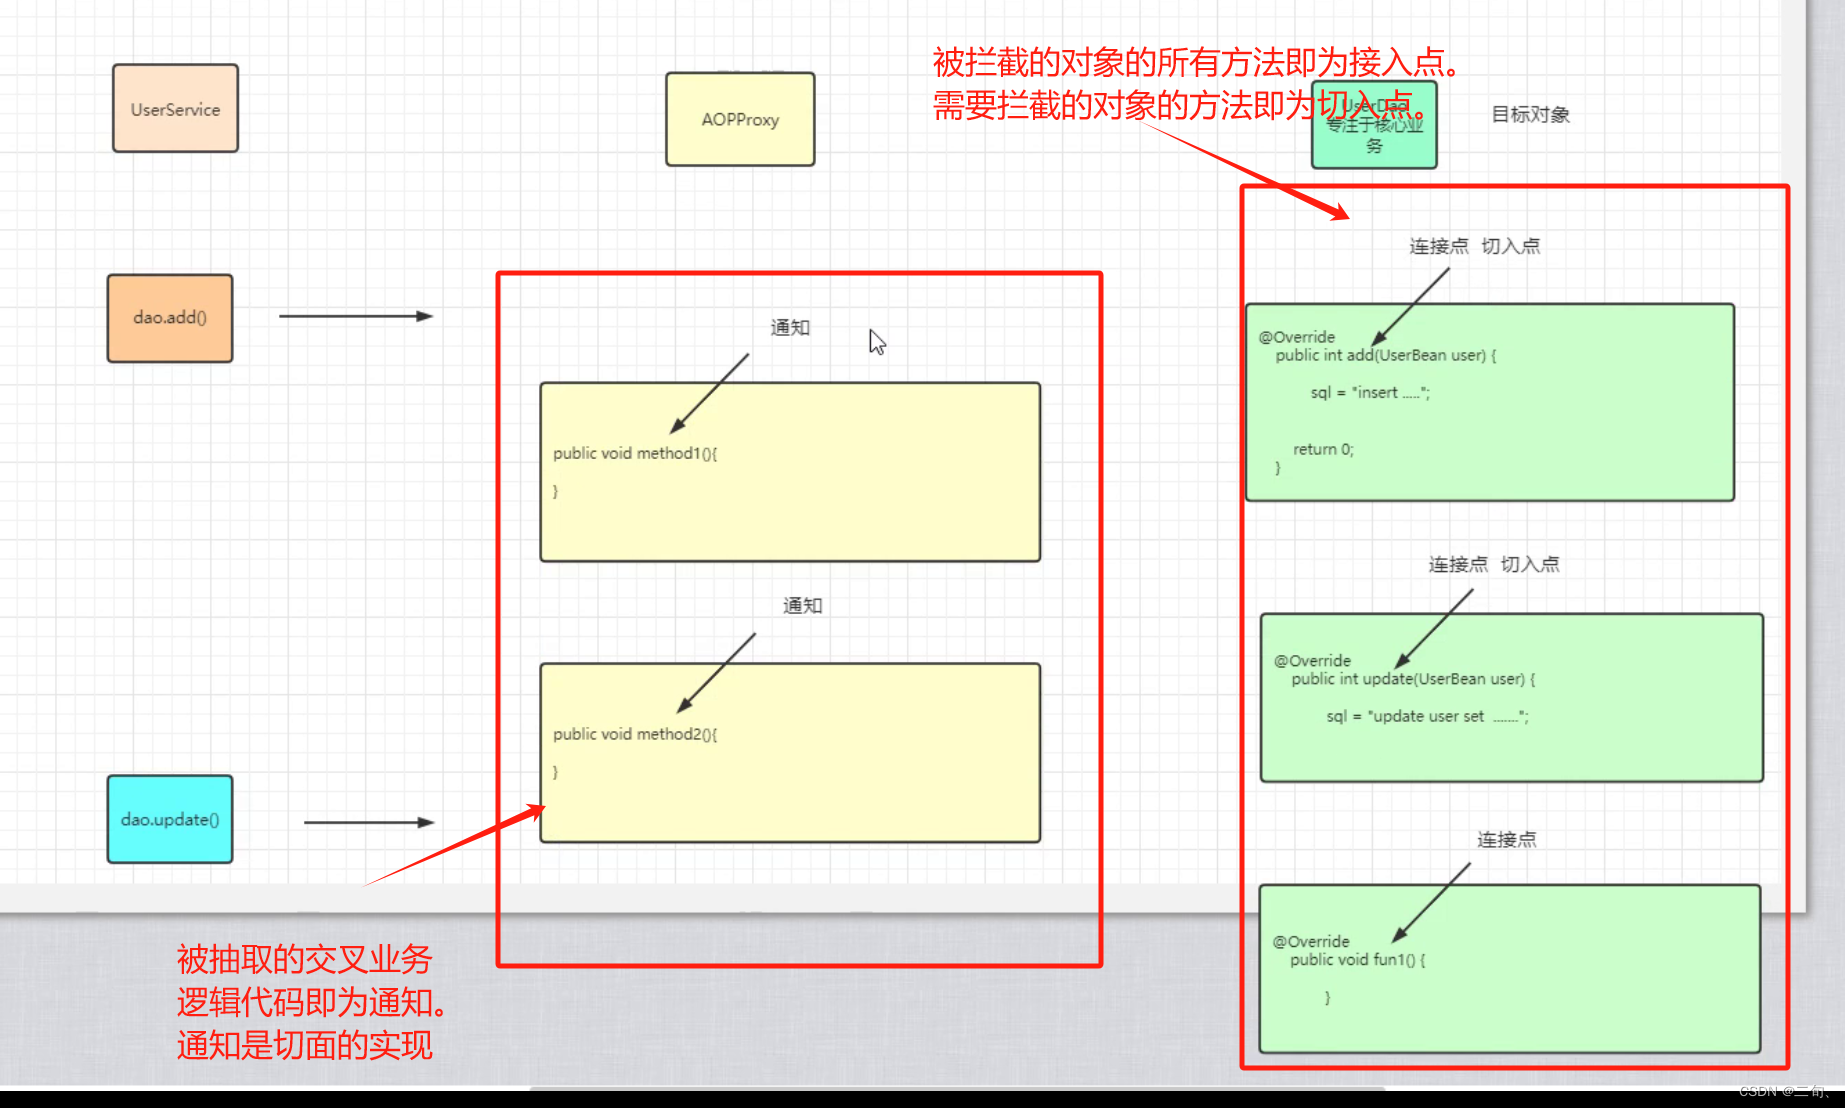
切面:将交叉业务逻辑从主逻辑中抽取的代码,即是切面。织入:将交叉业务逻辑代码插入到目标对象中执行。目标对象:需要被增强的对象代理对象:Spring代理目标对象,也就是AOP代理对象连接点:可以切入的目标对象的所有的方法。切入点:需要切入的目标对象的方法。通知:通知可以说是切面的具体实现,即被抽取的交叉业务逻辑代码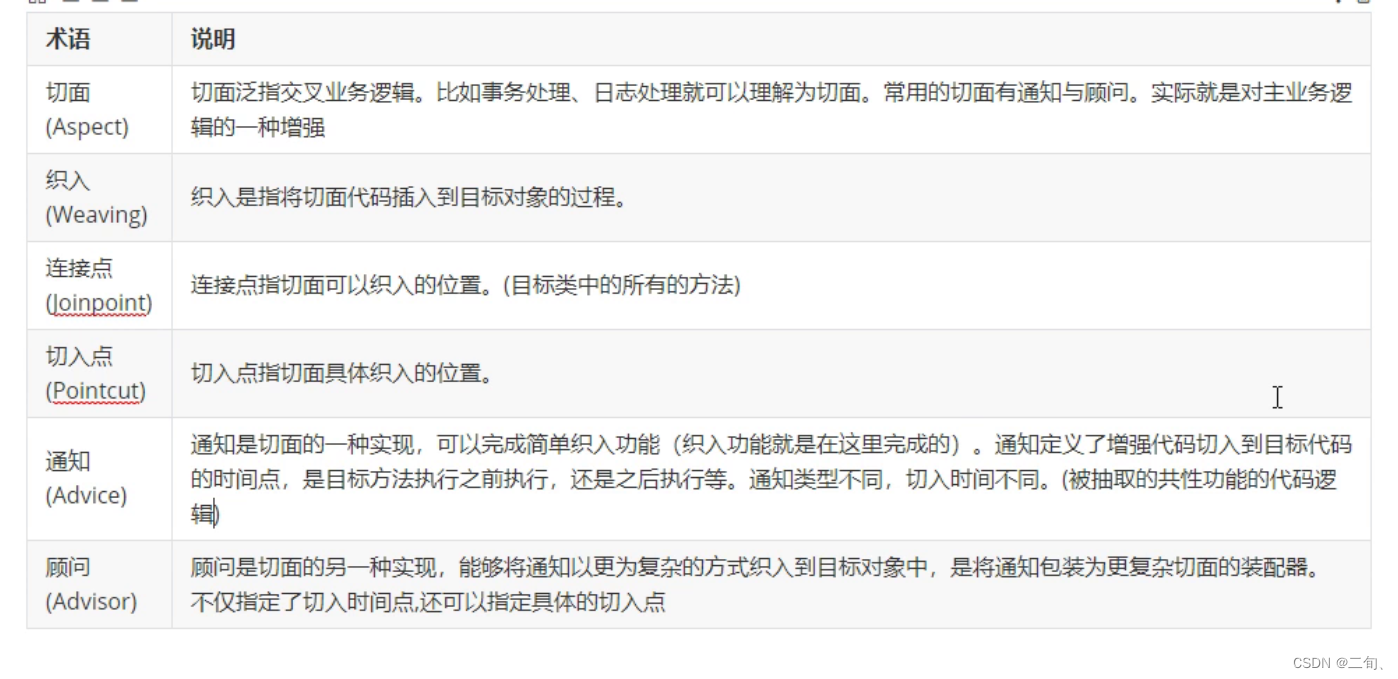
2)面相切面编程核心概念

3)AOP的具体实现
AOP面向切面编程,这个概念并不是spring发明的,这种思想一直存在。所以aop实现有很多种。今天我们讲两种。1、基于纯代理的AOP该方式是由spring提供的ProxyFactoryBean实现的。2、基于aspectJ的AOP对于AOP这种编程思想,很多框架都进行了实现。Spring就是其中之一,可以完成面向切面编程。然而,Aspect也实现了AOP的功能,且其实现方式更为简捷,使用更为方便,而且还支持注解式开发。所以,spring又将Aspect的对于AOP的实现也引入到了自己的框架中。在Spring中使用AOP开发时,一般使用Aspectl的实现方式2.3 AOP的具体实现 – 基于纯代理的AOP
2.3.1 基础
1、基于纯代理的AOP,实质上是使用了spring提供的ProxyFactoryBean来实现的。2、ProxyFactoryBean是FactoryBean,内部使用了JDK动态代理来实现代理对象。本质上还是一个创建Bean的工厂。1)环境准备
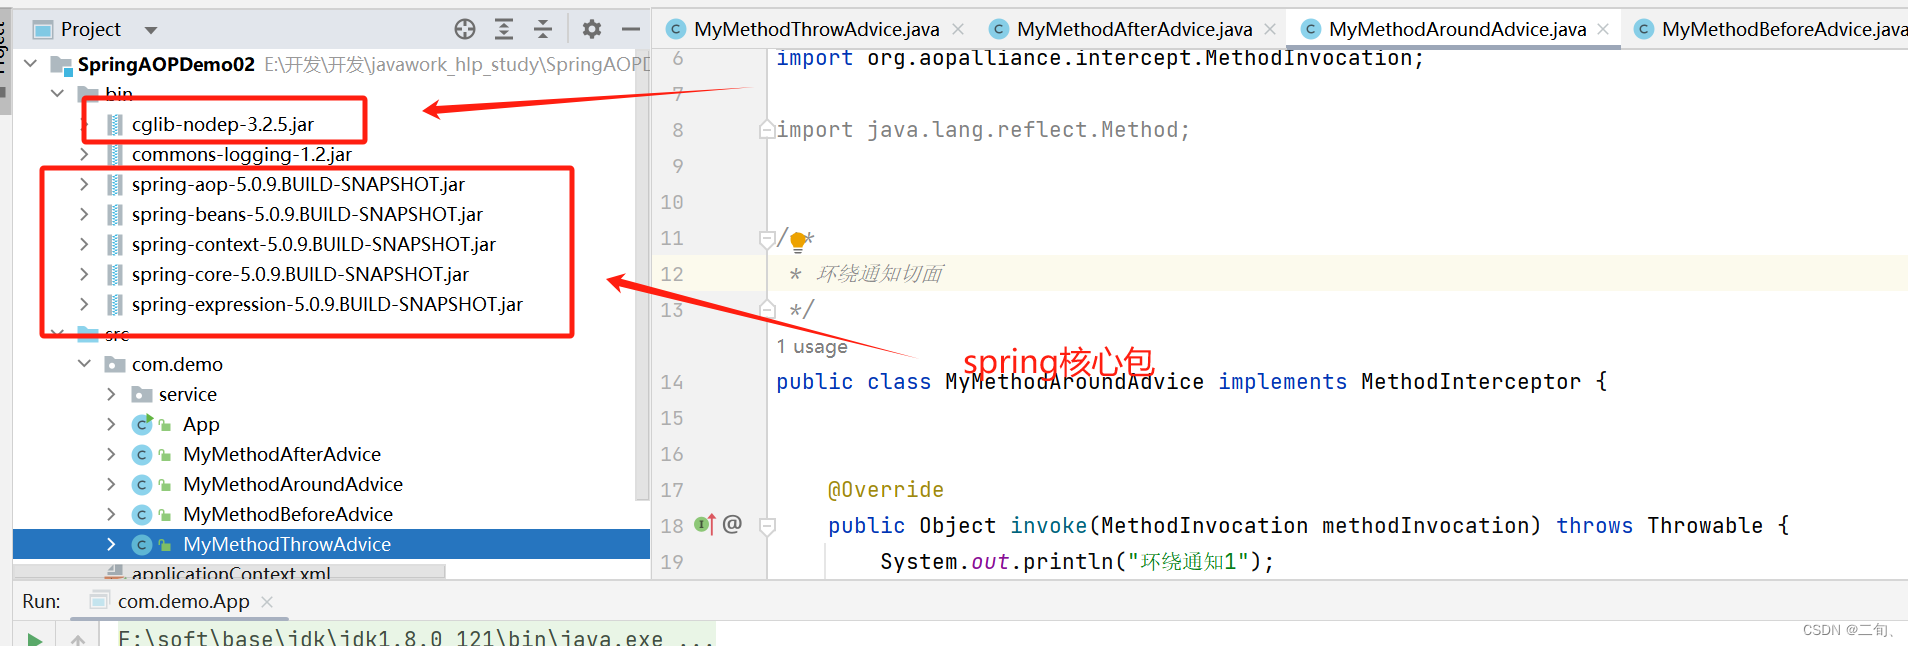
基于纯代理的AOP需导入cglib-nodep包
2) 通知类型

2.3.2 实现
1)前置通知
前置通知:在目标方法执行之前执行的通知不能修改代理类的方法返回的结果ISomeService.java
public interface ISomeService {public void doSomething(String msg);
}
SomeServiceImpl .java
public class SomeServiceImpl implements  ISomeService{@Overridepublic void doSomething(String msg) {System.out.println("SomeServiceImpl:"+msg);}
}
MyMethodBeforeAdvice.java
/*** 前置通知切面类*/
public class MyMethodBeforeAdvice implements MethodBeforeAdvice {@Overridepublic void before(Method method, Object[] objects, Object o) throws Throwable {System.out.println("前置通知执行了");}
}
applicationContext.xml
<?xml version="1.0" encoding="UTF-8"?>
<beans xmlns="http://www.springframework.org/schema/beans"xmlns:p="http://www.springframework.org/schema/p"xmlns:context="http://www.springframework.org/schema/context"xmlns:aop="http://www.springframework.org/schema/aop"xmlns:xsi="http://www.w3.org/2001/XMLSchema-instance"xsi:schemaLocation="http://www.springframework.org/schema/beanshttp://www.springframework.org/schema/beans/spring-beans.xsdhttp://www.springframework.org/schema/aophttp://www.springframework.org/schema/aop/spring-aop.xsdhttp://www.springframework.org/schema/contexthttp://www.springframework.org/schema/context/spring-context.xsd"><!--注册目标类--><bean id="someService" class="com.demo.service.SomeServiceImpl"></bean><!--注册前置通知--><bean id="myMethodBeforeAdvice" class="com.demo.MyMethodBeforeAdvice"></bean><!--创建代理类--><bean class="org.springframework.aop.framework.ProxyFactoryBean" id="myProxyFactory"><!--指定目标对象--><property name="target" ref="someService"></property><!--指定目标对象实现的接口--><property name="interfaces" value="com.demo.service.ISomeService"></property><!--注入前置通知--><property name="interceptorNames"><list><!--前置通知--><value>myMethodBeforeAdvice</value></list></property></bean></beans>
测试
public class App {public static void main(String[] args) {ApplicationContext ac = new ClassPathXmlApplicationContext("applicationContext.xml");ISomeService someService = (ISomeService) ac.getBean("myProxyFactory");someService.doSomething("!23");}
}
2)后置通知
后置通知:在目标方法执行之后执行的通知不可以修改代理类的方法返回的结果ISomeService.java
public interface ISomeService {public void doSomething(String msg);
}
SomeServiceImpl .java
public class SomeServiceImpl implements  ISomeService{@Overridepublic void doSomething(String msg) {System.out.println("SomeServiceImpl:"+msg);}
}
MyMethodAfterAdvice .java
/*** 后置通知切面*/
public class MyMethodAfterAdvice implements AfterReturningAdvice {@Overridepublic void afterReturning(Object o, Method method, Object[] objects, Object o1) throws Throwable {System.out.println("后置通知执行了");}
}
applicationContext.xml
<?xml version="1.0" encoding="UTF-8"?>
<beans xmlns="http://www.springframework.org/schema/beans"xmlns:p="http://www.springframework.org/schema/p"xmlns:context="http://www.springframework.org/schema/context"xmlns:aop="http://www.springframework.org/schema/aop"xmlns:xsi="http://www.w3.org/2001/XMLSchema-instance"xsi:schemaLocation="http://www.springframework.org/schema/beanshttp://www.springframework.org/schema/beans/spring-beans.xsdhttp://www.springframework.org/schema/aophttp://www.springframework.org/schema/aop/spring-aop.xsdhttp://www.springframework.org/schema/contexthttp://www.springframework.org/schema/context/spring-context.xsd"><!--注册目标类--><bean id="someService" class="com.demo.service.SomeServiceImpl"></bean><!--注册后置通知--><bean id="myMethodAfterAdvice" class="com.demo.MyMethodAfterAdvice"></bean><!--创建代理类--><bean class="org.springframework.aop.framework.ProxyFactoryBean" id="myProxyFactory"><!--指定目标对象--><property name="target" ref="someService"></property><!--指定目标对象实现的接口--><property name="interfaces" value="com.demo.service.ISomeService"></property><!--注入前置通知--><property name="interceptorNames"><list><!--后置通知--><value>myMethodAfterAdvice</value></list></property></bean></beans>
测试
public class App {public static void main(String[] args) {ApplicationContext ac = new ClassPathXmlApplicationContext("applicationContext.xml");ISomeService someService = (ISomeService) ac.getBean("myProxyFactory");someService.doSomething("!23");}
}
3)环绕通知
环绕通知就是在切入点方法之前前后都会织入的方式,而且环绕通知相比于前置通知和后置通知来说可以修改返回结果ISomeService.java
public interface ISomeService {public void doSomething(String msg);
}
SomeServiceImpl .java
public class SomeServiceImpl implements  ISomeService{@Overridepublic void doSomething(String msg) {System.out.println("SomeServiceImpl:"+msg);}
}
MyMethodAroundAdvice .java
/*** 环绕通知切面*/
public class MyMethodAroundAdvice implements MethodInterceptor {@Overridepublic Object invoke(MethodInvocation methodInvocation) throws Throwable {System.out.println("环绕通知1");Object result = methodInvocation.proceed();System.out.println("环绕通知2");return result;}
}
applicationContext.xml
<?xml version="1.0" encoding="UTF-8"?>
<beans xmlns="http://www.springframework.org/schema/beans"xmlns:p="http://www.springframework.org/schema/p"xmlns:context="http://www.springframework.org/schema/context"xmlns:aop="http://www.springframework.org/schema/aop"xmlns:xsi="http://www.w3.org/2001/XMLSchema-instance"xsi:schemaLocation="http://www.springframework.org/schema/beanshttp://www.springframework.org/schema/beans/spring-beans.xsdhttp://www.springframework.org/schema/aophttp://www.springframework.org/schema/aop/spring-aop.xsdhttp://www.springframework.org/schema/contexthttp://www.springframework.org/schema/context/spring-context.xsd"><!--注册目标类--><bean id="someService" class="com.demo.service.SomeServiceImpl"></bean><!--注册环绕通知--><bean id="myMethodAroundAdvice" class="com.demo.MyMethodAroundAdvice"></bean><!--创建代理类--><bean class="org.springframework.aop.framework.ProxyFactoryBean" id="myProxyFactory"><!--指定目标对象--><property name="target" ref="someService"></property><!--指定目标对象实现的接口--><property name="interfaces" value="com.demo.service.ISomeService"></property><!--注入前置通知--><property name="interceptorNames"><list><!--环绕通知--><value>myMethodAroundAdvice</value></list></property></bean></beans>
测试
public class App {public static void main(String[] args) {ApplicationContext ac = new ClassPathXmlApplicationContext("applicationContext.xml");ISomeService someService = (ISomeService) ac.getBean("myProxyFactory");someService.doSomething("!23");}
}
4)异常通知
异常通知:在目标方法执行抛出异常后执行的通知异常通知实现的ThrowsAdvice接口,该接口为一个标志接口(没有任何方法)。需手动写一个afterThrowing()方法。ISomeService.java
public interface ISomeService {public void doSomething(String msg);
}
SomeServiceImpl .java
public class SomeServiceImpl implements  ISomeService{@Overridepublic void doSomething(String msg) {int i=1;System.out.println(i/0); //抛出异常,触发异常通知System.out.println("SomeServiceImpl:"+msg);}
}
MyMethodThrowAdvice .java
/*** 异常通知切面类*/
public class MyMethodThrowAdvice implements ThrowsAdvice {/*** 异常通知** @param ex  异常通知类型*/public  void afterThrowing(Exception ex){System.out.println("异常通知执行了");}}
applicationContext.xml
<?xml version="1.0" encoding="UTF-8"?>
<beans xmlns="http://www.springframework.org/schema/beans"xmlns:p="http://www.springframework.org/schema/p"xmlns:context="http://www.springframework.org/schema/context"xmlns:aop="http://www.springframework.org/schema/aop"xmlns:xsi="http://www.w3.org/2001/XMLSchema-instance"xsi:schemaLocation="http://www.springframework.org/schema/beanshttp://www.springframework.org/schema/beans/spring-beans.xsdhttp://www.springframework.org/schema/aophttp://www.springframework.org/schema/aop/spring-aop.xsdhttp://www.springframework.org/schema/contexthttp://www.springframework.org/schema/context/spring-context.xsd"><!--注册目标类--><bean id="someService" class="com.demo.service.SomeServiceImpl"></bean><!--注册异常通知--><bean id="myMethodThrowAdvice" class="com.demo.MyMethodThrowAdvice"></bean><!--创建代理类--><bean class="org.springframework.aop.framework.ProxyFactoryBean" id="myProxyFactory"><!--指定目标对象--><property name="target" ref="someService"></property><!--指定目标对象实现的接口--><property name="interfaces" value="com.demo.service.ISomeService"></property><!--注入前置通知--><property name="interceptorNames"><list><value>myMethodThrowAdvice</value></list></property></bean></beans>
测试
public class App {public static void main(String[] args) {ApplicationContext ac = new ClassPathXmlApplicationContext("applicationContext.xml");ISomeService someService = (ISomeService) ac.getBean("myProxyFactory");someService.doSomething("!23");}
}
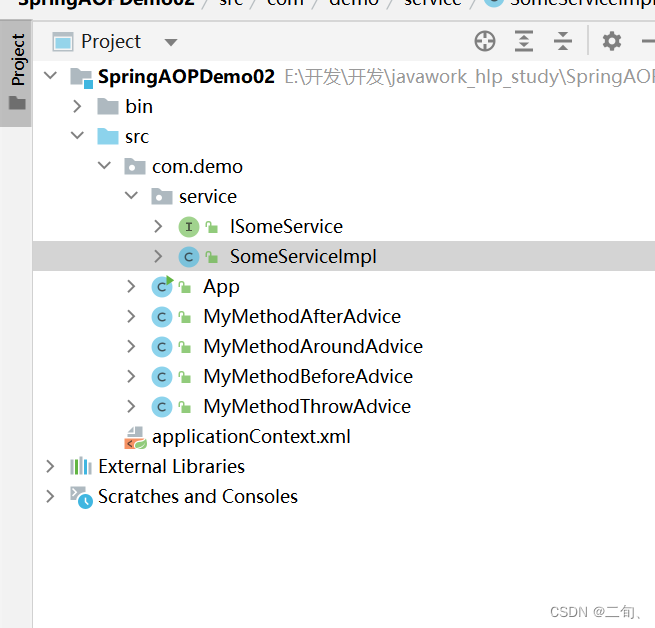
5)基于纯代理的AOP的案例
ISomeService.java
public interface ISomeService {public void doSomething(String msg);
}
SomeServiceImpl .java
public class SomeServiceImpl implements  ISomeService{@Overridepublic void doSomething(String msg) {System.out.println("SomeServiceImpl:"+msg);}
}
MyMethodBeforeAdvice .java
/*** 前置通知切面类*/
public class MyMethodBeforeAdvice implements MethodBeforeAdvice {@Overridepublic void before(Method method, Object[] objects, Object o) throws Throwable {System.out.println("前置通知执行了");}
}
MyMethodAfterAdvice .java
/*** 后置通知切面*/
public class MyMethodAfterAdvice implements AfterReturningAdvice {@Overridepublic void afterReturning(Object o, Method method, Object[] objects, Object o1) throws Throwable {System.out.println("后置通知执行了");}
}
MyMethodAroundAdvice .java
/*** 环绕通知切面*/
public class MyMethodAroundAdvice implements MethodInterceptor {@Overridepublic Object invoke(MethodInvocation methodInvocation) throws Throwable {System.out.println("环绕通知1");Object result = methodInvocation.proceed();System.out.println("环绕通知2");return result;}
}
MyMethodThrowAdvice .java
/*** 异常通知切面类*/
public class MyMethodThrowAdvice implements ThrowsAdvice {/*** 异常通知** @param ex  异常通知类型*/public  void afterThrowing(Exception ex){System.out.println("异常通知执行了");}}
applicationContext.xml
<?xml version="1.0" encoding="UTF-8"?>
<beans xmlns="http://www.springframework.org/schema/beans"xmlns:p="http://www.springframework.org/schema/p"xmlns:context="http://www.springframework.org/schema/context"xmlns:aop="http://www.springframework.org/schema/aop"xmlns:xsi="http://www.w3.org/2001/XMLSchema-instance"xsi:schemaLocation="http://www.springframework.org/schema/beanshttp://www.springframework.org/schema/beans/spring-beans.xsdhttp://www.springframework.org/schema/aophttp://www.springframework.org/schema/aop/spring-aop.xsdhttp://www.springframework.org/schema/contexthttp://www.springframework.org/schema/context/spring-context.xsd"><!--注册目标类--><bean id="someService" class="com.demo.service.SomeServiceImpl"></bean><!--注册前置通知--><bean id="myMethodBeforeAdvice" class="com.demo.MyMethodBeforeAdvice"></bean><!--注册后置通知--><bean id="myMethodAfterAdvice" class="com.demo.MyMethodAfterAdvice"></bean><!--注册环绕通知--><bean id="myMethodAroundAdvice" class="com.demo.MyMethodAroundAdvice"></bean><!--注册异常通知--><bean id="myMethodThrowAdvice" class="com.demo.MyMethodThrowAdvice"></bean><!--创建代理类--><bean class="org.springframework.aop.framework.ProxyFactoryBean" id="myProxyFactory"><!--指定目标对象--><property name="target" ref="someService"></property><!--指定目标对象实现的接口--><property name="interfaces" value="com.demo.service.ISomeService"></property><!--注入前置通知--><property name="interceptorNames"><list><!--前置通知--><value>myMethodBeforeAdvice</value><!--后置通知 --><value>myMethodAfterAdvice</value><!--环绕通知 --><value>myMethodAroundAdvice</value><!--异常通知 --><value>myMethodThrowAdvice</value></list></property></bean></beans>
测试
public class App {public static void main(String[] args) {ApplicationContext ac = new ClassPathXmlApplicationContext("applicationContext.xml");ISomeService someService = (ISomeService) ac.getBean("myProxyFactory");someService.doSomething("!23");}
}
2.4 AOP的具体实现 – 基于AspectJ的AOP
2.4.1 基础
1)环境准备
引入依赖
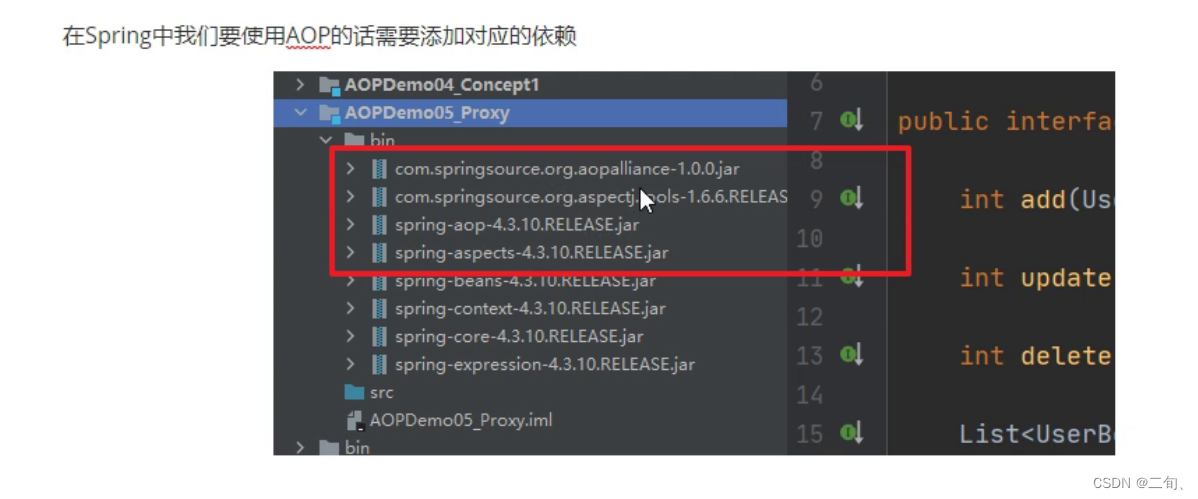
applicationContext.xml中引入aop约束
<?xml version="1.0" encoding="UTF-8"?>
<beans xmlns="http://www.springframework.org/schema/beans"xmlns:p="http://www.springframework.org/schema/p"xmlns:context="http://www.springframework.org/schema/context"xmlns:aop="http://www.springframework.org/schema/aop"  xmlns:xsi="http://www.w3.org/2001/XMLSchema-instance"xsi:schemaLocation="http://www.springframework.org/schema/beanshttp://www.springframework.org/schema/beans/spring-beans.xsdhttp://www.springframework.org/schema/aophttp://www.springframework.org/schema/aop/spring-aop.xsdhttp://www.springframework.org/schema/contexthttp://www.springframework.org/schema/context/spring-context.xsd"></beans>
2)AspectJ中的通知类型

2.4.2 JoinPoint 、ProceedingJoinPoint
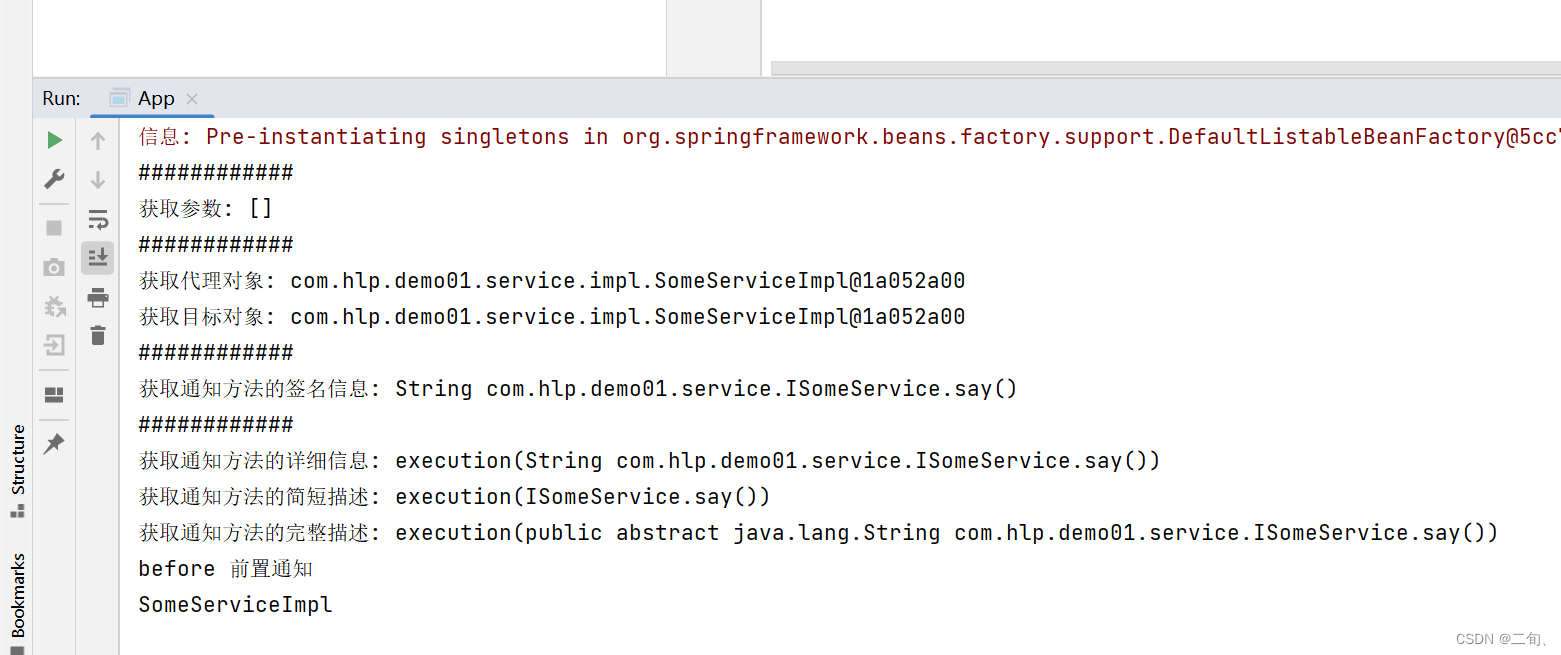
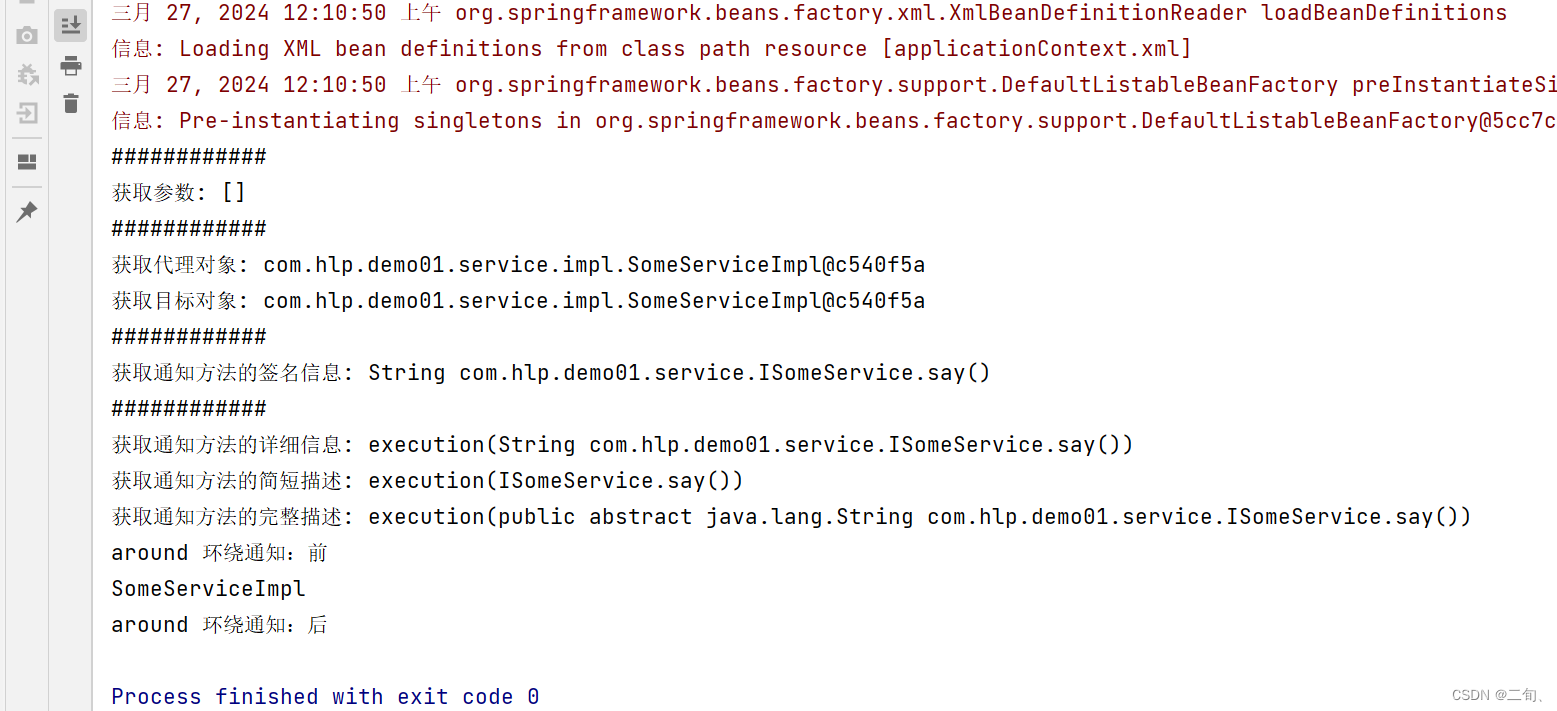
+++JoinPoint 1、作用1)在 Spring AOP 中,JoinPoint 接口代表了一个程序执行的点,比如方法执行或异常处理。2)JoinPoint 提供了一种方式来访问当前被通知方法的详细信息,如方法签名、参数等。当使用 AOP 通知(Advice)时,你可以将 JoinPoint 作为参数传递到通知方法中,以便获取有关当前执行点的详细信息。3)JoinPoint 可用于所有类型的通知(@Before、@After、@AfterReturning、@AfterThrowing),但不包括环绕通知。2、JoinPoint 常用方法getArgs():返回一个对象数组,包含了被通知方法的参数。 getThis():返回代理对象。getTarget():返回目标对象。 getSignature():返回被通知方法的签名信息。 toString():打印出正在执行的被通知方法的详细信息。 toShortString():提供正在执行的被通知方法的简短描述。toLongString():提供正在执行的被通知方法的完整描述3、其他关联类 MethodSignatureMethodSignature 是 Signature 接口的子接口,专门用于方法调用。它提供了访问被拦截方法的详细信息,如方法名称、返回类型和参数类型。在通知方法中,通常通过将 JoinPoint.getSignature() 的返回值强制转换为 MethodSignature 来获取更多关于方法的信息。+++ ProceedingJoinPoint:ProceedingJoinPoint 是 JoinPoint 的子接口,仅能用于环绕通知(@Around)。它添加了 proceed() 方法,允许控制何时继续执行拦截的方法。1)JoinPoint
applicationContext.xml
<?xml version="1.0" encoding="UTF-8"?>
<beans xmlns="http://www.springframework.org/schema/beans"xmlns:p="http://www.springframework.org/schema/p"xmlns:context="http://www.springframework.org/schema/context"xmlns:aop="http://www.springframework.org/schema/aop"xmlns:xsi="http://www.w3.org/2001/XMLSchema-instance"xsi:schemaLocation="http://www.springframework.org/schema/beanshttp://www.springframework.org/schema/beans/spring-beans.xsdhttp://www.springframework.org/schema/aophttp://www.springframework.org/schema/aop/spring-aop.xsdhttp://www.springframework.org/schema/contexthttp://www.springframework.org/schema/context/spring-context.xsd"><bean class="com.hlp.demo01.service.impl.SomeServiceImpl" id="someService"></bean><bean class="com.hlp.demo01.aop.LogAspect" id="logAspect"></bean><aop:config><aop:pointcut id="pt" expression="execution(* com.hlp.demo01.service..*(..))"/><aop:aspect ref="logAspect"><aop:before method="before" pointcut-ref="pt"></aop:before></aop:aspect></aop:config></beans>
ISomeService.java
public interface ISomeService {String say();
}
SomeServiceImpl .java
public class SomeServiceImpl implements ISomeService {public String say() {System.out.println("SomeServiceImpl");return "SomeServiceImpl";}
}
LogAspect.java
public class LogAspect {public void before(JoinPoint jp){System.out.println("############");System.out.println("获取参数: "+ Arrays.toString(jp.getArgs()));System.out.println("############");System.out.println("获取代理对象: "+jp.getThis());System.out.println("获取目标对象: "+jp.getTarget());System.out.println("############");System.out.println("获取通知方法的签名信息: "+jp.getSignature());System.out.println("############");System.out.println("获取通知方法的详细信息: "+jp.toString());System.out.println("获取通知方法的简短描述: "+jp.toShortString());System.out.println("获取通知方法的完整描述: "+jp.toLongString());System.out.println("before 前置通知");}
}
App.java
public class App {public static void main(String[] args) {ApplicationContext ac=new ClassPathXmlApplicationContext("applicationContext.xml");ISomeService someService = (ISomeService) ac.getBean("someService");someService.say();}
}
2)ProceedingJoinPoint
applicationContext.xml
<?xml version="1.0" encoding="UTF-8"?>
<beans xmlns="http://www.springframework.org/schema/beans"xmlns:p="http://www.springframework.org/schema/p"xmlns:context="http://www.springframework.org/schema/context"xmlns:aop="http://www.springframework.org/schema/aop"xmlns:xsi="http://www.w3.org/2001/XMLSchema-instance"xsi:schemaLocation="http://www.springframework.org/schema/beanshttp://www.springframework.org/schema/beans/spring-beans.xsdhttp://www.springframework.org/schema/aophttp://www.springframework.org/schema/aop/spring-aop.xsdhttp://www.springframework.org/schema/contexthttp://www.springframework.org/schema/context/spring-context.xsd"><bean class="com.hlp.demo01.service.impl.SomeServiceImpl" id="someService"></bean><bean class="com.hlp.demo01.aop.LogAspect" id="logAspect"></bean><aop:config><aop:pointcut id="pt" expression="execution(* com.hlp.demo01.service..*(..))"/><aop:aspect ref="logAspect"><aop:around method="around" pointcut-ref="pt"></aop:around></aop:aspect></aop:config></beans>
ISomeService.java
public interface ISomeService {String say();
}
SomeServiceImpl .java
public class SomeServiceImpl implements ISomeService {public String say() {System.out.println("SomeServiceImpl");return "SomeServiceImpl";}
}
LogAspect.java
public class LogAspect {public Object around(ProceedingJoinPoint jp) throws Throwable {System.out.println("############");System.out.println("获取参数: "+ Arrays.toString(jp.getArgs()));System.out.println("############");System.out.println("获取代理对象: "+jp.getThis());System.out.println("获取目标对象: "+jp.getTarget());System.out.println("############");System.out.println("获取通知方法的签名信息: "+jp.getSignature());System.out.println("############");System.out.println("获取通知方法的详细信息: "+jp.toString());System.out.println("获取通知方法的简短描述: "+jp.toShortString());System.out.println("获取通知方法的完整描述: "+jp.toLongString());System.out.println("around 环绕通知:前");Object result = jp.proceed();System.out.println("around 环绕通知:后");return result;}}App.java
public class App {public static void main(String[] args) {ApplicationContext ac=new ClassPathXmlApplicationContext("applicationContext.xml");ISomeService someService = (ISomeService) ac.getBean("someService");someService.say();}
}
2.4.3 切入点表达式
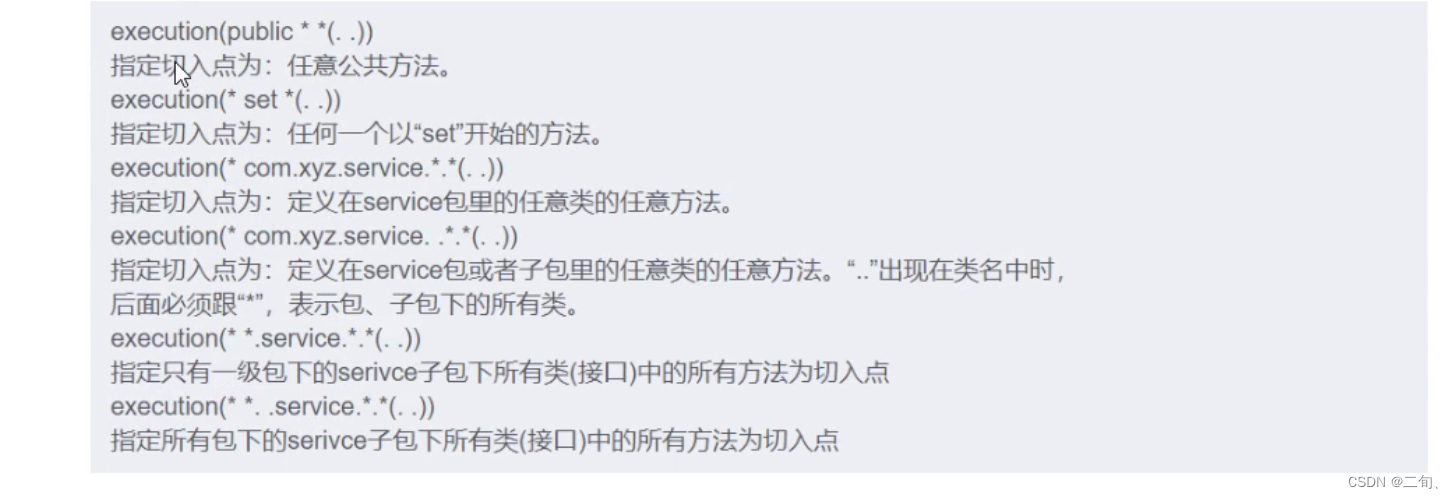
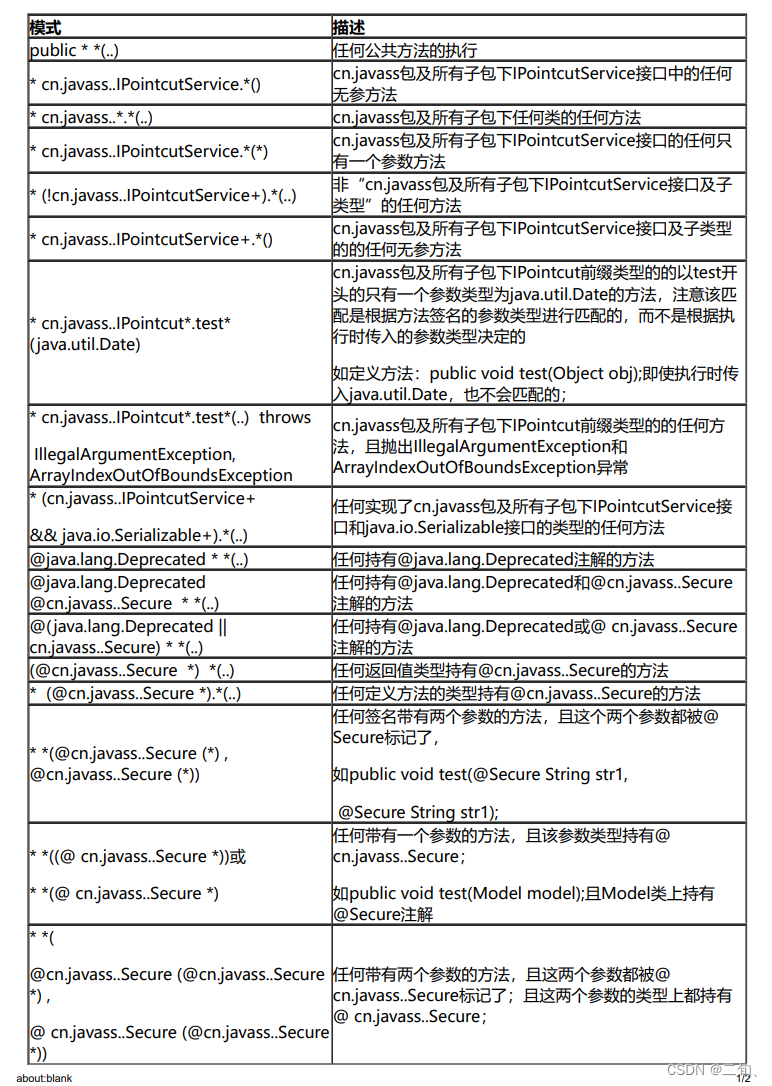
SpringAop只支持标准的AspectJ Aop的pointcut的表达式类型其中的10种,外加Spring Aop自己扩充的一种一共是11(10+1)种类型的表达式,分别如下。1.execution:一般用于指定方法的执行,用的最多。2.within:指定某些类型的全部方法执行,也可用来指定一个包。3.this:Spring Aop是基于动态代理的,生成的bean也是一个代理对象,this就是这个代理对象,当这个对象可以转换为指定的类型时,对应的切入点就是它了,Spring Aop将生效。target:当被代理的对象可以转换为指定的类型时,对应的切入点就是它了,Spring Aop将生效。4.reference pointcut:(经常使用)表示引用其他命名切入点,只有@ApectJ风格支持,Schema风格不支持5.args:当执行的方法的参数是指定类型时生效。6.@args:当执行的方法参数类型上拥有指定的注解时生效。7.@within:与@target类似,看官方文档和网上的说法都是@within只需要目标对象的类或者8.父类上有指定的注解,则@within会生效,而@target则是必须是目标对象的类上有指定的注解。而根据笔者的测试这两者都是只要目标类或父类上有指定的注解即可。9.@annotation:当执行的方法上拥有指定的注解时生效。10.@target:当代理的目标对象上拥有指定的注解时生效。11.bean:当调用的方法是指定的bean的方法时生效。(Spring AOP自己扩展支持的)注意:Pointcut定义时,还可以使用&&、||、! 这三个运算。进行逻辑运算。可以把各种条件组合起来使用1)execution
切入点表达式要匹配的对象就是目标方法的方法名。所以,execution表达式中明显就是方法的签名。注意,表达式中加`[]`的部分表示可省略部分,各部分间用空格分开。切入点表达式

切入点表达式符号

>>>>>> 举例1
>>>>>> 举例2
execution(void com.guanzhi.dao.BookDao.update())
√ 匹配接口,能匹配到execution(void com.guanzhi.dao.impl.BookDaoImpl.update())
√ 匹配实现类,能匹配到execution(* com.guanzhi.dao.impl.BookDaoImpl.update())
√ 返回值任意,能匹配到execution(* com.guanzhi.dao.impl.BookDaoImpl.update(*))
× 返回值任意,但是update方法必须要有一个参数,无法匹配,要想匹配需要在update接口和实现类添加参数execution(void com.*.*.*.*.update())
√ 返回值为void,com包下的任意包三层包下的任意类的update方法,匹配到的是实现类,能匹配execution(void com.*.*.*.update())
√ 返回值为void,com包下的任意两层包下的任意类的update方法,匹配到的是接口,能匹配execution(void *..update())
√ 返回值为void,方法名是update的任意包下的任意类,能匹配execution(* *..*(..))
√ 匹配项目中任意类的任意方法,能匹配,但是不建议使用这种方式,影响范围广execution(* *..u*(..))
√ 匹配项目中任意包任意类下只要以u开头的方法,update方法能满足,能匹配execution(* *..*e(..))
√ 匹配项目中任意包任意类下只要以e结尾的方法,update和save方法能满足,能匹配execution(void com..*())
√ 返回值为void,com包下的任意包任意类任意方法,能匹配,*代表的是方法execution(* com.guanzhi.*.*Service.find*(..))
√ 将项目中所有业务层方法的以find开头的方法匹配execution(* com.guanzhi.*.*Service.save*(..))
√ 将项目中所有业务层方法的以save开头的方法匹配
>>>>>> 举例3

2)within
使用“within(类型表达式)”匹配指定类型内的方法执行;
与execution相比,可以不写参数

>>>>>> 例子
@Aspect
public class LogAspect {//    @Before("execution(* com.hlp..*(..))")
//    public void before(){
//        System.out.println("#######");
//        System.out.println("before 前置通知");
//    }@Before("within(com.hlp..*)")public void before(){System.out.println("#######");System.out.println("before 前置通知");}}
3)this
使用“this(类型全限定名)”匹配当前AOP代理对象类型的执行方法;注意是AOP代理对象的类型匹配,这样就可能包括引入接口方法也可以匹配;注意this中使用的表达式必须是类型全限定名,不支持通配符;

4)target
使用“target(类型全限定名)”匹配当前目标对象类型的执行方法;注意是目标对象的类型匹配,这样就不包括引入接口也类型匹配;注意target中使用的表达式必须是类型全限定名,不支持通配符;

>>>>>> 例子
@Aspect
public class LogAspect {//    @Before("execution(* com.hlp..*(..))")
//    public void before(){
//        System.out.println("#######");
//        System.out.println("before 前置通知");
//    }@Before("target(com.hlp.demo01.service.impl.SomeServiceImpl)")public void before(){System.out.println("#######");System.out.println("before 前置通知");}}
5)@within
使用“@within(注解类型)”匹配所以持有指定注解类型内的方法;注解类型也必须是全限定类型名;

>>>>>> 例子
MyAnno.java 自定义注解
@Retention(RetentionPolicy.RUNTIME)
@Target({ElementType.TYPE})
public @interface  MyAnno {
}
SomeServiceImpl .java
@MyAnno
public class SomeServiceImpl implements ISomeService {public String say() {System.out.println("SomeServiceImpl");return "SomeServiceImpl";}
}
@Aspect
public class LogAspect {// @Before("execution(* com.hlp..*(..))")
// public void before(){
// System.out.println("#######");
// System.out.println("before 前置通知");
// }@Before("@within(com.hlp.demo01.MyAnno)")public void before(){System.out.println("#######");System.out.println("before 前置通知");}}
6) @target
使用“@target(注解类型)”匹配当前目标对象类型的执行方法,其中目标对象持有指定的注解;注解类型也必须是全限定类型名;

7) @args
使用“@args(注解列表)”匹配当前执行的方法传入的参数持有指定注解的执行;注解类型也必须是全限定类型名;

8) @annotation
使用“@annotation(注解类型)”匹配当前执行方法持有指定注解的方法;注解类型也必须是全限定类型名;

9)bean
使用“bean(Bean id或名字通配符)”匹配特定名称的Bean对象的执行方法;Spring ASP扩展的,在AspectJ中无相应概念;

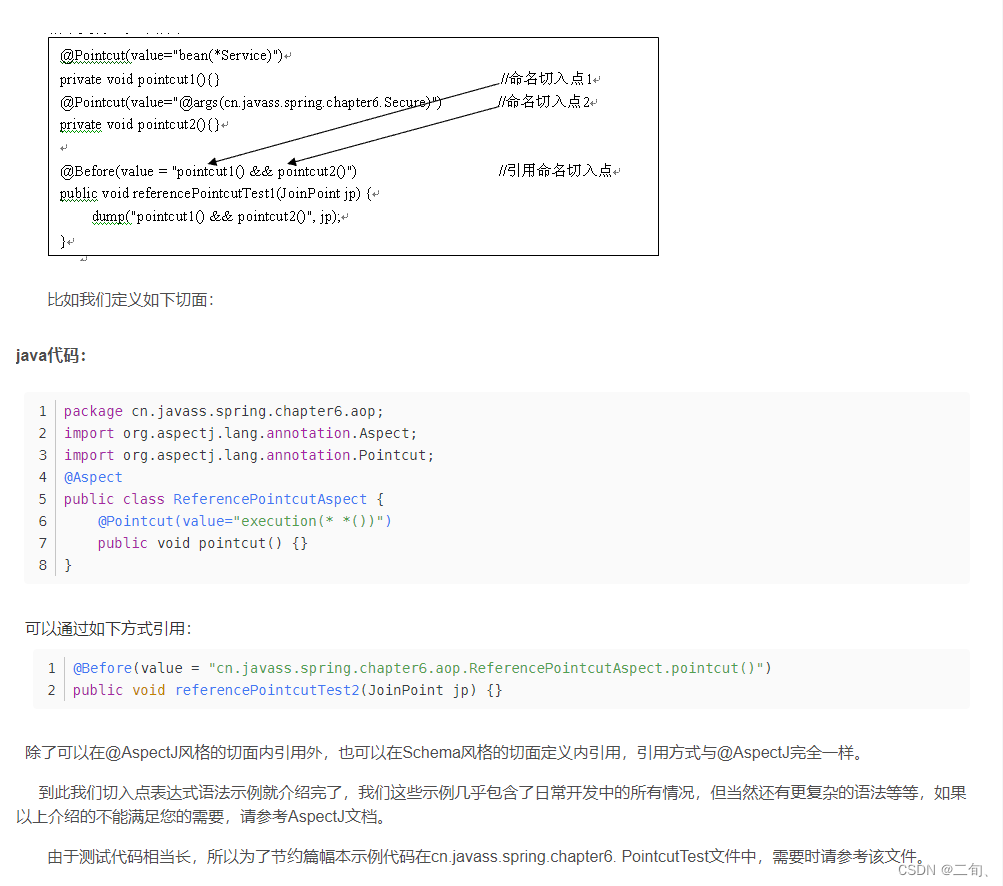
10)reference pointcut
表示引用其他命名切入点,只有@ApectJ风格支持,Schema风格不支持,如下所示
2.4.3 实现
2.4.3.1 IOC容器基于配置+aspectJ基于配置方式
<?xml version="1.0" encoding="UTF-8"?>
<beans xmlns="http://www.springframework.org/schema/beans"xmlns:p="http://www.springframework.org/schema/p"xmlns:context="http://www.springframework.org/schema/context"xmlns:aop="http://www.springframework.org/schema/aop"xmlns:xsi="http://www.w3.org/2001/XMLSchema-instance"xsi:schemaLocation="http://www.springframework.org/schema/beanshttp://www.springframework.org/schema/beans/spring-beans.xsdhttp://www.springframework.org/schema/aophttp://www.springframework.org/schema/aop/spring-aop.xsdhttp://www.springframework.org/schema/contexthttp://www.springframework.org/schema/context/spring-context.xsd"><!--注册someService类--><bean class="com.hlp.service.impl.SomeServiceImpl" id="someService"></bean><!--注册切面类--><bean class="com.hlp.MyAspect" id="myAspect"></bean><!--方式一:切面配置-->
<!-- <aop:config>-->
<!-- <aop:aspect ref="myAspect">-->
<!-- <!–前置通知–>-->
<!-- <aop:before method="beforeAdvice" pointcut="execution(* com.hlp.service..*.*(..))"></aop:before>-->
<!-- <!–后置通知–>-->
<!-- <aop:after-returning method="afterAdvice" returning="msg" pointcut="execution(* com.hlp.service..*.*(..))"></aop:after-returning>-->
<!-- <!–环绕通知–>-->
<!-- <aop:around method="aroundAdvice" pointcut="execution(* com.hlp.service..*.*(..))"></aop:around>-->
<!-- <!–异常通知–>-->
<!-- <aop:after-throwing method="throwsAdvice" throwing="ex" pointcut="execution(* com.hlp.service..*.*(..))"></aop:after-throwing>-->
<!-- <!–最终通知–>-->
<!-- <aop:after method="finalAdvice" pointcut="execution(* com.hlp.service..*.*(..))"></aop:after>-->
<!-- </aop:aspect>-->
<!-- </aop:config>--><!--方式二:切面配置--><aop:config><aop:pointcut id="myAspext" expression="execution(* com.hlp..*.*(..))"/><aop:aspect ref="myAspect"><!--前置通知--><aop:before method="beforeAdvice" pointcut-ref="myAspext"></aop:before><!--后置通知--><aop:after-returning method="afterAdvice" returning="msg" pointcut-ref="myAspext"></aop:after-returning><!--环绕通知--><aop:around method="aroundAdvice" pointcut-ref="myAspext"></aop:around><!--异常通知--><aop:after-throwing method="throwsAdvice" throwing="ex" pointcut-ref="myAspext"></aop:after-throwing><!--最终通知--><aop:after method="finalAdvice" pointcut-ref="myAspext"></aop:after></aop:aspect></aop:config></beans>1)前置通知
ISomeService.java
public interface ISomeService {public String doSomething(String msg);
}
SomeServiceImpl .java
public class SomeServiceImpl implements ISomeService {@Overridepublic String doSomething(String msg) {System.out.println("SomeServiceImpl:"+msg);return "123";}
}
MyAspect .java
/*** 自定义切面类*/
public class MyAspect {/*** 前置通知*      切入点表达式将通知与切入点关联*/public void before(){System.out.println("前置通知执行了");}
}
applicationContext.xml
<?xml version="1.0" encoding="UTF-8"?>
<beans xmlns="http://www.springframework.org/schema/beans"xmlns:p="http://www.springframework.org/schema/p"xmlns:context="http://www.springframework.org/schema/context"xmlns:aop="http://www.springframework.org/schema/aop"xmlns:xsi="http://www.w3.org/2001/XMLSchema-instance"xsi:schemaLocation="http://www.springframework.org/schema/beanshttp://www.springframework.org/schema/beans/spring-beans.xsdhttp://www.springframework.org/schema/aophttp://www.springframework.org/schema/aop/spring-aop.xsdhttp://www.springframework.org/schema/contexthttp://www.springframework.org/schema/context/spring-context.xsd"><!-- 注册目标对象--><bean class="com.demoaspect.service.SomeServiceImpl" id="someService"></bean><!-- 注册切面类对象--><bean class="com.demoaspect.MyAspect" id="myAspect"></bean><!--AspectJ的AOP配置:方式一-->
<!--        <aop:config>-->
<!--                <aop:pointcut id="myAspect" expression="execution(* com.demoaspect.service..*.*(..))"/>-->
<!--                <aop:aspect ref="myAspect">-->
<!--                        <aop:after-returning method="after" returning="msg" pointcut-ref="myAspext" ></aop:after-returning>-->
<!--                 </aop:aspect>-->
<!--        </aop:config>--><!--AspectJ的AOP配置:方式二--><aop:config><!--配置切面类--><aop:aspect ref="myAspect"><!-- 配置后置通知:将通知与切入点表达式关联--><aop:after-returning method="after" returning="msg" pointcut="execution(* com.demoaspect.service..*.*(..))"></aop:after-returning></aop:aspect></aop:config>
</beans>
测试
public class App {public static void main(String[] args) {ApplicationContext ac=new ClassPathXmlApplicationContext("applicationContext.xml");ISomeService someService = (ISomeService) ac.getBean("someService");someService.doSomething("123");}
}

2)后置通知
ISomeService.java
public interface ISomeService {public void doSomething(String msg);
}
SomeServiceImpl .java
public class SomeServiceImpl implements ISomeService {@Overridepublic void doSomething(String msg) {System.out.println("SomeServiceImpl:"+msg);}
}
MyAspect .java
/*** 自定义切面类*/
public class MyAspect {/*** 后置通知*      切入点表达式将通知与切入点关联*/public void after(Object msg){System.out.println("后通知执行了"+msg);}
}
applicationContext.xml
<?xml version="1.0" encoding="UTF-8"?>
<beans xmlns="http://www.springframework.org/schema/beans"xmlns:p="http://www.springframework.org/schema/p"xmlns:context="http://www.springframework.org/schema/context"xmlns:aop="http://www.springframework.org/schema/aop"xmlns:xsi="http://www.w3.org/2001/XMLSchema-instance"xsi:schemaLocation="http://www.springframework.org/schema/beanshttp://www.springframework.org/schema/beans/spring-beans.xsdhttp://www.springframework.org/schema/aophttp://www.springframework.org/schema/aop/spring-aop.xsdhttp://www.springframework.org/schema/contexthttp://www.springframework.org/schema/context/spring-context.xsd"><!-- 注册目标对象--><bean class="com.demoaspect.service.SomeServiceImpl" id="someService"></bean><!-- 注册切面类对象--><bean class="com.demoaspect.MyAspect" id="myAspect"></bean><!--AspectJ的AOP配置--><aop:config><!--配置切面类--><aop:aspect ref="myAspect"><!-- 配置后置通知:将通知与切入点表达式关联--><aop:after-returning method="after" returning="msg" pointcut="execution(* com.demoaspect.service..*.*(..))"></aop:after-returning></aop:aspect></aop:config>
</beans>
测试
public class App {public static void main(String[] args) {ApplicationContext ac=new ClassPathXmlApplicationContext("applicationContext.xml");ISomeService someService = (ISomeService) ac.getBean("someService");someService.doSomething("123");}
}
3)环绕通知
ISomeService.java
public interface ISomeService {public void doSomething(String msg);
}
SomeServiceImpl .java
public class SomeServiceImpl implements ISomeService {@Overridepublic void doSomething(String msg) {System.out.println("SomeServiceImpl:"+msg);}
}
MyAspect .java
/*** 自定义切面类*/
public class MyAspect {/*** 环绕通知*      切入点表达式将通知与切入点关联*/public Object round(ProceedingJoinPoint proceedingJoinPoint) throws Throwable {System.out.println("目标方法执行前打印");//执行目标对象的方法Object result = proceedingJoinPoint.proceed();//目标方法执行后打印System.out.println("目标方法执行前打印");return result;}
}
applicationContext.xml
<?xml version="1.0" encoding="UTF-8"?>
<beans xmlns="http://www.springframework.org/schema/beans"xmlns:p="http://www.springframework.org/schema/p"xmlns:context="http://www.springframework.org/schema/context"xmlns:aop="http://www.springframework.org/schema/aop"xmlns:xsi="http://www.w3.org/2001/XMLSchema-instance"xsi:schemaLocation="http://www.springframework.org/schema/beanshttp://www.springframework.org/schema/beans/spring-beans.xsdhttp://www.springframework.org/schema/aophttp://www.springframework.org/schema/aop/spring-aop.xsdhttp://www.springframework.org/schema/contexthttp://www.springframework.org/schema/context/spring-context.xsd"><!-- 注册目标对象--><bean class="com.demoaspect.service.SomeServiceImpl" id="someService"></bean><!-- 注册切面类对象--><bean class="com.demoaspect.MyAspect" id="myAspect"></bean><!--AspectJ的AOP配置--><aop:config><!--配置切面类--><aop:aspect ref="myAspect"><!-- 配置环绕通知:将通知与切入点表达式关联--><aop:around method="round" pointcut="execution(* com.demoaspect.service..*.*(..))"></aop:around></aop:aspect></aop:config>
</beans>
测试
public class App {public static void main(String[] args) {ApplicationContext ac=new ClassPathXmlApplicationContext("applicationContext.xml");ISomeService someService = (ISomeService) ac.getBean("someService");someService.doSomething("123");}
}
4)异常通知
ISomeService.java
public interface ISomeService {public void doSomething(String msg);
}
SomeServiceImpl .java
public class SomeServiceImpl implements ISomeService {@Overridepublic void doSomething(String msg) {System.out.println("SomeServiceImpl:"+msg);}
}
MyAspect .java
/*** 自定义切面类*/
public class MyAspect {/*** 异常通知*      切入点表达式将通知与切入点关联*/public void throws123(Exception ex) throws Throwable {System.out.println("出现异常了"+ex);}
}
applicationContext.xml
<?xml version="1.0" encoding="UTF-8"?>
<beans xmlns="http://www.springframework.org/schema/beans"xmlns:p="http://www.springframework.org/schema/p"xmlns:context="http://www.springframework.org/schema/context"xmlns:aop="http://www.springframework.org/schema/aop"xmlns:xsi="http://www.w3.org/2001/XMLSchema-instance"xsi:schemaLocation="http://www.springframework.org/schema/beanshttp://www.springframework.org/schema/beans/spring-beans.xsdhttp://www.springframework.org/schema/aophttp://www.springframework.org/schema/aop/spring-aop.xsdhttp://www.springframework.org/schema/contexthttp://www.springframework.org/schema/context/spring-context.xsd"><!-- 注册目标对象--><bean class="com.demoaspect.service.SomeServiceImpl" id="someService"></bean><!-- 注册切面类对象--><bean class="com.demoaspect.MyAspect" id="myAspect"></bean><!--AspectJ的AOP配置--><aop:config><!-- <aop:pointcut id="" expression=""/>--><!--配置切面类--><aop:aspect ref="myAspect"><!-- 配置异常通知:将通知与切入点表达式关联--><aop:after-throwing method="throws123" throwing="ex" pointcut="execution(* com.demoaspect.service..*.*(..))"></aop:after-throwing></aop:aspect></aop:config>
</beans>
测试
public class App {public static void main(String[] args) {ApplicationContext ac=new ClassPathXmlApplicationContext("applicationContext.xml");ISomeService someService = (ISomeService) ac.getBean("someService");someService.doSomething("123");}
}
5)最终通知
ISomeService.java
public interface ISomeService {public void doSomething(String msg);
}
SomeServiceImpl .java
public class SomeServiceImpl implements ISomeService {@Overridepublic void doSomething(String msg) {System.out.println("SomeServiceImpl:"+msg);}
}
MyAspect .java
/*** 自定义切面类*/
public class MyAspect {/*** 最终通知*      切入点表达式将通知与切入点关联*/public void final1(){System.out.println("最终通知执行了");}
}
applicationContext.xml
<?xml version="1.0" encoding="UTF-8"?>
<beans xmlns="http://www.springframework.org/schema/beans"xmlns:p="http://www.springframework.org/schema/p"xmlns:context="http://www.springframework.org/schema/context"xmlns:aop="http://www.springframework.org/schema/aop"xmlns:xsi="http://www.w3.org/2001/XMLSchema-instance"xsi:schemaLocation="http://www.springframework.org/schema/beanshttp://www.springframework.org/schema/beans/spring-beans.xsdhttp://www.springframework.org/schema/aophttp://www.springframework.org/schema/aop/spring-aop.xsdhttp://www.springframework.org/schema/contexthttp://www.springframework.org/schema/context/spring-context.xsd"><!-- 注册目标对象--><bean class="com.demoaspect.service.SomeServiceImpl" id="someService"></bean><!-- 注册切面类对象--><bean class="com.demoaspect.MyAspect" id="myAspect"></bean><!--AspectJ的AOP配置--><aop:config><!-- <aop:pointcut id="" expression=""/>--><!--配置切面类--><aop:aspect ref="myAspect"><!-- 配置最终通知:将通知与切入点表达式关联--><aop:after method="final1"  pointcut="execution(* com.demoaspect.service..*.*(..))"></aop:after></aop:aspect></aop:config>
</beans>
测试
public class App {public static void main(String[] args) {ApplicationContext ac=new ClassPathXmlApplicationContext("applicationContext.xml");ISomeService someService = (ISomeService) ac.getBean("someService");someService.doSomething("123");}
}
5)>>>>> 完整案例
ISomeService.java
public interface ISomeService {public void doSomething(String msg);
}
SomeServiceImpl .java
public class SomeServiceImpl implements ISomeService {@Overridepublic void doSomething(String msg) {System.out.println("SomeServiceImpl:"+msg);}
}
MyAspect .java
package com.demoaspect;import org.aspectj.lang.ProceedingJoinPoint;
import org.aspectj.lang.annotation.*;
import org.springframework.context.annotation.EnableAspectJAutoProxy;/*** 自定义切面类*/
public class MyAspect {/*** 前置通知*      切入点表达式将通知与切入点关联*/public void before(){System.out.println("前置通知执行了");}/*** 后置通知*      切入点表达式将通知与切入点关联*/public void after(Object msg){System.out.println("后通知执行了"+msg);}/*** 环绕通知*      切入点表达式将通知与切入点关联*/public Object round(ProceedingJoinPoint proceedingJoinPoint) throws Throwable {System.out.println("目标方法执行前打印");//执行目标对象的方法Object result = proceedingJoinPoint.proceed();//目标方法执行后打印System.out.println("目标方法执行前打印");return result;}/*** 异常通知*      切入点表达式将通知与切入点关联*/public void throws123(Exception ex) throws Throwable {System.out.println("出现异常了"+ex);}/*** 最终通知*      切入点表达式将通知与切入点关联*/public void final1(){System.out.println("最终通知执行了");}
}
applicationContext.xml
<?xml version="1.0" encoding="UTF-8"?>
<beans xmlns="http://www.springframework.org/schema/beans"xmlns:p="http://www.springframework.org/schema/p"xmlns:context="http://www.springframework.org/schema/context"xmlns:aop="http://www.springframework.org/schema/aop"xmlns:xsi="http://www.w3.org/2001/XMLSchema-instance"xsi:schemaLocation="http://www.springframework.org/schema/beanshttp://www.springframework.org/schema/beans/spring-beans.xsdhttp://www.springframework.org/schema/aophttp://www.springframework.org/schema/aop/spring-aop.xsdhttp://www.springframework.org/schema/contexthttp://www.springframework.org/schema/context/spring-context.xsd"><!-- 注册目标对象--><bean class="com.demoaspect.service.SomeServiceImpl" id="someService"></bean><!-- 注册切面类对象--><bean class="com.demoaspect.MyAspect" id="myAspect"></bean><!--AspectJ的AOP配置:方式一-->
<!--        <aop:config>-->
<!--                <aop:pointcut id="myAspect" expression="execution(* com.demoaspect.service..*.*(..))"/>-->
<!--                <aop:aspect ref="myAspect">-->
<!--                        <aop:before method="before" pointcut-ref="myAspect"></aop:before>-->
<!--                        <aop:after-returning method="after" returning="msg" pointcut-ref="myAspect"></aop:after-returning>-->
<!--                        <aop:around method="round" pointcut-ref="myAspect"></aop:around>-->
<!--                        <aop:after-throwing method="throws123" throwing="ex" pointcut-ref="myAspect"></aop:after-throwing>-->
<!--                        <aop:after method="final1"  pointcut-ref="myAspect"></aop:after>-->
<!--                </aop:aspect>-->
<!--        </aop:config>--><!--AspectJ的AOP配置:方式二--><aop:config><!-- <aop:pointcut id="" expression=""/>--><!--配置切面类--><aop:aspect ref="myAspect"><!-- 配置前置通知:将通知与切入点表达式关联--><aop:before method="before" pointcut="execution(* com.demoaspect.service..*.*(..))"></aop:before><!-- 配置后置通知:将通知与切入点表达式关联--><aop:after-returning method="after" returning="msg" pointcut="execution(* com.demoaspect.service..*.*(..))"></aop:after-returning><!-- 配置环绕通知:将通知与切入点表达式关联--><aop:around method="round" pointcut="execution(* com.demoaspect.service..*.*(..))"></aop:around><!-- 配置异常通知:将通知与切入点表达式关联--><aop:after-throwing method="throws123" throwing="ex" pointcut="execution(* com.demoaspect.service..*.*(..))"></aop:after-throwing><!-- 配置最终通知:将通知与切入点表达式关联--><aop:after method="final1"  pointcut="execution(* com.demoaspect.service..*.*(..))"></aop:after></aop:aspect></aop:config>
</beans>
测试
public class App {public static void main(String[] args) {ApplicationContext ac=new ClassPathXmlApplicationContext("applicationContext.xml");ISomeService someService = (ISomeService) ac.getBean("someService");someService.doSomething("123");}
}
2.3.2.2 IOC容器基于配置+aspectJ基于注解方式实现
【基于aspectJ注解方式,但是spring还是基于配置文件实现】
方式一
每个切入点单独设置表达式
@Aspect
public class LogAspect {//前置通知:@Before(value = "execution(* com.hlp.demo01.service..*(..))")public void before(){System.out.println("前置通知执行了");}//后置通知@AfterReturning(value = "execution(* com.hlp.demo01.service..*(..))",returning = "msg")public void after(Object msg){System.out.println("后通知执行了"+msg);}//环绕通知@Around(value = "execution(* com.hlp.demo01.service..*(..))")public Object after(ProceedingJoinPoint proceedingJoinPoint) throws Throwable {System.out.println("目标方法执行前打印");//执行目标对象的方法Object result = proceedingJoinPoint.proceed();//目标方法执行后打印System.out.println("目标方法执行前打印");return result;}//异常通知//目标方法抛异常后,才会执行。@AfterThrowing(value = "execution(* com.hlp.demo01.service..*(..))" ,throwing="ex")public void throws123(Exception ex) throws Throwable {System.out.println("出现异常了"+ex);}//最终通知//不管目标方法是否抛出异常,都会执行。@After(value = "execution(* com.hlp.demo01.service..*(..))")public void after11() {System.out.println("最终通知执行了");}
}
方式二
切入点统一设置表达式
@Aspect
public class LogAspect {@Pointcut(value = "execution(* com.hlp.demo01.service..*(..))")public void pt1(){}//前置通知:@Before("pt1()")public void before(){System.out.println("前置通知执行了");}//后置通知@AfterReturning(value = "pt1()",returning = "msg")public void after(Object msg){System.out.println("后通知执行了"+msg);}//环绕通知@Around(value = "pt1()")public Object after(ProceedingJoinPoint proceedingJoinPoint) throws Throwable {System.out.println("目标方法执行前打印");//执行目标对象的方法Object result = proceedingJoinPoint.proceed();//目标方法执行后打印System.out.println("目标方法执行前打印");return result;}//异常通知//目标方法抛异常后,才会执行。@AfterThrowing(value = "pt1()" ,throwing="ex")public void throws123(Exception ex) throws Throwable {System.out.println("出现异常了"+ex);}//最终通知//不管目标方法是否抛出异常,都会执行。@After(value = "pt1()")public void after11() {System.out.println("最终通知执行了");}
}
1)前置通知
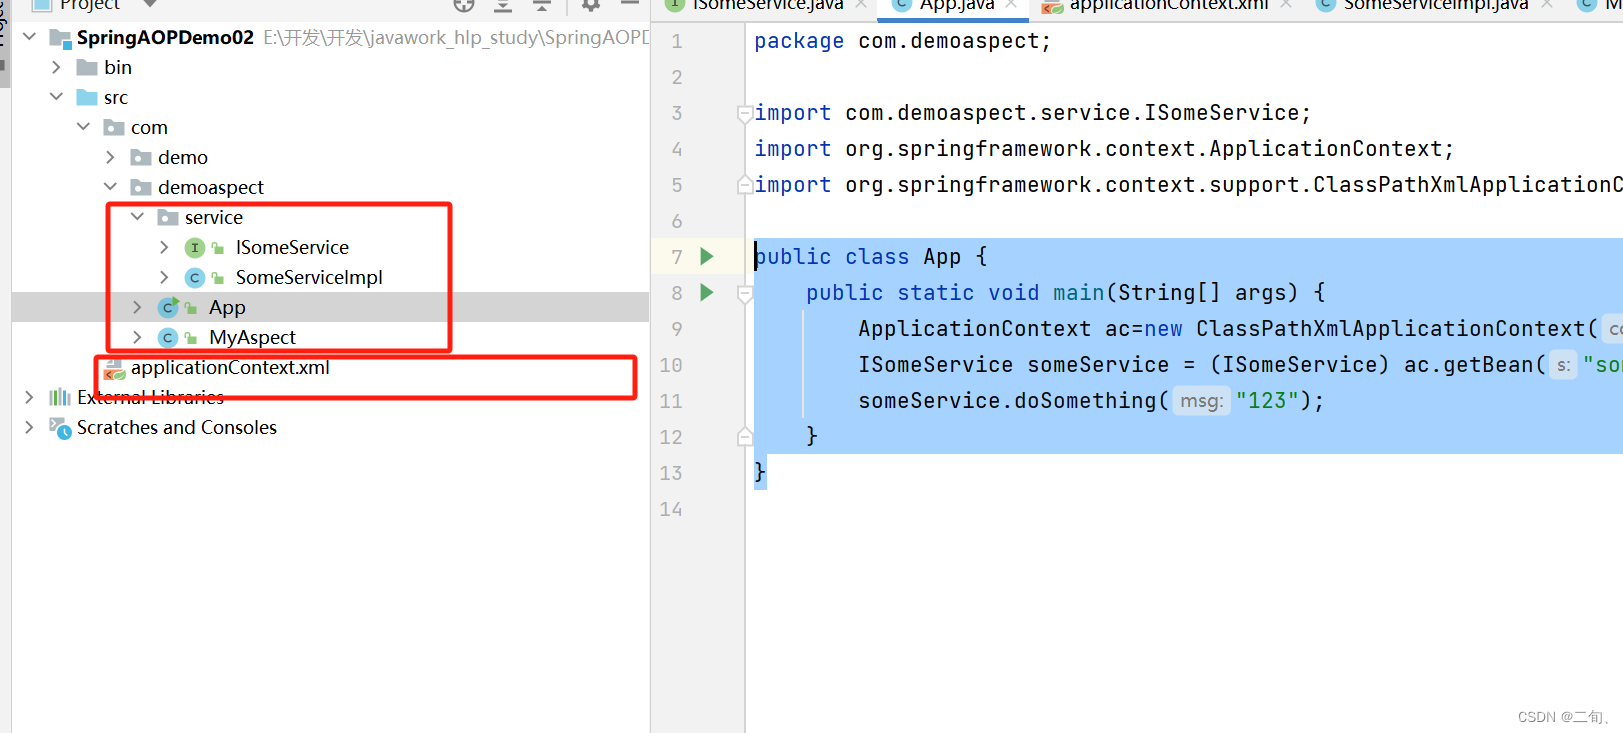
ISomeService.java
public interface ISomeService {public String doSomething(String msg);
}
SomeServiceImpl .java
public class SomeServiceImpl implements ISomeService {@Overridepublic String doSomething(String msg) {System.out.println("SomeServiceImpl:"+msg);return "123";}
}
MyAspect .java
/*** 自定义切面类*/
@Aspect
public class MyAspect {/*** 前置通知*      切入点表达式将通知与切入点关联*/@Before(value = "execution(* com.demoaspect.service.*.*(..))")public void before(){System.out.println("前置通知执行了");}
}
applicationContext.xml
<?xml version="1.0" encoding="UTF-8"?>
<beans xmlns="http://www.springframework.org/schema/beans"xmlns:p="http://www.springframework.org/schema/p"xmlns:context="http://www.springframework.org/schema/context"xmlns:aop="http://www.springframework.org/schema/aop"xmlns:xsi="http://www.w3.org/2001/XMLSchema-instance"xsi:schemaLocation="http://www.springframework.org/schema/beanshttp://www.springframework.org/schema/beans/spring-beans.xsdhttp://www.springframework.org/schema/aophttp://www.springframework.org/schema/aop/spring-aop.xsdhttp://www.springframework.org/schema/contexthttp://www.springframework.org/schema/context/spring-context.xsd"><!-- 注册目标对象--><bean class="com.demoaspect.service.SomeServiceImpl" id="someService"></bean><!-- 注册切面类对象--><bean class="com.demoaspect.MyAspect" id="myAspect"></bean><!--注册自动代理--><aop:aspectj-autoproxy></aop:aspectj-autoproxy>
</beans>
测试
public class App {public static void main(String[] args) {ApplicationContext ac=new ClassPathXmlApplicationContext("applicationContext.xml");ISomeService someService = (ISomeService) ac.getBean("someService");someService.doSomething("123");}
}

2)后置通知
ISomeService.java
public interface ISomeService {public void doSomething(String msg);
}
SomeServiceImpl .java
public class SomeServiceImpl implements ISomeService {@Overridepublic void doSomething(String msg) {System.out.println("SomeServiceImpl:"+msg);}
}
MyAspect .java
/*** 自定义切面类*/
@Aspect
public class MyAspect {/*** 后置通知*      切入点表达式将通知与切入点关联*/@AfterReturning(value = "execution(* com.demoaspect.service.*.*(..))",returning = "msg")public void after(Object msg){System.out.println("后通知执行了"+msg);}
}
applicationContext.xml
<?xml version="1.0" encoding="UTF-8"?>
<beans xmlns="http://www.springframework.org/schema/beans"xmlns:p="http://www.springframework.org/schema/p"xmlns:context="http://www.springframework.org/schema/context"xmlns:aop="http://www.springframework.org/schema/aop"xmlns:xsi="http://www.w3.org/2001/XMLSchema-instance"xsi:schemaLocation="http://www.springframework.org/schema/beanshttp://www.springframework.org/schema/beans/spring-beans.xsdhttp://www.springframework.org/schema/aophttp://www.springframework.org/schema/aop/spring-aop.xsdhttp://www.springframework.org/schema/contexthttp://www.springframework.org/schema/context/spring-context.xsd"><!-- 注册目标对象--><bean class="com.demoaspect.service.SomeServiceImpl" id="someService"></bean><!-- 注册切面类对象--><bean class="com.demoaspect.MyAspect" id="myAspect"></bean><!--注册自动代理--><aop:aspectj-autoproxy></aop:aspectj-autoproxy>
</beans>
测试
public class App {public static void main(String[] args) {ApplicationContext ac=new ClassPathXmlApplicationContext("applicationContext.xml");ISomeService someService = (ISomeService) ac.getBean("someService");someService.doSomething("123");}
}
3)环绕通知
ISomeService.java
public interface ISomeService {public String doSomething(String msg);
}
SomeServiceImpl .java
public class SomeServiceImpl implements ISomeService {@Overridepublic String doSomething(String msg) {System.out.println("SomeServiceImpl:"+msg);return "123";}
}
MyAspect .java
/*** 自定义切面类*/
@Aspect
public class MyAspect {/*** 环绕通知*      切入点表达式将通知与切入点关联*/@Around(value = "execution(* com.demoaspect.service.*.*(..))")public Object after(ProceedingJoinPoint proceedingJoinPoint) throws Throwable {System.out.println("目标方法执行前打印");//执行目标对象的方法Object result = proceedingJoinPoint.proceed();//目标方法执行后打印System.out.println("目标方法执行前打印");return result;}
}
applicationContext.xml
<?xml version="1.0" encoding="UTF-8"?>
<beans xmlns="http://www.springframework.org/schema/beans"xmlns:p="http://www.springframework.org/schema/p"xmlns:context="http://www.springframework.org/schema/context"xmlns:aop="http://www.springframework.org/schema/aop"xmlns:xsi="http://www.w3.org/2001/XMLSchema-instance"xsi:schemaLocation="http://www.springframework.org/schema/beanshttp://www.springframework.org/schema/beans/spring-beans.xsdhttp://www.springframework.org/schema/aophttp://www.springframework.org/schema/aop/spring-aop.xsdhttp://www.springframework.org/schema/contexthttp://www.springframework.org/schema/context/spring-context.xsd"><!-- 注册目标对象--><bean class="com.demoaspect.service.SomeServiceImpl" id="someService"></bean><!-- 注册切面类对象--><bean class="com.demoaspect.MyAspect" id="myAspect"></bean><!--注册自动代理--><aop:aspectj-autoproxy></aop:aspectj-autoproxy>
</beans>
测试
public class App {public static void main(String[] args) {ApplicationContext ac=new ClassPathXmlApplicationContext("applicationContext.xml");ISomeService someService = (ISomeService) ac.getBean("someService");someService.doSomething("123");}
}

4)异常通知
ISomeService.java
public interface ISomeService {public String doSomething(String msg);
}
SomeServiceImpl .java
public class SomeServiceImpl implements ISomeService {@Overridepublic String doSomething(String msg) {if(1==1){return (1/0)+"";}System.out.println("SomeServiceImpl:"+msg);return "123";}
}
MyAspect .java
/*** 自定义切面类*/
@Aspect
public class MyAspect {/*** 异常通知*      切入点表达式将通知与切入点关联*/@AfterThrowing(value = "execution(* com.demoaspect.service.*.*(..))" ,throwing="ex")public void throws123(Exception ex) throws Throwable {System.out.println("出现异常了"+ex);}
}
applicationContext.xml
<?xml version="1.0" encoding="UTF-8"?>
<beans xmlns="http://www.springframework.org/schema/beans"xmlns:p="http://www.springframework.org/schema/p"xmlns:context="http://www.springframework.org/schema/context"xmlns:aop="http://www.springframework.org/schema/aop"xmlns:xsi="http://www.w3.org/2001/XMLSchema-instance"xsi:schemaLocation="http://www.springframework.org/schema/beanshttp://www.springframework.org/schema/beans/spring-beans.xsdhttp://www.springframework.org/schema/aophttp://www.springframework.org/schema/aop/spring-aop.xsdhttp://www.springframework.org/schema/contexthttp://www.springframework.org/schema/context/spring-context.xsd"><!-- 注册目标对象--><bean class="com.demoaspect.service.SomeServiceImpl" id="someService"></bean><!-- 注册切面类对象--><bean class="com.demoaspect.MyAspect" id="myAspect"></bean><!--注册自动代理--><aop:aspectj-autoproxy></aop:aspectj-autoproxy>
</beans>
测试
public class App {public static void main(String[] args) {ApplicationContext ac=new ClassPathXmlApplicationContext("applicationContext.xml");ISomeService someService = (ISomeService) ac.getBean("someService");someService.doSomething("123");}
}

5)最终通知
ISomeService.java
public interface ISomeService {public String doSomething(String msg);
}
SomeServiceImpl .java
public class SomeServiceImpl implements ISomeService {@Overridepublic String doSomething(String msg) {if(1==1){return (1/0)+"";}System.out.println("SomeServiceImpl:"+msg);return "123";}
}
MyAspect .java
/*** 自定义切面类*/
@Aspect
public class MyAspect {/*** 最终通知*      切入点表达式将通知与切入点关联*/@After(value = "execution(* com.demoaspect.service.*.*(..))")public void after(){System.out.println("最终通知执行了");}
}
applicationContext.xml
<?xml version="1.0" encoding="UTF-8"?>
<beans xmlns="http://www.springframework.org/schema/beans"xmlns:p="http://www.springframework.org/schema/p"xmlns:context="http://www.springframework.org/schema/context"xmlns:aop="http://www.springframework.org/schema/aop"xmlns:xsi="http://www.w3.org/2001/XMLSchema-instance"xsi:schemaLocation="http://www.springframework.org/schema/beanshttp://www.springframework.org/schema/beans/spring-beans.xsdhttp://www.springframework.org/schema/aophttp://www.springframework.org/schema/aop/spring-aop.xsdhttp://www.springframework.org/schema/contexthttp://www.springframework.org/schema/context/spring-context.xsd"><!-- 注册目标对象--><bean class="com.demoaspect.service.SomeServiceImpl" id="someService"></bean><!-- 注册切面类对象--><bean class="com.demoaspect.MyAspect" id="myAspect"></bean><!--注册自动代理--><aop:aspectj-autoproxy></aop:aspectj-autoproxy>
</beans>
测试
public class App {public static void main(String[] args) {ApplicationContext ac=new ClassPathXmlApplicationContext("applicationContext.xml");ISomeService someService = (ISomeService) ac.getBean("someService");someService.doSomething("123");}
}

5)>>>>> 完整案例
ISomeService.java
public interface ISomeService {public String doSomething(String msg);
}
SomeServiceImpl .java
public class SomeServiceImpl implements ISomeService {@Overridepublic String doSomething(String msg) {System.out.println("SomeServiceImpl:"+msg);return "123";}
}
MyAspect .java
/*** 自定义切面类*/
@Aspect
public class MyAspect {/*** 前置通知*      切入点表达式将通知与切入点关联*/@Before(value = "execution(* com.demoaspect.service.*.*(..))")public void before(){System.out.println("前置通知执行了");}/*** 后置通知*      切入点表达式将通知与切入点关联*/@AfterReturning(value = "execution(* com.demoaspect.service.*.*(..))",returning = "msg")public void after(Object msg){System.out.println("后通知执行了"+msg);}/*** 环绕通知*      切入点表达式将通知与切入点关联*/@Around(value = "execution(* com.demoaspect.service.*.*(..))")public Object after(ProceedingJoinPoint proceedingJoinPoint) throws Throwable {System.out.println("目标方法执行前打印");//执行目标对象的方法Object result = proceedingJoinPoint.proceed();//目标方法执行后打印System.out.println("目标方法执行前打印");return result;}/*** 异常通知*      切入点表达式将通知与切入点关联*/@AfterThrowing(value = "execution(* com.demoaspect.service.*.*(..))" ,throwing="ex")public void throws123(Exception ex) throws Throwable {System.out.println("出现异常了"+ex);}/*** 最终通知*      切入点表达式将通知与切入点关联*/@After(value = "execution(* com.demoaspect.service.*.*(..))")public void after(){System.out.println("最终通知执行了");}
}
applicationContext.xml
<?xml version="1.0" encoding="UTF-8"?>
<beans xmlns="http://www.springframework.org/schema/beans"xmlns:p="http://www.springframework.org/schema/p"xmlns:context="http://www.springframework.org/schema/context"xmlns:aop="http://www.springframework.org/schema/aop"xmlns:xsi="http://www.w3.org/2001/XMLSchema-instance"xsi:schemaLocation="http://www.springframework.org/schema/beanshttp://www.springframework.org/schema/beans/spring-beans.xsdhttp://www.springframework.org/schema/aophttp://www.springframework.org/schema/aop/spring-aop.xsdhttp://www.springframework.org/schema/contexthttp://www.springframework.org/schema/context/spring-context.xsd"><!-- 注册目标对象--><bean class="com.demoaspect.service.SomeServiceImpl" id="someService"></bean><!-- 注册切面类对象--><bean class="com.demoaspect.MyAspect" id="myAspect"></bean><!--注册自动代理--><aop:aspectj-autoproxy></aop:aspectj-autoproxy>
</beans>
测试
public class App {public static void main(String[] args) {ApplicationContext ac=new ClassPathXmlApplicationContext("applicationContext.xml");ISomeService someService = (ISomeService) ac.getBean("someService");someService.doSomething("123");}
}

2.3.2.3 IOC容器基于注解+aspectJ基于注解方式实现
1)完整示例
ISomeService.java
public interface ISomeService {public String doSomething(String msg);
}
SomeServiceImpl .java
public class SomeServiceImpl implements ISomeService {@Overridepublic String doSomething(String msg) {System.out.println("SomeServiceImpl:"+msg);return "123";}
}
MyAspect .java
package com.demoaspect;import org.aspectj.lang.ProceedingJoinPoint;
import org.aspectj.lang.annotation.*;
import org.springframework.context.annotation.EnableAspectJAutoProxy;/*** 自定义切面类*/
@Aspect
public class MyAspect {/*** 前置通知*      切入点表达式将通知与切入点关联*/@Before(value = "execution(* com.demoaspect.service..*.*(..))")public void before(){System.out.println("前置通知执行了");}/*** 后置通知*      切入点表达式将通知与切入点关联*/@AfterReturning(value = "execution(* com.demoaspect.service..*.*(..))" ,returning = "msg")public void after(Object msg){System.out.println("后通知执行了"+msg);}/*** 环绕通知*      切入点表达式将通知与切入点关联*/@Around(value = "execution(* com.demoaspect.service..*.*(..))" )public Object round(ProceedingJoinPoint proceedingJoinPoint) throws Throwable {System.out.println("目标方法执行前打印");//执行目标对象的方法Object result = proceedingJoinPoint.proceed();//目标方法执行后打印System.out.println("目标方法执行前打印");return result;}/*** 异常通知*      切入点表达式将通知与切入点关联*/@AfterThrowing(value = "execution(* com.demoaspect.service..*.*(..))" ,throwing = "ex")public void throws123(Exception ex) throws Throwable {System.out.println("出现异常了"+ex);}/*** 最终通知*      切入点表达式将通知与切入点关联*/@After(value = "execution(* com.demoaspect.service..*.*(..))" )public void final1(){System.out.println("最终通知执行了");}
}
MyConfig.java
@Configuration
@EnableAspectJAutoProxy
public class MyConfig {@Beanpublic ISomeService someService(){return new SomeServiceImpl();}@Beanpublic MyAspect myAspect(){return  new MyAspect();}
}
测试
public class App {public static void main(String[] args) {ApplicationContext ac=new AnnotationConfigApplicationContext(MyConfig.class);ISomeService someService = (ISomeService) ac.getBean("someService");someService.doSomething("123");}
}

2)分析
"aspectJ基于注解方式实现【IOC容器基于配置】"中的applicationContext.xml配置文件=====》等价于“aspectJ基于注解方式实现【IOC容器基于注解】”中的MyConfig.java三、阶段总结
3.1 applicationContext.xml
1)applicationContext.xml 基础
<?xml version="1.0" encoding="UTF-8"?>
<beans xmlns="http://www.springframework.org/schema/beans"xmlns:xsi="http://www.w3.org/2001/XMLSchema-instance"xsi:schemaLocation="http://www.springframework.org/schema/beans http://www.springframework.org/schema/beans/spring-beans.xsd"></beans>
2)引入c标签,简化构造注入
c标签用于简化构造注入,使用c标签,必须引入xmlns:c=“http://www.springframework.org/schema/c”
<?xml version="1.0" encoding="UTF-8"?>
<beans xmlns="http://www.springframework.org/schema/beans"xmlns:xsi="http://www.w3.org/2001/XMLSchema-instance"xmlns:c="http://www.springframework.org/schema/c"xsi:schemaLocation="http://www.springframework.org/schema/beans http://www.springframework.org/schema/beans/spring-beans.xsd"><!--    <bean class="com.hlp.spring.ioc.beans.Car" id="myCar" >-->
<!--        <constructor-arg name="id" value="1111"></constructor-arg>-->
<!--        <constructor-arg name="name" value="宝马xxx"></constructor-arg>-->
<!--        <constructor-arg name="age" value="1"></constructor-arg>-->
<!--    </bean>--><!--    <bean class="com.hlp.spring.ioc.beans.Car" id="myCar" >-->
<!--        <constructor-arg index="0" value="1111"></constructor-arg>-->
<!--        <constructor-arg index="1" value="宝马xxx"></constructor-arg>-->
<!--        <constructor-arg  value="1"></constructor-arg>-->
<!--    </bean>--><bean class="com.hlp.spring.ioc.beans.Car" c:id="11" c:name="宝马xxx" c:age="12" id="myCar" ></bean></beans>
3)引入p标签,简化属性注入
p标签用于简化属性注入。若使用p标签,则必须引入xmlns:p=“http://www.springframework.org/schema/p”
<?xml version="1.0" encoding="UTF-8"?>
<beans xmlns="http://www.springframework.org/schema/beans"xmlns:xsi="http://www.w3.org/2001/XMLSchema-instance"xmlns:p="http://www.springframework.org/schema/p"xsi:schemaLocation="http://www.springframework.org/schema/beans http://www.springframework.org/schema/beans/spring-beans.xsd"><!-- 设值注入:方式一 -->
<!--        <bean class="com.hlp.spring.ioc.beans.Car"  id="car">-->
<!--            <property name="id" value="12xxxx"></property>-->
<!--            <property name="age" value="12"></property>-->
<!--            <property name="name" value="12"></property>-->
<!--        </bean>--><!-- 设值注入:方式二 --><bean class="com.hlp.spring.ioc.beans.Car"  id="car2" p:id="xxx" p:age="12" p:name="宝马xxx"></bean></beans>
4)使用context:component-scan开启注解扫描
使用context:component-scan开启注解扫描,必须引入xml约束
<?xml version="1.0" encoding="UTF-8"?>
<beans xmlns="http://www.springframework.org/schema/beans"xmlns:xsi="http://www.w3.org/2001/XMLSchema-instance"xmlns:context="http://www.springframework.org/schema/context"xsi:schemaLocation="http://www.springframework.org/schema/beanshttp://www.springframework.org/schema/beans/spring-beans.xsdhttp://www.springframework.org/schema/contexthttp://www.springframework.org/schema/context/spring-context-4.3.xsd"><!-- 添加扫描路径--><!-- 作用:ioc容器初始化时,会扫描该标签指定的路径,路径下是否有通过注解标识的java类--><context:component-scan base-package="com.hlp.spring.ioc.beans"></context:component-scan>
</beans>
5)使用aop,必须引入aop约束
使用aop,必须引入aop约束
<?xml version="1.0" encoding="UTF-8"?>
<beans xmlns="http://www.springframework.org/schema/beans"xmlns:p="http://www.springframework.org/schema/p"xmlns:context="http://www.springframework.org/schema/context"xmlns:aop="http://www.springframework.org/schema/aop"xmlns:xsi="http://www.w3.org/2001/XMLSchema-instance"xsi:schemaLocation="http://www.springframework.org/schema/beanshttp://www.springframework.org/schema/beans/spring-beans.xsdhttp://www.springframework.org/schema/aophttp://www.springframework.org/schema/aop/spring-aop.xsdhttp://www.springframework.org/schema/contexthttp://www.springframework.org/schema/context/spring-context.xsd"><!--注册目标类--><bean id="someService" class="com.demo.service.SomeServiceImpl"></bean><!--注册前置通知--><bean id="myMethodBeforeAdvice" class="com.demo.MyMethodBeforeAdvice"></bean><!--创建代理类--><bean class="org.springframework.aop.framework.ProxyFactoryBean" id="myProxyFactory"><!--指定目标对象--><property name="target" ref="someService"></property><!--指定目标对象实现的接口--><property name="interfaces" value="com.demo.service.ISomeService"></property><!--注入前置通知--><property name="interceptorNames"><list><!--前置通知--><value>myMethodBeforeAdvice</value></list></property></bean></beans>
6)完整xml配置
<?xml version="1.0" encoding="UTF-8"?>
<beans xmlns="http://www.springframework.org/schema/beans"xmlns:p="http://www.springframework.org/schema/p"xmlns:c="http://www.springframework.org/schema/c"xmlns:context="http://www.springframework.org/schema/context"xmlns:aop="http://www.springframework.org/schema/aop"xmlns:xsi="http://www.w3.org/2001/XMLSchema-instance"xsi:schemaLocation="http://www.springframework.org/schema/beanshttp://www.springframework.org/schema/beans/spring-beans.xsdhttp://www.springframework.org/schema/aophttp://www.springframework.org/schema/aop/spring-aop.xsdhttp://www.springframework.org/schema/contexthttp://www.springframework.org/schema/context/spring-context.xsd"><!--属性注入--><bean class="com.hlp.demo01.Person" id="person"><property name="name" value="张三"></property><property name="age" value="123"></property></bean><bean class="com.hlp.demo01.Person" p:name="张安"  p:age="12" id="person2"></bean><!--构造注入--><bean class="com.hlp.demo01.Person" id="person3"><constructor-arg name="name" value="张三"></constructor-arg><constructor-arg  name="age" value="123"></constructor-arg></bean><bean class="com.hlp.demo01.Person" c:name="123" c:age="12" id="person4"></bean></beans>
3.2 核心模块导入jar

1)导入jar
core核心

aop

dao

2)引入pom
pom文件
<project xmlns="http://maven.apache.org/POM/4.0.0" xmlns:xsi="http://www.w3.org/2001/XMLSchema-instance"xsi:schemaLocation="http://maven.apache.org/POM/4.0.0 http://maven.apache.org/xsd/maven-4.0.0.xsd"><modelVersion>4.0.0</modelVersion><groupId>org.example</groupId><artifactId>demo033</artifactId><version>1.0-SNAPSHOT</version><packaging>jar</packaging><name>demo033</name><dependencies><!-- ########################### core 核心模块 ########################### --><dependency><groupId>org.springframework</groupId><artifactId>spring-core</artifactId><version>3.2.7.RELEASE</version></dependency><dependency><groupId>org.springframework</groupId><artifactId>spring-beans</artifactId><version>3.2.7.RELEASE</version></dependency><dependency><groupId>org.springframework</groupId><artifactId>spring-context</artifactId><version>3.2.7.RELEASE</version></dependency><dependency><groupId>org.springframework</groupId><artifactId>spring-context-support</artifactId><version>3.2.7.RELEASE</version></dependency><dependency><groupId>org.springframework</groupId><artifactId>spring-expression</artifactId><version>3.2.7.RELEASE</version></dependency><!-- ########################### aop模块 ########################### --><dependency><groupId>org.springframework</groupId><artifactId>spring-aop</artifactId><version>3.2.7.RELEASE</version></dependency><dependency><groupId>org.springframework</groupId><artifactId>spring-aspects</artifactId><version>3.2.7.RELEASE</version></dependency><dependency><groupId>aopalliance</groupId><artifactId>aopalliance</artifactId><version>1.0</version></dependency><!-- ########################### dao模块 ########################### --><dependency><groupId>org.springframework</groupId><artifactId>spring-jdbc</artifactId><version>5.3.23</version></dependency><dependency><groupId>org.springframework</groupId><artifactId>spring-tx</artifactId><version>5.3.23</version></dependency><dependency><groupId>mysql</groupId><artifactId>mysql-connector-java</artifactId><version>8.0.31</version></dependency></dependencies>
</project>
相关文章:

一、Spring基础 --- 基础内容(二) (咕P4)
一、IOC容器 1.1 基础 1.1.1 容器 1、Spring框架的主要功能是通过其核心容器来实现的。2、Spring容器是生成Bean的工厂,它负责创建Bean的实例,并管理其生命周期。所有的组件都被当成Bean处理,例如数据源、Hibernate的SessionFactory、事务管…...

uview2 表单Form校验validate不生效处理方法
先贴官网实例: <template><view class""><u-form :model"form" ref"uForm"><u-form-item label"姓名" prop"name"><u-input v-model"form.name" /></u-form-item&g…...

给已存在的docker容器修改端口映射
1、systemctl stop docker 2、find / -name hostconfig.json 3、cd * 4、vim hostconfig.json 5、找到“PortBindings”字段,如下所示: "PortBindings":{"80/tcp": [{ //容器内端口"HostIp": "","…...

【Keil5-调试】
Keil5-调试 ■ 好的链接■ watch窗口中,变量值不会刷新■ 当选择了非0级优化时■■ ■ 好的链接 参考地址: debug ■ watch窗口中,变量值不会刷新 有时候在watch窗口中,变量值不会刷新,这时候就需要查看一下"V…...

OpenHarmony分布式软总线API调用测试工具 softbus_tool使用说明
softbus_tool 是 OpenHarmony 分布式软总线 API 调用测试工具,文件结构如下图所示。 softbus_tool 能够将软总线 interfaces 目录下的一些常用接口集中起来,供设备间搭建一些场景时使用(比如设备绑定、BR 组网,BLE 组网ÿ…...
Go第三方框架--ants协程池框架
1. 背景介绍 1.1 goroutine ants是站在巨人的肩膀上开发出来的,这个巨人是goroutine,这是连小学生都知道的事儿,那么为什么不继续使用goroutine(以下简称go协程)呢。这是个思考题,希望讲完本文大家可以有个答案。 go协程只涉及用…...
【原创】springboot+vue个人财务记账管理系统设计与实现
个人主页:程序猿小小杨 个人简介:从事开发多年,Java、Php、Python、前端开发均有涉猎 博客内容:Java项目实战、项目演示、技术分享 文末有作者名片,希望和大家一起共同进步,你只管努力,剩下的交…...

MySQL基础练习题:习题2-3
这部分主要是为了帮助大家回忆回忆MySQL的基本语法,数据库来自于MySQL的官方简化版,题目也是网上非常流行的35题。这些基础习题基本可以涵盖面试中需要现场写SQL的问题。上期帮助大家建立数据库,导入数据,接下来让我们继续练习。 …...
超图SuperMap-Cesium,地形图层,可以渲染一个或多个地形(地形可缓存DEM,TIN方式),webGL代码开发(2024-04-08)
1、缓存文件类型TIN格式,TIN的地形sct只能加一个 const viewer new Cesium.Viewer(cesiumContainer); viewer.terrainProvider new Cesium.CesiumTerrainProvider({isSct: true, // 是否为iServer发布的TIN地形服务,stk地形设置为falserequestWaterMask : true,…...
PCB学习记录---原理图
一、注释 NC:no connect,默认不连接 NF: no fix,默认不安装 0R: 0R的电阻,即可以短路 二、看图流程 1、看标题,了解功能 2、浏览有几个模块 3、找芯片对应的数据手册,了解芯片功能和使用 例如CH224ÿ…...
结构型模式--3.组合模式【草帽大船团】
1. 好大一棵树 路飞在德雷斯罗萨打败多弗朗明哥之后,一些被路飞解救的海贼团自愿加入路飞麾下,自此组成了草帽大船团,旗下有7为船长,分别是: 俊美海贼团75人 巴托俱乐部56人 八宝水军1000人 艾迪欧海贼团4人 咚塔塔海…...

网络基础三——其他周边问题
3.1ARP原理 ARP不是一个单纯的数据链路层的协议,而是一个介于数据链路层和网络层之间的协议; 以广播的形式(主机号填成全1)构建Mac帧,发送ARP请求包,告诉所有在局域网的主机我的IP地址和Mac帧,与目的IP相同的主…...
学习周报:文献阅读+Fluent案例+水力学理论学习
目录 摘要 Abstract 文献阅读:物理信息的神经网络与湍流传质的非封闭机制模型相结合 文献摘要 提出问题 提出方案 实验设置 所需方程介绍 雷诺时均方程(RANS) K-epsilon两方程模型 神经网络框架 DNN部分 损失函数定义 PINN部分…...
Redis(持久化 -- RDB AOF)
持久化 通常我们认为持久化为: 重启进程/重启主机之后, 数据仍然存在不丢失 把数据存储在硬盘上 – 持久 把数据存储在内存中 – 不持久 Redis 持久化 redis 是一个内存数据库, 也就是说本身是不持久的(但是快[效率高]), 于是 Redis 提供了持久化机制 — RDB 和 AOF 二者都是对…...
LDR6328助力Type-C普及,便捷充电,绿色生活更精彩
随着科技的进步和全球统一接口的需求,Type-C接口正日益受到青睐。越来越多的设备正选择采纳这一先进的接口设计,它的普及无疑在改善着我们的日常生活。 在过往,许多小功率设备如小风扇、蓝牙音箱、桌面台灯以及家用加湿器等,都普遍…...

redis主从复制、哨兵模式、集群
文章目录 redis主从复制主从复制的配置**安装Redis**配置主服务器配置从服务器验证主从效果 哨兵模式哨兵的工作机制哨兵模式的搭建启动哨兵 集群分布式集群的搭建 redis主从复制 Redis主从复制(Redis replication)是Redis提供的一种数据备份和故障转移…...

shell免登陆脚本
#!/bin/bash ## 脚本接收的参数,也就是要互相配置 SSH 免密登录的服务器列表参数 BASE_HOST_LISTip ## 密码,默认用户是当前运行脚本的用户,比如 root 用户 ## 这里改成你的用户对应的密码 BASE_PASSWORD"password" ## shell 函…...
基于springboot+vue+Mysql的职称评审管理系统
开发语言:Java框架:springbootJDK版本:JDK1.8服务器:tomcat7数据库:mysql 5.7(一定要5.7版本)数据库工具:Navicat11开发软件:eclipse/myeclipse/ideaMaven包:…...

GitLab教程(一):安装Git、配置SSH公钥
文章目录 序一、Git安装与基本配置(Windows)下载卸载安装基本配置 二、SSH密钥配置 序 为什么要使用代码版本管理工具: 最近笔者确实因为未使用代码版本管理工具遇到了一些愚蠢的问题,笔者因此认为代码版本管理工具对于提高团队…...

【算法】无序数组的两数之和 - map标记
题目 在一个无序数组中找到两个数,两个数之和为给定的一个数,返回两个数在数组中的下标。 原理 遍历数组,遍历到一个数字的时候,记录下这个数及其下标,遍历时判断给定数减去这个数为key在map中是否存在,…...
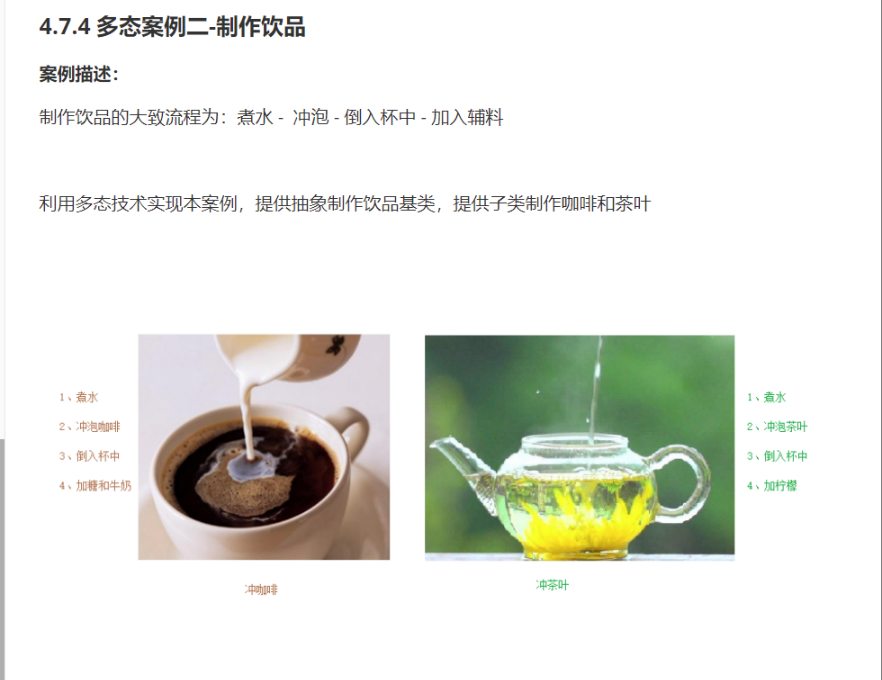
C++_核心编程_多态案例二-制作饮品
#include <iostream> #include <string> using namespace std;/*制作饮品的大致流程为:煮水 - 冲泡 - 倒入杯中 - 加入辅料 利用多态技术实现本案例,提供抽象制作饮品基类,提供子类制作咖啡和茶叶*//*基类*/ class AbstractDr…...

工业安全零事故的智能守护者:一体化AI智能安防平台
前言: 通过AI视觉技术,为船厂提供全面的安全监控解决方案,涵盖交通违规检测、起重机轨道安全、非法入侵检测、盗窃防范、安全规范执行监控等多个方面,能够实现对应负责人反馈机制,并最终实现数据的统计报表。提升船厂…...

UDP(Echoserver)
网络命令 Ping 命令 检测网络是否连通 使用方法: ping -c 次数 网址ping -c 3 www.baidu.comnetstat 命令 netstat 是一个用来查看网络状态的重要工具. 语法:netstat [选项] 功能:查看网络状态 常用选项: n 拒绝显示别名&#…...

质量体系的重要
质量体系是为确保产品、服务或过程质量满足规定要求,由相互关联的要素构成的有机整体。其核心内容可归纳为以下五个方面: 🏛️ 一、组织架构与职责 质量体系明确组织内各部门、岗位的职责与权限,形成层级清晰的管理网络…...

从零实现STL哈希容器:unordered_map/unordered_set封装详解
本篇文章是对C学习的STL哈希容器自主实现部分的学习分享 希望也能为你带来些帮助~ 那咱们废话不多说,直接开始吧! 一、源码结构分析 1. SGISTL30实现剖析 // hash_set核心结构 template <class Value, class HashFcn, ...> class hash_set {ty…...
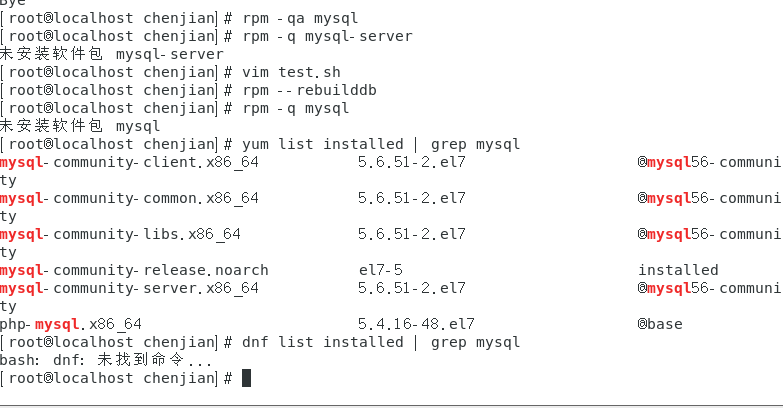
mysql已经安装,但是通过rpm -q 没有找mysql相关的已安装包
文章目录 现象:mysql已经安装,但是通过rpm -q 没有找mysql相关的已安装包遇到 rpm 命令找不到已经安装的 MySQL 包时,可能是因为以下几个原因:1.MySQL 不是通过 RPM 包安装的2.RPM 数据库损坏3.使用了不同的包名或路径4.使用其他包…...
dify打造数据可视化图表
一、概述 在日常工作和学习中,我们经常需要和数据打交道。无论是分析报告、项目展示,还是简单的数据洞察,一个清晰直观的图表,往往能胜过千言万语。 一款能让数据可视化变得超级简单的 MCP Server,由蚂蚁集团 AntV 团队…...

Mysql8 忘记密码重置,以及问题解决
1.使用免密登录 找到配置MySQL文件,我的文件路径是/etc/mysql/my.cnf,有的人的是/etc/mysql/mysql.cnf 在里最后加入 skip-grant-tables重启MySQL服务 service mysql restartShutting down MySQL… SUCCESS! Starting MySQL… SUCCESS! 重启成功 2.登…...

MFC 抛体运动模拟:常见问题解决与界面美化
在 MFC 中开发抛体运动模拟程序时,我们常遇到 轨迹残留、无效刷新、视觉单调、物理逻辑瑕疵 等问题。本文将针对这些痛点,详细解析原因并提供解决方案,同时兼顾界面美化,让模拟效果更专业、更高效。 问题一:历史轨迹与小球残影残留 现象 小球运动后,历史位置的 “残影”…...

android13 app的触摸问题定位分析流程
一、知识点 一般来说,触摸问题都是app层面出问题,我们可以在ViewRootImpl.java添加log的方式定位;如果是touchableRegion的计算问题,就会相对比较麻烦了,需要通过adb shell dumpsys input > input.log指令,且通过打印堆栈的方式,逐步定位问题,并找到修改方案。 问题…...
