YOLOV5 + 双目相机实现三维测距(新版本)
文章目录
- YOLOV5 + 双目相机实现三维测距(新版本)
- 1. 项目流程
- 2. 测距原理
- 3. 操作步骤和代码解析
- 4. 实时检测
- 5. 训练
- 6. 源码下载
YOLOV5 + 双目相机实现三维测距(新版本)
本文主要是对此篇文章做一些改进,以及解释读者在复现过程中遇到的问题,完整代码在文章末尾
1. 项目流程
- YOLOv5检测目标并提取其中心像素点坐标
- 双目相机经过系列操作将像素点坐标转为深度三维坐标
- 根据三维坐标计算距离
- 将深度信息画图显示
2. 测距原理
如果想了解双目测距原理,请移步该文章 双目三维测距(python)
3. 操作步骤和代码解析
下载 yolov5 6.1版本源码 ,之前用的是5.0源码,代码太旧出现了不少问题,故更新了一下,创建一个detect-01.py文件,文件里部分代码解析如下:
双目相机参数stereoconfig.py
双目相机标定误差越小越好,我这里误差为0.1,尽量使误差在0.2以下
import numpy as np
# 双目相机参数
class stereoCamera(object):def __init__(self):self.cam_matrix_left = np.array([[1101.89299, 0, 1119.89634],[0, 1100.75252, 636.75282],[0, 0, 1]])self.cam_matrix_right = np.array([[1091.11026, 0, 1117.16592],[0, 1090.53772, 633.28256],[0, 0, 1]])self.distortion_l = np.array([[-0.08369, 0.05367, -0.00138, -0.0009, 0]])self.distortion_r = np.array([[-0.09585, 0.07391, -0.00065, -0.00083, 0]])self.R = np.array([[1.0000, -0.000603116945856524, 0.00377055351856816],[0.000608108737333211, 1.0000, -0.00132288199083992],[-0.00376975166958581, 0.00132516525298933, 1.0000]])self.T = np.array([[-119.99423], [-0.22807], [0.18540]])self.baseline = 119.99423
测距代码部分解析
这一部分我直接计算了目标检测框中心点的深度值,把中心点的深度值当作了距离。你也可以写个循环,计算平均值或者中位数,把他们当作深度值
if (accel_frame % fps_set == 0):t3 = time.time() thread.join()points_3d = thread.get_result()t4 = time.time() a = points_3d[int(y_0), int(x_0), 0] / 1000b = points_3d[int(y_0), int(x_0), 1] / 1000c = points_3d[int(y_0), int(x_0), 2] / 1000dis = ((a**2+b**2+c**2)**0.5)
主代码detect-01.py
加入了多线程处理,加快处理速度
import argparse
import os
import sys
from pathlib import Pathimport cv2
import torch
import torch.backends.cudnn as cudnnFILE = Path(__file__).resolve()
ROOT = FILE.parents[0]  # YOLOv5 root directory
if str(ROOT) not in sys.path:sys.path.append(str(ROOT))  # add ROOT to PATH
ROOT = Path(os.path.relpath(ROOT, Path.cwd()))  # relativefrom models.common import DetectMultiBackend
from utils.datasets import IMG_FORMATS, VID_FORMATS, LoadImages, LoadStreams
from utils.general import (LOGGER, check_file, check_img_size, check_imshow, check_requirements, colorstr,increment_path, non_max_suppression, print_args, scale_coords, strip_optimizer, xyxy2xywh)
from utils.plots import Annotator, colors, save_one_box
from utils.torch_utils import select_device, time_sync
from stereo.dianyuntu_yolo import preprocess, undistortion, getRectifyTransform, draw_line, rectifyImage, \stereoMatchSGBM
from stereo import stereoconfig_040_2
from stereo.stereo import stereo_threading, MyThread@torch.no_grad()
def run(weights=ROOT / 'yolov5s.pt',  # model.pt path(s)source=ROOT / 'data/images',  # file/dir/URL/glob, 0 for webcamdata=ROOT / 'data/coco128.yaml',  # dataset.yaml pathimgsz=(640, 640),  # inference size (height, width)conf_thres=0.25,  # confidence thresholdiou_thres=0.45,  # NMS IOU thresholdmax_det=1000,  # maximum detections per imagedevice='',  # cuda device, i.e. 0 or 0,1,2,3 or cpuview_img=False,  # show resultssave_txt=False,  # save results to *.txtsave_conf=False,  # save confidences in --save-txt labelssave_crop=False,  # save cropped prediction boxesnosave=False,  # do not save images/videosclasses=None,  # filter by class: --class 0, or --class 0 2 3agnostic_nms=False,  # class-agnostic NMSaugment=False,  # augmented inferencevisualize=False,  # visualize featuresupdate=False,  # update all modelsproject=ROOT / 'runs/detect',  # save results to project/namename='exp',  # save results to project/nameexist_ok=False,  # existing project/name ok, do not incrementline_thickness=3,  # bounding box thickness (pixels)hide_labels=False,  # hide labelshide_conf=False,  # hide confidenceshalf=False,  # use FP16 half-precision inferencednn=False,  # use OpenCV DNN for ONNX inference):source = str(source)save_img = not nosave and not source.endswith('.txt')  # save inference imagesis_file = Path(source).suffix[1:] in (IMG_FORMATS + VID_FORMATS)is_url = source.lower().startswith(('rtsp://', 'rtmp://', 'http://', 'https://'))webcam = source.isnumeric() or source.endswith('.txt') or (is_url and not is_file)if is_url and is_file:source = check_file(source)  # download# Directoriessave_dir = increment_path(Path(project) / name, exist_ok=exist_ok)  # increment run(save_dir / 'labels' if save_txt else save_dir).mkdir(parents=True, exist_ok=True)  # make dir# Load modeldevice = select_device(device)model = DetectMultiBackend(weights, device=device, dnn=dnn, data=data)stride, names, pt, jit, onnx, engine = model.stride, model.names, model.pt, model.jit, model.onnx, model.engineimgsz = check_img_size(imgsz, s=stride)  # check image size# Halfhalf &= (pt or jit or onnx or engine) and device.type != 'cpu'  # FP16 supported on limited backends with CUDAif pt or jit:model.model.half() if half else model.model.float()# Dataloaderif webcam:view_img = check_imshow()cudnn.benchmark = True  # set True to speed up constant image size inferencedataset = LoadStreams(source, img_size=imgsz, stride=stride, auto=pt)bs = len(dataset)  # batch_sizeelse:dataset = LoadImages(source, img_size=imgsz, stride=stride, auto=pt)bs = 1  # batch_sizevid_path, vid_writer = [None] * bs, [None] * bs# Run inferencemodel.warmup(imgsz=(1 if pt else bs, 3, *imgsz), half=half)  # warmupdt, seen = [0.0, 0.0, 0.0], 0config = stereoconfig_040_2.stereoCamera()# 立体校正map1x, map1y, map2x, map2y, Q = getRectifyTransform(720, 1280, config)for path, im, im0s, vid_cap, s in dataset:t1 = time_sync()im = torch.from_numpy(im).to(device)im = im.half() if half else im.float()  # uint8 to fp16/32im /= 255  # 0 - 255 to 0.0 - 1.0if len(im.shape) == 3:im = im[None]  # expand for batch dimt2 = time_sync()dt[0] += t2 - t1# Inferencevisualize = increment_path(save_dir / Path(path).stem, mkdir=True) if visualize else Falsepred = model(im, augment=augment, visualize=visualize)t3 = time_sync()dt[1] += t3 - t2# NMSpred = non_max_suppression(pred, conf_thres, iou_thres, classes, agnostic_nms, max_det=max_det)dt[2] += time_sync() - t3# Second-stage classifier (optional)# pred = utils.general.apply_classifier(pred, classifier_model, im, im0s)# Process predictionsfor i, det in enumerate(pred):  # per imageseen += 1if webcam:  # batch_size >= 1p, im0, frame = path[i], im0s[i].copy(), dataset.counts += f'{i}: 'else:p, im0, frame = path, im0s.copy(), getattr(dataset, 'frame', 0)
################################################ start ##############################################thread = MyThread(stereo_threading, args=(config, im0, map1x, map1y, map2x, map2y, Q))thread.start()p = Path(p)  # to Pathsave_path = str(save_dir / p.name)  # im.jpgtxt_path = str(save_dir / 'labels' / p.stem) + ('' if dataset.mode == 'image' else f'_{frame}')  # im.txts += '%gx%g ' % im.shape[2:]  # print stringgn = torch.tensor(im0.shape)[[1, 0, 1, 0]]  # normalization gain whwhimc = im0.copy() if save_crop else im0  # for save_cropannotator = Annotator(im0, line_width=line_thickness, example=str(names))if len(det):# Rescale boxes from img_size to im0 sizedet[:, :4] = scale_coords(im.shape[2:], det[:, :4], im0.shape).round()# Print resultsfor c in det[:, -1].unique():n = (det[:, -1] == c).sum()  # detections per classs += f"{n} {names[int(c)]}{'s' * (n > 1)}, "  # add to string# Write resultsfor *xyxy, conf, cls in reversed(det):if (0 < xyxy[2] < 1280):if save_txt:  # Write to filexywh = (xyxy2xywh(torch.tensor(xyxy).view(1, 4)) / gn).view(-1).tolist()  # normalized xywhline = (cls, *xywh, conf) if save_conf else (cls, *xywh)  # label formatwith open(txt_path + '.txt', 'a') as f:f.write(('%g ' * len(line)).rstrip() % line + '\n')if save_img or save_crop or view_img:  # Add bbox to imagex_center = (xyxy[0] + xyxy[2]) / 2y_center = (xyxy[1] + xyxy[3]) / 2x_0 = int(x_center)y_0 = int(y_center)if (0 < x_0 < 1280):x1 = xyxy[0]x2 = xyxy[2]y1 = xyxy[1]y2 = xyxy[3]thread.join()points_3d = thread.get_result()a = points_3d[int(y_0), int(x_0), 0] / 1000b = points_3d[int(y_0), int(x_0), 1] / 1000c = points_3d[int(y_0), int(x_0), 2] / 1000distance = ((a ** 2 + b ** 2 + c ** 2) ** 0.5)if (distance != 0):  ## Add bbox to imagec = int(cls)  # integer classlabel = None if hide_labels else (names[c] if hide_conf else f'{names[c]} {conf:.2f}')annotator.box_label(xyxy, label, color=colors(c, True))print('点 (%d, %d) 的 %s 距离左摄像头的相对距离为 %0.2f m' % (x_center, y_center, label, distance))text_dis_avg = "dis:%0.2fm" % distance# only put dis on framecv2.putText(im0, text_dis_avg, (int(x1 + (x2 - x1) + 5), int(y1 + 30)), cv2.FONT_ITALIC,1.2, (255, 255, 255), 3)if save_crop:save_one_box(xyxy, imc, file=save_dir / 'crops' / names[c] / f'{p.stem}.jpg', BGR=True)# Stream resultsim0 = annotator.result()if view_img:cv2.namedWindow("Webcam", cv2.WINDOW_NORMAL)cv2.resizeWindow("Webcam", 1280, 480)cv2.moveWindow("Webcam", 0, 100)cv2.imshow("Webcam", im0)cv2.waitKey(1)# cv2.imshow(str(p), im0)# cv2.waitKey(1)  # 1 millisecond# Save results (image with detections)if save_img:if dataset.mode == 'image':cv2.imwrite(save_path, im0)else:  # 'video' or 'stream'if vid_path[i] != save_path:  # new videovid_path[i] = save_pathif isinstance(vid_writer[i], cv2.VideoWriter):vid_writer[i].release()  # release previous video writerif vid_cap:  # videofps = vid_cap.get(cv2.CAP_PROP_FPS)w = int(vid_cap.get(cv2.CAP_PROP_FRAME_WIDTH))h = int(vid_cap.get(cv2.CAP_PROP_FRAME_HEIGHT))else:  # streamfps, w, h = 30, im0.shape[1], im0.shape[0]save_path = str(Path(save_path).with_suffix('.mp4'))  # force *.mp4 suffix on results videosvid_writer[i] = cv2.VideoWriter(save_path, cv2.VideoWriter_fourcc(*'mp4v'), fps, (w, h))vid_writer[i].write(im0)# Print time (inference-only)LOGGER.info(f'{s}Done. ({t3 - t2:.3f}s)')# Print resultst = tuple(x / seen * 1E3 for x in dt)  # speeds per imageLOGGER.info(f'Speed: %.1fms pre-process, %.1fms inference, %.1fms NMS per image at shape {(1, 3, *imgsz)}' % t)if save_txt or save_img:s = f"\n{len(list(save_dir.glob('labels/*.txt')))} labels saved to {save_dir / 'labels'}" if save_txt else ''LOGGER.info(f"Results saved to {colorstr('bold', save_dir)}{s}")if update:strip_optimizer(weights)  # update model (to fix SourceChangeWarning)def parse_opt():parser = argparse.ArgumentParser()parser.add_argument('--weights', nargs='+', type=str, default=ROOT / 'yolov5s.pt', help='model path(s)')parser.add_argument('--source', type=str, default=ROOT / 'data/images/a1.mp4', help='file/dir/URL/glob, 0 for webcam')parser.add_argument('--data', type=str, default=ROOT / 'data/coco128.yaml', help='(optional) dataset.yaml path')parser.add_argument('--imgsz', '--img', '--img-size', nargs='+', type=int, default=[640], help='inference size h,w')parser.add_argument('--conf-thres', type=float, default=0.25, help='confidence threshold')parser.add_argument('--iou-thres', type=float, default=0.45, help='NMS IoU threshold')parser.add_argument('--max-det', type=int, default=1000, help='maximum detections per image')parser.add_argument('--device', default='', help='cuda device, i.e. 0 or 0,1,2,3 or cpu')parser.add_argument('--view-img', action='store_true', help='show results')parser.add_argument('--save-txt', action='store_true', help='save results to *.txt')parser.add_argument('--save-conf', action='store_true', help='save confidences in --save-txt labels')parser.add_argument('--save-crop', action='store_true', help='save cropped prediction boxes')parser.add_argument('--nosave', action='store_true', help='do not save images/videos')parser.add_argument('--classes', nargs='+', type=int, help='filter by class: --classes 0, or --classes 0 2 3')parser.add_argument('--agnostic-nms', action='store_true', help='class-agnostic NMS')parser.add_argument('--augment', action='store_true', help='augmented inference')parser.add_argument('--visualize', action='store_true', help='visualize features')parser.add_argument('--update', action='store_true', help='update all models')parser.add_argument('--project', default=ROOT / 'runs/detect', help='save results to project/name')parser.add_argument('--name', default='exp', help='save results to project/name')parser.add_argument('--exist-ok', action='store_true', help='existing project/name ok, do not increment')parser.add_argument('--line-thickness', default=3, type=int, help='bounding box thickness (pixels)')parser.add_argument('--hide-labels', default=False, action='store_true', help='hide labels')parser.add_argument('--hide-conf', default=False, action='store_true', help='hide confidences')parser.add_argument('--half', action='store_true', help='use FP16 half-precision inference')parser.add_argument('--dnn', action='store_true', help='use OpenCV DNN for ONNX inference')opt = parser.parse_args()opt.imgsz *= 2 if len(opt.imgsz) == 1 else 1  # expandprint_args(FILE.stem, opt)return optdef main(opt):check_requirements(exclude=('tensorboard', 'thop'))run(**vars(opt))if __name__ == "__main__":opt = parse_opt()main(opt)
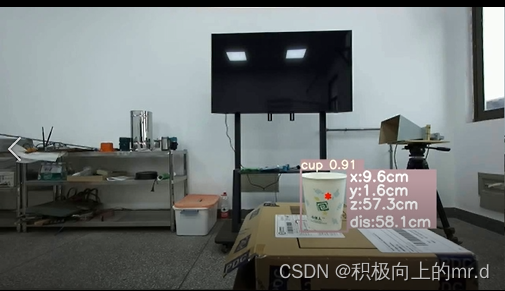
执行detect-01.py,检测结果如下:
4. 实时检测
(1)如想要调用摄像头检测,直接把detect-01.py里的
parser.add_argument('--source', type=str, default=ROOT / 'data/images/a1.mp4', help='file/dir/URL/glob, 0 for webcam')
改为
parser.add_argument('--source', type=str, default=ROOT / '0')
(2)需要注意的是,代码设置的是检测分辨率为2560x720大小的图或者视频,直接调用摄像头,摄像头分辨率不一定为2560x720,因此需要设定一下打开摄像头默认分辨率
打开utils/dataset.py文件,找到class LoadStreams:这个类
将
for i, s in enumerate(sources):  # index, source# Start thread to read frames from video streamst = f'{i + 1}/{n}: {s}... 'if 'youtube.com/' in s or 'youtu.be/' in s:  # if source is YouTube videocheck_requirements(('pafy', 'youtube_dl==2020.12.2'))import pafys = pafy.new(s).getbest(preftype="mp4").url  # YouTube URLs = eval(s) if s.isnumeric() else s  # i.e. s = '0' local webcamcap = cv2.VideoCapture(s)assert cap.isOpened(), f'{st}Failed to open {s}'w = int(cap.get(cv2.CAP_PROP_FRAME_WIDTH))h = int(cap.get(cv2.CAP_PROP_FRAME_HEIGHT))fps = cap.get(cv2.CAP_PROP_FPS)  # warning: may return 0 or nanself.frames[i] = max(int(cap.get(cv2.CAP_PROP_FRAME_COUNT)), 0) or float('inf')  # infinite stream fallbackself.fps[i] = max((fps if math.isfinite(fps) else 0) % 100, 0) or 30  # 30 FPS fallback_, self.imgs[i] = cap.read()  # guarantee first frameself.threads[i] = Thread(target=self.update, args=([i, cap, s]), daemon=True)LOGGER.info(f"{st} Success ({self.frames[i]} frames {w}x{h} at {self.fps[i]:.2f} FPS)")self.threads[i].start()
LOGGER.info('')  # newline
改为
for i, s in enumerate(sources):# Start the thread to read frames from the video streamprint(f'{i + 1}/{n}: {s}... ', end='')cap = cv2.VideoCapture(eval(s) if s.isnumeric() else s)####################################################################################################imageWidth = 2560imageHeight = 720cap.set(cv2.CAP_PROP_FRAME_WIDTH, imageWidth)cap.set(cv2.CAP_PROP_FRAME_HEIGHT, imageHeight)assert cap.isOpened(), f'Failed to open {s}'w = int(cap.get(cv2.CAP_PROP_FRAME_WIDTH))h = int(cap.get(cv2.CAP_PROP_FRAME_HEIGHT))fps = 24#cap.get(cv2.CAP_PROP_FPS) % 100_, self.imgs[i] = cap.read() # guarantee first framethread = Thread(target=self.update, args=([i, cap]), daemon=True)print(f' success ({w}x{h} at {fps:.2f} FPS).')thread.start()print('') # newline
这样就设置好了
5. 训练
数据集采用YOLO格式,目录如下:
dataset|coco|images|train2017|1.jpg2.jpgval2017|11.jpg22.jpglabels|train2017|1.txt2.txtval2017|11.txt22.txt
打开data/coco.yaml文件,把里边的内容修改如下(这里训练两个类别)
# YOLOv5 🚀 by Ultralytics, GPL-3.0 license
# COCO128 dataset https://www.kaggle.com/ultralytics/coco128 (first 128 images from COCO train2017) by Ultralytics
# Example usage: python train.py --data coco128.yaml
# parent
# ├── yolov5
# └── datasets
#     └── coco128  ← downloads here
# Train/val/test sets as 1) dir: path/to/imgs, 2) file: path/to/imgs.txt, or 3) list: [path/to/imgs1, path/to/imgs2, ..]
path: ./dataset/coco  # dataset root dir
train: images/train2017  # train images (relative to 'path') 128 images
val: images/train2017  # val images (relative to 'path') 128 images
test:  # test images (optional)# Classes
nc: 2  # number of classes
names: ['person', 'bicycle']  # class names
同时把训练用的model/yolov5s.yaml文件的类别改成与上边对应的类别数,接下来运行train.py即可
6. 源码下载
下载链接:https://download.csdn.net/download/qq_45077760/89136394
相关文章:
YOLOV5 + 双目相机实现三维测距(新版本)
文章目录 YOLOV5 双目相机实现三维测距(新版本)1. 项目流程2. 测距原理3. 操作步骤和代码解析4. 实时检测5. 训练6. 源码下载 YOLOV5 双目相机实现三维测距(新版本) 本文主要是对此篇文章做一些改进,以及解释读者在…...
计算机网络概述)
【计算机网络】(一)计算机网络概述
文章目录 【计算机网络】(一)计算机网络概述前言1.1 计算机网络在信息时代中的作用1.2 互联网概述1.2.1 网络的网络1.2.2 互联网基础结构发展的三个阶段1.2.3 互联网标准化工作 1.3 互联网的组成1.3.1 互联网的边缘部分1.3.2 互联网的核心部分 1.4 计算机…...

前端npm常用命令总结
npm(Node Package Manager)是Node.js的包管理器,用于安装和管理Node.js的依赖库。以下是一份npm命令的总结文档,涵盖了常用的npm命令及其功能: 包相关的 安装和卸载包 npm install :安装指定名称的包。n…...
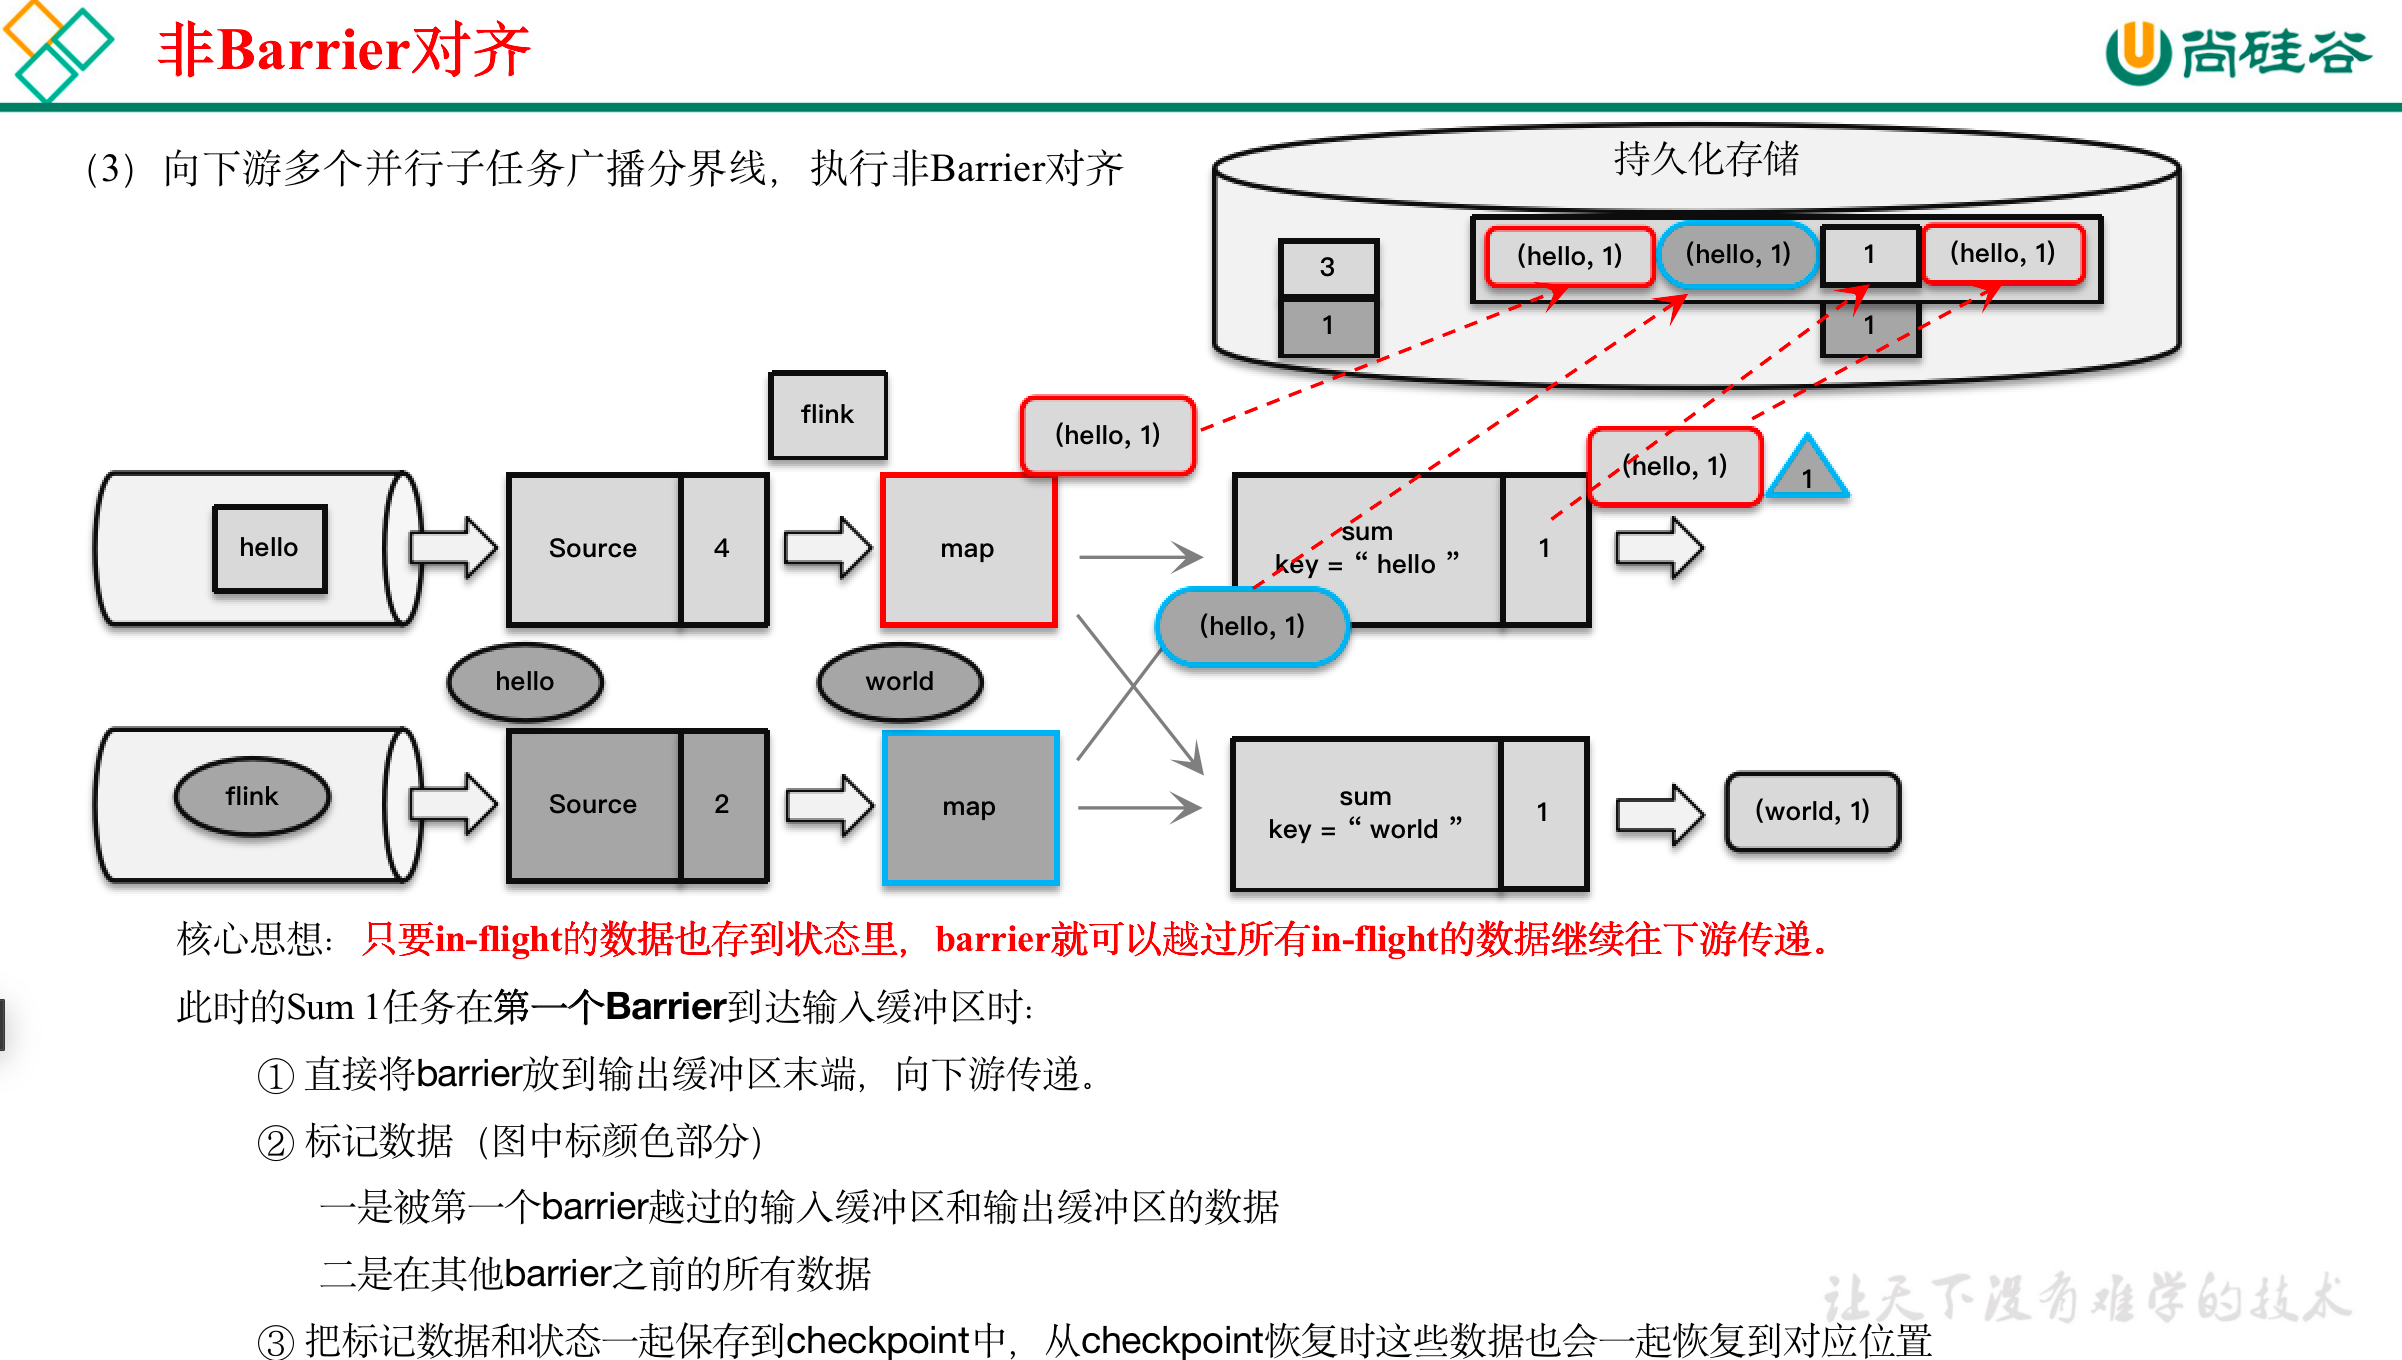
[尚硅谷flink] 检查点笔记
在Flink中,有一套完整的容错机制来保证故障后的恢复,其中最重要的就是检查点。 文章目录 11.1 检查点11.1.1 检查点的保存1)周期性的触发保存2)保存的时间点3)保存的具体流程 11.1.2 从检查点恢复状态11.1.3 检查点算法…...

JVM虚拟机(五)强引用、软引用、弱引用、虚引用
目录 一、强引用二、软引用三、弱引用四、虚引用五、总结 引文: 在 Java 中一共存在 4 种引用:强、软、弱、虚。它们主要指的是,在进行垃圾回收的时候,对于不同的引用垃圾回收的情况是不一样的。下面我们就一起来看一下这 4 种引用…...
itext7 freemarker动态模板转pdf)
(最新)itext7 freemarker动态模板转pdf
1.引入依赖 <!--PDF导出POM--> <dependency><groupId>com.itextpdf</groupId><artifactId>itext7-core</artifactId><version>8.0.3</version><type>pom</type> </dependency> <dependency><grou…...
solidworks electrical 2D和3D有什么区别
SolidWorks Electrical 是一款专为电气设计开发的软件工具,它提供了两种主要的工作环境:2D电气设计和3D电气集成设计。两者在功能和应用场景上存在显著的区别: SolidWorks Electrical 2D 设计 特点与用途: SolidWorks Electrica…...
进行语音识别)
4.2、ipex-llm(原bigdl-llm)进行语音识别
ipex-llm环境配置及模型下载 由于需要处理音频文件,还需要安装用于音频分析的 librosa 软件包。 pip install librosa下载音频文件 !wget -O audio_en.mp3 https://datasets-server.huggingface.co/assets/common_voice/--/en/train/5/audio/audio.mp3 !wget -O a…...

上海亚商投顾:创业板指低开低走 黄金、家电股逆势大涨
上海亚商投顾前言:无惧大盘涨跌,解密龙虎榜资金,跟踪一线游资和机构资金动向,识别短期热点和强势个股。 一.市场情绪 沪指4月12日震荡调整,创业板指尾盘跌超1%。黄金板块延续强势,莱绅通灵9连板࿰…...
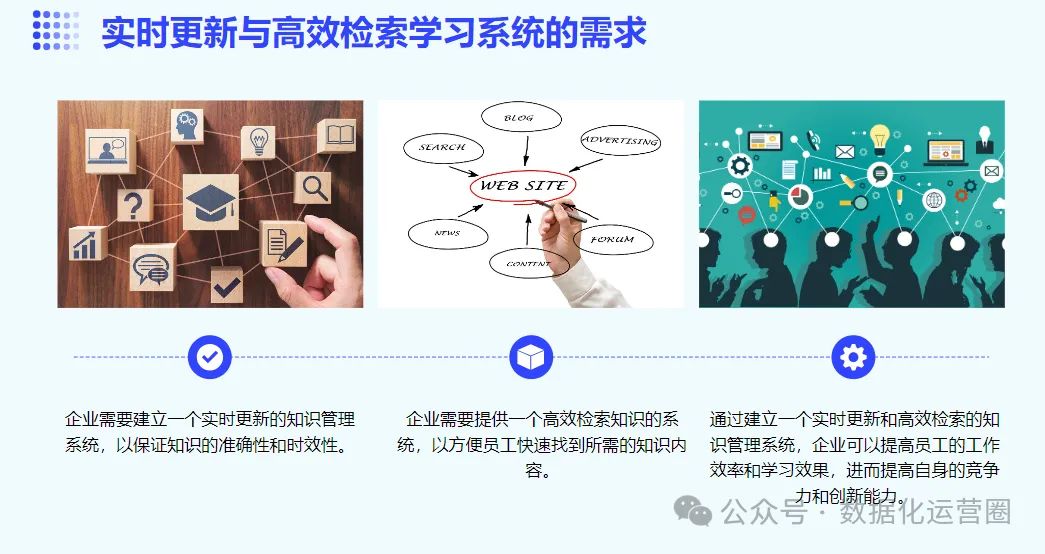
AIGC革新浪潮:大语言模型如何优化企业运营
在当今快速发展的商业环境中,企业对于有效管理知识资产的需求日益增长。知识管理作为企业核心竞争力的关键组成部分,对于提高决策质量、增强创新能力和优化运营流程起着至关重要的作用。随着数字化转型的推进,企业对知识管理系统提出了新的要…...

Golang基础-12
Go语言基础 介绍 目录操作 创建 删除 重命名 遍历目录 修改权限 文件操作 创建 打开关闭 删除 重命名 修改权限 读文件 写文件 文件定位 拷贝 测试 单元测试 基准测试 示例 介绍 本文介绍Go语言中目录操作(创建目录、删除目录、重命名、遍历…...

python递归统计文件夹下pdf文件的数量
python递归统计文件夹下pdf文件的数量 import os from docx import Documentdef count_all_pages(root_dir):total_pages 0# 遍历文件夹for dirpath, dirnames, filenames in os.walk(root_dir):for filename in filenames:# if filename.endswith(.docx) or filename.endswit…...

Kafka 硬件和操作系统
目录 一. 前言 二. Kafka 硬件和操作系统(Hardware and OS) 2.1. 操作系统(OS) 2.2. 磁盘和文件系统(Disks and Filesystem) 一. 前言 Kafka 是 I/O 密集型而非计算密集型的框架,所以对 CP…...

Kolla-ansible部署OpenStack集群
0. OpenStack 部署 系统要求 单机部署最低配置: 2张网卡8G内存40G硬盘空间 主机系统: CentOS Stream 9Debian Bullseye (11)openEuler 22.03 LTSRocky Linux 9- Ubuntu Jammy (22.04) 官方不再支持CentOS 7作为主机系统,我这里使用的是R…...

SHARE 203S PRO:倾斜摄影相机在地灾救援中的应用
在地质灾害的紧急关头,救援队伍面临的首要任务是迅速而准确地掌握灾区的地理信息。这时,倾斜摄影相机成为了救援测绘的利器。SHARE 203S PRO,这款由深圳赛尔智控科技有限公司研发的五镜头倾斜摄影相机,以其卓越的性能和功能&#…...
(附R语言和python代码实现))
MATLAB算法实战应用案例精讲-【数模应用】中介效应分析(补充篇)(附R语言和python代码实现)
目录 前言 几个高频面试题目 中介效应分析与路径分析的区别 1.中介效应分析 2.路径分析 注意事项...
Day96:云上攻防-云原生篇Docker安全系统内核版本漏洞CDK自动利用容器逃逸
目录 云原生-Docker安全-容器逃逸&系统内核漏洞 云原生-Docker安全-容器逃逸&docker版本漏洞 CVE-2019-5736 runC容器逃逸(需要管理员配合触发) CVE-2020-15257 containerd逃逸(启动容器时有前提参数) 云原生-Docker安全-容器逃逸&CDK自动化 知识点࿱…...

python botos s3 aws
https://boto3.amazonaws.com/v1/documentation/api/latest/reference/services/s3.html AWS是亚马逊的云服务,其提供了非常丰富的套件,以及支持多种语言的SDK/API。本文针对其S3云储存服务的Python SDK(boto3)的使用进行介绍。 …...
python画神经网络图
代码1(画神经网络连接图) from math import cos, sin, atan import matplotlib.pyplot as plt # 注意这里并没有用到这个networkx这个库,完全是根据matploblib这个库来画的。 class Neuron():def __init__(self, x, y,radius,nameNone):self.x xself.y …...

Bash 编程精粹:从新手到高手的全面指南之逻辑控制
在 Unix 和 Linux 系统中,Bash(Bourne-Again Shell)是一种广泛使用的 shell,提供了强大的脚本编程能力。本文将详细介绍 Bash 脚本中的逻辑控制结构,包括条件判断、分支选择、循环控制以及退出控制等内容。 条件判断&…...

搜搜果:一种面向AI生成内容验真与品牌可见度监测的实现方案
1. 问题定义 随着大语言模型(LLM)广泛集成到搜索、问答、推荐等场景中,出现两个可观测的问题: 内容可信性问题:模型会以高置信度输出事实上不存在的实体、事件或引用(幻觉,hallucination&#…...

别再只靠EWSA了!聊聊WPA密码破解的几种姿势与效率对比
WPA密码破解工具全维度评测:从EWSA到Hashcat的实战指南 在无线安全评估领域,WPA/WPA2密码破解始终是绕不开的技术课题。当安全研究员获得合法授权的握手包后,如何高效完成密码恢复任务?市面上既有EWSA这样的老牌图形化工具&#x…...

Linux调试利器:用addr2line精准定位程序崩溃现场
1. 当程序崩溃时,我们该如何快速定位问题? 作为一名长期奋战在Linux开发一线的程序员,我最头疼的就是遇到程序突然崩溃的情况。那种看着终端输出"Segmentation fault (core dumped)"却无从下手的无力感,相信很多开发者都…...

ARM DAP调试架构核心机制与实践指南
1. ARM调试访问端口(DAP)架构解析调试访问端口(Debug Access Port, DAP)是ARM调试架构中的核心组件,它作为调试器与芯片内部调试资源的桥梁,提供了标准化的访问接口。DAP的设计遵循ARM Debug Interface v5.1(ADIv5.1)规范,支持两种物理接口协…...
)
别再到处找激活码了!手把手教你用vlmcsd在Windows上自建KMS服务器(附各版本密钥)
企业级Windows批量激活解决方案:安全高效的本地KMS部署指南 在数字化办公环境中,批量激活Windows操作系统一直是IT管理员面临的常见挑战。传统单机激活方式效率低下,而依赖外部KMS服务器又存在连接不稳定、隐私泄露等潜在风险。本文将深入探讨…...

InjectFix实战:除了修Bug,如何在Unity里用它安全地‘新增’功能与属性?
InjectFix实战:突破Bug修复边界,安全扩展Unity功能 在Unity开发中,InjectFix作为热修复方案早已被开发者熟知,但大多数教程仅停留在修复Bug的基础用法上。当线上版本需要临时增加活动界面属性或工具函数时,重新打包发布…...
)
告别砖头:GD32 BootLoader设计中的Flash分区与地址规划实战指南(含IAR/Keil工程配置)
GD32 BootLoader架构设计与Flash分区策略实战 1. 理解GD32 Flash存储特性与IAP基础架构 GD32系列MCU的Flash存储结构呈现出典型的非均匀扇区分布特征——前4个扇区为16KB,后续扇区则扩展为64KB。这种物理特性直接影响了BootLoader设计的核心逻辑。不同于传统均匀分…...

如何在没有iCloud 备份的情况下从iPhone恢复联系人
不小心删除了 iPhone 上的重要联系人或短信,却发现没有 iCloud 备份可以依靠?别担心;没有 iCloud 备份的数据丢失并不意味着它永远消失了。无论您是误删了短信,还是在iOS更新后丢失了联系人,仍然有办法找回数据。在本指…...

Betaflight飞控固件:2025年如何让你的穿越机飞行更稳定更智能?
Betaflight飞控固件:2025年如何让你的穿越机飞行更稳定更智能? 【免费下载链接】betaflight Open Source Flight Controller Firmware 项目地址: https://gitcode.com/gh_mirrors/be/betaflight 还在为穿越机飞行抖动、信号不稳定而苦恼吗&#x…...

别再纠结了!KVM虚拟化实战:RAW和QCOW2磁盘格式到底怎么选?附qemu-img保姆级操作指南
KVM虚拟化存储选型实战:RAW与QCOW2的深度抉择与效能调优 当你的KVM虚拟机开始频繁弹出"存储空间不足"的警告,或是需要为关键业务系统建立可靠的快照机制时,面对RAW和QCOW2这两种主流磁盘格式,技术决策就变得尤为关键。这…...