【SpringBoot整合系列】SpringBoot整合RabbitMQ-基本使用
目录
- SpringtBoot整合RabbitMQ
- 1.依赖
- 2.配置
- RabbitMQ的7种模式
- 1.简单模式(Hello World)
- 应用场景
- 代码示例
- 2.工作队列模式(Work queues)
- 应用场景
- 代码示例
- 手动 ack
- 代码示例
- 3.订阅模式(Publish/Subscribe)
- 应用场景
- 代码示例
- 4.路由模式(Routing)
- 应用场景
- 代码示例
- 5.主题模式(Topics)
- 应用场景
- 代码示例
- 6.远程过程调用(RPC)
- 应用场景
- 代码示例
- 消息生产者开发
- 消息发送者开发
- 7.发布者确认(Publisher Confirms)
- 应用场景
- RabbitMQ的四种交换机
- 1.直连交换机(Direct exchange)
- 代码示例
- 2.扇形交换机(Fanout exchange)
- 代码示例
- 3.主题交换机(Topic exchange)
- 代码示例
- 4.首部交换机(Headers exchange)
- 代码示例
SpringtBoot整合RabbitMQ
1.依赖
<dependency><groupId>org.springframework.boot</groupId><artifactId>spring-boot-starter-amqp</artifactId></dependency><dependency><groupId>org.springframework.boot</groupId><artifactId>spring-boot-starter-web</artifactId></dependency><dependency><groupId>org.projectlombok</groupId><artifactId>lombok</artifactId><optional>true</optional></dependency><dependency><groupId>org.springframework.boot</groupId><artifactId>spring-boot-starter-test</artifactId><scope>test</scope></dependency><dependency><groupId>org.springframework.amqp</groupId><artifactId>spring-rabbit-test</artifactId><scope>test</scope></dependency>
2.配置
server:port: 9090
spring:rabbitmq:host: 192.168.29.200port: 5672username: adminpassword: adminvirtual-host: /
RabbitMQ的7种模式
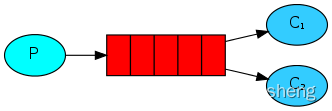
1.简单模式(Hello World)

- 做最简单的事情,一个生产者对应一个消费者,RabbitMQ相当于一个消息代理,负责将A的消息转发给B
应用场景
- 将发送的电子邮件放到消息队列,然后邮件服务在队列中获取邮件并发送给收件人
代码示例
- 配置类
@Configuration public class HelloWorldConfig {public static final String HELLO_WORLD_QUEUE_NAME = "hello_world_queue";@Beanpublic Queue queue1() {return new Queue(HELLO_WORLD_QUEUE_NAME);} } - 监听并消费消息
@Component public class HelloWorldConsumer {@RabbitListener(queues = HelloWorldConfig.HELLO_WORLD_QUEUE_NAME)public void receive(String msg) {System.out.println("msg = " + msg);} } - 生产消息并发送
@SpringBootTest
class MyMqBootApplicationTests {@ResourceRabbitTemplate rabbitTemplate;@Testvoid helloworld() {rabbitTemplate.convertAndSend(HelloWorldConfig.HELLO_WORLD_QUEUE_NAME, "hello world!!!");}
}
2.工作队列模式(Work queues)
- 在多个消费者之间分配任务(竞争的消费者模式),一个生产者对应多个消费者,一般适用于执行资源密集型任务,单个消费者处理不过来,需要多个消费者进行处理
- 一个队列对应了多个消费者,默认情况下,由队列对消息进行平均分配,消息会被分到不同的消费者手中。消费者可以配置各自的并发能力,进而提高消息的消费能力,也可以配置手动 ack,来决定是否要消费某一条消息。
应用场景
- 一个订单的处理需要10s,有多个订单可以同时放到消息队列,然后让多个消费者同时处理,这样就是并行了,而不是单个消费者的串行情况
代码示例
-
监听并消费消息
@Component public class HelloWorldConsumer {@RabbitListener(queues = HelloWorldConfig.HELLO_WORLD_QUEUE_NAME)public void receive(String msg) {System.out.println("receive = " + msg);}// concurrency 为 10,此时,receive2将会同时存在 10 个子线程去消费消息@RabbitListener(queues = HelloWorldConfig.HELLO_WORLD_QUEUE_NAME,concurrency = "10")public void receive2(String msg) {System.out.println("receive2 = " + msg+"------->"+Thread.currentThread().getName());} } -
生产消息并发送
@Testvoid work() {for (int i = 0; i < 10; i++) {rabbitTemplate.convertAndSend(HelloWorldConfig.HELLO_WORLD_QUEUE_NAME, "hello");}} -
运行结果:运行结果每次不一定一样
receive2 = hello------->org.springframework.amqp.rabbit.RabbitListenerEndpointContainer#1-9
receive2 = hello------->org.springframework.amqp.rabbit.RabbitListenerEndpointContainer#1-10
receive2 = hello------->org.springframework.amqp.rabbit.RabbitListenerEndpointContainer#1-1
receive2 = hello------->org.springframework.amqp.rabbit.RabbitListenerEndpointContainer#1-3
receive2 = hello------->org.springframework.amqp.rabbit.RabbitListenerEndpointContainer#1-7
receive2 = hello------->org.springframework.amqp.rabbit.RabbitListenerEndpointContainer#1-5
receive = hello
receive2 = hello------->org.springframework.amqp.rabbit.RabbitListenerEndpointContainer#1-4
receive2 = hello------->org.springframework.amqp.rabbit.RabbitListenerEndpointContainer#1-6
receive2 = hello------->org.springframework.amqp.rabbit.RabbitListenerEndpointContainer#1-8
手动 ack
手动 ack可以自行决定是否消费 RabbitMQ 发来的消息
代码示例
- 配置文件:配置手动ack
server:port: 9090
spring:rabbitmq:host: 192.168.29.200port: 5672username: adminpassword: adminvirtual-host: /listener:simple:acknowledge-mode: manual # 配置手动ack
- 消费代码:receive2 拒绝了所有消息,第一个消费者消费了所有消息
@Component public class HelloWorldConsumer {@RabbitListener(queues = HelloWorldConfig.HELLO_WORLD_QUEUE_NAME)public void receive(Message message, Channel channel) throws IOException {System.out.println("receive="+message.getPayload());//手动确认channel.basicAck(((Long) message.getHeaders().get(AmqpHeaders.DELIVERY_TAG)),true);}@RabbitListener(queues = HelloWorldConfig.HELLO_WORLD_QUEUE_NAME, concurrency = "10")public void receive2(Message message, Channel channel) throws IOException {System.out.println("receive2 = " + message.getPayload() + "------->" + Thread.currentThread().getName());//手动拒绝channel.basicReject(((Long) message.getHeaders().get(AmqpHeaders.DELIVERY_TAG)), true);} } - 测试结果(生产代码不变)
- 此时receive2 拒绝了所有消息,receive消费了所有消息(如果receive2没有拒绝,receive断然不会消费10次)
3.订阅模式(Publish/Subscribe)
- 一次向许多消费者发送消息,一个生产者发送的消息会被多个消费者获取,也就是将消息将广播到所有的消费者中。
- 一个生产者,多个消费者,每一个消费者都有自己的一个队列,生产者没有将消息直接发送到队列,而是发送到了交换机,每个队列绑定交换机,生产者发送的消息经过交换机,到达队列,实现一个消息被多个消费者获取的目的。
- 需要注意的是,如果将消息发送到一个没有队列绑定的 Exchange上面,那么该消息将会丢失,这是因为在 RabbitMQ 中 Exchange 不具备存储消息的能力,只有队列具备存储消息的能力
应用场景
- 更新商品库存后需要通知多个缓存和多个数据库,这里的结构应该是:
- 一个fanout类型交换机扇出两个个消息队列,分别为缓存消息队列、数据库消息队列
- 一个缓存消息队列对应着多个缓存消费者
- 一个数据库消息队列对应着多个数据库消费者
代码示例
具体内容看本文单独的目录 RabbitMQ的四种交换机 , 我这里单独拿出来解释了
4.路由模式(Routing)
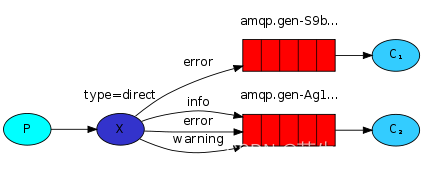
- 有选择地(Routing key)接收消息,发送消息到交换机并且要指定路由key ,消费者将队列绑定到交换机时需要指定路由key,仅消费指定路由key的消息
- 一个生产者,一个交换机,两个队列,两个消费者,生产者在创建 Exchange 后,根据 RoutingKey 去绑定相应的队列,并且在发送消息时,指定消息的具体 RoutingKey 即可
应用场景
- 如在商品库存中增加了1台iphone12,iphone12促销活动消费者指定routing key为iphone12,只有此促销活动会接收到消息,其它促销活动不关心也不会消费此routing key的消息
代码示例
参考本文单独的目录 RabbitMQ的四种交换机-1
5.主题模式(Topics)
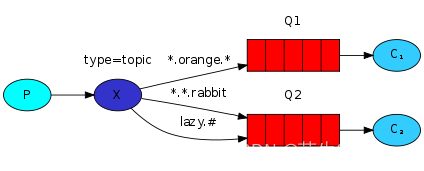
- 根据主题(Topics)来接收消息,将路由key和某模式进行匹配,此时队列需要绑定在一个模式上,#匹配一个词或多个词,*只匹配一个词。
- 一个生产者,一个交换机,两个队列,两个消费者,生产者创建 Topic 的 Exchange 并且绑定到队列中,这次绑定可以通过 * 和 # 关键字,对指定 RoutingKey 内容,编写时注意格式 xxx.xxx.xxx 去编写
应用场景
同上,iphone促销活动可以接收主题为iphone的消息,如iphone12、iphone13,iphone…等
代码示例
参考本文单独的目录 RabbitMQ的四种交换机-3
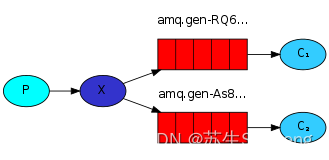
6.远程过程调用(RPC)
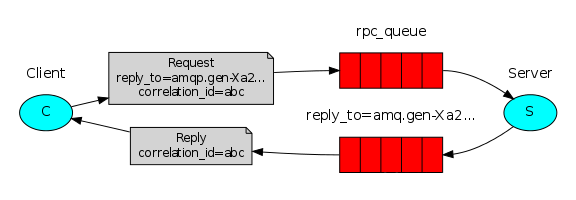
如果我们需要在远程计算机上运行功能并等待结果就可以使用RPC,具体流程可以看图。
- 首先 Client 发送一条消息,和普通的消息相比,这条消息多了两个关键内容:一个是 correlation_id,这个表示这条消息的唯一 id,还有一个内容是 reply_to,这个表示消息回复队列的名字。
- Server 从消息发送队列获取消息并处理相应的业务逻辑,处理完成后,将处理结果发送到 reply_to 指定的回调队列中。
- Client 从回调队列中读取消息,就可以知道消息的执行情况是什么样子了。
这种情况其实非常适合处理异步调用。
应用场景
- 需要等待接口返回数据,如订单支付
代码示例
消息生产者开发
-
依赖
<dependency><groupId>org.springframework.boot</groupId><artifactId>spring-boot-starter-amqp</artifactId></dependency><dependency><groupId>org.springframework.boot</groupId><artifactId>spring-boot-starter-web</artifactId></dependency><dependency><groupId>org.springframework.boot</groupId><artifactId>spring-boot-starter-test</artifactId><scope>test</scope></dependency><dependency><groupId>org.springframework.amqp</groupId><artifactId>spring-rabbit-test</artifactId><scope>test</scope></dependency><dependency><groupId>org.projectlombok</groupId><artifactId>lombok</artifactId><optional>true</optional></dependency> -
配置
server:port: 7777 spring:rabbitmq:host: 192.168.29.200port: 5672username: adminpassword: adminvirtual-host: /publisher-confirm-type: correlated # 配置消息确认方式,我们通过 correlated 来确认,只有开启了这个配置,将来的消息中才会带 correlation_id,只有通过 correlation_id 我们才能将发送的消息和返回值之间关联起来。publisher-returns: true #开启发送失败退回。 -
配置类
-
/*** @author: zjl* @datetime: 2024/5/9* @desc: * 这个配置类中我们分别配置了消息发送队列 msgQueue 和消息返回队列 replyQueue,* 然后将这两个队列和消息交换机进行绑定。常规操作。* 在 Spring Boot 中我们负责消息发送的工具是 RabbitTemplate,* 默认情况下,系统自动提供了该工具,但是这里我们需要对该工具重新进行定制,* 主要是添加消息发送的返回队列,最后我们还需要给返回队列设置一个监听器*/ @Configuration public class RabbitConfig {public static final String RPC_QUEUE1 = "queue_1";public static final String RPC_QUEUE2 = "queue_2";public static final String RPC_EXCHANGE = "rpc_exchange";/*** 设置消息发送RPC队列*/@Beanpublic Queue msgQueue() {return new Queue(RPC_QUEUE1);}/*** 设置返回队列*/@Beanpublic Queue replyQueue() {return new Queue(RPC_QUEUE2);}/*** 设置交换机*/@Beanpublic TopicExchange exchange() {return new TopicExchange(RPC_EXCHANGE);}/*** 请求队列和交换器绑定*/@Beanpublic Binding msgBinding() {return BindingBuilder.bind(msgQueue()).to(exchange()).with(RPC_QUEUE1);}/*** 返回队列和交换器绑定*/@Beanpublic Binding replyBinding() {return BindingBuilder.bind(replyQueue()).to(exchange()).with(RPC_QUEUE2);}/*** 使用 RabbitTemplate发送和接收消息* 并设置回调队列地址*/@Beanpublic RabbitTemplate rabbitTemplate(ConnectionFactory connectionFactory) {RabbitTemplate template = new RabbitTemplate(connectionFactory);template.setReplyAddress(RPC_QUEUE2);template.setReplyTimeout(6000);return template;}/*** 给返回队列设置监听器*/@Beanpublic SimpleMessageListenerContainer replyContainer(ConnectionFactory connectionFactory) {SimpleMessageListenerContainer container = new SimpleMessageListenerContainer();container.setConnectionFactory(connectionFactory);container.setQueueNames(RPC_QUEUE2);container.setMessageListener(rabbitTemplate(connectionFactory));return container;} } -
消息发送
/*** @author: zjl* @datetime: 2024/5/9* @desc:*     消息发送调用 sendAndReceive 方法,该方法自带返回值,返回值就是服务端返回的消息。*     服务端返回的消息中,头信息中包含了 spring_returned_message_correlation 字段,*     这个就是消息发送时候的 correlation_id,通过消息发送时候的 correlation_id*     以及返回消息头中的 spring_returned_message_correlation 字段值,*     我们就可以将返回的消息内容和发送的消息绑定到一起,*     确认出这个返回的内容就是针对这个发送的消息的。*/
@RestController
@Slf4j
public class RpcClientController {@Resourceprivate RabbitTemplate rabbitTemplate;@GetMapping("/send")public String send(String message) {// 创建消息对象Message newMessage = MessageBuilder.withBody(message.getBytes()).build();log.info("client send:{}", newMessage);//客户端发送消息Message result = rabbitTemplate.sendAndReceive(RabbitConfig.RPC_EXCHANGE, RabbitConfig.RPC_QUEUE1, newMessage);String response = "";if (result != null) {// 获取已发送的消息的 correlationIdString correlationId = newMessage.getMessageProperties().getCorrelationId();log.info("correlationId:{}", correlationId);// 获取响应头信息HashMap<String, Object> headers = (HashMap<String, Object>) result.getMessageProperties().getHeaders();// 获取 server 返回的消息 idString msgId = (String) headers.get("spring_returned_message_correlation");if (msgId.equals(correlationId)) {response = new String(result.getBody());log.info("client receive:{}", response);}}return response;}
}
这就是整个消息生产者的开发,其实最最核心的就是 sendAndReceive 方法的调用。调用虽然简单,但是准备工作还是要做足够。例如如果我们没有在 application.properties 中配置 correlated,发送的消息中就没有 correlation_id,这样就无法将返回的消息内容和发送的消息内容关联起来
消息发送者开发
-
依赖
<dependency><groupId>org.springframework.boot</groupId><artifactId>spring-boot-starter-amqp</artifactId></dependency><dependency><groupId>org.springframework.boot</groupId><artifactId>spring-boot-starter-web</artifactId></dependency><dependency><groupId>org.springframework.boot</groupId><artifactId>spring-boot-starter-test</artifactId><scope>test</scope></dependency><dependency><groupId>org.springframework.amqp</groupId><artifactId>spring-rabbit-test</artifactId><scope>test</scope></dependency><dependency><groupId>org.projectlombok</groupId><artifactId>lombok</artifactId><optional>true</optional></dependency> -
配置
server:port: 8888 spring:rabbitmq:host: 192.168.29.200port: 5672username: adminpassword: adminvirtual-host: /publisher-confirm-type: correlated # 配置消息确认方式,我们通过 correlated 来确认,只有开启了这个配置,将来的消息中才会带 correlation_id,只有通过 correlation_id 我们才能将发送的消息和返回值之间关联起来。publisher-returns: true #开启发送失败退回。 -
配置类
@Configuration public class RabbitConfig {public static final String RPC_QUEUE1 = "queue_1";public static final String RPC_QUEUE2 = "queue_2";public static final String RPC_EXCHANGE = "rpc_exchange";/*** 配置消息发送队列*/@BeanQueue msgQueue() {return new Queue(RPC_QUEUE1);}/*** 设置返回队列*/@BeanQueue replyQueue() {return new Queue(RPC_QUEUE2);}/*** 设置交换机*/@BeanTopicExchange exchange() {return new TopicExchange(RPC_EXCHANGE);}/*** 请求队列和交换器绑定*/@BeanBinding msgBinding() {return BindingBuilder.bind(msgQueue()).to(exchange()).with(RPC_QUEUE1);}/*** 返回队列和交换器绑定*/@BeanBinding replyBinding() {return BindingBuilder.bind(replyQueue()).to(exchange()).with(RPC_QUEUE2);} } -
消息消费
@RestController
@Slf4j
public class RpcConsumerReceiver {/** 服务端首先收到消息并打印出来。* 服务端提取出原消息中的 correlation_id。* 服务端调用 sendAndReceive 方法,将消息发送给 RPC_QUEUE2 队列,同时带上 correlation_id 参数。*/@Resourceprivate RabbitTemplate rabbitTemplate;@RabbitListener(queues = RabbitConfig.RPC_QUEUE1)public void process(Message msg) {log.info("server receive : {}",msg.toString());Message response = MessageBuilder.withBody(("i'm receive:"+new String(msg.getBody())).getBytes()).build();CorrelationData correlationData = new CorrelationData(msg.getMessageProperties().getCorrelationId());rabbitTemplate.sendAndReceive(RabbitConfig.RPC_EXCHANGE, RabbitConfig.RPC_QUEUE2, response, correlationData);}
}
7.发布者确认(Publisher Confirms)
- 与发布者进行可靠的发布确认,发布者确认是RabbitMQ扩展,可以实现可靠的发布。
- 在通道上启用发布者确认后,RabbitMQ将异步确认发送者发布的消息,这意味着它们已在服务器端处理
应用场景
- 对于消息可靠性要求较高,比如钱包扣款
RabbitMQ的四种交换机
1.直连交换机(Direct exchange)
- 具有路由功能的交换机,绑定到此交换机的时候需要指定一个routing_key,交换机发送消息的时候需要routing_key,会将消息发送道对应的队列
- DirectExchange 的路由策略是将消息队列绑定到一个 DirectExchange 上,当一条消息到达 DirectExchange 时会被转发到与该条消息 routing key 相同的 Queue 上
- 例如消息队列名为 “hello-queue”,则 routingkey 为 “hello-queue” 的消息会被该消息队列接收。
代码示例
- 配置类
@Configuration public class RabbitDirectConfig {//首先提供一个消息队列Queue,然后创建一个DirectExchange对象,三个参数分别是名字,重启后是否依然有效以及长期未用时是否删除。//创建一个Binding对象将Exchange和Queue绑定在一起。//DirectExchange和Binding两个Bean的配置可以省略掉,即如果使用DirectExchange,可以只配置一个Queue的实例即可。public final static String DIRECTNAME = "mq-direct";@Beanpublic Queue queue() {return new Queue("hello-queue");}@Beanpublic DirectExchange directExchange() {return new DirectExchange(DIRECTNAME, true, false);}@Beanpublic Binding binding() {return BindingBuilder.bind(queue()).to(directExchange()).with("direct");} } - 消费者
通过 @RabbitListener 注解指定一个方法是一个消息消费方法,方法参数就是所接收到的消息@Component public class DirectReceiver {@RabbitListener(queues = "hello-queue")public void handler1(String msg) {System.out.println("DirectReceiver:" + msg);} } - 生产者发送消息
@RestController
public class SendController {@Resourceprivate RabbitTemplate rabbitTemplate;@RequestMapping("/send")public String send(){rabbitTemplate.convertAndSend("hello-queue", "hello direct!");return "success";}
}
2.扇形交换机(Fanout exchange)
- 广播消息到所有队列,没有任何处理,速度最快
- FanoutExchange 的数据交换策略是把所有到达 FanoutExchange 的消息转发给所有与它绑定的 Queue 上,在这种策略中,routingkey 将不起任何作用
代码示例
-
配置类
@Configuration public class RabbitFanoutConfig {//在这里首先创建 FanoutExchange,参数含义与创建 DirectExchange 参数含义一致,// 然后创建两个 Queue,再将这两个 Queue 都绑定到 FanoutExchange 上public final static String FANOUTNAME = "mq-fanout";@Beanpublic FanoutExchange fanoutExchange() {return new FanoutExchange(FANOUTNAME, true, false);}@Beanpublic Queue queueOne() {return new Queue("queue-one");}@Beanpublic Queue queueTwo() {return new Queue("queue-two");}@Beanpublic Binding bindingOne() {return BindingBuilder.bind(queueOne()).to(fanoutExchange());}@Beanpublic Binding bindingTwo() {return BindingBuilder.bind(queueTwo()).to(fanoutExchange());} } -
消费者
@Component public class FanoutReceiver {@RabbitListener(queues = "queue-one")public void receiver1(String message) {System.out.println("FanoutReceiver:receiver1:" + message);}@RabbitListener(queues = "queue-two")public void receiver2(String message) {System.out.println("FanoutReceiver:receiver2:" + message);} } -
生产者发送消息
@RestController
public class SendController {@Resourceprivate RabbitTemplate rabbitTemplate;@RequestMapping("/send")public String send(){//注意这里发送消息时不需要 routingkey,指定 exchange 即可,routingkey 可以直接传一个 nullrabbitTemplate.convertAndSend(RabbitFanoutConfig.FANOUTNAME,null, "hello fanout!");return "success";}
}
3.主题交换机(Topic exchange)
- 在直连交换机基础上增加模式匹配,也就是对routing_key进行模式匹配,*代表一个单词,#代表多个单词
- TopicExchange 是比较复杂但是也比较灵活的一种路由策略,在 TopicExchange 中,Queue 通过 routingkey 绑定到 TopicExchange 上,
- 当消息到达 TopicExchange 后,TopicExchange 根据消息的 routingkey 将消息路由到一个或者多个 Queue 上
代码示例
-
配置类
@Configuration public class RabbitTopicConfig {/*** 首先创建 TopicExchange,参数和前面的一致。* 然后创建三个 Queue,第一个 Queue 用来存储和 “xiaomi” 有关的消息,* 第二个 Queue 用来存储和 “huawei” 有关的消息,* 第三个 Queue 用来存储和 “phone” 有关的消息。* * 将三个 Queue 分别绑定到 TopicExchange 上,* 第一个 Binding 中的 “xiaomi.#” 表示消息的 routingkey 凡是以 “xiaomi” 开头的,都将被路由到名称为 “xiaomi” 的 Queue 上,* 第二个 Binding 中的 “huawei.#” 表示消息的 routingkey 凡是以 “huawei” 开头的,都将被路由到名称为 “huawei” 的 Queue 上,* 第三个 Binding 中的 “#.phone.#” 则表示消息的 routingkey 中凡是包含 “phone” 的,都将被路由到名称为 “phone” 的 Queue 上。*/public final static String TOPICNAME = "mq-topic";@Beanpublic TopicExchange topicExchange() {return new TopicExchange(TOPICNAME, true, false);}@Beanpublic Queue xiaomi() {return new Queue("xiaomi");}@Beanpublic Queue huawei() {return new Queue("huawei");}@Beanpublic Queue phone() {return new Queue("phone");}@Beanpublic Binding xiaomiBinding() {return BindingBuilder.bind(xiaomi()).to(topicExchange()).with("xiaomi.#");}@Beanpublic Binding huaweiBinding() {return BindingBuilder.bind(huawei()).to(topicExchange()).with("huawei.#");}@Beanpublic Binding phoneBinding() {return BindingBuilder.bind(phone()).to(topicExchange()).with("#.phone.#");} } -
消费者
@Component public class TopicReceiver {@RabbitListener(queues = "phone")public void receiver1(String message) {System.out.println("PhoneReceiver:" + message);}@RabbitListener(queues = "xiaomi")public void receiver2(String message) {System.out.println("XiaoMiReceiver:"+message);}@RabbitListener(queues = "huawei")public void receiver3(String message) {System.out.println("HuaWeiReceiver:"+message);} } -
生产者发送消息
@RestController
public class SendController {@Resourceprivate RabbitTemplate rabbitTemplate;@RequestMapping("/send")public String send(){//根据 RabbitTopicConfig 中的配置,//第一条消息将被路由到名称为 “xiaomi” 的 Queue 上,//第二条消息将被路由到名为 “huawei” 的 Queue 上,//第三条消息将被路由到名为 “xiaomi” 以及名为 “phone” 的 Queue 上,//第四条消息将被路由到名为 “huawei” 以及名为 “phone” 的 Queue 上,//最后一条消息则将被路由到名为 “phone” 的 Queue 上rabbitTemplate.convertAndSend(RabbitTopicConfig.TOPICNAME,"xiaomi.news","小米新闻..");rabbitTemplate.convertAndSend(RabbitTopicConfig.TOPICNAME,"huawei.news","华为新闻..");rabbitTemplate.convertAndSend(RabbitTopicConfig.TOPICNAME,"xiaomi.phone","小米手机..");rabbitTemplate.convertAndSend(RabbitTopicConfig.TOPICNAME,"huawei.phone","华为手机..");rabbitTemplate.convertAndSend(RabbitTopicConfig.TOPICNAME,"phone.news","手机新闻..");return "success";}
}
4.首部交换机(Headers exchange)
- 忽略routing_key,使用Headers信息(一个Hash的数据结构)进行匹配,优势在于可以有更多更灵活的匹配规则
- HeadersExchange 是一种使用较少的路由策略,HeadersExchange 会根据消息的 Header 将消息路由到不同的 Queue 上,这种策略也和 routingkey无关
代码示例
-
配置类
@Configuration public class RabbitHeaderConfig {/*** 这里的配置大部分和前面介绍的一样,差别主要体现的 Binding 的配置上,* 第一个 bindingName 方法中,* whereAny 表示消息的 Header 中只要有一个 Header 匹配上 map 中的 key/value,* 就把该消息路由到名为 “name-queue” 的 Queue 上,* 这里也可以使用 whereAll 方法,* 表示消息的所有 Header 都要匹配。* whereAny 和 whereAll 实际上对应了一个名为 x-match 的属性。* bindingAge 中的配置则表示只要消息的 Header 中包含 age,不管 age 的值是多少,* 都将消息路由到名为 “age-queue” 的 Queue 上*/public final static String HEADERNAME = "mq-header";@Beanpublic HeadersExchange headersExchange() {return new HeadersExchange(HEADERNAME, true, false);}@Beanpublic Queue queueName() {return new Queue("name-queue");}@Beanpublic Queue queueAge() {return new Queue("age-queue");}@Beanpublic Binding bindingName() {Map<String, Object> map = new HashMap<>();map.put("name", "mq");return BindingBuilder.bind(queueName()).to(headersExchange()).whereAny(map).match();}@Beanpublic Binding bindingAge() {return BindingBuilder.bind(queueAge()).to(headersExchange()).where("age").exists();} } -
消费者
@Component public class HeaderReceiver {//注意这里的参数用 byte 数组接收@RabbitListener(queues = "name-queue")public void receiver1(byte[] msg) {System.out.println("HeaderReceiver:name:" + new String(msg, 0, msg.length));}@RabbitListener(queues = "age-queue")public void receiver2(byte[] msg) {System.out.println("HeaderReceiver:age:" + new String(msg, 0, msg.length));} } -
生产者发送消息
package cn.smbms.controller;import cn.smbms.config.RabbitFanoutConfig;
import org.springframework.amqp.core.Message;
import org.springframework.amqp.core.MessageBuilder;
import org.springframework.amqp.rabbit.core.RabbitTemplate;
import org.springframework.web.bind.annotation.RequestMapping;
import org.springframework.web.bind.annotation.RestController;import javax.annotation.Resource;/*** @author: zjl* @datetime: 2024/5/9* @desc: */
@RestController
public class SendController {@Resourceprivate RabbitTemplate rabbitTemplate;@RequestMapping("/send")public String send(){//这里创建两条消息,两条消息具有不同的 header,不同 header 的消息将被发到不同的 Queue 中去Message nameMsg = MessageBuilder.withBody("hello header! name-queue".getBytes()).setHeader("name", "sang").build();Message ageMsg = MessageBuilder.withBody("hello header! age-queue".getBytes()).setHeader("age", "99").build();rabbitTemplate.send(RabbitHeaderConfig.HEADERNAME, null, ageMsg);rabbitTemplate.send(RabbitHeaderConfig.HEADERNAME, null, nameMsg);return "success";}
}
相关文章:
【SpringBoot整合系列】SpringBoot整合RabbitMQ-基本使用
目录 SpringtBoot整合RabbitMQ1.依赖2.配置RabbitMQ的7种模式1.简单模式(Hello World)应用场景代码示例 2.工作队列模式(Work queues)应用场景代码示例手动 ack代码示例 3.订阅模式(Publish/Subscribe)应用…...

MySQL————创建存储过程函数
存储过程使用大纲 有参数传递 delimiter $$ 声明一个名称为get_student_introduce create procedure add_student_infor( in p_userName VARCHAR(20),in p_phone VARCHAR(11),in p_sex char(2),in p_introduce VARCHAR(255)) 开始操作 BEGIN 撰写真正在操作DMLDQL都行 INSE…...
——数据要素:管理核心框架)
数据赋能(86)——数据要素:管理核心框架
数据管理的核心框架是一个综合性的体系,旨在确保数据的有效利用、安全性以及合规性。这个框架主要包含了以下几个关键组成部分: 数据治理策略与目标:明确数据管理的整体战略和目标,包括数据价值的释放、数据资产地位的确定、多元…...
测试的基本概念
什么是软件测试 软件测试它就是一个过程测试就是对软件的全方位进行全面的校验.通过测试技术验证软件是不是符合用户的信息. 测试和开发的区别 在工作上的区别: 开发人员通过编程技能来开发和实现这个软件. 测试人员通过测试技能来验证软件是否符合用户需求. 在技术上的要求…...

Python多线程加速-休眠部分线程
总所周知Python由于GIL的问题,使用多线程时同一时刻只有一个线程在工作。故Python会在所有线程之间不断的切换,每切换到一个线程会执行一段字节码指令然后切换到另一个线程。如果开启了很多线程,且只有小部分线程在工作,如果不休眠…...
)
B+树(B+ Tree)
B树(B Tree)是一种对B树(B-Tree)的改进版本,它在数据库系统和文件系统中作为索引结构得到了广泛的应用,特别是在磁盘存储的场景下。B树保留了B树的基本特征,如自平衡、多路分支等,但…...
【Linux】了解信号产生的五种方式
文章目录 正文前的知识准备kill 命令查看信号man手册查看信号信号的处理方法 认识信号产生的5种方式1. 工具2. 键盘3. 系统调用kill 向任意进程发送任意信号raise 给调用方发送任意信号abort 给调用方发送SIGABRT信号 4. 软件条件5. 异常 正文前的知识准备 kill 命令查看信号 …...

【nuxt3国际化i18n】vue3+nuxt3+vite+TS国际化的正确做法
1、创建nuxt3请看Nuxt3官网 2、下面是添加i18n的叫教程,适用于企业前端项目。 添加依赖 依赖 yarn add vue-i18n yarn add nuxtjs/i18nnext -D配置文件nuxt.config.ts //nuxt.config.ts export default defineNuxtConfig({modules: [nuxtjs/i18n,],i18n: {stra…...
数据库管理-第185期 23ai:一套关系型数据干掉多套JSON存储(20240508)
数据库管理185期 2024-05-08 数据库管理-第185期 23ai:一套关系型数据干掉多套JSON存储(20240508)1 上期示例说明2 两个参数2.1 NEST/UNNEST2.2 CHECK/NOCHECK 3 一数多用3.1 以用户维度输出订单信息3.2 以产品维度3.3 以产品种类维度 4 美化输出总结 数…...

7 zip 介绍
7-Zip是一款广受好评的开源文件存档与压缩工具,支持高比率的压缩,适用于Windows、Linux和macOS等多种操作系统平台。以下是关于7-Zip的详细介绍: - **高压缩比**:7-Zip最显著的特点是其提供的高压缩率,尤其是使用其独…...

前端页面 贴边拖拽 盒子
vue 悬浮球(带自动吸附功能)_vue悬浮球-CSDN博客...

【408真题】2009-10
“接”是针对题目进行必要的分析,比较简略; “化”是对题目中所涉及到的知识点进行详细解释; “发”是对此题型的解题套路总结,并结合历年真题或者典型例题进行运用。 涉及到的知识全部来源于王道各科教材(2025版&…...

WebSocket概述
TCP和HTTP规范有连接超时一说,所以长轮询并不能一直持续,服务端和客户端的连接需要定期的连接和关闭再连接。 WebSocket在请求头中有一个Connection:Upgrade字段,表示客户端想对协议进行升级,还有一个Upgrade:websocket字段&…...

人机协同是虚拟与真实的协同
“人机协同”是指人类与机器之间的合作与协同工作。在这种协同中,机器可以作为助手、辅助或扩展人类的能力,帮助人们完成任务,提高工作效率和质量。 虚拟与真实的协同是指在人机协同的过程中,虚拟想象世界和真实世界之间的协同。通…...

【编程向导】Docker-常用命令
常用命令 管理命令 管理命令说明builder管理构建config管理配置container管理容器context管理上下文engine管理引擎image管理镜像network管理网络node管理 Swarm 节点plugin管理插件secret管理 Docker secretsservice管理服务stack管理 Docker stacksswarm管理 Swarm 集群sys…...
LeetCode题练习与总结:不同的二叉搜索树Ⅱ--95
一、题目描述 给你一个整数 n ,请你生成并返回所有由 n 个节点组成且节点值从 1 到 n 互不相同的不同 二叉搜索树 。可以按 任意顺序 返回答案。 示例 1: 输入:n 3 输出:[[1,null,2,null,3],[1,null,3,2],[2,1,3],[3,1,null,nul…...
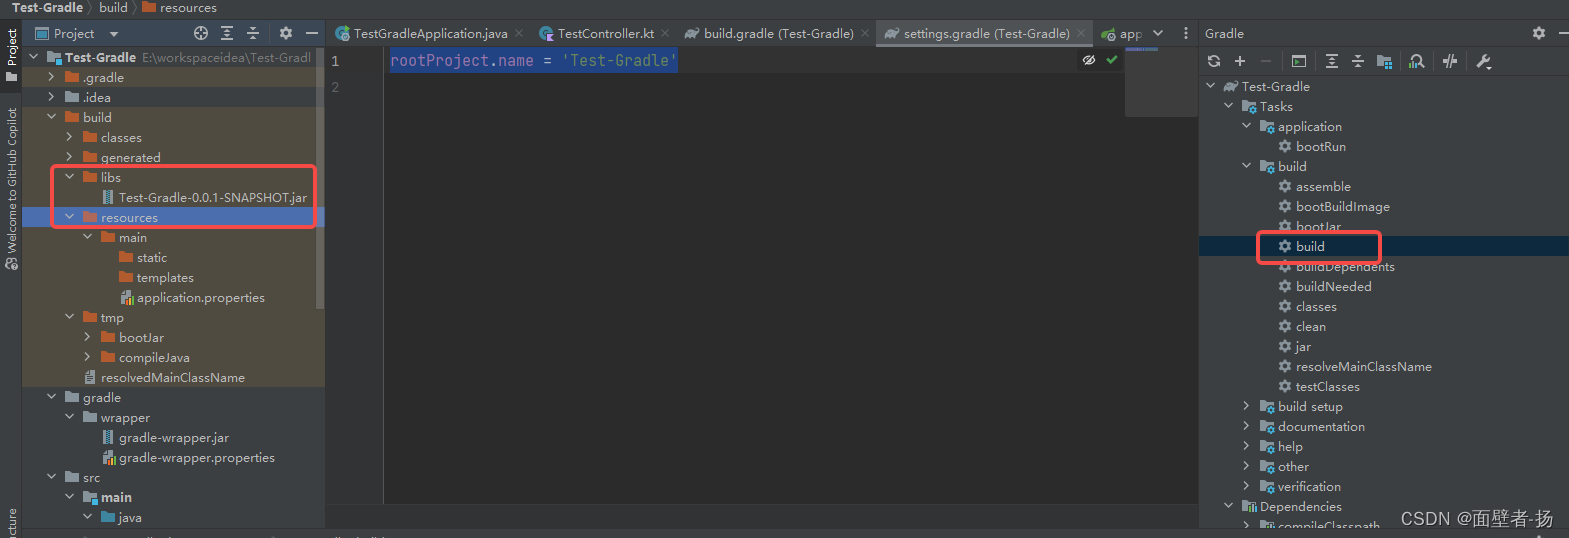
idea SpringBoot + Gradle 环境配置到项目打包
一、前言 Gradle是一个基于Apache Ant和Apache Maven概念的项目自动化构建开源工具。它使用一种基于Groovy的特定领域语言(DSL)来声明项目设置,也增加了基于Kotlin语言的kotlin-based DSL,抛弃了基于XML的各种繁琐配置。 面向Java应用为主。当前其支持…...

深入理解tengine的sysguard模块
目录 1. 引言2. 开启sysguard模块2.1 编译2.2 配置3. 源码分析3.1 配置参数分析3.2 模块的初始化3.3 ngx_http_sysguard_handler函数3.4 各项负载指标的获取3.4.1 load系统负载的获取3.4.2 cpu使用率的获取3.4.3 内存使用情况的获取3.3.5 请求平均响应时间的获取1. 引言 Tengin…...

探索多模态LLM作为驾驶的世界模型
24年5月MIT的论文“Probing Multimodal LLMs as World Models for Driving”。 主要对多模态大语言模型(MLLM)在自动驾驶领域的应用进行了审视,并挑战/验证了一些常见的假设,重点关注它们通过图像/帧序列推理和解释在闭环控制环境…...

掌握Vim:Linux系统维护的瑞士军刀 - 常用命令深度解析
在Linux的世界里,Vim编辑器犹如一位沉默的剑客,它的命令就是那锋利的剑刃,能够在代码的海洋中劈波斩浪。对于每一位Linux系统用户来说,掌握Vim的常用命令,就如同获得了维护系统的瑞士军刀。今天,让我们一起…...

hoverboard-firmware-hack-FOC终极兼容性指南:STM32F103RCT6与GD32F103RCT6深度对比
hoverboard-firmware-hack-FOC终极兼容性指南:STM32F103RCT6与GD32F103RCT6深度对比 【免费下载链接】hoverboard-firmware-hack-FOC With Field Oriented Control (FOC) 项目地址: https://gitcode.com/GitHub_Trending/ho/hoverboard-firmware-hack-FOC 想…...

什么是运算符
等一下...

Unity 2D物理入门:从愤怒的小鸟理解刚体、碰撞与力的核心机制
1. 为什么“愤怒的小鸟”仍是Unity 2D入门不可绕过的经典靶子你打开Unity Hub,新建一个2D项目,踌躇满志想做个“能动的”东西——不是静态UI,不是纯动画,而是有物理反馈、有交互逻辑、有失败与成功的即时判断。这时候,…...

航空航班延误预测:可解释性模型与四源融合实战
1. 项目概述:这不是一个“预测准不准”的问题,而是一个“预测有没有用”的问题我做航班延误预测项目,不是为了在Kaggle排行榜上刷个0.89的AUC就收工。真正让我在凌晨三点改完第17版特征工程脚本、盯着滚动的日志等模型收敛的,是去…...

Unity安装配置全链路排坑指南:从下载到首建成功
1. 这不是“装个软件”那么简单:Unity安装背后的真实战场很多人点开Unity官网,看到那个醒目的“Download”按钮,下意识觉得:“不就是点几下、选个路径、等十分钟?”——我带过三届Unity方向的实习团队,每年…...

成都制造企业供应链价格波动频繁,AI智能体该先预警哪些信号?
一、价格波动不是采购一个部门能扛住的问题很多制造企业谈供应链价格波动,第一反应是让采购去谈价、催报价、找替代供应商。但在真实经营里,价格风险很少只停留在采购单价上。铜、铝、钢材、塑料、电子元器件、包装材料、运费、汇率和供应商产能变化&…...

容器资源限制
1、创建一个临时容器c1 docker run -it --namec1 --rm centos:v1监控容器的资源使用情况 docker statsmemload工具可以直接占用消耗资源 将memload工具拷贝到c1容器的opt目录下 docker cp memload-7.0-1.r29766.x86_64.rpm c1:/opt在运行的容器中安装上传的安装包 rpm -ivh /op…...

从选刊到综述:GPT到底在学术写作上升级了什么?
各位同仁好,我是七哥。一个在高校里从事人工智能相关领域研究,钻研用大模型AI实操的学术人。可以和七哥交流学术写作或Gemini、GPT、Claude等大模型学术实操相关问题,多多交流,相互成就,共同进步。 导师把选题报告打回来,批注栏里写着:“创新点不够清晰,建议重新梳理研…...

软件测试的安全漏洞挖掘:掌握这3个方法,成为安全测试专家
对于软件测试从业者而言,随着数字化转型的深入,软件系统承载的敏感数据、核心业务不断增加,安全漏洞已经从“可接受的开发瑕疵”变成了威胁业务生存的核心风险。从用户隐私泄露到核心支付系统被攻破,从开源组件漏洞引发的供应链攻…...

【飞机】基于matlab数据驱动的多传感器飞机健康监测系统【含Matlab源码 15551期】
💥💥💥💥💥💥💞💞💞💞💞💞💞💞欢迎来到海神之光博客之家💞💞💞Ὁ…...