(WIP) my cloud test bed (by quqi99)
作者:张华 发表于:2023-03-10
版权声明:可以任意转载,转载时请务必以超链接形式标明文章原始出处和作者信息及本版权声明
问题
想创建一个local local test bed, 用来方便做各种云实验,如openstack, k8s, ovn, lxd等实验,限制条件为:
- 只有一台物理机,且为单网卡
- 尽量使用各种cache来应付特色网络
apt cache
首先就是apt cache:
sudo apt install apt-cacher-ng -y
echo 'PassThroughPattern: .*' |sudo tee -a /etc/apt-cacher-ng/acng.conf
sudo systemctl restart apt-cacher-ng.service && sudo systemctl enable apt-cacher-ng.service
du -sh /var/cache/apt-cacher-ng/
#vim /var/lib/dpkg/info/apt-cacher-ng.postinst
#dpkg --configure apt-cacher-ng#change the dir from /var/cache/apt-cacher-ng/ to /mnt/udisk/apt-cacher-ng
cat << EOF |sudo tee -a /etc/fstab
#use blkid to see uuid
UUID="d63d7251-ec3d-4ef5-aa92-f3d4c480f20c" /mnt/udisk   ext4    defaults    0  2
EOF
mkfs.ext4 -F -L udisk /dev/sdb1
mkdir /mnt/udisk/apt-cacher-ng
chown -R apt-cacher-ng:apt-cacher-ng /mnt/udisk/apt-cacher-ng
sudo sed -i 's/CacheDir: \/var\/cache\/apt-cacher-ng/CacheDir: \/mnt\/udisk\/apt-cacher-ng/g' /etc/apt-cacher-ng/acng.conf
du -sh /mnt/udisk/apt-cacher-ng#Use apt cache proxy
echo 'Acquire::http::Proxy "http://proxy:3142";' | sudo tee /etc/apt/apt.conf.d/01acng
pip mirror
#use pip mirror, or use this instead: PYPI_ALTERNATIVE_URL=http://mirrors.aliyun.com/pypi/simple
mkdir -p ~/.pip
cat << EOF |tee ~/.pip/pip.conf
[global]
trusted-host=mirrors.aliyun.com
index-url = http://mirrors.aliyun.com/pypi/simple
disable-pip-version-check = true
timeout = 120
EOF
image mirror
注:下列的sstream-mirror不知为什么在特色网络下始终都是0%, 待查
- archive.ubuntu.com, 可用 http://mirrors.clooud.tencent.com/ubuntu 代替
- ports.ubuntu.com, 可用http://ports.ubuntu.com/ubuntu-ports 代替
maas.io与cloud-images.ubuntu.com自己做mirror, 方法如下:
#https://blog.csdn.net/quqi99/article/details/78456909
sudo apt -y install simplestreams -y
#for cloud-images.ubuntu.com
sudo sstream-mirror --keyring=/usr/share/keyrings/ubuntu-cloudimage-keyring.gpg --progress --max=1 --path=streams/v1/index.json \https://cloud-images.ubuntu.com/releases/ /images/simplestreams 'arch=amd64' 'release~(jammy)' \'ftype~(lxd.tar.xz|squashfs|root.tar.xz|root.tar.gz|disk1.img|.json|.sjson)'
#for images.maas.io
sudo sstream-mirror --keyring=/usr/share/keyrings/ubuntu-cloudimage-keyring.gpg https://images.maas.io/ephemeral-v3/stable \/images/simplestreams 'arch=amd64' 'release~(jammy)' --max=1 --progress
sudo sstream-mirror --keyring=/usr/share/keyrings/ubuntu-cloudimage-keyring.gpg https://images.maas.io/ephemeral-v3/stable \/images/simplestreams 'os~(grub*|pxelinux)' --max=1 --progress
然后解决密钥:
#https://goharbor.io/docs/2.6.0/install-config/configure-https/
openssl genrsa -out ca.key 4096
openssl req -x509 -new -nodes -sha512 -days 3650 -subj "/C=CN/ST=Beijing/L=Beijing/O=example/OU=Personal/CN=node1.lan" -key ca.key -out ca.crt
openssl genrsa -out node1.lan.key 4096
openssl req -sha512 -new -subj "/C=CN/ST=Beijing/L=Beijing/O=example/OU=Personal/CN=node1.lan" -key node1.lan.key -out node1.lan.csr
#complies with the Subject Alternative Name (SAN) and x509 v3 extension requirements to avoid 'x509: certificate relies on legacy Common Name field, use SANs instead'
cat > v3.ext <<-EOF
authorityKeyIdentifier=keyid,issuer
basicConstraints=CA:FALSE
keyUsage = digitalSignature, nonRepudiation, keyEncipherment, dataEncipherment
extendedKeyUsage = serverAuth
subjectAltName = @alt_names[alt_names]
DNS.1=node1.lan
DNS.2=node1
DNS.3=hostname
EOF
openssl x509 -req -sha512 -days 3650 -extfile v3.ext -CA ca.crt -CAkey ca.key -CAcreateserial -in node1.lan.csr -out node1.lan.crt
#for docker, the Docker daemon interprets .crt files as CA certificates and .cert files as client certificates.
openssl x509 -inform PEM -in node1.lan.crt -out node1.lan.cert
设置nginx为https, 另外,由于上面使用了一个新目录/images/simplestreams作为root,那需要将/etc/nginx/nginx.conf中添加’user root;'来避免权限问题
$ cat /etc/nginx/sites-available/default
server {listen 443 ssl http2;listen [::]:443 ssl http2;server_name node1.lan;ssl_certificate /home/hua/ca/node1.lan.crt;ssl_certificate_key /home/hua/ca/node1.lan.key;#ssl_protocols TLSv1.2;ssl_prefer_server_ciphers on; location / {root /images/simplestreams;index index.html;}
}
测试:
curl --resolve node1.lan:443:192.168.99.235 --cacert ~/ca/ca.crt https://node1.lan:443/streams/v1/index.json
sudo cp ~/ca/ca.crt /usr/local/share/ca-certificates/ca.crt
sudo chmod 644 /usr/local/share/ca-certificates/ca.crt
sudo update-ca-certificates --fresh
curl --resolve node1.lan:443:192.168.99.235 https://node1.lan:443/streams/v1/index.json
物理机网络设计
因为只有一台机器node1, 只有一个网卡eno1:
- br-eth0, 虽然lxd也支持ovs bridge, 但为了更方便使用wol,更稳定的management网络,我们还是决定使用用这个仅有的网卡eno1创建一个linux bridge (br-eth0), 这样br-eth0足够做各种lxd实验了
- br-data, 若要做openstack实验,还需要创建一个ovs bridge (br-data), 只用node1这一台物理机做实验它并不需要物理网卡,若今后还想加物理机,可以创建一对linux peers来连接br-eth0与br-data,这linux peers的一端加入br-data即可。另外,即使要创建多机环境,用vagrant, lxd很多方案可以解决,并没有加多物理机的需求
下列netplan配置创建了br-eth0,也让br-eth0支持wol通过魔术包唤醒,也创建了一个没有dhcp的br-maas用于maas实验
cat << EOF |sudo tee /etc/netplan/90-local.yaml
network:version: 2renderer: networkdethernets:eno1:dhcp4: nomatch:macaddress: f8:32:e4:be:87:cdwakeonlan: truebridges:br-eth0:dhcp4: yesinterfaces:- eno1#Use 'etherwake F8:32:E4:BE:87:CD' to wol in bridgemacaddress: f8:32:e4:be:87:cdbr-maas:#br-maas without dhcp enabled so it's for maasdhcp4: falseaddresses:- 192.168.9.1/24routes:- to: defaultvia: 192.168.99.1nameservers:addresses:- 192.168.99.1
EOF
sudo netplan generate
sudo netplan apply
使用netplan的配置是想运行一些post script hook时不方便, 未测试下面使用networkd-dispatcher hook的曲线救国方法.
sudo systemctl stop NetworkManager.service
sudo systemctl disable NetworkManager.service
sudo systemctl stop NetworkManager-wait-online.service
sudo systemctl disable NetworkManager-wait-online.service
sudo systemctl stop NetworkManager-dispatcher.service
sudo systemctl disable NetworkManager-dispatcher.service
sudo apt install netplan.io openvswitch-switch -y
sudo apt install -y networkd-dispatcher -y
cat << EOF |sudo tee /etc/networkd-dispatcher/off.d/start.sh
#!/bin/bash -e
#IFACE='eno1'
if [ \$IFACE = "eno1" -o \$IFACE = "br-eth0" ]; thenif ip link show eno1 | grep "state DOWN" > /dev/null && !(arp -ni br-data | grep "ether" > /dev/null); thendate > /tmp/start.txt;/usr/bin/ovs-vsctl --may-exist add-port br-eth0 eno1ip l add name veth-br-eth0 type veth peer name veth-exip l set dev veth-br-eth0 upip l set dev veth-ex upip l set veth-br-eth0 master br-eth0fi
fi
EOF
cat << EOF |sudo tee /etc/networkd-dispatcher/routable.d/stop.sh
#!/bin/bash -e
if [ \$IFACE = "eno1" -o \$IFACE = "br-eth0" ]; thenif ip link show eno1 | grep "state UP" > /dev/null || arp -ni br-data | grep "ether" > /dev/null; thendate > /tmp/stop.txt;systemctl stop hostapd;fi
fi
EOF
sudo chmod +x /etc/networkd-dispatcher/off.d/start.sh
sudo chmod +x /etc/networkd-dispatcher/off.d/stop.sh
直接创建ovs-bridge的方法如下,但我们的设计并没有使用ovs-bridge的需求:
auto br-eth0
allow-ovs br-eth0
iface br-eth0 inet static
pre-up /usr/bin/ovs-vsctl -- --may-exist add-br br-eth0
pre-up /usr/bin/ovs-vsctl -- --may-exist add-port br-eth0 eno1address 192.168.99.125gateway 192.168.99.1network 192.168.99.0netmask 255.255.255.0broadcast 192.168.99.255
ovs_type OVSBridge
ovs_ports eno1#sudo ip -6 addr add 2001:2:3:4500:fa32:e4ff:febe:87cd/64 dev br-eth0
iface br-phy inet6 static
pre-up modprobe ipv6
address 2001:2:3:4500:fa32:e4ff:febe:87cd
netmask 64
gateway 2001:2:3:4500::1auto eno1
allow-br-phy eno1
iface eno1 inet manual
ovs_bridge br-eth0
ovs_type OVSPort
使用Networkmanager来代替netplan的方法容易支持post script hook:
root@node1:~# cat /etc/network/interfaces
auto lo
iface lo inet loopback
auto eth0
iface eth0 inet manual
auto br-eth0
iface br-eth0 inet staticaddress 192.168.99.124/24gateway 192.168.99.1bridge_ports eth0dns-nameservers 192.168.99.1bridge_stp onbridge_fd 0bridge_maxwait 0up echo -n 0 > /sys/devices/virtual/net/$IFACE/bridge/multicast_snooping
# for stateless it's 'inet6 auto', for stateful it's 'inet6 dhcp'
iface br-eth0 inet6 auto#iface eth0 inet6 static#address 2001:192:168:99::135                                                                                            #gateway 2001:192:168:99::1#netmask 64# use SLAAC to get global IPv6 address from the router# we may not enable ipv6 forwarding, otherwise SLAAC gets disabled# sleep 5 is due a bug and 'dhcp 1' indicates that info should be obtained from dhcpv6 server for statelessup echo 0 > /proc/sys/net/ipv6/conf/$IFACE/disable_ipv6up sleep 5autoconf 1accept_ra 2dhcp 1
devstack实验
单机实验,br-data不用veth-ex也行,br-ex用veth-ex也行(这时就可以当br-ex用了 )
- OVS_PHYSICAL_BRIDGE=br-data将用于这里(ovs-vsctl set open . external-ids:ovn-bridge-mappings=physnet1:br-data)
- 如果它想要访问外网的话,可以再设置PUBLIC_INTERFACE=veth-ex, 其中veth-ex为br-eth0(linux bridge)与br-data(ovs bridge)之间的linux peers
- PUBLIC_INTERFACE也就是br-ex, 也可以让它使用br-data
配置如下,未测试, 仅供参考:
cat << EOF |tee local.conf
[[local|localrc]]
#make rabbitmq-server to run well
#echo '10.0.1.1 node1' |sudo tee -a /etc/hosts
#sudo pip install --upgrade setuptools
#when USE_VENV=True and hitting pip issue, eg: install_ipip.sh related issues, can try:
#find /bak/openstack -name '*.venv' |xargs rm -rf {}
#https://docs.openstack.org/devstack/latest/configuration.html
#TARGET_BRANCH=stable/zed
#PYPI_ALTERNATIVE_URL=http://mirrors.aliyun.com/pypi/simple
sudo ovs-vsctl show
sudo ip l add name veth-br-eth0 type veth peer name veth-ex >/dev/null 2>&1
sudo ip l set dev veth-br-eth0 up
sudo ip l set dev veth-ex up
sudo ip l set veth-br-eth0 master br-eth0
sudo ovs-vsctl --may-exist add-br br-data
sudo ovs-vsctl --may-exist add-port br-data veth-ex
sudo ip addr add 10.0.1.1/24 dev br-data >/dev/null >/dev/null 2>&1
USE_VENV=False
OFFLINE=False
DEST=/bak/openstack
PUBLIC_INTERFACE=veth-ex
OVS_PHYSICAL_BRIDGE=br-data
PUBLIC_BRIDGE=br-data
HOST_IP=10.0.1.1
FIXED_RANGE=10.0.1.0/24
NETWORK_GATEWAY=10.0.1.1
PUBLIC_NETWORK_GATEWAY=192.168.99.1
FLOATING_RANGE=192.168.99.0/24
Q_FLOATING_ALLOCATION_POOL=start=192.168.99.240,end=192.168.99.249
disable_service tempest
disable_service horizon
disable_service memory_tracker
ADMIN_PASSWORD=password
DATABASE_PASSWORD=\$ADMIN_PASSWORD
RABBIT_PASSWORD=\$ADMIN_PASSWORD
SERVICE_PASSWORD=\$ADMIN_PASSWORD
IP_VERSION=4
SYSLOG=False
VERBOSE=True
LOGFILE=\$DEST/logs/stack.log
ENABLE_DEBUG_LOG_LEVEL=False
SCREEN_LOGDIR=\$DEST/logs
LOG_COLOR=False
LOGDAYS=5
Q_USE_DEBUG_COMMAND=False
WSGI_MODE=mod_wsgi
KEYSTONE_USE_MOD_WSGI=False
NOVA_USE_MOD_WSGI=False
CINDER_USE_MOD_WSGI=False
MYSQL_GATHER_PERFORMANCE=False
DOWNLOAD_DEFAULT_IMAGES=False
IMAGE_URLS="http://download.cirros-cloud.net/0.6.1/cirros-0.6.1-x86_64-disk.img"
heartbeat_timeout_threshold=7200
#GIT_BASE=http://git.trystack.cn
EOF
安装lxd
配置lxd默认创建两块网卡:
- eth0: br-eth0
- eth1: lxdbr0 with dhcp
对于maas lxd 容器,可能还需要一块没有dhcp的网卡(上面netplan中创建了br-maas), 可这样用它:lxc config device add maas eth2 nic name=eth2 nictype=bridged parent=br-maas
sudo snap install lxd --classic
sudo usermod -aG $USER lxd
sudo chown -R $USER ~/.config/
export EDITOR=vim
# MUST NOT use sudo, so must cd to home dir to run it
cd ~ && lxd init --auto
#lxc network set lxdbr0 ipv4.address=10.10.10.1/24
#lxc network set lxdbr0 ipv6.address none#Change the default storage
lxc profile device remove default root
lxc storage delete default
cat << EOF | sudo tee -a /etc/fstab
#mount -o bind /images/lxd /var/snap/lxd/common/lxd/storage-pools
/var/snap/lxd/common/lxd/storage-pools /images/lxd none bind 0 0
EOF
mkdir /images/lxd && sudo mount -a
sudo systemctl restart snap.lxd.daemon
lxc storage create default dir && lxc storage show default
lxc profile device add default root disk path=/ pool=default
lxd sql global "SELECT * FROM storage_pools_config"#Use br-data for lxd containers
cat << EOF |tee /tmp/default.yaml
config:boot.autostart: "true"linux.kernel_modules: openvswitch,nbd,ip_tables,ip6_tablessecurity.nesting: "true"security.privileged: "true"
description: ""
devices:eth0:name: eth0nictype: bridgedparent: br-datatype: niceth1:mtu: "9000"name: eth1nictype: bridgedparent: lxdbr0type: nickvm:path: /dev/kvmtype: unix-charmem:path: /dev/memtype: unix-charroot:path: /pool: defaulttype: disktun:path: /dev/net/tuntype: unix-char
name: default
EOF
cat /tmp/default.yaml |lxc profile edit defaultwget https://cloud-images.ubuntu.com/releases/22.04/release/ubuntu-22.04-server-cloudimg-amd64-lxd.tar.xz
wget https://cloud-images.ubuntu.com/releases/22.04/release/ubuntu-22.04-server-cloudimg-amd64.squashfs
lxc image import ./ubuntu-22.04-server-cloudimg-amd64-lxd.tar.xz ./ubuntu-22.04-server-cloudimg-amd64.squashfs --alias jammy
lxc image listlxc launch jammy maas
lxc config show maas --expanded
lxc exec maas bash
注:上面的配置在安装maas snap版本时会报错:security profiles (cannot setup udev for snap “maas”: cannot reload udev rules: exit status 1
继续使用’lxc profile edit default’来加入:
#https://discourse.maas.io/t/install-with-lxd/757/2
config:raw.lxc: |-lxc.mount.auto=sys:rwlxc.cgroup.devices.allow = c 10:237 rwmlxc.apparmor.profile = unconfinedlxc.cgroup.devices.allow = b 7:* rwm
若容器里如果上不了网,如无法访问api.snapcraft.io,是因为lxd容易默认使用了eth1上的dns=10.10.10.1,下面的配置可让eth0, eth1, eth2都默认使用dns=192.168.99.1来避免特色网络对api.snapcraft.io的污染
lxc exec maas bash
cat << EOF |sudo tee /etc/netplan/50-cloud-init.yaml
#make 192.168.99.1 as default dns instead of 10.10.10.1
network:version: 2renderer: networkdethernets:eth0:dhcp4: falseaddresses:- 192.168.99.221/24routes:- to: defaultvia: 192.168.99.1nameservers:addresses:- 192.168.99.1eth1:dhcp4: truenameservers:addresses:- 192.168.99.1eth2:dhcp4: falseaddresses:- 192.168.9.3/24nameservers:addresses:- 192.168.9.3
EOF
#In systemd 239 systemd-resolve has been renamed to resolvectl
resolvectl status
cat /run/systemd/netif/leases/*
nslookup api.snapcraft.io
安装maas
sudo snap install maas --channel=3.3/stable
sudo apt install -y postgresql
sudo -iu postgres psql -d template1 -U postgres
CREATE USER maas WITH ENCRYPTED PASSWORD 'password';
CREATE DATABASE maasdb;
GRANT all privileges on database maasdb to maas;
\c maasdb
cat << EOF | sudo tee -a /etc/postgresql/14/main/pg_hba.conf
host    maas    maasdb  0/0     md5
EOF
#This maas container has 3 IPs: eth0=192.168.99.221 eth1=10.10.10.238 eth2=192.168.9.3
sudo /snap/bin/maas init region+rack --maas-url http://192.168.99.221:5240/MAAS --database-uri "postgres://maas:password@localhost/maasdb"
sudo /snap/bin/maas createadmin --username admin --password password --email admin@example.com --ssh-import lp:zhhuabj
sudo /snap/bin/maas apikey --username admin |tee ~/admin-api-key
sudo /snap/bin/maas status
#login into http://192.168.99.221:5240/MAAS/r/
#change mirror: http://mirrors.cloud.tencent.com/ubuntu/ for http://archive.ubuntu.com/ubuntu
#change mirror: https://mirrors.tuna.tsinghua.edu.cn/ubuntu-ports/ for http://ports.ubuntu.com/ubuntu-ports
apikey=$(sudo maas apikey --username admin)
maas login admin http://127.0.0.1:5240/MAAS $apikey
maas root boot-source update 1 url=https://node1.lan:443 keyring_filename=/usr/share/keyrings/ubuntu-cloudimage-keyring.gpg
maas admin boot-resources import
创建openstack实验环境
在单机上创建openstack实验环境的方法有:
- juju/charm + lxd: 直接部署在lxd容器中,好像并发安装时速度较慢, 还是用虚机吧
- 用虚机的话,vagrant是一个选择,multipath也行(但multipath在运行qemu provider时cpu较高)
- 若创建openstack over openstack环境,底层openstack采用devstack或者microstack来搭建,然后使用juju openstack provider来通过juju来在租户之下搭建上层openstack环境。这种情况下,不需要修改现有bundle中的machine配置,这样是为每一个openstack组件都会新启动一个虚机来安装。问题是这一台物理机可能性能无法运行如此多的虚机吧、
- 这台物理机是4核的,那创建三台虚机差不多了,一台做controller, 两台做compute. 在lxd容器中安装maas, 用maas通过pxe来自动安装这三台虚机。然后使用juju maas provider来通过juju管理上层openstack环境,各种控制服务安装在controller虚机的lxd容器里
待续, 目前的问题主要是特色网络造成镜像无法下载,使用sstream-mirror做mirror时也下载不下来。
相关文章:
 my cloud test bed (by quqi99))
(WIP) my cloud test bed (by quqi99)
作者:张华 发表于:2023-03-10 版权声明:可以任意转载,转载时请务必以超链接形式标明文章原始出处和作者信息及本版权声明 问题 想创建一个local local test bed, 用来方便做各种云实验,如openstack, k8s, ovn, lxd等…...

git | git 2023 详细版
文章目录一、Git命令1.2 设计用户签名1.3 初始化本地库1.4 查看本地库状态1.5 添加至暂存区1.6 从暂存区删除1.7 将暂存区的文件提交到本地库1.8 查看版本信息二、Git分支2.1 查看分支2.2 创建分支2.3 切换分支2.4 合并分支三、GitHub3.1 代码克隆clone3.2 给库取别名3.3 推送本…...

camunda流程引擎基本使用(笔记)
文章目录一、camunda基础1.1 安装与部署流程引擎1.2 流程引擎结构1.3 流程引擎的基本使用1.3.1 创建一个BPMN Diagram1.3.2 实现一个外部工作者1.3.3 部署流程1.3.4 创建一个流程实例并消费1.3.5 向流程中添加用户任务1.3.6 添加网关1.3.7 业务规则二、Java 集成流程引擎2.1 为…...

JS之数据结构与算法
前言数据结构是计算机存储、组织数据的方式,算法是系统描述解决问题的策略。了解基本的数据结构和算法可以提高代码的性能和质量。也是程序猿进阶的一个重要技能。手撸代码实现栈,队列,链表,字典,二叉树,动态规划和贪心算法1.数据结构篇1.1 栈栈的特点:先进后出clas…...
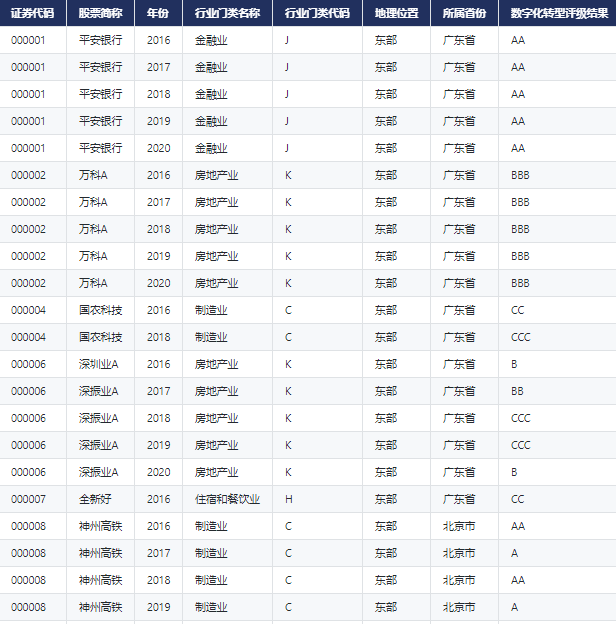
CnOpenData·A股上市企业数字化转型指数数据
一、数据简介 企业数字化转型是近年来中国社会各界重点关注的领域,但基础数据的不完善在很大程度上制约了相关科学研究的开展。构建合理、科学的数字化转型指标体系有利于学者定量地研究企业数字化的相关问题,也有利于衡量企业的数字化水平。广东金融学院…...

VMware16pro虚拟机安装全过程
很多时候需要用到Linux系统,简单的一种方式可以是:Windows系统运行Linux(Windows Subsystem for Linux)不过有些时候还是需要虚拟机来运行Linux,也更方便点,比如在做嵌入式系统的烧录等操作都需要Linux环境…...
)
阿里云第六代云服务器最新价格表(计算型c6、通用型g6和内存型r6)
目前阿里云第六代云服务器有计算型c6、通用型g6和内存型r6实例。计算型c6实例有2核4G、4核8G、8核16G配置可选,主要适用于网站应用、批量计算、视频编码等场景。通用型g6实例有2核8G、4核16G、8核32G配置可选,适用于各种类型的企业级应用,网站…...

微小目标识别研究(2)——基于K近邻的白酒杂质检测算法实现
文章目录实现思路配置opencv位置剪裁实现代码自适应中值滤波实现代码动态范围增强实现代码形态学处理实现代码图片预处理效果计算帧差连续帧帧差法原理和实现代码实现代码K近邻实现基本介绍实现代码这部分是手动实现的,并没有直接调用相关的库完整的代码——调用ope…...

2022-06-14至2022-08-11 关于复现MKP算法的总结与反思
Prerequisite 自2022年6月14日至2022年8月11日的时间内,我致力于完成A Hybrid Approach for the 0–1 Multidimensional Knapsack problem 论文的复现工作,此次是我第一次进行组合优化方向的学习工作,下面介绍该工作内容发展过程以及该工作结…...

IBMMQ教程二(window版安装)
下载下载地址:https://public.dhe.ibm.com/ibmdl/export/pub/software/websphere/messaging/mqadv/我这里选择的是9.1.0.0版本安装将下载完成的压缩包解压双击Setup.exe直接运行点击软件需求查看系统配置是否满足,右边绿色的对号说明满足需求,…...

Java | HashSet 语法
HashSet 基于 HashMap 来实现的,是一个不允许有重复元素的集合。 HashSet 允许有 null 值。 HashSet 是无序的,即不会记录插入的顺序。 HashSet 不是线程安全的, 如果多个线程尝试同时修改 HashSet,则最终结果是不确定的。 您必须…...
)
js学习4(运算符)
### 1.算数运算符: 、-、*、\、%(取余)、**(幂方) ## 优先级 同数学课程,可以加括号 ### 2.自增和自减 、--(即数值变量加一或减一) ### 3.赋值运算符 、、-、*、/、... ### 4.比较运…...

2月更新 | Visual Studio Code Python
我们很高兴地宣布,2023年2月版 Visual Studio Code Python 和 Jupyter 扩展现已推出!此版本包括以下改进:从激活的终端启动 VS Code 时的自动选择环境 使用命令 Python: Create Environmen 时可选择需求文件或可选依赖项 预发布:改…...

C++回顾(十八)—— 文件操作
18.1 I/O流概念和流类库结构 1 概念 程序的输入指的是从输入文件将数据传送给程序,程序的输出指的是从程序将数据传送给输出文件。 C输入输出包含以下三个方面的内容: (1)对系统指定的标准设备的输入和输出。即从键盘输入数据&am…...

以java编写员工管理系统(测试过 无问题)
一、系统结果的部分展示 二、题目以及相关要求 三、组成 1.该系统由 Employee 类 、commonEmployee类、Testemd类和managerEmployee类组成 2.Employee实现的代码 public class Employee {private String id;private String name;private String job;private int holiday…...
单例模式之懒汉式
在上篇文章中,我们讲了单例模式中的饿汉式,今天接着来讲懒汉式。 1.懒汉式单例模式的实现 public class LazySingleton {private static LazySingleton instance null;// 让构造函数为private,这样该类就不会被实例化private LazySingleto…...
1638_chdir函数的功能
全部学习汇总:GreyZhang/g_unix: some basic learning about unix operating system. (github.com) 今天看一个半生不熟的小函数,chdir。说半生不熟,是因为这个接口一看就知道是什么功能。然而,这个接口如何用可真就没啥想法了。 …...

使用CEF 获得某头条请求,并生成本地文件的方法
目录 一、获得网站请求响应信息 1、响应过滤 2、匹配过滤URL的函数 3、获得请求响应后的处理...

二十、Django-restframework之视图集和路由器
一、视图集和路由器 REST框架包含了一个处理视图集的抽象,它允许开发人员集中精力建模API的状态和交互,并根据通用约定自动处理URL构造。 视图集类与视图类几乎相同,不同之处在于它们提供的是retrieve或update等操作,而不是get或…...

[深入理解SSD系列 闪存实战2.1.2] SLC、MLC、TLC、QLC、PLC NAND_固态硬盘闪存颗粒类型
闪存最小物理单位是 Cell, 一个Cell 是一个晶体管。 闪存是通过晶体管储存电子来表示信息的。在晶体管上加入了浮动栅贮存电子。数据是0或1取决于在硅底板上形成的浮动栅中是否有电子。有电子为0,无电子为1. SSD 根据闪存颗粒区分,固态硬盘有SLC、MLC、TLC、QLC、PLC 五种类型…...

量化研究实战:从数据到策略的Python框架与机器学习应用
1. 从零到一:量化研究实战框架搭建心路如果你和我一样,对金融市场既着迷又敬畏,总想用理性和数据去解读那些看似随机的价格波动,那么“量化研究”这个词对你来说一定不陌生。它听起来高大上,仿佛是高学历精英们在华尔街…...

STM32CubeMX LL库配置外部中断,从按键消抖到中断嵌套的实战避坑指南
STM32CubeMX LL库外部中断深度优化:从硬件消抖到中断嵌套的工程实践 当你的嵌入式系统需要实时响应外部事件时,外部中断(EXTI)往往是最高效的选择。但在实际项目中,简单配置EXTI只是开始——按键抖动导致的误触发、中断优先级冲突引发的死锁、…...

如何快速掌握WindowResizer:终极窗口强制调整工具完整指南
如何快速掌握WindowResizer:终极窗口强制调整工具完整指南 【免费下载链接】WindowResizer 一个可以强制调整应用程序窗口大小的工具 项目地址: https://gitcode.com/gh_mirrors/wi/WindowResizer 还在为那些顽固的固定尺寸窗口而烦恼吗?WindowRe…...

BGA虚焊别头疼!从焊膏印刷到回流焊曲线,一份保姆级的SMT工艺避坑指南
BGA虚焊别头疼!从焊膏印刷到回流焊曲线,一份保姆级的SMT工艺避坑指南 在SMT产线上,BGA虚焊问题就像个幽灵,时不时冒出来折腾工程师。上周产线刚报修一批主板,X光下那些不规则焊点像极了抽象派画作——可惜客户要的是工…...

轻量级内存清理神器Mem Reduct:如何让旧电脑重获新生?[特殊字符]
轻量级内存清理神器Mem Reduct:如何让旧电脑重获新生?😊 【免费下载链接】memreduct Lightweight real-time memory management application to monitor and clean system memory on your computer. 项目地址: https://gitcode.com/gh_mirr…...

如何用Layerdivider在3步内将单张图片智能分层为PSD文件
如何用Layerdivider在3步内将单张图片智能分层为PSD文件 【免费下载链接】layerdivider A tool to divide a single illustration into a layered structure. 项目地址: https://gitcode.com/gh_mirrors/la/layerdivider 你是否曾面对一张精美的插画,想要修改…...

如何快速掌握MRIcroGL:医学影像三维可视化的完整指南
如何快速掌握MRIcroGL:医学影像三维可视化的完整指南 【免费下载链接】MRIcroGL v1.2 GLSL volume rendering. Able to view NIfTI, DICOM, MGH, MHD, NRRD, AFNI format images. 项目地址: https://gitcode.com/gh_mirrors/mr/MRIcroGL MRIcroGL是一款功能强…...

反射式红外光电管ITR9909:从基础测试到智能车竞赛应用实战
1. ITR9909反射式红外光电管基础入门 第一次拿到ITR9909这个小家伙时,我差点被它朴素的外表骗了。这个直径不到5mm的黑色塑料封装器件,看起来就像普通的三极管,但它的能力可不容小觑。作为智能车竞赛的老玩家,我发现它在信标检测…...

League Akari:3步打造你的英雄联盟智能游戏助手,告别繁琐操作
League Akari:3步打造你的英雄联盟智能游戏助手,告别繁琐操作 【免费下载链接】League-Toolkit An all-in-one toolkit for LeagueClient. Gathering power 🚀. 项目地址: https://gitcode.com/gh_mirrors/le/League-Toolkit League A…...

程序员裸辞转行网络安全,我只用了 90 天
程序员如何90天成功转行黑客(网络安全)? 有人说:”黑客到底比程序员高在哪,为什么很多人开始转行了“其实黑客都是程序员,但是并不是所有的程序员都是黑客. 从企业和社会需求来看,现在真不缺程…...