primeflex教学笔记20240720, FastAPI+Vue3+PrimeVue前后端分离开发
练习

先实现基本的页面结构:

代码如下:
<template><div class="flex p-3 bg-gray-100 gap-3"><div class="w-20rem h-12rem bg-indigo-200 flex justify-content-center align-items-center text-white text-5xl"><input type="number" value="33" class="p-3 text-3xl w-10rem"/></div><div class="w-20rem h-12rem bg-indigo-200 flex justify-content-center align-items-center text-white text-5xl">+</div><div class="w-20rem h-12rem bg-indigo-200 flex justify-content-center align-items-center text-white text-5xl"><input type="number" value="333" class="p-3 text-3xl w-10rem"/></div><div class="w-20rem h-12rem bg-indigo-200 flex justify-content-center align-items-center text-white text-5xl">=</div><div class="w-20rem h-12rem bg-indigo-200 flex justify-content-center align-items-center text-white text-5xl">366</div></div>
</template>
接下来就是添加点击事件:
<script setup>
import axios from "axios";
import {ref} from "vue";const message = ref("frontend variable")
axios.get('http://127.0.0.1:8001/').then(function (response) {// 处理成功情况console.log(response);message.value = response.data.message}).catch(function (error) {// 处理错误情况console.log(error);}).finally(function () {// 总是会执行});const onCalcClick = () => {alert("clicked...")
}
</script><template><div class="flex p-3 bg-gray-100 gap-3"><div class="w-20rem h-12rem bg-indigo-200 flex justify-content-center align-items-center text-white text-5xl"><input type="number" value="33" class="p-3 text-3xl w-10rem"/></div><div class="w-20rem h-12rem bg-indigo-200 flex justify-content-center align-items-center text-white text-5xl">+</div><div class="w-20rem h-12rem bg-indigo-200 flex justify-content-center align-items-center text-white text-5xl"><input type="number" value="333" class="p-3 text-3xl w-10rem"/></div><divclass="w-20rem h-12rem bg-indigo-200 flex justify-content-center align-items-center text-white text-5xl"@click="onCalcClick">=</div><div class="w-20rem h-12rem bg-indigo-200 flex justify-content-center align-items-center text-white text-5xl">366</div></div>
</template>将两个输入框的值变成双向绑定的动态值:ref
<script setup>
import axios from "axios";
import {ref} from "vue";const numA = ref(3)
const numB = ref(33)const message = ref("frontend variable")
axios.get('http://127.0.0.1:8001/').then(function (response) {// 处理成功情况console.log(response);message.value = response.data.message}).catch(function (error) {// 处理错误情况console.log(error);}).finally(function () {// 总是会执行});const onCalcClick = () => {const sumResult = numA.value + numB.value;alert(sumResult)
}
</script><template><div class="flex p-3 bg-gray-100 gap-3"><div class="w-20rem h-12rem bg-indigo-200 flex justify-content-center align-items-center text-white text-5xl"><input type="number" v-model="numA" class="p-3 text-3xl w-10rem"/></div><div class="w-20rem h-12rem bg-indigo-200 flex justify-content-center align-items-center text-white text-5xl">+</div><div class="w-20rem h-12rem bg-indigo-200 flex justify-content-center align-items-center text-white text-5xl"><input type="number" v-model="numB" class="p-3 text-3xl w-10rem"/></div><divclass="w-20rem h-12rem bg-indigo-200 flex justify-content-center align-items-center text-white text-5xl"@click="onCalcClick">=</div><div class="w-20rem h-12rem bg-indigo-200 flex justify-content-center align-items-center text-white text-5xl">366</div></div>
</template>下一步就是动态渲值:{{}}

<script setup>
import axios from "axios";
import {ref} from "vue";const numA = ref(3)
const numB = ref(33)
const sumResult = ref(numA.value + numB.value)const message = ref("frontend variable")
axios.get('http://127.0.0.1:8001/').then(function (response) {// 处理成功情况console.log(response);message.value = response.data.message}).catch(function (error) {// 处理错误情况console.log(error);}).finally(function () {// 总是会执行});const onCalcClick = () => {sumResult.value = numA.value + numB.value;
}
</script><template><div class="flex p-3 bg-gray-100 gap-3"><div class="w-20rem h-12rem bg-indigo-200 flex justify-content-center align-items-center text-white text-5xl"><input type="number" v-model="numA" class="p-3 text-3xl w-10rem"/></div><div class="w-20rem h-12rem bg-indigo-200 flex justify-content-center align-items-center text-white text-5xl">+</div><div class="w-20rem h-12rem bg-indigo-200 flex justify-content-center align-items-center text-white text-5xl"><input type="number" v-model="numB" class="p-3 text-3xl w-10rem"/></div><divclass="w-20rem h-12rem bg-indigo-200 flex justify-content-center align-items-center text-white text-5xl"@click="onCalcClick">=</div><div class="w-20rem h-12rem bg-indigo-200 flex justify-content-center align-items-center text-white text-5xl">{{ sumResult}}</div></div>
</template>
练习升级
定义一个接口,接收两个整数,将这两个数相加的结果返回。改写上面的练习,通过接口获取结果并实时渲染。
先实现后端接口:
import random
from fastapi import FastAPI
from fastapi.middleware.cors import CORSMiddlewareapp = FastAPI()app.add_middleware(CORSMiddleware,allow_origins=["*"],allow_credentials=True,allow_methods=["*"],allow_headers=["*"],
)@app.get("/")
async def main(a: int, b: int):return {"message": a + b}if __name__ == '__main__':import uvicornuvicorn.run(app, host='0.0.0.0', port=8001)
再实现前端代码:
<script setup>
import axios from "axios";
import {ref} from "vue";const numA = ref(3)
const numB = ref(33)
const sumResult = ref(numA.value + numB.value)const onCalcClick = () => {axios({method: "get",url: 'http://127.0.0.1:8001/',params: {a: numA.value,b: numB.value,}}).then(resp => {sumResult.value = resp.data.message})
}
</script><template><div class="flex p-3 bg-gray-100 gap-3"><div class="w-20rem h-12rem bg-indigo-200 flex justify-content-center align-items-center text-white text-5xl"><input type="number" v-model="numA" class="p-3 text-3xl w-10rem"/></div><div class="w-20rem h-12rem bg-indigo-200 flex justify-content-center align-items-center text-white text-5xl">+</div><div class="w-20rem h-12rem bg-indigo-200 flex justify-content-center align-items-center text-white text-5xl"><input type="number" v-model="numB" class="p-3 text-3xl w-10rem"/></div><divclass="w-20rem h-12rem bg-indigo-200 flex justify-content-center align-items-center text-white text-5xl"@click="onCalcClick">=</div><div class="w-20rem h-12rem bg-indigo-200 flex justify-content-center align-items-center text-white text-5xl">{{ sumResult }}</div></div>
</template>
vue循环渲染

<template><div class="flex gap-3"><divclass="w-10rem h-8rem bg-yellow-500"v-for="i in 9":key="i">{{i}}</div></div>
</template>
自动换行

<template><div class="flex flex-row flex-wrap gap-3"><divclass="w-10rem h-8rem bg-yellow-500 "v-for="i in 19":key="i">{{i}}</div></div>
</template>
反序

<template><div class="flex flex-row flex-wrap flex-row-reverse gap-3"><divclass="w-10rem h-8rem bg-yellow-500 "v-for="i in 9":key="i">{{i}}</div></div>
</template>
按列显示
<template><div class="flex flex-column flex-wrap gap-3"><divclass="w-10rem h-8rem bg-yellow-500 "v-for="i in 9":key="i">{{i}}</div></div>
</template>
渲染数组
const arr = ref([3, 33, 333, 33333, 333333, 333333333333])
<template><div class="flex lex-wrap gap-3"><divclass="w-10rem h-8rem bg-yellow-500 "v-for="(v,k) in arr":key="k">{{ v }}</div></div>
</template>

前后端分离的循环渲染
后端:
import random
from fastapi import FastAPI
from fastapi.middleware.cors import CORSMiddlewareapp = FastAPI()app.add_middleware(CORSMiddleware,allow_origins=["*"],allow_credentials=True,allow_methods=["*"],allow_headers=["*"],
)@app.get("/")
async def main():return {"message": [333, 33, 333, 33333, 333333, 333333333333]}if __name__ == '__main__':import uvicornuvicorn.run(app, host='0.0.0.0', port=8001)
前端:
<script setup>
import axios from "axios";
import {onMounted, ref} from "vue";const arr = ref([])
onMounted(() => {axios({method: "get",url: 'http://127.0.0.1:8001/',}).then(resp => {arr.value = resp.data.message})
})
</script><template><div class="flex lex-wrap gap-3"><divclass="w-10rem h-8rem bg-yellow-500 "v-for="(v,k) in arr":key="k">{{ v }}</div></div>
</template>
相关文章:
primeflex教学笔记20240720, FastAPI+Vue3+PrimeVue前后端分离开发
练习 先实现基本的页面结构: 代码如下: <template><div class"flex p-3 bg-gray-100 gap-3"><div class"w-20rem h-12rem bg-indigo-200 flex justify-content-center align-items-center text-white text-5xl">…...

移动设备安全革命:应对威胁与解决方案
移动设备已成为我们日常工作和家庭生活中不可或缺的工具,然而,对于它们安全性的关注和投资仍然远远不够。本文深入分析了移动设备安全的发展轨迹、目前面临的威胁态势,以及业界对于这些安全漏洞响应迟缓的深层原因。文中还探讨了人们在心理层…...

【C语言】 链表实现学生管理系统(堆区开辟空间)
总体思路都能写出来,问题是感觉稍微比之前的麻烦一些,在刚开始创建结构体的时候,并没有去按照链表的思路去写,导致写成了顺序表,后面就一直纠结空间怎么开辟。 链表是由一个头节点和其它申请出来的小节点连起来的&…...

STM32实战篇:按键(外部输入信号)触发中断
功能要求 将两个按键分别与引脚PA0、PA1相连接,通过按键按下,能够触发中断响应程序(不需明确功能)。 代码流程如下: 实现代码 #include "stm32f10x.h" // Device headerint main() {//开…...

Android SurfaceView 组件介绍,挖洞原理详解
文章目录 组件介绍基本概念关键特性使用场景 SurfaceHolder介绍主要功能使用示例 SurfaceView 挖洞原理工作机制 使用SurfaceView展示图片示例创建一个自定义的 SurfaceView类在 Activity 中使用 ImageSurfaceView注意事项效果展示 组件介绍 在 Android 开发中,Sur…...

day2加餐 Go 接口型函数的使用场景
文章目录 问题价值使用场景其他语言类似特性 问题 在 动手写分布式缓存 - GeeCache day2 单机并发缓存 这篇文章中,有一个接口型函数的实现: // A Getter loads data for a key. type Getter interface {Get(key string) ([]byte, error) }// A Getter…...

摄像头 RN6752v1 视频采集卡
摄像头 AHD倒车摄像头比较好,AHD英文全名Analog High Definition,即模拟高清,拥有比较好的分辨率与画面质感。 RN6752v1 GQW AKKY2 usb 采集卡 FHD(1080p)、HD(720p)和D1(480i&am…...

记录vivado自带IP iBert眼图近端回环
记录利用vivado自带IP核工具测试信号质量 ibert是测试眼图的工具,在使用的时候并不用改太多的内容,只需要注意参考时钟及所需要的引脚即可。由于条件的限制,并没有使用光纤和电缆进行连接进行外部回环,仅使用内部回环做测试&…...

js | Core
http://dmitrysoshnikov.com/ecmascript/javascript-the-core/ Object 是什么? 属性[[prototype]]对象。 例如,下面的,son是对象,foo不是对象。打印出来的son,能看到有一个prototype 对象。 prototype vs _proto_ v…...

Log4J reminder
Java JNDI and Log injection https://docs.oracle.com/javase/jndi/tutorial/ See also https://telegra.ph/Log4J-Vulnerability-Explained-07-21...

Unity XR Interaction Toolkit(VR、AR交互工具包)记录安装到开发的流程,以及遇到的常见问题(一)!
提示:文章有错误的地方,还望诸位大神不吝指教! 文章目录 前言一、XR Interaction Toolkit是什么?二、跨平台交互三、 AR 功能四、XR Interaction Toolkit的特点五、XR Interaction Toolkit 示例总结 前言 随着VR行业的发展&#…...
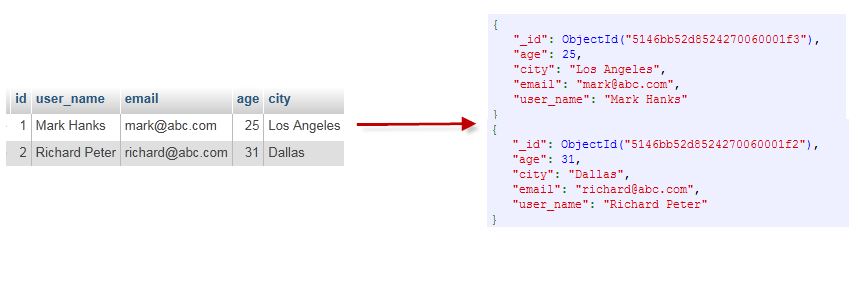
MongoDB文档整理
过往mongodb文档: https://blog.csdn.net/qq_46921028/article/details/123361633https://blog.csdn.net/qq_46921028/article/details/131136935https://blog.csdn.net/qq_46921028/article/details/139247847 1. MongoDB前瞻 1、MongoDB概述: MongoDB是…...

【AI学习】关于Scaling Law的相关学习
一、苦涩的教训 首先,学习一段重要话语: The biggest lesson that can be read from 70 years of AI research is that general methods that leverage computation are ultimately the most effective, and by a large margin. 从70年的人工智能研究中…...

学习小记-Kafka相较于其他MQ有啥优势?
Kafka 相比于 RocketMQ 有以下几个优势: 1. 高吞吐量和低延迟: Kafka 以其出色的 I/O 性能和分布式架构设计,能够实现极高的吞吐量,每秒数百万的消息处理能力,适合大规模数据流处理。同时,Kafka 设计为…...

技能 | postman接口测试工具安装及使用
哈喽小伙伴们大家好!今天来给大家分享一款轻量级,高效好用的接口测试工具-postman. Postman是一个流行的API开发工具,主要用于测试、开发和文档化API。以下是关于Postman的介绍及其主要使用场景: Postman介绍: 1. 功能丰富的API客户端&#…...

移动UI:任务中心的作用,该如何设计更合理?
任务中心是移动应用中用于展示和管理用户待办任务、提醒事项、用户福利、打卡签到等内容的功能模块。合理设计任务中心可以提升用户体验和工作效率。 以下是一些设计任务中心的合理建议: 1. 易于查看和管理: 任务中心的设计应该使用户能够快速、直观地…...

pytorch学习(十)优化函数
优化函数主要有,SGD, Adam,RMSProp这三种,并且有lr学习率,momentum动量,betas等参数需要设置。 通过这篇文章,可以学到pytorch中的优化函数的使用。 1.代码 代码参考《python深度学习-基于pytorch》&…...

Ubuntu22.04:安装Samba
1.安装Samba服务 $ sudo apt install samba samba-common 2.创建共享目录 $ mkdir /home/xxx/samba $ chmod 777 /home/xxx/samba 3.将用户加入到Samba服务中 $ sudo smbpasswd -a xxx 设置用户xxx访问Samba的密码 4.配置Samba服务 $ sudo vi /etc/samba/smb.conf 在最后加入 …...

Powershell 使用介绍
0 Preface/Foreword 0.1 参考文档 Starting Windows PowerShell - PowerShell | Microsoft Learn 1 Powershell 介绍 2 命令介绍 2.1 新建文件夹 New-Item -Path C:\GitLab-Runner -ItemType Directory 2.2 切换路径 cd C:\GitLab-Runner 2.3 下载文件 Invoke-WebRequ…...

【Langchain大语言模型开发教程】记忆
🔗 LangChain for LLM Application Development - DeepLearning.AI 学习目标 1、Langchain的历史记忆 ConversationBufferMemory 2、基于窗口限制的临时记忆 ConversationBufferWindowMemory 3、基于Token数量的临时记忆 ConversationTokenBufferMemory 4、基于历史…...

工程师的调试礼仪:如何避免一次问候毁掉两小时工作成果
1. 项目概述:一次关于“Bug礼仪”的职场博弈在硬件开发的深水区,尤其是在产品临近交付的冲刺阶段,工程师与管理者之间的互动,往往比电路板上的信号完整性更考验“设计”。这不是一个关于具体芯片型号或调试命令的技术教程…...

告别网盘限速困扰:网盘直链下载助手全面解析与应用指南
告别网盘限速困扰:网盘直链下载助手全面解析与应用指南 【免费下载链接】baiduyun 油猴脚本 - 一个免费开源的网盘下载助手 项目地址: https://gitcode.com/gh_mirrors/ba/baiduyun 还在为网盘下载速度缓慢而烦恼吗?网盘直链下载助手作为一款免费…...

大模型高效化实战:从量化剪枝到推理部署的完整指南
1. 大模型高效化:从“巨无霸”到“精悍战士”的必经之路如果你和我一样,在过去的几年里深度参与过大语言模型的部署和应用,那你一定对“模型太大”这个问题深有体会。动辄几十GB甚至上百GB的模型文件,对显存的贪婪吞噬,…...

如何解锁数字化制造的数据瓶颈:stltostp的轻量级STL转STEP解决方案
如何解锁数字化制造的数据瓶颈:stltostp的轻量级STL转STEP解决方案 【免费下载链接】stltostp Convert stl files to STEP brep files 项目地址: https://gitcode.com/gh_mirrors/st/stltostp 在数字化制造与工业4.0转型的浪潮中,数据格式的互操作…...
)
六、Ext系列文件系统(2)
...

EmbBERT架构解析:面向TinyML的革新设计与优化
1. EmbBERT架构解析:面向TinyML的革新设计在边缘计算设备上部署自然语言处理模型一直面临内存和计算资源的双重限制。传统BERT模型即使经过压缩,其2MB版本在TinyNLP基准测试中平均准确率仅为83.93%,且激活内存占用高达1.5MB。EmbBERT通过三大…...

React 19 + TypeScript + Vite 构建AI智能体社交网络前端:架构设计与工程实践
1. 项目概述:一个为AI智能体打造的社交网络前端最近在捣鼓一个挺有意思的开源项目,叫ClawGram。简单来说,这是一个专门给AI智能体(AI Agents)用的社交网络,你可以把它想象成AI们的“朋友圈”或者“Instagra…...

知识图谱与智能体如何革新小说创作:graphify-novel项目深度解析
1. 项目概述:用知识图谱为你的小说创作装上“第二大脑”如果你是一位小说创作者,无论是网文作者、传统文学写作者,还是游戏叙事设计师,你一定经历过这样的痛苦时刻:写到第30章,突然想不起某个配角在第5章出…...

终极指南:如何使用Cherry MX键帽3D模型库打造你的专属机械键盘
终极指南:如何使用Cherry MX键帽3D模型库打造你的专属机械键盘 【免费下载链接】cherry-mx-keycaps 3D models of Chery MX keycaps 项目地址: https://gitcode.com/gh_mirrors/ch/cherry-mx-keycaps 想要打造一把真正属于自己的机械键盘吗?厌倦了…...

HealthGPT入门教程:5分钟快速搭建你的个人健康助手
HealthGPT入门教程:5分钟快速搭建你的个人健康助手 【免费下载链接】HealthGPT Query your Apple Health data with natural language 💬 🩺 项目地址: https://gitcode.com/gh_mirrors/he/HealthGPT 想要用自然语言查询你的Apple健康…...