基于Cobbler实现多版本系统批量部署
一、实验题目
基于Cobbler实现多版本操作系统的批量部署。
二、实验目的
-
掌握Cobbler服务器的安装与配置方法。
-
学会使用Cobbler进行多版本操作系统的批量部署。
-
理解PXE网络启动原理及其在操作系统部署中的应用。
-
提高在实际生产环境中快速部署和管理操作系统的能力。
三、实验环境
-
硬件环境:
-
一台安装有Linux系统(如CentOS或Ubuntu)的服务器,作为Cobbler服务器。
-
若干台客户端计算机,通过网络与Cobbler服务器连接。
-
-
软件环境:
-
Cobbler 2.x版本
-
DHCP服务器(通常集成在Cobbler中)
-
TFTP服务器(通常集成在Cobbler中)
-
Apache或其他Web服务器
-
操作系统安装镜像文件(如CentOS、Ubuntu等)
-
四、实验内容
-
安装和配置Cobbler服务器。
-
配置DHCP和TFTP服务。
-
导入多版本操作系统的安装镜像。
-
创建和配置Cobbler profiles和systems。
-
通过PXE启动批量部署操作系统。
-
验证部署结果,确保客户端计算机成功安装指定的操作系统。
五、实验步骤
前提条件:
1、能够访问互联网
[root@localhost ~]# ping -c1 www.baidu.com
2、firewalld selinux 关闭
[root@localhost ~]# sed -i '/^SELINUX=/ c SELINUX=disabled' /etc/selinux/config [root@localhost ~]# setenforce 0如果不关闭selinux也可以 #getsebool -a|grep cobbler #setsebool -P cobbler_can_network_connect 1 [root@cobbler-server ~]# systemctl disable --now firewalld [root@localhost ~]# systemctl is-enabled firewalld.servicedisabled 或者firewall-cmd --permanent --add-port=67/udpfirewall-cmd --permanent --add-port=68/udpfirewall-cmd --permanent --add-port=80/tcpfirewall-cmd --permanent --add-port=443/tcpfirewall-cmd --reloadfirewall-cmd --permanent --list-ports
3、配置epel源
[root@localhost ~]# yum install epel-release -y
安装cobbler
1、安装dhcp httpd xinetd
[root@localhost ~]# yum install -y httpd dhcp xinetd tftp-server
2、安装cobbler
[root@localhost ~]# yum install -y cobbler cobbler-web
3、将cobbler httpd dhcp xinetd添加到开机自启
[root@localhost ~]# systemctl enable httpd dhcpd xinetd cobblerd
配置环境
cp /etc/cobbler/settings{,.bak}
环境检测:
[root@localhost ~]# systemctl start httpd cobblerd[root@localhost ~]# cobbler checkThe following are potential configuration items that you may want to fix:
1 : The 'server' field in /etc/cobbler/settings must be set to something other than localhost, or kickstarting features will not work. This should be a resolvable hostname or IP for the boot server as reachable by all machines that will use it.2 : For PXE to be functional, the 'next_server' field in /etc/cobbler/settings must be set to something other than 127.0.0.1, and should match the IP of the boot server on the PXE network.3 : SELinux is enabled. Please review the following wiki page for details on ensuring cobbler works correctly in your SELinux environment:https://github.com/cobbler/cobbler/wiki/Selinux4 : change 'disable' to 'no' in /etc/xinetd.d/tftp5 : some network boot-loaders are missing from /var/lib/cobbler/loaders, you may run 'cobbler get-loaders' to download them, or, if you only want to handle x86/x86_64 netbooting, you may ensure that you have installed a *recent* version of the syslinux package installed and can ignore this message entirely. Files in this directory, should you want to support all architectures, should include pxelinux.0, menu.c32, elilo.efi, and yaboot. The 'cobbler get-loaders' command is the easiest way to resolve these requirements.6 : enable and start rsyncd.service with systemctl7 : debmirror package is not installed, it will be required to manage debian deployments and repositories8 : ksvalidator was not found, install pykickstart9 : The default password used by the sample templates for newly installed machines (default_password_crypted in /etc/cobbler/settings) is still set to 'cobbler' and should be changed, try: "openssl passwd -1 -salt 'random-phrase-here' 'your-password-here'" to generate new one10 : fencing tools were not found, and are required to use the (optional) power management features. install cman or fence-agents to use them
Restart cobblerd and then run 'cobbler sync' to apply changes.逐个解决以上问题
1、配置文件设置server(cobbler服务器地址)[root@localhost ~]# sed -i 's#server: 127.0.0.1#server: 172.16.110.91#g' /etc/cobbler/settings
2、设置'next_server'(DHCP服务器地址)[root@localhost ~]# sed -i 's#next_server: 127.0.0.1#next_server: 172.16.110.91#g' /etc/cobbler/settings3、关闭selinux[root@localhost ~]# sed -i 's#SELINUX=enforcing#SELINUX=disabled#g' /etc/selinux/config#系统重启后生效
4、开启tftp修改/etc/xinetd.d/tftp,disable ‘yes’ 改为 ‘no’5、准备引导操作系统文件#如果没有互联网,引导文件通过安装syslinux包获取。安装syslinux程序包,而后复制/usr/share/syslinux/{pxelinux.0,memu.c32}等文件至/var/lib/cobbler/loaders/目录中[root@localhost ~]# cp /usr/share/syslinux/{pxelinux.0,memu.c32} /var/lib/cobbler/loaders/或者用提供的压缩包解压到指定文件夹[root@localhost ~]# tar xf loaders.tar.gz -C /var/lib/cobbler/loaders/
6、启动并开机自启动rsyncd.service[root@localhost ~]# systemctl start rsyncd.service[root@localhost ~]# systemctl enable rsyncd.service 7、如果不安装debian系统可以不配置
8、安装pykickstart[root@localhost ~]# yum install pykickstart -y
9、生成cobbler安装系统root初始化密码#这里生成密钥和配置默认密钥,ks文件引用(前面是干扰字符,后面的是密码)[root@localhost ~]# openssl passwd -1 -salt 'random-phrase-here' 'redhat'$1$random-p$MvGDzDfse5HkTwXB2OLNb.#更复杂安全密码[root@localhost ~]# openssl passwd -1 -salt $(openssl rand -hex 8) 'redaht'$1$4990cb90$jnQShir2NWVl23tbwpnFO0#加入到cobbler配置[root@localhost ~]# sed -i '/default_password_crypted:/cdefault_password_crypted: "$1$random-p$MvGDzDfse5HkTwXB2OLNb."' /etc/cobbler/settings
10、安装cman or fence-agents[root@localhost ~]# yum install cman fence-agents -y
配置DHCP:#启用cobbler管理DHCP功能[root@localhost ~]# sed -i 's#manage_dhcp: 0#manage_dhcp: 1#g' /etc/cobbler/settings#manage_dhcp: 0 #设置为1时,开启cobbler的dhcp管理器修改DHCP配置文件[root@localhost ~]# vim /etc/cobbler/dhcp.template ...subnet 172.16.110.0 netmask 255.255.255.0 {option routers 172.16.110.254;option domain-name-servers 114.114.114.114;option subnet-mask 255.255.255.0;range dynamic-bootp 172.16.110.50 172.16.110.80;;default-lease-time 21600;max-lease-time 43200;...
配置pxe[root@localhost ~]# sed -i 's/pxe_just_once: 0/pxe_just_once: 1/' /etc/cobbler/settings
重启机器,再次测试:
[root@localhost ~]# cobbler check
同步cobbler配置
[root@localhost ~]# cobbler synctask started: 2016-12-02_045946_synctask started (id=Sync, time=Fri Dec 2 04:59:46 2016)running pre-sync triggerscleaning treesremoving: /var/lib/tftpboot/grub/imagescopying bootloaderstrying hardlink /var/lib/cobbler/loaders/pxelinux.0 -> /var/lib/tftpboot/pxelinux.0trying hardlink /var/lib/cobbler/loaders/menu.c32 -> /var/lib/tftpboot/menu.c32trying hardlink /var/lib/cobbler/loaders/yaboot -> /var/lib/tftpboot/yaboottrying hardlink /usr/share/syslinux/memdisk -> /var/lib/tftpboot/memdisktrying hardlink /var/lib/cobbler/loaders/grub-x86.efi -> /var/lib/tftpboot/grub/grub-x86.efitrying hardlink /var/lib/cobbler/loaders/grub-x86_64.efi -> /var/lib/tftpboot/grub/grub-x86_64.eficopying distros to tftpbootcopying imagesgenerating PXE configuration filesgenerating PXE menu structurerendering DHCP filesgenerating /etc/dhcp/dhcpd.confrendering TFTPD filesgenerating /etc/xinetd.d/tftpcleaning link cachesrunning post-sync triggersrunning python triggers from /var/lib/cobbler/triggers/sync/post/*running python trigger cobbler.modules.sync_post_restart_servicesrunning: dhcpd -t -qreceived on stdout: received on stderr: running: service dhcpd restartreceived on stdout: received on stderr: Redirecting to /bin/systemctl restart dhcpd.servicerunning shell triggers from /var/lib/cobbler/triggers/sync/post/*running python triggers from /var/lib/cobbler/triggers/change/*running python trigger cobbler.modules.scm_trackrunning shell triggers from /var/lib/cobbler/triggers/change/**** TASK COMPLETE ***
WEB访问 https://IP/cobbler_web 账号密码:cobbler/cobbler
cobbler批量部署CentOS 7和8
1、创建用于上传iso文件目录
[root@localhost ~]# mkdir /software/iso -p
然后上传centos6 和 centos7 的dvd iso镜像,过程略。
上传好后如下:
[root@localhost iso]# ll
total 13648896
-rw-r--r-- 1 root root 4712300544 May 28 16:45 CentOS-7-x86_64-DVD-2009.iso
-rw-r--r-- 1 root root 7554990080 May 28 16:46 CentOS-8.1.1911-x86_64-dvd1.iso
2、创建镜像导入存放目录
# mkdir -p /data/os/Linux/CentOS/X86_64/CentOS{7..8}/dvd
3、挂载 ISO 镜像并导入dvd 数据
[root@localhost iso]# mount /software/iso/CentOS-7-x86_64-DVD-2009.iso /data/os/Linux/CentOS/X86_64/CentOS7/dvd/
[root@localhost iso]# mount /software/iso/CentOS-8.1.1911-x86_64-dvd1.iso /data/os/Linux/CentOS/X86_64/CentOS8/dvd/
导入时间较久,耐心等待
cobbler import --path=/data/os/Linux/CentOS/X86_64/CentOS7/dvd/ --name=CentOS7.9 --arch=x86_64
cobbler import --path=/data/os/Linux/CentOS/X86_64/CentOS8/dvd/ --name=CentOS8.1 --arch=x86_64
4、列出导入后的配置
[root@localhost iso]# cobbler list
distros:CentOS7.9-x86_64CentOS8.1-x86_64
profiles:CentOS7.9-x86_64CentOS8.1-x86_64
systems:
repos:
images:
mgmtclasses:
packages:
files:
卸载
[root@localhost ~]# umount /data/os/Linux/CentOS/X86_64/CentOS7/dvd/
[root@localhost ~]# umount /data/os/Linux/CentOS/X86_64/CentOS8/dvd/
同步cobbler配置
[root@localhost ~]# cobbler sync
参考文件
# Cobbler for Kickstart Configurator for CentOS 7 by yao zhang
install
url --url=$tree
text
lang en_US.UTF-8
keyboard us
zerombr
bootloader --location=mbr --driveorder=sda --append="crashkernel=auto rhgb quiet"
#Network information
$SNIPPET('network_config')
#network --bootproto=dhcp --device=eth0 --onboot=yes --noipv6 --hostname=CentOS7
timezone --utc Asia/Shanghai
authconfig --enableshadow --passalgo=sha512
rootpw --iscrypted $default_password_crypted
clearpart --all --initlabel
part /boot --fstype xfs --size 1024
part swap --size 1024
part / --fstype xfs --size 1 --grow
firstboot --disable
selinux --disabled
firewall --disabled
logging --level=info
reboot
%pre
$SNIPPET('log_ks_pre')
$SNIPPET('kickstart_start')
$SNIPPET('pre_install_network_config')
# Enable installation monitoring
$SNIPPET('pre_anamon')
%end
%packages
@^minimal
@compat-libraries
@core
@debugging
@development
bash-completion
chrony
dos2unix
kexec-tools
lrzsz
nmap
sysstat
telnet
tree
vim
wget
%end
%post
systemctl disable postfix.service
%end
#version=RHEL8
install
ignoredisk --only-use=sda
# Partition clearing information
clearpart --all --initlabel
# Use graphical install
text
# Use CDROM installation media
url --url=$treereboot
# Keyboard layouts
keyboard --vckeymap=cn --xlayouts='cn'
# System language
lang en_US.UTF-8selinux --disabled
firewall --disabled
# Network information
network  --bootproto=dhcp --device=ens160 --ipv6=auto --activate
network  --hostname=wenzi.localhost
# Root password
rootpw --iscrypted $default_password_crypted
# Run the Setup Agent on first boot
firstboot --enable
# Do not configure the X Window System
skipx
# System services
services --disabled="chronyd"
# System timezone
timezone Asia/Shanghai --isUtc --nontp
# Disk partitioning information
zerombrpart /boot --fstype="ext4" --ondisk=sda --size=1024
part /swap --fstype="swap" --ondisk=sda --size=2048
part / --fstype="xfs" --ondisk=sda --grow --size=1%packages
@^minimal-environment
kexec-tools
%end
%addon com_redhat_kdump --enable --reserve-mb='auto'
%end
%post
%end
%anaconda
pwpolicy root --minlen=6 --minquality=1 --notstrict --nochanges --notempty
pwpolicy user --minlen=6 --minquality=1 --notstrict --nochanges --emptyok
pwpolicy luks --minlen=6 --minquality=1 --notstrict --nochanges --notempty
%end
六、心得体会
通过本次实验,我掌握了Cobbler服务器的安装和配置方法,并成功实现了多版本操作系统的批量部署。理解了PXE网络启动的原理和实践操作。Cobbler大大简化了操作系统的部署过程,提高了效率。在实际工作中,Cobbler可以用于快速部署和管理大规模服务器环境,为系统管理员提供了极大的便利。
相关文章:

基于Cobbler实现多版本系统批量部署
一、实验题目 基于Cobbler实现多版本操作系统的批量部署。 二、实验目的 掌握Cobbler服务器的安装与配置方法。 学会使用Cobbler进行多版本操作系统的批量部署。 理解PXE网络启动原理及其在操作系统部署中的应用。 提高在实际生产环境中快速部署和管理操作系统的能力。 …...
一投就中不是梦,录取率>80%,最快1个月就见刊,计算机沾边就收,认可度还不低
本次模术狮精心整理5本期刊,最快1个月就见刊,计算机沾边就收,认可度还不低! 1 Knowledge-Based Systems ▲ 图片来源:Knowledge-Based Systems官网 期刊简介:《Knowledge-Based Systems》是人工智能领域的…...

【课程系列06】某乎AI大模型全栈工程师-第6期
网盘链接 链接:https://pan.baidu.com/s/1QLkRW_DmIm1q9XvNiOGwtQ --来自百度网盘超级会员v6的分享 课程目标 【知乎大模型课程】学习的四个维度 👉指挥层:学高阶指令工程 AI编程等,指挥大模型完成90%代码任务,包…...

Prompt——3分钟掌握,润色论文的7条经典指令。帮助很大,一定要看!
这是一篇帮助你润色论文的ChatGPT指令合集,整理了润色过程中语法优化、审阅校对、专业风格等7个主要方面。 建议收藏,需要的时候直接CtrlV即可,一定对你科研有所帮助~ 1. 修复语法和句法 第一个提示是修复语法和句法。这是任何写作的关键部…...

ARM学习(31)编译器对overlay方式的支持
ARM学习(31)编译器对overlay方式的支持 1、overlay介绍 overlay:重叠得意思,就是可以重复利用得空间,一般在内存上使用这种空间。比如以Windows操作系统为例,其存储空间(ROM/FLASH)…...

【YashanDB知识库】yasdb jdbc驱动集成BeetISQL中间件,业务(java)报autoAssignKey failure异常
问题现象 BeetISQL中间件版本:2.13.8.RELEASE 客户在调用BeetISQL提供的api向yashandb的表中执行batch insert并将返回sequence设置到传入的java bean时,报如下异常: 问题的风险及影响 影响业务流程正常执行,无法获得batch ins…...

软件测试——用例篇(上)
概念 什么是测试⽤例? 测试⽤例(Test Case)是为了实施测试⽽向被测试的系统提供的⼀组集合,这组集合包含:测试环境、操作步骤、测试数据、预期结果等要素 设计测试⽤例原则⼀: 测试⽤例中⼀个必需部分是对…...

Flink中三种模式:YARN Session 模式、YARN Per-Job 模式和 YARN Application 模式提交任务命令
在 Apache Flink 中,YARN 提供了多种模式来提交和管理作业,每种模式都有其独特的特点和适用场景。主要有以下三种模式:YARN Session 模式、YARN Per-Job 模式和 YARN Application 模式。 1. YARN Session 模式 在 YARN Session 模式中,一个长时间运行的 Flink 会话(Sess…...

DBMS-1.2 关系运算
本文章的素材与知识均来自于李国良老师的数据库管理系统课程。 关系代数 一.基本关系代数运算 基本关系代数运算包括:选择、投影、并、差、笛卡尔积、重命名。 1.选择(select) 选择运算用于从关系R中获取满足条件的元组。 (1…...

Python——继承
一、继承 1. 什么是继承? 继承是一种面向对象编程的机制,允许一个类(子类)从另一个类(父类)继承属性和方法。子类可以扩展或修改父类的功能。 2. 如何实现继承? 在Python中,实现…...

程序员转型AI大模型好转吗?成功率高吗?
前言 在程序员圈子中,技术转型近年来一直是热门话题。随着AI技术的迅猛发展,优秀人才短缺,程序员向AI大模型转型似乎成为了一条通往职场先机的路径。但是,这条转型之路是否容易走,成功率又如何呢? 一、程…...

关于 Postman 这些你都知道吗?
Postman是接口测试工具,在做接口测试的时候,Postman相当于一个客户端,它可以模拟用户发起的各种http请求,将请求的数据发送到服务端,获取对应的结果,从而测试接口是否能够满足业务功能要求,很直…...

ReentrantLock
ReentrantLock ReentrantLock 是一个可重入的互斥锁,它提供了比 synchronized 关键字更灵活的锁机制。它属于 java.util.concurrent.locks 包。 特点: 可重入性:同一个线程可以多次获取锁而不会造成死锁,锁的计数器会递增。公平…...

python | TypeError: list indices must be integers or slices, not tuple
python | TypeError: list indices must be integers or slices, not tuple 在Python编程中,TypeError: list indices must be integers or slices, not tuple 是一个常见的错误。此错误通常发生在尝试使用非整数(如元组)作为列表索引时。本…...

链码简介及MATLAB提取彩色图像链码
一、链码 链码(又称为freeman code)是一种通过带有给定方向的单位长度的线段序列来描述轮廓边界的方法,常被用来在图像处理、计算机图形学、模式识别等领域中表示曲线和区域边界。在二维图像中,链码可以表示为一系列的方向码,每个…...

二叉树,二叉查找树,平衡二叉树
一.绪论: 二.数据结构(二叉树): 1.简介: 1)每一个节点(也叫结点)都是一个独立的对象-->当中不仅要存数据值,还要存父节点地址值,左子节点地址值,右子 节点地址值 2)没有父节点或者子节点的节点就记为null 2.遍历方…...

《零散知识点 · SpringBoot 整合邮件功能》
📢 大家好,我是 【战神刘玉栋】,有10多年的研发经验,致力于前后端技术栈的知识沉淀和传播。 💗 🌻 CSDN入驻不久,希望大家多多支持,后续会继续提升文章质量,绝不滥竽充数…...

编程小白如何成为大神?大学新生的最佳入门攻略
目录 方向一:选择适合的编程语言 方向二:制定有效的学习计划 方向三:避免常见的学习陷阱 方向四:额外建议 编程已成为当代大学生的必备技能,但面对众多编程语言和学习资源,新生们常常感到迷茫。如何选择…...

使用 PyInstaller 和 Hook 文件打包 APK 解析工具
错误信息如下: Traceback (most recent call last):File "test.py", line 4, in <module>File "<frozen importlib._bootstrap>", line 991, in _find_and_loadFile "<frozen importlib._bootstrap>", line 975, …...
【分布式】分库分表知识点大全
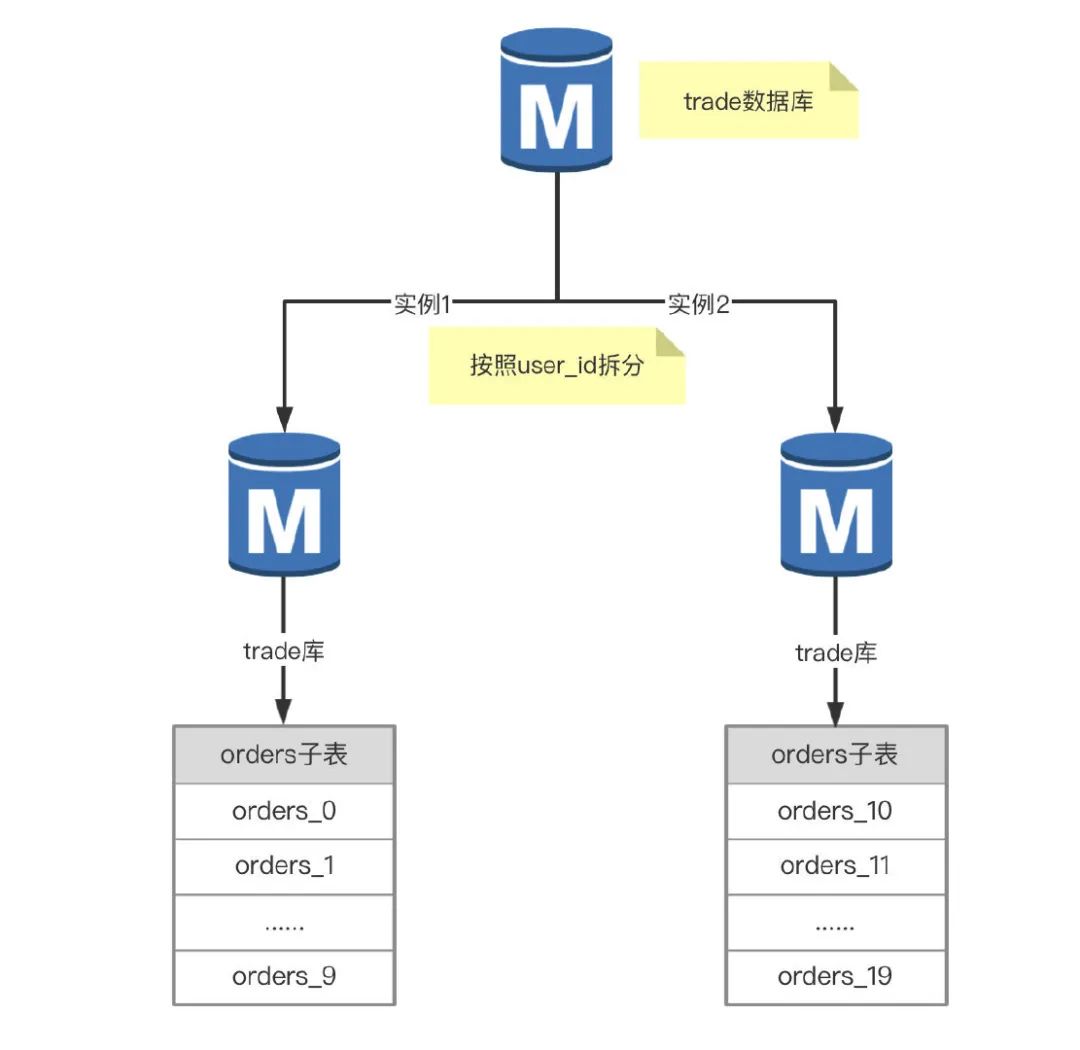
为什么要分库分表 随着业务量的增加导致数据库中数据量的增加,可能拖慢查询的性能,影响业务的可用性;如果数据库采用读写分离,可能会导致从库的延迟较大,主库进行写操作后,从库因为延迟无法及时同步&#…...

鸿蒙中用HarmonyOS SDK应用服务 HarmonyOS5开发一个医院挂号小程序
一、开发准备 环境搭建: 安装DevEco Studio 3.0或更高版本配置HarmonyOS SDK申请开发者账号 项目创建: File > New > Create Project > Application (选择"Empty Ability") 二、核心功能实现 1. 医院科室展示 /…...

MVC 数据库
MVC 数据库 引言 在软件开发领域,Model-View-Controller(MVC)是一种流行的软件架构模式,它将应用程序分为三个核心组件:模型(Model)、视图(View)和控制器(Controller)。这种模式有助于提高代码的可维护性和可扩展性。本文将深入探讨MVC架构与数据库之间的关系,以…...

鸿蒙中用HarmonyOS SDK应用服务 HarmonyOS5开发一个医院查看报告小程序
一、开发环境准备 工具安装: 下载安装DevEco Studio 4.0(支持HarmonyOS 5)配置HarmonyOS SDK 5.0确保Node.js版本≥14 项目初始化: ohpm init harmony/hospital-report-app 二、核心功能模块实现 1. 报告列表…...

基于Docker Compose部署Java微服务项目
一. 创建根项目 根项目(父项目)主要用于依赖管理 一些需要注意的点: 打包方式需要为 pom<modules>里需要注册子模块不要引入maven的打包插件,否则打包时会出问题 <?xml version"1.0" encoding"UTF-8…...

学习STC51单片机32(芯片为STC89C52RCRC)OLED显示屏2
每日一言 今天的每一份坚持,都是在为未来积攒底气。 案例:OLED显示一个A 这边观察到一个点,怎么雪花了就是都是乱七八糟的占满了屏幕。。 解释 : 如果代码里信号切换太快(比如 SDA 刚变,SCL 立刻变&#…...
项目部署到Linux上时遇到的错误(Redis,MySQL,无法正确连接,地址占用问题)
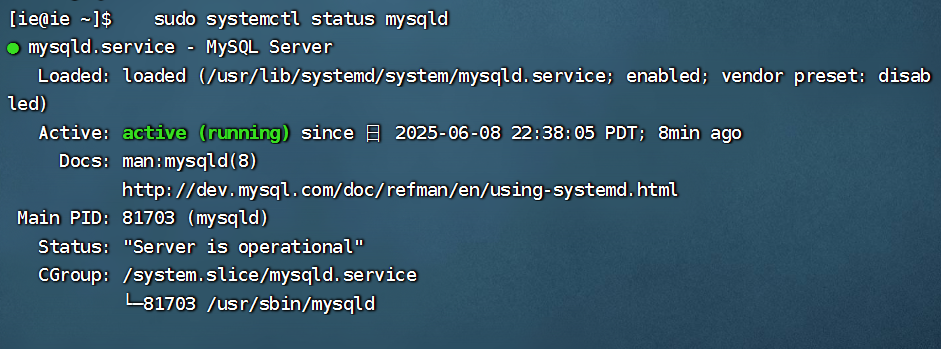
Redis无法正确连接 在运行jar包时出现了这样的错误 查询得知问题核心在于Redis连接失败,具体原因是客户端发送了密码认证请求,但Redis服务器未设置密码 1.为Redis设置密码(匹配客户端配置) 步骤: 1).修…...
Python基于历史模拟方法实现投资组合风险管理的VaR与ES模型项目实战
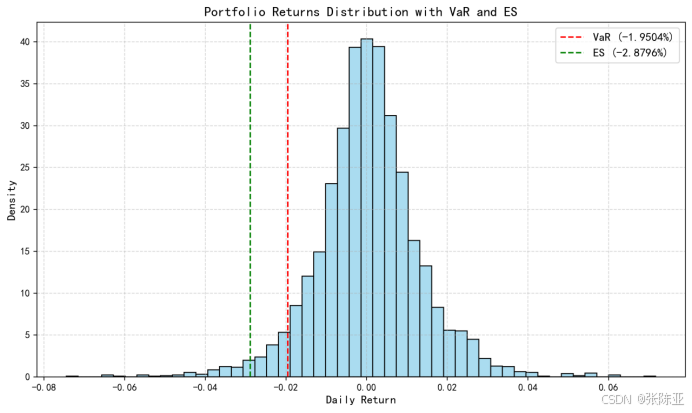
说明:这是一个机器学习实战项目(附带数据代码文档),如需数据代码文档可以直接到文章最后关注获取。 1.项目背景 在金融市场日益复杂和波动加剧的背景下,风险管理成为金融机构和个人投资者关注的核心议题之一。VaR&…...

A2A JS SDK 完整教程:快速入门指南
目录 什么是 A2A JS SDK?A2A JS 安装与设置A2A JS 核心概念创建你的第一个 A2A JS 代理A2A JS 服务端开发A2A JS 客户端使用A2A JS 高级特性A2A JS 最佳实践A2A JS 故障排除 什么是 A2A JS SDK? A2A JS SDK 是一个专为 JavaScript/TypeScript 开发者设计的强大库ÿ…...
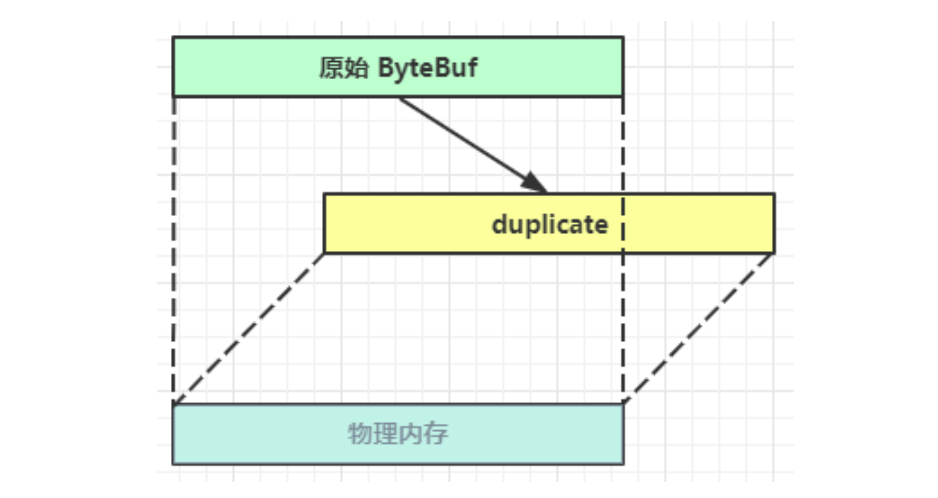
Netty从入门到进阶(二)
二、Netty入门 1. 概述 1.1 Netty是什么 Netty is an asynchronous event-driven network application framework for rapid development of maintainable high performance protocol servers & clients. Netty是一个异步的、基于事件驱动的网络应用框架,用于…...

PostgreSQL——环境搭建
一、Linux # 安装 PostgreSQL 15 仓库 sudo dnf install -y https://download.postgresql.org/pub/repos/yum/reporpms/EL-$(rpm -E %{rhel})-x86_64/pgdg-redhat-repo-latest.noarch.rpm# 安装之前先确认是否已经存在PostgreSQL rpm -qa | grep postgres# 如果存在࿰…...
