QT开发:深入掌握 QtGui 和 QtWidgets 布局管理:QVBoxLayout、QHBoxLayout 和 QGridLayout 的高级应用
目录
引言
1. QVBoxLayout:垂直布局管理器
基本功能
创建 QVBoxLayout
添加控件
添加控件和设置对齐方式
设置对齐方式
示例代码与详解
2. QHBoxLayout:水平布局管理器
基本功能
创建 QHBoxLayout
添加控件
添加控件和设置对齐方式
设置对齐方式
示例代码与详解
3. QGridLayout:网格布局管理器
基本功能
创建 QGridLayout
添加控件
添加控件和设置控件跨度
设置控件跨度
示例代码与详解
4. 综合示例:结合 QVBoxLayout、QHBoxLayout 和 QGridLayout 创建一个复杂布局应用程序
综合示例代码
代码解析
主垂直布局(QVBoxLayout)
顶部按钮区域(QHBoxLayout)
中心控件区域(QGridLayout)
底部按钮区域(QHBoxLayout)
5. 总结
关键要点
引言
在 Qt 开发中,布局管理器(Layouts)是组织和管理控件(widgets)位置和大小的关键工具。通过使用布局管理器,可以创建响应式和高度自适应的用户界面。本篇技术博客将详细讲解 QtGui 和 QtWidgets 模块中的布局管理:QVBoxLayout、QHBoxLayout 和 QGridLayout,帮助你轻松掌握这些布局管理器的基本概念和应用技术。
1. QVBoxLayout:垂直布局管理器
QVBoxLayout 是一个垂直布局管理器,用于将控件从上到下排列。它是创建垂直排列控件的理想选择。
基本功能
创建 QVBoxLayout
可以通过 QVBoxLayout 构造函数创建垂直布局管理器。
QVBoxLayout *vboxLayout = new QVBoxLayout();
添加控件
可以使用 addWidget 方法将控件添加到布局中。
QPushButton *button1 = new QPushButton("Button 1", this);
QPushButton *button2 = new QPushButton("Button 2", this);
vboxLayout->addWidget(button1);
vboxLayout->addWidget(button2);
添加控件和设置对齐方式
设置对齐方式
可以使用 setAlignment 方法设置控件的对齐方式。
vboxLayout->setAlignment(button1, Qt::AlignLeft);
vboxLayout->setAlignment(button2, Qt::AlignRight);
示例代码与详解
以下是一个完整的示例,展示了如何使用 QVBoxLayout 创建一个垂直布局,并将控件从上到下排列:
#include <QApplication>
#include <QWidget>
#include <QVBoxLayout>
#include <QPushButton>class VBoxLayoutExample : public QWidget {
public:VBoxLayoutExample(QWidget *parent = nullptr) : QWidget(parent) {QVBoxLayout *vboxLayout = new QVBoxLayout(this);QPushButton *button1 = new QPushButton("Button 1", this);QPushButton *button2 = new QPushButton("Button 2", this);QPushButton *button3 = new QPushButton("Button 3", this);vboxLayout->addWidget(button1);vboxLayout->addWidget(button2);vboxLayout->addWidget(button3);vboxLayout->setAlignment(button1, Qt::AlignLeft);vboxLayout->setAlignment(button2, Qt::AlignCenter);vboxLayout->setAlignment(button3, Qt::AlignRight);}
};int main(int argc, char *argv[]) {QApplication app(argc, argv);VBoxLayoutExample window;window.show();return app.exec();
}
运行如下:

这个示例展示了如何使用 QVBoxLayout 创建一个垂直布局,并将按钮控件从上到下排列,同时设置每个按钮的对齐方式。
2. QHBoxLayout:水平布局管理器
QHBoxLayout 是一个水平布局管理器,用于将控件从左到右排列。它是创建水平排列控件的理想选择。
基本功能
创建 QHBoxLayout
可以通过 QHBoxLayout 构造函数创建水平布局管理器。
QHBoxLayout *hboxLayout = new QHBoxLayout();
添加控件
可以使用 addWidget 方法将控件添加到布局中。
QPushButton *button1 = new QPushButton("Button 1", this);
QPushButton *button2 = new QPushButton("Button 2", this);
hboxLayout->addWidget(button1);
hboxLayout->addWidget(button2);
添加控件和设置对齐方式
设置对齐方式
可以使用 setAlignment 方法设置控件的对齐方式。
hboxLayout->setAlignment(button1, Qt::AlignTop);
hboxLayout->setAlignment(button2, Qt::AlignBottom);
示例代码与详解
以下是一个完整的示例,展示了如何使用 QHBoxLayout 创建一个水平布局,并将控件从左到右排列:
#include <QApplication>
#include <QWidget>
#include <QHBoxLayout>
#include <QPushButton>class HBoxLayoutExample : public QWidget {
public:HBoxLayoutExample(QWidget *parent = nullptr) : QWidget(parent) {QHBoxLayout *hboxLayout = new QHBoxLayout(this);QPushButton *button1 = new QPushButton("Button 1", this);QPushButton *button2 = new QPushButton("Button 2", this);QPushButton *button3 = new QPushButton("Button 3", this);hboxLayout->addWidget(button1);hboxLayout->addWidget(button2);hboxLayout->addWidget(button3);hboxLayout->setAlignment(button1, Qt::AlignTop);hboxLayout->setAlignment(button2, Qt::AlignCenter);hboxLayout->setAlignment(button3, Qt::AlignBottom);}
};int main(int argc, char *argv[]) {QApplication app(argc, argv);HBoxLayoutExample window;window.show();return app.exec();
}
运行结果:


这个示例展示了如何使用 QHBoxLayout 创建一个水平布局,并将按钮控件从左到右排列,同时设置每个按钮的对齐方式。
3. QGridLayout:网格布局管理器
QGridLayout 是一个网格布局管理器,可以将控件放置在网格的单元格中。它是创建复杂布局的理想选择。
基本功能
创建 QGridLayout
可以通过 QGridLayout 构造函数创建网格布局管理器。
QGridLayout *gridLayout = new QGridLayout();
添加控件
可以使用 addWidget 方法将控件添加到指定的网格单元格中。
QPushButton *button1 = new QPushButton("Button 1", this);
QPushButton *button2 = new QPushButton("Button 2", this);
gridLayout->addWidget(button1, 0, 0);
gridLayout->addWidget(button2, 0, 1);
添加控件和设置控件跨度
设置控件跨度
可以通过 addWidget 方法的额外参数设置控件的行跨度和列跨度。
QPushButton *button3 = new QPushButton("Button 3", this);
gridLayout->addWidget(button3, 1, 0, 1, 2); // 跨两列
示例代码与详解
以下是一个完整的示例,展示了如何使用 QGridLayout 创建一个网格布局,并将控件放置在指定的网格单元格中:
#include <QApplication>
#include <QWidget>
#include <QGridLayout>
#include <QPushButton>class GridLayoutExample : public QWidget {
public:// 构造函数,初始化一个新的窗口部件GridLayoutExample(QWidget *parent = nullptr) : QWidget(parent) {// 创建一个新的网格布局,父对象是当前窗口部件QGridLayout *gridLayout = new QGridLayout(this);// 创建四个按钮,并将它们的文本分别设置为"Button 1"到"Button 4"QPushButton *button1 = new QPushButton("Button 1", this);QPushButton *button2 = new QPushButton("Button 2", this);QPushButton *button3 = new QPushButton("Button 3", this);QPushButton *button4 = new QPushButton("Button 4", this);// 将button1添加到网格布局的第0行第0列gridLayout->addWidget(button1, 0, 0);// 将button2添加到网格布局的第0行第1列gridLayout->addWidget(button2, 0, 1);// 将button3添加到网格布局的第1行第0列,并跨两列gridLayout->addWidget(button3, 1, 0, 1, 2);// 将button4添加到网格布局的第2行第0列,并跨两行gridLayout->addWidget(button4, 2, 0, 2, 1);// 设置button1在网格中的对齐方式为顶部对齐gridLayout->setAlignment(button1, Qt::AlignTop);// 设置button2在网格中的对齐方式为居中对齐gridLayout->setAlignment(button2, Qt::AlignCenter);// 设置button3在网格中的对齐方式为底部对齐gridLayout->setAlignment(button3, Qt::AlignBottom);// 设置button4在网格中的对齐方式为右对齐gridLayout->setAlignment(button4, Qt::AlignRight);}
};int main(int argc, char *argv[]) {QApplication app(argc, argv);GridLayoutExample window;window.show();return app.exec();
}
运行结果:

这个示例展示了如何使用 QGridLayout 创建一个网格布局,并将按钮控件放置在指定的网格单元格中,同时设置每个按钮的对齐方式。
4. 综合示例:结合 QVBoxLayout、QHBoxLayout 和 QGridLayout 创建一个复杂布局应用程序
为了更好地展示 QVBoxLayout、QHBoxLayout 和 QGridLayout 的综合应用,我们将创建一个复杂的用户界面布局。这个布局包含以下部分:
- 垂直布局(
QVBoxLayout)用于排列主要部分 - 水平布局(
QHBoxLayout)用于排列顶部按钮区域 - 网格布局(
QGridLayout)用于排列中心控件区域
综合示例代码
以下是完整的应用程序代码,展示了如何结合使用 QVBoxLayout、QHBoxLayout 和 QGridLayout 创建一个复杂的用户界面布局:
#include <QApplication>
#include <QWidget>
#include <QVBoxLayout>
#include <QHBoxLayout>
#include <QGridLayout>
#include <QPushButton>
#include <QLabel>
#include <QLineEdit>class ComplexLayoutExample : public QWidget {
public:// 构造函数,初始化一个新的窗口部件ComplexLayoutExample(QWidget *parent = nullptr) : QWidget(parent) {// 创建一个垂直布局作为主布局,父对象是当前窗口部件QVBoxLayout *mainLayout = new QVBoxLayout(this);// ==================// 顶部按钮区域// ==================// 创建一个水平布局用于顶部按钮区域QHBoxLayout *topButtonLayout = new QHBoxLayout();// 创建两个按钮,并将它们添加到顶部按钮布局中QPushButton *button1 = new QPushButton("Button 1", this);QPushButton *button2 = new QPushButton("Button 2", this);topButtonLayout->addWidget(button1);topButtonLayout->addWidget(button2);// 将顶部按钮布局添加到主布局中mainLayout->addLayout(topButtonLayout);// ==================// 中心控件区域// ==================// 创建一个网格布局用于中心控件区域QGridLayout *centerGridLayout = new QGridLayout();// 创建标签和文本编辑控件,并将它们添加到网格布局中QLabel *label1 = new QLabel("Label 1", this);QLineEdit *lineEdit1 = new QLineEdit(this);QLabel *label2 = new QLabel("Label 2", this);QLineEdit *lineEdit2 = new QLineEdit(this);centerGridLayout->addWidget(label1, 0, 0);centerGridLayout->addWidget(lineEdit1, 0, 1);centerGridLayout->addWidget(label2, 1, 0);centerGridLayout->addWidget(lineEdit2, 1, 1);// 将中心网格布局添加到主布局中mainLayout->addLayout(centerGridLayout);// ==================// 底部按钮区域// ==================// 创建一个水平布局用于底部按钮区域QHBoxLayout *bottomButtonLayout = new QHBoxLayout();// 创建两个按钮,并将它们添加到底部按钮布局中QPushButton *button3 = new QPushButton("Button 3", this);QPushButton *button4 = new QPushButton("Button 4", this);bottomButtonLayout->addWidget(button3);bottomButtonLayout->addWidget(button4);// 添加一个弹簧,使底部按钮区域靠底部排列mainLayout->addStretch();// 将底部按钮布局添加到主布局中mainLayout->addLayout(bottomButtonLayout);}
};int main(int argc, char *argv[]) {QApplication app(argc, argv);ComplexLayoutExample window;window.show();return app.exec();
}
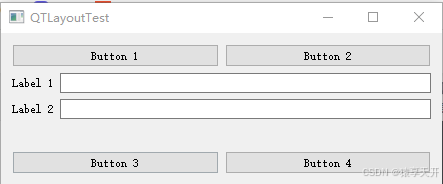
运行结果:
代码解析
这个综合示例展示了如何结合使用 QVBoxLayout、QHBoxLayout 和 QGridLayout 创建一个复杂的用户界面布局。以下是对各个部分的详细解析:
主垂直布局(QVBoxLayout)
QVBoxLayout *mainLayout = new QVBoxLayout(this);
QVBoxLayout:主垂直布局管理器,用于将各个部分从上到下排列。
顶部按钮区域(QHBoxLayout)
QHBoxLayout *topButtonLayout = new QHBoxLayout();
QPushButton *button1 = new QPushButton("Button 1", this);
QPushButton *button2 = new QPushButton("Button 2", this);
topButtonLayout->addWidget(button1);
topButtonLayout->addWidget(button2);
mainLayout->addLayout(topButtonLayout);
QHBoxLayout:顶部水平布局管理器,用于排列顶部按钮区域的按钮。addWidget:将按钮控件添加到水平布局中,并将布局添加到主垂直布局中。
中心控件区域(QGridLayout)
QGridLayout *centerGridLayout = new QGridLayout();
QLabel *label1 = new QLabel("Label 1", this);
QLineEdit *lineEdit1 = new QLineEdit(this);
QLabel *label2 = new QLabel("Label 2", this);
QLineEdit *lineEdit2 = new QLineEdit(this);
centerGridLayout->addWidget(label1, 0, 0);
centerGridLayout->addWidget(lineEdit1, 0, 1);
centerGridLayout->addWidget(label2, 1, 0);
centerGridLayout->addWidget(lineEdit2, 1, 1);
mainLayout->addLayout(centerGridLayout);
QGridLayout:中心网格布局管理器,用于排列中心控件区域的标签和文本输入框。addWidget:将标签和文本输入框添加到网格布局的指定单元格中,并将布局添加到主垂直布局中。
底部按钮区域(QHBoxLayout)
QHBoxLayout *bottomButtonLayout = new QHBoxLayout();
QPushButton *button3 = new QPushButton("Button 3", this);
QPushButton *button4 = new QPushButton("Button 4", this);
bottomButtonLayout->addWidget(button3);
bottomButtonLayout->addWidget(button4);
mainLayout->addStretch(); // 添加一个弹簧,以便底部按钮区域靠底部排列
mainLayout->addLayout(bottomButtonLayout);
QHBoxLayout:底部水平布局管理器,用于排列底部按钮区域的按钮。addStretch:添加一个弹簧,使底部按钮区域能够靠底部排列。addWidget:将按钮控件添加到水平布局中,并将布局添加到主垂直布局中。
这个综合示例展示了如何结合使用 QVBoxLayout、QHBoxLayout 和 QGridLayout 创建一个复杂的用户界面布局,帮助你了解多种布局管理器的综合应用。
5. 总结
本篇技术博客详细介绍了 QtGui 和 QtWidgets 模块中 QVBoxLayout、QHBoxLayout 和 QGridLayout 的基本概念和高级应用技术。通过详细解析和完整的示例代码,我们展示了如何使用这些布局管理器创建响应式和高度自适应的用户界面。
关键要点
- QVBoxLayout:垂直布局管理器,用于将控件从上到下排列,并支持设置控件的对齐方式。
- QHBoxLayout:水平布局管理器,用于将控件从左到右排列,并支持设置控件的对齐方式。
- QGridLayout:网格布局管理器,用于将控件放置在网格的单元格中,并支持设置控件的行跨度和列跨度。
- 综合应用:通过结合使用
QVBoxLayout、QHBoxLayout和QGridLayout,可以创建功能丰富且高度自适应的复杂用户界面布局。
通过掌握这些布局管理器及其应用技术,你可以轻松开发复杂的 Qt 应用程序,并自信地应对各种用户界面布局需求。希望这篇文章对你的 Qt 开发学习有所帮助!
相关文章:
QT开发:深入掌握 QtGui 和 QtWidgets 布局管理:QVBoxLayout、QHBoxLayout 和 QGridLayout 的高级应用
目录 引言 1. QVBoxLayout:垂直布局管理器 基本功能 创建 QVBoxLayout 添加控件 添加控件和设置对齐方式 设置对齐方式 示例代码与详解 2. QHBoxLayout:水平布局管理器 基本功能 创建 QHBoxLayout 添加控件 添加控件和设置对齐方式 设置对齐…...
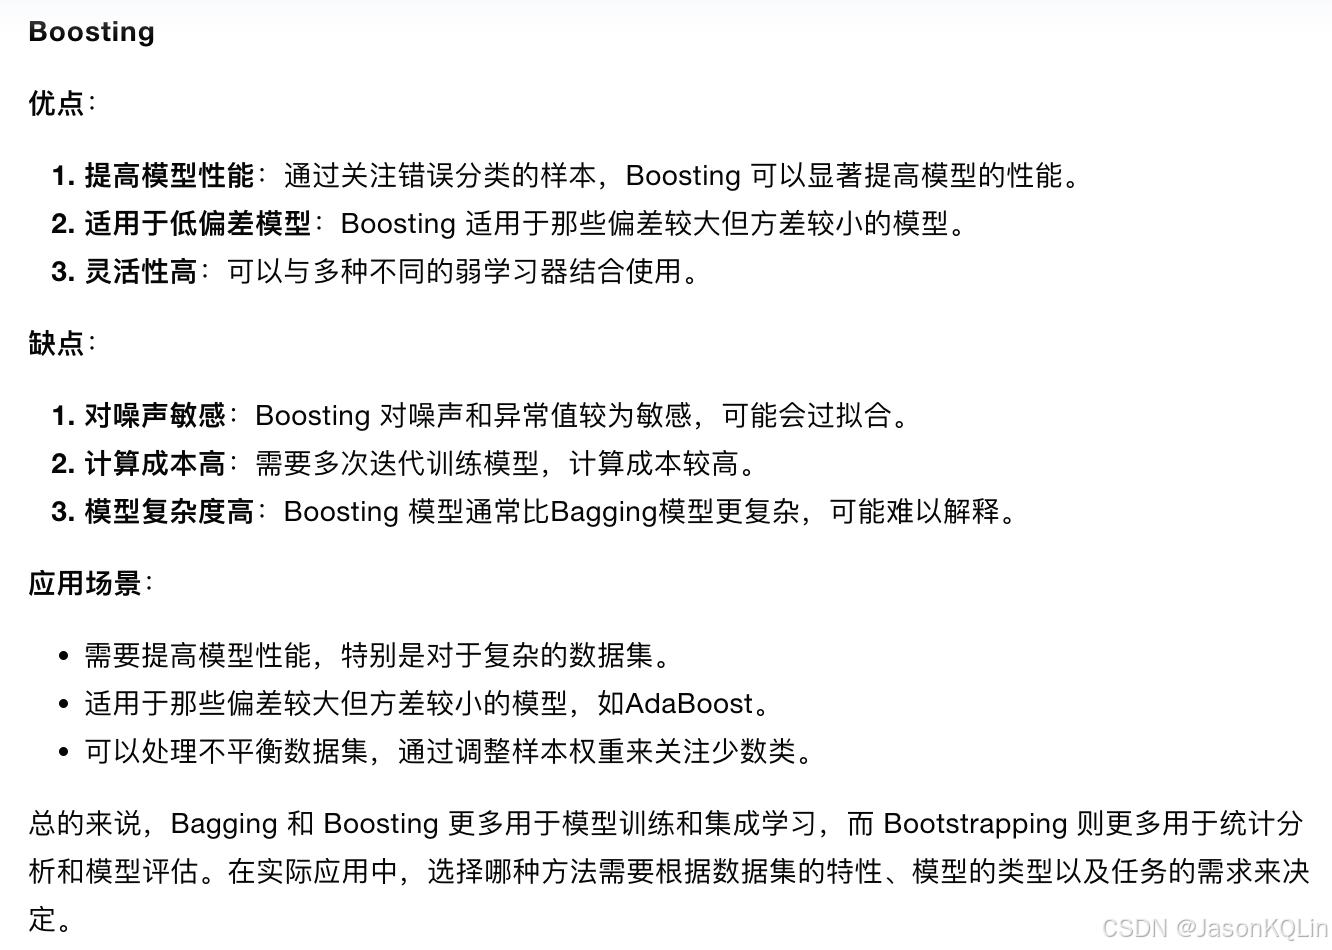
Bootstrapping、Bagging 和 Boosting
bagging方法如下: bagging和boosting比较...

板块龙头公司
高通 高通(Qualcomm)是一家总部位于美国加利福尼亚州的全球领先半导体和电信设备公司。成立于1985年,高通专注于无线通信技术的研发和创新。 移动处理器: 高通开发的骁龙(Snapdragon)系列芯片广泛用于智能手机和平板电…...
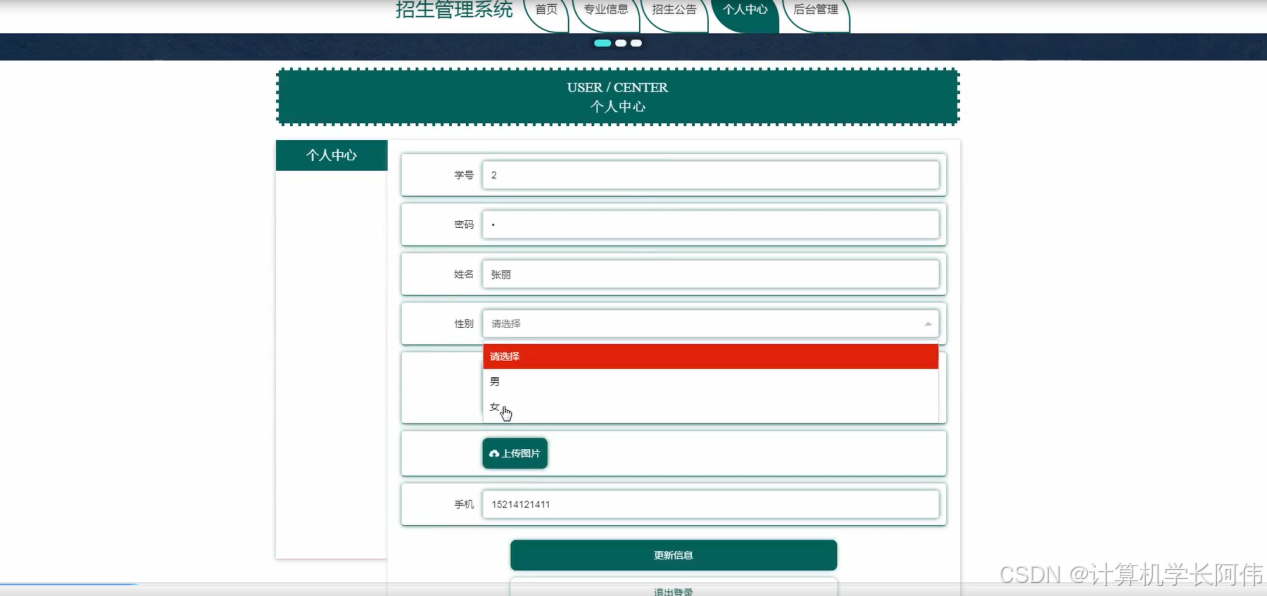
Java项目-基于Springboot的招生管理系统项目(源码+说明).zip
作者:计算机学长阿伟 开发技术:SpringBoot、SSM、Vue、MySQL、ElementUI等,“文末源码”。 开发运行环境 开发语言:Java数据库:MySQL技术:SpringBoot、Vue、Mybaits Plus、ELementUI工具:IDEA/…...
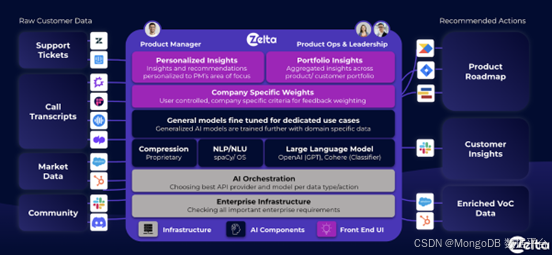
使用 MongoDB 构建 AI:利用实时客户数据优化产品生命周期
在《使用 MongoDB 构建 AI》系列博文中,我们看到越来越多的企业正在利用 AI 技术优化产品研发和用户支持流程。例如,我们介绍了以下案例: Ventecon 的 AI 助手帮助产品经理生成和优化新产品规范 Cognigy 的对话式 AI 帮助企业使用任意语言&a…...
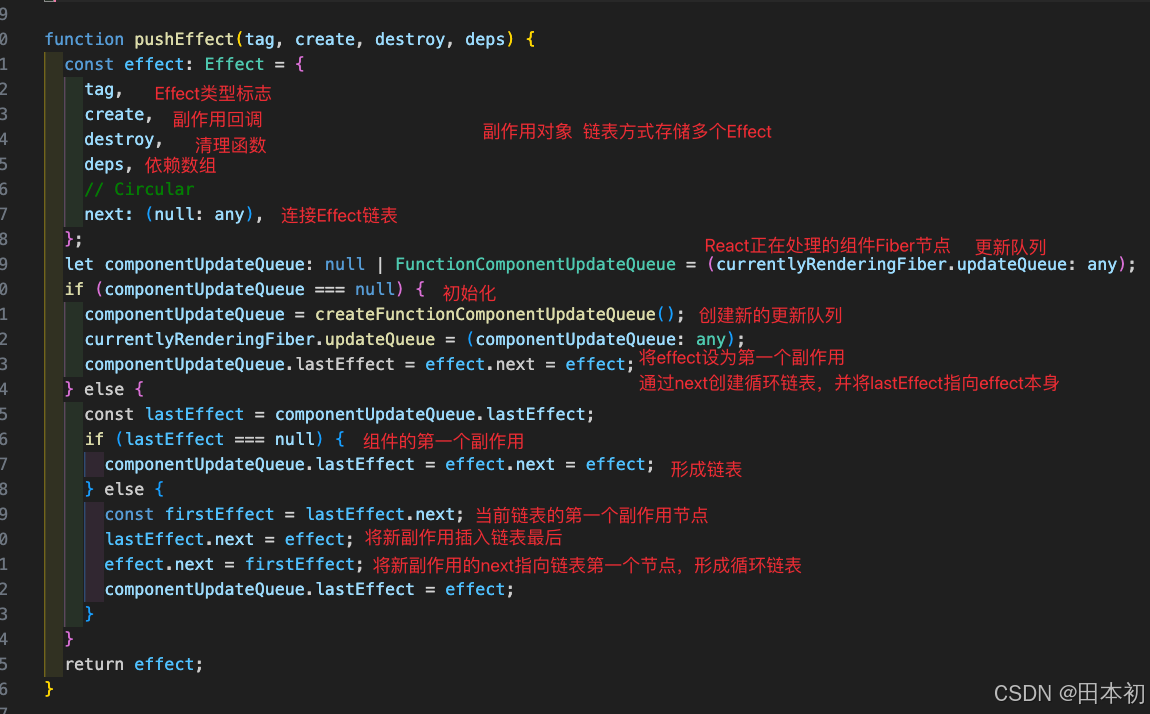
【React】React18核心源码解读
前言 本文使用 React18.2.0 的源码,如果想回退到某一版本执行git checkout tags/v18.2.0即可。如果打开源码发现js文件报ts类型错误请看本人另一篇文章:VsCode查看React源码全是类型报错如何解决。 阅读源码的过程: 下载源码 观察 package…...
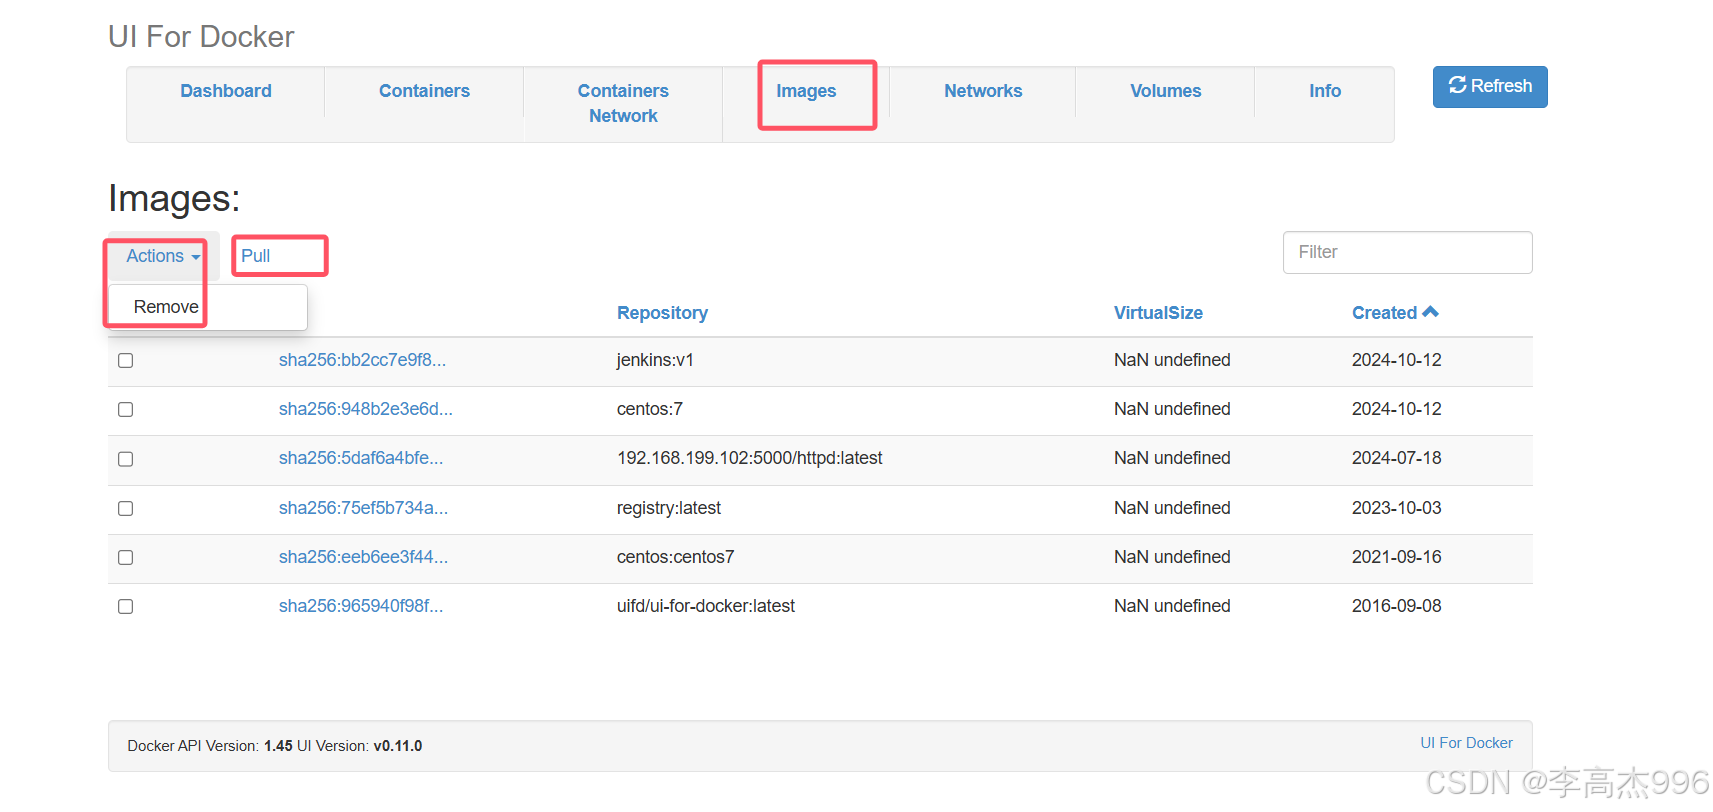
部署私有仓库以及docker web ui应用
官方地址:https://hub.docker.com/_/registry/tags 一、拉取registry私有仓库镜像 docker pull registry:latest 二、运⾏容器 docker run -itd -v /home/dockerdata/registry:/var/lib/registry --name "pri_registry1" --restartalways -p 5000:5000 …...
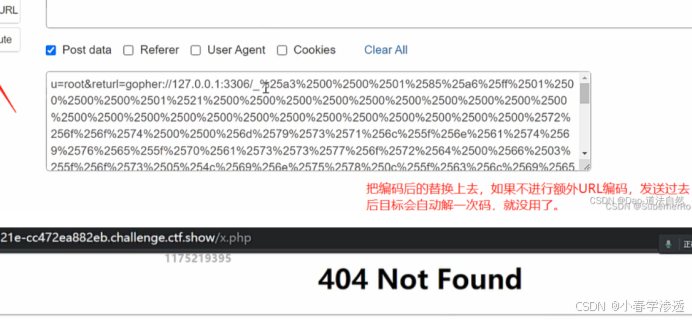
DAY57WEB 攻防-SSRF 服务端请求Gopher 伪协议无回显利用黑白盒挖掘业务功能点
知识点: 1、SSRF-原理-外部资源加载 2、SSRF-利用-伪协议&无回显 3、SSRF-挖掘-业务功能&URL参数 SSRF-原理&挖掘&利用&修复 漏洞原理:SSRF(Server-Side Request Forgery:服务器端请求伪造) ,一种由攻击者构造形成由服务…...

光盘刻录大文件时分卷操作
可以使用 split 命令来将大文件 finetune.tar 分卷为适合光盘大小的文件片段,然后在离线服务器上合并这些分卷文件。以下是具体的操作步骤: 步骤1:分卷文件 假设你的文件 finetune.tar 大小为35GB,并且你想分卷为每个4.7GB&…...

Kafka系列之:生产者性能调优
Kafka系列之:生产者性能调优 一、producer.type二、request.required.acks三、max.request.size四、batch.size五、buffer.memory一、producer.type 在Kafka中,producer.type是一个配置属性,用于指定Producer的类型。它有两个可能的值: sync:同步发送模式。当设置为sync时…...

【linux】进程创建与进程终止
🔥个人主页:Quitecoder 🔥专栏:linux笔记仓 目录 01.进程创建02.进程终止异常终止如何终止exit()_exit() 01.进程创建 #include <unistd.h> pid_t fork(void);返回值:自进程中返回0,父进程返回子进…...
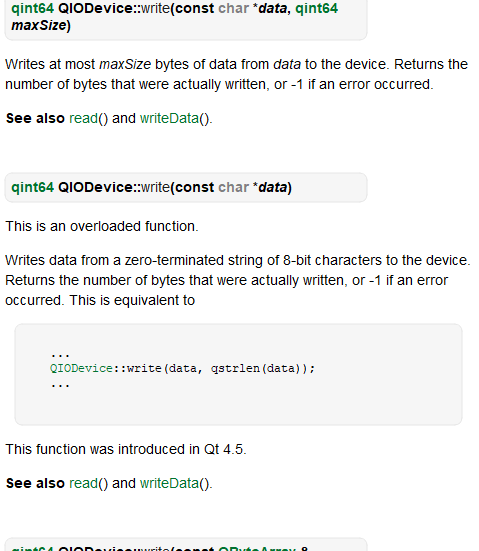
QT的文件操作类 QFile
QFile 是 Qt 框架中用于文件处理的一个类。它提供了读取和写入文件的功能,支持文本和二进制文 件。 QFile 继承自 QIODevice ,因此它可以像其他IO设备一样使用。 主要功能 文件读写: QFile 支持打开文件进行读取或写入操作文件信息&#x…...

java项目篇-用户脱敏展示
用户敏感信息脱敏展示 定义手机号和证件号的 Jackson 自定义序列化器,并在对应需要脱敏的敏感字段上指定自定义序列化器。在进行指定的需要脱敏的字段(身份证号,手机号,银行卡号等)序列化的时候,该字段自动…...

《C++计算引擎:驱动高效计算的强大动力》
在当今数字化时代,高效的计算能力是推动科技进步和创新的关键。而 C作为一种强大的编程语言,在构建高性能计算引擎方面发挥着重要作用。本文将深入探讨 C计算引擎的特点、优势以及在不同领域的应用,带您领略 C在计算领域的独特魅力。 一、C计…...
Linux的hadoop集群部署
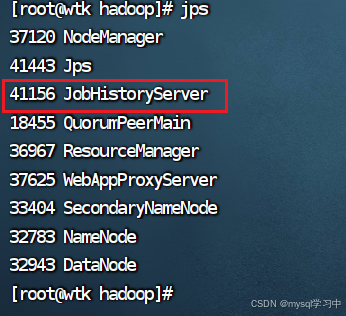
1.hadoop是一个分布式系统基础架构,主要解决海量数据额度存储与海量数据的分析计算问题 hdfs提供存储能力,yarn提供资源管理能力,MapReduce提供计算能力 2.安装 一:调整虚拟机内存,4G即可 二:下载安装包 网址:https://mirrors.aliyun.com/apache/hadoop/common/hadoop-3.4.0/…...

请问:ESModule 与 CommonJS 的异同点是什么?
前言 本篇文章不会介绍模块的详细用法,因为核心是重新认识和理解模块的本质内容是什么,直奔主题,下面先给出最后结论,接下来在逐个进行分析。 ECMAScript Module 和 CommonJS 的相同点: 都拥有自己的缓存机制&#…...

【数据结构与算法】力扣 59. 螺旋矩阵 II
题目描述 给你一个正整数 n ,生成一个包含 1 到 n2 所有元素,且元素按顺时针顺序螺旋排列的 n x n 正方形矩阵 matrix 。 示例 1: 输入: n 3 输出: [[1,2,3],[8,9,4],[7,6,5]]示例 2: 输入:…...
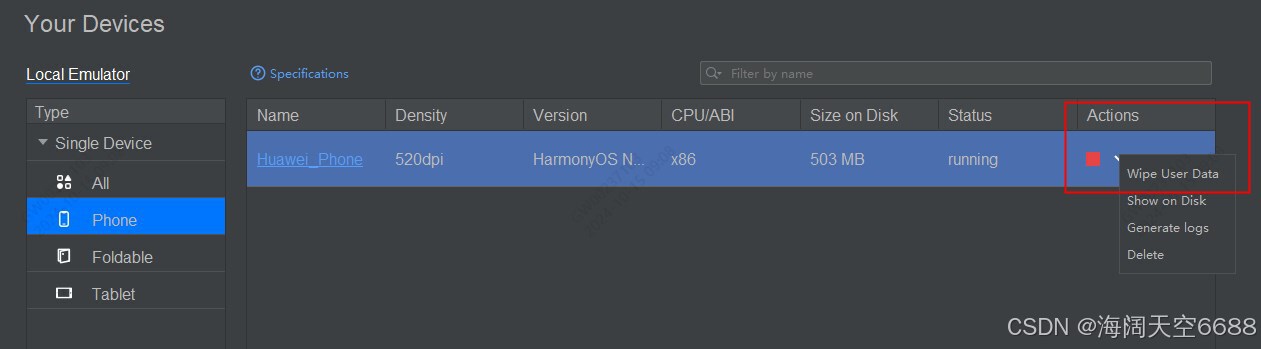
HarmonyOS Next模拟器异常问题及解决方法
1、问题1:Failed to get the device apiVersion. 解决方法:关闭模拟器清除用户数据重启...

求最大公约数(c语言)
先看题👇 我这里介绍的方法:辗转相除法: 最大公约数: 最大公约数是指同时能整除俩个或更多整数的最大正整数。 欧几里得算法就是求最大公约数的算法 求最大公约数涉及到一个数学原理的转换: 俩个数的最大公约数等于其中一个数和…...
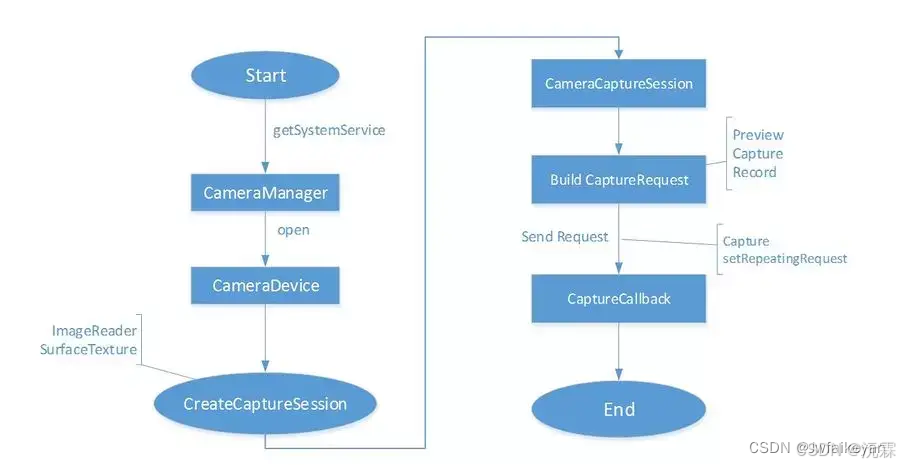
Android Camera2在textureView中的预览和拍照
Camera2预览和拍照 1、Camera2相机模型2、Camera2的重要类3、Camera2调用流程4、Camera2调用实现 1)定义TextureView作为预览界面2)设置相机参数3)开启相机4)开启相机预览5)实现PreviewCallback6)拍照 1、Camera2相机模型 解释上诉示意图,假如想要同时拍摄两张不同…...

Fast JSON API 生成器系统:Rails 模板和自定义生成器终极指南 [特殊字符]
Fast JSON API 生成器系统:Rails 模板和自定义生成器终极指南 🚀 【免费下载链接】fast_jsonapi No Longer Maintained - A lightning fast JSON:API serializer for Ruby Objects. 项目地址: https://gitcode.com/gh_mirrors/fa/fast_jsonapi 欢…...

IOFILE结构体的介绍与House of orange媚
认识Pass层级结构 Pass范围从上到下一共分为5个层级: 模块层级:单个.ll或.bc文件 调用图层级:函数调用的关系。 函数层级:单个函数。 基本块层级:单个代码块。例如C语言中{}括起来的最小代码。 指令层级:单…...

基于ECMS的混合动力汽车Simulink模型:可用于能量管理研究且模型无误
基于ECMS搭建的混合动力汽车simulink模型 可用于能量管理研究 模型运行无误 联系赠送模型搭建参考文献一份,赠送nedc、udds等常用工况数据表,可自行更改工况进行模型开发ECMS算法这玩意儿在混动能量管理圈子里挺能打,最近刚用Simulink搭了个模…...

Windows系统清理完全指南:使用WindowsCleaner高效解决C盘爆红问题
Windows系统清理完全指南:使用WindowsCleaner高效解决C盘爆红问题 【免费下载链接】WindowsCleaner Windows Cleaner——专治C盘爆红及各种不服! 项目地址: https://gitcode.com/gh_mirrors/wi/WindowsCleaner 你是否经常遇到Windows系统C盘空间不…...

直通大厂:腾讯二面高频考题,多Agent工作原理超详细拆解!
1. 题目分析 一个 Agent 能做的事情终归有限。当你试图让单个 Agent 去完成一个真正复杂的任务——比如从零开始做一次完整的市场调研并输出 PPT 报告——你会发现它要么因为上下文窗口塞满而"失忆",要么因为角色定位太泛而每一步都做得半吊子。这就像让…...
)
基于单片机的人脸识别门禁系统(有完整资料)
资料查找方式:特纳斯电子(电子校园网):搜索下面编号即可编号:T5912205M设计简介:本设计是基于单片机的人脸识别门禁系统,主要实现以下功能:1、人脸识别并进行红外测温 2、人脸识别并…...

PMP证书到底有什么用?考证后没含金量?真相扎心但实用
最近刷CSDN,总能看到不少同行吐槽:“花大几千考了PMP,持证大半年,薪资没涨、职位没动,感觉这证就是个摆设,一点含金量都没有”。甚至有人直言“PMP就是智商税,不如多写几行代码、多做几个项目实…...

4个革命性的B站体验升级:Windows平台的UWP客户端解决方案
4个革命性的B站体验升级:Windows平台的UWP客户端解决方案 【免费下载链接】BiliBili-UWP BiliBili的UWP客户端,当然,是第三方的了 项目地址: https://gitcode.com/gh_mirrors/bi/BiliBili-UWP 一、问题诊断:Windows用户的B…...

C++的std--ranges算法并行执
C的std::ranges算法并行执行:现代C的高效之道 随着现代计算机多核处理器的普及,并行计算已成为提升程序性能的关键手段。C20引入的std::ranges库不仅简化了范围操作,还通过与执行策略结合,为开发者提供了高效的并行计算能力。本文…...

高效抖音批量下载解决方案:从单视频到主页批量的完整指南
高效抖音批量下载解决方案:从单视频到主页批量的完整指南 【免费下载链接】douyin-downloader A practical Douyin downloader for both single-item and profile batch downloads, with progress display, retries, SQLite deduplication, and browser fallback su…...