CesiumJS 案例 P7:添加指定长宽的图片图层(原点分别为图片图层的中心点、左上角顶点、右上角顶点、左下角顶点、右下角顶点)
CesiumJS
-
CesiumJS API:https://cesium.com/learn/cesiumjs/ref-doc/index.html
-
CesiumJS 是一个开源的 JavaScript 库,它用于在网页中创建和控制 3D 地球仪(地图)
一、添加指定长宽的图片图层(原点为图片图层的中心点)
<!DOCTYPE html>
<html lang="en"><head><meta charset="UTF-8" /><meta name="viewport" content="width=device-width, initial-scale=1.0" /><title>ImageryProvider - 添加指定长宽的图片图层(原点为图片图层的中心点)</title><link rel="stylesheet" href="../js/Cesium-1.112/Build/Cesium/Widgets/widgets.css" /><style>* {margin: 0;padding: 0;box-sizing: border-box;}html,body {width: 100%;height: 100%;}.container {width: 100%;height: 100%;}</style></head><body><div id="container"></div></body><script src="../js/Cesium-1.112/Build/Cesium/Cesium.js"></script><script>const viewer = new Cesium.Viewer("container");// 图片图层的长宽const imageWidth = 200; // 单位为米const imageHeight = 100; // 单位为米// 图片图层的原点const originLongitude = 0; // 原点经度const originLatitude = 0; // 原点纬度// 在赤道上,每度大约对应 111,320 米const degreesPerMeterAtEquator = 111320;const longitudeRange = imageWidth / degreesPerMeterAtEquator;const latitudeRange = imageHeight / degreesPerMeterAtEquator;const west = originLongitude - longitudeRange / 2; // 西经(西经为负)const south = originLatitude - latitudeRange / 2; // 南纬(南纬为负)const east = originLongitude + longitudeRange / 2; // 东经(东经为正)const north = originLatitude + latitudeRange / 2; // 北纬(北纬为正)// 创建图片图层const imageryProvider = new Cesium.SingleTileImageryProvider({url: "../img/test.jpg",rectangle: Cesium.Rectangle.fromDegrees(west, south, east, north),});viewer.imageryLayers.addImageryProvider(imageryProvider);// 添加一个点表示原点const entity = viewer.entities.add({position: Cesium.Cartesian3.fromDegrees(originLongitude, originLatitude),point: {pixelSize: 5,color: new Cesium.Color(0, 1, 0, 1),},});// 调整相机视角以查看图片viewer.camera.flyTo({destination: Cesium.Cartesian3.fromDegrees(originLongitude, originLatitude, 1000.0),duration: 2.0,});</script>
</html>
二、添加指定长宽的图片图层(原点为图片图层的左上角顶点)
<!DOCTYPE html>
<html lang="en"><head><meta charset="UTF-8" /><meta name="viewport" content="width=device-width, initial-scale=1.0" /><title>ImageryProvider - 添加指定长宽的图片图层(原点为图片图层的左上角顶点)</title><link rel="stylesheet" href="../js/Cesium-1.112/Build/Cesium/Widgets/widgets.css" /><style>* {margin: 0;padding: 0;box-sizing: border-box;}html,body {width: 100%;height: 100%;}.container {width: 100%;height: 100%;}</style></head><body><div id="container"></div></body><script src="../js/Cesium-1.112/Build/Cesium/Cesium.js"></script><script>const viewer = new Cesium.Viewer("container");// 图片图层的长宽const imageWidth = 200; // 单位为米const imageHeight = 100; // 单位为米// 图片图层的原点const originLongitude = 0; // 原点经度const originLatitude = 0; // 原点纬度// 在赤道上,每度大约对应 111,320 米const degreesPerMeterAtEquator = 111320;const longitudeRange = imageWidth / degreesPerMeterAtEquator;const latitudeRange = imageHeight / degreesPerMeterAtEquator;const west = originLongitude; // 西经(西经为负)const south = originLatitude - latitudeRange; // 南纬(南纬为负)const east = originLongitude + longitudeRange; // 东经(东经为正)const north = originLatitude; // 北纬(北纬为正)// 创建图片图层const imageryProvider = new Cesium.SingleTileImageryProvider({url: "../img/test.jpg",rectangle: Cesium.Rectangle.fromDegrees(west, south, east, north),});viewer.imageryLayers.addImageryProvider(imageryProvider);// 添加一个点表示原点const entity = viewer.entities.add({position: Cesium.Cartesian3.fromDegrees(originLongitude, originLatitude),point: {pixelSize: 5,color: new Cesium.Color(0, 1, 0, 1),},});// 调整相机视角以查看图片viewer.camera.flyTo({destination: Cesium.Cartesian3.fromDegrees(originLongitude, originLatitude, 1000.0),duration: 2.0,});</script>
</html>
三、添加指定长宽的图片图层(原点为图片图层的右上角顶点)
<!DOCTYPE html>
<html lang="en"><head><meta charset="UTF-8" /><meta name="viewport" content="width=device-width, initial-scale=1.0" /><title>ImageryProvider - 添加指定长宽的图片图层(原点为图片图层的右上角顶点)</title><link rel="stylesheet" href="../js/Cesium-1.112/Build/Cesium/Widgets/widgets.css" /><style>* {margin: 0;padding: 0;box-sizing: border-box;}html,body {width: 100%;height: 100%;}.container {width: 100%;height: 100%;}</style></head><body><div id="container"></div></body><script src="../js/Cesium-1.112/Build/Cesium/Cesium.js"></script><script>const viewer = new Cesium.Viewer("container");// 图片图层的长宽const imageWidth = 200; // 单位为米const imageHeight = 100; // 单位为米// 图片图层的原点const originLongitude = 0; // 原点经度const originLatitude = 0; // 原点纬度// 在赤道上,每度大约对应 111,320 米const degreesPerMeterAtEquator = 111320;const longitudeRange = imageWidth / degreesPerMeterAtEquator;const latitudeRange = imageHeight / degreesPerMeterAtEquator;const west = originLongitude - longitudeRange; // 西经(西经为负)const south = originLatitude - latitudeRange; // 南纬(南纬为负)const east = originLongitude; // 东经(东经为正)const north = originLatitude; // 北纬(北纬为正)// 创建图片图层const imageryProvider = new Cesium.SingleTileImageryProvider({url: "../img/test.jpg",rectangle: Cesium.Rectangle.fromDegrees(west, south, east, north),});viewer.imageryLayers.addImageryProvider(imageryProvider);// 添加一个点表示原点const entity = viewer.entities.add({position: Cesium.Cartesian3.fromDegrees(originLongitude, originLatitude),point: {pixelSize: 5,color: new Cesium.Color(0, 1, 0, 1),},});// 调整相机视角以查看图片viewer.camera.flyTo({destination: Cesium.Cartesian3.fromDegrees(originLongitude, originLatitude, 1000.0),duration: 2.0,});</script>
</html>
四、添加指定长宽的图片图层(原点为图片图层的左下角顶点)
<!DOCTYPE html>
<html lang="en"><head><meta charset="UTF-8" /><meta name="viewport" content="width=device-width, initial-scale=1.0" /><title>ImageryProvider - 添加指定长宽的图片图层(原点为图片图层的左下角顶点)</title><link rel="stylesheet" href="../js/Cesium-1.112/Build/Cesium/Widgets/widgets.css" /><style>* {margin: 0;padding: 0;box-sizing: border-box;}html,body {width: 100%;height: 100%;}.container {width: 100%;height: 100%;}</style></head><body><div id="container"></div></body><script src="../js/Cesium-1.112/Build/Cesium/Cesium.js"></script><script>const viewer = new Cesium.Viewer("container");// 图片图层的长宽const imageWidth = 200; // 单位为米const imageHeight = 100; // 单位为米// 图片图层的原点const originLongitude = 0; // 原点经度const originLatitude = 0; // 原点纬度// 在赤道上,每度大约对应 111,320 米const degreesPerMeterAtEquator = 111320;const longitudeRange = imageWidth / degreesPerMeterAtEquator;const latitudeRange = imageHeight / degreesPerMeterAtEquator;const west = originLongitude; // 西经(西经为负)const south = originLatitude; // 南纬(南纬为负)const east = originLongitude + longitudeRange; // 东经(东经为正)const north = originLatitude + latitudeRange; // 北纬(北纬为正)// 创建图片图层const imageryProvider = new Cesium.SingleTileImageryProvider({url: "../img/test.jpg",rectangle: Cesium.Rectangle.fromDegrees(west, south, east, north),});viewer.imageryLayers.addImageryProvider(imageryProvider);// 添加一个点表示原点const entity = viewer.entities.add({position: Cesium.Cartesian3.fromDegrees(originLongitude, originLatitude),point: {pixelSize: 5,color: new Cesium.Color(0, 1, 0, 1),},});// 调整相机视角以查看图片viewer.camera.flyTo({destination: Cesium.Cartesian3.fromDegrees(originLongitude, originLatitude, 1000.0),duration: 2.0,});</script>
</html>
五、添加指定长宽的图片图层(原点为图片图层的右下角顶点)
<!DOCTYPE html>
<html lang="en"><head><meta charset="UTF-8" /><meta name="viewport" content="width=device-width, initial-scale=1.0" /><title>ImageryProvider - 添加指定长宽的图片图层(原点为图片图层的右下角顶点)</title><link rel="stylesheet" href="../js/Cesium-1.112/Build/Cesium/Widgets/widgets.css" /><style>* {margin: 0;padding: 0;box-sizing: border-box;}html,body {width: 100%;height: 100%;}.container {width: 100%;height: 100%;}</style></head><body><div id="container"></div></body><script src="../js/Cesium-1.112/Build/Cesium/Cesium.js"></script><script>const viewer = new Cesium.Viewer("container");// 图片图层的长宽const imageWidth = 200; // 单位为米const imageHeight = 100; // 单位为米// 图片图层的原点const originLongitude = 0; // 原点经度const originLatitude = 0; // 原点纬度// 在赤道上,每度大约对应 111,320 米const degreesPerMeterAtEquator = 111320;const longitudeRange = imageWidth / degreesPerMeterAtEquator;const latitudeRange = imageHeight / degreesPerMeterAtEquator;const west = originLongitude - longitudeRange; // 西经(西经为负)const south = originLatitude; // 南纬(南纬为负)const east = originLongitude; // 东经(东经为正)const north = originLatitude + latitudeRange; // 北纬(北纬为正)// 创建图片图层const imageryProvider = new Cesium.SingleTileImageryProvider({url: "../img/test.jpg",rectangle: Cesium.Rectangle.fromDegrees(west, south, east, north),});viewer.imageryLayers.addImageryProvider(imageryProvider);// 添加一个点表示原点const entity = viewer.entities.add({position: Cesium.Cartesian3.fromDegrees(originLongitude, originLatitude),point: {pixelSize: 5,color: new Cesium.Color(0, 1, 0, 1),},});// 调整相机视角以查看图片viewer.camera.flyTo({destination: Cesium.Cartesian3.fromDegrees(originLongitude, originLatitude, 1000.0),duration: 2.0,});</script>
</html>
相关文章:
)
CesiumJS 案例 P7:添加指定长宽的图片图层(原点分别为图片图层的中心点、左上角顶点、右上角顶点、左下角顶点、右下角顶点)
CesiumJS CesiumJS API:https://cesium.com/learn/cesiumjs/ref-doc/index.html CesiumJS 是一个开源的 JavaScript 库,它用于在网页中创建和控制 3D 地球仪(地图) 一、添加指定长宽的图片图层(原点为图片图层的中心…...

Redis 主从同步 问题
前言 相关系列 《Redis & 目录》(持续更新)《Redis & 主从同步 & 源码》(学习过程/多有漏误/仅作参考/不再更新)《Redis & 主从同步 & 总结》(学习总结/最新最准/持续更新)《Redis &a…...

【SQL Server】探讨 IN 和 EXISTS之间的区别
前言 在使用 SQL 查询相关表数据时,通常需要根据另一个表中的值来筛选数据。而 IN 与 EXISTS 子句都是用于此场景的常用方式,但使用时两者存在工作方式不同。它们使用上的选择会显著影响查询的性能,尤其是在大型数据集中。本文我们一起探讨 IN 和 EXISTS 之间的区别、使用与…...

清理pip和conda缓存
当用户目录没有空间时,可清理pip和conda缓存 清理conda缓存: conda clean --all清理pip缓存: pip cache purgeNote: 可以利用软链接,将用户目录下的文件链接到其他位置 首先移动文件或文件夹到其他位置 mv ~/test /…...

git rebase和merge的区别
Git merge和Git rebase是两种不同的合并策略,它们在处理分支合并时有各自的优点和缺点。 Git fetch git fetch 命令用于从远程仓库获取最新的更改,但不会自动合并这些更改到你的本地分支。它会下载远程仓库的所有分支和标签,并更新你的本地…...
【elkb】linux麒麟v10安装ELKB 8.8.X版本(ARM架构)
下载软件 相关版本信息 elasticsearch:8.8.1kibana:8.8.1logstash:8.8.1filebeat:8.8.1 下载地址 https://artifacts.elastic.co/downloads/elasticsearch/elasticsearch-8.8.1-linux-aarch64.tar.gzhttps://artifacts.elastic…...

bluez hid host介绍,连接键盘/鼠标/手柄不是梦,安排
零. 前言 由于Bluez的介绍文档有限,以及对Linux 系统/驱动概念、D-Bus 通信和蓝牙协议都有要求,加上网络上其实没有一个完整的介绍Bluez系列的文档,所以不管是蓝牙初学者还是蓝牙从业人员,都有不小的难度,学习曲线也相对较陡,所以我有了这个想法,专门对Bluez做一个系统…...

GPT打数模——电商品类货量预测及品类分仓规划
背景 电商企业在各区域的商品存储主要由多个仓库组成的仓群承担。其中存储的商品主要按照属性(品类、件型等)进行划分和打标,便于进行库存管理。图 1 是一个简化的示意图,商品品类各异,件数众多,必须将这些…...

华为OD机试 - 螺旋数字矩阵 - 矩阵(Python/JS/C/C++ 2024 D卷 100分)
华为OD机试 2024E卷题库疯狂收录中,刷题点这里 专栏导读 本专栏收录于《华为OD机试真题(Python/JS/C/C)》。 刷的越多,抽中的概率越大,私信哪吒,备注华为OD,加入华为OD刷题交流群,…...

分类预测 | GCN图卷积神经网络多特征分类预测(MATLAB)
分类预测 | GCN图卷积神经网络多特征分类预测(MATLAB) 目录 分类预测 | GCN图卷积神经网络多特征分类预测(MATLAB)分类效果基本介绍程序设计参考资料分类效果 基本介绍 GCN图卷积神经网络多特征分类预测(MATLAB) 在图卷积神经网络(GCN)中,多特征分类...

FPGA搭建PCIE3.0通信架构简单读写测试,基于XDMA中断模式,提供3套工程源码和技术支持
目录 1、前言工程概述免责声明 2、相关方案推荐我已有的PCIE方案本博客方案的PCIE2.0版本 3、PCIE基础知识4、工程详细设计方案工程设计原理框图XDMA配置及使用XDMA中断模块数据缓存架构用户逻辑Windows版本XDMA驱动安装Linux版本XDMA驱动安装测试应用程序工程源码架构PCIE上板…...

App相关技术以及打包
平时小伙伴们自己的博客网站只能在浏览器打开,但是有时候你想要制作自己独立个人博客app,宣传并推广自己的app,打造个人ip。如何把自己的web博客网站打包成安卓app? 1.开发App的相关技术使⽤ ⽬前市⾯上的移动互联开发技术主要分…...

【unity】【游戏开发】Unity代码不给提示怎么办?
【现象】 Unity用着用着忽然VS脚本不给提示了。 【分析】 重启Unity无效 重启VS无效 重装VS无效 感觉应该是项目设置问题 【最终方法】 打开Edit->Preferences。 如果是这个画面就把Script Editor改成自己的VS编辑器。 变成下面这个样子,点击Regenerate Pr…...

Kubernetes固定Pod IP和Mac地址
方案1: 在 Calico GitHub Issues#5196 问题的 commits#6249 提交中,引入新的 Pod 注释cni.projectcalico.org/hwAddr,用于将指定的 MAC 地址分配给容器端 Veth 接口。 将Calico升级至v3.24.1或以上版本,使用如下注解轻松设置Pod…...

计算机组成原理之数据的对齐和大/小端存放方式、计算机中数据对齐的具体方式有哪些
1、计算机组成原理之数据的对齐和大/小端存放方式 数据对齐 数据对齐是处理器为了提高处理性能而对存取数据的起始地址所提出的一种要求。 系统一次性读取内存中数据的大小是固定的,例如字长为32位的操作系统,默认的一次读取4字节内容。因此ÿ…...

【学术论文投稿】Windows11开发指南:打造卓越应用的必备攻略
【IEEE出版南方科技大学】第十一届电气工程与自动化国际会议(IFEEA 2024)_艾思科蓝_学术一站式服务平台 更多学术会议论文投稿请看:https://ais.cn/u/nuyAF3 目录 引言 一、Windows11开发环境搭建 二、Windows11关键新特性 三、Windows11设计指南 …...

【毕业论文+源码】基于SSM(Spring + Spring MVC + MyBatis)的房屋租赁系统
创建一个基于SSM(Spring Spring MVC MyBatis)框架的房屋租赁系统是一个涉及多个步骤的过程。这个过程包括但不限于需求分析、数据库设计、前端界面设计以及后端逻辑实现等。 1. 需求分析 首先,明确你的房屋租赁系统的功能需求。例如&…...

【golang】解析 JSON到指定结构体
1.解析[1,2,3,4]数组类型的json package mainimport ("encoding/json""fmt" )func main() {// JSON 数据jsonData : [1, 2, 3, 4]// 定义一个切片来接收解析后的数据var numbers []int// 解析 JSON 数据到切片err : json.Unmarshal([]byte(jsonData), &am…...

设计模式——过滤器模式
一、定义和概念 定义 C 过滤器模式(Filter Pattern)也称为标准模式(Criteria Pattern),是一种设计模式,用于根据不同的标准或条件从一组对象中筛选出符合条件的对象。它将筛选条件的逻辑封装在不同的过滤器…...

Unity(四十八):Unity与Web双向交互
效果 游戏对象绑定脚本 游戏脚本源码 using System.Collections; using System.Collections.Generic; using UnityEngine;public class Tent : MonoBehaviour {public Camera camera;// Start is called before the first frame updatevoid Start(){}// Update is called once…...
多模态2025:技术路线“神仙打架”,视频生成冲上云霄
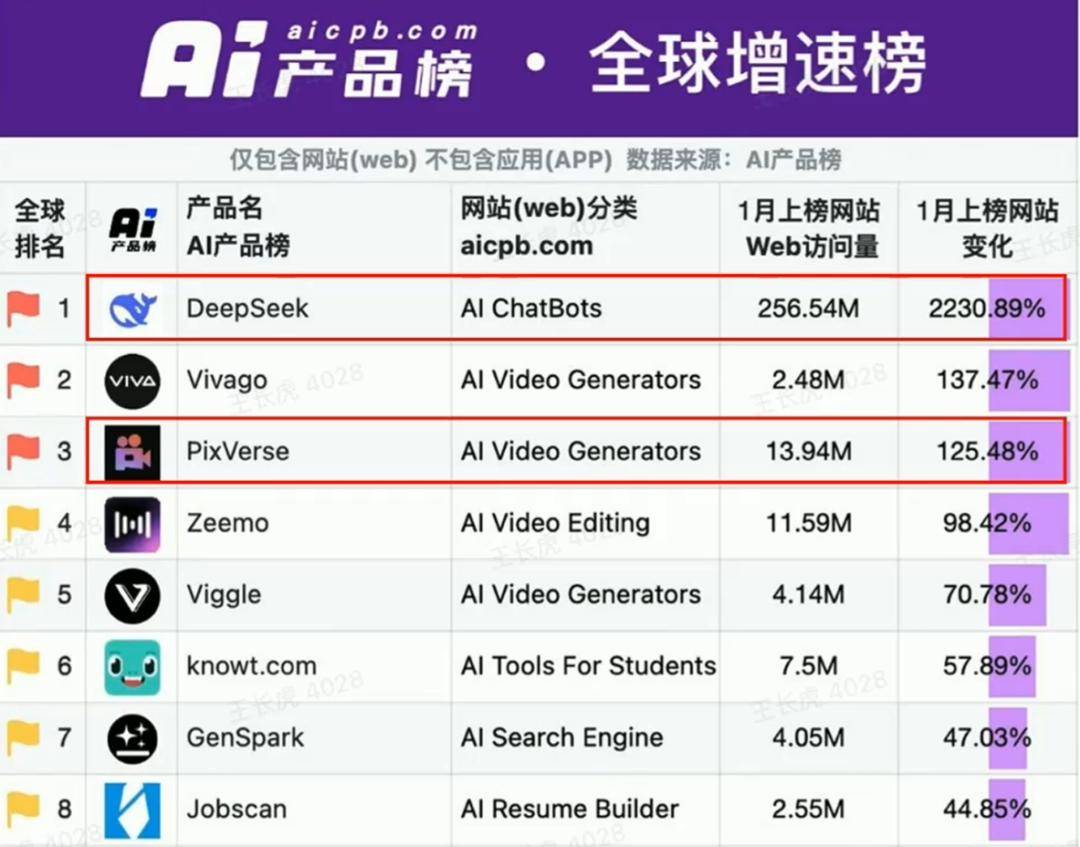
文|魏琳华 编|王一粟 一场大会,聚集了中国多模态大模型的“半壁江山”。 智源大会2025为期两天的论坛中,汇集了学界、创业公司和大厂等三方的热门选手,关于多模态的集中讨论达到了前所未有的热度。其中,…...
)
IGP(Interior Gateway Protocol,内部网关协议)
IGP(Interior Gateway Protocol,内部网关协议) 是一种用于在一个自治系统(AS)内部传递路由信息的路由协议,主要用于在一个组织或机构的内部网络中决定数据包的最佳路径。与用于自治系统之间通信的 EGP&…...
2025盘古石杯决赛【手机取证】
前言 第三届盘古石杯国际电子数据取证大赛决赛 最后一题没有解出来,实在找不到,希望有大佬教一下我。 还有就会议时间,我感觉不是图片时间,因为在电脑看到是其他时间用老会议系统开的会。 手机取证 1、分析鸿蒙手机检材&#x…...

CRMEB 框架中 PHP 上传扩展开发:涵盖本地上传及阿里云 OSS、腾讯云 COS、七牛云
目前已有本地上传、阿里云OSS上传、腾讯云COS上传、七牛云上传扩展 扩展入口文件 文件目录 crmeb\services\upload\Upload.php namespace crmeb\services\upload;use crmeb\basic\BaseManager; use think\facade\Config;/*** Class Upload* package crmeb\services\upload* …...
深入解析C++中的extern关键字:跨文件共享变量与函数的终极指南
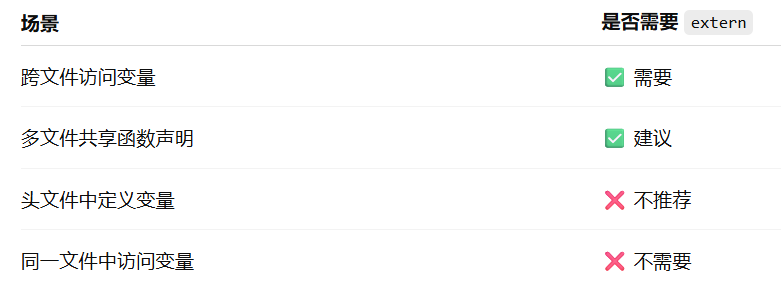
🚀 C extern 关键字深度解析:跨文件编程的终极指南 📅 更新时间:2025年6月5日 🏷️ 标签:C | extern关键字 | 多文件编程 | 链接与声明 | 现代C 文章目录 前言🔥一、extern 是什么?&…...
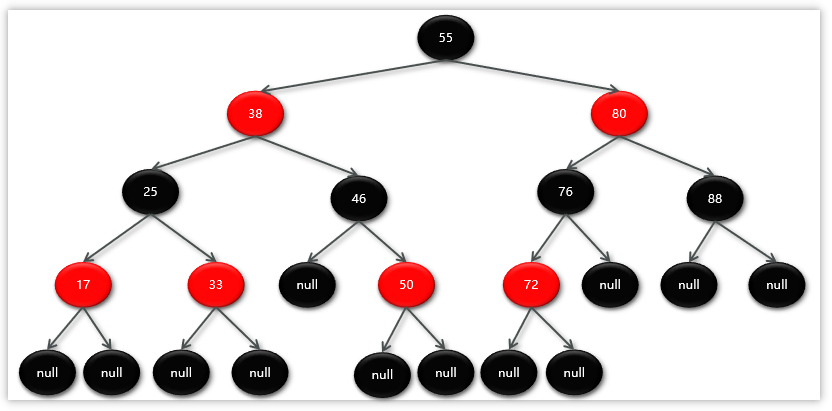
Map相关知识
数据结构 二叉树 二叉树,顾名思义,每个节点最多有两个“叉”,也就是两个子节点,分别是左子 节点和右子节点。不过,二叉树并不要求每个节点都有两个子节点,有的节点只 有左子节点,有的节点只有…...

【Go语言基础【13】】函数、闭包、方法
文章目录 零、概述一、函数基础1、函数基础概念2、参数传递机制3、返回值特性3.1. 多返回值3.2. 命名返回值3.3. 错误处理 二、函数类型与高阶函数1. 函数类型定义2. 高阶函数(函数作为参数、返回值) 三、匿名函数与闭包1. 匿名函数(Lambda函…...
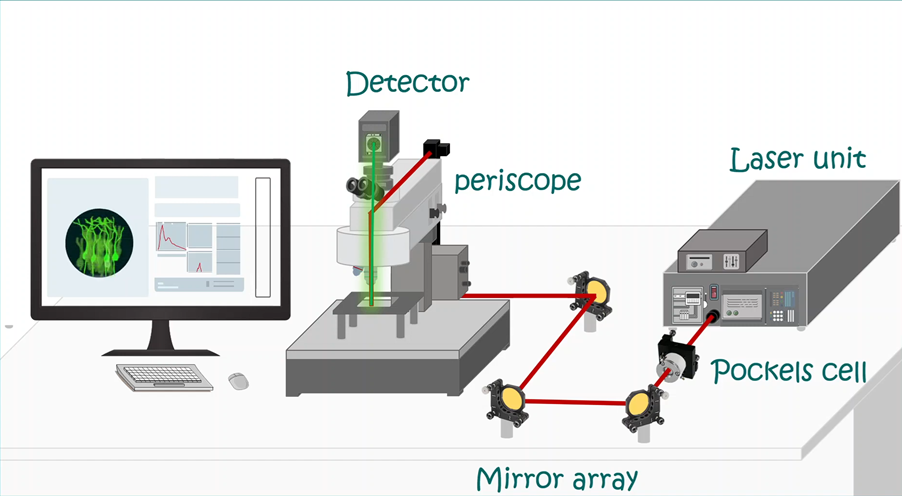
LabVIEW双光子成像系统技术
双光子成像技术的核心特性 双光子成像通过双低能量光子协同激发机制,展现出显著的技术优势: 深层组织穿透能力:适用于活体组织深度成像 高分辨率观测性能:满足微观结构的精细研究需求 低光毒性特点:减少对样本的损伤…...
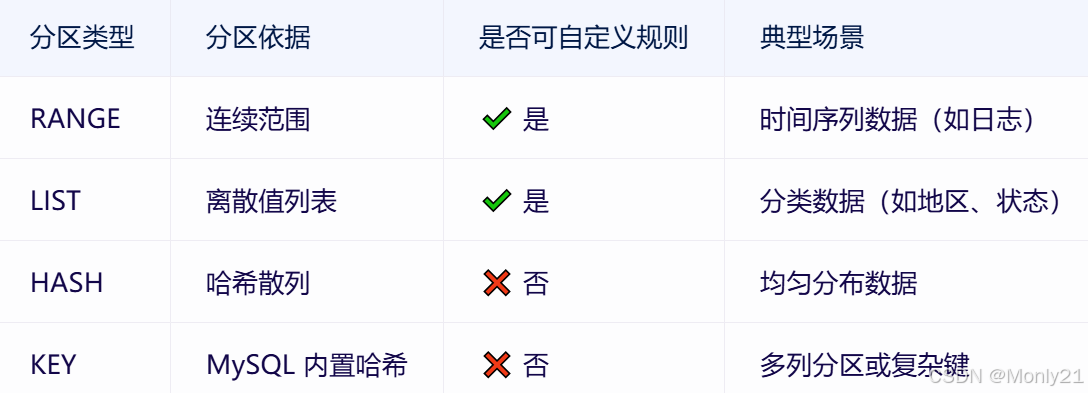
MySQL:分区的基本使用
目录 一、什么是分区二、有什么作用三、分类四、创建分区五、删除分区 一、什么是分区 MySQL 分区(Partitioning)是一种将单张表的数据逻辑上拆分成多个物理部分的技术。这些物理部分(分区)可以独立存储、管理和优化,…...
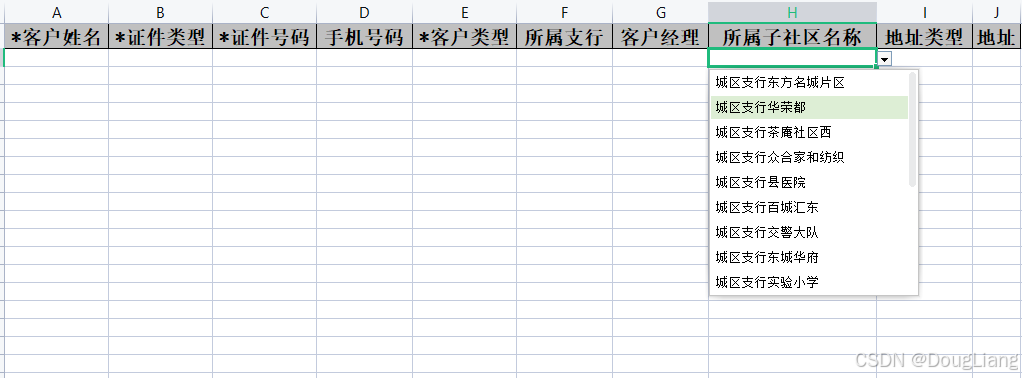
关于easyexcel动态下拉选问题处理
前些日子突然碰到一个问题,说是客户的导入文件模版想支持部分导入内容的下拉选,于是我就找了easyexcel官网寻找解决方案,并没有找到合适的方案,没办法只能自己动手并分享出来,针对Java生成Excel下拉菜单时因选项过多导…...
