Vue2进阶之Vue3高级用法
Vue3高级用法
- 响应式
- Vue2:Object.defineProperty
- Object.defineProperty
- this.$set设置响应式
- Vue3:Proxy
- composition API
- Vue2 option API和Vue3 compositionAPI
- reactive和shallowReactive
- readonly效果
- toRefs效果
- 生命周期
- main.js
- index.html
- LifeCycle.vue
- 异步组件元素节点
- 正常写
- index.html
- main.js
- Async.vue
- AsyncComp.vue
- 使用异步
- main.js
- teleport 传送门—createPortal React
- index.html
- main.js
- Dialog.vue
- 自定义hooks
- index.html
- main.js
- useMousePosition.js
- MouseMove.vue
作业:Vue3官网所有内容过一遍 Vue3
响应式
- Vue2:Object.defineProperty
- Vue3:Proxy
Vue2:Object.defineProperty
Object.defineProperty
//Vue2:Object.definePropertyconst initData={value:1
}const data={}Object.keys(initData).forEach(key=>{Object.defineProperty(data,key,{// getter setterget(){console.log("访问",key)return initData[key]},set(val){console.log("设置值",key)initData[key]=val}})
})
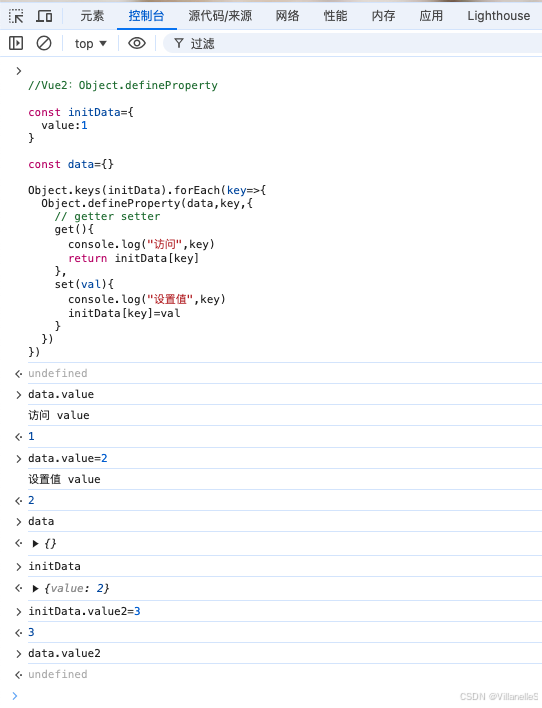
this.$set设置响应式
set给目的对象添加响应式属性后,并触发事件更新
this.$set(data,a,1)


Vue3:Proxy
// Vue3:Proxy
const person={name:"张三"
}let proxy=new Proxy(person,{get:function(target,key){if(key in target){return target[key]}throw new Error(`${key} is not defined`)},set(target,key,val){console.log("设置值",key)target[key]=val}}
)
let obj=Object.create(proxy)
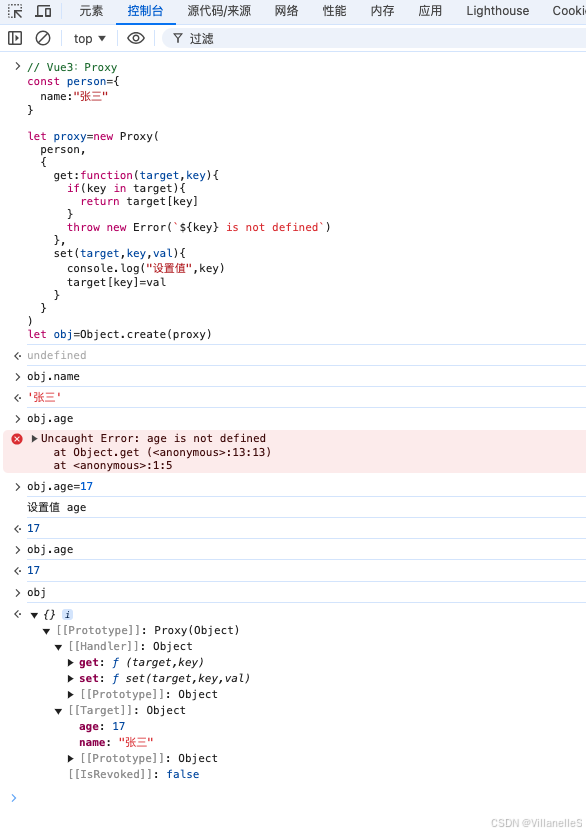
proxy的正规写法:
// Proxy正规写法
const initData={value:1
}
let proxy=new Proxy(initData,{get:function(target,key,receiver){console.log("访问",key)return Reflect.get(target,key,receiver)},set:function(target,key,val,receiver){console.log("修改",key)return Reflect.set(target,key,val,receiver)}}
)
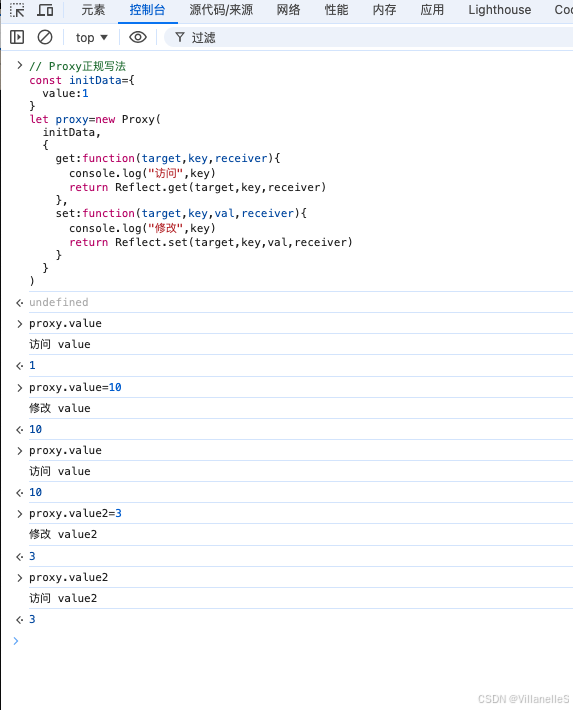
拓展
怎么将esNext转换为es5写法?
通过babel,国外主流的swc转换
composition API
Vue2 option API和Vue3 compositionAPI
Vue3的compositionAPI和Vue2的optionsAPI的最大的区别是:更加倾向于函数式编程以及Vue3支持多个根节点
Vue2:
<template><!--XXXX-->
</template>
<script>export default {data(){return{ XXXX }},methods:{},computed:{}}
</script>
<style></style>
Vue2最容易产生的问题是:写一个文件一开始还好,写着写着就发现这个文件内容非常非常多,非常非常繁琐。
OptionAPI非常非常容易导致一个文件内容非常非常多,越往后越难改,非常非常容易出bug
Rect相对于Vue不容易写出那么夸张的效果
Vue2的mixin将组件单一内容拆解到一个文件,太灵活了,对多人协作不友好
=>Vue3主要解决的就是这个问题,将明确的逻辑抽象到一起
React=>自定义hook,将一部分的逻辑功能放到单一组件里去维护
App.vue
<template><div class="mine"></div>
</template><script>
import {defineComponent,ref,isRef} from 'vue'
export default defineComponent({// 相当于Vue2生命周期中的beforeCreate,createdsetup(){const count=ref(10)const user="张三"console.log("count,user",count,count.value,user)console.log("count is ref?",isRef(count))console.log("user is ref?",isRef(user))}
})
</script>
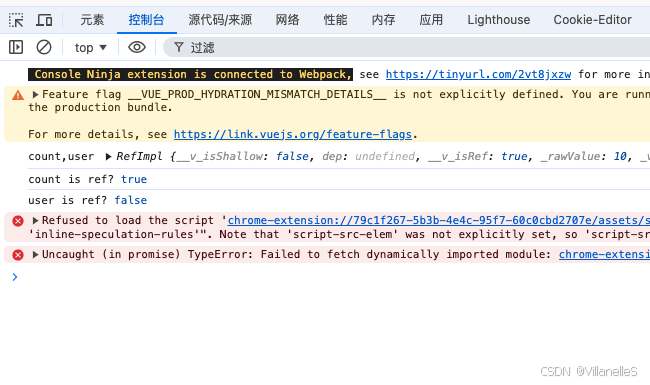
reactive和shallowReactive
<template><div class="mine"></div>
</template><script>
import {defineComponent,reactive,shallowReactive} from 'vue'
export default defineComponent({// 相当于Vue2生命周期中的beforeCreate,createdsetup(){const person={name:"张三",age:18,contacts:{phone:12345}}const personReactive=reactive(person)console.log("person reactive",personReactive)console.log("person reactive name",personReactive.name)console.log("person reactive contacts",personReactive.contacts)console.log("--------------分割线------------------------")const shallowPersonReactive=shallowReactive(person)console.log("shallow person reactive",shallowPersonReactive)console.log("shallow person reactive name",shallowPersonReactive.name)console.log("shallow person reactive contacts",shallowPersonReactive.contacts)}
})
</script>
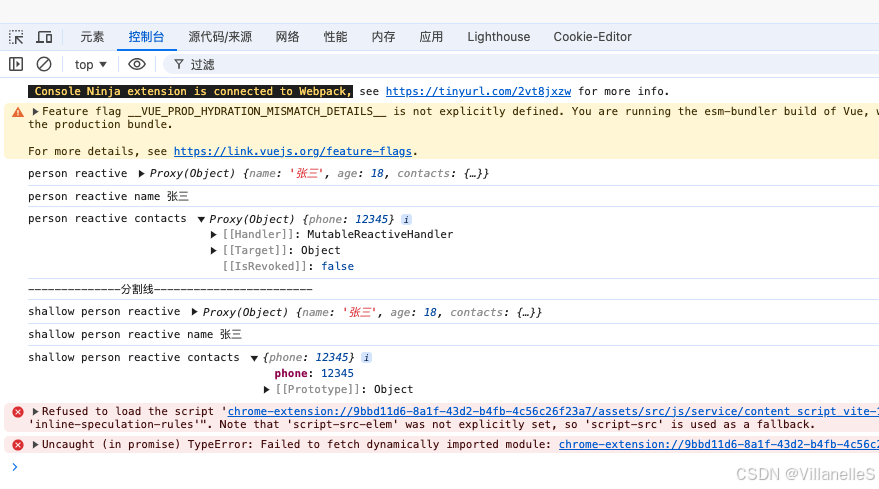
readonly效果
<template><div class="mine"></div>
</template><script>
import {defineComponent,ref,reactive,readonly} from 'vue'
export default defineComponent({// 相当于Vue2生命周期中的beforeCreate,createdsetup(){const count=ref(10)const obj=reactive({abc:18,count,userInfo:{age:66}})console.log("reactive obj:",obj)// 在Proxy的set中,是不允许做修改的const objOnly=readonly(obj)  console.log("readonly obj:",objOnly)objOnly.abc=100console.log("readonly obj:",objOnly)}
})
</script>
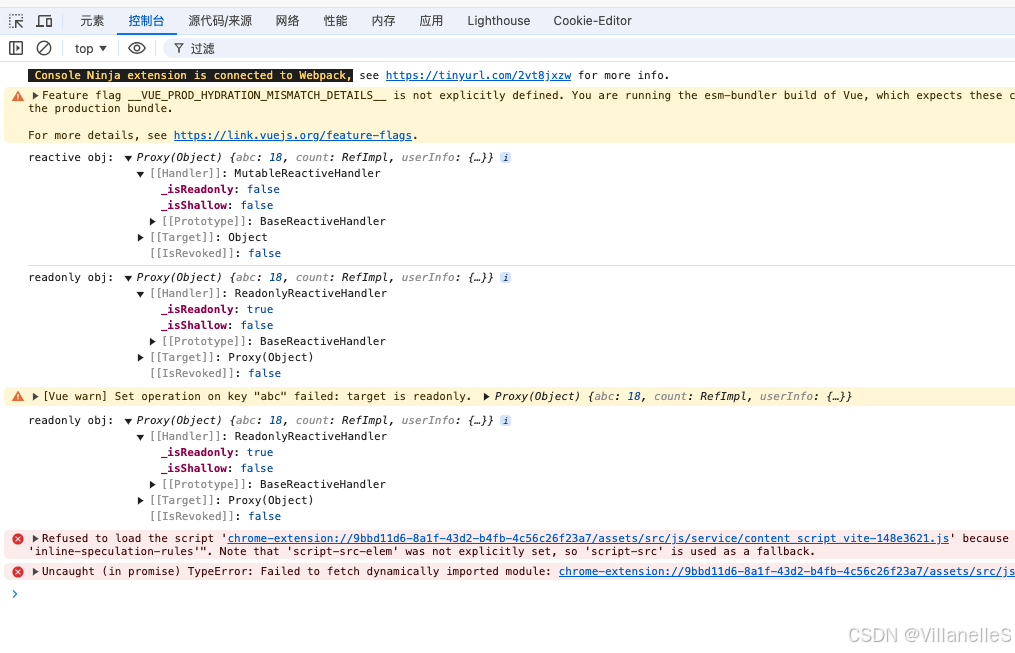
toRefs效果
<template><div class="mine"></div>
</template><script>
import {defineComponent,ref,isRef,reactive,shallowReactive,readonly, toRefs} from 'vue'
export default defineComponent({// 相当于Vue2生命周期中的beforeCreate,createdsetup(){const count=ref(10)const obj=reactive({abc:18,count,userInfo:{age:66}})console.log("reactive obj:",obj)console.log("toRefs obj",toRefs(obj))}
})
</script>
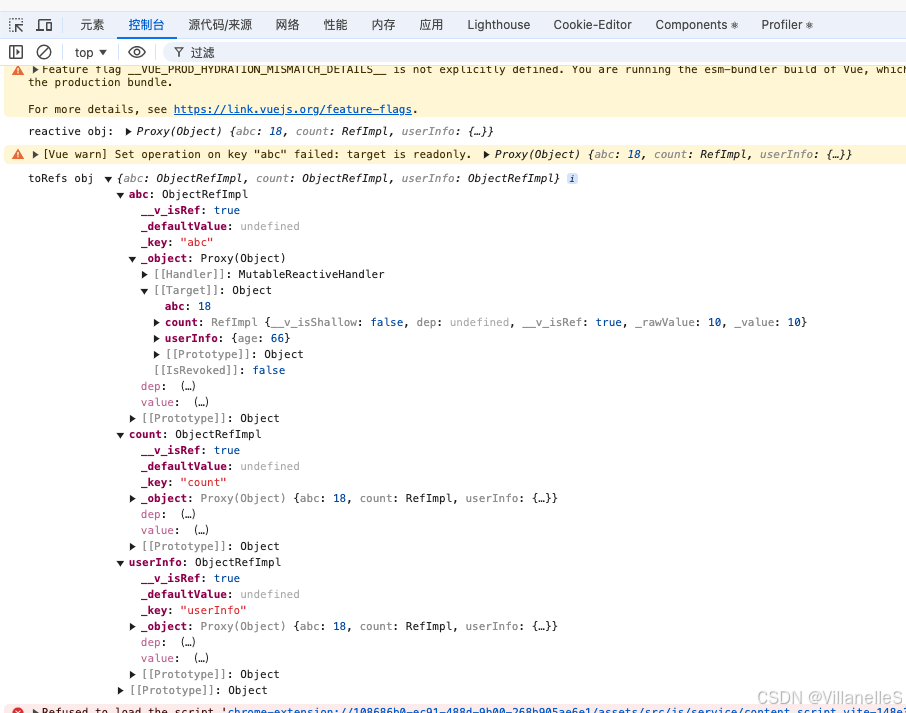
如果是通过ref创建出来的,一般是RefImpl,如果是通过toRefs创建出来的,一般把toRefs视为一个对象,针对对象里的所有属性,全部转换为toRefs的效果
生命周期
经常应用的场景:
1.初始化 mount
2.数据变化 update
3.卸载 unmount
加入LiftCycle组件
main.js
import { createApp } from 'vue'
import App from './App.vue'import LifeCycle from './LifeCycle.vue'createApp(App).mount('#app')createApp(LifeCycle).mount('#lifeCycle')
index.html
<div id="lifeCycle"></div>
全部:
<!DOCTYPE html>
<html lang=""><head><meta charset="utf-8"><meta http-equiv="X-UA-Compatible" content="IE=edge"><meta name="viewport" content="width=device-width,initial-scale=1.0"><link rel="icon" href="<%= BASE_URL %>favicon.ico"><title><%= htmlWebpackPlugin.options.title %></title></head><body><noscript><strong>We're sorry but <%= htmlWebpackPlugin.options.title %> doesn't work properly without JavaScript enabled. Please enable it to continue.</strong></noscript><div id="app"></div><!-- built files will be auto injected --><div id="lifeCycle"></div></body>
</html>
LifeCycle.vue
<template><div>{{ count }}{{ name }}</div><button @click="addNumber">+1</button><button @click="updateName">update name</button>
</template>
<script>
export default {data() {return {count:0,name:"张三"}},methods:{addNumber(){this.count++},updateName(){this.name = "李四"}},//  1.初始化,data还不能用beforeCreate(){console.log("beforeCreate")},//   data可以用,dom不可用created(){console.log("created")},//   挂载之前,DOM还没有生成beforeMount(){console.log("beforeMount")},//   在VNode(初次渲染/更新)渲染时调用renderTracked({key,target,type}){console.log("renderTracked",key,target,type)},//  挂载之后,DOM已经生成mounted(){console.log("mounted")console.log("-------------------------------------------------------------")},//  2.updaterenderTriggered({key,target,type}){console.log("renderTriggered",key,target,type)},beforeUpdate(){console.log("beforeUpdate")},renderTracked({key,target,type}){console.log("renderTriggered",key,target,type)},updated(){console.log("updated")},// 3.卸载beforeUnmount(){console.log("beforeUnmount")},unmounted(){console.log("unmounted")}
}
</script>
<style scoped></style>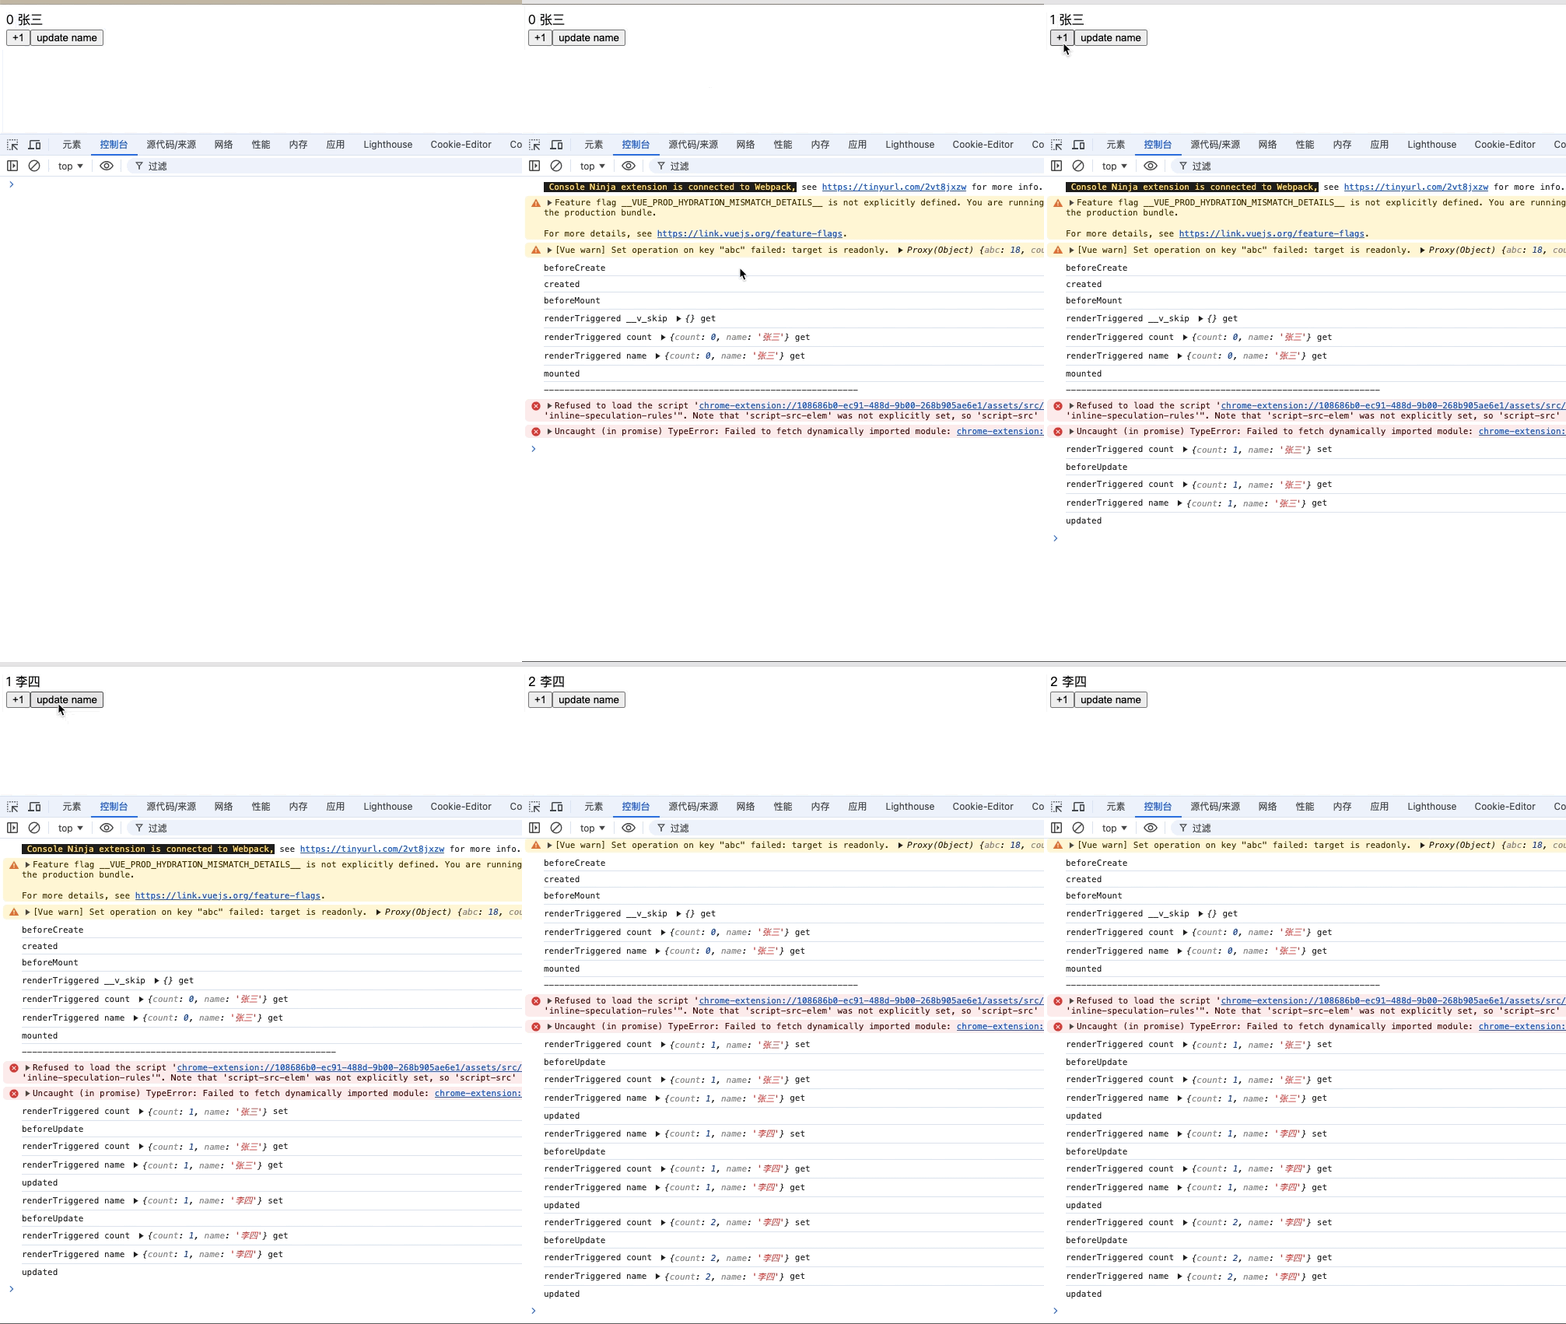
异步组件元素节点
正常写
- src
- Async.vue
- components
- AsyncComp.vue
index.html
<!-- 3.异步组件元素节点 -->
<div id="async"></div>
<!DOCTYPE html>
<html lang=""><head><meta charset="utf-8"><meta http-equiv="X-UA-Compatible" content="IE=edge"><meta name="viewport" content="width=device-width,initial-scale=1.0"><link rel="icon" href="<%= BASE_URL %>favicon.ico"><title><%= htmlWebpackPlugin.options.title %></title></head><body><noscript><strong>We're sorry but <%= htmlWebpackPlugin.options.title %> doesn't work properly without JavaScript enabled. Please enable it to continue.</strong></noscript><!-- 1.composition 元素节点 --><div id="app"></div><!-- built files will be auto injected --><!-- 2.生命周期元素节点 --><div id="lifeCycle"></div><!-- 3.异步组件元素节点 --><div id="async"></div></body>
</html>
main.js
import { createApp } from 'vue'
import App from './App.vue'import LifeCycle from './LifeCycle.vue'import Async from './Async.vue'
import AsyncComp from './components/AsyncComp.vue'createApp(App).mount('#app')createApp(LifeCycle).mount('#lifeCycle')const async=createApp(Async)
async.component("async-comp",AsyncComp)
async.mount('#async')
Async.vue
<template>ASYNC<async-comp></async-comp>
</template><script setup lang="ts"></script><style scoped></style>
AsyncComp.vue
<template><div>async defineComponent</div>
</template><script setup lang="ts"></script><style scoped></style>
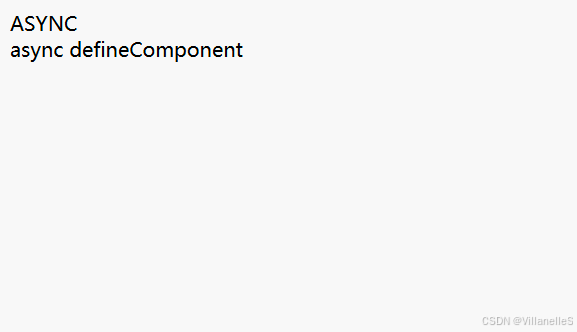
但是这样执行
pnpm run build
打包后,只会生成一个js文件

使用异步
main.js
const AsyncComp=defineAsyncComponent(()=>import('./components/AsyncComp.vue'))async.component("async-comp",AsyncComp)
全部代码:
import { createApp,defineAsyncComponent } from 'vue'
import App from './App.vue'import LifeCycle from './LifeCycle.vue'import Async from './Async.vue'
// import AsyncComp from './components/AsyncComp.vue'createApp(App).mount('#app')createApp(LifeCycle).mount('#lifeCycle')const async=createApp(Async)const AsyncComp=defineAsyncComponent(()=>import('./components/AsyncComp.vue'))async.component("async-comp",AsyncComp)
async.mount('#async')
再执行
pnpm run build
会生成两个js文件
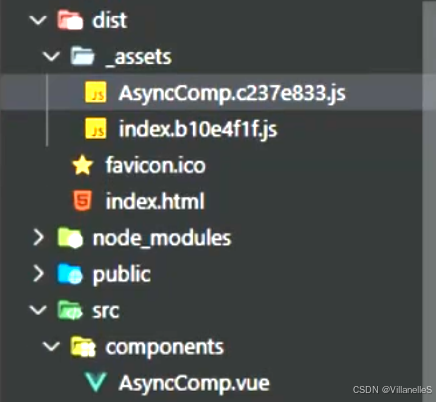
这两个文件是将我们异步的组件给单独拿出来,将异步组件单独拿出来的效果是,因为要做的是异步组件的动态引入,一般是额外使用或之后去用,就没有必要跟原先代码单独一起打包。
对应的是React.lazy和React中的suspense
const myComponent=React.lazy(()=>import('./Component'))function MyComponent(){return (<div><Suspense fallback={<Loading />}><Component /></Suspense></div>)
}
teleport 传送门—createPortal React
将子节点渲染到父节点以外的DOM的方式
- src
- Dialog.vue
index.html
<!-- 4.teleport 元素节点 -->
<div id="dialog"></div>
全部代码:
<!DOCTYPE html>
<html lang=""><head><meta charset="utf-8"><meta http-equiv="X-UA-Compatible" content="IE=edge"><meta name="viewport" content="width=device-width,initial-scale=1.0"><link rel="icon" href="<%= BASE_URL %>favicon.ico"><title><%= htmlWebpackPlugin.options.title %></title></head><body><noscript><strong>We're sorry but <%= htmlWebpackPlugin.options.title %> doesn't work properly without JavaScript enabled. Please enable it to continue.</strong></noscript><!-- 1.composition 元素节点 --><div id="app"></div><!-- built files will be auto injected --><!-- 2.生命周期元素节点 --><div id="lifeCycle"></div><!-- 3.异步组件元素节点 --><div id="async"></div><!-- 4.teleport 元素节点 --><div id="dialog"></div></body>
</html>
main.js
const dialog=createApp(Dialog)
dialog.mount('#dialog')
全部代码:
import { createApp,defineAsyncComponent } from 'vue'
import App from './App.vue'import LifeCycle from './LifeCycle.vue'import Async from './Async.vue'
import Dialog from './Dialog.vue'
// import AsyncComp from './components/AsyncComp.vue'createApp(App).mount('#app')createApp(LifeCycle).mount('#lifeCycle')const async=createApp(Async)const AsyncComp=defineAsyncComponent(()=>import('./components/AsyncComp.vue'))async.component("async-comp",AsyncComp)
async.mount('#async')const dialog=createApp(Dialog)
dialog.mount('#dialog')
Dialog.vue
<template><div class="portals"><button @click="showNotification">切换弹窗</button><teleport to="#dialog"><div v-if="isOpen" class="notification">这是一个弹窗</div></teleport></div>
</template>
<script>
import { ref } from 'vue';export default {setup(){const isOpen=ref(false)let closePopupconst showNotification=()=>{isOpen.value=trueclearTimeout(closePopup)closePopup=setTimeout(()=>{isOpen.value=false},20000)}return {isOpen,showNotification}}
}
</script>
<style scoped>
.notification{position: fixed;bottom: 20px;background-color: #fff;border: 1px solid #ccc;width: 300px;padding:30px;
}
</style>
弹窗是挂载在dialog下的,而不是protals下

自定义hooks
hooks最重要的特点:对于我们来说,不需要关心内部的逻辑,而且与Vue2相比,提供了一个非常合理的方式,使用Vue2的option API很容易写出三五千行的代码,但是对于函数式编程来说,按照逻辑功能拆分下来,一个文件至少包含一个功能,其他功能引用即可。
- public
- index.html
- src
- hooks
- useMousePosition.js
- MouseMove.vue
- main.js
- hooks
index.html
<!-- 5.自定义hook -->
<div id="mousemove"></div>
全部代码:
<!DOCTYPE html>
<html lang=""><head><meta charset="utf-8"><meta http-equiv="X-UA-Compatible" content="IE=edge"><meta name="viewport" content="width=device-width,initial-scale=1.0"><link rel="icon" href="<%= BASE_URL %>favicon.ico"><title><%= htmlWebpackPlugin.options.title %></title></head><body><noscript><strong>We're sorry but <%= htmlWebpackPlugin.options.title %> doesn't work properly without JavaScript enabled. Please enable it to continue.</strong></noscript><!-- 1.composition 元素节点 --><div id="app"></div><!-- built files will be auto injected --><!-- 2.生命周期元素节点 --><div id="lifeCycle"></div><!-- 3.异步组件元素节点 --><div id="async"></div><!-- 4.teleport 元素节点 --><div id="dialog"></div><!-- 5.自定义hook --><div id="mousemove"></div></body>
</html>
main.js
import MouseMove from './MouseMove.vue'const mousemove=createApp(MouseMove)
mousemove.mount('#mousemove')
全部代码:
import { createApp,defineAsyncComponent } from 'vue'
import App from './App.vue'import LifeCycle from './LifeCycle.vue'import Async from './Async.vue'
import Dialog from './Dialog.vue'
// import AsyncComp from './components/AsyncComp.vue'
import MouseMove from './MouseMove.vue'// createApp(App).mount('#app')// createApp(LifeCycle).mount('#lifeCycle')// const async=createApp(Async)// const AsyncComp=defineAsyncComponent(()=>import('./components/AsyncComp.vue'))// async.component("async-comp",AsyncComp)
// async.mount('#async')// const dialog=createApp(Dialog)
// dialog.mount('#dialog')const mousemove=createApp(MouseMove)
mousemove.mount('#mousemove')
useMousePosition.js
import { onMounted, onUnmounted, ref } from "vue";function useMousePosition() {const x=ref(0)const y=ref(0)const updateMouse=e=>{x.value=e.pageXy.value=e.pageY}onMounted(()=>{document.addEventListener('click',updateMouse)}) onUnmounted(()=>{document.removeEventListener('click',updateMouse)})return{x,y}
}export default useMousePosition
MouseMove.vue
<!-- 提供鼠标位置自定义hooks -->
<template><div><p>X:{{x}}</p><p>Y:{{y}}</p></div>
</template><script>
import { defineComponent } from 'vue';
import useMousePosition from './hooks/useMousePosition';export default defineComponent({setup(){const {x,y}=useMousePosition()return {x,y}}
})
</script><style scoped></style>

相关文章:

Vue2进阶之Vue3高级用法
Vue3高级用法 响应式Vue2:Object.definePropertyObject.definePropertythis.$set设置响应式 Vue3:Proxy composition APIVue2 option API和Vue3 compositionAPIreactive和shallowReactivereadonly效果toRefs效果 生命周期main.jsindex.htmlLifeCycle.vue…...

基于微信的追星小程序+ssm(lw+演示+源码+运行)
摘 要 随着我国经济迅速发展,人们对手机的需求越来越大,各种手机软件也都在被广泛应用,但是对于手机进行数据信息管理,对于手机的各种软件也是备受用户的喜爱,追星小程序被用户普遍使用,为方便用户能够可以…...

【51单片机】串口通信原理 + 使用
学习使用的开发板:STC89C52RC/LE52RC 编程软件:Keil5 烧录软件:stc-isp 开发板实图: 文章目录 串口硬件电路UART串口相关寄存器 编码单片机通过串口发送数据电脑通过串口发送数据控制LED灯 串口 串口是一种应用十分广泛的通讯接…...

优选算法第五讲:位运算模块
优选算法第五讲:位运算模块 1.常见的位运算总结2.判断字符是否唯一3.丢失的数字4.两整数之和5.只出现一次的数字II6.消失的两个数字 1.常见的位运算总结 2.判断字符是否唯一 链接: link class Solution { public:bool isUnique(string astr) {if(astr.size() >…...

【07】Maven项目多环境打包配置
(1)Web项目使用Maven进行多模块划分开发之后,面临一个问题,即如何加载不同环境的配置文件打包发布到不同的环境中? (2)不同的环境有开发环境、测试环境、线上生产环境等。 (3&#x…...
:Linux GIibc IO基础)
嵌入式Linux入门具备:C语言基础与基本驱动学习(2):Linux GIibc IO基础
标准IO 标准 I/O 虽然是对文件 I/O 进行了封装,但事实上并不仅仅只是如此,标准 I/O 会处理很多细节,譬如分配 stdio 缓冲区、以优化的块长度执行 I/O 等,这些处理使用户不必担心如何选择使用正确的块长度。I/O 库函数是构建于文件…...
【微服务】Docker 容器化
一、初识Docker 1. 为什么需要 Docker 大型项目组件较多,运行环境也较为复杂,部署时会遇到一些问题: 依赖关系复杂,容易出现兼容性的问题开发、测试、生产环境有差异 Docker 如何解决依赖的兼容问题 将应用的Libs(…...

[前端] 为网站侧边栏添加搜索引擎模块
前言 最近想给我的个人网站侧边栏添加一个搜索引擎模块,可以引导用户帮助本站SEO优化(让用户可以通过点击搜索按钮完成一次对本人网站的搜索,从而实现对网站的搜索引擎优化)。 最开始,我只是想实现一个简单的百度搜索…...

解决CORS (跨源资源共享) 错误
问题引入 前端代码 <template><div id"hello-vue" class"demo">{{ message }}</div><el-button type"primary" click"handleClick">我是一个按钮</el-button></template><script setup>//加…...

Redis 实现分布式缓存
一、引言 在当今互联网时代,随着业务的不断发展和用户量的持续增长,系统的性能和可扩展性成为了关键挑战。分布式缓存作为一种重要的技术手段,能够有效地缓解数据库压力、提高系统响应速度、增强系统的可扩展性。Redis 作为一种高性能的内存数…...

Chrome与火狐哪个浏览器的移动版本更流畅
在当今的数字化时代,移动设备已经成为我们生活中不可或缺的一部分。而浏览器作为我们访问互联网的重要工具,其性能和用户体验直接影响到我们的使用感受。本文将对比Chrome和火狐(Firefox)两款主流浏览器的移动版本,探讨…...
——2、爬取图片信息。)
7篇Python爬虫实例,直接代码可运行,全网最全,注释超详细(适合收藏)——2、爬取图片信息。
7篇Python爬虫实例,可直接运行,适合收藏 python爬虫7篇实例,分七个文章进行发布;第二篇:爬取图片信息。 爬取图片信息,并将每张图片都下载下来。 爬虫主要三部分: 1、获取数据 2、数据解析 3、…...

25.停车场管理系统(基于web的Java项目)
目录 1.系统的受众说明 2.相关技术与方法 3.系统分析 3.1 可行性分析 3.1.1 技术可行性 3.1.2 经济可行性 3.1.3 操作可行性 3.2 需求分析 3.2.1 系统功能描述 3.2.2 用例图分析 4. 系统设计 4.1 系统类分析 5. 系统详细设计与实现 5.1 用户登录 5.2 系统信…...

展览搭建公司怎么跟展会主办打好交道
与展会主办打好交道的重要性 首先,我们得明白,展览搭建公司为何要跟展会主办打交道。简单地说,展会主办拥有大量的参展商信息。这些参展商是展览搭建公司潜在的客户群体,与主办打好交道,就等于拿到了通向这些客户的 “…...

软件开发方法
软件开发方法是一种用于指导软件开发过程的系统性方法,它涵盖了从需求分析、设计、编码、测试到维护的整个软件生命周期。软件开发方法通常包括一系列的步骤、技术和工具,以确保软件的质量、可维护性和可扩展性。 常见的软件开发方法有瀑布模型、敏捷开发、螺旋模型等。这些…...

「Mac畅玩鸿蒙与硬件24」UI互动应用篇1 - 灯光控制小项目
本篇将带领你实现一个互动性十足的灯光控制小项目,用户可以通过点击按钮来控制灯光的开关。该项目将涉及状态管理、动态图片加载以及按钮交互,是学习鸿蒙应用开发的重要基础。 关键词 UI互动应用状态管理动态图片加载用户交互 一、功能说明 在这个灯光…...

十二:java web(4)-- Spring核心基础
目录 创建项目 Spring 核心基础 Spring 容器 Spring 容器的作用 Spring 容器的工作流程 Bean Bean 的生命周期 IOC(控制反转)与依赖注入(DI) 控制反转的概念 依赖注入的几种方式(构造器注入、Setter 注入、接…...

new和malloc有什么区别,他们的用法是什么?malloc分配失败会导致什么问题
1) new和malloc的区别,和他们的用法 new 和 malloc 主要有以下区别: 一、性质和来源 new :是 C 的运算符,在操作时会调用构造函数进行对象的初始化。它是 C 语言层面的操作,能更好地与 C 的面向对象特性结合。 malloc …...

了解SQLExpress数据库
SQLExpress(Microsoft SQL Server Express)是由微软公司开发的一款免费且轻量级的数据库管理系统。以下是关于SQLExpress的详细解释: 一、定义与特点 定义: SQLExpress是Microsoft SQL Server的一个缩减版或基础版,旨在…...

geoserver创建一个根据属性显示不同形状的点样式
geoserver创建一个根据属性显示不同形状的点样式 三角形 -triangle 圆形 - circle 正方形 - square 星形 - star 十字形 - cross 菱形 -diamond 代码: <?xml version"1.0" encoding"UTF-8"?> <StyledLayerDescriptor version"…...

挑战杯推荐项目
“人工智能”创意赛 - 智能艺术创作助手:借助大模型技术,开发能根据用户输入的主题、风格等要求,生成绘画、音乐、文学作品等多种形式艺术创作灵感或初稿的应用,帮助艺术家和创意爱好者激发创意、提高创作效率。 - 个性化梦境…...
label-studio的使用教程(导入本地路径)
文章目录 1. 准备环境2. 脚本启动2.1 Windows2.2 Linux 3. 安装label-studio机器学习后端3.1 pip安装(推荐)3.2 GitHub仓库安装 4. 后端配置4.1 yolo环境4.2 引入后端模型4.3 修改脚本4.4 启动后端 5. 标注工程5.1 创建工程5.2 配置图片路径5.3 配置工程类型标签5.4 配置模型5.…...

基于距离变化能量开销动态调整的WSN低功耗拓扑控制开销算法matlab仿真
目录 1.程序功能描述 2.测试软件版本以及运行结果展示 3.核心程序 4.算法仿真参数 5.算法理论概述 6.参考文献 7.完整程序 1.程序功能描述 通过动态调整节点通信的能量开销,平衡网络负载,延长WSN生命周期。具体通过建立基于距离的能量消耗模型&am…...
visual studio 2022更改主题为深色
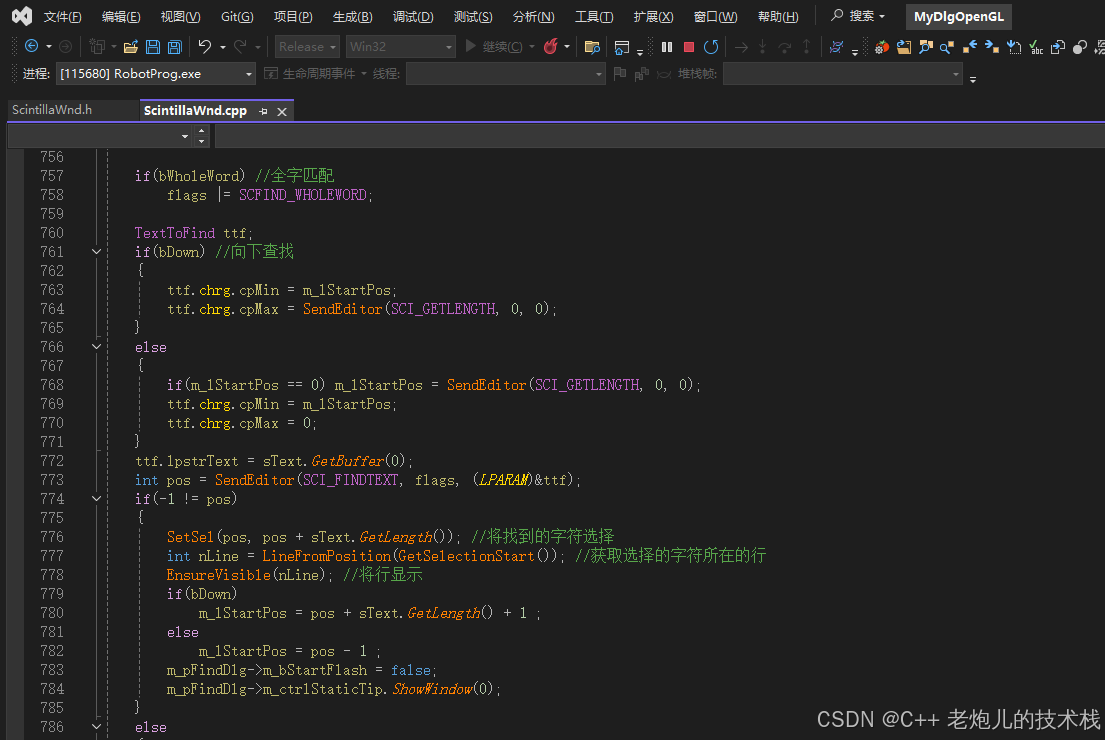
visual studio 2022更改主题为深色 点击visual studio 上方的 工具-> 选项 在选项窗口中,选择 环境 -> 常规 ,将其中的颜色主题改成深色 点击确定,更改完成...

蓝牙 BLE 扫描面试题大全(2):进阶面试题与实战演练
前文覆盖了 BLE 扫描的基础概念与经典问题蓝牙 BLE 扫描面试题大全(1):从基础到实战的深度解析-CSDN博客,但实际面试中,企业更关注候选人对复杂场景的应对能力(如多设备并发扫描、低功耗与高发现率的平衡)和前沿技术的…...

vue3 字体颜色设置的多种方式
在Vue 3中设置字体颜色可以通过多种方式实现,这取决于你是想在组件内部直接设置,还是在CSS/SCSS/LESS等样式文件中定义。以下是几种常见的方法: 1. 内联样式 你可以直接在模板中使用style绑定来设置字体颜色。 <template><div :s…...
:爬虫完整流程)
Python爬虫(二):爬虫完整流程
爬虫完整流程详解(7大核心步骤实战技巧) 一、爬虫完整工作流程 以下是爬虫开发的完整流程,我将结合具体技术点和实战经验展开说明: 1. 目标分析与前期准备 网站技术分析: 使用浏览器开发者工具(F12&…...
C# 类和继承(抽象类)
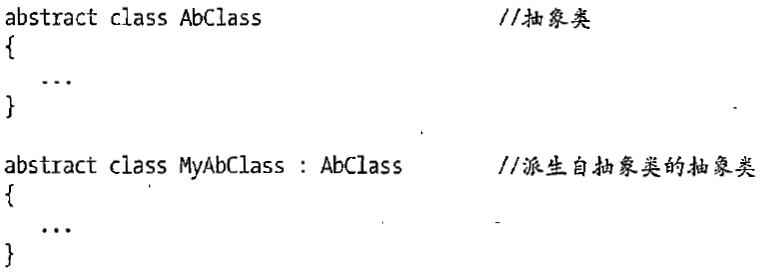
抽象类 抽象类是指设计为被继承的类。抽象类只能被用作其他类的基类。 不能创建抽象类的实例。抽象类使用abstract修饰符声明。 抽象类可以包含抽象成员或普通的非抽象成员。抽象类的成员可以是抽象成员和普通带 实现的成员的任意组合。抽象类自己可以派生自另一个抽象类。例…...

AI,如何重构理解、匹配与决策?
AI 时代,我们如何理解消费? 作者|王彬 封面|Unplash 人们通过信息理解世界。 曾几何时,PC 与移动互联网重塑了人们的购物路径:信息变得唾手可得,商品决策变得高度依赖内容。 但 AI 时代的来…...

在QWebEngineView上实现鼠标、触摸等事件捕获的解决方案
这个问题我看其他博主也写了,要么要会员、要么写的乱七八糟。这里我整理一下,把问题说清楚并且给出代码,拿去用就行,照着葫芦画瓢。 问题 在继承QWebEngineView后,重写mousePressEvent或event函数无法捕获鼠标按下事…...
