Java SpringBoot + Vue + Uniapp 集成JustAuth 最快实现多端三方登录!(QQ登录、微信登录、支付宝登录……)
注:本文基于 若依 集成just-auth实现第三方授权登录 修改完善,所有步骤仅代表本人如下环境亲测可用,其他环境需自辩或联系查看原因!
系统环境
运行系统:Windows10专业版、Linux Centos7.6
Java 版本:1.8.0_371
node 版本:14.21.3
Mysql版本:5.5.39、5.7.44
一、后台配置
1、添加依赖
<!-- JustAuth第三方授权登录 -->
<dependency><groupId>me.zhyd.oauth</groupId><artifactId>JustAuth</artifactId><version>1.15.6</version>
</dependency>
<!-- HttpClient -->
<dependency><groupId>org.apache.httpcomponents</groupId><artifactId>httpclient</artifactId>
</dependency>
2、添加认证授权工具类
package top.chengrongyu.common.utils;import me.zhyd.oauth.cache.AuthStateCache;
import me.zhyd.oauth.config.AuthConfig;
import me.zhyd.oauth.exception.AuthException;
import me.zhyd.oauth.request.*;
/*** 认证授权工具类* * @author ruoyi*/
public class AuthUtils
{@SuppressWarnings("deprecation")public static AuthRequest getAuthRequest(String source, String clientId, String clientSecret, String redirectUri,AuthStateCache authStateCache){AuthRequest authRequest = null;switch (source.toLowerCase()){case "dingtalk":authRequest = new AuthDingTalkRequest(AuthConfig.builder().clientId(clientId).clientSecret(clientSecret).redirectUri(redirectUri).build(), authStateCache);break;case "baidu":authRequest = new AuthBaiduRequest(AuthConfig.builder().clientId(clientId).clientSecret(clientSecret).redirectUri(redirectUri).build(), authStateCache);break;case "github":authRequest = new AuthGithubRequest(AuthConfig.builder().clientId(clientId).clientSecret(clientSecret).redirectUri(redirectUri).build(), authStateCache);break;case "gitee":authRequest = new AuthGiteeRequest(AuthConfig.builder().clientId(clientId).clientSecret(clientSecret).redirectUri(redirectUri).build(), authStateCache);break;case "weibo":authRequest = new AuthWeiboRequest(AuthConfig.builder().clientId(clientId).clientSecret(clientSecret).redirectUri(redirectUri).build(), authStateCache);break;case "coding":authRequest = new AuthCodingRequest(AuthConfig.builder().clientId(clientId).clientSecret(clientSecret).redirectUri(redirectUri).codingGroupName("").build(), authStateCache);break;case "oschina":authRequest = new AuthOschinaRequest(AuthConfig.builder().clientId(clientId).clientSecret(clientSecret).redirectUri(redirectUri).build(), authStateCache);break;case "alipay":// 支付宝在创建回调地址时,不允许使用localhost或者127.0.0.1,所以这儿的回调地址使用的局域网内的ipauthRequest = new AuthAlipayRequest(AuthConfig.builder().clientId(clientId).clientSecret(clientSecret).alipayPublicKey("").redirectUri(redirectUri).build(), authStateCache);break;case "qq":authRequest = new AuthQqRequest(AuthConfig.builder().clientId(clientId).clientSecret(clientSecret).redirectUri(redirectUri).build(), authStateCache);break;case "wechat_open":authRequest = new AuthWeChatOpenRequest(AuthConfig.builder().clientId(clientId).clientSecret(clientSecret).redirectUri(redirectUri).build(), authStateCache);break;case "csdn":authRequest = new AuthCsdnRequest(AuthConfig.builder().clientId(clientId).clientSecret(clientSecret).redirectUri(redirectUri).build(), authStateCache);break;case "taobao":authRequest = new AuthTaobaoRequest(AuthConfig.builder().clientId(clientId).clientSecret(clientSecret).redirectUri(redirectUri).build(), authStateCache);break;case "douyin":authRequest = new AuthDouyinRequest(AuthConfig.builder().clientId(clientId).clientSecret(clientSecret).redirectUri(redirectUri).build(), authStateCache);break;case "linkedin":authRequest = new AuthLinkedinRequest(AuthConfig.builder().clientId(clientId).clientSecret(clientSecret).redirectUri(redirectUri).build(), authStateCache);break;case "microsoft":authRequest = new AuthMicrosoftRequest(AuthConfig.builder().clientId(clientId).clientSecret(clientSecret).redirectUri(redirectUri).build(), authStateCache);break;case "mi":authRequest = new AuthMiRequest(AuthConfig.builder().clientId(clientId).clientSecret(clientSecret).redirectUri(redirectUri).build(), authStateCache);break;case "toutiao":authRequest = new AuthToutiaoRequest(AuthConfig.builder().clientId(clientId).clientSecret(clientSecret).redirectUri(redirectUri).build(), authStateCache);break;case "teambition":authRequest = new AuthTeambitionRequest(AuthConfig.builder().clientId(clientId).clientSecret(clientSecret).redirectUri(redirectUri).build(), authStateCache);break;case "pinterest":authRequest = new AuthPinterestRequest(AuthConfig.builder().clientId(clientId).clientSecret(clientSecret).redirectUri(redirectUri).build(), authStateCache);break;case "renren":authRequest = new AuthRenrenRequest(AuthConfig.builder().clientId(clientId).clientSecret(clientSecret).redirectUri(redirectUri).build(), authStateCache);break;case "stack_overflow":authRequest = new AuthStackOverflowRequest(AuthConfig.builder().clientId(clientId).clientSecret(clientSecret).redirectUri(redirectUri).stackOverflowKey("").build(),authStateCache);break;case "huawei":authRequest = new AuthHuaweiRequest(AuthConfig.builder().clientId(clientId).clientSecret(clientSecret).redirectUri(redirectUri).build(), authStateCache);break;case "wechat_enterprise":authRequest = new AuthWeChatEnterpriseRequest(AuthConfig.builder().clientId(clientId).clientSecret(clientSecret).redirectUri(redirectUri).agentId("").build(), authStateCache);break;case "kujiale":authRequest = new AuthKujialeRequest(AuthConfig.builder().clientId(clientId).clientSecret(clientSecret).redirectUri(redirectUri).build(), authStateCache);break;case "gitlab":authRequest = new AuthGitlabRequest(AuthConfig.builder().clientId(clientId).clientSecret(clientSecret).redirectUri(redirectUri).build(), authStateCache);break;case "meituan":authRequest = new AuthMeituanRequest(AuthConfig.builder().clientId(clientId).clientSecret(clientSecret).redirectUri(redirectUri).build(), authStateCache);break;case "eleme":authRequest = new AuthElemeRequest(AuthConfig.builder().clientId(clientId).clientSecret(clientSecret).redirectUri(redirectUri).build());break;case "wechat_mp":authRequest = new AuthWeChatMpRequest(AuthConfig.builder().clientId(clientId).clientSecret(clientSecret).redirectUri(redirectUri).build(), authStateCache);break;case "aliyun":authRequest = new AuthAliyunRequest(AuthConfig.builder().clientId(clientId).clientSecret(clientSecret).redirectUri(redirectUri).build(), authStateCache);break;default:break;}if (null == authRequest){throw new AuthException("未获取到有效的Auth配置");}return authRequest;}
}
3、新建第三方登录授权表
-- ----------------------------
-- 第三方授权表
-- ----------------------------
create table sys_auth_user (auth_id           bigint(20)      not null auto_increment    comment '授权ID',uuid              varchar(500)    not null                   comment '第三方平台用户唯一ID',user_id           bigint(20)      not null                   comment '系统用户ID',login_name        varchar(30)     not null                   comment '登录账号',user_name         varchar(30)     default ''                 comment '用户昵称',avatar            varchar(500)    default ''                 comment '头像地址',email             varchar(255)    default ''                 comment '用户邮箱',source            varchar(255)    default ''                 comment '用户来源',create_time       datetime                                   comment '创建时间',primary key (auth_id)
) engine=innodb auto_increment=100 comment = '第三方授权表';
4、添加实体表、Mapper、Service接口类
(1)实体
package top.chengrongyu.system.domain;import lombok.Data;
import top.chengrongyu.common.core.domain.BaseEntity;/*** 第三方授权表 sys_auth_user* * @author ruoyi*/
@Data
public class SysAuthUser extends BaseEntity
{private static final long serialVersionUID = 1L;/** 授权ID */private Long authId;/** 第三方平台用户唯一ID */private String uuid;/** 系统用户ID */private Long userId;/** 登录账号 */private String userName;/** 用户昵称 */private String nickName;/** 头像地址 */private String avatar;/** 用户邮箱 */private String email;/** 用户来源 */private String source;
}
(2)在原user的Mapper下添加如下接口
/*** 根据用户编号查询授权列表* * @param userId 用户编号* @return 授权列表*/public List<SysAuthUser> selectAuthUserListByUserId(Long userId);/*** 根据uuid查询用户信息** @param uuid 唯一信息* @return 结果*/public SysUser selectAuthUserByUuid(String uuid);/*** 校验source平台是否绑定** @param userId 用户编号* @param source 绑定平台* @return 结果*/public int checkAuthUser(@Param("userId") Long userId, @Param("source") String source);/*** 新增第三方授权信息* * @param authUser 用户信息* @return 结果*/public int insertAuthUser(SysAuthUser authUser);/*** 根据编号删除第三方授权信息* * @param authId 授权编号* @return 结果*/public int deleteAuthUser(Long authId);
(3)在原user的Service下添加如下接口
/*** 根据用户编号查询授权列表** @param userId 用户编号* @return 授权列表*/public List<SysAuthUser> selectAuthUserListByUserId(Long userId);
(4)在原user的ServiceImpl下添加如下接口
/*** 根据用户编号查询授权列表* * @param userId 用户编号* @return 授权列表*/public List<SysAuthUser> selectAuthUserListByUserId(Long userId){return userMapper.selectAuthUserListByUserId(userId);}
(5)在原user的Mapper.xml下添加如下sql
<resultMap id="SysAuthUserResult" type="SysAuthUser"><id property="authId" column="auth_id" /><result property="uuid" column="uuid" /><result property="userId" column="user_id" /><result property="userName" column="user_name" /><result property="nickName" column="nick_name" /><result property="avatar" column="avatar" /><result property="email" column="email" /><result property="source" column="source" /><result property="createTime" column="create_time" /></resultMap><select id="selectAuthUserByUuid" parameterType="String" resultMap="SysUserResult">select b.user_id as user_id, b.user_name as user_name, b.password as passwordfrom sys_auth_user a left join sys_user b on a.user_id = b.user_idwhere a.uuid = #{uuid} and b.del_flag = '0'</select><select id="selectAuthUserListByUserId" parameterType="Long" resultMap="SysAuthUserResult">select auth_id, uuid, user_id, user_name, nick_name, avatar, email, source, create_timefrom sys_auth_user where user_id = #{userId} </select><select id="checkAuthUser" parameterType="SysAuthUser" resultType="int">select count(1) from sys_auth_user where user_id=#{userId} and source=#{source} limit 1</select><insert id="insertAuthUser" parameterType="SysAuthUser">insert into sys_auth_user(<if test="uuid != null and uuid != ''">uuid,</if><if test="userId != null and userId != 0">user_id,</if><if test="userName != null and userName != ''">user_name,</if><if test="nickName != null and nickName != ''">nick_name,</if><if test="avatar != null and avatar != ''">avatar,</if><if test="email != null and email != ''">email,</if><if test="source != null and source != ''">source,</if>create_time)values(<if test="uuid != null and uuid != ''">#{uuid},</if><if test="userId != null and userId != 0">#{userId},</if><if test="userName != null and userName != ''">#{userName},</if><if test="nickName != null and nickName != ''">#{nickName},</if><if test="avatar != null and avatar != ''">#{avatar},</if><if test="email != null and email != ''">#{email},</if><if test="source != null and source != ''">#{source},</if>sysdate())</insert><delete id="deleteAuthUser" parameterType="Long">delete from sys_auth_user where auth_id = #{authId}</delete>
5、添加SysAuthController
注意:
①这里的auths下的clientId需要自己获取正式的个人网站客户端id、密钥、回调等信息;
②回调地址需要写成前端页面的地址,不是后端的;
③此处更改了三方登录的方式,新增了无绑定账户自动创建账户并登录的代码逻辑,并修复了一些绑定三方账户的bug;
参考JustAuth官网集成第三方步骤
package top.chengrongyu.web.controller.system;import java.io.IOException;
import java.util.HashMap;
import java.util.Map;
import javax.servlet.http.HttpServletRequest;
import org.springframework.beans.factory.annotation.Autowired;
import org.springframework.web.bind.annotation.DeleteMapping;
import org.springframework.web.bind.annotation.GetMapping;
import org.springframework.web.bind.annotation.PathVariable;
import org.springframework.web.bind.annotation.RequestMapping;
import org.springframework.web.bind.annotation.ResponseBody;
import org.springframework.web.bind.annotation.RestController;
import com.alibaba.fastjson2.JSONObject;
import me.zhyd.oauth.cache.AuthDefaultStateCache;
import me.zhyd.oauth.cache.AuthStateCache;
import me.zhyd.oauth.model.AuthCallback;
import me.zhyd.oauth.model.AuthResponse;
import me.zhyd.oauth.model.AuthUser;
import me.zhyd.oauth.request.AuthRequest;
import me.zhyd.oauth.utils.AuthStateUtils;
import org.springframework.web.multipart.MultipartFile;
import top.chengrongyu.common.constant.Constants;
import top.chengrongyu.common.core.controller.BaseController;
import top.chengrongyu.common.core.domain.AjaxResult;
import top.chengrongyu.common.core.domain.entity.SysUser;
import top.chengrongyu.common.core.domain.model.LoginUser;
import top.chengrongyu.common.enums.UserStatus;
import top.chengrongyu.common.exception.ServiceException;
import top.chengrongyu.common.utils.AuthUtils;
import top.chengrongyu.common.utils.SecurityUtils;
import top.chengrongyu.common.utils.StringUtils;
import top.chengrongyu.framework.web.service.SysLoginService;
import top.chengrongyu.framework.web.service.SysPermissionService;
import top.chengrongyu.framework.web.service.TokenService;
import top.chengrongyu.system.domain.SysAuthUser;
import top.chengrongyu.system.mapper.SysUserMapper;
import top.chengrongyu.system.service.ISysUserService;import static top.chengrongyu.common.utils.file.FileUploadUtils.fileUrlConvertToMultipartImage;
import static top.chengrongyu.common.utils.file.FileUploadUtils.upload;/*** 第三方认证授权处理** @author cry*/
@RestController
@RequestMapping("/system/auth")
public class SysAuthController extends BaseController {private AuthStateCache authStateCache;@Autowiredprivate ISysUserService userService;@Autowiredprivate SysPermissionService permissionService;@Autowiredprivate TokenService tokenService;@Autowiredprivate SysUserMapper userMapper;@Autowiredprivate SysLoginService loginService;/*** 三方应用登录回调地址*/String redirectUri = "http://127.0.0.1:81/social-login?source=";// PCString redirectUriMobile = "http://127.0.0.1:9090/pages/socialLogin?source=";// Mobile  注意:/# 哈希值不能携带!URL中的哈希值(#)部分可能不会被服务器处理/*** gitee 客户端ID*/String giteeClientId = "xxxx";/*** gitee 客户端密钥*/String giteeClientSecret = "xxxx";private final static Map<String, String> auths = new HashMap<String, String>();{auths.put("gitee", "{\"clientId\":\"" + giteeClientId + "\",\"clientSecret\":\"" + giteeClientSecret + "\",\"redirectUri\":\"" + redirectUri + "gitee"+"\",\"redirectUriMobile\":\"" + redirectUriMobile + "gitee\"}");authStateCache = AuthDefaultStateCache.INSTANCE;}/*** 认证授权** @param source 三方平台* @param type 请求端类型 PC、Mobile* @throws IOException*/@GetMapping("/binding/{source}/{type}")@ResponseBodypublic AjaxResult authBinding(@PathVariable("source") String source,@PathVariable("type")String type, HttpServletRequest request) throws IOException {LoginUser tokenUser = tokenService.getLoginUser(request);if (StringUtils.isNotNull(tokenUser) && userMapper.checkAuthUser(tokenUser.getUserId(), source) > 0) {return error(source + "平台账号已经绑定");}String obj = auths.get(source);if (StringUtils.isEmpty(obj)) {return error(source + "平台账号暂不支持");}JSONObject json = JSONObject.parseObject(obj);/*** 校验是PC端还是Mobile端*/String url = "PC".equals(type) ? json.getString("redirectUri") : json.getString("redirectUriMobile");AuthRequest authRequest = AuthUtils.getAuthRequest(source, json.getString("clientId"), json.getString("clientSecret"), url, authStateCache);String authorizeUrl = authRequest.authorize(AuthStateUtils.createState());System.out.println(authorizeUrl);return success(authorizeUrl);}@SuppressWarnings("unchecked")@GetMapping("/social-login/{source}/{type}")public AjaxResult socialLogin(@PathVariable("source") String source,@PathVariable("type") String type, AuthCallback callback, HttpServletRequest request) throws IOException {String obj = auths.get(source);if (StringUtils.isEmpty(obj)) {return AjaxResult.error(10002, "第三方平台系统不支持或未提供来源");}JSONObject json = JSONObject.parseObject(obj);/*** 校验是PC端还是Mobile端*/String url = "PC".equals(type) ? json.getString("redirectUri") : json.getString("redirectUriMobile");AuthRequest authRequest = AuthUtils.getAuthRequest(source, json.getString("clientId"), json.getString("clientSecret"), url, authStateCache);AuthResponse<AuthUser> response = authRequest.login(callback);if (response.ok()) {/*** 获取当前请求下登录用户缓存信息*/LoginUser tokenUser = null;try {tokenUser = tokenService.getLoginUser(request);} catch (ServiceException e) {/*** 提示获取用户信息异常时,抛出异常 不做处理*/throw e;}finally {/*** 根据三方登录平台的uuid查询用户三方绑定信息*/SysUser authUserByUuid = userMapper.selectAuthUserByUuid(source + response.getData().getUuid());/*** 验证当前用户是否已经登录  并且验证当前登录的和绑定的是否是一个账户*/if (StringUtils.isNotNull(tokenUser)) {if (StringUtils.isNotNull(authUserByUuid) && tokenUser.getUserId() == authUserByUuid.getUserId()) {String token = tokenService.createToken(SecurityUtils.getLoginUser());return success().put(Constants.TOKEN, token);}/*** 判断 当前登录的和绑定的不是一个账户时*/if (authUserByUuid != null && authUserByUuid.getUserId() != null) {return AjaxResult.error(10002, "对不起,来自" + source + "的账户已有绑定账户,如有需要,请登录原账户解绑后重新绑定!");}else{/*** 若已经登录,但未绑定该三方授权信息* 则直接绑定当前登录的系统账号*/SysAuthUser authUser = new SysAuthUser();authUser.setAvatar(response.getData().getAvatar());authUser.setUuid(source + response.getData().getUuid());authUser.setUserId(SecurityUtils.getUserId());authUser.setUserName(response.getData().getUsername());authUser.setNickName(response.getData().getNickname());authUser.setEmail(response.getData().getEmail());authUser.setSource(source);userMapper.insertAuthUser(authUser);String token = tokenService.createToken(SecurityUtils.getLoginUser());return success().put(Constants.TOKEN, token);}}/*** 当用户未登录* 判断 根据三方登录平台的uuid查询用户三方绑定信息 不为空时*/if (StringUtils.isNotNull(authUserByUuid)) {SysUser user = userService.selectUserByUserName(authUserByUuid.getUserName());if (StringUtils.isNull(user)) {throw new ServiceException("登录用户:" + user.getUserName() + " 不存在");} else if (UserStatus.DELETED.getCode().equals(user.getDelFlag())) {throw new ServiceException("对不起,您的账号:" + user.getUserName() + " 已被删除");} else if (UserStatus.DISABLE.getCode().equals(user.getStatus())) {throw new ServiceException("对不起,您的账号:" + user.getUserName() + " 已停用");}LoginUser loginUser = new LoginUser(user.getUserId(), user.getDeptId(), user, permissionService.getMenuPermission(user));String token = tokenService.createToken(loginUser);return success().put(Constants.TOKEN, token);} else {/*** 当用户未登录 且* 该三方登录信息也未绑定用户时* 创建一个新用户进行绑定*/SysUser user = new SysUser();/*** 默认用户名为 uuid + _三方平台名称*/user.setUserName(response.getData().getUuid()+"_"+source);/*** 默认密码为 123456*/user.setPassword(SecurityUtils.encryptPassword("123456"));user.setNickName(response.getData().getNickname());/*** 由于存储文件路径以用户为单位* 所以需要登录后跟俊网络地址修改用户头像*/MultipartFile multipartFile = fileUrlConvertToMultipartImage(response.getData().getAvatar(),user.getUserName()+"_avatar.png");String avatarUrl = upload(multipartFile);user.setAvatar(avatarUrl);user.setEmail(response.getData().getEmail());user.setRemark(response.getData().getRemark());/*** 新增用户信息*/int rows = userService.insertUser(user);if(rows>0){/*** 用户添加成功后 绑定该三方授权信息*/SysAuthUser authUser = new SysAuthUser();authUser.setUuid(source + response.getData().getUuid());authUser.setUserId(user.getUserId());authUser.setAvatar(response.getData().getAvatar());authUser.setUserName(response.getData().getUsername());authUser.setNickName(response.getData().getNickname());authUser.setEmail(response.getData().getEmail());authUser.setSource(source);userMapper.insertAuthUser(authUser);// 登录并生成令牌String token = loginService.login(user.getUserName(), "123456", "","");return success().put(Constants.TOKEN, token);}}}}return AjaxResult.error(10002, "对不起,授权信息验证不通过,请联系管理员");}/*** 取消授权*/@DeleteMapping(value = "/unlock/{authId}")public AjaxResult unlockAuth(@PathVariable Long authId) {return toAjax(userMapper.deleteAuthUser(authId));}
}6、在SysProfileController获取用户个人信息的profile方法中添加如下行
使在查询的同时携带用户的三方登录授权信息
ajax.put("auths", userService.selectAuthUserListByUserId(user.getUserId()));
二、前台配置(Vue、Uniapp 配置方法一致)
1、在校验文件permission.js中添加白名单
'/social-login',
2、在/api/system 中添加授权绑定、解除账号接口文件auth.js
auth.js
import request from '@/utils/request'// 绑定账号
export function authBinding(source) {return request({url: '/system/auth/binding/' + source + '/PC', //PC、Mobile 写死即可method: 'get'})
}// 解绑账号
export function authUnlock(authId) {return request({url: '/system/auth/unlock/' + authId,method: 'delete'})
}3、在login.js中添加三方登录接口
// 第三方平台登录
export function socialLogin(source, code, state) {const data = {code,state}return request({url: '/system/auth/social-login/' + source + '/PC', //PC、Mobile 写死即可method: 'get',params: data})
}
4、设置route文件夹下的index.js路由信息(Uniapp无该步骤)
在公共路由 constantRoutes 中添加三方登录的页面路径,使其在未登录时可以正常跳转页面
{path: '/social-login',component: () => import('@/views/socialLogin'),hidden: true},
5、设置store/modules文件夹下的user.js用户存储信息
添加action下的函数
// 第三方平台登录SocialLogin({ commit }, userInfo) {const code = userInfo.codeconst state = userInfo.stateconst source = userInfo.sourcereturn new Promise((resolve, reject) => {socialLogin(source, code, state).then(res => {setToken(res.token)commit('SET_TOKEN', res.token)resolve()}).catch(error => {reject(error)})})},
6、设置utils文件夹下的request.js请求文件处理信息
添加第三方登录失败时的报错信息处理,夹在401和500之间即可
else if (code === 10002) {// 第三方登录错误提示MessageBox.confirm(msg, '系统提示', {confirmButtonText: '重新登录',cancelButtonText: '取消',type: 'warning'}).then(() => {store.dispatch('LogOut').then(() => {location.href = '/index';// Uniapp 写 '/pages/login'})}).catch(() => { });return Promise.reject(new Error(msg))}
7、添加三方登录页面socialLogin.vue
socialLogin.vue
<template><div></div>
</template><script>
import { Loading } from 'element-ui'let loadingInstance;
export default {data() {return {redirect: undefined,};},created() {loadingInstance = Loading.service({lock: true,text: "正在验证第三方应用账户数据,请稍候",spinner: "el-icon-loading",background: "rgba(0, 0, 0, 0.7)",})// 第三方登录回调参数this.source = this.$route.query.source;this.code = this.$route.query.code;this.state = this.$route.query.state;this.$store.dispatch("SocialLogin", {code: this.code,state: this.state,source: this.source}).then(() => {loadingInstance.close();this.$router.push({ path: this.redirect || "/" }).catch(()=>{});}).catch(() => {loadingInstance.close();});},methods: {},
};
</script><style rel="stylesheet/scss" lang="scss">
</style>
8、登录页面添加三方登录跳转信息链接
vue
<!-- 第三方应用登录 --><el-form-item style="width:100%;"><div class="oauth-login" style="display:flex"><div class="oauth-login-item" @click="doSocialLogin('gitee')"><svg-icon icon-class="gitee" style="height:1.2em" /><span>Gitee</span></div><div class="oauth-login-item" @click="doSocialLogin('github')"><svg-icon icon-class="github" style="height:1.2em" /><span>Github</span></div><div class="oauth-login-item"><svg-icon icon-class="weixin" style="height:1.2em" /><span>Weixin</span></div><div class="oauth-login-item"><svg-icon icon-class="qq" style="height:1.2em" /><span>QQ</span></div></div></el-form-item>
js函数
import { authBinding } from "@/api/system/auth";……// 三方登录doSocialLogin(source) {authBinding(source).then(res => {top.location.href = res.msg;});}……
css
.oauth-login {display: flex;align-items: cen;cursor:pointer;
}
.oauth-login-item {display: flex;align-items: center;margin-right: 10px;
}
.oauth-login-item img {height: 25px;width: 25px;
}
.oauth-login-item span:hover {text-decoration: underline red;color: red;
}
9、添加个人中心三方登录信息展示(Uniapp需根据需要自定义)
views\system\user\profile\index.vue添加如下
vue
<el-tab-pane label="第三方应用" name="thirdParty"><thirdParty :auths="auths" /></el-tab-pane>
js
import thirdParty from "./thirdParty";
export default {name: "Profile",components: { userAvatar, userInfo, resetPwd, thirdParty },……auths: {},……/*** 赋值 用户授权三方登录信息 用于回显socialLogin页面*/this.auths = response.auths;
添加thirdParty.vue页面
<template><div><el-table :data="auths" style="width: 100%; height: 100%; font-size: 10px"><el-table-column label="序号" width="50" type="index"></el-table-column><el-table-columnlabel="绑定账号平台"width="140"align="center"prop="source":show-overflow-tooltip="true"/><el-table-column label="头像" width="120" align="center" prop="avatar"><template slot-scope="scope"><image-preview :src="scope.row.avatar" style="width: 45px; height: 45px" /></template></el-table-column><el-table-columnlabel="系统账号"width="180"align="center"prop="userName":show-overflow-tooltip="true"/><el-table-columnlabel="绑定时间"width="180"align="center"prop="createTime"/><el-table-columnlabel="操作"width="80"align="center"class-name="small-padding fixed-width"><template slot-scope="scope"><el-buttonsize="mini"type="text"icon="el-icon-delete"@click="unlockAuth(scope.$index, scope.row)">解绑</el-button></template></el-table-column></el-table><div id="git-user-binding"><h4 class="provider-desc">你可以绑定以下第三方帐号用于CyberSpace系统</h4><div id="authlist" class="user-bind"><aclass="third-app"href="#"@click="authUrl('gitee');"title="使用 Gitee 账号授权登录"><div class="git-other-login-icon"><svg-icon icon-class="gitee" /></div><span class="app-name">Gitee</span></a><aclass="third-app"href="#"@click="authUrl('github');"title="使用 GitHub 账号授权登录"><div class="git-other-login-icon"><svg-icon icon-class="github" /></div><span class="app-name">Github</span></a><a class="third-app" href="#" title="功能开发中..."><div class="git-other-login-icon"><svg-icon icon-class="weixin" /></div><span class="app-name">WeiXin</span></a><a class="third-app" href="#" title="功能开发中..."><div class="git-other-login-icon"><svg-icon icon-class="qq" /></div><span class="app-name">QQ</span></a></div></div></div>
</template><script>
import { authUnlock, authBinding } from "@/api/system/auth";export default {props: {auths: {type: Array,},},data() {return {};},methods: {unlockAuth(index, row) {var _this = this;this.$modal.confirm('您确定要解除"' + row.source + '"的账号绑定吗?').then(function () {return authUnlock(row.authId);}).then(() => {_this.auths.splice(index, 1);this.$modal.msgSuccess("解绑成功");}).catch(() => {});},authUrl(source) {authBinding(source).then(res => {top.location.href = res.msg;});}},
};
</script><style type="text/css">
.user-bind .third-app {display: -webkit-box;display: -ms-flexbox;display: flex;-webkit-box-orient: vertical;-webkit-box-direction: normal;-ms-flex-direction: column;flex-direction: column;-webkit-box-align: center;-ms-flex-align: center;align-items: center;min-width: 80px;float: left;
}
.user-bind {font-size: 1rem;text-align: start;height: 50px;margin-top: 10px;
}
.git-other-login-icon > img {height: 32px;
}
a {text-decoration: none;cursor: pointer;color: #005980;
}
.provider-desc {font-family: -apple-system, BlinkMacSystemFont, "Segoe UI", Helvetica, Arial,"Apple Color Emoji", "Segoe UI Emoji", "Segoe UI Symbol", "Liberation Sans","PingFang SC", "Microsoft YaHei", "Hiragino Sans GB", "Wenquanyi Micro Hei","WenQuanYi Zen Hei", "ST Heiti", SimHei, SimSun, "WenQuanYi Zen Hei Sharp",sans-serif;font-size: 1.071rem;
}
td > img {height: 20px;width: 20px;display: inline-block;border-radius: 50%;margin-right: 5px;
}
</style>
相关文章:
)
Java SpringBoot + Vue + Uniapp 集成JustAuth 最快实现多端三方登录!(QQ登录、微信登录、支付宝登录……)
注:本文基于 若依 集成just-auth实现第三方授权登录 修改完善,所有步骤仅代表本人如下环境亲测可用,其他环境需自辩或联系查看原因! 系统环境 运行系统:Windows10专业版、Linux Centos7.6 Java 版本:1.8.0_…...

支持向量回归(SVR:Support Vector Regression)用于A股数据分析、预测
简单说明 支持向量回归是一种用来做预测的数学方法,属于「机器学习」的一种。 它的目标是找到一条「最合适的线」,能够大致描述数据点的趋势,并允许数据点离这条线有一定的误差(不要求所有点都完全落在这条线上)。 可以把它想象成:找到一条「宽带」或「隧道」,大部分…...

ZYNQ初识10(zynq_7010)UART通信实验
基于bi站正点原子讲解视频: 系统框图(基于串口的数据回环)如下: 以下,是串口接收端的波形图,系统时钟和波特率时钟不同,为异步时钟,,需要先延时两拍,将时钟同…...

专题 - STM32
基础 基础知识 STM所有产品线(列举型号): STM产品的3内核架构(列举ARM芯片架构): STM32的3开发方式: STM32的5开发工具和套件: 若要在电脑上直接硬件级调试STM32设备,则…...

2 XDMA IP中断
三种中断 1. Legacy 定义:Legacy 中断是传统的中断处理方式,使用物理中断线(例如 IRQ)来传递中断信号。缺点: 中断线数量有限,通常为 16 条,限制了可连接设备的数量。中断处理可能会导致中断风…...
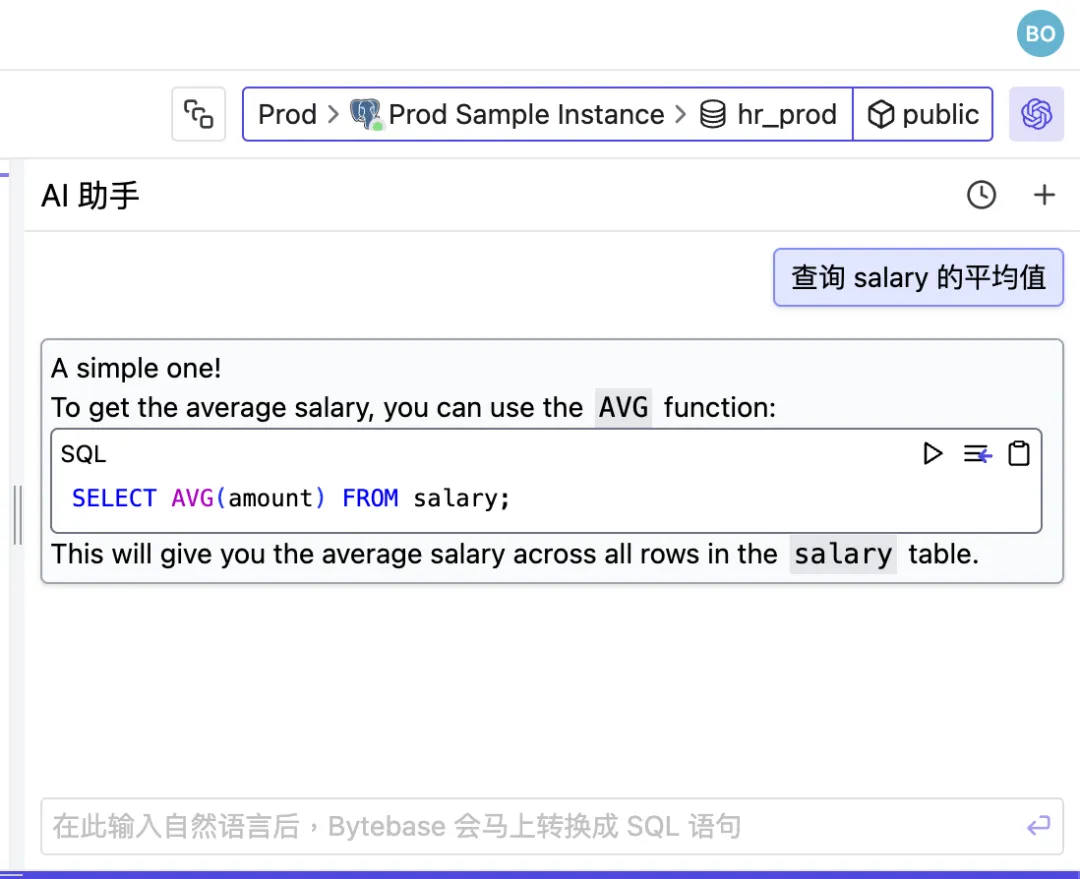
自然语言转 SQL:通过 One API 将 llama3 模型部署在 Bytebase SQL 编辑器
使用 Open AI 兼容的 API,可以在 Bytebase SQL 编辑器中使用自然语言查询数据库。 出于数据安全的考虑,私有部署大语言模型是一个较好的选择 – 本文选择功能强大的开源模型 llama3。 由于 OpenAI 默认阻止出站流量,为了简化网络配置&#…...

抖音矩阵是什么
抖音矩阵是指在同一品牌或个人IP下,通过创建多个不同定位的抖音账号(如主号、副号、子号等),形成一个有机的整体,以实现多维度、多层次的内容覆盖和用户互动。以下是关于抖音矩阵的详细介绍: 抖音矩阵的类…...

怎么抓取ios 移动app的https请求?
怎么抓取IOS应用程序里面的https? 这个涉及到2个问题 1.电脑怎么抓到IOS手机流量? 2.HTTPS怎么解密? 部分app可以使用代理抓包的方式,但是正式点的app用代理抓包是抓不到的,例如pin检测,证书双向校验等…...

pyqt鸟瞰
QApplication是Qt框架中的一个类,专门用于管理基于QWidget的图形用户界面(GUI)应用程序的控制流和主要设置。QApplication类继承自QGuiApplication,提供了许多与GUI相关的功能,如窗口系统集成、事件处理等。 QAppli…...
【Docker】入门教程
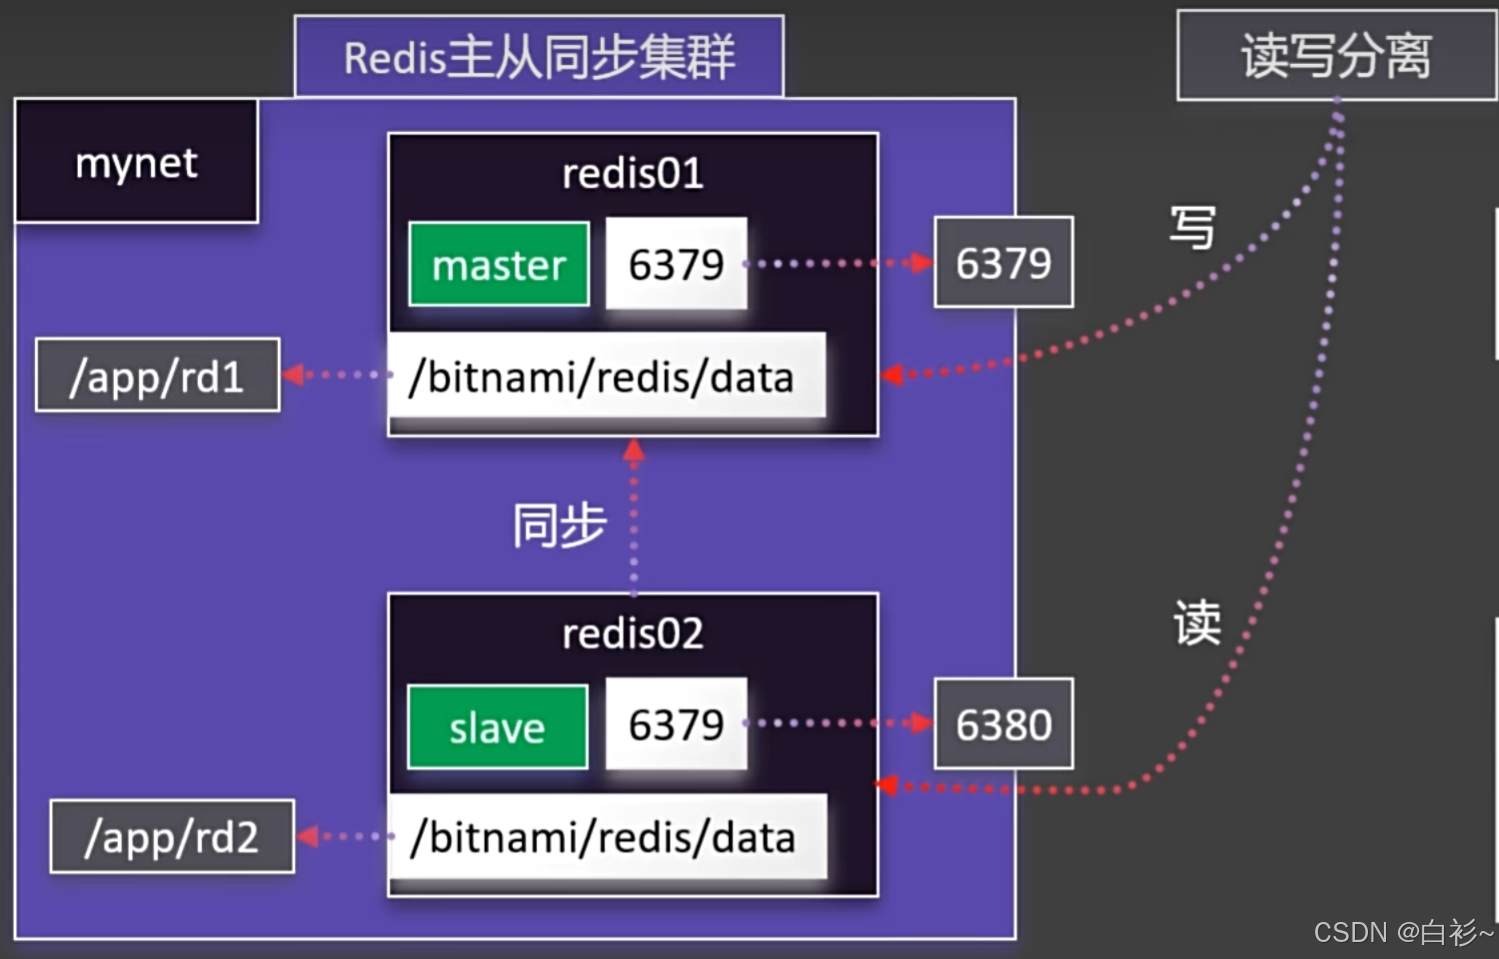
目录 一、Docker的安装 二、Docker的命令 Docker命令实验 1.下载镜像 2.启动容器 3.修改页面 4.保存镜像 5.分享社区 三、Docker存储 1.目录挂载 2.卷映射 四、Docker网络 1.容器间相互访问 2.Redis主从同步集群 3.启动MySQL 五、Docker Compose 1.命令式安装 …...

Token和JWT的关系详细讲解
Token 和 JSON Web Token (JWT) 是两个相关但概念上不同的术语,它们在现代 Web 应用程序的身份验证和授权中扮演着重要角色。下面将详细介绍两者之间的关系以及 JWT 的具体工作原理。 1. Token 概述 Token 是一种广义的概念,指的是任何可以证明用户身份…...

【Linux系列】Curl 参数详解与实践应用
💝💝💝欢迎来到我的博客,很高兴能够在这里和您见面!希望您在这里可以感受到一份轻松愉快的氛围,不仅可以获得有趣的内容和知识,也可以畅所欲言、分享您的想法和见解。 推荐:kwan 的首页,持续学…...

解决 Git SSL 连接错误:OpenSSL SSL_read: SSL_ERROR_SYSCALL, errno
问题描述 在执行 git pull 命令时遇到以下错误: > git pull --tags origin main fatal: unable to access github仓库: OpenSSL SSL_read: SSL_ERROR_SYSCALL, errno 0这个错误通常表示 Git 在尝试通过 HTTPS 连接到 GitHub 时遇到了 SSL 连接问题。 解决方案…...

《Vue3 八》<script setup> 语法
<script setup> 是在单文件中使用 Composition API 的编译时语法糖,里面的代码会被编译成组件 setup() 函数的内容。 <script setup> 中的代码在每次组件实例被创建的时候都都会被执行。 定义数据: 在 <script setup> 语法糖的写法中…...

51单片机和STM32集成蓝牙模块实用指南
51单片机和STM32集成蓝牙模块实用指南 蓝牙模块(如HC-05、HC-06、JDY-31等)是嵌入式开发中常用的无线通信模块,广泛应用于智能家居、物联网、机器人等领域。本文将详细介绍如何将蓝牙模块集成到 51单片机 和 STM32 中,并提供一个…...

Transformer:深度学习的变革力量
深度学习领域的发展日新月异,在自然语言处理(NLP)、计算机视觉等领域取得了巨大突破。然而,早期的循环神经网络(RNN)在处理长序列时面临着梯度消失、并行计算能力不足等瓶颈。而 Transformer 的横空出世&am…...

sql 函数
# 四则运算 - * / # 函数 distinct 、count、sum、max、min、avg、sum、round select concat(device_id 是,device_id ) device_id from device_id_apply_factor where device_id D6A42CE6A0; select concat_ws(|||,device_id ,factor_a ,module_type) from 、device_id_app…...

C# OpenCV机器视觉:OCR产品序列号识别
在一个看似平常却又暗藏玄机的工作日,阿明正坐在办公室里,对着堆积如山的文件唉声叹气。突然,电话铃声如炸雷般响起,吓得他差点从椅子上摔下来。原来是公司老板打来的紧急电话:“阿明啊,咱们刚生产出来的那…...

2012wtl,学习活扩
原文 WTL学习注意–活扩 在Win32下,活扩控件已是个成熟的概念了,即使对COM不太了解,使用活扩控件仍是件容易的事情.既然是控件,无非要关注两个方面,第一是如何调用它的函数,其次是如何接收它的事件. 看看在WTL中,如何使用活扩控件(基本对话框): 1.创建项目时,让对话框支持活…...

使用Deepseek搭建类Cursor编辑器
使用Deepseek搭建类Cursor编辑器 Cursor想必大家都用过了,一个非常强大的AI编辑器,在代码编写上为我们省了不少事,但高昂的价格让我们望而却步,这篇文章教你在Visual Studio Code上搭建一个类Cursor的代码编辑器。 步骤其实非常…...

前端倒计时误差!
提示:记录工作中遇到的需求及解决办法 文章目录 前言一、误差从何而来?二、五大解决方案1. 动态校准法(基础版)2. Web Worker 计时3. 服务器时间同步4. Performance API 高精度计时5. 页面可见性API优化三、生产环境最佳实践四、终极解决方案架构前言 前几天听说公司某个项…...
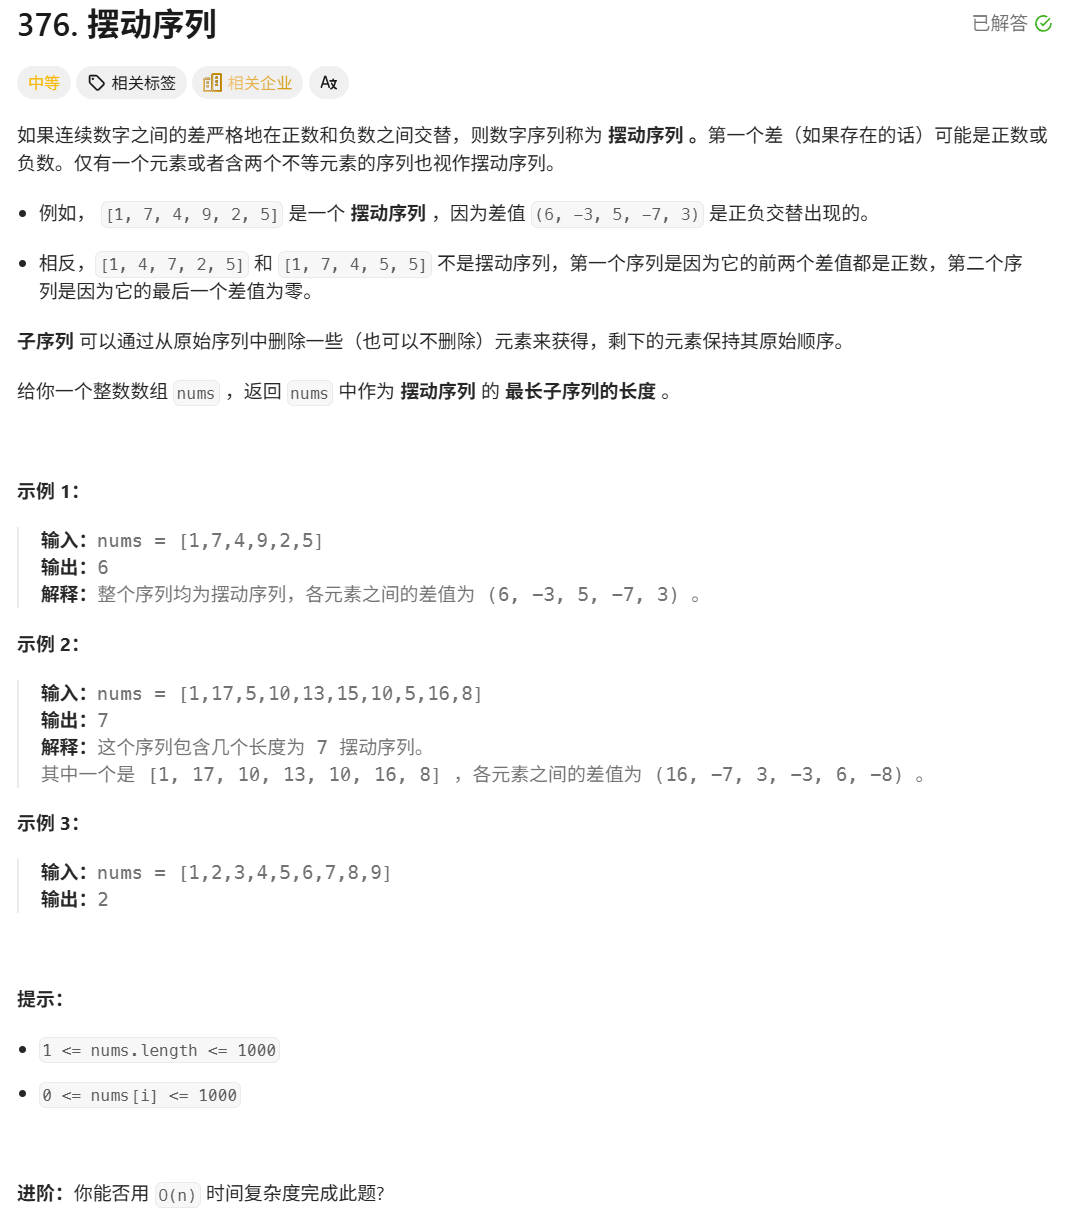
376. Wiggle Subsequence
376. Wiggle Subsequence 代码 class Solution { public:int wiggleMaxLength(vector<int>& nums) {int n nums.size();int res 1;int prediff 0;int curdiff 0;for(int i 0;i < n-1;i){curdiff nums[i1] - nums[i];if( (prediff > 0 && curdif…...
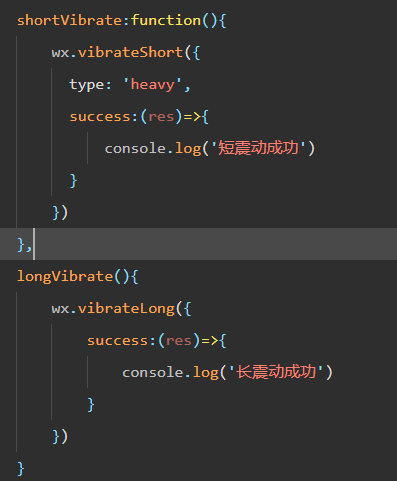
微信小程序 - 手机震动
一、界面 <button type"primary" bindtap"shortVibrate">短震动</button> <button type"primary" bindtap"longVibrate">长震动</button> 二、js逻辑代码 注:文档 https://developers.weixin.qq…...

LLM基础1_语言模型如何处理文本
基于GitHub项目:https://github.com/datawhalechina/llms-from-scratch-cn 工具介绍 tiktoken:OpenAI开发的专业"分词器" torch:Facebook开发的强力计算引擎,相当于超级计算器 理解词嵌入:给词语画"…...
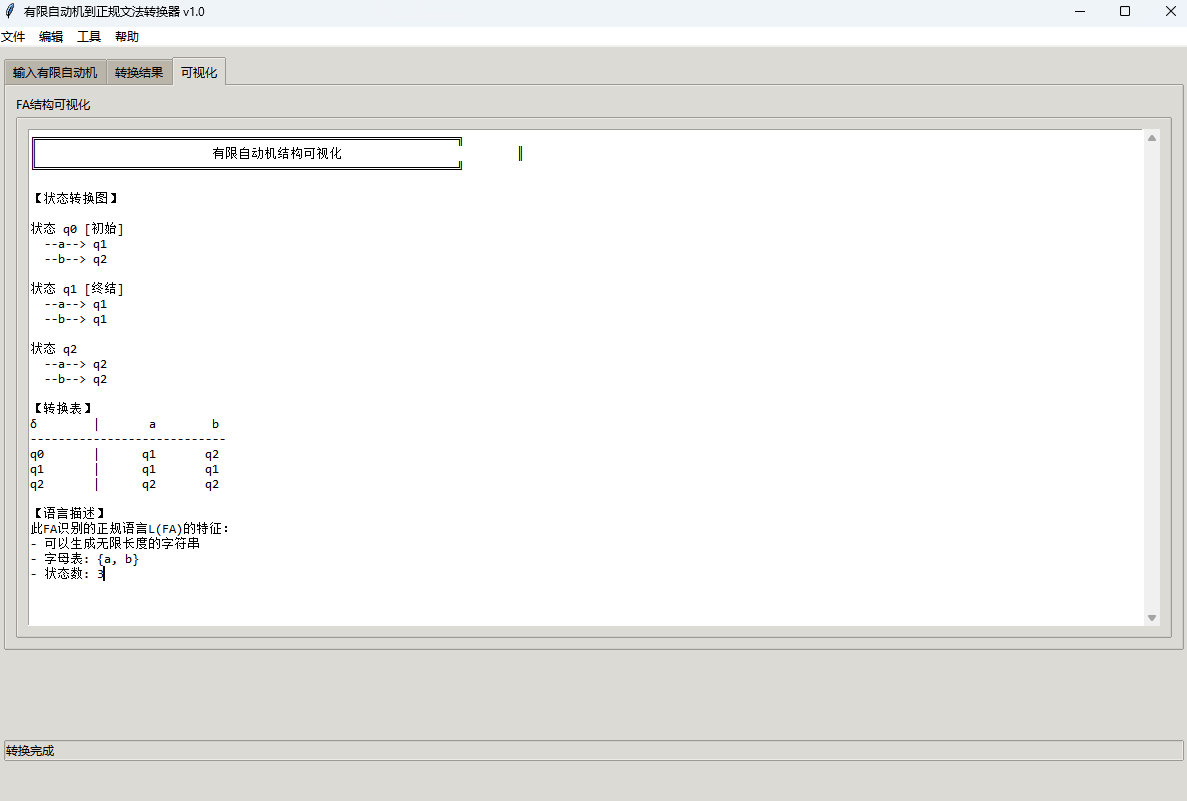
有限自动机到正规文法转换器v1.0
1 项目简介 这是一个功能强大的有限自动机(Finite Automaton, FA)到正规文法(Regular Grammar)转换器,它配备了一个直观且完整的图形用户界面,使用户能够轻松地进行操作和观察。该程序基于编译原理中的经典…...

短视频矩阵系统文案创作功能开发实践,定制化开发
在短视频行业迅猛发展的当下,企业和个人创作者为了扩大影响力、提升传播效果,纷纷采用短视频矩阵运营策略,同时管理多个平台、多个账号的内容发布。然而,频繁的文案创作需求让运营者疲于应对,如何高效产出高质量文案成…...

Unity UGUI Button事件流程
场景结构 测试代码 public class TestBtn : MonoBehaviour {void Start(){var btn GetComponent<Button>();btn.onClick.AddListener(OnClick);}private void OnClick(){Debug.Log("666");}}当添加事件时 // 实例化一个ButtonClickedEvent的事件 [Formerl…...
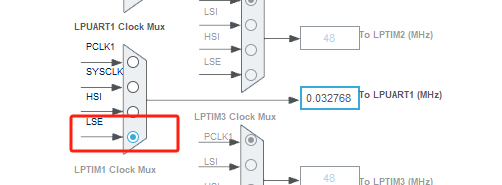
stm32wle5 lpuart DMA数据不接收
配置波特率9600时,需要使用外部低速晶振...

边缘计算网关提升水产养殖尾水处理的远程运维效率
一、项目背景 随着水产养殖行业的快速发展,养殖尾水的处理成为了一个亟待解决的环保问题。传统的尾水处理方式不仅效率低下,而且难以实现精准监控和管理。为了提升尾水处理的效果和效率,同时降低人力成本,某大型水产养殖企业决定…...

【Ftrace 专栏】Ftrace 参考博文
ftrace、perf、bcc、bpftrace、ply、simple_perf的使用Ftrace 基本用法Linux 利用 ftrace 分析内核调用如何利用ftrace精确跟踪特定进程调度信息使用 ftrace 进行追踪延迟Linux-培训笔记-ftracehttps://www.kernel.org/doc/html/v4.18/trace/events.htmlhttps://blog.csdn.net/…...
