Vue2+OpenLayers实现折线绘制、起始点标记和轨迹打点的完整功能(提供Gitee源码)
目录
一、案例截图
二、安装OpenLayers库
三、代码实现
3.1、HTML页面
3.2、初始化变量
3.3、创建起始点位
3.4、遍历轨迹点
3.5、画折线
3.6、初始化弹窗信息
3.7、初始化地图上标点的点击事件
3.8、完整代码
四、Gitee源码
一、案例截图

二、安装OpenLayers库
npm install ol三、代码实现
整体的实现思路:
1、创建开始、结束点位。
2、遍历轨迹点信息
3、画出轨迹折线
4、初始化弹窗样式
5、初始化地图上标点的点击事件。
3.1、HTML页面
关键代码:
<template><div><div id="map-container"></div><div id="popup-box" class="popup-box"><button id="close-button" class="close-button">×</button><div id="popup-content" class="popup-content"></div></div></div>
</template>3.2、初始化变量
关键代码:
data() {return {map:null,overLay:null,// 定义路径坐标pointList: [[120.430070,31.938140],[120.428570,31.939100],[120.429530,31.941680],[120.431240,31.943580],[120.432410,31.944820],[120.433600,31.943970],],pointLayer: new VectorLayer({source: new VectorSource(),zIndex: 5}),}
},
3.3、创建起始点位
关键代码:
/*** 创建开始点位*/
createStartPoint(){// 创建feature要素,一个feature就是一个点坐标信息let feature = new Feature({geometry: new Point(this.pointList[0]),});// 设置要素的图标feature.setStyle(new Style({// 设置图片效果image: new Icon({src: 'http://lbs.tianditu.gov.cn/images/bus/start.png',// anchor: [0.5, 0.5],scale: 1,}),zIndex: 10,}),);this.pointLayer.getSource().addFeature(feature);
},
//创建结束点位
createEndPoint(){// 创建feature要素,一个feature就是一个点坐标信息let feature = new Feature({geometry: new Point(this.pointList[this.pointList.length-1]),});// 设置要素的图标feature.setStyle(new Style({// 设置图片效果image: new Icon({src: 'http://lbs.tianditu.gov.cn/images/bus/end.png',// anchor: [0.5, 0.5],scale: 1,}),zIndex: 10}),);this.pointLayer.getSource().addFeature(feature);
},3.4、遍历轨迹点
先封装一个创建轨迹点的方法:
关键代码:
//创建轨迹点位
addPoint(coordinate) {// 创建feature要素,一个feature就是一个点坐标信息let feature = new Feature({geometry: new Point(coordinate),});// 设置要素的图标feature.setStyle(new Style({// 使用 Circle 图形image: new Circle({radius: 10, // 圆的半径fill: new Fill({color: 'white', // 内部颜色}),stroke: new Stroke({color: 'blue', // 外部颜色width: 3, // 外圈线宽}),}),zIndex: 5}),);return feature;
},
遍历轨迹点:
关键代码:
/*** 遍历点位*/
drawPoints(){this.createStartPoint();for(let i = 0 ; i < this.pointList.length ; i++){let feature = this.addPoint(this.pointList[i]);this.pointLayer.getSource().addFeature(feature);}this.createEndPoint();this.map.addLayer(this.pointLayer);
},
3.5、画折线
关键代码:
//画线
drawLine(){// 创建线特征const lineFeature = new Feature({geometry: new LineString(this.pointList),});// 设置线样式const lineStyle = new Style({stroke: new Stroke({color: '#25C2F2',width: 4,lineDash: [10, 8], // 使用点划线 数组的值来控制虚线的长度和间距}),});lineFeature.setStyle(lineStyle);// 创建矢量层并添加特征const vectorSource = new VectorSource({features: [lineFeature],});const vectorLayer = new VectorLayer({source: vectorSource,zIndex: 1});// 将矢量层添加到地图this.map.addLayer(vectorLayer);// 设置地图视图以适应路径this.map.getView().fit(lineFeature.getGeometry().getExtent(), {padding: [20, 20, 20, 20],maxZoom: 18,});
},
3.6、初始化弹窗信息
关键代码:
/*** 初始化弹窗信息*/
initPointWindow() {let popupBox = document.getElementById('popup-box');let closeButton = document.getElementById('close-button');//用于显示详情页面的窗口(根据经纬度来的,位置不固定)this.overlay = new Overlay({element: popupBox,autoPan: {animation: {duration: 250,},},offset:[0,-20],});this.map.addOverlay(this.overlay);// 关闭弹出框的事件处理let _that = this;closeButton.addEventListener('click', () => {_that.overlay.setPosition(undefined); // 关闭弹出框});
},
3.7、初始化地图上标点的点击事件
关键代码:
/*** 初始化地图上标点的点击事件*/
initPointEvent(){let _that = this;//给点初始化点击事件this.map.on("singleclick", (e) => {let pixel = this.map.getEventPixel(e.originalEvent);let feature = this.map.forEachFeatureAtPixel(pixel, function(feature) { return feature; });let coordinates = e.coordinate;if(feature){_that.overlay.setPosition(coordinates);let popupContent = document.getElementById('popup-content');popupContent.innerHTML = `<div>经度:${coordinates[0]}</div><div>纬度:${coordinates[1]}</div>`;}});
},
3.8、完整代码
<template><div><div id="map-container"></div><div id="popup-box" class="popup-box"><button id="close-button" class="close-button">×</button><div id="popup-content" class="popup-content"></div></div></div>
</template>
<script>
import { Map, View } from 'ol'
import {Tile as TileLayer} from 'ol/layer'
import Overlay from 'ol/Overlay';
import { get } from 'ol/proj';
import { getWidth, getTopLeft } from 'ol/extent'
import { WMTS } from 'ol/source'
import WMTSTileGrid from 'ol/tilegrid/WMTS'
import { defaults as defaultControls} from 'ol/control';
import 'ol/ol.css';
import OSM from 'ol/source/OSM';
import { Feature } from 'ol';
import LineString from 'ol/geom/LineString';
import VectorSource from 'ol/source/Vector';
import VectorLayer from 'ol/layer/Vector';
import Style from 'ol/style/Style';
import Stroke from 'ol/style/Stroke';
import {Circle, Fill, Icon} from "ol/style";
import CircleStyle from "ol/style/Circle";
import {Point} from "ol/geom";export const projection = get("EPSG:4326");
const projectionExtent = projection.getExtent();
const size = getWidth(projectionExtent) / 256;
const resolutions = [];
for (let z = 0; z < 19; ++z) {resolutions[z] = size / Math.pow(2, z);
}export default {data() {return {map:null,overLay:null,// 定义路径坐标pointList: [[120.430070,31.938140],[120.428570,31.939100],[120.429530,31.941680],[120.431240,31.943580],[120.432410,31.944820],[120.433600,31.943970],],pointLayer: new VectorLayer({source: new VectorSource(),zIndex: 5}),}},mounted(){this.initMap() // 加载矢量底图},methods:{initMap() {const KEY = '你申请的KEY'this.map = new Map({target: 'map-container',layers: [// 底图new TileLayer({source: new WMTS({url: `http://t{0-6}.tianditu.com/vec_c/wmts?tk=${KEY}`,layer: 'vec', // 矢量底图matrixSet: 'c', // c: 经纬度投影 w: 球面墨卡托投影style: "default",crossOrigin: 'anonymous', // 解决跨域问题 如无该需求可不添加format: "tiles", //请求的图层格式,这里指定为瓦片格式wrapX: true, // 允许地图在 X 方向重复(环绕)tileGrid: new WMTSTileGrid({origin: getTopLeft(projectionExtent),resolutions: resolutions,matrixIds: ['0', '1', '2', '3', '4', '5', '6', '7', '8', '9', '10', '11', '12', '13', '14', '15','16','17','18']})})}),// 标注new TileLayer({source: new WMTS({url: `http://t{0-6}.tianditu.com/cva_c/wmts?tk=${KEY}`,layer: 'cva', //矢量注记matrixSet: 'c',style: "default",crossOrigin: 'anonymous',format: "tiles",wrapX: true,tileGrid: new WMTSTileGrid({origin: getTopLeft(projectionExtent),resolutions: resolutions,matrixIds: ['0', '1', '2', '3', '4', '5', '6', '7', '8', '9', '10', '11', '12', '13', '14', '15','16','17','18']})})})],view: new View({center: [119.975000,31.809701],projection: projection,zoom: 12,maxZoom: 17,minZoom: 1}),//加载控件到地图容器中controls: defaultControls({zoom: false,rotate: false,attribution: false})});//画点this.drawPoints();//画线this.drawLine();//初始化窗体this.initPointWindow();//初始化标点点击事件this.initPointEvent();},/*** 创建开始点位*/createStartPoint(){// 创建feature要素,一个feature就是一个点坐标信息let feature = new Feature({geometry: new Point(this.pointList[0]),});// 设置要素的图标feature.setStyle(new Style({// 设置图片效果image: new Icon({src: 'http://lbs.tianditu.gov.cn/images/bus/start.png',// anchor: [0.5, 0.5],scale: 1,}),zIndex: 10,}),);this.pointLayer.getSource().addFeature(feature);},//创建结束点位createEndPoint(){// 创建feature要素,一个feature就是一个点坐标信息let feature = new Feature({geometry: new Point(this.pointList[this.pointList.length-1]),});// 设置要素的图标feature.setStyle(new Style({// 设置图片效果image: new Icon({src: 'http://lbs.tianditu.gov.cn/images/bus/end.png',// anchor: [0.5, 0.5],scale: 1,}),zIndex: 10}),);this.pointLayer.getSource().addFeature(feature);},//创建轨迹点位addPoint(coordinate) {// 创建feature要素,一个feature就是一个点坐标信息let feature = new Feature({geometry: new Point(coordinate),});// 设置要素的图标feature.setStyle(new Style({// 使用 Circle 图形image: new Circle({radius: 10, // 圆的半径fill: new Fill({color: 'white', // 内部颜色}),stroke: new Stroke({color: 'blue', // 外部颜色width: 3, // 外圈线宽}),}),zIndex: 5}),);return feature;},/*** 遍历点位*/drawPoints(){this.createStartPoint();for(let i = 0 ; i < this.pointList.length ; i++){let feature = this.addPoint(this.pointList[i]);this.pointLayer.getSource().addFeature(feature);}this.createEndPoint();this.map.addLayer(this.pointLayer);},//画线drawLine(){// 创建线特征const lineFeature = new Feature({geometry: new LineString(this.pointList),});// 设置线样式const lineStyle = new Style({stroke: new Stroke({color: '#25C2F2',width: 4,lineDash: [10, 8], // 使用点划线 数组的值来控制虚线的长度和间距}),});lineFeature.setStyle(lineStyle);// 创建矢量层并添加特征const vectorSource = new VectorSource({features: [lineFeature],});const vectorLayer = new VectorLayer({source: vectorSource,zIndex: 1});// 将矢量层添加到地图this.map.addLayer(vectorLayer);// 设置地图视图以适应路径this.map.getView().fit(lineFeature.getGeometry().getExtent(), {padding: [20, 20, 20, 20],maxZoom: 18,});},/*** 初始化地图上标点的点击事件*/initPointEvent(){let _that = this;//给点初始化点击事件this.map.on("singleclick", (e) => {let pixel = this.map.getEventPixel(e.originalEvent);let feature = this.map.forEachFeatureAtPixel(pixel, function(feature) { return feature; });let coordinates = e.coordinate;if(feature){_that.overlay.setPosition(coordinates);let popupContent = document.getElementById('popup-content');popupContent.innerHTML = `<div>经度:${coordinates[0]}</div><div>纬度:${coordinates[1]}</div>`;}});},/*** 初始化弹窗信息*/initPointWindow() {let popupBox = document.getElementById('popup-box');let closeButton = document.getElementById('close-button');//用于显示详情页面的窗口(根据经纬度来的,位置不固定)this.overlay = new Overlay({element: popupBox,autoPan: {animation: {duration: 250,},},offset:[0,-20],});this.map.addOverlay(this.overlay);// 关闭弹出框的事件处理let _that = this;closeButton.addEventListener('click', () => {_that.overlay.setPosition(undefined); // 关闭弹出框});},}
}
</script>
<style scoped>
#map-container {width: 100%;height: 100vh;
}
.popup-box {background: rgba(255, 255, 255, 0.95);border: 1px solid #ccc;border-radius: 8px;padding: 20px;z-index: 1000;box-shadow: 0 4px 20px rgba(0, 0, 0, 0.3);transition: all 0.3s ease;max-width: 300px;font-family: 'Arial', sans-serif;position: absolute;transform: translate(-50%, -100%); /* 使弹出框上移并居中 */
}/* 添加箭头样式 */
.popup-box::after {content: "";position: absolute;top: 100%; /* 箭头位于弹出框的底部 */left: 50%; /* 箭头横向居中 */margin-left: -6px; /* 调整箭头与弹出框的间距 */border-width: 6px; /* 箭头的大小 */border-style: solid;border-color: rgba(255, 255, 255, 0.95) transparent transparent transparent; /* 箭头的颜色 */
}.close-button {background: none;color: gray;border: none;font-size: 20px;position: absolute;top: 10px;right: 10px;cursor: pointer;
}.popup-content {width: 240px;margin-top: 10px;font-size: 16px;line-height: 1.5;
}
</style>
四、Gitee源码
地址:Vue2+OpenLayers实现折线绘制起始点标记和轨迹打点的完整功能
相关文章:

Vue2+OpenLayers实现折线绘制、起始点标记和轨迹打点的完整功能(提供Gitee源码)
目录 一、案例截图 二、安装OpenLayers库 三、代码实现 3.1、HTML页面 3.2、初始化变量 3.3、创建起始点位 3.4、遍历轨迹点 3.5、画折线 3.6、初始化弹窗信息 3.7、初始化地图上标点的点击事件 3.8、完整代码 四、Gitee源码 一、案例截图 二、安装OpenLayers库 n…...

基于Spring Boot的城市垃圾分类管理系统设计与实现(LW+源码+讲解)
专注于大学生项目实战开发,讲解,毕业答疑辅导,欢迎高校老师/同行前辈交流合作✌。 技术范围:SpringBoot、Vue、SSM、HLMT、小程序、Jsp、PHP、Nodejs、Python、爬虫、数据可视化、安卓app、大数据、物联网、机器学习等设计与开发。 主要内容:…...
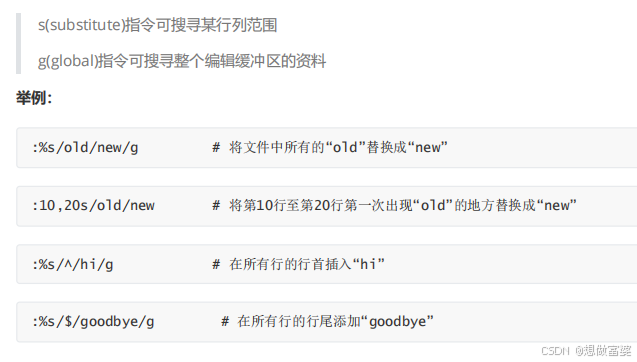
linux: 文本编辑器vim
文本编辑器 vi的工作模式 (vim和vi一致) 进入vim的方法 方法一:输入 vim 文件名 此时左下角有 "文件名" 文件行数,字符数量 方法一: 输入 vim 新文件名 此时新建了一个文件并进入vim,左下角有 "文件名"[New File] 灰色的长方形就是光标,输入文字,左下…...

Eclipse Debug 调试
关于Eclipse的Debug调试功能,有几点重要的信息可以分享。 Debug的启动方式:Eclipse提供了多种启动程序调试的方式,包括通过菜单(Run –> Debug)、点击“绿色臭虫”图标、右键选择Debug As以及使用快捷键(F11)【0†source】。 调试中最常用…...

vue3+ts的<img :src=““ >写法
vue3ts的<img :src"" >写法<img :src"datasetImage" alt"数据分布示意图" /><script setup lang"ts">const datasetImage ref();datasetImage.value new URL(../../../assets/images/login-background.jpg, impo…...

《心血管成像的深度学习》论文精读
Deep Learning for Cardiovascular Imaging 重要性:由深度学习 (DL) 的进步推动的人工智能 (AI) 有可能重塑心血管成像 (CVI) 领域。虽然 CVI 的 DL 仍处于起步阶段,但研究正在加速,以帮助获取、处理和/或解释各种模式下的 CVI,其…...

RDP、VNC、SSH 三种登陆方式的差异解析
一、引言 在计算机系统管理和远程访问的领域中,RDP(Remote Desktop Protocol,远程桌面协议)、VNC(Virtual Network Computing,虚拟网络计算)和 SSH(Secure Shell)是三种广…...

3d 可视化库 vister部署笔记
目录 vister 开源地址: python版本: 在python3.10以上版本安装 viser, 测试ok的案例: 立方体mesh选中 SMPL-X可视化 ok 推理代码: vister 开源地址: GitHub - nerfstudio-project/viser: Web-based 3D visualization + Python python版本: 在python3.10以上版本…...

操作系统八股文学习笔记
总结来自于javaguide,本文章仅供个人学习复习 javaguide操作系统八股 文章目录 操作系统基础什么是操作系统?操作系统主要有哪些功能?常见的操作系统有哪些?用户态和内核态为什么要有用户态和内核态?只有一个内核态不行嘛?用户态和内核态是如何切换的?系统调用 进程和线程…...

k8s基础(6)—Kubernetes-存储
Kubernetes-存储概述 k8s的持久券简介 Kubernetes的持久卷(PersistentVolume, PV)和持久卷声明(PersistentVolumeClaim, PVC)为用户在Kubernetes中使用卷提供了抽象。PV是集群中的一块存储,PVC是对这部分存储的请求。…...

K8S--配置存活、就绪和启动探针
目录 1 本人基础环境2 目的3 存活、就绪和启动探针介绍3.1 存活探针3.2 就绪探针3.3 启动探针 4 探针使用场景4.1 存活探针4.2 就绪探针4.3 启动探针 5 配置存活、就绪和启动探针5.1 定义存活探针5.2 定义一个存活态 HTTP 请求接口5.3 定义 TCP 的就绪探针、存活探测5.4 定义 g…...
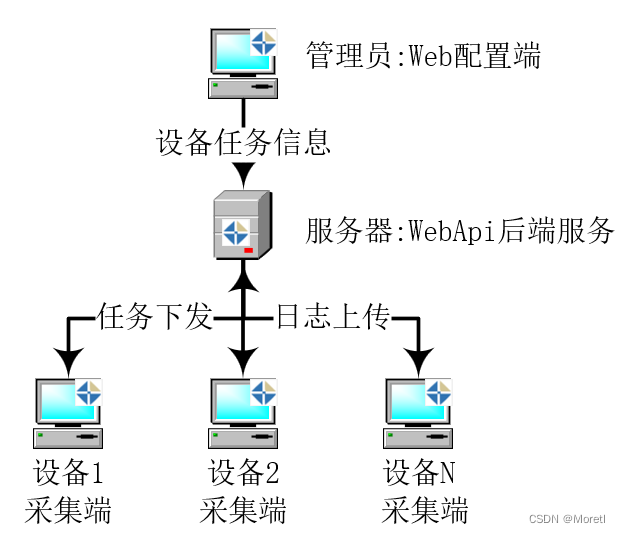
永久免费工业设备日志采集
永久免费: <下载> <使用说明> 用途 定时全量或增量采集工控机,电脑文件或日志. 优势 开箱即用: 解压直接运行.不需额外下载.管理设备: 后台统一管理客户端.无人值守: 客户端自启动,自更新.稳定安全: 架构简单,兼容性好,通过授权控制访问. 架构 技术架构: Asp…...

详解 Docker 启动 Windows 容器第二篇:技术原理与未来发展方向
提示:文章写完后,目录可以自动生成,如何生成可参考右边的帮助文档 文章目录 前言所遇问题问题 1:Docker 容器启动的 Windows 实例调用了 KVM 驱动,但为什么用 virsh list 命令查不到虚拟机?这意味着它不是一…...

HC32L136K8TA单片机输出互为反相双路PWM
可这里可以参考stm32的代码看看 HC32L136K8TA的机制跟32差不多 以使用一个通用定时器输出两路互为反相的 PWM 波,但需要通过一定的配置技巧实现。与高级定时器(如 STM32 的 TIM1、TIM8 等)不同,通用定时器通常没有直接的互补输出…...

数据分析-55-时间序列分析之获取时间序列的自然周期时间区间
文章目录 1 获取某年的总天数1.1 get_year_days()1.2 应用函数2 获取某年的总周数2.1 get_year_weeks()2.2 应用函数3 获取某日期属于某年的周数3.1 get_time_yearweek()3.2 应用函数4 获取某年某周的开始时间和结束时间4.1 get_week_start_end()4.2 应用函数5 获取往前num周期…...

Java Stream流操作List全攻略:Filter、Sort、GroupBy、Average、Sum实践
在Java 8及更高版本中,Stream API为集合处理带来了革命性的改变。本文将深入解析如何运用Stream对List进行高效的操作,包括筛选(Filter)、排序(Sort)、分组(GroupBy)、求平均值&…...

Sentaurus TCAD学习笔记:transform指令
目录 一、transform指令简介二、transform指令的实现1.cut指令2.flip指令3.rotate指令4.stretch指令5.translate指令6.reflect指令 三、transform指令示例 一、transform指令简介 在Sentaurus中,如果需要对器件进行翻转、平移等操作,可以通过transform指…...
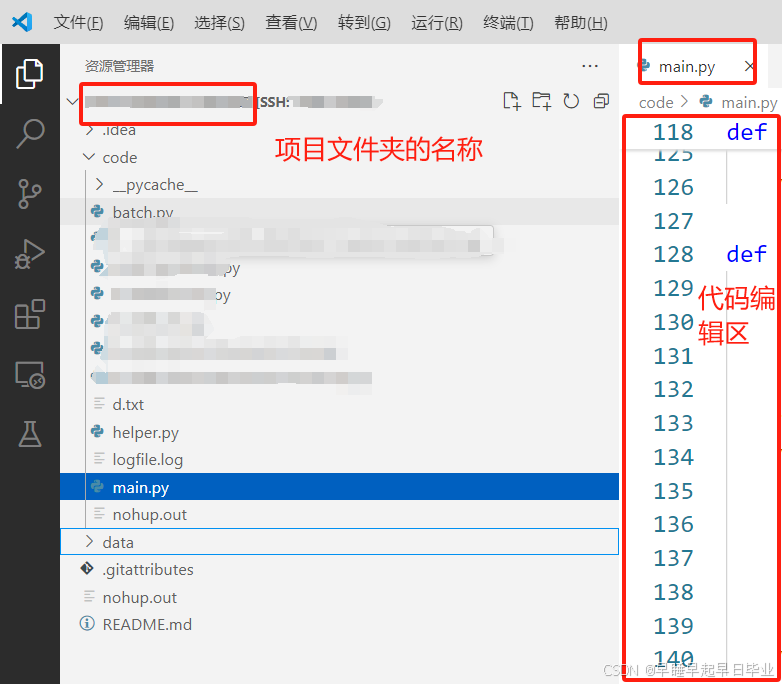
vscode支持ssh远程开发
文章目录 一、生成ssh使用的公钥/密钥对二、使用vscode通过ssh连接服务器1.安装插件2.配置文件3.连接服务器4.新建文件夹,存放不同的任务5.为不同的项目选择不同的conda环境 三、使用scp命令与服务器互传文件、文件夹1.检查Windows 系统是否支持scp命令2.在Windows系…...

Java线程详解
一、线程的基本概念 1. 什么是线程? 线程是程序执行的一个单元,它是进程中的一个实体,是被系统独立调度和分派的基本单位。一个进程可以包含多个线程,这些线程共享进程的资源,如内存空间和文件句柄,但每个…...

java -jar启动项目报错:XXX.jar中没有主清单属性
XXX.jar中没有主清单属性 1、错误复现2、错误原因3、解决方案 java -jar启动项目报错:XXX.jar中没有主清单属性 1、错误复现 今天使用springboot给项目打了jar包,使用命令启动时报错,截图如下: 2、错误原因 项目的pom文件配置如…...
结构体的进阶应用)
基于算法竞赛的c++编程(28)结构体的进阶应用
结构体的嵌套与复杂数据组织 在C中,结构体可以嵌套使用,形成更复杂的数据结构。例如,可以通过嵌套结构体描述多层级数据关系: struct Address {string city;string street;int zipCode; };struct Employee {string name;int id;…...
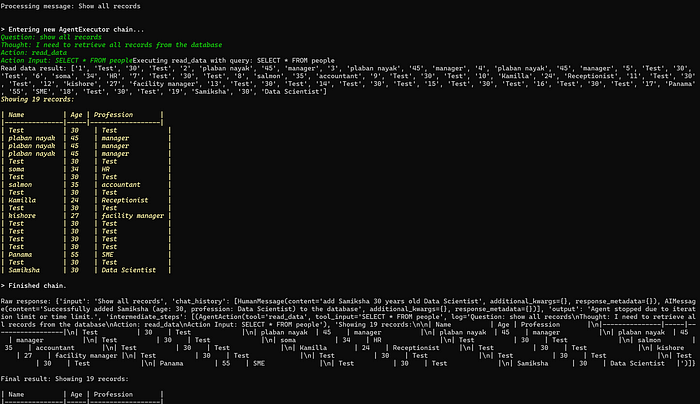
理解 MCP 工作流:使用 Ollama 和 LangChain 构建本地 MCP 客户端
🌟 什么是 MCP? 模型控制协议 (MCP) 是一种创新的协议,旨在无缝连接 AI 模型与应用程序。 MCP 是一个开源协议,它标准化了我们的 LLM 应用程序连接所需工具和数据源并与之协作的方式。 可以把它想象成你的 AI 模型 和想要使用它…...

python报错No module named ‘tensorflow.keras‘
是由于不同版本的tensorflow下的keras所在的路径不同,结合所安装的tensorflow的目录结构修改from语句即可。 原语句: from tensorflow.keras.layers import Conv1D, MaxPooling1D, LSTM, Dense 修改后: from tensorflow.python.keras.lay…...
深度学习水论文:mamba+图像增强
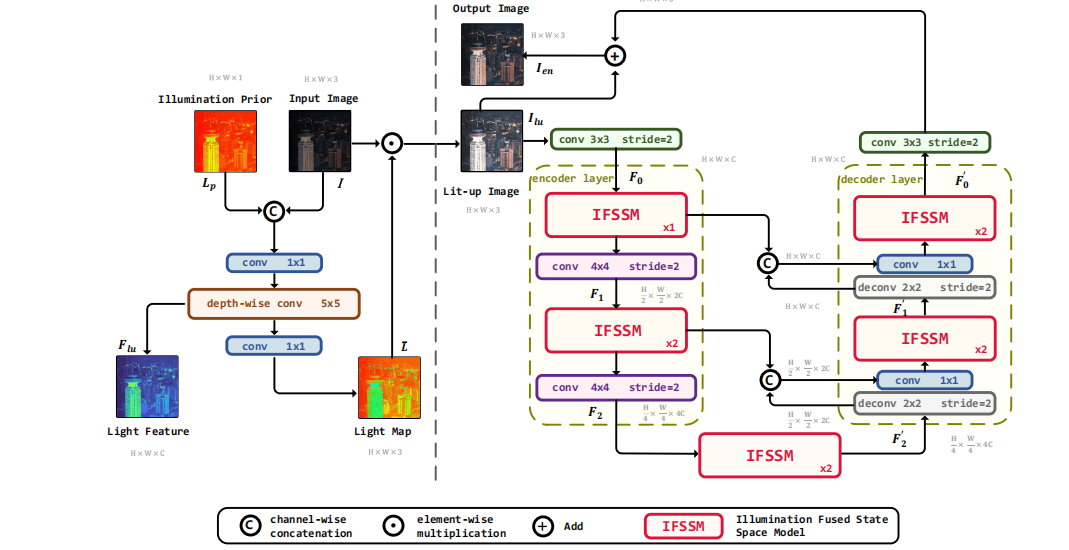
🧀当前视觉领域对高效长序列建模需求激增,对Mamba图像增强这方向的研究自然也逐渐火热。原因在于其高效长程建模,以及动态计算优势,在图像质量提升和细节恢复方面有难以替代的作用。 🧀因此短时间内,就有不…...
详细解析)
Caliper 负载(Workload)详细解析
Caliper 负载(Workload)详细解析 负载(Workload)是 Caliper 性能测试的核心部分,它定义了测试期间要执行的具体合约调用行为和交易模式。下面我将全面深入地讲解负载的各个方面。 一、负载模块基本结构 一个典型的负载模块(如 workload.js)包含以下基本结构: use strict;/…...

tomcat指定使用的jdk版本
说明 有时候需要对tomcat配置指定的jdk版本号,此时,我们可以通过以下方式进行配置 设置方式 找到tomcat的bin目录中的setclasspath.bat。如果是linux系统则是setclasspath.sh set JAVA_HOMEC:\Program Files\Java\jdk8 set JRE_HOMEC:\Program Files…...
高考志愿填报管理系统---开发介绍
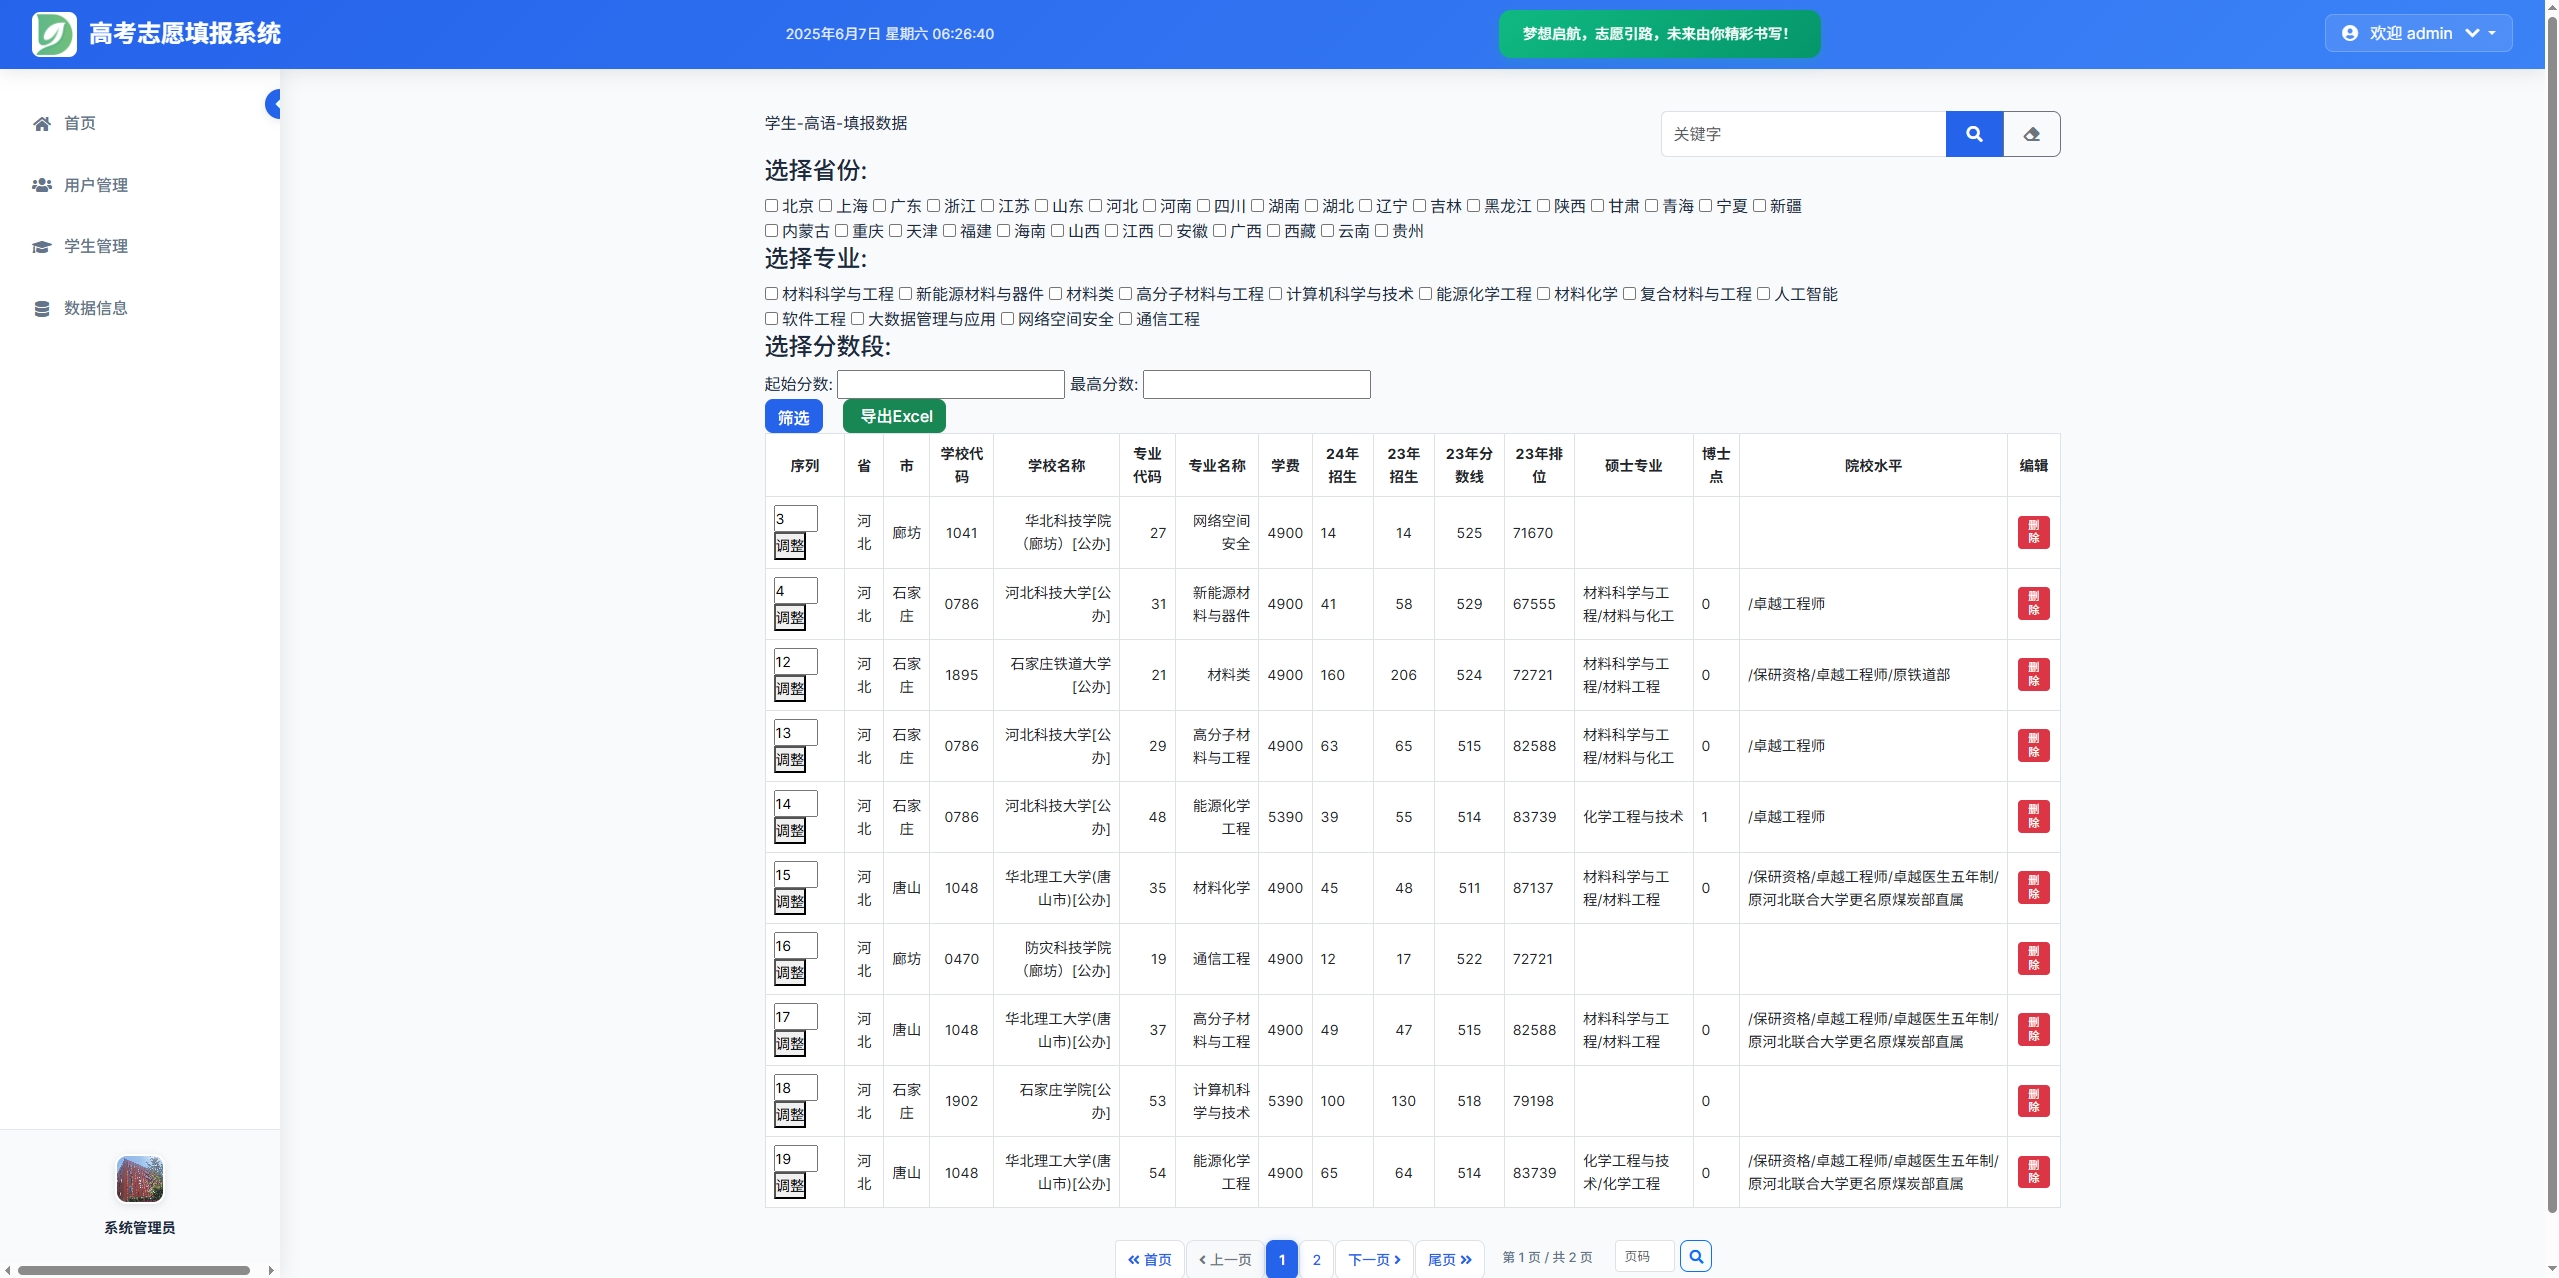
高考志愿填报管理系统是一款专为教育机构、学校和教师设计的学生信息管理和志愿填报辅助平台。系统基于Django框架开发,采用现代化的Web技术,为教育工作者提供高效、安全、便捷的学生管理解决方案。 ## 📋 系统概述 ### 🎯 系统定…...

Python常用模块:time、os、shutil与flask初探
一、Flask初探 & PyCharm终端配置 目的: 快速搭建小型Web服务器以提供数据。 工具: 第三方Web框架 Flask (需 pip install flask 安装)。 安装 Flask: 建议: 使用 PyCharm 内置的 Terminal (模拟命令行) 进行安装,避免频繁切换。 PyCharm Terminal 配置建议: 打开 Py…...
)
ArcPy扩展模块的使用(3)
管理工程项目 arcpy.mp模块允许用户管理布局、地图、报表、文件夹连接、视图等工程项目。例如,可以更新、修复或替换图层数据源,修改图层的符号系统,甚至自动在线执行共享要托管在组织中的工程项。 以下代码展示了如何更新图层的数据源&…...

GAN模式奔溃的探讨论文综述(一)
简介 简介:今天带来一篇关于GAN的,对于模式奔溃的一个探讨的一个问题,帮助大家更好的解决训练中遇到的一个难题。 论文题目:An in-depth review and analysis of mode collapse in GAN 期刊:Machine Learning 链接:...
