JavaScript系列(46)-- WebGL图形编程详解
JavaScript WebGL图形编程详解 🎨
今天,让我们深入探讨JavaScript的WebGL图形编程。WebGL是一种基于OpenGL ES的JavaScript API,它允许我们在浏览器中渲染高性能的2D和3D图形。
WebGL基础概念 🌟
💡 小知识:WebGL直接与GPU通信,使用GLSL着色器语言编写顶点和片段着色器。它提供了底层的图形API,让我们能够充分利用硬件加速进行图形渲染。
基本实现 📊
// 1. WebGL上下文初始化
class WebGLContext {constructor(canvas) {this.canvas = canvas;this.gl = canvas.getContext('webgl2') || canvas.getContext('webgl');if (!this.gl) {throw new Error('WebGL not supported');}// 初始化基本设置this.gl.clearColor(0.0, 0.0, 0.0, 1.0);this.gl.enable(this.gl.DEPTH_TEST);this.gl.enable(this.gl.CULL_FACE);this.gl.viewport(0, 0, canvas.width, canvas.height);}// 清除画布clear() {this.gl.clear(this.gl.COLOR_BUFFER_BIT | this.gl.DEPTH_BUFFER_BIT);}// 设置视口setViewport(width, height) {this.canvas.width = width;this.canvas.height = height;this.gl.viewport(0, 0, width, height);}
}// 2. 着色器程序管理
class ShaderProgram {constructor(gl, vertexSource, fragmentSource) {this.gl = gl;this.program = this.createProgram(vertexSource, fragmentSource);this.attributes = this.getAttributes();this.uniforms = this.getUniforms();}// 创建着色器程序createProgram(vertexSource, fragmentSource) {const vertexShader = this.createShader(this.gl.VERTEX_SHADER, vertexSource);const fragmentShader = this.createShader(this.gl.FRAGMENT_SHADER, fragmentSource);const program = this.gl.createProgram();this.gl.attachShader(program, vertexShader);this.gl.attachShader(program, fragmentShader);this.gl.linkProgram(program);if (!this.gl.getProgramParameter(program, this.gl.LINK_STATUS)) {throw new Error('Failed to link shader program');}return program;}// 创建着色器createShader(type, source) {const shader = this.gl.createShader(type);this.gl.shaderSource(shader, source);this.gl.compileShader(shader);if (!this.gl.getShaderParameter(shader, this.gl.COMPILE_STATUS)) {throw new Error(`Failed to compile shader: ${this.gl.getShaderInfoLog(shader)}`);}return shader;}// 获取所有属性位置getAttributes() {const attributes = {};const count = this.gl.getProgramParameter(this.program, this.gl.ACTIVE_ATTRIBUTES);for (let i = 0; i < count; i++) {const info = this.gl.getActiveAttrib(this.program, i);attributes[info.name] = this.gl.getAttribLocation(this.program, info.name);}return attributes;}// 获取所有统一变量位置getUniforms() {const uniforms = {};const count = this.gl.getProgramParameter(this.program, this.gl.ACTIVE_UNIFORMS);for (let i = 0; i < count; i++) {const info = this.gl.getActiveUniform(this.program, i);uniforms[info.name] = this.gl.getUniformLocation(this.program, info.name);}return uniforms;}// 使用程序use() {this.gl.useProgram(this.program);}
}// 3. 几何体管理
class Geometry {constructor(gl) {this.gl = gl;this.vao = this.gl.createVertexArray();this.buffers = new Map();}// 创建缓冲区createBuffer(name, data, target = this.gl.ARRAY_BUFFER) {const buffer = this.gl.createBuffer();this.gl.bindBuffer(target, buffer);this.gl.bufferData(target, data, this.gl.STATIC_DRAW);this.buffers.set(name, { buffer, target });}// 设置顶点属性setAttribute(location, size, type, normalized = false, stride = 0, offset = 0) {this.gl.vertexAttribPointer(location, size, type, normalized, stride, offset);this.gl.enableVertexAttribArray(location);}// 绑定几何体bind() {this.gl.bindVertexArray(this.vao);}// 解绑几何体unbind() {this.gl.bindVertexArray(null);}
}
高级功能实现 🚀
// 1. 矩阵变换
class Transform {constructor() {this.position = vec3.create();this.rotation = quat.create();this.scale = vec3.fromValues(1, 1, 1);this.matrix = mat4.create();}// 更新变换矩阵updateMatrix() {mat4.fromRotationTranslationScale(this.matrix,this.rotation,this.position,this.scale);return this.matrix;}// 设置位置setPosition(x, y, z) {vec3.set(this.position, x, y, z);return this;}// 设置旋转setRotation(x, y, z) {quat.fromEuler(this.rotation, x, y, z);return this;}// 设置缩放setScale(x, y, z) {vec3.set(this.scale, x, y, z);return this;}
}// 2. 相机系统
class Camera {constructor() {this.position = vec3.create();this.target = vec3.create();this.up = vec3.fromValues(0, 1, 0);this.viewMatrix = mat4.create();this.projectionMatrix = mat4.create();}// 更新视图矩阵updateViewMatrix() {mat4.lookAt(this.viewMatrix, this.position, this.target, this.up);return this.viewMatrix;}// 设置透视投影setPerspective(fov, aspect, near, far) {mat4.perspective(this.projectionMatrix, fov, aspect, near, far);return this;}// 设置正交投影setOrthographic(left, right, bottom, top, near, far) {mat4.ortho(this.projectionMatrix, left, right, bottom, top, near, far);return this;}
}// 3. 材质系统
class Material {constructor(gl, shader) {this.gl = gl;this.shader = shader;this.uniforms = new Map();}// 设置统一变量setUniform(name, value) {this.uniforms.set(name, value);return this;}// 应用材质apply() {this.shader.use();for (const [name, value] of this.uniforms) {const location = this.shader.uniforms[name];if (location) {this.setUniformValue(location, value);}}}// 设置统一变量值setUniformValue(location, value) {if (Array.isArray(value)) {switch (value.length) {case 2:this.gl.uniform2fv(location, value);break;case 3:this.gl.uniform3fv(location, value);break;case 4:this.gl.uniform4fv(location, value);break;case 16:this.gl.uniformMatrix4fv(location, false, value);break;}} else if (typeof value === 'number') {this.gl.uniform1f(location, value);} else if (value instanceof WebGLTexture) {this.gl.uniform1i(location, 0);this.gl.activeTexture(this.gl.TEXTURE0);this.gl.bindTexture(this.gl.TEXTURE_2D, value);}}
}
实际应用场景 💼
// 1. 3D场景渲染
class Scene {constructor(gl) {this.gl = gl;this.objects = new Set();this.camera = new Camera();}// 添加对象add(object) {this.objects.add(object);}// 移除对象remove(object) {this.objects.delete(object);}// 渲染场景render() {this.gl.clear(this.gl.COLOR_BUFFER_BIT | this.gl.DEPTH_BUFFER_BIT);const viewProjection = mat4.create();mat4.multiply(viewProjection,this.camera.projectionMatrix,this.camera.viewMatrix);for (const object of this.objects) {object.render(viewProjection);}}
}// 2. 粒子系统
class ParticleSystem {constructor(gl, maxParticles) {this.gl = gl;this.maxParticles = maxParticles;this.particles = [];this.geometry = this.createParticleGeometry();this.shader = this.createParticleShader();}// 创建粒子几何体createParticleGeometry() {const positions = new Float32Array(this.maxParticles * 3);const colors = new Float32Array(this.maxParticles * 4);const sizes = new Float32Array(this.maxParticles);const geometry = new Geometry(this.gl);geometry.createBuffer('position', positions);geometry.createBuffer('color', colors);geometry.createBuffer('size', sizes);return geometry;}// 更新粒子update(deltaTime) {for (const particle of this.particles) {particle.life -= deltaTime;if (particle.life <= 0) {this.resetParticle(particle);} else {particle.position[0] += particle.velocity[0] * deltaTime;particle.position[1] += particle.velocity[1] * deltaTime;particle.position[2] += particle.velocity[2] * deltaTime;}}this.updateGeometry();}// 渲染粒子render(viewProjection) {this.shader.use();this.shader.setUniform('viewProjection', viewProjection);this.geometry.bind();this.gl.drawArrays(this.gl.POINTS, 0, this.particles.length);this.geometry.unbind();}
}// 3. 后处理效果
class PostProcessor {constructor(gl) {this.gl = gl;this.framebuffer = this.createFramebuffer();this.shader = this.createPostProcessShader();this.quad = this.createScreenQuad();}// 创建帧缓冲区createFramebuffer() {const framebuffer = this.gl.createFramebuffer();this.gl.bindFramebuffer(this.gl.FRAMEBUFFER, framebuffer);// 创建纹理附件const texture = this.gl.createTexture();this.gl.bindTexture(this.gl.TEXTURE_2D, texture);this.gl.texImage2D(this.gl.TEXTURE_2D, 0, this.gl.RGBA,this.gl.canvas.width, this.gl.canvas.height,0, this.gl.RGBA, this.gl.UNSIGNED_BYTE, null);this.gl.texParameteri(this.gl.TEXTURE_2D,this.gl.TEXTURE_MIN_FILTER,this.gl.LINEAR);this.gl.texParameteri(this.gl.TEXTURE_2D,this.gl.TEXTURE_MAG_FILTER,this.gl.LINEAR);// 附加纹理this.gl.framebufferTexture2D(this.gl.FRAMEBUFFER,this.gl.COLOR_ATTACHMENT0,this.gl.TEXTURE_2D,texture,0);return {framebuffer,texture};}// 应用后处理效果apply(scene) {// 渲染场景到帧缓冲区this.gl.bindFramebuffer(this.gl.FRAMEBUFFER, this.framebuffer.framebuffer);scene.render();// 渲染后处理效果到屏幕this.gl.bindFramebuffer(this.gl.FRAMEBUFFER, null);this.shader.use();this.gl.activeTexture(this.gl.TEXTURE0);this.gl.bindTexture(this.gl.TEXTURE_2D, this.framebuffer.texture);this.quad.bind();this.gl.drawArrays(this.gl.TRIANGLES, 0, 6);this.quad.unbind();}
}
性能优化技巧 ⚡
// 1. 实例化渲染
class InstancedRenderer {constructor(gl, geometry, maxInstances) {this.gl = gl;this.geometry = geometry;this.maxInstances = maxInstances;this.setupInstancedBuffers();}// 设置实例化缓冲区setupInstancedBuffers() {const matrices = new Float32Array(this.maxInstances * 16);const colors = new Float32Array(this.maxInstances * 4);// 创建矩阵缓冲区const matrixBuffer = this.gl.createBuffer();this.gl.bindBuffer(this.gl.ARRAY_BUFFER, matrixBuffer);this.gl.bufferData(this.gl.ARRAY_BUFFER, matrices, this.gl.DYNAMIC_DRAW);// 设置矩阵属性for (let i = 0; i < 4; i++) {const location = this.geometry.shader.attributes[`instanceMatrix${i}`];this.gl.enableVertexAttribArray(location);this.gl.vertexAttribPointer(location, 4, this.gl.FLOAT, false,64, i * 16);this.gl.vertexAttribDivisor(location, 1);}// 创建颜色缓冲区const colorBuffer = this.gl.createBuffer();this.gl.bindBuffer(this.gl.ARRAY_BUFFER, colorBuffer);this.gl.bufferData(this.gl.ARRAY_BUFFER, colors, this.gl.DYNAMIC_DRAW);const colorLocation = this.geometry.shader.attributes.instanceColor;this.gl.enableVertexAttribArray(colorLocation);this.gl.vertexAttribPointer(colorLocation, 4, this.gl.FLOAT, false,0, 0);this.gl.vertexAttribDivisor(colorLocation, 1);}// 更新实例数据updateInstances(matrices, colors) {this.gl.bindBuffer(this.gl.ARRAY_BUFFER, this.matrixBuffer);this.gl.bufferSubData(this.gl.ARRAY_BUFFER, 0, matrices);this.gl.bindBuffer(this.gl.ARRAY_BUFFER, this.colorBuffer);this.gl.bufferSubData(this.gl.ARRAY_BUFFER, 0, colors);}// 渲染实例render(instanceCount) {this.geometry.bind();this.gl.drawArraysInstanced(this.gl.TRIANGLES,0,this.geometry.vertexCount,instanceCount);this.geometry.unbind();}
}// 2. 批处理渲染
class BatchRenderer {constructor(gl, maxBatchSize) {this.gl = gl;this.maxBatchSize = maxBatchSize;this.batch = [];}// 添加到批处理add(object) {if (this.batch.length >= this.maxBatchSize) {this.flush();}this.batch.push(object);}// 刷新批处理flush() {if (this.batch.length === 0) return;// 合并几何体数据const vertices = [];const indices = [];let indexOffset = 0;for (const object of this.batch) {vertices.push(...object.vertices);indices.push(...object.indices.map(i => i + indexOffset));indexOffset += object.vertices.length / 3;}// 更新缓冲区this.updateBuffers(vertices, indices);// 渲染批处理this.render();// 清空批处理this.batch.length = 0;}
}// 3. 视锥体剔除
class Frustum {constructor() {this.planes = new Array(6);for (let i = 0; i < 6; i++) {this.planes[i] = vec4.create();}}// 从投影视图矩阵更新视锥体updateFromMatrix(matrix) {// 提取平面for (let i = 0; i < 6; i++) {const plane = this.planes[i];const row = Math.floor(i / 2);const sign = i % 2 === 0 ? 1 : -1;vec4.set(plane,matrix[3] + sign * matrix[row],matrix[7] + sign * matrix[row + 4],matrix[11] + sign * matrix[row + 8],matrix[15] + sign * matrix[row + 12]);vec4.normalize(plane, plane);}}// 检查点是否在视锥体内containsPoint(point) {for (const plane of this.planes) {if (vec4.dot(plane, [...point, 1]) < 0) {return false;}}return true;}// 检查包围球是否在视锥体内containsSphere(center, radius) {for (const plane of this.planes) {if (vec4.dot(plane, [...center, 1]) < -radius) {return false;}}return true;}
}
最佳实践建议 💡
- 性能优化模式
// 1. 状态管理
class GLState {constructor(gl) {this.gl = gl;this.currentProgram = null;this.currentTexture = null;this.currentVAO = null;}// 使用着色器程序useProgram(program) {if (this.currentProgram !== program) {this.gl.useProgram(program);this.currentProgram = program;}}// 绑定纹理bindTexture(texture) {if (this.currentTexture !== texture) {this.gl.bindTexture(this.gl.TEXTURE_2D, texture);this.currentTexture = texture;}}// 绑定VAObindVAO(vao) {if (this.currentVAO !== vao) {this.gl.bindVertexArray(vao);this.currentVAO = vao;}}
}// 2. 资源管理
class ResourceManager {constructor() {this.resources = new Map();this.loading = new Set();}// 加载资源async load(url, type) {if (this.resources.has(url)) {return this.resources.get(url);}if (this.loading.has(url)) {return new Promise(resolve => {const check = () => {if (this.resources.has(url)) {resolve(this.resources.get(url));} else {requestAnimationFrame(check);}};check();});}this.loading.add(url);try {const resource = await this.loadResource(url, type);this.resources.set(url, resource);this.loading.delete(url);return resource;} catch (error) {this.loading.delete(url);throw error;}}// 释放资源unload(url) {const resource = this.resources.get(url);if (resource) {if (resource.dispose) {resource.dispose();}this.resources.delete(url);}}
}// 3. 渲染队列
class RenderQueue {constructor() {this.opaque = [];this.transparent = [];}// 添加渲染对象add(object) {if (object.material.transparent) {this.transparent.push(object);} else {this.opaque.push(object);}}// 排序渲染队列sort(cameraPosition) {// 不透明物体从前往后排序this.opaque.sort((a, b) => {return a.material.renderOrder - b.material.renderOrder;});// 透明物体从后往前排序this.transparent.sort((a, b) => {const distA = vec3.distance(a.position, cameraPosition);const distB = vec3.distance(b.position, cameraPosition);return distB - distA;});}// 执行渲染render(scene) {// 渲染不透明物体for (const object of this.opaque) {object.render(scene);}// 渲染透明物体this.gl.enable(this.gl.BLEND);this.gl.blendFunc(this.gl.SRC_ALPHA, this.gl.ONE_MINUS_SRC_ALPHA);for (const object of this.transparent) {object.render(scene);}this.gl.disable(this.gl.BLEND);}
}
结语 📝
WebGL为JavaScript提供了强大的图形渲染能力。通过本文,我们学习了:
- WebGL的基本概念和初始化
- 着色器程序和几何体管理
- 高级渲染技术
- 性能优化策略
- 最佳实践和设计模式
💡 学习建议:在使用WebGL时,要注意性能优化和内存管理。合理使用批处理和实例化渲染,避免频繁的状态切换。同时,要考虑跨平台兼容性和降级处理。
如果你觉得这篇文章有帮助,欢迎点赞收藏,也期待在评论区看到你的想法和建议!👇
终身学习,共同成长。
咱们下一期见
💻
相关文章:
-- WebGL图形编程详解)
JavaScript系列(46)-- WebGL图形编程详解
JavaScript WebGL图形编程详解 🎨 今天,让我们深入探讨JavaScript的WebGL图形编程。WebGL是一种基于OpenGL ES的JavaScript API,它允许我们在浏览器中渲染高性能的2D和3D图形。 WebGL基础概念 🌟 💡 小知识ÿ…...
YOLO目标检测4
一. 参考资料 《YOLO目标检测》 by 杨建华博士 本篇文章的主要内容来自于这本书,只是作为学习记录进行分享。 二. 环境搭建 (1) ubuntu20.04 anaconda安装方法 (2) 搭建yolo训练环境 # 首先,我们建议使用Anaconda来创建一个conda的虚拟环境 conda cre…...

十三先天记
没有一刻,只有当下在我心里。我像星星之间的空间一样空虚。他们是我看到的第一件事,我知道的第一件事。 在接下来的时间里,我意识到我是谁,我是谁。我知道星星在我上方,星球的固体金属体在我脚下。这个支持我的世界是泰…...

【论文阅读笔记】“万字”关于深度学习的图像和视频阴影检测、去除和生成的综述笔记 | 2024.9.3
论文“Unveiling Deep Shadows: A Survey on Image and Video Shadow Detection, Removal, and Generation in the Era of Deep Learning”内容包含第1节简介、第2-5节分别对阴影检测、实例阴影检测、阴影去除和阴影生成进行了全面的综述。第6节深入讨论了阴影分析࿰…...

Android AOP:aspectjx
加入引用 在整个项目的 build.gradle 中,添加 classpath "com.hujiang.aspectjx:gradle-android-plugin-aspectjx:2.0.10" 可以看到测试demo的 gradle 版本是很低的。 基于 github 上的文档,可以看到原版只支持到 gradle 4.4 。后续需要使…...

前端【11】HTML+CSS+jQUery实战项目--实现一个简单的todolist
前端【8】HTMLCSSjavascript实战项目----实现一个简单的待办事项列表 (To-Do List)-CSDN博客 学过jQUery可以极大简化js代码的编写,基于之前实现的todolist小demo,了解如何使用 jQuery 来实现常见的动态交互功能。 修改后的js代码 关键点解析 动态添加…...

2025课题推荐——USBL与DVL数据融合的实时定位系统
准确的定位技术是现代海洋探测、海洋工程和水下机器人操作的基础。超短基线(USBL)和多普勒速度计(DVL)是常用的水下定位技术,但单一技术难以应对复杂环境。因此,USBL与DVL的数据融合以构建实时定位系统&…...

滑动窗口详解:解决无重复字符的最长子串问题
滑动窗口详解:解决无重复字符的最长子串问题 在算法面试中,“无重复字符的最长子串”问题是一个经典题目,不仅考察基础数据结构的运用,还能够反映你的逻辑思维能力。而在解决这个问题时,滑动窗口(Sliding …...

第05章 11 动量剖面可视化代码一则
在计算流体力学(CFD)中,动量剖面(Momentum Profiles)通常用于描述流体在流动方向上的动量分布。在 VTK 中,可以通过读取速度场数据,并计算和展示动量剖面来可视化呈现速度场信息。 示例代码 以…...

MySQL的复制
一、概述 1.复制解决的问题是让一台服务器的数据与其他服务器保持同步,即主库的数据可以同步到多台备库上,备库也可以配置成另外一台服务器的主库。这种操作一般不会增加主库的开销,主要是启用二进制日志带来的开销。 2.两种复制方式…...

Cpp::IO流(37)
文章目录 前言一、C语言的输入与输出二、什么是流?三、C IO流C标准IO流C文件IO流以写方式打开文件以读方式打开文件 四、stringstream的简单介绍总结 前言 芜湖,要结束喽! 一、C语言的输入与输出 C语言中我们用到的最频繁的输入输出方式就是 …...

基于OpenCV实现的答题卡自动判卷系统
一、图像预处理 🌄 二、查找答题卡轮廓 📏 三、透视变换 🔄 四、判卷与评分 🎯 五、主函数 六、完整代码+测试图像集 总结 🌟 在这篇博客中,我将分享如何使用Python结合OpenCV库开发一个答题卡自动判卷系统。这个系统能够自动从扫描的答题卡中提取信…...

如何将电脑桌面默认的C盘设置到D盘?详细操作步骤!
将电脑桌面默认的C盘设置到D盘的详细操作步骤! 本博文介绍如何将电脑桌面(默认为C盘)设置在D盘下。 首先,在D盘建立文件夹Desktop,完整的路径为D:\Desktop。winR,输入Regedit命令。(或者单击【…...

二十三种设计模式-享元模式
享元模式(Flyweight Pattern)是一种结构型设计模式,旨在通过共享相同对象来减少内存使用,尤其适合在大量重复对象的情况下。 核心概念 享元模式的核心思想是将对象的**可共享部分(内部状态)提取出来进行共…...

算法【有依赖的背包】
有依赖的背包是指多个物品变成一个复合物品(互斥),每件复合物品不要和怎么要多种可能性展开。时间复杂度O(物品个数 * 背包容量),额外空间复杂度O(背包容量)。 下面通过题目加深理解。 题目一 测试链接:[NOIP2006 提…...

A7. Jenkins Pipeline自动化构建过程,可灵活配置多项目、多模块服务实战
服务容器化构建的环境配置构建前需要解决什么下面我们带着问题分析构建的过程:1. 如何解决jenkins执行环境与shell脚本执行环境不一致问题?2. 构建之前动态修改项目的环境变量3. 在通过容器打包时避免不了会产生比较多的不可用的镜像资源,这些资源要是不及时删除掉时会导致服…...

飞牛NAS新增虚拟机功能,如果使用虚拟机网卡直通安装ikuai软路由(如何解决OVS网桥绑定失败以及打开ovs后无法访问飞牛nas等问题)
文章目录 📖 介绍 📖🏡 演示环境 🏡📒 飞牛NAS虚拟机安装爱快教程 📒🛠️ 前期准备🌐 网络要求💾 下载爱快镜像🚀 开始安装💻 开启IOMMU直通🌐 配置网络🚨 解决OVS网桥绑定失败以及打开ovs后无法访问飞牛nas等问题➕ 创建虚拟机🎯 安装ikuai💻 进…...

蓝桥杯例题四
每个人都有无限潜能,只要你敢于去追求,你就能超越自己,实现梦想。人生的道路上会有困难和挑战,但这些都是成长的机会。不要被过去的失败所束缚,要相信自己的能力,坚持不懈地努力奋斗。成功需要付出汗水和努…...

八股——Java基础(四)
目录 一、泛型 1. Java中的泛型是什么 ? 2. 使用泛型的好处是什么? 3. Java泛型的原理是什么 ? 什么是类型擦除 ? 4.什么是泛型中的限定通配符和非限定通配符 ? 5. List和List 之间有什么区别 ? 6. 可以把List传递给一个接受List参数的方法吗? 7. Arra…...

CVE-2023-38831 漏洞复现:win10 压缩包挂马攻击剖析
目录 前言 漏洞介绍 漏洞原理 产生条件 影响范围 防御措施 复现步骤 环境准备 具体操作 前言 在网络安全这片没有硝烟的战场上,新型漏洞如同隐匿的暗箭,时刻威胁着我们的数字生活。其中,CVE - 2023 - 38831 这个关联 Win10 压缩包挂…...

Chapter03-Authentication vulnerabilities
文章目录 1. 身份验证简介1.1 What is authentication1.2 difference between authentication and authorization1.3 身份验证机制失效的原因1.4 身份验证机制失效的影响 2. 基于登录功能的漏洞2.1 密码爆破2.2 用户名枚举2.3 有缺陷的暴力破解防护2.3.1 如果用户登录尝试失败次…...

逻辑回归:给不确定性划界的分类大师
想象你是一名医生。面对患者的检查报告(肿瘤大小、血液指标),你需要做出一个**决定性判断**:恶性还是良性?这种“非黑即白”的抉择,正是**逻辑回归(Logistic Regression)** 的战场&a…...

C++ 基础特性深度解析
目录 引言 一、命名空间(namespace) C 中的命名空间 与 C 语言的对比 二、缺省参数 C 中的缺省参数 与 C 语言的对比 三、引用(reference) C 中的引用 与 C 语言的对比 四、inline(内联函数…...

图表类系列各种样式PPT模版分享
图标图表系列PPT模版,柱状图PPT模版,线状图PPT模版,折线图PPT模版,饼状图PPT模版,雷达图PPT模版,树状图PPT模版 图表类系列各种样式PPT模版分享:图表系列PPT模板https://pan.quark.cn/s/20d40aa…...

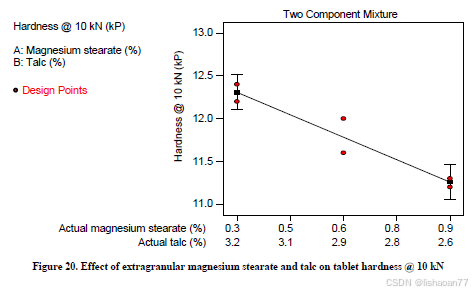
R语言速释制剂QBD解决方案之三
本文是《Quality by Design for ANDAs: An Example for Immediate-Release Dosage Forms》第一个处方的R语言解决方案。 第一个处方研究评估原料药粒径分布、MCC/Lactose比例、崩解剂用量对制剂CQAs的影响。 第二处方研究用于理解颗粒外加硬脂酸镁和滑石粉对片剂质量和可生产…...

【电力电子】基于STM32F103C8T6单片机双极性SPWM逆变(硬件篇)
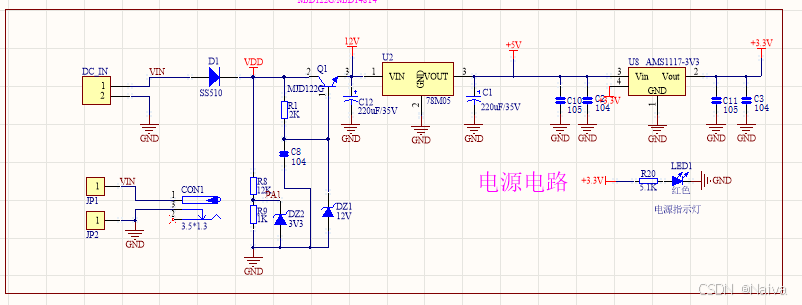
本项目是基于 STM32F103C8T6 微控制器的 SPWM(正弦脉宽调制)电源模块,能够生成可调频率和幅值的正弦波交流电源输出。该项目适用于逆变器、UPS电源、变频器等应用场景。 供电电源 输入电压采集 上图为本设计的电源电路,图中 D1 为二极管, 其目的是防止正负极电源反接, …...

Webpack性能优化:构建速度与体积优化策略
一、构建速度优化 1、升级Webpack和Node.js 优化效果:Webpack 4比Webpack 3构建时间降低60%-98%。原因: V8引擎优化(for of替代forEach、Map/Set替代Object)。默认使用更快的md4哈希算法。AST直接从Loa…...

消防一体化安全管控平台:构建消防“一张图”和APP统一管理
在城市的某个角落,一场突如其来的火灾打破了平静。熊熊烈火迅速蔓延,滚滚浓烟弥漫开来,周围群众的生命财产安全受到严重威胁。就在这千钧一发之际,消防救援队伍迅速行动,而豪越科技消防一体化安全管控平台构建的消防“…...

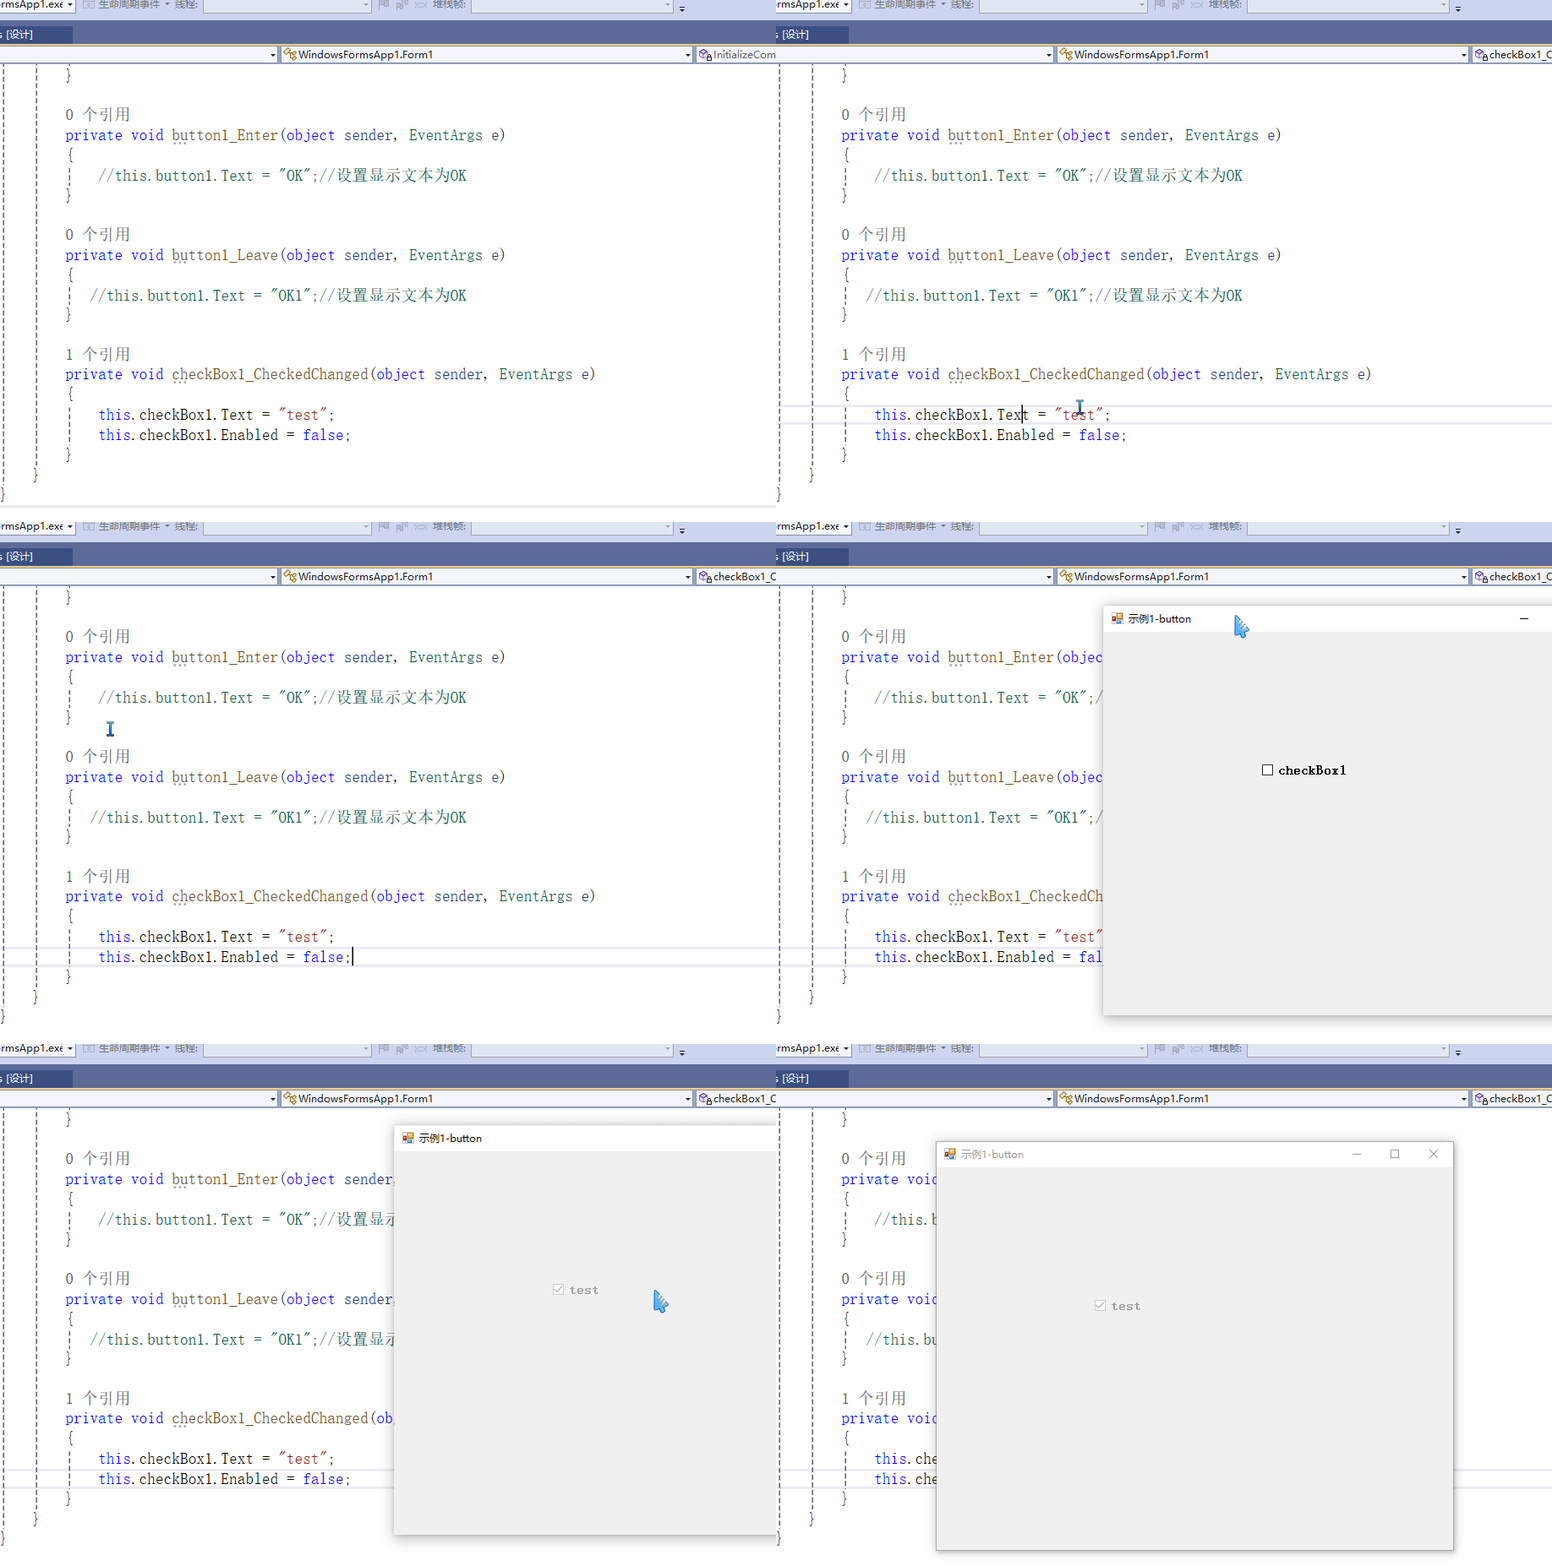
C# winform教程(二)----checkbox
一、作用 提供一个用户选择或者不选的状态,这是一个可以多选的控件。 二、属性 其实功能大差不差,除了特殊的几个外,与button基本相同,所有说几个独有的 checkbox属性 名称内容含义appearance控件外观可以变成按钮形状checkali…...

Python的__call__ 方法
在 Python 中,__call__ 是一个特殊的魔术方法(magic method),它允许一个类的实例像函数一样被调用。当你在一个对象后面加上 () 并执行时(例如 obj()),Python 会自动调用该对象的 __call__ 方法…...
