从零实现深度学习框架——再探多层双向RNN的实现
来源:投稿 作者:175
编辑:学姐
往期内容:
从零实现深度学习框架1:RNN从理论到实战(理论篇)
从零实现深度学习框架2:RNN从理论到实战(实战篇)
从零实现深度学习框架3:再探多层双向RNN的实现(本篇)
在前面的文章中,我们实现了多层、双向RNN。但是这几天一直在思考,这种实现方式是不是有问题。因为RNN的实现关乎后面ELMo和seq2seq,所以不得不重视。
双向RNN的实现方式
以两层双向RNN为例。我们之前实现的方式类似如下图所示:
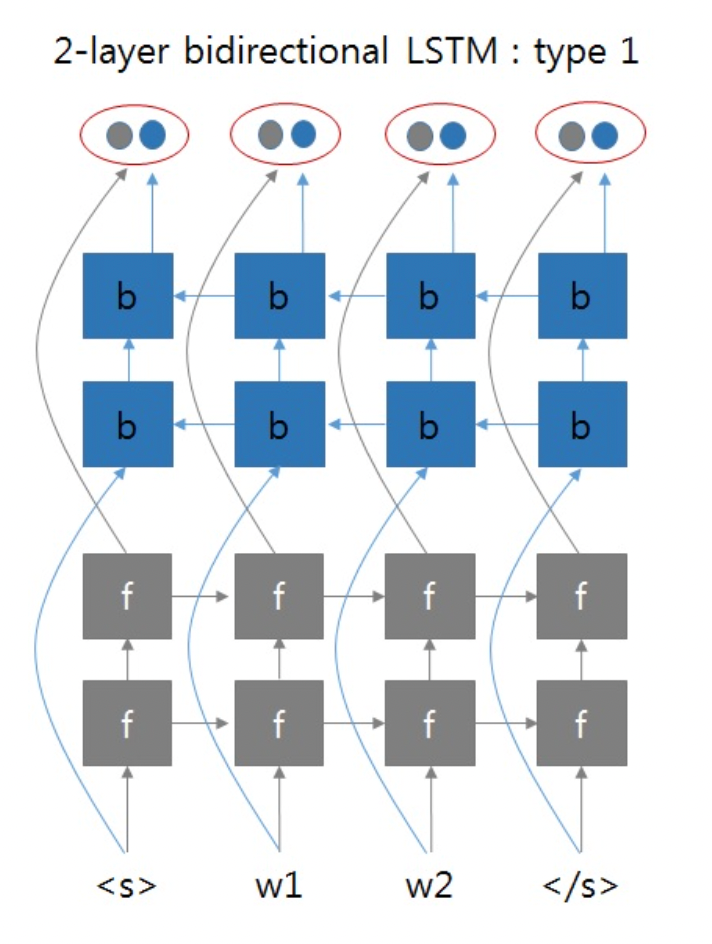
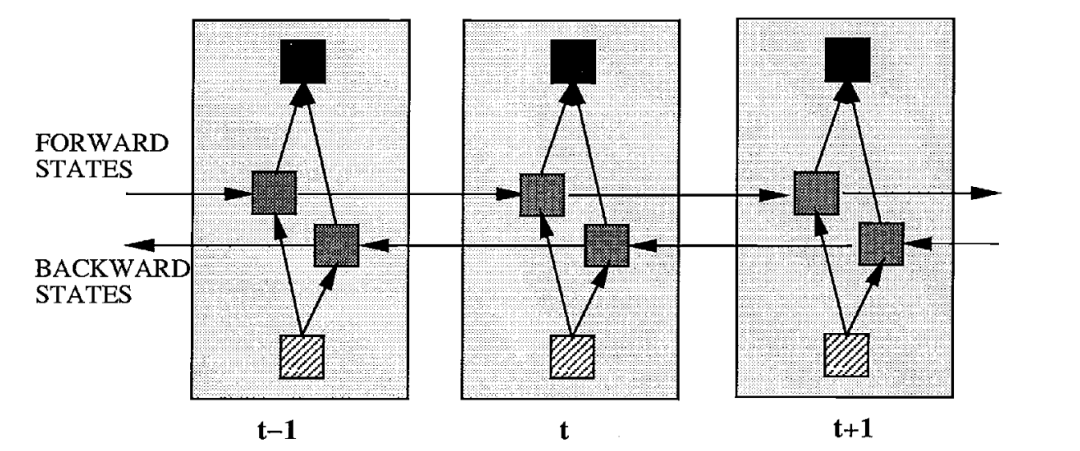
这两张图片来自于:https://github.com/pytorch/pytorch/issues/4930#issuecomment-361851298
就是正向RNN和反向RNN可以看成是两个独立的两层RNN网络,最终拼接了它们的输出。但是总感觉双向RNN不会这么简单,带着这个疑问去拜读了双向RNN的论文1,得到下面的这张图片:
如果采用这种方式的话,那么两层双向RNN的实现应该像下图这样:
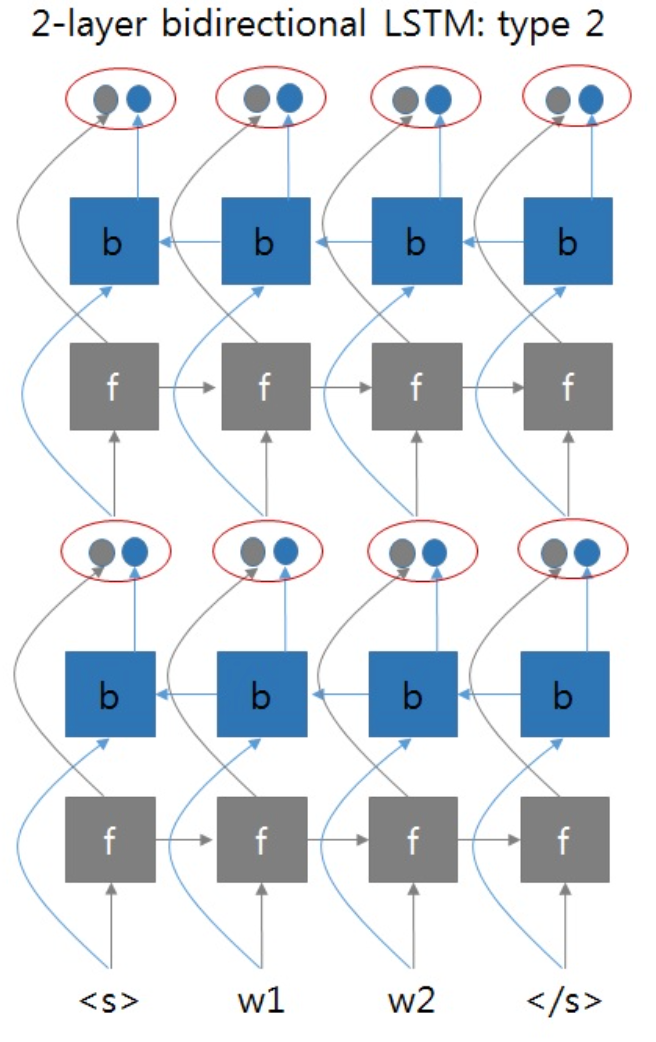
即第一层BRNN的输出同时考虑了正向和方向输出,将它们拼接在一起,作为第二层BRNN的输入。
但是这时遇到了一个问题,如果这样实现的话,那么输出的维度会怎样呢?BRNN中每层参数的维度会产生怎样的变化呢?
遇事不决找Torch,我们摸着PyTorch过河。
带着这个问题,我们去看PyTorch的文档,并查阅资料,梳理一下PyTorch实现的RNN(GRU、LSTM)中各种输入、输出、隐藏状态的维度。
理解RNN中的各种维度
以RNN为例,为什么不以最复杂的LSTM为例呢?因为LSTM参数过多,相比RNN太过复杂,不太容易理解。柿子要挑软的捏,我们理解了RNN,再去理解GRU或LSTM就会简单多了。
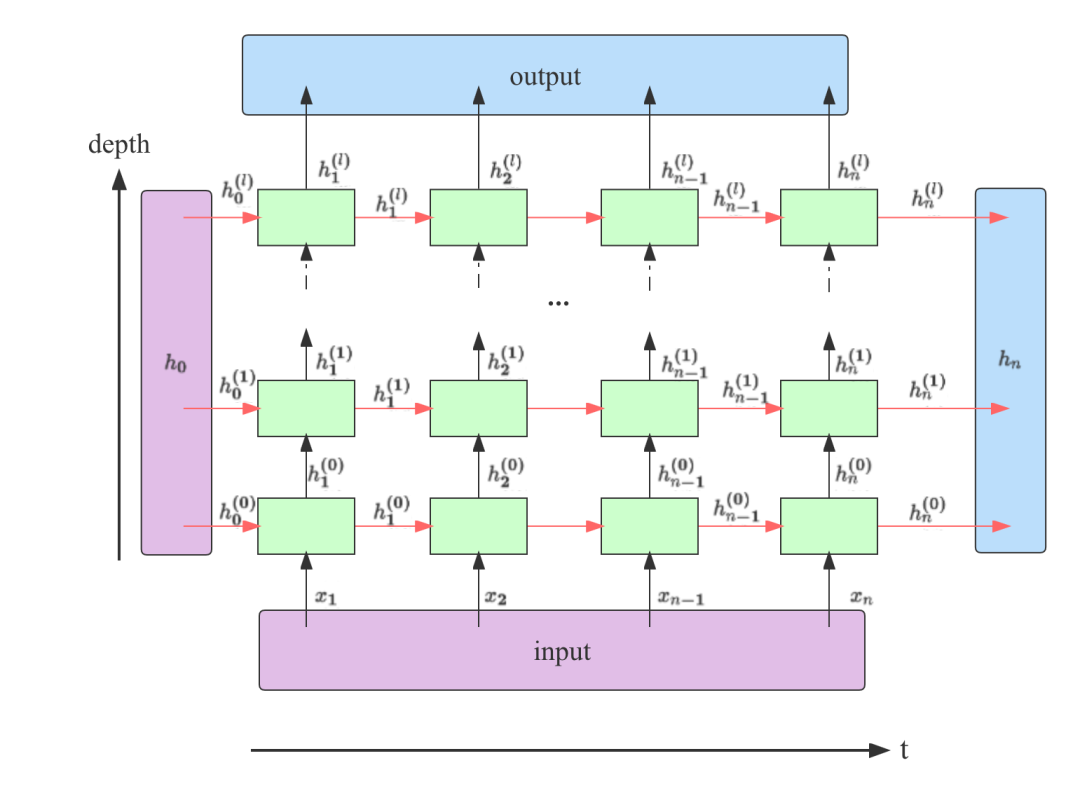
此图片参考了https://stackoverflow.com/a/48305882
从上图可以看出,在一个堆叠了l层的RNN中,output包含了最后一层RNN输出的所有隐藏状态;h_n包含了最后一个时间步上所有层的输出。
我们知道了它们的构成方式,下面看一下它们和上图中另外两个参数input和h_0在不同类型的RNN中维度如何2。
-
inputRNN的输入序列。若batch_first=False,则其大小为(seq_len, batch_size, input_size);若batch_first=True,则其大小为(batch_size, seq_len, input_size); -
h_0RNN的初始隐藏状态,可以为空。大小为(num_layers * num_directions, batch_size, hidden_size); -
outputRNN最后一层所有时间步的输出。若batch_first=False,则其大小为(seq_len, batch_size, num_directions * hidden_size);若batch_first=True,则其大小为(batch_size, seq_len, num_directions * hidden_size); -
h_nRNN中所有层最后一个时间步的隐藏状态。其大小为(num_layers * num_directions, batch_size, hidden_size)。不受batch_first的影响,其批次维度表现和batch_first=False一样。后面以代码实现的角度解释下为何这样,不代表官方的意图。
其中seq_len表示输入序列长度;batch_size表示批次大小;input_size表示输入的特征数量;num_layers表示层数;num_directions表示方向个数,单向RNN时为1,双向RNN时为2;hidden_size表示隐藏状态的特征数。
的形状应该和
是一致的。
下面我们进行验证,首先看一下初始参数:
# 输入大小
INPUT_SIZE = 2
# 序列长度
SEQ_LENGTH = 5
# 隐藏大小
HIDDEN_SIZE = 3
# 批大小
BATCH_SIZE = 4
以及输入:
inputs = Tensor.randn(BATCH_SIZE, SEQ_LENGTH, INPUT_SIZE)
简单RNN
简单RNN就是单向单层RNN:
rnn = nn.RNN(input_size=INPUT_SIZE, hidden_size=HIDDEN_SIZE, num_layers=1, batch_first=True)output, h_n = rnn(inputs)print(f'Input Shape: {inputs.shape} ')
print(f'Output Shape: {output.shape} ')
print(f'Hidden Shape: {h_n.shape} ')
-
inputs维度是我们预先定理好的,注意这里batch_first=True,所以inputs的第一个维度是批大小。 -
output来自最后一层所有时间步的输出,时间步长度为5,包含整个批次内4条数据,每条数据的输出维度为3,可以理解为3分类问题。 -
$h_n$来自单层最后一个时间步的隐藏状态,包含整个批次内4条数据,每条数据的输出维度为3。
Input Shape: (4, 5, 2)
Output Shape: (4, 5, 3)
Hidden Shape: (1, 4, 3)
堆叠RNN
如果将层数改成3,我们就得到了3层RNN堆叠在一起的架构,来看下此时output和h_n的维度会发生怎样的变化。
rnn = nn.RNN(input_size=INPUT_SIZE, hidden_size=HIDDEN_SIZE, num_layers=3, batch_first=True)output, h_n = rnn(inputs)print(f'Input Shape: {inputs.shape} ')
print(f'Output Shape: {output.shape} ')
print(f'Hidden Shape: {h_n.shape} ')
Input Shape: (4, 5, 2)
Output Shape: (4, 5, 3)
Hidden Shape: (3, 4, 3)
-
output来自最后一层所有时间步的输出,时间步长度为5,包含整个批次内4条数据,每条数据的输出维度为3。其维度保持不变。 -
h_n来自所有三层最后一个时间步的隐藏状态,包含整个批次内4条数据,每条数据的输出维度为3。可以看到,其输出的第一个维度大小由1变成了3,因为包含了3层的结果。
双向RNN
传入bidirectional=True,并将层数改回单层。
rnn = nn.RNN(input_size=INPUT_SIZE, hidden_size=HIDDEN_SIZE, num_layers=1, batch_first=True, bidirectional=True)output, h_n = rnn(inputs)print(f'Input Shape: {inputs.shape} ')
print(f'Output Shape: {output.shape} ')
print(f'Hidden Shape: {h_n.shape} ')
Input Shape: (4, 5, 2)
Output Shape: (4, 5, 6)
Hidden Shape: (2, 4, 3)
-
output来自最后一层所有时间步的输出,时间步长度为5,包含整个批次内4条数据,每条数据的输出维度为3,由于是双向,包含了两个方向上的结果,在此维度上进行堆叠,所以由3变成了6。 -
h_n最后一个时间步的隐藏状态,包含整个批次内4条数据,每条数据的输出维度为3。第一个维度由1变成了2,因为在此维度上堆叠了双向的结果。
它们都包含了双向的结果,那如果想分别得到每个方向上的结果,要怎么做呢?
对于output。若batch_first=True,将output按照out.reshape(shape=(batch_size, seq_len, num_directions, hidden_size))进行变形,正向和反向的维度值为别为0和1。
对于h_n,按照h_n.reshape(shape=(num_layers, num_directions, batch_size, hidden_size)),正向和反向的维度值为别为0和1。
我们来对output进行拆分:
# batch_first=True
output_reshaped = output.reshape((BATCH_SIZE, SEQ_LENGTH, 2, HIDDEN_SIZE))
print("Shape of the output after directions are separated: ", output_reshaped.shape)# 分别获取正向和反向的输出
output_forward = output_reshaped[:, :, 0, :]
output_backward = output_reshaped[:, :, 1, :]
print("Forward output Shape: ", output_forward.shape)
print("Backward output Shape: ", output_backward.shape)
Shape of the output after directions are separated:  (4, 5, 2, 3)
Forward output Shape:  (4, 5, 3)
Backward output Shape:  (4, 5, 3)
对h_n进行拆分:
# 1: 层数   2: 方向数
h_n_reshaped = h_n.reshape((1, 2, BATCH_SIZE, HIDDEN_SIZE))
print("Shape of the hidden after directions are separated: ", h_n_reshaped.shape)h_n_forward = h_n_reshaped[:, 0, :, :]
h_n_backward = h_n_reshaped[:, 1, :, :]
print("Forward h_n Shape: ", h_n_forward.shape)
print("Backward h_n Shape: ", h_n_backward.shape)
Shape of the hidden after directions are separated:  (1, 2, 4, 3)
Forward h_n Shape:  (1, 4, 3)
Backward h_n Shape:  (1, 4, 3)
堆叠双向RNN
设置bidirectional=True,并将层数设成3层。
rnn = nn.RNN(input_size=INPUT_SIZE, hidden_size=HIDDEN_SIZE, num_layers=3, batch_first=True, bidirectional=True)output, h_n = rnn(inputs)print(f'Input Shape: {inputs.shape} ')
print(f'Output Shape: {output.shape} ')
print(f'Hidden Shape: {h_n.shape} ')
Input Shape: (4, 5, 2)
Output Shape: (4, 5, 6)
Hidden Shape: (6, 4, 3)
-
output来自最后一层所有时间步的输出,时间步长度为5,包含整个批次内4条数据,每条数据的输出维度为3,由于是双向,包含了两个方向上的结果,在此维度上进行堆叠,所以由3变成了6。 -
h_n来自所有三层最后一个时间步的隐藏状态,包含整个批次内4条数据,每条数据的输出维度为3。第一个维度由变成了6,因为三层输出在此维度上堆叠了双向的结果。
如果我们也对它们按方向进行拆分的话。
首先对output拆分:
# batch_first=True
output_reshaped = output.reshape((BATCH_SIZE, SEQ_LENGTH, 2, HIDDEN_SIZE))
print("Shape of the output after directions are separated: ", output_reshaped.shape)# 分别获取正向和反向的输出
output_forward = output_reshaped[:, :, 0, :]
output_backward = output_reshaped[:, :, 1, :]
print("Forward output Shape: ", output_forward.shape)
print("Backward output Shape: ", output_backward.shape)
Shape of the output after directions are separated:  (4, 5, 2, 3)
Forward output Shape:  (4, 5, 3)
Backward output Shape:  (4, 5, 3)
其次对h_out拆分:
# 3: 层数   2: 方向数
h_n_reshaped = h_n.reshape((3, 2, BATCH_SIZE, HIDDEN_SIZE))
print("Shape of the hidden after directions are separated: ", h_n_reshaped.shape)h_n_forward = h_n_reshaped[:, 0, :, :]
h_n_backward = h_n_reshaped[:, 1, :, :]
print("Forward h_n Shape: ", h_n_forward.shape)
print("Backward h_n Shape: ", h_n_backward.shape)
Shape of the hidden after directions are separated:  (3, 2, 4, 3)
Forward h_n Shape:  (3, 4, 3)
Backward h_n Shape:  (3, 4, 3)
重构双向RNN的实现

我们按照对每层输出状态进行拼接的方式来重构多层双向RNN。
这里有一个问题是,由于我们对隐藏状态进行了拼接, 其维度变成了(n_steps, batch_size, num_directions * hidden_size)。
受到了PyTorch官网启发:
-
~RNN.weight_ih_l[k] – the learnable input-hidden weights of the k-th layer, of shape (hidden_size, input_size) for k = 0. Otherwise, the shape is (hidden_size, num_directions * hidden_size)
-
~RNN.weight_hh_l[k] – the learnable hidden-hidden weights of the k-th layer, of shape (hidden_size, hidden_size)
所以,我们相应地改变输入到隐藏状态的维度:(hidden_size, num_directions * hidden_size)。
我们说 h_n的输出维度不受batch_first的影响,其批次维度表现和batch_first=False一样。这是因为在实现时,为了统一,将input的时间步放到了第1个维度,将批大小放到中间,input就像batch_first=False一样,而隐藏状态的方式和它保持一致即可。
if self.batch_first:batch_size, n_steps, _ = input.shapeinput = input.transpose((1, 0, 2)) # 将batch放到中间维度
下面看具体实现:
RNNCellBase
class RNNCellBase(Module):def reset_parameters(self) -> None:stdv = 1.0 / math.sqrt(self.hidden_size) if self.hidden_size > 0 else 0for weight in self.parameters():init.uniform_(weight, -stdv, stdv)def __init__(self, input_size, hidden_size: int, num_chunks: int, bias: bool = True, num_directions=1,reset_parameters=True, device=None, dtype=None) -> None:'''RNN单时间步的抽象:param input_size: 输入x的特征数:param hidden_size: 隐藏状态的特征数:param bias: 线性层是否包含偏置:param nonlinearity: 非线性激活函数 tanh | relu (mode = RNN)'''factory_kwargs = {'device': device, 'dtype': dtype}super(RNNCellBase, self).__init__()self.input_size = input_sizeself.hidden_size = hidden_size# 输入x的线性变换self.input_trans = Linear(num_directions * input_size, num_chunks * hidden_size, bias=bias, **factory_kwargs)# 隐藏状态的线性变换self.hidden_trans = Linear(hidden_size, num_chunks * hidden_size, bias=bias, **factory_kwargs)if reset_parameters:self.reset_parameters()def extra_repr(self) -> str:s = 'input_size={input_size}, hidden_size={hidden_size}'if 'bias' in self.__dict__ and self.bias is not True:s += ', bias={bias}'if 'nonlinearity' in self.__dict__ and self.nonlinearity != "tanh":s += ', nonlinearity={nonlinearity}'return s.format(**self.__dict__)
RNNCell
class RNNCell(RNNCellBase):def __init__(self, input_size, hidden_size: int, bias: bool = True, nonlinearity: str = 'tanh', num_directions=1,reset_parameters=True, device=None, dtype=None):factory_kwargs = {'device': device, 'dtype': dtype, 'reset_parameters': reset_parameters}super(RNNCell, self).__init__(input_size, hidden_size, num_chunks=1, bias=bias, num_directions=num_directions,**factory_kwargs)if nonlinearity == 'tanh':self.activation = F.tanhelse:self.activation = F.reludef forward(self, x: Tensor, h: Tensor, c: Tensor = None) -> Tuple[Tensor, None]:h_next = self.activation(self.input_trans(x) + self.hidden_trans(h))return h_next, None
在RNNCell的forward中也返回了一个元组,元组中第二个元素代表了c_next,为了兼容LSTM的实现。
RNNBase
class RNNBase(Module):def __init__(self, cell: RNNCellBase, input_size: int, hidden_size: int, batch_first: bool = False,num_layers: int = 1, bidirectional: bool = False, bias: bool = True, dropout: float = 0,reset_parameters=True, device=None, dtype=None) -> None:''':param input_size: 输入x的特征数:param hidden_size: 隐藏状态的特征数:param batch_first: 批次维度是否在前面:param num_layers: 层数:param bidirectional: 是否为双向:param bias: 线性层是否包含偏置:param dropout: 用于多层堆叠RNN,默认为0代表不使用dropout:param reset_parameters: 是否执行reset_parameters:param device::param dtype:'''super(RNNBase, self).__init__()factory_kwargs = {'device': device, 'dtype': dtype, 'reset_parameters': reset_parameters}self.num_layers = num_layersself.hidden_size = hidden_sizeself.input_size = input_sizeself.batch_first = batch_firstself.bidirectional = bidirectionalself.bias = biasself.num_directions = 2 if self.bidirectional else 1# 支持多层self.cells = ModuleList([cell(input_size, hidden_size, bias, **factory_kwargs)] +[cell(hidden_size, hidden_size, bias, num_directions=self.num_directions,**factory_kwargs) for _ inrange(num_layers - 1)])if self.bidirectional:# 支持双向self.back_cells = copy.deepcopy(self.cells)self.dropout = dropoutif dropout != 0:# Dropout层self.dropout_layer = Dropout(dropout)def _one_directional_op(self, input, n_steps, cell, h, c) -> Tuple[Tensor, Tensor, Tensor]:hs = []# 沿着input时间步进行遍历for t in range(n_steps):inp = input[t]h, c = cell(inp, h, c)hs.append(h)return h, c, F.stack(hs)def _handle_hidden_state(self, input, state):assert input.ndim == 3 # 必须传入批数据,最小批大小为1if self.batch_first:batch_size, n_steps, _ = input.shapeinput = input.transpose((1, 0, 2)) # 将batch放到中间维度else:n_steps, batch_size, _ = input.shapeif state is None:h = Tensor.zeros((self.num_layers * self.num_directions, batch_size, self.hidden_size), dtype=input.dtype,device=input.device)else:h = state# 得到每层的状态hs = list(F.unbind(h)) # 按层数拆分hreturn hs, [None] * len(hs), input, n_steps, batch_sizedef forward(self, input: Tensor, state: Tensor) -> Tuple[Tensor, Tensor, Tensor]:'''RNN的前向传播:param input: 形状 [n_steps, batch_size, input_size] 若batch_first=False:param state: (隐藏状态,单元状态)元组, 每个元素形状 [num_layers, batch_size, hidden_size]:return:num_directions = 2 if self.bidirectional else 1output: (n_steps, batch_size, num_directions * hidden_size)若batch_first=False 或(batch_size, n_steps, num_directions * hidden_size)若batch_first=True包含每个时间步最后一层(多层RNN)的输出h_th_n: (num_directions * num_layers, batch_size, hidden_size) 包含最终隐藏状态c_n: (num_directions * num_layers, batch_size, hidden_size) 包含最终单元状态(LSTM);非LSTM为None'''hs, cs, input, n_steps, batch_size = self._handle_hidden_state(input, state)# 正向得到的h_n,反向得到的h_n,正向得到的c_n,反向得到的c_nh_n_f, h_n_b, c_n_f, c_n_b = [], [], [], []for layer in range(self.num_layers):h, c, hs_f = self._one_directional_op(input, n_steps, self.cells[layer], hs[layer], cs[layer])h_n_f.append(h) # 保存最后一个时间步的隐藏状态c_n_f.append(c)if self.bidirectional:h, c, hs_b = self._one_directional_op(F.flip(input, 0), n_steps, self.back_cells[layer],hs[layer + self.num_layers], cs[layer + self.num_layers])hs_b = F.flip(hs_b, 0) # 将输出时间步维度逆序,使得时间步t=0上,是看了整个序列的结果。# 拼接两个方向上的输入h_n_b.append(h)c_n_b.append(c)input = F.cat([hs_f, hs_b], 2) # (n_steps, batch_size, num_directions * hidden_size)else:input = hs_f # (n_steps, batch_size, num_directions * hidden_size)# 在第1层之后,最后一层之前需要经过dropoutif self.dropout and layer != self.num_layers - 1:input = self.dropout_layer(input)output = input # (n_steps, batch_size, num_directions * hidden_size) 最后一层最后计算的输入,就是它的输出c_n = Noneif self.bidirectional:h_n = F.cat([F.stack(h_n_f), F.stack(h_n_b)], 0)if c is not None:c_n = F.cat([F.stack(c_n_f), F.stack(c_n_b)], 0)else:h_n = F.stack(h_n_f)if c is not None:c_n = F.stack(c_n_f)if self.batch_first:output = output.transpose((1, 0, 2))return output, h_n, c_ndef extra_repr(self) -> str:s = 'input_size={input_size}, hidden_size={hidden_size}'if self.num_layers != 1:s += ', num_layers={num_layers}'if self.bias is not True:s += ', bias={bias}'if self.batch_first is not False:s += ', batch_first={batch_first}'if self.dropout:s += ', dropout={dropout}'if self.bidirectional is not False:s += ', bidirectional={bidirectional}'return s.format(**self.__dict__)
同样,做了兼容LSTM的实现,会多了一些if判断。
RNN
class RNN(RNNBase):def __init__(self, *args, **kwargs) -> None:''':param input_size: 输入x的特征数:param hidden_size: 隐藏状态的特征数:param batch_first::param num_layers: 层数:param bidirectional: 是否为双向:param bias: 线性层是否包含偏置:param dropout: 用于多层堆叠RNN,默认为0代表不使用dropout:param nonlinearity: 非线性激活函数 tanh | relu'''super(RNN, self).__init__(RNNCell, *args, **kwargs)def forward(self, input: Tensor, state: Tensor = None) -> Tuple[Tensor, Tensor]:output, h_n, _ = super().forward(input, state)return output, h_n
因为基类RNNBase的forward会返回output,h_n,c_n,所以RNN这里重写了forward方法,仅返回output和h_n。
通过这种方式实现GRU和RNN非常类似。
GRU
class GRU(RNNBase):def __init__(self, *args, **kwargs):''':param input_size: 输入x的特征数:param hidden_size: 隐藏状态的特征数:param batch_first::param num_layers: 层数:param bidirectional: 是否为双向:param bias: 线性层是否包含偏置:param dropout: 用于多层堆叠RNN,默认为0代表不使用dropout'''super(GRU, self).__init__(GRUCell, *args, **kwargs)def forward(self, input: Tensor, state: Tensor = None) -> Tuple[Tensor, Tensor]:output, h_n, _ = super().forward(input, state)return output, h_n
实例测试
同样的配置下:
embedding_dim = 128
hidden_dim = 128
batch_size = 32
num_epoch = 10
n_layers = 2
dropout = 0.2model = RNN(len(vocab), embedding_dim, hidden_dim, num_class, n_layers, dropout, bidirectional=True, mode=mode)
两层双向RNN可以得到75%的准确率。
Training Epoch 0: 94it [01:16,  1.23it/s]
Loss: 220.78
Training Epoch 1: 94it [01:16,  1.24it/s]
Loss: 151.85
Training Epoch 2: 94it [01:14,  1.26it/s]
Loss: 125.62
Training Epoch 3: 94it [01:15,  1.25it/s]
Loss: 110.55
Training Epoch 4: 94it [01:14,  1.27it/s]
Loss: 100.75
Training Epoch 5: 94it [01:13,  1.28it/s]
Loss: 94.12
Training Epoch 6: 94it [01:12,  1.29it/s]
Loss: 88.64
Training Epoch 7: 94it [01:12,  1.29it/s]
Loss: 84.51
Training Epoch 8: 94it [01:13,  1.28it/s]
Loss: 80.83
Training Epoch 9: 94it [01:13,  1.27it/s]
Loss: 78.12
Testing: 29it [00:06,  4.79it/s]
Acc: 0.75
Cost:749.8793613910675
完整代码
https://github.com/nlp-greyfoss/metagrad
References
Bidirectional recurrent neural networkshttps://www.researchgate.net/publication/3316656_Bidirectional_recurrent_neural_networks
Pytorch [Basics] — Intro to
RNNhttps://towardsdatascience.com/pytorch-basics-how-to-train-your-neural-net-intro-to-rnn-cb6ebc594677
关注下方《学姐带你玩AI》🚀🚀🚀
220+篇AI必读论文免费领取
码字不易,欢迎大家点赞评论收藏!
相关文章:
从零实现深度学习框架——再探多层双向RNN的实现
来源:投稿 作者:175 编辑:学姐 往期内容: 从零实现深度学习框架1:RNN从理论到实战(理论篇) 从零实现深度学习框架2:RNN从理论到实战(实战篇) 从零实现深度…...
Flink 连接流详解
连接流 1 Union 最简单的合流操作,就是直接将多条流合在一起,叫作流的“联合”(union)。联合操作要求必须流中的数据类型必须相同,合并之后的新流会包括所有流中的元素,数据类型不变。这种合流方式非常简…...

分享112个HTML电子商务模板,总有一款适合您
分享112个HTML电子商务模板,总有一款适合您 112个HTML电子商务模板下载链接:https://pan.baidu.com/s/13wf9C9NtaJz67ZqwQyo74w?pwdzt4a 提取码:zt4a Python采集代码下载链接:采集代码.zip - 蓝奏云 有机蔬菜水果食品商城网…...
)
2023备战金三银四,Python自动化软件测试面试宝典合集(八)
马上就又到了程序员们躁动不安,蠢蠢欲动的季节~这不,金三银四已然到了家门口,元宵节一过后台就有不少人问我:现在外边大厂面试都问啥想去大厂又怕面试挂面试应该怎么准备测试开发前景如何面试,一个程序员成长之路永恒绕…...
J-Link RTT Viewer使用教程(附代码)
目录 RTT(Real Time Transfer)简介 使用教程 常用API介绍 RTT缓冲大小修改 使用printf重定向 官方例程 RTT(Real Time Transfer)简介 平常调试代码中使用串口打印log,往往需要接出串口引脚,比较麻烦,并且串口打印速度较慢,串…...
C语言——指针、数组的经典笔试题目
文章目录前言1.一维数组2.字符数组3.二维数组4.经典指针试题前言 1、数组名通常表示首元素地址,sizeof(数组名)和&数组名两种情况下,数组名表示整个数组。 2、地址在内存中唯一标识一块空间,大小是4/8字节。32位平台4字节,64位…...
【C语言】程序环境和预处理|预处理详解|定义宏(上)
主页:114514的代码大冒险 qq:2188956112(欢迎小伙伴呀hi✿(。◕ᴗ◕。)✿ ) Gitee:庄嘉豪 (zhuang-jiahaoxxx) - Gitee.com 文章目录 目录 文章目录 前言 一、程序的翻译环境和执行环境 二、详解编译和链接 1.翻译环境 2.编…...

上海霄腾自动化装备盛装亮相2023生物发酵展
上海霄腾自动化携液体膏体粉剂颗粒等灌装生产线解决方案亮相2023生物发酵展BIO CHINA2023生物发酵展,作为生物发酵产业一年一度行业盛会,由中国生物发酵产业协会主办,上海信世展览服务有限公司承办,2023第10届国际生物发酵产品与技…...

python+flask开发mock服务
目录 什么是mock? 什么时候需要用到mock? 如何实现? pythonflask自定义mock服务的步骤 一、环境搭建 1、安装flask插件 2、验证插件 二、mock案例 1、模拟 返回结果 2、模拟 异常响应状态码 3、模拟登录,从jmeter中获取…...
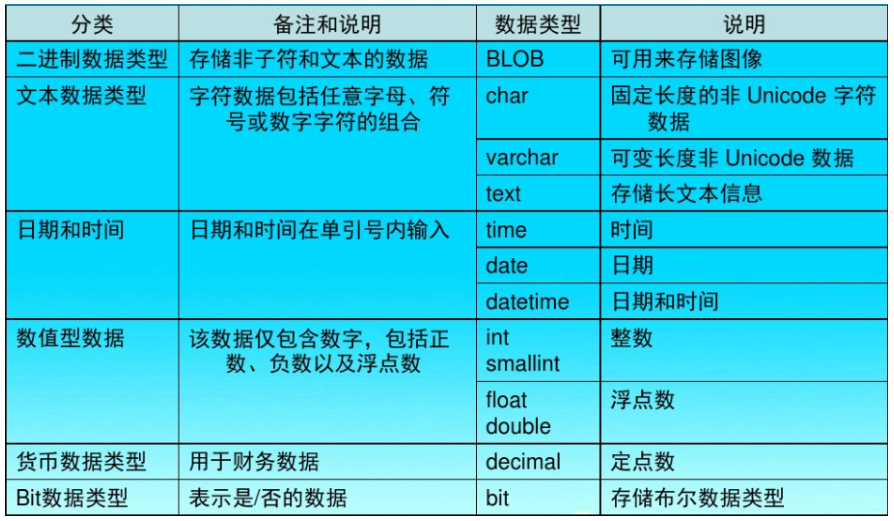
数据库(三)
第三章 MySQL库表操作 3.1 SQL语句基础 3.1.1 SQL简介 SQL:结构化查询语言(Structured Query Language),在关系型数据库上执行数据操作、数据检索以及数据维护的标准语言。使用SQL语句,程序员和数据库管理员可以完成如下的任务。 改变数据…...

2023软考纸质证书领取通知来了!
不少同学都在关注2022下半年软考证书领取时间,截止至目前,上海、湖北、江苏、南京、安徽、山东、浙江、宁波、江西、贵州、云南、辽宁、大连、吉林、广西地区的纸质证书可以领取了。将持续更新2022下半年软考纸质证书领取时间,请同学们在证书…...

Python requests模块
一、requests模块简介 requests模块是一个第三方模块,需要在python环境中安装: pip install requests 该模块主要用来发送 HTTP 请求,requests 模块比 urllib 模块更简洁。 requests模块支持: 自动处理url编码自动处理post请求…...

工业智能网关解决方案:物联网仓储环境监测系统
仓储是连接生产、供应和销售的中转系统,对于促进生产、提高效率有着重要的辅助作用。对于很多大型工厂或食品厂来说,需要对仓储环境进行严控的控制,以确保产品或食品的质量,避免不必要的产品损耗,提高产品存管的水平。…...
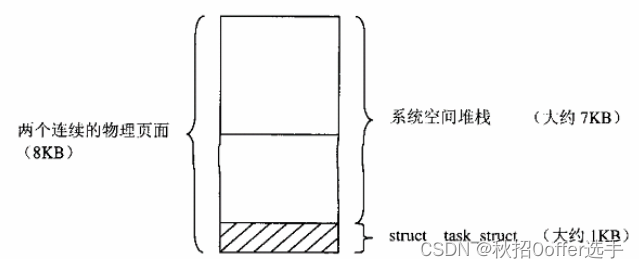
Linux进程线程管理
目录 存储管理 linux内存管理基本框架 系统空间管理和用户空间管理 进程与进程调度 进程四要素 用户堆栈的扩展 进程三部曲:创建,执行,消亡 系统调用exit(),wait() 内核中的互斥操作 存储管理 linux内存管理基本框架 系统空间管理…...

分享111个HTML电子商务模板,总有一款适合您
分享111个HTML电子商务模板,总有一款适合您 111个HTML电子商务模板下载链接:https://pan.baidu.com/s/1e8Wp1Rl9RaFrcW0bilIatg?pwdc97h 提取码:c97h Python采集代码下载链接:采集代码.zip - 蓝奏云 HTML5家居家具电子商务网…...

百度前端必会手写面试题整理
请实现一个 add 函数,满足以下功能 add(1); // 1 add(1)(2); // 3 add(1)(2)(3);// 6 add(1)(2, 3); // 6 add(1, 2)(3); // 6 add(1, 2, 3); // 6function add(...args) {// 在内部声明一个函数,利用闭包的特性保存并收集…...
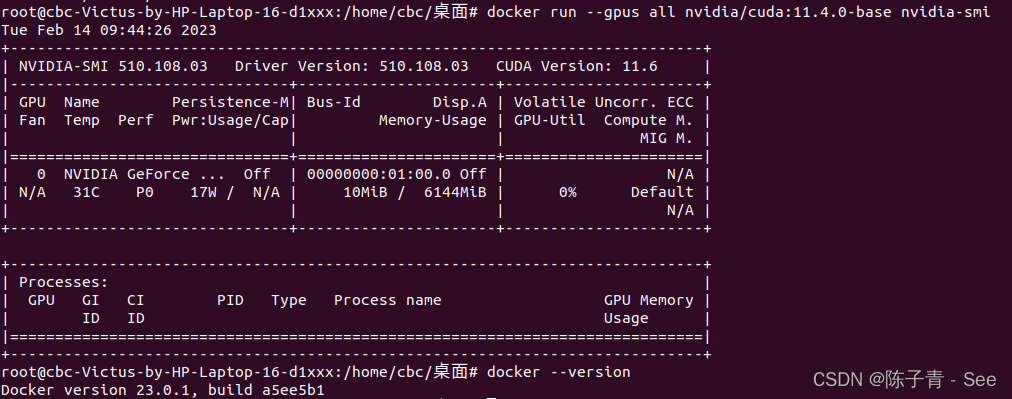
ubuntu 安装支持GPU的Docker详细步骤
安装依赖项 sudo apt-get update sudo apt-get install -y apt-transport-https ca-certificates curl gnupg-agent software-properties-common 添加 Docker GPG 密钥 curl -fsSL https://download.docker.com/linux/ubuntu/gpg | sudo apt-key add - sudo apt-key fingerpr…...

usbmon+tcpdump+wireshark USB抓包
文章目录usbmon抓包及配合wireshark解析usbmon抓包及配合wireshark解析 usbmon首先编译为内核模块,然后通过modprobe usbmon加载到linux sys文件系统中 rootroot-PC:~# modprobe usbmon 而后 linux系统下安装 tcpdump rootroot-PC:~# apt-get install tcpdump…...
【LeetCode】剑指 Offer 04. 二维数组中的查找 p44 -- Java Version
题目链接: https://leetcode.cn/problems/er-wei-shu-zu-zhong-de-cha-zhao-lcof/ 1. 题目介绍(04. 二维数组中的查找) 在一个 n * m 的二维数组中,每一行都按照从左到右 非递减 的顺序排序,每一列都按照从上到下 非递…...
TDengine 3.0.2.5 查询再优化!揭秘索引文件的工作原理
TDengine 3.0 虽然对底层做了大规模的优化重构,但是相对于数据文件的工作逻辑和 2.0 相比是整体保持不变的。本系列文章的主旨在于帮助用户深入理解产品,并且拥有基本的性能调试思路,从而获得更好的产品体验。本期文章会在讲解 TDengine 时序…...

Acode:重新定义Android移动代码编辑体验
Acode:重新定义Android移动代码编辑体验 【免费下载链接】Acode Acode - powerful text/code editor for android 项目地址: https://gitcode.com/gh_mirrors/ac/Acode 在移动开发日益普及的今天,拥有一款高效的移动代码编辑器成为开发者的迫切需…...
)
云效Codeup代码评审功能深度体验:如何用它提升团队代码质量(附真实项目案例)
云效Codeup代码评审实战指南:从规范制定到CI/CD集成 在当今快节奏的软件开发环境中,代码质量直接决定了产品的稳定性和可维护性。作为技术负责人,我经历过无数次因代码质量问题导致的深夜加班和紧急修复。直到团队开始系统化使用云效Codeup的…...
)
SDL2项目实战:用Conan一键集成SDL_image库(附CMake配置避坑指南)
SDL2项目实战:用Conan一键集成SDL_image库(附CMake配置避坑指南) 在开发跨平台C游戏或多媒体应用时,处理多种图片格式是刚需。SDL2原生仅支持BMP格式,而现代项目往往需要JPEG、PNG甚至WebP等更高效的格式。SDL_image库…...

Gauge常见问题解决:10个典型错误及修复方法
Gauge常见问题解决:10个典型错误及修复方法 【免费下载链接】gauge Light weight cross-platform test automation 项目地址: https://gitcode.com/gh_mirrors/ga/gauge Gauge作为一款轻量级跨平台测试自动化工具,在使用过程中可能会遇到各种错误…...

OpenClaw多任务队列:GLM-4.7-Flash并行处理邮件整理与文档生成
OpenClaw多任务队列:GLM-4.7-Flash并行处理邮件整理与文档生成 1. 为什么需要多任务队列 上周五下午,我同时面临三个紧急任务:整理客户邮件、生成季度报告草稿、汇总项目会议纪要。手动切换不同工具时,不仅效率低下,…...

TSL2561光传感器Arduino库原理与低功耗工程实践
1. TSL2561光强传感器Arduino库深度解析与工程实践1.1 传感器原理与硬件特性TSL2561是由TAOS(现为AMS)推出的高精度数字环境光传感器,采用CMOS工艺集成双通道光电二极管阵列,分别对可见光(VIS)和红外光&…...

单片机I/O口阻抗特性及其在电路设计中的关键作用
1. 阻抗基础:从水管到电路的理解 第一次接触阻抗概念时,我盯着教科书上的公式发呆了半小时。直到有天修水管时突然开窍——这不就是水管的粗细对水流的影响吗?在电路中,阻抗就是电子流动遇到的"阻力"。但和水管不同&…...
- 部署实践篇)
Kubernetes集群的搭建与DevOps实践(下)- 部署实践篇
需求清单: 100张数据表要迁移(还要支持后续动态新增) 双链路同步:MySQL到MySQL、MongoDB到PostgreSQL 不能写死配置,要能灵活扩展 工期不到1个月 技术约束: 源环境(塔外)和目标环境&…...
)
告别龟速成像:手把手教你用Python实现FBP算法的子孔径并行加速(附代码)
告别龟速成像:手把手教你用Python实现FBP算法的子孔径并行加速(附代码) 雷达成像技术在现代遥感领域扮演着至关重要的角色,而快速后向投影(FBP)算法作为合成孔径雷达(SAR)成像的核心方法之一,其计算效率直接决定了实际…...

5个核心功能实现全球多语言语音降噪:基于深度滤波的开源解决方案
5个核心功能实现全球多语言语音降噪:基于深度滤波的开源解决方案 【免费下载链接】DeepFilterNet Noise supression using deep filtering 项目地址: https://gitcode.com/GitHub_Trending/de/DeepFilterNet 在当今全球化的语音通信时代,背景噪声…...