分布式服务框架 如何设计一个更合理的协议
1、概述
前面我们聊了如何设计一款分布式服务框架的问题,并且编码实现了一个简单的分布式服务框架 cheese, 目前 cheese 基本具备分布式服务框架的基本功能。后面我们又引入了缓存机制,以及使用Socket替代了最开始的 RestTemplate。并且还学习了网络相关的知识点和HTTP协议。今天我们就继续分析,如何继续优化我们的Cheese,让她变得更加高效简洁。
2、HTTP协议合不合适
我们回忆一下之前学习的HTTP请求的组成,大概是这个样子,

如果展开请求头和响应头 内容会更多,如果是浏览器访问肯定是没问题,但是如果用在Cheese 里面是否合适呢。你想想,Jerry就是想问Tom 要一块奶酪,一个简单的请求,难道还要按照HTTP协议约定的格式拼接一大堆和奶酪无关的东西,然后组成一个HTTP请求发过去,这样不仅会影响Cheese的远程调用的效率更是一种资源浪费。想想一个HTTP请求从源端到目标端经历的那些是不是头皮发麻。 (参考这里)
这个问题就是HTTP协议里面存在很多和业务需求无关的信息,但是我们又不能去掉,否则解析的时候会出现问题。 那么怎么解决呢,显而易见解决方案就是放弃HTTP协议。
3、一个更为合理的协议
3.1、协议的概念
首先说明一下 这里我们说的协议是工作在应用层的,也就是类似HTTP协议的那种,传输层依然还是TCP协议。这里大家可以先 回忆一下之前的文章中反复提到的一句话 客户端和服务器可以通过 Socket 建立网络连接 然后使用Socket对象的输入输出流 进行数据交换 ,(传送门)
我们仔细想想,既然是数据交换,那么协议的本质就是定义一组固定格式的数据,客户端按照这种格式组装请求报文,服务端按照同样的方式解析请求报文。这里的 固定格式 就是协议的体现了
3.2、 设计一个合理的固定格式
在这之前我们还是先给我们的协议取个名字吧,姑且就叫 Cheese 协议吧。我们回忆一下之前的 RemoteServer 2.0 设计的思路。也就是回到 Tom & Jerry的那个案例中去

之前的步骤 大概是这样 (懒得打字了,截图吧)

这是一个抽象的过程,我们这里将上述步骤可以进一步细化,如下所示

我们这里设计的 Cheese 协议说的透彻点就是如何封装请求对象和响应对象。根据上图我们可以大概的知道这一组对象主要包括的属性,其中请求对象 至少需要5个属性,首先是服务对应的类名,客户端需要告诉服务端执行哪一个类,接着还有方法名以及参数类型和返回值类型等等。返回对象主要有返回值和返回状态标识,如果发生异常了还需要将异常信息返回给客户端。
设计完成后按照上图描述的 Jerry 和 Tom 的步骤 传递这一组对象就可以实现这个通信的过程了。
4、Cheese 协议的落地
4.1、请求对象和响应对象的设计
这部分内容主要涉及请求和响应对象,首先定义出一个顶层的接口,里面包含设置返回码和服务端ip
package org.wcan.cheese.protocol;import java.io.Serializable;/*** @Description* @Author wcan* @Date 2025/1/16 下午 23:37* @Version 1.0*/
public interface CheeseProtocol extends Serializable {public void setResponseCode(Integer responseCode);public void setServerIp(String serverIp);
}
接着我们实现请求对象和响应对象的适配层,这里引入一个抽象类 AbstractCheeseProtocol
package org.wcan.cheese.protocol;/*** @Description* @Author wcan* @Date 2025/1/17 下午 17:12* @Version 1.0*/
public class AbstractCheeseProtocol implements CheeseProtocol{public  Integer responseCode = 200;public String serverIp = null;public  Integer getResponseCode() {return responseCode;}public String getServerIp() {return serverIp;}@Overridepublic void setResponseCode(Integer responseCode) {this.responseCode= responseCode;}@Overridepublic void setServerIp(String serverIp) {this.serverIp = serverIp;}
}
最后给出 CheeseRequest 和 CheeseResponse 的代码
package org.wcan.cheese.protocol;import java.util.Arrays;
import java.util.Objects;/*** @Description Cheese 请求对象* @Author wcan* @Date 2025/1/16 下午 23:15* @Version 1.0*/
public class CheeseRequest extends AbstractCheeseProtocol{public String className;public String methodName;private Class<?> returnValueType;private Class[] parameterTypes;private Object[] parameterValue;public CheeseRequest() {}public CheeseRequest(String className, String methodName, Class<?> returnValueType, Class[] parameterTypes, Object[] parameterValue) {this.className = className;this.methodName = methodName;this.returnValueType = returnValueType;this.parameterTypes = parameterTypes;this.parameterValue = parameterValue;}public String getClassName() {return className;}public void setClassName(String className) {this.className = className;}public String getMethodName() {return methodName;}public void setMethodName(String methodName) {this.methodName = methodName;}public Class<?> getReturnValueType() {return returnValueType;}public void setReturnValueType(Class<?> returnValueType) {this.returnValueType = returnValueType;}public Class[] getParameterTypes() {return parameterTypes;}public void setParameterTypes(Class[] parameterTypes) {this.parameterTypes = parameterTypes;}public Object[] getParameterValue() {return parameterValue;}public void setParameterValue(Object[] parameterValue) {this.parameterValue = parameterValue;}@Overridepublic boolean equals(Object o) {if (this == o) return true;if (o == null || getClass() != o.getClass()) return false;CheeseRequest that = (CheeseRequest) o;return Objects.equals(className, that.className) && Objects.equals(methodName, that.methodName) && Objects.equals(returnValueType, that.returnValueType) && Arrays.equals(parameterTypes, that.parameterTypes) && Arrays.equals(parameterValue, that.parameterValue);}@Overridepublic int hashCode() {int result = Objects.hash(className, methodName, returnValueType);result = 31 * result + Arrays.hashCode(parameterTypes);result = 31 * result + Arrays.hashCode(parameterValue);return result;}@Overridepublic String toString() {return "CheeseRequest{" +"className='" + className + '\'' +", methodName='" + methodName + '\'' +", returnValueType=" + returnValueType +", parameterTypes=" + Arrays.toString(parameterTypes) +", parameterValue=" + Arrays.toString(parameterValue) +'}';}
}
package org.wcan.cheese.protocol;/*** @Description Cheese 请求对象* @Author wcan* @Date 2025/1/16 下午 23:15* @Version 1.0*/
public class CheeseResponse extends AbstractCheeseProtocol {private Object returnValue;private Exception exceptionValue;public CheeseResponse() {}public CheeseResponse(Object returnValue, Exception exceptionValue) {this.returnValue = returnValue;this.exceptionValue = exceptionValue;}public Object getReturnValue() {return returnValue;}public void setReturnValue(Object returnValue) {this.returnValue = returnValue;}public Exception getExceptionValue() {return exceptionValue;}public void setExceptionValue(Exception exceptionValue) {this.exceptionValue = exceptionValue;}@Overridepublic String toString() {return "CheeseResponse{" +"returnValue=" + returnValue +", exceptionValue=" + exceptionValue +'}';}
}
4.2、服务端组件设计
服务端的逻辑相对简单一些 ,主要就是解析CheeseRequest对象,获取类名、方法名、返回值类型以及入参类型这几个关键的信息,然后通过反射调用对应的目标方法,最后将结果封装成CheeseResponse对象返回给客户端。
首先我们使用 NIO 实现 ServerEndpoint
package org.wcan.cheese.remote.cheese;import com.fasterxml.jackson.databind.ObjectMapper;
import org.springframework.beans.factory.annotation.Autowired;
import org.springframework.beans.factory.annotation.Value;
import org.springframework.stereotype.Component;
import org.wcan.cheese.execute.ReflectionExecute;
import org.wcan.cheese.protocol.CheeseRequest;
import org.wcan.cheese.protocol.CheeseResponse;import java.io.IOException;
import java.nio.ByteBuffer;
import java.nio.channels.SelectionKey;
import java.nio.channels.Selector;
import java.nio.channels.ServerSocketChannel;
import java.nio.channels.SocketChannel;
import java.nio.charset.StandardCharsets;
import java.util.Iterator;/*** @Description rpc 通信端点* @Author wcan* @Date 2025/1/17 下午 14:15* @Version 1.0*/
@Component
public class ServerEndpoint {@Autowiredprivate ReflectionExecute reflectionExecute;@Value(value = "${cheesePort:8000}")private int cheesePort;  // 监听端口public void ServerStart() {try {// 打开服务器端的 ServerSocketChannelServerSocketChannel serverSocketChannel = ServerSocketChannel.open();serverSocketChannel.bind(new java.net.InetSocketAddress(cheesePort));serverSocketChannel.configureBlocking(false);// 打开 SelectorSelector selector = Selector.open();serverSocketChannel.register(selector, SelectionKey.OP_ACCEPT);System.out.println("服务器正在运行,监听端口 " + cheesePort);//TODO 注册端口while (true) {// 阻塞,等待 I/O 事件发生selector.select();// 获取所有发生的事件Iterator<SelectionKey> selectedKeys = selector.selectedKeys().iterator();while (selectedKeys.hasNext()) {SelectionKey key = selectedKeys.next();selectedKeys.remove();if (key.isAcceptable()) {// 接受连接请求handleAccept(serverSocketChannel, selector);} else if (key.isReadable()) {// 处理读取请求handleResponse(key);}}}} catch (IOException e) {e.printStackTrace();}}private static void handleAccept(ServerSocketChannel serverSocketChannel, Selector selector) throws IOException {// 接受客户端连接SocketChannel socketChannel = serverSocketChannel.accept();socketChannel.configureBlocking(false);// 注册到 Selector,监听读事件socketChannel.register(selector, SelectionKey.OP_READ);System.out.println("新连接接入:" + socketChannel.getRemoteAddress());}private void handleResponse(SelectionKey key) throws IOException {SocketChannel socketChannel = (SocketChannel) key.channel();ByteBuffer buffer = ByteBuffer.allocate(1024);int bytesRead = socketChannel.read(buffer);if (bytesRead == -1) {socketChannel.close();System.out.println("连接关闭");return;}//获取请求内容String request = new String(buffer.array(), 0, bytesRead, StandardCharsets.UTF_8);ObjectMapper objectMapper = new ObjectMapper();CheeseRequest cheeseRequest = objectMapper.readValue(request, CheeseRequest.class);//执行请求CheeseResponse cheeseResponse = reflectionExecute.execute(cheeseRequest);//返回内容String response = objectMapper.writeValueAsString(cheeseResponse);ByteBuffer byteBuffer = ByteBuffer.wrap(response.getBytes(StandardCharsets.UTF_8));// 发送响应数据while (byteBuffer.hasRemaining()) {socketChannel.write(byteBuffer);}socketChannel.close();System.out.println("响应已发送");}
}
接着 我们编写反射调用指定方法的工具类
package org.wcan.cheese.execute;import org.springframework.stereotype.Component;
import org.wcan.cheese.protocol.CheeseRequest;
import org.wcan.cheese.protocol.CheeseResponse;import java.lang.reflect.Method;
import java.util.Arrays;/*** @Description* @Author wcan* @Date 2025/1/16 下午 23:26* @Version 1.0*/
@Component
public class ReflectionExecute {public CheeseResponse execute(CheeseRequest cheeseRequest) {CheeseResponse cheeseResponse = new CheeseResponse();String className = cheeseRequest.getClassName();String methodName = cheeseRequest.getMethodName();
//        Class<?> returnValueType = cheeseRequest.getReturnValueType();
//        Class[] parameterTypes = cheeseRequest.getParameterTypes();try {Class<?> aClass = Class.forName(className);Method method = aClass.getMethod(methodName, cheeseRequest.getParameterTypes());Object invoke = method.invoke(aClass.newInstance(), cheeseRequest.getParameterValue());cheeseResponse.setReturnValue(invoke);} catch (Exception e) {cheeseResponse.setExceptionValue(e);}return cheeseResponse;}}
至此服务端的逻辑已经完成了
4.3、服务端功能测试
我们先测试一下编写的服务组件,在 tom-store 工程里 新建一个Service类 (工程代码从这里下载)
package org.tom.service;import org.springframework.stereotype.Service;import java.util.HashMap;
import java.util.Map;/*** @Description* @Author wcan* @Date 2025/1/20 下午 14:26* @Version 1.0*/
@Service
public class CheeseService {public Map<String, Object> getCheese() throws Exception{Map<String, Object> map = new HashMap<String, Object>();map.put("cheese", "A piece of cheese on the small table in the room");map.put("msg","我正在约会 不要打扰我");return map;}public Map<String, Object> getCheeseByName(String name,Integer size) throws Exception{Map<String, Object> map = new HashMap<String, Object>();map.put("cheese", "A "+ size+ "-centimeter piece of cheese is on the table");map.put("msg","hi "+name +"! 我正在约会 不要打扰我");return map;}
}
接着我们编写一个测试类
public class TestDemo {public static void main(String[] args) {CheeseRequest cheeseRequest = new CheeseRequest();cheeseRequest.setClassName("org.tom.service.CheeseService");cheeseRequest.setMethodName("getCheeseByName");cheeseRequest.setReturnValueType(Map.class);cheeseRequest.setParameterTypes(new Class[]{String.class,Integer.class});cheeseRequest.setParameterValue(new Object[]{"乔峰",35});CheeseResponse cheeseResponse = new ReflectionExecute().execute(cheeseRequest);Object returnValue = cheeseResponse.getReturnValue();System.out.println(returnValue);}
}
执行后结果如下图所示:

至此服务端的反射调用的逻辑能走通,接着我们后续就能通过Socket 来发送 CheeseRequest 对象了。
4.4、客户端组件设计
客户端主要承载的能力是 连接服务端,将Jerry 需要调用Tom 的服务的元信息(类名、入参、入参类型、返回值类型)封装成 CheeseRequest 对象,然后通过Socket 发送到服务端。
package org.wcan.cheese.remote.cheese;import com.fasterxml.jackson.databind.ObjectMapper;
import org.springframework.beans.factory.annotation.Value;
import org.springframework.stereotype.Component;
import org.wcan.cheese.protocol.CheeseRequest;
import org.wcan.cheese.protocol.CheeseResponse;import java.io.IOException;
import java.net.InetSocketAddress;
import java.nio.ByteBuffer;
import java.nio.channels.SocketChannel;
import java.nio.charset.Charset;/*** @Description* @Author wcan* @Date 2025/1/17 下午 15:13* @Version 1.0*/
@Component
public class ClientEndpoint {@Value(value = "${cheesePort:8000}")private int cheesePort;  // 监听端口public CheeseResponse doRequest(CheeseRequest cheeseRequest){SocketChannel client = null;CheeseResponse cheeseResponse = null;try {// 创建一个客户端SocketChannel,并连接到服务端client = SocketChannel.open(new InetSocketAddress(cheeseRequest.getServerIp(), 8000));// 设置为非阻塞模式client.configureBlocking(false);ObjectMapper objectMapper = new ObjectMapper();// 准备发送的数据String request = objectMapper.writeValueAsString(cheeseRequest);// 使用Charset将字符串编码成字节ByteBuffer buffer = Charset.forName("UTF-8").encode(request);// 发送数据到服务端while (buffer.hasRemaining()) {client.write(buffer);}System.out.println("Message sent to the server: " + request);// 等待服务端响应并读取响应数据// 创建一个缓冲区用于接收服务端的响应ByteBuffer readBuffer = ByteBuffer.allocate(1024);int bytesRead = 0;// 不断尝试读取服务端响应while (bytesRead == 0) {bytesRead = client.read(readBuffer);}// 读取数据完成,解码并输出响应消息if (bytesRead > 0) {readBuffer.flip();String response = Charset.forName("UTF-8").decode(readBuffer).toString();cheeseResponse = objectMapper.readValue(response, CheeseResponse.class);System.out.println("Response from server: " + cheeseResponse);}} catch (IOException e) {throw new RuntimeException(e);} finally {try {if (client != null && client.isOpen()) {client.close();}} catch (IOException e) {e.printStackTrace();}}return cheeseResponse;}
}
我们编写好了 ClientEndpoint,客户端的核心内容还有一部分,那就是我们需要和服务发现组件集成。
4.5、CheeseRemoteExecute 实现
这里我们设计一个 CheeseRemoteExecute 组件,通过这个组件将 ClientEndpoint 组件和DiscoveryServer组件关联起来,DiscoveryServer组件从注册中心获取服务端的ip和端口号信息 然后交给ClientEndpoint处理。
package org.wcan.cheese.execute;import org.springframework.stereotype.Service;
import org.wcan.cheese.DiscoveryServer;
import org.wcan.cheese.RemoteExecute;
import org.wcan.cheese.protocol.CheeseRequest;
import org.wcan.cheese.protocol.CheeseResponse;
import org.wcan.cheese.remote.cheese.ClientEndpoint;import java.util.HashMap;
import java.util.Map;/*** @Description* @Author wcan* @Date 2024/10/27 下午 19:24* @ClassName HttpRemoteExecute* @Version 1.0*/
@Service
public class CheeseRemoteExecute implements RemoteExecute {private DiscoveryServer discoveryServer;private ClientEndpoint clientEndpoint;public CheeseRemoteExecute(DiscoveryServer discoveryServer,ClientEndpoint clientEndpoint) {this.discoveryServer = discoveryServer;this.clientEndpoint = clientEndpoint;}@Overridepublic String execute(String serviceName) throws Exception {return null;}@Overridepublic Map<String, Object> execute(String serviceName, Object[] params) throws Exception {String[] serviceNames = serviceName.split("#");String className = serviceNames[0];String methodName = serviceNames[1];String serverUrl = discoveryServer.getSingleServer(className);String[] split = serverUrl.split(":");String serverIp = split[0];CheeseRequest cheeseRequest = new CheeseRequest();cheeseRequest.setClassName(className);cheeseRequest.setMethodName(methodName);cheeseRequest.setReturnValueType(Map.class);Class[] classes = null;if(params.length>0){classes = new Class[params.length];for (int i = 0; i <params.length; i++) {classes[i] = params[i].getClass();}}cheeseRequest.setParameterTypes(classes);cheeseRequest.setParameterValue(params);cheeseRequest.setServerIp(serverIp);CheeseResponse cheeseResponse = clientEndpoint.doRequest(cheeseRequest);Object returnValue = cheeseResponse.getReturnValue();HashMap<String, Object> objectHashMap = new HashMap<>();objectHashMap.put("data", returnValue);return objectHashMap;}
}
到这里我们的 Cheese 协议已经开发完成了,后面我们需要做的就是把它集成到框架里进行工程化落地。
5、工程化落地
5.1、ServerEndpoint 集成方案
当我们将 tom-store 服务启动起来后,ServerEndpoint 怎么启动呢,毫无疑问我们首先想到的就是 Spring容器启动的时候就初始化 ServerEndpoint 组件,然后随着SpringBoot内置的Tomcat启动而启动,这个时候 tom-store 服务大概就是这个样子

9000端口负责处理HTTP请求,8000端口处理我们自己设计的 Cheese 协议请求。同样的我们启动Jerry 服务也是上图中描述的样子,无论是 Tom 还是Jerry 他们既可以是服务端也可以是客户端。
集成方案如下,我们改造一下 ServerLister 组件,将 ServerEndpoint 组件注入进去,并且在ServerLister 的构造器中使用一个线程异步启动 ServerEndpoint 组件。相关代码如下
package org.wcan.cheese.event;import org.springframework.boot.context.event.ApplicationReadyEvent;
import org.springframework.context.ApplicationListener;
import org.springframework.stereotype.Component;
import org.springframework.stereotype.Controller;
import org.springframework.stereotype.Service;
import org.wcan.cheese.config.CheeseConfig;
import org.wcan.cheese.remote.cheese.ServerEndpoint;import java.util.HashMap;
import java.util.Map;@Component
public class ServerLister implements ApplicationListener<ApplicationReadyEvent> {private final RegisterEvent registerEvent;private final CheeseConfig cheeseConfig;private final ServerEndpoint serverEndpoint;public ServerLister(RegisterEvent registerEvent, CheeseConfig cheeseConfig, ServerEndpoint serverEndpoint) {this.registerEvent = registerEvent;this.cheeseConfig = cheeseConfig;this.serverEndpoint = serverEndpoint;new Thread(() -> serverEndpoint.ServerStart()).start();}@Overridepublic void onApplicationEvent(ApplicationReadyEvent event) {System.out.println("所有的 Controller 和它们的请求映射:");Map<String, Object> serverMap = new HashMap<String, Object>();Map<String, Object> controllers = event.getApplicationContext().getBeansWithAnnotation(Controller.class);String serverPackage = cheeseConfig.getServerPackage();if (null == serverPackage || "".equals(serverPackage))return;controllers.forEach((key, value) -> {if (value.toString().contains(serverPackage)) {serverMap.put(key.toString(), value.getClass().getName());}});Map<String, Object> servers = event.getApplicationContext().getBeansWithAnnotation(Service.class);servers.forEach((key, value) -> {if (value.toString().contains(serverPackage)) {serverMap.put(key.toString(), value.getClass().getName());}});registerEvent.registerServer(serverMap);}}
5.2、集成测试
PS: 大家可以去仓库拉取完整的工程化代码运行
我们分别启动 tom-store 和 jerry-store 两个工程 ,然后浏览器访问
http://localhost:8001/getCheeseByName?name=jerry&size=5
我们就能看到效果了

 我们观察控制台,也能看到调用的的时候打印的信息

5.3、如何处理 ServerEndpoint 的启停
相信聪明的你肯定 能想到单独开一个线程启动 ServerEndpoint 组件的好处,第一是异步启动不会影响到主服务的启动效率,第二是子线程如果发生了异常不会影响到主线程的运行。这就是偷偷new 一个线程去处理 ServerEndpoint 的好处
但是这么做也有一个问题或许要考虑,假设子线程发生了异常终止,在不重启服务的情况下 怎么把 ServerEndpoint 重新拉起来呢。或者我想要不停服的情况下单独停止 ServerEndpoint,假设ServerEndpoint 遭受了恶意攻击,影响了主服务业务我们要单独停掉 ServerEndpoint 。这种情况需要怎么处理呢
我们改造一下ServerEndpoint 类 ,加入两个方法,改造后的代码如下
@Component
public class ServerEndpoint {@Autowiredprivate ReflectionExecute reflectionExecute;private ServerSocketChannel serverSocketChannel;private Selector selector;@Value(value = "${cheesePort:8000}")private int cheesePort = 8000;  // 监听端口public void ServerStart() {try {// 打开服务器端的 ServerSocketChannelserverSocketChannel = ServerSocketChannel.open();serverSocketChannel.bind(new java.net.InetSocketAddress(cheesePort));serverSocketChannel.configureBlocking(false);// 打开 Selectorselector = Selector.open();serverSocketChannel.register(selector, SelectionKey.OP_ACCEPT);System.out.println("服务器正在运行,监听端口 " + cheesePort);//TODO 注册端口while (true) {// 阻塞,等待 I/O 事件发生selector.select();// 获取所有发生的事件Iterator<SelectionKey> selectedKeys = selector.selectedKeys().iterator();while (selectedKeys.hasNext()) {SelectionKey key = selectedKeys.next();selectedKeys.remove();if (key.isAcceptable()) {// 接受连接请求handleAccept(serverSocketChannel, selector);} else if (key.isReadable()) {// 处理读取请求handleResponse(key);}}}} catch (IOException e) {e.printStackTrace();}}public void stopServer() throws IOException {this.serverSocketChannel.close();this.selector.close();System.out.println("服务器已关闭");}public void restartServer() throws IOException {stopServer();new Thread(() -> ServerStart()).start();System.out.println("服务器正在重启");}private static void handleAccept(ServerSocketChannel serverSocketChannel, Selector selector) throws IOException {// 接受客户端连接SocketChannel socketChannel = serverSocketChannel.accept();socketChannel.configureBlocking(false);// 注册到 Selector,监听读事件socketChannel.register(selector, SelectionKey.OP_READ);System.out.println("新连接接入:" + socketChannel.getRemoteAddress());}private void handleResponse(SelectionKey key) throws IOException {SocketChannel socketChannel = (SocketChannel) key.channel();ByteBuffer buffer = ByteBuffer.allocate(1024);int bytesRead = socketChannel.read(buffer);if (bytesRead == -1) {socketChannel.close();System.out.println("连接关闭");return;}//获取请求内容String request = new String(buffer.array(), 0, bytesRead, StandardCharsets.UTF_8);ObjectMapper objectMapper = new ObjectMapper();CheeseRequest cheeseRequest = objectMapper.readValue(request, CheeseRequest.class);//执行请求CheeseResponse cheeseResponse = reflectionExecute.execute(cheeseRequest);//返回内容String response = objectMapper.writeValueAsString(cheeseResponse);ByteBuffer byteBuffer = ByteBuffer.wrap(response.getBytes(StandardCharsets.UTF_8));// 发送响应数据while (byteBuffer.hasRemaining()) {socketChannel.write(byteBuffer);}socketChannel.close();System.out.println("响应已发送");}
}
我们继续在 tom-store工程里加入一个Controller
@RestController
public class AdminController {@Autowiredprivate ServerEndpoint serverEndpoint;@RequestMapping("/stop")public String stopServer() throws IOException {serverEndpoint.stopServer();return "stop success";}@RequestMapping("/restart")public String restartServer() throws IOException {serverEndpoint.restartServer();return "restart success";}}
我们重启 tom-store 然后访问下面的地址
重启: http://localhost:9000/restart
停止: http://localhost:9000/stop这是一个比较简单的方案,把 ServerEndpoint的存活权交给用户处理。
6、总结与思考
6.1、总结
这篇文章给大家介绍了如何自定义应用层的协议,根据我们的实际业务设计一个更合理的协议。我们主要的实现方案就是 基于 NIO 创建 Socket 通道传输根据Cheese协议封装的对象来完成客户端和服务端的数据交换。
6.2、关于Cheese的思考
数据从内存里传递到网络中这个过程会涉及到序列化,本篇文章我们使用的是 JSON序列化,这种方式比较直观,因为人可以看懂所以也方便调试。缺点就是效率不高,我们后面会研究一下常用的序列化方式,为我们的Cheese 协议 选择一种最佳的方案
在服务端我们使用的是反射执行目标方法,其实这是一个很耗时的操作,因为每次我们都要加载类的元信息,而类信息又是固定的,所以这里其实是可以优化的。
目前我们是把服务接口配在了配置文件中,比如 jerry-store 项目的配置文件中serviceName 就是指定调用的服务接口,程序拿着这个接口去注册中心获取这个接口的注册信息
spring.application.name=jerry-store
server.port=8001zkUrl=XXXX
zookeeperBasePath=/jerry
nodePath=/config
timeout=5000
#serverPackage=org.jerry##配置接口编号
serviceName=org.tom.service.CheeseService#getCheeseByName##cheese协议端口
cheesePort=8002
这种方法实现比较简单,但是你肯定看的出来这并不是一个好的解决方案,我们应该思考将serviceName放在哪里合适。
后面我们讨论的话题将主要围绕这三点展开,让我们的 Cheese 更加健壮。
相关文章:
分布式服务框架 如何设计一个更合理的协议
1、概述 前面我们聊了如何设计一款分布式服务框架的问题,并且编码实现了一个简单的分布式服务框架 cheese, 目前 cheese 基本具备分布式服务框架的基本功能。后面我们又引入了缓存机制,以及使用Socket替代了最开始的 RestTemplate。并且还学习了网络相关…...

git客户端版本下载
1. 访问官方网站:您可以在git官方网站(https://git-scm.com)上找到git软件最新稳定版下载链接。 2.如果需要下载其它版本,可访https://github.com/git-for-windows/git/releases选择想要的版本下载。...

前端快速生成接口方法
大家好,我是苏麟,今天聊一下OpenApi。 官网 : umijs/openapi - npm 安装命令 npm i --save-dev umijs/openapi 在根目录(项目目录下)创建文件 openapi.config.js import { generateService } from umijs/openapi// 自…...

mysql 学习12 存储引擎,mysql体系结构
mysql 体系结构 存储引擎简介 存储引擎 就是 存储数据,建立索引,更新/查询 数据等技术的实现方式。 存储引擎 是基于表的,而不是基于库的,所以存储引擎也可以称为 表类型 mysql默认的使用InnoDB 做为存储引擎 查看一下我们之前…...

【Java八股文】02-Java集合面试篇
【Java八股文】02-Java集合面试篇 概念数组与集合区别常用集合Java中的线程安全的集合是什么?Collections和Collection的区别 Listjava中list的几种实现把ArrayList变成线程安全的有哪些方法?CopyOnWriteArrayList是如何保证线程安全的? Mapj…...

稀土抑烟剂——为汽车火灾安全增添防线
一、稀土抑烟剂的基本概念 稀土抑烟剂是一类基于稀土元素(如稀土氧化物和稀土金属化合物)开发的高效阻燃材料。它可以显著提高汽车内饰材料的阻燃性能,减少火灾发生时有毒气体和烟雾的产生。稀土抑烟剂不仅能提升火灾时的安全性,…...

Unity进阶教程AOI算法原理详解
最新课程《全栈双客户端(Unity/Cocos) TurnKey方案》更新了AOI专题,今天分享一下AOI算法的实现原理。 AOI的功能和作用 在MMORPG网路游戏当中,单服同时在线一般都会有几千人。当有个玩家执行一个操作,理想情况下要把玩家的操作广播同步给单…...

Python中的HTTP客户端库:httpx与request | python小知识
Python中的HTTP客户端库:httpx与request | python小知识 在Python中,发送HTTP请求和处理响应是网络编程的基础。requests和httpx是两个常用的HTTP库,它们都提供了简洁易用的API来发送HTTP请求。然而,httpx作为新一代的HTTP客户端…...

ASP.NET Core SignalR的分布式部署
假设聊天室程序被部署在两台服务器上,客户端1、2连接到了服务器A上的ChatRoomHub,客户端3、4连接到服务器B上的ChatRoomHub,那么客户端1发送群聊消息时,只有客户端1、2能够收到,客户端3、4收不到;在客户端3…...

【Elasticsearch】match查询
Elasticsearch 的match查询是全文搜索中最常用和最强大的查询类型之一。它允许用户在指定字段中搜索文本、数字、日期或布尔值,并提供了丰富的功能来控制搜索行为和结果。以下是match查询的详细解析,包括其工作原理、参数配置和使用场景。 1.match查询的…...

AndroidStudio中可用的Ai插件
GitHub Copilot 这是我目前主用的,还行 1. 安装 打开 Android Studio:启动您的 Android Studio。 导航到插件设置: 点击菜单栏中的 File(文件) > Settings(设置)。在设置窗口中࿰…...

【C】链表算法题7 -- 环形链表||
leetcode链接https://leetcode.cn/problems/linked-list-cycle-ii/description/ 问题描述 给定一个链表的头节点 head ,返回链表开始入环的第一个节点。 如果链表无环,则返回 null。如果链表中有某个节点,可以通过连续跟踪 next 指针再次到…...

STM32系统架构介绍
STM32系统架构 1. CM3/4系统架构2. CM3/4系统架构-----存储器组织结构2.1 寄存器地址映射(特殊的存储器)2.2 寄存器地址计算2.3 寄存器的封装 3. CM3/4系统架构-----时钟系统 STM32 和 ARM 以及 ARM7是什么关系? ARM 是一个做芯片标准的公司,…...

Android Studio:EditText常见4种监听方式
1. 文本变化监听(TextWatcher) TextWatcher 主要用于监听 EditText 里的文本变化,它有三个方法: beforeTextChanged(文本变化前)onTextChanged(文本正在变化时)afterTextChanged&a…...

window patch按块分割矩阵
文章目录 1. excel 示意2. pytorch代码3. window mhsa 1. excel 示意 将一个三维矩阵按照window的大小进行拆分成多块2x2窗口矩阵,具体如下图所示 2. pytorch代码 pytorch源码 import torch import torch.nn as nn import torch.nn.functional as Ftorch.set_p…...

机器学习(李宏毅)——BERT
一、前言 本文章作为学习2023年《李宏毅机器学习课程》的笔记,感谢台湾大学李宏毅教授的课程,respect!!! 读这篇文章必须先了解self-attention、Transformer,可参阅我其他文章。 二、大纲 BERT简介self-…...

数据科学之数据管理|统计学
使用python学习统计 目录 01 统计学基础 7 一、 统计学介绍 7 二、 数据和变量 8 02 描述统计 10 一、 描述统计概述 10 二、 分类变量的描述 11 三、 等距数值变量的描述 13 四、 等比数值变量的描述 16 五、 常用软件包介绍 16 六、 数值变量的描述统计 18 (一)…...

深度学习-111-大语言模型LLM之基于langchain的结构化输出功能实现文本分类
文章目录 1 langchain的结构化输出1.1 推荐的使用流程1.2 模式定义1.3 返回结构化输出1.3.1 工具调用(方式一)1.3.2 JSON模式(方式二)1.3.3 结构化输出法(方式三)2 文本分类2.1 定义分类模式2.2 配置分类提示模板2.3 初始化分类模型2.4 分类示例3 参考附录1 langchain的结构化输…...

常见的排序算法:插入排序、选择排序、冒泡排序、快速排序
1、插入排序 步骤: 1.从第一个元素开始,该元素可以认为已经被排序 2.取下一个元素tem,从已排序的元素序列从后往前扫描 3.如果该元素大于tem,则将该元素移到下一位 4.重复步骤3,直到找到已排序元素中小于等于tem的元素…...

C++17 中的 std::gcd:探索最大公约数的现代 C++ 实现
文章目录 一、std::gcd 的基本用法(一)包含头文件(二)函数签名(三)使用示例 二、std::gcd 的实现原理三、std::gcd 的优势(一)简洁易用(二)类型安全ÿ…...
)
力扣刷题(数组篇)
日期类 #pragma once#include <iostream> #include <assert.h> using namespace std;class Date { public:// 构造会频繁调用,所以直接放在类里面(类里面的成员函数默认为内联)Date(int year 1, int month 1, int day 1)//构…...

OpenWRT中常说的LuCI是什么——LuCI介绍(一)
我相信每个玩openwrt的小伙伴都或多或少看到过luci这个东西,但luci到底是什么东西,可能还不够清楚,今天就趁机来介绍下,openwrt中的luci,到底是个什么东西。 什么是LuCI? 首先,LuCI是OpenWRT中…...

机器学习核心算法解析
机器学习核心算法解析 机器学习是人工智能的核心技术之一,它通过从数据中学习模式并做出预测或决策。本文将深入解析机器学习的核心算法,包括监督学习、无监督学习和强化学习,并通过具体案例和代码示例帮助读者理解这些算法的实际应用。 1. …...

【目标检测json2txt】label从COCO格式json文件转YOLO格式txt文件
目录 🍀🍀1.COCO格式json文件 🌷🌷2.YOLO格式txt文件 💖💖3.xml2json代码(python) 🐸🐸4.输入输出展示 🙋🙋4.1输入json 🍂🍂4.2输出txt 整理不易,欢迎一键三连!!! 送你们一条美丽的--分割线-- 🍀🍀1.COCO格式json文件 COCO数…...
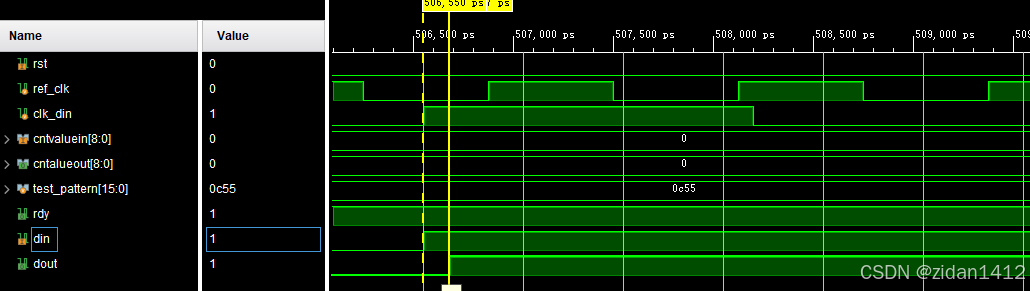
LVDS接口总结--(5)IDELAY3仿真
仿真参考资料如下: https://zhuanlan.zhihu.com/p/386057087 timescale 1 ns/1 ps module tb_idelay3_ctrl();parameter REF_CLK 2.5 ; // 400MHzparameter DIN_CLK 3.3 ; // 300MHzreg ref_clk ;reg …...

Flink内存配置和优化
在 Apache Flink 1.18 的 Standalone 集群中,内存设置是一个关键配置,它直接影响集群的性能和稳定性。 Flink 的内存配置主要包括 JobManager 和 TaskManager 的内存分配。 以下是如何在 Standalone 模式下配置内存的详细说明。 JobManager 内存配置 Jo…...

网络安全之笔记--Linus命令
Linux命令 文件和目录操作 ls 列出目录内容 常用选项 -a:显示所有文件和目录(包括隐藏文件,以.开头的文件)。 -l:以长格式显示文件和目录的详细信息。 -h:与-l配合使用,以更易读的方式显示文件大…...

deepseek和chatgpt对比
DeepSeek 和 ChatGPT 都是自然语言处理领域的工具,但它们的设计目标和功能有所不同。 功能定位: ChatGPT 是一个基于 OpenAI GPT-3 或 GPT-4 的聊天机器人,旨在进行人机对话、文本生成、问题解答等,广泛应用于教育、客服、创意写作…...

微服务与网关
什么是网关 背景 单体项目中,前端只用访问指定的一个端口8080,就可以得到任何想要的数据 微服务项目中,ip是不断变化的,端口是多个的 解决方案:网关 网关:就是网络的关口,负责请求的路由、转发、身份校验。 前段还是访问之前的端口8080即可 后端对于前端来说是透明的 网…...

Unity中实现动态图集算法
在 Unity 中,动态图集(Dynamic Atlas)是一种在运行时将多个纹理合并成一个大纹理图集的技术,这样可以减少渲染时的纹理切换次数,提高渲染效率。 实现原理: 动态图集的核心思想是在运行时动态地将多个小纹理…...