React低代码项目:问卷编辑器 I
问卷编辑器
Date: February 20, 2025 4:17 PM (GMT+8)
目标
- 完成问卷编辑器的设计和开发
- 完成复杂系统的 UI 组件拆分
- 完成复杂系统的数据结构设计
内容
- 需求分析
- 技术方案设计
- 开发
注意事项:
- 需求指导设计,设计指导开发。前两步很重要
- 页面复杂的话,可以设计边开发
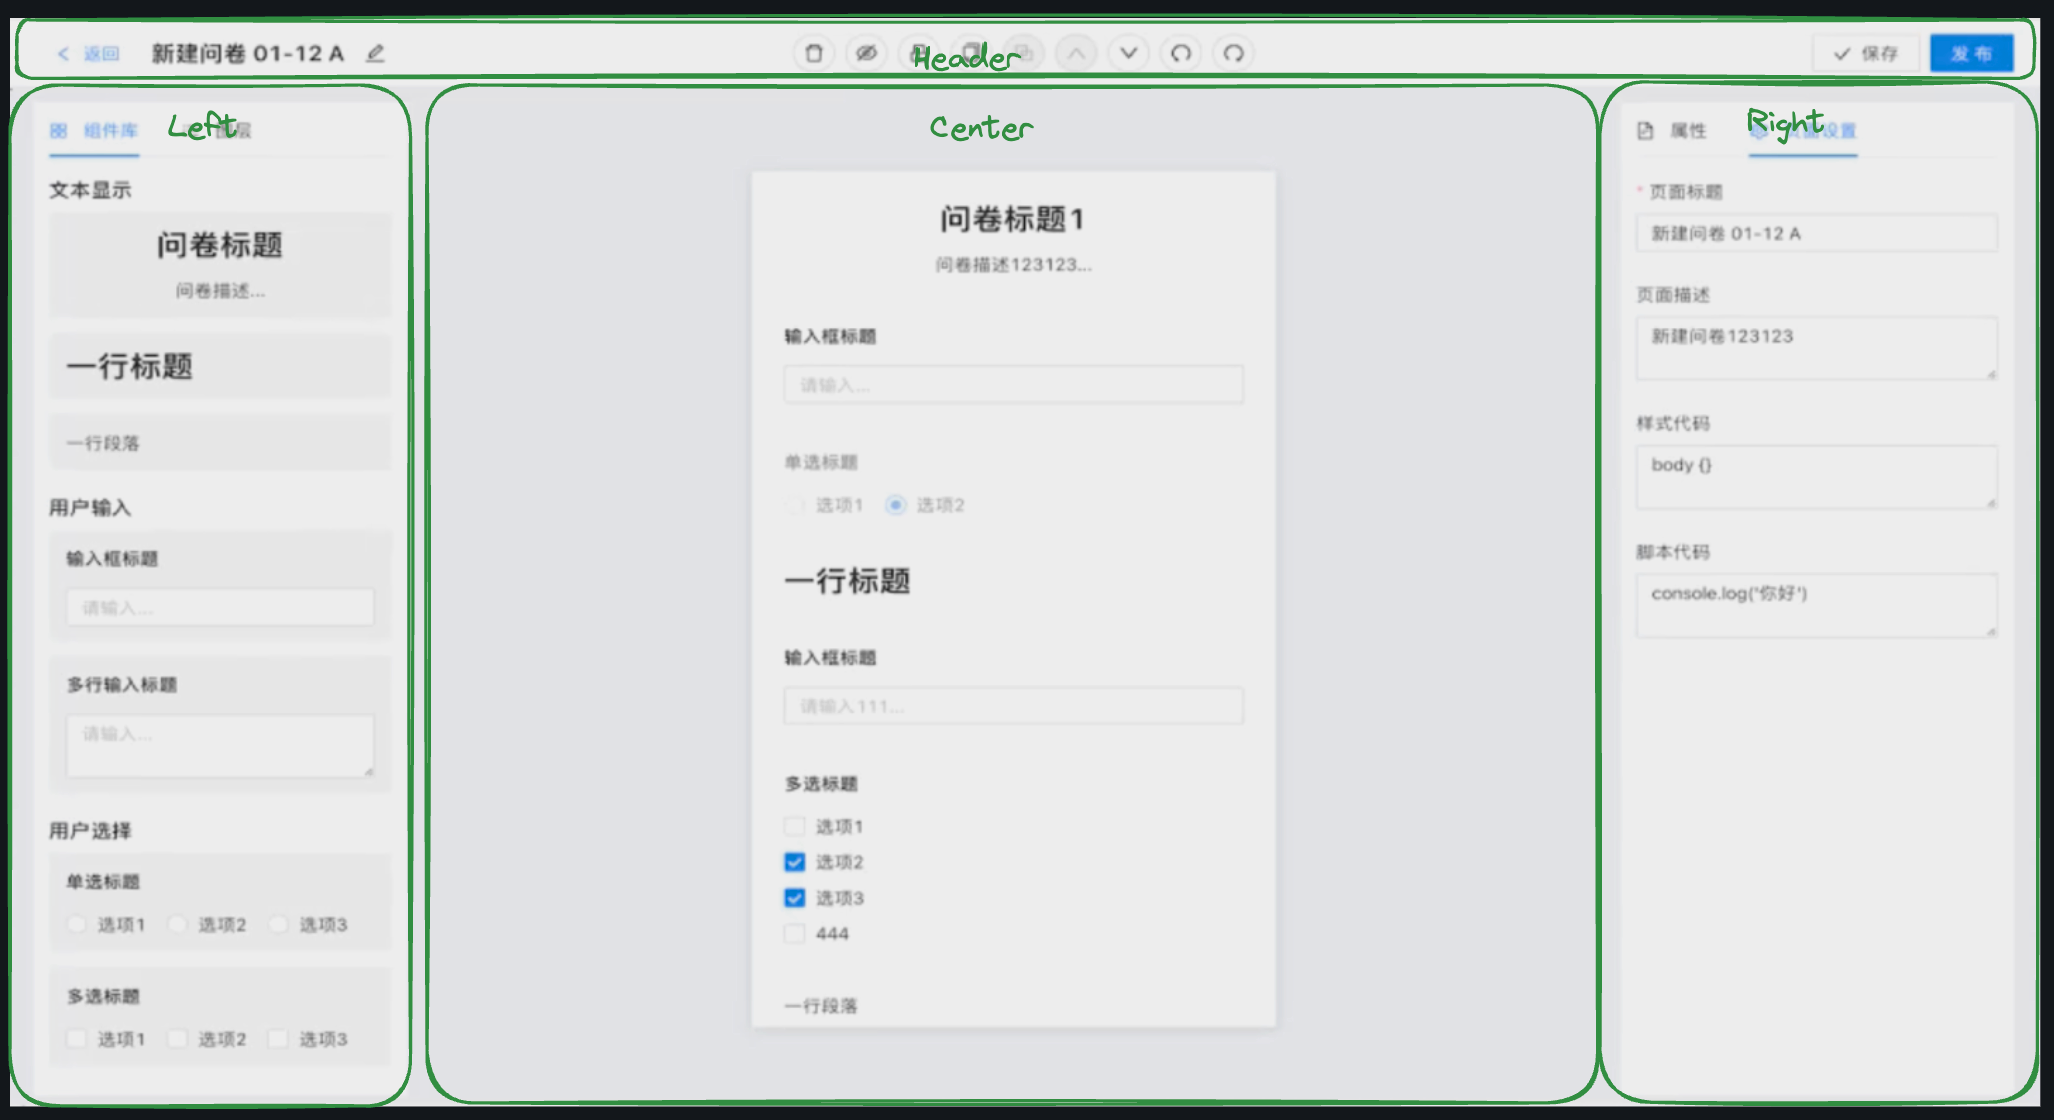
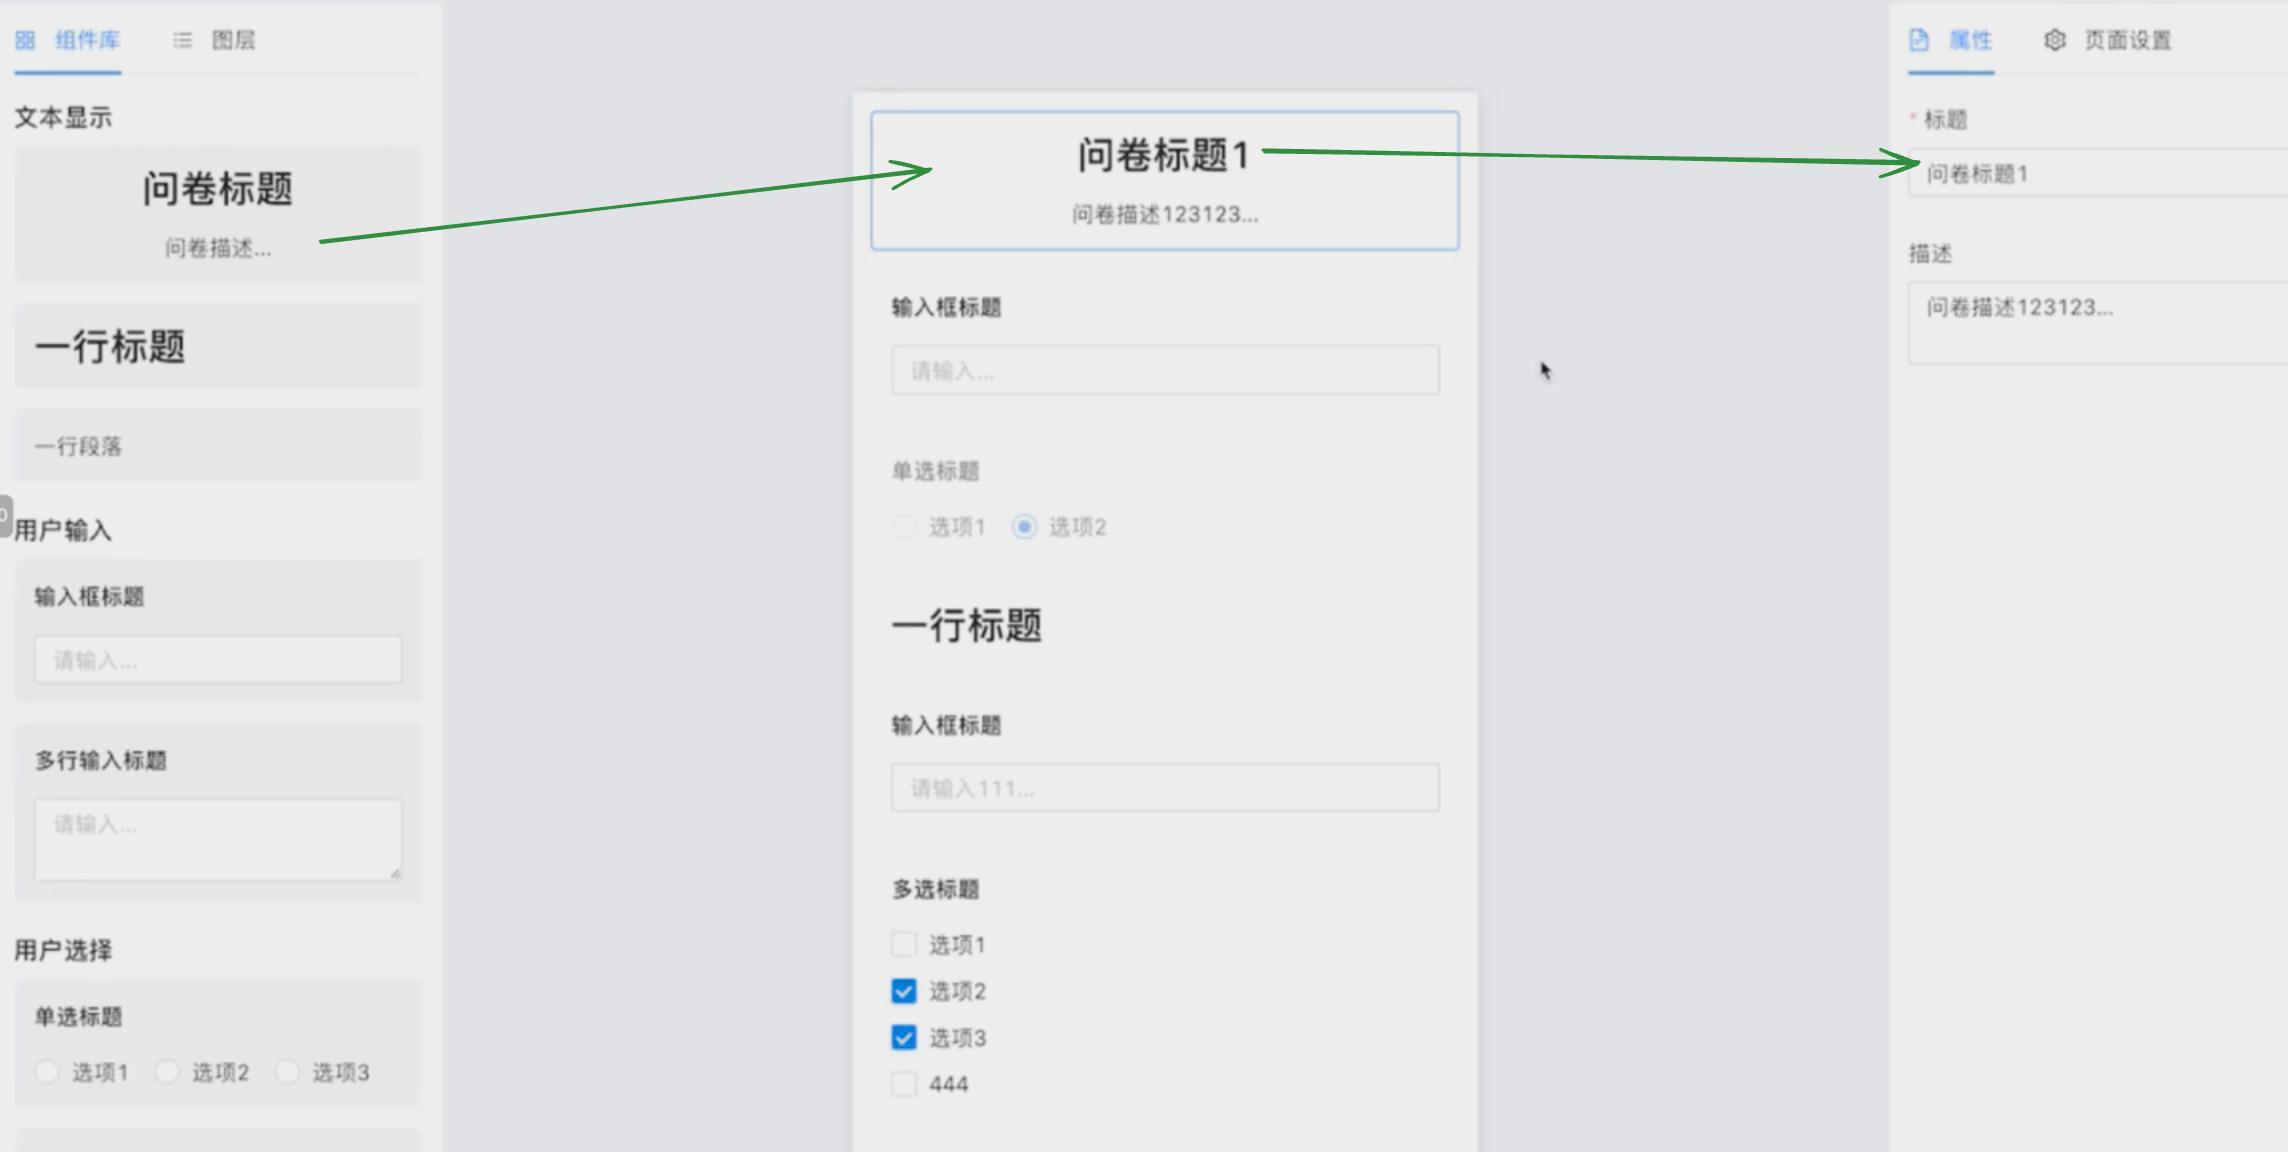
画布 UI 分析
画布UI组成:
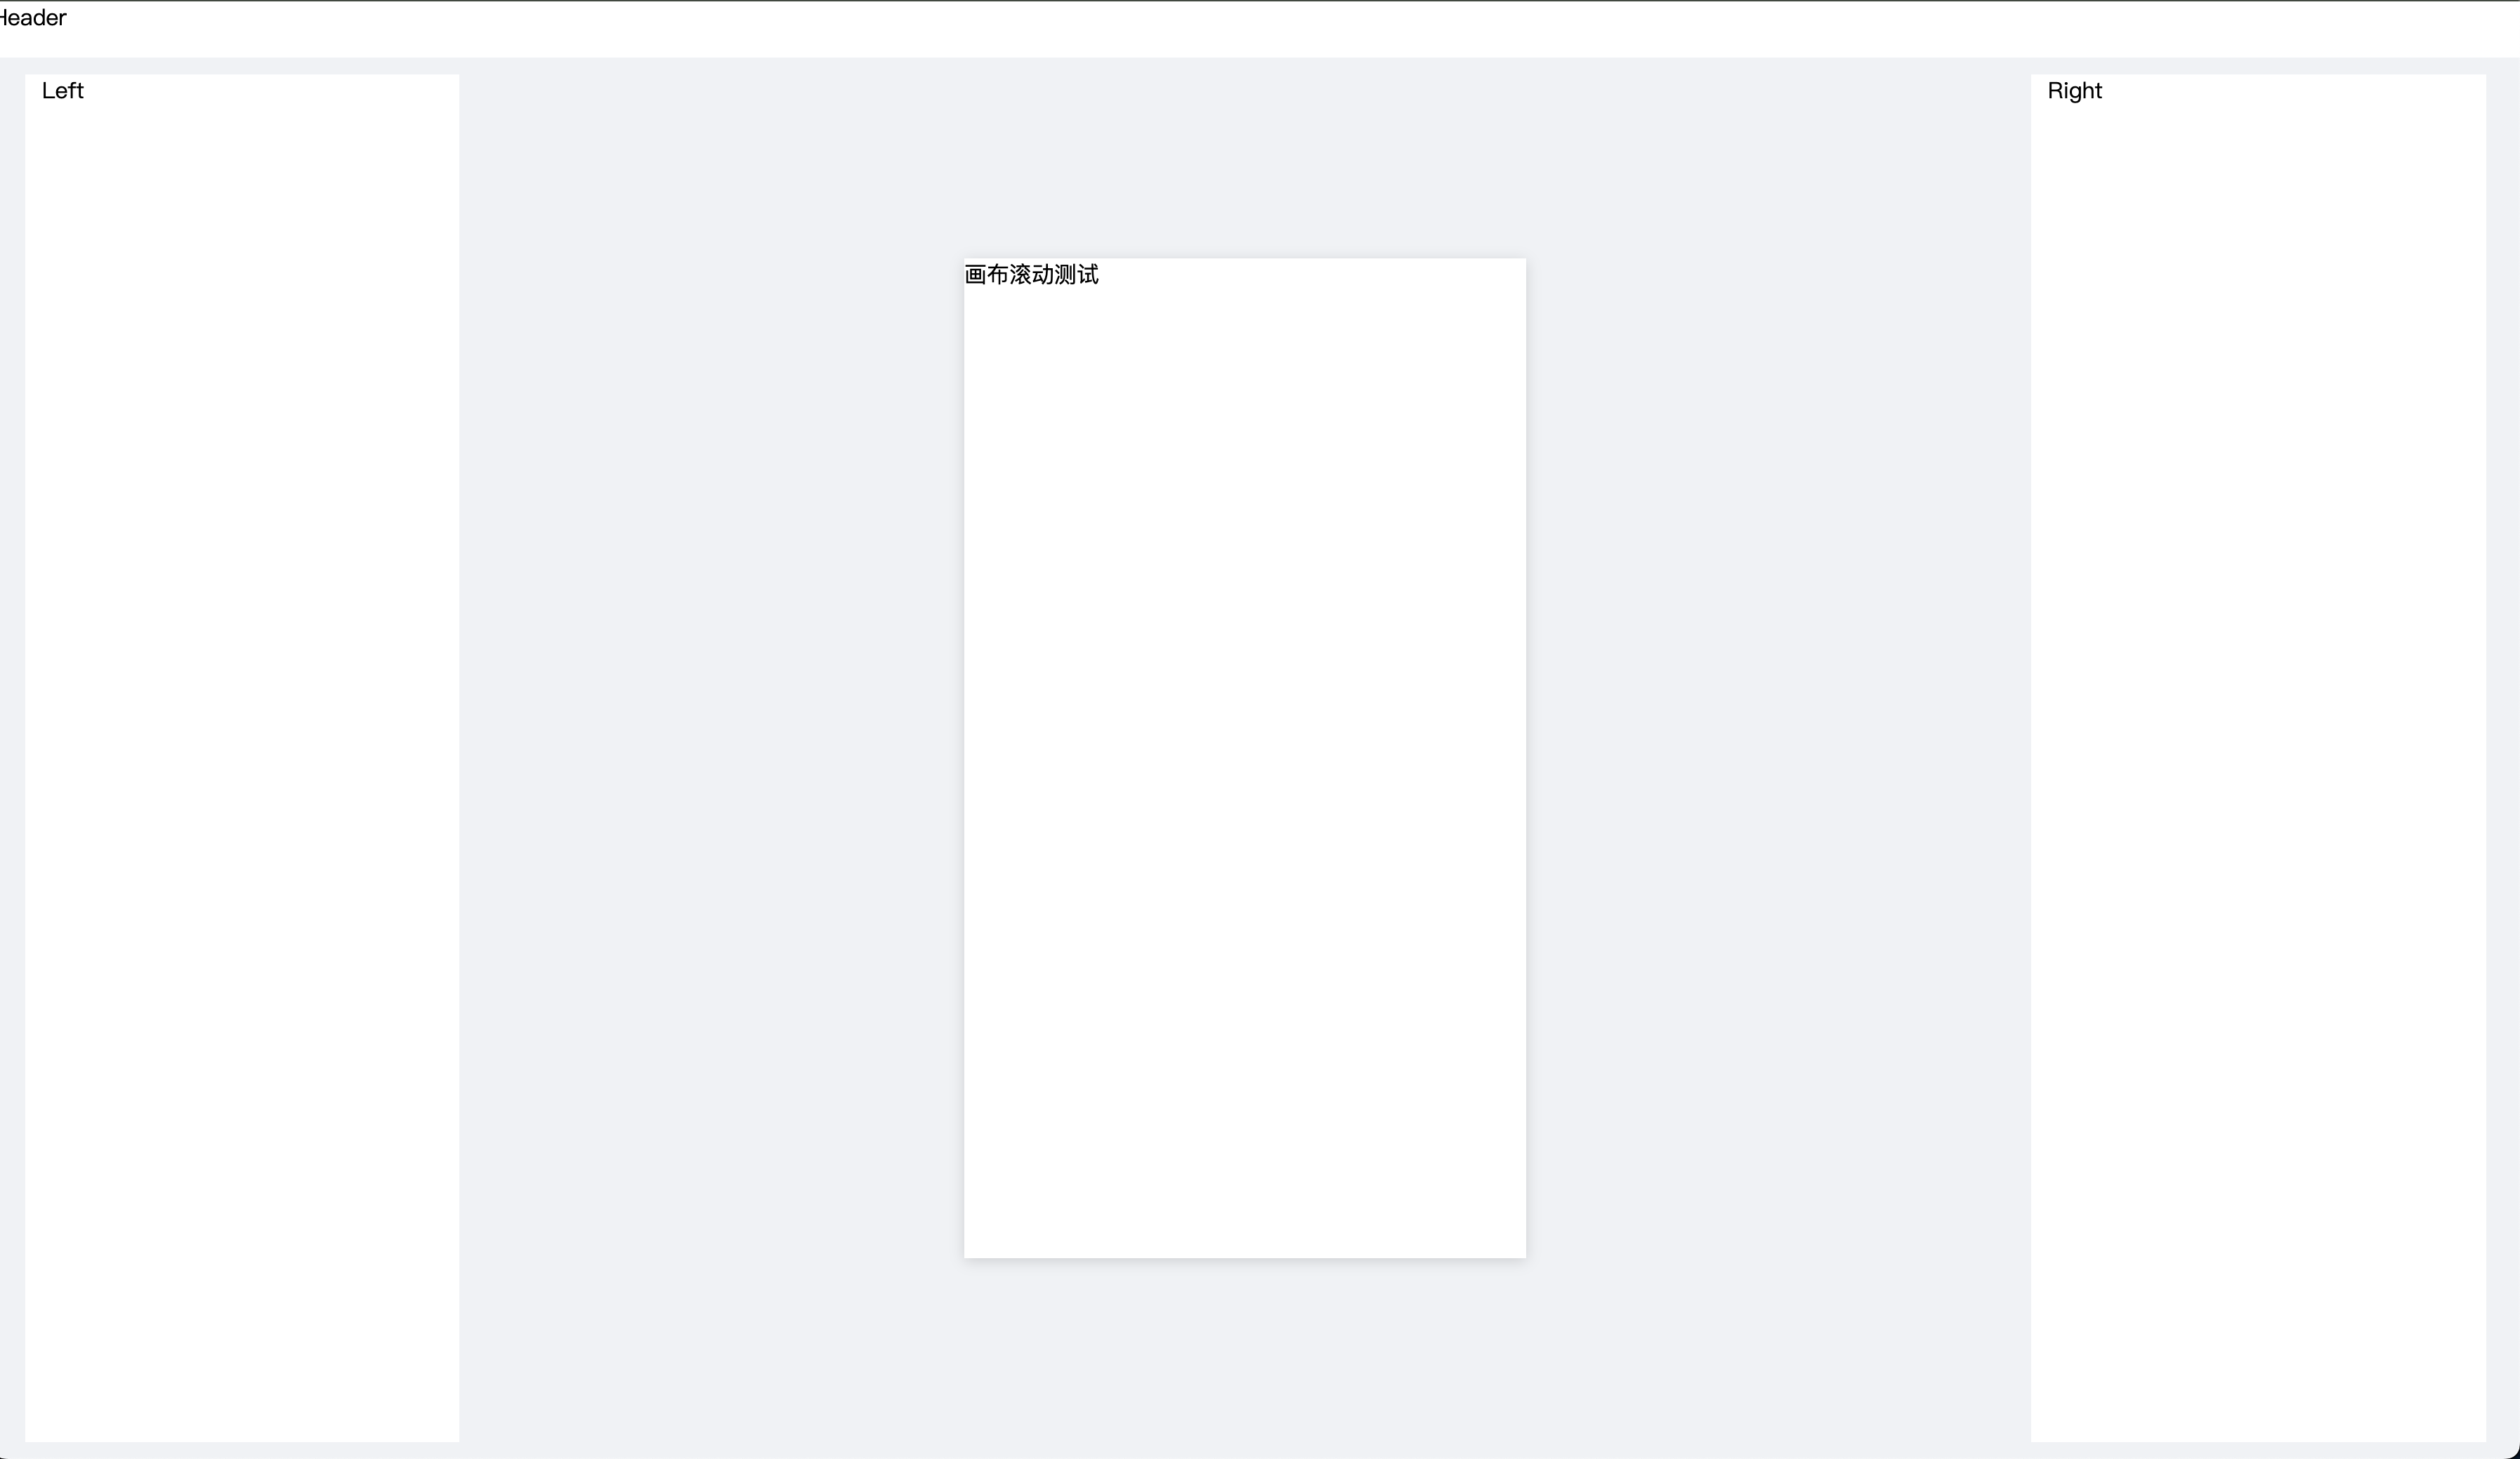
画布基础构建
画布Y轴滚动
要点:
- flex 布局
- 居中对齐
- 画布 Y 向滚动
效果:
question/Edit/index.tsx
import React, { FC } from 'react'
import styles from './index.module.scss'
// import { useParams } from 'react-router-dom'
// import useLoadQuestionData from '../../../hooks/useLoadQuestionData'const Edit: FC = () => {// const { id = '' } = useParams()// const { loading, data } = useLoadQuestionData()return (<div className={styles.container}><div style={{ backgroundColor: '#fff', height: '40px' }}>Header</div><div className={styles['content-wrapper']}><div className={styles.content}><div className={styles.left}>Left</div><div className={styles.main}><div className={styles['canvas-wrapper']}><div style={{ height: '900px' }}>画布滚动测试</div></div></div><div className={styles.right}>Right</div></div></div></div>)
}export default Edit
question/Edit/index.module.scss
.container {display: flex;flex-direction: column;height: 100vh;background-color: #f0f2f5;
}.content-wrapper {flex: auto;padding: 12px 0;
}.content {display: flex;margin: 0 24px;height: 100%;.left {width: 285px;background-color: #fff;padding: 0 12px;}.main {flex: 1;position: relative;overflow: hidden;.canvas-wrapper {position: absolute;top: 50%;left: 50%;transform: translate(-50%, -50%);width: 400px;height: 712px;background-color: #fff; overflow: auto;box-shadow: 0 2px 10px rgba(0, 0, 0, 0.15);}}.right {width: 300px;background-color: #fff;padding: 0 12px;}
}
开发问卷组件:Title 和 Input
开发组件 Title
目标:
要点:
- 组件默认参数设置
{ ...QuestionInputDefaultProps, ...props }
Component.ts
import React, { FC } from 'react'
import { Typography, Input } from 'antd'
import { QuestionTitleProps, QuestionInputDefaultProps } from './interface'const { Paragraph } = Typography
const QuestionTitle: FC<QuestionTitleProps> = (props: QuestionTitleProps) => {const { title = '', placeholder = '' } = {...QuestionInputDefaultProps,...props,}return (<div><Paragraph strong>{title}</Paragraph><div><Input placeholder={placeholder}></Input></div></div>)
}
export default QuestionTitle
interface.ts
export type QuestionTitleProps = {title?: stringplaceholder?: string
}export const QuestionInputDefaultProps: QuestionTitleProps = {title: '输入框标题',placeholder: '请输入内容',
}
开发组件 Input
目标:

要点:
- Input标题样式函数设计
genFontSize
Component.ts
import React, { FC } from 'react'
import { Typography } from 'antd'
import { QuestionTitleProps, defaultQuestionTitleProps } from './interface'const { Title } = Typography
const QuestionTitle: FC<QuestionTitleProps> = (props: QuestionTitleProps) => {const {text = '',level = 1,isCenter = false,} = { ...defaultQuestionTitleProps, ...props }const genFontSize = (level: number) => {if (level === 1) return '24px'if (level === 2) return '20px'if (level === 3) return '16px'if (level === 4) return '14px'if (level === 5) return '12px'return '24px'}return (<Titlelevel={level}style={{textAlign: isCenter ? 'center' : 'left',marginBottom: '0px',fontSize: genFontSize(level),}}>{text}</Title>)
}export default QuestionTitle
interface.ts
export type QuestionTitleProps = {text?: stringlevel?: 1 | 2 | 3 | 4 | 5isCenter?: boolean
}export const defaultQuestionTitleProps: QuestionTitleProps = {text: '一行标题',level: 1,isCenter: false,
}
画布集成组件测试
目标:
要点:
- 画布元素禁止点击,样式设计
.componet - 标题样式上方多余空距问题处理(见下方)
EditCanvas.tsx
import React, { FC } from 'react'
import styles from './EditCanvas.module.scss'
import QuestionTitle from '../../../component/QuestionComponents/QuestionTitle/Component'
import QuestionInput from '../../../component/QuestionComponents/QuestionInput/Component'const EditCanvas: FC = () => {return (<div className={styles.canvas}><div className={styles['component-wrapper']}><div className={styles.component}><QuestionTitle /></div></div><div className={styles['component-wrapper']}><div className={styles.component}><QuestionInput /></div></div></div>)
}export default EditCanvas
EidtCanvas.module.scss
.canvas {min-height: 100%;background-color: #fff;overflow: hidden;
}.component-wrapper {margin: 12px;border: 1px solid #fff;padding: 12px;border-radius: 3px;// 新增修复代码(推荐方案):global(.ant-typography) {margin-block-start: 0 !important;margin-block-end: 0 !important;}&:hover {border: 1px solid #d9d9d9;}
}.componet {pointer-events: none; // 禁止点击
}
问卷数据获取与存储
问卷信息存储在 Redux 中的原因:
组件间需要不断联动,如下所示,段落的选中以及修改,都涉及到相同的数据的访问。因此,建议把问卷信息存储在 Redux 中,便于组件间共享使用。
组件数据结构设计
服务端mock数据:
{url: '/api/question/:id',method: 'get',response() {return {errno: 0,data: {id: Random.id(),title: Random.ctitle(),componentList: [{id: Random.id(),type: 'questionTitle', // 组件类型,不能重复,前后端统一好title: '这是一个文本组件',props: {text: '文本内容',level1,isCenter: false}},{id: Random.id(),type: 'questionInput',title: '这是一个输入框组件',props: {title: '你的名字',placeholder: '请输入内容'}},{id: Random.id(),type: 'questionInput',title: '这是一个输入框组件',props: {title: '你的电话',placeholder: '请输入内容'}}],}}}},
Ajax 加载数据
要点:
- Hook
useLoadQuestionData设计- 问卷信息获取函数
- id 变化,更新问卷信息
- 数据更新后,存储在 Redux 中
useLoadQuestionData.ts
import { useEffect } from 'react'
import { useParams } from 'react-router-dom'
import { useDispatch } from 'react-redux'
import { getQuestionService } from '../services/question'
import { useRequest } from 'ahooks'
import { resetComponentList } from '../store/componentReducer'function useLoadQuestionData() {const { id = '' } = useParams()const dispatch = useDispatch()// 问卷信息获取函数const { data, loading, error, run } = useRequest(async (id: string) => {const data = await getQuestionService(id)return data},{manual: true,})// 数据更新后,存储在 Redux 中useEffect(() => {if (!data) returnconst { title = '', componentList } = dataif (!componentList || componentList.length === 0) returnconst action = resetComponentList({ componentList })dispatch(action)}, [data])// id 变化,更新问卷信息useEffect(() => {run(id)}, [id])return {loading,error,}
}export default useLoadQuestionData
Redux 数据存储
要点:
- 设计 componentReducer,定义类型以及切片
- 设计 index,作为各个切片 类型 和 reducer 的统一收口
文件树:
│   ├── store
│   │   ├── componentReducer
│   │   │   └── index.ts
│   │   ├── index.ts
│   │   └── userReducer.ts
componentReducer/index.ts
import { createSlice, PayloadAction } from '@reduxjs/toolkit'
import { ComponentPropsType } from '../../component/QuestionComponents'export type ComponentInfoType = {fe_id: stringtype: stringtitle: stringprops: ComponentPropsType
}export type ComponentsStateType = {componentList: Array<ComponentInfoType>
}const INIT_STATE: ComponentsStateType = {componentList: [],// 其他拓展
}export const componentsSlice = createSlice({name: 'component',initialState: INIT_STATE,reducers: {resetComponentList: (state: ComponentsStateType,action: PayloadAction<ComponentsStateType>) => {return action.payload},},
})export const { resetComponentList } = componentsSlice.actions
export default componentsSlice.reducer
index.ts
import { configureStore } from '@reduxjs/toolkit'
import userReducer, { UserStateType } from './userReducer'
import componentReducer, { ComponentsStateType } from './componentReducer'export type StateType = {user: UserStateTypecomponents: ComponentsStateType
}export default configureStore({reducer: {user: userReducer,components: componentReducer,// 组件列表// 问卷信息},
})
画布显示问卷列表
组件类型设定
要点:
- 整合各组件 prop type
- 整合各组件 配置列表
文件树:
│   │   ├── QuestionComponents
│   │   │   ├── QuestionInput
│   │   │   │   ├── Component.tsx
│   │   │   │   ├── index.ts
│   │   │   │   └── interface.ts
│   │   │   ├── QuestionTitle
│   │   │   │   ├── Component.tsx
│   │   │   │   ├── index.ts
│   │   │   │   └── interface.ts
│   │   │   └── index.ts
QuestionComponents/index.ts
import QuestionInputConf, { QuestionInputPropsType } from './QuestionInput'
import QuestionTitleConf, { QuestionTitlePropsType } from './QuestionTitle'// 各个组件的 prop type
export type ComponentPropsType = QuestionInputPropsType & QuestionTitlePropsType// 组件的配置
export type ComponentConfType = {title: stringtype: stringComponent: React.FC<ComponentPropsType>defaultProps: ComponentPropsType
}// 全部组件配置的列表
const componentConfList: ComponentConfType[] = [QuestionInputConf,QuestionTitleConf,
]export function getComponentConfByType(type: string) {return componentConfList.find(c => c.type === type)
}
画布动态显示组件列表
效果:
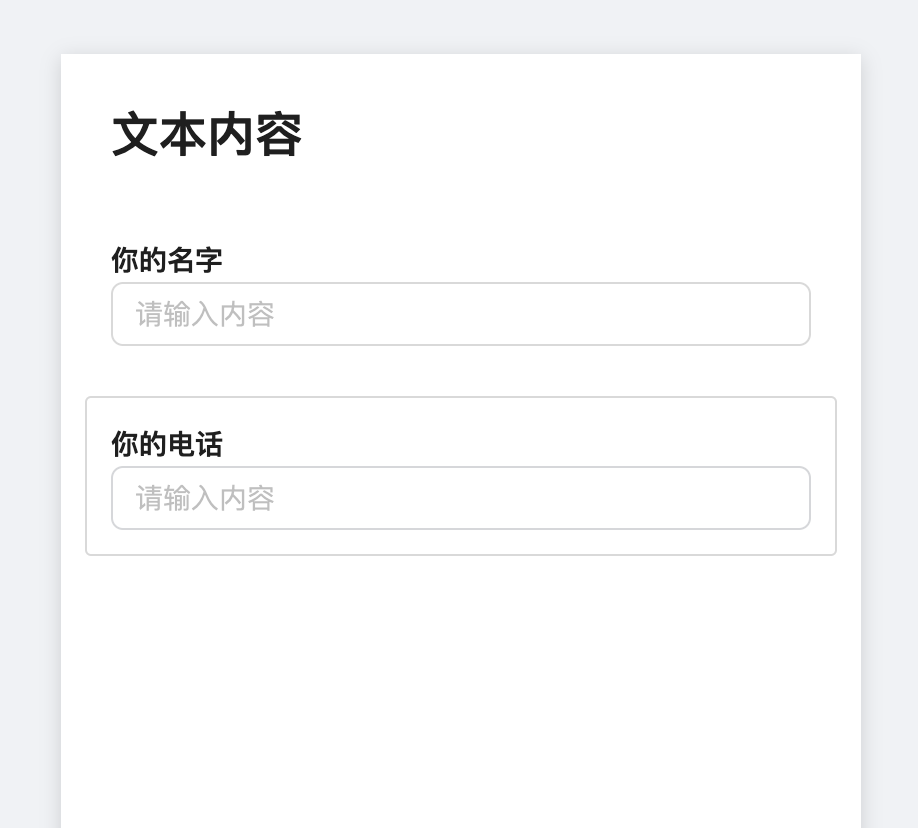
要点:
- 根据组件类型动态渲染指定组件
- 返回组件函数实现:
getComponent用于根据组件类型返回指定组件
- 返回组件函数实现:
question/Edit/EditCanvas.tsx
import React, { FC } from 'react'
import styles from './EditCanvas.module.scss'
// import QuestionTitle from '../../../component/QuestionComponents/QuestionTitle/Component'
// import QuestionInput from '../../../component/QuestionComponents/QuestionInput/Component'
import { Spin } from 'antd'
import useGetComponentInfo from '../../../hooks/useGetComponentInfo'
import { getComponentConfByType } from '../../../component/QuestionComponents'
import { ComponentInfoType } from '../../../store/componentReducer'type PropsType = {loading: boolean
}function getComponent(componentInfo: ComponentInfoType) {const { type, props } = componentInfoconst componentConf = getComponentConfByType(type)if (!componentConf) {return null}const { Component } = componentConfreturn <Component {...props} />
}const EditCanvas: FC<PropsType> = ({ loading }) => {const { componentList } = useGetComponentInfo()if (loading) {return (<div style={{ textAlign: 'center', padding: '20px' }}><Spin /></div>)}return (<div className={styles.canvas}>{componentList.map(c => {const { fe_id } = creturn (<div key={fe_id} className={styles['component-wrapper']}><div className={styles.component}>{getComponent(c)}</div></div>)})}</div>)// <div className={styles.canvas}>//   <div className={styles['component-wrapper']}>//     <div className={styles.component}>//       <QuestionTitle />//     </div>//   </div>//   <div className={styles['component-wrapper']}>//     <div className={styles.component}>//       <QuestionInput />//     </div>//   </div>// </div>
}export default EditCanvas
点击画布选中组件
效果:
要点:
- 选中画布中组件显示
- 点击画布组件选中,点击空白不选中。
clearSelectedId()和handleClick()实现- 冒泡机制实现
- 组件 selectedId 与 Redux 绑定
- ComponentsStateType 设定 selectedId
useLoadQuestionData设定进入画布时默认选中组件
- 点击画布组件选中,点击空白不选中。
- 处理 Immer 中 draft 为空的问题
EditCanvas.tsx
import React, { FC, MouseEvent } from 'react'
import styles from './EditCanvas.module.scss'
import { useDispatch } from 'react-redux'
import useGetComponentInfo from '../../../hooks/useGetComponentInfo'
import { getComponentConfByType } from '../../../component/QuestionComponents'
import classNames from 'classnames'
import {ComponentInfoType,changeSelectedId,
} from '../../../store/componentReducer'type PropsType = {loading: boolean
}function getComponent(componentInfo: ComponentInfoType) {const { type, props } = componentInfoconst componentConf = getComponentConfByType(type)if (!componentConf) {return null}const { Component } = componentConfreturn <Component {...props} />
}const EditCanvas: FC<PropsType> = ({ loading }) => {const { componentList, selectedId } = useGetComponentInfo()const dispatch = useDispatch()// 点击冒泡机制实现function handleClick(event: MouseEvent, id: string) {event.stopPropagation()dispatch(changeSelectedId(id))}if (loading) {return (<div style={{ textAlign: 'center', padding: '20px' }}><Spin /></div>)}return (<div className={styles.canvas}>{componentList.map(c => {const { fe_id } = c// 拼接 class nameconst wrapperDefaultClassName = styles['component-wrapper']const selectedClassName = styles.selectedconst wrapperClassName = classNames({[wrapperDefaultClassName]: true,[selectedClassName]: fe_id === selectedId,})return (<divkey={fe_id}className={wrapperClassName}onClick={e => handleClick(e, fe_id || '')}><div className={styles.component}>{getComponent(c)}</div></div>)})}</div>)
}export default EditCanvas
/Edit/index.tsx
import React, { FC } from 'react'
import styles from './index.module.scss'
import EditCanvas from './EditCanvas'
import { changeSelectedId } from '../../../store/componentReducer'
import { useDispatch } from 'react-redux'
import useLoadQuestionData from '../../../hooks/useLoadQuestionData'const Edit: FC = () => {const { loading } = useLoadQuestionData()const dispatch = useDispatch()function clearSelectedId() {dispatch(changeSelectedId(''))}return (<div className={styles.container}><div style={{ backgroundColor: '#fff', height: '40px' }}>Header</div><div className={styles['content-wrapper']}><div className={styles.content}><div className={styles.left}>Left</div><div className={styles.main} onClick={clearSelectedId}><div className={styles['canvas-wrapper']}><div style={{ height: '900px' }}><EditCanvas loading={loading} /></div></div></div><div className={styles.right}>Right</div></div></div></div>)
}export default Edit
store/componentReducer/index.ts
import { createSlice, PayloadAction } from '@reduxjs/toolkit'
import { ComponentPropsType } from '../../component/QuestionComponents'export type ComponentInfoType = {fe_id: stringtype: stringtitle: stringprops: ComponentPropsType
}// ComponentsStateType 设定 selectedId
export type ComponentsStateType = {selectedId: stringcomponentList: Array<ComponentInfoType>
}const INIT_STATE: ComponentsStateType = {selectedId: '',componentList: [],// 其他拓展
}export const componentsSlice = createSlice({name: 'component',initialState: INIT_STATE,reducers: {resetComponentList: (state: ComponentsStateType,action: PayloadAction<ComponentsStateType>) => {return action.payload},changeSelectedId: (draft: ComponentsStateType,action: PayloadAction<string>) => {draft.selectedId = action.payload || ''},},
})export const { resetComponentList, changeSelectedId } = componentsSlice.actions
export default componentsSlice.reducer
useLoadQuestionData.ts
useEffect(() => {if (!data) returnconst { componentList } = data// 获取默认的 idlet selectedId = ''if (componentList.length > 0) {const { fe_id } = componentList[0]selectedId = fe_id}if (!componentList || componentList.length === 0) returnconst action = resetComponentList({ componentList, selectedId })dispatch(action)
}, [data])
fix:immer draft 为空
**问题:**draft打印出来为null,请问是什么原因?
// ... 其他代码保持不变 ...export const componentsSlice = createSlice({name: 'component',initialState: INIT_STATE,reducers: {// 错误写法:多层嵌套 producechangeSelectedId: produce( // 需移除外层 produce(draft: ComponentsStateType, action: PayloadAction<string>) => {console.log('payload', action.payload)console.log(draft) // 此时 draft 为 nulldraft.selectedId = action.payload || ''}),},
})
原因:
- Redux Toolkit 已内置 Immer 集成,无需额外使用
produce包装 - 双重 Immer 包装会导致状态代理失效,此时
draft参数无法正确接收 Redux 状态树 - 直接通过
state参数操作即可实现安全的不可变更新
方案:
export const componentsSlice = createSlice({name: 'component',initialState: INIT_STATE,reducers: {// 正确写法:直接使用 Immer(Redux Toolkit 已内置)changeSelectedId: (state: ComponentsStateType, action: PayloadAction<string>) => {console.log('payload', action.payload)state.selectedId = action.payload || ''},// ...其他 reducer 保持不变...},
})
注意点:
- RTK 从 1.0 版本开始内置 Immer。
- Immer 默认用于
createSlice和createReducer,允许开发者以“可变”的方式更新状态。 - 如果需要,可以通过配置禁用 Immer,但绝大多数情况下,默认启用 Immer 是推荐的做法。
组件库面板
组件分组显示
需求:
要点:
- 组件库配置
- 组件库组件列表渲染显示
- 组件库组件点击框图、鼠标样式设计
思路:
先对组件库进行配置,然后在页面中对应位置进行渲染组件即可。
QuestionComponents/index.ts
import QuestionInputConf, { QuestionInputPropsType } from './QuestionInput'
import QuestionTitleConf, { QuestionTitlePropsType } from './QuestionTitle'export type ComponentPropsType = QuestionInputPropsType & QuestionTitlePropsTypeexport type ComponentConfType = {title: stringtype: stringComponent: React.FC<ComponentPropsType>defaultProps: ComponentPropsType
}const componentConfList: ComponentConfType[] = [QuestionInputConf,QuestionTitleConf,
]// 组件库配置
export const componentConfGroup = [{groupId: 'textGroup',groupName: '文本显示',components: [QuestionTitleConf],},{groupId: 'inputGroup',groupName: '用户输入',components: [QuestionInputConf],},
]export function getComponentConfByType(type: string) {return componentConfList.find(c => c.type === type)
}
ComponentLib.tsx
import React, { FC } from 'react'
import { componentConfGroup } from '../../../component/QuestionComponents'
import { Typography } from 'antd'
import { ComponentConfType } from '../../../component/QuestionComponents'
import styles from './ComponentLib.module.scss'const { Title } = Typographyfunction genComponent(c: ComponentConfType) {const { Component } = creturn (<div className={styles.wrapper}><div className={styles.component}><Component /></div></div>)
}const Lib: FC = () => {return (<>{componentConfGroup.map((item, index) => {const { groupId, groupName } = itemreturn (<div key={groupId}><Titlelevel={3}style={{ fontSize: '16px', marginTop: index > 0 ? '20px' : '0' }}>{groupName}</Title><div>{item.components.map(c => genComponent(c))}</div></div>)})}</>)
}
export default Lib
ComponentLib.scss
.wrapper {padding: 12px;margin-bottom: 12px;cursor: cursor;border: 1px solid #fff;border-radius: 3px;background-color: #fff;&:hover {border-color: #d9d9d9;}
}.component {pointer-events: none; // 屏蔽鼠标
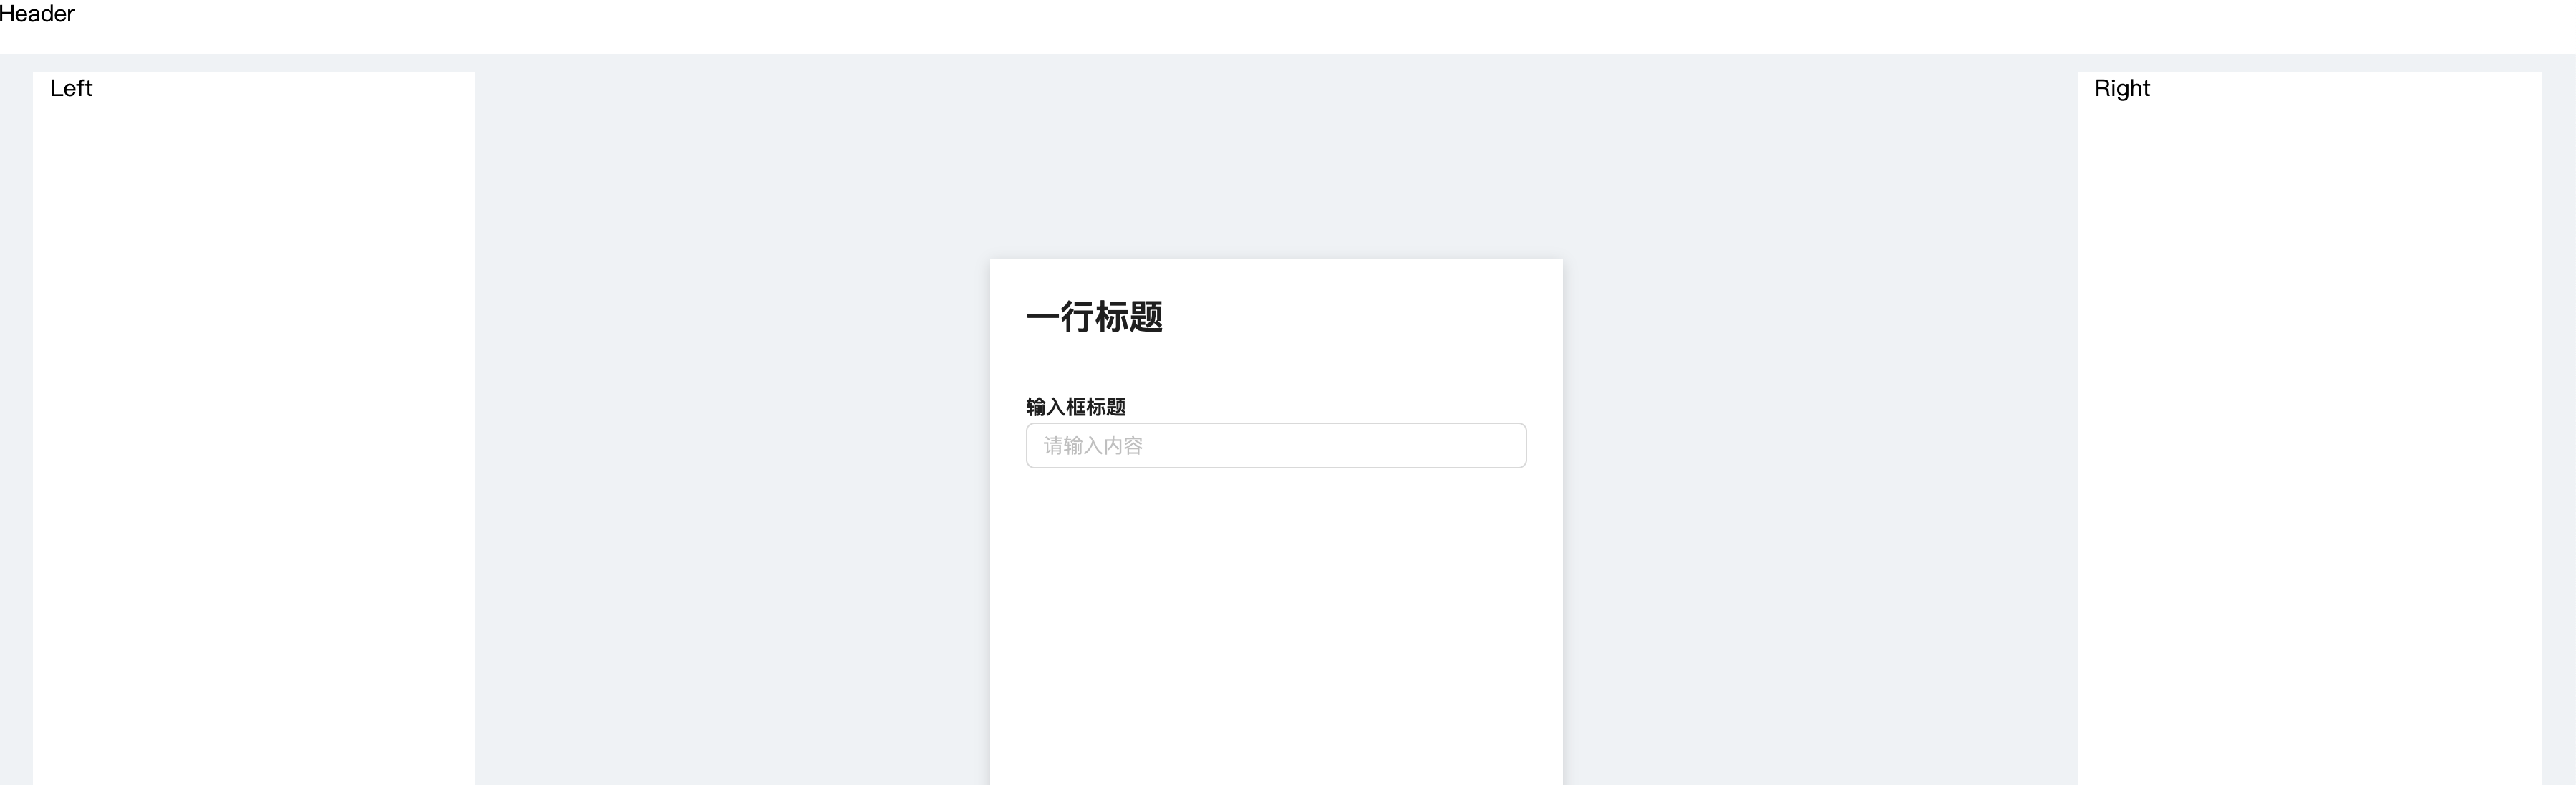
} No newline at end of file组件库添加到画布
需求:
要点:
- 组件与画布交互逻辑
- 组件默认插入画布末尾
- 画布中组件选定后,组件插入会在其之后
- 交互逻辑数据实现
ComponentLib组件插入画布位置逻辑实现addComponent通过 selected 判断组件插入画布位置
ComponentLib.tsx
import React, { FC } from 'react'
import { componentConfGroup } from '../../../component/QuestionComponents'
import { Typography } from 'antd'
import { ComponentConfType } from '../../../component/QuestionComponents'
import styles from './ComponentLib.module.scss'
import { useDispatch } from 'react-redux'
import { addComponent } from '../../../store/componentReducer'
import { nanoid } from '@reduxjs/toolkit'const { Title } = Typographyconst Lib: FC = () => {const dispatch = useDispatch()function genComponent(c: ComponentConfType) {const { type, Component } = cfunction handleClick(c: ComponentConfType) {const { title, type, defaultProps } = cdispatch(addComponent({fe_id: nanoid(),type,title,props: defaultProps,}))}return (<div key={type} className={styles.wrapper} onClick={() => handleClick(c)}><div className={styles.component}><Component /></div></div>)}return (<>{componentConfGroup.map((item, index) => {const { groupId, groupName } = itemreturn (<div key={groupId}><Titlelevel={3}style={{ fontSize: '16px', marginTop: index > 0 ? '20px' : '0' }}>{groupName}</Title><div>{item.components.map(c => genComponent(c))}</div></div>)})}</>)
}
export default Lib
componentReducer/index.ts
import { createSlice, PayloadAction } from '@reduxjs/toolkit'
import { ComponentPropsType } from '../../component/QuestionComponents'export type ComponentInfoType = {fe_id: stringtype: stringtitle: stringprops: ComponentPropsType
}export type ComponentsStateType = {selectedId: stringcomponentList: Array<ComponentInfoType>
}const INIT_STATE: ComponentsStateType = {selectedId: '',componentList: [],// 其他拓展
}export const componentsSlice = createSlice({name: 'component',initialState: INIT_STATE,reducers: {......addComponent: (draft: ComponentsStateType,action: PayloadAction<ComponentInfoType>) => {const newCompontent = action.payloadconst { selectedId, componentList } = draftconst index = componentList.findIndex(c => c.fe_id === selectedId)if (index < 0) {draft.componentList.push(newCompontent)} else {draft.componentList.splice(index + 1, 0, newCompontent)}draft.selectedId = newCompontent.fe_id},},
})export const { resetComponentList, changeSelectedId, addComponent } =componentsSlice.actions
export default componentsSlice.reducer
注意:fe_id 和 _id 区别
要点:
- _id是服务端的数据,_是因为 mongodb 会为每条数据生成id,这是不重复的,由 _id 表示
- fe_id 是前端用于区分组件是否被选中的标记,用于组件库与画布的交互
QuestionCart.tsx
type PropsType = {_id: stringtitle: stringisPublished: booleanisStar: booleananswerCount: numbercreatedAt: string
}
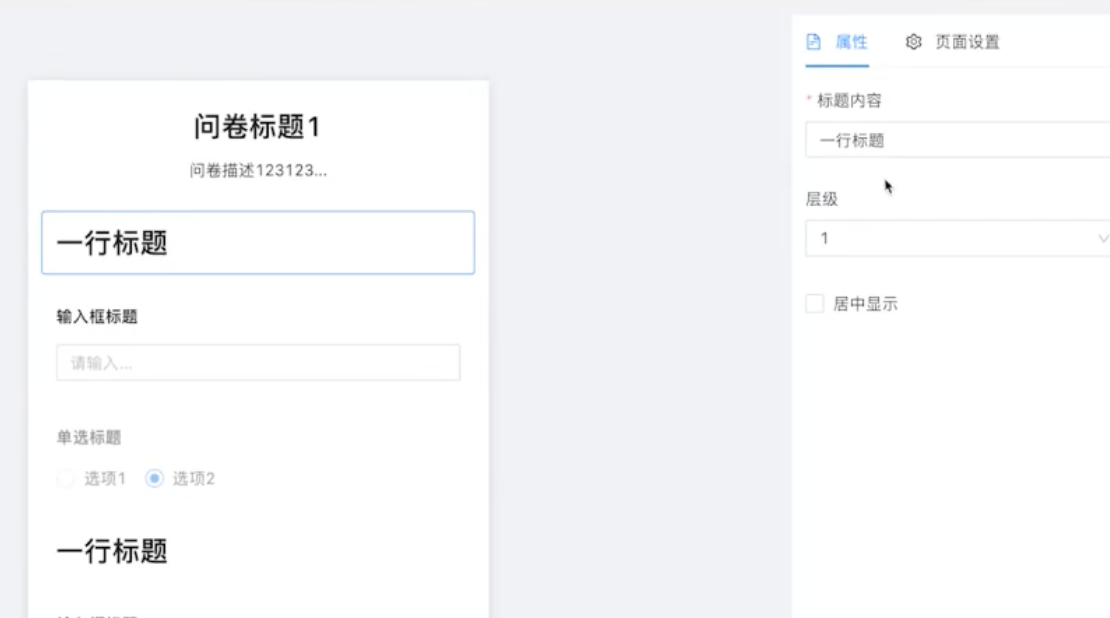
组件属性面板
点击组件显示属性
需求:
要点:
- 构建属性面板
- 构造组件属性模块
PropComponet,用于配制组件属性
│   │   ├── QuestionComponents
│   │   │   ├── QuestionInput
│   │   │   │   ├── Component.tsx
│   │   │   │   ├──+ PropComponent.tsx
│   │   │   │   ├── index.ts
│   │   │   │   └── interface.ts
│   │   │   ├── QuestionTitle
│   │   │   │   ├── Component.tsx
│   │   │   │   ├──+ PropComponent.tsx
│   │   │   │   ├── index.ts
│   │   │   │   └── interface.ts
│   │   │   └──m index.ts
思路:
- 当我们点击画布中的组件后,更新组件
selectedId - 属性面板通过
useGetComponentInfo获取selectedComponent-
从
selectedComponent中层层解构出组件参数props和参数组件PropComponent,返回
<PropComponent {...props} />传参后的组件即可。
-

构建属性面板
RightPanel.tsx
import React, { FC } from 'react'
import { Tabs } from 'antd'
import { FileTextOutlined, SettingOutlined } from '@ant-design/icons'
import ComponentProp from './componentProp'const RightPanel: FC = () => {const tabsItems = [{key: 'prop',label: (<span><FileTextOutlined />属性</span>),children: <ComponentProp />,},{key: 'setting',label: (<span><SettingOutlined />页面设置</span>),children: <div>页面设置</div>,},]return <Tabs defaultActiveKey="prop" items={tabsItems} />
}export default RightPanel
构造组件属性模块 PropComponet ,用于配制组件属性
question/Edit/ComponentProp.tsx
import React, { FC } from 'react'
import useGetComponentInfo from '../../../hooks/useGetComponentInfo'
import { getComponentConfByType } from '../../../component/QuestionComponents'const NoProp = () => {return <div style={{ textAlign: 'center' }}>请先选择组件</div>
}const ComponentProp: FC = () => {const { selectedComponent } = useGetComponentInfo()if (!selectedComponent) return <NoProp />const { type, props } = selectedComponentconst componentConf = getComponentConfByType(type)if (!componentConf) return <NoProp />const { PropComponent } = componentConfreturn <PropComponent {...props} />
}
export default ComponentProp
QuestionComponents/index.ts 新增 PropComponent
import QuestionInputConf, { QuestionInputPropsType } from './QuestionInput'
import QuestionTitleConf, { QuestionTitlePropsType } from './QuestionTitle'
import { FC } from 'react'export type ComponentPropsType = QuestionInputPropsType & QuestionTitlePropsType// 组件的配置: 新增 PropComponent
export type ComponentConfType = {title: stringtype: stringComponent: FC<ComponentPropsType>PropComponent: FC<ComponentPropsType> // HeredefaultProps: ComponentPropsType
}const componentConfList: ComponentConfType[] = [QuestionInputConf,QuestionTitleConf,
]export const componentConfGroup = [{groupId: 'textGroup',groupName: '文本显示',components: [QuestionTitleConf],},{groupId: 'inputGroup',groupName: '用户输入',components: [QuestionInputConf],},
]export function getComponentConfByType(type: string) {return componentConfList.find(c => c.type === type)
}
QuestionInput/PropComponent.tsx
import React, { FC } from 'react'
import { useEffect } from 'react'
import { Form, Input } from 'antd'
import { QuestionInputPropsType } from './interface'const PropComponent: FC<QuestionInputPropsType> = (props: QuestionInputPropsType
) => {const { title, placeholder } = propsconst [form] = Form.useForm()useEffect(() => {form.setFieldsValue({ title, placeholder })}, [title, placeholder])return (<Form layout="vertical" initialValues={{ title, placeholder }} form={form}><Form.Itemlabel="标题"name="title"rules={[{ required: true, message: '请输入标题' }]}><Input /></Form.Item><Form.Item label="Placeholder" name="placeholder"><Input /></Form.Item></Form>)
}export default PropComponent
QuestionTitle/PropComponent.tsx
import React, { FC } from 'react'
import { useEffect } from 'react'
import { Form, Input, Select, Checkbox } from 'antd'
import { QuestionTitlePropsType } from './interface'const PropComponent: FC<QuestionTitlePropsType> = (props: QuestionTitlePropsType
) => {const { text, level, isCenter } = propsconst [form] = Form.useForm()useEffect(() => {form.setFieldsValue({ text, level, isCenter })}, [text, level, isCenter])return (<Formlayout="vertical"initialValues={{ text, level, isCenter }}form={form}><Form.Itemlabel="标题内容"name="text"rules={[{ required: true, message: '请输入标题内容' }]}><Input /></Form.Item><Form.Item label="标题级别" name="level"><Selectoptions={[{ value: 1, label: '一级标题' },{ value: 2, label: '二级标题' },{ value: 3, label: '三级标题' },]}/></Form.Item><Form.Item name="isCenter" valuePropName="checked"><Checkbox>居中显示</Checkbox></Form.Item></Form>)
}export default PropComponent
组件属性数据同步画布
需求:
要点:
componentProp统一更新组件数据,更新方式传递给PropComponent- Redux 设计
changeComponentProps参数更新函数
思路:
- 用户选择画布组件后,传递
selectedId到Redux中 - 用户更新组件属性面板数值,会通过
onChange事件传递参数到Redux,采用changeComponentProps对画布中组件数据进行修改
Edit/componentProp.tsx
import React, { FC } from 'react'
import useGetComponentInfo from '../../../hooks/useGetComponentInfo'
import {getComponentConfByType,ComponentPropsType,
} from '../../../component/QuestionComponents'
import { useDispatch } from 'react-redux'
import { changeComponentProps } from '../../../store/componentReducer'const NoProp = () => {return <div style={{ textAlign: 'center' }}>请先选择组件</div>
}const ComponentProp: FC = () => {const dispatch = useDispatch()const { selectedComponent } = useGetComponentInfo()if (!selectedComponent) return <NoProp />const { type, props } = selectedComponentconst componentConf = getComponentConfByType(type)if (!componentConf) return <NoProp />const { PropComponent } = componentConf// 组件参数更新:传递组件参数到 Redux 进行更新function changeProps(newProps: ComponentPropsType) {if (!selectedComponent) returndispatch(changeComponentProps({ fe_id: selectedComponent.fe_id, newProps }))}return <PropComponent {...props} onChange={changeProps} />
}
export default ComponentProp
store/componentReducer/index.tsx
import { createSlice, PayloadAction } from '@reduxjs/toolkit'
import { ComponentPropsType } from '../../component/QuestionComponents'......
export const componentsSlice = createSlice({name: 'component',initialState: INIT_STATE,reducers: {......changeComponentProps: (draft: ComponentsStateType,action: PayloadAction<{ fe_id: string; newProps: ComponentPropsType }>) => {const { fe_id, newProps } = action.payloadconst component = draft.componentList.find(c => c.fe_id === fe_id)if (component) {component.props = {...component.props,...newProps,}}},},
})export const {resetComponentList,changeSelectedId,addComponent,changeComponentProps,
} = componentsSlice.actions
export default componentsSlice.reducer
相关文章:
React低代码项目:问卷编辑器 I
问卷编辑器 Date: February 20, 2025 4:17 PM (GMT8) 目标 完成问卷编辑器的设计和开发完成复杂系统的 UI 组件拆分完成复杂系统的数据结构设计 内容 需求分析技术方案设计开发 注意事项: 需求指导设计,设计指导开发。前两步很重要页面复杂的话&…...

信刻光盘安全隔离与信息交换系统让“数据摆渡”安全高效
随着数据传输、存储及信息技术的飞速发展,信息安全保护已成为重中之重。各安全领域对跨网数据交互的需求日益迫切,数据传输的安全可靠性成为不可忽视的关键。为满足业务需求并遵守保密规范,针对于涉及重要秘密信息,需做到安全的物…...

使用Python自动生成图文并茂的网页分析报告
在数据分析中,不管是市场研究还是科学分析,经常需要使用Python进行数据分析并生成图表报告。一般使用Python生成和展示图表时都是使用matplotlib 库生成静态图片文件,这种方式不便之处是不方便跟动态文字段落结合在一起,也不方便分…...
—— 网络请求与数据交互)
uniapp 系统学习,从入门到实战(七)—— 网络请求与数据交互
全篇大概 3600 字(含代码),建议阅读时间 25min 📚 目录 使用uni.request发起请求封装全局请求工具破解跨域难题总结 在跨平台应用开发中,网络请求是连接前端与后端服务的核心环节。UniApp 提供了 uni.request 方法处理网络请求,但…...

【项目管理】基于 C 语言的 QQ 聊天室实现(TCP + 多线程 + SQLite3)
基于 C 语言的 QQ 聊天室(TCP + 多线程 + SQLite3) 项目功能基础功能: 登录、注册、添加好友、私聊、创建群聊、群聊扩展功能: 删除好友、注销账号、好友在线状态、群管理(拉人/踢人)、VIP 特权、邮件通知等 功能介绍:模拟QQ聊天客户端:登录界面:1、登录2、注册 //将用…...

力扣27.移除元素(双指针)
题目看起来很乱,实际上意思是:把数组中值不等于val的元素放在下标为0,1,2,3......,并且返回数组中值不等于val的元素的个数 方法一:直接判断覆盖 class Solution { public:int removeElement(vector<int>& nums, int…...

VADv2: 基于矢量表征和概率规划的E2E架构
1. 写在前面 今天分享一篇自动驾驶领域的论文VADv2(End-to-End Vectorized Autonomous Driving via Probabilistic Planning), 基于矢量表征和概率规划的E2E架构,2024年2月份华中科技大和地平线合作的一篇文章, 在经典的端到端模型架构上作出了基于概率规划去输出规划轨迹的…...

机器学习:强化学习的epsilon贪心算法
强化学习(Reinforcement Learning, RL)是一种机器学习方法,旨在通过与环境交互,使智能体(Agent)学习如何采取最优行动,以最大化某种累积奖励。它与监督学习和无监督学习不同,强调试错…...
创建Jwt工具类)
授权与认证之jwt(一)创建Jwt工具类
JWT的Token要经过加密才能返回给客户端,包括客户端上传的Tokn,后端项目需要验证核 实。于是我们需要一个WT工具类,用来加密Token和验证Token的有效性。 一、导入依赖 <dependency><groupId>com.auth0</groupId><artifactId>jav…...

计算机毕业设计SpringBoot+Vue.js基于JAVA语言的在线考试与学习交流网页平台(源码+文档+PPT+讲解)
温馨提示:文末有 CSDN 平台官方提供的学长联系方式的名片! 温馨提示:文末有 CSDN 平台官方提供的学长联系方式的名片! 温馨提示:文末有 CSDN 平台官方提供的学长联系方式的名片! 作者简介:Java领…...

Difyにboto3を変更したカスタムDockerイメージの構築手順
Difyにboto3を変更したカスタムDockerイメージの構築手順 はじめに1. Dockerfileの作成2. Dockerイメージのビルド3. docker-compose.yamlの更新変更点: 4. コンテナの再起動注意事項まとめ はじめに DifyのDockerイメージに特定バージョンのboto3を変更する手順を…...

uniapp 中引入使用uView UI
文章目录 一、前言:选择 uView UI的原因二、完整引入步骤1. 安装 uView UI2. 配置全局样式变量(关键!)3. 在 pages.json中添加:4. 全局注册组件5. 直接使用组件 五、自定义主题色(秒换皮肤) 一、…...

数据图表ScottPlot.WPF用法示例
目录 一、添加 NuGet 程序包(5.0.47) 二、MainWindow.xaml中添加引用 三、MainWindow.xaml.cs 具体使用代码 图表示例: 一、添加 NuGet 程序包(5.0.47) 二、MainWindow.xaml中添加引用 <Window x:Class"…...

js加密之延伸requestAnimationFrame
简言 上篇文章有提到requestAnimationFrame,只是随笔带过。这篇文章就着重研究一下requestAnimationFrame的运用,以及实际作用。还有关于在js加密技术中的落地实现可行性。 功能说明 小声说一下,做开发的同学一定要学会翻官方文档,我这里直接引用一段官方介绍。 …...

系统架构设计师—计算机基础篇—存储管理
文章目录 基本概念地址重定位 存储管理方案分区存储管理分页存储管理做题的方法地址重定位淘汰页号 分段存储管理段页式存储管理虚拟存储管理 基本概念 地址重定位 地址重定位是指将程序中的虚拟地址(逻辑地址)变换称内存的真实地址(物理地…...

【第二十五周】:DeepPose:通过深度神经网络实现人体姿态估计
DeepPose 摘要Abstract文章信息引言DeepPose归一化网络结构初始网络(粗略估计所有关节点位置)精细化级联网络(分别修正每个关节点的位置) 疑问与解决代码实践总结 摘要 这篇博客介绍了DeepPose,这是首个基于深度神经网…...

SVN 简介
SVN 简介 引言 版本控制系统(Version Control System,VCS)是软件开发过程中不可或缺的工具之一。它能够帮助开发者管理代码的版本,追踪代码变更,协同工作,以及确保代码的稳定性和安全性。Subversion(简称SVN)是一种流行的版本控制系统,本文将为您详细介绍SVN的基本概…...

ARM Linux LCD上实时预览摄像头画面
文章目录 1、前言2、环境介绍3、步骤4、应用程序编写4.1、lcd初始化4.2、摄像头初始化4.3、jpeg解码4.4、开启摄像头4.5、完整的程序如下 5、测试5.1、编译应用程序5.2、运行应用程序 6、总结 1、前言 本次应用程序主要针对支持MJPEG格式输出的UVC摄像头。 2、环境介绍 rk35…...

基于DeepSeek 的图生文最新算法 VLM-R1
目录 一、算法介绍 二 算法部署 三 模型下载 四 算法测试 五 可视化脚本 一、算法介绍 VLM-R1:稳定且可通用的 R1 风格大型视觉语言模型 自从 Deepseek-R1 推出以来,出现了许多专注于复制和改进它的作品。在这个项目中,我们提出了 VLM-R1,一种稳定且可通用的 R1 风格…...

《论软件测试中缺陷管理及其应用》审题技巧 - 系统架构设计师
论软件测试中缺陷管理及其应用写作框架 一、考点概述 本论题“论软件测试中缺陷管理及其应用”主要考查的是软件测试领域中的缺陷管理相关知识与实践应用。论题涵盖了以下几个核心内容: 首先,需要理解软件缺陷的基本概念,即软件中存在的破坏正常运行能力的问题、错误或隐…...

MacOS本地部署Deepseek,不联网也可以使用AI,保护隐私
苹果笔记本本地部署deepseek主要用到Ollama与open-webui 1. 安装Ollama “Ollama” 是一个轻量级的 AI 模型运行时环境(runtime),旨在简化在本地部署和使用大语言模型(LLM)的过程。它由 Vicarious 公司开发ÿ…...

python爬虫:pyspider的详细使用
文章目录 一、pyspider介绍1.1 核心概念1.2 与其他爬虫框架的比较二、 安装 pyspider三、编写爬虫脚本四、运行和监控爬虫4.1 启动爬虫4.2 监控任务状态4.3 任务管理五、高级功能5.1 分布式爬取5.2 JavaScript 渲染5.3 数据存储5.4 定时任务5.5 错误处理和重试机制六、示例:采…...

3-5 WPS JS宏 工作表的移动与复制学习笔记
************************************************************************************************************** 点击进入 -我要自学网-国内领先的专业视频教程学习网站 *******************************************************************************************…...

Sqlserver安全篇之_启用TLS即配置SQL Server 数据库引擎以加密连接
官方文档 https://learn.microsoft.com/zh-cn/sql/database-engine/configure-windows/configure-sql-server-encryption?viewsql-server-ver16 https://learn.microsoft.com/zh-cn/sql/database-engine/configure-windows/manage-certificates?viewsql-server-ver15&pre…...

删除变慢问题
问题: 有一个场景,每天都会删除数据,SQL为delete from xxx where record_date < DATE_SUB(now(), INTERVAL ? DAY) limit 1000 ,一直循环执行,当执行到最后一次满足条件的时候,就会很慢 原理分析 索引与…...

创建一个MCP服务器,并在Cline中使用,增强自定义功能。
MCP介绍 MCP 是一个开放协议,它标准化了应用程序如何向LLMs提供上下文。可以将 MCP 视为 AI 应用程序的 USB-C 端口。正如 USB-C 提供了一种标准化的方法来将您的设备连接到各种外围设备和配件一样,MCP 提供了一种标准化的方法来将 AI 模型连接到不同的…...

游戏引擎学习第131天
仓库:https://gitee.com/mrxiao_com/2d_game_3 运行游戏并识别我们的小问题 今天的工作重点是对游戏引擎进行架构优化,特别是针对渲染和多线程的部分。目前,我们的目标是让地面块在独立线程上进行渲染,以提高性能。在此过程中,我…...

人大金仓国产数据库与PostgreSQL
一、简介 在前面项目中,我们使用若依前后端分离整合人大金仓,在后续开发过程中,我们经常因为各种”不适配“问题,但可以感觉得到大部分问题,将人大金仓视为postgreSQL就能去解决大部分问题。据了解,Kingba…...

《认知·策略·跃迁:新能源汽车工程师的深度学习系统构建指南》
--- ## 前言:为什么传统学习法正在杀死你的竞争力? 在新能源汽车领域,我们正经历着每18个月知识体系更新迭代的指数级变革。当磷酸铁锂电池能量密度刚突破200Wh/kg时,固态电池已进入量产倒计时;当自动驾驶还在L2级徘…...

存贮论模型案例与Matlab实现
摘要:本文结合存贮论确定性模型,详细解析经济订购批量(EOQ)、允许缺货生产批量等核心模型,并通过商品库存管理、生产计划等实际案例,配合Matlab代码实现,展示模型求解过程。涵盖公式推导、参数优…...