【gradio】从零搭建知识库问答系统-Gradio+Ollama+Qwen2.5实现全流程
从零搭建大模型问答系统-Gradio+Ollama+Qwen2.5实现全流程(一)
- 前言
- 一、界面设计(计划)
- 二、模块设计
- 1.登录模块
- 2.注册模块
- 3. 主界面模块
- 4. 历史记录模块
- 三、相应的接口(前后端交互)
- 四、实现前端界面的设计
- config.py
- History_g1.py
- Login.py
- Main.py
- Register.py
- App.py
- 五、效果展示
压抑的气氛,疲惫的身躯,干涩的眼眶,闲暇的周末~
不甘沉浸在打瓦与go学长的对抗较量,不愿沉迷于开麦与队友间的加密通信,
我便默默地打开电脑,选择换个活法度过周末。
前言
随着人工智能 AI 的快速发展,基于大语言模型(LLM)的应用逐渐成为软件开发中的热点。今天就学习一下如何设计和实现一个前后端交互的问答系统。在这里先进行需求分析,从以下三个角度去考虑:
技术需求 :
- 前端使用 Gradio 构建用户界面
- 后端使用 Ollama(本地化模型部署工具)
- 框架调用 Qwen2.5 大模型
- 通信协议选择RESTful API(JSON格式)
通过初始设计,我们需要从需求分析开始入手,再去系统实现,最后完成开发的整个过程。
功能需求 :
- 用户可以通过前端界面输入问题。
- 系统能够基于大模型生成准确的回答。
- 支持多轮对话。
- 提供简单的用户操作反馈(如加载状态、错误提示等)。
非功能性需求 :
- 系统响应时间控制在合理范围内。
- 界面简洁直观,用户体验友好。
通信流程图
通信流程
用户->>+前端: 输入问题
前端->>+后端: POST /api/generate
后端->>+Ollama: 模型调用请求
Ollama->>-后端: 生成响应
后端->>-前端: JSON响应
前端->>-用户: 显示回答
一、界面设计(计划)
在设计的时候将预期的功能都设计出来,之后再逐个去实现,往往设计的太简单,当后续需添加功能的时候,前端界面的布局反复修改也比较麻烦。先照葫芦画瓢,根据deepseek以及kimi等问答系统的界面进行模仿学习,修改设计。
这里登录方式分为三种 : 一种是微信扫码,手机号登录,账号密码登录。在实现过程中,暂时计划实现一种登录方式即可,完成整个项目的逻辑。
- 界面1 ,登陆界面
| 验证码登录 | 密码登录 |
————————————
这块就使用到我们前面学习到的多页面布局
还有Row 和 Column的组合拳


-
界面2 ,注册界面

-
界面3,主界面

4.历史记录界面

界面设计不用太细节有个草图模样就行,重点还是需要理解如何使用容器来布局这些设计,以及添加组件,绑定什么事件。你也可以自己设计一些更加丰富多彩的界面,有的设计在gradio中要想完美的显示,还是需要费很大的功夫(别问为什么)。
二、模块设计
预期有以下四个界面,先将每个界面写出来,再去考虑整合在一块。
1.登录模块
核心功能
发送验证码 :
用户输入手机号或邮箱后,点击“发送验证码”按钮。
前端调用后端接口 /send_verification_code 发送验证码。
如果输入格式错误(如手机号不是11位数字),前端会直接提示错误信息。
验证码登录验证 :
用户输入验证码后,点击“登录”按钮。
前端调用后端接口 /verify_code_login 验证验证码是否正确。
如果验证成功,返回“登录成功”;否则提示错误信息。
密码登录验证 :
用户输入用户名和密码后,点击“登录”按钮。
前端调用后端接口 /login 进行密码验证。
如果验证成功,返回用户ID和成功信息;否则提示错误信息。
用户注册 :
用户输入用户名和密码后,点击“注册”按钮。
前端调用后端接口 /register 提交注册信息。
如果注册成功,提示用户“注册成功,请登录”。
忘记密码 :
提示用户联系管理员重置密码。
界面设计
使用 Gradio 的 Tabs 组件实现验证码登录和密码登录的切换。
左侧为扫码登录区域,右侧为登录选项卡区域。
提供清晰的输入框、按钮和状态提示。
2.注册模块
核心功能
发送验证码 :
用户输入手机号后,点击“获取验证码”按钮。
前端调用后端接口 /send-code 发送验证码。
如果手机号格式错误或发送失败,前端会提示错误信息。
用户注册 :
用户输入手机号、验证码、用户名、密码和确认密码后,点击“立即注册”按钮。
前端调用后端接口 /register 提交注册信息。
如果注册成功,提示用户“注册成功!”;否则提示错误信息。
返回登录 :
提供“返回登录”按钮,用户可以跳转回登录界面。
界面设计
提供清晰的输入框和按钮。
实时显示状态提示(如验证码发送成功或失败)。
3. 主界面模块
核心功能
用户输入处理 :
用户输入问题后,点击“提交”按钮或按 Enter 键。
前端调用后端接口 /chat 获取模型的回答。
将用户输入和模型回答更新到聊天历史记录中。
新建对话 :
用户点击“开启新对话”按钮。
前端调用后端接口 /save_conversation 保存当前对话记录,并清空聊天历史。
切换侧边栏 :
用户可以点击“切换侧边栏”按钮展开或收起侧边栏。
二维码窗口 :
用户点击“手机端下载”按钮,显示二维码窗口。
点击关闭按钮隐藏二维码窗口。
快捷问题 :
提供三个快捷问题按钮,用户点击后自动填充到输入框。
4. 历史记录模块
核心功能
获取历史记录 : 前端调用后端接口 /get_conversation 获取历史记录。
如果后端不可用,使用本地模拟数据。
动态更新 :
用户选择时间范围或输入搜索关键词后,前端动态更新历史记录。
返回主界面 :
提供“返回主界面”按钮,用户可以跳转回主界面。
界面设计
提供时间范围选择器和搜索框。 使用 HTML 动态生成历史记录列表。
三、相应的接口(前后端交互)
在接口设计的过程中,一定要设计好请求参数与相应参数,如果未确定好请求响应的参数,在与后端交互的时候会有很多不必要的麻烦。以下是我设计的相关参数,读者也可以自己去设计添加更多的参数以优化自己系统的功能。
接口概览表
| 模块 | 接口地址 | 请求方法 | 功能说明 | 调用位置 |
|---|---|---|---|---|
| 登录模块 | /send_verification_code | POST | 发送验证码 | 登录界面发送按钮 |
| /verify_code_login | POST | 验证码登录 | 验证码登录按钮 | |
| /login | POST | 密码登录 | 密码登录按钮 | |
| 注册界面 | /send-code | POST | 发送注册验证码 | 注册界面发送按钮 |
| /register | POST | 提交注册信息 | 注册按钮 | |
| 主界面 | /chat | POST | 处理用户提问 | 聊天消息提交 |
| /save_conversation | POST | 保存对话记录 | 新建对话按钮 | |
| 历史记录 | /get_conversation | POST | 获取历史对话 | 历史记录页面加载 |
- 登录模块
1.1 发送验证码
请求地址
/send_verification_code
请求参数
{"phone_email": "用户输入的手机号或邮箱"}
响应示例
{"message": "验证码已发送,请查收!"}
{ "detail": "错误信息(如手机号格式错误)"}
1.2 验证码登录
请求地址
/verify_code_login
请求参数
{"phone_email": "用户输入的手机号或邮箱","code": "用户输入的验证码"
}
响应示例
{"status": "success","message": "登录成功!"
}
{"status": "error","detail": "验证码错误,请重新输入!"
}
1.3 密码登录
请求地址
/login
请求参数
{"username": "用户名","password": "密码"
}
响应示例
{"status": "success","message": "登录成功!","user_id": 12345
}
{"status": "error","detail": "用户名或密码错误!"
}
- 注册模块
2.1 发送注册验证码
请求地址
/send-code
请求参数
{"phone_number": "用户输入的手机号"}
响应示例
# 成功
{ "message": "验证码已发送至 {phone_number}"}
# 失败
{"message": "发送失败:错误信息"}
2.2 提交注册
请求地址
/register
请求参数
{"username": "用户名","password": "密码"
}
响应示例
# 成功
{ "message": "注册成功!"}
# 失败
{ "message": "注册失败:错误信息"}
- 主界面
3.1 处理用户提问
请求地址
/chat
请求参数
{"user_input": "用户输入的问题","chat_history": [{"role": "user", "content": "用户输入"},{"role": "assistant", "content": "模型回答"}]
}
响应示例
# 成功
{"status": "success","response": "模型生成的回答","chat_history": [{"role": "user", "content": "用户输入"},{"role": "assistant", "content": "模型回答"}]
}
# 失败
{"status": "error","detail": "无法处理请求,请稍后再试!"
}
3.2 保存对话记录
请求地址
/save_conversation
请求参数
{"user_id": "用户ID","conversation": [{"user_input": "用户输入"},{"bot_response": "模型回答"}]
}
响应示例
# 成功
{ "message": "对话记录保存成功"}
# 失败
{"message": "保存失败:错误信息"}- 历史记录模块
4.1 获取历史对话
请求地址
/get_conversation
请求参数
{"user_id": "用户ID","time_period": "时间范围(本周/本月/本年/全部)","search_query": "搜索关键词"
}
响应示例
# 成功
{"status": "success","chat_history": [{"title": "会话标题","content": "会话内容","date": "会话日期"},...]
}
# 失败
{"status": "error","detail": "无法获取历史记录,请稍后再试!"
}
四、实现前端界面的设计
当确定好接口,设计好界面,我们就可以进行编程了。
这是文件目录:

config.py
# config.py# 后端 API 地址
BASE_URL = "http://localhost:8000"
History_g1.py
import gradio as gr
import requests
import json
from config import BASE_URLdef fetch_history(user_id, time_period="全部", search_query=""):"""从后端接口或 mock_history_data 获取历史记录。:param user_id: 用户的唯一标识:param time_period: 时间范围("本周", "本月", "本年", "全部"):param search_query: 搜索关键词:return: 历史记录数据"""try:# 构造请求数据payload = {"user_id": user_id,"time_period": time_period,"search_query": search_query,}# 发送 POST 请求到后端 APIresponse = requests.post(f"{BASE_URL}/get_conversation", json=payload)# 检查响应状态码if response.status_code == 200:# 解析后端返回的数据history_data = response.json().get("chat_history", [])# 数据适配:确保返回的是嵌套列表,每个元素是一个字典formatted_data = []for index, item in enumerate(history_data):# print(f"处理第 {index + 1} 条记录: {item}")  # 输出当前处理的记录if isinstance(item, list):  # 判断是否为嵌套列表valid_conversation = []for record in item:# print(f"  当前记录: {record}, 类型: {type(record)}")  # 输出当前记录及其类型# 如果记录是字符串形式的 JSON,尝试解析为 Python 对象if isinstance(record, str) and (record.startswith("[") or record.startswith("{")):try:record = json.loads(record.replace("'", '"'))  # 替换单引号为双引号# print(f"    成功解析字符串 JSON: {record}")except json.JSONDecodeError:# print(f"    无法解析字符串 JSON: {record}")continue# 如果解析后的对象是列表,则遍历其中的每个元素if isinstance(record, list):for sub_record in record:if isinstance(sub_record, dict):  # 判断是否为字典# print(f"      子记录字典内容: {sub_record.keys()}")  # 输出子记录字典的键if "user_input" in sub_record or "bot_response" in sub_record:# 添加默认 date 字段sub_record.setdefault("date", "未知日期")valid_conversation.append(sub_record)else:print(f"      非字典子记录: {sub_record}")elif isinstance(record, dict):  # 判断是否为字典# print(f"    字典内容: {record.keys()}")  # 输出字典的键if "user_input" in record or "bot_response" in record:# 添加默认 date 字段record.setdefault("date", "未知日期")valid_conversation.append(record)else:print(f"    非字典记录: {record}")if valid_conversation:  # 只保留有效的对话记录formatted_data.append(valid_conversation)else:print(f"非嵌套列表记录: {item}")print(f"后端返回的原始数据: {history_data}")print(f"格式化后的数据: {formatted_data}")return formatted_dataelse:print(f"后端错误: {response.status_code}")raise Exception("后端返回错误状态码")except Exception as e:# 如果后端调用失败,回退到本地模拟数据print(f"调用后端接口失败: {str(e)}")def update_history(user_id, time_period="全部", search_query=""):"""根据时间范围和搜索关键词动态更新历史记录。:param user_id: 用户的唯一标识:param time_period: 时间范围("本周", "本月", "本年", "全部"):param search_query: 搜索关键词:return: 历史记录 HTML 内容"""# 获取所有历史记录all_conversations = fetch_history(user_id, time_period, search_query)# 构造 HTML 输出内容if not all_conversations:return "<div style='color: gray;'>暂无历史记录</div>"html_content = []for conversation in all_conversations:# 第一条提问作为超链接标题first_user_input = conversation[0].get("user_input", "无标题")first_date = conversation[0].get("date", "未知日期")# 超链接部分html_content.append(f'''<div style="display: flex; justify-content: space-between; align-items: center; margin-bottom: 20px;"><button style="background: none; border: none; color: blue; text-decoration: underline; cursor: pointer;" onclick="handleButtonClick('{first_user_input}')">{first_user_input}</button><span style="margin-left: 10px; color: gray;">{first_date}</span></div>''')return "\n".join(html_content)def show_conversation_details(conversation_title, user_id, time_period="全部", search_query=""):"""根据超链接标题显示对应对话的详细信息。:param conversation_title: 对话标题(第一条提问的内容):param user_id: 用户的唯一标识:param time_period: 时间范围("本周", "本月", "本年", "全部"):param search_query: 搜索关键词:return: 对话详细信息的 HTML 内容"""# 获取所有历史记录all_conversations = fetch_history(user_id, time_period, search_query)# 找到对应标题的对话for conversation in all_conversations:if conversation[0].get("user_input") == conversation_title:html_content = []for record in conversation:if "user_input" in record:content = f"用户提问: {record['user_input']}"elif "bot_response" in record:content = f"机器人回复: {record['bot_response']}"html_content.append(f'<div style="margin-left: 20px;">{content} <span style="margin-left: 10px; color: gray;">{record["date"]}</span></div>')return "<br>".join(html_content)return "<div style='color: gray;'>未找到相关对话</div>"def history_interface(user_id_state):"""历史记录界面的封装函数"""with gr.Column() as history_content:gr.Markdown("# 历史会话")with gr.Row(elem_classes="highlight-border"):# 添加返回按钮back_to_main_btn = gr.Button("返回主界面", elem_classes="send-btn4", elem_id="back-to-main-btn")change_btn = gr.Button("刷新", elem_classes="send-btn4", elem_id="change_btn")# 时间范围选择器with gr.Row(elem_classes="highlight-border"):time_period_dropdown = gr.Dropdown(choices=["本周", "本月", "本年", "全部"],label="选择时间范围",value="全部")# 搜索框with gr.Row(elem_classes="highlight-border"):search_box = gr.Textbox(label="搜索历史会话", placeholder="输入关键词搜索")# 历史记录展示区域with gr.Group(elem_classes="highlight-border"):history_output = gr.HTML()# # 隐藏的 Textbox 用于触发事件# click_event_trigger = gr.Textbox(visible=False)# 刷新按钮事件change_btn.click(fn=update_history,inputs=[user_id_state, time_period_dropdown, search_box],outputs=[history_output])# 动态生成按钮并绑定事件def on_link_click(link_text):detailed_info = show_conversation_details(link_text, user_id_state.value, "全部", "")return detailed_info# 获取历史记录并动态生成按钮all_conversations = fetch_history(user_id_state.value, "全部", "")buttons = []for conversation in all_conversations:first_user_input = conversation[0].get("user_input", "无标题")button = gr.Button(first_user_input, elem_classes="history-button",style="background: none; border: none; color: blue; text-decoration: underline; cursor: pointer;")button.click(fn=on_link_click,inputs=[gr.State(first_user_input)],  # 使用 State 传递按钮的文本outputs=[history_output])buttons.append(button)return history_content, back_to_main_btn, change_btn, history_output, search_box, time_period_dropdown
Login.py
import gradio as gr
import requests
from config import BASE_URL
import global_vars# 后端 API 地址# 发送验证码
def send_verification_code(phone_email):"""发送验证码到后端"""if len(phone_email) != 11 or not phone_email.isdigit():return "手机号格式错误,请输入11位数字!"url = f"{BASE_URL}/send_verification_code"response = requests.post(url, json={"phone_email": phone_email})if response.status_code == 200:return response.json().get("message", "验证码已发送,请查收!")else:return response.json().get("detail", "没链接呢")# 验证码登录验证
def login_with_code(phone_email, code):"""验证码登录验证"""url = f"{BASE_URL}/verify_code_login"response = requests.post(url, json={"phone_email": phone_email, "code": code})if response.status_code == 200:return "登录成功!"else:return response.json().get("detail", "验证码错误,请重新输入!")
# 密码登录验证
'''
返回结果:
{"status": "success","message": "登录成功!","user_id": 12345
}
{"status": "error","detail": "用户名或密码错误!"
}
'''
def login_handler(username, password):"""密码登录验证的前端逻辑"""if not username or not password:return "用户名和密码不能为空!", False  # 返回错误信息和跳转标志# 打印调试信息(可选)print(f"正在验证:用户名={username}, 密码={password[:4]}")# 调用后端接口进行验证url = f"{BASE_URL}/login"response = requests.post(url, json={"username": username, "password": password})if response.status_code == 200:data = response.json()if data.get("status") == "success":user_id = data.get("user_id", "")global_vars.user_id_state = usernamereturn "登录成功!", True  # 返回成功信息和跳转标志else:return data.get("detail", "登录失败!"), False  # 返回错误信息和跳转标志else:return response.json().get("detail", "服务器错误!"), False  # 返回错误信息和跳转标志# 用户注册
def register_handler(username, password):"""用户注册的前端逻辑"""if not username or not password:return "用户名和密码不能为空!"# 打印调试信息(可选)print(f"正在注册:用户名={username}, 密码={password[:4]}****")# 调用后端接口进行注册url = f"{BASE_URL}/register"response = requests.post(url, json={"username": username, "password": password})if response.status_code == 200:return "注册成功,请登录!"else:return response.json().get("detail", "注册失败!")def forgot_password():return "请联系管理员重置密码!"def login_interface():"""登录界面的封装函数"""with gr.Column() as login_content:  # 使用 Column 而不是 Blocksgr.Markdown("# logo+名称", elem_classes="centered-containerL")with gr.Row(elem_classes="gradio-containerL"):# 左侧扫码登录区域with gr.Column(scale=1,elem_classes="highlight-border"):gr.Markdown("""<h1 style="font-size: 20px; color: #007BFF; text-align: center;">微信扫码 快速登录</h1>""")gr.Markdown("""<h1 style="font-size: 20px; color: #000000; text-align: center;">——————————————</h1>""")image = gr.Image("WX.jpg", elem_id="custom-image", height=300)# 验证码登录选项卡with gr.TabItem("验证码登录",elem_classes="highlight-border"):phone_email = gr.Textbox(label="手机号/邮箱",placeholder="请输入手机号或邮箱",info="区分大小写,不含空格",elem_classes="input-field",)code = gr.Textbox(show_label=False,placeholder="输入验证码",)send_btn = gr.Button("发送验证码",elem_classes="send-btnL",)send_status = gr.Markdown(value="", elem_classes="status-text")login_code_button = gr.Button("登录", variant="primary", elem_id="login-confirm-btn")login_result = gr.Textbox(label="操作结果", interactive=False)# 密码登录选项卡with gr.TabItem("密码登录",elem_classes="highlight-border"):username = gr.Textbox(show_label=False,placeholder="用户名",info="区分大小写,不含空格",elem_classes="input-field",)password = gr.Textbox(show_label=False,type="password",placeholder="输入密码",)forgot_btn = gr.Button("忘记密码?")login_pwd_button = gr.Button("登录", variant="primary", elem_id="login-confirm-btn")register_button = gr.Button("注册",  elem_id="register-btn")login_result = gr.Textbox(label="操作结果", interactive=False) # interactive=False 无法编辑should_redirect = gr.State(False)send_btn.click(send_verification_code,inputs=[phone_email],outputs=[send_status])login_code_button.click(login_with_code,inputs=[phone_email, code],outputs=[login_result])# 绑定登录按钮事件login_pwd_button.click(login_handler,inputs=[username, password],outputs=[login_result, should_redirect])forgot_btn.click(forgot_password,inputs=[],outputs=[login_result])register_button.click(register_handler,inputs=[username, password],outputs=[login_result])return login_content, register_button, login_code_button, login_pwd_button,should_redirect,login_result,username
Main.py
import gradio as gr
import requestsfrom global_vars import user_id_state
from config import BASE_URL
from copy import deepcopy'''
后端返回的类型:正确{"status": "success","response": "你好!有什么可以帮您的吗?","chat_history": [{"role": "user", "content": "你好"},{"role": "assistant", "content": "你好!有什么可以帮您的吗?"}{"role": "user", "content": "你好"},{"role": "assistant", "content": "你好!有什么可以帮您的吗?"}]
错误:{"status": "error","detail": "无法处理请求,请稍后再试!"}
'''#之前的
# def process_user_input(user_input, chat_history):
#     """处理用户输入并更新聊天记录。"""
#     try:
#         #chat_history 发送格式 List[Dict[str, str]]
#         formatted_chat_history = chat_history if isinstance(chat_history, list) else []
#         formatted_chat_history.append({"role": "user", "content": user_input})
#
#         # 构造请求数据
#         payload = {
#             "user_input": user_input,
#             "chat_history": formatted_chat_history  # 发送 JSON 格式正确的 chat_history
#         }
#         # 发送 POST 请求到后端 API
#         response = requests.post(f"{BASE_URL}/chat", json=payload)
#
#         # 检查响应状态码
#         if response.status_code == 200:
#             data = response.json()
#             if data.get("status") == "success":
#                 bot_response = data.get("response", "后端未返回有效数据")
#                 #返回 Gradio Chatbot 需要 List[Dict[str, str]]
#                 chat_history.append({"role": "assistant", "content": bot_response})
#             else:
#                 error_message = data.get("detail", "后端返回无效数据")
#                 chat_history.append({"role": "assistant", "content": error_message})
#         else:
#             error_message = f"后端错误: {response.status_code}"
#             chat_history.append({"role": "assistant", "content": error_message})
#     except Exception as e:
#         error_message = f"通信失败: {str(e)}"
#         chat_history.append({"role": "assistant", "content": error_message})
#
#     return "", chat_historydef process_user_input(user_input, chat_history):"""处理用户输入并更新聊天记录。"""try:# 构造请求数据payload = {"user_input": user_input,"chat_history": chat_history  # 发送 JSON 格式正确的 chat_history}# 发送 POST 请求到后端 APIresponse = requests.post(f"{BASE_URL}/chat", json=payload)# 检查响应状态码if response.status_code == 200:data = response.json()if data.get("status") == "success":bot_response = data.get("response", "后端未返回有效数据")chat_history.append({"role": "assistant", "content": bot_response})else:error_message = data.get("detail", "后端返回无效数据")chat_history.append({"role": "assistant", "content": error_message})else:error_message = f"后端错误: {response.status_code}"chat_history.append({"role": "assistant", "content": error_message})except Exception as e:error_message = f"通信失败: {str(e)}"chat_history.append({"role": "assistant", "content": error_message})return "", chat_historydef toggle_sidebar(expand):"""切换侧边栏处理"""if expand:return gr.update(visible=True), gr.update(visible=False)else:return gr.update(visible=False), gr.update(visible=True)def toggle_qrcode(show_qrcode):"""显示或隐藏二维码窗口。"""return gr.update(visible=show_qrcode)def fill_input(text, user_input):return textdef update_and_scroll(user_input, chat_history):"""更新聊天记录并模拟滚动到底部"""# Step 1: 立即更新用户输入到聊天记录中if not chat_history:chat_history = []chat_history.append({"role": "user", "content": user_input})# 返回清空的输入框和更新后的聊天记录(显示用户输入)yield "", chat_history# Step 2: 异步处理后端请求_, updated_chat_history = process_user_input(user_input, chat_history)# 返回最终结果(包含后端响应)yield "", updated_chat_history# def update_and_scroll(user_input, chat_history):
#
#     # Step 1: 立即更新用户输入到聊天记录中
#     if not chat_history:
#         chat_history = []
#     chat_history.append({"role": "user", "content": user_input})
#
#     # 返回清空的输入框和更新后的聊天记录(显示用户输入)
#     yield "", deepcopy(chat_history)
#
#     # Step 2: 异步处理后端请求
#     _, updated_chat_history = process_user_input(user_input, deepcopy(chat_history))
#
#     # 返回最终结果(包含后端响应)
#     yield "", deepcopy(updated_chat_history)#调用后端
def save_and_clear_conversation(chat_history,user_id_state):"""新建对话功能事件1.保存当前对话记录到后端,并清空聊天记录。:param chat_history: 当前的聊天记录(List[Dict[str, str]] 格式):param user_id_state: 用户 ID(用于标识用户):return: 清空后的聊天记录"""try:# 将 chat_history 转换为后端所需的格式formatted_conversation = []for entry in chat_history:role = entry.get("role", "")content = entry.get("content", "")if role == "user":formatted_conversation.append({"user_input": content})elif role == "assistant":formatted_conversation.append({"bot_response": content})# 构造请求数据payload = {"user_id": user_id_state,"conversation": formatted_conversation}# 发送 POST 请求到后端 APIresponse = requests.post(f"{BASE_URL}/save_conversation", json=payload)# 检查响应状态码if response.status_code == 200:print("对话记录保存成功")else:print(f"后端错误: {response.status_code}")except Exception as e:print(f"通信失败: {str(e)}")# 清空聊天记录return []# # 定义全局变量用于存储聊天记录状态
# chat_history_state = gr.State([])
def main_interface(user_id_state):"""主界面的封装函数"""with gr.Column() as register_content:# 插入自定义 CSSgr.HTML("""<style>.custom-button {width:50px;height: 40px;font-size: 14px;}/* 自定义 Chatbot 样式 */.chatbot-wrap {max-height: 1000px; /* 设置最大高度 */overflow-y: auto; /* 启用垂直滚动条 */border: 1px solid #ccc; /* 添加边框 */padding: 10px; /* 内边距 */border-radius: 8px; /* 圆角 */}/* 二维码窗口样式 */.qrcode-window {position: fixed; /* 固定定位 */top: 20px;right: 20px;width: 250px;background-color: white;border: 1px solid #ccc;padding: 15px;box-shadow: 0 4px 6px rgba(0, 0, 0, 0.1);z-index: 1000; /* 确保在最上层 */}.qrcode-window h3 {margin-top: 0;}.qrcode-close-btn {float: right;cursor: pointer;color: red;}</style>""")with gr.Row(elem_classes="highlight-border"):with gr.Row(elem_classes="highlight-border"):# toggle_button = gr.Button("切换侧边栏", elem_classes="send-btn2")# 添加返回按钮back_tologin_btn = gr.Button("退出", elem_classes="send-btn4", elem_id="back-to-login-btn")with gr.Column(min_width=200, scale=1, visible=True,elem_classes="highlight-border") as sidebar_expanded:# gr.Markdown("侧边栏展开")gr.Image(value="panda.jpg", elem_classes="highlight-border")new_chat_button = gr.Button("开启新对话", elem_classes="send-btn")history_btn = gr.Button("历史记录", elem_classes="send-btn")more_features_button = gr.Button("更多功能", elem_classes="send-btn")favorites_button = gr.Button("收藏对话", elem_classes="send-btn")settings_button = gr.Button("个人设置", elem_classes="send-btn")mobile_download_button = gr.Button("手机端下载", elem_classes="send-btn")desktop_download_button = gr.Button("电脑端下载", elem_classes="send-btn")with gr.Column(min_width=100, scale=1, visible=False,elem_classes="highlight-border") as sidebar_collapsed:gr.Markdown("缩小")gr.Image(value="panda.jpg" ,elem_classes="highlight-border")gr.Button("新对话", elem_classes="send-btn")# 添加跳转按钮history_button = gr.Button("查看历史记录", elem_id="history-btn")gr.Button("更多", elem_classes="send-btn")gr.Button("收藏", elem_classes="send-btn")gr.Button("设置", elem_classes="send-btn")gr.Button("手载", elem_classes="send-btn")gr.Button("电载", elem_classes="send-btn")# toggle_button.click(lambda: toggle_sidebar(True), outputs=[sidebar_expanded, sidebar_collapsed])# toggle_button.click(lambda: toggle_sidebar(False), outputs=[sidebar_expanded, sidebar_collapsed])with gr.Column(scale=4,elem_classes="highlight-border"):gr.Markdown("""<h1 style="font-size: 60px; color: #007BFF; text-align: center;">我是小希,很高兴与您交流</h1><p style="font-size: 24px; color: #333; text-align: center;">我可以帮你写代码、读文件、写作各种创意内容,请把你的任务交给我吧~</p>""")# 聊天历史记录组件chat_history = gr.Chatbot(label="聊天框", elem_classes="chatbot-wrap",type="messages")user_input = gr.Textbox(label="请输入您的问题", placeholder="宇宙超强大脑小希为您解忧消愁,摆脱一切烦恼!")with gr.Row(elem_classes="highlight-border"):# 左侧占位(可留空)gr.HTML("")gr.HTML("")gr.HTML("")gr.HTML("")gr.HTML("")submit_button = gr.Button("提交", elem_classes="send-btn3")# 创建一个隐藏的文本框用于存储问题hidden_textbox = gr.Textbox(visible=False)# 使用 gr.Row 将三个按钮放在一行展示with gr.Row(elem_classes="highlight-border"):weather_question = gr.Button("贷款流程是什么?", elem_classes="send-btn2")guide_question = gr.Button("贷款材料需要什么",elem_classes="send-btn2")click_answer = gr.Button("点击就可解答",elem_classes="send-btn2")weather_question.click(lambda: fill_input("贷款流程是什么?", hidden_textbox), outputs=hidden_textbox)guide_question.click(lambda: fill_input("贷款材料需要什么", hidden_textbox), outputs=hidden_textbox)click_answer.click(lambda: fill_input("点击就可解答", hidden_textbox), outputs=hidden_textbox)# 将隐藏文本框的内容复制到用户输入框hidden_textbox.change(lambda x: x, inputs=hidden_textbox, outputs=user_input)# 手机端下载二维码窗口(悬浮窗口)with gr.Column(visible=False, elem_classes="highlight-border") as qrcode_window:gr.Markdown("### 扫码下载")close_button = gr.Button("×", elem_classes="qrcode-close-btn")gr.Image(value="WX.jpg", label="手机端下载二维码")# 按钮绑定事件mobile_download_button.click(lambda: toggle_qrcode(True), outputs=[qrcode_window])close_button.click(lambda: toggle_qrcode(False), outputs=[qrcode_window])# desktop_download_button.click(lambda: show_page("desktop_download"), outputs=[register_content, desktop_download_page])# back_to_home_button.click(lambda: show_page("home"), outputs=[register_content, desktop_download_page])# 其他按钮事件# 在 main_interface 函数中绑定 new_chat_button 的事件new_chat_button.click(save_and_clear_conversation,inputs=[chat_history,user_id_state],outputs=[chat_history])history_button.click()history_btn.click()more_features_button.click()favorites_button.click()settings_button.click()# 将按钮和 Textbox 的 Enter 键绑定到同一个回调函数submit_button.click(update_and_scroll,inputs=[user_input, chat_history],outputs=[user_input, chat_history])# 监听 Enter 键事件user_input.submit(update_and_scroll,inputs=[user_input, chat_history],outputs=[user_input, chat_history])return register_content, history_btn, history_button, back_tologin_btn
Register.py
import gradio as gr
import requests
from config import BASE_URLdef send_verification_code(phone_number, status_text):"""调用后端发送验证码接口"""if not phone_number.isdigit() or len(phone_number) != 11:return gr.update(value="⚠️ 手机号格式不正确"), status_texttry:# 模拟调用后端发送验证码接口response = requests.post(f"{BASE_URL}/send-code",  # 使用 BACKEND_URLjson={"phone_number": phone_number})if response.status_code == 200:# 返回成功消息return gr.update(value=f"✅ 验证码已发送至 {phone_number}"), status_textelse:# 返回错误消息error_message = response.json().get("message", "未知错误")return gr.update(value=f"❌ 发送失败:{error_message}"), status_textexcept Exception as e:# 捕获网络错误return gr.update(value=f"❌ 网络错误:{str(e)}"), status_textdef register_user(phone, code, username, password, confirm_pwd, status_text):"""调用后端注册接口"""# 验证密码一致性if password != confirm_pwd:return gr.update(value="⚠️ 两次输入的密码不一致"), status_texttry:# 调用后端注册接口response = requests.post(f"{BASE_URL}/register",  # 使用 BACKEND_URLjson={# "phone_number": phone,# "code": code,"username": username,"password": password,# "confirm_password": confirm_pwd})if response.status_code == 200:# 注册成功return gr.update(value="🎉 注册成功!"), status_textelse:# 注册失败,返回错误信息error_message = response.json().get("message", "注册失败")return gr.update(value=f"❌ {error_message}"), status_textexcept Exception as e:# 捕获网络错误return gr.update(value=f"❌ 网络错误:{str(e)}"), status_textdef register_interface():"""注册界面的封装函数"""with gr.Column() as register_content:  # 移除 css 参数gr.Markdown("# 用户注册", elem_classes="centered-containerR")with gr.Column(elem_classes="gradio-containerR"):with gr.Row(elem_classes="highlight-border"):gr.Button("手机号注册", variant="secondary")with gr.Row(elem_classes="highlight-border"):username = gr.Textbox(label="用户名(必填)", placeholder="请输入用户名")with gr.Row(elem_classes="highlight-border"):phone = gr.Textbox(label="+86(中国) 手机号", placeholder="请输入手机号")password = gr.Textbox(label="密码(必填)", type="password", placeholder="请输入密码")with gr.Row(elem_classes="highlight-border"):code_input = gr.Textbox(label="短信验证码", placeholder="请输入收到的6位验证码")confirm_password = gr.Textbox(label="确认密码(必填)", type="password", placeholder="请确认密码")with gr.Row(elem_classes="highlight-border"):send_code_btn = gr.Button("获取验证码", variant="primary", elem_classes="send-btn3")with gr.Row(elem_classes="highlight-border"):gr.Markdown("已有账号,[去登录](#) 返回到初始界面", elem_classes="centered-containerR")register_btn = gr.Button("立即注册", variant="success")# 添加返回按钮back_to_login_btn = gr.Button("返回登录", elem_id="back-to-login-btn")status_text = gr.Textbox(label="状态提示",interactive=False)# # 绑定发送验证码事件# send_code_btn.click(#     send_verification_code,#     inputs=[phone, status_text],#     outputs=[status_text]# )# 绑定注册事件register_btn.click(register_user,inputs=[phone, code_input, username, password, confirm_password, status_text],outputs=[status_text])return register_content, send_code_btn, register_btn, back_to_login_btn
App.py
# 主文件,负责整合所有界面
import gradio as gr
from Login import login_interface
from Register import register_interface
from Main import main_interface
from History import history_interface,fetch_history
import global_vars'''
通用返回值设计形式:
{"status": "success/error",  // 请求状态"message": "操作成功的描述信息",  // 成功时的提示信息"data": {                   // 成功时的附加数据(可选)"token": "eyJhbGciOiJIUzI1NiIsInR5cCI6IkpXVCJ9...","user_id": 12345},"detail": "失败时的具体原因"  // 错误时的详细信息
}
'''
# 定义全局变量用于跟踪当前界面
current_page = "login"# 定义跳转逻辑
def navigate_to_register():"""从登录界面跳转到注册界面"""return gr.update(visible=False), gr.update(visible=True), gr.update(visible=False), gr.update(visible=False)def navigate_to_login():"""从注册界面跳转到登录界面"""return gr.update(visible=True), gr.update(visible=False), gr.update(visible=False), gr.update(visible=False)def navigate_to_main2():"""从登录界面跳转到主界面"""return gr.update(visible=False), gr.update(visible=False), gr.update(visible=True), gr.update(visible=False)def navigate_to_main1(login_result, should_redirect):"""根据登录结果决定是否跳转到主界面。"""if should_redirect:return gr.update(visible=False), gr.update(visible=False), gr.update(visible=True), gr.update(visible=False)else:return gr.update(), gr.update()  # 不跳转,保持当前界面def navigate_to_history():"""从主界面跳转到历史记录界面"""# print(global_vars.user_id_state)# # update_history(user_id_state)# user_id_state.value = global_vars.user_id_state# # history_content,back_to_main_btn,change_btn,history_output, search_box= history_interface(user_id_state)# # print(global_vars.user_id_state)# print(f"history_context: {history_content}")# print(f"history_output: {history_output}")# # history_context = "123456"return gr.update(visible=False), gr.update(visible=False), gr.update(visible=False), gr.update(visible=True),gr.update(value=history_output.value)def navigate_to_main_from_history():"""从历史记录界面跳转到主界面"""return gr.update(visible=False), gr.update(visible=False), gr.update(visible=True), gr.update(visible=False)def updateA_history(user_id_state):history_data = fetch_history(user_id_state)return gr.update(value=history_data)# 定义全局 CSS 样式
css = """
.gradio-containerR{    /* Register的相关 */max-width: 50%;margin: 40px auto;padding: 40px;border: 1px solid #ccc;border-radius: 8px;box-shadow: 0 2px 10px rgba(0,0,0,0.1);
}
.centered-containerR{text-align: center;
}
.input-rowR{display: flex;justify-content: space-between;margin-bottom: 16px;
}
.input-rowR > * {width: 48%;
}
.button-rowR {display: flex;justify-content: center;margin-top: 16px;
}.gradio-containerL { /*登录界面*/width: 840px; /* 固定宽度 */height: 550px; /* 固定高度 */margin: auto; /* 水平居中 */display: flex; /* 使用 Flexbox 实现内容居中 */align-items: center; /* 垂直居中 */justify-content: center; /* 水平居中 */border: 6px solid #e0e0e0; /* 外边框 */border-radius: 16px; /* 圆角 */box-shadow: 0px 4px 12px rgba(0, 0, 0, 0.1); /* 阴影效果 */background: linear-gradient(145deg, #ffffff, #f8f9fa); /* 渐变背景 */
}.verification-boxL {height: 60px; margin-bottom: 15px;}
.send-btnL {width: 100%; background: #4CAF50; color: white; border: none; padding: 12px 0;}
#custom-galleryL {background-color: #f0feee !important; border-radius: 8px;}/* 新增样式 */
.button-primary {background-color: #4CAF50 !important;color: white !important;border: none !important;padding: 10px 20px !important;font-size: 16px !important;cursor: pointer !important;
}.button-secondar {background-color: #f0f0f0 !important;color: black !important;border: none !important;padding: 10px 20px !important;font-size: 16px !important;cursor: pointer !important;
}.send-btn {width: 80%;height: 50%; /* 固定高度 */background-color: 	#F4A460; /*  */color: black; /* 白色文字 */font-size: 16px;border: none;border-radius: 5px;cursor: pointer;/* 居中对齐 */display: block; /* 块级元素:将按钮设置为块级元素,以便可以使用 margin 属性进行居中 */margin-left: 30px; /* 左外边距自动:水平方向左对齐 */margin-right: 10px; /* 右外边距自动:水平方向右对齐 */margin-top: 5px; /* 上外边距:设置按钮距离上方 10px 的间距(可选) */margin-bottom: 5px; /* 下外边距:设置按钮距离下方 10px 的间距(可选) */
}
.send-btn2 {    # width: 50px;# height: 50px; /* 较小的高度 */background-color: #8B003; /* 木色 */color: white;font-size: 18px;border: none;border-radius: 5px;cursor: pointer;/* 居中对齐 */display: block; /* 块级元素:将按钮设置为块级元素,以便可以使用 margin 属性进行居中 */margin-left: 80px; /* 左外边距自动:水平方向左对齐 */margin-right: 80px; /* 右外边距自动:水平方向右对齐 */margin-top: 5px; /* 上外边距:设置按钮距离上方 10px 的间距(可选) */margin-bottom: 5px; /* 下外边距:设置按钮距离下方 10px 的间距(可选) */}.send-btn3 {width: 50px; /* 自动宽度:按钮宽度根据内容自动调整 */height: 50px; /* 中等高度:设置按钮的固定高度为 35px */background-color:  #4CAF50; /* 蓝色背景:设置按钮的背景颜色为蓝色 (#2196F3) */color: white; /* 白色文字:设置按钮的文字颜色为白色 */font-size: 15px; /* 字体大小:设置按钮文字的字体大小为 15px */border: none; /* 无边框:移除按钮的默认边框 */border-radius: 20px; /* 圆角:设置按钮的圆角半径为 5px,使其看起来更柔和 */cursor: pointer; /* 鼠标悬停时显示手型光标:提示用户该按钮是可点击的 *//* 居中对齐 */display: block; /* 块级元素:将按钮设置为块级元素,以便可以使用 margin 属性进行居中 */margin-left: auto; /* 左外边距自动:将按钮推到右边 */margin-right: 0; /* 右外边距为 0:确保按钮紧贴容器右边 */}
.send-btn4 {width: 50px; /* 自动宽度:按钮宽度根据内容自动调整 */height: 50px; /* 中等高度:设置按钮的固定高度为 35px */background-color: #808080; /* 蓝色背景:设置按钮的背景颜色为蓝色 (#2196F3) */color: white; /* 白色文字:设置按钮的文字颜色为白色 */font-size: 15px; /* 字体大小:设置按钮文字的字体大小为 15px */border: none; /* 无边框:移除按钮的默认边框 */border-radius: 5px; /* 圆角:设置按钮的圆角半径为 5px,使其看起来更柔和 */cursor: pointer; /* 鼠标悬停时显示手型光标:提示用户该按钮是可点击的 *//* 居中对齐 */display: block; /* 块级元素:将按钮设置为块级元素,以便可以使用 margin 属性进行居中 */margin-left: 0; /* 左外边距自动:水平方向左对齐 */margin-right: 0; /* 右外边距自动:水平方向右对齐 */margin-top: 0; /* 上外边距:设置按钮距离上方 10px 的间距(可选) */margin-bottom: 0; /* 下外边距:设置按钮距离下方 10px 的间距(可选) */}.highlight-border {border: 2px solid #007BFF; /* 蓝色边框 */padding: 10px;             /* 内边距 */margin: 5px;               /* 外边距 */border-radius: 5px;        /* 圆角 */}"""# 创建主应用
with gr.Blocks(title="知识库问答系统", css=css) as demo:# 创建一个标题gr.Markdown("# 知识库问答系统")Login_state = 0# 登录界面with gr.Row(visible=True) as login_row:login_content, register_button, login_code_button, login_pwd_button ,should_redirect,login_result,username = login_interface()# 定义全局变量用于存储用户信息user_id_state = usernameprint(f"user_id_state: {global_vars.user_id_state}")# 注册界面with gr.Row(visible=False) as register_row:register_content, send_code_btn, register_btn,back_to_login_btn = register_interface()# 主界面with gr.Row(visible=False) as main_row:main_content,history_btn,history_button,back_tologin_btn= main_interface(user_id_state)# 历史记录界面with gr.Row(visible=False) as history_row:history_content,back_to_main_btn,change_btn,history_output,search_box,time_period_dropdown  = history_interface(user_id_state)from History import update_historysearch_box.change(lambda search_query, user_id: update_history(user_id, search_query),inputs=[search_box, user_id_state],outputs=[history_output])# 绑定按钮事件register_button.click(navigate_to_register,inputs=[],outputs=[login_row, register_row, main_row, history_row])back_to_login_btn.click(navigate_to_login,inputs=[],outputs=[login_row, register_row, main_row, history_row])back_tologin_btn.click(navigate_to_login,inputs=[],outputs=[login_row, register_row, main_row, history_row])# 密码登录跳转绑定login_pwd_button.click(navigate_to_main1,inputs=[login_result, should_redirect],outputs=[login_row, register_row, main_row, history_row]  # 假设 main_row 是主界面,login_row 是登录界面)# 验证码跳转绑定login_code_button.click(navigate_to_main2,inputs=[],outputs=[login_row, register_row, main_row, history_row])history_btn.click(navigate_to_history,inputs=[],outputs=[login_row, register_row, main_row, history_row, history_output]).then(fn=updateA_history,inputs=[user_id_state],outputs=[history_output])# 跳转历史记录绑定history_button.click(navigate_to_history,inputs=[],outputs=[login_row, register_row, main_row, history_row, history_output])back_to_main_btn.click(navigate_to_main_from_history,inputs=[],outputs=[login_row, register_row, main_row, history_row])# 监听时间范围选择器和搜索框的变化,动态更新历史记录def on_change(user_id, time_period, search_query):return update_history(user_id, time_period, search_query)time_period_dropdown.change(on_change,inputs=[user_id_state, time_period_dropdown, search_box],outputs=[history_output])search_box.change(on_change,inputs=[user_id_state, time_period_dropdown, search_box],outputs=[history_output])# change_btn.click(#     change_function,#     inputs=[user_id_state],#     outputs=[login_row, register_row, main_row, history_row]# )# 启动应用
demo.launch(server_name="0.0.0.0")
五、效果展示
这是前端实现完与后端进行交互之后的结果,相应的注册信息,聊天记录都是存在数据库中。
-
首先进行注册: 这里手机号功能后端暂未实现,只用输入用户名和密码。点击注册,会与后端进行交互存储用户信息,返回一个结果,前端根据返回结果进行相应的提示(注册成功!)

-
登录过程,验证码、手机登录后端暂未实现,暂时支持密码登录(输入注册的用户名和密码),系统根据信息会给一个返回值,根据结果显示状态(登陆成功!):

-
历史记录,这块是为了记录我们历史对话过程,刚注册的账号没有对话记录:

- 一轮对话:当输入问题并且有回复就说明我们与后端的交互是没有问题的,后端处理请求是基于数据库回答,在数据库中没有的情况下基于千问大模型接口来进行回答。
第一轮对话首个问题: 贷款材料需要什么

多轮对话:在第一轮对话之后,提问回答过程中的相关内容,看它是否有分析检索的能力(这部分内容是数据库中没有的)

- 验证基于数据库与大模型的回答
以下问题是数据库中的问题,看是否可以根据数据库中的内容直接回答。
这是第二次会话: 你好,银行贷款的五级分类

同样的问题,这是在千问中请求的结果,对比来看,回答的形式不同。

再查看数据库中的内容,这部分是完全直接输出给用户请求了。说明首先还是基于数据库进行回复的。

下图为再次咨询回答中某一条相关信息的具体内容的时候,他回复的在数据库中并没有,是根据学习数据库中的内容以及借助千问大模型给出的回复。

再重新进行一轮对话,我们问问数据库中没有的,第三轮对话内容:我有个数学难题不会解决,1+2等于,是可以正常输出的,此时就是调用千问接口进行回复的。

6. 查看历史会话记录
根据我们前面三次会话的第一问作为超链接显示某个会话,如图所示。

前端基本实现了,与刚开始设计的界面多少有差距,但是整体交互逻辑没问题。部分内容没有更新到位,希望这个笔记能更好的促进我们使用gradio,也期待宝子们的实践成果。
后端的内容请学习以下文章内容:
ollama+qwen2.5+nomic本地部署及通过API调用模型示例
使用FastAPI为知识库问答系统前端提供后端功能接口
相关文章:
【gradio】从零搭建知识库问答系统-Gradio+Ollama+Qwen2.5实现全流程
从零搭建大模型问答系统-GradioOllamaQwen2.5实现全流程(一) 前言一、界面设计(计划)二、模块设计1.登录模块2.注册模块3. 主界面模块4. 历史记录模块 三、相应的接口(前后端交互)四、实现前端界面的设计co…...

PowerBI,用度量值实现表格销售统计(含合计)的简单示例
假设我们有产品表 和销售表 我们想实现下面的效果 表格显示每个产品的信息,以及单个产品的总销量 有一个切片器能筛选各个门店的产品销量 还有一个卡片图显示所筛选条件下,所有产品的总销量 实现方法: 1.我们新建一个计算表,把…...

Mac 常用命令
一、文件操作(必知必会) 1. 快速导航 cd ~/Documents # 进入文档目录 cd .. # 返回上级目录 pwd # 显示当前路径 2. 文件管理 touch new_file.txt # 创建空文件 mkdir -p project/{src,docs} # 递归创建目录 cp …...

26考研——查找_树形查找_二叉排序树(BST)(7)
408答疑 文章目录 三、树形查找二叉排序树(BST)二叉排序树中结点值之间的关系二叉树形查找二叉排序树的查找过程示例 向二叉排序树中插入结点插入过程示例 构造二叉排序树的过程构造示例 二叉排序树中删除结点的操作情况一:被删除结点是叶结点…...

美摄科技开启智能汽车车内互动及娱乐解决方案2.0
在科技飞速发展的今天,汽车已不再仅仅是简单的代步工具,而是逐渐演变为集出行、娱乐、社交于一体的智能移动空间。美摄科技,作为前沿视觉技术与人工智能应用的领航者,凭借其卓越的技术实力和创新精神,携手汽车行业&…...

【行驶证识别】批量咕嘎OCR识别行驶证照片复印件图片里的文字信息保存表格或改名字,基于QT和腾讯云api_ocr的实现方式
项目背景 在许多业务场景中,如物流管理、车辆租赁、保险理赔等,常常需要处理大量的行驶证照片复印件。手动录入行驶证上的文字信息,像车主姓名、车辆型号、车牌号码等,不仅效率低下,还容易出现人为错误。借助 OCR(光学字符识别)技术,能够自动识别行驶证图片中的文字信…...

Vue-admin-template安装教程
#今天配置后台管理模板发现官方文档的镜像网站好像早失效了,自己稍稍总结了一下方法# 该项目环境需要node17及以下,如果npm install这一步报错可能是这个原因 git clone https://github.com/PanJiaChen/vue-admin-template.git cd vue-admin-template n…...

21.Excel自动化:如何使用 xlwings 进行编程
一 将Excel用作数据查看器 使用 xlwings 中的 view 函数。 1.导包 import datetime as dt import xlwings as xw import pandas as pd import numpy as np 2.view 函数 创建一个基于伪随机数的DataFrame,它有足够多的行,使得只有首尾几行会被显示。 df …...

LabVIEW FPGA与Windows平台数据滤波处理对比
LabVIEW在FPGA和Windows平台均可实现数据滤波处理,但两者的底层架构、资源限制、实时性及应用场景差异显著。FPGA侧重硬件级并行处理,适用于高实时性场景;Windows依赖软件算法,适合复杂数据处理与可视化。本文结合具体案例&#x…...

【NLP 48、大语言模型的神秘力量 —— ICL:in context learning】
目录 一、ICL的优势 1.传统做法 2.ICL做法 二、ICL的发展 三、ICL成因的两种看法 1.meta learning 2.Bayesian Inference 四、ICL要点 ① 语言模型的规模 ② 提示词prompt中提供的examples数量和顺序 ③ 提示词prompt的形式(format) 五、fine-tune VS I…...

vue 中渲染 markdown 格式的文本
文章目录 需求分析第一步:安装依赖第二步:创建 Markdown 渲染组件第三步,使用实例扩展功能1. 代码高亮:2. 自定义渲染规则:需求 渲染 markdown 格式的文本 分析 在Vue 3中实现Markdown渲染的常见方法。通常有两种方式:使用现有的Markdown解析库,或者自己编写解析器…...

工业4G路由器赋能智慧停车场高效管理
工业4G路由器作为智慧停车场管理系统通信核心,将停车场内的各个子系统连接起来,包括车牌识别系统、道闸控制系统、车位检测系统、收费系统以及监控系统等。通过4G网络,将这些系统采集到的数据传输到云端服务器或管理中心,实现信息…...
)
卡尔曼滤波入门(二)
核心思想 卡尔曼滤波的核心就是在不确定中寻找最优,那么怎么定义最优呢?答案是均方误差最小的,便是最优。 卡尔曼滤波本质上是一种动态系统状态估计器,它回答了这样一个问题: 如何从充满噪声的观测数据中,…...

企业如何平稳实现从Tableau到FineBI的信创迁移?
之前和大家分享了《如何将Tableau轻松迁移到Power BI》。但小编了解到,如今有些企业更愿意选择国产BI平台。为此,小编今天以Fine BI为例子,介绍如何从Tableau轻松、低成本地迁移到国产BI平台。 在信创政策全面推进的背景下,企业数…...

蓝桥与力扣刷题(蓝桥 蓝桥骑士)
题目:小明是蓝桥王国的骑士,他喜欢不断突破自我。 这天蓝桥国王给他安排了 N 个对手,他们的战力值分别为 a1,a2,...,an,且按顺序阻挡在小明的前方。对于这些对手小明可以选择挑战,也可以选择避战。 身为高傲的骑士&a…...
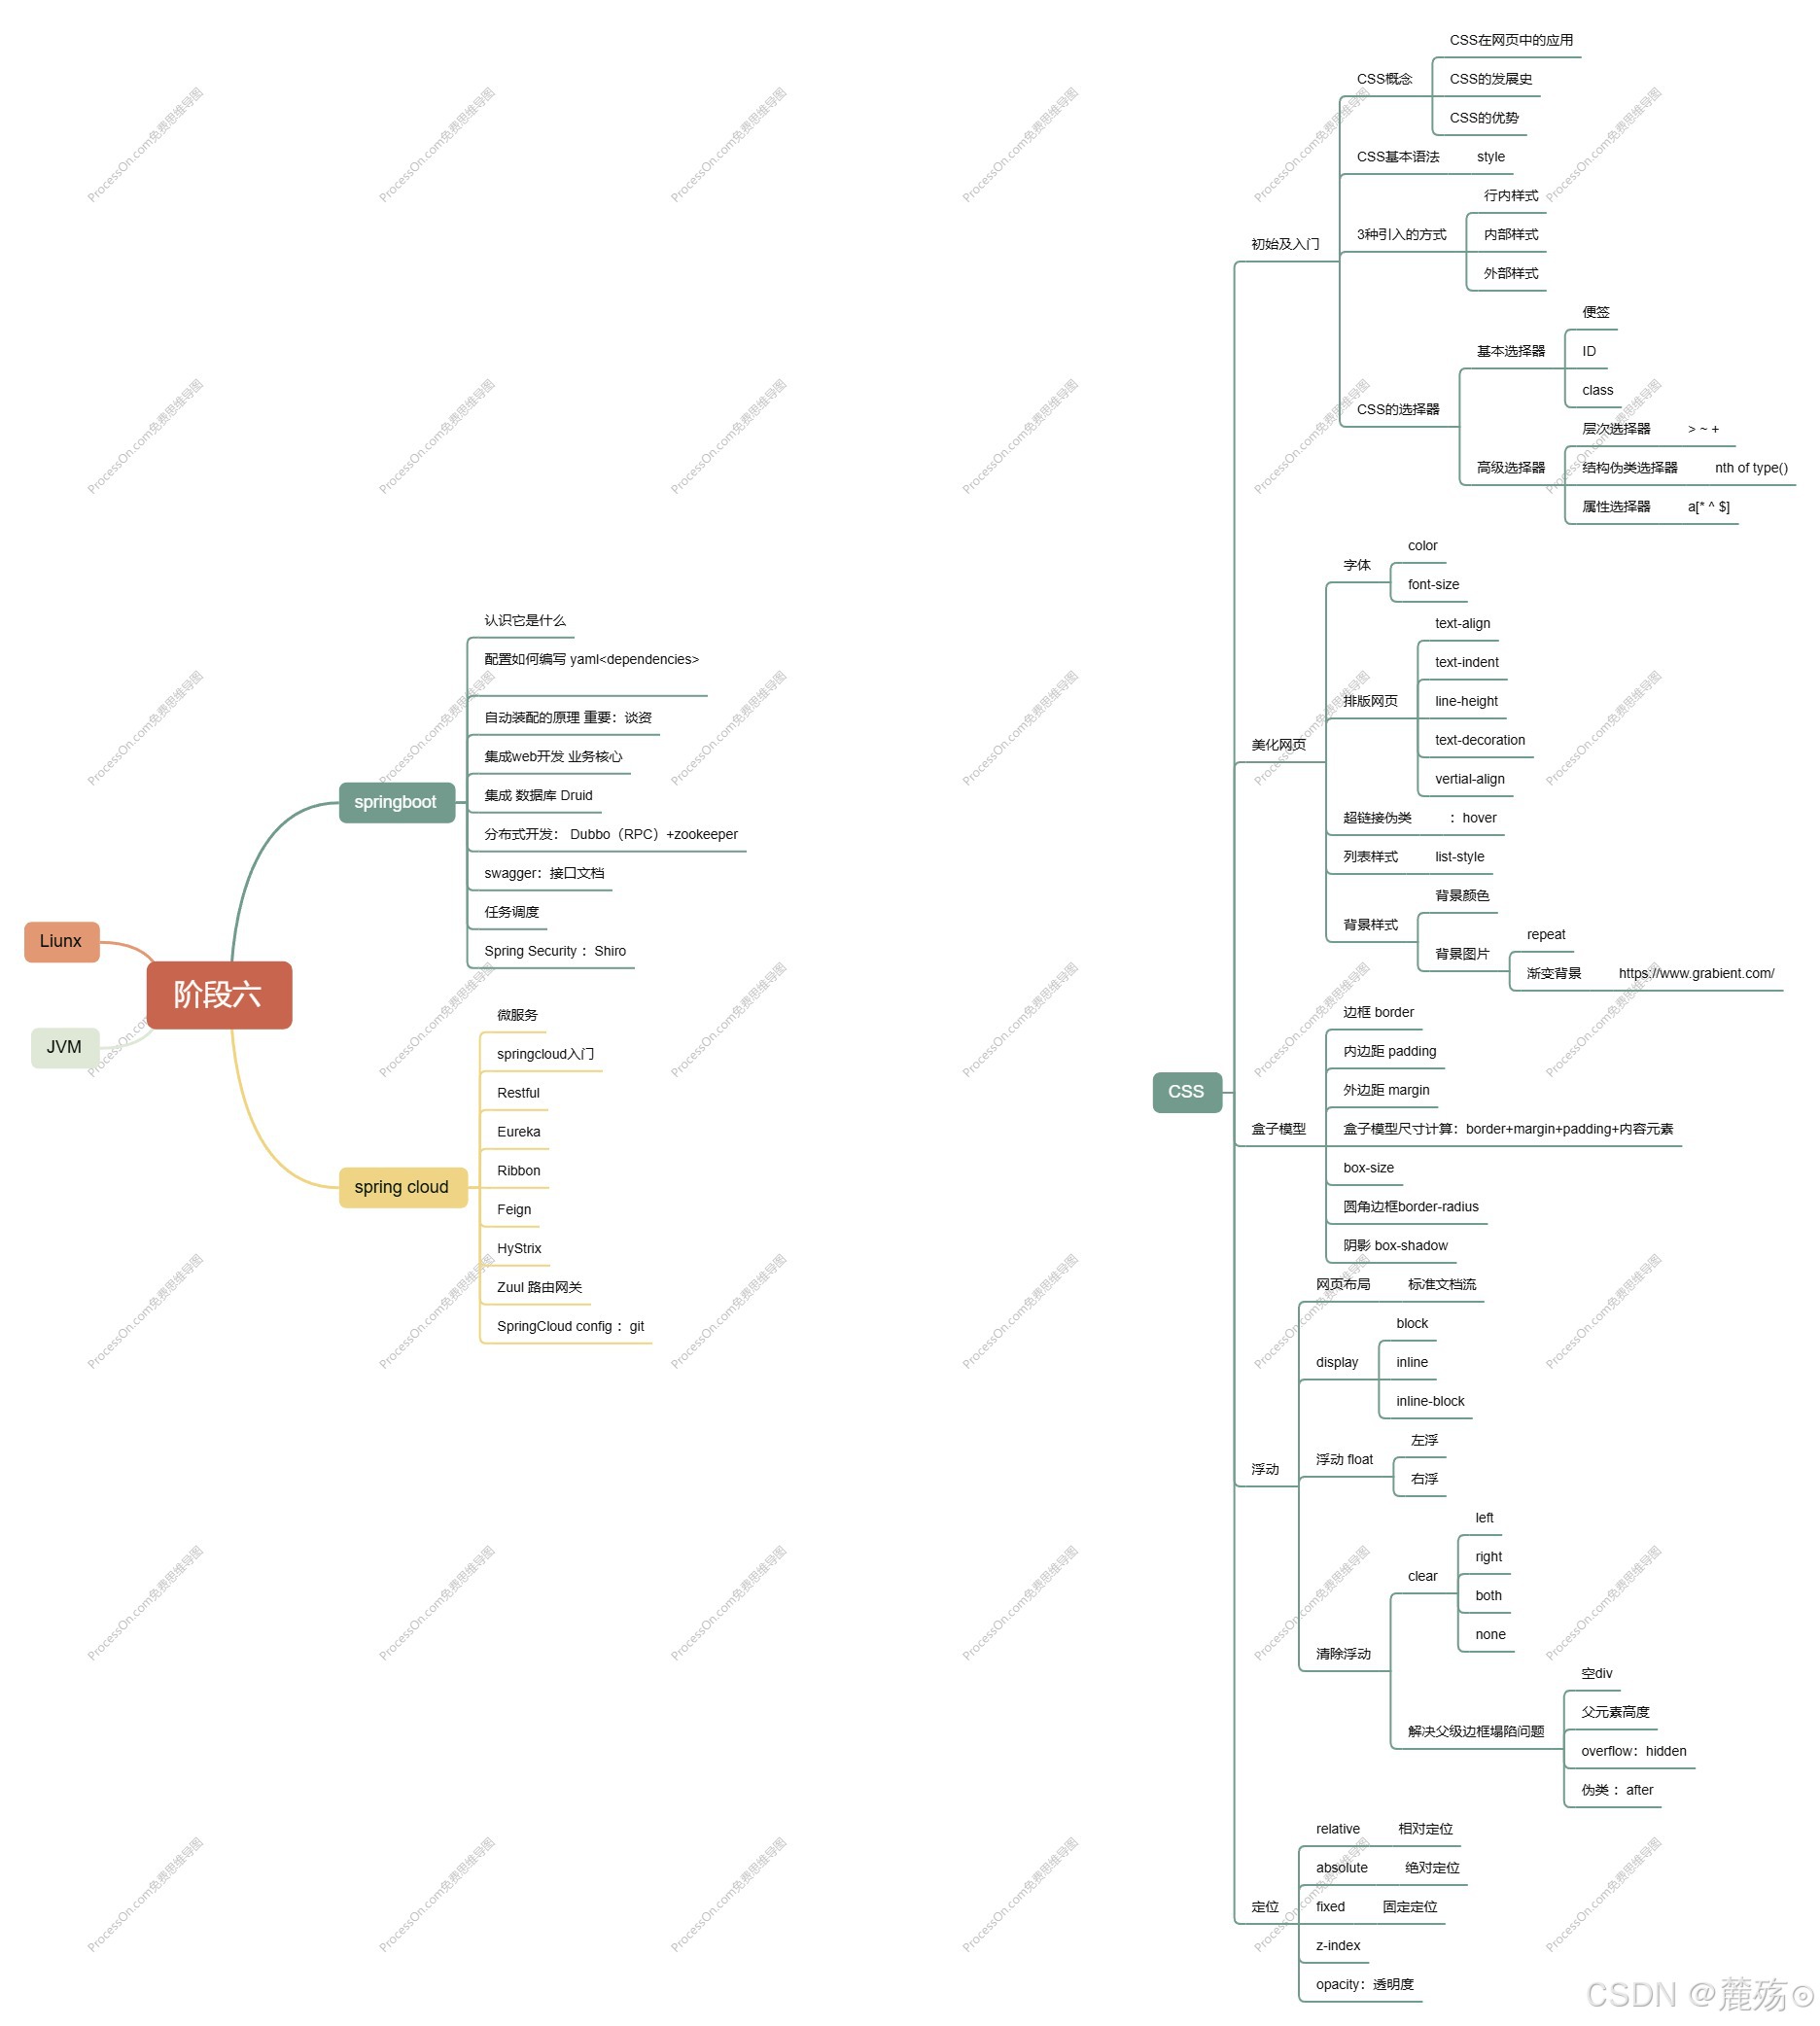
前端学习笔记--CSS
HTMLCSSJavaScript 》 结构 表现 交互 如何学习 1.CSS是什么 2.CSS怎么用? 3.CSS选择器(重点,难点) 4.美化网页(文字,阴影,超链接,列表,渐变。。。) 5…...

阶段一:Java基础语法
目标:掌握Java的基本语法,理解变量、数据类型、运算符、控制结构等。 1. Java开发环境搭建 安装JDK配置环境变量编写第一个Java程序 代码示例: // HelloWorld.java public class HelloWorld { // 定义类名为 HelloWorldpublic static vo…...

31天Python入门——第15天:日志记录
你好,我是安然无虞。 文章目录 日志记录python的日志记录模块创建日志处理程序并配置输出格式将日志内容输出到控制台将日志写入到文件 logging更简单的一种使用方式 日志记录 日志记录是一种重要的应用程序开发和维护技术, 它用于记录应用程序运行时的关键信息和…...
PyTorch张量简介)
深度学习框架PyTorch——从入门到精通(10)PyTorch张量简介
这部分是 PyTorch介绍——YouTube系列的内容,每一节都对应一个youtube视频。(可能跟之前的有一定的重复) 创建张量随机张量和种子张量形状张量数据类型 使用PyTorch张量进行数学与逻辑运算简单介绍——张量广播关于张量更多的数学操作原地修改…...

前端批量导入方式
webpack批量导入 webpack中使用 require.context 实现自动导入 const files require.context(./modules, false, /\.ts$/); const modules {}; files.keys().forEach((key) > {if (key ./index.ts) { return; }modules[key.replace(/(\.\/|\.ts)/g, )] files(key).def…...

使用ucharts写的小程序,然后让圆环中间的空白位置变大
将ringWidth属性调小 extra: { ring: { ringWidth: 20, activeOpacity: 1.5, activeRadius: 10, offsetAngle: 0, labelWidth: 15, border: true, borderWidth: 0, borderColor: #F…...

GPT-4o Image
每周跟踪AI热点新闻动向和震撼发展 想要探索生成式人工智能的前沿进展吗?订阅我们的简报,深入解析最新的技术突破、实际应用案例和未来的趋势。与全球数同行一同,从行业内部的深度分析和实用指南中受益。不要错过这个机会,成为AI领…...

SpringMVC请求与响应深度解析:从核心原理到高级实践
一、SpringMVC架构与核心组件剖析 SpringMVC是基于Java的MVC设计模型实现的轻量级Web框架,其核心架构围绕前端控制器模式构建。以下是核心组件及其作用: DispatcherServlet 作为前端控制器,所有请求首先到达此处。它负责请求分发、协调组件协…...

大模型量化框架GPTQModel的基本使用方法
接上一篇博客:AutoGPTQ报torch._C._LinAlgError: linalg.cholesky: The factorization could not be completed的解决办法-CSDN博客 如果Llama factory量化一直报错,可以改用其他的量化框架,例如GPTQ:https://github.com/ModelCl…...

C++:函数(通识版)
一、函数的基础 1.什么是函数?(独立的功能单位) 函数是C中封装代码逻辑的基本单元,用于执行特定任务。 作用:代码复用、模块化、提高可读性。 2、函数的基本结构 返回类型 函数名(参数列表) {// 函数体return 返回值…...

Spring AI相关的面试题
以下是150道Spring AI相关的面试题目及答案: ### Spring AI基础概念类 **1. 什么是Spring AI?** Spring AI是Spring框架的扩展,旨在简化人工智能模型在Java应用中的集成与使用,提供与Spring生态无缝衔接的工具和抽象,…...

无线安灯按钮盒汽车零部件工厂的故障告警与人员调度专家
在汽车零部件制造领域,生产线故障与物料短缺等问题往往引发连锁反应,导致停机损失与成本激增。传统人工巡检与纸质工单模式已难以满足高效生产需求,而无线安灯按钮盒的智能化应用,正成为破解这一难题的关键利器。 一、精准告警&am…...

登录接口带验证码自动化(tesseract-OCR)
登录接口是很多网站和应用程序中必不可少的一部分。为了增加安全性,很多登录接口还会加入验证码的验证步骤,以防止恶意登录行为。 通常,遇到这样情况时有以下解决办法 1、使用万能验证码:如果遇到前台输入的是万能验证码…...

【Python】pillow库学习笔记2-ImageFilter类和ImageEnhance类
PIL库的ImageFilter类和ImageEnhance类提供了过滤图像和增强图像的方法。 3.ImageFilter类 ImageFilter类共提供10种预定义图像过滤方法: 方法表示描述ImageFilter.BLUR图像的模糊效果ImageFilter.CONTOUR图像的轮廓效果ImageFilter.DETAIL图像的细节效果ImageFi…...

3.Matplotlib:绘图参数文件和绘图的主要函数
一 绘图参数文件 1.绘图参数文件是什么 可以通过在程序中添加代码对参数进行配置,但是如果一个项日对于 Matplotlib 的特性参数总会设置相同的值,就没有必要在每次编写代码的时候都进行相同的配置。在代码之外使用一个永久的文件设定 Matplotlib 参数默认…...