使用 DeepSeek API 实现新闻文章地理位置检测与地图可视化
使用 DeepSeek API 实现新闻文章地理位置检测与地图可视化 | Implementing News Article Location Detection and Map Visualization with DeepSeek API
作者:zhutoutoutousan | Author: zhutoutoutousan
发布时间:2025-04-08 | Published: 2025-04-08
标签:AI, Next.js, React, DeepSeek API, 地图可视化 | Tags: AI, Next.js, React, DeepSeek API, Map Visualization
链接
https://github.com/zhutoutoutousan/lotion-notes
摘要 | Abstract
本文介绍了如何在 Next.js 应用中集成 DeepSeek API 实现新闻文章的地理位置检测功能,并将检测到的位置信息在交互式地图上可视化展示。我们还将探讨如何批量处理多篇文章的位置检测,以及如何优化 API 调用以提高性能和用户体验。
This article introduces how to integrate DeepSeek API in a Next.js application to implement location detection for news articles and visualize the detected locations on an interactive map. We will also explore how to batch process location detection for multiple articles and optimize API calls to improve performance and user experience.
引言 | Introduction
在信息爆炸的时代,新闻文章往往包含丰富的地理信息。通过提取这些信息,我们可以为用户提供更直观的新闻阅读体验,帮助他们更好地理解新闻事件的地理分布。本文将详细介绍如何实现这一功能。
In the era of information explosion, news articles often contain rich geographical information. By extracting this information, we can provide users with a more intuitive news reading experience, helping them better understand the geographical distribution of news events. This article will detail how to implement this functionality.
技术栈 | Tech Stack
- 前端框架 | Frontend Framework: Next.js, React, TypeScript
- UI 组件 | UI Components: Shadcn UI, Tailwind CSS
- 地图可视化 | Map Visualization: Leaflet.js
- AI 服务 | AI Service: DeepSeek API
- 状态管理 | State Management: React Hooks
实现步骤 | Implementation Steps
1. 设置 DeepSeek API | Setting up DeepSeek API
首先,我们需要获取 DeepSeek API 密钥并设置环境变量。
First, we need to obtain a DeepSeek API key and set up environment variables.
# .env.local
DEEPSEEK_API_KEY=your_deepseek_api_key
2. 创建 API 路由 | Creating API Route
在 Next.js 中,我们创建一个 API 路由来处理 DeepSeek API 的请求。
In Next.js, we create an API route to handle DeepSeek API requests.
// client/app/api/deepseek/route.ts
import { NextResponse } from "next/server";export async function POST(req: Request) {try {const { prompt } = await req.json();if (!prompt) {return NextResponse.json({ error: 'Prompt is required' },{ status: 400 });}const response = await fetch('https://api.deepseek.com/v1/chat/completions', {method: 'POST',headers: {'Content-Type': 'application/json','Authorization': `Bearer ${process.env.DEEPSEEK_API_KEY}`,},body: JSON.stringify({model: 'deepseek-chat',messages: [{ role: 'user', content: prompt }],temperature: 0.7,max_tokens: 1000,}),});if (!response.ok) {const errorText = await response.text();console.error('DeepSeek API error:', errorText);return NextResponse.json({ error: 'Failed to process request with DeepSeek API' },{ status: response.status });}const data = await response.json();return NextResponse.json(data);} catch (error) {console.error('Error processing DeepSeek API request:', error);return NextResponse.json({ error: 'Internal server error' },{ status: 500 });}
}
3. 实现位置检测服务 | Implementing Location Detection Service
接下来,我们创建一个服务函数来处理位置检测逻辑。
Next, we create a service function to handle the location detection logic.
// client/services/news-service.ts
export interface Location {name: string;latitude: number;longitude: number;
}export async function detectLocationWithDeepSeek(title: string,description: string,content?: string
): Promise<Location | null> {try {// 组合文本进行分析 | Combine the text for analysisconst textToAnalyze = `${title}. ${description}${content ? `. ${content}` : ''}`;// 创建 DeepSeek API 的提示 | Create a prompt for the DeepSeek APIconst prompt = `Analyze the following news article text and extract the primary geographic location mentioned.If multiple locations are mentioned, choose the most relevant one.If no specific location is mentioned, return null.Text: "${textToAnalyze}"Return a JSON object with the following structure:{"name": "Location Name","latitude": latitude as number,"longitude": longitude as number}If no location is found, return null.`;// 调用 DeepSeek API | Call the DeepSeek APIconst response = await fetch('/api/deepseek', {method: 'POST',headers: {'Content-Type': 'application/json',},body: JSON.stringify({ prompt }),});if (!response.ok) {throw new Error(`API request failed with status ${response.status}`);}const data = await response.json();// 解析响应 | Parse the responsetry {// 从 DeepSeek API 响应中提取内容 | Extract the content from the DeepSeek API responseconst content = data.choices[0].message.content;// 从内容中提取 JSON 字符串(它被 ```json 和 ```包裹)| Extract the JSON string from the content (it's wrapped in ```json and ```)const jsonMatch = content.match(/```json\n([\s\S]*?)\n```/);if (jsonMatch && jsonMatch[1]) {const locationData = JSON.parse(jsonMatch[1]);// 验证位置数据 | Validate the location dataif (locationData &&typeof locationData.name === 'string' &&typeof locationData.latitude === 'number' &&typeof locationData.longitude === 'number') {return {name: locationData.name,latitude: locationData.latitude,longitude: locationData.longitude,};}}} catch (parseError) {console.error('Failed to parse location data:', parseError);}return null;} catch (error) {console.error('Error detecting location:', error);return null;}
}
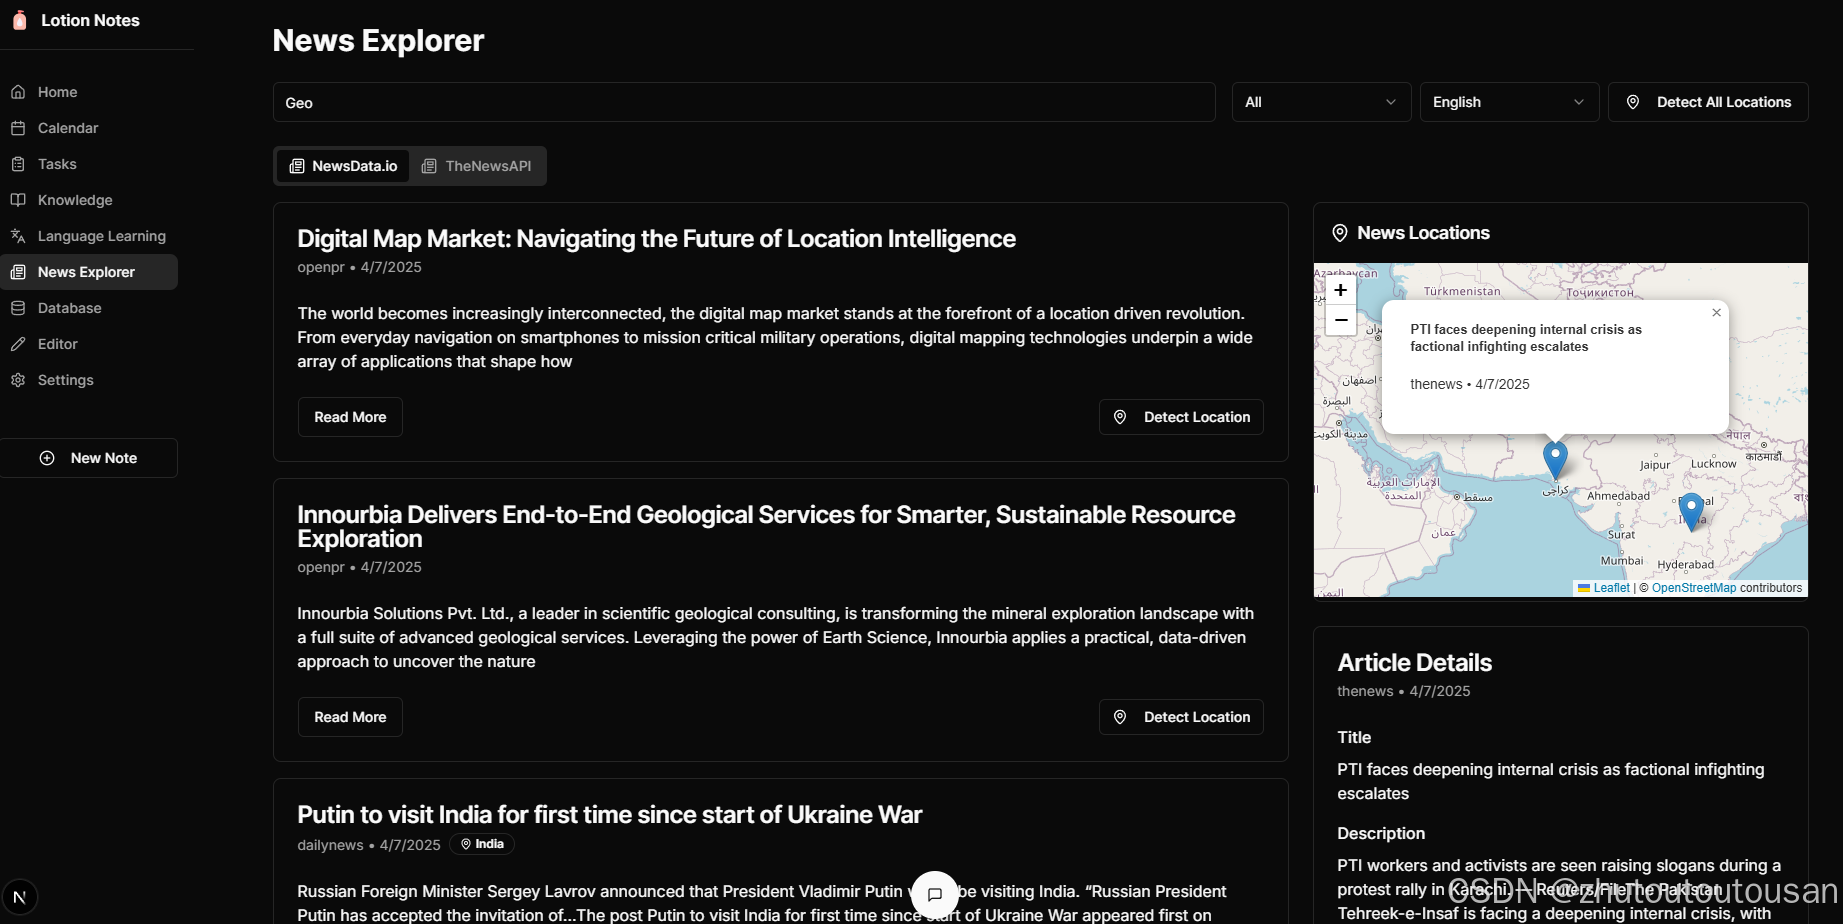
4. 创建地图组件 | Creating Map Component
我们使用 Leaflet.js 创建一个交互式地图组件来显示文章位置。
We use Leaflet.js to create an interactive map component to display article locations.
// client/components/NewsMap.tsx
'use client';import { useState, useEffect, useRef } from 'react';
import { Card, CardContent, CardHeader, CardTitle } from '@/components/ui/card';
import { NewsArticle, Location } from '@/services/news-service';
import { MapPin } from 'lucide-react';interface NewsMapProps {articles: NewsArticle[];selectedArticle: NewsArticle | null;onArticleSelect: (article: NewsArticle) => void;
}export default function NewsMap({ articles, selectedArticle, onArticleSelect }: NewsMapProps) {const [mapLoaded, setMapLoaded] = useState(false);const [map, setMap] = useState<any>(null);const [markers, setMarkers] = useState<any[]>([]);const mapContainerRef = useRef<HTMLDivElement>(null);const mapInstanceRef = useRef<any>(null);const markersRef = useRef<any[]>([]);// 动态加载 Leaflet 以避免 SSR 问题 | Load Leaflet dynamically to avoid SSR issuesuseEffect(() => {const loadLeaflet = async () => {if (typeof window !== 'undefined') {// 导入 Leaflet CSS | Import Leaflet CSSconst link = document.createElement('link');link.rel = 'stylesheet';link.href = 'https://unpkg.com/leaflet@1.9.4/dist/leaflet.css';link.integrity = 'sha256-p4NxAoJBhIIN+hmNHrzRCf9tD/miZyoHS5obTRR9BMY=';link.crossOrigin = '';document.head.appendChild(link);// 导入 Leaflet JS | Import Leaflet JSconst L = await import('leaflet');// 修复 Leaflet 图标问题 | Fix Leaflet icon issuedelete (L.Icon.Default.prototype as any)._getIconUrl;L.Icon.Default.mergeOptions({iconRetinaUrl: 'https://unpkg.com/leaflet@1.9.4/dist/images/marker-icon-2x.png',iconUrl: 'https://unpkg.com/leaflet@1.9.4/dist/images/marker-icon.png',shadowUrl: 'https://unpkg.com/leaflet@1.9.4/dist/images/marker-shadow.png',});setMapLoaded(true);}};loadLeaflet();}, []);// 当 Leaflet 加载完成时初始化地图 | Initialize map when Leaflet is loadeduseEffect(() => {if (mapLoaded && mapContainerRef.current && !mapInstanceRef.current) {const L = require('leaflet');// 创建地图实例 | Create map instanceconst mapInstance = L.map(mapContainerRef.current).setView([0, 0], 2);// 添加图层(OpenStreetMap)| Add tile layer (OpenStreetMap)L.tileLayer('https://{s}.tile.openstreetmap.org/{z}/{x}/{y}.png', {attribution: '© <a href="https://www.openstreetmap.org/copyright">OpenStreetMap</a> contributors',}).addTo(mapInstance);mapInstanceRef.current = mapInstance;setMap(mapInstance);}// 清理函数 | Cleanup functionreturn () => {if (mapInstanceRef.current) {mapInstanceRef.current.remove();mapInstanceRef.current = null;}};}, [mapLoaded]);// 当文章变化时更新标记 | Update markers when articles changeuseEffect(() => {if (!map) return;const L = require('leaflet');// 清除现有标记 | Clear existing markersmarkersRef.current.forEach(marker => marker.remove());markersRef.current = [];// 创建新标记 | Create new markersconst newMarkers = articles.map(article => {if (!article.location) return null;// 使用位置中的纬度/经度 | Use latitude/longitude from the locationconst { latitude, longitude, name } = article.location;// 创建标记 | Create markerconst marker = L.marker([latitude, longitude]).addTo(map).bindPopup(`<div class="p-2"><h3 class="font-bold">${article.title}</h3><p class="text-sm">${article.source} • ${article.publishedAt}</p></div>`);// 添加点击事件 | Add click eventmarker.on('click', () => {onArticleSelect(article);});return marker;}).filter(Boolean);// 在 ref 中存储标记 | Store markers in refmarkersRef.current = newMarkers;// 更新标记状态 | Update markers statesetMarkers(newMarkers);}, [articles, map, onArticleSelect]);// 更新选中的文章标记 | Update selected article markeruseEffect(() => {if (!map || !selectedArticle || !selectedArticle.location) return;// 查找并高亮选中的文章标记 | Find and highlight the selected article's markerconst selectedMarker = markersRef.current.find(marker => {const { latitude, longitude } = selectedArticle.location!;const markerLatLng = marker.getLatLng();return markerLatLng.lat === latitude && markerLatLng.lng === longitude;});if (selectedMarker) {// 将地图中心设置为选中的标记 | Center map on selected markermap.setView(selectedMarker.getLatLng(), 5);// 打开弹出窗口 | Open popupselectedMarker.openPopup();}}, [selectedArticle, map]);return (<Card className="w-full h-[400px] overflow-hidden"><CardHeader className="p-4"><CardTitle className="flex items-center gap-2 text-lg"><MapPin className="h-5 w-5" />新闻位置 | News Locations</CardTitle></CardHeader><CardContent className="p-0 h-[calc(100%-4rem)]">{!mapLoaded ? (<div className="flex items-center justify-center h-full"><p>加载地图中... | Loading map...</p></div>) : (<div ref={mapContainerRef} className="w-full h-full" />)}</CardContent></Card>);
}
5. 实现批量位置检测 | Implementing Batch Location Detection
为了处理多篇文章,我们实现了批量位置检测功能。
To process multiple articles, we implemented a batch location detection feature.
// 处理所有文章的位置检测 | Handle detecting locations for all articles
const handleDetectAllLocations = async () => {if (articles.length === 0) return;setDetectingAllLocations(true);setAllLocationsProgress(0);setLocationError(null);// 创建文章数组的副本 | Create a copy of the articles arrayconst updatedArticles = [...articles];let progress = 0;try {// 分批处理文章以避免 API 过载 | Process articles in batches to avoid overwhelming the APIconst batchSize = 3;for (let i = 0; i < articles.length; i += batchSize) {const batch = articles.slice(i, Math.min(i + batchSize, articles.length));// 处理批次中的每篇文章 | Process each article in the batchawait Promise.all(batch.map(async (article) => {try {// 如果文章已有位置数据则跳过 | Skip if article already has location dataif (article.location) {progress++;setAllLocationsProgress(Math.round((progress / articles.length) * 100));return;}const location = await detectLocationWithDeepSeek(article.title,article.description,article.content);if (location) {// 使用位置数据更新文章 | Update the article with location dataconst updatedArticle = {...article,location};// 更新数组中的文章 | Update the article in the arrayconst index = updatedArticles.findIndex(a => a.id === article.id);if (index !== -1) {updatedArticles[index] = updatedArticle;}// 如果是同一篇文章则更新选中的文章 | Update the selected article if it's the same oneif (selectedArticle && selectedArticle.id === article.id) {setSelectedArticle(updatedArticle);}}} catch (err) {console.error(`Failed to detect location for article: ${article.title}`, err);} finally {progress++;setAllLocationsProgress(Math.round((progress / articles.length) * 100));}}));// 每批次后更新文章状态 | Update the articles state after each batchsetArticles(updatedArticles);// 批次之间添加小延迟以避免速率限制 | Add a small delay between batches to avoid rate limitingawait new Promise(resolve => setTimeout(resolve, 1000));}} catch (err) {setLocationError("Failed to detect locations for some articles. Please try again later.");console.error(err);} finally {setDetectingAllLocations(false);setAllLocationsProgress(0);}
};
6. 添加 UI 元素 | Adding UI Elements
最后,我们在 UI 中添加了检测位置按钮和进度指示器。
Finally, we added the detect location button and progress indicator to the UI.
<Buttonvariant="outline"onClick={handleDetectAllLocations}disabled={detectingAllLocations || articles.length === 0}className="whitespace-nowrap"
>{detectingAllLocations ? (<><Loader2 className="mr-2 h-4 w-4 animate-spin" />{allLocationsProgress}% 完成 | Complete</>) : (<><MapPin className="mr-2 h-4 w-4" />检测所有位置 | Detect All Locations</>)}
</Button>{locationError && (<Alert variant="destructive" className="mb-4"><AlertCircle className="h-4 w-4" /><AlertTitle>位置检测错误 | Location Detection Error</AlertTitle><AlertDescription>{locationError}</AlertDescription></Alert>
)}
性能优化 | Performance Optimization
为了提高性能和用户体验,我们实施了以下优化措施:
To improve performance and user experience, we implemented the following optimizations:
-
批量处理 | Batch Processing: 将文章分批处理,避免一次性发送过多请求。
Process articles in batches to avoid sending too many requests at once. -
延迟加载 | Lazy Loading: 动态加载 Leaflet 库,避免 SSR 问题。
Dynamically load the Leaflet library to avoid SSR issues. -
缓存标记 | Caching Markers: 使用 ref 缓存标记,避免不必要的重新渲染。
Use refs to cache markers to avoid unnecessary re-renders. -
错误处理 | Error Handling: 完善的错误处理机制,确保用户体验不受影响。
Comprehensive error handling to ensure user experience is not affected. -
进度指示 | Progress Indication: 显示批量处理的进度,提供更好的用户反馈。
Display batch processing progress for better user feedback.
展示
结论 | Conclusion
通过集成 DeepSeek API 和 Leaflet.js,我们成功实现了新闻文章的地理位置检测和地图可视化功能。这一功能不仅提升了用户体验,还为用户提供了更直观的新闻阅读方式。批量处理功能进一步增强了应用的实用性,使用户能够一次性处理多篇文章。
By integrating DeepSeek API and Leaflet.js, we successfully implemented location detection and map visualization for news articles. This feature not only enhances user experience but also provides users with a more intuitive way to read news. The batch processing feature further enhances the application’s utility, allowing users to process multiple articles at once.
未来改进 | Future Improvements
-
聚类标记 | Clustered Markers: 当标记过多时,实现标记聚类以提高性能。
Implement marker clustering when there are too many markers to improve performance. -
自定义标记样式 | Custom Marker Styles: 根据文章类别或重要性自定义标记样式。
Customize marker styles based on article category or importance. -
时间线视图 | Timeline View: 添加时间线视图,按时间顺序展示新闻事件。
Add a timeline view to display news events chronologically. -
离线支持 | Offline Support: 实现离线缓存,减少 API 调用。
Implement offline caching to reduce API calls.
参考资料 | References
- DeepSeek API 文档 | DeepSeek API Documentation
- Leaflet.js 文档 | Leaflet.js Documentation
- Next.js API 路由 | Next.js API Routes
- React Hooks | React Hooks
如果您喜欢这篇文章,请点赞并关注我们以获取更多技术内容!
If you like this article, please like and follow us for more technical content!
相关文章:
使用 DeepSeek API 实现新闻文章地理位置检测与地图可视化
使用 DeepSeek API 实现新闻文章地理位置检测与地图可视化 | Implementing News Article Location Detection and Map Visualization with DeepSeek API 作者:zhutoutoutousan | Author: zhutoutoutousan 发布时间:2025-04-08 | Published: 2025-04-08 标…...
如何精准控制大模型的推理深度
论文标题 ThinkEdit: Interpretable Weight Editing to Mitigate Overly Short Thinking in Reasoning Models 论文地址 https://arxiv.org/pdf/2503.22048 代码地址 https://github.com/Trustworthy-ML-Lab/ThinkEdit 作者背景 加州大学圣迭戈分校 动机 链式推理能显…...
【力扣hot100题】(078)跳跃游戏Ⅱ
好难啊,我愿称之为跳崖游戏。 依旧用了两种方法,一种是我一开始想到的,一种是看答案学会的。 我自己用的方法是动态规划,维护一个数组记录到该位置的最少步长,每遍历到一个位置就嵌套循环遍历这个位置能到达的位置&a…...

Leetcode 34.在排序数组中查找元素的第一个和最后一个位置
题目描述 给你一个按照非递减顺序排列的整数数组 nums,和一个目标值 target。请你找出给定目标值在数组中的开始位置和结束位置。 如果数组中不存在目标值 target,返回 [-1, -1]。 你必须设计并实现时间复杂度为 O(log n) 的算法解决此问题。 考察二…...

LangChain入门指南:调用DeepSeek api
文章目录 1. 什么是LangChain?2. 核心组件3. 为什么选择LangChain?4. 实战案例安装简单chat案例流式交互Prompt模板 5. 简单总结 1. 什么是LangChain? 定义:LangChain是一个用于构建大语言模型(LLM)应用的…...

WES与WGS数据线粒体DNA数据分析及检测工具
1. 线粒体DNA的异质性 传统的全外显子组测序(WES)和全基因组测序(WGS)的二代测序(SGS) 数据分析流程,能够识别多种类型的基因改变。但大多数用于基因变异分析和注释的工具,在输出文…...
word表格间隔设置
1.怎么解决word表格间隔达不到我们想要的要求 其实很简单, 我们直接在word表格里面, 全选表格中里面的内容。接着,我们选择自动调整---->根据内容自动调整表格,即可达到我们想要的要求...
SpringBoot 接口限流Lua脚本接合Redis 服务熔断 自定义注解 接口保护
介绍 Spring Boot 接口限流是防止接口被频繁请求而导致服务器负载过重或服务崩溃的一种策略。通过限流,我们可以控制单位时间内允许的请求次数,确保系统的稳定性。限流可以帮助防止恶意请求、保护系统资源,并优化 API 的可用性,避…...

设计模式 --- 观察者模式
设计模式 --- 观察者模式 什么是观察者模式观察者模式典型应用 --- C#中的事件使用观察者模式实现事件处理机制 什么是观察者模式 观察者模式(Observer Pattern)是一种行为型设计模式,用于在对象之间建立一对多的依赖关系。当一个对象&#x…...

电商核心指标解析与行业趋势:数据驱动的增长策略【大模型总结】
电商核心指标解析与行业趋势:数据驱动的增长策略 在电商领域,数据是决策的核心。从流量监测到用户行为分析,从价格策略到技术赋能,每一个环节的优化都离不开对核心指标的深度理解。本文结合行业最新趋势与头部平台实践࿰…...
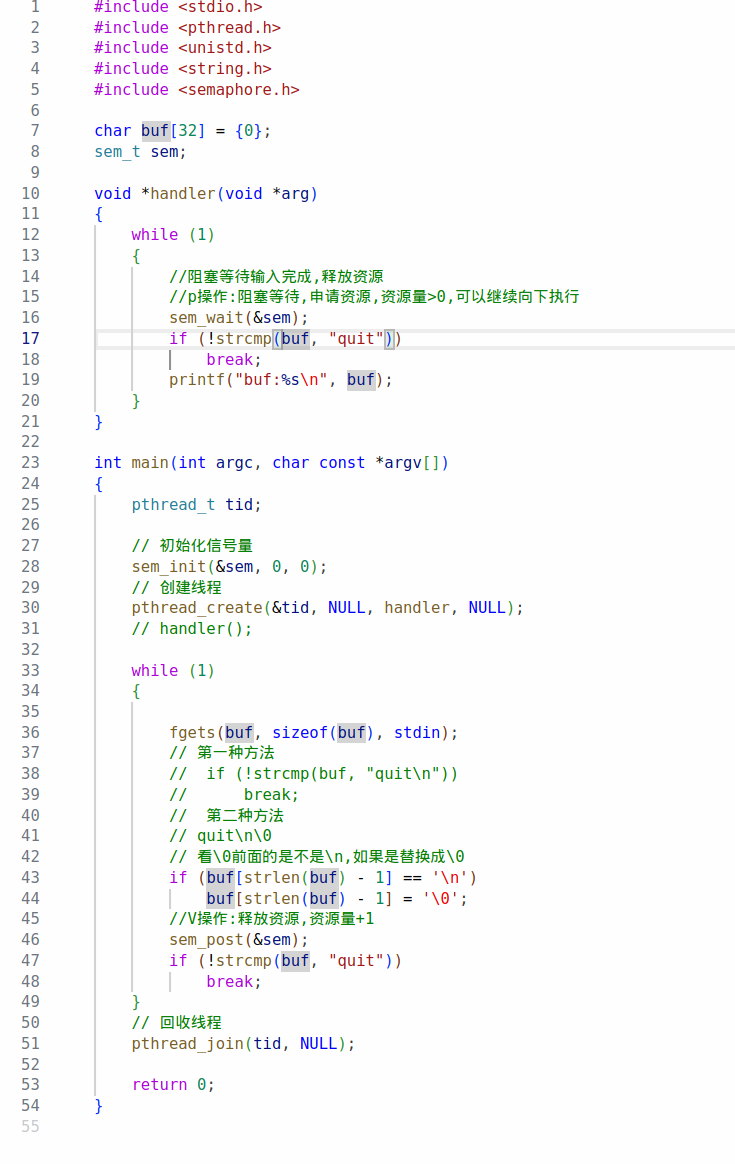
I/O进程4
day4 九、信号灯集 1.概念 信号灯(semaphore),也叫信号量。它是不同进程间或一个给定进程内部不同线程间同步的机制;System V的信号灯是一个或者多个信号灯的一个集合。其中的每一个都是单独的计数信号灯。 通过信号灯集实现共享内存的同步操作。 2.编程…...
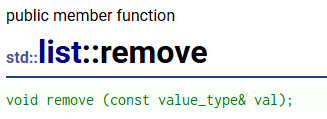
【语法】C++的list
目录 为什么会有list? 迭代器失效: list和vector的迭代器不同的地方: list的大部分用法和vector都很像,例如push_back,构造,析构,赋值重载这些就不再废话了,本篇主要讲的是和vecto…...

【算法笔记】并查集详解
🚀 并查集(Union-Find)详解:原理、实现与优化 并查集(Union-Find)是一种非常高效的数据结构,用于处理动态连通性问题,即判断若干个元素是否属于同一个集合,并支持集合合…...
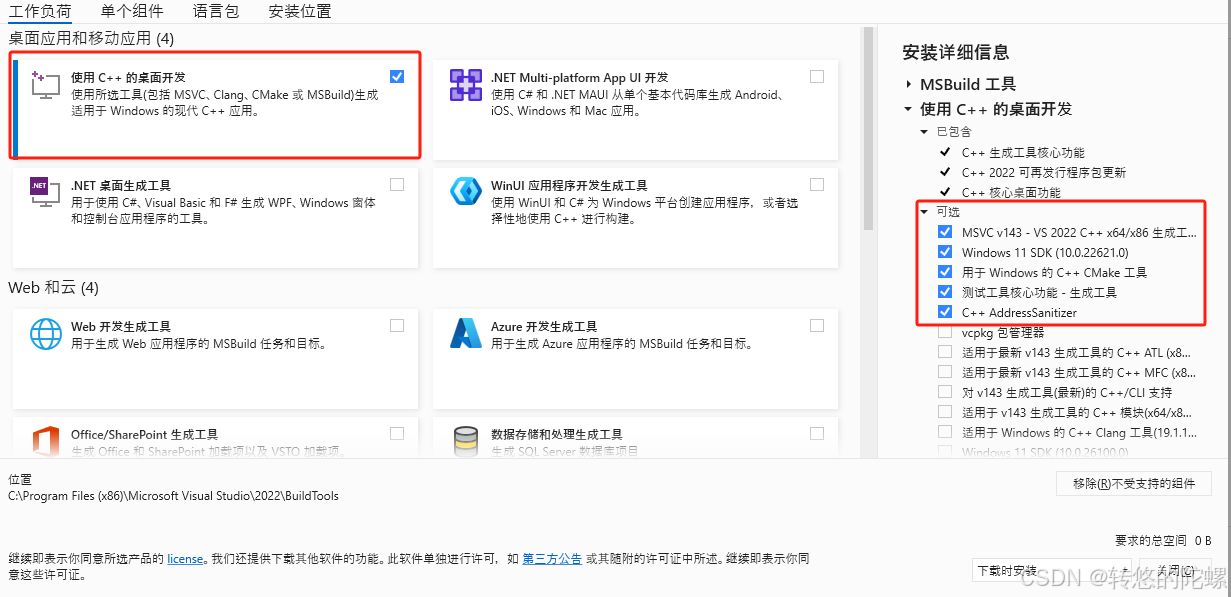
【Ai/Agent】Windows11中安装CrewAI过程中的错误解决记录
CrewAi是什么,可以看之下之前写的 《初识CrewAI多智能代理团队协框架》 (注:这篇是基于linux系统下安装实践的) 基于以下记录解决问题后,可以再回到之前的文章继续进行CrewAI的安装 遇到问题 在windows系统中安装 CrewAi 不管是使用 pip 或者…...

OSPF的数据报文格式【复习篇】
OSPF协议是跨层封装的协议(跨四层封装),直接将应用层的数据封装在网络层协议之后,IP协议包中协议号字段对应的数值为89 OSPF的头部信息: 所有的数据共有的信息字段 字段名描述版本当前OSPF进程使用的版本(…...

[leetcode]查询区间内的所有素数
一.暴力求解 #include<iostream> #include<vector> using namespace std; vector<int> result; bool isPrime(int i) { if (i < 2) return false; for (int j 2;j * j < i;j) { if (i % j 0) { …...

【力扣刷题实战】Z字形变换
大家好,我是小卡皮巴拉 文章目录 目录 力扣题目:Z字形变换 题目描述 解题思路 问题理解 算法选择 具体思路 解题要点 完整代码(C) 兄弟们共勉 !!! 每篇前言 博客主页:小卡…...

【RK3588 嵌入式图形编程】-SDL2-扫雷游戏-添加地雷到网格
添加地雷到网格 文章目录 添加地雷到网格1、概述2、更新Globals.h3、在随机单元格中放置地雷4、更新单元格以接收地雷5、渲染地雷图像6、开发助手7、完整代码8、总结在本文中,我们将更新游戏以在网格中随机放置地雷,并在单元格被清除时渲染它们。 1、概述 在我们扫雷游戏教程…...

Fortran 中读取 MATLAB 生成的数据文件
在 Fortran 中读取 MATLAB 生成的数据文件,可以通过以下几种方法实现,包括使用开源工具和手动解析: 1. 使用开源工具:MATFOR MATFOR 是一个商业/开源混合工具(部分功能免费),提供 Fortran 与 M…...

Kubernetes 入门篇之网络插件 calico 部署与安装
在运行kubeadm init 和 join 命令部署好master和node节点后,kubectl get nodes 看到节点都是NotReady状态,这是因为没有安装CNI网络插件。 kubectl get nodes NAME STATUS ROLES AGE VERSION k8s-master Not…...
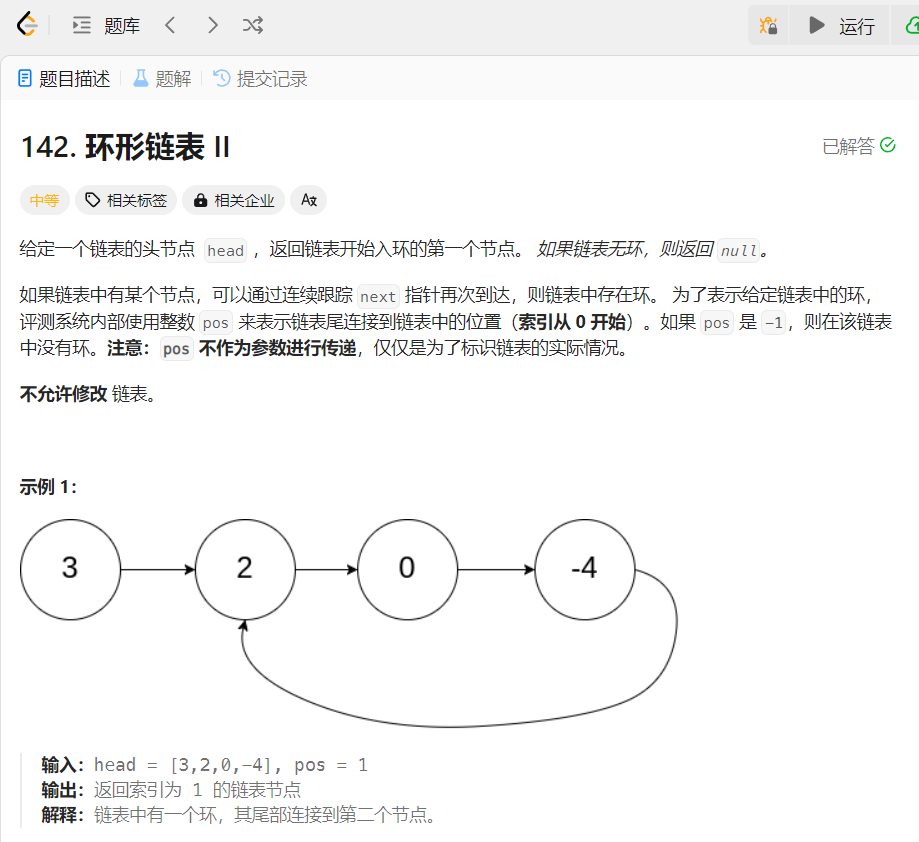
力扣题解:142. 环形链表 II
在链表学习中,我们已经了解了单链表和双链表,两者的最后一个结点都会指向NULL;今天我们介绍的循环列表则不同,其末尾结点指向的这是链表中的一个结点。 循环链表是一种特殊类型的链表,其尾节点的指针指向头节点&#…...

latex模板文件
LaTeX 是一款广泛应用于学术领域的文档排版系统,尤其以其在数学公式、科学符号和复杂技术文档排版中的强大能力著称。虽然它本身并非专门的“数学软件”,但在处理数学相关内容时表现尤为出色。 1. LaTeX 的核心特点 数学公式支持ÿ…...

BLE 协议栈事件驱动机制详解
在 BlueNRG-LP 等 BLE 系统中,事件驱动是控制状态转移、数据交互和外设协作的基础。本文将深入讲解 BLE 协议栈中事件的来源、分发流程、处理结构与实际工程实践策略,帮助你构建稳定、可维护的 BLE 系统。 📦 一、BLE 事件的来源分类 BLE 协议栈中的事件严格来自协议栈本身…...
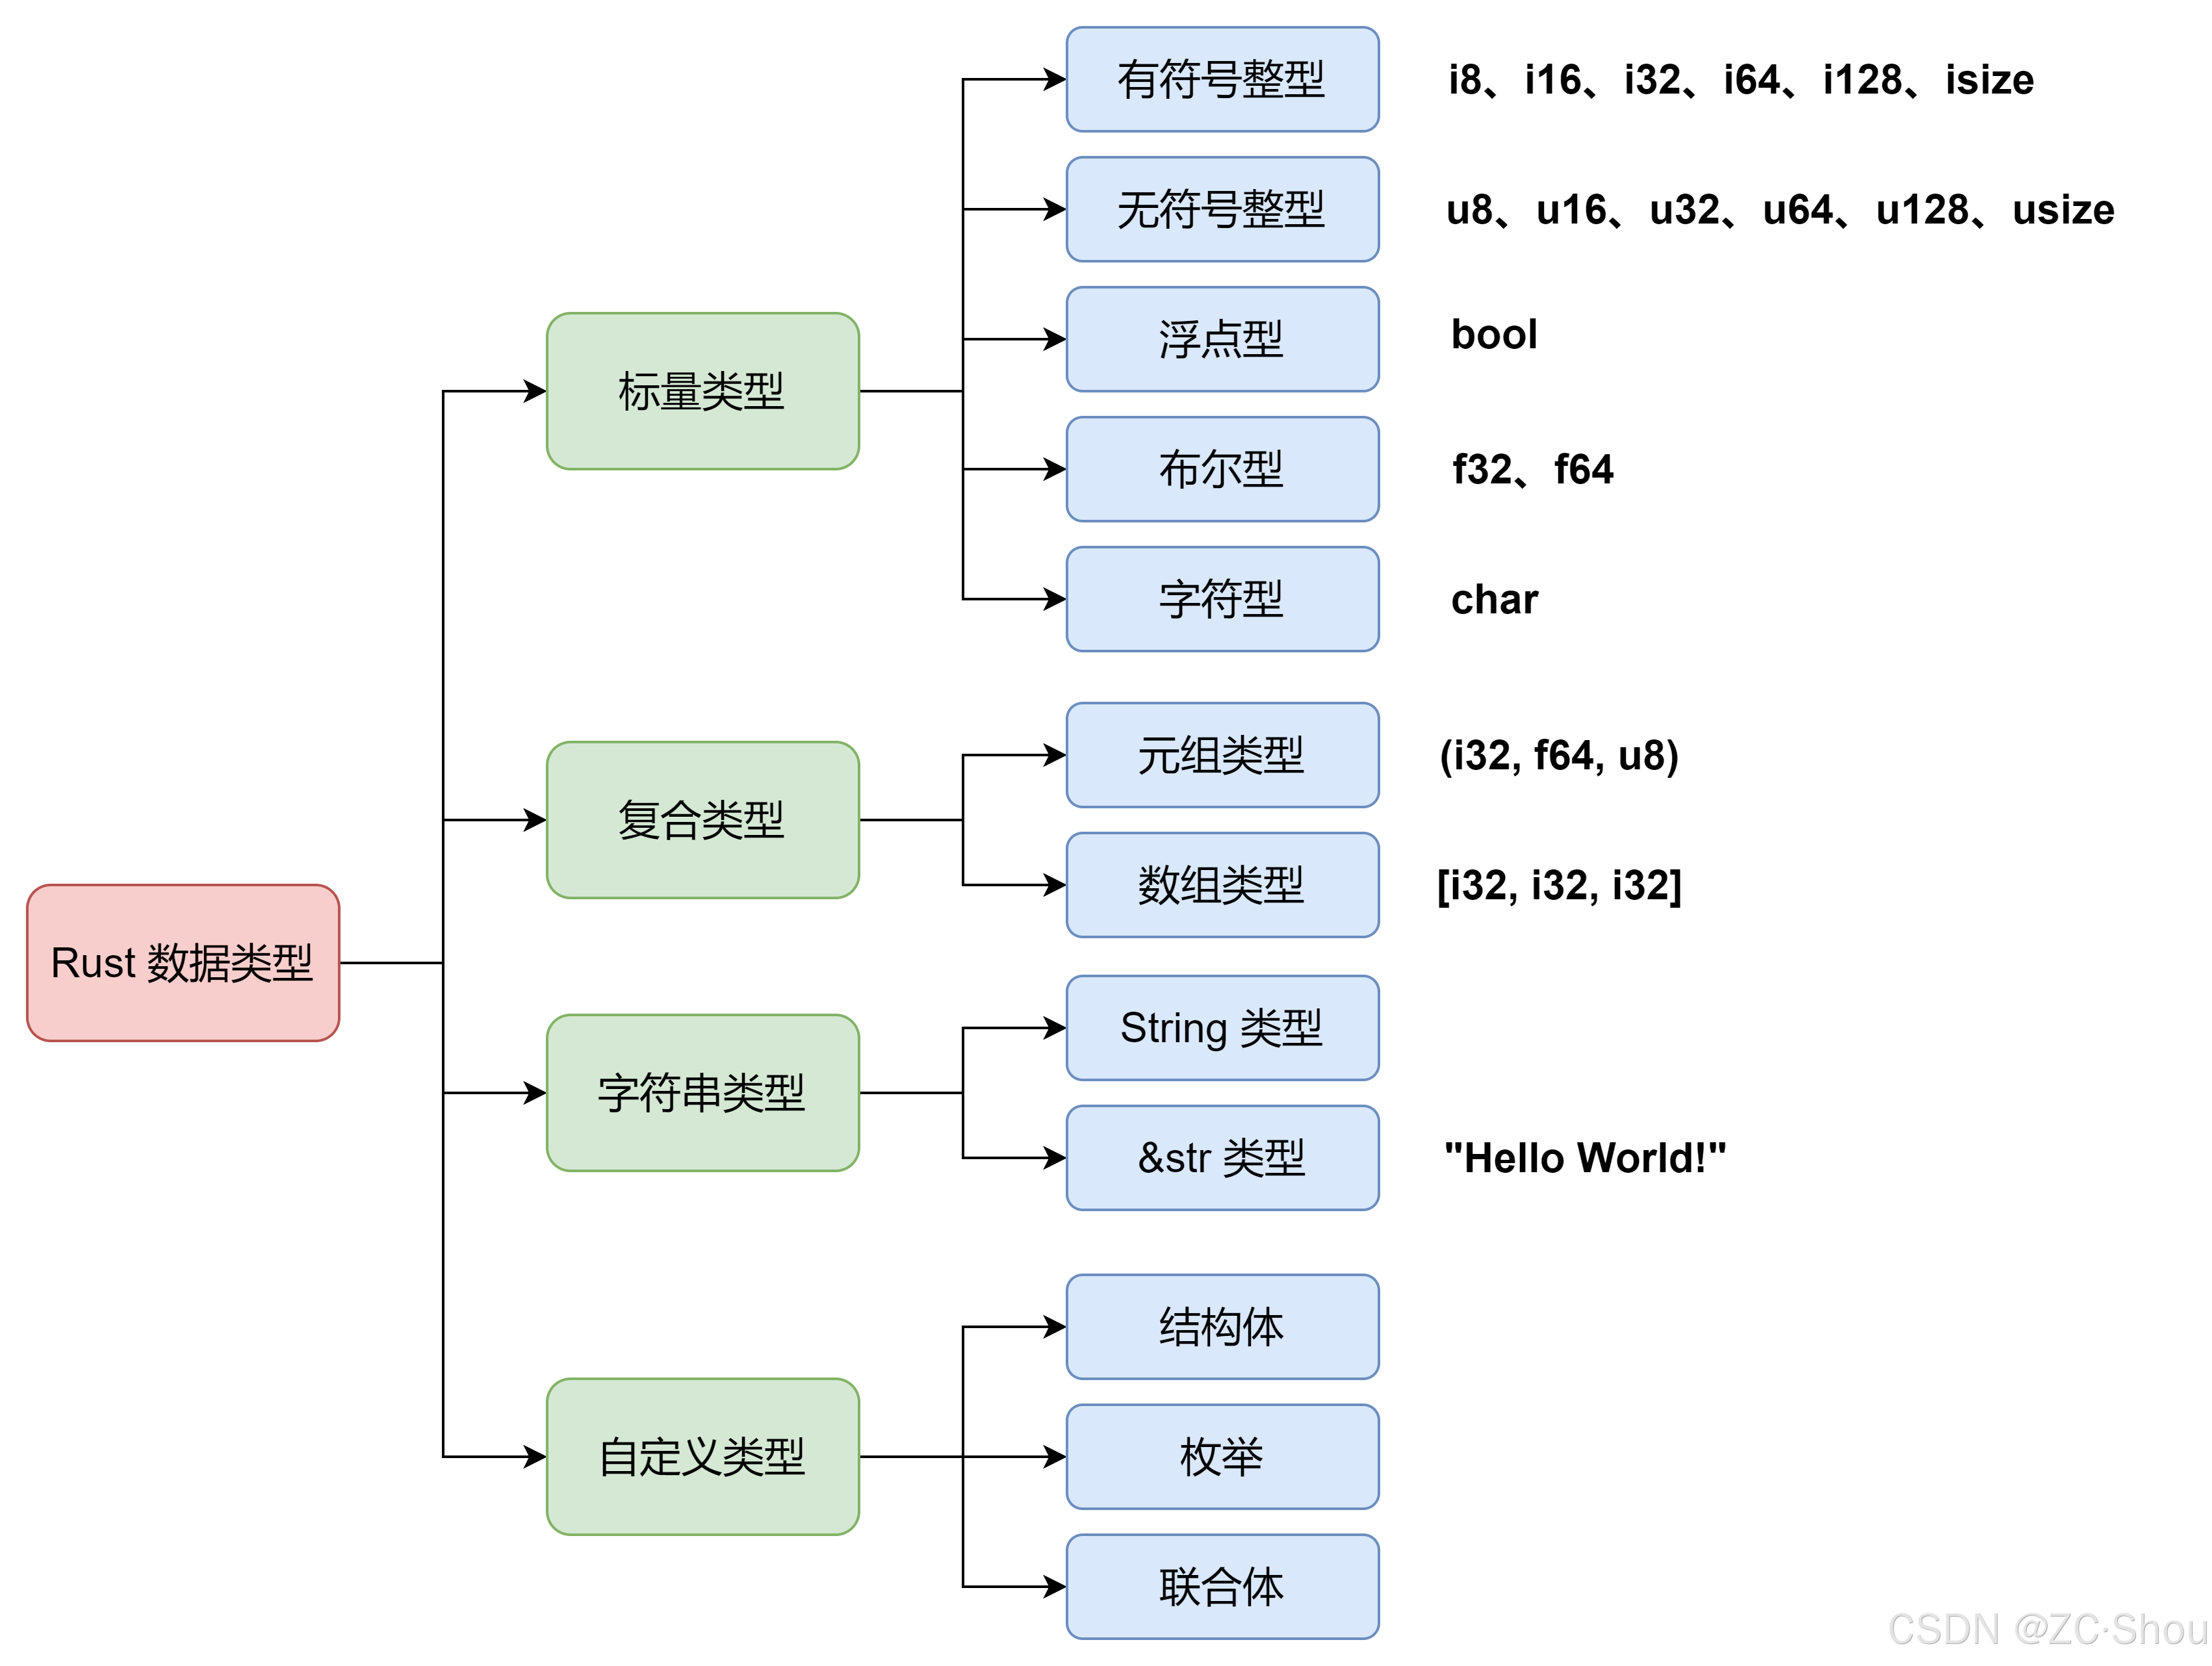
Rust 之四 运算符、标量、元组、数组、字符串、结构体、枚举
概述 Rust 的基本语法对于从事底层 C/C 开发的人来说多少有些难以理解,虽然官方有详细的文档来介绍,不过内容是相当的多,看起来也费劲。本文通过将每个知识点简化为 一个 DEMO 每种特性各用一句话描述的形式来简化学习过程,提高学…...
fuse-python使用fuse来挂载fs
winfsp 安装winfsp,https://winfsp.dev/ fusepy python安装fusepy #!/usr/bin/env python3 import os import stat from fuse import FUSE, FuseOSError, Operationsclass Passthrough(Operations):def __init__(self, root):self.root root# 辅助函数:将挂载点…...
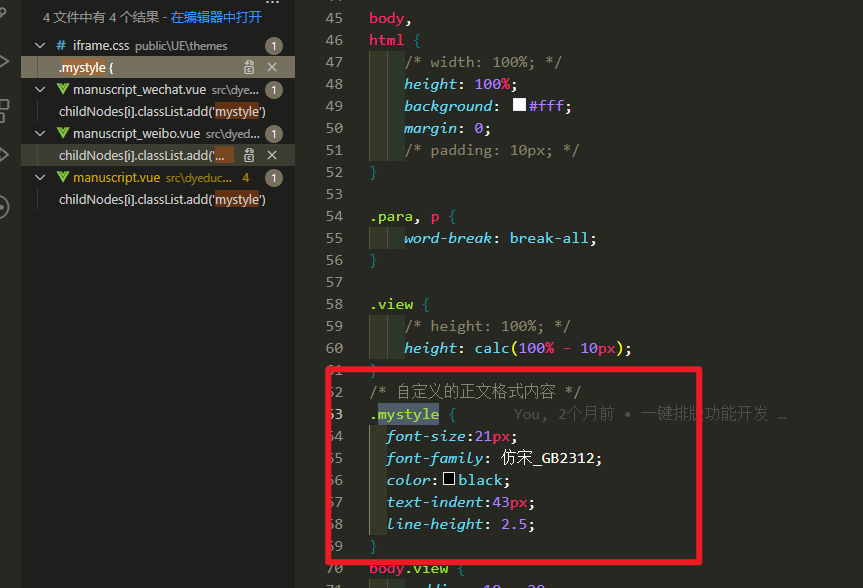
基于ueditor编辑器的功能开发之增加自定义一键排版功能
用户有自己的文章格式,要求复制或者粘贴进来的文章能够一键排版,不需要手动调试 这个需求的话咱们就需要自己去注册一个事件啦,这里我没有修改源码,而是在编辑器初始化之后给他注册了一个事件 我的工具列表变量 vue组件中data中…...

内核态切换到用户态
内核态切换到用户态 是操作系统中 CPU 执行模式的一种切换过程,涉及从高权限的内核态(Kernel Mode)切换到低权限的用户态(User Mode)。以下是详细解释: 1. 什么是内核态和用户态? 内核态&#…...

win10离线环境下配置wsl2和vscode远程开发环境
win10离线环境下配置wsl2和vscode远程开发环境 环境文件准备wsl文件准备vscode文件准备 内网环境部署wsl环境部署vscode环境部署 迁移后Ubuntu中的程序无法启动 环境 内网机:win10、wsl1 文件准备 wsl文件准备 在外网机上的wsl安装Ubuntu24.04,直接在…...
概述)
AWS弹性容器服务(AWS Elastic Container Service,ECS)概述
李升伟 编译 标签:AWS | ECS | 容器 | Docker AWS弹性容器服务(AWS Elastic Container Service,ECS)简介 AWS弹性容器服务(ECS)是一项完全托管的容器编排服务,支持运行、管理和扩展容器化应用…...

Redis过期key处理、内存淘汰策略与缓存一致性策略实践方案
在现代的高性能应用开发中,Redis作为一款极为热门的内存数据库,其快速的读写性能和丰富的数据结构使其在缓存、消息队列等诸多领域得到了广泛应用。然而,在实际使用过程中,处理好Redis过期key、选择合适的内存淘汰策略以及确保缓存…...