智慧水务项目(八)基于Django 5.1 版本PyScada详细安装实战
一、说明
PyScada,一个基于Python和Django框架的开源SCADA(数据采集与监视控制系统)系统,采用HTML5技术打造人机界面(HMI)。它兼容多种工业协议,如Modbus TCP/IP、RTU、ASCII等,并具备系统统计、文件操作、网络服务等多项功能。PyScada对服务器硬件要求不高,可灵活适用于各类工业环境。
SCADA系统的核心功能包括自动数据采集、智能分析、高效存储以及实时推送。这些功能使得它在电力、冶金、石油化工等多个领域发挥着重要作用。作为开源项目,PyScada赋予用户自由定制和修改源代码的权利,从而满足不同的工业需求。
尽管PyScada已相当完善,但仍有一些功能仍在开发中,如BACNet、OPC-UA和MeterBus等。详细的安装指南和项目文档可在其官方网站查阅。在云计算日益普及的今天,SCADA系统正不断演变,以适应新的信息技术和工业需求,特别是在数据处理能力、系统灵活性和可扩展性方面。
二、安装
1、安装说明
ubuntu版本为24.04.2 LTS,系统干净,如果以前玩过pyscada 需要删除
数据库使用mysql8,redis6 , Gunicorn as WSGI HTTP Server and nginx as HTTP Server.
开发工具用vscode 直接远程连接测试服务器开发,
参考:https://blog.csdn.net/jiangkp/article/details/141328574?spm=1011.2415.3001.5331
2、脚本选择
安装脚本选择,这个在执行install.sh时可以选择,我们选择system而不是docker,未来生产部署可以选择docker
根据脚本内容会调用install_system.sh,由于安装过程中发生了很多问题,所以我们做了一些更改,不过大致是差不多的
3、下载Pyscada源码
#确认安装了git
sudo apt install git
sudo mkdir -p /home/work
sudo chown  -R t400:t400 /home/work
cd /home/work
sudo git clone https://github.com/pyscada/PyScada.git
cd PyScada
4、打包PyScada
# 打包一般用不上
t400@t400:/home/work/PyScada$ python3 -V
Python 3.12.3# 安装必要的包
sudo apt update
sudo apt upgrade
sudo apt install python3-venvsudo python3 -m venv /home/work/PyScada/.venv# 激活虚拟环境
source /home/work/PyScada/.venv/bin/activate(.venv) t400@t400:/home/work/PyScada$ python -V
Python 3.12.3# 安装打包工具
python -m pip install --upgrade pip setuptools wheel# 打包命令
python setup.py sdist bdist_wheel# 退出虚拟环境
(.venv) t400@t400:/home/work/PyScada$ deactivate
t400@t400:/home/work/PyScada$

5、安装mysql和redis
我们用docker和docker-compose安装mysql8,和redis6.2.7
参考
https://blog.csdn.net/jiangkp/article/details/145995259
6、安装Miniconda
由于服务器自带python版本不一样,比方ubuntu20 就是3.8 ubuntu 22好像还是3.8,ubuntu24 是3.12
所以我们安装了conda,保证python 版本一致
sudo apt update && sudo apt upgrade -y
wget https://repo.anaconda.com/miniconda/Miniconda3-latest-Linux-x86_64.sh
chmod +x Miniconda3-latest-Linux-x86_64.sh
./Miniconda3-latest-Linux-x86_64.sh#安装过程交互
按回车查看许可协议,按 q 退出阅读。
输入 yes 同意协议。
设置安装路径(默认:/home/用户名/miniconda3,直接回车使用默认路径)。
提示是否初始化时,输入 yes(这会自动将conda添加到环境变量)#激活与验证
source ~/.bashrc
conda --version  # 应显示版本号(如 `conda 24.5.0`)
conda list       # 查看已安装的包
# 配置国内源
conda config --add channels https://mirrors.tuna.tsinghua.edu.cn/anaconda/pkgs/main/
conda config --add channels https://mirrors.tuna.tsinghua.edu.cn/anaconda/pkgs/free/
conda config --set show_channel_urls yes
#安装虚拟环境
conda create -n myenv python=3.12  # 创建名为myenv的环境
conda activate myenv             # 激活环境
conda deactivate                 # 退出环境
conda env list                   # 列出所有环境
7、install.sh说明
该文件就是选择venv安装还是docker安装,我们选择venv
#!/bin/bash# check if the script is run from script directory
SOURCE=${BASH_SOURCE[0]}
while [ -L "$SOURCE" ]; do # resolve $SOURCE until the file is no longer a symlinkDIR=$( cd -P "$( dirname "$SOURCE" )" >/dev/null 2>&1 && pwd )SOURCE=$(readlink "$SOURCE")[[ $SOURCE != /* ]] && SOURCE=$DIR/$SOURCE # if $SOURCE was a relative symlink, we need to resolve it relative to the path where the symlink file was located
done
DIR=$( cd -P "$( dirname "$SOURCE" )" >/dev/null 2>&1 && pwd )
# 以上从第4行到10行的代码作用就是获取本脚本存储位置的绝对路径,在前面加了这么多代码,
# 可以完美解决别名、链接、source、bash -c 等导致的问题#判断上面得到的路径与当前目录是否一致,要保持一致
if [[ "$DIR" != "$PWD" ]]; thenecho "You must run this script from $DIR"exit 1
fi# Make sure only root can run our script
# 确保root运行
if [[ $EUID -ne 0 ]]; thenecho "This script must be run as root" 1>&2exit 1
fi# Choose the config method (venv or docker)
# 下面所有代码就完成一个任务,输入1 就是调用 install_venv.sh
# 输入2 调用install_docker.sh
answer_config=""
echo "choose your installation"while [[ "$answer_config" == "" ]]; doread -p "1: venv, 2: docker : " answer_configcase $answer_config in"1")#remove logs file if exist (to avoid appending)if [ -f logs_install.txt ]; thenrm logs_install.txtfi#execute the install_venv.sh script and output error in logs filesource install_venv.sh 2>&1 | tee -a logs_install.txt 1>&2 | { while IFS= read -r line; do echo "$line"; done; };;"2")#remove logs file if exist (to avoid appending)if [ -f logs_docker.txt ]; thenrm logs_docker.txtfisource install_docker.sh 2>&1 | tee -a logs_docker.txt 1>&2  | { while IFS= read -r line; do echo "$line"; done; };;*)echo "choose a valid configuration"answer_config="";;esac#statements
done
8、install_venv.sh说明以及修改
该文档包括了不少东西,我们在下面源码中注释
说明:
1、数据库我们不用mariadb,而是用mysql8 已经安装
2、redis6也已经安装
3、一些配置常量,有交互输入变为直接写死,主要是为了调试方便,也是为了保证输入的一致性
4、python 版本是3.12,保证conda activate myenv激活myenv
5、django 版本为5.1,老版本的Pyscada是4.2
#!/bin/bash# todo : add inputs for django admin name, password# check if the script is run from script directory
SOURCE=${BASH_SOURCE[0]}
while [ -L "$SOURCE" ]; do # resolve $SOURCE until the file is no longer a symlinkDIR=$( cd -P "$( dirname "$SOURCE" )" >/dev/null 2>&1 && pwd )SOURCE=$(readlink "$SOURCE")[[ $SOURCE != /* ]] && SOURCE=$DIR/$SOURCE # if $SOURCE was a relative symlink, we need to resolve it relative to the path where the symlink file was located
done
DIR=$( cd -P "$( dirname "$SOURCE" )" >/dev/null 2>&1 && pwd )if [[ "$DIR" != "$PWD" ]]; thenecho "You must run this script from $DIR"exit 1
fi# Make sure only root can run our script
if [[ $EUID -ne 0 ]]; thenecho "This script must be run as root"exit 1
fi#安装部署路径,服务器部署后台项目就在这里
INSTALL_ROOT=/var/www/pyscada
# log存放位置
log_file_dir="/var/log/pyscada/"
# 后面会建立一个django服务项目,放在这里,服务项目的名字也为PyScadaServer
SERVER_ROOT=$INSTALL_ROOT/PyScadaServer
# pyscada 存放文件的目录,包括虚拟环境
pyscada_home=/home/pyscada
# 安装虚拟环境路径
pyscada_venv=$pyscada_home/.venv# VAR 变量,以前是交互,现在直接在这里修改,因为容易输错,所以写死# ubuntu设置时区
#  sudo cp /usr/share/zoneinfo/Asia/Shanghai /etc/localtime# 时间是否正确,主要是时区,如果设置为n,会退出,所以这里必须是y,所以必须先检查系统时间是否正常
answer_date="y"
# 代理配置,我们没有用这个
answer_proxy="n"
# 没有用到,这个已经在install.sh里选了
# answer_config=""
# 数据库的名字,默认是PyScada_db
answer_db_name="PyScada_db"   # 数据库用户,会创建,默认PyScada-user,不是root,用户自己建立,并分配权限
answer_db_user="PyScada-user"
#数据库密码,用户设置的对应answer_db_user的密码
answer_db_password="PyScada-user-password"
#是否安装redis和channels,本来原始代码是在这里安装redis,但是因为redis还是要测试的,或者说也有可能会用外部的redis
# 所以我们这里redis的安装在运行这个脚本之前就安装好了,这里只是安装依赖包,注意和settings.py有所关联。
answer_channels="y"
# 是否全新安装还是更新安装
# 如果为n就是全新安装,为y就是更新一下项目
# 全新安装:
# 1、会重新要求输入这里这些常量,由于我们已经写死了,所以这个功能就没有了,我们就在这里改
# 2、会创建数据库,用户名或者密码,但是如果数据库名称没有变化那么改数据库存在,我们是没有删除后再建立数据库的,
#     就是说数据库还是第一次建立的数据库,这样数据库不会丢失,如果你想全部重建,改个数据库名称就行了
# 3、用户名密码是可以重新设置的,设置有效
# 4、我们知道PyScadaServer项目是一个用来部署的项目,如果这些和settings.py相关的配置变化了,PyScadaServer项目
#      是不会更新的,就算重建也不会更新,试过了,所以我们在重建时会全部删除掉PyScadaServer项目源码,然后再重建
# 5、如果需要更改配置文件,比方说配置email服务器,在这个脚本里没有设置项,那么就需要在模板文件
#     /home/work/PyScada/tests/project_template/project_name/settings.py-tpl 里修改,然后再重建PyScadaServer项目
#     这样就要重新运行install.sh
# 6、三遍提醒不要在PyScadaServer项目里修改代码,很危险,所以我们要修改模板,然后用模板重建,模板在./tests/project_template
# 7、数据库和redis必须安装并测试好,要不然安装项目会报错,在运行install.sh是后面会建立数据表,如果redis不用,可以不装
#   但是answer_channels需要配置为n,我们这里是把redis安装与依赖包安装分开,而在settings.py判断是否需要redis,就是根据是否安装了
#   channels来判断的,if util.find_spec('channels') is not None: 这条语句就是来查询channels的信息
answer_update="n" # 为True就是自动安装,False就是手动安装
# 所谓自动安装就是你通过pip install或uninstall安装和卸载了插件,那么你在重新运行项目时,在加载settings.py里的配置时,
# 会通过【importlib.metadata.distributions()函数用于获取当前环境中所有已安装的Python包及其元数据信息】重新判断是否安装
# 哪些插件,具体代码在settings.py里
# 手动安装就是你你通过pip install或uninstall安装和卸载了插件,在settings.py不会自动判断你是否安装了插件,这时候需要你把安装的插件
# 添加在settings.py里,在下面数组里添加,
# INSTALLED_APPS = [
#   .......
#    'pyscada',
#    'pyscada.core',
#    'pyscada.hmi',
#    'pyscada.export',
#   #在这里添加或删除
#]#其实这个就是如果你通过pip install或uninstall安装和卸载了插件,那么你重新运行pyscada ,gunicorn,否则需要自己到settings里去添加
answer_auto_add_apps="True"
# 错误输出到用户名,在settings.py中使用,需要配置邮件服务器才有效
answer_admin_name="jkp258"
# 错误输出到email
answer_admin_mail="jkp258@qq.com"
#这里是创建超级用户名
answer_web_name="superadmin"
# web interface admin password,这里是超级用户对应的密码
answer_web_password="123456"   echo -e "\nPyScada python packages will be installed in the virtual environment $pyscada_venv"function debug(){message=$1echo ""echo $message 1>&2echo ""
}# called in questions_setup
# 用正则表达式判断代理是否正确
function regex_proxy(){echo "regex_proxy" 1>&2regex='^(https?|ftp)://[0-9a-zA-Z.-]+:[0-9]+$';while true; do# read -p "Use proxy? [http://proxy:port or n]: " answer_proxyif [[ $answer_proxy == "n" || $answer_proxy =~ $regex ]]; thenbreakelseecho "Choose a valid proxy"fidoneecho "regex_proxy end" 1>&2
}
# pip3 的代理,不用就相当于 pip3
function pip3_proxy(){if [[ "$answer_proxy" == "n" ]]; thenpip3 $*elseecho "pip3 using" $answer_proxy "for" $* > /dev/ttypip3 --proxy=$answer_proxy $*fi
}
# 安装有关
function pip3_proxy_not_rust(){if [[ "$answer_proxy" == "n" ]]; thenCRYPTOGRAPHY_DONT_BUILD_RUST=1 pip3 install cryptography==3.4.6 --no-cache-dirpip3 $*elseecho "pip3 using" $answer_proxy "for" $* > /dev/ttyCRYPTOGRAPHY_DONT_BUILD_RUST=1 pip3 --proxy=$answer_proxy install cryptography==3.4.6 --no-cache-dirpip3 --proxy=$answer_proxy $*fi
}
# 不用代理,就是apt
function apt_proxy(){if [[ "$answer_proxy" == "n" ]]; thenapt-get $*elseecho "apt using" $answer_proxy "for" $* > /dev/ttyexport http_proxy=$answer_proxyapt-get $*unset http_proxyfi
}
# 正则判断email是否合规
# called in questions_clean_inst_setup
function regex_mail(){debug "regex_mail"regex='^[a-zA-Z0-9._%+-]+@[a-zA-Z0-9.-]+\.[a-zA-Z]{2,}$';while true; do# read -p "admin mail ? " answer_admin_mailif [[ $answer_admin_mail =~ $regex ]]; thenbreakelseecho "Choose a valid mail"fidonedebug "regex_mail end"
}
# called in questions_clean_inst_setup
function admin_name_setup(){debug "admin_name_setup"while true; do# read -p "admin name ? " answer_admin_nameif [[ "$answer_admin_name" == "" ]]; thenecho "Choose a valid name"elsebreakfidonedebug "admin_name_setup end"
}# called in questions_setup
function questions_clean_install_setup(){debug "questions_clean_install_setup"#数据库名称密码用户名#read -p "DB name ? [PyScada_db]: " answer_db_name#read -p "DB user ? [PyScada-user]: " answer_db_user#read -sp "DB password ? [PyScada-user-password]: " answer_db_password#echo ""#  名称,就是后台管理系统的登录名 answer_admin_name,我们就叫noknow,就是现在忘了是哪里用了#admin_name_setup# email 就是noknow@qq.comregex_mailproject_admins=$(echo "('${answer_admin_name}', '${answer_admin_mail}' )")echo $project_adminsecho $answer_db_name#定义的超级用户,后面有用到#read -p "web interface admin name [pyscada]: " answer_web_name#read -p "web interface admin password [password]: " answer_web_passwordif [[ "$answer_db_name" == "" ]]; thenanswer_db_name="PyScada_db"fiif [[ "$answer_db_user" == "" ]]; thenanswer_db_user="PyScada-user"fiif [[ "$answer_db_password" == "" ]]; thenanswer_db_password="PyScada-user-password"fiif [[ "$answer_web_name" == "" ]]; thenanswer_web_name="pyscada"fiif [[ "$answer_web_password" == "" ]]; thenanswer_web_password="password"fiwhile true; do#read -p "Auto load pyscada plugins installed ? If False, you need to edit the settings.py file manually to load a plugin. [True/False]: " answer_auto_add_appsif [[ "$answer_auto_add_apps" == "True" ]]; thenecho 'You need to restart pyscada and gunicorn after (un)installing any pyscada plugin.'break;elif [[ "$answer_auto_add_apps" == "False" ]]; thenecho 'You need manually add a plugin to the django project settings and restart pyscada and gunicorn after (un)installing any pyscada plugin.'break;elseecho "Please answer True or False."fidonedebug "questions_clean_install_setup end"
}# called in the core of the script
function questions_setup(){debug "questions_setup"# Date verification#时间是否正确,主要是时区echo 'date :'echo $(date)# read -p "Is the date and time correct ? [y/n]: " answer_dateif [[ "$answer_date" != "y" ]]; thenecho "please set the date correctly or enter 'y'"exit 1fi# Proxy setupregex_proxy# Channels and redis#read -p "Install channels and redis to speed up inter pyscada process communications ? [y/n]: " answer_channels# Clean installation or not# 这里是全新安装,就是更新while true; do#read -p "Update only : if 'y' it will not create DB, superuser, copy services, settings and urls... On a fresh install you should answer 'n' ? [y/n]: " answer_updateif [[ "$answer_update" == "y" ]]; thenbreakelif [[ "$answer_update" == "n" ]]; thenbreakelseecho "Please answer y or n."fidoneif [[ "$answer_update" == "n" ]]; thenquestions_clean_install_setupfidebug "questions_setup end"
}# called in the core of the script
# 安装依赖,有系统的,有虚拟环境的
function install_dependences(){debug "install_dependences"apt_proxy install -y python3-pipecho 'Some python3 packages installed:'# Install prerequisites# 这里去掉   mariadb-server,把libhdf5-103去掉DEB_TO_INSTALL="libatlas-base-devlibffi-devlibhdf5-devlibjpeg-devlibmariadb-devlibopenjp2-7nginxpython3-devpython3-mysqldbpython3-pippython3-venvzlib1g-devpkg-config"apt_proxy install -y $DEB_TO_INSTALL# 删除virtual environmentsudo rm -rf $pyscada_venv# Create virtual environmentsudo -u pyscada python3 -m venv $pyscada_venv# activatesource $pyscada_venv/bin/activatePIP_TO_INSTALL="cffiCythondocutilsgunicornlxmlmysqlclientnumpy"pip3_proxy install --upgrade $PIP_TO_INSTALLdebug "install_dependences end"
}# called in pyscada_init
function web_setup(){debug "web_setup"(cd $SERVER_ROOT# 创建了超级用户sudo -u pyscada -E env PATH=${PATH} python3 manage.py shell << EOF
try:from django.contrib.auth import get_user_modelfrom django.db.utils import IntegrityErrorUser = get_user_model()User.objects.create_superuser('$answer_web_name','team@pyscada.org','$answer_web_password')
except IntegrityError:print('User pyscada already exist')
EOF)# 前面已经安装了Nginx,这里做了配置,包括ssl,并且设置开机启动# Nginxcp extras/nginx_sample.conf /etc/nginx/sites-available/pyscada.confln -sf ../sites-available/pyscada.conf /etc/nginx/sites-enabled/rm -f /etc/nginx/sites-enabled/defaultmkdir -p /etc/nginx/ssl# the certificate will be valid for 5 Years,openssl req -x509 -nodes -days 1780 -newkey rsa:2048 -keyout /etc/nginx/ssl/pyscada_server.key -out /etc/nginx/ssl/pyscada_server.crt -subj '/CN=www.mydom.com/O=My Company Name LTD./C=US'systemctl enable nginx.service # enable autostart on bootsystemctl restart nginx#配置了两个服务gunicorn和pyscada两个服务# Gunicorn and PyScada as systemd unitscp extras/service/systemd/{gunicorn.{socket,service},pyscada_daemon.service} /etc/systemd/system# Rename PyScada service filemv /etc/systemd/system/pyscada_daemon.service /etc/systemd/system/pyscada.service# Fix if gunicorn installed in /usr/bin and not /usr/local/bin -> create symbolic linkif [[ $(which gunicorn) != /usr/local/bin/gunicorn ]] && [[ ! -f /usr/local/bin/gunicorn ]] && [[ -f /usr/bin/gunicorn ]]; thenecho "Creating symcolic link to gunicorn" ;ln -s /usr/bin/gunicorn /usr/local/bin/gunicorn;fidebug "web_setup end"
}# called in the core of the script
#安装redis,redis不用装,但是依耐包还是要装的,注释掉apt_proxy -y install redis-server
function install_channel_redis(){debug "install_channel_redis"#apt_proxy -y install redis-serverif grep -R "Raspberry Pi 3"  "/proc/device-tree/model" ; thenecho "Don't install Rust for RPI3"pip3_proxy_not_rust install --upgrade channels channels-redis asgirefelsepip3_proxy install --upgrade cryptography==3.4.6 channels channels-redis asgireffidebug "install_channel_redis end"
}# called in the core of the script
function pyscada_init(){debug "pyscada_init"(cd $SERVER_ROOT# Migration and static files,数据迁移sudo -u pyscada -E env PATH=${PATH} python3 manage.py migrate#收集静态数据,staic目录下sudo -u pyscada -E env PATH=${PATH} python3 manage.py collectstatic --noinput#收集静态数据,staic目录下# Load fixtures with default configuration for chart lin colors and unitssudo -u pyscada -E env PATH=${PATH} python3 manage.py loaddata colorsudo -u pyscada -E env PATH=${PATH} python3 manage.py loaddata units# Initialize the background service system of pyscada,后台服务sudo -u pyscada -E env PATH=${PATH} python3 manage.py pyscada_daemon init)if [[ "$answer_update" == "n" ]]; thenweb_setupfi# enable the services for autostartsystemctl enable gunicornsystemctl restart gunicornsystemctl enable pyscadasystemctl restart pyscadasleep 1systemctl --quiet is-active pyscadaif [ $? != 0 ] ; thenecho "Can't start pyscada systemd service." > /dev/stderrexit 1fiif [[ "$answer_update" == "n" ]]; thenecho "PyScada installed"echo "Connect to http://127.0.0.1 using :"echo "username : $answer_web_name"echo "password : $answer_web_password"elseecho "PyScada updated"fidebug "pyscada_init end"
}# called in the core of the script
# 创建数据库,已经为改数据库创建用户及权限,这里不是安装数据库,我们用docker-compose单独装了
function db_setup(){debug "db_setup"# CREATE DATABASE IF NOT EXISTS testtest CHARACTER SET utf8;# Create DBsudo docker exec -i mysql8 mysql -u root -p123456 << EOFCREATE DATABASE IF NOT EXISTS ${answer_db_name} CHARACTER SET utf8mb4;CREATE USER '${answer_db_user}'@'%' IDENTIFIED BY '${answer_db_password}';GRANT ALL PRIVILEGES ON ${answer_db_name}.* TO '${answer_db_user}'@'%';FLUSH PRIVILEGES;
EOFdebug "db_setup end"
}#called in the core of the script
# 利用模板创建PyScadaServer,部署运行就是靠这个,Pyscada只是他其中的一个,就当是插件
function template_setup(){debug "template_setup"# add db informations to django templaterm -r ./tests/project_template_tmp/cp -r ./tests/project_template ./tests/project_template_tmp/chmod a+w ./tests/project_template_tmp/project_name/settings.py-tplsudo -u pyscada -E env PATH=${PATH} python3 << EOF
import django
from django.conf import settings
from django.template.loader import render_to_stringsettings.configure(TEMPLATES=[{'BACKEND': 'django.template.backends.django.DjangoTemplates','DIRS': ['./'],  # script dir'OPTIONS': {'string_if_invalid': '{{ %s }}'}, # prevents the other template tags to be replaced by ''}]
)django.setup()
from django.template import Template, Context
with open("./tests/project_template_tmp/project_name/settings.py-tpl", "r+") as f:template = Template(f.read())context = Context({"db_name": "${answer_db_name}","db_user": "${answer_db_user}","db_password": "${answer_db_password}","project_root": "${INSTALL_ROOT}","pyscada_home": "${pyscada_home}","log_file_dir": "${log_file_dir}","project_admins": "${project_admins}","auto_add_apps": "${answer_auto_add_apps}","additional_apps": "","additional_settings": "",})f.seek(0)f.write(template.render(context))f.truncate()
EOF# 先删除,不然修改了,也不变啊sudo -u pyscada rm -rf $SERVER_ROOTsudo -u pyscada mkdir -p $SERVER_ROOTsudo -u pyscada -E env PATH=${PATH} django-admin startproject PyScadaServer $SERVER_ROOT --template ./tests/project_template_tmprm -rf ./tests/project_template_tmpdebug "template_setup end"
}# called in the core of the script
# 用户有关的目录创建,给予权限等等
function user_setup(){debug "user_setup"# Create pyscada userecho "Creating system user pyscada..."useradd -r pyscadamkdir -p $pyscada_homechown -R pyscada:pyscada $pyscada_homemkdir -p $INSTALL_ROOTchown -R pyscada:pyscada $INSTALL_ROOTmkdir -p $pyscada_home/measurement_data_dumpschown -R pyscada:pyscada $pyscada_home/measurement_data_dumpsmkdir ${log_file_dir}chown pyscada:pyscada ${log_file_dir}touch ${log_file_dir}pyscada_{daemon,debug}.logchown pyscada:pyscada ${log_file_dir}pyscada_{daemon,debug}.log# Add rights for usb, i2c and serialadduser www-data pyscadaadduser pyscada dialoutdebug "user_setup end"
}# stop pyscada and show some python3 packages installed
function stop_pyscada(){debug "stop_pyscada"echo "Stopping PyScada"systemctl stop pyscada gunicorn gunicorn.socketsleep 1 # Give systemd time to shutdownsystemctl --quiet is-active pyscadaif [ $? == 0 ] ; thenecho "Can't stop pyscada systemd service. Aborting."exit 1fiecho "PyScada stopped"debug "stop_pyscada end"
}# install process: * means depending on the user answer
: <<'END'
- questions_setup- regex_proxy- *questions_clean_install_setup- admin_name_setup- regex_mail
- stop_pyscada
- user_setup
- install_dependences- apt_proxy- pip3_proxy
- pyscada install
- *install_channel_redis- apt_proxy- pip3_proxy_not_rust- pip3_proxy
- *db_setup
- *template_setup
- pyscada_init- *web_setup
ENDquestions_setupstop_pyscadauser_setupinstall_dependences
# 我们在这里安装前面打包的PyScada-0.8.3-py3-none-any.whl
# pip3_proxy install /home/work/PyScada/dist/pyscada-0.8.3-py3-none-any.whl
# Install PyScada
pip3_proxy install --upgrade .if [[ "$answer_channels" == "y" ]]; theninstall_channel_redis
fiif [[ "$answer_update" == "n" ]]; thendb_setuptemplate_setup
fipyscada_init# fix owner in /home/pyscada
chown -R pyscada:pyscada $pyscada_home
9、模板settings.py-tpl修改
DATABASES = {'default': {'ENGINE':   'django.db.backends.mysql','NAME':     '{{ db_name }}','USER':     '{{ db_user }}','PASSWORD': '{{ db_password }}',#修改部分'HOST': '127.0.0.1','PORT': '3306','OPTIONS': {'init_command': "SET sql_mode='STRICT_TRANS_TABLES'",}}
}# LANGUAGE_CODE = 'en-us'
LANGUAGE_CODE = "zh-hans"#TIME_ZONE = 'UTC'
TIME_ZONE = "Asia/Shanghai"#添加修改,配置QQ邮件服务器,可以用喔,不过是我的,请改过来
# email settings
EMAIL_BACKEND = 'django.core.mail.backends.smtp.EmailBackend'
DEFAULT_FROM_EMAIL = 'jkp258@qq.com'  #设置发件人,改为管理员的邮件
EMAIL_HOST = 'smtp.qq.com'  # QQ邮箱SMTP服务器(邮箱需要开通SMTP服务)
EMAIL_PORT = 587  # QQ邮箱SMTP服务端口
EMAIL_HOST_USER = 'jkp258@qq.com'  #改为改为管理员的邮件
EMAIL_USE_TLS = True
EMAIL_USE_SSL = False
EMAIL_HOST_PASSWORD = '*********************'  # 授权码  不是你的QQ密码,qq邮箱里可以去申请
EMAIL_PREFIX = 'A Message From PyScada'
# for admins and managers
SERVER_EMAIL=DEFAULT_FROM_EMAIL
EMAIL_SUBJECT_PREFIX=EMAIL_PREFIX
EMAIL_TIMEOUT=5
10、安装流程图
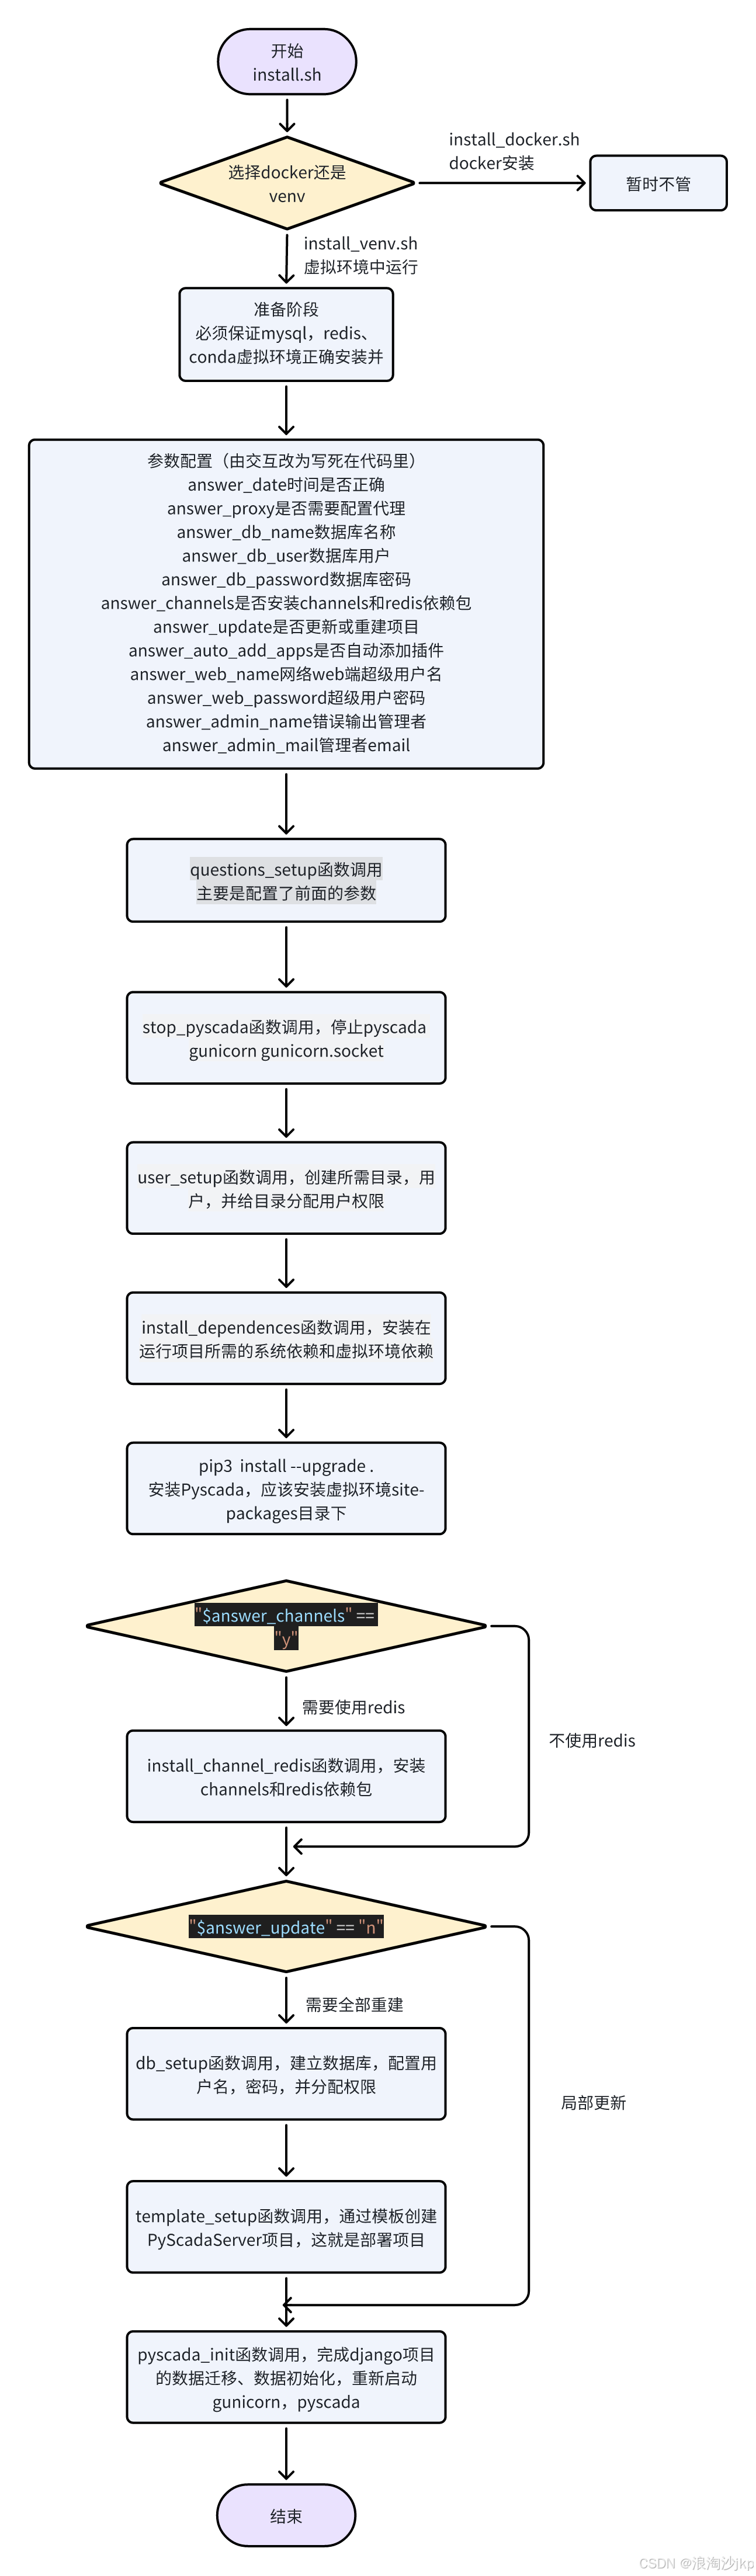 11、安装
11、安装
#确定conda activate myen
sudo ./install.sh
运行过程:
错误:
E: Package 'libhdf5-103' has no installation candidate
ERROR: Could not find a version that satisfies the requirement cffi (from versions: none)
ERROR: No matching distribution found for cffi
注释掉这个就可以了'libhdf5-103吧,有libhdf5-dev就行
安装结束:
PyScada installed
Connect to http://127.0.0.1 using :
username : superadmin
password : 123456
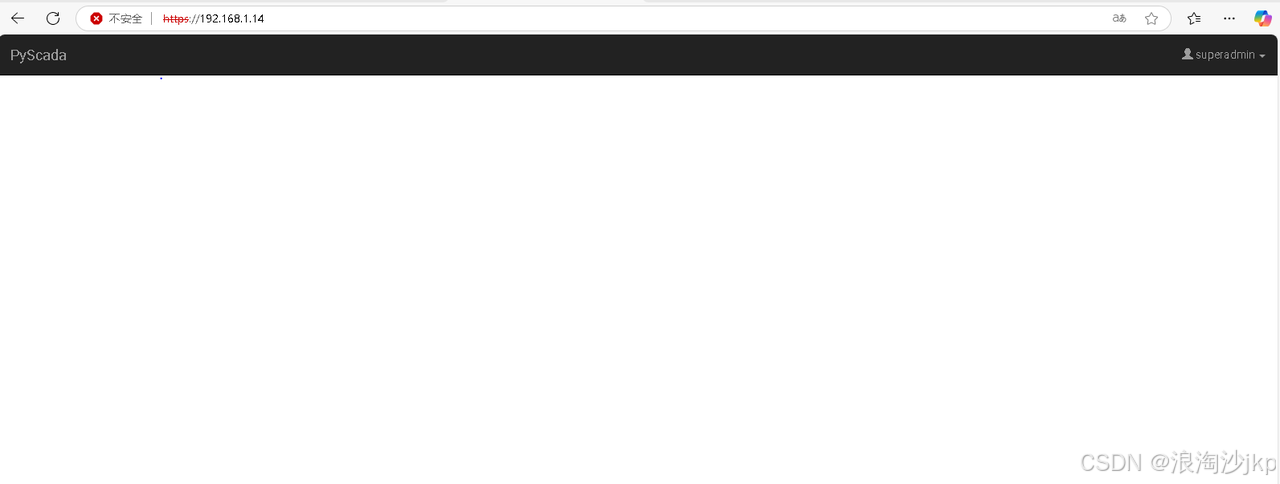
12、界面展示
我的服务器是192.168.1.14,初始界面
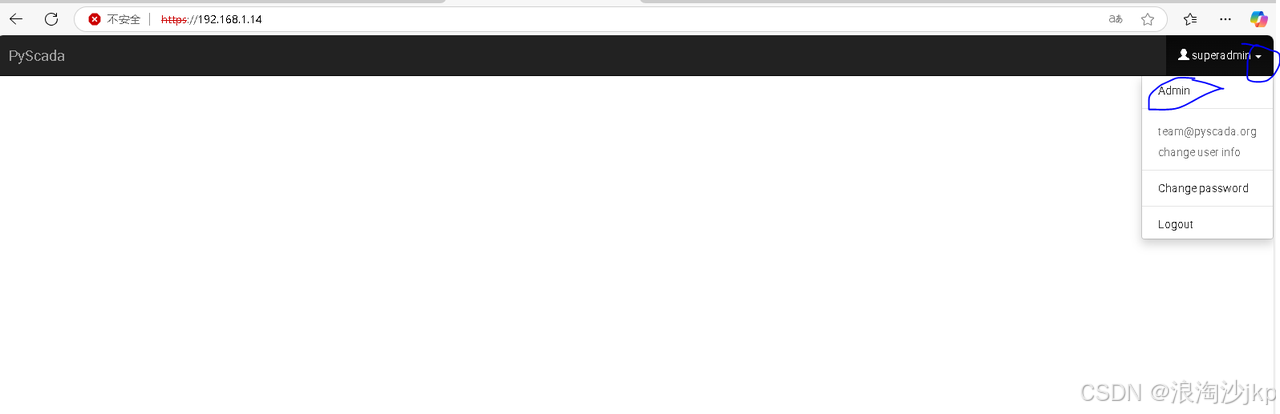
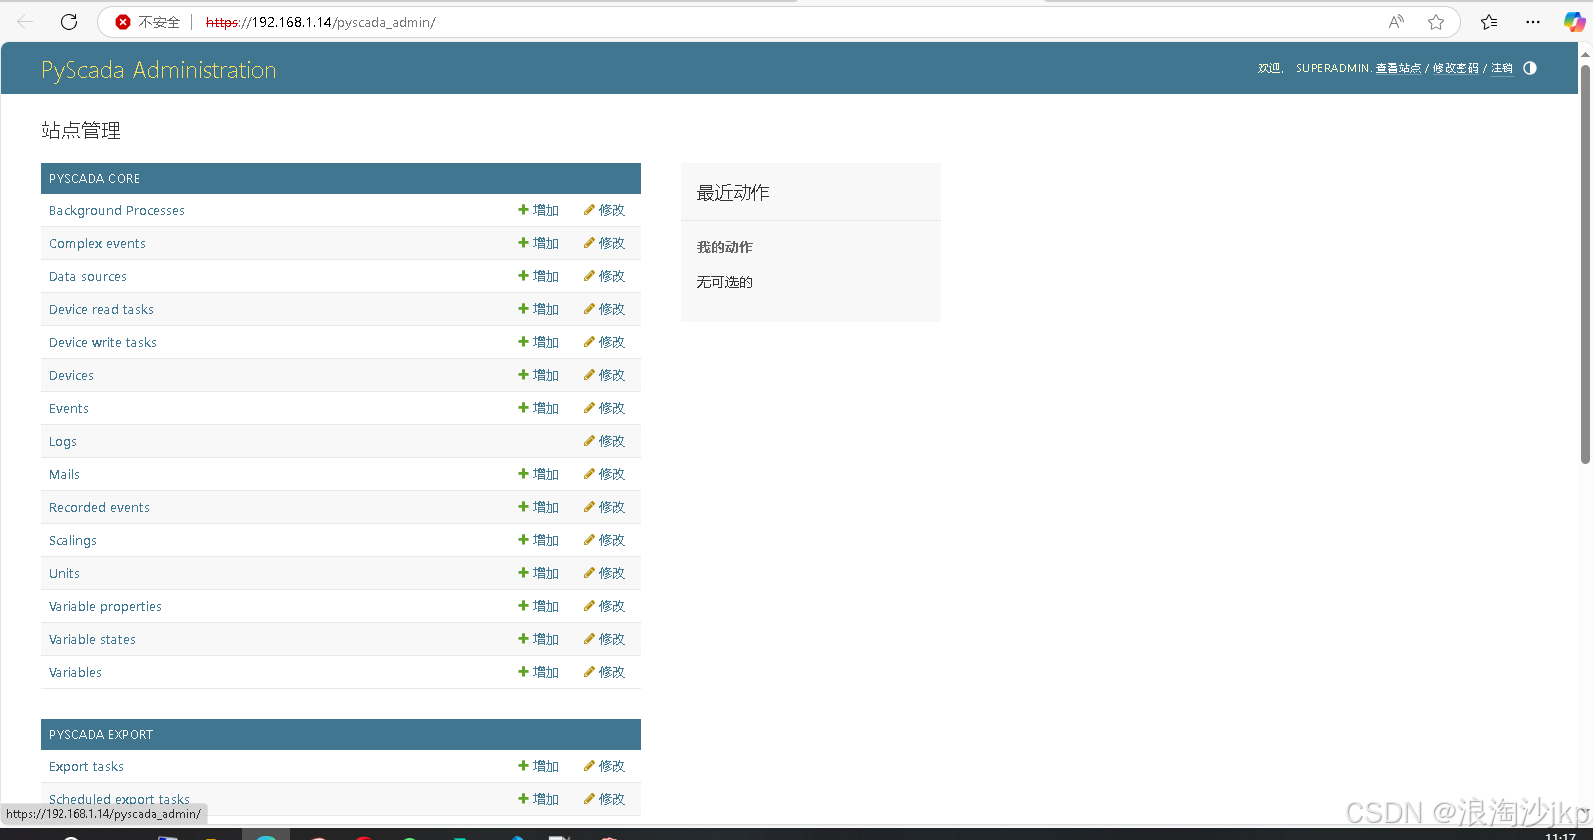
选择点击Admin进入另一个界面
相关文章:
智慧水务项目(八)基于Django 5.1 版本PyScada详细安装实战
一、说明 PyScada,一个基于Python和Django框架的开源SCADA(数据采集与监视控制系统)系统,采用HTML5技术打造人机界面(HMI)。它兼容多种工业协议,如Modbus TCP/IP、RTU、ASCII等,并具…...

畅游Diffusion数字人(23):字节最新表情+动作模仿视频生成DreamActor-M1
畅游Diffusion数字人(0):专栏文章导航 前言:之前有很多动作模仿或者表情模仿的工作,但是如果要在实际使用中进行电影级的复刻工作,仅仅表情或动作模仿还不够,需要表情和动作一起模仿。最近字节跳动提出了一个表情+动作模仿视频生成DreamActor-M1。 目录 贡献概述 核心动…...
【Unity网络编程知识】C#的 Http相关类学习
1、搭建HTTP服务器 使用别人做好的HTTP服务器软件,一般作为资源服务器时使用该方式(学习阶段建议使用)自己编写HTTP服务器应用程序,一般作为Web服务器或者短连接游戏服务器时使用该方式(工作后由后端程序员来做&#…...

Python operator 模块介绍
operator 模块是 Python 标准库中的一个模块,它提供了一系列与 Python 内置运算符对应的函数。这些函数可以用于替代一些常见的运算符操作,在某些场景下能让代码更加简洁、高效,还能方便地用于函数式编程。以下是对 operator 模块的详细介绍: 1. 导入模块 使用 operator …...

SpringBoot企业级开发之【用户模块-更新用户头像】
功能如下所示: 我们先看一下接口文档: 为什么头像是一串字符串呢?因为我们是将头像图片放到第三方去存储,比如:阿里云等 开发思路: 实操: 1.controller 注意!这里使用【PatchMapping】注解…...
DAPP实战篇:使用ethersjs连接智能合约并输入地址查询该地址余额
本系列目录 专栏:区块链入门到放弃查看目录-CSDN博客文章浏览阅读400次。为了方便查看将本专栏的所有内容列出目录,按照顺序查看即可。后续也会在此规划一下后续内容,因此如果遇到不能点击的,代表还没有更新。声明:文中所出观点大多数源于笔者多年开发经验所总结,如果你…...

网络流量管理-流(Flow)
1. 传统网络的问题:快递员送信模式 想象你每天要寄100封信给同一个朋友,传统网络的处理方式就像一个固执的快递员: 每封信都单独处理:检查地址、规划路线、盖章、装车…即使所有信的目的地、收件人都相同,也要重复100…...

每日文献(十一)——Part two
今天从第四章:快速RCNN,方法细节开始介绍。 目录 四、快速RCNN:方法细节 4.1 快速R-CNN回顾 4.2 对抗网络设计 4.2.1 遮挡的对抗空间信息损失 4.2.2 对抗空间Transformer网络 4.2.3 对抗融合 五、实验 5.1 实验设置 5.2 PASCAL VOC…...
Laravel 实现 队列 发送邮件功能
一. 什么是队列 在构建 Web 应用程序时,你可能需要执行一些任务,例如解析文件,发送邮件,大量的数据计算等等,这些任务在典型的 Web 请求期间需要很长时间才能执行。 庆幸的是,Laravel 可以创建在后台运行…...
一、绪论(Introduction of Artificial Intelligence)
写在前面: 老师比较看重的点:对问题的概念本质的理解,不会考试一堆运算的东西,只需要将概念理解清楚就可以,最后一个题会出一个综合题,看潜力,前面的部分考的不是很深,不是很难&…...
Web攻防—SSRF服务端请求伪造Gopher伪协议无回显利用
前言 重学Top10的第二篇,希望各位大佬不要见笑。 SSRF原理 SSRF又叫服务端请求伪造,是一种由服务端发起的恶意请求,SSRF发生在应用程序允许攻击者诱使服务器向任意域或资源发送未经授权的请求时。服务器充当代理,执行攻击者构造…...

2025蓝桥杯python A组题解
真捐款去了,好长时间没练了,感觉脑子和手都不转悠了。 B F BF BF 赛时都写假了, G G G 也只写了爆搜。 题解其实队友都写好了,我就粘一下自己的代码,稍微提点个人的理解水一篇题解 队友题解 B 思路: 我…...

使用Python建模量子隧穿
引言 量子隧穿是量子力学中的一个非常有趣且令人神往的现象。在经典物理学中,我们通常认为粒子必须克服一个势垒才能通过它。但是,在量子力学中,粒子有时可以“穿越”一个势垒,即使它的能量不足以克服这个势垒。这种现象被称为“量子隧穿”。今天,我们将通过 Python 来建…...

微信小程序开发常用语法和api
vue写习惯了,小程序太久不做,一些语法和api都忘记。本文总结下小程序常用的语法和api 语法 绑定事件和传参 绑定事件还有很多,触摸反馈事件,表单事件,媒体事件后续更新细说。 <!-- 绑定事件 bindtap 事件传参 da…...

【时时三省】(C语言基础)选择结构程序综合举例
山不在高,有仙则名。水不在深,有龙则灵。 ----CSDN 时时三省 下面综合介绍几个包含选择结构的应用程序。 例题1: 写一程序,判断某一年是否为闰年。 程序1: 先画出判别闰年算法的流程图,见下图用变量le…...

Redis实现分布式定时任务
设计思路 任务表示:每个任务通过一个特定格式的键来表示。键名可以包含任务ID等信息,值可以是任务的具体内容或指向任务详情的引用。过期机制:利用Redis的EXPIRE命令为任务设置过期时间,当到达设定的时间点时,Redis会…...

File 类 (文件|文件夹操作)
一、File 类 1.1 前言 在 JDK 中 通过 java.io.File 类,可以实现操作系统重文件|文件夹的创建、删除、查看、重命名等操作。 1.2 File 类构造方法 File 一共提供了四个构造方法,都是有参构造。其中最常使用的是 File(String) 和 File(String, String)…...

Html页面Table表格导出导入Excel文件 xlsx.full
Html页面Table表格导出Excel文件 引用 xlsx.full.min.js 文件 导出 <!DOCTYPE html> <html> <head><meta charset"utf-8" /><title></title><script src"https://cdn.bootcdn.net/ajax/libs/jquery/3.6.3/jquery.min.j…...

【资料分享】瑞芯微RK3576,8核2.2GHz+6T算力NPU工业核心板说明书
核心板简介 创龙科技SOM-TL3576-S是一款基于瑞芯微RK3576J/RK3576高性能处理器设计的4核ARM Cor...

埃隆·马斯克如何通过开源创新塑造未来
李升伟 编译 埃隆马斯克的名字在多个行业回响——从电动汽车、太空探索到人工智能及更多领域。虽然许多人关注他革命性的公司(如特斯拉、SpaceX、Neuralink和The Boring Company),但较少有人意识到他在开源软件运动中悄然却深远的影响力。本…...

ALOPS智能化运维管理平台
AIOps(Artificial Intelligence for IT Operations)即智能运维,是将人工智能技术应用于 IT 运维管理领域,以实现自动化、智能化的运维决策和管理。以下是关于 AIOps 的详细介绍: 核心能力 数据收集与整合:…...
Hadoop文件操作指南:深入解析文件操作
1 Hadoop文件系统概述 Hadoop分布式文件系统(HDFS)是Hadoop生态的核心存储组件,专为大规模数据集设计,具有高容错性和高吞吐量特性。 HDFS核心特性: 分布式存储:文件被分割成块(默认128MB)分布存储多副本机制:每个块默认3副本&…...

使用Fortran读取HDF5数据
使用Fortran读取HDF5数据 下面我将介绍如何在Fortran中读取HDF5文件中的各种类型数组数据,包括一维数组、二维数组、元数组和变长数组。 准备工作 首先需要确保系统安装了HDF5库,并且在编译时链接了HDF5库。例如使用gfortran编译时: gfor…...
STM32 HAL库之EXTI示例代码
外部中断按键控制LED灯 在main.c中 HAL_Init(); 初始化Flash,中断优先级以及HAL_MspInit函数,也就是 stm32f1xx_hal.c 中 HAL_StatusTypeDef HAL_Init(void) {/* Configure Flash prefetch */ #if (PREFETCH_ENABLE ! 0) #if defined(STM32F101x6) || …...

通过C#将GB18030编码转义为UTF-8
使用C#代码,对于GB18030编码转义为UTF-8格式。 using System.Text;public class FileEncodingConverter {// 支持转换的文件扩展名列表(可根据需求扩展)private static readonly string[] SupportedExtensions { ".sln", ".…...
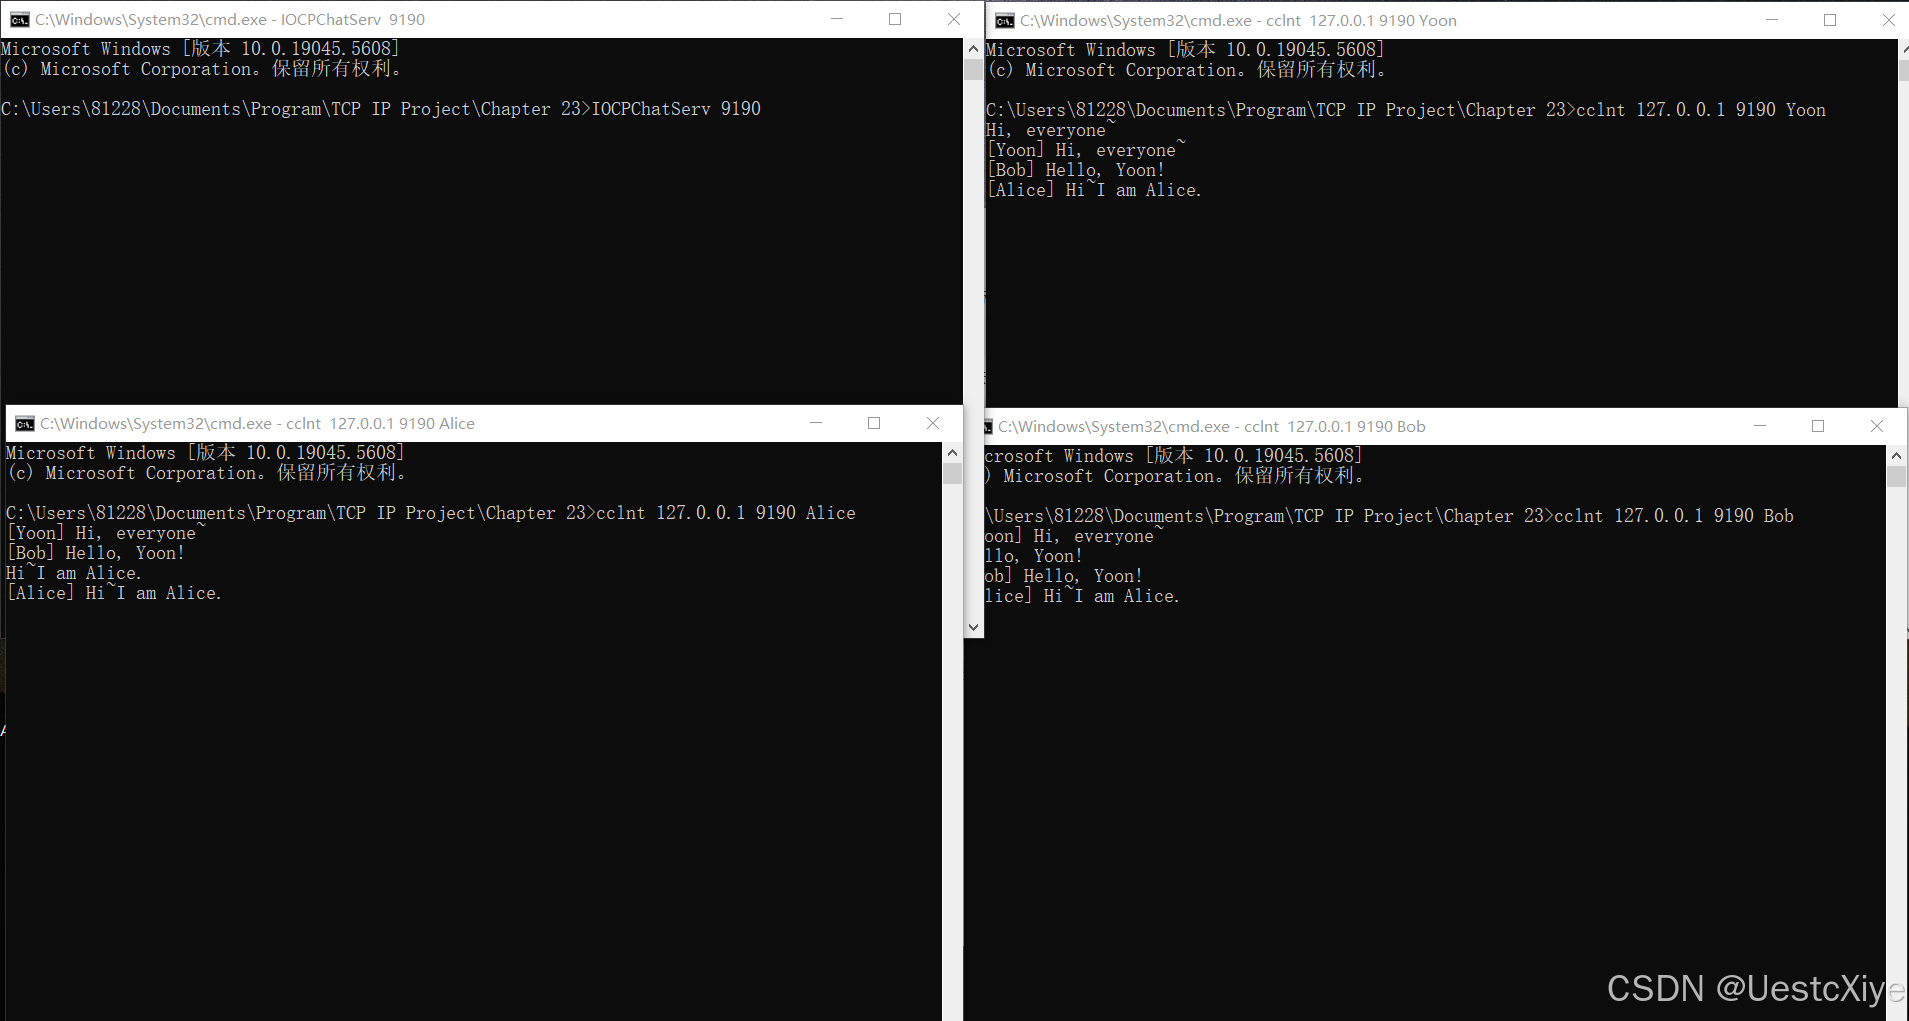
《TCP/IP网络编程》学习笔记 | Chapter 23:IOCP
《TCP/IP网络编程》学习笔记 | Chapter 23:IOCP 《TCP/IP网络编程》学习笔记 | Chapter 23:IOCP通过重叠 I/O 理解 IOCPepoll 和 IOCP 的性能比较实现非阻塞模式的套接字以纯重叠 I/O 方式实现回声服务器端重新实现客户端测试从重叠 I/O 模型到 IOCP 模型…...

Java学习打卡-Day25-注解和反射、Class类
注解(JDK5引入) 什么是注解? Java注解(Annotation),也叫元数据。一种代码级别的说明,与类、接口、枚举是在同一个层次。它可以声明在包、类、字段、方法、局部变量、方法参数等的前面…...

电感、互感器、变压器和磁珠综合对比——《器件手册--电感/线圈/变压器/磁珠篇》
三、电感/线圈/变压器/磁珠 名称 定义 特点...
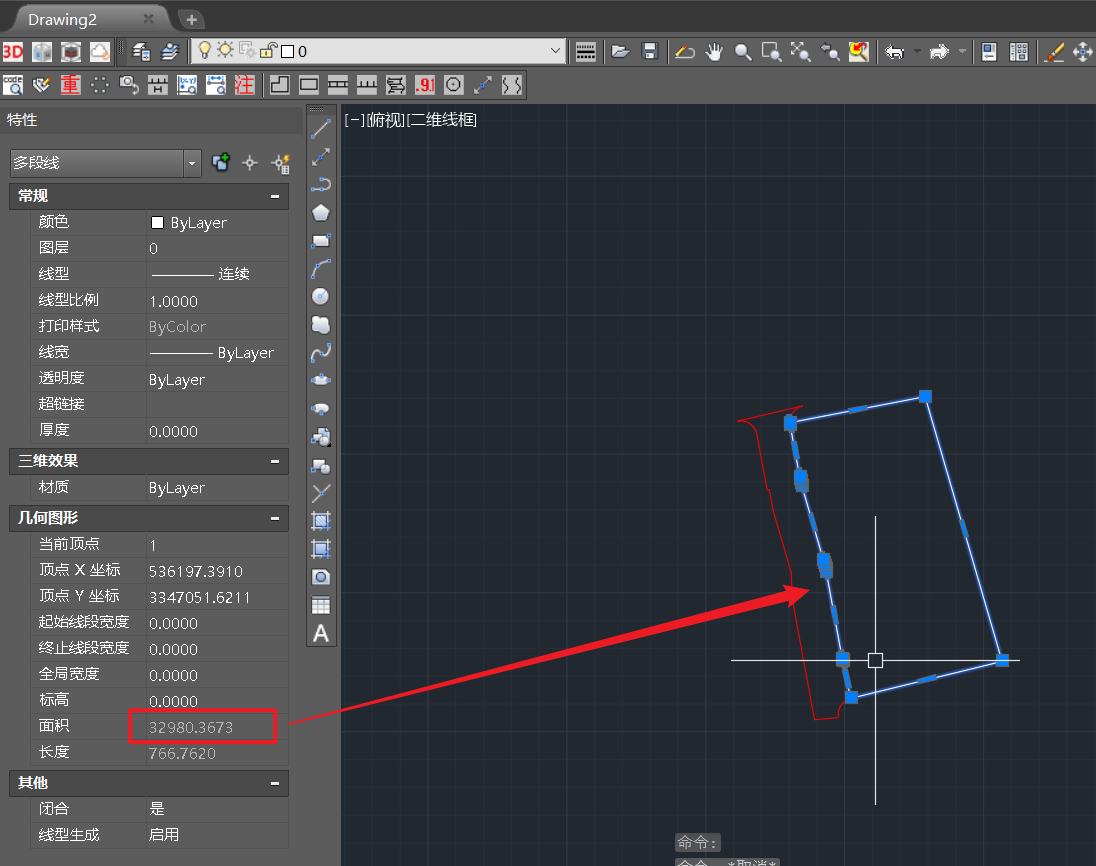
CAD导入arcgis中保持面积不变的方法
1、加载CAD数据,选择面数据,如下: 2、加载进来后,右键导出数据,导出成面shp数据,如下: 3、选择存储路径,导出面后计算面积,如下: 4、与CAD中的闭合线面积核对…...
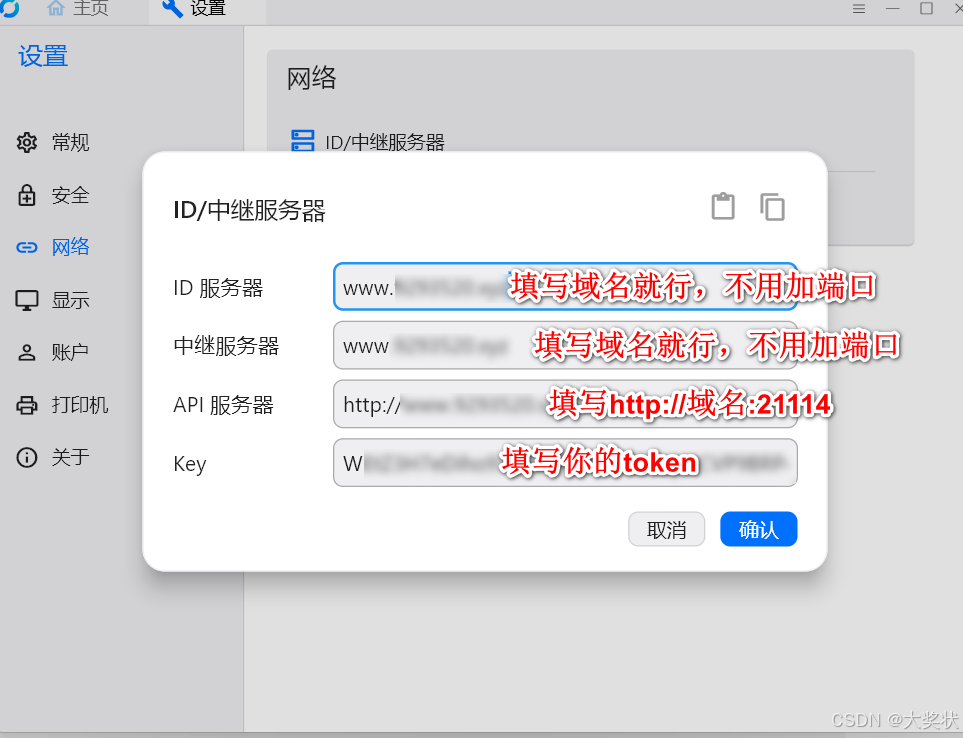
rustdesk自建服务器怎么填写客户端配置信息
目录 # id、api、中继都怎么填?rustdesk程序启动后服务不自动启动 # id、api、中继都怎么填? rustdesk程序启动后服务不自动启动 完全退出RudtDesk程序(右下角托盘区有的话,需要右键点退出) 创建windows服务ÿ…...